


MP260 series On-screen Manual |
Page 1 of 628 pages |
 How to Use This Manual
  Printing This Manual
MC-2746-V1.00
Basic Guide |
Advanced Guide |
Troubleshooting |
Describes the summary of |
Describes the detailed |
|
this product. |
function of this product. |
|

MP240/MP260 series Basic Guide |
Page 2 of 628 pages |
 How to Use This Manual
  Printing This Manual
MP-2146-V1.00
Contents
 Overview of the Machine
Main Components
LED Display and Basic Operations
 Printing from a Memory Card (MP260 series)
Printing Photos Saved on the Memory Card Inserting the Memory Card
Setting the Language for the Photo Index Sheet
 Copying
Copying Documents
Copying Photos
Fit-to-Page Copying
 Scanning
Saving Scanned Data
 Printing from Your Computer
Printing Photos (Easy-PhotoPrint EX)
Printing Documents (Windows)
Printing Documents (Macintosh)
 Advanced Guide
 Other Usages
Printing Photos from a PictBridge Compliant Device (MP240 series)
Solution Menu and My Printer
 Loading Paper / Originals
Loading Paper
Loading Originals to Copy or Scan
 Routine Maintenance
When Printing Becomes Faint or Colors Are Incorrect
Replacing a FINE Cartridge Cleaning the Machine
 Appendix
Safety Precautions
Legal Limitations on Use of Your Product and
Use of Images
Tips on How to Use Your Machine

Overview of the Machine |
Page 3 of 628 pages |
 Advanced Guide
  Troubleshooting
Contents > Overview of the Machine
Overview of the Machine
This section shows the component names of the machine and describes the basic operations you need to know before using it.
Main Components
Front View
Rear View
Inside View
Operation Panel
LED Display and Basic Operations
 Page top

Main Components |
Page 4 of 628 pages |
 Advanced Guide
  Troubleshooting
Contents > Overview of the Machine > Main Components
Main Components
 Front View
(1) Document Cover
Open to load an original on the Platen Glass.
(2) Paper Support
Raise and tip back to load paper in the Rear Tray.
(3) Paper Guides
Slide to align with both sides of the paper stack.
(4) Rear Tray
Load various sizes or types of paper which you can use on the machine. Two or more sheets of the same size and type of paper can be loaded at the same time, and fed automatically one sheet at a time.
(5) Direct Print Port (MP240 series)
Connect a PictBridge compliant device such as a digital camera when printing directly.
See Printing Photos from a PictBridge Compliant Device (MP240 series).
 Warning
 Do not connect any equipment other than PictBridge compliant devices to the Direct Print
Port of the machine. This may cause fire, electric shock, or damage to the machine.
 Caution
 Do not touch the metal casing.
(6) Paper Output Tray
Opens automatically when printing or copying starts and printed papers are ejected.
(7) Output Tray Extension
Open to support the printouts. Open it when printing or copying.

Main Components |
Page 5 of 628 pages |
(8) Platen Glass
Load an original to copy or scan.
(9) Operation Panel
Use to change the settings of the machine or to operate it.
See Operation Panel.
 Note
Note
 The LED and lamps on the Operation Panel other than the Power lamp will go out if the machine is not operated for about 5 minutes. To restore them, press any button except the ON button or perform the print operation.
(10) Card Slot Cover (MP260 series)
Open to insert a memory card.
See Inserting the Memory Card.
 Rear View
(11) USB Port
Plug in the USB cable to connect the machine with a computer.
 Caution
 Do not touch the metal casing.
 Important
 Do not plug in or unplug the USB cable while the machine is printing from or scanning originals to the computer, or the computer is in the sleep mode or standby mode.
(12) Power Cord Connector
Plug in the supplied power cord.
 Inside View
Main Components |
Page 6 of 628 pages |
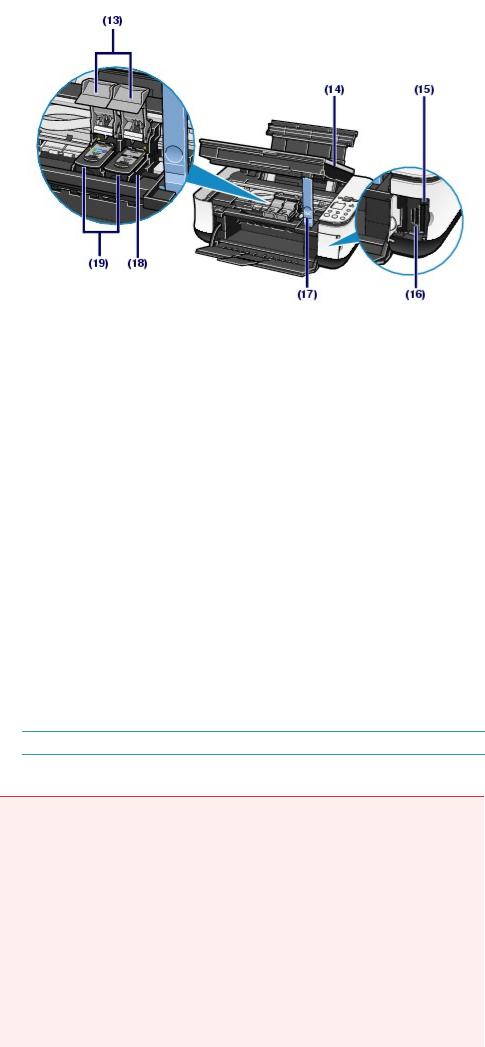
(13) Ink Cartridge Locking Covers
Locks the FINE Cartridges into place.
(14) Scanning Unit (Cover)
Scans originals. Open it to replace the FINE Cartridges or remove jammed paper inside the machine. When opening the Scanning Unit (Cover), lift it with the Document Cover closed.
(15) Access lamp (MP260 series)
Lights or flashes to indicate the memory card status.
See Inserting the Memory Card.
(16) Card Slot (MP260 series)
Insert a memory card.
See Inserting the Memory Card.
(17) Scanning Unit Support
Holds the Scanning Unit (Cover) being opened.
(18) FINE Cartridge Holder
Install the FINE Cartridges.
The Color FINE Cartridge should be installed into the left slot and the Black FINE Cartridge should be installed into the right slot.
(19) FINE Cartridges (Ink Cartridges)
A replaceable cartridge that is integrated with Print Head and ink tank.
 Note
Note
 For details on installing the FINE Cartridges, refer to the printed manual: Getting Started.
 Important
 The area (A) indicated in the figure below may be splattered with ink. It does not affect the performance of the machine.
 Do not touch the area (A). The machine may not print properly if you touch it.

Main Components |
Page 7 of 628 pages |
|
|
|
|
|
|
|
 Operation Panel
(1) ON button / Power lamp
Turns the power on or off. Before turning on the power, make sure that the Document Cover is closed.
 Note
Note
Power and Alarm lamps
 You can check the status of the machine with the Power lamp and Alarm lamp.
-Power lamp Off: The power is off.
-Power lamp lit green: The machine is ready to print.
-Power lamp flashing green: The machine is initializing or shutting down.
-Alarm lamp lit or flashing orange: An error has occurred and the machine is not ready to print. For details, refer to the "Troubleshooting" in the on-screen manual: Advanced
Guide.
-Power lamp flashes green once and Alarm lamp flashes orange once alternately: An error that requires contacting your Canon service representative may have occurred.
For details, refer to the " Troubleshooting" in the on-screen manual: Advanced Guide.
 Important
Disconnecting the power plug
 When disconnecting the power plug after turning off the power, be sure to confirm that the Power lamp is not lit. If the power plug is disconnected from the wall outlet while the
Power lamp is lit or flashing, the machine may become unable to print since the Print Head is not protected.
(2) LED (Light Emitting Diode)
Displays the number of copies, Maintenance menu code, or operational status such as an error code.
(3) [+] button
Specifies the number of copies.

Main Components |
Page 8 of 628 pages |
(4) Ink lamps
Lights or flashes orange when ink runs out, etc. The lamp on the left indicates the Color FINE Cartridge status and the lamp on the right indicates the Black FINE Cartridge status.
(5) Paper button
Switches the page size and media type.
(6) Photo Index Sheet button (MP260 series)
Prints the Photo Index Sheet or starts scanning the Photo Index Sheet to print selected photos on the memory card.
(7) SCAN button
Starts scanning an original to save it on the memory card (MP260 series) or the computer.
(8) Stop/Reset button
Cancels operations. You can also press this button to cancel operation when a print job is in progress.
(9) Color button*
Starts color copying. You can also press this button to finalize your selection for the menu or setting item.
(10) Black button*
Starts black & white copying. You can also press this button to finalize your selection for the menu or setting item.
(11) Fit to Page button / Fit to Page lamp
Enables the Fit-to-Page copy function. You can copy an original automatically enlarged or reduced to fit the selected page size. When the Fit-to-Page copy function is disabled, you can make copies in the same size as an original.
(12)  (Maintenance) button
Accesses the Maintenance menu.
(13) Paper lamp
Lights to indicate the selected page size and media type.
(14) Alarm lamp
Lights or flashes orange when an error, such as paper-out or ink-out, occurs.
* In the software applications or manuals, the Black and Color buttons are collectively called the " Start" or "OK" button.
 Page top

LED Display and Basic Operations |
Page 9 of 628 pages |
 Advanced Guide
  Troubleshooting
Contents > Overview of the Machine > LED Display and Basic Operations
LED Display and Basic Operations
You can use the machine to make copies or print out without a computer.
This section describes the LED display and basic operations on the Operation Panel.
The number 1 appears on the LED normally when turning on the power.
The LED display indicates the machine status as follows.
Machine Status |
LED Display |
While copying |
Number of copies (flashing) |
|
|
While printing, scanning, or |
|
performing maintenance |
|
operations |
(flashing in order) |
|
|
|
|
When an error occurs |
E and number appear alternately. |
|
For details on the error codes, refer to the " Troubleshooting" in the on |
|
-screen manual: Advanced Guide. |
|
P and number appear alternately. |
|
An error that requires contacting your Canon service representative |
|
may have occurred. For details, refer to the " Troubleshooting" in the |
|
on-screen manual: Advanced Guide. |
|
|
While the Scanning Unit |
|
(Cover) is open |
|
|
(flashing) |
|
|
 Note
Note
 When a PictBridge compliant device such as a digital camera is connected to the machine, C appears on the LED (MP240 series).
 Number of Copies
When copying starts, the specified number of copies appears on the LED. While copying is in progress, the number on the LED is flashing and reduced by one to indicate the remaining number of copies to be made.
Each time you press the [ +] button, the number on the LED increases by one. When F appears, the number of copies is set to "20". Press the [ +] button again to return to "1".

LED Display and Basic Operations |
Page 10 of 628 pages |
 Maintenance Codes
To perform maintenance of the machine, press the |
(Maintenance) button repeatedly until the desired |
|||
code appears on the LED, and then press the Black or Color button. |
||||
Maintenance |
Operation |
|
See |
|
Code |
|
|
||
|
|
|
|
|
|
Prints the nozzle check pattern. |
Printing the Nozzle Check Pattern |
|
|
|
|
|
|
|
|
Cleans the Print Head. |
Cleaning the Print Head |
|
|
|
|
|
|
|
|
Cleans the Print Head deeply. |
Cleaning the Print Head Deeply |
|
|
|
|
|
|
|
|
Prints the print head alignment |
Aligning the Print Head |
|
|
|
sheet. |
|
|
|
|
|
|
|
|
|
Scans the print head alignment |
Aligning the Print Head |
|
|
|
sheet. |
|
|
|
|
|
|
|
|
|
Prints the current head position |
Aligning the Print Head |
|
|
|
adjustment values. |
|
|
|
|
|
|
|
|
|
Cleans the Paper Feed Roller. |
Cleaning the Paper Feed Roller |
|
|
|
|
|
|
|
|
Cleans the inside of the machine. |
Cleaning the Inside of the Machine (Bottom Plate |
|
|
|
|
Cleaning) |
|
|
|
|
|
|
|
|
Switches the size of paper |
Switching the Page Size between A4 or 8.5" x 11" |
|
|
|
loaded in the Rear Tray between |
(Letter) |
|
|
|
A4 and 8.5" x 11" (Letter). |
|
|
|
|
(This setting is used for making |
|
|
|
|
copies.) |
|
|
|
|
|
|
|
|
|
Sets the machine to prevent |
Refer to the "Paper is Smudged/Printed Surface is |
|
|
|
paper abrasion. |
Scratched" in the "Troubleshooting" of the on- |
|
|
|
|
screen manual: Advanced Guide. |
|
|
|
|
|
|
|
|
Selects the read/write attribute of |
Setting the Read/Write Attribute of the Card Slot |
|
|
|
the Card Slot (MP260 series). |
|
|
|
|
|
|
|
|
|
Prints the Language Selection |
Setting the Language for the Photo Index Sheet |
|
|
|
Sheet for the Photo Index Sheet |
|
|
|
|
(MP260 series). |
|
|
|
|
|
|
|
|
|
Scans the Language Selection |
Setting the Language for the Photo Index Sheet |
|
|
|
Sheet for the Photo Index Sheet |
|
|
|
|
(MP260 series). |
|
|
|
|
|
|
|
|
 Error Codes
When an error occurs, E and number appear alternately on the LED to indicate the error code.
Error Code |
LED Display |
|
|
E + 1-digit number
(flashing in order)
E + 2-digit number
(flashing in order)
 Note
Note
 For details on the error codes, refer to the " Troubleshooting" in the on-screen manual: Advanced
Guide.
 If an error code with P appears, an error that requires contacting your Canon service representative may have occurred. For details, refer to the " Troubleshooting" in the on-screen manual: Advanced Guide.
LED Display and Basic Operations |
Page 11 of 628 pages |
|
|
|
|
 Page top

Printing from a Memory Card (MP260 series) |
Page 12 of 628 pages |
 Advanced Guide
  Troubleshooting
Contents > Printing from a Memory Card (MP260 series)
Printing from a Memory Card (MP260 series)
You can print thumbnails of photos saved on the memory card on A4 or Letter-sized paper and select photos to print.
Printing Photos Saved on the Memory Card
Inserting the Memory Card
Before Inserting the Memory Card
Inserting the Memory Card
Removing the Memory Card
Setting the Read/Write Attribute of the Card Slot
Setting the Language for the Photo Index Sheet
 Page top

Printing Photos Saved on the Memory Card |
Page 13 of 628 pages |
 Advanced Guide
  Troubleshooting
Contents > Printing from a Memory Card (MP260 series) > Printing Photos Saved on the Memory Card
Printing Photos Saved on the Memory Card
Thumbnails of photos on the memory card are printed on A4 or Letter-sized paper (this printed sheet is called Photo Index Sheet). You can select photos, number of copies, page size, etc. on this sheet, and print them.
For the operation, see the notes and operation procedure described in the reference page.
You need to prepare:
A memory card on which photos are saved. See Before Inserting the Memory Card .
A4 or Letter-sized plain paper for printing the Photo Index Sheet.
Paper for printing. See Media Types You Can Use .
1. Prepare for printing.

Printing Photos Saved on the Memory Card |
Page 14 of 628 pages |
(1) Turn on the power.
See Operation Panel.
(2) Load two or more sheets of A4 or Letter-sized plain paper in the Rear Tray.
See Loading Paper.
 Note
Note
 If there are more than 30 photos on the memory card, two or more Photo Index Sheets will be printed.
(3)Open the Paper Output Tray gently, and open the Output Tray Extension.
(4)Insert a memory card into the Card Slot.
For the types of memory cards you can use and the locations to insert them, see Inserting the Memory Card
.
 Important
 Do not remove the memory card until printing with the Photo Index Sheet is completed.
 Note
Note
 When the read/write attribute of the Card Slot is set to the "Writable from PC" mode, you cannot print photos on a memory card with the Photo Index Sheet. Set the read/write attribute to the "Not writable from PC" mode. See Setting the Read/Write Attribute of the Card Slot.
2. Make sure that no original is left on the Platen Glass, and press the Photo Index Sheet button to start printing the Photo Index Sheet.
The Photo Index Sheet(s) will be printed.
Thumbnails of all photos saved on the memory card are printed in order from the latest photo first.
 Important
 Depending on the country or region of purchase, the Language Selection Sheet will be printed when you press the Photo Index Sheet button if the language for the Photo Index Sheet has not been selected. To set the language used to print the Photo Index Sheet, follow the procedures from step 4 onwards in Setting the Language for the Photo Index Sheet .
 Note
Note
 To cancel printing, press the Stop/Reset button.

Printing Photos Saved on the Memory Card |
Page 15 of 628 pages |
3. Fill in the appropriate circles on the Photo Index Sheet.
Fill in the appropriate circles with a dark pencil or a black ink pen to select photos to print and the print settings.
 Good
Good
 Bad
Bad
(A)Check mark
(B)Line only
(C)Too light
(1) Select the page size, media type, and layout.
 Note
Note
 When printing photos using the Photo Index Sheet, you can select 4" x 6" (10 x 15 cm), 5" x 7" (13 x 18 cm), 8.5" x 11" (LTR), or A4 for the page size.
 When you select Plain Paper 8.5" x 11" (LTR) or Plain Paper A4 in Page size/Media type, photos are printed with borders even if you select the borderless print in Layout.
(2)Select Date / Photo Optimizer PRO / Face Brightener / Red-Eye correction as necessary.
(3)Fill in the circle of Print all photographs to print a copy of all photos.
*If you filled in this circle, any other circles you have filled in for the number of copies to print for each photo will be disregarded, and only one copy each of all photos will be printed.
Fill in the circle of DPOF Print to print according to the DPOF settings on the digital camera, such as photos to print, date, and layout settings.
*You can specify the Standard Print, Multi-Image Print, or Index Print in the DPOF settings. Available layouts or image correction options are different depending on each print setting. For details, refer to the on-screen manual: Advanced Guide.
(4)Select the number of copies (fill in a circle under each photo to print).
(5)Confirm and follow the described printing procedure.
(6)Fill in this circle to print the same Photo Index Sheet again.
*If you filled in this circle, all other settings will be disregarded.
(7)Be sure not to stain the bar-code.
* If the bar-code gets stained or wrinkled, the Photo Index Sheet may not be scanned properly.

Printing Photos Saved on the Memory Card |
Page 16 of 628 pages |
 Important
 Be sure to fill in a circle for every setting item except options.
 If there are two or more Photo Index Sheets, fill in all the sheets.
 If the filled circles on the Photo Index Sheet are not dark enough, the machine may not scan the settings.
4. Scan the Photo Index Sheet, and print photos.
(1) Load paper.
See Loading Paper.
Make sure that the page size and media type of the loaded paper match those specified on the Photo Index
Sheet.
(2) Place the Photo Index Sheet on the Platen Glass.
Place the Photo Index Sheet with the filled-in side FACING DOWN and align the sheet with the alignment mark as shown below.
Then close the Document Cover gently.
(3) Press the Photo Index Sheet button.
The Photo Index Sheet is scanned and the specified photos will be printed.
 Important
 Do not open the Document Cover or move the loaded Photo Index Sheet until scanning is completed.
 Be careful not to get the Photo Index Sheet dirty. If the Photo Index Sheet is stained or wrinkled, it may not be scanned properly.
 If the error code "E, 3, 2" or "E, 3, 3" appears on the LED, confirm the following.
-The Platen Glass and the Photo Index Sheet are not dirty.
-The Photo Index Sheet is placed in the correct position with the filled-in side facing down.
-You have filled in all the necessary circles on the sheet.
-Only one option is selected for items that do not accept two or more selections.
-The filled circles are dark enough.
For details, refer to the " Troubleshooting" in the on-screen manual: Advanced Guide.
 If you selected to print according to the DPOF settings but there is no DPOF information on the memory card, the error code "E, 3, 4" will appear on the LED. For details, refer to the " Troubleshooting" in the on-screen manual: Advanced Guide.
 Do not remove the memory card until printing is completed.
 Note
Note
 To cancel printing, press the Stop/Reset button.
 To continue to print photos using subsequent Photo Index Sheets, repeat the procedure from step 3.
 If the memory card has been removed and then reinserted before printing photos with the
Photo Index Sheet, it may take some time before printing starts.
 To remove the memory card after printing is completed, see Removing the Memory Card.
Printing Photos Saved on the Memory Card |
Page 17 of 628 pages |
 Page top

Inserting the Memory Card |
Page 18 of 628 pages |
 Advanced Guide
  Troubleshooting
Contents > Printing from a Memory Card (MP260 series) > Inserting the Memory Card
Inserting the Memory Card
 Before Inserting the Memory Card
The following types of memory cards and image data are compatible with the machine.
 Important
 If you took and saved photos on a type of memory card that is not guaranteed operation to be used on your digital camera, the image data may be unreadable on the machine or damaged. For information on memory cards that your digital camera guarantees operation, refer to the instruction manual supplied with your digital camera.
 Format the memory card with a digital camera compliant with DCF ver. 1.0/2.0 standard. The memory card may not be usable with the machine if it is formatted on a computer.
 Memory Cards that Do Not Require a Card Adapter
 SD Secure Digital memory card
 SDHC memory card
 MultiMediaCard (ver.4.1)
 MultiMediaCard Plus (ver.4.1)
 Compact Flash (CF) Card
Supports Type I/II (3.3 V)
 Microdrive
 Memory Stick
 Memory Stick PRO
 Memory Stick Duo
 Memory Stick PRO Duo
 Memory Cards that Require a Card Adapter
 Important
 Be sure to attach the special card adapters to the following memory cards before inserting to the
Card Slot.
If one of the following memory cards is inserted without the card adapter, you may not be able to remove the memory card. In this case, refer to the " Troubleshooting" in the on-screen manual:
Advanced Guide.
 miniSD Card *1
  miniSDHC Card *1
 microSD Card *1
  microSDHC Card *1
 xD-Picture Card *2
 xD-Picture Card Type M *2
 xD-Picture Card Type H *2
 RS-MMC (ver.4.1) *3
 Memory Stick Micro *4
*1 Use the special "SD Card Adapter".
*2 Requires purchase of a separate compact flash card adapter for xD-Picture Card. *3 Use the special card adapter.
*4 Use the special "Memory Stick Micro Duo size Adapter".
Inserting the Memory Card |
Page 19 of 628 pages |
 Printable Image Data
This machine supports images created by DCF ver. 1.0/2.0 standard compliant digital cameras (Exif ver. 2.2/2.21 compliant, including TIFF etc.). Other image or movie types such as RAW images cannot be printed.
 Inserting the Memory Card
 Note
Note
 When the read/write attribute of the Card Slot is set to the "Writable from PC" mode on the
Maintenance menu, you cannot print photos on a memory card with the Photo Index Sheet. After using the Card Slot as the memory card drive of a computer, remove the memory card and be sure to set the read/write attribute to the "Not writable from PC" mode.
See Setting the Read/Write Attribute of the Card Slot .
 When you use a computer to edit or enhance photos saved on a memory card, be sure to print them from the computer. If you print the photos with the Photo Index Sheet, they may not be printed properly.
1.
2.
3.
Prepare your memory card.
Attach a special card adapter if your memory card requires one.
See Memory Cards that Require a Card Adapter.
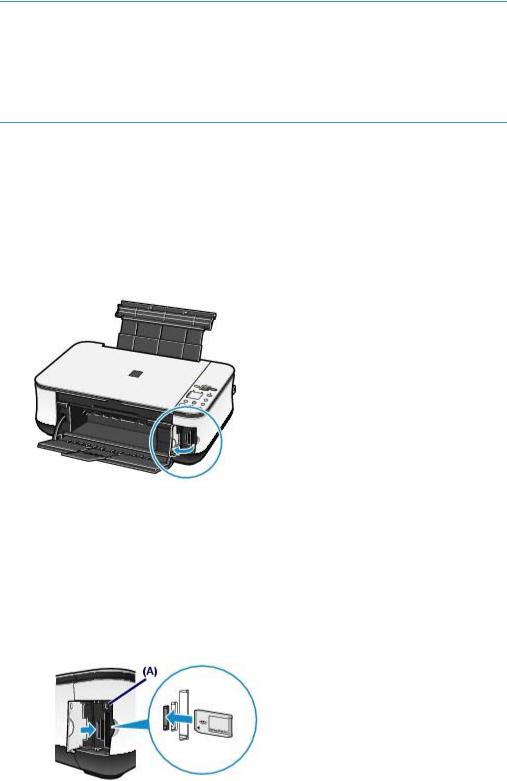
Turn on the power, and open the Card Slot Cover.
Insert only one memory card into the Card Slot.
The location to insert a memory card varies depending on each type of memory card. Insert your memory card straightforward WITH THE LABELED SIDE FACING TO THE LEFT into the Card Slot, according to the insert location in the figure below.
When the memory card is inserted properly, the Access lamp (A) will light up.
Be sure to attach the card adapter to the memory card with the mark * (asterisk) below, and then insert it into the
Card Slot.
For Memory Stick Duo, Memory Stick PRO Duo, or Memory Stick Micro*:
For SD Secure Digital memory card, SDHC memory card, miniSD Card*, miniSDHC Card*, microSD Card*, microSDHC Card*, Memory Stick, Memory Stick PRO, MultiMediaCard (ver.4.1), MultiMediaCard Plus (ver.4.1), or RS-MMC (ver.4.1)*:

Inserting the Memory Card |
Page 20 of 628 pages |
For Compact Flash (CF), Microdrive, or xD-Picture Card*, xD-Picture Card Type M*, xD-Picture Card
Type H*:
 Caution
 Part of the memory card will stick out of the Card Slot, but do not force it into the slot any further. This can damage the machine or the memory card.
 Make sure that the memory card is correctly oriented before inserting it into the Card Slot. If you force the memory card into the Card Slot in the wrong orientation, the memory card or the machine can be damaged.
 Important
 Do not insert more than one memory card at a time.
4. Close the Card Slot Cover.
 Removing the Memory Card
 Important
 If you used the Card Slot as the memory card drive of a computer, you must perform the "safe removal" operation on your computer before physically removing the memory card from the machine.
-In Windows, right-click the removable disk icon and click Eject. If Eject does not appear on the screen, make sure that the Access lamp is not flashing, and then remove the memory card.
-In Macintosh, drag  (Mount drive) into the Trash.
1.
2.
Open the Card Slot Cover.
Make sure that the Access lamp is lit, and remove the memory card.
Hold the part of the memory card that is sticking out and remove it from the machine straightforward.
 Caution
 Do not remove the memory card while the Access lamp is flashing. The Access lamp flashes while the machine is reading or writing data from/to the memory card. If you remove the memory card or turn off the power while the Access lamp is flashing, the data saved on the memory card can be damaged.
3. Close the Card Slot Cover.
Inserting the Memory Card |
Page 21 of 628 pages |
 Setting the Read/Write Attribute of the Card Slot
1.
2.
Press the  (Maintenance) button repeatedly until c appears.
Set the read/write attribute.
To select the "Not writable from PC" mode
Press the Color button.
To select the "Writable from PC" mode
Press the Black button.
 Note
Note
 Remove a memory card from the Card Slot of the machine before setting the read/write attribute. You cannot set the read/write attribute when a memory card is inserted.
 When the read/write attribute is set to the "Writable from PC" mode, you cannot print photos on a memory card with the Photo Index Sheet.
 Page top

Setting the Language for the Photo Index Sheet |
Page 22 of 628 pages |
 Advanced Guide
  Troubleshooting
Contents > Printing from a Memory Card (MP260 series) > Setting the Language for the Photo Index Sheet
Setting the Language for the Photo Index Sheet
You can select a language for the Photo Index Sheet that is used to print photos saved on a memory card.
 Note
Note
 Depending on the country or region of purchase, the Language Selection Sheet will be printed when you press the Photo Index Sheet button if the language for the Photo Index Sheet has not been selected. In this case, follow the procedures from step 4 onwards.
You need to prepare: A4 or Letter-sized plain paper and a memory card on which photos are saved
1. Make sure that the power is turned on, and load two or more sheets of A4 or Lettersized plain paper in the Rear Tray.
2.
3.
Open the Paper Output Tray gently, and open the Output Tray Extension.
Print the Language Selection Sheet.
(1) Make sure that the memory card is inserted.
 Note
Note
 Do not remove the memory card until all the operations are completed.
(2) Press the  (Maintenance) button repeatedly until h appears.
(3) Press the Black or Color button.
The Language Selection Sheet will be printed.
4. Fill in the circle of a desired language used to print the Photo Index Sheet.
Fill in the circle with a dark pencil or a black ink pen to select a language.
 Good
Good
 Bad
Bad
(A)Check mark
(B)Line only
(C)Too light
Setting the Language for the Photo Index Sheet |
Page 23 of 628 pages |
 Important
 If the filled circle is not dark enough, the machine may not be able to scan the setting.
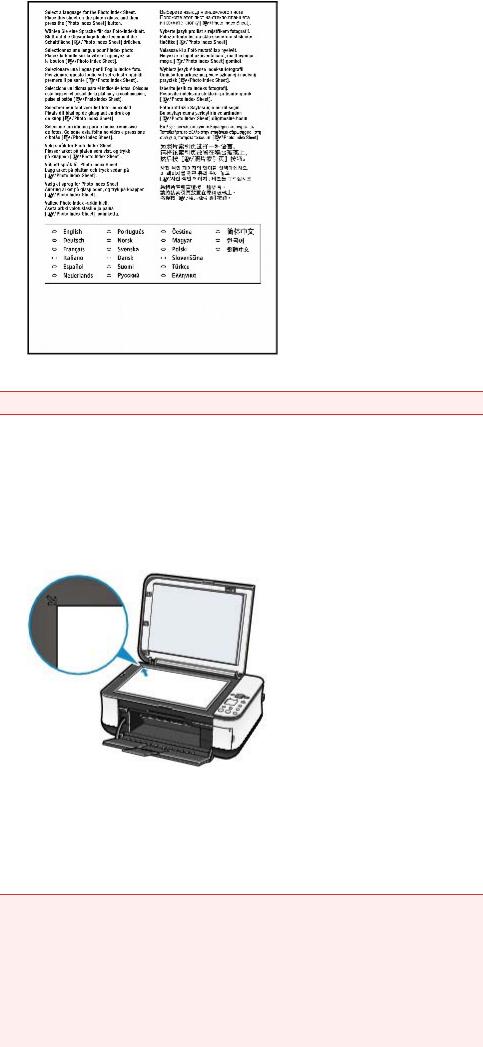
5. Scan the Language Selection Sheet to set the language.
(1) Place the Language Selection Sheet on the Platen Glass.
Place the Language Selection Sheet with the filled-in side FACING DOWN on the Platen Glass and align the upper corner of the sheet with the alignment mark as shown below.
Then close the Document Cover gently.
(2) Press the Photo Index Sheet button.
The language used to print the Photo Index Sheet will be set, and the Photo Index Sheet(s) will be printed in the selected language.
To print photos on the memory card, follow the procedures from step 3 onwards in Printing Photos Saved on the Memory Card.
 Important
 Do not open the Document Cover or move the loaded Language Selection Sheet until scanning is completed.
 Be careful not to get the Language Selection Sheet dirty. If the Language Selection Sheet is stained or wrinkled, it may not be scanned properly.
 If the error code "E, 5, 2" or "E, 5, 3" appears on the LED, confirm the following.
-The Platen Glass and the Language Selection Sheet are not dirty.
-The Language Selection Sheet is placed in the correct position with the filled-in side facing down.
-The filled circle is dark enough.
-Only one circle is selected.

Setting the Language for the Photo Index Sheet |
Page 24 of 628 pages |
For details, refer to the " Troubleshooting" in the on-screen manual: Advanced Guide.
 If the Photo Index Sheet is not printed in the selected language, be sure to place the Language
Selection Sheet on the Platen Glass correctly and press the Photo Index Sheet button to scan it again.
 Note
Note
 If you only want to set the language, press the
  (Maintenance) button repeatedly until n appears, and press the Black or Color button.
 Page top

Copying |
Page 25 of 628 pages |
 Advanced Guide
  Troubleshooting
Contents > Copying
Copying
You can make enlarged or reduced copies to fit the page size, and borderless copies of photos, besides standard copies.
Copying Documents
Switching the Page Size between A4 or 8.5" x 11" (Letter)
Copying Photos
Fit-to-Page Copying
 Page top

Copying Documents |
Page 26 of 628 pages |
 Advanced Guide
  Troubleshooting
Contents > Copying > Copying Documents
Copying Documents
This section describes the basic operation to copy documents.
For the operation, see the notes and operation procedure described in the reference page.
You need to prepare:
Originals to copy. See Originals You Can Load .
Paper for printing. See Media Types You Can Use .
1. Prepare for copying.
(1) Turn on the power.
See Operation Panel.

Copying Documents |
Page 27 of 628 pages |
(2) Load paper.
See Loading Paper.
(3)Open the Paper Output Tray gently, and open the Output Tray Extension.
(4)Load an original on the Platen Glass.
Load the original with the side to copy facing down and align it with the alignment mark as shown below.
See Loading Originals to Copy or Scan .
2. Start copying.
(1)Press the [+] button repeatedly to specify the number of copies (max. 20 copies).
To make 1 to 9 copies or 20 copies
Display the desired number of copies on the LED.
Each time you press the [ +] button, the number on the LED increases by one. When F appears, the number of copies is set to "20". Press the [ +] button again to return to "1".
To make 10 to 19 copies
(1) Display F on the LED.
(2)Load only the desired number of sheets to copy in the Rear Tray.
(2)Press the Paper button repeatedly to specify the page size and media type.
The Paper lamp indicates the selected page size and media type.
A4 or 8.5" x 11" Plain Paper / A4 or 8.5" x 11" Photo Paper / 4" x 6" Photo Paper
 Note
Note
 You can switch the size of paper loaded in the Rear Tray between A4 and 8.5" x 11" (Letter) regardless of the size indicated on the Operation Panel.
See Switching the Page Size between A4 or 8.5" x 11" (Letter) .
 When the Fit-to-Page copy function is enabled, you can copy an original in the size automatically enlarged or reduced to fit the selected page size. In this case, the original is copied with borders on the plain paper and without borders on the photo
paper.
Cancel the Fit-to-Page copy function to copy an original in the same size.
See Fit-to-Page Copying.
(3) Press the Color button for color copying, or the Black button for black & white copying.
The machine starts copying.
While copying is in progress, the number on the LED is flashing and reduced by one to indicate the

Copying Documents |
Page 28 of 628 pages |
remaining number of copies to be made.
To make 10 to 19 copies
The paper-out error will occur ("E, 2" appears on the LED) when all of the loaded paper has been used to print. Press the Stop/Reset button to release the error.
 Note
Note
 You can set the print quality to "Fast" only when A4 or Letter-sized plain paper is selected for the page size and media type.
To set the print quality to "Fast"
(1)Press and hold down the Color or Black button for 2 or more seconds.
The LED flashes once.
*When you press the Color or Black button for less than 2 seconds, the machine starts copying in the print quality "Standard".
(2)Release the button.
The machine starts copying.
 When the print quality is set to "Fast", print speed is given priority over quality. To give priority to quality, copy in the print quality "Standard".
 Important
 Do not open the Document Cover or move the loaded original until copying is completed.
 Note
Note
 To cancel copying, press the Stop/Reset button.
 Switching the Page Size between A4 or 8.5" x 11" (Letter)
You can switch the size of paper loaded in the Rear Tray between A4 and 8.5" x 11" (Letter).
This setting is useful if you usually load Letter-sized paper in the Rear Tray regardless of the page size indication "A4" on the Operation Panel, and vice versa.
1.
2.
Press the  (Maintenance) button repeatedly until d appears.
Press the Black button to select A4, or the Color button to select 8.5" x 11" (Letter).
 Note
Note
 When you switch the page size to A4 or 8.5" x 11" (Letter), load paper of the selected size regardless of the size indicated on the Operation Panel.
-When the page size is set to A4: A4 Plain Paper / A4 Photo Paper
-When the page size is set to 8.5" x 11" (Letter): 8.5" x 11" Plain Paper / 8.5" x 11" Photo
Paper
 Page top

Copying Photos |
Page 29 of 628 pages |
 Advanced Guide
  Troubleshooting
Contents > Copying > Copying Photos
Copying Photos
This section describes the basic operation to copy photos.
You need to prepare:
Printed photos.
Paper for printing. See Media Types You Can Use .
1. Prepare for copying a photo.
(1) Turn on the power.
See Operation Panel.
(2) Load paper.
See Loading Paper.
(3)Open the Paper Output Tray gently, and open the Output Tray Extension.
(4)Load a photo on the Platen Glass.
See Loading Originals to Copy or Scan .
2. Start copying.
(1) Press the [+] button repeatedly to specify the number of copies.
See Start copying..
(2) Press the Paper button repeatedly to specify the page size and media type.
The Paper lamp indicates the selected page size and media type.
A4 or 8.5" x 11" Photo Paper / 4" x 6" Photo Paper
 Note
Note
 You can switch the size of paper loaded in the Rear Tray between A4 and 8.5" x 11" (Letter) regardless of the size indicated on the Operation Panel.
See Switching the Page Size between A4 or 8.5" x 11" (Letter) .
 When the Fit-to-Page copy function is enabled, you can copy an original in the size automatically enlarged or reduced to fit the selected page size. In this case, the original is copied with borders on the plain paper and without borders on the photo paper.
Cancel the Fit-to-Page copy function to copy an original in the same size.
See Fit-to-Page Copying.
(3) Press the Color button for color copying, or the Black button for black & white

Copying Photos |
Page 30 of 628 pages |
copying.
The machine starts copying.
 Important
 Do not open the Document Cover or move the loaded photo until copying is completed.
 Note
Note
 To cancel copying, press the Stop/Reset button.
 Page top
 Loading...