


 Loading...
Quick Setup Guide
Start Here DCP-7055 / DCP-7057
DCP-7060D / DCP-7065DN
Please read the Safety and Legal booklet first before you set up your machine. Then, please read this Quick Setup Guide for the correct setup and installation.
To view the Quick Setup Guide in other languages, please visit http://solutions.brother.com/.
WARNING |
WARNING indicates a potentially hazardous situation which, if not avoided, |
could result in death or serious injuries. |
|
|
|
CAUTION |
CAUTION indicates a potentially hazardous situation which, if not avoided, may |
result in minor or moderate injuries. |
1 Unpack the machine and check the components
Drum Unit and Toner Cartridge Assembly
(pre-installed)
Installation CD-ROM, |
AC Power Cord |
Quick Setup Guide |
Documentation CD-ROM
Safety and Legal booklet
 WARNING
Plastic bags are used in the packaging of your machine. Plastic bags are not toys. To avoid danger of suffocation, please keep these bags away from babies and children and dispose of them correctly.
UK/IRE Version 0
1
 CAUTION
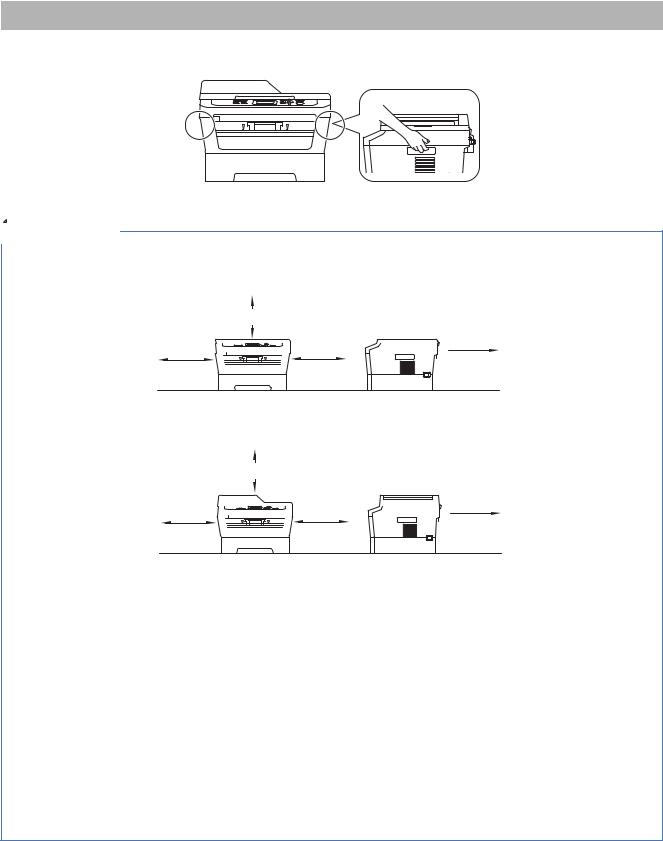
When you move the machine, grasp the side handholds that are under the scanner. DO NOT carry the machine by holding it at the bottom.
 Note
Note
•Keep a minimum gap around the machine as shown in the illustration. DCP-7055 / DCP-7057 / DCP-7060D
350 mm

 90 mm 100 mm
  100 mm

DCP-7065DN
250 mm

 90 mm 100 mm
  100 mm

•The components included in the box may differ depending on your country.
•Please save the original packaging should you need to ship the machine in future.
•If for any reason you must ship your machine, carefully repack the machine in the original packaging to avoid any damage during transit. The machine should be adequately insured with the carrier. For how to repack the machine, see Packing and shipping the machine in the Advanced User's Guide.
•The interface cable is not a standard accessory. Buy the appropriate interface cable for the interface you want to use (USB or Network).
USB cable
•It is recommended to use a USB 2.0 cable (Type A/B) that is no longer than 2 metres.
•DO NOT connect the interface cable at this time. Connecting the interface cable is done during the MFL-Pro installation process.
Network cable
Use a straight-through Category5 (or greater) twisted-pair cable for 10BASE-T or 100BASE-TX Fast Ethernet Network.
2

2 |
Remove the packing |
machinematerial from the |
 IMPORTANT
DO NOT connect the AC power cord yet.
a Remove the packing tape from the outside of the machine and the film covering the scanner glass.
b Open the front cover.
c Remove the Silica Pack from the inside of the machine.
 CAUTION
DO NOT eat the Silica Pack. Please discard. If ingested seek medical attention immediately.
d Lift the elastic band off the drum.
e Pull the paper strip to remove the protective material as shown in the illustration.
f Take out the drum unit and toner cartridge assembly.
3
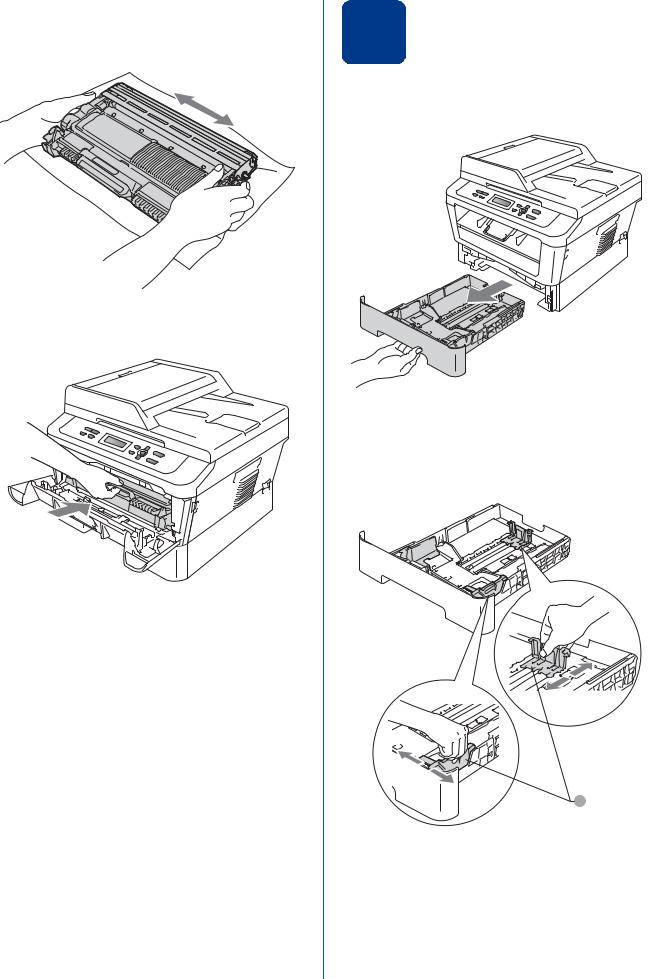
g Gently shake it from side to side several times to distribute the toner evenly inside the assembly.
h Put the drum unit and toner cartridge assembly back in the machine.
i Close the front cover of the machine.
4
3 |
Load paper in the paper |
|
|
|
tray |
a Pull the paper tray completely out of the machine.
b While pressing the green paper-guide release lever a, slide the paper guides to fit the paper size you are loading in the tray. Make sure that the guides are firmly in the slots.
1
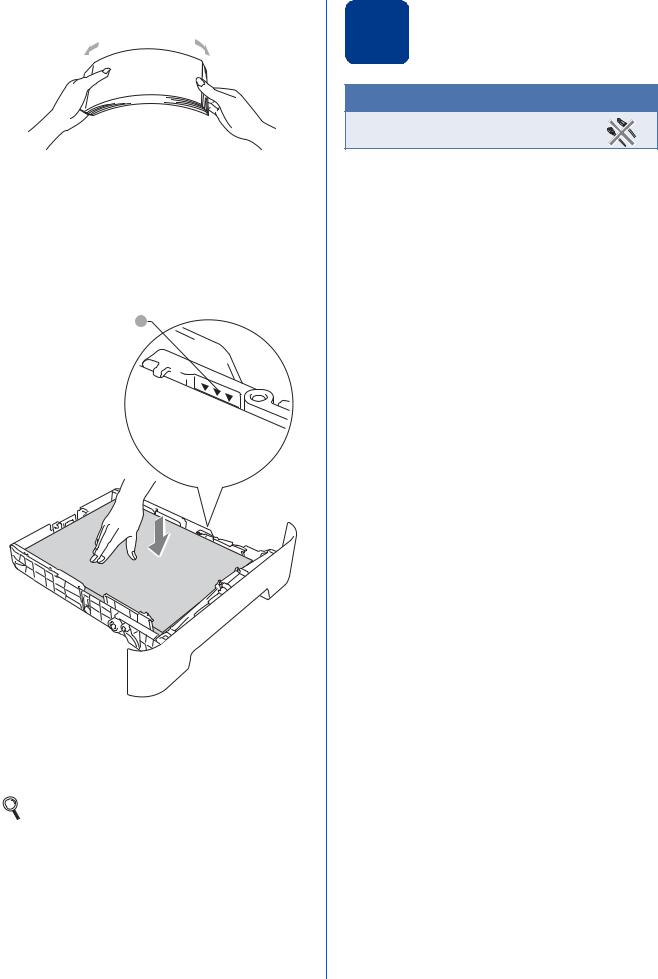
c Fan the stack of paper well to avoid paper jams and misfeeds.
d Put paper in the tray and make sure:
The paper is below the maximum paper mark (b b b) a.
Over filling the paper tray will cause paper jams.
The side to be printed on must be face down.
The paper guides touch the sides of the paper so it will feed correctly.
1
e Put the paper tray firmly back in the machine. Make sure that it is completely inserted into the machine.
For more information about recommended paper, see Recommended paper and print media in the Basic User’s Guide.
4 Connect the power cord
 IMPORTANT
DO NOT connect the interface cable yet.
a Connect the AC power cord to the machine, and then plug it into an electrical socket.
b Turn on the machine’s power switch.
5

5 Choose your language
a After turning the power switch on, the LCD shows:
Select Language
Press OK Key
Press OK.
b Press a or b to choose your language and press OK.
Select Language English
c If the LCD shows the correct language, press a. —OR—
Press b to go back to step b to choose the language again.
English?
a Yes b No
 Note
Note
If you have set the wrong language, you can change the language from the control panel menu of the machine. For details, see Changing the LCD language in the Basic User's Guide.
6
6 |
Set the LCD contrast |
|
|
|
(if needed) |
If you are having difficulty reading the LCD, try changing the contrast setting.
a Press Menu.
b Press a or b to choose 1.General Setup. Press OK.
c Press a or b to choose 3.LCD Contrast. Press OK.
d Press a to increase the contrast. —OR—
Press b to decrease the contrast. Press OK.
e Press Stop/Exit.
Loading...