


COMPANION® 3 Series II
M U L T I M E D I A S P E A K E R S
!"#$%&'()*+,$
)*-.(,$(*'.%+/
0/1+2$(,&*1+3+1'.1+/#

Français |
Español |
English |
|
|
|
SAFETY INFORMATION
Please read this owner’s guide
Please take the time to follow this owner’s guide carefully. It will help you set up and operate your system properly and enjoy its advanced features. Please save your owner’s guide for future reference.
 WARNING: !"#$%&'(%#)*%#$+,-#".#.+$%#"$#%/%()$+(#,*"(-0#&"#1")#%23",%#)*+,#,4,)%5#)"#$6+1#"$#5"+,)'$%7#
 WARNING: !*%#6336$6)',#,*6//#1")#8%#%23",%)"#&$+33+19#"$#,3/6,*+190#61"8:%(),#.+//%+)*#/+<'+&,0#,'(*#6,# =6,%,0#,*6//#1")#8%#3/6(%"1#)*%#6336$6)',7#>,#;+)*#614#%/%()$"1+(#3$"&'(),0#',%#(6$%#1")#)"#,3+//#/+<'+&,#+1)"#614#36$)# ".#)*%#,4,)%57#?+<'+&,#(61#(6',%#6#.6+/'$%#61&@"$#.+$%#*6A6$&7
These CAUTION marks are located on the rear panel of the Acoustimass® module:
The lightning flash with arrowhead symbol within an equilateral triangle is intended to alert the user !
to the presence of uninsulated, dangerous voltage within the system enclosure that may be of sufficient magnitude to constitute a risk of electric shock.
The exclamation point within an equilateral triangle, as marked on the system, is intended to alert the user to the presence of important operating and maintenance instruction in this owner’s guide.
Class B emissions
This Class B digital apparatus meets all requirements of the Canadian Interference-Causing Equipment Regulations (Canada only).
WARNING: To prevent electric shock, match the wide blade of the line cord plug to the wide slot of the AC (mains) receptacle. Insert fully.
WARNING: Do not place computer monitors, floppy disks, hard drives, or other magnetic media within 6 inches of the Acoustimass module. The magnetic field produced by this module can erase magnetic media and interfere with the monitor.
WARNING: No naked flame sources, such as lighted candles, should be placed on the apparatus.
 CAUTION: Long-term exposure to loud music may cause hearing damage. It is best to avoid extreme volume when using headphones, especially for extended periods.
This product conforms to the EMC Directive 89/336/EEC and to the Low Voltage Directive 73/23/EEC. The ! complete Declaration of Conformity can be found at www.bose.com/static/compliance/index.html.!
Notes:
•The product label is located on the bottom of the product.
•Where the mains plug or appliance coupler is used as the disconnect device, such disconnect device shall remain readily operable.
•The product must be used indoors. It is neither designed nor tested for use outdoors, in recreation vehicles, or on boats.
©2006 Bose Corporation. No part of this work may be reproduced, modified, distributed, or otherwise used without prior ! written permission. Design and specifications subject to change without notice.
2

English |
Español |
Français |
|
|
|
Important Safety Instructions
1.!"#$%&'"("%)*(&+,-&).*( – for all components before using this product.
2./""0%&'"("%)*(&+,-&).*( – for future reference.
3.1""$%#22%3#+*)*4( – on the product and in the owner’s guide.
4.5.22.3%#22%)*(&+,-&).*(6
5.7.%*.&%,("%&')(%#00#+#&,(%*"#+%3#&"+%.+%8.)(&,+" – Do not use this product near a bathtub, washbowl, kitchen sink, laundry tub, in a wet basement, near a swimming pool, or anywhere else that water or moisture are present.
6.92"#*%.*2:%3)&'%#%$+:%-2.&' – and as directed by Bose !
Corporation. Unplug this product from the wall outlet before cleaning.
7.7.%*.&%;2.-<%#*:%="*&)2#&).*%.0"*)*4(6%>*(%)*%#--.+? $#*-"%3)&'%&'"%8#*,@#-&,+"+A(%)*(&+,-&).*( – To ensure reliable operation of the product and to protect it from ! overheating, put the product in a position and location that will not interfere with its proper ventilation. For example, do
not place the product on a bed, sofa, or similar surface that may block the ventilation openings. Do not put it in a built-in! system, such as a bookcase or a cabinet that may keep air from flowing through its ventilation openings.
8.7.%*.&%)*(%*"#+%#*:%'"#&%(.,+-"(B%(,-'%#(%+#$)#&.+(B% '"#&%+"4)(&"+(B%(&.="(B%.+%.&'"+%#00#+#&,(%C)*-2,$)*4% #802)@)"+(D%&'#&%0+.$,-"%'"#&6
9.7.%*.&%$"@"#&%&'"%(#@"&:%0,+0.("%.@%&'"%0.2#+)E"$%.+%
4+.,*$)*4?&:0"%02,46%F%0.2#+)E"$%02,4%'#(%&3.%;2#$"(% 3)&'%.*"%3)$"+%&'#*%&'"%.&'"+6%F%4+.,*$)*4?&:0"%02,4%'#(% &3.%;2#$"(%#*$%#%&')+$%4+.,*$)*4%0+.*46%G'"%3)$"+%;2#$"%
.+%&')+$%0+.*4%#+"%0+.=)$"$%@.+%:.,+%(#@"&:6%>@%&'"%0+.? =)$"$%02,4%$."(%*.&%@)&%)*%:.,+%.,&2"&B%-.*(,2&%#*%"2"-&+)? -)#*%@.+%+"02#-"8"*&%.@%&'"%.;(.2"&"%.,&2"&6
10.H+.&"-&%&'"%0.3"+%-.+$%@+.8%;")*4%3#2<"$%.*%.+%0)*-'"$B% 0#+&)-,2#+2:%#&%02,4(B%-.*="*)"*-"%+"-"0-2"(B%#*$%&'"% 0.)*&%3'"+"%&'":%"I)&%@+.8%&'"%#00#+#&,(6
11.J*2:%,("%#&-'8"*&(K#--"((.+)"(%(0"-)@)"$%;:%&'" 8#*,@#-&,+"+6
12.L("%.*2:%3)&'%&'"%-#+&B%(*$B%&+)0.$B% ;+#-<"&B%.+%2"%(0"-)@)"$%;:%&'"%8#*,? 
@#-&,+"+%.+%(.2$%3)&'%&'"%#00#+#&,(6% 
M'"*%#%-#+&%)(%,("$B%,("%-#,&).*%3'"*%  8.=)*4%&'"%-#+&K#00#+#&,(%-.8;)*#&).*%
  &.%#=.)$%)*N,+:%@+.8%&)0?.="+6
13.L*02,4%&')(%#00#+#&,(%$,+)*4%2)4'&*)*4%(&.+8(%.+%3'"*% ,*,("$%@.+%2.*4%0"+).$(%.@%&)8" – to prevent damage to this product.
14.!"@"+%#22%("+=)-)*4%&.%O,#2)@)"$%("+=)-"%0"+(.**"26%P"+=)-? )*4%)(%+"O,)+"$%3'"*%&'"%#00#+#&,(%'#(%;""*%$#8#4"$%)*% #*:%3#:Q%(,-'%#(%0.3"+?(,002:%-.+$%.+%02,4%)(%$#8?
#4"$R%2)O,)$%'#(%;""*%(0)22"$%.+%.;N"-&(%'#="%@#22"*%)*&.% &'"%#00#+#&,(R%&'"%#00#+#&,(%'#(%;""*%"I0.("$%&.%+#)*%
.+%8.)(&,+"B%$."(%*.&%.0"+#&"%*.+8#22:B%.+%'#(%;""*% $+.00"$ – Do not attempt to service this product yourself. Opening or removing covers may expose you to dangerous voltages or other hazards. Please call Bose to be referred to an authorized service center near you.
15.G.%0+"="*&%+)(<%.@%@)+"%.+%"2"-&+)-%('.-<B%#=.)$%.="+2.#$? )*4%3#22%.,&2"&(B%"I&"*().*%-.+$(B%.+%)*&"4+#2%-.*="? *)"*-"%+"-"0-2"(6
16.7.%*.&%2"&%.;N"-&(%.+%2)O,)$(%"*&"+%&'"%0+.$,-& – as they may touch dangerous voltage points or short-out parts that could result in a fire or electric shock.
ST6 P""%0+.$,-&%"*-2.(,+"%;.&&.8%@.+%(#@"&:?+"2#&"$% 8#+<)*4(6
18.L("%0+.0"+%0.3"+%(.,+-"( – Plug the product into a proper power source, as described in the operating instructions or as marked on the product.
Information about products that generate electrical noise
If applicable, this equipment has been tested and found to comply with the limits for a Class B digital device, pursuant to Part 15 of the FCC rules. These limits are designed to provide reasonable protection against harmful interference in a residential installation. This equipment generates, uses, and can radiate radio frequency energy and, if not installed and used in accordance with the instructions, may cause harmful interference to radio communications. However, this is no guarantee that interference will not occur in a particular installation. If this equipment does cause harmful interference to radio or television reception, which can be determined by turning the equipment off and on, you are encouraged to try to correct the interference by one or more of the following measures:
•Reorient or relocate the receiving antenna.
•Increase the separation between the equipment and receiver.
•Connect the equipment to an outlet on a different circuit than the one to which the receiver is connected.
•Consult the dealer or an experienced radio/TV technician for help.
Note: Unauthorized modification of the receiver or radio remote control could void the user’s authority to operate this equipment.
This product complies with the Canadian ICES-003 Class B specifications.
3
Français |
Español |
English |
|
|
|
|
|
|
|
|
|
|
|
|
|
4

English |
Español |
Français |
|
|
|
|
CONTENTS |
GETTING STARTED |
|
6 |
|
Congratulations on your choice |
. . . . . . . . . . . . . . . . . . . . . . . . . . . . . . . . . . . . . . . . . . . . . . . . . . . . . . |
. . . . . . . . . . . . 6 |
|
Unpacking the carton . . . . . . . . |
. . . . . . . . . . . . . . . . . . . . . . . . . . . . . . . . . . . . . . . . . . . . . . . . . . . . . . . |
. . . . . . . . . . . 6 |
|
SETUP AND CONNECTIONS |
|
7 |
|
Placing your system . . . . . . . . . |
. . . . . . . . . . . . . . . . . . . . . . . . . . . . . . . . . . . . . . . . . . . . . . . . . . . . . . . |
. . . . . . . . . . . 7 |
|
Positioning the Acoustimass® module . . . . . . . . . . . . . . . . . . . . . . . . . . . . . . . . . . . . . . . . . . . . . . . . |
. . . . . . . . . . . 7 |
||
Positioning the speakers . . . . |
. . . . . . . . . . . . . . . . . . . . . . . . . . . . . . . . . . . . . . . . . . . . . . . . . . . . . . . |
. . . . . . . . . . . 8 |
|
Making connections . . . . . . . . . . . . . . . . . . . . . . . . . . . . . . . . . . . . . . . . . . . . . . . . . . . . . . . . . . . . . . . . . . . . . . . . . . . 8 Connecting the speakers to the module . . . . . . . . . . . . . . . . . . . . . . . . . . . . . . . . . . . . . . . . . . . . . . . . . . . . . . . . . . 9 Connecting the power cord . . . . . . . . . . . . . . . . . . . . . . . . . . . . . . . . . . . . . . . . . . . . . . . . . . . . . . . . . . . . . . . . . . . 10 Connecting other sources . . . . . . . . . . . . . . . . . . . . . . . . . . . . . . . . . . . . . . . . . . . . . . . . . . . . . . . . . . . . . . . . . . . . 10
USING YOUR SPEAKER SYSTEM |
11 |
Controlling the system . . . . . . . . . . . . . . . . . . . . . . . . . . . . . . . . . . . . . . . . . . . . . . . . . . . . . . . . . . . . . . . . . . . . . . . . . |
11 |
Balancing tone for the sound you like . . . . . . . . . . . . . . . . . . . . . . . . . . . . . . . . . . . . . . . . . . . . . . . . . . . . . . . . . . . |
12 |
Troubleshooting. . . . . . . . . . . . . . . . . . . . . . . . . . . . . . . . . . . . . . . . . . . . . . . . . . . . . . . . . . . . . . . . . . . . . . . . . . . . . . |
12 |
REFERENCE |
13 |
Cleaning the system . . . . . . . . . . . . . . . . . . . . . . . . . . . . . . . . . . . . . . . . . . . . . . . . . . . . . . . . . . . . . . . . . . . . . . . . . . . |
13 |
Contacting Customer Service . . . . . . . . . . . . . . . . . . . . . . . . . . . . . . . . . . . . . . . . . . . . . . . . . . . . . . . . . . . . . . . . . . . |
13 |
Limited warranty . . . . . . . . . . . . . . . . . . . . . . . . . . . . . . . . . . . . . . . . . . . . . . . . . . . . . . . . . . . . . . . . . . . . . . . . . . . . . . |
13 |
Technical Information . . . . . . . . . . . . . . . . . . . . . . . . . . . . . . . . . . . . . . . . . . . . . . . . . . . . . . . . . . . . . . . . . . . . . . . . . . |
13 |
For your records
The system serial number is located on the bottom of the Acoustimass module.
Serial number: __________________________________________________________________________________
Dealer name: ___________________________________________________________________________________
Dealer phone: __________________________________________________________________________________
We suggest you keep your sales receipt together with this owner’s guide.
Now would be a good time to register your product online at www.bose.com/register.
5

Français |
Español |
English |
|
|
|
GETTING STARTED
Congratulations on your choice
Thank you for purchasing the Bose®!Companion® 3 Series II multimedia speaker system.
Bose designed this amplified system to provide true-to-life stereo performance for music, computer games, and video, plus high-quality sound from a variety of desktop audio sources. Unique features make this system a superior choice for home or office workspaces.
Companion 3 multimedia speaker system benefits include:
•Small speakers and an easy-to-hide Acoustimass® module that keep your workspace ! clutter free.
•TrueSpace® stereo signal processing for a wide soundstage from speakers positioned close together.
•Control pod for at-hand volume adjustments and mute capability plus jacks to connect! headphones or external equipment like a CD player, MP3 player, or other audio source.
•Magnetic shielding that allows speaker placement next to your monitor or television ! without on-screen color distortion.
Unpacking the carton
Figure 1
Carton contents
Carefully unpack your speakers and save all of the packing materials, which provide the ! safest means for shipping or transporting. Check to be sure your system includes all of the parts (Figure 1).
If any part of the system appears damaged, do not attempt to use it. Notify your authorized Bose dealer immediately. Or, to contact Bose directly, refer to the address sheet included in the carton.
Acoustimass® module
Speakers
Control pod
Rubber feet
AC power cord
Owner’s guide |
Audio input cable |
 WARNING: !"#6="+&619%$#".#,'.."(6)+"10#-%%3#3/6,)+(#869,#"')#".#)*%#$%6(*#".#(*+/&$%17
Now is a good time to copy the serial number, located on the back of the Acoustimass ! module, into the form labeled “For your records” on page 5.
6

English |
Español |
Français |
|
|
|
SETUP AND CONNECTIONS
Placing your system
Figure 2
Recommended system placement
Figure 3
Module placement
The following guidelines are offered as an aid in placing the speakers and the Acoustimass® module to provide outstanding performance (Figure 2). Feel free to set up the system where it is most convenient and provides the sound you enjoy.
 Speakers
Acoustimass module
6 inches
(15 cm) minimum
3 inches (8 cm) minimum
Positioning the Acoustimass® module
The Acoustimass module functions as the unseen part of the system. When placed under or behind furniture, for example, it plays an invisible role in producing lifelike sound.
Keep the module:
•Positioned on a flat surface.
•Within reach of an AC (mains) power outlet.
•With the rear of the module at least 3 inches (8 cm) from a wall.
•With the front aimed away from the wall to decrease or toward the wall to increase bass.
•At least 6 inches (15 cm) from your computer monitor or TV to avoid interference from the module, which is not magnetically shielded.
•Where nothing blocks the openings on the back of the module, which provide ventilation to prevent overheating during use.
•Away from heat sources (radiators, baseboards, quartz heater, etc.).
•Resting on the bottom surface, not on the top, a side, or either end (Figure 3).
Ventilation openings
7

Français |
Español |
English |
|
|
|
SETUP AND CONNECTIONS
Other suggestions:
•Use the supplied audio input cable, which allows for placement of the module up to 6 feet ! (2 m) from your sound source.
•To place the module farther from the source, use a shielded audio input extension cable available from retail electronics stores.
Figure 4
Removing a speaker from the stand (a) and applying rubber feet (b) to the speaker
Positioning the speakers
The supplied speaker cables allow the speakers to be set up within 6 feet (2 m) of the ! module.
The speakers are designed for desktop placement on stands that lift them slightly above the surface or for resting directly on it.
If you prefer to use the speakers without stands, removing them is simple (Figure 4). After removing a speaker from the stand, apply the supplied rubber feet to the bottom surface ! for stability.
 CAUTION: B*"",%#6#,)68/%0#/%=%/#,'$.6(%#."$#)*%#,3%6-%$,#61,)61&,7#C+8$6)+"1#(61#(6',%# )*%5#)"#5"=%0#36$)+('/6$/4#"1#,5"")*#,'$.6(%,#/+-%#6#&%,-)"37
Keep the speakers:
•Up to 3 feet (91 cm) from the sides of the screen.
•At equal distance on each side of the computer monitor or TV and slightly angled away
from it (Figure 2 on page 7). a.
b.
Making connections
Custom cables supplied with this system simplify connections to the labeled jacks on the rear of the Acoustimass® module (Figure 7).
 CAUTION: D"#1")#3/'9#)*%#>("',)+56,,#5"&'/%#+1)"#61#>B#3";%$#E56+1,F#"')/%)#'1)+/#6//#)*%# ,"'$(%#("53"1%1),#6$%#("11%()%)"#)*%#5"&'/%7
8
English |
Español |
Français |
|
|
|
SETUP AND CONNECTIONS
Connecting the speakers to the module
The speakers, control pod, and computer all connect directly to the Acoustimass® module.
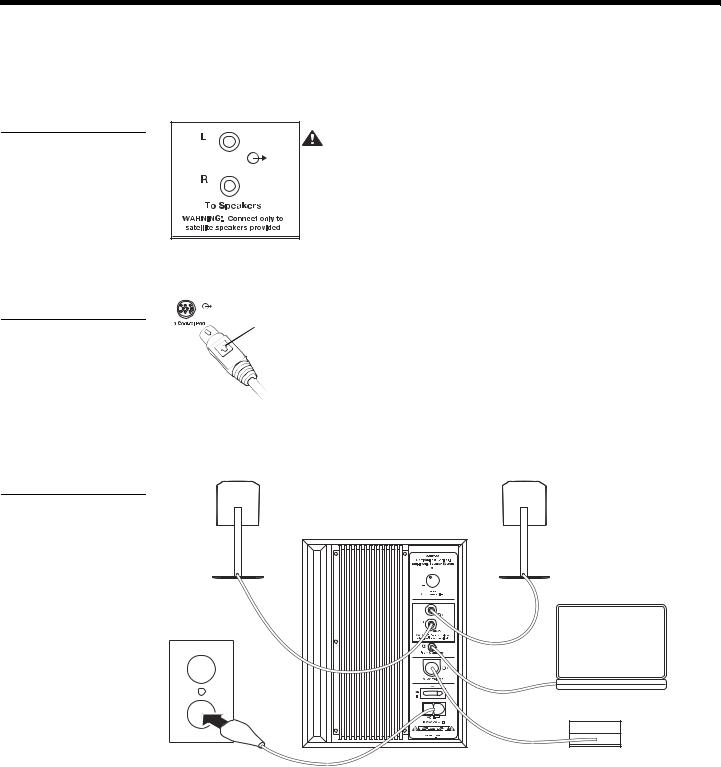
1.Insert the connector on each speaker cable into the corresponding L or R jack labeled! To Speakers on the rear of the Acoustimass module (Figure 5).
Figure 5
Speaker connection jacks
CAUTION: Connect only Companion® 3 speakers to these jacks. Connecting any other electronic device to these jacks may damage your speaker system.
2.Insert the control pod cable into the jack labeled To Control Pod on the rear of the! module. Be sure the cable connector is right side up, with the arrow showing (Figure 6).
Figure 6
Proper control pod cable |
Arrow indicator |
connection |
|
3.Insert the connector on one end of the supplied audio input cable into the jack labeled From Computer on the rear of the module. Connect the other end to the audio output jack on your computer (Figure 7).
Figure 7
Labels on the module for ease in making connections
Right |
Acoustimass Module |
Left |
speaker |
speaker |
|
|
|
To |
AC outlet |
|
Speakers |
|
|
From |
|
|
Computer |
|
|
Computer |
|
|
To |
|
|
Control Pod |
Power cord |
|
Control Pod |
 Note: G.#4"'$#,"'1,"'$(%#*6,#3*"1"#:6(-,#+1,)%6".#6#,)%$%"#5+1+#:6(-0#',%#61#6'&+"# 6&63)%$#(68/%#available from retail electronics stores7#B"11%()#)*%#6&63)%$#)"#)*%#6'&+"#+13')# (68/%#61+1,%$)#)*%#6&63)%$#+1)"#)*%#3*"1"#:6(-,#"1#4"'$#,"'$(%7
9

Français |
Español |
English |
|
|
|
SETUP AND CONNECTIONS
Connecting the power cord
Plugging in and turning on the Acoustimass® module is the final step before using the system.
1.Insert the small connector end of the power cord into the AC INPUT jack on the module.
2.Plug the large connector into an AC power (mains) outlet.
3.Turn the power switch, located on the back of the Acoustimass module, to ON (|).
On the control pod, the LED turns yellow to indicate the system is on and is ready for use.
Connecting other sources
The control pod features two jacks: one for connection directly to another sound source and the other for a headphone.
•To connect an external CD or MP3 player to your system, plug the cable from the sound source output jack into the input jack ( ) on the control pod. See Figure 8 on page 11.
•To connect headphones, insert the connector on the headphone cable into the headphone jack 
 on the control pod. This connection mutes the sound from the speakers.
10
English |
Español |
Français |
|
|
|
USING YOUR SPEAKER SYSTEM
Controlling the system
Figure 8
Switches and settings
To begin using your Companion® 3 speaker system (Figure 8):
1.Be sure your computer or other sound source is turned on.
2.If you have not yet done so, also turn on the power switch on the rear of the Acoustimass® module.
If the LED on the control pod is yellow, touch the top of the control pod to active the system. The light then turns green.
Bass compensation |
|
Standby/active |
Mute/activate |
touch control |
|
LED |
Volume |
|
|
Power |
control |
|
|
switch |
|
Headphone |
Sound source |
jack |
jack |
Controlling the volume
To adjust the sound level using your speaker system controls:
•For volume – Rotate the outer band on the control pod clockwise to increase or counterclockwise to decrease the volume (Figure 8).
•For mute – Gently press the mute/standby touch control on the pod. To unmute, press again.
The control pod LED light turns yellow when the system is muted (or in standby mode), and green when it is active.
To use the sound source volume control instead of the control pod:
•Rotate the outer band on the control pod clockwise until it approaches maximum volume.
•Use the volume control on your computer or other sound source to adjust the level as you listen.
Note: Setting a source volume control to the highest level may activate the speaker system’s internal protection circuity and reduce speaker volume.
11

Français |
Español |
English |
|
|
|
USING YOUR SPEAKER SYSTEM
Balancing tone for the sound you like
The acoustics of your room affects the sound you hear there. Upholstered furniture, carpets, and drapes absorb sound, which can muffle the treble (high frequencies). Bare floors, walls, and furniture have the opposite effect and can make the treble sound shrill.
A bass compensation control on the Acoustimass® module enables you to balance the tones you hear.
There are two ways to adjust the bass:
•Turn the control clockwise to increase or counterclockwise to decrease bass.
•Reposition the module. To increase bass, turn the front of the module toward a wall or other nearby surface. To decrease bass, aim the front from the wall.
Troubleshooting
Problem |
What to do |
|
|
The speaker system does not |
• Make sure all connections are secure. (See “Making |
play |
connections” on page 8.) |
|
• Check your speaker wires for damage or frays, which |
|
can cause an open or short circuit. |
|
• Be sure that the sound source is plugged in and ! |
|
playing at an audible volume. |
|
• Make sure the power is on and the system is not |
|
muted. The LED on the control pod should be green |
|
when unmuted. |
|
• If using a PC, check your sound card settings to make |
|
sure the “Digital output only” setting is turned OFF. |
|
This setting is typically found in the Options menu of |
|
the volume control icon. This icon is usually located in |
|
the lower right-hand corner of the Windows desktop. |
|
|
The speaker system sound! |
• Decrease the volume of the sound source and |
seems distorted |
increase the speaker system volume using the control |
|
pod. |
|
|
One speaker does not perform |
• Check connections from the speakers, control pod, |
or sounds distorted |
and computer to the Acoustimass® module. (See |
|
“Making connections” on page 8.) |
|
• Be sure the cable from the unheard speaker is firmly |
|
inserted in the proper To Speaker jack on the module. |
|
• Switch the connection of both speakers to jacks on |
|
the rear of the Acoustimass module. |
|
- If this does not resolve the problem for the ! |
|
originally unheard speaker, this speaker may be |
|
the cause. Contact Bose® Customer Service. |
|
- If the problem switches to the other speaker (the |
|
one that previously performed) a defective output |
|
channel on the sound source may be the cause. |
|
Try a different source. |
|
- If this does not resolve the problem, the Acousti- |
|
mass module may be the cause. Contact Bose |
|
Customer Service. |
|
• Check balance levels on your sound source. |
|
|
12
 Loading...