


Changer remote control
CDC-FM 08
Bedienungsund Einbauanleitung Operating and installation instructions Notice d’emploi et de montage Istruzioni d’uso e di montaggio
Gebruiksaanwijzing en inbouwhandleiding Bruksoch monteringsanvisning Instucciones de manejo y de conexión Instrução de serviço e de montagem

Einbauund Anschlußanleitung
Sicherheitshinweise |
Strom-Anschluß |
Lesen Sie vor dem Einbau Ihrer Fernbedienung CDC-FM 08 die folgenden Einbau- und Anschlußvorschriften.
Für die Dauer der Montage und des Anschlusses muß der Minuspol der Batterie abgeklemmt werden.
Hierbei sind die Sicherheitshinweise des Kfz-Herstellers (Airbag, Alarmanlagen, Bordcomputer, Wegfahrsperren) zu beachten.
Beim Bohren von Löchern darauf achten, daß keine Fahrzeugteile (Batterie, Kabel, Sicherungskasten, Kraftstoffleitungen) beschädigt werden.
Bauen Sie den CD-Wechsler gemäß der dem CD-Wechsler beiliegenden Einbauanleitung in Ihr Fahrzeug ein.
Für eine einwandfreie Funktion muß Plus über Zündung und Dauerplus angeschlossen sein.
Stellen Sie die Stromverbindungen gemäß der Abbildung Fig. 2 her. Beachten Sie für den Anschluß des CD-Wechslers die dem CD-Wechsler beiliegende Einbauanleitung. Unterbrechen Sie für die Dauer der Montagearbeiten auf jeden Fall die Masseverbindung der Batterie. Diese Maßnahme dient zu Ihrer Sicherheit und schützt das Gerät vor Fehlspannungsschäden während der Montage.
Hinweis: Montieren Sie zuerst den CDWechsler gemäß der dem CD-Wechsler beiliegenden Einbauanleitung und schließen Sie diesen an.
Installation der Empfängerschnittstelle
Die Empfängerschnittstelle erzeugt ein UKW-Signal, das über den Antenneneingang des Autoradios eingespeist wird.
•Finden Sie für die Empfängerschnittstelle einen geeigneten Montageort, z. B. hinter dem Amaturenbrett in der Nähe des Autoradios. Beachten Sie dabei, daß das fahrzeugseitige Antennenkabel mit der Schnittstelle verbunden werden muß.
•Befestigen Sie die Schnittstelle mit den mitgelieferten Schrauben.
•Lösen Sie die Antennenverbindung ihres Radiogerätes und schließen Sie diese an den entsprechenden Eingang der Empfängerschnittstelle an.
•Verbinden Sie den Antennenausgang der Schnittstelle mit Ihrem Autoradiogerät.
Hinweis: evt. sind zum Anschluß der Antennenkabel gesonderte Anschlußadapter (nicht im Lieferumfang) erforderlich.
•Schließen Sie die Kabel der Spannungsversorgung gemäß der Abbildung Fig. 2 an.
•Stellen Sie mit einem Schraubendreher die Frequenz, auf der das Signal ausgegeben werden soll, ein (Schalter). Sie können zwischen den Frequenzen 88.7 MHz und 89.1 MHz wählen. Wählen Sie eine Frequenz, die nicht von einem lokalen Radiosender benutzt wird. Der Schalter zur Frequenzeinstellung befindet sich auf einer Längsseite des Gehäuses und ist mit RF FREQ gekennzeichnet.
•Schließen Sie das 8-polige Kabel des CD-Wechslers an die Empfängerschnittstelle an. Für den CD-Wechsler CDC-A 05 benötigen Sie zusätzlich das Adapterkabel 7 607 889 093.
6

Installation der Fernbedienung
Die Fernbedienung muß nicht fest im Fahrzeuginnenraum montiert werden. Sie können die Fernbedienung z. B. mit einem selbstklebenden Klettband und Klettverschluß befestigen, siehe Fig. 1.
•Finden Sie einen geeigneten Befestigungsort für die Fernbedienung. Sie sollten die Fernbedienung an dieser Stelle bequem erreichen können.
•Befestigen Sie die Fernbedienung, bzw. sichern Sie sie gegen Verrutschen während der Fahrt.
•Führen Sie das Kabel der Fernbedienung zu der Empfängerschnittstelle.
•Verbinden Sie den 6-poligen Anschluß des Kabels mit der Empfängerschnittstelle.
•Stellen Sie nach Abschluß aller Anschlußund Montagearbeiten die Stromversorgung wieder her.
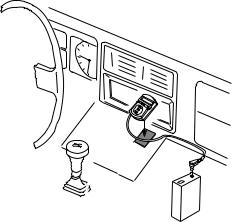
Fig. 1
Mögliche Installation der Fernbedienung mit einem selbstklebenden Klettband.
Erste Inbetriebnahme
Nachdem Sie alle Anschlußund Montagearbeiten abgeschlossen haben, stellen Sie die elektr. Verbindungen wieder her.
•Schalten Sie die Fernbedienung CDCFM 08 durch Drücken der Taste  ein. Drücken Sie nun den auf der Rückseite der Fernbedienung befindlichen Resetknopf mit einem Bleistift oder Kugelschreiber.
Hinweis: bei Funktionsstörungen der Anlage während des Betriebes, Resetknopf kurz drücken.
•Stellen Sie an Ihrem Autoradiogerät die Frequenz ein, die Sie zuvor an der Empfängerschnittstelle gewählt haben. Gehen Sie zum Einstellen der gewünschten Frequenz bitte wie in Ihrer Autoradiobedienungsanleitung beschrieben vor.
Hinweis: Wenn Sie einen Suchlauf zum Einstellen des Senders verwenden wollen, schalten Sie zuerst die CD-Wiedergabe ein (siehe “CD-Wiedergabe starten”).
•Speichern Sie die gewählte Frequenz nach Möglichkeit auf einer Stationstaste. Beachten Sie dazu die Hinweise und Bemerkungen in Ihrer Autoradio - Bedienungsanleitung.
PORTUGUÊS ESPAÑOL SVENSKA NEDERLANDS ITALIANO FRANÇAIS ENGLISH DEUTSCH
7
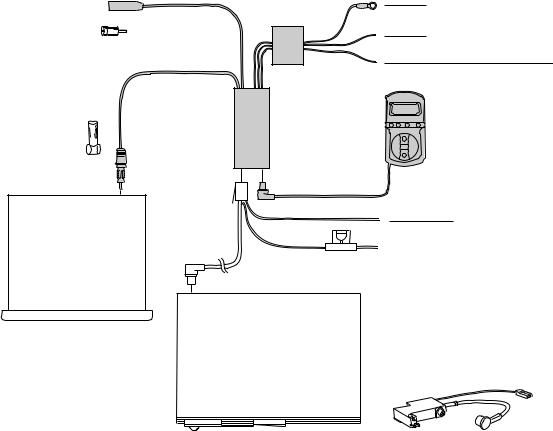
Elektr. Anschlußplan
Fahrzeugantennenanschluß **
evtl. Adapter 8 694 419 761
evtl. Adapter
8 694 419 774
Autoradioantenneneingang
Autoradiogerät
schwarz
Sicherungsund |
Masse * |
|
Anschlußkasten |
||
gelb |
||
|
||
|
+ 12 Volt Dauerplus |
|
|
rot |
|
Empfänger- |
Fernbedienung |
|
CDC-FM 08 |
||
schnittstelle |
||
|
braun
Masse *
Sicherung, 3 A
rot, + 12 V
* Anschluß an einen gekennzeichneten Masseanschluß  oder ein metallisch blankes, nicht lackiertes Chassisteil.
CD-Wechsler
CDC-A05, 06, 071, 072, 08 ** evtl. Adapter 7 691 290 202 (AUDI, SEAT, VW)
Anschluß an eine 12 Volt
Spannungsquelle, die bei eingeschalteter Zündung aktiviert und bei ausgeschalteter Zündung deaktiviert ist.
Achtung: Wird das Autoradio ausschließlich über Batterie + angeschlossen, ist folgende Anschlußart zu wählen:
Anschluß an den 12 Volt Schaltspannungsausgang des Autoradios (zb. Schaltplus für einen Verstärker).
Achtung: Bei Blaupunkt Autoradios mit TIM - Funktion darf der Schaltplusausgang für die Antenne nicht verwendet werden.
Hinweis: Um einen störungsfreien Betrieb sicherzustellen muß die "RDS" Radiofunktion AF - (Alternativ-Frequenz) ausgeschaltet werden.
Fig. 2 Elektrische Anschlüsse
8

Anleitung zur Fehlersuche
Fehler |
Ursache |
Abhilfe |
||
• CD-Wechsler arbeitet nicht. |
• |
Sicherung durchgebrannt. |
• |
Sicherung ersetzen. |
|
• |
Schlechte Masseverbindung des |
• |
Masseverbindung herstellen. |
|
|
Wechslers. |
|
|
|
• Kein Magazin eingeschoben, keine |
• CDs und Magazin ordnungsgemäß |
||
|
|
CDs im Magazin, CDs falsch eingelegt. |
|
einführen. |
|
|
|
|
|
• CD wird abgespielt, aber keine Musik |
• |
Schlechte Verbindung mit Empfänger- |
• |
Auf ordnungsgemäße Verbindungen |
hörbar. |
|
schnittstelle. |
|
der Komponenten achten. |
|
• Schlechte Erdung der Empfänger- |
• |
Ordnungsgemäße Masseverbindung |
|
|
|
schnittstelle. |
|
herstellen. |
|
• |
Sicherung der Empfängerschnittstelle |
• |
Sicherung ersetzen. |
|
|
durchgebrannt. |
|
|
|
• Autoradiogerät nicht auf richtige Fre- |
• |
Autoradiogerät richtig einstellen. |
|
|
|
quenz abgestimmt (88.7 MHz oder |
|
|
|
|
89.1 MHz). |
|
|
|
• Feuchtigkeitsbildung an der Leseein- |
• Magazin entfernen und die Tür des |
||
|
|
heit des Wechslers. |
|
Wechslers ca. eine Stunde geöffnet |
|
|
|
|
lassen. |
|
|
|
|
|
• Keine Anzeige auf der Fernbedienung. |
• |
Sicherung der Empfängerschnittstelle |
• |
Sicherung ersetzen. |
|
|
durchgebrannt. |
|
|
•Dauerndes “Springen” der Musikwiedergabe während der Fahrt.
• Schrauben der Transportsicherung am |
• |
Schrauben entfernen. |
CD-Wechsler nicht entfernt. |
|
|
• Stellschrauben für vertikale/ horizonta- |
• |
Richtige Position einstellen. |
le Montage nicht richtig eingestellt. |
|
|
• CD-Wechsler in falschem Winkel mon- |
• CD-Wechsler in korrektem Winkel in- |
|
tiert. |
|
stallieren. |
Sollte sich ein Fehler mit diesen Abhilfemaßnahmen nicht beheben lassen, wenden Sie sich bitte an einen autorisierten BlaupunktFachhändler.
PORTUGUÊS ESPAÑOL SVENSKA NEDERLANDS ITALIANO FRANÇAIS ENGLISH DEUTSCH
9

Technische Daten
Ausgangsfrequenz: 88,7 MHz, 89,1 MHz
schaltbar
Frequenzgang: |
20-15.000 Hz ± 3 dB |
Klirrfaktor: |
< 0,25 % |
Abmessungen |
|
(B x H x T): |
|
Fernbedienung |
|
(Commander): |
99 x 23 x 54 mm |
Empfänger- |
|
schnittstelle |
|
(Modulator): |
87 x 26 x 56 mm |
Änderungen vorbehalten!
Blaupunkt Telefon-Hotline
(nur für Deutschland)
Haben Sie Fragen zur Bedienung oder benötigen Sie weitergehende Informationen?
Rufen Sie uns an unter der Rufnummer:
01 80 / 5 00 02 25
(gebührenpflichtig)
Wir freuen uns auf Ihren Anruf!
Per Fax erreichen Sie uns unter der Nummer:
0 51 21 / 49 40 02.
10

Mounting and connection instructions
Safety notes |
Power connection |
Before starting to mount your CDC-FM 08 remote control, please read through the following information carefully.
Disconnect the vehicle battery’s negative terminal before making connections.
Be sure to observe the safety notes of the automobile manufacturer (airbags, alarm systems, on-board computers, vehicle immobilisers)!
Before drilling any holes for attachment or laying cables, look to see what is on the other side - be sure not to damage important parts such as the battery, wiring looms, fuse boxes or fuel lines!
Follow the mounting instructions attached to the CD changer to install the equipment.
In order to ensure that the unit operates properly the positive power supply line must be connected via the ignition and the constant +12 V lead.
Make all connections as illustrated in figure 2. To install the CD changer, follow the mounting instructions attached to the equipment. Be sure to disconnect the vehicle battery’s negative terminal before making connections. This will serve for your personal protection and protect the changer from overvoltage damages.
Note: Mount the CD changer first following the instructions attached to the unit and then connect it to the on-board system.
Modulator installation
The modulator is used to generate an FM signal fed in via the antenna input of the car radio.
•Find a suited mounting location, e.g. behind the dashboard close to the car radio. Note that the vehicle’s antenna cable has to be connected to the modulator.
•Use the supplied screws to attach the modulator unit.
•Undo the antenna connection of the radio and plug the antenna connector into the corresponding modulator input.
•Connect the modulator’s antenna output with the car radio.
Note: To hook up the antenna cables you may need specific adapters, which are not included in the delivery.
•Connect the power cables as illustrated in figure 2.
•Use a screwdriver to adjust the frequency to be employed for signal output (switch). You can choose between 88.7 and 89.1 MHz. Select a free frequency which is not used by a local broadcasting station. The switch used for frequency adjustment is found on one of the two long sides of the housing and is marked RF FREQ.
•Connect the 8-pole cable of the CD changer to the modulator. For the CDC-A 05 model you will also need the adapter cable 7 607 889 093.
PORTUGUÊS ESPAÑOL SVENSKA NEDERLANDS ITALIANO FRANÇAIS ENGLISH DEUTSCH
15
Remote control installation
The remote control does not necessarily have to be firmly attached to the passenger compartment of the vehicle. For example, you may fix it using a self-adhesive hook- and-loop fabric fastener as illustrated in figure 1.
•Find a suited mounting location for the remote control unit. It should be conve-
niently accessible from the driver seat.
•Attach it so that it cannot slip.
• Route the remote control cable to the modulator.
• Connect the 6-pole cable connector with the modulator.
•Re-connect the battery terminal after having completed all installation and connection work.
Fig. 1
Possible installation of the remote control using self-adhesive hook-and-loop fabric fastener tape.
First operation
Re-establish all electrical connections after having completed all installation and connection work.
•Press  to switch on the CDC-FM 08. Now use a pencil or ball pen to press the reset button on the back of the remote control.
Note: Press the reset button briefly whenever a malfunction occurs.
•Tune your car radio into the frequency selected before on the modulator. To adjust the frequency, follow the operating instructions of the radio equipment.
Note: If you would like to adjust the frequency by seek tuning, start CD playback first (see “Starting CD playback”).
•We recommend to store the selected frequency on one of the preset buttons. For this, please read the information in your car radio user manual.
16

Electrical connection scheme
To the vehicle’s antenna connector **
Use adapter 8 694 419 761 if necessary
Use adapter
8 694 419 774 if necessary
Antenna input
Car radio
Fuse/connector |
black |
Ground * |
|
||
box |
yellow |
|
|
+ 12 V constant power |
|
|
|
|
|
red |
|
Modulator |
|
CDC-FM 08 |
|
remote control |
|
|
|
brown
Ground *
Fuse, 3 A
red, + 12 V
CD changer CDC-A05, 06, 071, 072, 08
*Connection to a dedicated ground connector marked or an unpainted part of the chassis
(scratched down to the bare metal).
**Use adapter 7 691 290 202 (AUDI, SEAT, VW)
Connection to a 12 V voltage source which is activated when the ignition is switched on and deactivated when the ignition is switched off.
Caution: If the car radio is connected to the battery + terminal only, you will need to use the following type of connection:
Connection to the 12 volt switching voltage output of the car radio (e.g. switch plus for an amplifier).
Caution: In the case of Blaupunkt car radios with TIM function, the switch plus output for the aerial must not be used.
Note: In order to ensure faultfree operation, the “RDS” radio function AF (Alternative Frequency) must be switched off.
Fig. 2 Electrical connections
PORTUGUÊS ESPAÑOL SVENSKA NEDERLANDS ITALIANO FRANÇAIS ENGLISH DEUTSCH
17

Troubleshooting guide
Malfunction |
Cause |
Remedy |
||
• CD changer does not function properly. |
• |
Fuse blown. |
• |
Replace fuse. |
|
• Bad ground connection of the changer. |
• Provide good ground connection. |
||
|
• |
No magazine inserted, no CDs in the |
• |
Insert discs and magazine correctly. |
|
|
magazine, CDs inserted upside down. |
|
|
•CD is played back but no music audible.
•Bad modulator connection.
•Bad ground connection of the modulator.
•Modulator fuse blown.
•Car radio not tuned into the right frequency (88.7 MHz or 89.1 MHz).
•Take care that all components are properly connected.
•Provide good ground connection.
•Replace fuse.
•Adjust the correct frequency.
• Moisture on the changer’s pick-up unit. • Remove the magazine, leave changer door open for approx. 1 hour.
• No display on the remote control. |
• Modulator fuse blown. |
• Replace fuse. |
•Playback permanently “jumping” while the vehicle is moving.
• |
Transport protection screws of the CD |
• |
Remove screws. |
|
changer not removed. |
|
|
• |
Adjustable screws for vertical/horizon- |
• |
Adjust correct position. |
|
tal installation in wrong position. |
|
|
• |
CD changer mounted at a wrong angle. |
• |
Install changer at correct angle. |
Should the malfunction remain despite these troubleshooting recommendations, then please get in touch with an authorised Blaupunkt service centre.
18
Specifications
Output |
|
frequency: |
88.7 MHz, 89.1 MHz |
|
switchable |
Frequency |
20 - 15000 Hz ± 3 dB |
response: |
|
THD: |
< 0.25 % |
Dimensions |
|
(w x h x d): |
|
Remote control: |
99 x 23 x 54 mm |
Modulator: |
87 x 26 x 54 mm |
Subject to modifications!
PORTUGUÊS ESPAÑOL SVENSKA NEDERLANDS ITALIANO FRANÇAIS ENGLISH DEUTSCH
19

Instructions de montage et de branchement
Consignes de sécurité
Prière de lire les consignes de montage et de branchement suivantes avant de procéder au montage de votre télécommande CDC-FM 08.
Le pôle de la batterie doit être débranché pendant la durée du montage et du branchement.
Les consignes de sécurité du constructeur automobile (airbag, alarmes, ordinateur de bord, dispositif de blocage des roues) doivent être également observées.
En perçant des trous, prenez soin de n’endommager aucune pièce du véhicule (batterie, câbles, boîtier à fusibles, conduites de carburant).
Montez le changeur CD dans votre véhicule conformément à la notice de montage fournie avec changeur CD.
Branchement électrique
Afin de garantir le bon fonctionnement de la télécommande, il est impératif de brancher le «plus» via l’allumage et le «plus permanent».
Etablir les connexions comme montré sur la Fig. 2. Pour le branchement du changeur CD, observer les indications de la notice de montage fournie avec celui-ci. Interrompre dans tous les cas la connexion à la masse de la batterie pendant la durée du montage. Cette mesure sert à votre sécurité et protège l’appareil de tensions incorrectes risquant de le détériorer pendant le montage.
Note : Monter d’abord le changeur CD conformément aux indications de la notice de montage fournie avec celui-ci et procéder à son branchement.
Installation de l’interface du récepteur
L’interface du récepteur produit un signal FM qui s’alimente via l’entrée de l’antenne de l’autoradio.
•Choisir pour le montage de l’interface du récepteur un endroit adéquat, par exemple derrière le tableau de bord à proximité de l’autoradio. Prendre note que le câble d’antenne du véhicule doit être relié à l’interface.
•Fixer l’interface à l’aide des vis fournies.
•Desserrer le raccord d’antenne de votre autoradio et le brancher à l’entrée correspondante de l’interface du récepteur.
•Relier la sortie antenne de l’interface à l’autoradio.
Note : Le branchement des câbles d’antenne requiert éventuellement des adaptateurs de connexion spécifiques (non fournis).
•Brancher les câbles de connexion conformément à la Fig. 2.
•A l’aide d’un tournevis, régler la fréquence à laquelle le signal sera produit (bouton). Il est possible de choisir entre les fréquences 88,7 MHz et
89,1 MHz. Choisir une fréquence qui n’est pas utilisée par une station locale. Le bouton de réglage des fréquences se trouve sur le long côté du boîtier et porte l’inscription RF FREQ.
•Raccorder le câble 8 pôles du changeur CD à l’interface du récepteur.
Le changeur CD requiert également un câble adaptateur 7 607 889 093 .
24

Installation de la télécommande
La télécommande ne doit pas être fixée à l’intérieur du véhicule. Il est possible de la fixer par exemple avec un ruban auto-adhé- sif et une bande agrippante, cf. Fig. 1.
•Choisir un endroit de fixation adéquat
pour la télécommande. Elle doit toujours être facilement accessible.
•Fixer la télécommande ou la bloquer
pour empêcher qu’elle glisse pendant la marche.
• Conduire le câble de la télécommande à l’interface du récepteur.
• Relier la prise 6 pôles du câble à l’interface du récepteur.
•Rétablir l’alimentation électrique lorsque tous les travaux de montage et de branchement sont terminés.
Fig. 1
Possibilité d’installation de la télécommande avec un ruban auto-adhésif.
Première mise en service
Au terme des travaux de branchement et de montage, rétablir les connexions électriques.
•Allumer la télécommande CDC-FM 08 en pressant la touche  . Enfoncer ensuite le bouton de réinitialisation (reset) au dos de la télécommande au moyen d’un crayon de bois ou stylo à bille.
Note : Presser brièvement le bouton de réinitialisation en cas de perturbations de fonctionnement de l’appareil.
•Régler sur l’autoradio la fréquence qui a été précédemment sélectionnée sur l’interface du récepteur.
Pour le réglage de la fréquence, procéder comme décrit dans la notice d’emploi de l’autoradio.
Note : Si vous souhaitez utiliser la fonction de recherche pour régler la station, activez d’abord le mode de lecture CD (cf. «Démarrer la lecture CD).
•Mémoriser si possible la fréquence choisie sur une touche de station. Suivre les indications et remarques contenues dans la notice d’emploi de l’autoradio.
PORTUGUÊS ESPAÑOL SVENSKA NEDERLANDS ITALIANO FRANÇAIS ENGLISH DEUTSCH
25
 Loading...