


Owner's manual
Instrukcja obsługi
Návod k obsluze
Príručka vlastníka
Használati útmutató
CR6
Digital alarm clock radio
Digitální radiobudík
Digitálny rádiobudík
Ébresztőórás digitális rádiól
Radiobudzik


CR6
IM PORTAN T NOTES
• Thi s safet y and ope rating i nstru ctio n shoul d be retai ned for f uture r eferen ce.
• The ap parat us shou ld not be ex posed t o dripp ing or sp lashi ng or pla ced in a hu mid
atm osphe re such a s a bathro om.
• Do no t insta ll the pr oduct i n the fol lowin g areas:
• Pla ces exp osed to di rect su nligh t or clos e to radi ators .
• On to p of othe r stereo e quipm ent tha t radia te too mu ch heat.
• Blo cking v entil ation o r in a dust y area.
• Are as where t here is c onsta nt vibr ation .
• Hum id or moi st plac es.
• Do no t place n ear can dles or o ther na ked flam es.
• Ope rate th e produc t only a s instr ucted i n this ma nual.
• Bef ore tur ning on t he power f or the fir st time, m ake sur e the pow er adap tor is pro perl y
con necte d.
For safe ty reason s, d o n ot r emove any cove rs o r at tempt to gain ac cess to the insid e of th e
pro duct. R efer any s ervi cing to q ualifi ed pers onnel .
Do n ot atte mpt to r emove a ny scre ws, or o pen th e casi ng of th e unit ; there are n o user
ser vicea ble par ts ins ide. Re fer all se rvic ing to qu alifie d servi ce pers onnel .
SA FETY INST RUCTIO NS
1. Re ad Inst ructi ons - All th e safet y and ope rating i nstru ction s must be r ead befo re the
pro duct is o perat ed.
2. Re tain I nstru ction s - The saf ety a nd ope ratin g inst ructi ons sh ould be k ept wi th th e
pro duct fo r future r efere nce.
3. Hee d warn ings - All wa rning s on th e prod uct an d in th e oper ating instr uctio ns sho uld be
adh ered to.
4. Fol low ins truct ions - Al l opera ting an d users ' instr uctio ns shou ld be fol lowed.
5. Wate r and moi sture - To red uce the r isk of fir e or elec tric sh ock, d o not exp ose the p roduc t
to t rain, drip ping, splas hing o r exce ssive moist ure su ch as in a s auna o r bat hroom. Do no t
use this produc t nea r wate r, for examp le, ne ar a b athtub , wash bowl, kitch en si nk, l aundr y
tub, i n a wet bas ement o r near a sw immin g pool (o r simil ar).
6. O bjec t and Li quid E ntry - N ever p ush obj ects o f any ki nd into thi s prod uct thr ough
ope nings , as th ey m ay touch dan gerou s vo ltage po ints or shor t-ci rcuit par ts that coul d
res ult in a fire or ele ctric shoc k. Nev er spi ll li quid o f any k ind o n the p roduc t. Do not pl ace
any o bject c ontai ning li quid on to p of the pr oduc t.
7. S ervi cing - D o not att empt to servi ce this produ ct your self, a s openi ng or rem oving covers
may ex pose you to da ngero us volta ge or othe r h azard s. Refer al l s ervi cing to qu alifie d
ser vice pe rsonn el.
8. Rep laceme nt p arts - W hen r eplac ement pa rts are re quire d, en sure tha t the s ervic e
tec hnici an h as used repl aceme nt parts sp ecifie d by th e m anufa cture r or ha ve t he same
cha racte risti cs as the orig inal part . Un autho rized subs titut ions may result in fire, elect ric
sho ck or oth er haza rds.
9. P lace you r cloc k radio o n a stabl e surf ace, aw ay from s ources o f direc t sunl ight or e xcessi ve
hea t or mois ture.
ENGLISH
1

CR6
10. Prote ct yo ur fur nitu re whe n pla cing your u nits on a n atura l woo d and lacqu ered fi nish by
usi ng a clot h or prote ctiv e materi al bet ween it an d the fur nitur e.
11. C lean yo ur uni t with a s oft cl oth moi stene d only w ith mil d soap a nd wate r. Stron ger age nts
suc h as benz ene, th inner o r simil ar mate rials c an dama ge the su rfac e of the un it. Mak e sure
the u nit is un plugg ed befo re clean ing.
12. B atter y
1) The b atter ies mus t not be exp osed to e xcess ive heat s uch as su nshin e, fire or t he like .
2) The b atter ies sho uld be dra wn to the e nviro nmenta l aspec ts of ba ttery d ispos al.
3) Ba ttery u sage C AUTI ON - to pr event ba tter y leaka ge whic h may res ult in bo dy
inj uries , proper ty dam age, or d amage t o the app aratu s:
- Ins tall al l batte ries co rrect ly, + and – as m arked o n the app aratu s.
- Rem ove batt eries w hen the u nit is no t used fo r a long ti me.
WAR NING
Thi s app lianc e is not inten ded for u se by per sons (incl uding chi ldren) wit h red uced physi cal
sen sory or menta l ca pabil ities , or lack of expe rienc e an d kn owled ge, u nless the y ha ve b een
give n sup ervi sion or in struc tion conce rning use of th e app lianc e by a per son re spons ible for
the ir safe ty.
Chi ldren s hould b e super vised t o ensur e that th ey do not p lay with t he appl iance .
1. T he ap parat us m ust n ot b e exp osed to d rippi ng or spl ashin g and that obj ects fille d wit h
liq uids, s uch as va ses, mus t not be pl aced on t he appa ratus .
2. To preven t fire or shock hazard , do no t expos e this e quipm ent to hot pla ces, ra in, mo istur e
or du st.
3. Do n ot loca te this u nit nea r any wate r sourc es e.g. ta ps, bat htubs, w ashin g machi nes or
swi mming p ools. E nsure th at you pl ace the u nit on a dr y, stab le surf ace.
4. Do n ot plac e this un it clos e to a stron g magne tic fiel d.
5. Do n ot plac e the uni t on a ampl ifier or r eceive r.
6. Do no t plac e thi s unit in a d amp a rea as th e mois ture w ill a ffect t he li fe of e lect ric
com ponen ts.
7. If the clock is b rought dire ctly from a cold to a warm locat ion, or is place d in a ver y dam p
roo m, moi sture may conde nse on the lens insid e the playe r. If this o ccurs , the syste m wil l
not ope rate p roper ly. Ple ase le ave th e syst em tur ned on fo r abou t an ho ur unt il the
moi sture e vapora tes.
8. D o no t att empt to cl ean t he un it wi th ch emica l so lvents as this might dama ge th e fini sh.
Wipe w ith a cle an, dr y or slig htly da mp clot h.
2
CR6
NOTI CE
Thi s produc t comp lies wi th the rad io inte rfere nce req uirem ents of t he Europ ean com munit y.
Your pr oduct s is desi gned a ma nufac tured w ith hig h quali ty mate rials a nd comp onent s, whic h
can b e recyc led and r eused.
Whe n this cr ossed -out wh eeled b in symb ol is att ached t o a produc t it mea ns that t he produ ct
is co vered by t he Euro pean Di recti ve 2002/ 96/E C. Plea se info rm your self ab out the l ocal
sep arate co llec tion sy stem for e lectr ical an d elec tronic p roduc ts. Ple ase cat a ccord ing to you r
loc al rule s and do no t dispo se of you r old prod ucts w ith your n ormal h ouseh old was te. Cor rect
dis posal o f your ol d produc t help s to preve nt pote ntial n egati ve conse quenc es for th e
env ironme nt and hu man hea lth.
Your pr oduct c ontai ns batt eries c overed b y the Euro pean Di recti ve 2006 /66/E C, whi ch cann ot
be di spose w ith nor mal hou sehol d waste. P lease i nform y ourse lf abou t the loc al rule s on
sep arate co llec tion of b atter ies bec ause cor rect d isposa l helps t o preve nt nega tive
con seque nces for t he envi ronme ntal an d human h ealth .
Envi ronme ntal in format ion
All unn ecess ary pack aging has be en o mitte d. We have tri ed to m ake the pack aging eas y to
sep arate in to thre e mater ials: ca rdboa rd (box ),pol ystyre ne foam (buffe r) and pol y ethyl ene
(ba gs, prot ectiv e f oam shee t). Your syst em consi sts of mat erial wh ich can be re cycl ed and
reu sed if di sass emble d by a sp ecia lized c ompan y. Pl ease ob serv e th e lo cal reg ulati ons
reg arding t he disp osal of p acka ging ma teria ls, exha usted b atter ies and o ld equi pment .
Rec ordin g and pla yback of mate rial might req uire conse nt. See Copyr ight Act 1956 and The
Per forme r's Prot ectio n Acts 19 58 to 197 2.
ENGLISH
3
CR6
Tha nk you for y our pur chase o f this cl ock rad io. Plea se read t hese in struc tions c arefu lly and
kee p the man ual for f uture re feren ce.
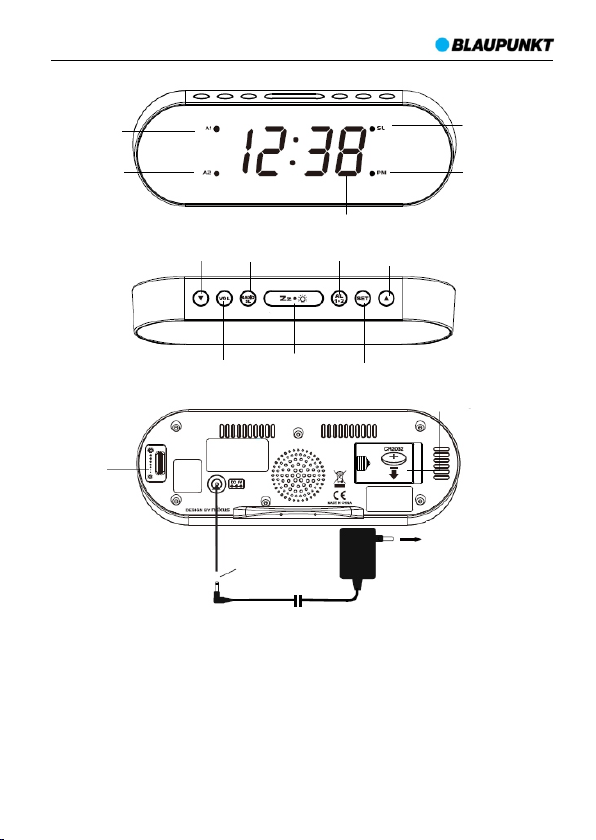
Powe r on cloc k radio
Ins ert th e AC/D C adapt or to any 2 30V AC ho useho ld outl et. Then i nsert t he DC ja ck to the b ack
sid e of your u nit. Your cl ock rad io will b e powere d on and re ady to wor k for you .
Bac k up batte ry ins talla tion
Your cl ock rad io requ ires 1 x CR 2032 li thium b atter y (not i nclud ed) to pro vide ba ckup po wer
to th e clock i n the even t of a temp orar y power in terru ption .
4
CR6
1. Pla ce your u nit fac e down on a fla t surf ace.
2. Sli de and re move th e batter y cover a t the bot tom of yo ur unit .
3. Ins ert on e fresh C R203 2 lithi um batte ry int o the bat tery co mpar tment wi th the “+” side
fac ing up as i ndica ted.
4. Rep lace th e batte ry cove r.
If AC power is i nterr upted , the LE D displ ay will o ff and bot h the rad io and th e alarm w ill not
fun ction . T he back up batt ery wi ll keep t he time a nd all se tting s of your un it. Mak e sure a fr esh
CR 2032 li thium b atter y is used . A fresh C R2032 b atter y coul d backu p your clo ck cont inuou sly
for a round 1 we ek.
Time , calen dar and s nooze s ettin g
1. Pre ss and ho ld SET, t he hour d igits w ill flar e. Press o r to set the h ours. P ress an d
hol d or will a ccele rate you r setti ng.
2. Pre ss SE T again , the min ute dig its wil l flare. Pr ess or to se t the min utes. P ress and
hol d or will a ccele rate you r setti ng.
3. Pre ss SET a gain, t he disp lay wil l show “24H r” and flar e, press o r to sele ct 12H r 24Hr.
In 12 Hr mode , P (PM) L ED wil l appea r on the di splay t o indic ate aft ernoo n time. The re
is no A M indi cator.
4. Pre ss SET a gain, “20 16” digit s will fla re. Pres s or butt on to set t he year.
5. Pre ss SET a gain, m onth di gits wi ll flare . Press or b utton t o set the m onth.
6. Pre ss SET a gain, d ate dig its wil l flare. Pr ess or bu tton to s et the dat e.
7. Pre ss SET a gain, t he disp lay wil l show “05” and fl are. Pre ss or to se lect yo ur snoo ze
tim e from 5 to 60 m inute s.
8. Pre ss SET a gain or i f no key pr essed f or appr ox. 10 sec onds to e xit the s ettin g mode.
Ala rm sett ing
1. Pre ss and ho ld AL 1. 2, the A1 L ED and t he hour d igits w ill flar e. Press o r to set the
Ala rm 1's ho urs. Pre ss and ho ld or wil l accel erate yo ur sett ing.
2. Pre ss AL 1. 2 once aga in, the m inute d igits w ill flar e. Press o r to set th e Alarm 1 's
min utes. Pr ess and h old or wi ll acce lerate y our set ting.
3. Pre ss AL 1. 2 again , the LE D displ ay shows “b u”. Pre ss or to se lect al arm sou rce:
bu = wa ke-to -buz zer
rd = wa ke-to -radi o
4. Pre ss AL 1. 2 again , the “1-7” digi ts will fl are; Pr ess or to se lect a larm wa ke up date
bet ween“ 6-7” or “1-5” or “1-1 ”.
1-5 = w orkin g day (Mo nday ~Fr iday)
6-7 = w eeken d ( Saturd ay and Su nday)
1-7 = Wee kly (M onday to S unday )
1-1 = s ingle -day a larm. A fter th e alarm w ake up, th e A1 LED goes off. Pr ess AL 1 .2 once
to re -acti ve anot her sin gle- day ala rm of Ala rm 1.
5. Foll owing t he abov e steps, p ress A L 1.2 aga in, the A 2 LED a nd the ho ur digit s will fla re.
Pres s or to set t he Alar m 2's hou rs. Then re peat ab ove ste p 2 ~ 4 to set al arm 2.
ENGLISH
5
CR6
6. To stor e your al arm tim e setti ngs, pre ss SE T once (o r if no but ton is pre ssed in a round
10 se conds ), your cl ock rad io will r eturn t o norma l time di splay m ode.
7. Sho rt pres s the AL 1 .2 repe atedl y to acti vate or off a larm 1 , alarm 2 o r both.
8. Whe n the rel ated ala rm is tur ned on, t he A1, A2 o r both L ED wil l on and ap pear on t he
lef t side of t he disp lay.
Not es:
a. A larm fu ncti on only wo rks wh en your cl ock rad io is con necte d with AC /DC a dapto r.
b. When a larm 1 or 2 i s ring u p, the rel ated A1 or A 2 LED w ill flar e. Press t he RAD IO /
SL EEP or A L 1.2 on ce to sto p the ala rm and re set it to co me on the f ollow ing day, a nd
the a larm L ED will r emain l ight on .
c. When al arm is ri ng up, pre ss once , the ala rm will i n silen ce and re -wake u p again
aft er the se t snooz e durati on.(d efaul t snooz e durat ion is 5 mi nutes )
d. If y our seco nd alar m be act ivate d while t he first a larm is r ing up, or i t is in the s nooze
mod e, the se cond ala rm wil l overri de the fir st alar m (the fir st alar m is rese t to come o n
the n ext day ).
e. T he alar m voice du ratio n time is 1 h our in ca se of no fu rthe r opera tion.
Dim mer
Pres s to sele ct the L ED bri ghtne ss (HI GH- / LO W-dim / O FF) o f the LE D displ ay. This ca n
onl y be done w hen the r adio is o ff.
Whe n low-d im brig htnes s is sele cted, t urn the k nob at th e backs ide to ad just yo ur desi red
low -dim br ightn ess. Ro tate th e knob do wnward s to redu ce and upw ards to i ncrea se the Lo dim b right ness.
Not e: the hi gh LED b right ness is n ot adju stabl e.
Rad io oper ation
Bef ore list en to the r adio, pl ease ex tend t he FM wir e anten na full y and var y the dir ectio n, or
try t o put the u nit nex t to the wi ndow fo r best FM r ecept ion. Do n ot stri p, alter o r attac h to
oth er ante nnas.
1. Sho rt pres s RAD IO/S LEE P once to t urn on th e radio, t he disp lay wil l show “ON” ,an d
sta rt the pl ay then . Shor t Press to t urn off th e radio.
2. Sho rt pres s or to man ual tun e the rad io freq uency p er 0.1M Hz. Pr ess and h old or
to au to scan t he avail able st ation .
3. Pres s VOL on ce, the di splay w ill sho w “L 06” (defa ult vol ume), p ress or t o adjus t
out put vol ume from L 00 (sou nd off ) to L15 ( maxim um).
4. Man ual tun e or auto s can you r favori te stat ion; pr ess and h old the S ET unt il “P01” flare
on di splay ; Press o r to selec t your d esired p reset s tatio n numbe r betwe en
P01 ~P10;
Pres s SET o nce aga in to save t he stat ion. The u nit can s ave up to 10 p reset s tatio ns.
5. To pick u p the pre set sta tion fo r listen ing, pl ease sh ort pre ss the S ET.
6. Whe n you save a n ew stat ion on th e same pr eset nu mber, the p revio us pres et stat ion
wil l be over ridde n.
Rem ark: ke ep your ra dio awa y from flu oresce nt lamp s or othe r elec tronic d evice s, whic h may
6

CR6
Sle ep
1. At Ra dio mod e, press a nd hold RADI O/S LEEP t o activ ate the s leep mo de, and t he
sle ep LED w ill lig ht on. Sh ort pre ss the R ADI O/SL EEP re peate dly to ad just th e sleep
tim er betw een 5, 15 , 30, 45, 6 0, 75, 90 o r OFF.
2. Whe n the dis play ch anges b ack to sho w the tim e, pres s and hol d RADI O/S LEEP to
sho w the sle ep remai ned tim e.
3. The r adio wi ll play fo r the pro gramm ed slee p time an d then sh ut off auto matic ally.
4. To turn o ff the rad io befo re the sl eep tim e has ela psed, pr ess onc e.
Troub le shoo ting
If yo ur cloc k radio d ispla ys irrel evant t ime or do es not fu nctio n prope rly, whi ch may be c aused
by el ectro -stat ic disc harge o r other i nterf erenc e, unplu g the DC j ack to di sconn ect the A C
powe r (and re move th e backu p batte ry) and l eave it fo r few min utes be fore pow ering i t up
aga in. The cl ock rad io will b e reset to d efaul t setti ngs and y ou need t o set it ag ain.
Spe cifica tion
Powe r source : DC IN 5 V/300 mA
FM fr equen cy: 87 .5~10 8MHz
Powe r consu mptio n: 1.5W
Sta ndby pow er cons umpti on: <1W
Def ault se tting s:
Tim e format 24 ho ur
Tim e 0:00
Ala rm 1 and 2 6:0 0
Volu me L6 (Leve l 6)
Sno oze dura tion 05 (5 m inute s)
(T he above s pec may u pdate w ithou t prior n otice )
ENGLISH
Competen ce Center Au dio
2N- Everpol Sp.z o. o.
w prz ypad ku pytań lub pro blemó w
pro simy o konkakt z nas zym serw isem.
ln ca se of que stion s or problems
ple ase con tact ou r service .
Tel.0 0 48 22 331 9 9 53
E-m ail: in fo@blaupun kt-au dio.pl
7

CR6
8

CR6
WAŻ NE IN FORMACJE
• Nal eży z achowa ć inst rukcj ę obsłu gi ora z infor macje dot ycząc e bezpi eczeń stwa w c elu
wyk orzy stani a ich w prz yszło ści.
• Ni e należ y dopu szczać do tego, a by na ur ządze nie kap ała lub wylew ała się c iecz. Nie wol no
też u żywać g o w wilgo tnych m iejsc ach, ja k np. łazi enka .
• Nie w olno in stalo wać tego u rząd zenia w na stępu jący ch miej scach:
• Wys tawion ych na be zpośr ednie d ziała nie prom ieni sł onecz nych lu b w pobli żu grze jnikó w.
• Kła ść go na wi erzch u inneg o sprzę tu ster eofoni czneg o któr y wydzi ela cie pło.
• Blo kując w entyl ację lu b w zapyl onym mie jscu.
• W mie jscac h naraż onych na c iągłe d rgani a.
• W mie jscac h o wysok iej wil gotno ści.
• Nie w olno st awiać u rządz enia w po bliżu ś wiec lu b otwar tego og nia.
• Urz ądzen ia możn a używa ć wyłą cznie w s posób o pisany w n iniej szej in struk cji.
• Przed pier wszy m wł ączen iem zasil ania należ y u pewni ć si ę, że zas ilacz zost ał p rawid łowo
pod łączo ny.
Ze wz ględó w bezpi eczeń stwa ni e należ y demo ntowa ć obudó w ani uz yskiw ać dost ępu do
wnę trza ur ządze nia. Urz ądzen ie powi nno być nap rawia ne prze z w ykwa lifikow any per sonel
ser wisu.
Nie woln o roz kręca ć ur ządze nia a ni o twier ać je go o budow y, gdy ż wew nątrz nie ma żadnyc h
czę ści, kt óre mog łyby by ć napra wiane p rzez uż ytko wnika . Kons erwac ją i nap rawą sp rzętu
zaj mują si ę wyłąc znie wy kwal ifikowa ni prac ownic y serw isu.
IN STRUKCJE D OTYCZĄCE BEZ PIECZE ŃST WA
1. Pr zeczy tać ins trukcj e — prze d korzy stani em z urzą dzeni a należ y prze czyta ć całoś ć
ins trukc ji obsł ugi ora z inform acje o be zpiec zeńst wie.
2. Za chować i nstru kcje — na leży z achowa ć instr ukcje u żytk owani a i obsłu gi w celu
wyk orzy stani a ich w prz yszło ści.
3. Pr zestr zegać o strze żeń — nal eży pos tępow ać zgod nie z wsz ystki mi ostr zeżen iami
zam ieszc zonymi n a urząd zeniu o raz zgo dnie z in struk cją obs ługi.
4. Pr zestr zegać i nstruk cji — nal eży po stępow ać zgod nie z ins trukc ją obsł ugi ora z
wsk azówk ami dla u żytk ownik a.
5. Wo da i wilg oć — aby zmni ejszy ć zag rożen ie po żarem lub poraż eniem ele ktryc znym, nie
wol no n araża ć u rządz enia na bez pośre dnie dzia łanie de szczu , wo dy i w ilgoc i, jak np. w
sau nie czy w łazi ence. Ni e u żywa ć n iniej szego ur ządze nia w pobli żu wody, na prz ykła d
obo k wa nny, umyw alki, zl ewu kuche nnego lu b ba lii, w wilg otnej piw nicy lub w pobl iżu
bas enu (lu b w podob nych mie jscac h).
6. Pr zedmi oty i cie cze w urz ądzen iu — nie na leży wc iskać j akic hkolw iek prz edmio tów
przez otw ory urzą dzeni a, ponie waż mogą one zet knąć się z punk tami nie bezpi eczne go
nap ięcia i pod zespo łami, c o może w ywoła ć pożar lub por ażeni e prąde m. Pod ża dnym
poz orem nie n ależy rozl ewać jaki chkol wiek ciecz y na powi erzch ni ur ządze nia. Nie wolno
kła ść na wie rzchu u rząd zenia pr zedmi otów za wiera jącyc h ciecz e.
7. Se rwiso wanie – n ie nale ży prób ować wł asnor ęczne go prze gląda nia urz ądzen ia.
Otwi erani e pokr ywy moż e spowod ować ko ntakt z ni ebezp ieczn ym napię ciem i na razić
uży tkown ika na in ne n iebez piecze ństwa . Ko nser wacją i na prawą sp rzętu z ajmuj ą się
POLISH
9

CR6
wył ączni e wykw alifik owani pr acown icy ser wisu .
8. Częś ci z amien ne — prz y w ymian ie c zęści nale ży sprawd zić, czy prac ownik ser wisu użył
czę ści za mienn ych za lecany ch pr zez pro ducen ta lub też c zy czę ści s ą iden tyczn e jak c zęść
ory ginal na. Dok onywan ie wymi any na nie zatwi erdzon e częśc i g rozi wyb uchem p ożaru,
por ażeni em prąde m elekt rycz nym lub in nymi ni ebezp iecze ństwa mi.
9. N ale ży u mie ści ć r adi obu dzi k n a st abi lne j p owi erz chn i, z d ala o d b ezp ośr edn ieg o
nas łonec znien ia lub źr ódeł ci epła i wi lgoci .
10. N ależy z abezp iecz yć m eble lak iero wane lu b wyk onan e z nat uraln ego dre wna p rzed
ust awien iem na ni ch urzą dzeni a, prze z położe nie obr usa lub m ateri ału och ronne go.
11. Urzą dzeni e moż na cz yści ć wył ączni e mi ękką szma tką z wilż oną w odą z rozt worem mydła .
Ben zyna , rozp uszcz alnik or az in ne śr odki cz yszcz ące mo gą sp owodo wać u szkod zenie
pow ierz chni ur ządz enia . Prz ed c zysz czen iem nal eży si ę up ewni ć, że u rząd zeni e je st
wył ączon e.
12. B ateri a
1) Ba terie n ie mogą b yć naraż one na dz iałan ie nadm ierne go ciep ła, jak n p. promi eni
sło neczn ych, ogn ia itp.
2) Pod czas ut yliza cji bat erii na leży z wróci ć uwagę n a aspek ty ochr ony śro dowisk a.
3) P RZES TRO GA dot ycząc a używ ania ba terii : aby ni e dopuś cić do ro zszcze lnien ia bate rii,
któ re może sp owodo wać obra żenia c iała bą dź uszk odzen ie urzą dzeni a:
- Podc zas wk ładan ia bater ii zwr ócić uw agę na je j polar yzacj ę (+ i -).
- Nal eży wy jąć bate rie z ur ządze nia, gd y nie będ zie ono u żywan e przez d łuższ y czas .
OS TRZEŻ ENIE
Urz ądzen ie nie pow inno by ć używ ane prze z osoby ( w tym dzi eci) o ob niżone j spraw ności
fi zy cz ne j, s en so r yc zn ej l ub u my sł ow ej o ra z o so by z n ie wy st a rc za ją cą w ie dz ą i
doś wiadc zenie m, jeś li ni e zna jdują si ę one po d nadz orem oso by od powied zialn ej za ic h
bez piecz eństw o i nie zost ały poi nstru owane j ak bezp ieczn ie uży wać urz ądzen ia.
Obe cnoś ć osó b do rosły ch j est wy magan a, j eśli ur ządz enie ob sługu ją d ziec i; po zwol i to
zap ewnić b ezpie czne ko rzyst anie z ur ządz enia.
1. Nie nale ży d opusz czać do t ego, aby n a ur ządze nie kapał a lu b wy lewał a się cie cz, a ni n ie
nal eży sta wiać na n im prze dmiot ów wype łnion ych cie czami , takic h jak waz ony.
2. Aby un iknąć pożar u lub po rażen ia prą dem ele ktry cznym, należ y chro nić ur ządze nie pr zed
gor ącymi m iejsc ami, dz iałan iem des zczu, w ilgoc i i pyłu.
3. Nie wolno ustaw iać ur ządze nia w pobli żu jak ichko lwiek źróde ł wody, np. kr anów, w anien ,
pra lek lu b ba senó w pł ywac kic h. U rząd zeni e na leży us tawić na ró wnym i s tabi lnym
pod łożu.
4. Ni e wolno n araża ć urząd zenia n a silne p ole mag netyc zne.
5. Ni e wolno s tawia ć urząd zenia b ezpoś rednio n a wzmac niacz u lub amp litun erze.
6. N ie wo lno s tawia ć urz ądzen ia w wilgo tnym miejs cu, gd yż wi lgoć ma sz kodli wy w pływ na
pod zespo ły elek trycz ne.
7. Po wni esien iu urz ądzen ia z zi mnego d o ciep łego m iejsc a lub do wilgo tnego miejs ca może
doj ść d o ko nden sacji w ilgo ci n a soc zewc e wew nątr z od twar zacza . W tak iej sy tuac ji
urz ądzen ie nie b ędzie d ziała ć prawi dłowo. N ależ y pozos tawić w łączo ne urzą dzeni e na
oko ło jedn ą godzi nę, aby um ożliw ić odpa rowan ie wilg oci.
8. Nie wolno czyś cić urząd zenia rozp uszcz alnik ami chemi cznymi , gd yż mo gą o ne zn iszcz yć
lak ier obu dowy. Ur ządze nie wy ciera si ę czys tą, suc hą lub ni eznac znie zw ilżon ą ścier eczką .
10
CR6
UWAGA
Nin iejsz e urząd zenie s pełni a wymag ania dy rekty w europ ejsk ich dot ycząc ych zak łóceń
rad iowyc h.
Prod ukt zos tał wyp roduk owany z w ysoki ej jako ści mat eriał ów i podz espoł ów, które m ożna
pod dać rec yklin gowi i po nowni e użyć.
Jeś li na urz ądzen iu znaj duje si ę znak pr zekre ślone go kosz a na śmie ci, ozn acza to, ż e produ kt
jes t objęt y posta nowie niami d yrekt ywy eur opejs kiej 2 002/9 6/WE. N ależ y zapoz nać się z
wym agani ami dot ycząc ymi lo kalne go syst emu zbi órki od padów e lektr yczny ch i
ele ktron icznyc h. Nale ży pos tępowa ć zgodn ie z lok alnymi p rzepi sami. N ie woln o wyrz ucać
teg o produk tu raze m ze zwy kłymi o dpada mi domo wymi. P rawid łowe usu nięci e stare go
pro duktu z apobi egnie po tencj alnym n egaty wnym sk utkom d la środ owisk a natur alneg o i
zdro wia lud zkie go.
Urz ądzen ie jest w yposa żone w ba terie o bjęte d yrekt ywą eur opejs ką 2006 /66/W E. Bat erii ni e
wol no wyrz ucać ra zem z odp adami g ospod arstw a domow ego. Nal eży zap oznać s ię z
lok alnym i przep isami d otycz ącymi o ddzie lnej zb iórk i bater ii, pon ieważ p rawidł owa uty lizac ja
zap obieg nie pot encja lnym neg atyw nym skut kom dla ś rodow iska na tural nego i zd rowia
lud zkieg o.
Inf ormac je o ochro nie śro dowis ka natu ralne go
Opa kowan ie zawi era tyl ko niez będne eleme nty. Doł ożono w szelk ich st arań, a by trz y mater iały
skł adowe opa kowan ia był y łat we do o ddzie lenia : kar ton ( pudeł ko), p ianka po listy renow a
( za be zp ie cz en i a w ew ną t rz ) i p ol ie t yl en ( to re bk i, a rk us z o ch ro nn y) . U rz ąd z en ie
wyp roduk owano z mat eriał ów, któr e można pod dać rec ykli ngowi i uż yć pono wnie po ich
de mon taż u p rz ez wy spe cja li zow aną fi rmę . N ale ży p rze st rze gać l ok aln ych p rze pis ów
do tycz ącyc h u tyli zacj i m ater iałó w o pako wani owyc h, zu żyt ych ba teri i i ni epo trze bnyc h
urz ądzeń .
Nag rywa nie i odt warz anie m ateri ałów mo że w ymaga ć uz ysk ania zg ody. Pat rz u stawa o
pra wach aut orsk ich i praw ach wy konawc ów/ar tystó w.
POLISH
11
CR6
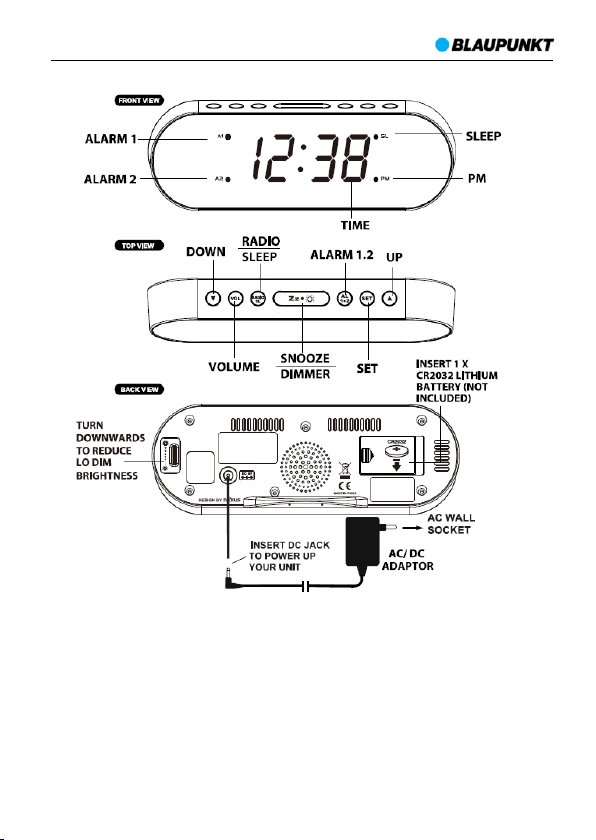
Wido k z przod u
Ala rm 1
Ala rm 2
Wido k z góry
Wido k z tyłu
Prz esuwaj w d ół,
aby z mniej szyć
nis ki pozi om jasn ości
Dzi ękuje my za zak upien ie radi obudz ika. Pr zed rozp oczęc iem kor zyst ania z ur ządze nia nal eży
uwa żnie pr zeczy tać tę in struk cję obs ługi i za chowa ć ją do uży tku w pr zyszł ości.
Włą czani e radiob udzik a
Podł ącz prz ewód si eciow y zasil acza do d omowe go gnia zdka si eciowe go 230 V (p rądu
prz emien nego) . Nastę pnie po dłącz w tyczk ę zasil acza do gn iazda z t yłu rad iobud zika . Po
pod łącze niu zas ilani a radio budzi k jest go towy do p racy.
Prz ycisk
W dół
RA DIO/ SLE EP
Gło śność V OL
Prz ycisk
Drz emka/ jasno ść
Podł ącz wty czkę
zas ilacz a, aby
zas ilić ur ządze nie
Cza s
Ala rm 1–2
W gór ę
Prz ycisk S ET
Zas ilacz s iecio wy
Drz emka
Wsk aźnik P M
Włó ż 1 x bateri ę litow ą
CR 2032 (n ie jest d ołą
czo na do zes tawu))
Gni azdo za silan ia
sie cioweg o
12

CR6
Zak ładan ie bate rii pod trzym ania pa mięci
Do po dtrz ymani a pamię ci radi obudz ika na wy padek k rótko trwa łego za niku za silan ia uży wa się
jed nej (1) b ateri i CR20 32 (nie wc hodzi w s kład z estawu ).
1. Poł óż urzą dzenie n a płask iej po wierz chni pr zedni ą częśc ią w dół.
2. Ods uń i zdej mij pok rywę b ateri i w dolne j częśc i urząd zenia .
3. Włó ż nową ba terię l itową C R2032 s tyki em „+ ” sk ierow anym do g óry (pa trz ry sunek ).
4. Zał óż pono wnie po kryw ę bater ii.
Po zan iku zas ilani a sieci owego z gaśni e wyświ etlac z LED i ni e będą dz iałać r adio i al army.
Bat eria za pewni a podtr zyman ie pami ęci dat y i godz iny w urzą dzeni u. Nale ży się u pewni ć, że
zos tała uż yta now a bater ia. Now a bateri a CR20 32 umoż liwia p odtrz yman ie pami ęci urz ądzen ia
prz ez ok. 1 ty dzień .
Usta wieni e czasu , daty i dr zemki
1. Nac iśnij i p rzyt rzyma j przy cisk S ET; zac zną mig ać cyf ry godz in. Nac iśnij p rzyc isk lub
aby u stawi ć godzin y. Naciś nij i prz ytrz ymaj p rzyci sk lub , ab y zwię kszyć
szy bkość u stawi enia.
2. Nac iśnij p onown ie prz ycisk S ET; za czną mi gać cyf ry min ut. Nac iśnij p rzyci sk lub ,
aby u stawi ć minut y. Naciś nij i prz ytrz ymaj pr zyci sk lub , ab y zwięk szyć s zybko ść
ust awien ia.
3. Nac iśnij p onown ie prz ycisk S ET; na w yświe tlacz u zaczn ie miga ć wskaz anie „24H r”.
Nac iśnij p rzyci sk lub , ab y wybra ć ustaw ienie 1 2Hr 24H r. W trybi e 12Hr di oda
LE D P (PM) p ojawi s ię na wyś wietl aczu w ce lu wska zania c zasu po połud niowe go. Nie
ma ws kaźni ka AM (c zasu do p ołudn ia).
4. Nac iśnij p onown ie prz ycisk S ET, zac zną mig ać cyfr y roku „201 6”. N aciśn ij przy cisk
lub , a by usta wić rok .
5. Nac iśnij p onown ie prz ycisk S ET; za czną mi gać cyf ry mie siąca . Naciś nij prz ycisk l ub
aby u stawi ć miesi ąc.
6. Nac iśnij p onown ie prz ycisk S ET; za czną mi gać cyf ry dat y. Naciś nij prz ycisk l ub ,
aby u stawi ć datę.
7. Nac iśnij p onown ie prz ycisk S ET; na w yświe tlacz u zaczn ie miga ć wskaz anie „05”.
Nac iśnij p rzyci sk lub , ab y wybra ć czas dr zemk i z zakre su od 5 do 60 m inut.
8. Nac iśnij p onown ie prz ycisk S ET, aby z amkną ć tryb u stawi eń. Ten tryb z ostan ie
zam knięt y autom atycz nie po up łynię ciu oko ło 10 sek und od os tatni ego nac iśnię cia
prz ycisk u.
Usta wieni e alarm u
1. Nac iśnij i p rzyt rzyma j przy cisk A L 1.2; na w yświe tlacz u zaczn ie miga ć dioda L ED A1 i
cyf ry god zin. Na ciśni j przyc isk lub , a by usta wić god zinę al armu 1. N aciśn ij i
prz ytrz ymaj pr zyci sk lub , ab y zwięk szyć s zybko ść usta wieni a.
2. Na ciśni j ponow nie prz ycisk A L 1.2; z aczną m igać c yfry mi nut. Na ciśni j przy cisk
lub , a by ustaw ić minu ty ala rmu 1. Na ciśni j i przy trzym aj prz ycisk l ub ,
aby z więks zyć sz ybkoś ć ustaw ienia .
3. Nac iśnij p onown ie prz ycisk A L 1.2; na w yświ etlac zu zacz nie mig ać wska zanie „bu”.
Nac iśnij p rzyci sk lub , ab y wybra ć źródł o dźwi ęku bud zenia :
bu = bu dzeni e brzęc zyki em
rd= b udzeni e radie m
POLISH
13

CR6
4. Nac iśnij p onown ie przy cisk A L 1.2; za czną mi gać cy fry „1-7”. Naci śnij pr zycis k lub ,
aby w ybrać d zień bu dzeni a: „6 -7”, „1- 5” l ub „ 1-1”.
1-5 = d ni robo cze (pon iedzi ałek — pi ątek)
6-7 = w eeken d (sobo ta i nied ziela )
1-7 = c ały tyd zień (o d ponie dział ku do nie dziel i)
1-1 = a larm je dnodn iowy. Po w ystąp ieniu c zasu al armu di oda LE D A1 wyłą czy si ę.
Nac iśnij j eden ra z przyc isk AL 1 .2, aby p onown ie włąc zyć jed nodni owy ala rm 1.
5. Wyk onują c powyż sze czy nnośc i, naci śnij po nowni e przy cisk AL 1.2; na w yświe tlacz u
zac znie mi gać dio da LED A 1 i cyfr y godzi n. Naci śnij pr zyci sk lub , ab y ustawi ć
god zinę al armu 2. Wy konuj ąc pono wnie cz ynnoś ci 2–4, u staw al arm 2.
3. Aby z achowa ć ustaw ienia c zasu al armu, n aciśn ij jede n raz prz ycisk SET (l ub bez
nac iśnię cia żad nego pr zycis ku prz ez okoł o 10 seku nd); rad iobud zik pow róci do
wyś wietl ania cz asu.
4. Nac iskaj k olejn o przy cisk A L 1.2, ab y włącz yć alar m 1, alar m 2 lub oba a larmy.
5. Po włą czeni u daneg o alarm u z lewej s trony w yświe tlacz a pojawi s ię wsk azani e LED
A1, A 2 lub oba .
Uwag i:
a. Fun kcja al armu dz iała ty lko pr zy zasi laniu z z asila cza sie ciowe go.
b.Gd y zosta nie odt worzo ny alar m 1 lub 2, za cznie m igać di oda LE D A1 lub A2 . Naciś nij
jed en raz pr zycis k RAD IO/S LEE P lub AL 1 .2, aby w yłącz yć alar m i prze sunąć g o na
nas tępny dz ień; di oda LE D alar mu pozo stani e włączo na.
c. Jedno krotn e naciś nięci e przy cisku p owoduj e wycis zenie o dtwar zane go alar mu
i pow tórne j ego uru chomi enie po u płyni ęciu cz asu trw ania dr zemk i (domyś lny cza s
trw ania dr zemk i to 5 minu t).
d. Je śli dru gi alar m zostan ie odt worzon y w trakc ie odtw arzan ia pier wsze go alar mu lub
gdy t rwa jeg o czas dr zemk i, drug i alarm m a wyższ y prio rytet n iż pier wszy ( pier wszy
ala rm jest z erowan y i przes uwany n a następ ny dzie ń).
e. Po n adejś ciu cza su alar mu dźw ięk będ zie odt warza ny prze z 1 godzi nę i wyłą czy si ę
aut omaty cznie, g dy nie zo stani e naciś nięty ż aden pr zyci sk.
Prz yciem niani e
Nac iśnij p rzyci sk , aby w ybrać ja sność w yświ etlac za LED ( wysok a/nis ka/w yłącz ona
HI GH/LO W/O FF). M ożna to zr obić ty lko wte dy, gdy ra dio jes t wyłąc zone.
Po wy braniu n iski ej jasn ości ob róć pok rętło z t yłu urz ądzen ia, aby d ostos ować nis ki poz iom
jas ności . Obrac aj go w dół, a by zmni ejsz yć nisk i pozio m jasno ści lub w g órę, aby g o zwię kszyć .
Uwag a: nie m ożna reg ulowa ć wysok iego po ziomu j asnoś ci wyśw ietla cza LE D.
Obs ługa ra dia
Prz ed przy stąpi eniem d o słuch ania ra dia nal eży ca łkowic ie rozc iągną ć antenę FM i
dos tosowa ć położ enie ur ządze nia, ab y zapew nić dob ry odb iór sta cji radi owych ( np. ust awić
rad io obok o kna). N ie woln o skrac ać, mod yfikow ać lub do łącza ć innych a nten.
14

CR6
1. Nac iska j krótk o przyc isk RA DIO /SLE EP, aby włą czyć ra dio; na w yświe tlacz u pojaw i się
wsk azani e „O N” i włącz y się sta cja rad iowa. N aciśn ij krót ko przy cisk , ab y
wył ączyć r adio.
2. Nac iśnij k rótko p rzyc isk / , aby rę cznie d ostro ić się do s tacji z k roki em 0,1 Mh z.
Nac iśnij i p rzyt rzyma j przy cisk / , ab y dostr oić się d o kolej nej, dos tępne j
sta cji rad iowej.
3. Nac iśnij j eden pr zyci sk VOL; n a wyświ etlac zu poja wi się ws kazan ie „ L06” (dom yślny
poz iom gło śnośc i); nac iśnij p rzyci sk / , aby do stoso wać pozi om głoś ności
od L0 0 (dźwi ęk wył ączony ) do L15 (m aksym alny) .
4. Ust aw ulub ioną st ację ra diową (r ęczni e lub prz ez auto matyc zne ska nowan ie).N aciśn iji
prz ytrz ymaj pr zyci sk SET, n a wyświ etlac zu zacz nie mig ać wsk azani e „P0 1”. N aciśn ij
prz ycisk l ub , aby wy brać żą dany nu mer sta cji do za pamię tania o d P01 do
P10 . Naciś nij pon ownie p rzyci sk SE T, aby zapi sać sta cję. Ur ządze nie umo żliwi a
zap isani e maksy malni e 10 stac ji.
5. Aby o dtwor zyć zap rogra mowan ą stacj ę, naciś nij kr ótko pr zycis k SET.
6. Pod czas za pisyw ania st acji po d numer em, w któr ym zap isano j uż stac ję, sta ra stac ja
zos tanie u sunię ta i zapi sana no wa.
Uwag a: nie n ależy z bliża ć radia d o lamp flu oresc encyj nych lub i nnych u rządz eń
ele ktron icznyc h, poni eważ mo gą zakł ócać od biór st acji ra diowy ch.
Drz emka
1. W tr ybie R ADIA n aciśn ij i prz ytrz ymaj pr zycis k RAD IO/S LEE P, ab y włącz yć try b
drz emki; w łącz y się dio da LED d rzemk i. Nac iskaj k olejn o przy cisk RA DIO /SLE EP, aby
ust awić ti mer drz emki na 5 , 15, 30, 4 5, 60, 75 , 90 minu t lub OF F (wył ączon a).
2. Gdy n a wyświ etlac zu poja wi się z po wrote m czas, na ciśni j raz pr zycis k RAD IO/S LEEP,
aby w yświe tlić po został y czas dr zemk i.
3. Sta cja rad iowa bę dzie od twarz ana prz ez zapr ogram owany cz as drze mki, a na stępn ie
urz ądzen ie wyłą czy si ę autom atyczn ie.
4. Ab y wyłąc zyć rad io prze d upłyn ięcie m czasu d rzemk i, nac iśnij j eden raz p rzyc isk
.
Roz wiązy wanie p roble mów
Gdy r adiob udzik w yświe tla nie prawi dłowy c zas lub n ie dzia ła popr awnie, c o może być
spo wodowa ne wyła dowan iami el ektro staty cznym i lub inny mi zak łóceni ami, na leży o dłącz yć
wty czkę za silac za z urzą dzeni a i wyjąć b ateri ę podtr zyma nia pam ięci. N astęp nie pozo stawi ć
rad iobud zik w tym s tanie n a kilk a minut p rzed po nownym p odłąc zenie m zasil ania. Z ostan ą
prz ywró cone fa brycz ne usta wieni a radio budzi ka, a god zinę i in ne usta wieni a trzeb a będzi e
ust awić od n owa.
Dan e techn iczne
Źró dło zas ilani a: 5 V/30 0 mA (prą du stał ego)
Czę stotl iwość F M: 87, 5~108 M Hz
Zuż ycie en ergii : 1,5 W
Pobó r mocy w t rybie c zuwan ia: <1 W
POLISH
15

CR6
Usta wieni a stand ardowe :
Form at czas u 24 go dziny
Cza s 0 :00
Ala rm 1 i 2 6:00
Gło śność L6 (po ziom 6)
Cza s trwan ia drze mki 05 ( 5 minut )
(Ws zyst kie dan e mogą ul ec zmia nie bez p owiad omien ia)
Competen ce Center Au dio
2N- Everpol Sp.z o. o.
w prz ypad ku pytań lub pro blemó w
pro simy o konkakt z nas zym serw isem.
ln ca se of que stion s or problems
ple ase con tact ou r service .
Tel.0 0 48 22 331 9 9 53
E-m ail: in fo@blaupun kt-au dio.pl
16

CR6
Informacja dla użytkowników o sposobie postępowania ze zużytym
sprzętem elektrycznym I elektronicznym.
Symbol przekreślonego kołowego kontenera na odpady umieszczony na
produktach informuje, że zużytego sprzętu elektrycznego i elektronicznego
nie można wyrzucać wraz z odpadami komunalnymi. Wyrzucając
elektrośmieci do kontenera stwarzasz zagrożenie dla środowiska. Segregując i
przekazując do przetworzenia, odzysku, recyklingu oraz utylizacji zużyte
urządzenia elektryczne i elektroniczne chronisz środowisko przed
zanieczyszczeniem i skażeniem, przyczyniasz się do zmniejszenia stopnia
wykorzystania zasobów naturalnych oraz obniżenia kosztów produkcji
nowych urządzeń.
Szczegółowe informacje o najbliższym punkcie zbiórki można uzyskać
bezpośrednio od sprzedawcy lub w firmie Blaupunkt Competence Centre, 2NEverpol Sp. z o.o., ul. Puławska 403A, 02-801 Warszawa, tel. +48 22 331 9959,
email: info@blaupunkt-audio.pl
17

CR6
18

CR6
DŮ LEŽIT É POZ NÁMKY
• Tyto b ezpeč nostn í a provoz ní inst rukce b y měly být z achov ány pro b udouc í použi tí.
• Pří stroj ne smí být v ystav en kapa jící ne bo stří kají cí vodě n ebo umí stěn do vl hkého
pro středí , např. ko upeln a.
• Neu misťu jte výr obek v ná sledu jícíc h oblas tech:
• mís ta vyst avená p římém u slune čnímu z áření ne bo v blíz kosti t opnýc h těles.
• na ji né stere o zaří zení, kt eré vyd ává pří liš mno ho tepl a.
• na míst ech, kde by by lo z amezen o oc hlazo vání příst roje pomo cí je ho ve ntilá toru nebo v
pra šném pr ostřed í.
• na mí stech , která ko nstan tně vib rují.
• na vl hkých a m okrý ch prost orách .
• Neu misťu jte pří stroj b lízko sti zap álenýc h svíče k nebo ji ných zdr ojů ote vřenéh o ohně.
• Výr obek po užívej te pouz e podle p okynů v t éto pří ručce.
• Před p rvní m zapnu tím pří stroj e se ujis těte, že j e napáj ecí kab el sprá vně při pojen .
Z bez pečno stníc h d ůvodů n eodst raňuj te žádné k ryty a ni se nepo kouše jte zís kat pří stup k
vni třku vý robku. N epoko ušejt e se ods trani t šro ubky, ne bo ot evírat k ryt jed notky. S ervi s
pro duktu a ve škeré o pravy v ždy svě řte aut orizo vaném u se rvis u a jeh o kv alifik ované mu
per sonál u.
BE ZPEČN OSTNÍ POKYNY
1. Čt ěte pok yny – před u veden ím přís troje d o provoz u si přeč těte veš keré be zpečn ostní a
prov ozní po kyny a ná vod k obs luze.
2. Uc hovejt e návod k ob sluze – t ento ná vod k obsl uze usc hovej te pro bud oucí po užití .
3. Db ejte va rování – v šechn a varová ní na pro duktu a v n ávodu k o bsluze j e třeba d održo vat.
4. Pos tupuj te podl e pokyn ů – poky ny pro pro voz a bezp ečnos tní pok yny je tř eba
dod ržova t.
5. Vo da a vlh kost – pr o sníže ní riz ika po žáru ne bo úraz u elek trick ým prou dem, n evyst avujt e
výr obek ka pajíc í, st říkaj ící n ebo t ekouc í vod ě a n adměr né vl hkost i, na př. v sa uně č i
kou pelně . Nepou žívej te tento v ýrob ek v blíz kosti v ody, nap říkl ad u vany, u myvad la, dře zu,
kád ě, ve vlh kém skl epě, v bl ízkos ti bazé nu apod.
6. Vnik nutí př edmět ů a tekut in – nikd y nevk ládej te jakék oli ciz í předm ěty do ot vorů
vý robku, mohly by se do tkno ut mís t pod v ysoký m napě tím neb o by mo hly zp ůsobi t zkra t,
což m ůže vé st k po žáru ne bo úra zu ele ktric kým pr oudem . Nikd y neli jte ja kouko li tek utinu
jak éhoko liv druhu na výr obek ani do výr obku. Neu misťu jte jakýk oli před mět obsah ující
tek utinu n a povrch v ýrobk u (nap ř. váza, sk leni čka s vod ou apod .).
7. Se rvis – ne pokou šejte s e o serv is nebo o o pravu to hoto př ístro je svép omocí , otevře ní
neb o ods traně ní kr ytů příst roje v ás mů že vy stavit nebe zpečí úraz u elek tric kým p roudem
neb o ji nému ne bezpe čí. Ve škeré o pravy p říst roje svě řte kv alifik ované mu s ervi snímu
per sonál u autor izovan ého ser visu .
8. Náhra dní díly – po kud j sou potře ba ná hradn í díl y, uj istěte se, že s ervi sní t echni k po užil
ná hrad ní d íly, k teré j sou sp ecifi kova né vý robc em n ebo m ají st ejné v last nos ti j ako
ori ginál ní díly. N eoprá vněná v ýměn a může vé st k požá ru, úra zu elek tric kým pro udem
neb o způso bit jin é nebez pečí.
9. Um ístět e radiob udík na p evný po vrch, m imo dop ad přím ého slu neční ho zářen í a v
CZECH
19

CR6
dos tateč né vzdál enost i od zdro jů nadm ěrnéh o tepla n ebo vlh kosti .
10. Chra ňte svůj nábyt ek, pokud chce te p řístr oj um ístit na příro dní dřevo nebo na lakov aný
pov rch, dej te mezi p řístr oj a náby tek had řík, ne bo jiný o chran ný mater iál.
11. Příst roj či stěte pomoc í měk kého h adřík u namo čenéh o do r oztoku vody a jemn ého mý dla.
Sil nější č inidl a, jak o je ben zen, ře didla n ebo po dobné m ohou z působ it pošk ození p ovrch u
pří stroj e. Ujist ěte se, ž e příst roj je pře d čiště ním vyp nut a odp ojen.
12. B aterie
1. Bate rie nesm í být vyst aveny na dměrn ému tepl u, jako nap říkl ad působ ení pří mého
slu neční ho svět la, ohn ě a podob ně.
2. Pou žívan é bater ie by měl y být vho dné pro ek ologi ckou li kvid aci bate rií.
3. UPO ZORN ĚNÍ pro použí vání bater ií – pro za mezen í úni ku el ektro lytu z bat erie, kter ý
můž e způso bit por anění , poškoz ení maj etku ne bo přís troje :
- Všec hny bat erie na insta lujte s právně , š a - jak je vy znače no na pří stroj i.
- Nek ombin ujte ba terie ( staré a no vé nebo u hlíko vé a alka lické a pod.)
- Poku d ne budet e př ístro j del ší d obu požív at, v yjmě te ba terie ven (mů že do jít k
jej ich vyt ečení a t ím k pošk ození p řístro je).
VAR OVÁNÍ
Tento sp otřeb ič nen í urče n pro pou žíván í oso bami ( včetn ě dět í) se sní ženým i fyzi ckými ,
smy slov ými n ebo du ševn ími sc hop nost mi, ne bo o sob ami be z pa třič ných z kuše nos tí a
zna lostí , poku d jim ne byl po skytn ut doh led ne bo inst rukce týk ajíc í se pou žití s potře biče
oso bou zo dpověd nou za jejic h bez pečno st. Dě ti by m ěly být pod d ozorem , aby s e zaji stilo, že
si se s potře bičem ne budou h rát.Č
1. Pří stroj n esmí b ýt vys taven tek oucí, kap ající ne bo stř íkají cí vod ě. Před měty n aplně né
kap alina mi, jak o jsou na př. vázy, n esmí bý t umíst ěny na př ístro ji.
2. A by nedo šlo k p ožáru n ebo úra zu ele ktric kým pr oudem , neumi sťujt e toto z aříze ní na
hor kých mí stech , nevys tavuj te ho deš ti, vlh kosti n ebo pra chu.
3. Neu misťu jte te nto př ístro j v bl ízkos ti jak ýchko liv zd rojů v ody, na př. ko houty, vany, p račky
neb o bazény. U jistě te se, že j e příst roj umí stěn na su chém, s tabil ním pov rchu.
4. Ne umisť ujte te nto přís troj v bl ízkos ti siln ého mag netic kého po le.
5. Ne poklá dejte p řístr oj na zes ilova če nebo př ijíma če.
6. Ne umisť ujte te nto přís troj na v lhkém p rostř edí, vl hkost b ude mít v liv na ži votnos t
ele ktric kých ko mpone nt.
7. Poku d syst ém be zprost ředně přemí stíte z chla dného do te plého prost ředí, nebo p okud je
umí stěn ve velm i vl hké míst nosti , mů že dojít ke kon denza ci vlhko sti uvnit ř p řehráv ače.
Poku d k tomu d ojde, s ystém můž e být poš kozen a neb ude fun govat s právn ě. Prosí m,
nec hte syst ém zapn utý př ibliž ně po dob u jedné h odiny, do kud se vl hkost n eodpa ří.
8. Neč istěte jedno tku c hemic kými r ozpou štědl y, ta mo hou po škodi t povr ch zař ízení . Přís troj
otř ete čist ým, su chým neb o lehce n avlhč eným ha dříke m.
20

CR6
PO ZNÁMK A
Tento v ýrobe k je ve sho dě s poža davky E vropsk ého spo lečen ství n a rádiov é rušen í.
Naš e p rodukt y j sou navr ženy a vyrob eny z v ysoce kv alitn ích mate riálů a komp onent , k teré
jso u recyk lovat elné a zn ovu pou žitel né.
Je -li na vý robku u veden t ento sym bol pře škrt nutéh o konte jneru , zname ná to, že vý robek
pod léhá s měrni ci E U 2002 /96/ ES. I nform ujte s e pro sím o mís tní sy stém sbě ru tř íděnéh o
odp adu pro elekt rické a elek troni cké vý robky. Prosím řiďte se mís tními pravid ly a ne likvi dujte
sta ré produk ty spolu s běž ným komu nální m o dpade m. Správn ou likvi dací sta rého výr obku
pom ůžete p ředejí t možný m negat ivním d opadů m na život ní pros tředí a l idské z draví.
Výr obek o bsahu je bat erie pod léhaj ící sm ěrnic i EU 200 6/66/ EC, k teré n elze vyh azova t do
běž ného do movní ho odpa du. Inf ormuj te se pro sím o mís tních p ravid lech o sb ěru bat erií,
neb oť sprá vnou li kvid ací pom ůžete p ředch ázet ne gativ ním dů sledk ům pro ži votní p rostř edí a
lid ské zdr aví.
Inf ormace t ýkaj ící se ži votníh o prost ředí
Výr obek j e zaba len p ouze v nezby tném obalu pro j eho oc hranu . Snah ou na ší firm y je, a by by l
ob alo vý ma ter iál s nad no ro zděl ite lný n a t ři ma ter iál y: le pen ku (k ra bice ), po lys tyr én
(oc hrann é bale ní) a p olyet hylen (sáčk y, ochr anné f ólie z lehče ného p lastu ). Výro bek se sklá dá
z ma teriá lů, kt eré lz e rec yklov at a z novu p oužít v p řípad ě dem ontáže od borno u firmo u.
Dod ržujt e pros ím mís tní př edpis y týk ající se lik vidac e obal ových mater iálů, vybit ých ba terií a
sta rého za řízen í.
Na na hrává ní a pře hráván í mater iálů m ůže být vyžad ován so uhlas . Viz Zák on o Copy right u Act
195 6 a Zákon n a ochra nu uměl ců Sk 195 8-197 2.
21
CZECH

CR6
Pohl ed zepř edu
Bud ík 1
Bud ík 2
Pohl ed shor a
Pohl ed zeza du
Otá čením
dol ů sníží te
jas d isple je
Děk ujeme v ám za zak oupen í tohot o radio budík u. Pečli vě si přeč těte t yto pok yny a usch ovejt e
si př íručk u k budou címu po užití .
Zap nutí ra diobu díku
Zap ojte na pájec í adapt ér do jak ékoli s íťové zá suvky s n apětí m 230 V AC. Po té přip ojte
kon ektor s íťovéh o adapt éru do zd ířky D C na zadn í stran ě příst roje. R adiob udík se z apne a je
při praven k p rovoz u.
Vlož ení zál ožní ba terie
Rad iobud ík vyža duje je dnu lit hiovo u bater ii CR2 032 (ne ní souč ástí do dávky ), kter á zajis tí
zál ožní na pájen í v přípa dě doča sného v ýpadk u napáj ení ze sí tě. zál ožní nap ájení v p řípad ě
doč asnéh o výpad ku napá jení ze s ítě.
Dol ů
Rád io/re žim spá nku
Odl ožení b uzení/ stmív ač
Hla sitos t
Zap ojte
kon ektor
nap ájecí ho
ada ptéru
Čas
Bud ík 1-2
Nah oru
Nas tavit
Nap ájecí a dapté r
Rež im spán ku
Ind ikáto r odpol edníh o
čas u
Vlo žte 1 lith iovou b ateri i
CR 2032
(ne ní souč ástí do dávky )
Síť ová zásu vka
22

CR6
1. Polo žte pří stroj n a rovnou p lochu .
2. Vys uňte a sej měte k ryt bat eriov ého pros toru na s podní s traně p řístr oje.
3. Vlo žte do bat eriov ého pro storu no vou lit hiovo u bater ii CR20 32 tak , aby se pó l „+“
nac házel n ahoře, j ak je zná zorně no.
4. Nas aďte zp ět kry t bater iového p rosto ru.
Při p řeruše ní síťo vého na pájen í displ ej LED z hasne a r ádio a bu dík neb udou fu nkční . Zálož ní
bat erie ud ržují č as a všec hna nas tavení p řístr oje. Pou žijte n ovou li thiovo u bater ii CR2 032.
Nov á lithi ová bate rie CR 2032 vy stačí n a zálož ní napá jení př ístro je nepř etrži tě po dob u
při bližn ě 1 týdne .
Nas tavení č asu, ka lendá ře a odlo žení bu zení
1. Sti sknět e a přidr žte tla čítko S ET (N ASTAV IT) . Začno u blik at čísli ce hodi ny. Stis knutí m
tla čítka n ebo nas tavte h odinu . Stisk nutím a p řidrž ením tl ačítk a nebo
lze h odnot ami proc házet z rych leně.
2. Sti sknět e znovu t lačít ko SET. Z ačnou b lika t čísli ce hodno ty min ut. Stis knut ím tlač ítka
neb o nasta vte min uty. Sti sknut ím a přid ržení m tlačí tka ne bo lze
hod notam i proch ázet zr ychle ně.
3. Sti sknět e znovu t lačít ko SET ; na disp leji za čne bli kat „24Hr “. S tiskem t lačít ka
neb o vyber te možn ost 12H r 24Hr. Ve 12 hodin ovém for mátu zo braze ní času s e
na di splej i zobra zí indi kátor P ( PM), kt erý oz načuj e odpol ední ča s. Indi kátor
dop oledn ího čas u AM se ne použí vá.
4. Sti sknět e znovu t lačít ko SET. Z ačnou b lika t čísli ce „2 016“. Stis knutí m tlačí tka
neb o nasta vte rok .
5. Sti sknět e znovu t lačít ko SET. Z ačnou b lika t čísli ce měsíc e. Stis knutí m tlačí tka
neb o nasta vte měs íc.
6. Sti sknět e znovu t lačít ko SET. Z ačnou b lika t čísli ce dne. St isknu tím tla čítk a nebo
nas tavte d en.
7. Opě tovným s tisk nutím t lačít ka SE T se na dis pleji z obraz í a začne b likat „05“. Sti sknu tím
tla čítka n ebo nas tavte č as odlo žení bu díku v roz mezí 5 až 6 0 minut .
8. Rež im nast avení u končí te opěto vným st isknu tím tla čítk a SET, ne bo se rež im ukon čí asi
po 10 s ekund ách neč innos ti auto matic ky.
Nas tavení b udíku
1. Sti sknět e a přidr žte tla čítko A L 1.2. Z ačne bl ikat di oda AL 1 .2 a na dis pleji b lika jí čísl ice
hod in. Sti skem tl ačítk a nebo na stavt e hodin u budík u 1. Stis knutí m a
při držen ím tlač ítka ne bo lze ho dnota mi proc házet z rychl eně.
2. Sti sknět e znovu t lačít ko AL 1. 2. Začn e blika t a čísli ce hodn oty min ut. Sti sknut ím
tla čítka n ebo nas tavte m inuty b udíku 1 . Stisk nutí m a přidr žením t lačít ka
neb o lze hod notam i prochá zet zr ychle ně.
3. Opě t stisk něte tl ačítk o AL 1.2 . Na disp leji se z obraz í nápis „bu“. Sti sknut ím tlač ítka
neb o se volí zd roj bud íku:
bu = bu zení bz učáke m
rd = bu zení rád iem
CZECH
23

CR6
1. Zno vu stis kněte t lačít ko AL 1. 2. Začn ou blik at čísl ice „1-7“. Stis knut ím tlač ítka
neb o vyber te den b uzení z mo žnost í „6 -7“, „1- 5“ nebo „1- 1“.
1-5 = p racovn í den (po ndělí a ž pátek )
6-7 = v íkend ( sobot a a neděl e)
1-7 = k aždý de n (pond ělí až ne děle)
1-1 = j ednor ázový b udík. Po a ktiva ci budí ku zhas ne indi káto r A1. Jed ním sti sknut ím
tla čítka AL 1.2 je m ožné zn ovu zap nout je dnorá zový bu dík 1.
2. Po pro veden í výše uv edenýc h krok ů stisk něte zn ovu tla čítko A L 1.2. Z ačne bl ikat
dio da A2 a na di splej i blika jí čísl ice hod in. Sti sknut ím tlač ítka n ebo
nas tavte h odinu b udíku 2 . Zopako vání kr oků 2 až 4 na stavt e budík 2 .
3. Nas taven í času bu díku ul ožíte j edním s tiskn utím tl ačítk a SET ( nebo po kud nen í
sti sknut o žádné t lačít ko asi za 1 0 sekun d), rad iobud ík se vrá tí k norm álním u zobra zení
čas u.
4. Krá tkým o pakova ným sti skem tl ačítk a AL 1.2 z apnet e nebo vy pnete b udík 1, b udík 2
neb o oba bud íky.
5. Kdy ž se akti vuje so uvise jící bu dík, ro zsvít í se na lev é straně d isple je diod a A1, A2 ne be
obě .
Pozn ámky:
a. Bu dík fun guje po uze v pří padě, že j e příst roj při pojen k n apáje címu ad aptér u.
b. Kdy ž nasta ne čas bu díku 1 ne bo 2, bli ká odp ovída jící di oda LE D A1 nebo A 2. Jedn ím
sti sknut ím tlač ítka R ADI O/SL EEP ne bo AL 1. 2 lze bud ík zast avit a re setova t jej tak , aby
zno vu zazn ěl násl edují cího dn e. Dioda b udíku z ůstan e svíti t.
c. Když na stane č as buze ní, sti sknět e jedno u tlačí tko . Bud ík se zti ší a znov u se
roze zní po up lynut í nasta vení do by odlo žení buz ení (vý chozí d oba odl ožení b uzení j e
5 min ut).
d. Pok ud se běh em doby, k dy zní pr vní bu dík, ne bo je pr vní budí k v režim u odlož ení,
akt ivuje d ruhý bu dík, bu de mít pr iorit u druhý b udík (p rvní bu dík bud e nasta ven tak ,
aby z novu za zněl ná sledu jícíh o dne).
e. D oba tr vání zv uku bud íku je 1 ho dina, p okud ne bude na p řístr oji pro vedena ž ádná
čin nost.
Stm ívač
Sti sknut ím tlač ítka l ze nasta vit jas d isple je LED (HI/ LO/OF F) (V ysoká /nízk á/vy pnuto ).
Toto na stave ní je možn é prové st pouz e v přípa dě, že je v ypnuto r ádio.
Je -li vyb rán níz ký jas, o táčen ím knofl íku na za dní str aně pří stroj e upravt e jas na po žadov anou
úrov eň. Ot áčením s měrem d olů zme nšíte a s měrem n ahoru z větší te jas di splej e.
Pozn ámka: h orní me z jasu di splej e LED n elze upr avovat .
Posl ech roz hlasov ého vys ílání
Před p oslec hem roz hlaso vého vy sílán í zcela ro ztáhn ěte drát ovou an ténu FM a u pravt e její
pol ohu tak , abyst e dosáh li nejl epšíh o příjm u. Přípa dně pří stroj p řesuň te k oknu . Antén u
neo dpoju jte, neu pravu jte ani n epřip ojujt e k další m antén ám.
1. Chc ete-l i zapno ut rádi o, stis kněte j ednou t lačít ko RAD IO/S LEE P. Na d isple ji se zob razí
ON “ a zaháj í se přeh rávání . Krátk ým stis knut ím tlač ítka rá dio vyp nete.
24

CR6
1. Ruč ní ladě ní frek vence s k rokem p o 0,1 MH z lze prov ádět k rátký m stisk nutím t lačít ka
/ . Sti sknut ím a přid ržení m tlačí tka / je m ožné
aut omati cky vyh ledat d ostup nou sta nici.
2. Stis knět e jedno u tlačí tko VOL . Na disp leji se z obraz í L06” (výc hozí hl asito st).
Sti sknut ím tlač ítka / u pravít e hlasi tost od L 00 (bez z vuku ) do L15
(ma ximum ).
3. Ručn ě nebo au tomat icky na laďte s voji ob líben ou stan ici. St iskně te a přid ržte tl ačítk o
SE T, dokud n a displ eji nez ačne bl ikat „P01 “. St iskem t lačít ka nebo v yber te
čís lo poža dované p ředvo lby P01 ~P10. D alším s tiske m tlačí tka SE T stan ici ulo žíte. Do
pam ěti pří stroj e je možn é uložit n ejvýš e 10 rozh lasov ých sta nic.
4. Chc ete-l i poslo uchat p ředna staven ou stan ici, st iskn ěte krá tce tla čítko S ET.
5. Pok ud ulož íte nov ou stan ici pod s tejným č íslem p ředvo lby, bud e předch ozí ulo žená
sta nice pře psána .
Pozn ámka: R ádio um ístět e mimo do sah zář ivek ne bo jinýc h elekt ronic kých za řízen í, kter é
moh u rušit p říjem r ozhla sového v ysílá ní.
Rež im spán ku
1. V reži mu rádi a stisk nutím a p řidr žením t lačít ka RAD IO/ SLEE P akti vujet e režim
spá nku. Ro zsvít í se indi kátor r ežimu s pánku . Opakov aným kr átkým s tisk nutím
tla čítka RADI O/SL EEP n astav te časo vač reži mu spán ku na 5, 15 , 30, 45, 6 0, 75, 90 n ebo
OF F (Vyp nuto) .
2. Jak mile se n a displ eji zno vu zobr azí čas , jední m stisk em a přid ržení m tlačí tka
RA DIO/ SLE EP je mo žné zobr azit zb ývají cí dobu d o aktiv ace rež imu spá nku.
3. Rá dio bud e hrát po n aprog ramova nou dob u a poté se a utoma ticky v ypne.
Chc ete-l i rádio v ypnou t před up lynut ím nast avené d oby reži mu spán ku, sti skně te
jed nou tla čítko .
Řeš ení pot íží
Poku d se na rad iobud íku zob razuj e chybný č as, neb o příst roj nep racuj e správ ně, může b ýt
tat o situa ce způso bena el ektro stati ckým v ýboje m nebo ji ným ruše ním. V ta kovém př ípadě
odp ojení m konek toru DC přeruš te napá jení ze s ítě (na víc je nu tné vyj mout zá ložní b ateri i) a
za ně kolik m inut je j znovu p řipoj te. Dojd e k obnov ení výc hozíc h nasta vení rad iobud íku,
kte ré budet e muset z novu na stavi t podle s vých po třeb.
Techn ické úda je
Ele ktric ké napá jení: Vst up 5 V DC / 300 m A
Frek vence F M: 87, 5~108 M Hz
Pří kon: 1, 5 W
Pří kon v poh otovos tním re žimu: <1 W
Výc hozí nas taven í:
Form át času 24 ho din
Čas 0:0 0
Bud ík 1 a 2 6:0 0
Hla sitos t L6 (úro veň 6)
Dob a odlož ení buze ní 05 (5 mi nut)
(V ýše uve dené tec hnick é údaje s e mohou z měnit b ez před chozí ho upoz orněn í.)
CZECH
25

CR6
26

CR6
DÔ LEŽIT É POZ NÁMKY
• Tieto b ezpeč nostn é a prevá dzkové p okyny b y ste si ma li odlo žiť pre pr ípad po treby i ch
pou žitia v b udúcn osti.
• Prís troj ne smie by ť vysta vený kva pkaj úcej ani š pliec hajúc ej vode a n esmie b yť umie stnen ý
vo vl hkom pro stred í (napr íkla d v kúpeľ ni).
• Prod ukt neu miest ňujte :
• na mie sta vys taven é priam emu sln ečném u svitu a lebo v bl ízkos ti radi átorov,
• na iné s tereo fónne z ariad enia, k toré vy žaruj ú príli š veľa tep la,
• na mie sta blo kujúc e vetra nie zar iaden ia aleb o do praš ného pr ostred ia,
• na mie sta vys taven é neust álym vi bráci ám,
• na vlh ké aleb o mokré m iesta ,
• v blíz kosti s viec al ebo iné ho otvo renéh o ohňa.
• Prod ukt prev ádzku jte iba v s úlade s p okyn mi v tejto p ríruč ke.
• Pred p rvým z apnut ím zari adeni a skont rolujt e, či je na pájac í adapt ér správ ne prip ojený.
Z bez pečno stných d ôvodo v neods traňu jte žiad ne kry ty a ani s a nepok úšajt e o príst up do
vnú tornýc h častí z ariad enia. S ervi sné zás ahy zve rujte v ždy iba k valifi kovan ému per sonál u.
Nep okúša jte sa od straň ovať sk rutky a ni otvá rať kr yt jedn otky, ne nachá dzajú s a pod ním
žia dne súč asti, k torýc h serv is by mal v ykoná vať použ ívate ľ. Všetk y servi sné zás ahy zve rujte
kva lifiko vaném u servi snému p erson álu.
BE ZPEČN OSTNÉ POKYNY
1. Prečí tajte s i tieto p okyny – pr ed uved ením pr odukt u do prevá dzky j e nutné p rečíta ť si
vše tky bez pečno stné a pr evádz kové pok yny.
2. Ponec hajte si ti eto po kyny – bezp ečnos tné a p revád zkové pokyn y si o dložt e pre p rípad
pot reby ich p oužit ia v budú cnost i.
3. Berte ohľad na up ozorne nia – j e nutn é pri hliad ať na vš etky upozor nenia na pro dukte a v
pre vádzk ových po kyno ch a riad iť sa tým ito upo zorne niami .
4. Pos tupuj te podľ a pokyn ov – je nut né post upova ť v súlad e so všet kými pr evádz kovým i
pok ynmi a po kynmi p re použ ívate ľov.
5. Vod a a vlhko sť – v záujm e zn íženi a ri zika vypu knut ia p ožiaru ale bo z ásahu ele ktric kým
prú dom n evyst avujt e pro dukt pôso beniu dažď a, k vapka júcej ani špli echaj úcej vody, ako
ani nadm ernej vlhko sti, aká s a vys kytuj e nap ríkla d v s aune a lebo v kúp eľni. Nepou žívaj te
ten to pro dukt v blí zkost i vod y, nap ríkla d v b lízko sti v ane, umýva dla, kuchyn ského drez u,
prá čovne, v o vlhke j pivni ci aleb o v blízk osti ba zéna či i ného po dobné ho prost redia .
6. Vnikn utie p redme tov a k vapal ín – D o prod uktu n ikdy n ezasú vajte žiadn e pred mety c ez
otv ory na produ kte, preto že b y sa mo hli dosta ť do kon taktu so súč asťam i, k toré sú pod
neb ezpeč ným na pätím , ale bo súč asťam i, kt oré mô žu sp ôsobi ť skr at, čo mô že vie sť k
vyp uknu tiu požia ru alebo k zása hu elekt rický m p rúdom . N a p rodukt ni kdy nevy lieva jte
ži adn e k vap ali ny. N a p rod ukt ni kdy ne umi est ňuj te ž iad ne pr edm ety ob sah uj úce
kva palin u.
7. Se rvis – ne pokúš ajte sa s ami o ser vis toh to prod uktu, p retože p o otvor ení ale bo
odst ránení kryt ov sa vy stavu jete ne bezpe čnému napäti u a ďal ším riz ikám . Všetky servi sné
zás ahy zve rujte k valifi kovan ému ser visné mu pers onálu .
8. Ná hradn é sú čiast ky – v prípa de p otreby pou žitia náh radnýc h sú čiast ok s kontro lujte , či
SLOVAK
27

CR6
ser visný te chnik po užil náhr adné súč iastk y p odľa špe cifiká cií výro bcu aleb o s účias tky s
rovn akým i chara kteri stik ami, ak é má aj p ôvodn á súči astka . Použi tie ne autor izovan ých
náh radnýc h súči astok m ôže vie sť k vy puknu tiu po žiaru , zásah u elek trick ým prú dom ale bo
ďal ším riz ikám.
9. S voje r ádio s hodi nami umies tnite na sta bilný povrc h v do stato čnej v zdial enost i od m iest
vys tavený ch pria memu sl nečné mu svit u, nadm erném u teplu a lebo na dmern ej vlhk osti.
10. Pr i umies tnení je dnotk y na náby tok z prír odnéh o a lebo la kované ho či ina k p ovrch ovo
upr avovan ého dreva chr áňte svoj náby tok tak, že pod jedno tku umies tnenú na nábyt ku
pol ožíte d ečku al ebo iný oc hrann ý mater iál.
11. J ednot ku č istit e mä kkou ha ndrič kou nav lhčen ou v j emnom r oztok u myd lovej vo dy.
Sil nejši e látk y, ak o je n aprík lad b enzín , rie didlo aleb o podo bné m ateri ály, m ôžu po škodi ť
pov rch jedn otky. Pr ed čist ením je dnotk u odpoj te od zdr oja nap ájani a.
12. Baté ria
1.) B atéri e sa nesm ú vysta vovať na dmern ému tep lu, ako n aprík lad sln ečném u žiare niu,
ohň u apod.
2) Pr i batéri ách je nu tné pr ihlia dať na env ironm entál ne aspe kty lik vidác ie baté rií.
3) VARO VANI E týk ajúc e sa použí vania baté rií – v zá ujme zamed zenia vyte čeniu baté rií,
kto ré môže v iesť k t elesn ým zran eniam , pošk odeni am maje tku al ebo po škode niu
prí stroj a:
- Sprá vne vlo žte všet ky bat érie, ab y ich pól y + a – boli or iento vané ta k, ako je
vyz načen é na jedn otke.
- Ak sa je dnotk a nebu de použ ívať dlh šiu dob u, vybe rte z ne j batér ie.
UP OZOR NENIE
Toto za riade nie nie j e určen é na použ ívani e osoba mi (vrát ane det í) so zní ženým i fyzic kými,
zmys lový mi aleb o mentál nymi sc hopno sťami a lebo s ne dosta tkom sk úseno stí a zna lostí , ak
len t ieto os oby zar iaden ie nepo užíva jú pod do hľado m alebo p odľa po kynov o soby
zod poveda júcej z a ich bez pečno sť. Na de ti je nut né dohl iadať , aby sa ne hrali s o zaria dením .
1. Pr íst roj ne smie b yť vy stav ený kv apk ajúc ej an i šp liec haj úcej v ode a n esmú s a na ň
umi estňo vať pred mety na plnen é kvap alina mi, ako s ú naprí klad vá zy.
2. V záujm e zab ránen ia vy puknu tiu p ožiar u ale bo zá sahu e lektr ický m prú dom ne vysta vujte
tot o zaria denie p ôsobe niu tep la, dažď a, vlhk osti al ebo pra chu.
3. Túto j ednot ku n eumi estň ujte v bl ízkos ti z drojo v vo dy, a ko sú n aprí klad vo dovo dné
koh útiky, v ane, p ráčky a lebo baz ény. D ajte poz or, aby j ednot ka bo la um iestn ená n a
suc hom a sta bilno m povrch u.
4. Neumi estňu jte tút o jedno tku v dos ahu sil ného ma gneti ckého p oľa.
5. Neumi estňu jte jed notku n a žiadn y zosil ňovač a ni prij ímač.
6. Neu miest ňujte túto j ednot ku do v lhkýc h prie storov, pretož e vlhk osť ov plyvň uje ži votno sť
ele ktric kých sú čiast ok.
7. Ak sa hod iny pre nesú pr iamo z ch ladné ho pros tredia d o teplé ho pros tredi a alebo a k sa
umi estni a v mimor iadne v lhkej m iestn osti, v lhkos ť môže sk onden zovať na v nútor nej
st rane di splej a. Ak k tom u dôjde , systé m nebud e fungo vať spr ávne. N echaj te systé m aspo ň
hod inu zap nutý, ký m sa vlhk osť neo dpar í.
8. Nep okúša jte sa či stiť j ednot ku che mick ými ro zpúšť adlam i, pre tože m ôžu po škodi ť jej
pov rch. Ut ierajt e ju čist ou, suc hou ale bo jemn e navlh čenou h andri čkou.
28

CR6
OZ NÁMEN IE
Tento p roduk t vyhov uje pož iadavk ám Euró pskeh o spolo čenst va na rád ioint erfer enciu .
Tento p roduk t je navr hnutý a v yrobe ný z vyso ko kval itných m ateri álov a ko mpone ntov, kt oré
sa da jú recy klova ť a znova p oužiť .
Ak je p roduk t označe ný týmt o symbo lom pre čiark nutéh o odpad ového k ontajn era s
kol ieska mi, zna mená to , že na prod ukt sa vz ťahuj e smern ica 200 2/96/ ES Eur ópske ho
par lamen tu a Rady. O bozná mte sa, p rosím , so systé mom sep arova ného zb eru ele ktric kých a
ele ktron ickýc h produk tov vo va šej obl asti. Po stupu jte v súl ade s mie stnym i pravid lami a
nev yhadz ujte st aré pro dukty d o bežné ho domo vého odp adu. Sp rávna l ikvid ácia st arého
pro duktu p omáha z abráni ť poten ciáln ym neži aduci m vplyv om na živ otné pr ostred ie a zdra vie
člo veka.
Tento p roduk t obsah uje baté rie, na k toré sa v zťahu je smer nica 20 06/66 /ES Eu rópske ho
par lamen tu a Rady a k toré ne možno v yhadz ovať do be žného d omové ho odpa du. Inf ormuj te
sa na m iestn e pravi dlá sep arovan ého zbe ru baté rií, pr etože sp rávna l ikvid ácia po máha
zab rániť n ežiad ucim vp lyvom n a život né prost redie a z dravi e človek a.
Inf ormác ie o ochra ne živo tného p rostr edia
Vyl účili s me vš etky ne potre bné oba lové mat eriál y. Pou žívan é ob alové ma teriá ly s me sa
pok úsili ro zdeli ť na t ri k ategór ie na u ľahčen ie ic h sep aráci e: ka rtón ový p apier (š katul e),
pol ystyr énová p ena (p rotiná razov á ochra na) a p olyet ylén (v recúš ka, oc hrann é penov é obal y).
Váš systé m po zostá va z mater iálov, kto ré je mož né re cykl ovať a zn ova p oužiť po rozob ratí u
špe ciali zované ho pos kytov ateľa. Obo známte sa s mi estny mi nari adeni ami, k toré sa t ýkajú
lik vidác ie obal ových m ateri álov, op otreb ovanýc h batér ií a vyra dených z ariad ení.
Nah rávani e a pre hráva nie ma teriál ov môž e vyža dovať súhla s. Pozr ite si A utors ký zák on z ro ku
SLOVAK
29

CR6
Pohľ ad spre du
Bud ík č. 1
Bud ík č. 2
RA DIO/ SLE EP
Pohľ ad zhor a
VO L (Hlas itosť )
Pohľ ad zoza du
Pre st lmeni e
jas u posuň te
nad ol
Ďak ujeme z a zakúp enie to hto rád iobud íka. Poz orne si p rečít ajte na sledu júce po kyny a
prí ručku s i uscho vajte.
Zap nutie r ádiob udíka
Zas uňte ad aptér st ried avého pr údu do ľu bovoľ nej 230 V el ektri ckej zá suvky v d omácn osti.
Poto m zasuň te kone ktor je dnosm ernéh o prúdu d o zadne j strany j ednot ky. Rád iobud ík sa
zap ne a je pri praven ý na použ itie.
Inš talác ia zálo žnej bat érie
Rád iobud ík vyža duje je dnu lít iovú ba tériu C R203 2 (nie je s účasť ou dodá vky), k torá
pre dstavu je zálo žný zdr oj napá jania v p rípad e dočas ného vý padku d odávk y elekt rické ho
prú du.
Nad ol
(Rá dio/ ul oženi e
na sp ánok)
Odl oženi e
bud enia/ s tlmen ie jasu
Pre sp usten ie
nap ájani a jedno tky
zas uňte ko nektor
pre j ednos merný
prú d
Čas
Bud ík 1-2
SE T (Nast aviť)
Ulo ženie n a spáno k
Ind ikáto r PM
Nah or
Vlo žte 1 líti ovú
bat ériu CR 2032
(ni e je súča sťou do dávky ))
Ele ktric ká zásu vka na
str iedav ý prúd
Ada ptér str iedav ého prú du
30

CR6
1. Polo žte jed notku p redno u stran ou nado l na ploc hý povrc h.
2. Vys uňte a ods tráňt e kryt p riehr adky pr e batér iu na spo dnej st rane je dnotk y.
3. Vlo žte jedn u novú lí tiovú b atéri u CR20 32 do pri ehrad ky pre ba tériu t ak, aby j ej pól „+“
sme roval na hor, ako j e vyzna čené.
4. Nas aďte kr yt pri ehrad ky pre ba tériu s päť na jeh o miest o.
V prí pade pr eruše nia dod ávky el ektri ckého p rúdu L ED disp lej zha sne a rád io ani bu dík
neb udú fun govať. Z áložn á batér ia zais tí fung ovani e hodín a u chova nie nas tavení j ednot ky.
Zab ezpeč te, aby b ola pou žitá nov á lítio vá baté ria CR 2032. N ová baté ria CR 2032 do káže z aisti ť
nep retrž ité fun govani e hodín n a prib ližne 1 t ýždeň .
Nas taveni e času, k alend ára a odl oženi a buden ia
1. Stl ačte a po držte s tlače né tlač idlo S ET, kým s a nerozs vieti a čísli ce pre na staven ie
hod iny. Stl áčaní m tlači dla ale bo tlač idla na stavte h odinu . Stlač ením
a pod ržaní m tlači dla ale bo tlač idla mô žete na stavov anie zr ýchli ť.
2. Zno va stla čte tla čidlo S ET. Roz sviet ia sa čís lice pr e minút y. Stláč aním tl ačidl a
ale bo tlač idla na stavt e minútu . Stlač ením a po držan ím tlač idla al ebo
tla čidla m ôžete na stavo vanie z rýchl iť.
3. Zno va stla čte tla čidlo S ET, na di splej i sa zobr azí a rozs vieti „24 Hr“. Stlač te ale bo
pre v ýber fo rmátu 1 2Hr 24H r. Pri 12H r formát e sa na ozn ačeni e popol udňaj ších ho dín
na di splej i zobra zí LED i ndiká tor P (P M). Ind ikáto r pre dop oludň ajšie h odiny
nee xistu je.
4. Zno va stla čte tla čidlo S ET, roz sviet i sa „2 016“. Stlá čaním t lačid la aleb o tlači dla
nas tavte ro k.
5. Zno va stla čtetl ačidl o SET, ro zsvie tia sa čí slice p re mesia c. Stlá čaním t lačid la
ale bo tlač idla na stavt e mesia c.
6. Zno va stla čte tla čidlo S ET, roz sviet ia sa čís lice pre d eň. Stl áčaní m tlači dla
ale bo tlač idla na stavt e deň.
7. Zno va stla čte tla čidlo S ET. Na di splej i sa zobr azí a rozs vieti „05 “. St láčan ím tlač idla
ale bo tlač idla vy bert e čas odl oženia b udeni a v rozsa hu od 5 do 60
min út.
8. Opu sťte rež im nast avova nia opä tovným s tlače ním tla čidla S ET al ebo tak , že prib ližne
10 se kúnd ne stlač íte žia dne tla čidlo.
Nas taveni e budík a
1. Zno va stla čte a pod ržte tl ačidl o AL 1.2 . Rozsv ieti sa L ED A1 a čí slice h odiny. S tlačen ím
tla čidla a lebo na staví te čas bud íka č. 1 . Stlače ním a pod ržan ím tlač idla
ale bo zrýc hlite n astav ovanie .
2. Zno va stla čte AL 1 .2. Čís lice pre m inúty s a rozsv ietia . Stláč aním tl ačidl a alebo
tla čidla n astav te minú tu budí ka č. 1. St lačení m a podr žaním t lačid la aleb o
tla čidla m ôžete na stavo vanie z rýchl iť.
3. Zno va stla čte tla čidlo A L 1.2, n a LED di splej i sa zobr azí „ bu“. Stlač ením tl ačidl a
ale bo vybe rte zdr oj budí ka:
bu = pr ebúdz anie zv onení m budík a
rd = pre búdza nie rád iom
SLOVAK
31

CR6
1. Znov a stlač te tlač idlo A L 1.2, ro zsvie tia sa čí slice „1-7 “. St lačte t lačid lo aleb o
a vyb erte d ni, ked y má budí k zvoni ť - „6- 7“, „1- 5“ aleb o „1- 1“.
1-5 = p racovn é dni (po ndelo k až piat ok)
6-7 = v íkend ( sobot a a nedeľ a)
1-7 = c elý týž deň (po ndelo k až nede ľa)
1-1 = j ediný d eň Po ukon čení bu denia p resta ne svie tiť LE D A1. Ak ch cete na staviť
bud enie bu díkom č . 1 na iný deň , jeden krát st lačt e AL 1.2
2. Pod ľa vyšš ie uved ených k rokov z nova stl ačte tl ačidl o AL 1.2 . Rozsv ieti sa LED A2 a
čís lice ho diny. Stl áčaní m tlači dla ale bo tlač idla na stavt e hodin u
bud íka č. 2. O pakov aním vy ššie uv edenýc h kroko v 2 až 4 nast avte bu dík č. 2.
3. Ak c hcete u ložiť va še nast aveni e budík a, jede nkrát s tlač te tlač idlo SE T (ale bo
pri bližn e 10 sekú nd nest lačte ž iadne t lačid lo), a rá diobu dík sa vr áti do re žimu
zob razova nia nor málne ho času .
4. Krát kym op akovan ým stlá čaním t lačid la AL 1. 2 môžet e aktivo vať ale bo deak tivov ať
bud ík č. 1, bu dík č. 2 ale bo oba.
5. Keď je a ktivo vaný pr ísluš ný budík , na ľave j stran e displ eja sa ro zsvie ti LED A 1, A2
ale bo obe.
Pozn ámky:
a. Fu nkcia b udeni a je k disp ozíci i len vte dy, keď je r ádiob udík za pojen ý
pro stredn íctv om adap téra str iedav ého prú du.
b. Keď z ačne z voniť bu dík č. 1 al ebo bud ík č. 2, ro zsvie ti sa prí slušný LED in dikát or A1
ale bo A2. Je dným st lačení m tlači dla RA DIO /SLE EP ale bo AL 1. 2 budík v ypnet e a
nas tavít e ho na bud enie na n asled ujúci de ň. LE D indik átor zo stane s vieti ť.
c. Keď b udík za čne zv oniť, je denk rát stl ačte tl ačidl o . Zvonen ie sa vy pne a
zno vu sa spu stí po up lynut í nastav eného č asu odl oženi a buden ia (pre dnast avený ča s
odl oženi a buden ia je 5 min út).
d. Ak sa d ruhý bu dík akt ivuje v č ase, ke ď zvoní p rvý bu dík ale bo keď je p rvý bu dík
odl ožený, te nto dru hý budí k má predn osť pre d prvý m budík om (pr vý budí k sa nast aví
na bu denie n a nasle dujúc i deň).
e. B udík bu de zvon iť po dob u 1 hodin y, ak nevy konát e žiadn u akciu .
Stl menie j asu
Stl áčaní m tlači dla môže te nast aviť ja s LED d isplej a (HI GH- / LO W-dim / O FF). J as
môž ete nast avova ť len vted y, keď je rá dio vy pnuté.
Keď s te si zvo lili st lmený j as (LOW -dim) , otáča jte kol iesko m na zadn ej stra ne a nast avte
pož adovan ú úrove ň stlme nia jas u. Ak chce te zníž iť úrov eň stlm eného j asu, otá čajte
kol iesko m nadol . Ak ju chce te zvý šiť, ot áčajt e kolie skom na hor.
Pozn ámka : V ysoký ( HIG H) jas LE D disp leja sa n edá upr avovať .
Použ ívani e rádia
Pred z ačatí m počúv ania rá dia úpl ne vysu ňte ant énu FM a up ravte j ej smero vanie , alebo
skú ste umi estni ť jedno tku bli žšie k ok nu pre le pší prí jem sig nálu FM . Neodd eľujt e,
neu pravu jte ani ne pripá jajte a nténu F M k iným an ténam .
1. Kr átkym s tlače ním tla čidla R ADI O/SL EEP z apnit e rádio. N a displ eji sa zo brazí „ON “ a rádio
zač ne hrať . Ak chcet e vypnú ť rádio , krátk o stlač te tlač idlo .
32

CR6
2. Krát kym st lačen ím / manu álne na stavuj ete fre kvenc iu rádi a v kroko ch
po 0, 1 MHz. A k chcet e autom atick y vyhľa dať dos tupnú s tanic u, stla čte tla čidlo /
a pod ržte ho s tlače né.
3. Je denkr át stla čte tla čidlo VOL , na disp leji sa zo brazí „L0 6“ (pred nasta vená
hla sitos ť).St lačení mtlač idla / na staví te úrove ň hlasi tosti v ýstup u zvuk u
od L0 0(zvu k je vyp nutý) doL15 ( maxim um).
4. Man uálne n alaďte a lebo au tomat icky v yhľad ajte svo ju obľú benú st anicu , stlač te
pod ržte st lačen é tlači dlo SE T, až kým sa n a displ eji ner ozsvi eti„P 01“. Stlač te
ale bo a zvoľ te žela né čísl o predn astave nej sta nice od P 01 do P10 . Stani cu
ulo žíte op ätovný m stlač ením tl ačidl aSET. V je dnotk e je možn é uloži ť až 10
pre dnast avenýc h staní c.
5. Ak c hcete v ybrať p rednas taven ú stani cu na poč úvani e, krát ko stla čte tla čidlo S ET.
6. Ak n a danom č ísle ul ožíte no vú stan icu, pô vodná p rednas taven á stani ca sa nah radí
novo u.
Pozn ámka: R ádio um iestn ite v dos tatoč nej vzd ialen osti od fl uores cenčný ch lámp a lebo iný ch
ele ktron ickýc h zaria dení, k toré môž u spôso bovať i nterf erenc iu.
Ulo ženie na s pánok
1. V reži me rádi a aktiv ujete r ežim sp ánku st lačen ím a podr žaním t lačid la RAD IO/ SLEE P.
Roz sviet i sa LED i ndik átor pre s pánok . Znovu s tlač te tlači dlo RA DIO /SLE EP a pod ľa
pot reby nas tavte č asova č ulože nia na sp ánok na 5, 1 5, 30, 45 , 60, 75, 9 0 minút a lebo na
hod notu O FF (Vy pnuté ).
2. Ke ď sa na dis pleji z nova za čne zobr azova ť čas a chc ete zist iť, koľ ko času z ostáv a pre
spá nok, st lačte a p održ te tlači dlo RA DIO /SLE EP.
3. Rád io bude h rať až do do siahn utia na progr amova ného ča su ulože nia na sp ánok a
pot om sa aut omatic ky vyp ne.
4. Ak c hcete v ypnúť r ádio eš te pred up lynut ím toht o času, s tlačt e tlači dlo .
Rie šenie p roblé mov
Ak ho diny zob razuj ú irele vantný č as aleb o nefun gujú sp rávne , čo môže by ť spôso bené
ele ktros tatic kým výb ojom al ebo ino u inter feren ciou, o dpoje ním kon ektor a pre jedn osmer né
nap ätie od pojte n apája nie str iedav ým prúd om (a vyb erte zá ložnú b atéri u) a nech ajte ho t ak po
dob u nieko ľkých m inút. Po tom môž ete rád io znova z apnúť . V rádiob udíku s a tak obn ovia
pôvo dné nas taven ia a je pot rebné z novu ho n astavi ť.
Špe cifiká cia
Zdro j napáj ania: J ednos merný p rúd 5 V / 300 mA
Frek venci a FM: 87 ,5 ~ 108 MH z
Spo treba e nergie : 1 ,5W
Spo treba v p ohotov ostno m režim e: < 1 W
Pred volen é nasta venia :
Form át času 24- hodin ový
Čas 0 :00
Bud ík č. 1 a č. 2 6 :00
Hla sitos ť L6 (ú roveň 6)
Trva nie odl oženi a buden ia 05 (5 mi nút)
(šp ecifik ácie sa m ôžu zme niť bez p redch ádzaj úceho u pozorn enia)
SLOVAK
33

CR6
FO NTOS ME GJEGY ZÉS EK
• Őriz ze meg a je len biz tonsá gi és has znála ti utas ításo kat kés őbbi fe lhasz nálás c éljáb ól.
• Ne teg ye ki a kés zülék et párá nak vag y fröcc senés nek és ne dves kör nyeze tnek (p l.
für dőszob a).
• Ne hel yezze a k észül éket a kö vetkez ő helye kre:
• Köz vetlen n apfén ynek ki tett va gy fűtő teste khez kö zeli he lyek.
• Túl so k hőt sug árzó sz tereób erend ezése k teteje .
• Sze llőzé st akad ályoz ó hely va gy poro s terüle t.
• Folya matos an rezg ő helye k.
• Maga s párat arta lmú vag y nedves h elyek .
• Ne hel yezze g yerty ákho z vagy más n yílt lá nghoz k özel.
• Csak a h aszná lati út mutat ó szeri nt üzem eltess e a készü léket .
• A kész ülék el ső bek apcso lása el őtt győz ődjön m eg arró l, hogy m egfele lően cs atlak oztat ta
a táp adapt ert.
Biz tonsá gi okokb ól ne távol ítsa el a burk olato t, és ne kísé reljen me g hozzáf érni a kész ülék
bel sejéh ez. A sze rvize lést bí zza sza kképz ett sze relőr e.
Ne pr óbálj a meg elt ávolít ani a cs avarok at vagy k inyit ni a kés zülék h ázát; n em talá lhatók b enne
sze rvize lhető a lkatr észek . Az öss zes szer vize lést bí zza sza kképz ett sze relőre .
BI ZTON SÁGI UTA SÍTÁSO K
1. O lvass a el az uta sítás okat – A ké szülé k üzemb e helye zése el őtt olv assa el a z összes
biz tonsá gi és has ználat i utasí tást.
2. Őr izze m eg az utasí tások at – A bizto nsági és ha sznál ati ut asítá sokat tart sa a k észül ékkel
egy ütt kés őbbi fe lhasz nálás cé ljábó l.
3. F igyel meztet ések – A ké szülé ken, va lamin t a haszn álati u tasít ásokb an lévő ö sszes
figy elmez tetést b e kell ta rtan i.
4. Tar tsa be az u tasít ások at – Ta rtsa b e az össz es hasz nálat i utasít ást.
5. Ví z és nedve sség – A t űzves zély és a z áramü tés elke rülés e érdek ében ne t egye ki a
kés zülék et esőn ek, frö ccsen ésnek v agy túl zott ne dvessé gnek (p l. szau na vagy
für dőszob a). Ne ha sznál ja a kész üléke t víz köz elébe n, mint p éldáu l fürdő kád,
mos dókag yló, mo sogató , mosók onyha , úszóme dence k özelé ben és ny irkos p incéb en.
6. Tár gyak és fo lyadé kok – Ne nyo mjon be t árgya kat a kés zülék n yílás aiba, m ivel az ok
hoz záérh etnek v eszély es fesz ültsé gponto khoz v agy rövi dzárl atot ok ozhat nak, és e z
tűz höz va gy áram ütésh ez veze thet. Ne ö ntsön sem mifél e folya dékot a ké szülé kre. Ne
hel yezze ol yan tár gy tete jére, am ely fol yadék ot tart almaz .
7. Sze rvize lés – Ne p róbál ja meg szer vizel ni a ké szülé ket, miv el a bu rkola tok kiny itása és
elt ávolít ása sor án vesz élyes fe szült ségne k vagy má s veszél ynek le het kit éve. Az ö sszes
sze rvize lést bí zza sza kképz ett sze relőr e.
8. Cserea lkatr észek – H a cserea lkat részek re van sz ükség , a szere lőnek a g yártó á ltal el őírt
cse realk atrés zeket va gy az ere deti al katré sszel a zonos m űszak i tulaj donsá gokk al
ren delke ző csere alka trésze ket kel l haszn álnia . A nem eng edély ezett c sereal katr észek
tüz et, ára mütést v agy más v eszél yt okoz hatna k.
9. Közve tlen na pfényt ől, túl zott hő től és n edves ségtől távol, s tabil f elüle tre hel yezze a r ádiós
órá t.
10. Ha a ké szülé ket te rmés zete s fá ra v agy la kkoz ott fel ület re h elye zi, a bút or v édel me
HUNGARIAN
34

CR6
érd ekébe n tegyen a k észül ék és a bút or közé r uhát va gy védőa nyago t.
11. A kész üléke t enyhé n szapp anos ví zzel át itato tt, puh a ruhá val tis ztíts a. Az erő sebb a nyagok
(pl . benz in, h ígító vagy hason ló an yagok ) kár osíth atják a kés zülék felü letét. Tiszt ítás előtt
ára mtala nítsa a k észül éket.
12. Ak kumul átor
1) Ne t egye ki a z akkum uláto rokat t úlzot t hőnek , mint pé ldául n apsüt és, tűz v agy
has onló.
2) Az a kkum ulátor okat a z akkum uláto rok árt almat lanít ására v onatk ozó
kör nyezet védel mi előí rások fi gyele mbe véte lével k ell ár talma tlaní tani.
3) Ak kumul átorh aszná latta l kapcs olato s FIG YELM EZT ETÉ S – a testi s érülé st, anya gi kár t
vag y a készü lék kár osodá sát oko zó akku mulát orszi várgás m egak adály ozásáh oz:
- A kész üléke n lévő + és - j elölé sekne k megfe lelőe n, hely esen te gye be az ös szes
akk umulá tort .
- Vegye k i az akk umulá torok at, ha a ké szülé ket hos szabb i deig ne m haszn álja.
FI GYEL EM
A be ren dezé st a c sök kent fiz ika i v agy m ent áli s ké pes ség ekk el re nde lke ző s zem ély ek
(be leért ve a g yerek eket is), va gy az olyan sz emélye k, akik ne m i smeri k a ber endez ést, csa k
fel ügy elet m ell ett va gy a bi zton ság ukér t f elel ő s zemé ly ál tal el őír t u tasí tás ok s zer int
has ználh atják . Gyer mekek csak f elügy elet m ellet t hasz nálha tják a kész üléke t. A ké szülé k nem
ját ékszer.
1. N e tegye ki a ké szülé ket párá nak vag y f röccs enésn ek, és ne hel yezze ol yan tárg yakr a,
ame lyek fol yadék kal va nnak tö ltve (p l. váza) .
2. A tűz v agy ára mütés megak adály ozása é rdeké ben ne te gye a ké szülé ket for ró hely re, és n e
érj e eső, ned vessé g vagy po r.
3. Ne te gye a k észül éket ví zforrá s kö zelébe ( pl. c sapok , fü rdőká dak, mo sógép ek va gy
úsz ómede ncék) . A készü lék szá raz, sta bil fel ülete n legye n.
4. Ne tegy e a készü léket e rős mág neses m ező köze lébe.
5. Ne tegy e a készü léket e rősít őre vagy v evőké szülé kre.
6. Ne tegy e a készü léket n yirko s helyr e, mivel a n edves ség ked vezőtl en hatá ssal va n az
ele ktrom os alka trész ek élet tarta mára.
7. Ha az órá t közv etlen ül hide gről me legre viszi á t, vagy nagyon nyirk os hely re tesz i, a len cse
bel sején nedv esség képző dhet. Ebbe n az esetb en a rends zer ne m műk ödik megfe lelőe n.
Hag yja a ren dszer t bekap csolv a körül belül e gy órái g, amíg a n edves ség el ne m párolo g.
8. Ne prób álja me g vegyi o ldósz erekk el tisz títan i a készü léket , mivel e zek kár osíth atják a
fel ületét . Tiszta , szára z vagy en yhén ne dves ruh ával tö rölje m eg.
ME GJEGY ZÉS
A készül ék m eg fe le l az E ur óp ai K öz ös sé g rá di ói nt er fe re nc iá ra v on at ko zó
35

CR6
követ el mé ny ei ne k.
A k és zü lé k ki vá ló m in ős ég ű, ú jr ah as zn os ít ha tó é s új ra fe lh as zn ál ha tó anyagokb ól é s
alk atrés zekbő l készü lt.
Ha az á thúzo tt, kere kes sze metes láda sz imból um fel va n tüntet ve a kész üléke n, az azt j elent i,
hog y a készü lék meg felel a 2 002/9 6/EK e urópai i ránye lvnek . Kérjü k, tájé kozód jon az
ele ktrom os és ele ktroni kus kés zülék ek hely i szele ktív gy űjtés ére von atkozó e lőírá sokró l.
Cse leked jen a hel yi törv ények nek meg felel ően, és a k isele jteze tt kész üléke ket gyű jtse
elk ülöní tve a lak osság i hulla déktó l. A feles leges sé vált k észül ék hely es kise lejte zésév el segít
meg előzn i a környe zetsz ennyez ést és a kü lönfé le egés zségk ároso dások at.
A ter mék akk umulá torai m egfel elnek a 2 006/6 6/EK e urópai i ránye lv követ elmén yeine k, ezér t
ne ke zelje ő ket ház tartá si hull adék ként. Tájé kozód jon a hul ladék ok szele ktív gy űjtés ének he lyi
ren dszeré ről, mi vel a meg felelő h ullad ékke zelés ho zzájá rul a kör nyeze tszen nyezés sel és a
kül önfél e egész ségká rosod ásokk al kap csola tos köve tkezm ények m egelő zéséh ez.
Környezetvé delem mel kapcsol atos tudnivalók
A ter mék cso magol ása nem tar talma z feles leges c somag olóan yagot . A csoma golás h árom
kül önböz ő anyagr a oszth ató fel : kart on (dob oz), po liszt irén ha b (védő bakok ) és pol ietil én
(ta sakok , vé dő ha blap ok). A ren dszer ú jraha sznos íthat ó és új rafel haszn álhat ó any agok at
ta r ta lm az , h a a zo ka t e gy e rr e s pe ci al iz ál ó do tt v ál la la t s ze re li s zé t. Ta rt sa b e a
cs omag olóa nyag ok, e lhas zná lt a kku mulá toro k é s ré gi b ere ndez ések á rta lmat lan ítás ára
von atkozó h elyi sz abály ozáso kat.
Biz onyos an yagok fe lvétel éhez és l ejáts zásáh oz ho zzájá rulás sz ükség es. Lás d az 19 56-os
sze rzői jo gi, ill etve az 1 958–1 972-e s, a szel lemi tu lajdo n védelm ével fo glalk ozó tör vényt.
HUNGARIAN
36

CR6
Elö lnéze tJI
Elö lnéze tJI
1. éb resztő
2. éb resztő
Felü lnéze t
Le
Rád ió/al vás
Idő
1. és 2 . ébres ztő
Alv ás
PM (d élutá n) jelz és
Fel
Han gerő
Hát ulnéze t
Lefe lé forg atva
csö kken az
ala csony fé nyerő
Kös zönjü k, hogy e zt az ébr esztő órás rád iót vál aszto tta. Fi gyelme sen olv assa el a z utasí tások at,
és ta rtsa me g a kézik önyve t későb bi felh aszná lásra .
Az éb resztő órás rá dió bek apcso lása
Ill essze a z AC/D C adapt er duga szát eg y 230 vol tos kon nekto rba. Il lessz e a DC-d ugasz t a
kés zülék h átold alán lé vő aljza tba. A ké szülé k beka pcsol, é s haszn álatr a kész.
A tar talék e lem beh elyez ése
Az ór ás rádi ó egy CR 2032 lí tiume lemme l (nem a cs omag ré sze) tud t arta lék táp ellát ást
biz tosít ani az ór ának id eigle nes áram kima radás e setén .
Szu ndi/f ényerő
A kés zülék á ram
alá h elyezé séhez
csa tlako ztass a a
DC -duga szt
Beá llítá s
Hel yezzen b e 1 db
CR 2032 lí tiume lemet
(ne m a csoma g része)
Vált óáram ú fali al jzat
AC/ DC ada pter
37

CR6
1. Hel yezze a ké szülé ket elő lappa l lefel é egy sík f elüle tre.
2. Csú sztas sa ki, és t ávolí tsa el a ké szülé k alján t alálh ató ele mtart ó fedel ét.
3. Hel yezzen b e egy új C R2032 l ítium eleme t az elem tart óba úgy, h ogy a „ +” o ldala
néz zen felf elé a jel zés sze rint.
4. Hel yezze vi ssza az e lemta rtó fed elét.
Ha a vá ltako zó áramú t ápell átás me gszak ad, a LE D-k ijelző k ikap csol, é s sem a rád ió, sem az
ébr esztés f unkci ó nem műk ödik . A tarta lék ele m megta rtja a z idő- és a k észül ékbe állít ásoka t.
Új C R2032 l ítium -ion el emet ha sznál jon. Eg y új CR2 032 ele m akár fo lyamat osan, 1 n apig is
meg t udja ta rtani a z óra beá llítá sait.
Az id ő, a dátum é s a szund i funkci ó beáll ítása
1. Tart sa lenyo mva a SE T gomb ot amíg a z óra szá mjegye i villo gni nem k ezden ek. A
vag y gombb al állí tsa be az ó rát. A vag y a gombo t nyomva t artv a
a beá llítá s felgyo rsul.
2. Nyo mja meg i smét a S ET gom bot, ek kor a per c számj egyei ke zdene k villo gni. A
vag y gombb al állí tsa be a pe rcet. A va gy a gomb ot nyomv a
tar tva a be állít ás felgy orsul .
3. Nyo mja meg i smét a S ET gom bot; a ki jelző n a „24 Hr” jele nik meg v illog va. Nyo mja
meg a v agy a gom bot a 12H r 24Hr le hetős ég kivá laszt ásáho z. Ha a 12
órá s formát umot vá laszt ja, a dél utáni i dőt a ki jelző n megje lenő P (P M) LED jelzi . A
dél előtt i időt (A M) nem je lzi a kés zülék .
4. A SE T gomb ot ismé t megnyo mva a „ 2016” kez d villo gni. A va gy a gomb bal
áll ítsa be a z évet.
5. A SE T gomb ot ismé t megnyo mva a hón ap szám jegyei k ezden ek vill ogni. A v agy a
gom bbal ál lítsa b e a hónap ot.
6. A SE T gomb ot ismé t megnyo mva a dátu m számj egyei k ezden ek vill ogni. A v agy a
gom bbal ál lítsa b e a dátum ot.
7. Nyo mja meg i smét a S ET gom bot, a ki jelző n a „05 ” sz ám kezd e l villo gni. A sz undi i
dőt artam ának (5 –60 per c) kivá laszt ásáho z nyomj a meg a vag y a gombo t.
8. Nyo mja meg i smét a S ET gom bot, vag y ha kb. 10 m ásodp ercig n em tört énik
gom bnyomá s, a rend szer ki lép a beá llítá si üzem módbó l.
Ébr eszté s beáll ítása
1. Az A L 1.2 gom bot nyo mva tar tva az A1 L ED és az ó ra szám jegye i villo gni kez denek . A
vag y a gombb al állí tsa be az 1 . ébresz tés óra érté két. A vag y a
gom bot nyom va tart va a beá llítá s felgyo rsul.
2. Az A L 1.2 gom bot még e gysze r megnyo mva a perc s zámje gyei ke zdene k villo gni. A
vag y a gombb al állí tsa be az 1 . ébresz tés per cérté két. A va gy a
gom bot nyom va tart va a beá llítá s felgyo rsul.
3. Nyo mja meg i smét az A L 1.2 go mbot; a L ED-k ijel zőn a „ bu” felira t jelen ik meg. A
vag y a gombo t megnyo mva áll ítsa be a z ébresz tés típ usát:
bu = éb redés h angje lzésre
rd = éb redés rá dióra
HUNGARIAN
38

CR6
4. Nyo mja meg i smét az A L 1.2 go mbot; a z „1- 7” s zámje gy vill ogni ke zd. A vag y a
gom bbal vá lassz a ki az ébr eszté s dátum át a „6 -7”, az „1 -5” és az „ 1-1” közü l.
1-5 = h étköz nap (hé tfő-p éntek)
6-7 = h étvég e (szom bat-va sárna p)
1-7 = h ét (hét fő-va sárna p)
1-1 = n api ébr esztés . Az ébre sztés v égén az A 1 LED k ialsz ik. Az A L 1.2 gom bot egy szer
meg nyomva i smét ak tivál hatja a z 1. napi é breszt ést.
5. A fent i lépés eket kö vetve n yomja me g ismét a z AL 1.2 g ombot ; villo gni kez denek a z
A2 L ED és az ór a számj egyei . A vagy a go mbbal á llíts a be a 2. ébr esztés
órá ját. A 2. é breszt és beál lítás ához is métel je meg a 2– 4. lépé st.
6. Az éb reszt ő időbe állít ásána k menté séhez ny omja me g egysz er a SET g ombot : a
kés zülék v issza tér a nor mál idő megje lenít ési üzem módba . Ha 10 más odper cig
sem milye n gombo t nem nyom m eg, akk or is ugy anez tö rténi k.
7. Az A L 1.2 gom bot gyo rs egym ásutá nban me gnyomv a beáll íthat ja az 1., a 2 . vagy
min dkét éb resztő t.
8. Az ad ott ébr esztő b ekapc solás a után az A 1, A2 vag y mindk ét LED bekap csol, é s
meg jelen ik a kije lző bal o ldalá n.
Meg jegyz ések:
a. Az é bresz tés csa k akkor m űködi k, ha a kés zülék a z AC/D C adap teren ke reszt ül kap
ára mot.
b. Ha az 1. va gy 2. ébr eszté s szól, a m egfele lő A1 vag y A2 LED villo g. Nyomj a meg a
RA DIO / S LEEP vagy az A L 1.2 go mbot eg yszer az é bresz tés leá llítá sához , és a
köve tkező n apra tö rténő á tütem ezésé hez. Az é bresz tés LE D-je b ekapc solva m arad.
c. Am ikor az é bresz tő megs zólal , nyomja m eg a gomb ot egys zer. Az éb reszté s a
szu ndi idő tarta mára el hallg at, maj d utána i smét me gszól al (az al apért elmez ett
idő tarta m 5 perc)
d. Ha a más odik éb reszté s az első é bresz tés köz ben akt iváló dik, va gy éppe n szund i
üze mmódb an van, a m ásodi k ébresz tés fel ülírj a az első é bresz tést (az e lső ébr eszté s a
köve tkező n apon fo g újra be kapcs olni) .
e. Ha má s művel etet ne m végez nek a kés zülék kel, az é breszt és időt arta ma 1 óra.
Fénye rő-sz abály ozás
A gom bbal ál lítsa b e a LED -kije lző fény erejé t (INT ENZ ÍV/A LACS ONY /KI) . A művele t
csa k kika pcsol t rádió m ellet t végezh ető el.
Az al acson y inten zitás ú fényer ő kivál asztá sakor a h átold alon lé vő gombo t elfor gatva
áll íthat ja be ann ak kívá nt mér tékét. A g ombot l efelé f orgat va csök kenti , felfel é forga tva
ped ig növel i az alac sony fé nyerej ű kijel ző inte nzitá sát.
Meg jegyz és: az in tenzí v LED fé nyerej e nem áll íthat ó.
A rádi ó haszn álata
A rád ió hasz nálat a előtt te ljese n húzza k i az FM -anten nát, és á llíts a be a megf elelő h elyze tbe.
A leg jobb vé tel érde kében e lőfor dulha t, hogy a ké szülé ket az ab lak mel lé kell t enni. N e
rag assza l e, módos ítsa va gy köss e össze m ás ante nnákk al.
39

CR6
1. A RA DIO/ SLE EP gom bot egy szer röv iden me gnyomv a bekap csolh atja a rá diót. A
kij elzőn a z „O N” felira t jelen ik meg, ma jd bek apcso l a rádió. A r ádió ki kapc solás ához
nyom ja meg rö viden a g ombot .
2. A / gom bot röv iden me gnyomv a a rádió f rekven ciája 0 ,1 MH z lépés enként
áll íthat ó. A / gombo t nyomva t artv a a készü lék aut omati kusan k eresi az
áll omáso kat.
3. A VO L gomb e gyszer i megny omásá ra az „ L06” jele nik meg a k ijelz őn (ala pért elmeze tt
han gerő) . A / gombb al állí tsa be a ha ngerőt a z L00 (ha ng kik apcso lva) és a z
L15 ( maxim ális ha ngerő ) között .
4. Man uális v agy aut omati kus ker eséss el kere sse meg a k edvenc á llomá st, tar tsa nyo mva
a SE T gomb ot amíg a k ijelz őn a „P 01” villo gni nem k ezd. Adj a meg a ked venc ál lomás
szá mát a vag y a gombb al P01 és P 10 közöt t. A SE T gombo t még egy szer
meg nyomva m entse e l az állo mást. A k észül ék legfe ljebb 1 0 állom ást tud t ároln i.
5. A men tett ál lomás h allga tásáh oz nyomj a meg rövi den a SE T gomb ot.
6. Ha az á llomá st egy ol yan szá mhoz me nti, ame lyen má r van kor ábban m entet t állom ás,
a kés zülék a zt az új ál lomás sal fel ülírj a.
Meg jegyz és: Tarts a távol a rá diót fé nycsöv ektől , illet ve olya n elekt roniku s beren dezés ektől ,
ame lyek in terfe renci át okozh atnak a r ádióv al.
Alvá s
1. A rád ió üzem módba n lévő kés zülék en tar tsa nyom va a RAD IO/ SLEE P gomb ot az alvó
mód b ekapc solás ához. A z alvó üz emmód L ED- je beka pcsol . Az alvá s időta rtam ának 5,
15, 3 0, 45, 60 , 75, 90 va gy KI ér tékre v aló beá llítá sához n yomja me g többs zör röv iden a
RA DIO/ SLE EP gom bot.
2. Ha a ki jelző v issza vált az i dőkij elzés re, a RA DIO/ SLE EP gomb ot nyomv a tart va
meg jelen íthet i az alvá sból há tralé vő időt.
3. A rád ió a bepr ogramo zott id eig fol ytatja a l ejáts zást, m ajd aut omati kusan k ikap csol.
4. A rád iót a gom b megnyo másáv al kapc solha tja ki az a lvási i dő lejá rta el őtt.
Hib aelhá rítás
Ha az ó ra elek trosz tatiku s kisü lés vag y egyéb i nterf erenci a miatt h elyte len idő t mutat v agy
nem m űködi k megfe lelőe n, húzz a ki a DC- dugas zt az ára mellá tás meg szünt etésé hez (és
veg ye ki a tar talék e lemet ), majd p ár perc nyi vár akozás u tán ka pcsol ja be ism ét a kész üléke t.
Ekk or az órá s rádió v issza áll az al apér telmez ett beá llítá sokr a, amel yeket új ra meg ke ll adni a.
Műs zaki ad atok
Ára mforrá s: DC I N, 5 V / 300 mA
FM- frekv encia : 87,5– 108 MH z
Ára mfogya sztás : 1,5 W
Ára mfogya sztás k észen léti ál lapot ban: <1 W
Ala pérte lmeze tt beál lítás ok:
Idő formá tum 24 órá s
Idő 0: 00
1. és 2 . ébres ztés 6:0 0
Han gerő L6 (6. sz int)
Szu ndi idő tarta ma 05 ( 5 perc)
(A fen ti műsz aki ad atok elő zetes b ejele ntés né lkül fr issül hetne k)
HUNGARIAN
40


udio
. z o.o.
Warsaw oland
e
www.blaupunkt.com
W przypadku pytań lub problemów
prosimy o kontakt z naszym serwisem.
please contact our service.
.pl
Wszelkie prawa zastrzeżone. Wszystkie naz wy marek są zarejestrowanymi
znakami towarowymi należącymi do odpowiednich podmiotów.
Dane i parametry techniczne mogą ulec zmianie bez wcześniejszego uprzedzenia.
All rights reserved. All brand names are registered trademarks of their
respective owners. Specications are subject to change without prior notice.
 Loading...