

Blaupunkt Competence Center Security
Security Brand Pro GmbH
Mondstrasse 2-4
85622 Feldkirchen, Germany
E-Mail: contact@blaupunkt-sc.com
www.blaupunkt.com/service
Follow the instruction in this document to setup and use the accessory.
For further setting and operation details, please visit the Blaupunkt website
service.blaupunkt-security.com to download the complete manual.
DG2-Pro
2G GSM Dongle
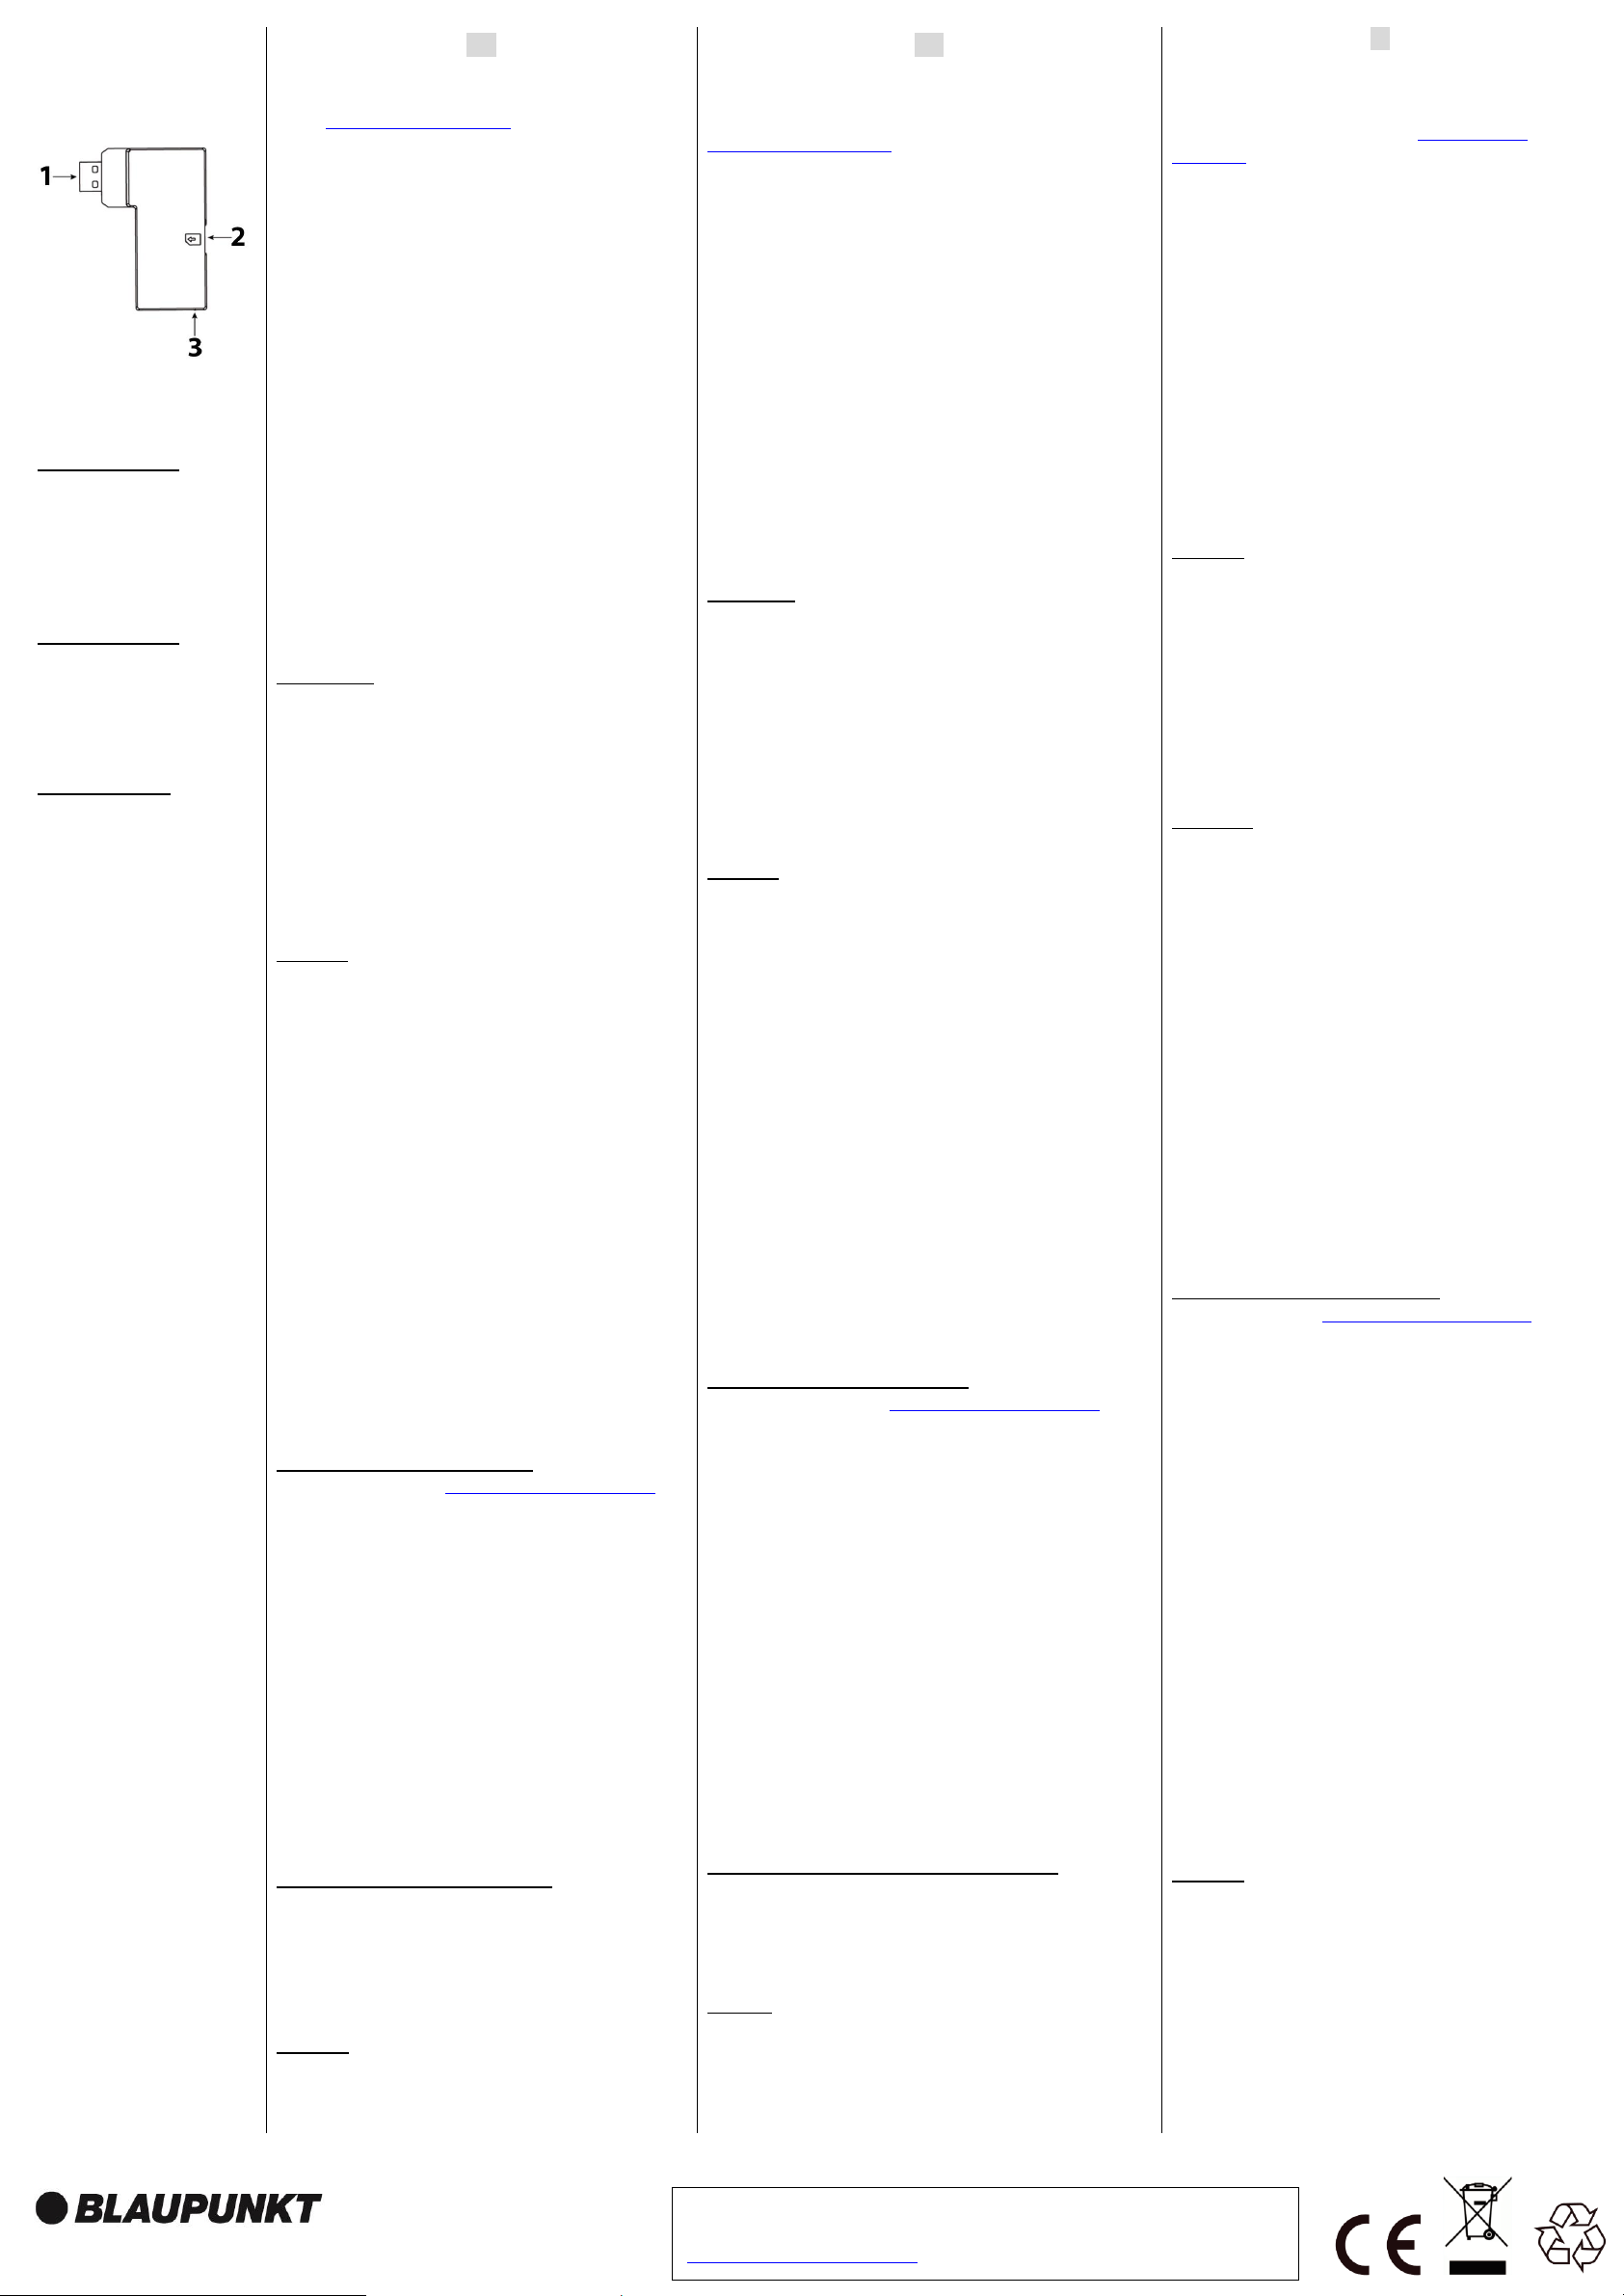
EN | GSM Dongle
1. USB
2. Micro SIM Card
compartment
3. Blue LED (inside casing)
DE | Funk-
DE | GSM Dongle
1. USB
2. Micro-SIM-
Kartensteckplatz
3. Blaue LED (im Gehäuse)
IT | GSM Dongle
1. USB
2. Slot Micro SIM Card
3. LED Blu (Interno)
EN
Follow instruction in this document to setup and use the accessory.
For further setting and operation detail, please visit Blaupunkt
website service.blaupunkt-security.com to download the complete
manual.
Use Case of the DG2-Pro GSM backup:
If the GSM dongle is installed and there is an Internet breakout (e.g.
an intruder disconnect the router or cut off the complete energy of
the home) the Q-Pro Hub with its internal back up battery and this
GSM dongle will send a push notification to alert each user of the
Internet failure. With the DG2 GSM dongle the Q-Pro Alarm System
can also alert the user for any event while the router is offline.
Additionally the user will be able to connect to the panel via the app
or web interface for basic management as Arm or Disarm.
Note: The GSM dongle does not provide GSM backup for the video
camera IPC-S1. For image verification while the network is offline
we recommend the use of PIR with cameras (e.g. IRC-S2 or IRCP4).
The DG2-Pro works under 2G network and offers backup for alarm
notifications and standard App overview. We recommend to use this
backup option in areas where there is no 4G communication. We do
not recommend to use the DG2-Pro as standalone communication
method, it is meant to be backup only.
Getting Started
1. Search for a telecom provider with good signal strength on the
installation location.
2. Acquire a Micro SIM size card from your selected Telecom
Provider. The Micro SIM Card needs to have mobile internet data
available, there is no need for SMS or mobile airtime. The amount of
internet data needed will change depending its usage, for backup
usage 100Mb is enough.
3. Ask the telecom provider to disable the PIN code from the Micro
SIM Card. Alternative insert the Micro SIM card on your smartphone
and disable the PIN code.
Installation
1. Power OFF the Q-Pro HUB by switching the Q-Pro HUB battery
switch to OFF and unplugging the AC adaptor.
2. Insert the Micro SIM Card into the Micro SIM Card Compartment
located at the side of the GSM Dongle. . (Refer to the picture
point 2).
3. Install the GSM Dongle into the USB port located at the back of
the Q-Pro Hub.
4. Power ON the Q-Pro HUB by switching the Q-Pro HUB battery
switch to ON and plugin in the AC adaptor.
5. The dongle’s Blue LED will light up.
6. After the installation wait for a couple of minutes until the GSM
dongle receives signal properly.
• If the GSM dongle or the SIM Card are removed the Q-Pro
will light up the failure LED and send a notification via the
Ethernet cable. To install the Micro SIM card or the dongle
back power OFF the panel first.
• If the installation of the Micro SIM card or GSM dongle is
done while the panel is powered ON they won’t be detected
properly and GSM system won’t work.
Access Point Name (APN) configuration
1. Go to the Web Interface https://eu.bphomeconnect.com/BP/ and
login to your Q-Pro Hub. Go to Settings → Panel→ Panel →
GSM
2. For some telecom providers the Q-Pro Hub would fill-up the APN
settings automatically. Check that the APN settings are filled
up. If there are refer to step 5, if not refer to step 3.
3. Click “Overridden by HPS” checkbox and set up the APN
settings manually. Ask your telecom provider for your APN
settings: “APN name”, “username” and “password”.
4. Click submit to save the changes.
5. At the “RSSI” field check that the GSM signal strength signal is 6
or above. If the signal is below 6 try another location for the
Q-Pro or test with other telecom provider.
• If GSM signal is not detected: APN settings might be
outdated. Please refer to step 3.
Select the desired communication method:
1. Go to the Web Interface go to Settings → Panel→ Panel →
Internet Communication
2. Select “Ethernet & GSM” to work via the router as your main
communication method and GSM only as backup in case router
doesn’t work.
Frequency: GPRS 900/1800 MHz
DE
Befolgen Sie die Anweisungen in dieser Schnellstartanleitung, um das
Zubehör einzurichten und zu nutzen. Weitere Informationen zu den
Einstellungen und zum Betrieb finden Sie auf der Blaupunkt-Website
service.blaupunkt-security.com, um das vollständige Handbuch
herunterzuladen.
Anwendungsbereich des DG2-Pro:
Wenn der GSM-Dongle installiert ist und ein Fehler in der
Internetverbindung vorliegt (z. B. ein Eindringling trennt den Router oder
schaltet die gesamte Stromversorgung der Wohnung ab), sendet der Q-Pro
Hub dank seiner internen Backup-Batterie und dem GSM-Dongle eine
Push-Benachrichtigung, um jeden Benutzer über den Internetfehler zu
informieren. Mit dem DG2-Pro GSM-Dongle kann das Q-Pro Alarm System
den Benutzer auch über Ereignisse informieren, wenn der Router offline ist.
Darüber hinaus kann der Benutzer über die App oder das Webinterface
eine Verbindung zum Panel herstellen, um die grundlegenden Funktionen
wie das Scharf oder Unscharf schalten der Alarmanlage zu steuern.
Hinweis: Der GSM-Dongle bietet keine Backup-Sicherung für die IPC-S1
Videokamera. Zur Bildverifizierung bei offline geschaltetem Netzwerk
empfehlen wir die Verwendung von Bewegungsmeldern mit Kameras (z. B.
IRC-S2 oder IRC-P4).
Der DG2-Pro arbeitet mit einem 2G-Netzwerk und kann als Backup für
Alarmbenachrichtigungen und die Standard-App-Übersicht verwendet
werden. Wir empfehlen diese Sicherungsoption in Bereichen zu
verwenden, in denen keine 4G-Kommunikation besteht. Es wird nicht
empfohlen, den DG2-Pro als eigenständige Kommunikationsmethode zu
verwenden. Er ist nur als Backup gedacht.
Erste Schritte
1. Suchen Sie nach einem Telekommunikationsanbieter mit guter
Signalstärke am Installationsort.
2. Erwerben Sie eine Micro-SIM-Karte von Ihrem ausgewählten
Telekommunikationsanbieter. Für die Micro-SIM-Karte müssen mobile
Internetdaten verfügbar sein. SMS oder Mobilfunk sind nicht erforderlich.
Die benötigte Menge an Internetdaten ändert sich je nach Nutzung. Für
die Backup-Nutzung reichen 100 MB.
3. Wir bitten Sie den Telekommunikationsanbieter, den PIN-Code Ihrer
Micro-SIM-Karte zu deaktivieren. Alternativ legen Sie die Micro-SIM-Karte
in Ihr Smartphone ein und deaktivieren den PIN-Code.
Installation
1. Schalten Sie den Q-ProHub aus, indem Sie den Q-ProHub-
Batterieschalter auf OFF stellen und den Netzadapter abziehen.
2. Legen Sie die Micro-SIM-Karte in das Micro-SIM-Kartenfach an der
Seite des GSM-Dongles ein. (Siehe Bildpunkt 2).
3. Stecken Sie den GSM-Dongle in den USB-Anschluss an der Rückseite
des Q-ProHub.
4. Schalten Sie den Q-ProHub ein, indem Sie den Q-ProHub-
Batterieschalter auf ON stellen und das Netzteil einstecken.
5. Die blaue LED des Dongle leuchtet auf.
6. Warten Sie nach der Installation einige Minuten, bis der GSM-Dongle
das Signal ordnungsgemäß empfängt.
• Wenn der GSM-Dongle oder die SIM-Karte entfernt werden,
leuchtet die Fehler-LED des Q-ProHub auf und sendet eine
Benachrichtigung über das Ethernet-Kabel. Um die Micro-SIMKarte oder den Dongle einzustecken, schalten Sie zuerst das
Panel aus.
• Wenn die Micro-SIM-Karte oder der GSM-Dongle eingesteckt
werden, während das Panel eingeschaltet ist, werden sie nicht
richtig erkannt und das GSM-System funktioniert nicht.
Konfiguration des (APN) Zugangspunkts
1. Rufen Sie das Web Portal https://eu.bphomeconnect.com/BP/ auf und
melden Sie sich bei Ihrem Q-ProHub an. Gehen Sie zu Einstellungen →
Panel → Panel → GSM
2. Bei einigen Telekommunikationsanbietern füllt der Q-Pro Hub die APN-
Einstellungen automatisch auf. Stellen Sie sicher, dass die APNEinstellungen gefüllt sind. Wenn dies der Fall ist, beziehen Sie sich auf
Schritt 5, falls nicht, beziehen Sie sich auf Schritt 3.
3. Klicken Sie auf das Kontrollkästchen "Von HPS überschrieben" und
richten Sie die APN-Einstellungen manuell ein. Fragen Sie Ihren
Telekommunikationsanbieter nach Ihren APN-Einstellungen: "APN-Name",
"Benutzername" und "Passwort".
4. Klicken Sie auf Senden, um die Änderungen zu speichern.
5. Überprüfen Sie im Feld "RSSI", ob die GSM-Signalstärke 6 oder höher
ist. Wenn das Signal unter 6 liegt, versuchen Sie es an einem anderen Ort
für den Q-ProHub oder testen Sie es mit einem anderen
Telekommunikationsanbieter.
• Wenn kein GSM-Signal erkannt wird: Sind die APN-Einstellungen
möglicherweise veraltet. Bitte beziehen Sie sich in diesem fall auf
Schritt 3.
Wählen Sie die gewünschte Kommunikationsmethode:
1. Gehen Sie zum Web Portal und gehen Sie zu Einstellungen → Panel
→ Panel → Internetkommunikation
2. Wählen Sie „Ethernet & GSM“ um den Router als
Hauptkommunikationsmethode zu nutzen, und GSM nur als
Backup, falls der Router nicht funktioniert.
Frequenz:
GPRS 900/1800 MHz
IT
Seguire le istruzioni contenute in questo documento per impostare e
utilizzare l'accessorio. Per ulteriori dettagli su impostazioni e
operazioni, visitare il sito Web Blaupunkt service.blaupunkt-
security.com per scaricare il manuale completo
Usa caso del backup GSM DG2-Pro:
Se il dongle GSM è installato e vi è un'interruzione di Internet (ad
esempio un intruso disconnette il router o viene staccata l'energia
elettrica di casa), la centrale Q-Pro con la batteria di backup interna e
il dongle GSM, invierà una notifica push per avvisare ogni utente
dell'errore di Internet. Con il dongle GSM DG2, il sistema di allarme,
può anche avvisare l'utente di qualsiasi evento mentre il router è
offline. Inoltre l'utente sarà in grado di connettersi al pannello tramite
l'app o l'interfaccia web per la gestione di base come Armare o
Disarmare
Nota: il dongle GSM non fornisce il backup GSM per la videocamera
IPC-S1. Per la verifica dell'immagine mentre la rete è offline,
raccomandiamo l'uso del PIR con la fotocamera (ad esempio IRC-S2
o IRC-P4).
DG2-Pro funziona con la rete 2G e offre backup per notifiche di allarmi
e panoramica delle app standard. Si consiglia di utilizzare questa
opzione di backup in aree in cui non vi è alcuna comunicazione 4G.
Non è consigliabile utilizzare il DG2-Pro come metodo di
comunicazione stand-alone ma solo come backup.
Per Iniziare
1. Rivolgersi ad un utenza telefonica che abbia un buon segnale nella
zona d'installazione
2. Acquistare una Micro SIM dal gestore selezionato. La Micro SIM
Card deve disporre di dati Internet mobili disponibili, non sono
necessari SMS. La quantità di dati Internet necessari cambierà a
seconda dell'utilizzo, per l'utilizzo di backup 100 MB è sufficiente.
3. Chiedere al gestore di servizio, di disabilitare il codice PIN dalla
Micro SIM Card. In alternativa, inserire la scheda Micro SIM
sullo smartphone e disabilitare il codice PIN.
Installazione
1. Spegnere la centrale Q-Pro spostando l'interruttore della batteria
su OFF e scollegando l'adattatore AC
2. Inserire la Micro SIM Card nello slot situato sul lato del Dongle
GSM. (Fare riferimento al punto 2 dell'immagine).
3. Installare il dongle GSM nella porta USB situata sul retro della
centrale
4. Accendere la centrale tramite l'interruttore della batteria e
inserendo l'alimentatore
5. Il LED blu del dongle si illuminerà.
6. Dopo l'installazione, attendere un paio di minuti finché il dongle
GSM non riceve correttamente il segnale.
• Se il dongle GSM o la scheda SIM vengono rimossi, la centrale
accenderà il LED di errore e invierà una notifica tramite il cavo LAN.
Per installare la scheda Micro SIM o il dongle, spegnere prima il
pannello.
• Se l'installazione della scheda Micro SIM o del dongle GSM viene
eseguita mentre il pannello è acceso, non verranno rilevato
correttamente e il sistema GSM non funzionerà.
Configurazione Access Point Name (APN)
1. Vai all'interfaccia Web https://eu.bphomeconnect.com/BP/ e accedi
al tuo account nel pannello del Q-Pro. Vai a Impostazioni →
Pannello→Pannello→GSM
2. Per alcuni provider di telefonia mobile,la centrale Q-Pro potrebbe
riempire automaticamente le impostazioni APN. Verifica che le
impostazioni APN siano complete.
3. Fare clic sulla casella di controllo "Sostituito da HPS" e configurare
manualmente le impostazioni APN. Chiedere al proprio operatore
telefonico le impostazioni APN: "Nome APN", "nome utente" e
"password".
4. Fare clic su Invia per salvare le modifiche.
5. Nel campo "RSSI" verificare che il segnale di intensità del segnale
GSM sia 6 o superiore. Se il segnale è inferiore a 6, provare un'altra
posizione del pannello o testare con un altro operatore telefonico.
• Se il segnale GSM non viene rilevato: le impostazioni APN
potrebbero essere obsolete. Si prega di fare riferimento al
passaggio 3
1. Andare all'interfaccia Web su
Impostazioni→Pannello→Pannello→Comunicazione Internet
2. Selezionare "Ethernet e GSM" per utilizzare il router come metodo
di comunicazione principale e GSM solo come backup nel caso in cui
il router non funzioni.
Frequenze:
GPRS 900/1800 MHz
Blaupunkt Competence Center Security
Security Brand Pro GmbH
Mondstrasse 2-4
85622 Feldkirchen, Germany
E-Mail: contact@blaupunkt-sc.com
www.blaupunkt.com/service
Follow the instruction in this document to setup and use the accessory.
For further setting and operation details, please visit the Blaupunkt website
service.blaupunkt-security.com to download the complete manual.
DG2-Pro
2G GSM Dongle
ES | GSM Dongle
1. USB
2. Ranura para Tarjeta
Micro SIM
3. LED Azul (interior)
DE | Funk-
PL | Klucz GSM
1. USB
2. Przedział karty Micro SIM
3. Niebieska dioda LED
(obudowa wewnętrzna)
FIN | GSM nettitikku
1. USB
2. Micro SIM -paikka
3. Sinien LED (kotelon
sisällä)
ES
Siga las instrucciones de este documento para configurar y usar el
accesorio. Para más detalles de configuración y manejo, visite la web
service.blaupunkt-security.com para descargar el manual completo.
Caso de uso del DG2-Pro GSM (Sistema de respaldo):
Si el módulo GSM está instalado y falla la conexión a internet (p.ej. un
intruso desconecta el router o corta la red eléctrica de la vivienda), con la
batería de respaldo del panel y este módulo GSM el panel Q-Pro podrá
enviar una notificación push para alertar al usuario del fallo de internet.
Además, la Q-Pro podrá alertarle de cualquier otro evento mientras no
funcione el router. Tambien le permitirá conectarse al panel a través de la
App para realizar funciones básicas como armar y desarmar.
Nota: El módulo GSM no funciona como sistema de respaldo GSM para
la cámara de video IPC-S1. Para verificar la imagen mientras la red no
funcione, recomendamos usar PIR con cámara (p.ej. IRC-S2 o IRC-P4).
El DG2-Pro funciona con la red 2G y sirve como sistema de respaldo para
las notificaciones y para poder comprobar el estado general del panel.
Recomendamos utilizar esta opción en áreas donde no hay comunicación
4G. No recomendamos usarlo como método de comunicación
independiente. Está diseñado para ser exclusivamente un Sistema de
respaldo.
Primeros Pasos
1. Busca un proveedor de telefonía que tenga buena cobertura en el lugar
de instalación.
2. Adquiera una tarjeta Micro SIM del proveedor de telefonía
seleccionado. La tarjeta Micro SIM necesita tener datos móviles - los SMS
o las llamadas no son necesarios. La cantidad de datos necesarios
cambiará dependiendo de su uso. Si solo lo usa como Sistema de
respaldo, con 100Mb es suficiente.
3. Pídale a su proveedor que desactive el código PIN de la tarjeta Micro
SIM. Alternativamente, también puede insertar la tarjeta Micro SIM en su
móvil y desactivarlo desde el móvil.
Instalación
1. Apague el Panel Q-Pro desconectando la alimentación y apagando
el interruptor de la batería interna (OFF).
2. Inserte la tarjeta Micro SIM en la ranura lateral del módulo GSM
(Véase el punto número 2 de la imagen).
3. Conecte el modulo GSM al puerto USB localizado en la parte trasera
del Panel Q-Pro.
4. Ahora encienda el Panel Q-Pro encendiendo primero el interruptor
de la batería (ON) y después conectando de nuevo el conector de
alimentación.
5. El LED azul del modulo GSM se encenderá.
6. Tras la instalación, espera varios minutos hasta que el modulo GSM
reciba la señal correctamente.
• Si desenchufa el módulo GSM o saca la tarjeta SIM, se encenderá
el LED central de fallo y le enviará una notificación a través del cable
Ethernet. Para instalar de nuevo la tarjeta Micro SIM o el modulo
GSM, apague el panel primero.
• Si insertas la tarjeta Micro SIM o el módulo GSM mientras está
encendido el panel, no se detectará la señal GSM correctamente y
por tanto no funcionará.
Configuración del APN (Access Point Name)
1.Ve a la interfaz web https://eu.bphomeconnect.com/BP/ e inicia
session en su Panel Q-pro. Ve a configuración → Panel→ Panel →
GSM
2.Para algunos proveedores, la configuración APN se rellenará
automáticamente - compruebe si se ha rellenado. Si es el caso, ve al
paso 5. De lo contrario continue con el paso 3.Apriete la casilla
“Sobrescribir APN” y configure el APN manualmente. Pregunte a su
proveedor de telefonía los siguientes datos: “Nombre - APN”, “Usuario” y
“contraseña”.
4.Apreta enviar para guardar los cambios realizados.
5.En el campo “RSSI” revise que la señal GSM sea 6 o mayor. Si la
intensidad de señal es menor que 6, mueva el panel a otra localización o
prueba con otro proveedor.
• Si el panel no detecta la señal GSM: revise la configuración APN,
pordría estar obsoleta. Véase el paso 3.
Seleccione el método de comunicación deseado:
1. Ve a configuración → Panel→ Panel → Método de comunicación.
2. Selecione “Ethernet & GSM” para que el método de comunicacion
principal sea IP (Ethernet) y el Sistema GSM funcione como sistema de
respaldo en caso de que no funcione el router.
Frecuencia:
GPRS 900/1800 MHz
PL
Postępuj zgodnie z instrukcją, aby skonfigurować i używać
akcesoriów. Więcej szczegółów dotyczących ustawień, instalacji oraz
w celu pobrania pełnej instrukcji obsługi należy odwiedzić stronę
serwisu Blaupunkt service.blaupunkt-security.com
Użyj przypadku kopii zapasowej GSM DG2-Pro:
Jeśli modem GSM jest zainstalowany i istnieje awaria Internetu (np.
Intruz odłącza router lub odcina pełną energię domu), Q-Pro Hub z
wewnętrzną baterią podtrzymującą i ten klucz GSM wyśle
powiadomienie push do powiadomić każdego użytkownika o awarii
Internetu. Za pomocą klucza sprzętowego DG2 GSM system
alarmowy Q-Pro może również ostrzegać użytkownika o każdym
zdarzeniu, gdy router jest w trybie offline. Dodatkowo użytkownik
będzie mógł łączyć się z panelem za pośrednictwem aplikacji lub
interfejsu internetowego w celu podstawowego zarządzania, jak
uzbrojenie lub rozbrojenie.
Uwaga: Klucz sprzętowy GSM nie zapewnia kopii zapasowej GSM dla
kamery IPC-S1. W celu weryfikacji obrazu, gdy sieć jest w trybie offline,
zalecamy użycie PIR z kamerami (np. IRC-S2 lub IRC-P4).
DG2-Pro działa w sieci 2G i oferuje kopie zapasowe powiadomień o
alarmach i standardowym przeglądzie aplikacji. Zalecamy korzystanie
z tej opcji kopii zapasowej w obszarach, w których nie ma
komunikacji 4G. Nie zalecamy używania DG2-Pro jako samodzielnej
metody komunikacji, ma ona być tylko kopią zapasową.
Pierwsze kroki
1. Wyszukaj dostawcę usług telekomunikacyjnych o dobrej sile
sygnału w miejscu instalacji.
2. Uzyskaj kartę rozmiaru Micro SIM od wybranego dostawcy usług
telekomunikacyjnych. Karta Micro SIM musi mieć dostępne mobilne
dane internetowe, nie ma potrzQeby wysyłania SMS-ów i mobilnego
czasu antenowego. Ilość potrzebnych danych w Internecie zmieni się
w zależności od jej użycia, do wykorzystania kopii zapasowej.
Minimalnie wystarczy 100 MB.
3. Poproś operatora telekomunikacyjnego, aby wyłączył kod PIN z
karty Micro SIM. Alternatywnie włóż kartę Micro SIM do smartfona i
wyłącz kod PIN.
Instalacja
1. Wyłącz zasilanie Hub Q-Pro, przełączając przycisk akumulatora Q-
Pro HUB w położenie OFF i odłączając zasilacz sieciowy.
2. Włóż kartę Micro SIM do przegródki karty Micro SIM znajdującej się
z boku klucza GSM. (Patrz punkt 2).
3. Zainstaluj klucz GSM w porcie USB znajdującym się z tyłu
urządzenia Q-Pro.
4. Włącz Hub Q-Pro, przełączając przycisk baterii Q-Pro HUB w
pozycję ON i wtyczkę w zasilaczu.
5. Włączy się niebieska dioda LED klucza sprzętowego.
6. Po zakończeniu instalacji odczekaj kilka minut, aż klucz GSM
odbierze sygnał poprawnie.
• Po usunięciu klucza GSM lub karty SIM Q-Pro zapali diodę LED
awarii i wyśle powiadomienie za pośrednictwem kabla Ethernet. Aby
zainstalować kartę Micro SIM lub klucz sprzętowy, należy najpierw
WYŁĄCZYĆ panel.
• Jeśli instalacja karty Micro SIM lub klucza GSM zostanie wykonana,
gdy centrala urządzenia jest włączona, nie zostaną wykryte
prawidłowo i system GSM nie będzie działał.
Konfiguracja nazwy punktu dostępu (APN)
1. Przejdź do strony internetowej https://eu.bphomeconnect.com/BP/ i
zaloguj się do swojego centrum Q-Pro. Przejdź do Ustawienia→
Panel → Panel → GSM
2. W przypadku niektórych dostawców usług telekomunikacyjnych
centrum Q-Pro automatycznie uzupełni ustawienia APN. Sprawdź, czy
ustawienia APN są wypełnione. Jeśli są wpisane przejdź do kroku 5,
jeśli nie, patrz krok 3.
3. Kliknij pole wyboru "Zastąpiono przez HPS" i ręcznie skonfiguruj
ustawienia APN. Zapytaj swojego dostawcę usług
telekomunikacyjnych o ustawienia APN: "nazwa APN", "nazwa
użytkownika" i "hasło".
4. Kliknij przycisk Wyślij, aby zapisać zmiany.
5. W polu "RSSI" sprawdź, czy sygnał siły sygnału GSM wynosi 6 lub
więcej. Jeśli sygnał jest poniżej 6, spróbuj użyć innej lokalizacji dla QPro lub przetestuj z innym dostawcą usług telekomunikacyjnych.
• Jeśli sygnał GSM nie zostanie wykryty: ustawienia APN mogą być
nieaktualne. Zobacz krok 3.
Wybierz żądaną metodę komunikacji:
1. Przejdź do interfejsu internetowego przejdź do Ustawienia→ Panel
→Panel →Komunikacja internetowa
2. Wybierz "Ethernet i GSM", aby pracować z routerem jako główną
metodą komunikacji, a GSM tylko jako backup w przypadku, gdy router
nie działa.
Częstotliwość:
GPRS 900/1800 MHz
FI
Noudata tämän asiakirjan ohjeita lisävarusteen asentamiseksi ja
käyttämiseksi. Lisätietoja asennuksesta ja käytöstä on Blaupunktin
verkkosivustolla service.blaupunkt-security.com
DG2-Pro GSM –varmistuksen käyttötarkoitus:
Jos GSM-nettitikku on asennettu ja Internet-yhteys katkeaa (esim.
Tunkeilija irrottaa reitittimen tai katkaisee kohteesta virran) Q-Prokeskittimen sisäinen varmuusakku ja tämä GSM-nettitikku lähettävät
push-ilmoituksen. Ilnmoitus hälyttää jokaisen käyttäjän
mobiililaitteessa ilmoittaen Internet-viasta. DG2 GSM-donglen avulla
Q-Pro-hälytysjärjestelmä voi myös ilmoittaa käyttäjälle kaikista
tapahtumista, kun reititin on offline-tilassa. Lisäksi käyttäjä voi
muodostaa yhteyden paneeliin sovelluksen tai web-käyttöliittymän
kautta perustoimintojen käyttämiseksi.
Huomio: GSM-nettitikku ei tarjoa GSM-varmennusta videokameralle
IPC-S1. Kuvanvarmistuksessa, kun verkko on offline-tilassa,
suosittelemme kameroilla varutettujen liiketunnistimien käyttämistä
(esim. IRC-S2 tai IRC-P4).
DG2-Pro toimii 2G-verkon alla ja tarjoaa varmuusyhteyden hälytysten
ilmoituksista ja sovelluksen yleiskatsauksesta. Suosittelemme tämän
yhteysvaihtoehdon käyttöä alueilla, joilla ei ole 4G-yhteyttä. Emme
suosittele DG2-Proata erillisenä viestintämenetelmänä, vaan sen on
tarkoitus olla vain varmuusyhteys internetin katketessa.
Aloitus
1. Etsi teleoperaattori, jolla on hyvä signaalivoima asennuspaikassa.
2. Hanki Micro SIM -kortti valitsemaltasi palveluntarjoajalta. Mikro SIM-
kortilla on oltava käytettävissä data-yhteys, ei ole tarvetta
tekstiviesteille tai puheluille. Tarvittava datan määrä vaihtelee riippuen
sen käytöstä. Varmuuskopiointiin 100Mb on tarpeeksi.
3.Pyydä telekoperaattoria poistamaan PIN-koodin kysely Micro SIM-
kortilta. Vaihtoehtoisesti aseta Micro SIM-kortti älypuhelimeen ja poista
PIN-koodi käytöstä.
Asennus
1. Kytke Q-Pro HUB pois päältä kytkemällä Q-Pro HUB -akun kytkin
OFF-asentoon ja irrottamalla verkkolaite.
2. Aseta Micro SIM -kortti Micro SIM -korttipaikkaan, joka sijaitsee
GSM-nettitikun sivulla. . (Katso kuva 2).
3. Asenna GSM Dongle Q-Pro Hubin takana olevaan USB-porttiin
4. Käynnistä Q-Pro HUB kytkemällä Q-Pro HUB -akun kytkin ON-
asentoon ja liitä verkkolaite.
5. Kulman sininen LED-merkkivalo syttyy.
6. Asennuksen jälkeen odota muutama minuutti, kunnes GSM-
nettitikku vastaanottaa signaalin oikein.
• Jos GSM-nettitikku tai SIM-kortti on poistettu, Q-Pro käynnistää
häiriövalon ja lähettää ilmoituksen Ethernet-kaapelin kautta.
Asentaaksesi Micro SIM-kortti tai nettitikun uudestaa laita hälytin ensin
pois päältä.
• Jos mikro SIM-kortin tai GSM-donglen asennus on suoritettu, kun
hälytin on kytketty päälle, niitä tunnisteta oikein ja GSM-järjestelmä ei
toimi.
GSM -verkkoyhteyden (APN) konfigurointi
1. Siirry Web-käyttöliittymään https://eu.bphomeconnect.com/BP/ ja
kirjaudu Q-Pro-laitteeseen. Siirry kohtaan Asetukset → Paneeli →
Paneeli → GSM
2. Useimmilla tietoliikenneoperaattoreilla Q-Pro Hub täyttää APN-
asetukset automaattisesti. Tarkista, että APN-asetukset täyttyvät. Jos
asetukset löytyvät siirry vaiheeseen 5, muuten siirry vaiheeseen 3.
3. Napsauta "Overridden by HPS" -valintaruutu ja määritä APN-
asetukset manuaalisesti. Kysy tietoliikenneoperaattorilta APNasetuksistasi: "APN-nimi", "käyttäjätunnus" ja "salasana".
4. Tallenna muutokset napsauttamalla Lähetä.
5. Tarkista "RSSI" -kenttään, että GSM-signaalin voimakkuussignaali
on 6 tai yli. Jos signaali on alle 6, kokeile toista sijaintia Q-Pro: lle tai
testaat toista operaattoria.
• Jos GSM-signaalia ei tunnisteta: APN-asetukset voivat olla
vanhentuneita. Katso vaihe 3.
Valitse haluamasi tiedonsiirtomenetelmä:
1. Siirry Web-käyttöliittymään valitsemalla Asetukset → Paneeli →
Paneeli → Internet-viestintä
2. Valitse Ethernet ja GSM toimimaan reitittimen kautta
pääviestintämenetelmänä ja GSM vain varmuuskopioina, jos reititin ei
toimi.
Taajuus:
GPRS 900/1800 MHz

Blaupunkt Competence Center Security
Security Brand Pro GmbH
Mondstrasse 2-4
85622 Feldkirchen, Germany
E-Mail: contact@blaupunkt-sc.com
www.blaupunkt.com/service
Follow the instruction in this document to setup and use the accessory.
For further setting and operation details, please visit the Blaupunkt website
service.blaupunkt-security.com to download the complete manual.
DG2-Pro
2G GSM Dongle
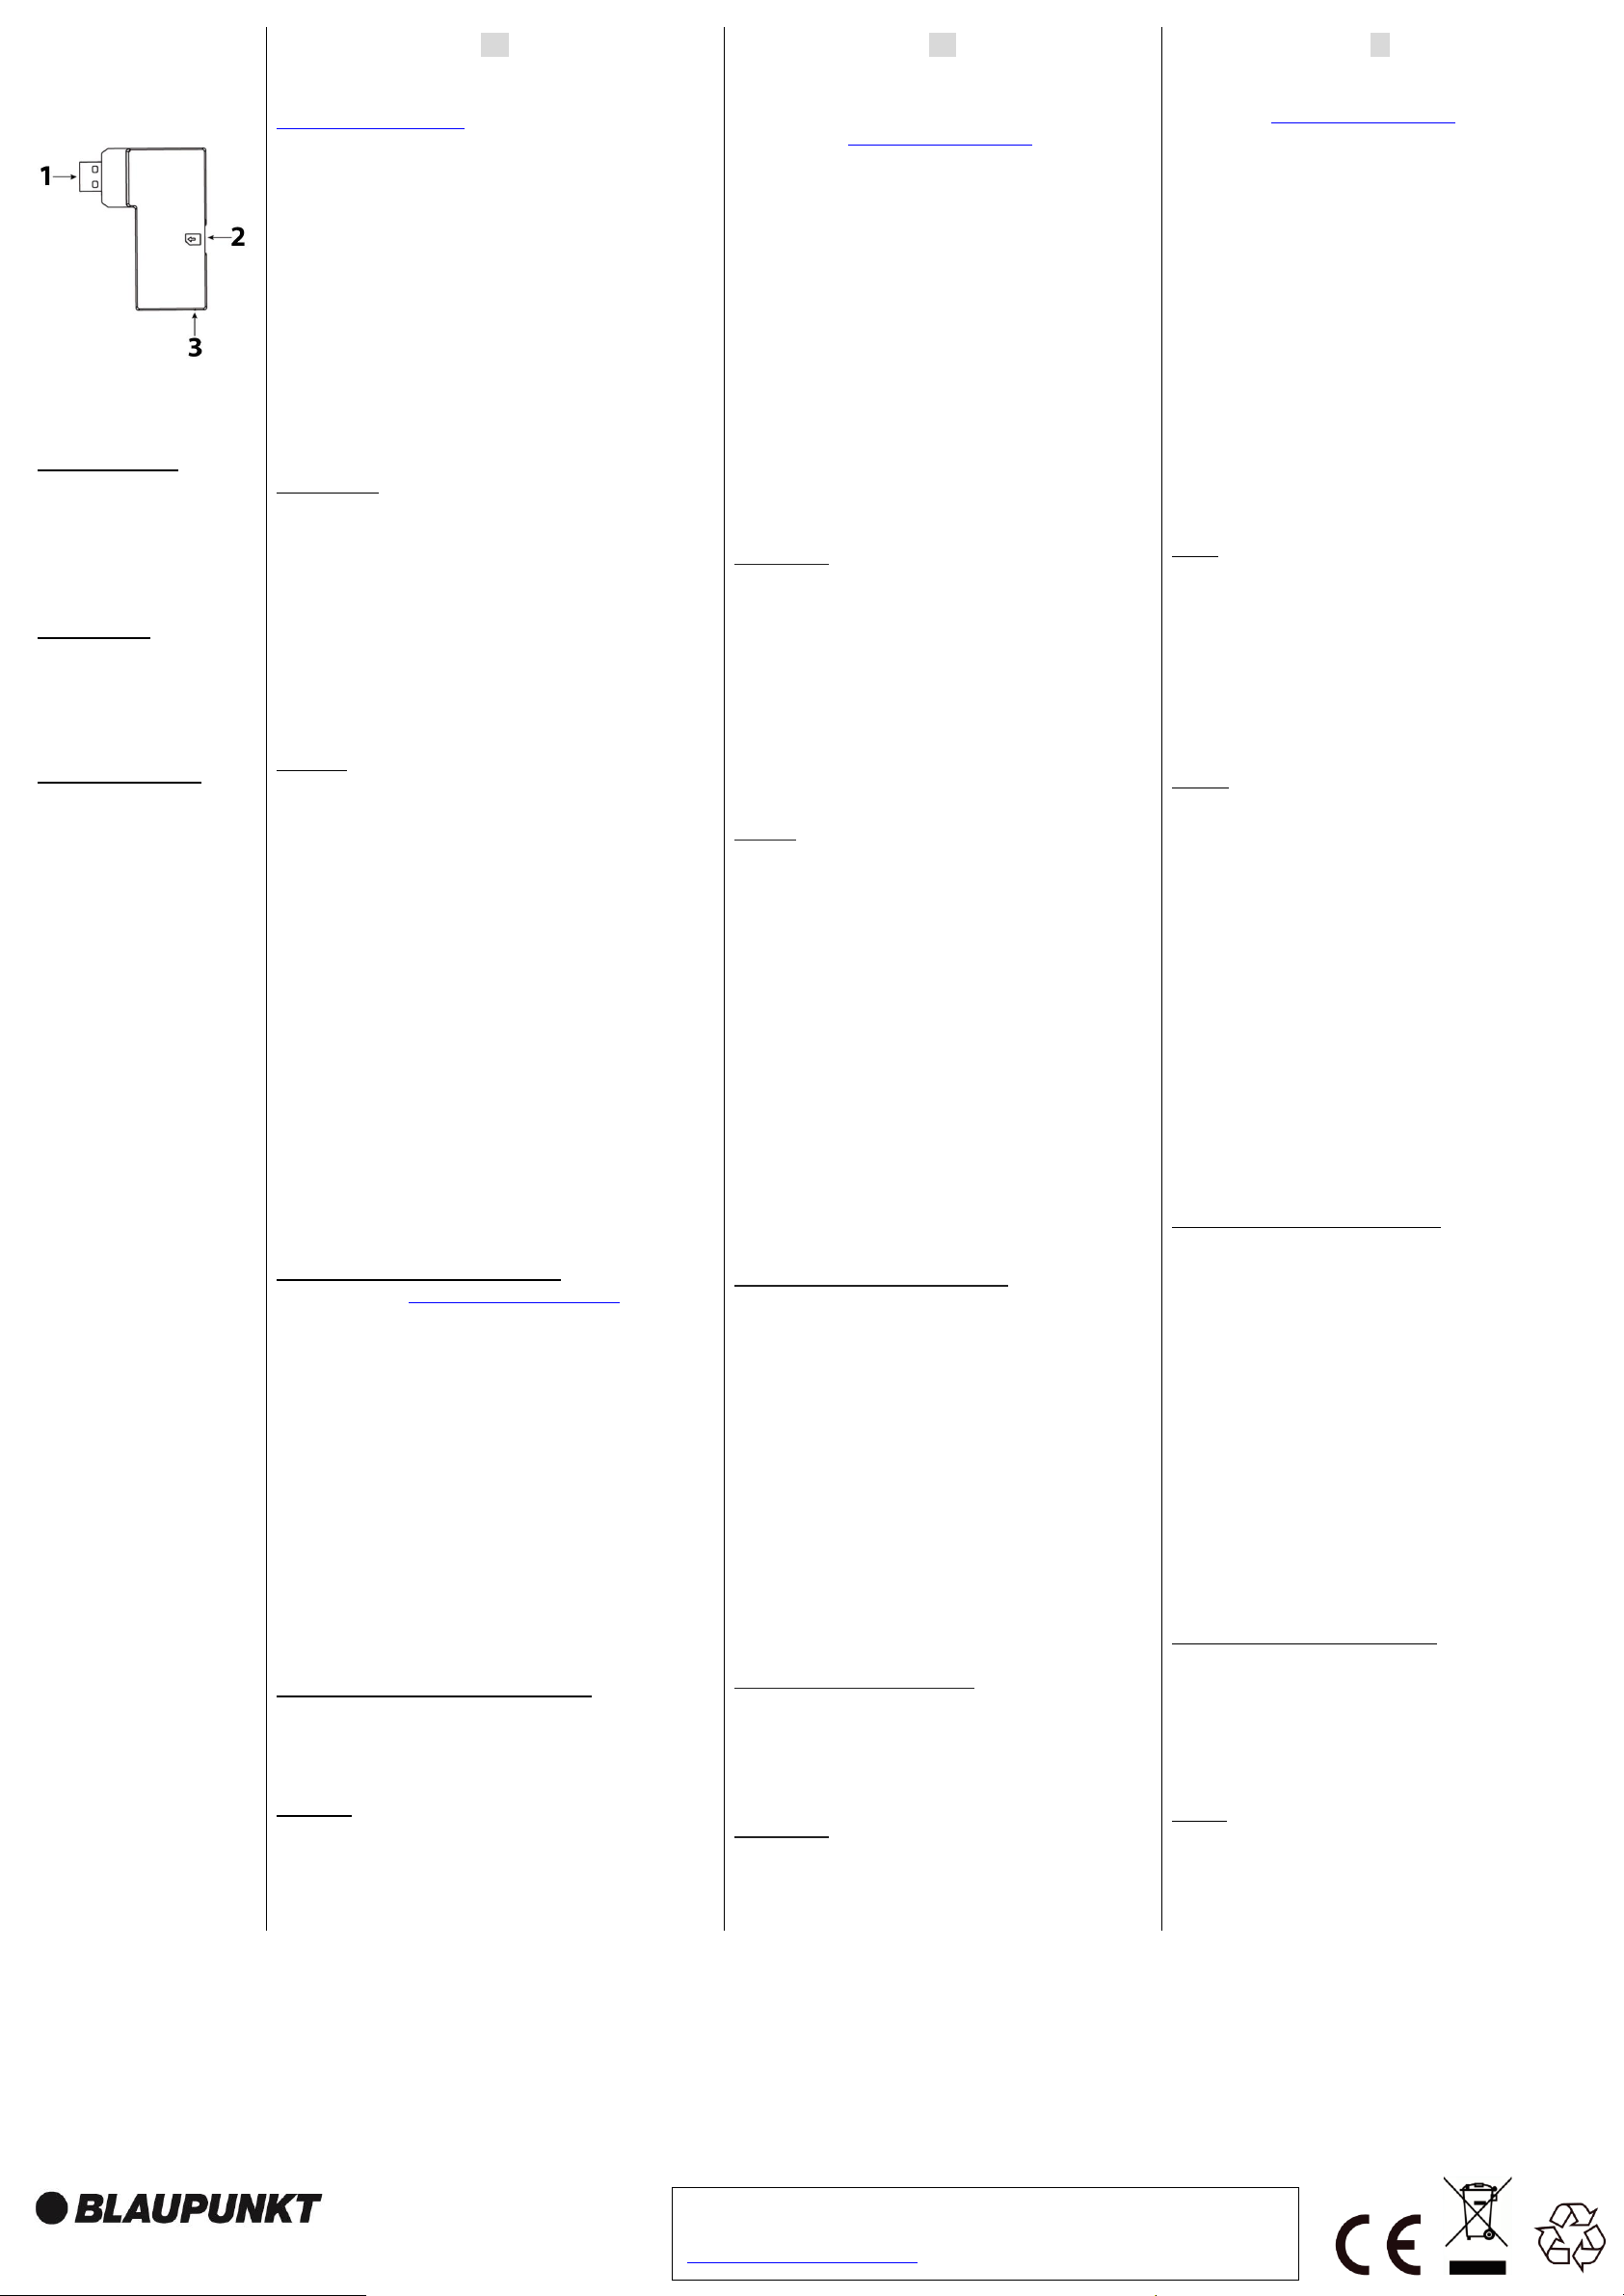
FR | GSM Dongle
1. USB
2. Compartiment de la carte
Micro SIM
3. LED bleue
(à l'intérieur du boîtier)
FR
Suivez les instructions de ce document pour configurer et utiliser cet
accessoire. Pour plus de détails sur les réglages et le fonctionnement,
visitez le site Web de Blaupunkt à l’adresse suivante : service.blaupunkt-
security.com pour télécharger le manuel complet.
Cas d'utilisation du DG2-Pro:
Si le dongle GSM est installé et qu’il survient une panne d’internet (par
exemple, un intrus déconnecte le routeur ou coupe l’electricité de toute la
maison), le Q-Pro Hub avec sa batterie de secours interne et ce dongle
GSM enverra une notification push à chaque utilisateur afin de les alerter
de la défaillance Internet. Avec le dongle GSM DG2, le système d'alarme
Q-Pro peut également alerter l'utilisateur de tout événement lorsque le
routeur est hors ligne. De plus, l'utilisateur pourra se connecter au panneau
via l'application ou l'interface Web pour une gestion de base comme Armer
ou Désarmer le système.
Remarque: le dongle GSM ne fournit pas de sauvegarde GSM pour la
caméra vidéo IPC-S1. Pour la vérification des images lorsque le réseau est
hors ligne, nous recommandons l’utilisation de détecteurs infrarouge (PIR)
équipés de caméras (par exemple, IRC-S2 ou IRC-P4).
Le DG2-Pro fonctionne sur un réseau 2G et offre une prise en charge des
notifications d’alarmes ainsi qu’un fonctionnement basique des
applications. Nous vous recommandons d'utiliser cette option de
sauvegarde dans les zones où il n'y a pas de communication 4G. Nous
vous déconseillons d’utiliser le DG2-Pro comme méthode de
communication autonome, il s’agit uniquement d’une méthode de
communication de sauvegarde.
Commencer
1. Recherchez un fournisseur de services de télécommunication dont le
signal est de bonne qualité sur le lieu d’installation.
2. Procurez-vous une carte au format Micro SIM auprès du fournisseur
télécom sélectionné. La carte Micro SIM doit disposer de l’option données
Internet mobile, il n’a pas besoin de l’option SMS ni d’appels. La quantité
de données Internet nécessaire changera en fonction de son utilisation,
pour une utilisation en tant que méthode de communication de sauvegarde,
100 Mo suffisent.
3. Demandez au fournisseur de télécommunication de désactiver le code
PIN de la carte Micro SIM. Vous pouvez également insérer la carte Micro
SIM sur votre smartphone et désactiver le code PIN dans les menus de
sécurité.
Installation
1. Mettez le Q-Pro HUB hors tension en commutant l’interrupteur de
batterie du Q-Pro HUB sur OFF et en débranchant l'adaptateur secteur.
2. Insérez la carte Micro SIM dans le compartiment pour carte SIM situé
sur le côté du dongle GSM. . (Reportez-vous au point 2 de l’image).
3. Installez le dongle GSM dans le port USB situé à l'arrière du hub Q-Pro.
4. Mettez le Q-Pro HUB sous tension en commutant l’interrupteur de
batterie du Q-Pro HUB sur ON et branchez l'adaptateur secteur.
5. La LED bleue du dongle s’allumera.
6. Après l'installation, attendez quelques minutes que le dongle GSM
reçoive le signal correctement.
• Si le dongle GSM ou la carte SIM sont retirés, le Q-Pro allume le
voyant d’erreur et envoie une notification via la connexion cablée
(Ethernet). Pour installer la carte Micro SIM ou le dongle, éteignez
d’abord le panneau.
• Si l’installation de la carte Micro SIM ou du dongle GSM est
effectuée alors que le panneau est sous tension, ils ne seront pas
détectés correctement et le système GSM ne fonctionnera pas.
Configuration du nom du point d'accès (APN)
1. Accédez à l'interface Web https://eu.bphomeconnect.com/BP/ et
connectez-vous à votre hub Q-Pro. Allez dans Paramètres → Panneau
→ Panneau GSM
2. Pour certains fournisseurs de téléphonie, le concentrateur Q-Pro remplit
automatiquement les paramètres APN. Vérifiez que les paramètres APN
sont remplis. S'il y en a, reportez-vous à l'étape 5, sinon à l'étape 3.
3. Cliquez sur la case à cocher «Remplacé par HPS» et configurez les
paramètres APN manuellement. Demandez à votre opérateur téléphonique
les paramètres de votre APN: “Nom APN”, “Nom d'utilisateur” et “Mot de
passe”.
4. Cliquez sur soumettre pour enregistrer les modifications.
5. Dans le champ «RSSI», vérifiez que le signal de force du signal GSM
est égal ou supérieur à 6. Si le signal est inférieur à 6, essayez un autre
emplacement pour le Q-Pro ou faites l’essai avec un autre fournisseur de
télécommunications.
• Si le signal GSM n'est pas détecté: les paramètres APN peuvent
être obsolètes. Veuillez vous référer à l'étape 3.
Sélectionnez la méthode de communication souhaitée:
1. Accédez à l'interface Web, sélectionnez Paramètres → Panneau→
Panneau → Communication Internet.
2. Sélectionnez «Ethernet et GSM» pour utiliser le routeur internet comme
méthode de communication principale et GSM uniquement comme solution
de secours au cas où le routeur ne fonctionnerait pas.
Frequences: GPRS 900/1800 MHz
 Loading...