


 heart rate monitor herzfrequenz pulsuhr
german|engineering
PM 90
Operating Instructions
Gebrauchsanleitung

TABLE OF CONTENTS
Scope of delivery............................................................................. |
3 |
Important Notes ............................................................................... |
4 |
General Information for Training.................................................... |
6 |
Functions of the HR monitor .......................................................... |
7 |
Transmission of signal and methods of Devices Measurement.9
Getting started ............................................................................... |
12 |
General operation of the HR monitor........................................... |
17 |
Buttons on the HR monitor ....................................................... |
17 |
Display...................................................................................... |
18 |
Menus....................................................................................... |
19 |
Basic settings ................................................................................ |
21 |
Overview .................................................................................. |
21 |
Enter personal data .................................................................. |
22 |
Set training zone ...................................................................... |
23 |
Set units of measure ................................................................ |
24 |
Setting the LightManager ......................................................... |
24 |
Setting the sampling rate.......................................................... |
26 |
Pairing the signals from the device .......................................... |
27 |
Watch settings ............................................................................... |
28 |
Overview .................................................................................. |
28 |
Set time of day and date .......................................................... |
29 |
Set alarm clock......................................................................... |
30 |
Display speed and distance ..................................................... |
31 |
Recording of training .................................................................... |
33 |
Overview .................................................................................. |
33 |
Stop run times .......................................................................... |
35 |
Record laps manually............................................................... |
36 |
1 |
|
G B
Display speed and distance...................................................... |
37 |
Stop and store recording .......................................................... |
38 |
Delete all recordings................................................................. |
39 |
Analyzing memory messages................................................... |
40 |
Speed and distance ....................................................................... |
41 |
Overview................................................................................... |
41 |
Setting the speed unit and automatic lap function.................... |
42 |
Calibrate the Speedbox............................................................ |
44 |
Display speed and distance...................................................... |
46 |
Altitude, air pressure and temperature........................................ |
48 |
Overview................................................................................... |
48 |
Set reference altitude, altitude and temperature units.............. |
48 |
Display altitude profile, temperature and air pressure.............. |
50 |
Results............................................................................................ |
53 |
Overview................................................................................... |
53 |
Display training data ................................................................. |
53 |
Transmit weight management data to the monitor ................... |
55 |
Lap results...................................................................................... |
57 |
Overview................................................................................... |
57 |
Display lap results .................................................................... |
57 |
Fitness test..................................................................................... |
58 |
Overview................................................................................... |
58 |
Conduct fitness test .................................................................. |
59 |
Display fitness values ............................................................... |
61 |
EasyFit software ............................................................................ |
62 |
Technical specifications, batteries .............................................. |
63 |
List of abbreviations...................................................................... |
65 |
Index ............................................................................................... |
69 |
2 |
|
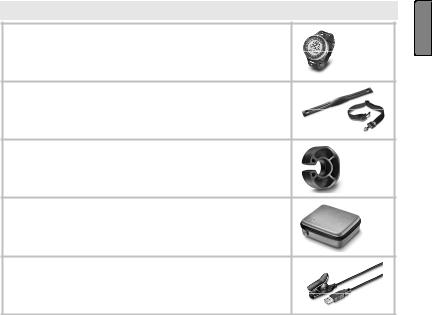
SCOPE OF DELIVERY
Heart rate monitor with wrist band
Chest strap and elastic tension strap (adjustable)
Bike mount
Storage box
PC Software EasyFit (available to download online from www.beurer.de/.com)
and PC interface cable (USB)
In addition: Operating instructions and separate short instructions.
Beurer accessories are available from specialised stores:
Accessory |
Function |
Beurer Speedbox |
You can have your speed and dis- |
|
tance values displayed on the HR |
|
monitor. |
3
G B

IMPORTANT NOTES
Please carefully read through these operating instructions, keep it for future reference and also make it available to others.
Training
This product is not a therapeutic device. It is a training instrument, which was developed for the measurement and representation of the human heart rate.
With high-risk sports, please note that the use of the heart rate monitor can represent an additional source of injury.
If in doubt or for illnesses, please consult your doctor concerning the values of your upper and lower target heart rate as well as the duration and frequency of training. In such a way, you can achieve optimal results when training.
WARNING: People suffering from heart and circulatory illnesses or those with pacemakers should only use this heart rate monitor after having consulted their doctor.
Application
The device is only intended for private use.
This device may only be used for the purpose it was designed for and in the manner outlined in this operating instructions. Any form of improper use can be dangerous. The manufacturer is not liable for damages that are caused by improper or incorrect use.
The heart rate monitor is waterproof. (see chapter "Technical Specifications")
4
Cleaning and care
From time to time, carefully clean your chest strap, elastic chest strap, heart rate monitor and if necessary the Speedbox with a soap and water solution. Then rinse off all components with clean water. Carefully dry them with a soft towel. You can wash the elastic chest strap in the washing machine at 30° without fabric softener. The chest strap is not made for the dryer!
Store the chest strap in a clean and dry place. Dirt impairs the elasticity and functioning of the transmitter. Sweat and moisture can keep the electrodes wet and consequently activate the transmitter, which shortens battery life.
Repair, Accessories and Disposal
Prior to use, it should be ensured that the device and accessories are free of damage. If in doubt, do not use the device and consult your sales representative or the customer service address provided.
Repairs may only be conducted by customer service or authorized dealers. Please do not in any case attempt to repair the device!
Use the device only with the original accessories of Beurer.
Avoid contact with sunscreen or the like since these can cause
damage to the imprint or plastic components.
Please dispose of the device in accordance with Waste Electric and Electronic Equipment 2002/96/EC - WEEE. For inquiries, please contact the municipal authority responsible for disposal in your area.
5
G B

GENERAL INFORMATION FOR TRAINING
This heart rate monitor serves to measure the human pulse. By means of various settings, you can support your individual training program and monitor your pulse. You should monitor your pulse during exercise because you should prevent your heart from excessive strain on the one hand and on the other in order to achieve the optimal training results. The table provides you with some information on the selection of your training zone. The maximum heart rate reduces with advancing age. Information on the training heart rate must therefore always be in relation to the maximum heart rate. The following rule of thumb helps to identify the maximum heart rate:
220 - age = maximum heart rate
The following example applies to a 40-year-old person: 220-40 = 180
|
Heart/health |
Fat burning zone |
Fitness |
Endurance trai- |
Anaerobic |
|
programme |
|
programme |
ning programme |
training |
Max. heart rate |
50 - 60% |
60 - 70% |
70 - 80% |
80 - 90% |
90 - 100% |
range |
|
|
|
|
|
Effect |
Strengthens the |
The body burns |
Improves the |
Improves speed |
Overloads specific |
|
heart and the |
the highest per- |
respiratory and |
maintenance and |
muscles. High |
|
circulatory system |
centage of calo- |
circulatory system. |
increases basic |
injury risk for |
|
|
ries from fat. |
Ideal to promote |
speed |
athletes at ama- |
|
|
Strengthens the |
the basic |
|
teur level, risk re- |
|
|
heart and the |
endurance |
|
lated to the heart |
|
|
circulatory system, |
|
|
in case of disease |
|
|
enhances fitness |
|
|
|
Suitable for |
Ideal for beginners |
Weight control |
Athletes at |
Ambitious athletes |
Only professional |
|
|
and loss |
amateur level |
at amateur level, |
athletes |
|
|
|
|
professional |
|
|
|
|
|
athletes |
|
|
|
|
|
|
|
Training |
Regenerative |
|
Fitness training |
Endurance |
Fitness training |
|
training |
|
|
training |
addressing |
|
|
|
|
|
specific zones |
|
|
|
|
|
|
See the chapter "Basic Settings", section "Setting your training zone" on how to individually set your training zone. See the chapter "Fitness Test" on how the heart rate monitor sets your individual limits of the suggested training zone through the fitness test.
6

Analysis of the Training
With the PC software EasyFit you can acquire the results from the watch and analyze them in various ways. In addition, EasyFit provides useful calendar and administrative functions, which also support optimal training over longer periods of time. Using the software, you can also control and monitor your weight management.
FUNCTIONS OF THE HR MONITOR
HR functions
Exact ECG heart rate measurement
Transmission: digital
Individual training zone adjustable
Acoustic and visual alarm
Average heart rate (average)
Maximum training heart rate
Calorie consumption in Kcal (basis jogging)
Fat burning in g/oz
Time functions
Time of day (12or 24-hour format)
Calendar and weekday
Date
Alarm / alarm clock
Stop watch
50 laps for each training, recall of all of them or each one. Display of lap time and average heart rate
Automatic lap function (400 m - 10 km) (0,25 mi - 6,21 mi)
Settings
Gender
Weight
Height
7
G B
Age
Unit of weight kg/lb
Unit of height cm/inch
Maximum heart rate
Speed units km(mi)/h or min/km(mi)
LightManager (display illumination)
12/24-hour format
Sampling rate (5 sec / 30 sec / 60 sec / 120 sec)
Fitness test
Fitness index
Maximum oxygen-breath volume (VO2max)
Basal metabolic rate (BMR)
Active metabolic rate (AMR)
Calculated maximum heart rate
Suggested training zones
Altitude, air pressure and temperature
Altitude measurement and evaluation of its variation during training
Reference altitude for the respective measurement
Air pressure and temperature display
Temperature unit °C or °F
Altitude unit metres or feet
8

TRANSMISSION OF SIGNAL AND METHODS OF DEVICES
MEASUREMENT
Receiving range of the heart rate monitor
Your heart rate monitor picks up the heart rate signals sent by the chest strap transmitter within a range of 70 centimeters.
Your HR monitor receives the signals from the Speedbox within a range of three meters.
Sensors on the chest strap
The entire chest strap consists of two components: the actual chest strap and an elastic tension belt. On the inside of the chest strap contacting the body, there are two rectangular, corrugated sensors. Both sensors determine your heart rate ECG exactly and transmit this to the heart rate monitor.
The digital transmission works almost without interference. Your HR monitor only receives the signal from the corresponding transmitter. There can be no interfering signals from other transmitters.
The chest strap is not compatible with analogue devices, such as e.g. ergometers.
9
G B
Measuring device of the Speedbox
Your HR monitor has all the functions to analyze the signals from the Beurer Speedbox. A multidimensional measuring device is installed in the Speedbox. This calculates the acceleration of your foot and transmits this value to the HR monitor. The HR monitor displays the distance covered and the speed, which is calculated from the acceleration and the time of each individual pace.
The following diagram shows the measured movements of feet over two paces depending on the type of pace i.e. walking, jogging, running and sprinting.
Quelle: Dynastream Technology
10

Altitude, air pressure and temperature measurement
With your HR monitor you can measure the altitude above sea level, the air pressure and the temperature.
The altitude is calculated according to the present air pressure. The measurement principle of the monitor is based on the assumption that the air pressure changes are caused by a change in the altitude. The air pressure decreases at higher altitudes. As a rule of thumb: An altitude difference of 10 m causes a change of 1.25 hPa in the air pressure at sea level.
To be able to measure the altitude correctly, you have to set the exact reference altitude of your location on the monitor before starting the training.
If the air pressure changes during training due to the different weather conditions, the altitude displayed will be different from the actual altitude. Big variations in air pressure are a sign of a weather change. During the course of a day, it is possible to have considerable variations in air pressure. Therefore, the altitude displayed on the monitor should be compared from time to time to the reference altitude of your location and adjusted if necessary.
The altitude details of your location can be taken from a topographical map, for example.
The body temperature can have a strong influence on the temperature displayed as well as if the monitor is also covered by clothing. The monitor should be removed from your wrist for approx. 2 hours to enable a correct temperature measurement.
11
G B
GETTING STARTED
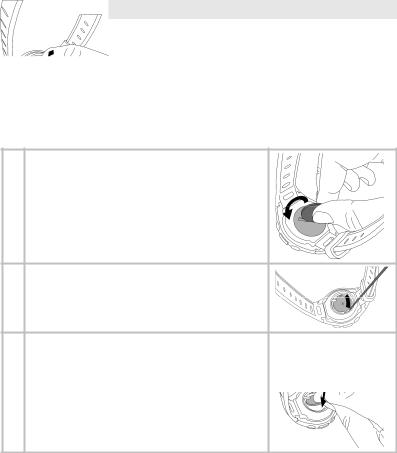
Insert battery/Change battery
If you do not want to insert or change the battery yourself, please bring it to a watchmaker.
The battery compartment of the HR monitor is located on the back of the monitor. Place the monitor with the front facing downwards on a soft surface and insert the battery as follows:
1Using a coin, turn the lid of the battery compartment anticlockwise until the lid comes off.
2Only when changing the battery: remove the battery from the battery compartment with the aid of a pointed, nonmetallic tool, e.g. toothpick.
3Put the battery into the battery compartment in such a way that the battery is underneath the clip and the transparent insulation sheet and the positive pole (+) faces upwards. Lock the battery into place.
12

4Check the seal. The seal has to lie flat in the casing of the monitor and there must be no visible damage to it. The impermeability of the monitor cannot be guaranteed otherwise.
5Turn the lid clockwise with your fingers without pressure for at least one turn until the lid is level with the battery compartment.
Caution! Do not continue to turn the lid, if it cannot be turned into the battery compartment without resistance. Repeat the process after changing the position of the lid. The thread could be damaged otherwise.
6Tighten the lid with the coin until it stops so as to guarantee continued impermeability.
7The monitor is now in power-saving mode and only displays the current time and the date.
Press any button in order to activate the HR monitor.
13
G B

Putting on the heart rate monitor
You can wear your heart rate monitor like a wrist watch. If you would like to use the HR monitor when riding a bike, fix the monitor to the handlebars. This improves the signal transmission greatly. Use the assembly bracket supplied and fix the HR monitor firmly on to the handlebars so that the monitor does not slip when riding the bike.
Initial activation of the heart rate monitor
You can activate your heart rate monitor from the transport mode by pressing any button for 5 seconds.
Activating the heart rate monitor from power saving mode
If the heart rate monitor has not received any signal for approx. five minutes, it switches to the power saving mode. At that point, only the current time and the date will be displayed. Press any button in order to reactivate the watch.
Putting on the chest strap
Tighten the chest strap with the elastic tension belt. Adjust the length of the belt such that the belt is snug, but neither too loose nor too tight. Position the belt around the chest such that the logo is facing outwards and in the correct position directly over the breast bone. For men, the chest belt should be located directly below the pectoral muscles, for women, directly below the breast.
Since optimal contact between the skin and the heart rate sensors can not be created immediately, it may take some time until the heart rate is measured and displayed. If necessary, alter the position of the transmitter in order to achieve optimal contact. Most of the time, sufficient contact is achieved through the accumulation
14
of sweat beneath the chest strap. You can, however, also wet the |
G |
contact points on the inside of the chest strap. For this, lift the |
|
chest strap up from the skin slightly and wet the two sensors with |
B |
saliva, water or ECG gel (available at chemistry). The contact be- |
|
tween skin and chest strap may not be interrupted also with grea- |
|
ter movements of the thorax such as during deep breathing. Sig- |
|
nificant chest chair can interfere with and even prevent contact. |
|
Put on the chest strap a few minutes before starting in order to warm it up to body temperature and establish optimal contact.
Pairing the signals from the device
The digital transmitters (chest strap, Speedbox, diagnostic scale) and receiver (HR monitor) have to be paired. If you buy each device separately, e.g. as a replacement, or if you change the batteries, then you have to pair the devices before use.
You can find out how to pair the devices by reading the chapter “Basic settings”, section “Pairing the device signals”.
Connecting the devices
Your HR monitor receives signals from the digital transmitters, chest strap and Speedbox, as soon as you have activated them and have changed into the Training menu by pressing the menu button.
How you can identify on the display whether signals are being received:
If the heart symbol flashes, then the heart rate is being received from the chest strap.
If “0” is displayed in the 1st line for a longer period, then the HR monitor cannot receive the signals from the chest strap. The display “0” can occur in the Training, Time and Spd’nDist menus. In this case, change into the Training menu with the menu button. The HR monitor tries once more to make
contact with the devices.
15

Attaching the Speedbox
Put on the Speedbox as described in the manual of the Speedbox.
Calibrating the Speedbox
You will get the most accurate results if you calibrate your Speedbox. You can read how to calibrate your Speedbox in chapter “Speed and distance”, section “Calibrate the Speedbox”.
Weight management data
You can transmit your weight data and your body fat from the diagnostic scale to the HR monitor. Your can read how to transmit the data in chapter “Results”, section “Transmit weight management data”.
16

GENERAL OPERATION OF THE HR MONITOR |
G |
|
|
Buttons on the HR monitor |
B |
1 |
start / stop |
Starts and stops functions and adjusts values. |
||||
|
|
|
|
|
|
Press and holding accelerates the entry. |
2 |
|
|
|
|
|
Switches between different displays for speed, |
|
|
|
|
|
||
|
|
|
|
|
|
distance, altitude and heart rate values. |
3 |
option / set |
Switches between the functions within one menu |
||||
|
|
|
|
|
|
and confirms settings. |
4 |
menu |
Switches between the different menus. |
||||
5 |
Sensor |
To measure the temperature and the air pressure |
||||
6 |
/ |
|
|
|
|
Pressing quickly illuminates the display for five |
|
|
|
|
|
|
seconds. |
By pressing for a long time, the key tone and the acoustic alarm when leaving the training zone is activated/deactivated.
17

Display
1Top line
2Middle line
3Bottom line
4Scale to display the current speed in [km/h]
5Symbols
Alarm clock is activated.
Heart rate is being received.
Training zone has been exceeded.
Training zone has been underrun.
Acoustic alarm for key tone and for exit from the training zone is activated.
An explanation of the display abbreviations can be found in the list of abbreviates at the end of the operating instructions.
18
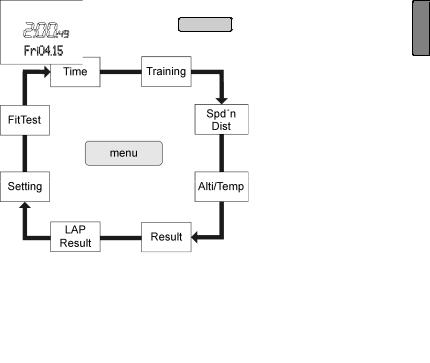
Menus |
menu |
|
G |
|
You can switch menus with the |
button. |
|||
|
B |
|||
|
|
|
Power saving mode
If your heart rate monitor has not |
|
|
received any signal for approx. |
|
|
five minutes, it switches to the |
|
|
power saving mode. The current |
|
|
time and date only are then dis- |
|
|
played. Press any key to reacti- |
24h format |
12h format |
vate the HR monitor. |
|
|
Low battery status
The display low battery means that training sessions of 8 hours are no longer possible. Confirm using  button. Replace the battery before starting a new training session (see chapter „Technical specifications“, section „Replacing the batteries“).
19
Main display
When changing menus, the name of the menu is first shown, then your HR monitor will automatically switch to the main display of the active menu.
From there, you have to first choose a submenu or you can directly access functions.
Overview of the menus
Menu
automatically
Main display
Menu |
Meaning |
Description: |
|
|
see chapter... |
Time |
Time |
"Watch Settings" |
Training |
Training |
"Recording of Training" |
Spd'nDist |
Speed and distance |
"Speed and distance" |
|
|
|
Alti/Temp |
Altitude, air pressure |
“Altitude, air pressure |
|
and temperature mea- |
and temperature” |
|
surement |
|
Result |
Result |
"Results" |
Lap Result |
Lap result |
"Lap results" |
Setting |
Settings |
"Basic settings" |
|
|
|
FitTest |
Fitness test |
"Fitness test" |
|
|
|
20

BASIC SETTINGS
Overview
In the menu Setting you can:
Enter your personal data (user). Based on this data, your HR monitor determines your calorie consumption and your fat burning during training!
Set your training zone (limits). See chapter "General Information on Training" for explanations on how to set the training zones. Your HR monitor issues an acoustic and visual alarm during your training when the training zone is exited.
Change the units of measurement (units) for height and weight.
Adjust the display illumination to the situation encountered when running in the dark (LightManager).
Setting the sampling rate in seconds (Sam Rate)
Pair the signals of your new devices (PairNewDev).
Once you are in the menu Setting, your HR monitor automatically switches to the main display. This displays User.
21
G B

Enter personal data
menu |
Switch to the menu Setting. |
start / stop |
Gender is displayed. |
|
|
||
|
start / stop |
Select M, if you are male. |
|
|
|
|
Select F, if you are female. |
|
|
||
|
|
|
|
|
|
option / set |
AGE is displayed. |
|
|
||
|
start / stop |
Set your age (10-99). |
|
|
|
|
|
|
|
||
option / set |
MaxHR is displayed. The HR monitor |
|
|
|
|
|
automatically calculates the maxi- |
|
|
|
|
|
mum heart rate according to the |
|
|
|
|
|
formula: 220 - age = MaxHR. Please |
|
|
|
|
|
note that the HR monitor also de- |
|
|
|
|
|
termines the MaxHR after every |
|
|
|
|
|
fitness test and sets it as a sug- |
|
|
|
|
|
gested value. |
|
|
|
|
|
start / stop |
You can overwrite the |
|
|
|
|
value calculated (65-239). |
|
|
|
|
option / set |
Weight is displayed. Please note |
|
|
|
|
|
that when using the diagnostic |
|
|
|
|
|
scales, this value is overwritten dur- |
|
|
|
|
|
ing each weight measurement. |
|
|
|
|
|
|
|
|
|
|
|
|
22 |
|
|
|

|
start / stop |
Please select your weight |
|
|
(20-226 kg or 44-499 lbs). |
|
|
option / set |
Height is displayed. |
|
|
|
start / stop |
Set your height (80-227 |
|
|
cm or 2'6''-7'6'' feet). |
|
|
|
|
|
|
option / set |
Return to the display User. |
|
|
Set training zone
You can set your individual upper and lower heart rate limit as described below.
Please note that both limits are automatically set as a training zone suggestion after every fitness test and that the old data are consequently overwritten. For this, the lower limit of the suggested training zone totals 65%, the upper limit 85% of the maximum heart rate.
menu |
Switch to the menu Setting. |
|
|
option / set |
Limits is displayed. |
|
|
start / stop |
Lo limit is displayed. |
|
|
|
start / stop |
Set the lower limit for your |
|
|
training zone (40-238). |
|
|
|
|
|
|
option / set |
Hi limit is displayed. |
|
|
|
start / stop |
Set the upper limit (41- |
|
|
239). |
|
|
|
|
|
|
option / set |
Return to the display Limits. |
|
|
|
|
23 |
|
G B
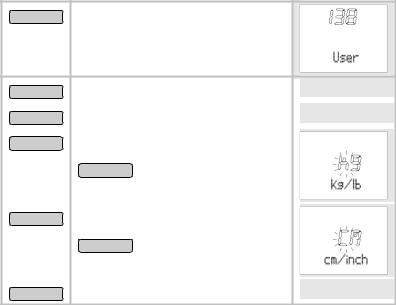
Set units of measure
menu |
Switch to the menu Setting. |
option / set |
Limits is displayed. |
|
|
|
option / set |
Units is displayed. |
|
|
|
start / stop |
kg/lb is displayed. The weight unit |
|
|
|
|
blinks. |
|
|
|
|
start / stop Switch between the units. |
|
|
|
|
|
|
|
|
option / set |
cm/inch is displayed. The unit of |
|
|
|
|
measurement for height blinks. |
|
|
|
|
start / stop Switch the units. |
|
|
|
|
|
|
|
|
option / set |
Return to the display Units. |
|
|
|
|
|
|
|
|
Setting the LightManager
Basically, you have the possibility to illuminate the display for 5 seconds by pressing the  /
/  button. The LightManager function available on the HR monitor is an additional support for runners training in the dark. If the LightManager function is activated, the display will be illuminated for 5 seconds simply by pressing a button. The LightManager differentiates between three different functions when switching off:
If the LightManager was activated (ON) during a pulse measurement, this function will be automatically switched off (OFF) when
24
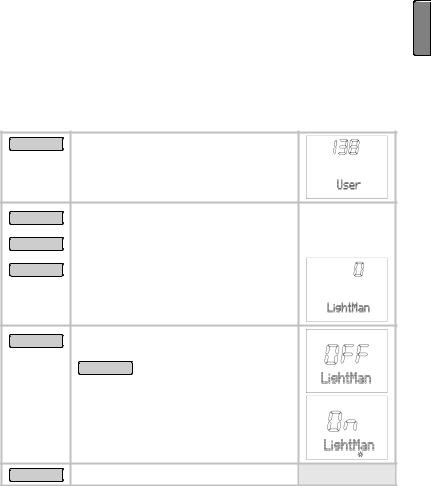
you stop training and the power saving mode is subsequently ac- |
G |
tivated. |
|
If the LightManager was activated (ON) while the pulse was not |
B |
being measured, the LightManager function will remain active for |
|
an hour and then it will be automatically switched off (OFF). If you |
|
press a button during this time, the LightManager will be active for |
|
a further sixty minutes. |
|
You can switch off the LightManager manually at any time to reduce the power consumption as much as possible.
menu |
Change into the Setting menu. |
|
|
|
|
option / set |
Limits is displayed. |
|
|
option / set |
Units is displayed. |
|
|
option / set |
LightMan is displayed. |
|
|
|
|
|
|
start / stop |
OFF LightMan is displayed. The dis- |
|
|
play flashes. |
|
|
start / stop Switches the LightManager |
|
|
function alternately on (On) and off |
|
|
(Off). |
|
|
|
|
option / set Back to the LightMan display.
25

Setting the sampling rate
You can set the sampling rate to ensure optimum analysis in the EasyFit software. By default, the heart rate monitor saves your training data every minute. For shorter distances, we recommended reducing the sampling rate (5 sec, 30 sec). For longer distances such as hikes, you can increase the sampling rate to 120 sec.
The memory in your heart rate monitor is limited. This means that different training periods are possible depending on the set sampling rate. For example:
The maximum training period with a sampling rate of 5 sec is around 2.8 hours
The maximum training period with a sampling rate of 120 sec is around 65 hours
Please note that a training session can never be longer than 23:59:59 hours. The training session is stopped automatically at this point.
menu |
Switch to the Setting menu. |
|
|
|
|
option / set |
Limits is displayed. |
|
|
|
|
||
|
|
|
|
|
|
||
option / set |
Units is displayed. |
|
|
|
|
||
|
|
|
|
|
|
||
option / set |
LightMan is displayed. |
|
|
|
|
||
|
|
|
|
|
|
||
option / set |
Sam Rate is displayed. |
|
|
|
|
||
|
start / stop |
Set |
the sampling |
rate |
|
|
|
|
(60 sec, |
120 |
sec, 5 sec |
or |
|
|
|
|
30 sec). |
|
|
|
|
|
|
|
|
|
|
|
|
|
|
|
|
|
26 |
|
|
|
|

option / set |
Press the button until you reach |
|
the main display. |
Pairing the signals from the device
The digital transmitter and receiver have to be paired. If you buy each device separately, e.g. as a replacement, or if you change the batteries, then you have to pair the devices before use.
The devices have to be switched on for this operation. To do this put on the chest strap, activate the Speedbox and switch on the scale by pressing it slightly with your foot.
menu |
Change into the Setting menu. |
|
|
|
|
option / set |
Limits is displayed. |
|
|
option / set |
Units is displayed. |
|
|
option / set |
LightMan is displayed. |
|
|
option / set |
Sam Rate is displayed. |
|
|
option / set |
Pair NewDev is displayed. |
|
|
start / stop |
Hr Search is displayed. Your HR |
|
|
|
monitor starts to search for the de- |
|
|
|
vices. You can follow the success of |
|
|
|
the search on the display: |
|
|
|
HR-Belt signals that the chest strap |
|
|
|
has been successfully connected. |
|
|
|
SPD Dev signals that the Speedbox |
|
|
|
has been successfully connected. |
|
|
|
27 |
|
|
G B

Scale signals that the scale has been successfully connected. If the scale has switched itself off automatically in the meantime, then switch them on again.
After the signal search is completed, the monitor displays all existing devices once more:
HR OK: Chest strap is connected Spd OK: Speedbox is connected Scale OK: Scales are connected
The display No Device found appears at the end of the search for the devices, if no devices were connected.
option / set Back to the main display.
WATCH SETTINGS
Overview
In the Time menu you can:
Set the time and the date.
Set the alarm clock.
With  , information on the speed/distances can be displayed in the bottom line.
28
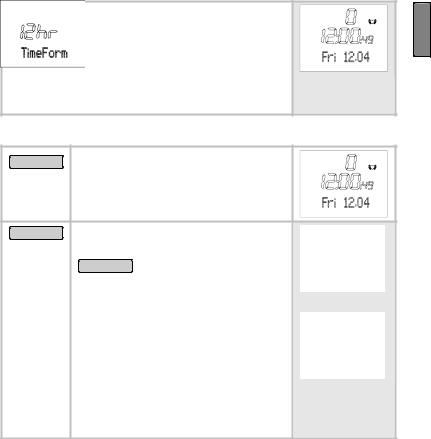
When you are in the Time menu the heart rate monitor automatically activates the main display. In this mode both the weekday and the current date are displayed. On the display: Fri 12.04 (Friday 12th April).
By pressing the  button you can change the information in the bottom line.
Set time of day and date
menu |
Switch to the menu Time. |
|
|
|
|
start / stop |
Set Time is displayed briefly. |
|
5 sec |
24hr is displayed and flashes. |
|
|
start / stop |
Changing the hour format |
|
(12 or 24 hours). |
|
|
Notes: |
|
Display of the date for 24h format: “Weekday day.month”.
Display of the date for 12h format: “Weekday month.day”.
Display AM (morning), e.g. 2:00 AM means 2:00
Display PM (afternoon), e.g. 2:00 PM means 14:00
29
G B
 Loading...