


User Guide
AT&T Velocity® USB Stick
Copyright © 2017 ZTE CORPORATION. All rights reserved.
No part of this publication may be excerpted, reproduced, translated or utilized in any form or by any means, electronic or mechanical, including photocopying and microfilm, without the prior written permission of ZTE Corporation.
The manual is published by ZTE Corporation. We reserve the right to make modifications on print errors or update specifications without prior notice.
Version No. : V1.0 Edition Time: April 2017
Contents
Get Started. . . . . . . . . . . . . . . . . . . . . . . . . . . . . . 3
Know Your Device. . . . . . . . . . . . . . . . . . . . . |
. . . |
|
|
3 |
Set Up and Connect to the Internet. |
. . . . . . . . . . . . . . . . |
. . . . . . . . . . |
. . |
. 5 |
Disconnect and Remove the Device. |
. . . . . . . . |
. . . . . |
. |
7 |
Use the AT&T Velocity® USB Stick. . . |
. . . . . . . . |
. . . . . |
. |
8 |
Management Web Site . . . . . . . . |
. . . . . . . . |
. . . . . |
. |
8 |
View Network Information. . . . . . |
. . . . . . . . |
. . . . . |
. |
9 |
Configure Data Network Options. . |
. . . . . . . . |
. . . . . . |
. 9 |
|
View Messages. . . . . . . . . . . . . . . . . . . . . . |
. . . |
|
|
10 |
View Details. . . . . . . . . . . . . . . . . . . . . . . . . . . . 11 |
||||
View Local Time and Time Zone. . . . . . |
. . . . . . . . . . |
|
|
11 |
Replace the Nano-SIM Card. . . . . |
. . . . . . . . |
. . . . . |
. |
12 |
Reset the Device. . . . . . . . . . . |
. . . . . . . . |
. . . . . . |
13 |
|
Advanced Settings. . . . . . . . . . . . . . . . . . . . . |
. . . |
|
|
14 |
Configure APN Details. . . . . . . . |
. . . . . . . . |
. . . . . |
. |
15 |
Enable MAC/IP/Port Filtering. . . . . |
. . . . . . . . . . . . . . 16 |
|||
Enable DMZ. . . . . . . . . . . . . . . . . . . . . . . . . . . . 19 |
||||
Configure SIM PIN. . . . . . . . . . . . . . . . . . . . |
. . . . |
|
|
20 |
Troubleshooting. . . . . . . . . . . . . . . . . . . . . . . . |
. |
|
|
21 |
Specifications. . . . . . . . . . . . . . . . . . . . . . . . . . . 22 |
||||
Contents |
|
|
|
1 |
Health and Safety Information.. . . . . . . . . . . . . . . . . |
23 |
To the Owner. . . . . . . . . . . . . . . . . . . . . . . . . |
23 |
Using Your USB Stick. . . . . . . . . . . . . . . . . . . . . . |
24 |
RF Exposure Information (SAR). . . . . . . . . . . . . . . . |
. 25 |
FCC Compliance.. . . . . . . . . . . . . . . . . . . . . . . . |
26 |
Warranty. . . . . . . . . . . . . . . . . . . . . . . . . . . . . .28 |
|
Limited Warranty. . . . . . . . . . . . . . . . . . . . . . . . 30 |
|
How to Get Warranty Service. . . . . . . . . . . . . . . . . |
. 31 |
Other Warranty Programs . . . . . . . . . . . . . . . . . . . |
31 |
Get Started
This chapter provides an overview of the features of your AT&T Velocity USB Stick and instructions on how to set it up and connect to the Internet.
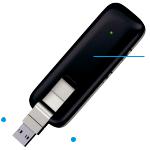
Know Your Device
Indicator light 
 Back cover (removable)
USB |
|
|
|
|
|
|
|
|
|
connector |
|
|
|
USB connector |
pivot |
|
|
|
|
|
|
|
|
USB connector – Connects to your computer through a standard (type A) USB port.
USB connector pivot – Allows the USB connector to rotate for easier connection to computers.
Back cover (removable) – Covers the nano-SIM card slot.
Indicator light – Indicates connection status and more (see Status Indicator Light on page 5 for details).
2 |
Contents |
Get Started |
3 |
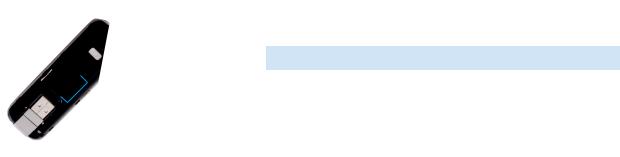
Nano-SIM 
card slot  External antenna connector
USB folding  hinge
hinge
External antenna connector – Allows an external antenna to be connected, if necessary.
USB folding hinge – Allows the USB connector to fold in for storage or out to plug into a computer.
Nano-SIM card slot – Spring-loaded slot for insertion of a 4G LTE™ nano-SIM card (preinstalled).
4 |
Get Started |
Status Indicator Light
The color and behavior of the light indicates the device’s current status regarding network connection, nano-SIM card, software updates, and more.
Color |
Status |
Description |
|
Green |
Solid |
Device ready, network connection registered |
|
|
|
||
Blinking |
Device powering up, searching for network |
||
|
|||
|
|
|
|
|
Solid |
No network service |
|
Yellow |
|
|
|
Blinking |
Software upgrading or new message |
||
|
|||
|
received (see View Messages on page 10). |
||
|
|
|
|
|
Solid |
Failure state (no SIM, locked SIM, SIM error, |
|
Red |
PUK error) |
||
|
|||
|
Blinking |
Software upgrade failure |
|
|
|
|
Set Up and Connect to the Internet
Connect to a Computer
1.Use your thumb to gently flip open the USB connector on the device.
Note: Avoid overextending the USB connector past its resistance point.
2.Hold the device along its side edges and gently insert it into your computer’s USB port.
Get Started |
5 |

3.The operating system will automatically detect and recognize your device and install any needed drivers. (If you are using a Mac, see Install the Driver (Mac® OS X®) below.)
Note: Compatible with many operating systems; see Supported Operating Systems on page 22 for details. Installation may vary depending on your operating system and version.
Install the Driver (Mac OS X)
Note: Installing the driver will improve data speed, particularly on systems running version 10.10.
1.Insert the AT&T Velocity USB Stick into a USB port on your Mac.
2.Double-click on the AT&T USB Modem icon that appears.
3.Double-click on the AT&T USB Modem package icon. (You may need to enter your password.)
Uninstall the Driver (Mac OS X)
1.Disconnect from the Internet and remove the AT&T Velocity
USB Stick from your Mac.
2.Open Applications (in Finder, click Go > Applications or press Shift-Command-A) and double-click on the
Uninstall AT&T USB Modem icon.
3.Click Uninstall. (If you have not yet removed the AT&T Velocity USB Stick from your Mac, remove it and click OK.)
4.You may need to enter your password. When driver removal is finished, click Close.
6 |
Get Started |
Connect to the Internet
Once installation is complete, your device will automatically connect to the network. Connection is complete when the indicator light is solid green.
Disconnect and Remove the Device
Disconnect From the Network
1.Launch a browser and enter http://attusbmodem/ or http://192.168.1.1 in the address bar.
2.Under Domestic Data, click Off next to Mobile Data.
3.Click Apply.
Properly Remove the Device
Disconnect from the network and close the management web site before removing the device from the computer. You can safely remove the device at any time when you are not connected to the network. Gently grip the device on both sides and pull straight out of the port to avoid damaging the USB connector.
Get Started |
7 |

Use the AT&T Velocity USB Stick
This chapter describes the main features of the web site for managing and configuring the device.
Management Web Site
Launch a browser and enterhttp:/attusbmodem/ or http://192.168.1.1 in the address bar. You will see this screen:
Menu |
|
Status bar |
||||
|
|
|
|
|
|
|
|
|
|
|
|
|
|
|
|
|
|
|
|
|
|
|
|
|
|
|
|
|
|
|
|
|
|
|
|
|
|
|
|
|
|
|
|
|
|
|
|
|
|
|
|
|
|
|
|
|
|
|
|
|
|
|
Navigation options:
•Home – Manage your network connection.
•Messages – Read messages from AT&T.
•Settings – Manage advanced settings.
•About – View device details, such as your wireless number.
8 |
Use the AT&T Velocity USB Stick |
View Network Information
On the right side of the status bar at the top of the management web site, you can view network information, such as the signal strength, operator, and network mode.
Configure Data Network Options
You can turn the data connection on or off, choose whether to allow the device to be used when roaming internationally, and select the preferred network mode.
1.From the management web site, click Home on the menu and do one of the following:
•To enable/disable mobile data: Under Domestic Data, click On or Off next to Mobile Data.
•To enable/disable international roaming: Under
International Data Roaming, click On or Off next to
Mobile Data.
•To set network mode: With mobile data off, click the drop-down box beside Network Mode and select the one you prefer.
Note: Specifying a mode may limit network availability.
2.Click Apply.
Use the AT&T Velocity USB Stick |
9 |
 Loading...