

Page 1
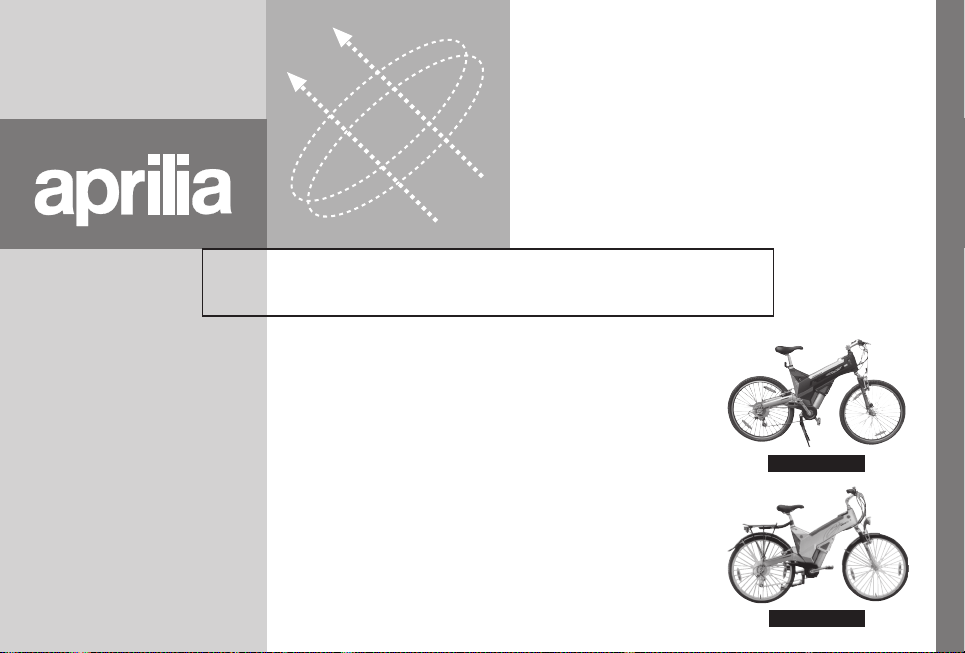
use and maintenance
Tables of contents
SAFE DRIVING ........................................ 2
GENERAL FEATURES ............................ 6
MAIN INDEPENDENT CONTROLS ....... 10
MAIN COMPONENTS ............................ 19
INSTRUCTIONS FOR USE .................... 23
RECHARGEMENT ................................. 28
MAINTENANCE ..................................... 31
enjoy racing
enjoy city
Page 2

use and maintenance
2
Enjoy Racing - Enjoy City
Page 3

SAFE DRIVING
1) 2) 3) 4) 5) 6)
7) 8) 9) 10)
DRIVING SAFELY
1) Don’t turn the key while riding.
2) Check the bike when noise is heard during riding. Call for service from Aprilia authorized dealer if problems remain unsolved.
3) For the bycicle correct operation and for safety reasons we
suggest that it be used by only one person per time.
4) Don’t overload or carry anything which obscure your view.
5) Don’t ride when drinking.
6) Make sure the bycicle is in vertical position before you start
riding to avoid falling.
7) Don’t try to operate the dynamo with one leg, and pedal with
the other.This may cause danger or injury.
8) Don’t pedal too hard when power assistance from motor is
deelining on a downhill run.
9) Avoiding riding the bycicle with an open umbrella in the rain.
10) Don’t touch the motorkit after travel; the temperature could be
very high.
11) WARNING! The bike is provided with an electric safety system
that stops the electric assistance to prevent improper use.(For
example uphill riding using the highest gear and increasing too
much the uman pressure on pedal).
use and maintenance Enjoy Racing - Enjoy City
3
Page 4
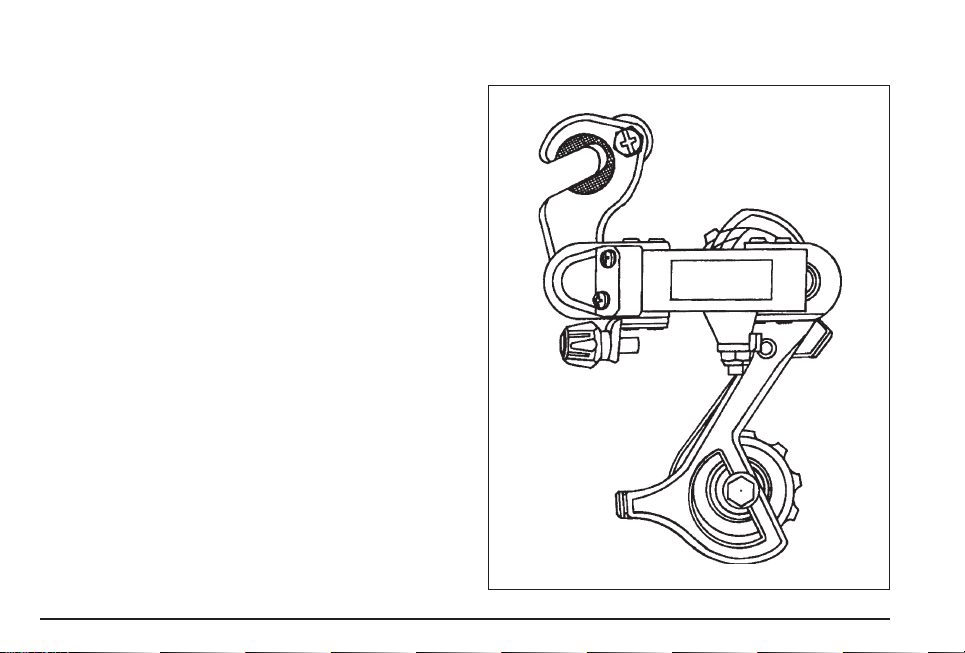
Do not adjust the adjusting screw of the rear derailleur by yourself
to avoid damaging the gear shifting mechanism or causing technical troubles.
use and maintenance
4
Enjoy Racing - Enjoy City
Page 5
1) 2) 3)
4) 5) 6) 7)
8) 9)
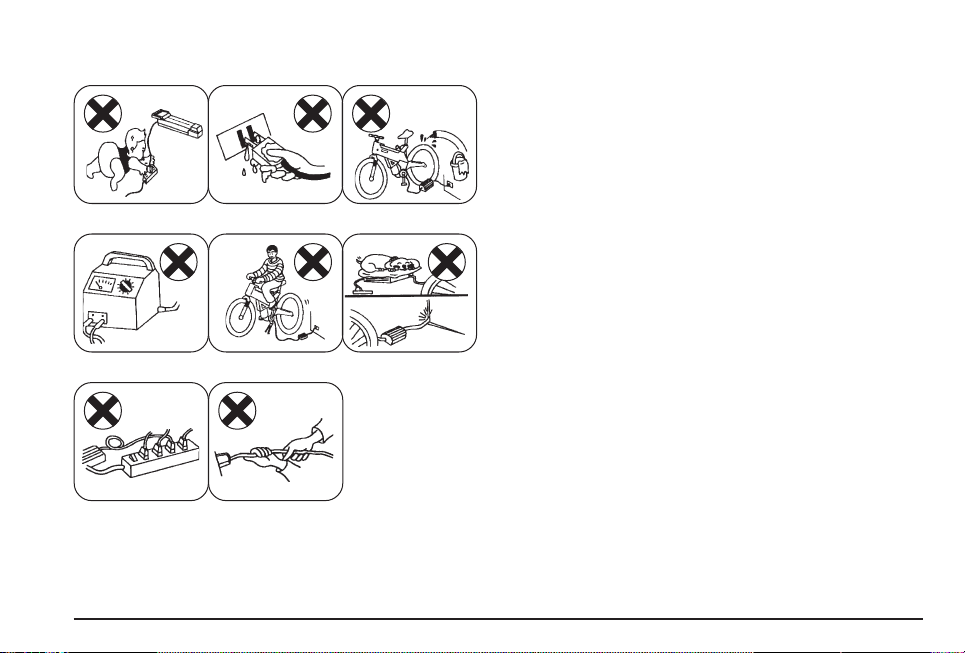
Please pay special attention to the following when recharging.
1) Keep children away from recharging equipment and avoid elec-
tric cables entanglement.
2) To avoid shock,don’t plug in with wet hands or when the electrical components are damp. Moreover, prevent the charger
from coming into contact with water.
3) Don’t clean the bike with water when recharging.
4) For longer battery life,use genuine aprilia equipment for re-
charging. Check that there is enough ventilation to avoid over-
heating the charger.
5) Don’t ride on and pedal the bike when recharging to avoid falling or serious damages to the charger.
6) Don’t put clothes over the tackle when recharging.
7) Be sure the cable won’t be squeezed when re-charging to prevent short circuit.
8) Be sure to use single outlet socket.
9) Never disconnect the plug by pulling the cable.
use and maintenance Enjoy Racing - Enjoy City
5
Page 6
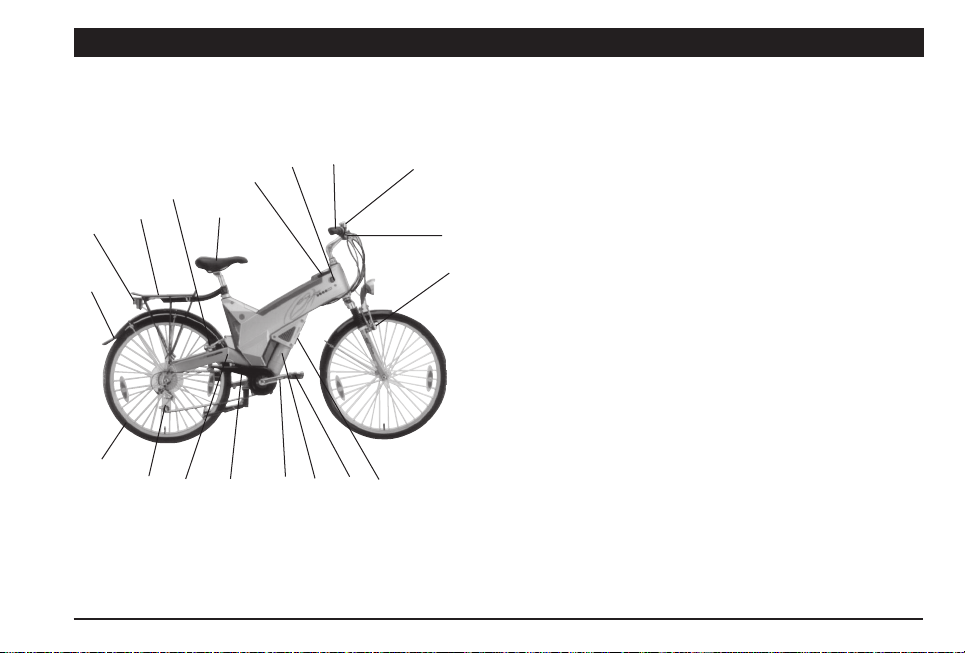
GENERAL FEATURES
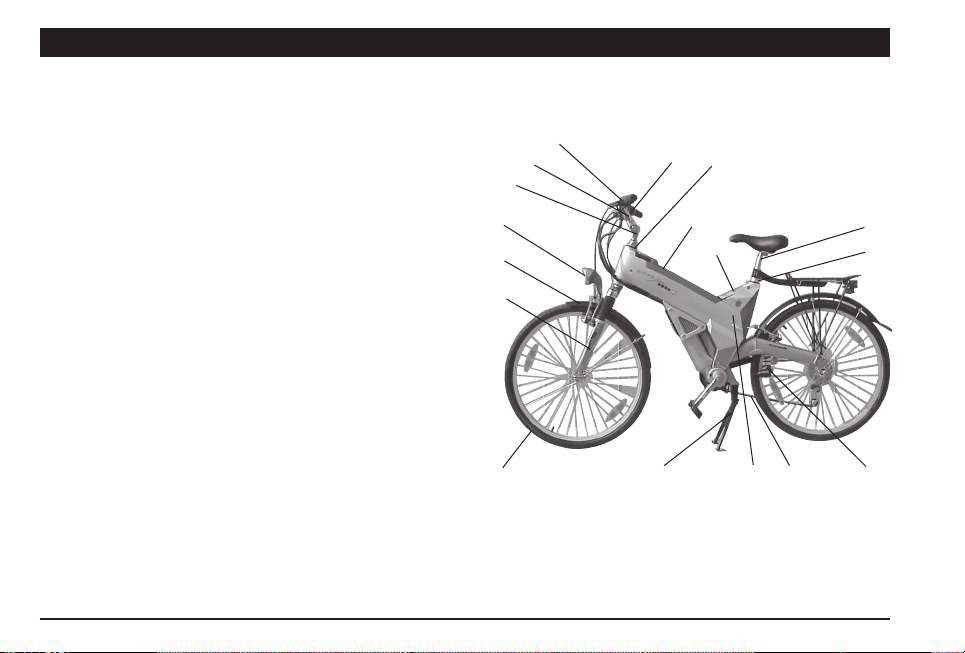
BIKE COMPONENTS
1) FRONT WHEEL
2) FRONT SUSPENSION FORK
3) FRONT MUDGUARD
4) FRONT BRAKE
5) FRONT LAMP
6) BRAKE LEVER
7) GRIP SHIFT
8) FUNCTION SWITCH
9) STEM
10) HANDLEBAR
11) STEERING SET
12) LED INDICATOR
13) BATTERY SET
14) RECHARGE COVER
15) PILLAR
16) PILLAR LOCK
17) SIDE GUARD
18) DYNAMO
NOTE: ENJOY RACING VERSION IS WITHOUT ITEMS Nº
3,5,18,22,23,24
use and maintenance
6
Enjoy Racing - Enjoy City
8
10
7
11
9
5
3
13
14
15
16
2
1
27
17 1826
Page 7
12
36
24
23
22
21
25 28 31 32
192030
33
35
29
34
19) FRAME
20) REAR BRAKE
21) REAR WHEEL
22) REAR MUDGUARD
23) CARRIER
6
4
24) REAR LAMP
25) REAR DERAILLEUR
26) CHAIN
27) KICK STAND
28) CRANK
29) PEDAL
30) CHAIN GUARD
31) MOTOR KIT
32) CONTROLLER
33) LOCK POWER SWITCH
34) BELL
35) GRIP
36) SADDLE
use and maintenance Enjoy Racing - Enjoy City
7
Page 8
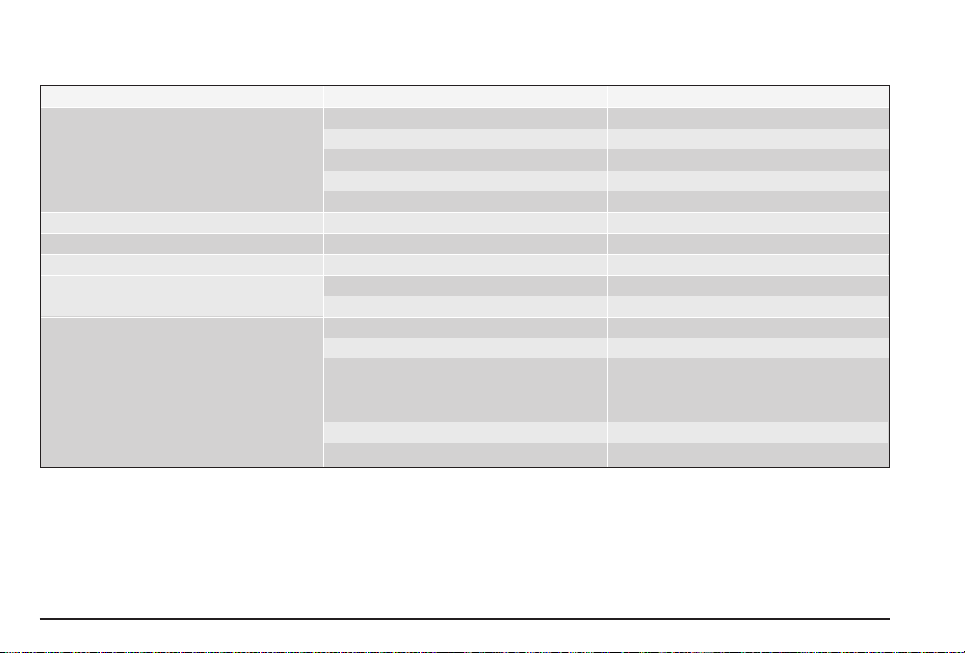
SPECIFICATION
Model name Aprilia Enjoy City Aprilia Enjoy Racing
Weights /dimensions
Empty Weight, depending on fitting Approx. 30.5 kg Approx. 29.2 kg
Permissible total weight Max. 130 kg Max. 130 kg
Permissible load on carrier Max. 10 kg Max. 10 kg
Dimensions (L x W x H ) Approx. 1760x580x1040 mm Approx. 1760x570x1180 mm
Frame Alloy 7005 Alloy 7005
Front/rear tyre 47-559 (26”x1.75”) 51-559 (26”x1.90”)
Front/rear rim 20x559 18x559
Front tyre pressure 3.0 bar max.4.5 bar 3.0 bar max.4.5 bar
Rear tyre Pressure 3.5 bar max.4.5 bar 3.5 bar max.4.5 bar
Drive
Tread drive Pedal, crank length 170 mm Pedal, crank length 170 mm
Gear shift 6 speed shimano and Sram grip 6 speed shimano and Sram grip
Distance per crank revolution
Long ratio (6th speed) 8.75 m 8.75 m
Short ratio (1
st
speed) 3.6 m 3.6 m
use and maintenance
8
Enjoy Racing - Enjoy City
Page 9
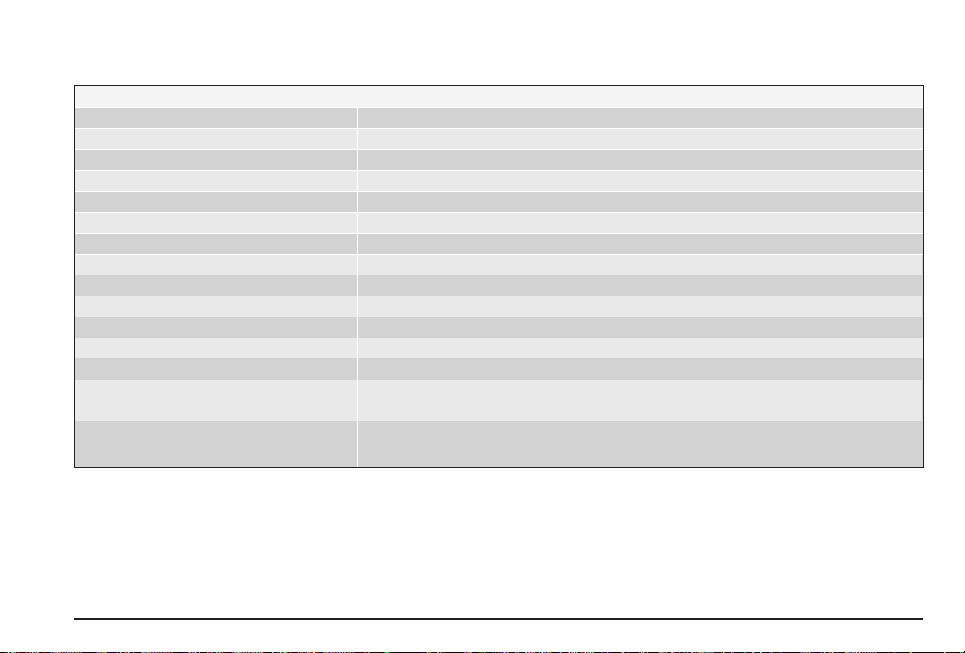
Model name
Motor drive unit d.c. motor 24V/250W
Power control Electronically controlled via torque and pedal speed sensor
Drive d.c. commutator motor
Power assistance ratio Max. up to 20 Km/h, falling linearly to 24 Km/h
Power assistance Max. 220 W
Gearbox, power transmission Planetary gear assembly and chain
Total transmission ratio 1:22.7
Battery 20 Nickel-Hidrate metal cells at 1.2 V = 24 V
Peak current 70 A
Nominal capacity 13 Ah
Fuse 2x30 A and 2x5 A
Resistance NTC 10 Kohm
Weight 5.5 Kg
Range Up to 40 Km depending on the level of power assistance, charging condition of the
battery, level or hilly route, opposing wind, loading, road surface wear, air pressure etc.
Life Min. 500 chargings with completely discharged battery,
correspondingly more with partly discharged battery
use and maintenance Enjoy Racing - Enjoy City
9
Page 10

MAIN INDEPENDENT CONTROLS
MOTOR KIT
More unique features aprilia cycle is its Motor Kit design, such
as Dual-Sense module (torque sensor+speed sensor), enhanced
use and maintenance
10
Enjoy Racing - Enjoy City
computerized controller, spiral bevel gearing drivetrain system, etc.
Spiral bevel gearing drive-train system
(Dualsense Module = Torque sensor + Speed sensor)
Pedalling
Drive
Device
Motor
Battery
Dual Sense
Module
Computerized
Controller
Page 11
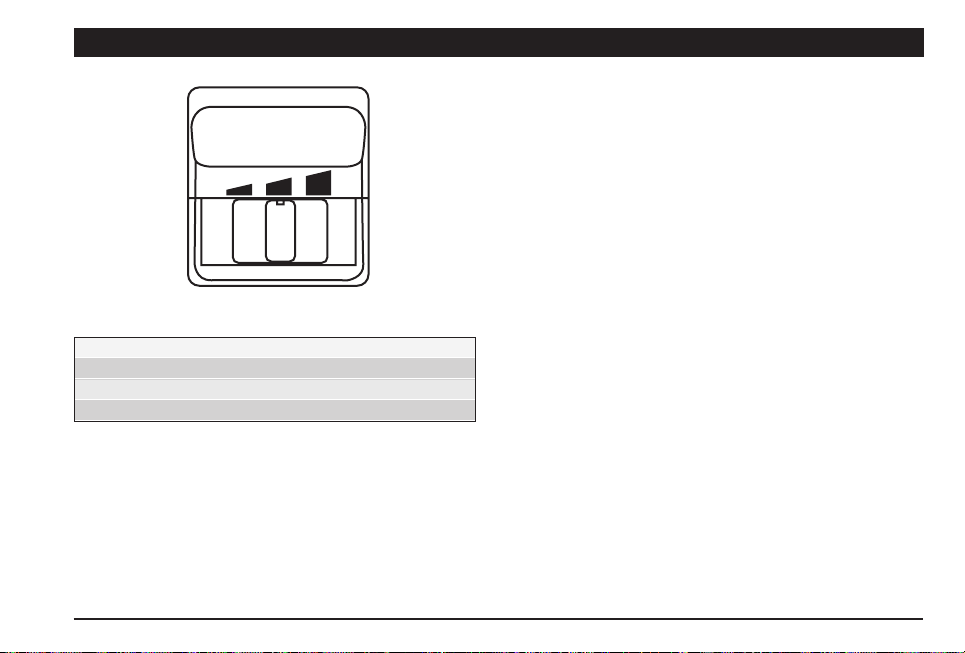
FUNCTION DRIVING FUNCTION Remarks
LEFT ECO
MIDDLE NORMAL
RIGHT UP_HILL
FUNCTION SWITCH
As illustrated above,it is a 3-mode switch, which has
left,middle,and right positions.
The function and definition of the switch
ECO
An economic mode in lower power assisting, the assistance will
be automatically off when the speed reaches about 24km/hr.
NORMAL
The normal power assistance mode,the assistance is off at a
speed of about 24km/hr.
UP_HILL
A mode in stronger power assistance than the NORMAL position. The assistance will be automatically off when the speed
reaches about 24km/hr.
use and maintenance Enjoy Racing - Enjoy City
11
Page 12
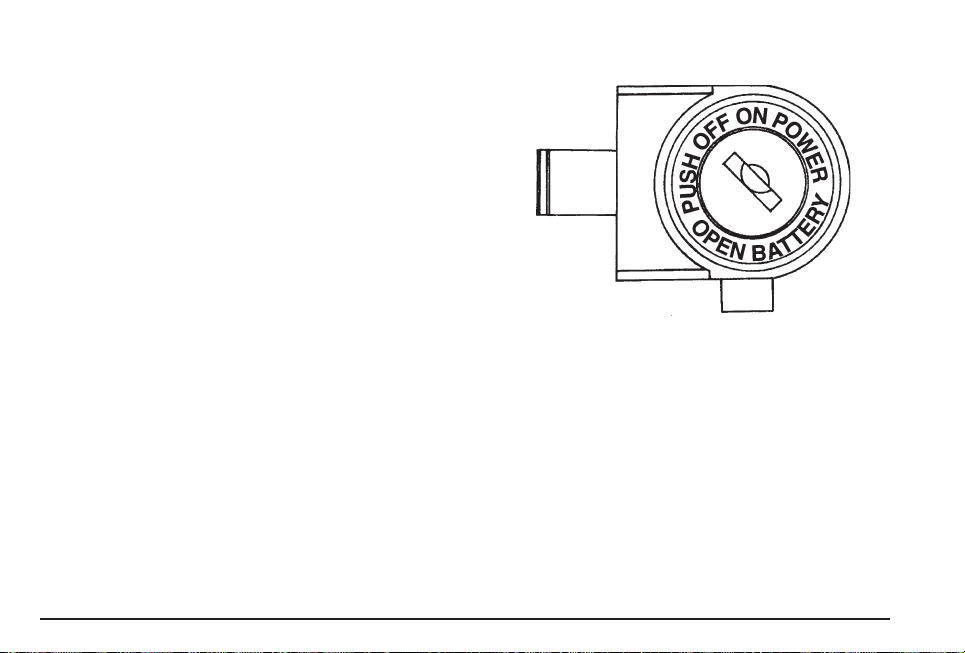
LOCK POWER SWITCH
Features
There are 3 positions for the key:
1. position “OFF”: With key turned to this position, the power
supply is switched off, but the battery set is still locked on
the body of the bike.
2. position “ON”: the power is switched on and the battery
set is also locked.
3. position “OPEN”: The power is off,and the battery set is
unlocked so that you can remove the battery set from the
bike. Moreover, the OPEN position enables you to put
the battery set back onto the bike.
use and maintenance
12
Enjoy Racing - Enjoy City
Page 13

BRAKE SWITCH
1. When you are not braking, please make sure the brake levers
(Right & Left) are on the right positions. Otherwise, it may cut
off the power and result in no power assistance.
2. When you brake, the brake switch will cut off the power.
3. If the wire of the brake switch is broken,there will be no power
assistance.
4. If the connectors inside the brake bracket are broken or losen,
there will be no power assistance.
NO BRAKE
BRAKE
NO BRAKE
BRAKE
SWITCH
BRAKE
BRAKE SWITCH
use and maintenance Enjoy Racing - Enjoy City
13
Page 14

CHARGER DESCRIPTION
CHARGE
CONNECTOR
RED LED
SWITCH ON-OFF
use and maintenance
14
ORANGE LED
(YELLOW)
POWER
CONNECTOR
VOLTAGESWITCH
Enjoy Racing - Enjoy City
Page 15

1. Specification 2. Operating Instruction
1) Manually adjust the correct input voltage (115V/230V).
Item Specification
Output Current 4Adc ± 5%
Output Voltage 32.0Vdc ± 2%
Input Current 2.0A
Input Voltage 100-120 Vac Or 200-240 Vac
(Manual Select)
Performance Switching Mode
Charging Method Two Stage Constant Current
Battery Application Ni-MH Batteries (1.2V a 20
Cells 13000mAh)
Output Detection 1. Short Circuit Detection
2. Output Voltage Current
Limit
3. Reverse Power Protected
4. Overheat Detection On
Battery And Charger
5. Charging Time Limit
Operating Temperature 0°C ~ 35°C
Operating Humidity 20% ~ 85%
2) Connect the plug of battery charger to the socket of battery.
3) Plug in the power cord and turn on the power switch. LED
(POWER) shows RED when AC current passes.
4) Charging starts as ORANGE light means charging and
GREEN means fully charged.
3. LED Indication
LED(POWER) - RED LIGHT ON: Power On
A LED(CHARGE) - LIGHT OFF: Battery Disconnect
ORANGE LIGHT FLASH: Abnormal orwaiting to start
ORANGE LIGHT ON: Charging
GREEN LIGHT ON: Fully Charged
use and maintenance Enjoy Racing - Enjoy City
15
Page 16

5. Trouble Shooting
(1) If LED(POWER) light is off
• Check the input voltage (115V/230V) is the same as you
adjust.
• Check the AC fuse. If broken, please replace the spare
one.
• Check AC passing is in normal condition.
• If light is still off, please have the battery charger to be
recovered.
(2) If LED(CHARGE) light is off
• Check the plug of battery charger and socket of battery is
correctly connected.
• Check the DC fuse. If broken, please replace the spare
one.
• If light is still off, the battery may be defective.
(3) If ORANGE light flashes
• The battery temperature is too high to start with recharge
process.
(4) If ORANGE light turns to GREEN immediately
• The battery may be in well-charged condition.
• If the LED indicator signals that the battery is not fully
charged, it may be defective. Please have it to be recovered.
6. Caution
(a) To prolong charger life, do not connect the short output for
long time.
(b) Use the charger in a well-ventilated area.
(c) Use for Ni-MH (1.2V, 20 cells, 13000mAh) batteries only.
(d) Make sure AC voltage input and select correctly (115V/
230V) before charging.
(e) After fully charged, avoid reconnect the battery with battery
charger to overcharging.
(f) Use the Charger with an ambient temperature lower than
35°C.
use and maintenance
16
Enjoy Racing - Enjoy City
Page 17

Battery Indicator
FULL CHARGE
MEDIUM CHARGE
LOW CHARGE
EMPTY
COMPLETELY
DOWN
123
4
LED INDICATOR FUNCTIONS
The led indicator may display a charge which is too low when:
• The ambient temperature is too low
• The driving conditions are very hard (e.g. during a strong uphill)
A charge which is too high may be displayed a few minutes
after recharge,when:
• The battery has only been 1/2 charged
use and maintenance Enjoy Racing - Enjoy City
17
Page 18

LED INDICATOR FUNCTIONS AND SOUND ALARMS
Item Indicator Buzzer Alarm Condition Solution
1 ● ❍ ❍ ❍ Continuous The battery voltage Charge the battery.
Ist indicator is always ON. intermittent alarm is too low
ON:0.8S,OFF:0.2S
2 ● ❍ ❍ ❍ Continuous The battery middle Charge the battery.
st
I
indicator is always ON. intermittent alarm is too low
ON:0.3S,OFF:0.2S
3“●” ❍ ❍ ❍ Three short warning Electrical Call the aprilia.
st
indicator is flashing. alarms then stop components dealer
I
ON:0.5S,OFF:0.2S warning failure
4“●” ❍ ❍ ❍ Continuous Over current Switch off, then
st
I
indicator is flashing. intermittent alarm warning switch on then
ON:0.5S,OFF:0.2S switch
If the alarm stops:
Overcurrent
happened, please
use a lower gear
If the alarm is
keeping:Call the
aprilia dealer
use and maintenance
18
Enjoy Racing - Enjoy City
Page 19

MAIN COMPONENTS
SHIFTING
Function and Operation/The Derailleur System
The word derailleur refers to the derailing or shifting of the
chain from one sprocket to another. The derailleur system includes rear derailleurs,the shift levers,and the cables. A variety of gear ratios allows you to maintain a constant rate of
pedal revolutions in spite of changes in terrain, climatic conditions and your physical condition.
Never attempt to shift gears when stopped or when back pedalling. When you shift, reduce your pressure on the pedals;
excessive chain tension makes shifting difficult. Avoid shifting
when going over railroad tracks or other bumpy surfaces,or
the chain may not shift properly and may come off.
The GRIP-SHIFT,Figure 4,are operated by GRIPSHIFT
control.right-hand GRIP controls the rear derailleur. Choose
the gear combination most comfortable for the road
conditions,and you should be able to maintain a constant rate
of pedalling. It is not essential that various gear combinations
be used in sequence.
C
A
B
A) Function switch
B) Rear derailleur grip shift
C) Brake lever
Figure 4,Shift Levers Grip Shift
A properly adjusted drivetrain and derailleur system is quiet. If
an unusual noise accompanies or follows any shift, try moving the GRIPSHIFT slightly. If the noise persists or grows
louder, stop the bicycle and try to locate the noise. If
necessary,ask your aprilia dealer to identify and correct any
problems.
use and maintenance Enjoy Racing - Enjoy City
19
Page 20

Cleaning and lubrication of the chain
Keep the chain as free of dirt as possible. After cleaning with a
chain cleaning set,allow the chain to air dry and then apply
the proper bicycle oil. Keep in mind that excessive oil on the
chain will attract more dirt.
Carefully apply oil only to the pivot points of each link.
Cleaning of the freewheel
The freewheel should be kept as clean as possible. Remove
the surface dirt that gathers around the cog with solvent and
a brush. Do not use gasoline.
To clean and lubricate the bearings, remove the freewheel
unit from the hub.
Adjustment
Check that the derailleurs have been properly adjusted if:
- shifting is sluggish or difficult
- you hear a rubbing or grinding noise
- the chain rubs on any part of the bicycle or falls off during or
after a shift.
The rear derailleur (Figure 5) should be checked and adjusted
by your aprilia dealer first.
Removal of spoke protector may cause technical troubles.
Apply to an Authorized aprilia Service Center.
Figure 5. Rear Derailleur
use and maintenance
20
Enjoy Racing - Enjoy City
Page 21

WHEEL
Inspect your wheels frequently to make sure that there are no
loose,damaged,or broken spokes.
Remember:If a wheel is not in good condition, both the range,
the effectiveness of the brakes and the strength of the wheel
are greatly reduced.
Tire Inspection
Keep your tires inflated to the pressure molded on the tire
sidewalls.Use a gauge and a bicycle pump whenever possible.
Avoid filling your tires at gas stations; because of the greater
pressure and volume of air their pumps release,blowouts are
very possible.
When you fill your tires,check to see that each tire is properly
seated in the rim and that there are no defects on its surface.If
a tire shows signs of excessive wear, dry rot, or if it is badly
cut, replace it as soon as possible.
use and maintenance Enjoy Racing - Enjoy City
21
Page 22

QUICK RELEASE
Quick Release Hubs
Some wheels are provided with quick release hubs. These
allow you to remove and install the wheel without the use of
tools. To release,pull the lever out away from the hub.To tighten,
press the lever back toward the hub.
Caution: Be sure that hub quick release lever is firmly in the
engaged position,and that wheel is firmly locked into the frame
before riding.
disengaged
A
Figure 12. Hub Quick Release
A) Skewed lever
B) Adjusting nut
engaged
B
use and maintenance
22
Enjoy Racing - Enjoy City
Page 23

INSTRUCTION FOR USE
PREPARATION BEFORE RIDING
INTRODUCTION OF FUNCTIONS
Lock-Power Switch Shifting Lever
Lock-Power Switch
1) Push the key down temporarily and then turn the key to
“ON” while riding.The indicator will indicate the battery
charge level.
2) Turn the key to “OPEN” to remove the battery set for recharging or replacement.
3) Turn the key to “OPEN” to put the battery set back on the
bike.
4) Turn to “OFF” and take the key out when not in use.
Lift the gear shift lever
1) Uphill riding,please use lst gear.
2) Headwind riding,please use 2nd gear.
3) Normal riding and starting,please use 3.4.5 gear.
4) Speedy riding,please use 6th gear.
5) Don’t apply too much pressure on the pedals when shifting.
human output
motor output
OPEN
Pedal Control
• The motor output is controlled by
the pedaling force and the
speed.
Recharging Socket
• Recharging socket is avaliable
under the recharge cover. Onbike recharging can be done
from this socket. Check that the
ignition lock key is turned to OFF
during the recharging operation.
Seat Height
• The height of the seat can be ad-
OPEN
CLOSED
use and maintenance Enjoy Racing - Enjoy City
justed. Before riding,always ensure that the seat clamp screw
has to be fixed.
Controller
• Fuse on the back side of battery
case protect the Controller.
23
Page 24

CHECK-LIST BEFORE RIDING
To ensure a safe and comfortable ride, please check the following
items before riding:
1) The range of a fully charged Aprilia battery under normal riding condition is approximately 25km~40km. However, the
range will vary depending on a variety of factors such as terrain, battery condition, tyre pressures, general conditions and
load of bicycle.
4) Check the brake function. Make
sure the aprilia won’t move when
applying the brake lever to 1/2 of
the reach.
5) Check that the battery firmly lo-
cated onto the bike.
height
use and maintenance
24
2) Check that the charger has been
properly stored.
3) Check that the seat been properly
adjusted according to the height
of rider.
Enjoy Racing - Enjoy City
6) Check all the bolts tightening (seat,
wheels, steering set and handlebar stem).
7) Check the tyre pressures and inflate if necessary.
Corporeal weight: 65 kg
(L) ~130 -140 mm
Page 25

BRIEF INSTRUCTION ON STARTING
1) Lock-Power Switch (On-Off-Open)-
ON: Power is on and the bike is ready to ride.
OFF: Power is off and the battery can be recharged.
OPEN: The battery can be removed,but first the key has to be
pushed down and released again.
2) Indicating Light-
Normal: When the key is turned to “ON”, the bike will give off a
sound. All 4 indicators will flash for a short (check with cast controller function!) moment and then one remains on to indicate the relevant battery charge level.
LED 2): The battery needs recharing.
LED 1): Battery has run down.
Malfunction: one Indicator keeps flashing and there is warning
sound.
3) Release the kickstand before riding.
4) Familiarise yourself with your bicycle and its controls before you attempt to ride in traffic.
5) To start,simply apply pressure to the pedals.
use and maintenance Enjoy Racing - Enjoy City
25
Page 26

Battery Indicator
1
1) 2) 3)
aprilia aprilia aprilia
4) 5) 6)
7) 8) 9)
DRIVING INSTRUCTIONS
!!
!!!
!!!
1) Flashing (1) light signals low battery. Recharging is required.
2) Indicator (1) signals empty battery. The controller will cut power
supply to the motor and pedaling becomes harder. Battery recharging is required.
3) Malfunction of motor or reduction gear may cause noise when
riding. Please check and call for service.
4) If battery case falls into water,dry it out and call for check from
dealer before riding.
5) Stop riding when motor gets wet. Call for check from aprilia
dealer before riding.
6) Don’t ride when battery case is broken. Replace the case at
your dealers shop.
7) Find a proper parking place.
8) Turn key to “OFF” position and take the key out when not in
use.
9) Extra lock required to prevent theft.
use and maintenance
26
Enjoy Racing - Enjoy City
Page 27

RECHARGEMENT
SAFELY RECHARGEMENT
Charging with wrong charger will damage the battery & may cause
danger!
Please follow the specified charge conditions.
The battery must be recharged before first use and after each use.
1) 2) 3) 4)
5) 6) 7)
1) Don’t put the battery on the fire as it may explode.
2) To ensure the performance of the battery, please recharge the
battery after each use using only aprilia original equipment.
3) Don’t disconnect from the mains until the indicator light changes
from orange to green.
4) Leaving the battery not fully charged will result in the deterioration of the battery performance. Make sure it is always fully
charged.
5) Don’t try to dismantle the battery set.
6) Don’t grind the electrode connectors. Clean with a dry cloth if
neccssary.
7) Don’t deform the electrode metal plates as this may cause contact failure.
8) In case of prolonged stops (about 1 month), remove the battery from the bicycle and store it in a separate place.
To prevent battery deterioration it must be recharged at least every
three months especially when in storage.
use and maintenance Enjoy Racing - Enjoy City
27
Page 28

RECHARGING PROCEDURE
Recharging can be done either by plugging direct into the socket
located in the frame, or by removing the battery case and placing it
in the recharging equipment. Recharging time is about four hours.
For maximum economy,we recommend that you recharge at night
during off-peak hours.
1. Proper place for recharging
1). Indoor:Avoid high temperature and humidity.
2). Outdoor:Avoid sunshine or rain.
2. Off-bike recharging
1) Park the bike
2) Turn the key to “Open” (Push and release first) and unpack
the battery case.
3) Oper the open cover pushing both sides.
4) Pull the HANDLE to take out the battery case.
Warning! when pull-out the battery pay attention to don’t
touch the led indicator.
5) Put the charger plug into the socket of the battery.
6) Verify that the voltage is the right one (FOR EUROPE 220V)
7) Plug the socket into the mains outlet.
switch on the charger
use and maintenance
28
Enjoy Racing - Enjoy City
Page 29

8) If the charger indicating led is not lit, it is abnormal. Please
check or call for service from dealer.
9) Recharging should not be undertaken under the following
conditions:
a) Immediately after riding,when the battery temperature has
risen. Please wait until the battery returns to its normal
temperature.
b) When the temperature of the battery is Over 35°C (Am-
bient Temperature)
c) In an area where the temperature is below 0°C. Please
find a warmer place.
10) When the indicating light of the re-charger turns from yellow to green color,it signals the re-charging has been done
fully. At this time, the electric current of the re-charger will
automatically become smaller and there will be no danger
even though the plug is still connected to the mains outlet.
use and maintenance Enjoy Racing - Enjoy City
29
Page 30

3. After recharging
1) Ensure there are no other objects inside the battery cover
on either side of the frame.
2) Turn the key to “OPEN” position.
3) Push in the battery set and have it firmly locked with the
locking device.
4) Make sure the battery case is firmly located before riding.
4. On-bike recharging
1) Turn the key to “Off” position.
2) Turn dust cap aside and plug charger cable in the connector.
3) Same procedures as 2-(6)(7)(8)(9)(10).
4) After recharging, remove the charger plug and put the connector cap in the original position. Close the recharge cover.
use and maintenance
30
Enjoy Racing - Enjoy City
Page 31

MAINTENANCE
BICYCLE CARE BICYCLE CARE CHECKLIST IN SCHEDULE
Each Time You Ride ❐ Follow safety information provided on page titled:Preparation Befor Riding.
❐ Wipe off your bicycle with a damp rag.
❐ heck tyre pressure.
❐ Check brakes.
Weekly ❐ Oil cable,chain and pivot points (brake levers and calipers,shift levers,derailleurs) with a light
bicycle lubricant.Avoid heavy oils that evaporate and leave a gummy residue.
Remove excess oil to avoid dirt buildup.
❐ Tighten any loose nuts and bolts.
Monthly ❐ Check wheels and have the bicycle shop true them if necessary.
❐ Replace brake shoes if they are worn down past the grooves.
❐ Clean chain,derailleurs,and other greasy parts with a brush and kerosene and then relubricate.
❐ Check gear adjustments.
❐ Recharge battery if unused
Every 3 Months ❐ Clean all bearings in the hubs and steering set.Repack bearings with grease.
Every Year Oil or grease pedal bearings.
❐ Replace frayed cables.
❐ Replace tyres if they are split or if cord can be seen anywhere.
use and maintenance Enjoy Racing - Enjoy City
31
Page 32

BICYCLE CARE
Storage
Improper storage is very hard on a bicycle.
1) Before storing your bike,clean and lubricate it.
2) Hang the bicycle off the ground,with the tyres at approximately half pressure.
3) Do not store near electric motors (ozone destroys rubber
and paint).
4) Before riding the bicycle again, be certain it is in good working order.
5) Batteries have to be charged every three months at
least,also when the bicycle is not being used.
This maintenance schedule is based on normal usage. If you ride
your bike more than average or in rain, snow, or off road conditions, you will want to go over your bicycle more often than the
schedule suggests. If any part appears to be malfunctioning, check
and adjust it immediately if you can do so yourself,or consult your
dealer.
Never ride any bicycle that is not operating properly.
Security
To avoid theft, observe the following precautionary measures:
1. Keep a record of the serial number in a safe place.
2. Purchase a lock from a manufacturer that guarantees its
absolute effectiveness against bolt cutters and saws.
3. Never leave your bicycle unlocked.
use and maintenance
32
Enjoy Racing - Enjoy City
Page 33

Routine Maintenance
Keeping your bicycle properly maintained is extremely important.
Use the following maintenance notes and schedule as a guide to
complete care. You can do many of these operations yourself,but
1) 2) 3) 4) 5)
6) 7) 8) 9) 10)
we recommend an expert to do the more technical tune-up work.If
you have questions about how to care for your bike,please feel
free to ask your dealer.
use and maintenance Enjoy Racing - Enjoy City
33
Page 34

1) Please clean up the bike routinely. (Do not use aggressive
solvent or gasoline)
2) To replace part,please come to aprilia authorized dealer
for replacing.
3) Check and keep the proper tire pressure.
4) Park your Aprilia in a sheltered place away from rain,heat
and humidity.
5) Please turn the key to “Off” position and take the key out
when not in use.
6) If your bike has been stored for a long while,clean and lubricate it,and recharge the battery before riding.
7) When cleaning,don’t let water come into contact with any
electrical components.
(IMPORTANT TAKE OUT THE BATTERY BEFORE
CLEANING!!)
8) When replacing parts,always use the originally specified
components.obtainable from your aprilia dealer.
9) Don’t try to dismantle electrical components.
10) Do not take a seat on the bike when the kickstand is in use.
use and maintenance
34
Enjoy Racing - Enjoy City
Page 35

TROUBLE SHOOTING
Please refer this table for problems and remedies.
If problem remains unsolved, please call for service from aprilia authorized dealer.
Problem Cause Remedy
Key isn’t in “On”position. Turn the key to “On” position.
Hard pedaling
Reduced range
Malfunction of the
battery recharging
Strange smell of
recharger.
Temperature of
recharger and
battery is too high
Can’t remove the
battery unit
Battery isn’t firmly located;no good contact. Make sure the battery is firmly located.
Low battery Recharge fully.
Road condition or overload. Range varies according to load,terrain & road
Bike is not used for a long time. Recharge battery before riding
Battery running out of life. Buy new battery.
Malfunction of the re-charger. Check & repair the re-charging tackle.
Malfunction of the battery. Check battery-replace it if necessary
Switch is not in “Off” position. Turn the key to “Off” position.
Temperature of battery is too high. Wait to recharge when the battery gets cooler.
Temperature is too low.
Malfunction of the electric circuit Pull out of mains socket immediately. Call for
If the temperature is very high and the Pull out of mains socket immediately. Call for
recharger remains on there is the service from authorized dealer.
malfunction of the electrical circuit.
Obstructed by other object. Check and remove the object.
Switch is not on “Open” position. Turn the key to “Open” position.
condition and outside temperature.
Recharging can’t be done if the temperature is below
0°C J.Change to a warmer place for recharging.
service from authorized dealer.
use and maintenance Enjoy Racing - Enjoy City
35
Page 36

APRILIA WARRANTY
Dear Customer,
aprilia S.p.A., based in Via Galilei 1, 30033 Noale (VE), Italy
(hereinafter referred to as “aprilia”), congratulates you on choosing an aprilia product covered by a warranty (hereinafter referred
to as “Warranty”) according to the terms and conditions stated
below.
We recommend operating, maintaining and repairing your new
aprilia electric bicycle in strict compliance with the indications
provided in the Operation and Maintenance Manual.
the aprilia vehicle you have purchased, and to return it to the
following address within 15 (fifteen) days from the date of purchase:
Aprilia Warranty Center
Via Rovereto 33/35
20059 Vimercate (Milano)
Italy
The Warranty Initiation Form must bear the official stamp of a dealer
or subdealer expressly authorized by aprilia. The form must be
returned with a copy of the receipt of purchase, or any other document serving as proof of purchase.
The Warranty can also be initiated by fax or via the Internet directly by aprilia dealers qualified for this type of service.
Removing, erasing or tampering in any way with your vehicle’s
frame serial number makes the Warranty null and void.
TERMS AND CONDITIONS
1. VALIDITY
The Warranty is valid for a period of 2 (two) years from the date of
purchase.
The battery is guaranteed for one year.
2. TERRITORY
The Warranty covers all’aprilia electric bicycles sold in the territory of the European Union.
3. INITIATION/VALIDITY
Your aprilia electric bicycle is accompanied by an Operation and
Maintenance Manual containing a “Warranty Initiation Form”, which
is required to initiate the Warranty. You are kindly requested to fill
in the form with your particulars and with the identification data of
use and maintenance
36
Enjoy Racing - Enjoy City
4. WARRANTY CLAIM
Should you experience any malfunctioning of the product you have
purchased, you are entitled to request the warranty service within
the Warranty period. To put in a warranty claim, you must apply to
an authorized aprilia dealer, subdealer or workshop within 60
(sixty) days from the time the malfunction was discovered and produce, in addition to presenting your vehicle, the Operation and
Maintenance Manual or any other document serving as proof of
the date of purchase. If any part of the vehicle is found to be defective because of faulty materials and/or workmanship by the aprilia
dealer, subdealer or workshop, or by aprilia itself, the part involved will be repaired or replaced (at aprilia’s option) at no expense for the new components and/or necessary labour.
Page 37

5. EXCLUSION
The Warranty does not cover ordinary maintenance, servicing,
adjustments and consumables.
Also excluded from the Warranty is damage resulting from:
• Tampering, neglect, improper or imprudent use.
• Poor and inadequate maintenance.
• Rust and corrosion.
• Improperly performed repairs or incorrect replacement of parts
with spares.
• Use of components not produced or supplied by aprilia, modifications not recommended or approved in writing by aprilia.
• Ordinary wear and tear of components, battery included.
• Activities such as hire, business use, competitions, tests, shows
and other public performances.
• Accidents and shocks due to improper riding conduct or fortuitous events.
Finally, no coverage is provided for any inconvenience resulting
from the impossibility of using the vehicle during repairs.
6. NOTE
The network of aprilia distributors and dealers, as well as aprilia’s
employees and agents, are not authorized to change or extend
the warranty terms and conditions.
The performance of any after-sales service under the Warranty
terms does not constitute an acknowledgement of or an agreement on defective design and manufacture of aprilia products.
Aprilia reserves the right to discontinue the manufacture of its
products and to change the specifications of products already marketed at any moment and without notice.
7. FINAL PROVISIONS
Aprilia acknowledges no other warranties, statements or promises previously made by third parties, orally or in writing. All guarantees not expressly covered in this document are therefore excluded.
The rights arising under the Warranty are in addition to and do not
affect the statutory rights granted in relation to the sale of
consumables.
use and maintenance Enjoy Racing - Enjoy City
37
Page 38

NOTES
use and maintenance
38
Enjoy Racing - Enjoy City
Page 39

WARRANTY ACTIVATION FORM
This form serves to activate your warranty. You are therefore requested to complete it by inserting your
personal data and send it on to the following address: Aprilia Warranty Center Via Rovereto 33/35
20059 Vimercate (Milan), Italy, within 15 (fifteen) days of purchasing your vehicle. The warranty can also
be activated via fax or Internet directly at the aprilia Salesrooms which offer this service.
OWNER’S NAME __________________________________________________________________
ADDRESS ________________________________________________________________________
TOWN __________________ POST CODE _________ COUNTRY __________________________
TEL. N° _________________ E-MAIL _________________________________________________
SALESROOM/SALES PERSON*_______________________________________
SALESROOM/SALES PERSON’S CODE*________________________________
TOWN ______________________
DATE OF PURCHASE _________
FRAME N° __________________
We hereby declare to have assembled the bicycle following the assembly instructions and the programme
of pre-delivery operations appropriate for this model.
STAMP AND SIGNATURE OF THE SALESROOM/SALES PERSON* _____________________________
*A sales person expressly authorised by Aprilia on activating the warranty.
✂
use and maintenance Enjoy Racing - Enjoy City
39
Page 40

The undersigned authorises aprilia S.p.A. to insert his data in computer or telecom archives in order to
fulfil the obligations connected with this warranty to carry out research and investigations into the market,
to send informative and promotional material, also using specialised companies working on behalf of
aprilia S.p.A. for these operations. The undersigned can at any time demand and obtain changes to or
the cancellation of all his data should they be dealt with in breach of the law, or oppose their use with a
simple written request addressed to the owner of the data, aprilia S.p.A., via G. Galilei 1 - 30033 Noale
VE, for the attention of the Head of Treatment of Personal Data in accordance with what is laid out in
article 13 of the law 675/96.
Cross the box if you do not wish to receive informative or promotional material ❏
DATE______________ CLIENT’S SIGNATURE________________________
use and maintenance
40
Enjoy Racing - Enjoy City
 Loading...