

Page 1

PowerBook
File Assistant
User’s Guide
Page 2

K Apple Computer, Inc.
All rights reserved. No part of this publication may be reproduced, stored in a retrieval system,
or transmitted, in any form or by any means, mechanical, electronic, photocopying, recording,
or otherwise, without prior written permission of Apple Computer, Inc.
The Apple logo is a trademark of Apple Computer, Inc., registered in the U.S. and other
countries. Use of the “keyboard” Apple logo (Option-Shift-K) for commercial purposes without
the prior written consent of Apple may constitute trademark infringement and unfair
competition in violation of federal and state laws.
Every effort has been made to ensure that the information in this manual is accurate. Apple is
not responsible for printing or clerical errors.
© 1993 Apple Computer, Inc.
20525 Mariani Avenue
Cupertino, CA 95014-6299
(408) 996-1010
Apple, the Apple logo, AppleTalk, LaserWriter, LocalTalk, and Macintosh are trademarks of
Apple Computer, Inc., registered in the U.S. and other countries.
Finder, Duo, and PowerBook are trademarks of Apple Computer, Inc.
™
This program was developed in part using NeoAccess
™
The NeoAccess
software contained within this program is proprietary to NeoLogic Systems
and is licensed to Apple Computer, Inc., for distribution only for use in combination with the
Apple software. NeoLogic Systems makes no warranties whatsoever, expressed or implied,
regarding this product, including warranties with respect to its merchantability or its fitness for
any particular purpose.
Adobe, Adobe Illustrator, Adobe Photoshop, and PostScript are trademarks of Adobe Systems
Incorporated, which may be registered in in certain jurisdictions.
Exposure is a registered trademark of Preferred Publishers, Inc.
Helvetica and Times are registered trademarks of Linotype Co.
QMS is a registered trademark of QMS, Inc.
QuarkXPress is a registered trademark of Quark, Inc.
SuperPaint is a registered trademark of Aldus Corporation.
Tektronix is a registered trademark of Tektronix, Inc.
Simultaneously published in the United States and Canada.
Mention of third-party products is for informational purposes only and constitutes neither an
endorsement nor a recommendation. Apple assumes no responsibility with regard to the
performance or use of these products.
:©1992-1993 NeoLogic Systems.
Page 3

Contents
How the PowerBook File Assistant Can Help You v
What is file synchronization? v
What is the Assistant Toolbox? vi
1 Installing Your Software 1
Do you have what you need? 1
Using the Installer 1
Easy Install 2
Custom Install 3
2 Using the PowerBook File Assistant 5
Why synchronize your files? 5
Using a PowerBook with your desktop Macintosh 6
Using a PowerBook with a network 7
Using a PowerBook Duo with a Duo Dock 8
Starting the PowerBook File Assistant 9
iii
Page 4

Linking files or folders for synchronization 9
If your PowerBook has a system software version 7.1 or later 10
If your PowerBook has a system software version earlier than 7.1 11
Setting the direction of the link 12
Linking non-matching folders 12
Deleting a linked pair 13
Synchronizing linked folders or files 14
Manual synchronization 16
Automatic synchronization 16
Understanding the alert messages 16
Setting completely automatic synchronization 18
3 Using the Assistant Tool Box 19
Extending your PowerBook’s battery life 20
Controlling automatic screen dimming 20
Using persistent RAM disk 21
Putting your PowerBook to sleep 22
Spinning down the hard disk 22
Automatically remounting to shared volumes 23
Printing later 24
Improving pointer display 25
iv
C
ONTENTS
Page 5

How the PowerBook File Assistant Can Help You
The PowerBook File Assistant is software that synchronizes files on your
PowerBook and desktop Macintosh by automatically updating files whenever
you make changes. With the File Assistant, you can always be sure that the
file you are working on is the current version.
What is file synchronization?
As a user of both a desktop Macintosh and a PowerBook, you may often have
the same file or folder on both computers. This allows you to work on files
wherever and whenever it’s convenient. The only problem is keeping track of
what files are on what computer, and where the current copy of a file is.
The PowerBook File Assistant eliminates this problem by keeping the most
recent version of a file or folder on both your desktop Macintosh and your
PowerBook. The process of updating the files on both computers is called
synchronization.
individual files or folders.
file
With the PowerBook File Assistant, you can synchronize
v
Page 6

What is the Assistant Toolbox?
Also included with the PowerBook File Assistant is the Assistant Toolbox.
The Toolbox is a group of PowerBook enhancements that make your
PowerBook even easier to use by allowing you to:
m extend your PowerBook’s battery life by controlling automatic screen
dimming and using persistent RAM disk
m put your PowerBook to sleep with one touch
m connect your PowerBook to your Macintosh desktop system more easily
m send documents to print the next time you connect your PowerBook to a
printer
m track the pointer on the screen more easily
vi
H
O W T H EPOWERBOOKFILEASSISTANTCANHELPYOU
Page 7

1
Installing Your Software
Do you have what you need?
To use the PowerBook File Assistant, you’ll need:
m a PowerBook computer with at least 4 megabytes of RAM
m system software version 7.0 or later (System software version 7.1 or later is
required to use the drag-and-drop feature for file synchronization, as
described in Chapter 2.)
Be sure you’re acting within the terms of the software license agreement
before you install programs on a computer. The license agreement specifies
how many copies of the program you can make for yourself and others.
Using the Installer
To use the PowerBook File Assistant, you need to install the software on your
PowerBook’s hard disk. You do this with a program called the Installer, which
allows you to install the software one of two ways: Easy Install or Custom
Install.
1
Page 8
If you want to install all of the software, use Easy Install. It installs both the
PowerBook File Assistant and the Assistant Toolbox on your PowerBook. It
also installs system software that lets you drag icons from the Finder to the
PowerBook File Assistant’s Setup window, which makes using the program
very simple. (You need system software version 7.1 or later to support this
feature.)
If you only want to install a portion of the software, use Custom Install.
Easy Install
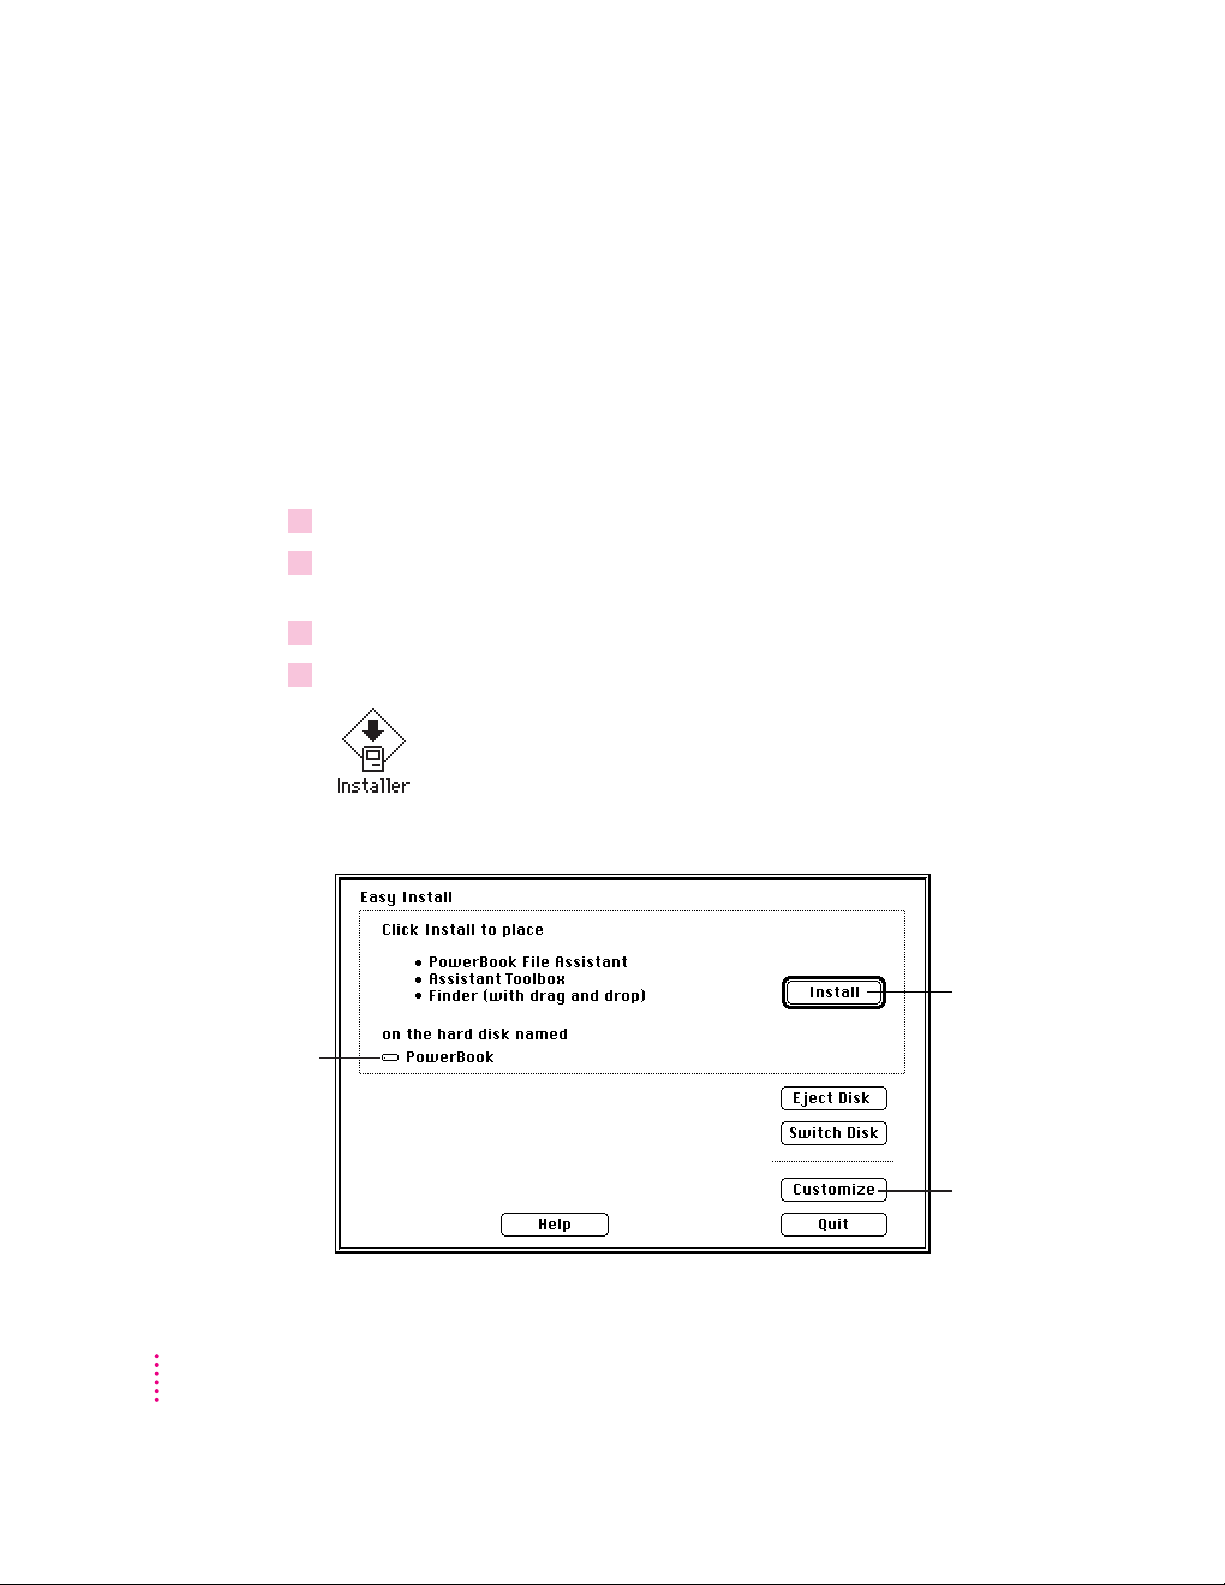
1 Turn on your PowerBook.
2Insert the floppy disk labeled
3Double-click the disk icon to open it.
4Double-click the Installer icon to open it.
Make sure the name
of your PowerBook
appears here.
PowerBook File Assistant Setup
your PowerBook.
The Easy Install window appears.
in the floppy disk drive of
Click for
Easy
Install.
Click for
Custom
Install.
(The Easy Install window may look slightly different if your system software
version is earlier than version 7.1.)
2
C
HAPTERONE
Page 9
5Make sure the hard disk named in the box is the one on which you want to install the
PowerBook File Assistant software.
If it’s not, click the Switch Disk button until the name of the disk appears.
6 Click Install.
Messages appear on the screen describing the progress of the installation.
7When you see a message saying that installation was successful, click Restart.
Your PowerBook restarts and the floppy disk is ejected. You are ready to use
the PowerBook File Assistant software.
Custom Install
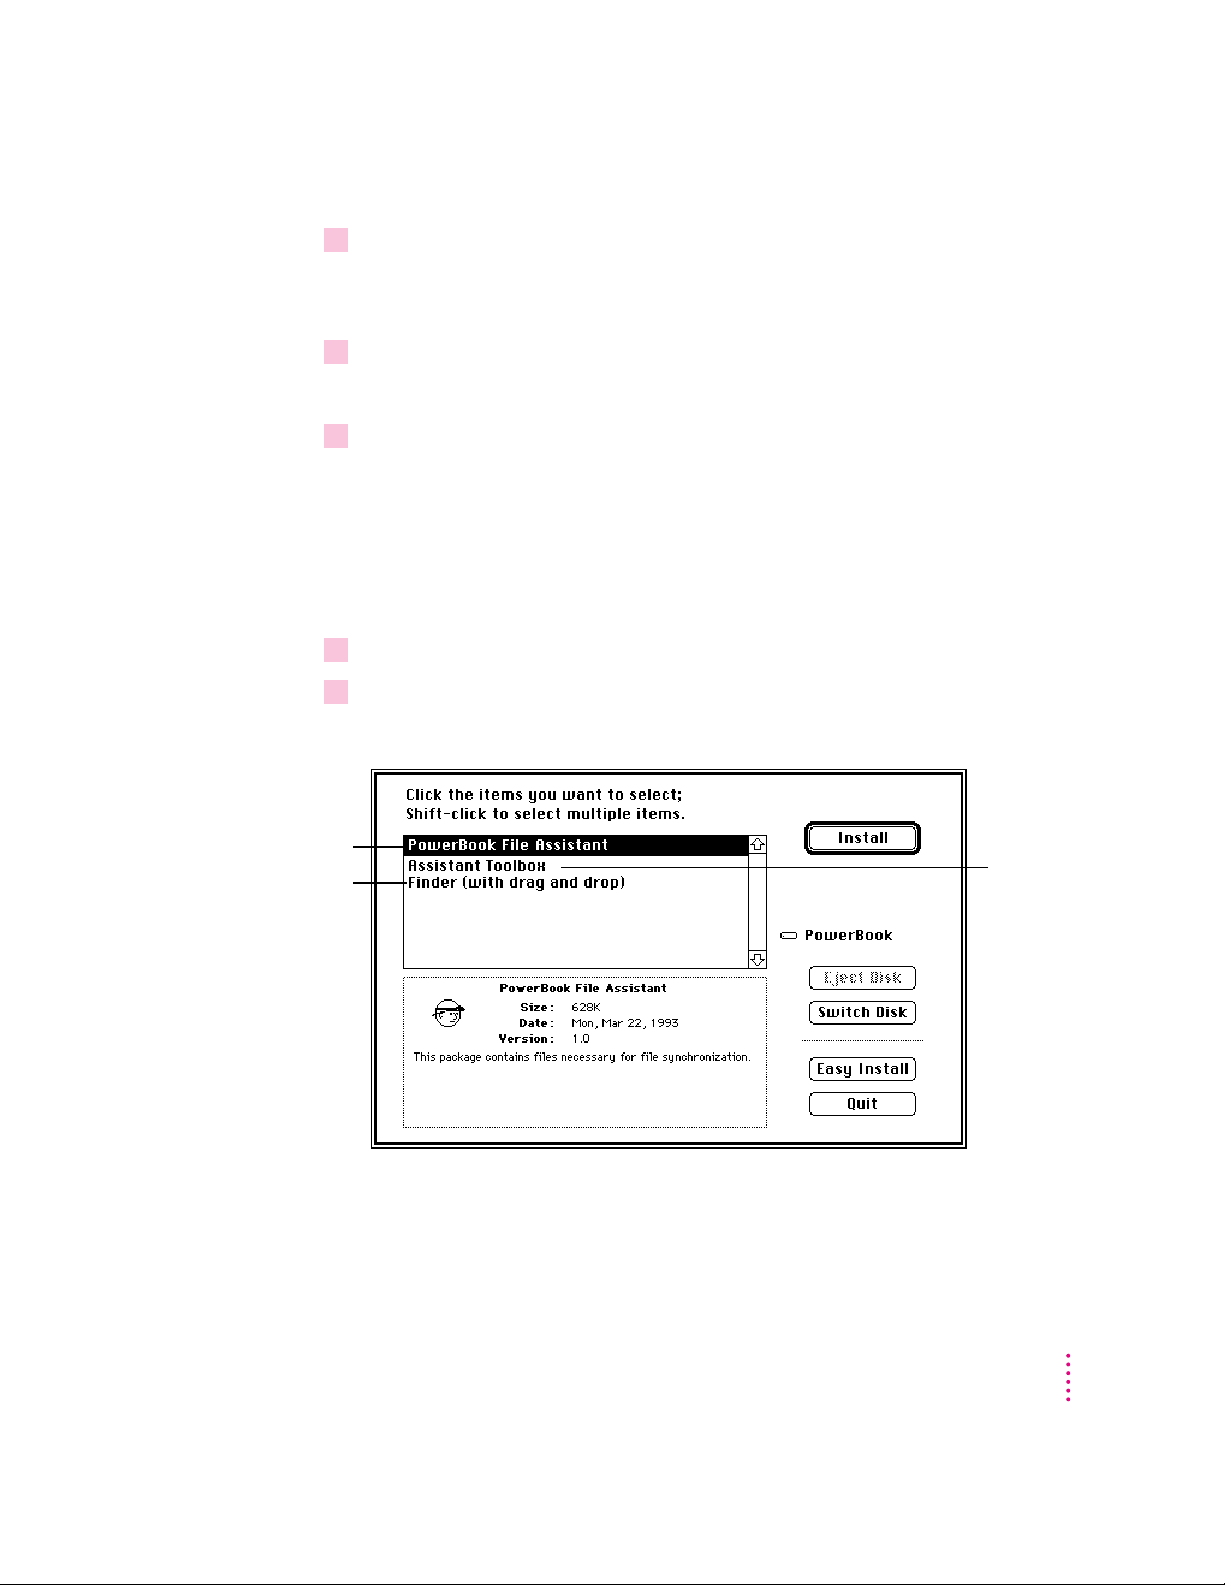
If you want to custom install the software on your PowerBook:
1 Open the Installer as described in steps 1 through 5 of “Easy Install.”
2 Click Customize.
The Custom Install window appears.
To install the
PowerBook File
Assistant, click here.
To install the drag-
and-drop feature,
click here. To install
with either the
PowerBook File
Assistant or the
Assistant Toolbox,
hold the Shift key
down when you click.
A list of items you can install appears in the window.
I
NSTALLINGYOURSOFTWARE
To install the
Assistant
Toolbox,
click here.
3
Page 10

3Click the software you want to install.
Shift-click to choose more than one item. A description of each item appears
in the box below the item names.
4 Click Install.
Messages appear on the screen describing the progress of the installation.
5When you see a message saying that installation was successful, click Restart.
Your PowerBook restarts and the floppy disk is ejected. You are ready to use
the software you installed.
4
C
HAPTERONE
Page 11

2
Using the PowerBook File Assistant
In this chapter
m why synchronize your files?
m starting the PowerBook File Assistant
m linking files or folders for synchronization
m synchronizing linked folders or files
m understanding alert messages
m setting completely automatic synchronization
Why synchronize your files?
The PowerBook File Assistant allows you to keep the most recent version of a
file or folder on two different computers or disks. The File Assistant mimics
your actions, so if you revise a file that was linked with its copy on another
disk, all changes made to the first file are also made to the second file.
There are three common scenarios in which file synchronization makes
sense:
m using a PowerBook with your desktop Macintosh
m using a PowerBook with network file servers
m using a PowerBook Duo with a Duo Dock
5
Page 12

Using a PowerBook with your desktop Macintosh
Work files
PowerBook
Desktop Macintosh
Working with both a PowerBook and a desktop Macintosh often means that
you have two copies of the same document—one on your PowerBook and
one on your desktop Macintosh. Keeping track of which file has been
changed, deleted, or added can be difficult. The PowerBook File Assistant
keeps files on both your PowerBook and your desktop Macintosh up to date.
There are three common ways to transfer files between your PowerBook and
a desktop Macintosh:
m Copying files to and from a floppy disk.
m Connecting your PowerBook to your desktop Macintosh with a SCSI
connection (using an Apple HDI-30 SCSI Disk Adapter).
m Using an AppleTalk connection to set up your desktop Macintosh for file
sharing and to access its hard disk from your PowerBook.
The PowerBook File Assistant can help you in all these cases. You can
synchronize files between your PowerBook and a floppy disk, so the floppy
disk always has a current copy that you can transfer to your desktop
Macintosh. When you connect your PowerBook to the desktop Macintosh
using either a SCSI or an AppleTalk connection, the File Assistant can update
any linked files.
See the user’s guide that came with your PowerBook for more details on using
your PowerBook with a desktop Macintosh.
6
C
HAPTERTWO
Page 13

Using a PowerBook with a network
Work files
PowerBook
File server on a network
If you are on a network and have access to servers, you are probably familiar
with downloading or copying files from network servers to your PowerBook’s
hard disk. You may find yourself downloading files that are updated weekly
and sorted on a file server, such as a price list or weekly inventory update.
When you use the PowerBook File Assistant to link files on your PowerBook
with files on a network server, any time a server file changes, the copy of the
file on your PowerBook is automatically updated.
There are two common ways you can access a network:
m Connecting directly to a network, using the AppleTalk networking software
built in to your PowerBook.
m Connecting to a network through a desktop Macintosh, using an AppleTalk
connection.
See the user’s guide that came with your PowerBook for more details on using
your PowerBook with a network.
U
S I N G T H EPOWERBOOKFILEASSISTANT
7
Page 14

Using a PowerBook Duo with a Duo Dock
Work files
PowerBook Duo
DuoDock
As a user of a PowerBook Duo and Duo Dock, you store files on your Duo
and on your Duo Dock’s internal hard disk, or on a hard disk that is connected
to your Duo Dock through a SCSI connection. Often, you may find that you
have copies of files and folders in several places.
The PowerBook File Assistant keeps the copies of files on both the Duo and
the Duo Dock the same, so if you update or delete a file that is linked, that
same update or deletion is made to the corresponding file or folder.
8
C
HAPTERTWO
You use your Duo with a DuoDock by inserting the Duo into the DuoDock.
See the user’s guide that came with your PowerBook Duo for more details on
using your Duo with a DuoDock.
Page 15

Starting the PowerBook File Assistant
Once you have installed the PowerBook File Assistant, you are ready to
decide which files you want to synchronize.
m
Open the PowerBook File Assistant Icon.
The File Assistant Setup window appears:
Linking files or folders for synchronization
The first step to synchronizing files is to link two files or folders. Linking
joins two files together so that when one file or folder in the pair is modified,
the corresponding file or folder in the pair is also changed.
IMPORTANT
pair of files or folders exists on two different disks (for example, on your
PowerBook and your desktop computer, or on your PowerBook Duo and the
Duo Dock). Files cannot be linked if they are not identical copies.
Also, make sure that each computer’s internal clock is set for the same time.
See the user’s guide that came with your computer for information on how to
set the time on your computer’s clock.
Before you can link files or folders, you need to make sure that a
U
S I N G T H EPOWERBOOKFILEASSISTANT
9
Page 16

If your PowerBook has a system software version 7.1 or later
If you installed the PowerBook File Assistant with Easy Install (or installed
the Finder with drag and drop through Custom Install), you can drag the icons
of the files or folders you want to synchronize to the Setup window. Follow
these steps:
1 Drag the icon of the folder or file you want to synchronize from one of the disks to one of
the item selection boxes in the File Assistant Setup window.
The item selection box is this area
on either side of the arrow
Drag the icon of the file you want to
synchronize to the item selection box.
10
C
HAPTERTWO
2 Drag the matching icon of the folder or file you want to synchronize from the other disk
to the corresponding item selection box.
Once you have two matching files or folders in the Setup window, you have a
linked pair. Continue steps 1 and 2 to link more pairs of files or folders.
The setup screen grows as you add to the list of linked pairs. Use the scroll
bars on the right of the screen to see the part of the list that is not in view.
Page 17

If your PowerBook has a system software version earlier than 7.1
You cannot drag the icon to the screen. Instead, follow these steps to link
files:
1Click the item selection box to select it.
A box appears around the pair when it is selected.
2Choose Select An Item To Synchronize from the File Menu.
A dialog box appears displaying the files and folders on your PowerBook.
Name of disk where the file you
want to synchronize is saved.
Click here to find files on the
desktop or another disk.
Click here to select the
highlighted file.
3Highlight the file or folder you want to synchronize, then click select.
The icon of the file or folder appears in the Setup window.
4Click the corresponding item selection box in the selected pair.
5 Repeat steps 2 and 3 above to link the matching file or folder to be synchronized.
The icon of the file or folder appears on the other side of the pair in the Setup
window. You can repeat these steps to link more pairs of files or folders.
U
S I N G T H EPOWERBOOKFILEASSISTANT
11
Page 18

1Click the pair of linked files you want to synchronize one way.
2Choose the direction you want from the Synchronize menu.
Choose two-way
synchronization to
update both files
when either file
changes.
Setting the direction of the link
Notice the arrow between the two linked files; this is how you can tell the
direction in which the files are linked. Normally the PowerBook File
Assistant synchronizes files in both directions, but you can set the direction to
be one way, from either left to right or right to left.
This type of link is helpful if you want to receive updated versions of a
document from a file server on a network.
Choose one-way synchronization to update a
file on your hard disk from a network server.
12
C
HAPTERTWO
The direction of the arrow between the two linked files in the Setup window
changes to reflect your choice.
Arrow changes depending on the direction of the link.
Linking non-matching folders
PowerBook File Assistant lets you synchronize folders that have different
names and contain different files.
Page 19

1Choose Preferences from the File Menu.
Click here to be able
to link folders with
different names.
2Click the checkbox to allow non-matching folder names.
3 Click OK.
The following dialog box appears:
Now you can link folders that have different names and contents. The first
time you synchronize a pair of non-matching folders, PowerBook File
Assistant copies all the files from one folder to the other folder.
Deleting a linked pair
If you don’t want to synchronize a linked pair anymore, you can delete the
linked pair from the Setup window.
1Click the pair of linked files you want to delete to highlight it.
To delete more than one pair, hold down the Shift key and click any other
pairs.
To delete all pairs from the Setup window, choose Select All from the Edit
menu. This allows you to select every pair in the Setup window.
2Choose Delete Pairs from the Edit menu.
The pairs you selected are deleted from the Setup window.
U
S I N G T H EPOWERBOOKFILEASSISTANT
13
Page 20

Synchronizing linked folders or files
To synchronize files or folders you linked in the Setup window, you must do
two things:
m Mount whatever disks contain the two files you are synchronizing (for
instance, your PowerBook and desktop Macintosh, or your PowerBook
Duo and Duo Dock).
m Run the PowerBook File Assistant program.
Once you have the disks mounted and the program running, you are ready to
synchronize the pairs of files or folders you linked. Any time you make a
change to either of the files or folders in the linked pair, the same change is
made to the corresponding file or folder.
Changes include deleting a file or folder. If either file or folder in the linked
pair has been deleted since the last synchronization, the PowerBook File
Assistant displays a message asking you if you really want to delete the
corresponding file or folder. When the File Assistant deletes a file or folder it
puts it in the trash. If you want the file or folder back, you can drag it out of
the trash any time before you choose Empty Trash from the Special menu.
Information about each linked pair is displayed in the Setup window.
The name of the disk
appears here.
14
C
HAPTERTWO
If the files have been
synchronized, the time
and date appear here.
Page 21

The way the PowerBook File Assistant updates files in a linked pair depends
on what kinds of changes are made. There are three kinds of changes:
m modifying the file or folder
m deleting the file or folder, or moving it to another place on the disk
m replacing the file with another file with the same name
When the PowerBook File Assistant notices these changes, it does the
following:
If the left file is And the right file is This is what happens
Changed Unchanged Right file is updated.
Unchanged Changed In a two-way link, the left file is updated.
In a left-to-right link, nothing happens.
Unchanged Deleted In a two-way link, you get a message
asking you if you want to delete the left file.
In a left-to-right link, the right file is updated.
Deleted Unchanged You get a message asking if you
want to delete the right file.
There are two ways the PowerBook File Assistant synchronizes
files—manually and automatically. You set whether you want manual
synchronization or automatic synchronization for each pair when you link the
files or folders.
U
S I N G T H EPOWERBOOKFILEASSISTANT
15
Page 22

Manual synchronization
When you manually update your linked files, you decide when you want to
update a linked pair. When you make a change to a file on one disk, the
PowerBook File Assistant doesn’t update that file on the other disk until you
tell it to. You can manually synchronize linked files at any time:
1Choose Manual from the Synchronize menu with the pair selected.
2Click the arrow between the two files in the synchronization window.
Click the arrow to synchronize the pair.
A message appears telling you that the files are being updated.
3Continue to click the arrows for all the pairs you want to update.
You can also manually update files that are linked by selecting the pair and
then choosing Synchronize Now from the Synchronize menu.
Automatic synchronization
To update files you have linked automatically whenever a change is made to
either of the linked files:
m
Select the pair and then choose Automatic from the Synchronize menu.
A message appears whenever files are being updated. You can set up your
PowerBook so files are updated every time you connect with another disk.
See “Setting Completely Automatic Synchronization” later in this guide.
Understanding the alert messages
As you synchronize linked pairs, the PowerBook File Assistant displays
messages about the synchronization called
you what is happening—and if files cannot be synchronized, they tell you
why. If you are synchronizing several pairs of files, you may not want the
messages to appear on the screen. To turn off the alert messages:
16
C
HAPTERTWO
alert messages
. These messages tell
Page 23

1Choose Preferences from the File menu.
The following dialog box appears:
2Click the Warn When Can’t Synchronize checkbox to deselect it.
The alert messages that appear when files cannot be synchronized only
appear when the checkbox is selected. If you deselect the checkbox, the
messages do not appear.
If you don’t want the alert message to appear when a file or folder is put in
the trash, click the checkbox next to Warn Before Deleting to deselect it.
WARNING
Be very careful if you turn off the alert message that warns
you when files are put into the trash. The File Assistant puts a file or
folder in the trash during synchronization whenever its corresponding
file or folder is deleted or renamed. If you turn this alert message off,
the message notifying you when a file is put in the trash does not
appear.
3 Click OK.
Alert messages are turned off. If you want to turn them back on, choose
Preferences from the File menu and click the checkboxes again to reselect
them.
U
S I N G T H EPOWERBOOKFILEASSISTANT
17
Page 24

To turn alert messages off temporarily:
m
Hold down the Option key.
While you hold down the Option key, the alert messages for any commands
you execute are turned off.
Setting completely automatic synchronization
The PowerBook File Assistant needs to be running in order to synchronize
your files. To set up your system to automatically synchronize linked files:
1 Select the pair and then choose Automatic from the Synchronize menu.
2 Use the AutoRemounter control panel to reconnect to shared disks.
See Chapter 3 for instructions on automatically remounting to shared disks.
3 Drag an alias of the PowerBook File Assistant icon to the Startup Items folder.
The Startup Items folder is in your PowerBook’s System Folder.
See the user’s guide that came with your PowerBook for help on creating an
alias.
18
Drag an alias of
the icon to the
Startup Items
folder.
C
HAPTERTWO
Now whenever AutoRemounter mounts your volumes and the PowerBook
File Assistant is running, all automatically linked pairs are synchronized.
Page 25

3
Using the Assistant Toolbox
In this chapter
m controlling automatic screen dimming
m using persistent RAM disk
m putting your PowerBook to sleep
m spinning down the hard disk
m automatically remounting to shared volumes
m printing later
m improving pointer display
19
Page 26

Extending your PowerBook’s battery life
Controlling automatic screen dimming
To save power and increase the life of the screen, your PowerBook’s screen
dims automatically when the PowerBook is left idle. Screen dimming also
conserves power, since the screen’s backlight is the single biggest consumer of
your computer’s battery power.
You can specify the delay before the screen is dimmed. You set this option in
the PowerBook Display control panel.
1Choose Control Panels from the Apple (
control panel:
K
) menu and open the PowerBook Display
The PowerBook Display control panel appears.
If your PowerBook supports mirroring, then
this option is available. See the user’s
guide that came with your PowerBook for
information on mirroring.
2Click the On button under Screen Dimming.
3 Drag the slider to set the delay.
If you want to keep the screen from dimming when the power adapter is
plugged in, click the checkbox labeled ‘‘Don’t dim when plugged in.”
20
4 Close the PowerBook Display control panel.
C
HAPTERTHREE
Page 27

Using persistent RAM disk
You use the Memory control panel to select the option of having any files that
are copied to the RAM disk saved in the System Folder on the hard disk when
you shut down your PowerBook, and copied back to the RAM disk the next
time you start up. This allows you to use your PowerBook’s RAM disk
without needing to rebuild it every time you restart your PowerBook.
1Choose Control Panels from the Apple (
K
) menu and open the Memory control panel.
The Memory control panel appears.
Drag the slider to set the
amount of memory to be
used for the RAM disk.
The size of the RAM disk
appears here.
2 Click the On button under RAM Disk.
3 Drag the slider to set the percentage of memory to use for the RAM disk.
4 Close the Memory control panel.
U
S I N G T H EASSISTANTTOOLBOX
21
Page 28

Putting your PowerBook to sleep
With the Assistant Toolbox you can put your PowerBook to sleep with one
touch. Putting your PowerBook to sleep more often gives you longer battery
life.
To put your PowerBook to sleep:
1Hold down the Shift, x(command), and 0 (zero) keys at the same time.
Your PowerBook goes to sleep.
2Press any key to wake your PowerBook up.
Spinning down the hard disk
Sometimes (for example, in a meeting) you may want to use your PowerBook
without the subtle hum of its hard disk. You can do this by “spinning down”
the hard disk, which actually stops the hard disk from spinning. You can spin
down the hard disk without putting the PowerBook to sleep:
Hold down the Shift, Control, x(command), and 0 (zero) keys at the same time.
m
Your PowerBook’s hard disk spins down.
22
C
HAPTERTHREE
Page 29

Automatically remounting to shared volumes
Your PowerBook disconnects from any shared disks it’s connected to when
you either turn it off or restart it. With the Assistant Toolbox, your
PowerBook can reconnect to those shared disks when you turn it back on (or
wake it from sleep). In addition, if you connect a hard disk to your
PowerBook while it’s asleep, the hard disk appears on the desktop when you
wake it up.
1Choose Control Panels from the Apple (
panel.
2If you want to reconnect to shared disks only when you wake the computer from sleep,
click the After Sleep button.
K
) menu and open the AutoRemounter control
If you always want to reconnect (that is, when you restart the computer as
well as after sleep), click the Always button.
3If you want to enter your password when you reconnect to shared disks, click Always
Entering Passwords. Otherwise click Automatically Remounting.
IMPORTANT
Having your computer ask for your password better protects your
privacy and the security of shared disks. Automatically remounting remounts
your volumes without requiring the passwords.
4Close the AutoRemounter control panel.
U
S I N G T H EASSISTANTTOOLBOX
23
Page 30

Printing later
If you use a PostScript™laser printer (such as a Laserwriter Pro 600) on a
network, the Assistant Toolbox allows you to send documents to print from
your PowerBook while it’s not hooked up to the network printer. The next
time you connect to the network printer, the documents you sent to print will
be printed.
1Choose Print from the File menu in the application in which you are working.
If you are working in a word processor or spreadsheet program, choose Print
as you normally would in that particular program. In most applications the
print dialog box appears. Click Print in the dialog box.
The following dialog box appears:
2 Click Print Later.
24
C
HAPTERTHREE
The next time you connect with a network printer through an AppleTalk
connection, this document is printed.
Page 31

Improving pointer display
You may notice that the pointer sometimes disappears from your PowerBook’s
screen if you have an LCD screen. The Assistant Toolbox allows you to set
your mouse so you can always see the pointer on the screen. You do this in
the Mouse control panel.
1After you have installed PowerBook File Assistant, choose Control Panels from the
Apple (K) menu and open the Mouse control panel.
The following control panel appears:
2Click the mouse tracks length you want.
3 To display a thicker I-beam on your PowerBook, click the checkbox labeled Thick I-beam.
This makes the I-beam more visible on LCD screens.
4 Close the Mouse control panel.
U
S I N G T H EASSISTANTTOOLBOX
25
Page 32

The Apple Publishing System
This Apple manual was written, edited, and produced on a desktop publishing system using
Apple Macintosh computers and QuarkXPress. Proof pages were created on Apple LaserWriter
printers and on the QMS and Tektronix color printers. Final pages were output directly to
separated film on a PostScript
Cover art was produced with Adobe Photoshop. Screen shots were created and modified with
system software, Exposure Pro, Aldus SuperPaint, and Adobe Photoshop.
®
Text type is Times
, display type is Helvetica®Narrow, and cover type is Apple Garamond,
Apple’s corporate font. Ornaments are custom symbols designed for Apple Computer.
PostScript, the LaserWriter page-description language, was developed by Adobe Systems
Incorporated.
™
-driven imagesetter. Line art was created with Adobe Illustrator.
 Loading...