

Page 1

Mac OS X Server
User Management
For Version 10.5 Leopard
Page 2

K
Apple Inc.
© 2007 Apple Inc. All rights reserved.
The owner or authorized user of a valid copy of
Mac OS X Server software may reproduce this
publication for the purpose of learning to use such
software. No part of this publication may be reproduced
or transmitted for commercial purposes, such as selling
copies of this publication or for providing paid-for
support services.
Every effort has been made to ensure that the
information in this manual is accurate. Apple Inc. is not
responsible for printing or clerical errors.
Apple
1 Infinite Loop
Cupertino, CA 95014-2084
408-996-1010
www.apple.com
Use of the “keyboard” Apple logo (Option-Shift-K) for
commercial purposes without the prior written consent
of Apple may constitute trademark infringement and
unfair competition in violation of federal and state laws.
Apple, the Apple logo, AirPort, AppleShare, Bonjour,
FireWire, iCal, iTunes, Mac, Mac OS, MacBook, Macintosh,
QuickTime, SuperDrive, Xgrid, Xsan, and Xserve are
trademarks of Apple Inc., registered in the U.S. and other
countries. Apple Remote Desktop, Extensions Manager,
Finder, iWork, and Safari are trademarks of Apple Inc.
Mac is a service mark of Apple Inc.
Adobe and PostScript are trademarks of Adobe Systems
Incorporated.
®
The Bluetooth
trademarks owned by the Bluetooth SIG, Inc. and any
use of such marks by Apple is under license.
Java and all Java-based trademarks and logos are
trademarks or registered trademarks of Sun
Microsystems, Inc. in the U.S. and other countries.
UNIX is a registered trademark of The Open Group.
Other company and product names mentioned herein
are trademarks of their respective companies. Mention
of third-party products is for informational purposes
only and constitutes neither an endorsement nor a
recommendation. Apple assumes no responsibility with
regard to the performance of these products.
019-0938/2007-09-01
word mark and logos are registered
Page 3

1
Contents
Preface 13 About This Guide
13
What’s New in Workgroup Manager
14
What’s in This Guide
15
Using Onscreen Help
16
Mac OS X Server Administration Guides
17
Viewing PDF Guides Onscreen
17
Printing PDF Guides
18
Getting Documentation Updates
18
Getting Additional Information
Chapter 1 19 User Management Overview
19
Tools for User Management
19
20
21
21
21
22
22
23
24
25
25
26
26
26
27
Workgroup Manager
Server Admin
Server Preferences
NetBoot
NetInstall
Command-Line Tools
Accounts
Administrator Accounts
User Accounts
Group Accounts
Computer Accounts
Computer Groups
The User Experience
Authentication and Identity Validation
Information Access Control
Chapter 2 31 Getting Started with User Management
31
Setup Overview
34
Planning Strategies for User Management
34
Analyzing Your Environment
3
Page 4

35
35
36
37
38
38
Identifying Directory Services Requirements
Determining Server and Storage Requirements
Choosing a Home Folder Structure
Devising a Home Folder Distribution Strategy
Identifying Groups
Determining Administrator Requirements
Chapter 3 41 Getting Started with Workgroup Manager
41
Configuring the Administrator’s Computer and Account
41
42
42
42
43
44
45
46
46
46
47
48
48
48
49
50
50
50
51
53
Setting Up an Administrator Computer
Creating a Domain Administrator Account
Using Workgroup Manager
Using Mac OS X Server v10.5 to Administer Earlier Versions of Mac OS X
Connecting and Authenticating to Directory Domains in Workgroup Manager
Major Workgroup Manager Tasks
Modifying Workgroup Manager Preferences
Finding and Listing Accounts
Working with Account Lists in Workgroup Manager
Listing Accounts in the Local Directory Domain
Listing Accounts in Search Policy Directory Domains
Listing Accounts in Available Directory Domains
Refreshing Account Lists
Finding Specific Accounts in a List
Using Advanced Search
Sorting Users and Groups
Shortcuts for Working with Accounts
Using Presets
Editing Multiple Accounts Simultaneously
Importing and Exporting Account Information
Chapter 4 55 Setting Up User Accounts
55
About User Accounts
55
56
57
57
58
59
59
60
60
60
4
Where User Accounts Are Stored
Predefined User Accounts
Administering User Accounts
Creating User Accounts
Editing User Account Information
Working with Read-Only User Accounts
Working with Guest Users
Working with Windows User Accounts
Deleting a User Account
Disabling a User Account
Contents
Page 5

61
Working with Presets
61
62
62
62
63
63
63
64
65
66
67
68
68
69
70
70
70
72
72
72
73
73
74
75
75
76
77
77
78
78
79
79
80
80
81
81
81
82
82
83
Creating a Preset for User Accounts
Using Presets to Create Accounts
Renaming Presets
Editing Presets
Deleting a Preset
Working with Basic Settings
Modifying User Names
Modifying Short Names
Choosing Stable Short Names
Avoiding Duplicate Names
Modifying User IDs
Assigning a Password to a User
Assigning Administrator Privileges for a Server
Choosing a User’s Login Picture
Working with Privileges
Removing Administrative Privileges from a User
Giving a User Limited Administrative Capabilities
Giving a User Full Administrative Capabilities
Working with Advanced Settings
Enabling a User’s Calendar
Allowing a User to Log In to More Than One Computer At a Time
Choosing a Default Shell
Choosing a Password Type and Setting Password Options
Creating a Master List of Keywords
Applying Keywords to User Accounts
Editing Comments
Working with Group Settings
Choosing a User’s Primary Group
Reviewing a User’s Group Memberships
Adding a User to a Group
Removing a User from a Group
Working with Home Settings
Working with Mail Settings
Enabling Mail Service Account Options
Disabling a User’s Mail Service
Forwarding a User’s Mail
Working with Print Quota Settings
Enabling a User’s Access to All Available Print Queues
Enabling a User’s Access to Specific Print Queues
Removing a Print Quota For a Queue
Contents
5
Page 6

83
84
Resetting a User’s Print Quota
Disabling a User’s Access to Print Queues That Enforce Quotas
84 Working with Info Settings
85 Working with Windows Settings
85 Changing a Windows User’s Profile Location
86 Changing a Windows User’s Login Script Location
87 Changing a Windows User’s Home Folder Drive Letter
87 Changing a Windows User’s Home Folder Location
87 Working with GUIDs
87 Viewing GUIDs
Chapter 5 89 Setting Up Group Accounts
89 About Group Accounts
89 How Group Accounts Track Membership
90 Where Group Accounts Are Stored
90 Predefined Group Accounts
91 Administering Group Accounts
91 Creating Group Accounts
92 Creating a Preset for Group Accounts
92 Editing Group Account Information
93 Creating Hierarchical Groups
94 Upgrading Legacy Groups
94 Working with Read-Only Groups
95 Deleting a Group
95 Working with Basic Settings for Groups
95 Naming a Group
96 Defining a Group ID
97 Choosing a Group’s Login Picture
98 Enabling a Group’s Web Services
99 Working with Member Settings for Groups
99 Adding Users or Groups to a Group
10 0 Removing Group Members
10 0 Working with Group Folder Settings
101 Specifying No Group Folder
101 Creating a Group Folder
10 3 Designating a Group Folder for Use by Multiple Groups
Chapter 6 105 Setting Up Computers and Computer Groups
10 5 About Computer Accounts
10 6 Creating Computer Accounts
10 7 Working with Guest Computers
10 7 Working with Windows Computers
6
Contents
Page 7

10 8 About Computer Groups
10 8 Differences Between Computer Groups and Computer Lists
10 8 Administering Computer Groups
10 8 Creating a Computer Group
10 9 Creating a Preset for Computer Groups
11 0 Using a Computer Group Preset
111 Adding Computers or Computer Groups to a Computer Group
111 Removing Computers and Computer Groups from a Computer Group
112 Deleting a Computer Group
112 Upgrading Computer Lists to Computer Groups
Chapter 7 113 Setting Up Home Folders
113 About Home Folders
11 4 Hosting Home Folders for Mac OS X Clients
11 4 Hosting Home Folders for Other Clients
11 5 Distributing Home Folders Across Multiple Servers
11 6 Administering Share Points
11 6 Setting Up a Share Point
117 Setting Up an Automountable AFP Share Point for Home Folders
11 8 Setting Up an Automountable NFS Share Point for Home Folders
11 9 Setting Up an SMB Share Point
121 Administering Home Folders
121 Specifying No Home Folder
12 2 Creating a Home Folder for a Local User
12 3 Creating a Network Home Folder
12 4 Creating a Custom Location for Home Folders
12 7 Setting Up a Home Folder for a Windows User
12 9 Setting Disk Quotas
13 0 Setting Disk Quotas for Windows Users to Avoid Data Loss
13 0 Using Presets to Choose Default Home Folders
13 0 Moving Home Folders
13 0 Deleting Home Folders
Chapter 8 131 Managing Portable Computers
131 About Mobile Accounts
13 2 About Portable Home Directories
13 3 Logging In to Mobile Accounts
13 4 Resolving Sync Conflicts
13 4 About External Accounts
13 5 Logging In to External Accounts
13 6 Considerations and Strategies for Deploying Mobile Accounts
13 6 Advantages of Using Mobile Accounts
Contents 7
Page 8

13 7 Considerations for Using Mobile Accounts
13 9 Strategies for Syncing Content
14 0 Setting Up Mobile Accounts for Use on Portable Computers
14 0 Configuring Portable Computers
141 Managing Mobile Clients Without Using Mobile Accounts
141 Unknown Mac OS X Portable Computers
14 2 Using Mac OS X Portable Computers with One Primary Local User
14 2 Using Mac OS X Portable Computers with Multiple Users
14 4 Securing Mobile Clients
14 4 Optimizing the File Server for Mobile Accounts
Chapter 9 147 Client Management Overview
14 8 Using Network-Visible Resources
14 9 Customizing the User Experience
14 9 The Power of Preferences
15 0 Designing the Login Experience
151 Choosing a Workgroup
15 2 Working with Synced Homes
15 2 Improving Workflow
Chapter 10 155 Managing Preferences
15 5 Using Workgroup Manager to Manage Preferences
15 6 Understanding Managed Preference Interactions
15 9 Understanding Hierarchical Preference Management
15 9 Setting the Permanence of Management
160 Caching Preferences
160 Preference Management Basics
161 Managing User Preferences
162 Managing Group Preferences
162 Managing Computer Preferences
163 Managing Computer Group Preferences
163 Disabling Management for Specific Preferences
164 Managing Access to Applications
165 Controlling User Access to Specific Applications and Folders
167 Allowing Specific Dashboard Widgets
168 Disabling Front Row
168 Allowing Legacy Users to Open Specific Applications and Folders
169 Managing Classic Preferences
17 0 Selecting Classic Startup Options
171 Choosing a Classic System Folder
171 Allowing Special Actions During Restart
17 2 Controlling Access to Classic Apple Menu Items
8 Contents
Page 9

17 3 Adjusting Classic Sleep Settings
174 Maintaining Consistent User Preferences for Classic
174 Managing Dock Preferences
174 Controlling the User’s Dock
17 5 Providing Easy Access to Group Folders
17 6 Adding Items to a User’s Dock
17 7 Preventing Users from Adding or Deleting Dock Items
17 7 Managing Energy Saver Preferences
17 8 Using Sleep and Wake Settings for Desktop Computers
17 9 Setting Energy Saver Settings for Portable Computers
18 0 Displaying Battery Status to Users
181 Scheduling Automatic Startup, Shutdown, or Sleep
18 2 Managing Finder Preferences
18 2 Setting Up Simple Finder
183 Keeping Disks and Servers from Appearing on the User’s Desktop
183 Controlling the Behavior of Finder Windows
18 4 Hiding the Alert Message When a User Empties the Trash
18 4 Making Filename Extensions Visible
185 Controlling User Access to Remote Servers
185 Controlling User Access to an iDisk
185 Preventing Users from Ejecting Discs
18 6 Hiding the Burn Disc Command in the Finder
18 6 Controlling User Access to Folders
187 Removing Restart and Shut Down from the Apple Menu
187 Adjusting the Appearance and Arrangement of Desktop Items
18 8 Adjusting the Appearance of Finder Window Contents
18 9 Managing Login Preferences
18 9 Changing the Appearance of the Login Window
191 Configuring Miscellaneous Login Options
19 2 Choosing Who Can Log In
19 3 Customizing the Workgroups Displayed at Login
19 4 Enabling the Use of Login and Logout Scripts
19 6 Choosing a Login or Logout Script
19 7 Automatically Opening Items After a User Logs In
19 8 Providing Access to a User’s Network Home Folder
19 9 Providing Easy Access to the Group Share Point
200 Managing Media Access Preferences
200 Controlling Access to CDs, DVDs, and Recordable Discs
201 Controlling Access to Hard Drives, Disks, and Disk Images
201 Ejecting Removable Media Automatically When a User Logs Out
202 Managing Mobility Preferences
Contents 9
Page 10

202 Creating a Mobile Account
203 Preventing the Creation of a Mobile Account
204 Manually Removing Mobile Accounts from Computers
205 Enabling FileVault for Mobile Accounts
207 Selecting the Location of a Mobile Account
208 Creating External Accounts
209 Setting Expiration Periods for Mobile Accounts
210 Choosing Folders to Sync at Login and Logout, or in the Background
211 Stopping Files from Syncing for a Mobile Account
212 Setting the Background Sync Frequency
212 Showing Mobile Account Status in the User’s Menu Bar
213 Managing Network Preferences
213 Configuring Proxy Servers by Port
214 Allowing Users to Bypass Proxy Servers for Specific Domains
215 Enabling Passive FTP Mode
215 Disabling Internet Sharing
216 Disabling AirPort
216 Disabling Bluetooth
217 Managing Parental Controls Preferences
217 Hiding Profanity in Dictionary
217 Preventing Access to Adult Websites
218 Allowing Access Only to Specific Websites
219 Setting Time Limits and Curfews on Computer Usage
220 Managing Printing Preferences
221 Making Printers Available to Users
221 Preventing Users from Modifying the Printer List
222 Restricting Access to Printers Connected to a Computer
222 Setting a Default Printer
223 Restricting Access to Printers
223 Adding a Page Footer to All Printouts
224 Managing Software Update Preferences
224 Managing Access to System Preferences
225 Managing Time Machine Preferences
227 Managing Universal Access Preferences
227 Adjusting the User’s Display Settings
228 Setting a Visual Alert
228 Adjusting Keyboard Accessibility Options
230 Adjusting Mouse and Pointer Responsiveness
230 Enabling Universal Access Shortcuts
231 Allowing Devices for Users with Special Needs
231 Using the Preference Editor with Preference Manifests
10 Contents
Page 11

232 Adding to the Preference Editor’s List
234 Editing Application Preferences with the Preference Editor
235 Removing an Application’s Managed Preferences in the Preference Editor
236 Using the Preference Editor to Manage Core Services
237 Using the Preference Editor to Manage Safari
Chapter 11 239 Solving Problems
239 Diagnosing Common Network Issues
239 Testing Your Network’s Time and Time Zones
240 Testing Your DNS Service
241 Testing Your DHCP Service
242 Solving Account Problems
242 If You Want to Use Earlier Versions of Workgroup Manager
242 If You Can’t Edit an Account Using Workgroup Manager
242 If Users Can’t See Their Names in the Login Window
242 If You Can’t Unlock an LDAP Directory
243 If You Can’t Modify a User’s Open Directory Password
243 If You Can‘t Change a User’s Password Type to Open Directory
243 If You Can’t Assign Server Administrator Privileges
243 If Users Can’t Log In or Authenticate
244 If Users Relying on a Password Server Can’t Log In
245 If Users Can’t Log In with Accounts in a Shared Directory Domain
245 If Users Can’t Access Their Home Folders
245 If Users Can’t Change Their Passwords
245 If Users Can’t Authenticate Using Single Sign-On or Kerberos
245 Problems with a Primary or Backup Domain Controller
245 If a Windows User Can’t Log in to the Windows Domain
246 If a Windows User Has No Home Folder
246 If a Windows User’s Profile Settings Revert to Defaults
246 If a Windows User Loses the Contents of the My Documents Folder
247 Solving Preference Management Problems
247 Testing Your Managed Client Settings
247 If Users Don’t See a List of Workgroups at Login
247 If Users Can’t Open Files
248 If Users Can’t Add Printers to a Printer List
248 If Login Items Added by a User Don’t Open
249 If Items Placed in the Dock by a User Are Missing
249 If a User’s Dock Has Duplicate Items
249 If Users See a Question Mark in the Dock
250 If Users See a Message About an Unexpected Error
250 If You Can’t Manage Network Views
Contents 11
Page 12

Appendix 251 Importing and Exporting Account Information
251 Understanding What You Can Import and Export
252 Limitations for Importing and Exporting Passwords
252 Maintaining GUIDs When Importing from Earlier Versions of Mac OS X Server
253 Archiving the Open Directory Master
253 Using Workgroup Manager to Import Accounts
254 Using Workgroup Manager to Export Accounts
255 Using XML Files Created with Mac OS X Server v10.1 or Earlier
256 Using XML Files Created with AppleShare IP 6.3
Glossary 257
Index 267
12 Contents
Page 13

About This Guide
This guide explains how to use Workgroup Manager to set up
and manage accounts and preferences for clients.
Mac OS X Server includes Workgroup Manager, a user management tool you can use to
create and manage accounts.
When managing accounts, you can define core account settings like name, password,
home folder location, and group membership. You can also manage preferences,
allowing you to customize the user’s experience, granting or restricting access to his or
her own computer’s settings and to network resources.
Workgroup Manager works closely with a directory domain. Directory domains are like
databases but are specifically designed for storing account information and handling
authentication.
Preface
What’s New in Workgroup Manager
 Computer accounts and computer groups. You can create computer accounts for
individual computers. By managing computer accounts individually, you can fully
customize preference management settings for those computers.
You can create computer groups composed of these individual computer accounts,
or of hierarchical groups. Managed preferences for a parent computer group in a
hierarchical group also apply to child computer groups.
The addition of computer accounts and computer groups eases administration and
increases flexibility. For more information, see Chapter 6, “Setting Up Computers and
Computer Groups.”
 Improved mobile accounts. Mobile accounts are now more secure, efficient, and
portable.
You can protect mobile accounts with FileVault. You can set account expiry options
so that local home folders are deleted after a period of inactivity. You can also create
mobile accounts on an external drive, so users can still access a synced home folder
with cached managed preferences even when they don’t have their computers.
13
Page 14

You can enable these features by managing Mobility preferences. For more
information, see Chapter 8, “Managing Portable Computers.”
 New managed preferences. Preferences now let you manage Parental Controls,
Dashboard, Front Row, and Time Machine. Existing preferences have been enhanced,
using embedded and detached signatures to prevent the launching of unapproved
applications, giving you more control over the login window, and letting you create
page footers on printed documents. For more information, see Chapter 10,
“Managing Preferences.”
What’s in This Guide
This guide includes the following chapters:
 Chapter 1, “User Management Overview,” highlights important concepts, introduces
user management tools, and tells you where to find additional information about
user management and related topics.
 Chapter 2, “Getting Started with User Management,” provides planning and setup
information to create a user management environment.
 Chapter 3, “Getting Started with Workgroup Manager,” describes how to set up
Workgroup Manager and use its core features.
 Chapters 4, 5, and 6 explain how to use Workgroup Manager to set up users, groups,
computers, and computer groups.
 Chapter 7, “Setting Up Home Folders,” covers creating home folders.
 Chapter 8, “Managing Portable Computers,” details considerations for managing
portable computers.
 Chapter 9, “Client Management Overview,” introduces client management tools and
concepts, such as how to customize a user’s work environment and provide user
access to network resources.
 Chapter 10, “Managing Preferences,” describes how to use Workgroup Manager to
control preference settings for users, groups, computers, and computer groups that
use Mac OS X.
 Chapter 11, “Solving Problems,” helps you address issues involving account creation,
home folder maintenance, preference management, and client setup, and also helps
you solve problems encountered by managed clients.
In addition, the appendix, “Importing and Exporting Account Information,” provides
information you’ll need when you want to transfer account information to or from an
external file.
Finally, the glossary defines terms you’ll encounter as you read this guide.
Note: Because Apple periodically releases new versions and updates to its software,
images shown in this book may be different from what you see on your screen.
14 Preface About This Guide
Page 15

Using Onscreen Help
You can get task instructions onscreen in the Help Viewer application while you’re
managing Leopard Server. You can view help on a server or an administrator computer.
(An administrator computer is a Mac OS X computer with Leopard Server
administration software installed on it.)
To get help for an advanced configuration of Leopard Server:
m Open Server Admin or Workgroup Manager and then:
 Use the Help menu to search for a task you want to perform.
 Choose Help > Server Admin Help or Help > Workgroup Manager Help to browse
and search the help topics.
The onscreen help contains instructions taken from Server Administration and other
advanced administration guides described in “Mac OS X Server Administration Guides,”
next.
To see the most recent server help topics:
m Make sure the server or administrator computer is connected to the Internet while
you’re getting help.
Help Viewer automatically retrieves and caches the most recent server help topics from
the Internet. When not connected to the Internet, Help Viewer displays cached help
topics.
Preface About This Guide 15
Page 16

Mac OS X Server Administration Guides
Getting Started covers installation and setup for standard and workgroup configurations
of Mac OS X Server. For advanced configurations, Server Administration covers planning,
installation, setup, and general server administration. A suite of additional guides, listed
below, covers advanced planning, setup, and management of individual services. You
can get these guides in PDF format from the Mac OS X Server documentation website:
www.apple.com/server/documentation
This guide ... tells you how to:
Getting Started and
Installation & Setup Worksheet
Command-Line Administration Install, set up, and manage Mac OS X Server using UNIX command-
File Services Administration Share selected server volumes or folders among server clients
iCal Service Administration Set up and manage iCal shared calendar service.
iChat Service Administration Set up and manage iChat instant messaging service.
Mac OS X Security Configuration Make Mac OS X computers (clients) more secure, as required by
Mac OS X Server Security
Configuration
Mail Service Administration Set up and manage IMAP, POP, and SMTP mail services on the
Network Services Administration Set up, configure, and administer DHCP, DNS, VPN, NTP, IP firewall,
Open Directory Administration Set up and manage directory and authentication services, and
Podcast Producer Administration Set up and manage Podcast Producer service to record, process,
Print Service Administration Host shared printers and manage their associated queues and print
QuickTime Streaming and
Broadcasting Administration
Server Administration Perform advanced installation and setup of server software, and
System Imaging and Software
Update Administration
Upgrading and Migrating Use data and service settings from an earlier version of Mac OS X
Install Mac OS X Server and set it up for the first time.
line tools and configuration files.
using the AFP, NFS, FTP, and SMB protocols.
enterprise and government customers.
Make Mac OS X Server and the computer it’s installed on more
secure, as required by enterprise and government customers.
server.
NAT, and RADIUS services on the server.
configure clients to access directory services.
and distribute podcasts.
jobs.
Capture and encode QuickTime content. Set up and manage
QuickTime streaming service to deliver media streams live or on
demand.
manage options that apply to multiple services or to the server as a
whole.
Use NetBoot, NetInstall, and Software Update to automate the
management of operating system and other software used by
client computers.
Server or Windows NT.
16 Preface About This Guide
Page 17

This guide ... tells you how to:
User Management Create and manage user accounts, groups, and computers. Set up
managed preferences for Mac OS X clients.
Web Technologies Administration Set up and manage web technologies, including web, blog,
webmail, wiki, MySQL, PHP, Ruby on Rails, and WebDAV.
Xgrid Administration and High
Performance Computing
Mac OS X Server Glossary Learn about terms used for server and storage products.
Set up and manage computational clusters of Xserve systems and
Mac computers.
Viewing PDF Guides Onscreen
While reading the PDF version of a guide onscreen:
 Show bookmarks to see the guide’s outline, and click a bookmark to jump to the
corresponding section.
 Search for a word or phrase to see a list of places where it appears in the document.
Click a listed place to see the page where it occurs.
 Click a cross-reference to jump to the referenced section. Click a web link to visit the
website in your browser.
Printing PDF Guides
If you want to print a guide, you can take these steps to save paper and ink:
 Save ink or toner by not printing the cover page.
 Save color ink on a color printer by looking in the panes of the Print dialog for an
option to print in grays or black and white.
 Reduce the bulk of the printed document and save paper by printing more than one
page per sheet of paper. In the Print dialog, change Scale to 115% (155% for Getting
Started). Then choose Layout from the untitled pop-up menu. If your printer supports
two-sided (duplex) printing, select one of the Two-Sided options. Otherwise, choose
2 from the Pages per Sheet pop-up menu, and optionally choose Single Hairline from
the Border menu. (If you’re using Mac OS X version 10.4 or earlier, the Scale setting is
in the Page Setup dialog and the Layout settings are in the Print dialog.)
You may want to enlarge the printed pages even if you don’t print double sided,
because the PDF page size is smaller than standard printer paper. In the Print dialog or
Page Setup dialog, try changing Scale to 115% (155% for Getting Started, which has CDsize pages).
Preface About This Guide 17
Page 18

Getting Documentation Updates
Periodically, Apple posts revised help pages and new editions of guides. Some revised
help pages update the latest editions of the guides.
 To view new onscreen help topics for a server application, make sure your server or
administrator computer is connected to the Internet and click “Latest help topics” or
“Staying current” in the main help page for the application.
 To download the latest guides in PDF format, go to the Mac OS X Server
documentation website:
www.apple.com/server/documentation
Getting Additional Information
For more information, consult these resources:
 Read Me documents—important updates and special information. Look for them on
the server discs.
 Mac OS X Server website (www.apple.com/server/macosx)—gateway to extensive
product and technology information.
 Mac OS X Server Support website (www.apple.com/support/macosxserver)—access to
hundreds of articles from Apple’s support organization.
 Apple Discussions website (discussions.apple.com)—a way to share questions,
knowledge, and advice with other administrators.
 Apple Mailing Lists website (www.lists.apple.com)—subscribe to mailing lists so you
can communicate with other administrators using email.
18 Preface About This Guide
Page 19

1 User Management Overview
1
This chapter introduces user management concepts and
describes the applications used to manage accounts and
privileges.
User management encompasses everything from setting up accounts for network
access and creating home folders, to fine-tuning the user experience by managing
preferences and settings for users, groups, computers and computer groups. Mac OS X
Server provides tools for accomplishing these tasks and more.
Tools for User Management
User management tools and technologies in Mac OS X Server include Workgroup
Manager, Server Admin, NetBoot, and NetInstall.
Workgroup Manager
Workgroup Manager is a powerful tool that delivers features for comprehensive
management of Macintosh clients.
You can use Workgroup Manager on a computer with Mac OS X or Mac OS X Server
installed.
Workgroup Manager provides a centralized method of managing Mac OS X computers,
controlling access to software and removable media, and providing a consistent,
personalized experience for users at different levels, whether they’re beginners in a
classroom or advanced users in an office.
You use Workgroup Manager to create user accounts and set up groups to provide
convenient access to resources. You can:
 Use account settings and managed preferences to achieve the level of administrative
control you need, while making the user experience more efficient
 Manage Finder, login, media access, and print settings
 Control access to computers and restrict the applications allowed to run on them
19
Page 20

Using Workgroup Manager with Mac OS X Server services, you can:
 Customize the work environments of network users by organizing their desktop
resources and personal files
 Enable services that require user accounts, such as mail, file sharing, iChat service,
and web service
 Share system resources, such as printers and computers, maximizing their availability
and ensuring that disk space and printer usage remains equitably shared
To get started with Workgroup Manager, see Chapter 3, “Getting Started with
Workgroup Manager.”
Server Admin
The Server Admin application provides access to various tools and services that play a
role in server management.
After installing the Mac OS X Server software, use Server Admin to set up directory
services and establish your network. Then use Workgroup Manager to create and
manage accounts. After that, use Server Admin to set up additional services to provide
mail service, host websites, share printers, and create share points (which allow users to
share folders and files).
For information about how to use the many services managed through Server Admin,
see the service administration guides. The following table lists common server
administration tasks and includes the location of related documentation.
To See this document
Assign permissions to folders and files in a
share point
Share printers among users Print Service Administration
Set up websites or WebDAV support on the
server
Provide email service for users Mail Service Administration
Broadcast multimedia from the server in real
time
Provide identical operating system and
applications folders for client computers
Install applications across a network System Imaging and Software Update Administration
Share information among multiple Mac OS X
Server systems or Mac OS X computers
For a complete list of Mac OS X Server documentation, see “Mac OS X Server
Administration Guides” on page 16.
20 Chapter 1 User Management Overview
File Services Administration
Web Technologies Administration
QuickTime Streaming Server Administration
System Imaging and Software Update Administration
Open Directory Administration
Page 21

Server Preferences
If you use the standard or workgroup configuration of Mac OS X Server, you can use
Server Preferences to configure key features of collaboration and file services. Its
streamlined approach allows novice system administrators to quickly configure a server
without requiring much technical knowledge.
You can also use Server Preferences to configure user and group accounts (such as
setting passwords, enabling services, and assigning group membership). However, you
can’t use Server Preferences to manage preferences.
For more information, see Getting Started and Server Preferences Help.
NetBoot
Mac OS X computers can start up from a network-based NetBoot image, providing
quick and easy configuration of department, classroom, and individual systems, as well
as web and application servers, throughout a network.
When you update a NetBoot image, all computers using NetBoot have instant access to
the new configuration. To customize the computer setup for different groups of clients,
you can set up multiple NetBoot images. These features provide quick setup and a
customized user experience.
NetBoot simplifies administration and reduces the support normally associated with
large-scale deployments of network-based Macintosh computers. It’s ideal for an
organization with client computers that are identically configured. For example,
NetBoot can be a powerful solution for a data center that needs multiple, identically
configured web and application servers.
With NetBoot, you can quickly configure and update client computers by updating a
NetBoot image stored on the server. NetBoot images contain the operating system and
application folders for all clients on the server, so that changes made on the server are
reflected on the clients when they restart. Systems that are compromised or otherwise
altered can be instantly restored by restarting them.
You use System Image Utility to create and modify NetBoot images, and then use
NetBoot to deploy NetBoot images.
For more information about these tools, or about installing an operating system over a
network, see System Imaging and Software Update Administration.
NetInstall
NetInstall is a centralized software installation service that lets you use installation
images to selectively and automatically install, restore, or upgrade network-based
Macintosh systems. Those images can contain the latest version of Mac OS X, a
software update, site-licensed or custom applications, or configuration scripts.
Chapter 1 User Management Overview 21
Page 22

You can use NetInstall to upgrade operating systems, install software updates and
custom software packages, or re-image desktop and portable computers. You can
create custom installation packages for various departments in an organization, such as
marketing, engineering, and sales.
Using NetInstall, it’s not necessary to use CDs or DVDs to configure a computer. All
installation files and packages reside on the server.
Use NetInstall to run pre- and post-installation scripts to perform system commands
before or after the installation of a software package or system image.
To create NetInstall packages, use System Image Utility or PackageMaker. Then use
NetBoot to deploy NetInstall packages. For more information about using these tools
with NetInstall, see System Imaging and Software Update Administration.
Command-Line Tools
Mac OS X Server v10.5 includes several client-management command-line tools. For
example, the dscl tool allows you to view and edit account settings and manage
preferences, while the mcxquery tool reports the managed preferences that are
effective for a particular user.
Use the mcxquery tool to review how combined and overridden managed preferences
interact at the user, group, computer, or computer group level. The tool also
determines which directory domain stores those managed preference settings.
For more information about client-management command-line tools, see Command-
Line Administration.
Accounts
To manage accounts, you use an administrator account. With an administrator account,
you can set up and manage the following account types:
 User accounts
 Group accounts
 Computer accounts
 Computer groups
When creating a user account, you must specify a user name and password, which is
needed to prove the user’s identity. You can also specify a user identification number
(user ID), which is useful for folder and file permissions. Other user account information
is used by various services to determine what the user is authorized to do and to
personalize the user’s environment.
In addition to the accounts you create, Mac OS X Server also has predefined user and
group accounts, some of which are reserved for use by Mac OS X.
22 Chapter 1 User Management Overview
Page 23

Administrator Accounts
Users with server administration or directory domain administration privileges are
known as administrators. An administrator can be a server administrator, domain
administrator, or both.
Server administrator privileges determine whether a user can change the settings of a
particular server.
Domain administrator privileges determine the extent to which an administrator can
change account settings for users, groups, computers, and computer groups in the
directory domain.
Server Administration
Server administration privileges determine the functions available to a user when
logged in to a particular Mac OS X Server. For example, a server administrator can use
Directory Utility to make changes to a server’s search policy.
When you assign server administration privileges to a user, the user is added to the
“admin” group in the server’s local directory domain. Many Mac OS X applications—
such as Server Admin, Directory Utility, and System Preferences—use the admin group
to determine whether a particular user can perform certain administrative activities
with the application.
Local Mac OS X Computer Administration
Any user who belongs to the admin group in the local directory domain of any
Mac OS X computer has administrator privileges on that computer.
Limited Administration
You can control the extent to which a limited administrator can use Workgroup
Manager to change account data stored in a domain. For example, you can set up
directory domain privileges so your network administrator can add and remove user
accounts, but allow limited administrators to change the information for particular
users. Or, you can designate multiple limited administrators to manage different
groups.
For more information, see “Giving a User Limited Administrative Capabilities” on
page 70.
Directory Domain Administration
When you create a directory domain in Mac OS X Server, a domain administrator
account is created and added to the admin group in the domain. If you plan to connect
your directory domain to other directory domains, make sure you choose a unique
name and user ID for each domain.
Chapter 1 User Management Overview 23
Page 24

When you assign full directory domain administration privileges to a user, the user is
added to the “admin” group in the directory domain. This does not grant the user local
admin privileges on the servers hosting this directory domain or on any other servers
or clients bound to this directory domain.
Each directory domain has a domain administrator account, and a domain
administrator can create additional domain administrators in the same domain. Any
user with a user account in a directory domain can be made a directory domain
administrator (an administrator of that domain).
For more information, see “Giving a User Full Administrative Capabilities” on page 72.
User Accounts
Depending on how you set up server and user accounts, you can use Mac OS X Server
to support users who log in using Mac OS X computers, Windows computers, or UNIX
computers.
Most users have an individual account used to authenticate them and control their
access to services. When you want to personalize a user’s environment, you define user,
group, computer, or computer group preferences for that user.
The term managed client or managed user refers to a user who has administratorcontrolled preferences associated with his or her account. Managed client is also used
to refer to computers or computer groups that have preferences defined for them.
To learn more about how to set up user accounts, see Chapter 4, “Setting Up User
Accounts.” To specify the preferences for user accounts, see Chapter 10, “Managing
Preferences.”
Guest Account
You can provide services for users who can’t be authenticated because they don’t have
a valid user name or password. These users are known as guest users. If your computers
run Mac OS X v10.5 or later, you can enable a guest account, which is specifically
designed for guest users.
The guest account allows anonymous access to a computer. The guest account has a
local home folder that has its contents erased when the user logs in or out of the guest
account.
The guest account is best used for common-access computers, such as those in a
library or open lab where you may not need to log user access and where the user
maintains his or her files separate from the local computer.
24 Chapter 1 User Management Overview
Page 25

For some services, like Apple Filing Protocol (AFP), you can let guest users access files.
Instead of authenticating with a name and a password, a guest user connects as a
guest, not as a registered user. Guests are restricted to files and folders with
permissions set to Everyone.
Group Accounts
To ease user administration, you can create group accounts. A group is a collection of
users who have similar needs. For example, you can add all English teachers to one
group and allow that group to access certain files or folders on a volume.
Groups simplify the administration of shared resources. Instead of granting access to
various resources for each user who needs access, you can add users to a group and
then grant access to everyone in the group.
Use group account settings to control user access to folders and files. For more
information, see “Folder and File Access by Other Users” on page 28.
A group can be a member of another group. A group that contains another group is
called a parent group. The group contained in the parent group is called a hierarchical
group. Hierarchical groups are useful for inheriting access permissions and managed
preferences.
To learn more about how to set up group accounts, see Chapter 5, “Setting Up Group
Accounts.” To specify preferences for group accounts, see Chapter 10, “Managing
Preferences.”
Workgroups
When you define preferences for a group, it becomes a workgroup. A workgroup lets
you manage the work environment of group members.
Workgroup preferences are stored in the group account. For a description of
workgroup preferences, see Chapter 10, “Managing Preferences.”
Group Folders
When you define a group, you can also specify a folder for storing files that you want
group members to share. The location of the folder is stored in the group account.
You can give users permission to write to a group folder, or to change group folder
attributes in the Finder.
Computer Accounts
Computer accounts allow you to identify and manage individual computers.
To create a computer account, you need the computer’s Ethernet ID. When creating the
account, you can also associate it with an IP address. After creating the account, you
can manage its preferences or add it to a computer group.
Chapter 1 User Management Overview 25
Page 26

For more information about setting up computer accounts, see Chapter 6, “Setting Up
Computers and Computer Groups.” To specify preferences for Mac OS X computer
accounts, see Chapter 10, “Managing Preferences.”
Guest Computers
Most computers on your network should have a computer account. If an unknown
computer (one that doesn’t have a computer account) connects to your network and
attempts to access services, that computer is treated as a guest. Settings chosen for the
Guest Computer account apply to unknown guest computers.
Computer Groups
A computer group is composed of one or more computer accounts or computer
groups. By combining these into a single computer group, you can apply the same
managed preferences to all its members.
To learn more about how to set up computer groups for Mac OS X client computers,
see Chapter 6, “Setting Up Computers and Computer Groups.” To specify preferences
for Mac OS X computer groups, see Chapter 10, “Managing Preferences.”
The User Experience
After you create an account for a user, the user can access server resources according
to the permissions you set.
The user experience depends on the type of user, permissions set, type of client
computer in use (such as Windows or UNIX), whether the user is a member of a group,
and whether preference management is implemented at the user, group, or computer
level.
For more information about the Mac OS X user experience, see Chapter 9, “Client
Management Overview.” Basic information about authentication, identity validation,
and information-access control is given in the following sections.
Authentication and Identity Validation
Before a user can log in or connect to a Mac OS X computer, he or she must enter a
name and password associated with a user account accessible by the computer.
A Mac OS X computer can access user accounts that are stored in a directory domain of
the computer’s search policy:
 A directory domain stores information about users and resources. It is like a database
that a computer accesses to retrieve configuration information.
 A search policy is a list of directory domains that the computer searches when it
needs configuration information, starting with the local directory domain on the
user’s computer.
26 Chapter 1 User Management Overview
Page 27
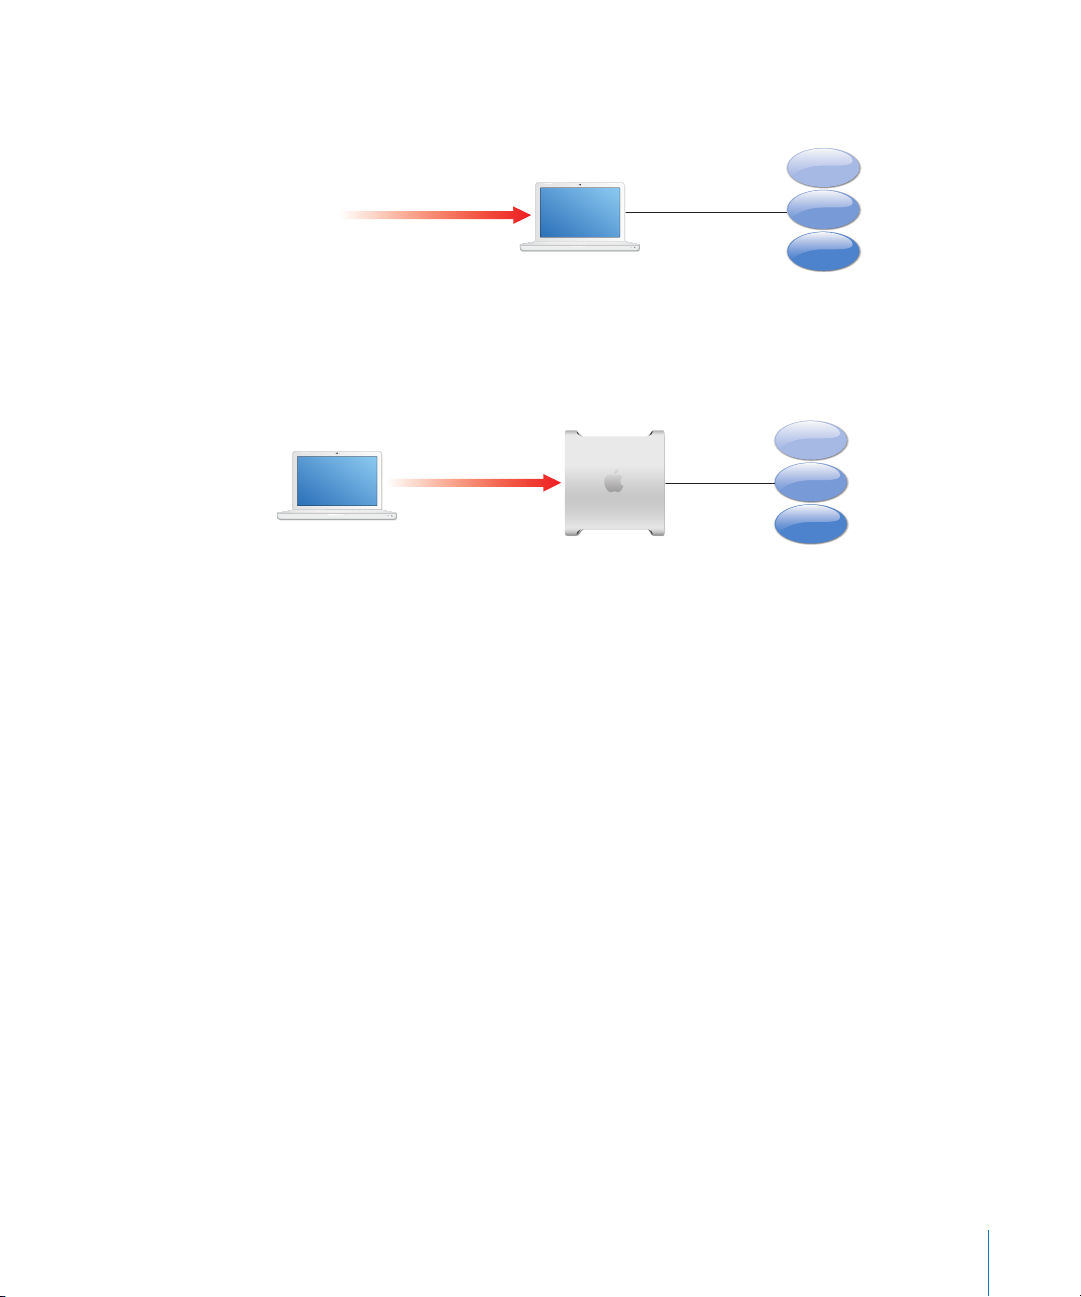
The following illustration shows a user logging in to an account in a directory domain
in the computer’s search policy.
Log in to
Mac OS X
Directory domains
in search policy
After login, the user can connect to a remote server to access its services (if the user’s
account is located in the server’s search policy).
Connect to
Mac OS X Server
Directory domains
in search policy
If Mac OS X finds a user account containing the name entered by the user, it attempts
to validate the password associated with the account. If the password is validated, the
user is authenticated and the login or connection process is completed.
Mac OS X Server validates passwords using Kerberos, Open Directory Password Server,
shadow passwords, and crypt passwords.
For more information about types of directory domains and instructions for
configuring search policies, see Open Directory Administration. This guide also discusses
authentication methods and provides instructions for setting up user authentication
options.
Information Access Control
To control access to information, a universal ID called a globally unique identifier (GUID)
provides user and group identity for access control list (ACL) permissions.
An ACL is a list of access control entries (ACEs), each specifying the permissions to be
granted or denied to a group or user, and how these permissions are propagated
throughout a folder hierarchy. The GUID also associates a user with group and
hierarchical group memberships.
Chapter 1 User Management Overview 27
Page 28

Prior to Mac OS X v10.4, Mac OS X used user ID and POSIX permissions to track folder
and file permissions. In Mac OS X, folders or files include POSIX permissions for entities
such as:
 Owner
 Group
 Everyone else
Because GUIDs are 128-bit values, duplicate GUIDs are extremely unlikely. Unlike ACL
permissions, POSIX permissions can cause file-ownership and group-membership
issues when multiple users have identical short names or user IDs. When using GUIDs,
users with the same short name or user ID can have different ACL permissions.
The introduction of GUIDs does not change or remove POSIX permissions, so it does
not affect the interoperability of Mac OS X with legacy UNIX systems or other operating
systems.
Folder and File Owner Access
When a folder or file is created, the file system stores the user ID of the user who
created the file or folder as its owner. By default, when a user with that user ID accesses
the folder or file, he or she can read and write to it. Also, any process started by the
user who creates the file or folder can read and write to any files associated with that
same user ID.
If you change a user ID, the user may not be able to modify or access files and folders
he or she created. Likewise, if the user logs in as a user whose user ID is different from
the user ID he or she used to create the files and folders, the user no longer has owner
permissions for those files and folders.
Folder and File Access by Other Users
The use of GUIDs in conjuction with ACLs determines the files that users and groups
can access. Also, the user ID, in conjunction with a group ID, is used to control access.
Every user belongs to a primary group. The primary group ID for a user is stored in the
user’s account. When a user accesses a folder or file and the user isn’t the owner, the file
system checks the file’s group permissions, and the following occurs:
 If the user’s primary group ID matches the ID of the group associated with the file,
the user inherits group permissions.
 If the user’s primary group ID doesn’t match the file’s group ID, Mac OS X searches for
the group account that has permission to access the file. When the group is found, all
members of that group and subsequent hierarchical groups are given permission to
that file.
 If neither of these cases apply, the user’s access permissions default to the generic
“everyone.”
28 Chapter 1 User Management Overview
Page 29

ACLs and POSIX Permissions
Every file and folder has POSIX permissions. Unless an administrator assigns ACL
permissions, POSIX permissions continue to define user access. If you assign ACL
permissions, they take precedence over standard POSIX permissions.
If a file has ACL permissions, but none apply to the user, the POSIX permissions
determine user access. If a file has multiple ACEs that apply to a user, the first
applicable ACE takes precedence, and subsequent ACEs are ignored.
For more information about ACL and POSIX permissions, see File Services Administration.
SIDs and Windows Interoperability
Mac OS X computers work seamlessly with Windows computers because Mac OS X
assigns a security identifier (SID) to a process or file when it assigns a GUID to the
process or file. A SID is a Windows identifier that has similar functionality to a GUID on
a Mac OS X computer.
When Windows users access share points using Server Message Block (SMB), they
transfer SIDs, not GUIDs. When Mac OS X Server receives SIDs, it retrieves the user
accounts with the corresponding GUIDs.
Windows servers use Active Directory as their directory domain. If a user account is
moved to a different Active Directory domain, it receives a new SID but not a new
GUID. The user still has access permissions assigned to old SIDs because Active
Directory keeps track of SID history in user accounts.
Chapter 1 User Management Overview 29
Page 30

30 Chapter 1 User Management Overview
Page 31

2 Getting Started with
User Management
2
This chapter provides information about planning and setting
up a user management environment.
To create an effective user management environment, you must carefully plan your
network. Then, when deploying the network, you must systematically and methodically
set up your network resources.
Setup Overview
This section provides an overview of user management setup tasks, including the
sequence of stages an administrator follows to create a managed environment. Not all
steps are necessary in every case.
For a more comprehensive approach to planning, security, server setup, installation and
deployment, management, and monitoring, see Server Administration.
Step 1: Before you begin, do some planning
Analyze your users’ needs to determine which directory service configuration and
home folder setup is the most suitable. For more information, see “Planning Strategies
for User Management” on page 34.
Step 2: Set up the server infrastructure
Before deploying client computers, make sure one or more computers with Mac OS X
Server installed is set up for hosting accounts and share points. New servers come with
Mac OS X Server software preinstalled.
Set up the server so it hosts or provides access to shared directory domains. Shared
directory domains (also called shared directories) contain user, group, and computer
information you want multiple computers to access. Users whose accounts reside in a
shared directory are referred to as network users.
There are different kinds of shared directories. You can use Workgroup Manager to add
or modify accounts that reside in read/write directory domains such as an Open
Directory domain or the local directory domain.
31
Page 32

Make sure that read-only directory domains (such as LDAPv2, read-only LDAPv3, or BSD
flat files) are configured to support Mac OS X Server and that they provide necessary
account data. To make the directory compatible, you must add, modify, and reorganize
directory information.
Mac OS X offers various options for authenticating users (including Windows users)
whose accounts are stored in directory domains on Mac OS X Server. In addition,
Mac OS X accesses accounts in existing directories on your network, such as an Active
Directory hosted on a Windows server.
To make resources visible throughout the network so users can access them from
different computers, use file services. Important network-visible resources include
network home folders, group folders, and other shared folders.
If some users use Windows computers, you can configure the server to provide them
with file services, domain login, and home folders.
The following administration guides describe infrastructure setup in detail:
 For installation requirements and guidelines, see Getting Started.
 For information about advanced installation and setup of server software, see Server
Administration.
 For information about directory services and authentication, see Open Directory
Administration.
 For information about how to set up file services, see File Services Administration.
Step 3: Set up an administrator computer
Because servers are usually kept in a secure, locked location, administrators typically
conduct user management tasks remotely from a Mac OS X computer. Such a
computer is referred to as an administrator computer.
Before you can use an administrator computer to create and manage accounts in a
shared directory, you must have a user account in the shared directory and you must
be a domain administrator. A domain administrator can use Workgroup Manager to
add and change accounts in an Open Directory domain or another read/write directory
domain.
To set up an administrator computer and create domain administrator accounts, see
Chapter 3, “Getting Started with Workgroup Manager.”
Step 4: Set up a home folder share point
Home folders for accounts stored in shared directories can reside in a network share
point accessible by the user’s computer.
You can set up network home folders so they can be accessed using either AFP or NFS,
or you can set up home folders for exclusive use by Windows users using SMB.
32 Chapter 2 Getting Started with User Management
Page 33

For information about setting up home folders using AFP, NFS, or SMB, see Chapter 7,
“Setting Up Home Folders.”
Step 5: Create user accounts and home folders
You can use Workgroup Manager to create user accounts in directories that reside on
Mac OS X Server or in other read/write directory domains. The following sections
contain instructions for creating accounts and folders:
 To create user accounts, see Chapter 4, “Setting Up User Accounts.”
 To create mobile user accounts, see Chapter 8, “Managing Portable Computers.”
 To set up home folders, see Chapter 7, “Setting Up Home Folders.”
Step 6: Set up client computers
Mac OS X Server supports users of Mac OS X, Windows, and UNIX client computers.
For Mac OS X computers, configure the search policy of the computers so it locates
shared directory domains. For instructions, see Open Directory Administration.
For setup instructions for mobile Mac OS X computers that use AirPort to communicate
with Mac OS X Server, see Designing AirPort Extreme Networks at
http://www.apple.com/support/manuals/airport/.
You can join Windows workstations to the Mac OS X Server primary domain controller
(PDC), which is similar to the way you configure Windows workstations to join a
Windows NT server domain.
If you have more than a few Macintosh client computers to set up, consider using
NetInstall to create a system image that automates client computer setup.
For instructions, see System Imaging and Software Update Administration.
To prevent unauthorized access to client computers, secure them from local and
network threats. For information, see Mac OS X Security Configuration.
Step 7: Define user account preferences
You manage the work environment of Macintosh users whose accounts reside in a
shared domain by defining user account preferences. For information about Mac OS X
user preferences, see Chapter 9, “Client Management Overview,” and Chapter 10,
“Managing Preferences.”
Step 8: Create group accounts and group folders
Use Workgroup Manager to create group accounts in directories that reside on
Mac OS X Server and in other read/write directory domains.
You can create group folders to distribute documents and organize group member
applications. You can also set up ACLs and other access privileges to restrict a group’s
access to folders or files:
Chapter 2 Getting Started with User Management 33
Page 34

 For information about how to work with Mac OS X group accounts and group
folders, see Chapter 5, “Setting Up Group Accounts.”
 For information about how to add a group folder to the dock to make it more
accessible to users, see Chapter 10, “Managing Preferences.”
 For information about setting up ACLs, see File Services Administration.
Step 9: Define group account preferences
You can manage preferences for a group account. A group account with managed
preferences is called a workgroup. For information about Mac OS X workgroups, see
Chapter 9, “Client Management Overview,” and Chapter 10, “Managing Preferences.”
Step 10: Define computer accounts, computer groups, and preferences
Use computer accounts or computer groups to manage Macintosh client computers.
 For information about creating Mac OS X computer accounts or computer groups,
see Chapter 6, “Setting Up Computers and Computer Groups.”
 For information about computer group preferences, see Chapter 9, “Client
Management Overview,” and Chapter 10, “Managing Preferences.”
Step 11: Perform ongoing account maintenance
As users come and go, and the requirements for your servers change, you must update
account information:
 For information about how to use Workgroup Manager to display accounts,
see Chapter 3, “Getting Started with Workgroup Manager.”
 For information about how to perform common tasks such as creating accounts,
disabling accounts, adding and removing users from groups, and deleting accounts,
see Chapter 4 through Chapter 6.
 For solutions to common problems, see Chapter 11, “Solving Problems.”
Planning Strategies for User Management
The following are planning activities to undertake before you implement user
management.
Analyzing Your Environment
Your environment defines your user management settings, including:
 Size and distribution of your network
 Number of users who access your network
 Type of computers used (Mac OS X or Windows)
 How client computers are used
 Which computers are mobile
 Which users should have administrator privileges
 Which users should have access to particular computers
34 Chapter 2 Getting Started with User Management
Page 35

 What services and resources users need (such as mail or access to data storage)
 How to divide users into groups (for example, by class topic or job function)
 How to group computers (such as all computers in a public lab)
Identifying Directory Services Requirements
Identify the directories where you’ll store user and group accounts, computers, and
computer groups:
 Set up an Open Directory master and replicas to host a Lightweight Directory Access
Protocol (LDAP) directory for storing other user accounts, group accounts,
computers, and computer groups on your network. For information about password
handling options, see Open Directory Administration.
 If you have an earlier version of an Apple server, you might be able to migrate
existing records. For available options, see Updating and Migrating.
 If you have an LDAP or Active Directory server set up, you might be able to use
existing account records. For details about accessing existing directories, see Open
Directory Administration.
For information about working with Open Directory groups and computer groups,
see Chapter 5, “Setting Up Group Accounts,” and Chapter 6, “Setting Up Computers
and Computer Groups.”
Note: If all domains are not finalized when you’re ready to start adding user and group
accounts, add the accounts to any directory domain that exists on your server (the local
directory domain is always available). You can move users and groups to another
directory domain later by using your server’s export and import functions.
Passwords are not retained when exporting and importing account information. For
more information, see the appendix, “Importing and Exporting Account Information.”
Determining Server and Storage Requirements
When planning for server needs, you must first acquire the following information:
 The number of concurrently connected computers, which affects network traffic and
server response times
 The number of user accounts, which affects the amount of storage space required to
store user files
Directory services, including authentication and user management, require one Open
Directory master or replica for every 1000 computers, regardless of the number of total
user accounts. For example, if you have 400 computers and 2000 users, you need one
Open Directory master for authentication and account management. If you have 1800
computers and 2500 users, you need one Open Directory master and one Open
Directory replica.
Chapter 2 Getting Started with User Management 35
Page 36

If you use network home folders, they require one dedicated home folder server for
every 150 concurrent connections. If you use mobile accounts with portable home
directories, you need one dedicated home folder server for every 300 concurrent
connections.
For example, if you have 400 computers and 2000 users on network home folders, you
need three dedicated home folders servers. If those users are deployed with portable
home folders, you need two dedicated home folder servers.
If you have 1800 computers and 2500 users, you should have 12 dedicated home folder
servers for network home folders and 6 dedicated servers for portable home
directories.
Group folders require one server for every 450 concurrent connections. For example, if
you have 400 computers, you need one group folder server. For 1800 computers, you
need four group folder servers.
Storage requirements vary because users have varying storage needs. Some users may
store very few files in their home folders, while other users fill theirs. A simple guideline
is to start with 1 gigabyte (GB) of storage per user account, but allow for expansion.
Don’t establish disk quotas or other space restrictions unless you have closely
examined your users' storage needs. For example, 2000 user accounts might only need
2 terabytes (TB) of storage over the course of several years. However, if you give that
same 2000 users their own computers with 60 GB drives, they could use as much as 120
TB of storage. In this case, every user fills his or her own drive, and portable home
directory syncing mirrors files from his or her local home folder to the network file
server.
Choosing a Home Folder Structure
When deploying computers, one of the most crucial decisions is choosing how and
where to host home folders.
There are three types of home folders: a local home folder, a network home folder, and
a portable home directory. These home folders are typically tied, respectively, to local,
network, and mobile accounts.
When considering your home folder structure, keep the following in mind:
 Users with local accounts typically have local home folders.
When users save files in local home folders, the files are stored locally. To save the
files over the network, users must connect to the network and upload the file.
Using local home folders provides the least amount of control over a user’s managed
preferences, and is also not inherently tied to a network account.
 Users with network accounts typically have network home folders.
36 Chapter 2 Getting Started with User Management
Page 37

When users save files in network home folders, the files are stored on the server.
Additionally, when users access home folders, even for common tasks like caching
webpages, the users’ computers must retrieve these files from the server.
Using network home folders provides complete control over a user’s managed
preferences. When users are not connected to the network, they can’t access their
accounts or home folders.
 Users with mobile accounts have both local and network home folders, which
combine to form portable home directories.
When users save files, the files are stored in a local home folder. The portable home
directory is a synced subset of a user’s local and network home folders. You can
configure which folders to sync and how frequently to sync them.
Mobile accounts also cache authentication information and managed preferences. If
you sync key folders, a user can work on and off the network, and experience a
seamless work environment.
If you choose not to sync portable home directories, mobile accounts are then very
similar to local accounts, except that mobile accounts have managed preferences.
 Users with mobile accounts who access their accounts on computers running
Mac OS X v10.5 or later can use portable home directories with an external drive.
When users connect external drives to a computer (including computers off of the
network), they can still access their accounts. These types of mobile accounts are
called external accounts.
An external account stores its local home folder on the external drive and doesn’t
create a local home folder on the computer it’s accessed from.
Except for the location of the local home folder, external accounts are treated like
mobile accounts, with the same kinds of syncing, cached authentication, and
managed preference benefits.
Note: If a user’s mobile account is hosted in an Active Directory domain, the mobile
account does not have a portable home directory. However, it does have a local home
folder and a network home folder, and caches authentication.
Mobile accounts and external accounts are described in detail in Chapter 8,
“Managing Portable Computers.”
Devising a Home Folder Distribution Strategy
Determine which users need home folders and identify the computers where you want
these home folders to reside. For performance reasons, avoid using network home
folders over network connections slower than 100 megabits per second (Mbit/s).
Chapter 2 Getting Started with User Management 37
Page 38

A user’s network home folder doesn’t need to be stored on the same server as the
directory containing the user’s account. In fact, distributing directory domains and
home folders across multiple servers can help balance your network load. This scenario
is described in “Distributing Home Folders Across Multiple Servers” on page 115.
You may want to store home folders for users with last names beginning with A
through F on one computer, G through J on another, and so on. Or, you may want to
store home folders on a Mac OS X Server computer but store user and group accounts
on an LDAP or Active Directory server.
Before creating users, pick a distribution strategy. If your distribution strategy fails while
using it, you can move home folders, but doing so can require changing a large
number of user records.
When determining the access protocol to use for home folders, AFP offers the greatest
level of security. If you are hosting home folders on UNIX servers that do not support
AFP, you may want to use NFS. If you are hosting home folders on Windows servers,
you may want to use SMB.
For more information about how to use these protocols for home folders, see “About
Home Folders” on page 113.
Identifying Groups
Identify users with similar requirements and consider assigning them to groups.
See Chapter 5, “Setting Up Group Accounts.”
Determining Administrator Requirements
With Mac OS X v10.5, you don’t need to give full domain administrator privileges to all
users who need only some administrative control. Instead, you can give them limited
administrative privileges.
Decide which users will have full administrative control over accounts and which users
will perform only a few administrative duties.
The domain administrator has the greatest amount of control over other user accounts
and privileges. The domain administrator can create user accounts, group accounts,
computer accounts, and computer groups, and can assign settings, privileges, and
managed preferences for them. He or she can also create other server administrator
accounts, or give specific users (for example, teachers or technical staff ) administrator
privileges in certain directory domains.
Limited administrators can perform common administrative tasks for specified users
and groups. They can manage user preferences, edit managed preferences, edit user
information, and edit group membership. Giving users limited administrative privileges
helps them to be more self-sufficient, without putting your organization at risk.
38 Chapter 2 Getting Started with User Management
Page 39

For example, you might want to give student lab assistants the ability to manage user
passwords for a small group of students, while giving teachers the ability to manage
user passwords, edit user information, and edit group information for all of their
classes.
Because users can be given limited administrator privileges, consider which users
require domain administrator privileges. A well-planned hierarchy of administrators and
users with special administrator privileges helps you distribute system administration
tasks and makes workflow and network management more efficient.
When you use Server Assistant to configure your server, specify a password for the
owner/administrator. This password also becomes the root password for your server.
Only a few server administrators need to know the root password, but sometimes it’s
necessary when using command-line tools (such as CreateGroupFolder).
Administrators who don’t need root access can use Workgroup Manager to create an
administrator user with a password different from the root password.
Use the root password with caution and store it in a secure location. The root user has
full access to the system, including system files. If necessary, you can use Workgroup
Manager to change the root password.
Chapter 2 Getting Started with User Management 39
Page 40

40 Chapter 2 Getting Started with User Management
Page 41

3 Getting Started with
Workgroup Manager
3
This chapter provides instructions for setting up Workgroup
Manager and using its core features.
Workgroup Manager is the primary application for managing client computers. You can
use Workgroup Manager to create accounts and manage preferences.
Configuring the Administrator’s Computer and Account
To use Workgroup Manager, you must first install the Mac OS X Server administration
tools. Before you can manage client computers, you must configure a computer for use
as an administrator computer and create a domain administrator account.
Setting Up an Administrator Computer
When you install Workgroup Manager and other administration tools on a remote
administrator computer, you do not need to physically access the server. Instead, use
this administrator computer to connect to the server and perform administrative tasks
remotely.
The computer should have Mac OS X v10.5 or later, at least 512 MB of RAM, and
1 GB of unused disk space.
For more about server and storage requirements, see “Determining Server and Storage
Requirements” on page 35.
To create and modify accounts, you must also have a domain administrator account.
To set up an administrator computer:
1 Insert the Administration Tools disc and then start the installer,
ServerAdministrationSoftware.mpkg, located in the /Installers folder.
Make sure the server administration tools you install are the same version as the
Mac OS X Server software installed on your servers. If you use older server
administration tools with a newer server version, the tools can cause errors and corrupt
data.
2 Follow the onscreen instructions.
41
Page 42

3 If you are managing preferences that use specific paths to find files (such as Dock
preferences), make sure the administrator computer has the same file system structure
as each managed client computer.
This means that folder names, volumes, the location of applications, and so on should
be the same.
Creating a Domain Administrator Account
Before creating and editing accounts in a shared directory, you need a domain
administrator account in the directory. A domain administrator can use Workgroup
Manager to add and change accounts residing in an Open Directory domain, the local
directory domain, or another read/write directory domain.
To create a domain administrator account:
1 On the administrator computer, open Workgroup Manager and then authenticate as
the administrator user created during server setup.
2 Access the shared directory by clicking the globe icon and choose the directory
domain.
If you’re not authenticated, click the lock and enter the name and password of a
directory domain administrator.
3 Click New User, click Basic, and then provide basic information for the administrator.
4 Click Privileges and from the “Administration capabilities” pop-up menu choose Full.
5 Click Save.
From the Command Line
You can also create a domain administrator account using the dscl and pwpolicy
commands in Terminal. For more information, see the users and groups chapter of
Command-Line Administration.
Using Workgroup Manager
After installing the Mac OS X Server software and setting up a domain administrator
account, you can access and use Workgroup Manager for user management.
This section provides an introduction to Workgroup Manager.
Using Mac OS X Server v10.5 to Administer Earlier Versions of
Mac OS X
Servers running Mac OS X Server v10.3 or v10.4 can be administered using v10.5 server
administration tools. You can use Workgroup Manager on a computer running
Mac OS X Server v10.5 to manage Mac OS X clients running Mac OS X v10.3.9 or later.
42 Chapter 3 Getting Started with Workgroup Manager
Page 43

Connecting and Authenticating to Directory Domains in Workgroup Manager
When you install your server or set up an administrator computer, Workgroup Manager
is installed in /Applications/Server/. Use the Finder to open the application, or click its
icon in the Dock or in the toolbar of the Server Admin application.
You can view a directory domain without authenticating by choosing Server >
View Directories in Workgroup Manager. Initially, you have read-only access to
information displayed in Workgroup Manager. To make changes in a directory, you
must authenticate using a domain administrator account. This approach is most useful
when you’re administering different servers and working with different directory
domains.
To connect and authenticate to directory domains:
1 Open Workgroup Manager and when the Workgroup Manager Connect window
appears click Browse, or enter the IP address or DNS name for a server that connects to
directory domains.
2 Enter the user name and password for a domain administrator and click Connect.
3 To change directory domains while connected to a server, click the globe icon (see
below) to select a domain, then authenticate as a domain administrator by clicking the
lock icon.
Click the globe icon to select a
directory domain
4 To connect to a different server, choose Server > Connect.
Click the lock to
authenticate
Chapter 3 Getting Started with Workgroup Manager 43
Page 44

Major Workgroup Manager Tasks
After login, the Accounts pane appears (see below), showing a list of user accounts.
Initially, the user accounts listed are those stored in the last directory domain of the
server’s search policy.
Groups button
Click the globe icon to
select a directory domain
Users button
Type here to search or
filter the list below
Accounts list
Computers
button
Computer
Groups button
Currently
selected domain
Click the lock to
authenticate
Here is how to get started with the primary Workgroup Manager tasks:
 To specify the directory that stores accounts you want to work with, click the globe
icon.
 To work with accounts in different directories at the same time or to work with
different views of accounts in a particular directory, open multiple Workgroup
Manager windows by clicking the New Window icon in the toolbar or by choosing
Server > New Workgroup Manager Window.
 To administer accounts in the selected directory, click the Accounts icon in the
toolbar; then click the Users, Groups, Computers, or Computer Groups button on the
left side of the window to list the accounts that exist in the directories you are
working with.
 To filter the displayed account list, use the pop-up search menu above the accounts
list.
 To work with managed preferences, select an account (or several accounts) and then
click the Preferences icon in the toolbar.
 To import or export user and group accounts, choose Server > Import or Server >
Export.
44 Chapter 3 Getting Started with Workgroup Manager
Page 45

 To view onscreen help, use the Help menu. The Help menu gives you access to help
for administration tasks available through Workgroup Manager, as well as other
Mac OS X Server topics.
 To open Server Admin so you can monitor and work with services on a server, click
the Server Admin icon in the Workgroup Manager toolbar.
For information about Server Admin, see Server Administration.
Modifying Workgroup Manager Preferences
You can change Workgroup Manager preferences to customize how records are
displayed and to enable the Inspector, which is an advanced directory domain editor.
Workgroup Manager includes the following preferences.
Preference Description
Resolve DNS names when
possible
Show “All Records” tab and
inspector
Limit search results to requested
records
List a maximum of # records (Default: off ) Enabling this preference limits the maximum number
(Default: on) Disabling this preference causes Workgroup Manager
to stop resolving DNS names when writing data. If you’re having
DNS issues, disabling this can help mitigate the effect of those DNS
issues (but you should fix those issues).
(Default: off) Enabling this preference enables the Inspector. The
Inspector allows you to see and edit directory data not otherwise
visible in Workgroup Manager. For more information, see Open
Directory Administration.
(Default: off) When you don’t enter anything in the search field, by
default, Workgroup Manager lists all user records in the selected
directory domain.
Disabling this preference requires you to enter “*” (without quotes)
to list all records, which can expedite working with large directory
domains in Workgroup Manager (because Workgroup Manager
doesn’t automatically list all records).
of search results to a number you specify.
Enabling this preference and setting a reasonable maximum
number can improve Workgroup Manager performance. However,
setting the number too low can cause you to overlook the total
number of matches.
To set Workgroup Manager preferences:
1 In Workgroup Manager, choose Workgroup Manager > Preferences.
2 Select the preferences you want to change.
3 To reset the warning messages you’ve marked as “Don’t show again,” click “Reset ‘Don’t
show again’ messages.”
4 Click OK.
Chapter 3 Getting Started with Workgroup Manager 45
Page 46

Finding and Listing Accounts
Workgroup Manager provides several methods for finding and listing user accounts,
group accounts, computer accounts, and computer groups.
Working with Account Lists in Workgroup Manager
In Workgroup Manager, user accounts, group accounts, computer accounts, and
computer groups are listed on the left side of the Workgroup Manager window.
The following settings influence the contents and appearance of the list:
 Workgroup Manager preferences control the maximum number of records shown
and whether you want to enable the Inspector (which allows you to view or edit raw
directory data). To set up Workgroup Manager preferences, choose Workgroup
Manager > Preferences.
 The list reflects the directory you’ve chosen from the globe icon. If you connect to
the directory server, the accounts in the parent directory domain are listed. If you do
not connect to the directory server, local accounts are listed.
The listed domains are the local directory domain, all directory domains in the
server’s search policy, and all available directory domains (domains the server is
configured to access, even if not in the search policy). For instructions on configuring
a server to access directory domains, see Open Directory Administration.
After you choose directory domains, all accounts residing in those domains are listed.
 You can list users, groups, computers or computer groups by clicking the Users,
Groups, Computers, or Computer Groups buttons above the search filter.
 To sort a list, click a column heading. An arrow shows the sort order (ascending or
descending), which you can reverse by clicking the column heading again.
 You can search for specific items in the list by typing in the field above the accounts
list. To choose the search criteria, use the Search (magnifying glass) pop-up menu.
To work with accounts, select them. Settings for the selected accounts appear in the
pane to the right of the list. Available settings vary, depending on which pane you’re
viewing.
Listing Accounts in the Local Directory Domain
When you list accounts in the local directory domain, you list all local accounts. These
local accounts can only be accessed by users of the local computer or server, not by
users of client computers.
Services and programs running on a server can access the server’s local directory
domain. Programs running on a client computer, such as the client computer’s login
window, can’t access the server’s local directory domain.
If a server hosts file services, users with accounts from the server’s local directory
domain can authenticate with the file services.
46 Chapter 3 Getting Started with Workgroup Manager
Page 47

User accounts from the server’s local directory domain can’t be used to authenticate in
the login window on client computers, because the login window is a process running
on the client computer.
To list accounts in a server’s local directory domain:
1 In Workgroup Manager, connect to the server hosting the domain; then click the globe
icon and choose Local.
For servers running Mac OS X Server v10.5 or later, the local directory domain is listed
as /Local/Default.
2 Choose from the following:
 To view user accounts, click the Users button.
 To view group accounts, click the Groups button.
 To view computer accounts, click the Computers button.
 To view computer groups, click the Computer Groups button.
3 To work with a particular account, select it.
Changing account settings or preferences requires server administrator privileges, so
you may need to click the lock to authenticate.
Listing Accounts in Search Policy Directory Domains
A computer’s search policy specifies which directory domains Open Directory can
access. The search policy also specifies the order in which Open Directory accesses
directory domains. By listing accounts in a search policy, you list the accounts on all
directory domains in the search policy.
You can’t edit accounts when listing accounts in a search policy.
For more information about how to set up search policies, see Open Directory
Administration.
To list accounts in search policy domains of the server you’re working with:
1 In Workgroup Manager, connect to a server that has a search policy containing the
directory domains of interest.
2 Click the globe icon and choose Search Policy.
3 Choose from the following:
 To view user accounts, click the Users button.
 To view group accounts, click the Groups button.
 To view computer accounts, click the Computers button.
 To view computer groups, click the Computer Groups button.
Chapter 3 Getting Started with Workgroup Manager 47
Page 48

Listing Accounts in Available Directory Domains
Using Workgroup Manager, you can list user accounts, group accounts, computer
accounts, and computer groups residing in any available directory domain accessible
from the server you’re connected to.
Available directory domains are not the same as directory domains in a search policy.
A search policy consists of the directory domains a server searches routinely when it
needs to retrieve accounts. However, the same server might be configured to access
directory domains that haven’t been added to its search policy.
To learn how to configure access to directory domains, see Open Directory
Administration.
To list accounts in a directory domain accessible from a server:
1 In Workgroup Manager, connect to a server where you can access the directory
domains.
2 Click the globe icon and then choose the domain where the user’s account resides.
If the directory domain is not listed, add it to the pop-up menu by choosing Other. In
the dialog that appears, select the domain and then click OK.
3 Choose from the following:
 To view user accounts, click the Users button.
 To view group accounts, click the Groups button.
 To view computer accounts, click the Computers button.
 To view computer groups, click the Computer Groups button.
4 To work with a particular account, select it.
Changing the account requires domain administrator privileges, so you might need to
click the lock to authenticate.
Refreshing Account Lists
If more than one administrator makes changes to directory domains, make sure you’re
viewing the current list of user accounts, group accounts, computer accounts, and
computer groups by refreshing the lists.
To refresh account lists, click Refresh in the toolbar. Alternatively, click the globe icon
and then choose the directory domain you’re working in from the pop-up menu.
Finding Specific Accounts in a List
After you’ve displayed a list of accounts in Workgroup Manager, you can filter the list to
find particular users or groups.
You can choose from several filters:
 Name Contains
48 Chapter 3 Getting Started with Workgroup Manager
Page 49

 Name Starts With
 Name Ends With
 Name Is
 ID Is
 ID Is Greater Than
 ID Is Less Than
 Comment Contains
 Keyword Contains
To filter items in the list of accounts:
1 After listing accounts, click the Users, Groups, Computers, or Computer Groups button.
2 Click the Search (magnifying glass) pop-up menu, choose an option to describe what
you want to find, and then type search terms in the search field.
The original list is replaced by items that satisfy your search criteria. If you enter a user
name, both full and short user names are searched. If you enter a group name, short
group names are searched.
3 When the domains you’re working with contain thousands of accounts, choose
Workgroup Manager > Preferences and do the following:
To do this Do this
Avoid listing accounts until a filter is
specified
List all accounts in the selected directory
domain
Specify the maximum number of
accounts to list
Select “Limit search results to requested records.”
Type “*” (without quotes) in the search field.
Select “List a maximum of n records,” and then enter a
number no greater than 32,767.
Using Advanced Search
Use the Search button in the toolbar to locate specific users or groups by searching
several fields relevant to them. You can then batch-edit these search results. For more
information about batch editing, see “Editing Multiple Accounts Simultaneously” on
page 51.
You can search across several fields:
 Record Name
 Real Name
 User ID
 Comment
 Keyword
 Group ID
Chapter 3 Getting Started with Workgroup Manager 49
Page 50

There are several field options:
 Is less than
 Is greater than
 Is
 Contains
To locate users or groups in the Accounts or Preferences panes:
1 In the Workgroup Manager toolbar, click Search.
You can also click the Search (magnifying glass) button in the search field above the
accounts list and then choose Advanced Search.
2 Choose a field to search, a field option, and then enter the text you want to search.
3 Click the Add (+) button to add search criteria.
4 Save, rename, or delete a preset by using the Search Presets pop-up menu.
5 After you define your search, click Search Now.
After receiving search results, you can clear the search to revert to your default display
or edit the search to refine it further. While editing the search, you can save the search
as a preset for later use.
Sorting Users and Groups
After displaying a list of accounts in Workgroup Manager, click a column heading to
sort entries using the values in that column. Click the heading again to reverse the sort
order.
Shortcuts for Working with Accounts
Workgroup Manager provides shortcuts for applying the same settings to new or
existing accounts. You can also import user and group account information from a file.
Using Presets
You can select settings for a user account, group account, or computer group, and save
them as presets. Presets work like templates, allowing you to apply predefined settings
to a new account. Using presets, you can easily set up multiple accounts with similar
settings.
You can only use presets during account creation. You can’t use a preset to modify an
existing account. You can use presets when creating accounts manually, or when
importing them from a file.
If you change a preset after it has been used to create an account, accounts already
created using the preset are not updated to reflect those changes.
50 Chapter 3 Getting Started with Workgroup Manager
Page 51

For more information about how to create presets, see “Creating a Preset for User
Accounts” on page 61.
Editing Multiple Accounts Simultaneously
You can edit settings (if they don’t need to be unique) for multiple user accounts,
group accounts, or computer groups at the same time. Simultaneously editing multiple
accounts is referred to as batch editing.
There are two ways to simultaneously edit accounts: select several accounts in the
accounts list, or use the batch edit feature in the Advanced Search dialog.
Unlike when you select several accounts, the batch edit feature allows you to preview
and edit search results before applying changes, and you can view changes and errors
after applying more changes.
There are several ways to select multiple accounts:
 To select a range of accounts, hold down the Shift key while clicking.
 To select accounts individually, hold down the Command key while clicking.
 To deselect accounts, choose Edit > Select All and then Command-click individual
accounts.
Although you can simultaneously edit most account settings for multiple users, some
settings must be made for individual users. For example, you can’t assign the same
name, short name, or user ID to multiple users. Workgroup Manager disables fields
where you must provide unique values.
If a setting is not the same for two or more accounts, you may see a mixed-state slider,
radio button, checkbox, text field, pop-up menu, or list:
Interface element Mixed-state appearance
Sliders, radio buttons, and
checkboxes
Text fields Either the term “Varies” or “...” appears in the text field
Pop-up menu The term “--Varies--” appears in the pop-up menu
Lists The term “Data Varies” appears in the list
A dash, which indicates that the setting is not the same for all
selected accounts
The mixed-state interface element also appears when you do the following:
 Edit managed preferences that were originally set in Mac OS X v10.4 or earlier
 Change a preference in the preference editor that corresponds to an interface
element
If you choose a new setting for a mixed-state setting, every account has the new
setting.
Chapter 3 Getting Started with Workgroup Manager 51
Page 52

For example, suppose you select three group accounts that each have different settings
for the Dock size. When you look at the Dock Display preference pane for these
accounts, the Dock Size slider is centered and has a dash on it. If you change the
position of the Dock Size slider to Large, all selected accounts then have a large-size
Dock.
To batch-edit accounts that match specific criteria:
1 In Workgroup Manager, select Accounts or Preferences.
2 Click the globe icon below the toolbar and choose the directory domain that contains
the accounts you want to edit.
3 To authenticate, click the lock and enter the name and password of a directory domain
administrator.
4 In the toolbar, click Search.
You can also click the magnifier in the search field above the accounts list and then
choose Advanced Search.
5 To enter search criteria, choose the field to search and the field option, enter the text
you want to search, and then click the Add (+) button to add additional search criteria.
6 Select “Perform a batch edit on the search results.”
7 To create a list of accounts affected when you save batch edits, select “Preview and edit
search results before applying changes.”
8 To create a list of accounts and changes made to each of those accounts after saving
batch edits, select “Display postview of changes or errors.”
9 Click Continue.
10 Change account information or preference settings, and then click Apply Now.
If a field is disabled, you can’t edit the field while multiple user accounts are selected.
11 If you selected “Preview and edit search results before applying changes,” a dialog
appears listing all accounts affected by the batch edit. To remove an account, select the
account, and then click Remove Item. When the dialog lists only the accounts you want
to edit, click Apply.
If you perform more batch edits using the same query, the removed account returns to
this list.
12 If you selected “Display postview of changes errors,” a dialog appears listing the batch-
edit results, including the changed records and fields. To save a text log of the batchedit results, click Save. Click OK.
13 To stop batch editing, click Clear.
52 Chapter 3 Getting Started with Workgroup Manager
Page 53

Importing and Exporting Account Information
You can use XML or character-delimited text files to import and export user and group
account information. Importing information can make it easier to set up many
accounts quickly. Exporting information to a file is useful for record-keeping. To back up
account information with passwords intact, archive the directory.
For more information, see the appendix, “Importing and Exporting
Account Information.”
Chapter 3 Getting Started with Workgroup Manager 53
Page 54

54 Chapter 3 Getting Started with Workgroup Manager
Page 55

4 Setting Up User Accounts
4
This chapter tells you how to set up, edit, and manage user
accounts.
User accounts give users unique identities on your network and allow you to manage
those users.
You can use Workgroup Manager to view, create, edit, and delete user accounts.
To view user accounts in Workgroup Manager, click the Users button above the
accounts list.
About User Accounts
A user account stores data that Mac OS X Server uses to validate a user’s identity and
provide services to the user.
Where User Accounts Are Stored
User accounts, group accounts, computer accounts, and computer groups are stored in
a directory domain, available to any Mac OS X computer. A directory domain can reside
on a Mac OS X computer (for example, an Open Directory domain or other read/write
directory domain), or it can reside on a non-Apple server (for example, a non-Apple
LDAP or Active Directory server).
For Windows file service and other services, you can store user accounts in any
directory domain accessible from the server that needs to authenticate users for a
service.
If the user account is used for Windows domain login from a Windows computer, you
must store it in the LDAP directory of the Mac OS X Server that is the primary domain
controller (PDC), or in a copy of the LDAP directory on a backup domain controller
(BDC).
55
Page 56

A Windows user account that is not stored in the PDC server’s LDAP directory can be
used to access other services. For example, Mac OS X Server can authenticate users
with accounts in the server’s local directory domain for the server’s Windows file
service.
Mac OS X Server also authenticates users with accounts on other directory systems,
such as an Open Directory master on another Mac OS X Server system, or Active
Directory on a Windows server.
For complete information about the different kinds of directory domains, see Open
Directory Administration.
Predefined User Accounts
The following table describes user accounts that are created when you install Mac OS X
Server (unless otherwise indicated). For a complete list, open Workgroup Manager and
choose View > Show System Users and Groups.
Predefined user name Short name User ID Use
MySQL Server mysql 74 The user that the MySQL database server uses for
its processes that handle requests.
sshd Privilege
separation
System Administrator root 0 A user with no protections or restrictions.
System Services daemon 1 A legacy UNIX user.
Unknown User unknown 99 A user with no login or password. When files or
Unprivileged User nobody -2 This user was originally created so system services
World Wide Web Server www 70 The nonprivileged user that Apache uses for its
sshd 75 The user for the sshd child processes that process
network data.
volumes have no real owner, they are assigned
unknown as their owner.
didn’t need to run as System Administrator. Now
service-specific users such as World Wide Web
Server are often used for this purpose.
processes that handle requests.
56 Chapter 4 Setting Up User Accounts
Page 57

Administering User Accounts
You can view, create, edit, and delete user accounts stored in various kinds of directory
domains.
Creating User Accounts
To create a user account in a directory domain, you must have administrator privileges
for the domain.
To create user accounts in an LDAPv3 directory on a non-Apple server, use Directory
Utility to map the LDAPv3 directory attributes to Open Directory user and group
attributes. For more information about user account elements that may need to be
mapped, see “Understanding What You Can Import and Export” on page 251.
To create users in an Active Directory domain, use Active Directory administration tools
on a Windows computer. You can’t use Workgroup Manager to create user accounts,
group accounts, computer accounts, or computer groups in a standard Active Directory
domain. If you extend the schema of the Active Directory domain, you can create
computer groups in Active Directory.
To create user accounts for Windows users, create them on a Mac OS X Server PDC,
which creates them in the server’s LDAP directory. Windows users with accounts on the
PDC server can log in to the Windows domain from a Windows workstation. These user
accounts can be used to authenticate to Windows file service and other services, and to
Mac OS X computers on the network.
You can create user accounts in the Mac OS X Server PDC LDAP directory but not in a
BDC read-only LDAP directory. If you have a BDC, the PDC server replicates the new
accounts to the BDC.
If you create user accounts in a server’s local directory domain, you can only
authenticate for services provided by that server. You can’t use these accounts to log in
to a Mac OS X client computer or to perform Windows domain login. However,
Windows users can authenticate with Windows file service, mail service, and other
platform-neutral services.
For instructions on mapping LDAPv3 attributes or connecting to Active Directory, see
Open Directory Administration.
To create a user account:
1 In Workgroup Manager, click Accounts.
2 Make sure the directory services of the Mac OS X Server computer you’re using are
configured to access the directory domain.
For instructions, see Open Directory Administration.
Chapter 4 Setting Up User Accounts 57
Page 58

3 Click the globe icon and then choose the domain where you want the user’s account to
reside.
For Mac OS X Server v10.5 or later, Local and /Local/Default refer to the local directory
domain.
4 To authenticate, click the lock and enter the name and password of a directory domain
administrator.
5 Choose Server > New User or click New User in the toolbar.
6 In the panes provided, specify settings for the user.
For details, see “Working with Basic Settings” on page 63 through “Working with
Windows Settings” on page 85.
You can also use a preset or an imported file to create a user account. For details, see
“Using Presets to Create Accounts” on page 62 and “Using Workgroup Manager to
Import Accounts” on page 253.
From the Command Line
You can also create user accounts using the dscl command in Terminal. For more
information, see the users and groups chapter of Command-Line Administration.
Editing User Account Information
You can use Workgroup Manager to change a user account that resides in an Open
Directory domain, the local directory domain, or other read/write directory domain.
You can modify accounts in an Open Directory domain if you’re authorized to
administer the directory domain. You don’t need server administrator privileges but
your user ID must have limited or full administrative privileges (which are set in the
Privileges pane of Accounts in Workgroup Manager). For more information, see
“Working with Privileges” on page 70.
To make changes to a user account:
1 In Workgroup Manager, click Accounts.
2 Make sure that the directory services of the Mac OS X Server computer you’re using are
configured to access the desired directory domain.
For instructions, see Open Directory Administration.
3 Click the globe icon and then choose the domain where the user’s account resides.
If the directory domain is not listed, add it to the pop-up menu by choosing Other. In
the dialog that appears, select the domain and then click OK.
4 To authenticate, click the lock and enter the name and password of a directory domain
administrator.
5 Click the Users button and select the user account.
6 In the panes provided, edit settings for the user account.
58 Chapter 4 Setting Up User Accounts
Page 59

For details, see “Working with Basic Settings” on page 63 through “Working with
Windows Settings” on page 85.
From the Command Line
You can also edit user account information using the dscl command in Terminal. For
more information, see the users and groups chapter of Command-Line Administration.
Working with Read-Only User Accounts
Use Workgroup Manager to review information about user accounts stored in read-only
directory domains. Read-only directory domains include LDAPv2 domains, LDAPv3
domains not configured for write access, and BSD configuration files.
To work with a read-only user account:
1 In Workgroup Manager, click Accounts.
2 Make sure that the directory services of the Mac OS X Server computer you’re using are
configured to access the directory domain where the account resides.
For information about using Directory Utility to configure server connections, see Open
Directory Administration. For information about the user account elements that need to
be mapped, see the appendix, “Importing and Exporting Account Information.”
3 Click the globe icon and choose the directory domain where the user’s account resides.
4 Review the user’s account settings using the panes provided.
For details, see “Working with Basic Settings” on page 63 through “Working with
Windows Settings” on page 85.
Working with Guest Users
You can set up some services to support guest users, who are not authenticated
because they don’t have a valid user name or password. You don’t need to create a user
account to support guest users.
The following services can be set up to support guest access:
 Apple file service. See File Services Administration.
 FTP service. See File Services Administration.
 Web service. See Web Technologies Administration.
 Windows services. See Open Directory Administration.
Users who connect to a server anonymously are restricted to files, folders, and websites
with permissions set to Everyone.
Another kind of guest user account is a managed user account that you can configure
for easy setup of public or kiosk computers. For more about these kinds of user
accounts, see Chapter 10, “Managing Preferences.”
Chapter 4 Setting Up User Accounts 59
Page 60

Working with Windows User Accounts
Use Workgroup Manager to change passwords, password policies, and other settings in
Windows user accounts.
The user accounts can reside in a server’s local directory domain, a Mac OS X Server
PDC LDAP directory, or another directory system that allows read-write access (not
read-only access) such as an Open Directory master LDAP directory or Active Directory
on a Windows server.
You can change the user account settings in the Mac OS X Server PDC LDAP directory,
but not in a BDC read-only LDAP directory. If you have a BDC, the PDC server replicates
the changes to the BDC.
Deleting a User Account
You can use Workgroup Manager to delete a user account stored in an Open Directory
domain, the local directory domain, or from any other read/write directory domain.
WARNING: You cannot undo this action.
Deleting a user account also deletes all of the user’s mail.
To delete a user account using Workgroup Manager:
1 In Workgroup Manager, click Accounts.
2 Select the user account you want to delete.
3 To authenticate, click the lock and enter the name and password of a directory domain
administrator.
4 Choose Server > Delete Selected User or click the Delete icon in the toolbar.
From the Command Line
You can also delete a user account using the dscl command in Terminal. For more
information, see the users and groups chapter of Command-Line Administration.
Disabling a User Account
To disable a user account, you can:
 Deselect the “User can access account” option in the Basic pane in Workgroup
Manager.
 Delete the account.
 Change the user’s password to an unknown value.
 Set password options to disable login. This applies to user accounts with the
password type Open Directory or Shadow Password.
60 Chapter 4 Setting Up User Accounts
Page 61

From the Command Line
You can also disable a user account using the dscl and pwpolicy commands in
Terminal. For more information, see the users and groups chapter of Command-Line
Administration.
Working with Presets
Presets are templates used to define attributes that apply to new user, group, or
computer group accounts.
Creating a Preset for User Accounts
You can create presets to use when creating user accounts in a directory domain.
Presets are stored in the directory domain you’re currently viewing. If you change
directory domains, the presets you created in the other directory domain are not
available.
To create a preset for user accounts:
1 In Workgroup Manager, click Accounts.
2 Click the globe icon and then choose the domain where the user’s account resides.
3 To authenticate, click the lock and enter the name and password of a directory domain
administrator.
4 To create a preset using data in an existing user account, open the account; to create a
preset from scratch, create a user account.
5 If you’re basing the preset on an existing account, fill in the fields with values you want
new user accounts to inherit and then delete values you don’t want to specify in
advance.
The following attributes can be defined in a user-account preset: simultaneous login,
default shell, comment, primary group ID, group membership list, home folder settings,
disk quota, mail settings, and print settings.
6 Click Preferences.
7 Configure settings you want the preset to define, and then click Accounts.
After configuring preference settings for a preset, you return to the Accounts settings
to save the preset.
8 From the Presets pop-up menu, choose Save Preset, enter a name for the preset, and
click OK.
The preset is saved to the current directory domain.
Chapter 4 Setting Up User Accounts 61
Page 62

Using Presets to Create Accounts
Presets provide a quick way to apply settings to a new account. After applying the
preset, you can continue to modify settings for the new account, if necessary.
You can use presets with user, group, and computer group accounts.
Presets are stored in the directory domain you’re viewing. If you change directory
domains, the presets you created in the other directory domain are not available.
When importing accounts, you can apply a preset to the imported account. For more
information, see “Using Workgroup Manager to Import Accounts” on page 253.
To create an account using a preset:
1 In Workgroup Manager, click Accounts.
2 Click the globe icon and then choose the directory domain where you want the new
account to reside.
Make sure the directory domain you choose contains the preset you want to use.
3 To authenticate, click the lock and then enter the name and password of a directory
domain administrator.
4 Click the Users, Groups, or Computer Groups button.
5 From the Presets pop-up menu, choose a preset.
6 To create accounts, click New User, New Group, or New Computer Group.
7 Add or update attribute values.
Renaming Presets
You can name presets to help remind you of template settings or to identify the type of
user account, group account, or computer group that the preset is best suited for.
To rename a preset:
1 In Workgroup Manager, click Accounts.
2 Click the globe icon and then choose the directory domain that has the preset you
want to rename.
3 To authenticate, click the lock and enter the name and password of a directory domain
administrator.
4 From the Presets pop-up menu, choose Rename Preset.
5 Choose a preset from the “Rename preset” pop-up menu, enter a name, and then click
OK.
Editing Presets
When you change a preset, existing accounts that were created with it are not updated
to reflect the changes.
62 Chapter 4 Setting Up User Accounts
Page 63

You edit a preset by using it to create an account, changing fields defined by the
preset, and then saving the preset.
To edit a preset:
1 In Workgroup Manager, click Accounts.
2 Click the globe icon and then choose the directory domain with the preset you want to
edit.
3 To authenticate, click the lock and enter the name and password of a directory domain
administrator.
4 Click the Users, Groups, or Computer Groups button.
5 From the Presets pop-up menu, choose a preset.
6 Click New User, New Group, or New Computer Group to create accounts.
7 Change account settings that you want to save to the preset.
8 After completing your changes, choose Save Preset from the Presets pop-up menu,
enter the name of the preset you want to change, click OK, and then click Replace.
Deleting a Preset
If you no longer need a particular preset, you can delete it.
To delete a preset:
1 In Workgroup Manager, click Accounts.
2 Click the globe icon and then choose the directory domain with the preset you want to
delete.
3 To authenticate, click the lock and enter the name and password of a directory domain
administrator.
4 From the Presets pop-up menu, choose Delete Preset.
5 Select the preset you want to delete and click Delete.
Working with Basic Settings
Basic settings are a collection of attributes that must be defined for all users.
In Workgroup Manager, use the user account’s Basic pane to work with basic settings.
Modifying User Names
The user name is the long name for a user, such as Mei Chen or Dr. Anne Johnson. (In
addition to the long name, sometimes the user name is referred to as the full name or
the real name.) Users can log in using the user name or a short name associated with
their accounts.
Chapter 4 Setting Up User Accounts 63
Page 64

A user name can contain no more than 255 bytes. Because long user names support
various character sets, the maximum number of characters for long user names ranges
from 255 Roman characters to as few as 63 characters in character sets where
characters occupy up to 4 bytes.
Use Workgroup Manager to edit the user name of an account stored in an Open
Directory domain, the local directory domain, or other read/write directory domain.
You can also use Workgroup Manager to review the user name in any directory domain
accessible from the server you’re using.
To work with the user name using Workgroup Manager:
1 In Workgroup Manager, click Accounts.
2 Select the user account you want to work with.
To select the account, click the globe icon, choose the directory domain where the
account resides, and then select the user account in the accounts list.
3 To authenticate, click the lock and enter the name and password of a directory domain
administrator.
4 In the Name field (in the Basic pane), review or edit the user name.
Initially, the value of the user name is “Untitled #,” where # is the sequential number
generated after the last generated number for an existing untitled user.
Avoid assigning the same name to more than one user. Workgroup Manager doesn’t let
you assign the same name to different users in any domain or in a domain in the
search policy. However, it can’t detect whether duplicates exist in other domains.
Modifying Short Names
A short name is an abbreviated name for a user, such as “mchen” or “annejohnson.”
Users can log in using a short name or the user name associated with his or her
accounts. The short name is used by Mac OS X for home folders.
When Mac OS X creates a user’s local or network AFP home folder, it names the
directory after the user’s short name. For more information about home folders, see
Chapter 7, “Setting Up Home Folders.”
You can have as many as 16 short names associated with a user account. For example,
you might want to use multiple short names as aliases for mail accounts. The first short
name is the name used for home folders and legacy group membership lists. Don’t
reassign that name after you save the user account.
A short user name can contain as many as 255 Roman characters. However, for clients
using Mac OS X v10.1.5 and earlier, the first short user name must be eight characters or
fewer.
64 Chapter 4 Setting Up User Accounts
Page 65

For the first short user name, use only these characters (subsequent short names can
contain any Roman character):
 a through z
 A through Z
 0 through 9
 _ (underscore)
 - (hyphen)
Typically, short names contain eight or fewer characters.
Initially, the value of the first short name is “untitled_#,” where # is the sequential
number generated after the last generated number for an existing untitled user.
Avoid assigning the same name to more than one user. Workgroup Manager doesn’t let
you assign the same name to different users in a domain or in a domain search policy.
However, it can’t detect whether duplicates exist in other domains.
After the user’s account is saved you can’t change the first short name but you can
change any of the other short names.
Use Workgroup Manager to edit the short name of an account stored in an Open
Directory domain, the local directory domain, or other read/write directory domain.
You can also use Workgroup Manager to review the short name in any directory
domain accessible from the server you’re using.
To work with a user short name using Workgroup Manager:
1 In Workgroup Manager, click Accounts.
2 Select the user account you want to work with.
To select the account, click the globe icon, choose the directory domain where the
account resides, and then select the user account.
3 To authenticate, click the lock and enter the name and password of a directory domain
administrator.
4 Click Basic, then in the Short Names field review or edit the short names:
To do this Do this
Change a short name Double-click the short name and then replace it.
Add a short name Double-click the blank entry at the bottom of the short name list
and then enter a short name.
Choosing Stable Short Names
When you create a user account, assign the account a short name that won’t be
changed. After creating the account, you can’t use the Basic pane of Workgroup
Manager to change a user’s first short name.
Chapter 4 Setting Up User Accounts 65
Page 66

To change a user’s first short name, create a new account for the user in the same
directory domain that contains the new first short name and retain all other account
information (user ID, primary group, home folder, and so on). Make sure you use the
same GUID for the new account. Then disable the login for the old user account.
After you disable the old login, the user can log in using the changed name but will
have the same access to files and other network resources as before and will belong to
the same groups.
For more information, see “Working with GUIDs” on page 87, and “Disabling a User
Account” on page 60.
Avoiding Duplicate Names
A user’s short name is used by the login window. This means that having multiple users
with the same short name causes a conflict. Although you can’t create multiple users
with the same short name in the Basic pane of Workgroup Manager, it’s still possible to
create multiple users with the same short name when you use command-line tools or
the Inspector.
If multiple user accounts have the same long user name on a Mac OS X computer, the
login window displays a list of users to choose from.
If two users have the same first short user name, the login window only recognizes and
authenticates the first matching user account it finds in the sequence of directory
domains specified by the computer’s search policy, as set in Directory Utility.
If a local user and a network user have the same first short user name, the local user
always takes precedence, preventing the network user from logging in to the
computer.
In groups created using Mac OS X versions earlier than 10.4, group membership is
determined by the user’s first short name and group ID (GID). If multiple users have the
same first short name, then they have the same group memberships.
Groups created using Mac OS X Server v10.4 or later determine group membership
using a GUID and a combination of the user’s short name and GID. For information
about GUIDs, see “Working with GUIDs” on page 87.
If you don’t upgrade legacy groups, the groups still determine membership by only the
user’s first short name and GID. For instructions on upgrading legacy groups, see
“Upgrading Legacy Groups” on page 94.
To ensure that users have the correct legacy group membership, do not use duplicate
user short names.
66 Chapter 4 Setting Up User Accounts
Page 67

Modifying User IDs
A user ID is a number that uniquely identifies a user. Mac OS X computers use the
user ID to track a user’s folder and file ownership.
When a user creates a folder or file, the user ID is stored as the ID of the user who
created the folder or file. This user ID has read and write permissions to the folder or file
by default.
The user ID should be a unique string of digits from 500 through 2,147,483,647. It is risky
to assign the same user ID to different users, because two users with the same user ID
have identical directory and file permissions.
User IDs between 0 and 100 are reserved for system use and should not be deleted or
modified except to change the password of the root user. Accounts with user IDs
below 100 aren’t listed in the login window.
In general, after user IDs are assigned and users start creating files and folders, you
shouldn’t change user IDs. However, one possible scenario where you might need to
change a user ID is when merging users that were created on different servers onto a
new server or cluster of servers. The same user ID might still be associated with a
different user on the previous server.
When you create a user account in a shared directory domain, Workgroup Manager
assigns a user ID. The value assigned is an unused user ID (1025 or greater) in the
server’s search policy. (Users created using the Accounts pane of System Preferences
are assigned user IDs starting at 501.)
You can use Workgroup Manager to edit the user ID of an account stored in an Open
Directory domain or in the local directory domain. You can also use Workgroup
Manager to review the user ID in any directory domain accessible from the server
you’re using.
To change a user ID in Workgroup Manager:
1 In Workgroup Manager, click Accounts.
2 Select the user account you want to work with.
To select an account, click the globe icon above the accounts list, choose the directory
domain where the user’s account resides, and then select the user.
3 To authenticate, click the lock and enter the name and password of a directory domain
administrator.
4 In the Basic pane, specify a value in the User ID field.
Chapter 4 Setting Up User Accounts 67
Page 68

Make sure the value is unique for all directory domains set in the search policy of
computers that the user logs in to. Workgroup Manager warns you if you change the
value to another user ID in the same directory domain. You can quickly find all existing
user IDs by choosing View > “Show System Users and Groups,” and then clicking the
UID column header in the accounts list to sort the accounts by user ID.
Assigning a Password to a User
When you create a user account, you must assign a password to the user. You can reset
the user’s password by replacing the password field with a new password.
For information about choosing secure passwords, see Mac OS X Security Configuration.
When you export user accounts using Workgroup Manager, password information isn’t
exported. If you want to set passwords, you can modify the export file before you
import it, or you can set passwords after importing. You can also manually create a
text-delimited import file and include passwords in it.
For more information about importing user accounts, see “Understanding What You
Can Import and Export” on page 251.
To assign a password:
1 In Workgroup Manager, click Accounts.
2 Select the user account you want to work with.
To select an account, click the globe icon above the accounts list, choose the directory
domain where the user’s account resides, and then select the user.
3 To authenticate, click the lock and enter the name and password of a directory domain
administrator.
4 In the Basic pane, enter a password in the Password field, enter it again in the Verify
field, and then click Save.
Assigning Administrator Privileges for a Server
A user who has server administrator privileges controls most of the server’s
configuration settings and can use applications (such as Server Admin) that require a
user to be a member of the server’s administrator group.
You can use Workgroup Manager to assign server administrator privileges to a user
with an account stored in an Open Directory domain. You can also use Workgroup
Manager to review the server administrator privileges in any directory domain
accessible from the server you’re using.
To set server administrator privileges in Workgroup Manager:
1 Log in to Workgroup Manager by specifying the name or IP address of the server you
want to grant administrator privileges for.
2 Click Accounts.
68 Chapter 4 Setting Up User Accounts
Page 69

3 Click the globe icon and choose Local.
4 Click the lock and enter the name and password of a local administrator.
5 Click the globe icon and choose the directory domain where the user’s account resides.
6 Click the lock and enter the name and password of a directory domain administrator.
7 To grant server administrator privileges, in the Basic pane, select “User can administer
this server.”
From the Command Line
You can also set server administrator privileges using the dscl command in Terminal.
For more information, see the users and groups chapter of Command-Line
Administration.
Choosing a User’s Login Picture
You can change a user’s login picture using Workgroup Manager. This picture
represents the user in the login window, in the Directory application, and in group web
services, and is the default buddy icon for the user in iChat.
Although you can use an image file of any size, you should use an image that is 64 x 64
pixels in size. If you use a larger image, resize and crop it in Workgroup Manager.
To change a user’s login picture:
1 In Workgroup Manager, click Accounts.
2 Select the user account you want to work with.
To select an account, click the globe icon above the accounts list, choose the directory
domain where the user’s account resides, and then select the user.
3 To authenticate, click the lock and enter the name and password of a directory domain
administrator.
4 In the Basic pane, click the picture area in the top right and then choose Edit Picture to
open the User Picture window.
5 In the User Picture window, click Choose, select an image file, and then click Open.
As an alternative, you can drag an image file from the Finder or Safari and drop it into
the picture area in Workgroup Manager, or in the main area of the User Picture window.
If you have iSight, you can click the camera button to take a snapshot.
6 Use the slider to zoom in and out of your picture and drag your picture around so the
focal point is in the center square, and then click Set.
The user’s picture is the image in the center square.
7 Click Save.
Chapter 4 Setting Up User Accounts 69
Page 70

Working with Privileges
You can give a user account full or limited control over domain administration. When
giving limited administrative control, you can choose which users and groups the user
can administer, and what kind of control the user has over those users and groups.
You can change a user’s domain privileges for Open Directory domains. You can’t
change privileges for a local user account or an account stored in domains that are not
Open Directory.
Full and limited administrators use Workgroup Manager to administer and manage
users.
In Workgroup Manager, use the user account’s Privileges pane to set privileges.
Removing Administrative Privileges from a User
Users with no administrative privileges can use Workgroup Manager to view (but not
change) accounts in a directory domain.
You can change a user’s domain privileges for LDAPv3 directory domains. You can’t
change privileges for a local user account or an account stored in a non-LDAPv3
directory domain.
To remove a user’s administrative privileges:
1 In Workgroup Manager, click Accounts.
2 Select the user account you want to work with.
To select an account, click the globe icon above the accounts list, choose the directory
domain where the user’s account resides, and then select the user.
3 To authenticate, click the lock and enter the name and password of a directory domain
administrator.
4 In Privileges, choose None from the “Administration capabilities” pop-up menu and
click Save.
Giving a User Limited Administrative Capabilities
You can allow users who don’t need full administrative control the ability to perform
common administrative tasks by giving them limited administrative control.
For example, you might want student lab assistants to reset other students’ passwords
but not to edit the groups they belong to. Similarly, you might want school staff to edit
student user information but not their managed preferences.
When a user has limited administrative control, after authenticating in Workgroup
Manager, the Workgroup Manager interface only allows users to perform tasks assigned
to the limited administrator.
70 Chapter 4 Setting Up User Accounts
Page 71

The following tasks are available to limited administrators:
Task Description
Manage user passwords Change a user’s password in the user account’s Basic pane. A
limited administrator can’t change a full administrator’s password.
Edit managed preferences Change managed preference settings.
Edit user information Edit the user account’s Info pane.
Edit group membership Edit the user account’s Groups pane or the group account’s
Members pane.
If you give a user different administrative capabilities at several account levels, the
capabilities are merged.
For example, let’s say a user named Anne Johnson is a member of the Algebra 101
group, and the Algebra 101 group is a member of the All Classes group. You give
another user, Ravi Patel, the following administrative control:
 “Manage user passwords” rights for All Users and Groups
 “Edit managed preferences” rights for the All Classes group
 “Edit user information” rights for the Algebra 101 group
 “Edit group membership” rights for the Anne Johnson user account
Ravi Patel has all four abilities for Anne Johnson’s user account.
You can change a user’s domain privileges for LDAPv3 directory domains. You can’t
change privileges for a local user account or an account stored in a non-LDAPv3
directory domain.
To add limited administrative capabilities:
1 In Workgroup Manager, click Accounts.
2 Select the user account you want to work with.
To select an account, click the globe icon above the accounts list, choose the directory
domain where the user’s account resides, and then select the user.
3 To authenticate, click the lock and enter the name and password of a directory domain
administrator.
4 In Privileges, choose Limited from the “Administration capabilities” pop-up menu.
5 To control the level of user or group administration, click the Add (+) button and drag
users and groups from the drawer to the “User can administer” list.
6 Select a user or group from the “User can administer” list and then select the
administration capabilities you want the limited administrator to have.
To give administrative control to all users and groups, select “All Users and Groups” and
then select administrative capabilities.
7 Click Save.
Chapter 4 Setting Up User Accounts 71
Page 72

Giving a User Full Administrative Capabilities
A user with full administrative capabilities is also known as a directory domain
administrator. Directory domain administrators can modify any records in the directory
domain and are the only users who can change the passwords of other directory
domain administrators.
You can change a user’s domain privileges for LDAPv3 directory domains. You can’t
change privileges for a local user account or an account stored in a non-LDAPv3
directory domain.
To change a user’s administrative privileges:
1 In Workgroup Manager, click Accounts.
2 Select the user account you want to work with.
To select an account, click the globe icon above the accounts list, choose the directory
domain where the user’s account resides, and then select the user.
3 To authenticate, click the lock and enter the name and password of a directory domain
administrator.
4 In Privileges, from the “Administration capabilities” pop-up menu, choose Full, and then
click Save.
Working with Advanced Settings
Advanced settings include login settings, keywords, password type, and searchable
comments. In Workgroup Manager, use the user account’s Advanced pane to work with
advanced settings.
Enabling a User’s Calendar
If your iCal server enables individual user calendars, you can configure user accounts to
use iCal server. When users use iCal to log into the server, they can access their
calendars.
To enable a user’s calendar:
1 In Workgroup Manager, click Accounts.
2 Select the user account you want to work with.
To select an account, click the globe icon above the accounts list, choose the directory
domain where the user’s account resides, and then select the user.
3 To authenticate, click the lock and enter the name and password of a directory domain
administrator.
4 In Advanced, select “Enable calendaring,” choose a server from the pop-up menu, and
then click Save.
72 Chapter 4 Setting Up User Accounts
Page 73

Allowing a User to Log In to More Than One Computer At a Time
You can allow a managed user to log in to more than one managed computer at a
time, or you can prevent the user from doing so.
Note: Simultaneous login is not recommended for most users. You may want to reserve
simultaneous login privileges for technical staff, teachers, or other users with
administrator privileges. (If a user has a network home folder, that’s where the user’s
application preferences and documents are stored. Simultaneous login can change
these items, and many applications don’t support such changes while the applications
are open.)
You can only disable simultaneous login for users with AFP home folders.
To allow a user to log in to more than one computer at a time:
1 In Workgroup Manager, click Accounts.
2 Select the user account you want to work with.
To select the account, click the globe icon, choose the directory domain where the
account resides, and then select the user account.
3 To authenticate, click the lock and enter the name and password of a directory domain
administrator.
4 Click Advanced.
5 Select “Allow simultaneous login on managed computers.”
Choosing a Default Shell
You can change the default shell that the user uses for command-line interactions with
Mac OS X, such as /bin/tcsh or /bin/bash (the default).
The default shell is used by the Terminal application on the computer that the user is
logged in to, but Terminal has a preference that lets you override the default shell. The
default shell is used by secure shell (SSH) when the user logs in to a remote Mac OS X
computer.
Note: Terminal has a preference that allows the user to override the default shell.
To choose a default shell:
1 In Workgroup Manager, click Accounts.
2 Select the user account you want to work with.
To select the account, click the globe icon, choose the directory domain where the
account resides, and then select the user account.
3 To authenticate, click the lock and enter the name and password of a directory domain
administrator.
Chapter 4 Setting Up User Accounts 73
Page 74

4 To specify the user’s default shell when logging in to a Mac OS X computer, choose a
shell from the Login Shell pop-up menu.
To specify a shell that doesn’t appear in the list, choose Custom and then enter the
path to the shell.
To ensure that a user can’t access the server remotely using the command line, choose
None.
Choosing a Password Type and Setting Password Options
For user accounts in the LDAP directory of an Open Directory server, you can set the
password type to Open Directory or Crypt Password. User accounts in the local
directory domain have a password type of Shadow Password.
When you set the password type to Shadow Password or Open Directory, you can set
several password policy options, including disabling login after a period of inactivity or
failed authentication attempts, or setting password restrictions (such as requiring that
passwords be a certain length or that they be changed at the next login).
If you set the password type to Shadow Password, you can also set security options to
control which authentication methods are used when validating the user’s password.
You can only assign the Open Directory password type if the directory administrator
account that you authenticate with also uses an Open Directory password.
Windows users must have Open Directory passwords for Windows domain login.
For a detailed explanation of password types, password policy options, and security
options, see Open Directory Administration.
To choose a user password type and set password options:
1 In Workgroup Manager, click Accounts.
2 Select the user account you want to work with.
To select the account, click the globe icon, choose the directory domain where the
account resides, and then select the user account in the accounts list.
3 To authenticate, click the lock and enter the name and password of a directory domain
administrator.
4 Click Advanced.
5 From the User Password Type pop-up menu, choose Shadow Password, Open Directory,
or Crypt Password.
When you choose a password type, a prompt might appear requiring you to enter a
password, depending on whether you entered a password in the Basic pane.
If you choose Open Directory or Shadow Password, you can set a password policy for
the selected users by clicking Options, selecting any of the options, and clicking OK.
74 Chapter 4 Setting Up User Accounts
Page 75

If you choose Shadow Password, you can also select authentication methods by
clicking Security.
6 Click Save.
Creating a Master List of Keywords
You can define keywords that enable quick searching and sorting of user accounts.
Using keywords can simplify tasks such as creating groups or editing multiple user
accounts.
Before you begin adding keywords to user records, you must create a master keyword
list. The list of keywords shown in the Advanced pane for a selected user applies only
to that user.
Each directory domain has its own master keyword list. For example, if you add a
keyword to the local directory domain’s master keyword list, it isn’t available in another
directory domain unless you add it to that directory domain’s master keyword list.
To edit the master keyword list:
1 In Workgroup Manager, click Accounts.
2 Select the user account you want to work with.
To select the account, click the globe icon, choose the directory domain where the
account resides, and then select the user account in the accounts list.
3 To authenticate, click the lock and enter the name and password of a directory domain
administrator.
4 Click Advanced and choose from the following:
To do this Do this
View the master keyword list,
which lists all terms available for
use as keywords
Add a keyword to the master list Click the Add (+) button and enter the keyword in the text field.
Remove a keyword from the
master list and from all user and
computer accounts where it
appears
Remove a keyword only from
the master list
Click the Edit (pencil) button. You can access and edit the master
keyword list from any selected user account.
Select the keyword, select “Remove deleted keywords from users
and computers,” and then click the Remove (–) button.
Deselect “Remove deleted keywords from users and computers,”
select the keyword you want to remove, and then click the Remove
(–) button.
5 When you finish editing the master list, click OK.
Applying Keywords to User Accounts
You can remove a keyword from all user accounts that are tagged with that keyword.
However, you can only add keywords to one user account at a time.
Chapter 4 Setting Up User Accounts 75
Page 76

To work with keywords for a user account:
1 In Workgroup Manager, click Accounts.
2 Select the user account you want to work with.
To select the account, click the globe icon, choose the directory domain where the
account resides, and then select the user account in the accounts list.
3 To authenticate, click the lock and enter the name and password of a directory domain
administrator.
4 Click Advanced and choose from the following:
To do this Do this
Add a keyword to the selected
account
Remove a keyword from a
specific user account
Click the Add (+) button to view the list of available keywords,
select one or more keywords in the list, and then click OK.
Select the keyword you want to remove and click the Remove (–)
button.
5 When you finish adding or removing keywords for the selected user account,
click Save.
Editing Comments
You can save a comment in a user’s account to provide information you might need to
help administer a user. A comment can contain no more than 32,767 bytes.
Note: Some character sets use characters that occupy up to 4 bytes. This reduces the
total number of characters you can use.
You can use Workgroup Manager to add a comment to an account stored in an Open
Directory domain, the local directory domain, or other read/write directory domain.
You can also use Workgroup Manager to review the comment in any directory domain
accessible from the server you’re using.
To work with a comment using Workgroup Manager:
1 In Workgroup Manager, click Accounts.
2 Select the user account you want to work with.
To select the account, click the globe icon, choose the directory domain where the
account resides, and then select the user account in the accounts list.
3 To authenticate, click the lock and enter the name and password of a directory domain
administrator.
4 Click Advanced and edit or review the contents of the Comment field.
76 Chapter 4 Setting Up User Accounts
Page 77

Working with Group Settings
Group settings identify the groups a user belongs to. In Workgroup Manager, use the
Group Settings pane in the user’s account to work with group settings.
For information about how to administer group accounts, see Chapter 5, “Setting Up
Group Accounts.”
Choosing a User’s Primary Group
A primary group is the fastest way to determine whether a user has group permissions
for a file. The primary group ID is used by the file system when the user accesses a file
that he or she doesn’t own. The file system checks the file’s group permissions, and if
the primary group ID of the user matches the ID of the group associated with the file,
the user inherits group access permissions.
Important: Don’t rely on primary group membership when assigning file permissions.
Although you can make a primary group a hierarchical group or a parent of hierarchical
groups, the file permissions for the primary group do not propagate. If a user’s primary
group is a hierarchical group or the parent of a hierarchical group, the user is granted
file permissions only for the primary group.
If the user does not belong to other groups, the user belongs to the primary group. If a
user selects a different workgroup at login, the user still retains access permissions from
the primary group.
The primary group ID should be a unique string of digits. By default, the primary group
ID is 20 (which identifies the group as “staff”), but you can change it. The maximum
value for a group ID is 2,147,483,647.
Use Workgroup Manager to define the primary group ID of an account stored in an
Open Directory domain, the local directory domain, or other read/write directory
domain. You can also use Workgroup Manager to review the primary group information
for any directory domain accessible from the server you’re using.
To set a primary group ID using Workgroup Manager:
1 In Workgroup Manager, click Accounts.
2 Select the user account you want to work with.
To select the account, click the globe icon, choose the directory domain where the
account resides, and then select the user account in the accounts list.
3 To authenticate, click the lock and enter the name and password of a directory domain
administrator.
4 Click Groups and then edit or review the Primary Group ID field.
Chapter 4 Setting Up User Accounts 77
Page 78

Workgroup Manager displays long and short names for the group after you enter a
primary group ID (if the group exists and is accessible in the search policy of the server
you’re logged in to).
Reviewing a User’s Group Memberships
You can use Workgroup Manager to review the groups a user belongs to if the user
account resides in a directory domain accessible from the server you’re using.
You can view all groups the user belongs to and the parent groups of those groups.
To review group memberships using Workgroup Manager:
1 In Workgroup Manager, click Accounts.
2 Select the user account you want to work with.
To select the account, click the globe icon, choose the directory domain where the
account resides, and then select the user account in the accounts list.
3 To authenticate, click the lock and enter the name and password of a directory domain
administrator.
4 Click Groups.
Except for the primary group, all other groups the user belongs to are listed in the
Other Groups list.
5 To view parent groups, click Show Inherited Groups.
Parent groups are shown in italics.
Adding a User to a Group
Add a user to a group when you want multiple users to have the same file permissions,
or when you want to manage their Mac OS X preferences using workgroups or
computer groups.
For example, you can have groups for students in a classroom who are not permitted
to use a particular printer, or for the quality control team in a factory that requires
access to the internal reports of different groups.
Groups can include users and groups that are in an Open Directory domain or the local
directory domain. If you use an NFS directory, there is a 16-group limitation.
You can also add users to a group using the Members pane in the group account.
If a user is a direct member of multiple groups, he or she can choose which group to
acquire managed preferences from when logging in. You can manage Login
preferences so that preferences are combined from all workgroups accessible by the
user.
Note: There is no limit to the number of groups a user can belong to.
78 Chapter 4 Setting Up User Accounts
Page 79

To add a user to a group using Workgroup Manager:
1 In Workgroup Manager, click Accounts.
2 Select the user account you want to work with.
To select the account, click the globe icon, choose the directory domain where the
account resides, and then select the user account in the accounts list.
3 To authenticate, click the lock and enter the name and password of a directory domain
administrator.
4 Click Groups and then click the Add (+) button.
This opens a drawer that lists the groups defined in the directory domain you’re
working with.
5 Select the group and then drag it to the Other Groups list in the Groups pane.
Removing a User from a Group
You can use Workgroup Manager to remove a user from a group if the user and group
accounts reside in an Open Directory domain or the local directory domain.
To remove a user from a group using Workgroup Manager:
1 In Workgroup Manager, click Accounts.
2 Select the user account you want to work with.
To select the account, click the globe icon, choose the directory domain where the
account resides, and then select the user account in the accounts list.
3 To authenticate, click the lock and enter the name and password of a directory domain
administrator.
4 Click Groups.
5 Select the groups you want to remove the user from and then click the Remove (–)
button.
You can also remove users from a group by using the Members pane of group
accounts. For more information, see “Removing Group Members” on page 100.
Working with Home Settings
Home settings describe a user’s home folder attributes. If you don’t have a share point
set up to host home folders, you must set one up. To set up share points, use Server
Admin. To set up home folders, use Workgroup Manager.
For information about setting up share points and home folders, see Chapter 7, “Setting
Up Home Folders.”
Chapter 4 Setting Up User Accounts 79
Page 80

Working with Mail Settings
You can create a mail account by specifying mail settings in the user account. To use
the mail service account, the user configures a mail client to identify the user name,
password, mail service, and mail protocol you specify in the mail settings.
In Workgroup Manager, use the Mail pane in the user account to work with mail
settings.
For information about how to set up and manage Mac OS X Server mail service, see
Mail Service Administration.
Enabling Mail Service Account Options
You can use Workgroup Manager to enable mail service and set mail options for a user
account stored in an Open Directory domain or other read/write directory domain. You
can also use Workgroup Manager to review the mail settings of accounts stored in a
directory domain accessible from the server you’re using.
To work with a user’s mail account options using Workgroup Manager:
1 In Workgroup Manager, click Accounts.
2 Select the user account you want to work with.
To select the account, click the globe icon, choose the directory domain where the
account resides, and then select the user account in the accounts list.
3 To authenticate, click the lock and enter the name and password of a directory domain
administrator.
4 Click Mail.
5 To allow the user to use mail service, select Enabled.
6 In the Mail Server fields, enter a valid mail server name or address for the DNS name, or
enter the IP address of the server the user’s mail should be routed to.
Workgroup Manager doesn’t verify this information.
7 In the Mail Quota field, enter a value to specify the maximum number of megabytes for
the user’s mailbox.
A 0 (zero) or empty value means no quota is used.
When the user’s message space approaches or surpasses the mail quota you specify,
mail service displays a message prompting the user to delete unwanted messages to
free up space. The message shows quota information in megabytes (MB).
8 To identify the protocol used for the user’s mail account, select a Mail Access setting:
Post Office Protocol (POP), Internet Message Access Protocol (IMAP), or both.
9 Click Save.
80 Chapter 4 Setting Up User Accounts
Page 81

Disabling a User’s Mail Service
You can use Workgroup Manager to disable mail service for users whose accounts are
stored in an Open Directory domain, the local directory domain, or other read/write
directory domain.
To disable a user’s mail service using Workgroup Manager:
1 In Workgroup Manager, click Accounts.
2 Select the user account you want to work with.
To select the account, click the globe icon, choose the directory domain where the
account resides, and then select the user account in the accounts list.
3 To authenticate, click the lock and enter the name and password of a directory domain
administrator.
4 Click Mail, select None, and then click Save.
Forwarding a User’s Mail
You can use Workgroup Manager to set up mail-forwarding for users whose accounts
are stored in an Open Directory domain or the local directory domain.
To forward a user’s mail using Workgroup Manager:
1 In Workgroup Manager, click Accounts.
2 Select the user account you want to work with.
To select the account, click the globe icon, choose the directory domain where the
account resides, and then select the user account in the accounts list.
3 To authenticate, click the lock and enter the name and password of a directory domain
administrator.
4 Click Mail, select Forward, and then enter the forwarding mail address in the Forward
To field.
Make sure you enter the correct address. Workgroup Manager doesn’t verify that the
address exists.
5 Click Save.
Working with Print Quota Settings
User print settings define the ability of a user to print to accessible Mac OS X Server
print queues.
For information about how to set up print queues, see Print Service Administration.
Chapter 4 Setting Up User Accounts 81
Page 82

In Workgroup Manager, use the Print Quota pane in the user account to work with print
quota settings.
Enabling a User’s Access to All Available Print Queues
You can use Workgroup Manager to allow a user to print to all or some of the
accessible Mac OS X print queues that enforce quotas. To use Workgroup Manager to
enable access to print queues, the user’s account must be stored in an Open Directory
domain or the local directory domain.
To set a user’s print quota for all available print queues enforcing quotas:
1 In Workgroup Manager, click Accounts.
2 Select the user account you want to work with.
To select the account, click the globe icon, choose the directory domain where the
account resides, and then select the user account in the accounts list.
3 To authenticate, click the lock and enter the name and password of a directory domain
administrator.
4 In Print Quota, select “All Queues.”
5 Enter values for the maximum number of pages the user can print in a specific number
of days.
For the settings to take effect, the print service queue must enforce quotas.
6 Click Save.
Enabling a User’s Access to Specific Print Queues
You can use Workgroup Manager to allow a user to print to all or some of the
accessible Mac OS X print queues that enforce quotas. To use Workgroup Manager to
enable access to print queues, the user’s account must be stored in an Open Directory
domain or the local directory domain.
To set a user’s print quota for specific print queues enforcing quotas:
1 In Workgroup Manager, click Accounts.
2 Select the user account you want to work with.
To select the account, click the globe icon, choose the directory domain where the
account resides, and then select the user account in the accounts list.
3 To authenticate, click the lock and enter the name and password of a directory domain
administrator.
4 In Print Quota, select “Per Queue.”
5 If the print queue you want to specify is not on the Queue Name pop-up menu, click
Add, enter the queue name, and then specify the IP address or DNS name of the server
where the queue is defined in the Print Server field.
For your settings to take effect, the print service queue must enforce quotas.
82 Chapter 4 Setting Up User Accounts
Page 83

6 To give the user unlimited printing rights to the queue, select “Unlimited printing”;
otherwise, select “Limit to” and specify the maximum number of pages the user can
print in a specific number of days.
7 Click Save.
Removing a Print Quota For a Queue
If you no longer require a print quota for a queue, you can use Workgroup Manager to
delete the quota for specific users.
To delete specific print quotas, you must manage print settings per queue.
To delete a user’s print quota using Workgroup Manager:
1 In Workgroup Manager, click Accounts.
2 Select the user account you want to work with.
To select the account, click the globe icon, choose the directory domain where the
account resides, and then select the user in the list.
3 To authenticate, click the lock and enter the name and password of a directory domain
administrator.
4 Click Print Quota and then select Per Queue.
5 Choose the user’s print queue that you want to delete from the Queue Name pop-up
menu.
6 Click Delete and then click Save.
Resetting a User’s Print Quota
Occasionally, a user exceeds his or her print quota and needs to print additional pages.
For example, an administrator might want to print a 200-page manual, but the print
quota is only 150 pages. Or a student may exceed his or her quota by printing several
revisions of the same essay.
You can use Workgroup Manager to reset a user’s print quota and allow the user to
continue printing.
You can also extend a user’s page limit without resetting the quota time period by
changing the number of pages allowed for the user. In this way, the time period for the
quota remains the same and is not reset, but the number of pages the user can print
during that period is adjusted for both the current and future print quota periods.
To restart a user’s print quota using Workgroup Manager:
1 In Workgroup Manager, click Accounts.
2 Select the user account you want to work with.
To select the account, click the globe icon, choose the directory domain where the
account resides, and then select the user account in the accounts list.
Chapter 4 Setting Up User Accounts 83
Page 84

3 To authenticate, click the lock and enter the name and password of a directory domain
administrator.
4 Click Print Quota.
5 If you’re managing All Queues, click Restart Print Quota.
6 If you’re managing Per Queue, choose a print queue from the Queue Name pop-up
menu and then click Restart Print Quota.
7 To increase or decrease a user’s page limit, enter a new number in the “Limit to ___
pages” field.
8 Click Save.
Disabling a User’s Access to Print Queues That Enforce Quotas
You can use Workgroup Manager to prevent a user from printing to any accessible
Mac OS X print queues that enforce quotas.
To use Workgroup Manager to disable access to print queues, the user’s account must
be stored in an Open Directory domain or the local directory domain.
To disable a user’s access to print queues enforcing quotas:
1 In Workgroup Manager, click Accounts.
2 Select the user account you want to work with.
To select the account, click the globe icon, choose the directory domain where the
account resides, and then select the user account in the accounts list.
3 To authenticate, click the lock and enter the name and password of a directory domain
administrator.
4 Click Print Quota and then select None.
Working with Info Settings
If a user’s account resides in an LDAPv3 directory domain, it can contain information
imported from Address Book.
Attributes that are tracked in the Info pane include:
 Name
 Address
 Phone number
 Email address
 Chat names
 Homepage URL
 Weblog URL
84 Chapter 4 Setting Up User Accounts
Page 85

Other users can view the information in this pane when they view the user account in
Workgroup Manager and Directory.
To change a user’s info:
1 In Workgroup Manager, click Accounts.
2 Select the user account you want to work with.
To select the account, click the globe icon, choose the directory domain where the
account resides, and then select the user account in the accounts list.
3 To authenticate, click the lock and enter the name and password of a directory domain
administrator.
4 Click Info, enter or change values, and when you finish, click Save.
Working with Windows Settings
Windows users have settings for a Windows home folder, a roaming user profile, and a
Windows login script. You can change these settings in the Windows pane of
Workgroup Manager.
You can change user account settings in the Mac OS X Server PDC LDAP directory but
not in a BDC read-only LDAP directory. If you have a BDC, the PDC server replicates
changes to the BDC.
Changing a Windows User’s Profile Location
You can change where a Windows user’s profile settings are stored. The profile includes
the user’s My Documents folder, favorites (web browser bookmarks), preference
settings (such as backgrounds and event sounds), and more.
User profiles are stored in /Users/Profiles/ on the PDC server. This is an SMB share point,
although it is not shown as a share point in Workgroup Manager.
You can designate a different location for a user profile, which can be a share point on
the PDC server or a Windows domain member server. The share point must be
configured to use SMB.
User profiles can be located in a share point or in a folder in a share point. The share
point or folder used for user profiles must have the proper access privileges.
Set the owner to “root” and give the owner Read & Write permission. Set the group to
the user’s primary group (which is normally “staff”) and give the group Read & Write
permission. Set the permission for everyone else to None.
For instructions, see “Setting Up an SMB Share Point” on page 119.
Instead of storing a roaming profile in a share point on a server, you can designate the
location of a local profile stored on the Windows computer.
Chapter 4 Setting Up User Accounts 85
Page 86

To change the Windows roaming profile location for a user account:
1 In Workgroup Manager, click Accounts.
2 Open the user account whose profile location you want to change.
To open a user account in the PDC, click the globe icon and choose the PDC server’s
LDAP directory.
3 To authenticate, click the lock and enter the name and password of a directory domain
administrator.
4 Click Windows and enter the new profile location in the User Profile Path field.
 To use the default share point for user profiles, leave this field blank.
 For a roaming profile stored in a different share point, enter the location of the share
point using the universal naming convention (UNC) format:
\\servername\sharename\usershortname
For servername, substitute the NetBIOS name of the PDC server or a Windows
domain member server where the share point is located.
To view the server’s NetBIOS name, open Server Admin, select SMB in the Servers list,
click Settings, click General, and then look at the Computer Name field.
For sharename, substitute the name of the share point.
For usershortname, substitute the first short name of the user account you’re
configuring.
 For a local profile stored on the Windows computer, enter the drive letter and folder
path in UNC format as in the following example:
C:\Documents and Settings\juan
5 Click Save.
Changing a Windows User’s Login Script Location
You can use Workgroup Manager to change the folder location of a user’s Windows
login script in the /etc/netlogon/ folder on the PDC server.
To change the Windows login script location for a user account:
1 In Workgroup Manager, click Accounts.
2 Open the user account whose Windows login script location you want to change.
To open a user account in the PDC, click the globe icon and choose the PDC server’s
LDAP directory.
3 To authenticate, click the lock and enter the name and password of a directory domain
administrator.
4 Click Windows and enter the new login script location in the Login Script field.
86 Chapter 4 Setting Up User Accounts
Page 87

Enter the relative path to a login script in /etc/netlogon/ on the PDC server. For
example, if an administrator places a script named setup.bat in /etc/netlogon/, the
Login Script field should contain “setup.bat.”
5 Click Save.
Changing a Windows User’s Home Folder Drive Letter
You can use Workgroup Manager to change the Windows drive letter that a user’s
home folder is mapped to.
To change the Windows home folder drive letter for a user account:
1 In Workgroup Manager, click Accounts.
2 Open the user account whose Windows home folder drive letter you want to change.
To open a user account in the PDC, click the globe icon and choose the PDC server’s
LDAP directory.
3 To authenticate, click the lock and enter the name and password of a directory domain
administrator.
4 Click Windows and choose a drive letter from the Hard Drive pop-up menu.
The default drive letter is H. Windows uses the drive letter to identify the mounted
home folder.
5 Click Save.
Changing a Windows User’s Home Folder Location
You can change where a Windows user’s network home folder is stored. By default, the
network home folder is the same for Windows as it is for Mac OS X, and its location is
specified in the Home pane.
For more information, see “Setting Up a Home Folder for a Windows User” on page 127.
Working with GUIDs
Although you can view and modify most user account attributes using the Accounts
pane in Workgroup Manager, you must use the Inspector to view and modify GUIDs.
Viewing GUIDs
GUIDs are stored in the directory domain and are not immediately visible in Workgroup
Manager. To view GUIDs, you must first enable the Inspector in Workgroup Manager.
For instructions on using the Inspector, see Open Directory Administration.
WARNING: Although the Inspector allows you to edit GUIDs, it is not recommended.
Doing so destroys existing group memberships and file permissions for that user ID.
Chapter 4 Setting Up User Accounts 87
Page 88

To view a user or group GUID:
1 In Workgroup Manager, click Accounts.
2 Make sure the directory services of the Mac OS X Server computer you’re using are
configured to access the directory domain.
3 Click the globe icon and then choose the domain where the account resides.
4 To authenticate, click the lock and enter the name and password of a directory domain
administrator.
5 Click the Users, Groups, Computers, or Computer Groups button and select the
account.
You can only view GUIDs for individual accounts.
6 Click the Inspector button under the lock on the far right.
If there is no Inspector button, make sure the Inspector is enabled by choosing
Workgroup Manager > Preferences, and then select “Show ‘All Records’ tab and
inspector.”
7 Select the GeneratedUID field and then click Edit.
8 Click Cancel to make sure you do not change the GUID.
From the Command Line
You can also view a user or group GUID using the dscl command in Terminal. For more
information, see the users and groups chapter of Command-Line Administration.
88 Chapter 4 Setting Up User Accounts
Page 89

5 Setting Up Group Accounts
5
This chapter tells you how to set up, edit, and manage group
accounts.
A group account offers a simple way to manage a collection of users with similar needs.
You can also create group folders, which provide an easy way for group members to
share files with each other.
You can use Workgroup Manager to view, create, edit, and delete group accounts.
To view group accounts in Workgroup Manager, click the Groups button above the
accounts list.
About Group Accounts
A group account stores the identities of users who belong to the group, as well as
information that lets you customize the working environment for members of the
group. When you define preferences for a group, the group is known as a workgroup.
A primary group is the user’s default group. Primary groups can expedite the validation
performed by the Mac OS X file system when a user accesses a file.
How Group Accounts Track Membership
Mac OS X Server uses GUIDs and a combination of the user’s short name and GID to
determine group membership. Before Mac OS X v10.4, group membership was based
only on a combination of the user’s short name and GID.
You can now have groups composed of users with all versions of Mac OS X. When you
use Workgroup Manager on Mac OS X Server v10.5 to add a member to a group, you
add both the user’s short name and GUID, which ensures backward compatibility.
89
Page 90

Where Group Accounts Are Stored
Group accounts can be stored in any Open Directory domain. A directory domain can
reside on a Mac OS X computer (for example, an Open Directory domain) or it can
reside on a non-Apple server (for example, an LDAP or Active Directory server).
Workgroup Manager can work with accounts stored in any of these directory domains.
Group accounts must be stored in a directory domain accessible from the server that
needs them:
 For services provided by a Mac OS X Server PDC or Windows domain member server,
group accounts can be stored in the PDC LDAP directory.
 For services provided by an Active Directory domain member, group accounts can be
stored in the Active Directory domain.
 For services provided by a Windows standalone server, group accounts can be stored
in the server’s local directory domain.
 If a server is configured to access multiple directory domains, group accounts can be
stored in any of them.
For more information about the different kinds of Open Directory domains, see Open
Directory Administration.
Predefined Group Accounts
The following table describes most group accounts that are created when you install
Mac OS X Server. For a complete list, open Workgroup Manager and choose View >
Show System Users and Groups.
Predefined
group name
admin 80 A group that users with administrator privileges belong to.
bin 7 A group that owns all binary files.
daemon 1 A group used by system services.
dialer 68 A group for controlling access to modems on a server.
kmem 2 A legacy group used to control access to reading kernel memory.
mail 6 A group historically used for access to local UNIX mail.
_mysql 74 A group that the MySQL database server uses for its processes that
network 69 A group that has no specific meaning.
nobody -2 A group used by system services.
nogroup -1 A group used by system services.
operator 5 A group that has no specific meaning.
smmsp 25 A group used by sendmail.
sshd 75 A group used for the sshd child processes that process network
90 Chapter 5 Setting Up Group Accounts
Group ID Use
handle requests.
data.
Page 91

Predefined
group name
staff 20 A default group that UNIX users are traditionally placed.
sys 3 A group that has no specific meaning.
tty 4 A group that owns special files such as the device file associated
_unknown 99 A group used when the system doesn’t know about the hard drive.
utmp 45 A group that controls who can update the system’s list of logged-in
_uucp 66 A group used to control access to UUCP spool files.
wheel 0 A group (in addition to the admin group) that users with
_www 70 A nonprivileged group that Apache uses for its processes that
Group ID Use
with an SSH or telnet user.
users.
administrator privileges belong to. Membership is required for
using the
handle requests.
su command.
Administering Group Accounts
Workgroup Manager lets you administer group accounts stored in multiple directory
domains.
Creating Group Accounts
To create a group account in a directory domain, you must have domain administrator
privileges.
You can also create group accounts on a non-Apple LDAPv3 server if the server is
configured for write access.
To create a group account:
1 In Workgroup Manager, click Accounts.
2 Make sure the directory services of the Mac OS X Server computer you’re using are
configured to access the directory domain.
For information about using Directory Utility to configure an LDAP connection, see
Open Directory Administration. For information about the group account elements that
may need to be mapped, see the appendix, “Importing and Exporting
Account Information.”
3 Click the globe icon and choose the domain where you want the group account to
reside.
4 To authenticate, click the lock and enter the name and password of a directory domain
administrator.
5 Click the Groups button.
6 Click New Group and then specify settings for the group in the panes provided.
Chapter 5 Setting Up Group Accounts 91
Page 92

You can also use a preset or an import file to create a group. For details, see “Creating a
Preset for Group Accounts,” and the appendix, “Importing and Exporting
Account Information.”
From the Command Line
You can also create a group account using the dseditgroup command in Terminal. For
more information, see the users and groups chapter of Command-Line Administration.
Creating a Preset for Group Accounts
You can use presets to apply predetermined settings to a new group account.
Presets are stored in the directory domain that you’re viewing. If you change directory
domains, the presets you created in the other directory domain are not available.
For instructions on renaming, editing, or deleting group presets, see “Renaming
Presets” on page 62, “Editing Presets” on page 62, and “Deleting a Preset” on page 63.
To create a preset for group accounts:
1 In Workgroup Manager, click Accounts.
2 Make sure the server is configured to access the Mac OS X directory domain or non-
Apple LDAPv3 domain where the preset is used to create accounts.
3 To create a preset using data in an existing group account, open the account; to create
a preset from scratch, create a group account.
4 Fill in the fields with values you want new groups to inherit and delete values you don’t
want to specify in advance.
5 Click Preferences, configure settings that you want the preset to define, and then click
Accounts.
After configuring preference settings for a preset, you must return to the Accounts
settings to save the preset.
6 From the Presets pop-up menu, choose Save Preset, enter a name for the preset, and
then click OK.
Editing Group Account Information
You can use Workgroup Manager to change a group account that resides in an Open
Directory domain, the local directory domain, or other read/write directory domain.
To make changes to a group account:
1 In Workgroup Manager, click Accounts.
2 Make sure the directory services of the Mac OS X Server computer you’re using are
configured to access the directory domain.
For instructions, see Open Directory Administration.
3 Click the globe icon and choose the domain where the group account resides.
92 Chapter 5 Setting Up Group Accounts
Page 93

4 To authenticate, click the lock and enter the name and password of a directory domain
administrator.
5 Click the Groups button and select the group you want to work with.
6 Edit settings for the group in the panes provided.
For details, see “Working with Basic Settings for Groups” on page 95, “Working with
Member Settings for Groups” on page 99, and “Working with Group Folder Settings” on
page 100.
From the Command Line
You can also edit a group account using the dseditgroup command in Terminal. For
more information, see the users and groups chapter of Command-Line Administration.
Creating Hierarchical Groups
A hierarchical group is a group that is a member of another group, known as a parent
group.
For computers with Mac OS X v10.5 or later, hierarchical groups inherit managed
preferences. Members of a hierarchical group have combined preferences managed by
their chosen workgroup and by parent groups. They can also inherit preferences from
parent groups.
For computers with Mac OS X v10.4 or later, the access permissions of a parent group
are inherited. For example, if you set a parent group’s ACL permissions so the parent
group can’t write to a folder, the ACL permissions are propogated so that hierarchical
groups also can’t write to that folder.
Groups created using Mac OS X Server v10.3 and v10.4 must be upgraded to become
parent or child hierarchical groups and use hierarchical preference management. If you
don’t upgrade groups created using Mac OS X Server v10.3, you can’t use hierarchical
groups. If you don’t upgrade groups created using Mac OS X Server v10.4, you can’t use
hierarchical preference management with those groups. For more information, see
“Upgrading Legacy Groups” on page 94.
To create a hierarchical group:
1 In Workgroup Manager, click Accounts.
2 Make sure that the directory services of the Mac OS X Server computer you’re using are
configured to access the desired directory domain.
For instructions, see Open Directory Administration.
3 Click the globe icon and choose the domain where you want the hierarchical group to
reside.
4 To authenticate, click the lock and enter the name and password of a directory domain
administrator.
Chapter 5 Setting Up Group Accounts 93
Page 94

5 To create a group, click the Groups button.
6 In the Members pane, click the Add (+) button to open a drawer that lists the users and
groups defined in the directory domain you’re working with.
Make sure the group account resides in a directory domain specified in the search
policy of computers the user logs in to.
The drawer lists user and group accounts. Click the Groups button in the drawer to list
group accounts.
7 Drag the group from the drawer to the Members list.
All members of the hierarchical group also become members of the parent group.
8 Click Save.
From the Command Line
You can also create a hierarchical group account using the dseditgroup command in
Terminal. For more information, see the users and groups chapter of Command-Line
Administration.
Upgrading Legacy Groups
When you upgrade from Mac OS X Server v10.3 or earlier, or when you import groups
created using Workgroup Manager v10.3 or earlier, existing groups can’t use
hierarchical preference management unless you first convert them.
Upgrading legacy groups does not negatively affect group members with client
computers running previous versions of Mac OS X.
To convert a legacy group to an upgraded group account:
1 In Workgroup Manager, click Accounts.
2 Make sure that the directory services of the Mac OS X Server computer you’re using are
configured to access the directory domain.
For instructions, see Open Directory Administration.
3 Click the globe icon and choose the domain where the group account resides.
4 To authenticate, click the lock and enter the name and password of a directory domain
administrator.
5 Click the Groups button and select the legacy group you want to upgrade.
6 In the Members pane, click the Upgrade Legacy Group button and then click Save.
Working with Read-Only Groups
You can use Workgroup Manager to review information for group accounts stored in
read-only directory domains. Read-only directory domains include LDAPv2 domains,
LDAPv3 domains not configured for write access, NIS domains, and BSD configuration
files.
94 Chapter 5 Setting Up Group Accounts
Page 95

To work with read-only groups:
1 In Workgroup Manager, click Accounts.
2 Make sure that the directory services of the Mac OS X Server computer you’re using are
configured to access the directory domain where the account resides.
For information about using Directory Utility to configure server connections, see Open
Directory Administration. For information about the group account elements that need
to be mapped, see the appendix, “Importing and Exporting Account Information.”
3 Click the globe icon and then choose the directory domain where the group account
resides.
4 Use the panes provided to review the group account settings.
Deleting a Group
You can use Workgroup Manager to delete a group account stored in an Open
Directory domain, the local directory domain, or other read/write directory domain.
WARNING: You cannot undo this action.
To delete a group using Workgroup Manager:
1 In Workgroup Manager, click Accounts.
2 Select the group account you want to delete.
To select the account, click the globe icon, choose the directory domain where the
account resides, click the Groups button, and then select the group.
3 To authenticate, click the lock and enter the name and password of a directory domain
administrator.
4 Choose Server > Delete Selected Group or click the Delete icon in the toolbar.
From the Command Line
You can also delete a group account using the dseditgroup command in Terminal. For
more information, see the users and groups chapter of Command-Line Administration.
Working with Basic Settings for Groups
Basic settings for groups include name, ID, picture path, comments, and whether the
group uses web services.
Naming a Group
A group has two names: a long name and a short name.
 A long group name (for example, English Department Students) is used for display
purposes and contains no more than 255 bytes.
Chapter 5 Setting Up Group Accounts 95
Page 96

Because long group names support various character sets, the number of characters
for long group names can range from 255 Roman characters to as few as 63
characters (for character sets in which characters occupy up to 4 bytes).
 A short group name contains as many as 255 Roman characters. However, for clients
using Mac OS X v10.1.5 or earlier, the short group name must be eight characters or
less. Use only the following characters in a short group name:
 a through z
 A through Z
 0 through 9
 _ (underscore)
The short name (typically eight or less characters) may be used by Mac OS X to find
group members’ user IDs when determining whether a user can access a file as a
result of his or her group membership.
For more information about group membership, see “How Group Accounts Track
Membership” on page 89.
If a group has a mailing list enabled, the short name is also used in the group’s
mailing list address (shortname@hostname.com).
For more information about enabling a group’s mailing list, see “Enabling a Group’s
Web Services” on page 98.
You can use Workgroup Manager to edit the long or short names of a group account
stored in an Open Directory domain, the local directory domain, or other read/write
directory domain. You can also use Workgroup Manager to review the names in any
directory domain accessible from the server you’re using.
To work with group names using Workgroup Manager:
1 In Workgroup Manager, click Accounts.
2 Select the group account you want to work with.
To select an account, click the globe icon, choose the directory domain where the
account resides, click the Groups button, and select the group.
3 To authenticate, click the lock and enter the name and password of a directory domain
administrator.
4 Click Basic, then in the Name field (or the “Short name” field) review or edit the names
and then click Save.
Before saving a new name, Workgroup Manager checks to ensure that the name is
unique.
Defining a Group ID
A group ID is a string of ASCII digits that uniquely identifies the group. The maximum
value is 2,147,483,647.
96 Chapter 5 Setting Up Group Accounts
Page 97

You can use Workgroup Manager to edit the ID for a group account stored in an Open
Directory domain or the local domain, or to review the group ID in any directory
domain accessible from the server you’re using. The group ID is associated with group
privileges and permissions.
To work with a group ID using Workgroup Manager:
1 In Workgroup Manager, click Accounts.
2 Select the group account you want to work with.
To select an account, click the globe icon, choose the directory domain where the
account resides, click the Groups button, and then select the group.
3 To authenticate, click the lock and enter the name and password of a directory domain
administrator.
4 Click Basic, then in the Group ID field review or edit the ID and click Save.
Before saving a group ID, Workgroup Manager checks to ensure that it is unique in the
directory domain you’re using.
Choosing a Group’s Login Picture
You can quickly change a group’s login picture in Workgroup Manager. This picture
represents the group in the workgroup chooser of the login window.
Although you can use an image file of any size, you should use an image that is 64 x 64
pixels in size. If you use a larger image, it is centered and resized to 64 x 64.
Group pictures are stored as a path to an image file, not as the file itself. This path must
be accessible by the computers used by the group. For example, if you enter a path to
an image file on the desktop, the image file must be located on the desktop of all
computers used by the group. To avoid copying image files to all computers, store
image files on a server.
To choose a group’s login picture:
1 In Workgroup Manager, click Accounts.
2 Select the group account you want to work with.
To select an account, click the globe icon, choose the directory domain where the
account resides, click the Groups button, and select the group.
3 To authenticate, click the lock and enter the name and password of a directory domain
administrator.
4 In the Basic pane, drag a picture to the picture area in the top right.
When you drag a picture to the picture area, the Picture Path field is updated with the
new location of the picture. You can also change the picture by editing this path.
5 Click Save.
Chapter 5 Setting Up Group Accounts 97
Page 98

Enabling a Group’s Web Services
Mac OS X Server v10.5 includes Groups, a feature that allows groups to easily create a
collaborative website. This website uses calendar, wiki, and blog technology to
streamline group communication. You can also set up a mailing list so that mail sent to
the list is sent to all group members and are archived on the group website.
You can only enable the web calendar and mailing list archive if you first enable the
wiki and blog service.
You can choose who views or edits the website:
 “Group members only” includes all members of the group
 “Some group members” (only available for editing) includes group members who are
given editing privileges
 “Authenticated users” includes anyone who can authenticate with your organization’s
directory
 “Anyone” allows everyone, without requiring authentication
You can provide different levels of website access to different subsets of users. For
example, you can set up an intranet site where everyone in your organization can view
the site (allow “Entire directory” to view services), but only group members can edit it
(allow “Group members” to edit services).
When setting up levels of website access, the users who can edit the website are a
subset of the users who can view it. For example, you can’t let anyone edit the site and
allow only group members to view it.
When you create a group, the URL of the group website and the mailing list email
address is based on the short name of the group (shortname@hostname.com). If you
change the group’s name after creating it, the URL and mailing list email address do
not change.
The administrator computer’s search policy must include the server that hosts web
services.
To enable a group’s web services:
1 In Workgroup Manager, click Accounts.
2 Select the group account you want to work with.
To select an account, click the globe icon, choose the directory domain where the
account resides, click the Groups button, and select the group.
3 To authenticate, click the lock and enter the name and password of a directory domain
administrator.
4 Choose a server from the “Enable the following services for this group on” pop-up
menu.
98 Chapter 5 Setting Up Group Accounts
Page 99

5 Select the services you want to enable.
You can only select services that are not disabled by your web server.
6 Choose who can view the group website by using the “can view these services” pop-up
menu.
This option applies to viewing the wiki, blog, calendar, and mailing list archive.
7 Choose who can edit the group website by using the “can write to these services” pop-
up menu.
This option applies to editing the wiki, blog, and calendar.
8 Click Save.
Working with Member Settings for Groups
In Workgroup Manager, use the Members pane for a group to view, add, or remove
group members.
When a user name in the Members list appears in italics, the group is the user’s primary
group.
Adding Users or Groups to a Group
When you want multiple users or groups to have the same file permissions, or when
you want to apply the same management settings to all users or groups, add the users
or groups to a group.
After assigning a user to a primary group, you don’t need to add the user to that group.
However, you must specifically add users to other groups.
You can use Workgroup Manager to add a user to a group if the user and group
accounts are in an Open Directory domain or the local directory domain. Although
some group information doesn’t apply to Windows users, you can also add Windows
users to groups you create.
Mac OS X Server v10.5 and later supports hierarchical groups—groups composed of
nested groups. By managing preferences for a parent group, child groups also receive
these managed preferences. For more information, see “Understanding Hierarchical
Preference Management” on page 159.
To add a user to a group using Workgroup Manager:
1 In Workgroup Manager, click Accounts.
2 Select the group account you want to work with.
To select an account, click the globe icon, choose the directory domain where the
account resides, click the Groups button, and then select the group.
Chapter 5 Setting Up Group Accounts 99
Page 100

3 To authenticate, click the lock and enter the name and password of a directory domain
administrator.
4 In the Members pane, click the Add (+) button to open a drawer that lists the users and
groups defined in the directory domain you’re working with.
Make sure the group account resides in a directory domain specified in the search
policy of computers that the user logs in to.
5 Select the user account, drag the user into the list, and then click Save.
From the Command Line
You can add a user to a group using the dseditgroup command in Terminal. For more
information, see the users and groups chapter of Command-Line Administration.
Removing Group Members
You can use Workgroup Manager to remove group members if the group account and
its members reside in an Open Directory domain or the local directory domain.
You can’t remove a user’s primary group.
To remove group members:
1 In Workgroup Manager, click Accounts.
2 Select the group account you want to work with.
To select an account, click the globe icon, choose the directory domain where the
account resides, click the Groups button, and then select the group.
3 To authenticate, click the lock and enter the name and password of a directory domain
administrator.
4 In the Members pane, select the members you want to remove from the group, click
the Remove (–) button, and then click Save.
From the Command Line
You can also remove users from a group using the dseditgroup command in Terminal.
For more information, see the users and groups chapter of Command-Line
Administration.
Working with Group Folder Settings
A group folder offers a way to organize and distribute documents and applications to
group members, and gives group members a way to share files with each other.
Group folders are not directly linked to workgroup management, but access and
workflow management can be improved by combining the use of group folders with
managed preferences for workgroups.
100 Chapter 5 Setting Up Group Accounts
 Loading...