

Page 1

Mac OS X Server
Getting Started
For Version 10.5 Leopard
Page 2

K
Apple Inc.
2007 Apple Inc. All rights reserved.
©
The owner or authorized user of a valid copy of
Mac OS X Server software may reproduce this
publication for the purpose of learning to use such
software. No part of this publication may be reproduced
or transmitted for commercial purposes, such as selling
copies of this publication or for providing paid-for
support services.
Every effort has been made to ensure that the
information in this manual is accurate. Apple Inc. is not
responsible for printing or clerical errors.
Because Apple periodically releases new versions and
updates to its software, images shown in this book may
be different from what you see on your screen.
Apple
1 Infinite Loop
Cupertino, CA 95014-2084
408-996-1010
www.apple.com
The Apple logo is a trademark of Apple Inc., registered
in the U.S. and other countries. Use of the “keyboard”
Apple logo (Option-Shift-K) for commercial purposes
without the prior written consent of Apple may
constitute trademark infringement and unfair
competition in violation of federal and state laws.
Apple, the Apple logo, AirPort, AirPort Express, AirPort
Extreme, Bonjour, FireWire, iCal, iPod, iSight, iTunes,
Keychain, Keynote, Mac, Mac OS, Macintosh, Panther,
Power Mac, QuickTime, Xcode, Xgrid, and Xserve are
trademarks of Apple Inc., registered in the U.S. and other
countries. Apple Remote Desktop, Apple TV, Finder,
iPhone, Leopard, Safari, Spotlight, and Tiger are
trademarks of Apple Inc.
Adobe and PostScript are trademarks of Adobe Systems
Incorporated.
Intel, Intel Core, and Xeon are trademarks of Intel Corp.
in the U.S. and other countries.
™
PowerPC
and the PowerPC logo™ are trademarks of
International Business Machines Corporation, used
under license therefrom.
UNIX is a registered trademark of The Open Group in the
U.S. and other countries.
Other company and product names mentioned herein
are trademarks of their respective companies. Mention
of third-party products is for informational purposes
only and constitutes neither an endorsement nor a
recommendation. Apple assumes no responsibility with
regard to the performance or use of these products.
034-4192-A/2007-09-01
Page 3

Contents
9 Chapter 1: Introducing Mac OS X Server
10
What’s New in Leopard Server
11
Simple Setup
13
Server Preferences and Server Status
14
iCal Server
15
Group Services with Wikis and Blogs
16
Directory
17
Podcast Producer
18
Spotlight Server
19
UNIX Compliance
19
64-Bit Computing
20
Server Configurations
22
Leopard Server in Action
24
Leopard Server in a Workgroup
26
Services
28
Applications and Utilities
29
Advanced Tools and Applications
3
Page 4

31 Chapter 2: Installing Mac OS X Server
32
What You Need to Install Leopard Server
34
Installing Locally
36
Preparing an Administrator Computer
37
Installing Remotely
41 Chapter 3: Setting Up Mac OS X Server
42
Setting Up a Server Locally
43
Keeping Your Server Secure
44
Protecting the System Administrator (root) Account
44
Setting Up a Server Remotely
47 Chapter 4: Managing Your Server
47
Using Server Preferences
49
Using the Server Status Widget
51
Finding Settings in Server Preferences
51
Connecting Server Preferences to a Remote Server
52
Closing a Server Preferences Connection
53
Backing Up and Restoring the Server
54
Keeping Leopard Server Up to Date
55 Chapter 5: Managing Users
56
About User Accounts
58
About Administrator Accounts
60
Adding a User Account
62
Importing Users
4
Contents
Page 5

63
Importing Groups of Users Automatically
65
Deleting a User Account
66
Changing a User’s Account Settings
68
Changing a User’s Contact Info
69
Controlling a User’s Access to Services
70
Changing a User’s Group Membership
71
Changing a User’s Name or Password
73
Changing a User’s Picture
74
Customizing the Welcome Email
75
Customizing the Server Invitation Email
76
Customizing the Group Invitation Email
79 Chapter 6: Managing Users’ Computers
79
Setting Up Leopard Users’ Macs Automatically
82
Setting Up Services for New Leopard Users
84
Setting Up Leopard Users with an Invitation Email
85
Setting Up a Mac by Using Directory Utility
86
Setting Up Users’ Computers Manually
87
Setting Up a Mac User’s VPN Connection
89
Setting Up a User’s VPN Connection Manually
90
Working with Directory Information on Leopard Users’ Macs
93 Chapter 7: Managing Groups
94
Creating a New Group
96
Deleting a Group
97
Adding or Removing Members of a Group
Contents
5
Page 6

99
Adding or Removing External Members of a Group
101
Changing Group Settings
10 2
Changing a Group’s Name
10 2
Setting Up a Group File Sharing Folder
10 3
Setting Up a Group Mailing List
10 3
Setting Up a Group Wiki Website
10 5
Setting Up a Group Calendar
10 6
Setting Up a Group Mailing List Archive
10 7 Chapter 8: Customizing Services
10 7
Managing File Sharing Service
10 8
About File Sharing Service
10 8
Adding a Shared Folder
10 9
Removing a Shared Folder
10 9
Controlling Access to a Shared Folder
110
Finding a Server’s File Sharing Address
111
Managing iCal Service
112
About iCal Service
113
Managing iChat Service
113
About iChat Service
11 4
Making All Users Buddies
115
Chatting with Users of Google Talk and Other XMPP Services
115
Saving and Archiving Instant Messages
11 6
Managing Mail Service
11 6
About Mail Service
6
Contents
Page 7

117
Specifying a Mail Relay Server
118
About Junk Mail and Virus Filtering
118
Scanning for Incoming Junk Mail and Viruses
119
Managing Web Services
12 0
About Web Services
121
Finding the Server’s Website Address
121
Hosting a Conventional Website
12 2
Setting Up Group Wiki Service
12 3
Setting Up Webmail Service
12 3
Setting Up User Blogs
12 4
Managing VPN Service
12 4
About VPN Service
12 5
Changing the VPN Shared Secret
12 6
Creating a VPN Configuration File
12 7
Changing the IP Address Range for VPN
12 9
Providing VPN Service Through an Internet Router
13 0
Customizing Services Using Advanced Applications
131 Chapter 9: Managing Server Information
131
Managing Server Information
13 2
Changing the Serial Number or Site License Details
13 2
Changing the Notification Settings
13 3
Changing Your Server’s Name
13 4
Changing Your Server’s IP Address
Contents
7
Page 8

13 5
Connecting to a Directory Server
13 6
Changing Firewall Settings
13 7
About the Firewall
13 8
Checking Server Logs
141
Monitoring Server Graphs
14 3 Chapter 10: Learning More
14 3
Using Onscreen Help
14 4
Mac OS X Server Administration Guides
14 7
Viewing PDF Guides Onscreen
14 7
Printing PDF Guides
14 8
Getting Documentation Updates
14 8
Getting Additional Information
14 9 Appendix A: Preparing Disks for Installing Mac OS X Server
15 0
Erasing with the Installer
151
Erasing with Server Assistant
151
Erasing with Disk Utility
152
Partitioning a Hard Disk
152
Creating a RAID Set
153 Appendix B: Configuring an Internet Router
153
Configuring Port Mapping on an AirPort Extreme Base Station
155
Manually Configuring Port Mapping on an Internet Router
157 Index
8
Contents
Page 9

1
Introducing Mac OS X Server
1
Mac OS X Server has everything you need to provide
standards-based workgroup and Internet services, making it
ideal for education, small businesses, and large enterprises.
Mac OS X Server version 10.5 Leopard blends a mature, stable UNIX foundation with
open standards and Macintosh ease of use. It provides an extensive array of services
that support Macintosh, Windows, and UNIX client computers over a network.
With Leopard Server, small organizations and workgroups without an IT department
can take full advantage of the benefits of a server. Even a nontechnical user can set up
and manage Leopard Server for a group. Other users in the group can automatically
configure their Macs to get services from Leopard Server. Leopard Server has advanced
configuration options and management tools for IT professionals as well.
9
Page 10

What’s New in Leopard Server
Mac OS X Server v10.5 Leopard offers major enhancements in several key areas:
Â
Simple setup
 Server Preferences and Server Status
 iCal Server
 Group services with wikis and blogs
 Directory application
 Podcast Producer
 Spotlight Server
 UNIX compliance and 64-bit computing
Leopard Server also has significant performance and scalability improvements for key
services, such as file sharing and mail services, compared to earlier versions.
If you’re an experienced server administrator and want to set up an enterprise server or
have other advanced needs, you’ll find enhancements to file sharing services, web
technologies, media streaming, instant messaging, mail service, directory and network
authentication, system imaging, and client management. Server Admin, Workgroup
Manager, and System Image Utility are all improved. For more information, see Server
Administration and the other advanced administration guides described in “Mac OS X
Server Administration Guides” on page 144.
10 Chapter 1
Introducing Mac OS X Server
Page 11

Simple Setup
Using Mac OS X Server is easier than ever. Server Assistant eliminates the complexities
of configuring a server. It walks you through the setup process and the configuration
of essential services. It automatically configures your AirPort Extreme Base Station
(802.11n) and runs a built-in network health check to verify local network and Internet
connectivity. In a few clicks, Leopard Server readies file sharing, email, group websites,
instant messaging, personal calendars, and remote access.
Chapter 1 Introducing Mac OS X Server 11
Page 12
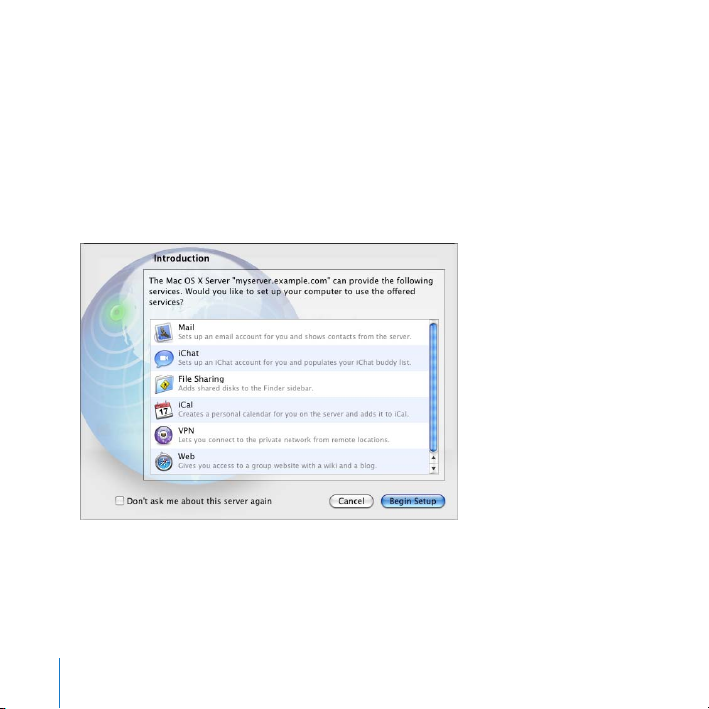
Users can quickly and easily set up Macs with Mac OS X Leopard to get services from
the server. They click a button in an invitation email or open the Directory Utility
application to open an assistant that connects to the server and sets up applications to
use its services. In no time, Mail, iChat, iCal, and a VPN network connection are all ready
to use. iChat users see other users in their iChat buddy lists. Mail users are ready to
send email to anyone in their group. Address Book, Directory, and Mail are ready to
look up shared contact information in the server’s directory. A printer connected to the
server’s USB port is automatically available to users.
12 Chapter 1 Introducing Mac OS X Server
Page 13
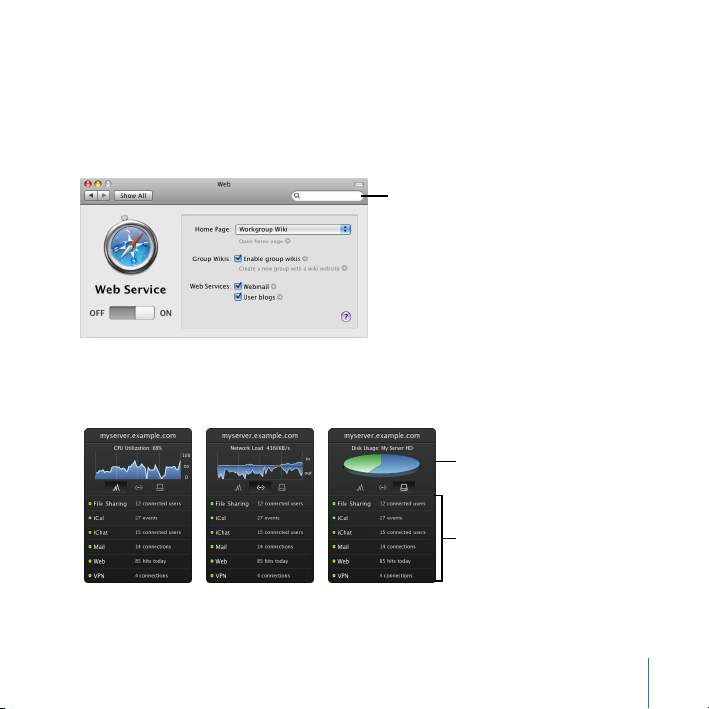
Server Preferences and Server Status
Leopard Server is even easier to keep running. Need to change something? With Server
Preferences, you can quickly manage users, groups, services, and system information.
You can use Server Preferences on the server, or use it on another Mac to manage your
server over the network.
Find the setting you
need without knowing
its exact location
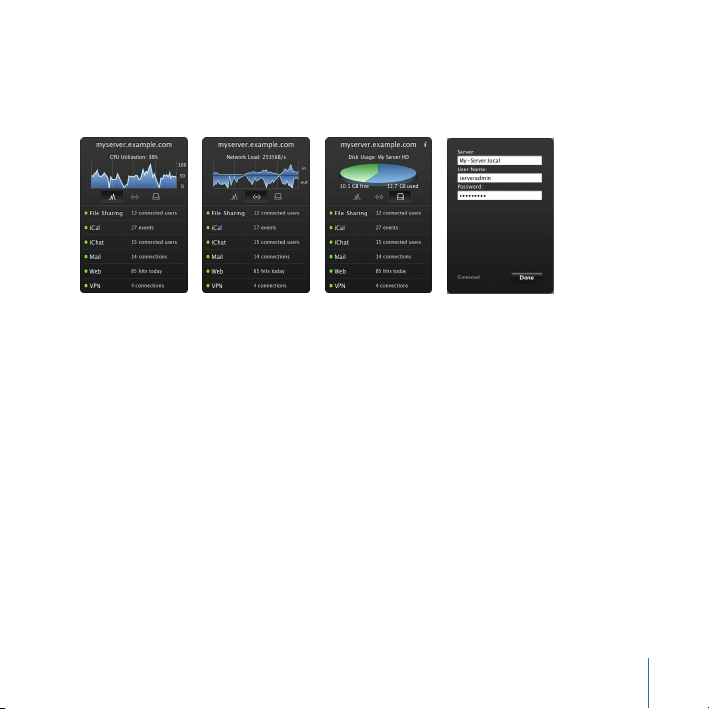
To monitor server performance and services, you can check graphs and statistics with
the Server Status Dashboard widget. Server Status works over the network, so you can
keep an eye on the server from another Mac.
Monitor processor,
network, or disk usage
Check service status
Chapter 1 Introducing Mac OS X Server 13
Page 14
iCal Server
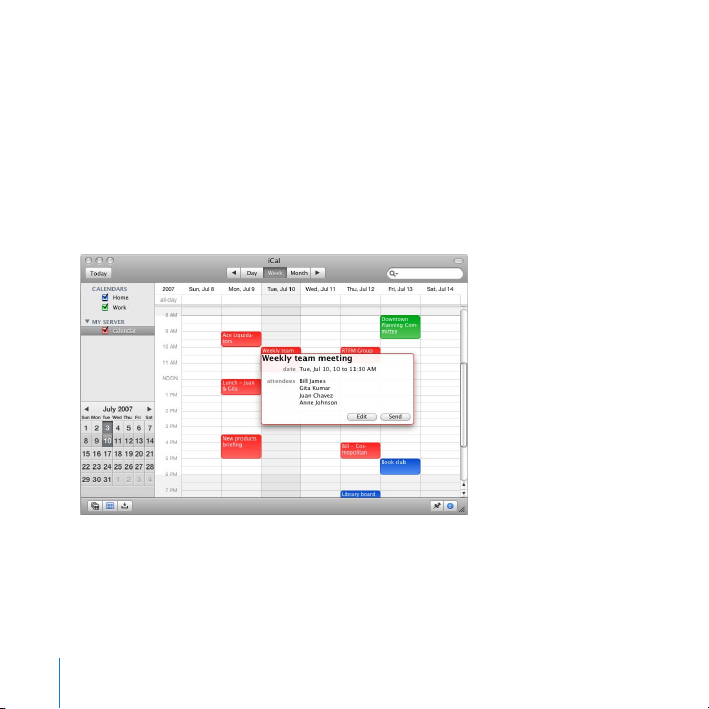
iCal Server makes it easy to share calendars, schedule meetings, and coordinate events
within a workgroup, a small business, or a large organization. Colleagues can check
each other’s availability, propose and accept meetings, book conference rooms, reserve
projectors, and more. iCal Server sends meeting invitations with agendas or to-do lists,
and tabulates replies.
iCal Server integrates with leading calendar applications including iCal 3 in Leopard
and third-party calendar applications that support the standard CalDAV protocol.
14 Chapter 1 Introducing Mac OS X Server
Page 15
Group Services with Wikis and Blogs
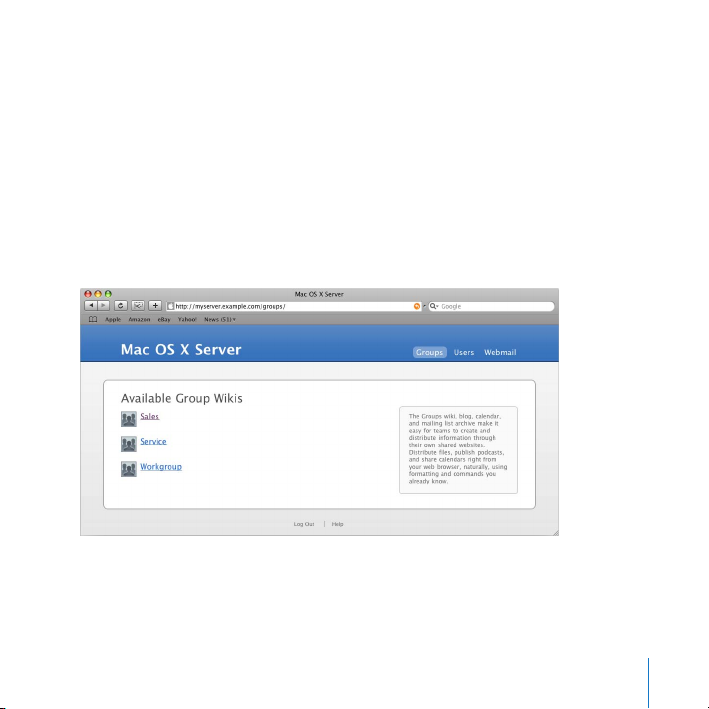
Leopard Server includes a wiki service that makes it easy for groups to create and
distribute information through their own shared intranet websites. All members of a
group can easily view, search, and edit wiki content in their web browsers. By using
included templates, or by creating their own, they can add, delete, edit, and format
content naturally—without knowing markup codes or special syntax. With a few clicks,
they can attach files and images, publish to podcasts, assign keywords, and link to
other wiki pages or other websites. They can also review the wiki’s complete history of
changes and revert pages to a previous version. In addition, they can view and
contribute to shared calendars, blogs, and mailing list archives.
Each user can have a blog, which provides an easy way to keep colleagues up to date
with projects, the files they’re working on, and pictures or podcasts. A personal blog is
the perfect place to put information for your group, or just for your own reference.
Chapter 1 Introducing Mac OS X Server 15
Page 16
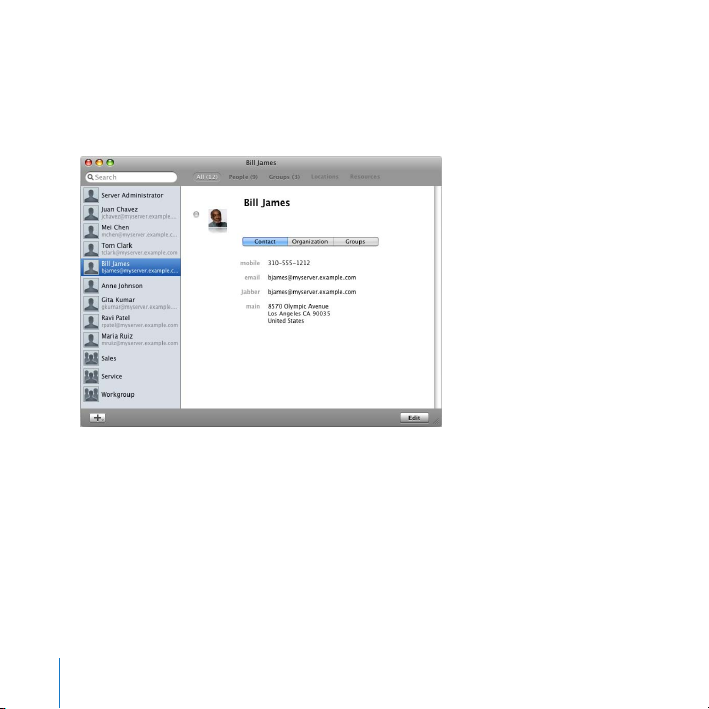
Directory
The Directory application gives users access to shared information about people,
groups, locations, and resources within the organization. Users can share contacts, add
groups, set up group services, and manage their own contact information.
16 Chapter 1 Introducing Mac OS X Server
Page 17
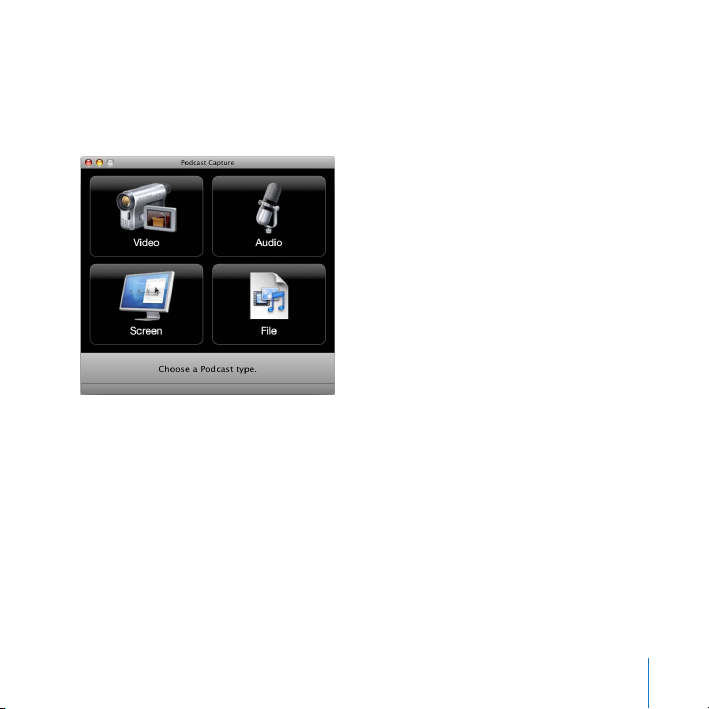
Podcast Producer
A video camera, a Mac, and Leopard Server are all you need to produce podcasts of
lectures, training, or any other audio and video projects. Podcast Producer automates
video and audio capture, encoding, and delivery.
The Podcast Capture application installed on every Mac with Leopard allows users to
record high-quality audio and video from a FireWire camera, USB microphone, iSight,
or other supported device attached to a local or remote Mac. Podcast Capture
automatically sends the completed recording to Podcast Producer on Leopard Server,
which encodes and publishes the recording based on your workflow selection in
Podcast Capture. Podcast Producer can add effects such as watermarks, titles, and
introductory video, and then publish the podcast to a webpage, blog, iTunes, iTunes U,
QuickTime streaming server, an iPod, Apple TV, iPhone, or other mobile phone. Leopard
Server’s mail service can even notify you when the job has completed.
Chapter 1 Introducing Mac OS X Server 17
Page 18

In addition to recording audio and video, you can use Podcast Capture to record screen
activity (for example a Keynote presentation) along with audio from a local or remote
source. You can also use Podcast Capture to share QuickTime movies with others.
Anyone with an Internet connection and authorization to use Podcast Capture can
start the whole process. Simply log in to Podcast Capture, make a few selections, and
click a button to start recording. Click another button to stop recording, enter a title
and description, and click a button to start the podcast publishing process. Podcast
Producer takes care of the rest.
Podcast Producer automatically uses your server’s Xgrid 2 service for high performance
podcast encoding. Xgrid distributes encoding jobs across the network to Macs that
have Leopard set up to share their spare processing power. You can accommodate
more podcasts by adding Macs, and Xgrid scales automatically.
Spotlight Server
Spotlight simplifies finding content on a Mac, and Leopard Server extends Spotlight
searching to the network. Spotlight Server lets Mac users quickly and easily find
documents, files, and other content stored on your server. It works the way people
think, by searching the content on mounted network volumes, not just looking at file
names. There is no need to remember what someone else named a particular shared
document, project, or file. Use Quick Look to view, play, and read found files without
opening them.
18 Chapter 1 Introducing Mac OS X Server
Page 19

Content indexing happens automatically and transparently on the server. No
configuration of the server or users’ Macs is necessary.
For security, Spotlight Server works with the file access controls and permissions of
Mac OS X Server. A user’s search lists only items to which the user has access, ensuring
that secrets stay secret. So everyone in a group can store files on the server. Group
members can easily find shared files, but outsiders can’t find them.
UNIX Compliance
Leopard Server is an Open Brand UNIX 03 Registered Product, conforming to the SUSv3
and POSIX 1003.1 specifications for the C API, Shell Utilities, and Threads. Leopard
Server can compile and run all your UNIX 03-compliant code, so it can be deployed in
environments that demand full conformance. Mac OS X Server also provides full
compatibility with your server and application software.
64-Bit Computing
For the first time in Leopard Server, key server software components take advantage of
64-bit computing to achieve higher performance and processing power and to work
with larger data sets. Leopard Server runs 64-bit applications alongside 32-bit
applications, optimized for each.
Chapter 1 Introducing Mac OS X Server 19
Page 20

Server Configurations
Leopard Server offers several options for setting up your server to suit your
circumstances. The table on the next page lists some reasons for choosing each of the
following configurations:
 Standard: A simplified configuration ideal for the first server or only server in a small
organization
 Workgroup: An easy-to-use setup ideal for a workgroup in an organization with an
existing directory server
 Advanced: A flexible configuration ideal for advanced, highly customized
deployments
You can change a standard configuration to a workgroup configuration by connecting
the server to a directory server in your organization. Conversely, you can change from
workgroup to a standard configuration by disconnecting the server from the directory
server. You can also convert to advanced from standard or workgroup (but not the
reverse, except by reinstalling Leopard Server). For information about changing
configurations, see “Connecting to a Directory Server” on page 135 and Server
Administration (described in “Mac OS X Server Administration Guides” on page 144).
20 Chapter 1 Introducing Mac OS X Server
Page 21

Reasons to choose Standard Workgroup Advanced
Set up the first server or only server for a small
organization
Have all services set up automatically
Have only selected services set up automatically
Use existing user accounts from your organization’s
directory server
Use one simple application, Server Preferences, to
manage essential settings for user accounts, groups,
and services
Have Leopard users’ Macs automatically set up to use
the server
Need no server administration experience
Completely control hundreds of service configuration
settings for multiple servers
Manage user accounts, home folders, and preferences
for hundreds or thousands of users, groups, and
computers
Set up network home folders and mobile user
accounts
Use powerful applications, such as Server Admin and
Workgroup Manager, or command-line tools, to
configure services and manage clients
Save setup data for automatic setup of multiple servers
Upgrade existing servers
%
%
%
%
%%
%%
%%
%
%
%
%
%
%
Chapter 1 Introducing Mac OS X Server 21
Page 22

Leopard Server in Action
The following illustration shows a standard configuration of Mac OS X Server in a small
organization. The server connects to a local network together with some users’
computers. Other users’ computers connect to the local network wirelessly through an
AirPort Extreme Base Station. The AirPort Extreme connects to the Internet through a
DSL modem or cable modem and shares the Internet connection with the server and
users’ computers. The server and users’ computers get their network addresses from
the AirPort Extreme’s DHCP server. They get DNS name service from the Internet
service provider (ISP).
The server provides user and group accounts, shared folders, shared calendars, instant
messaging, and a wiki website with blogs. The ISP doesn’t provide enough email
addresses for everyone in the organization, so the server provides email addresses and
mail service.
Some users may check their email while away, but they don’t have portable computers
to take home or on the road. They can log in to the server’s webmail service from their
home computers or any borrowed computer with a web browser.
Other users have their portable computers and home computers set up to connect to
the server’s VPN via the Internet. This gives them secure remote access, while working
at home or traveling, to all the services that the server provides on the local network.
22 Chapter 1 Introducing Mac OS X Server
Page 23
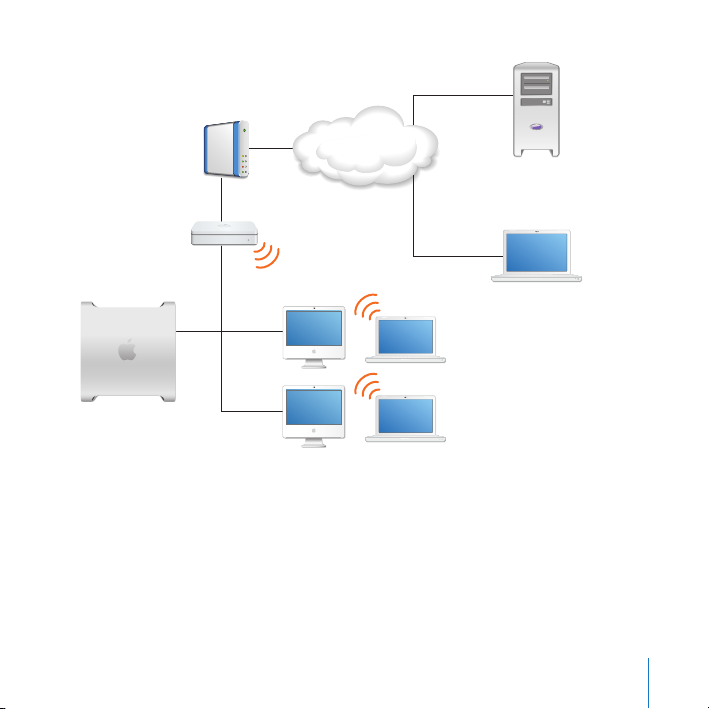
AirPort
Extreme
Mac OS X
Server
DSL or
cable modem
The Internet
ISP’s DNS
server
VPN
Mac OS X
computer
Mac OS X computers
Chapter 1 Introducing Mac OS X Server 23
Page 24

Leopard Server in a Workgroup
The next illustration depicts a workgroup configuration of Mac OS X Server that serves
a department in a large organization. This organization has an IT group that provides
DHCP service for assigning network addresses, DNS name service, mail service, Internet
access, and a VPN.
Everyone in the department already has a user account provided by the organization’s
Open Directory server, so these user accounts have been imported to the workgroup
server. This means everyone simply uses the user name and password they already
know to authenticate for services provided by the workgroup server. Those services
were automatically set up to use the Kerberos authentication of the Open Directory
server, allowing users to log in once per session for all workgroup services.
The workgroup server provides calendar and instant messaging services that work with
the users’ Mac OS X iCal and iChat applications. The workgroup server also provides
shared folders and wiki websites for groups within the department. Some
departmental groups include participants from outside the department. A group’s
external members use their existing user accounts to access the group’s shared folder,
calendar, wiki, and blog.
The department has some Windows users, who use Internet Explorer and Safari to
access their group’s wiki, calendar, and blog. Shared folders appear as mapped drives in
their Network Places. They have also set up their PCs to use the workgroup server’s
Jabber instant messaging.
24 Chapter 1 Introducing Mac OS X Server
Page 25
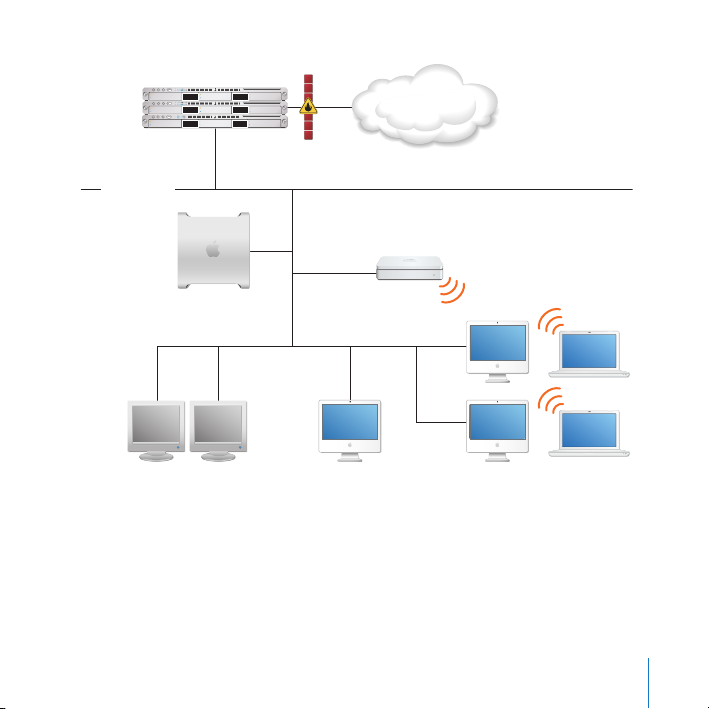
Organization-wide servers
Organization
The intranet
Workgroup
The Internet
AirPort
Extreme
Mac OS X
server
Mac OS X
administrator computer
Mac OS X computersWindows computers
Chapter 1 Introducing Mac OS X Server 25
Page 26

Services
Leopard Server provides the services and system features shown in the following table.
Services and system information are set up automatically for a standard or workgroup
configuration, using information you provide during the initial server setup.
After setting up a standard or workgroup configuration, you can change service and
system settings. You can turn off services that you don’t need, perhaps because you
already have them. For example, a standard configuration doesn’t need to provide mail
service if you want to use the mail service provided by an Internet service provider. If
no one needs to access your server from home or while traveling, you can turn off VPN
service.
A workgroup configuration may not need to provide mail or VPN service if your
organization provides them. For information about service and system settings, see
Chapter 4, “Managing Your Server,” Chapter 8, “Customizing Services,” and Chapter 9,
“Managing Server Information.”
If you select an advanced configuration during initial setup, services are not set up
automatically. You use advanced administration applications such as Server Admin and
Workgroup Manager, or command-line tools, to configure advanced settings for the
services you need the server to provide. For information about an advanced
configuration, see Server Administration and the other advanced administration guides
described in “Mac OS X Server Administration Guides” on page 144.
26 Chapter 1 Introducing Mac OS X Server
Page 27

Service Standard Workgroup Advanced
File sharing (AFP and SMB protocols) Included Optional Optional
File sharing (FTP and NFS protocols) Not used Not used Optional
Printer sharing (directly connected USB or FireWire
Automatic Automatic Not used
printer)
Print Not used Not used Optional
iCal (calendar sharing, event scheduling) Included Optional Optional
iChat (instant messaging) Included Optional Optional
Mail with spam and virus filtering Included Optional Optional
Web (wikis, blogs, webmail) Included Optional Optional
VPN (secure remote access) Optional Optional Optional
Internet gateway (NAT, DNS) Optional Optional Optional
Time Machine backup of server Optional Optional Not used
Open Directory (user accounts and other data) Automatic Automatic Optional
Application firewall Optional Optional Not used
IP firewall with optional adaptive firewall Not used Not used Optional
Podcast Producer Not used Not used Optional
Comprehensive user and workgroup management Not used Not used Optional
Xgrid (computational clustering) Not used Not used Optional
DHCP, DNS, NAT Automatic Automatic Optional
RADIUS Not used Not used Optional
NetBoot and NetInstall (system imaging) Not used Not used Optional
Chapter 1 Introducing Mac OS X Server 27
Page 28

Service Standard Workgroup Advanced
Spotlight (searching) Automatic Automatic Automatic
QuickTime Streaming Not used Not used Optional
Software update Not used Not used Optional
Remote management Included Included Included
Remote login (SSH) Included Included Included
Applications and Utilities
After setting up Leopard Server, you can change service settings and perform other
server administration tasks using the applications described below. You can also use
the Directory application, which is designed for users who aren’t administrators to
manage shared information in the server’s directory. It’s installed on all Macs with
Leopard as well as on your server. For information about using the Directory
application or Directory Utility, open it and then use the Help menu. For information
about using the other applications, see other chapters in this book.
Applications for standard and workgroup server administrators
Directory
(in /Applications/Utilities/)
Directory Utility
(in /Applications/Utilities/)
Server Assistant
(in /Applications/Server/)
28 Chapter 1 Introducing Mac OS X Server
Gives users access to shared information about people,
groups, locations, and resources. Users can share
contacts, add groups set up group services, and
manage their own contact information.
Connect your server to a directory server in your
organization.
Install or set up Mac OS X Server on a remote
computer.
Page 29

Applications for standard and workgroup server administrators
Server Preferences
(in /Applications/Server/)
Server Status widget for Dashboard Monitor server activity from any Mac with Leopard.
Manage users and groups, customize services and
system information, and monitor server activity.
Advanced Tools and Applications
If you set up an advanced configuration of Leopard Server, you administer it using the
applications and tools listed below. For more information, see Server Administration and
the other advanced administration guides described in “Mac OS X Server
Administration Guides” on page 144.
Important: If you have administrative applications and tools from Mac OS X Server
version 10.4 Tiger or earlier, do not use them with Leopard Server.
Applications and tools for advanced server administrators
Directory Utility
(in /Applications/Utilities/)
Podcast Capture
(in /Applications/Utilities/)
QuickTime Broadcaster
(in /Applications/)
RAID Admin
(in /Applications/Server/)
Connect the server to a directory server in your
organization.
Lets users record high-quality audio and video from a
local or remote camera, capture screen activity, or
upload QuickTime files into Podcast Producer for
encoding and distribution.
Captures live audio and video and works seamlessly
with QuickTime Streaming Server for high-quality
network broadcasting.
Set up and monitor Xserve RAID hardware.
Chapter 1 Introducing Mac OS X Server 29
Page 30

Applications and tools for advanced server administrators
Server Admin
(in /Applications/Server/)
Set up services, manage file share points, change
service setup, and customize server settings. Monitor
server activity and view detailed service logs.
Server Assistant
(in /Applications/Server/)
Server Monitor
(in /Applications/Server/)
System Image Utility
(in /Applications/Server/)
Workgroup Manager
(in /Applications/Server/)
Install or set up Mac OS X Server on a remote
computer.
Remotely monitor and manage one or more Xserve
systems.
Create and customize NetBoot and NetInstall images
for Mac OS X and Mac OS X Server computers.
Manage users, groups, computers, and computer
groups in advanced server deployments. Manage
preferences for Mac OS X users.
Xgrid Admin
(in /Applications/Server/)
Remotely manage clusters and monitor the activity of
controllers, agents, and the status of jobs on the grid.
Command-line tools Use UNIX tools to install and set up server software,
administer services, manage users, and so forth.
30 Chapter 1 Introducing Mac OS X Server
Page 31

2 Installing Mac OS X Server
Use the Installer to install Leopard Server locally, or use
Server Assistant to install remotely.
To get started you need to:
 Make sure the target server meets system requirements
 Connect the target server to your Ethernet network
 Use the Installation & Setup Worksheet to collect information you’ll need (it’s in the
Documentation folder on the Mac OS X Server Install Disc)
 Install Mac OS X Server version 10.5 Leopard using one of these methods:
 Install locally if the target server has a display that you can use conveniently
 Install remotely if the target server is inconveniently located or doesn’t have a
display
For information about installing Leopard Server on multiple servers, performing
automated installations, and other advanced installation methods, see Server
Administration. For information about upgrading or migrating to Leopard Server from
an earlier version of Mac OS X Server, see Upgrading and Migrating. These advanced
guides are described in “Mac OS X Server Administration Guides” on page 144.
2
31
Page 32

What You Need to Install Leopard Server
To install Leopard Server, you need a Macintosh desktop computer or server with:
 An Intel processor or PowerPC G5 or G4 (867 MHz or faster) processor
 At least 1 gigabyte (GB) of random access memory (RAM)
 At least 20 gigabytes (GB) of disk space available
 An active connection to a secure Ethernet network
A standard or workgroup server needs significantly more disk space—such as a high
capacity external hard drive—if you want to back up the server using Time Machine.
(Time Machine backup of server data isn’t supported for an advanced server.)
A built-in DVD drive is convenient but you can attach an external FireWire DVD drive or
a Mac that has a DVD drive and is operating in target disk mode instead.
A display is optional. You can install and administer Mac OS X Server on a computer
that has no display by using an administrator computer. For information, see
“Preparing an Administrator Computer” on page 36.
Some encoding operations require a compatible graphics card.
Your server doesn’t need to be located where someone has constant access to it. When
you need to perform administrative tasks, you can use any Mac that you’ve set up as an
administrator computer.
Unless you have a site license, you need a unique serial number for each server. You
must use a Mac OS X Server v10.5 Leopard serial number, which begins with XSVR-105.
32 Chapter 2 Installing Mac OS X Server
Page 33

Installing Mac OS X Server Securely
When you start up a computer from the Mac OS X Server Install Disc, SSH remote login
service and VNC screen sharing service start automatically in order to make remote
installation possible.
Important: Make sure the network is secure before you install or reinstall Mac OS X
Server, because SSH and VNC give others access to the computer over the network.
For example, set up your local network so that only users you trust can access it. Avoid
having Ethernet jacks in public places. If you have an AirPort Base Station or other
wireless access point, configure it to use WEP-2 authentication with a strong
password. Consider making the wireless network name private. Also, try to keep the
hardware serial number confidential, because it’s used as the password for remote
installation and setup.
Chapter 2 Installing Mac OS X Server 33
Page 34

Installing Locally
You can install Mac OS X Server directly onto the target server by starting up the server
from the Mac OS X Server Install Disc. The Installer application guides you through the
interactive installation process. The target server must have a display attached so you
can interact with the Installer.
Installer
application
You can perform:
 A new installation of Mac OS X Server on a disk that doesn’t already have Mac OS X
Server or Mac OS X installed
 A clean installation, which installs Mac OS X Server after erasing and formatting a
target disk
To install Mac OS X Server locally:
1 If you’re planning to erase or partition the target disk, make sure you have a backup of
the disk.
2 Make sure the computer has an active connection to a secure Ethernet network.
This network connection is needed to set up the server’s Open Directory domain.
3 Start up the computer, log in if necessary, and insert the Mac OS X Server Install Disc into
the DVD drive.
34 Chapter 2 Installing Mac OS X Server
Target server
Page 35

4 Open the Install Mac OS X Server application and click the Restart button.
The application is in the Mac OS X Server Install Disc window.
If you see an Install button instead of a Restart button in the lower-right corner of the
application window, click Install and proceed through the Installer panes by following
the onscreen instructions (skip steps 5 through 8 below). When installation is complete,
restart the server. Server Assistant opens so you can set up the server. For information,
see Chapter 3, “Setting Up Mac OS X Server.”
5 After the computer restarts, choose the language you want to use on the server, and
then click the arrow button.
6 Proceed through the Installer panes by following the onscreen instructions.
7 When the Select a Destination pane appears, select a target disk or volume (partition)
and make sure it’s in the expected state.
If you need to erase the target disk, click Options, select Erase and Install, choose a
format, and click OK.
You can instead choose Utilities > Disk Utility to erase the target disk using a less
common format, partition the server’s hard disk, or create a RAID set.
For more information, see Appendix A, “Preparing Disks for Installing Mac OS X Server.”
8 After installation is complete, the computer restarts and Server Assistant opens so you
can set up the server.
For information, see Chapter 3, “Setting Up Mac OS X Server.”
Chapter 2 Installing Mac OS X Server 35
Page 36

Preparing an Administrator Computer
You can use an administrator computer to install Mac OS X Server on another
computer over the network. As illustrated below, you start up the server using the
Mac OS X Server Install Disc and use Server Assistant application the administrator
computer to perform remote installation. The target server doesn’t need a display.
Server
Assistant
Administrator
computer
Target server
with DVD drive
You can also use an administrator computer to set up and manage Mac OS X Server
remotely. For information, see “Setting Up a Server Remotely” on page 44 and
“Connecting Server Preferences to a Remote Server” on page 51.
You make a Mac OS X computer into an administrator computer by installing server
administration software on it. If you have another server with Leopard Server already
set up, you can use it as an administrator computer as well.
36 Chapter 2 Installing Mac OS X Server
Page 37

To set up an administrator computer:
1 Make sure the Mac OS X computer has Mac OS X version 10.5 Leopard installed.
2 Insert the Administration Tools disc.
3 Open the Installers folder.
4 Double-click ServerAdministrationSoftware.mpkg to open the Installer, and then follow
the onscreen instructions.
Installing Remotely
Using Server Assistant on an administrator computer, you can install Mac OS X Server
on another computer over the network. The computer you’re installing on doesn’t need
a display, but it does need a DVD drive for the Mac OS X Server Install Disc. If the
computer doesn’t have a built-in DVD drive, you can attach an external FireWire DVD
drive or a Mac that has a DVD drive and is operating in target disk mode.
You can perform:
 A new installation of Mac OS X Server on a disk that doesn’t already have Mac OS X
Server or Mac OS X installed.
 A clean installation, which installs Mac OS X Server after erasing and formatting a
target disk.
Chapter 2 Installing Mac OS X Server 37
Page 38

To install Mac OS X Server remotely:
1 If you’re planning to erase the target disk or partition, make sure you have a backup of
it, and optionally use Disk Utility to prepare the target disk.
If you only need to erase the target disk using the most common format, Mac OS
Extended (Journaled), you don’t need to use Disk Utility. With Disk Utility, you can erase
the target disk using other formats, partition the server’s hard disk, or create a RAID set.
For information about using Disk Utility for these tasks, see Appendix A, “Preparing
Disks for Installing Mac OS X Server.”
2 Start up the target server with the Mac OS X Server Install Disc.
If the target server has a built-in DVD drive, insert the disc and then restart the
computer while holding down the C key on the keyboard. Release the C key when you
see the Apple logo.
If the target server has an external FireWire DVD drive, restart the computer while
holding down the Option key, select the icon representing the Mac OS X Server Install
Disc, and then click the Arrow button.
3 On an administrator computer, open Server Assistant, select “Install Mac OS X Server on
a remote computer,” and click Continue.
Server Assistant is located in /Applications/Server/. You can use Server Assistant
without an administrator account.
4 In the Destination pane, identify the target server and select it in the list.
You can identify a server by its IP address, DNS name, or MAC address (also called the
Ethernet address or hardware address).
38 Chapter 2 Installing Mac OS X Server
Page 39

For servers that Server Assistant finds on the local network (IP subnet), the IP address
may be assigned automatically by a DHCP server on the network. If no DHCP server
exists, the target server uses a 169.254.xxx.xxx address unique among servers on the
local network. Later, when you set up the server, you can change the IP address.
If the server you want isn’t listed, you can click Refresh List to have Server Assistant look
again for servers that are ready for installation on your local network. If the server you
want is on a different local network, choose “Server at IP Address” from the “Install to”
pop-up menu, and enter an IP address in IPv4 format (for example, 192.0.2.200). You
can also choose “Server at DNS Name” and enter the server’s DNS name.
5 When prompted for a password, type the first 8 characters of the server’s built-in
hardware serial number.
To find the serial number, look for a label on the server. Match the capitalization of the
serial number when you type it.
For a computer that has no built-in hardware serial number, use 12345678 as the
password.
6 Proceed through the Install Language, Important Info, and Software License panes,
following the onscreen instructions.
For information about settings in a Server Assistant pane, click the Help button in the
pane.
7 In the Volumes pane, select a target disk or partition, make sure it’s in the expected
state, and click Continue.
For information about the disk status icons, click the Help button in the Volumes pane.
Chapter 2 Installing Mac OS X Server 39
Page 40

8 If the volume you selected already has Mac OS X Server or Mac OS X installed, select an
available option and then click OK.
The options may include:
 Erase using Mac OS X Extended (Journaled) format, then install: Completely erases the
destination volume before installing a new copy of Mac OS X Server.
 Upgrade Mac OS X Server: This option is available only if the target volume has the
latest update of Mac OS X Server v10.4 Tiger or has Mac OS X Server v10.3.9 Panther.
You can upgrade this volume to an advanced configuration of Leopard Server
without erasing the destination volume. For information, see Upgrading and
Migrating (described in “Mac OS X Server Administration Guides” on page 144).
9 After installation is complete, the target server restarts and you can continue using
Server Assistant to set up the server remotely.
For information, see Chapter 3, “Setting Up Mac OS X Server.”
Instead of using Server Assistant on an administrator computer, you can remotely
control installation by using screen sharing on a Mac with Mac OS X v10.5 Leopard or
with Apple Remote Desktop (which you can purchase separately) on another Mac. For
more information, see Server Administration (described in “Mac OS X Server
Administration Guides” on page 144).
40 Chapter 2 Installing Mac OS X Server
Page 41

3 Setting Up Mac OS X Server
3
Server Assistant leads you through setting up your server
for the first time.
Server Assistant opens automatically when you:
 Finish installing Mac OS X Server version 10.5 Leopard
 Start up a new server with Leopard Server preinstalled
You can use Server Assistant:
 Locally on the server
 Remotely on an administrator computer to set up the server over the network
For information about interactively setting up multiple servers or automatically setting
up an advanced configuration, see Server Administration (described in “Mac OS X Server
Administration Guides” on page 144).
41
Page 42

Setting Up a Server Locally
You can set up a new server or a computer with Mac OS X Server newly installed by
using the server’s keyboard, mouse, and display.
To set up a server locally:
1 Prepare for setup by filling out a printed copy of the Installation & Setup Worksheet.
The Installation & Setup Worksheet is located on the Mac OS X Server Install Disc in the
Documentation folder.
2 If you have DHCP or DNS service provided by your ISP, Internet router, or other servers
on your network, make sure they are set up for your new server and are running.
3 If you want to set up your server as an Internet gateway, so the server shares an
Internet connection with other computers on your network, make sure of the
following:
 One Ethernet port, or interface, connects to your DSL modem, cable modem, or other
Internet source. The Internet interface must have a public IP address (not a private IP
ad d r es s li ke 10. 0.1.1 or 19 2.16 8.1.1 ).
 Another Ethernet port connects to your local network.
During setup, you specify which port connects to the Internet. For example, if the
server’s built-in Ethernet port connects to the Internet, you would specify it as the
Internet port. If your server has more than two Ethernet ports, you select at least one of
them as a local network port.
4 If the server is off, turn it on.
When the server starts up, Server Assistant opens automatically.
5 Proceed through the Server Assistant panes, following the onscreen instructions and
entering the information you’ve recorded on the Installation & Setup Worksheet.
42 Chapter 3 Setting Up Mac OS X Server
Page 43

For information about settings in a Server Assistant pane, click the Help button in the
pane.
When server setup is complete, you can:
 Take a few additional steps to keep your server secure. For information, see “Keeping
Your Server Secure” and “Protecting the System Administrator (root) Account,” next.
 Use Software Update to install any available Mac OS X Server updates. For
information, see “Keeping Leopard Server Up to Date” on page 54.
 Configure an AirPort Base Station or an Internet router so that users can access your
server over the Internet. For information, see Appendix B, “Configuring an Internet
Router.”
 Use Server Preferences to set up users and groups, customize services and system
information, and monitor server activity. You can also use the Server Status widget
with Dashboard to monitor your server. For information about these tasks, see
Chapters 4 through 9 or open Server Preferences and then use the Help menu.
Keeping Your Server Secure
For security, you should create a standard user account after completing server setup.
When you log in on the server, routinely use this standard account instead of an
administrator account. Then use your administrator account with each application that
requires administrator privileges. For example, use your administrator name and
password with Server Preferences when you need to manage users, groups, or services.
To create a standard user account, use the Accounts pane of System Preferences on the
server. For information, open System Preferences and then use the Help menu.
Chapter 3 Setting Up Mac OS X Server 43
Page 44

Protecting the System Administrator (root) Account
The administrator password you enter during setup is also used for the server’s System
Administrator user account, whose short name is root. The System Administrator (root)
account can move or delete any file in the system, including system files not available
to a server administrator account or any other user account. You don’t need root user
privileges to administer your server.
Important: Protecting the root user password is very important, so it should not be the
same as another account’s password.
After setting up the server, you should change the password of the root user account.
For information about changing the root user’s password, open Directory Utility (in
/Applications/Utilities/) and then use the Help menu.
Setting Up a Server Remotely
If you have a new server or another computer with Mac OS X Server newly installed,
you can set it up over the network by using Server Assistant on an administrator
computer. The server you’re setting up doesn’t need a keyboard or display. For
information about administrator computers, see “Preparing an Administrator
Computer” on page 36.
To set up a remote server:
1 Prepare for setup by filling out a printed copy of the Installation & Setup Worksheet.
The Installation & Setup Worksheet is located on the Mac OS X Server Install Disc in the
Documentation folder.
44 Chapter 3 Setting Up Mac OS X Server
Page 45

2 If you have DHCP or DNS service provided by your ISP, Internet router, or other servers
on you network, make sure they are set up for your new server and are running.
3 If you want to set up your server as an Internet gateway, so the server shares an
Internet connection with other computers on your network, make sure of the
following:
 One Ethernet port, or interface, connects to your DSL modem, cable modem, or other
Internet source. The Internet interface must have a public IP address (not a private IP
ad d r es s li ke 10. 0.1.1 or 19 2.16 8.1.1 ).
 Another Ethernet port connects to your local network.
During setup, you specify which port connects to the Internet. For example, if the
server’s built-in Ethernet port connects to the Internet, you would specify it as the
Internet port. If your server has more than two Ethernet ports, you select at least one of
them as a local network port.
4 If the server is off, turn it on.
When the server starts up, Server Assistant opens automatically and waits for remote
setup to begin.
5 On an administrator computer, open Server Assistant, select “Set up a remote server,”
and click Continue.
Server Assistant is located in /Applications/Server/. You can use Server Assistant
without an administrator account on the local computer.
6 In the Destination pane, type the preset password in the Password column for the
server you want to set up, and then select the Apply checkbox.
Chapter 3 Setting Up Mac OS X Server 45
Page 46

If the server isn’t listed, click Refresh List to have Server Assistant look again for servers
that are ready to set up on your local network (IP subnet). If the server you want is on a
different local network, click the Add (+) button and enter its IP address or DNS name.
The preset password consists of the first 8 characters of the computer’s built-in
hardware serial number, which is located on a label on the computer. Match the
capitalization of the serial number when you type it. For a computer that has no builtin hardware serial number, use 12345678 as the password.
7 Click Continue and proceed through the Server Assistant panes, following the onscreen
instructions and entering the information you’ve recorded on the Installation & Setup
Worksheet.
For information about settings in Server Assistant, click the Help button in any pane.
When server setup is complete, you can:
 Take a few steps to keep your server secure. For information, see “Keeping Your
Server Secure” on page 43 and “Protecting the System Administrator (root) Account”
on page 44.
 Use Software Update to install any available Mac OS X Server updates. For
information, see “Keeping Leopard Server Up to Date” on page 54.
 Configure an AirPort Base Station or an Internet router so that users can access your
server over the Internet. For information, see Appendix B, “Configuring an Internet
Router.”
 Use Server Preferences to set up users and groups, customize services and system
information, and monitor server activity. You can also use the Server Status widget
with Dashboard to monitor your server. For information about these tasks, see
Chapters 4 through 9 or open Server Preferences and then use the Help menu.
46 Chapter 3 Setting Up Mac OS X Server
Page 47

4 Managing Your Server
4
Use the Server Status widget, Server Preferences, Time
Machine, and Software Update to check status, change
settings, back up and restore, and update server software.
Check status with Server Preferences or the Server Status widget. Find and change
server settings with Server Preferences. Use Server Preferences and the Server Status
widget on the server itself or over the network from any Mac with Leopard. Set Time
Machine preferences to back up the server, and restore using the Time Machine
application or the Installer. Keep the server software current with Software Update.
Using Server Preferences
With Server Preferences, you can check the status of services and change their settings.
You use Server Preferences to manage various aspects of a standard or workgroup
configuration of Leopard Server, such as who can use its services, how its services are
configured, or what its status is.
47
Page 48

When you open Server Preferences, individual preferences are grouped in the
categories described below.
 Accounts: Manage users and groups.
 Services: Customize settings for file sharing, iCal calendar service, iChat instant
messaging service, mail service, web services, and VPN remote access service.
 System: Check server information, service logs, graphs of server activity, and firewall
settings.
To manage a standard or workgroup server:
1 Open Server Preferences.
Server Preferences is located in /Applications/Server/.
2 If Server Preferences asks you for Server, User Name, and Password, enter the server’s
DNS name or IP address, the name of an administrator user account on the server, and
the password for the administrator account.
The account you created when you set up the server is an administrator account.
48 Chapter 4 Managing Your Server
Page 49
Using the Server Status Widget
You can use the Server Status widget to monitor the status of Mac OS X Server either
on the server itself or from another computer with Mac OS X Server or Mac OS X.
To use the Server Status widget:
1 Open Dashboard, click its Open (+) button, and then click or drag the Server Status
widget from the widget bar.
You can open Dashboard by clicking its icon in the Dock or pressing its keyboard
shortcut, which is usually the F12 key.
2 Enter the server’s DNS name or IP address, an administrator name and password, and
then click Done.
3 When the Server Status widget is connected to a server, it displays the server’s DNS
name and status information about the server and its services.
Monitor processor utilization, network load, or disk usage by clicking an icon below the
graph.
Change the processor or network graph’s time period to one hour, day, or week by
clicking the graph.
Chapter 4 Managing Your Server 49
Page 50

If your server has more than one disk, you can see the status of each disk in turn by
clicking the disk usage graph.
Check the status indicator and current number of connections for the listed services. A
green indicator means the service is running.
Open the Server Preferences pane for a listed service by clicking the service in the
widget.
Connect to a different server by moving the mouse to the upper left corner of the
widget and clicking the small Info (i) button.
You can open another Server Status widget to see more than one aspect of a server’s
status at once or to monitor another server on the network.
The Server Status widget requires Mac OS X Server version 10.5 Leopard or Mac OS X
v10.5 Leopard.
For information about widgets and Dashboard, switch to the Finder and then use the
Help menu.
You can also see graphs of server activity using Server Preferences. For information, see
“Monitoring Server Graphs” on page 141.
50 Chapter 4 Managing Your Server
Page 51

Finding Settings in Server Preferences
Server Preferences contains dozens of settings you can change to customize your
computer. You can quickly search Server Preferences to find the specific setting you
want.
To find settings in Server Preferences:
1 Open Server Preferences.
2 In the search box, type a word or phrase that describes what you want to change. For
example, if you want to add members to a group, type “group members.”
As you type, you see possible matches to what you’re typing below the search box.
3 When you see what you’re looking for in the search results list, stop typing. One or
more preferences are spotlighted in the Server Preferences window.
4 Click the item in the list that matches what you want to change. In the pane that
opens, you can change the settings for that item.
Connecting Server Preferences to a Remote Server
You can connect Server Preferences to a server over the network and manage users,
groups, services, and system information remotely.
To manage a server remotely:
1 Open Server Preferences on an administrator computer and choose Connection > New
Connection.
For information about administrator computers, see “Preparing an Administrator
Computer” on page 36.
Chapter 4 Managing Your Server 51
Page 52

2 Enter the remote server’s DNS name or IP address and the name and password of an
administrator account on the remote server.
When Server Preferences is connected to a remote server, the server’s name or IP
address is displayed in the title bar of the Server Preferences window.
To reconnect to a server you have connected to recently, choose Connection > Open
Recent Connection, and then choose the server you want.
You can connect Server Preferences to standard and workgroup configurations of
Leopard Server, but not to an advanced configuration of Leopard Server or an earlier
version of Mac OS X Server.
Closing a Server Preferences Connection
For security, you should close a Server Preferences window when you are not actively
using it to manage the server’s users, groups, services, or system information. Leaving a
server connection open on an unattended server makes it easier for an unauthorized
person to make changes to users, groups, or services.
Here are ways you can close a Server Preferences connection:
m Close the Server Preferences window.
m Choose Connection > Close.
m Quit Server Preferences.
If you close the only open Server Preferences window, Server Preferences quits
automatically.
52 Chapter 4 Managing Your Server
Page 53

Backing Up and Restoring the Server
You can back up server files automatically using Time Machine. It’s a comprehensive
backup solution for the system. It automatically makes a complete backup of all files on
the system to either a locally attached external hard drive or a remote network file
system. It also keeps track as files are created, updated, or deleted over time. Time
Machine backs up the changes and creates a history of the file system that you can
navigate by date. You can use its intuitive time-based visual browser to search back
through time to find and restore any files that were backed up.
You can set up a list of folders and disks that you want excluded from backup. Time
Machine automatically excludes temporary and cache files located in /tmp/, /Library/
Logs/, /Library/Caches/, and /Users/username/Library/Caches/.
You set backup options in the Time Machine pane of System Preferences. You use the
Time Machine application to restore files. You can also restore the entire system to a
previous state using the Installer. For information about backing up and restoring with
Time Machine or the Installer, open System Preferences and then use the Help menu.
Note: You can restore a standard or workgroup configuration from a Time Machine
backup, but may not be able to completely restore advanced settings changed with
Server Admin.
Chapter 4 Managing Your Server 53
Page 54

Keeping Leopard Server Up to Date
When your server is connected to the Internet, Software Update can automatically get
the latest free Leopard Server version, security updates, and other enhancements from
Apple. Your server is set to check automatically for updates once a week, but you can
set it to check daily or monthly. You can also check now.
To check for updates or adjust automatic updating:
1 Open System Preferences.
2 Click the Software Update Icon and follow the onscreen instructions.
If your organization has another server with Mac OS X Server, your server may get
software updates from it rather than from Apple. An expert administrator can set up
Mac OS X Server to provide software update service by using Server Admin.
You can also download software updates directly from the Apple Downloads website:
www.apple.com/support/downloads
54 Chapter 4 Managing Your Server
Page 55

5 Managing Users
5
Create or import user accounts, change their settings,
or delete them in the Users pane of Server Preferences.
In the Users pane, you set up accounts for people who use the services that this server
provides, and you control which services they can access. You can update their contact
information and change their group memberships. You can also edit the email
messages that can be sent to new users. For information about the settings and
controls in this pane, click the Help button in the lower-right corner of the Server
Preferences window.
55
Page 56

About User Accounts
User accounts on your server allow users to gain access to services provided by the
server. A user account contains the information needed to prove the user’s identity for
all services that require authentication. A user account also provides a centralized place
to store a user’s contact information and other data.
Each user account can provide an email address, iChat instant messaging address,
personal calendar, and VPN remote access to your server. Users can also be members
of groups, authorizing them to access group resources such as a shared group folder,
group website, and group calendar. Of course, if any of these services is turned off,
then users don’t have access to it.
You can add new user accounts in the Users pane of Server Preferences by:
 Creating new accounts
 Importing existing accounts, if your organization has a directory server and your
server is connected to it
You can import user accounts individually. You can also automatically import all user
accounts that are members of a group.
New user accounts you create are stored in your server’s directory. Imported user
accounts remain in your organization’s directory server. You can supplement imported
accounts with contact information, group membership information, and so forth. The
supplemental information is stored in your server’s directory. When someone uses an
imported user account, your server automatically combines the account information
stored in the directory server with supplemental account information stored in your
server’s directory.
56 Chapter 5 Managing Users
Page 57

You can use Server Preferences to edit user accounts created on your server. Users can
also edit their own accounts using the Directory application.
If your server has imported user accounts, you can use Server Preferences to edit an
account’s supplemental information in your server’s directory, but not the account
information in your organization’s directory. An administrator of that directory can edit
its account information using tools for the directory server.
Users who have administrator privileges on their own computers can create local user
accounts with the Accounts pane of System Preferences. These local user accounts are
stored on the user’s computer. Local user accounts have home folders on the computer
and can be used for logging in to the computer. Local user accounts can’t be used to
access the server over the network.
Because your server is also a Mac OS X computer, it has local accounts in addition to
server accounts and possibly imported accounts. Your server’s local accounts can be
used to log in to it, and a local account with administrator privileges can be used to
administer the server. For information about administrator privileges, see “About
Administrator Accounts,” next.
Chapter 5 Managing Users 57
Page 58

The following table summarizes the key differences between server accounts, imported
accounts, and local accounts.
Account type Stored in Created by Used for
Server accounts Your server’s directory You (a server
Imported accounts Your organization’s
directory server, with
supplements in your
server’s directory
Local accounts Each Mac OS X
computer
administrator), using
Server Preferences
Directory server’s
administrator
A user with an
administrator account
on the computer,
using Accounts
preferences
Group membership,
contact information,
authenticating for
services
Group membership,
contact information,
authenticating for
services
Home folders, logging
in to the computer
About Administrator Accounts
You need an administrator account on your server to create other user accounts,
create groups, change server settings, and perform other tasks using Server
Preferences. With an administrator account, you can also make changes to locked
preferences in System Preferences, install software on the server, and perform other
tasks that standard users can’t.
58 Chapter 5 Managing Users
Page 59

Your server has two administrator accounts after you finish the initial setup process
described in Chapter 3. The primary administrator account is the one whose name and
password you entered while setting up the server. The other administrator account also
has the password you entered, but its name is Local Administrator, and its short name
is localadmin. The table below summarizes their similarities and differences.
The primary administrator account is in your server’s directory together with other user
accounts you create using the Users pane of Server Preferences. You can use this
administrator account on the server itself, and you can use it to manage your server
over the network from another Mac.
The Local Administrator account is stored on the server, not in its directory, together
with any user accounts you might create using the Accounts pane of System
Preferences. You can use the Local Administrator account to log in on the server and
use Server Preferences on the server in the event of a malfunction that makes the other
administrator account unusable.
Primary administrator Local administrator
Name and short name Specified during setup Local Administrator and
Password Specified during setup Specified during setup
Stored in the server’s directory Yes No
Can be used from an
administrator computer
Yes No
localadmin
Chapter 5 Managing Users 59
Page 60

When you create a new user account, you specify whether the user is an administrator
or a standard user. You can also make an imported user account a server administrator.
If you don’t want a user to be able to use Server Preferences or install software on the
server, don’t make the user an administrator.
To keep your computer secure, don’t share an administrator name and password with
anyone. Be sure to log out when you leave your computer, or set up a locked screen
saver using the Screen Saver pane and Security pane of System Preferences. If you
leave your computer while you’re logged in and the screen is unlocked, someone could
sit down at your computer while you’re away and make changes using your
administrator privileges.
For added security, routinely log in on the server using a standard user account. Use
your administrator name and password when you open Server Preferences or other
application that requires administrator privileges.
Never set an administrator to be automatically logged in when the server starts up. If
you do, someone can simply restart the server to gain access as an administrator.
Adding a User Account
You can add an individual user account for each person who uses the services provided
by your server. Your server gives each user account a separate email address, iChat
address, and personal calendar. User accounts can also have access to the server’s
shared files and shared websites, and they can use VPN to access the server remotely.
Availability of each service is subject to the service being turned on, and you can
separately control each user account’s access to services.
60 Chapter 5 Managing Users
Page 61

To add a new user account:
1 Click the Add (+) button in the Users pane of Server Preferences.
2 If you see a pop-up menu, choose one of the commands:
Import User From Directory: You can import users’ existing accounts from your
organization’s directory server. For information about doing this, see “Importing Users”
on page 62.
Create New User: You generally add new users from your organization’s directory server
if possible, but you can also create new user accounts in your server’s directory. To do
this, continue with step 3.
If you don’t see a pop-up menu when you click the Add (+) button, your server isn’t
connected to a directory server. Continue with step 3 to create a user account in your
server’s directory.
3 Enter the user’s name.
The name can be as long as 255 characters (from 255 Roman characters to as few as 85
Japanese characters). It can include spaces.
4 If you don’t want to use the short name generated automatically, type a new short
name. (Once the account is created, you won’t be able to change the short name.)
The short name typically is eight or fewer characters, but can be as long as 255 Roman
characters. Use only the characters a through z, A through Z, 0 through 9,
_ (underscore), or - (hyphen).
Note: If the user whose account you’re creating already has a Mac set up, try to use the
same short name for the user’s account on the server. Having the same short name will
facilitate logging in for services.
Chapter 5 Managing Users 61
Page 62

5 Enter the user’s password in the Password and Verify fields.
You can use Password Assistant to help you choose a new password. Click the Key
button to the right of the Password field to see how secure the new password is.
6 Select “Allow user to administer this computer” if this user account needs to create
other user accounts, create groups, install software on the server, or change server
settings.
Importing Users
If your server is connected to your organization’s directory server, you can import users’
existing accounts. Your server gives each imported user account a separate iChat
address and personal calendar. Imported user accounts can also have access to the
server’s shared files and shared websites. If your server’s mail service and VPN service
are turned on, imported user accounts get email addresses and can use VPN to access
the server remotely. Access to each service is subject to the service being turned on,
and you can separately control each imported user account’s access to services.
To import a user account:
1 Before importing a user account, be sure the invitation email is worded to suit your
needs.
For information, see “Customizing the Server Invitation Email” on page 75.
2 In the Users pane of Server Preferences, click the Add (+) button and choose “Import
User From Directory” from the pop-up menu.
If you don’t see a pop-up menu when you click Add (+), your server isn’t connected to
a directory server in your organization. See “Connecting to a Directory Server” on
page 135.
62 Chapter 5 Managing Users
Page 63

If your organization doesn’t have a directory server (apart from your server), you can
create new user accounts. For information about creating new user accounts, see
“Adding a User Account” on page 60.
3 Select a user account from the list of accounts on your organization’s directory server,
optionally select “Send imported users an email invitation,” and then click Import.
4 When you’re finished importing user accounts, click Done.
User accounts you import using this procedure are listed as “Imported” in the Users
pane.
Instead of importing user accounts individually using this procedure, you can import
user accounts automatically from groups. For information about how to do this, see the
next section.
Importing Groups of Users Automatically
If your server is connected to your organization’s directory server, you can import
groups of existing user accounts. If you import a group, your server automatically
imports user accounts for all group members. Your server periodically checks with your
organization’s directory server for changes in each imported group’s membership, and
automatically adds and removes imported user accounts as users are added to or
removed from an imported group.
Chapter 5 Managing Users 63
Page 64

Your server gives each imported user account a separate iChat address and personal
calendar. Imported user accounts can also have access to the server’s shared files and
shared websites. If your server’s mail service and VPN service are turned on, imported
user accounts get email addresses and can use VPN to access the server remotely.
Access to each service is subject to the service being turned on, and you can separately
control each imported user account’s access to services.
To import user accounts automatically from groups:
1 Before importing user accounts from groups, be sure the invitation email is worded to
suit your needs.
For information, see “Customizing the Server Invitation Email” on page 75.
2 In the Users pane of Server Preferences, click the Action (gear) button and choose
“Import Users From Groups” from the pop-up menu.
If the Action pop-up menu doesn’t include this option, your server isn’t connected to a
directory server. See “Connecting to a Directory Server” on page 135.
If your organization doesn’t have a directory server (apart from your server), you can
create new user accounts. For information about creating new user accounts, see
“Adding a User Account” on page 60.
64 Chapter 5 Managing Users
Page 65

3 Change the list on the right so it contains the groups whose members you want to
import automatically.
Add an available group by selecting it in the list on the left and clicking Add.
Remove a group to import by selecting it in the list on the right and clicking Remove.
4 Optionally select “Send new imported users an email invitation.”
5 When you’re satisfied with the list of groups to import, click Save.
User accounts that are imported automatically from groups are listed as “Automatic” in
the Users pane.
You can also import user accounts individually. For information about how to do this,
see “Importing Users” on page 62.
Deleting a User Account
You can use Server Preferences to delete user accounts that are no longer needed for
your server. Deleting a user account cancels its group memberships and stops it from
being an automatic iChat buddy. Deleting a user account also deletes the mail the user
has stored on the server and makes the user’s personal calendar inaccessible.
To delete a user account:
1 In the Users pane of Server Preferences, select the user account you want to change in
the list on the left.
2 Click the Delete (–) button.
Chapter 5 Managing Users 65
Page 66

Changing a User’s Account Settings
Change a user’s name, password, picture, or administrator privilege by clicking Account
in the Users pane of Server Preferences.
66 Chapter 5 Managing Users
Page 67

To change account settings for a user:
1 In the Users pane of Server Preferences, select the user account you want to change in
the list on the left.
2 Click Account, and then change any available setting, using the following information
as a guide:
Name: Enter the user’s name. It can be used with the password to authenticate for
services.
Short Name: This is an abbreviation of the user’s name. It’s used for the user’s email
and iChat addresses. It can also be used with the password to authenticate for services.
It can’t be changed after the account is created.
Reset Password: Click to reset the password. The password can’t be changed for a user
account that’s imported from a directory server.
Picture: Click to set the user’s picture by choosing a picture, taking a picture with an
attached camera, or applying a visual effect.
Allow user to administer this server: If selected, this user account can manage users,
groups, and services with Server Preferences.
If settings besides the short name are dimmed in the Account pane, you can’t change
them because they are stored the directory server that your server is connected to.
Users with Leopard can change their own account information using the Directory
application.
Chapter 5 Managing Users 67
Page 68
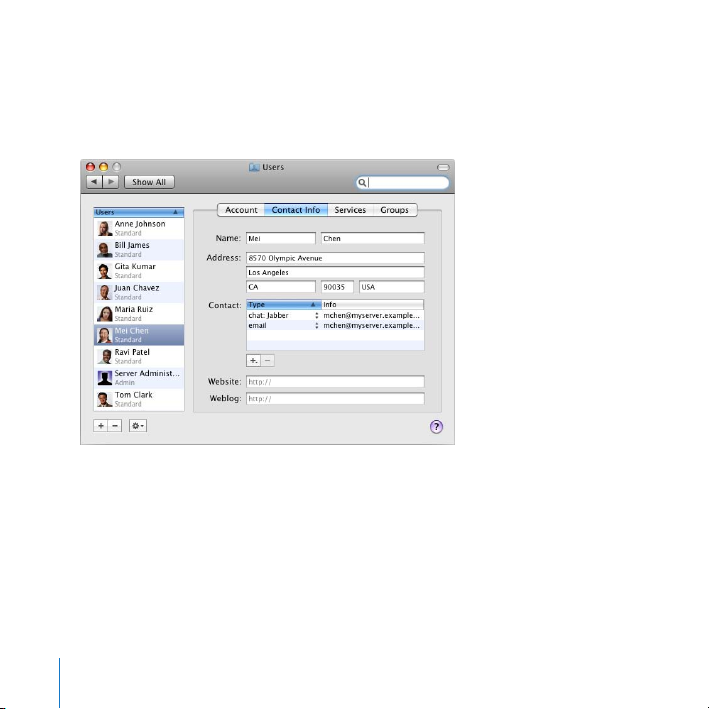
Changing a User’s Contact Info
Change a user’s first and last names, address, email and chat addresses, website
address, and blog address by clicking Contact Info in the Users pane of Server
Preferences.
68 Chapter 5 Managing Users
Page 69

To change contact information for a user:
1 In the Users pane of Server Preferences, select the user account you want to change in
the list on the left.
2 Click Contact Info, and then change any available setting, using the following
information as a guide:
Name: The user’s first name and last name.
Address: The user’s postal address.
Contact: The user’s instant messaging addresses and email addresses.
 To add an address, click the Add (+) button.
 To remove an address, select it and click the Delete (–) button.
Website: The user’s personal website address, beginning with http://.
Weblog: The user’s personal blog address, beginning with http://.
If some settings in the Contact Info pane are dimmed, you can’t change them because
they are stored in the directory server that your server is connected to.
Users with Leopard can change their own contact info using the Directory application.
For information, see “Working with Directory Information on Leopard Users’ Macs” on
page 90.
Controlling a User’s Access to Services
Control a user’s access to individual services by clicking Services in the Users pane of
Server Preferences.
Chapter 5 Managing Users 69
Page 70

To change service access settings for a user:
1 In the Users pane of Server Preferences, select the user account you want to control in
the list on the left.
2 Click Services, and then select the services that you want to let the user access.
Deselect the services you don’t want the user to access.
Changing a User’s Group Membership
Make a user a member of a group or remove a user from a group by clicking Groups in
the Users pane.
70 Chapter 5 Managing Users
Page 71

To change group membership for a user:
1 In the Users pane of Server Preferences, select the user account you want to change in
the list on the left.
2 Click Groups, and then click Edit Membership.
3 Select the checkbox next to each group you want the user to be a member of. Deselect
the checkbox next to each group you don’t want the user to be a member of.
4 When you finish making changes, click Edit Membership again to display a static list of
groups that the user belongs to.
For information about adding, removing, or configuring groups, see Chapter 7,
“Managing Groups.”
Changing a User’s Name or Password
You can use Server Preferences to change the name or password for a standard user
account or an administrator account.
To change a user account’s name or password:
1 In the Users pane of Server Preferences, select a standard or administrator user account
you want to change in the list on the left, and then click Account.
2 If you want to change the name, edit the Name field.
The name can be as long as 255 characters (from 255 Roman characters to as few as 85
Japanese characters). It can include spaces.
You can’t change a user account’s short name using Server Preferences.
3 If you want to change the password, click Reset Password, enter the new password in
the New Password and Verify fields, and click Change Password.
Chapter 5 Managing Users 71
Page 72

You can use Password Assistant to help you choose a new password. Click the Key
button to the right of the New Password field to see how secure the new password is.
Users with Leopard can change their name and password using the Directory
application. Users can change their passwords when authenticating for file sharing.
If your server has imported user accounts, or user accounts imported automatically
from groups, their names or passwords can be changed by an administrator of the
directory server where the accounts are stored. If that directory server is a standard
configuration of Mac OS X Server and you are an administrator of it, you can connect
Server Preferences to it remotely and then make the changes. For information about
how to connect remotely, see “Connecting Server Preferences to a Remote Server” on
page 51.
If your server’s imported user accounts are stored on an advanced configuration of
Mac OS X Server, the directory administrator can use Workgroup Manager to change
the account name and password. For information about using Workgroup Manager,
open it and then use the Help menu.
To change the password or other attributes of the Local Administrator account, use the
Accounts pane of System Preferences after setting up the server. For information about
changing local accounts, open System Preferences and then use the Help menu.
To change the password of the System Administrator (root) account, use the Directory
Utility application after setting up the server. For information about using Directory
Utility, open it and then use the Help menu.
72 Chapter 5 Managing Users
Page 73

Changing a User’s Picture
You can use Server Preferences to change the picture for a standard user account or an
administrator account. If your server has imported user accounts or user accounts
imported automatically from groups, you can change their pictures unless the pictures
were set on your organization’s directory server.
To change the picture for a user account:
1 In the Users pane of Server Preferences, select a user account you want to change in
the list on the left, and then click Account.
2 To use an included picture, click the picture field and choose a picture from the pop-up
menu.
3 To edit the picture or use a one from a camera or a file, click the picture field, choose
Edit Picture from the pop-up menu, make changes to the picture as desired, and then
click Set or Cancel.
To choose a picture you’ve used recently, click Recent Pictures.
To move the picture, drag it up, down, or sideways.
To crop the picture, drag the slider.
To capture a new picture using a video camera attached to the computer, click the
Camera button.
To apply a visual effect, click the Visual Effects (grid) button, scroll through the available
effects, and select the effect you want.
To use a picture file, click Choose.
Chapter 5 Managing Users 73
Page 74

Users with Leopard can change their own pictures using the Directory application. For
information, see “Working with Directory Information on Leopard Users’ Macs” on
page 90.
Customizing the Welcome Email
You can use Server Preferences to add your name, email address, and a personal
introduction to the standard email message that your server sends to tell new users
about its services. The standard message specifies the server’s DNS name and the
recipient’s email address, and it explains the services that the server provides. The
standard message also includes links to available file sharing and web services.
The server sends the email automatically when you add a new user account. However,
your server doesn’t send the email if its mail service is stopped when you add new user
accounts.
To customize the email sent to newly added user accounts:
1 In the Users pane of Server Preferences, click the Action (gear) button and choose
“Email Message Settings” from the pop-up menu.
2 Enter the sender’s name and email address in the Admin Full Name and Admin Email
fields.
3 Optionally enter a personal message in the Welcome field.
You can use the message to introduce yourself, so recipients know the email is
genuine. Example: Hi, I’m the administrator for our server, myserver.example.com. If
you need help getting services from it, please don’t hesitate to send me an email or call
me at 310-555-4357. —Bill
74 Chapter 5 Managing Users
Page 75

Users receive the welcome email when they start using their email accounts. They see
your name and message in a boxed section set apart from the standard message text
that the server generates.
Customizing the Server Invitation Email
You can use Server Preferences to add your name, email address, and a personal
introduction to the standard email message that your server can send to tell newly
imported users how to get its services. The standard message specifies the server’s DNS
name, and it explains the services that the server provides. Recipients who have
Mac OS X v10.5 Leopard can click a button in the email to automatically set up their
Macs to get services from your server. The standard message also includes links to
available file sharing and web services.
You can select an option to send the email when you import users or a group of users.
The server sends the invitation to email addresses that already exist in the imported
user accounts. The server doesn’t send the invitation to an imported user account that
doesn’t contain an email address.
To customize the email sent to newly imported user accounts:
1 In the Users pane of Server Preferences, click the Action (gear) button and choose
“Email Message Settings” from the pop-up menu.
2 Enter the sender’s name and email address in the Admin Full Name and Admin Email
fields.
3 Optionally enter a personal message in the Invitation field.
If you don’t see an Invitation field, your server isn’t connected to a directory server. See
“Connecting to a Directory Server” on page 135.
Chapter 5 Managing Users 75
Page 76

You can use the message to introduce yourself, so recipients know the email is
genuine. Example: Hi, I’m the administrator for our server, myserver.example.com. If
you need help setting up your computer to get services from it, please don’t hesitate to
send me an email or call me at 310-555-4357. —Bill
Recipients see your name and message in a boxed section set apart from the standard
message text that the server generates.
Customizing the Group Invitation Email
You can use Server Preferences to add your name, email address, and a personal
introduction to the standard email message that your server can send to tell new
external members of a group how to use the group’s services. The standard message
specifies the group name and the server’s DNS name, and it explains the services that
the server provides. The standard message also includes links to available file sharing
and group services.
You can select an option to send the email when you add users or groups from your
organization’s directory server as external members of a group on your server. The
server sends the invitation to email addresses that already exist in each new external
member’s user account. The server doesn’t sent the invitation to a new external
member whose user account doesn’t contain an email address.
76 Chapter 5 Managing Users
Page 77

To customize the email sent to new external members of a group:
1 In the Users pane of Server Preferences, click the Action (gear) button and choose
“Email Message Settings” from the pop-up menu.
2 Enter the sender’s name and email address in the Admin Full Name and Admin Email
fields.
3 Optionally enter a personal message in the Group Invitation field.
If you don’t see the Group Invitation field, your server isn’t connected to a directory
server. See “Connecting to a Directory Server” on page 135.
You can use the message to introduce yourself, so recipients know the email is
genuine. Example: Hi, I’m the administrator for the server myserver.example.com,
which provides services for the group. If you need help getting group services from the
server, please don’t hesitate to send me an email or call me at 310-555-4357. —Bill
Recipients see your name and message in a boxed section set apart from the standard
message text that the server generates.
Chapter 5 Managing Users 77
Page 78

Page 79

6 Managing Users’ Computers
6
Learn how to help users set up their computers to use the
services you server provides.
Users need to set up their computers to get services from your server. Users with
Mac OS X version 10.5 Leopard can have their computers set up automatically. Users
with earlier Mac OS X versions or Windows need to set up their computers manually.
Users whose Macs have Leopard and are connected to your server can use the
Directory application to share contacts, add groups, set up group services, and manage
their own contact information.
Setting Up Leopard Users’ Macs Automatically
Users who have Mac OS X v10.5 Leopard can automatically set up their Macs to get
services from your server. The procedure is different for three types of Leopard users, as
explained in the following table.
79
Page 80

Automatic setup for Begins after users For information, see
New users of Leopard (with a
new Mac or Leopard newly
installed) if your server is a
standard configuration
Current users of Leopard
whose accounts you import
from a directory server
Current users of Leopard
whose accounts you create on
the server
Complete the “Connect to
Mac OS X Server” pane during
Leopard setup
Click the button in the
invitation email they receive
Open the Directory Utility
application (or after it opens
automatically)
“Setting Up Services for New
Leopard Users,” next
“Setting Up Leopard Users
with an Invitation Email” on
page 84
“Setting Up a Mac by Using
Directory Utility” on page 85
After a user finishes one of the automatic setup procedures, the user is ready to access
services as shown in the table on the next page. (Of course, the user can only access
services that are turned on.)
The user’s local account is tied to the user’s server account, and the local account is
labeled “Managed” in the Accounts pane of System Preferences. Both accounts have
the same password.
 If the user’s server account is new, its password is changed to the password from the
user’s existing local account.
 If the user’s server account is imported from an existing account in a directory server,
this account’s password replaces the user’s local account password.
80 Chapter 6 Managing Users’ Computers
Page 81

If the user changes the password in the Accounts pane of System Preferences, the
server account password will change to match.
If a user’s accounts were created with different user names, the user can change the
long name of the local account by using the Accounts pane of System Preferences. The
user can also use the Directory application to change the long name of the server
account.
For information about local, server, and imported user accounts, see “About User
Accounts” on page 56.
Application Is ready to access
Address Book Other users’ contact information
Directory User, group, and resource information
Finder Shared folders
iCal User’s personal calendar and group calendar
iChat User’s Jabber account and buddy list
Mail User’s email account and other users’ email addresses
Safari Server website: http://myserver.example.com
Group wikis: http://myserver.example.com/groups
User blogs: http://myserver.example.com/users
Webmail: http://myserver.example.com/webmail
Network preferences VPN connection
Chapter 6 Managing Users’ Computers 81
Page 82

Setting Up Services for New Leopard Users
During initial setup of a new Mac or a Mac with Mac OS X v10.5 Leopard newly
installed, the “Connect to Mac OS X Server” pane lets the user choose your server if it
has a standard configuration of Leopard Server and the user has an account on it. (A
server is a standard configuration if it doesn’t have imported user accounts and isn’t
connected to a directory server.)
User chooses your
server
User specifies an
account on your
server
82 Chapter 6 Managing Users’ Computers
Page 83

This pane appears only if the Mac detects a standard configuration of Leopard Server
on the network. This pane doesn’t allow a user to choose a workgroup configuration of
Leopard Server. (A server is a workgroup configuration if it’s connected to a directory
server. See “Connecting to a Directory Server” on page 136.)
If the user completes this pane:
 A local user account is created on the user’s Mac based on the specified account on
the server. Both accounts have the same long name, short name, and password.
 A home folder is set up on the user’s computer.
 The user’s computer is automatically connected to your server and configured to get
services from it. For information about how the computer gets services, see “Setting
Up Leopard Users’ Macs Automatically” on page 79.
The user may be unable to complete the “Connect to Mac OS X Server” pane for several
reasons. For example:
 The user may not know your server’s name or may not have a user account on the
server. In these cases, the user can skip the “Connect to Mac OS X Server” pane by
deselecting “Use the following Mac OS X Server.”
 The user’s Mac may not be connected to the network during initial setup. In this case,
the “Create Your Account” pane appears instead of the “Connect to Mac OS X Server”
pane, and the user creates a new account not based on a server account.
If the user doesn’t complete the “Connect to Mac OS X Server” pane for any reason, the
user can finish initial setup and then configure the Mac to get services from your
server. For information about how the user does this, see “Setting Up a Mac by Using
Directory Utility” on page 85.
Chapter 6 Managing Users’ Computers 83
Page 84

Setting Up Leopard Users with an Invitation Email
If some users already have Mac OS X v10.5 Leopard set up and you import their user
accounts from a directory server, you can have an email sent inviting them to join the
server. Leopard users can click a button in the invitation email to begin using an
assistant that connects their computers to the server and sets up their applications
to get its services. For information about the assistant, see “Setting Up a Mac by Using
Directory Utility,” next.
Note: To receive an invitation email, an imported user must have an email address
in the user’s account on the directory server. Only users with imported user accounts
receive the invitation email. Users with accounts you create on your server don’t
receive the invitation email. The next two sections describe how their computers
get set up.
When Leopard users click the button in the invitation email to use the assistant, it
checks the server for a user account with a long name or short name that matches the
local user account that’s currently logged in on the user’s computer. If the assistant
finds a match, it asks whether the user wants to tie the local account to the server
account. If the user agrees, the local account is changed to use the password from the
account on the server. The user’s home folder remains on the user’s computer.
The user chooses whether to have applications set up to get services from the server.
For information about how applications are set up, see “Setting Up Leopard Users’
Macs Automatically” on page 79.
For information about adding your name, email address, and a personal introduction to
the standard message text that the server generates for the invitation email, see
“Customizing the Server Invitation Email” on page 75.
84 Chapter 6 Managing Users’ Computers
Page 85

Setting Up a Mac by Using Directory Utility
If a Mac with Mac OS X v10.5 Leopard isn’t connected to a server yet, and Leopard
detects your server on the network, Directory Utility opens automatically. It displays an
assistant that connects the Mac to the server and sets up applications to use its
services. The user can also open Directory Utility manually, and it will display the
assistant if it detects your server.
While using the assistant:
 The user decides whether to set up the Mac to get services from your server. If
Directory Utility discovers more than one server that can provide services, it lists the
servers by computer name and IP address and the user has to know which server to
choose. The list includes only servers with a standard or workgroup configuration of
Leopard Server.
Chapter 6 Managing Users’ Computers 85
Page 86

 The user enters the name and password of the user account on the server and the
password of the local user account that’s currently logged in on the user’s computer.
The password of the server account changes to the password of the local account.
The user’s home folder remains on the user’s computer.
 The user chooses whether to have applications set up to get services from the server.
For information about how the applications get services, see “Setting Up Leopard
Users’ Macs Automatically” on page 79.
Setting Up Users’ Computers Manually
Users who have Mac OS X v10.4 Tiger or earlier, or who are running Windows, can get
services from your server by configuring their applications manually. They can use the
settings in the following table, replacing the italicized placeholders with your server’s
DNS name and the user’s short name.
Application Settings
Finder
(File sharing)
iChat
(XMPP instant messaging application)
86 Chapter 6 Managing Users’ Computers
afp://myserver.example.com
smb://myserver.example.com
Account type: Jabber
Server: myserver.example.com
Jabber ID: usershortname@myserver.example.com
Authentication: Kerberos v5 preferred
Port: 5223
Page 87

Application Settings
Mail
(Email application)
iCal
(CalDAV calendar application)
Safari
(Web browser)
Internet Connect
(VPN connection)
Account type: IMAP or POP
Incoming mail server: myserver.example.com
Outgoing mail server: myserver.example.com
Email address: usershortname@myserver.example.com
Authentication: Kerberos v5 preferred
Subscribe to: http://myserver.example.com:8008/
principals/users/usershortname
If the calendar application supports SSL, subscribe to:
https://myserver.example.com:8443/principals/users/
usershortname
Website: http://myserver.example.com
Group wikis: http://myserver.example.com/groups
User blogs: http://myserver.example.com/users
Webmail: http://myserver.example.com/webmail
See “Setting Up a Mac User’s VPN Connection,” next,
or “Setting Up a User’s VPN Connection Manually” on
page 89
Setting Up a Mac User’s VPN Connection
You can use Server Preferences to generate a file that Mac users can open to create a
VPN configuration automatically. Then a user can make a VPN connection to the server
and its network via the Internet. The configuration file works with Mac OS X v10.3 or
later. For information about generating the configuration file, see page 126.
When you give Mac users a VPN configuration file you have generated, you can also
give them the following instructions for using it.
Chapter 6 Managing Users’ Computers 87
Page 88

Using a VPN Configuration File
If you got a VPN configuration file from the person who manages your server, and you
have Mac OS X version 10.3 or later, you can use the file to set up your computer for
making VPN connections to the server. The configuration file contains all the
information necessary to make a VPN connection to the server, except the name and
password of your user account on the server.
To import a VPN configuration from a file:
1 Open the file and select VPN (L2TP) if asked where to put the imported
configuration.
2 Enter your user account name in the Account Name field.
3 If the server administrator tells you to enter your user account password, enter it in
the Password field.
If you have Mac OS X v10.5 Leopard, click Authentication Settings to see the
Password field.
For security, the administrator may tell you not to enter your password now.
4 Quit the application, and save or apply your changes when prompted.
If you want to make a VPN connection from a network with a firewall, configure it to
allow traffic on UDP ports 500 and 4500, and on IP protocol 50.
If you didn’t enter your password before saving the VPN configuration, you’ll be asked
to enter it each time you make a VPN connection to the server.
88 Chapter 6 Managing Users’ Computers
Page 89

Setting Up a User’s VPN Connection Manually
Users may be unable to import VPN settings from a configuration file because they
don’t have the file or they have Windows computers, which can’t use the file. These
users can manually set up their computers for a VPN connection to your server. They
need to create a new VPN configuration and enter the following VPN connection
settings:
 VPN server or host: your server’s DNS name or public IP address
 VPN type: L2TP over IPSec
 Shared secret (key) for IPSec: shown in the VPN pane of Server Preferences when you
click Edit and select “Show shared secret”
 Account name: the short name of the user’s account on your server
 User password: the password of the user’s account on your server
Users who want to make a VPN connection from a computer or network with a firewall
need to configure the firewall to allow traffic on UDP ports 500 and 4500, and on IP
protocol 50.
Chapter 6 Managing Users’ Computers 89
Page 90

Working with Directory Information on Leopard Users’ Macs
Users who have Mac OS X v10.5 Leopard can use the Directory application to view
shared information about people, groups, locations, and resources. They can use
Directory to share contacts, add and remove groups, change group membership, set
up group services, and manage their own contact information.
90 Chapter 6 Managing Users’ Computers
Page 91

When users look up information about other people, they’ll see more than just contact
information. Directory can display the picture a person has provided, list public groups
the person belongs to, list the person’s manager and direct reports, and show a map
that pinpoints the person’s location.
Directory works together with several Mac OS X applications. Users can create shared
contacts from Address Book entries, click email addresses to send email using Mail, or
visit group wiki websites in Safari.
Directory shows users the records from your server’s directory. If your server is
connected to a directory server, Directory also shows its records.
Note: Changes that users make with Directory show up in Server Preferences. To see
the most recent changes made with Directory, you may need to choose View > Refresh
in Server Preferences.
For information about how to use Directory, open it and then use the Help menu.
Directory is located in /Applications/Utilities/.
Chapter 6 Managing Users’ Computers 91
Page 92

Page 93
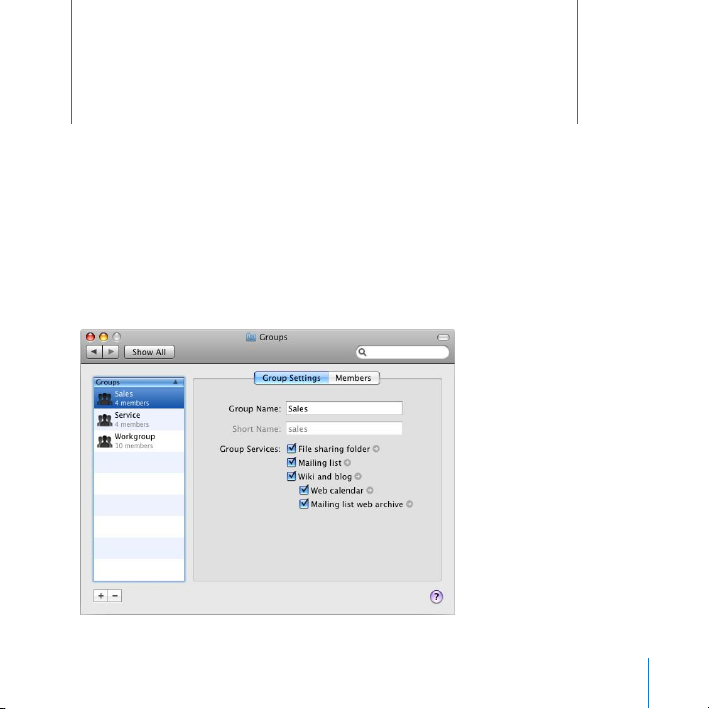
7 Managing Groups
7
Use the Groups pane to add or delete groups, see and
change group membership, or configure group services.
In the Groups pane, you create groups, set up group services such as wikis and blogs,
add and remove group members, and delete unneeded groups. For information about
the settings and controls in this pane, click the Help button in the lower-right corner of
the Server Preferences window.
93
Page 94

Creating a New Group
You can create a new group whenever some server users need their own mailing list,
shared group folder, wiki and blog, calendar, or mailing list archive. You select which of
those services each group has.
To create a new group:
1 Click the Add (+) button in the Groups pane of Server Preferences.
2 Enter a name for the group, optionally change the short name, and click Create Group.
The group name can be as long as 255 characters (from 255 Roman characters to as
few as 85 Japanese characters). It can include spaces.
Once the account is created, you won’t be able to change the short name. If you don’t
want to use the short name generated automatically, type a new short name.
The short name typically is eight or fewer characters, but can be as long as 255 Roman
characters. Use only the characters a through z, A through Z, 0 through 9,
_ (underscore), or - (hyphen).
3 Select the services you want this group to have.
File sharing folder: A shared group folder is set up, and group members can get files
from the shared group folder and put files in it. It’s named after the group’s short name
and located on the server’s startup disk at /Groups/.
Mailing list: A group email address is set up using the group short name, and group
members receive all mail sent to the group address.
94 Chapter 7 Managing Groups
Page 95

Wiki and blog: Group members can view and contribute to the group wiki using their
web browsers.
Web calendar: Group members can check the group calendar and add events to it
using their web browsers.
Mailing list web archive: Group members can read archived email sent to the group
email address.
4 Add users to the group by clicking Members, and add users and groups from your
organization’s directory server by clicking External Members.
For instructions, see “Adding or Removing Members of a Group” on page 97 and
“Adding or Removing External Members of a Group” on page 99.
If you don’t see an External Members tab (shown on page 99), your server isn’t
connected to a directory server. See “Connecting to a Directory Server” on page 135.
To access group services, group members must authenticate using their user account
name and password. Availability of group services is subject to file sharing service, iCal
service, web services, and mail service being turned on.
Users with Leopard can add groups using the Directory application. For information,
see “Working with Directory Information on Leopard Users’ Macs” on page 90.
Chapter 7 Managing Groups 95
Page 96

Deleting a Group
You can use Server Preferences to delete groups that are no longer needed.
To delete a group:
1 In the Groups pane of Server Preferences, select the group you want to delete in the
list on the left.
2 Click the Delete (–) button.
After you delete a group, the group’s shared folder and website folder remain on the
server’s startup disk. The shared folder is located at /Groups/, and the group website
folder is at /Library/Collaboration/Groups/. You can keep these folders or drag them to
the Trash.
Users with Leopard can remove groups using the Directory application. For
instructions, users can open Directory and then use the Help menu.
96 Chapter 7 Managing Groups
Page 97

Adding or Removing Members of a Group
In the Groups pane, you can add or remove group members who are users you have
created or imported in the Users pane. (To have imported users, your server must be
connected to a directory server.)
Chapter 7 Managing Groups 97
Page 98

To add or remove members of a group:
1 In the Groups pane of Server Preferences, select the group you want to edit in the list
on the left.
2 Click Members, and then click Edit Membership.
3 Select the checkbox next to each user you want to be a member of the group. Deselect
the checkbox next to each user you don’t want to be a member.
4 When you finish, click Edit Membership again to display a static list of group members.
Users with Leopard can add and remove group members using the Directory
application. For information, see “Working with Directory Information on Leopard
Users’ Macs” on page 90.
For information about adding, deleting, or configuring user accounts, see Chapter 5,
“Managing Users.”
98 Chapter 7 Managing Groups
Page 99

Adding or Removing External Members of a Group
If your server is connected to a directory server, your group members can include users
and group from the directory server. External members don’t have user accounts on
your server, but they can use the group’s wiki website. You use the Groups pane to add
or remove external group members.
Chapter 7 Managing Groups 99
Page 100

To add or remove external group members:
1 Before adding external group members, be sure the group invitation email is worded
to suit your needs.
For information, see “Customizing the Group Invitation Email” on page 76.
2 In the Groups pane of Server Preferences, select the group you want to change in the
list on the left, and click External Members.
If you don’t see an External Members tab, your server isn’t connected to a directory
server. See “Connecting to a Directory Server” on page 135.
3 To remove an external group member, select the member in the list on the right, and
then click the Delete (–) button below the list.
4 To add a group member, click the Add (+) button below the list of members.
5 Select a prospective member from the list, optionally select “Send added users an email
invitation,” and click Add to Group.
To search for a user or group, type the first part of the name in the search box.
To show or hide users and groups below a heading, click the triangle in the heading.
6 When you finish adding members, click Done.
For information about adding, deleting, or configuring user accounts, see Chapter 5,
“Managing Users.”
100 Chapter 7 Managing Groups
 Loading...