

Page 1

Mac OS X Server
File Services
Administration
For Version 10.3 or Later
Page 2

Apple Computer, Inc.
© 2003 Apple Computer, Inc. All rights reserved.
The owner or authorized user of a valid copy of
Mac OS X Server software may reproduce this
publication for the purpose of learning to use such
software. No part of this publication may be reproduced
or transmitted for commercial purposes, such as selling
copies of this publication or for providing paid-for
support services.
The Apple logo is a trademark of Apple Computer, Inc.,
registered in the U.S. and other countries. Use of the
“keyboard” Apple logo (Option-Shift-K) for commercial
purposes without the prior written consent of Apple
may constitute trademark infringement and unfair
competition in violation of federal and state laws.
Apple, the Apple logo, AppleScript, AppleShare,
AppleTalk, ColorSync, FireWire, Keychain, Mac,
Macintosh, Power Macintosh, QuickTime, Sherlock, and
WebObjects are trademarks of Apple Computer, Inc.,
registered in the U.S. and other countries. AirPort,
Extensions Manager, Finder, iMac, and Power Mac are
trademarks of Apple Computer, Inc.
Adobe and PostScript are trademarks of Adobe Systems
Incorporated.
Java and all Java-based trademarks and logos are
trademarks or registered trademarks of Sun
Microsystems, Inc. in the U.S. and other countries.
©1995–2001 The Apache Group. All rights reserved.
UNIX is a registered trademark in the United States and
other countries, licensed exclusively through
X/Open Company, Ltd.
034-2346/09-20-03
Page 3

1
Contents
Chapter 1 9 About File Services
9
Overview
10
Privileges
11
11
12
12
12
13
13
13
14
14
15
Explicit Privileges
The User Categories Owner, Group, and Everyone
Hierarchy of Privileges
Client Users and Privileges
Privileges in the Mac OS X Environment
Customizing the Mac OS X Network Globe
Share Points in the Network Globe
Adding System Resources to the Network Library Folder
Security Considerations
Restricting Access for Unregistered Users (Guests)
For More Information About File Services
Chapter 2 17 Setting Up Share Points
17
Overview
17
Before You Begin
17
18
18
18
19
19
19
20
21
22
23
24
25
26
27
Consider the Privileges Your Clients Need
Decide on Which Protocols to Use
Organize Your Shared Information
For Your Windows Users
Consider Security
Share Points for Network Home Directories
Disk Quotas
Setup Overview
Setting Up a Share Point
Creating a Share Point and Setting Privileges
Changing Apple File Settings for a Share Point
Changing Windows (SMB) Settings for a Share Point
Changing FTP Settings for a Share Point
Setting Up an NFS Share Point
Resharing NFS Mounts as AFP Share Points
3
Page 4

29
30
30
30
31
31
31
32
32
33
33
34
35
Automatically Mounting Share Points for Clients
Managing Share Points
Disabling a Share Point
Disabling a Protocol for a Share Point
Viewing Share Points
Copying Privileges to Enclosed Items
Viewing Share Point Settings
Changing Share Point Owner and Privilege Settings
Changing the Protocols Used by a Share Point
Changing NFS Share Point Client Scope
Allowing Guest Access to a Share Point
Setting Up a Drop Box
Using Workgroup Manager With Mac OS X Server Version 10.1.5
Chapter 3 37 AFP Service
37
General Information
37
38
38
38
38
39
40
41
42
43
44
44
44
45
45
46
46
47
47
48
48
49
49
50
50
51
51
Kerberos Authentication
Automatic Reconnect
Find By Content
AppleTalk Support
Apple File Service Specifications
Setting Up AFP Service
Changing General Settings
Changing Access Settings
Changing Logging Settings
Changing Idle User Settings
Starting AFP Service
Managing AFP Service
Checking Service Status
Viewing Service Logs
Stopping Apple File Service
Enabling NSL and Rendezvous Browsing
Enabling AppleTalk Browsing
Limiting Connections
Keeping an Access Log
Archiving AFP Service Logs
Disconnecting a User
Disconnecting Idle Users Automatically
Sending a Message to a User
Allowing Guest Access
Creating a Login Greeting
Supporting AFP Clients
Mac OS X Clients
4
Contents
Page 5

53
Mac OS 8 and Mac OS 9 Clients
Chapter 4 55 Windows Service
55
General Information
55
56
56
56
57
58
59
59
60
61
61
61
62
62
63
63
64
64
65
65
66
66
66
67
67
Windows File Services Specifications
Before You Set Up Windows Services
Ensuring the Best Cross-Platform Experience
Windows User Password Validation
Setting Up Windows Services
Changing General Settings
Changing Access Settings
Changing Logging Settings
Changing Advanced Settings
Starting Windows Service
Managing Windows Services
Stopping Windows Services
Changing the Windows Server Name
Changing the Workgroup
Checking Service Status
Registering with a WINS Server
Enabling Domain Browsing
Limiting Connections
Allowing Guest Access
Choosing What to Record in the Log
Disconnecting a User
Supporting Windows Clients
TCP/IP
Connecting to the Server Using Network Neighborhood
Connecting to the Server by Name or Address in Windows
Chapter 5 69 NFS Service
69
Overview
70
Before You Set Up NFS Service
70
71
72
72
73
73
73
Security Considerations
Setup Overview
Setting Up NFS Service
Configuring NFS Settings
Managing NFS Service
Starting and Stopping NFS Service
Viewing NFS Service Status
74 Viewing Current NFS Exports
Contents
5
Page 6

Chapter 6 75 FTP Service
75 Overview
75 A Secure FTP Environment
76 FTP Users
76 FTP User Environments
80 On-the-Fly File Conversion
80 Kerberos Authentication
80 FTP service specifications
81 Before You Set Up FTP Service
81 Server Security and Anonymous Users
82 Setup Overview
83 Setting Up File Transfer Protocol (FTP) Service
83 Changing General Settings
84 Changing the Greeting Messages
84 Choosing Logging Options
85 Changing Advanced Settings
85 Creating an Uploads Folder for Anonymous Users
86 Starting FTP Service
86 Managing FTP Service
86 Stopping FTP Service
87 Allowing Anonymous User Access
87 Changing the User Environment
88 Changing the FTP Root Directory
88 Viewing the Log
89 Displaying Banner and Welcome Messages
89 Displaying Messages Using message.txt Files
89 Using README Messages
Chapter 7 91 Solving Problems
91 General Problems
91 Users Can’t Access a CD-ROM Disc
91 Users Can’t Find a Shared Item
91 Users Can’t See the Contents of a Share Point
91 You Can’t Find a Volume or Directory to Use as a Share Point
92 Solving Problems With Apple File Service
92 User Can’t Find the Apple File Server
92 User Can’t Connect to the Apple File Server
92 User Doesn’t See Login Greeting
93 Solving Problems With Windows Services
93 User Can’t See the Windows Server in the Network Neighborhood
93 User Can’t Log in to the Windows Server
94 Solving Problems With File Transfer Protocol (FTP)
94 FTP Connections Are Refused
6 Contents
Page 7

94 Clients Can’t Connect to the FTP Server
94 Anonymous FTP Users Can’t Connect
95 Solving Problems With Home Directories
95 Users Can’t Open Their Home Directories
Glossary 97
Index 99
Contents 7
Page 8

Page 9

1 About File Services
1
This chapter gives an overview of Mac OS X Server file
services, important concepts, and related security issues.
Overview
File services let clients of the Mac OS X Server access shared files, applications, and
other resources over a network.
Mac OS X Server includes file services based on four common protocols:
• AFP service uses the Apple Filing Protocol (AFP) to share resources with clients who
use Macintosh or Macintosh-compatible computers.
• Windows service uses the Server Message Block (SMB) protocol to share resources
with and provide name resolution for clients who use Windows or Windowscompatible computers.
• FTP service uses the File Transfer Protocol to share files with anyone using FTP client
software.
• NFS service uses the Network File System to share files and folders with users
(typically UNIX users) who have NFS client software.
You can use the following Mac OS X Server applications to set up and manage file
services:
• Server Admin Use to turn on and configure individual file services for each protocol
• Workgroup Manager Use to create share points and set access privileges
You can also perform most setup and management tasks by typing commands at a
command prompt in Terminal. For more information, see the file services chapter of the
command-line administration guide.
9
Page 10

Privileges
Privileges specify the type of access users have to shared items. There are four types of
access privileges you can assign to a share point, folder, or file: Read & Write, Read
Only, Write Only, and None. The table below shows how the privileges affect user
access to different types of shared items (files, folders, and share points).
Read
Users can
Open a shared file Yes Yes No No
Copy a shared file Yes Yes No No
Open a shared folder or share point Yes Yes No No
Copy a shared folder or share point Yes Yes No No
Edit a shared file’s contents Yes No No No
Move items into a shared folder or share point Yes No Yes No
Move items out of a shared folder or share point Yes No No No
& Write
Read
Only
Write
Only
None
You can assign everyone but its owner Write Only privileges to a folder to create a drop
box. The folder’s owner can see and modify the drop box’s contents. Everyone else can
only copy files and folders into the drop box, without seeing what it contains.
Note: QuickTime Streaming Server and WebDAV have separate privileges settings. For
information about QTSS, refer to the QTSS online help and the QuickTime website
(www.apple.com/quicktime/products/qtss/). You’ll find information about Web
privileges in the Web technologies administration guide.
10 Chapter 1 About File Services
Page 11

Explicit Privileges
Share points and the shared items they contain (including both folders and files) have
separate privileges. If you move an item to a different folder, it retains its own privileges
and doesn’t automatically adopt the privileges of the folder where you moved it. In the
following illustration, the second folder (Designs) and the third folder (Documents)
were assigned privileges that are different from those of their parent folders:
Read & Write
Engineering
Designs
Read Only
Read & Write
Documents
You can also set up an AFP or SMB share point so that new files and folders inherit the
privileges of their parent folder. See “Changing Apple File Settings for a Share Point” on
page 23 or “Changing Windows (SMB) Settings for a Share Point” on page 24.
The User Categories Owner, Group, and Everyone
You can assign access privileges separately to three categories of users:
Owner
A user who creates a new item (file or folder) on the file server is its owner and
automatically has Read & Write privileges for that folder. By default, the owner of an
item and the server administrator are the only users who can change its access
privileges, that is, allow a group or everyone to use the item. The administrator can also
transfer ownership of the shared item to another user.
Note: When you copy an item to a drop box on an Apple file server, ownership of that
item is transferred to the owner of the drop box. This is done because only the owner
of the drop box has access to items copied to it.
Group
You can put users who need the same access to files and folders into group accounts.
Only one group can be assigned access privileges to a shared item. For more
information on creating groups, see the user management guide.
Everyone
Everyone is any user who can log in to the file server: registered users and guests.
Chapter 1 About File Services 11
Page 12

Hierarchy of Privileges
If a user is included in more than one category of users, each of which has different
privileges, these rules apply:
• Group privileges override Everyone privileges.
• Owner privileges override Group privileges.
For example, when a user is both the owner of a shared item and a member of the
group assigned to it, the user has the privileges assigned to the owner.
Client Users and Privileges
Users of AppleShare Client software can set access privileges for files and folders they
own. Windows file sharing users can set folder properties, but not privileges.
Privileges in the Mac OS X Environment
If you’re new to Mac OS X and are not familiar with UNIX, it’s important to know that
there are some differences in the way ownership and privileges are handled compared
to Mac OS 9.
To increase security and reliability, Mac OS X sets many system directories, such as
/Library, to be owned by the root user (literally, a user named “root”). Files and folders
owned by root can’t be changed or deleted by you unless you’re logged in as the root
user. Be careful—there are few restrictions on what you can do when you log in as the
root, and changing system data can cause problems.
Files and folders are, by default, owned by the user who creates them. After they’re
created, items keep their privileges even when moved, unless the privileges are
explicitly changed by their owners or an administrator.
Therefore, new files and folders you create are not accessible by client users if they are
created in a folder for which the users do not have privileges. When setting up share
points, make sure that items allow appropriate access privileges for the users with
whom you want to share them.
12 Chapter 1 About File Services
Page 13

Customizing the Mac OS X Network Globe
The Network globe you find at the top level of a Mac OS X Finder window contains
shared network resources. You can customize the contents of the Network globe to suit
your clients by setting up automatically-mounting share points. You can provide
automatic access to system resources such as fonts and preferences by automatically
mounting share points containing them in specific directory locations.
Share Points in the Network Globe
The Network globe on OS X clients represents the /Network directory. By default, the
Network globe contains at least these folders:
• Applications
• Library
• Servers
You can mount share points into any of these folders. See “Automatically Mounting
Share Points for Clients” on page 29 for instructions.
Additional servers and shared items are added as they are discovered on your network.
Adding System Resources to the Network Library Folder
The Library folder in the Network globe is included in the system search path. This
gives you the ability to make available, over the network, any type of system resource
usually found in the local Library folder. These resources could include fonts,
application preferences, ColorSync profiles, desktop pictures, and so forth. You can use
this capability to customize your managed client environment.
For example, suppose you wish to have a specific set of fonts available to each user in a
given Open Directory domain. You would create a share point containing the desired
fonts and then set the share point to mount automatically as a shared library in
/Network/Library/Fonts on client machines. See “Automatically Mounting Share Points
for Clients” on page 29 for more information.
Chapter 1 About File Services 13
Page 14

Security Considerations
Security of your data and your network is critical. The most effective method of
securing your network is to assign appropriate privileges for each file, folder, and share
point as you create it.
Be careful when creating and granting access to share points, especially if you’re
connected to the Internet. Granting access to Everyone, or to World (in NFS service),
could potentially expose your data to anyone on the Internet.
NFS share points don’t have the same level of security as AFP and SMB, which require
user authentication (typing a user name and password) to gain access to a share point’s
contents. If you have NFS clients, you may want to set up a share point to be used only
by NFS users.
Restricting Access for Unregistered Users (Guests)
When you configure any file service, you have the option of turning on guest access.
Guests are users who can connect to the server anonymously without entering a valid
user name or password. Users who connect anonymously are restricted to files and
folders with privileges set to Everyone.
To protect your information from unauthorized access, and to prevent people from
introducing software that might damage your information or equipment, you can take
these precautions using the Sharing module of Workgroup Manager:
• Share individual folders instead of entire volumes. The folders should contain only
those items you want to share.
• Set privileges for Everyone to None for files and folders that guest users shouldn’t
access. Items with this privilege setting can be accessed only by the item’s owner or
group.
• Put all files available to guests in one folder or set of folders. Assign the Read Only
privilege to the Everyone category for that folder and each file within it.
• Assign Read & Write privileges to the Everyone category for a folder only if guests
must be able to change or add items in the folder. Make sure you keep a backup
copy of information in this folder.
• Check folders frequently for changes and additions and use a virus-protection
program regularly to check the server for viruses.
• Disable anonymous FTP access using the FTP service settings in Server Admin.
• Don’t export NFS volumes to World. Restrict NFS exports to a subnet or a specific list
of computers.
14 Chapter 1 About File Services
Page 15

For More Information About File Services
For more information about the protocols used by file services, see these resources:
• Apple Filing Protocol (AFP) www.apple.com/developer/
• Server Message Block (SMB) protocol (for Windows file services) www.samba.org
• FTP You can find a Request for Comments (RFC) document about FTP at
www.faqs.org/rfcs/rfc959.html. To obtain the UNIX manual pages for FTP, open the
Terminal application in Mac OS X. At the prompt, type man ftp and press Return.
• NFS Search the Web for “Network File System”
RFC documents provide an overview of a protocol or service that can be helpful for
novice administrators, as well as more detailed technical information for experts. You
can search for RFC documents by number at this website: www.faqs.org/rfcs.
Chapter 1 About File Services 15
Page 16

Page 17

2 Setting Up Share Points
2
This chapter shows how to share specific volumes and
directories via the AFP, SMB, FTP, and NFS protocols.
Overview
You use the Sharing module of Workgroup Manager to share information with clients
of the Mac OS X Server and control access to shared information by assigning access
privileges.
To share individual folders or entire volumes that reside on the server, you set up share
points. A share point is a folder, hard disk, hard disk partition, CD, or DVD that you
make accessible over the network. It’s the point of access at the top level of a hierarchy
of shared items. Users with privileges to access share points see them as volumes
mounted on their desktops or in their Finder windows.
Before You Begin
Consider the following topics before you set up a share point.
Consider the Privileges Your Clients Need
Before you set up a share point, you need to understand how privileges for shared
items work. Consider which users need access to shared items and what type of
privileges you want those users to have. Privileges are described in Chapter 1 (see
“Privileges” on page 10).
17
Page 18

Decide on Which Protocols to Use
You also need to know which protocols clients will use to access the share points. In
general, you will want to set up unique share points for each type of client and share
each using a single protocol:
• Mac OS clients—Apple Filing Protocol (AFP)
• Windows clients—Server Message Block (SMB)
• UNIX clients—Network File System (NFS)
• FTP clients—File Transfer Protocol (FTP)
In some cases you might want to share an item using more than one protocol. For
example, Mac OS and Windows users might want to share graphics or word processing
files that can be used on either platform. In a case such as this, you can create a single
share point that supports users of both platforms.
Conversely, you might want to set up share points using a single protocol even though
you have different kinds of clients. For example, if most of your clients are UNIX users
and just a few are Mac OS clients, you may want to share items using only NFS to keep
your setup simple. Keep in mind, however, that NFS doesn’t provide many AFP features
that Mac OS users are accustomed to, such as performance optimization or quick file
searching.
Organize Your Shared Information
Once you have created share points, users will start to form “mental maps” of the
organization of the share points and the items they contain. Changing share points and
moving information around can cause confusion. If you can, organize shared
information before you set up the share points. This is especially important if you’re
setting up network home directories.
For Your Windows Users
If you share applications or documents that are exclusively for Windows users, you can
set up an SMB share point to be used only by them. This provides a single point of
access for your Windows users and lets them take advantage of both opportunistic and
strict file locking.
18 Chapter 2 Setting Up Share Points
Page 19

Opportunistic Locking (oplocks)
SMB share points in Mac OS X Server support the improved performance offered by
opportunistic locking (“oplocks”).
In general, file locking prevents multiple clients from modifying the same information
at the same time; a client locks the file or part of the file to gain exclusive access.
Opportunistic locking grants this exclusive access but also allows the client to cache its
changes locally (on the client computer) for improved performance.
To enable oplocks, you change the Windows protocol settings for a share point using
Workgroup Manager.
Important: Do not enable oplocks for a share point that’s using any protocol other
than SMB.
Strict Locking
It’s normally the responsibility of a client application to see if a file is locked before it
tries to open it. A poorly written application may fail to check for locks, and could
corrupt a file already being used by someone else.
Strict locking, which is enabled by default, helps prevent this. When strict locking is
enabled, the SMB server itself checks for and enforces file locks.
Consider Security
Review the issues discussed in “Security Considerations” on page 14.
Share Points for Network Home Directories
If you’re setting up a share point on your server to store user home directories, keep
these points in mind:
• There’s a share point named Users already set up when you install Mac OS X Server
that you can use for home directories.
• Make sure you set the Network Mount settings for the share point to indicate that it’s
used for user home directories.
• Make sure you create the share point in the same Open Directory domain as your
user accounts.
Disk Quotas
You can limit the disk space a user’s home directory can occupy by setting a quota on
the Home pane of the user’s account settings in Workgroup Manager.
To set space quotas for other share points, you must use the command line. See the file
services chapter of the command-line administration guide.
Chapter 2 Setting Up Share Points 19
Page 20

Setup Overview
You use the Sharing module of Workgroup Manager to create share points and set
privileges for them.
Here is an overview of the basic steps for setting up share points:
Step 1: Read “Before You Begin”
Read “Before You Begin” on page 17 for issues you should consider before sharing
information on your network.
Step 2: Locate or create the information you want to share
Decide which volumes, partitions, or folders you want to share. You may want to move
folders and files to different locations before setting up the share point. You may want
to partition a disk into volumes so you can give each volume different access privileges
or create folders that will have different levels of access. See “Organize Your Shared
Information” on page 18.
Step 3: Set up share points and set privileges
When you designate an item to be a share point, you set its privileges at the same time.
You create share points and set privileges in the Sharing module of Workgroup
Manager. See “Setting Up a Share Point” on page 21.
Step 4: Turn specific file services on
For users to access share points, you must turn on the required Mac OS X Server file
services. For example, if you use Apple File Protocol with your share point, you must
turn on AFP service. You can share an item using more than one protocol. See
Chapter 3, “AFP Service,” on page 37, Chapter 4, “Windows Service,” on page 55,
Chapter 5, “NFS Service,” on page 69, or Chapter 6, “FTP Service,” on page 75.
20 Chapter 2 Setting Up Share Points
Page 21
Setting Up a Share Point
This section describes:
• How to create share points
• How to set share point access privileges
• How to share using specific protocols (AFP, SMB, FTP, or NFS)
• How to automatically mount share points on clients’ desktops
You use Workgroup Manager to accomplish these tasks.
See “Managing Share Points” on page 30 for additional tasks that you might perform
after you have set up sharing on your server.
Chapter 2 Setting Up Share Points 21
Page 22

Creating a Share Point and Setting Privileges
You use the Sharing module of Workgroup Manager to share volumes (including disks,
CDs and DVDs), partitions, and individual folders by setting up share points.
Note: Don’t use a slash (/) in the name of a folder or volume you plan to share. Users
trying to access the share point might have trouble seeing it.
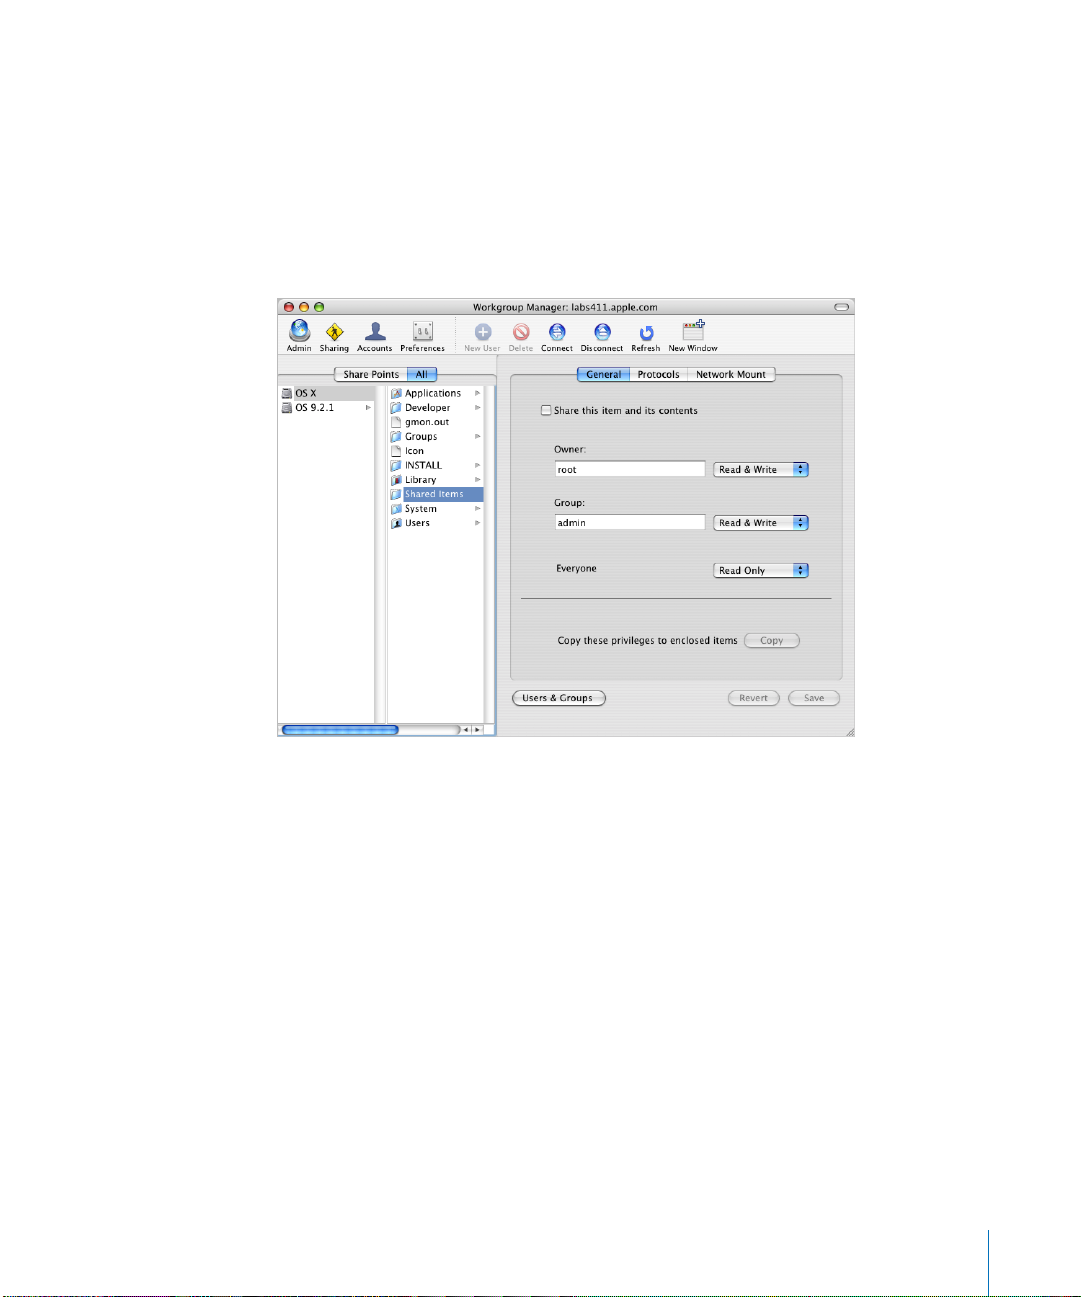
To create a share point and set privileges:
1 Open Workgroup Manager and click Sharing.
2 Click All and select the item you want to share.
3 Click General.
4 Select “Share this item and its contents.”
5 To control who has access to the share point, change the owner or group of the shared
item. Type names or drag names from the Users & Groups drawer.
To open the drawer, click Users & Groups. If you don’t see a recently created user or
group, click Refresh. To change the autorefresh interval, choose Workgroup Manager >
Preferences.
6 Use the pop-up menus next to the fields to change the privileges for the Owner, Group,
and Everyone.
Everyone is any user who can log in to the file server: registered users and guests.
7 (Optional) To apply the ownership and privileges of the share point to all files and
folders it contains, click Copy. This overrides privileges that other users may have set.
8 Click Save.
The new share point is shared using the AFP, SMB, and FTP protocols, but not NFS.
To change protocol settings, stop sharing via a particular protocol, or export the share
point using NFS, click Protocol and choose the protocol from the pop-up menu.
Settings specific to each protocol are described in the following sections.
From the Command Line
You can also set up a share point using the sharing command in Terminal. For more
information, see the file services chapter of the command-line administration guide.
22 Chapter 2 Setting Up Share Points
Page 23

Changing Apple File Settings for a Share Point
You can use Workgroup Manager to choose whether a share point is available via AFP
and to change settings such as the share point name that AFP clients see, whether
guest access is allowed, or the permissions model for new items.
The default settings for a new share point should make it readily accessible to
Mac OS 8, Mac OS 9, and Mac OS X clients.
To change the settings of an AFP share point:
1 Open Workgroup Manager and click Sharing.
2 Click Share Points and select the share point.
3 Click Protocols and choose Apple File Settings from the pop-up menu.
4 To provide AFP access to the share point, select “Share this item using AFP.”
5 To allow unregistered users to access the share point, select “Allow AFP guest access.”
For greater security, do not select this item.
6 To change the name that clients see when they browse for and connect to the share
point using AFP, type a name in the “Custom AFP name” field.
Changing the custom AFP name does not affect the name of the share point itself, only
the name that AFP clients see.
7 Choose a default permissions option for new files and folders.
To have new or copied items keep their original privileges while inheriting the user and
group ID of the user who creates or copies them, select “Use Standard UNIX behavior.”
To have new or copied items adopt the privileges of the enclosing folder, select “Inherit
permissions from parent.”
Note: Do not select the “Inherit permissions” option for share points that contain home
directories.
8 Click Save.
From the Command Line
You can also change AFP settings for a share point using the sharing command in
Terminal. For more information, see the file services chapter of the command-line
administration guide.
Chapter 2 Setting Up Share Points 23
Page 24

Changing Windows (SMB) Settings for a Share Point
You can use Workgroup Manager to set whether a share point is available via SMB and
to change settings such as the share point name that SMB clients see, whether guest
access is allowed, whether opportunistic locking is allowed, and the default privileges
for new items.
To change the settings of an SMB share point:
1 Open Workgroup Manager and click Sharing.
2 Click Share Points and select the share point.
3 Click Protocols (on the right) and choose Windows File Settings from the pop-up menu.
4 To provide SMB access to the share point, select “Share this item using SMB.”
5 To allow unregistered users access to the share point, select “Allow SMB guest access.”
For greater security, don’t select this item.
6 To change the name that clients see when they browse for and connect to the share
point using SMB, type a new name in the “Custom SMB name” field.
Changing the custom SMB name doesn’t affect the name of the share point itself, only
the name that SMB clients see.
7 To allow clients to use opportunistic file locking, select “Enable oplock.”
To have clients use standard locks on server files, select “Enable strict locking.”
For more information on oplocks, see “Opportunistic Locking (oplocks)” on page 19.
8 Choose a method for assigning default access privileges for new files and folders in the
share point.
To have new items adopt the privileges of the enclosing item, select “Inherit
permissions from parent.”
To assign specific privileges, select “Assign as follows” and set the Owner, Group, and
Everyone privileges using the pop-up menus.
9 Click Save.
From the Command Line
You can also change a share point’s SMB settings using the sharing command in
Terminal. For more information, see the file services chapter of the command-line
administration guide.
24 Chapter 2 Setting Up Share Points
Page 25

Changing FTP Settings for a Share Point
You can use Workgroup Manager to set whether a share point is available via FTP and
to change settings such as whether guest access is allowed and the share point name
that FTP clients see.
To change the settings of an FTP share point:
1 Open Workgroup Manager and click Sharing.
2 Click Share Points and select the share point.
3 Click Protocols and choose FTP Settings from the pop-up menu.
4 To make the share point available to FTP clients, select “Share this item using FTP.”
5 Select “Allow FTP guest access” to allow anonymous FTP users to open this item.
For greater security, don’t select this item.
6 To change the name clients see when they browse for and connect to the share point
using FTP, type a new name in the “Custom FTP name” field.
Changing the custom FTP name doesn’t affect the name of the share point itself, only
the name that FTP clients use.
7 Click Save.
From the Command Line
You can also change a share point’s FTP settings using the sharing command in
Terminal. For more information, see the file services chapter of the command-line
administration guide.
Chapter 2 Setting Up Share Points 25
Page 26

Setting Up an NFS Share Point
You can use NFS to export share points to UNIX clients. (Export is the NFS term for
sharing.)
Note: Don’t use spaces or slashes (/) in the name of a share point you plan to export
using NFS. Spaces and slashes in volume names can cause access problems for NFS
clients. If you must use spaces in the name of an NFS share point, use Netinfo Manager
to “escape” the spaces in the export record in NetInfo (that is, precede the spaces with a
backslash “\”). For example, you would have to change “/folder1/folder two” t o
“/folder1/folder\ two”.
To configure an NFS share point:
1 Open Workgroup Manager and click Sharing.
2 Click Share Points and select the share point.
3 Click Protocols and choose NFS Export Settings from the pop-up menu.
4 Select “Export this item and its contents to” and choose an audience from the pop-up
menu.
To limit clients to specific computers, choose “Client” and click Add to specify the IP
addresses of computers that can access the share point.
To limit clients to the entire subnet, choose “Subnet” and type the IP address and
subnet mask for the subnet.
Important: Make sure that the subnet address you enter is the actual IP network
address that corresponds to the subnet mask you chose (not just one of the client
addresses). Otherwise, your clients will be unable to access the share point.
A network calculator can help you select the subnet address and mask for the range of
client addresses you want to serve, and you should use one to validate your final
address/mask combination. Calculators are available on the Web; use Sherlock or
Google to search for “subnet calculator.”
For example, suppose you want to export to clients that have IP addresses in the range
192.168.100.50 through 192.168.100.120. Using a subnet calculator, you can discover that
the mask 255.255.255.128 applied to any address in this range defines a subnet with
network address 192.168.100.0 and a range of usable IP addresses from 192.168.100.1
through 192.168.100.126, which includes the desired client addresses. So, in Workgroup
Manager you enter subnet address 192.168.100.0 and subnet mask 255.255.255.128 in the
NFS Export Settings for the share point.
To allow unlimited (and unauthenticated) access to the share point, choose “World.”
Note: If you export more than one NFS share point to “World,” only the last export is
available to clients. Don’t create more than one NFS world export on a single server
volume.
26 Chapter 2 Setting Up Share Points
Page 27

5 Select “Map Root user to nobody” if you want the root user on a remote client to have
only minimal privileges to read, write, and execute commands.
6 Select “Map All users to nobody” if you want all users to have minimal privileges to
read, write, and execute.
7 Select “Read-only” if you don’t want client users to be able to modify the contents of
the shared item in any way.
8 Click Save.
File and file range locking (standard POSIX advisory locks) are enabled by default for
NFS share points in Mac OS X Server.
From the Command Line
You can also set up an NFS share point by using the niutil command in Terminal to
add an entry to the NetInfo /exports directory. For more information, see the file
services chapter of the command-line administration guide.
Resharing NFS Mounts as AFP Share Points
Resharing NFS mounts (NFS volumes that have been exported to the Mac OS X Server)
as AFP share points allows clients to access NFS volumes using the secure
authentication of an AFP connection. Resharing NFS mounts also allows Mac OS 9
clients to access NFS file services on traditional UNIX networks.
Note: Quotas set on the original NFS export are not enforced on the AFP reshare.
To reshare an NFS mount as an AFP share point:
1 On the NFS server that’s exporting the original share, make sure the NFS export maps
root-to-root so that AFP (which runs as root) can access the files for the clients. Restrict
the export to the single AFP server (seen as the client to the NFS server). For even
greater security, you can set up a private network for the AFP-to-NFS connection.
2 On the AFP server, create a directory named nfs_reshares at the root level of the file
system. Log in to Terminal as admin and use the command:
sudo mkdir /nfs_reshares
The nfs_reshares directory will work with default permissions, but at a minimum must
allow read/write for root so that the exports can be mounted there and accessed by
the AFP server.
3 Create a subdirectory in the /nfs_reshares directory for each NFS volume you want to
reshare. In Terminal, while logged in as admin, use the command:
sudo mkdir /nfs_reshares/<local mount name>
Replace <local mount name> with the name of the volume as you want it to appear
to AFP clients.
Chapter 2 Setting Up Share Points 27
Page 28

4 On the AFP server, create a mount record that mounts the reshared volume in the
/nfs_reshares directory.
a Open NetInfo Manager, select mounts in the directory browser window, click the lock
at the lower left corner of the window and enter your administrator password.
Note: To authenticate in NetInfo Manager, you must use an administrator account
with a basic password. NetInfo Manager can’t authenticate an administrator account
that uses Password Server.
b Select New Subdirectory from the Directory menu. The new mount record is named
new_directory. Edit the name property and add two new properties following this
format:
name: <nfsservername>:<nfs export path>
vfstype: nfs
dir: /nfs_reshares/<local mount name>
For example, a mount record to reshare as “myshare” an NFS volume located on a
server named “server” at the path /test/lab1 would have the following properties:
name: server:/test/lab1
vfstype: nfs
dir: /nfs_reshares/myshare
c Click the lock when finished. In the Confirm Changes dialog, click “Update this copy”
to save your changes.
5 Restart the computer to enable the mount. You can also manually mount the NFS
volume in Terminal with the following command:
sudo mount_nfs <nfsservername>:<nfs export path> /nfs_reshares/<local
mount name>
6 Use the Sharing module in Workgroup Manager to share the NFS mounts as AFP share
points. The NFS mounts appear as normal volumes in the All list. (You can also share
the NFS mounts using SMB and FTP, but it’s recommended that you use only AFP.) You
can change privileges and ownership, but not enable quotas (quotas work only on
local volumes). However, if quotas are enabled on the NFS server, they should apply to
the reshared volume as well.
28 Chapter 2 Setting Up Share Points
Page 29

Automatically Mounting Share Points for Clients
You can mount share points automatically on client computers using network mounts.
You can automatically mount AFP or NFS share points. When you set a share point to
automatically mount, a mount record is created in the Open Directory database. Be
sure you create these records in the same shared domain in which the user and
computer records exist.
Note: All users have guest access to network-mounted AFP share points. Authenticated
access is only allowed for a user’s own home directory or if you have Kerberos set up to
support single signon.
To set up a network mount:
1 Open Workgroup Manager and click Sharing.
2 Click Share Points and select the share point.
3 Click Network Mount (on the right).
4 Choose the directory domain that contains your users and computers from the Where
pop-up menu.
If the correct directory is already chosen, click the lock to authenticate.
5 Choose the sharing protocol (AFP or NFS) from the Protocol pop-up menu.
6 Choose how you want the share point to be used and mounted on client computers.
User Home Directories: the home directories on the share point are listed on a user’s
computer in /Network/Servers (in Servers inside the Network globe in the Finder).
Note: Share points used for home directories should be named using only US ASCII
characters. Don’t use multibyte encoding or accented characters.
Shared Applications: the share point appears on the user’s computer in
/Network/Applications (in Applications inside the Network globe in the Finder).
Shared Library: the share point appears in /Network/Library (in Library inside the
Network globe in the Finder).
“Custom mount path”: the share point appears in the directory you specify. You must
make sure that this directory exists on the client computer before the share point can
be mounted.
7 Click Save.
Chapter 2 Setting Up Share Points 29
Page 30

Managing Share Points
This section describes typical day-to-day tasks you might perform after you have set up
share points on your server. Initial setup information appears in “Setting Up a Share
Point” on page 21.
Disabling a Share Point
To stop sharing a particular share point, you use the Sharing module of Workgroup
Manager to remove it from the Share Points list.
You may want to notify users that you are removing a share point so that they know
why the share point is no longer available.
To remove a share point:
1 Open Workgroup Manager and click Sharing.
2 Click Share Points and select the share point you want to remove.
3 Click General and deselect “Share this item and its contents.”
Protocol and network mount settings you have made for the item are discarded.
From the Command Line
You can also disable a share point by using the sharing command in Terminal. For
more information, see the file services chapter of the command-line administration
guide.
Disabling a Protocol for a Share Point
You can use the Sharing module of Workgroup Manager to stop sharing a share point
using a particular protocol and still allow sharing to continue via other protocols.
To stop sharing via a particular protocol:
1 Open Workgroup Manager and click Sharing.
2 Click Share Points and select the share point you want to remove.
3 Click Protocols and choose settings for the protocol from the pop-up menu.
4 Deselect “Share this item using...”
You can disable a protocol for all share points by stopping the underlying service that
provides support for the protocol. For help, see “Stopping Apple File Service” on
page 45, “Stopping Windows Services” on page 61, “Starting and Stopping NFS Service”
on page 73, or “Stopping FTP Service” on page 86.
From the Command Line
You can also disable a protocol for a share point by using the sharing command in
Terminal. For more information, see the file services chapter of the command-line
administration guide.
30 Chapter 2 Setting Up Share Points
Page 31

Viewing Share Points
You can use the Sharing module of Workgroup Manager to view share points and their
contents.
To view share points on a server:
1 Open Workgroup Manager and click Sharing.
2 Click Share Points.
Select an item in the list to see its contents. Use the scroll bar at the bottom to move
up or down in the directory hierarchy.
From the Command Line
You can also view share points and their contents by using the sharing and ls
commands in Terminal. For more information, see the file services chapter of the
command-line administration guide.
Copying Privileges to Enclosed Items
When you set the privileges for a share point, volume, or folder, you can copy the
ownership and privileges to all the items it contains.
To copy privileges:
1 Open Workgroup Manager and click Sharing.
2 Click Share Points or All, then select the item whose privileges you want to propagate.
3 Click Copy in the General pane.
Viewing Share Point Settings
You can use Workgroup Manager to view the sharing and privilege settings for a share
point.
To view sharing and privileges for a share point:
1 Open Workgroup Manager and click Sharing.
2 Click Share Points and select the share point you want to view.
3 Click General to see the privilege settings for the share point.
4 Click Protocols and use the pop-up menu to see the protocol settings for the item.
5 Click Network Mount to see the automatic mount settings.
From the Command Line
You can also view share point settings using the sharing command in Terminal. For
more information, see the file services chapter of the command-line administration
guide.
Chapter 2 Setting Up Share Points 31
Page 32

Changing Share Point Owner and Privilege Settings
You use the Workgroup Manager to view and change the owner and privileges for a
share point.
To change privileges for a share point:
1 Open Workgroup Manager and click Sharing.
2 Click Share Points and select the share point you want to update.
3 Click General.
Change the owner and group of the shared item by typing names into those fields or
by dragging names from the Users & Groups drawer. You can open the drawer by
clicking “Users & Groups.”
Use the pop-up menus next to the fields to change the privileges for the Owner, Group,
and Everyone. Everyone is any user who can log in to the file server: registered users
and guests.
From the Command Line
You can also change a share point’s owner and privileges using the chmod, chgrp, and
chown commands in Terminal. For more information, see the file services chapter of the
command-line administration guide.
Changing the Protocols Used by a Share Point
You can use the Protocols pane of Workgroup Manager to change the protocols
available for accessing a share point.
To change the protocols for a share point:
1 Open Workgroup Manager and click Sharing.
2 Click Share Points and select the share point you want to change.
3 Click Protocols.
4 Use the pop-up menu to choose the protocols you want to change.
See the following sections for descriptions of the protocol settings:
• “Changing Apple File Settings for a Share Point” on page 23
• “Changing Windows (SMB) Settings for a Share Point” on page 24
• “Changing FTP Settings for a Share Point” on page 25
• “Setting Up an NFS Share Point” on page 26
From the Command Line
You can also change a share point’s protocol settings using the sharing command in
Terminal. For more information, see the file services chapter of the command-line
administration guide.
32 Chapter 2 Setting Up Share Points
Page 33

Changing NFS Share Point Client Scope
You can use the Protocols pane of Workgroup Manager to restrict the clients that can
access an NFS export.
To change authorized NFS clients:
1 Open Workgroup Manager and click Sharing.
2 Click Share Points and select the NFS share point.
3 Click Protocols and choose NFS Export Settings from the pop-up menu.
4 To limit clients to specific computers, choose Client and click Add to specify the IP
addresses of computers that can access the share point. To remove a client, select an
address and click Remove.
To limit clients to the entire subnet, choose Subnet and type the IP address and subnet
mask for the subnet.
To allow unlimited (and unauthenticated) access to the share point, choose World.
5 Click Save.
Allowing Guest Access to a Share Point
You can use Workgroup Manager to allow guest users (users not defined in the
directories used by your server) to connect to specific share points.
To change guest access privileges for a share point:
1 Open Workgroup Manager and click Sharing.
2 Click Share Points and select the share point.
3 Click Protocols and use the pop-up menu to choose the protocol you’re using to
provide access to the share point.
4 Select the “Allow guest access” option.
5 Click Save.
From the Command Line
You can also enable guest access to a share point using the sharing command in
Terminal. For more information, see the file services chapter of the command-line
administration guide.
Chapter 2 Setting Up Share Points 33
Page 34

Setting Up a Drop Box
A drop box is a shared folder with permissions set so that anyone can copy files into
the folder, but only the owner can read them.
Note: Create drop boxes only within AFP share points. AFP is the only protocol that
automatically changes the owner of any file put into the drop box to be the same as
the owner of the drop box. For other protocols, the ownership of the file is not
transferred even though the original owner may not have access to the file once it’s
inside the drop box.
To create a drop box:
1 Create the folder that will act as a drop box within an AFP share point.
2 Open Workgroup Manager and click Sharing.
3 Click Share Points and select the folder in the AFP share point that you want to use as a
drop box.
4 Click General.
5 Set Write Only privileges for users who can copy items into the drop box.
To create a drop box for a select group of users, enter the group name (or drag the
group from the Users & Groups drawer) and choose Write Only privileges from the
Group pop-up menu.
To create a drop box anyone can put things in, choose Write Only privileges from the
Everyone pop-up menu. (For greater security, do not allow access to everyone—assign
None for the Everyone privileges.)
6 Click Save.
From the Command Line
You can also set up a drop box using the mkdir and chmod commands in Terminal. For
more information, see the file services chapter of the command-line administration
guide.
34 Chapter 2 Setting Up Share Points
Page 35

Using Workgroup Manager With Mac OS X Server Version 10.1.5
Workgroup Manager is available only on Mac OS X Server version 10.2 or later. If you
want to use Workgroup Manager to edit account information on a Mac OS X Server
version 10.1.5, you must access that server remotely from a computer running
Mac OS X Server version 10.2 and log in as a root user.
To log in to a remote server as a root user with Workgroup Manager:
1 In Workgroup Manager, choose the shared domain of interest from the domain pop-up
list below the toolbar.
Alternatively, you can choose View Directories from the Server menu.
2 Use a root user name and password to log in.
If you are not logged in as a root user, you can’t make changes using Workgroup
Manager.
If possible, you should upgrade servers on your network to use Mac OS X Server
version 10.2 or later.
Chapter 2 Setting Up Share Points 35
Page 36

Page 37

3 AFP Service
3
This chapter shows how to set up and manage AFP
service in Mac OS X Server.
General Information
AFP (Apple Filing Protocol) service allows Macintosh clients to connect to your server
and access folders and files as if they were located on their own computers.
AFP service uses version 3.1 of AFP, which supports new features such as Unicode file
names and 64-bit file sizes. Unicode is a standard that assigns a unique number to
every character regardless of language or the operating system used to display the
language.
Kerberos Authentication
Apple file service supports Kerberos authentication. Kerberos is a network
authentication protocol developed at MIT to provide secure authentication and
communication over open networks. In addition to the standard authentication
method, Mac OS X Server utilizes Generic Security Services Application Programming
Interface (GSSAPI) authentication protocol to support Kerberos v.5. You specify the
authentication method using the Access pane of AFP service settings. See “Changing
Access Settings” on page 41. For more information on setting up Kerberos, see the
Open Directory administration guide.
37
Page 38

Automatic Reconnect
Mac OS X Server provides the ability to automatically reconnect Mac OS X clients that
have become idle or gone to sleep. When clients become idle or go to sleep, the
Mac OS X Server disconnects those clients to free up server resources. Mac OS X Server
can save Mac OS X client sessions, however, allowing these clients to resume work on
open files without loss of data. You configure this setting in the Idle Users pane of the
AFP service configuration window. See “Changing Idle User Settings” on page 43.
Find By Content
Mac OS X clients can use Sherlock to search the contents of AFP servers. This feature
enforces privileges so that only files to which the user has access are searched.
AppleTalk Support
One difference in the new Apple file service is that AppleTalk is no longer supported as
a client connection method. Mac OS X Server advertises its services over AppleTalk so
clients using AppleTalk can see servers in the Chooser, but they’ll need to connect to
the server using TCP/IP. See “Mac OS X Clients” on page 51 and “Mac OS 8 and
Mac OS 9 Clients” on page 53.
Apple File Service Specifications
• Maximum number of connected users, depending on your license
agreement: Unlimited (hardware dependent)
• Maximum volume size: 2 terabytes
• TCP port number: 548
• Log file location: /Library/Logs in the AppleFileService folder
• Rendezvous registration type: afpserver
38 Chapter 3 AFP Service
Page 39

Setting Up AFP Service
If you allowed the Server Assistant to start AFP service when you installed Mac OS X
Server, you don’t have to do anything else. However, you should check to see if the
default service settings meet your needs. The following section steps you through each
of the Apple file service settings.
You set up Apple file service by configuring four groups of settings on the Settings
pane for AFP service in Server Admin:
• General Set information that identifies your server, enable automatic startup, and
create a login message for Apple file service
• Access Set up client connections and guest access
• Logging Configure and manage logs for Apple file service
• Idle Users Configure and administer idle user settings
The following sections describe the tasks for configuring these settings. A fifth section
tells you how to start up Apple file service after you’ve completed its configuration.
Chapter 3 AFP Service 39
Page 40

Changing General Settings
You use the General pane of AFP service settings to enable automatic startup, enable
browsing with Network Service Location or AppleTalk, and create a login greeting for
your users.
To configure AFP service General settings:
1 Open Server Admin and select AFP in the Computers & Services list.
2 Click Settings, then click General.
3 To advertise the AFP share point using both Network Service Location (NSL) and
Rendezvous, select “Enable Rendezvous registration.”
This option lets clients browse for the share point using the Mac OS X “Connect to
Server” command or the Mac OS 9 Network Browser.
For NSL registration to work, you must also enable IP multicasting on your network
routers. See the network services administration guide for more information about
Service Location Protocol (SLP) and IP multicasting.
4 To allow Mac OS 8 and Mac OS 9 clients to find your file server using the Chooser,
select “Enable browsing with AppleTalk.”
For Chooser browsing to work, AppleTalk must be enabled on both the client computer
and the server. Clients can then see the server in the Chooser, but will need to connect
using TCP/IP.
5 If you have Mac OS 8 and Mac OS 9 clients with special language needs, choose the
appropriate character set from the “Encoding for older clients” pop-up menu.
When Mac OS 9 and earlier clients are connected, the server converts file names from
the system’s UTF-8 to the chosen set. This has no effect on Mac OS X client users.
6 In the Logon Greeting field, type the message you want users to see when they
connect.
Note: The message does not appear when a user logs in to his or her home directory.
7 To prevent users from seeing the greeting repeatedly, select “Do not send same
greeting twice to the same user.”
8 Click Save.
From the Command Line
You can also change the AFP service settings using the serveradmin command in
Terminal or by modifying the AFP preferences file. For more information, see the file
services chapter of the command-line administration guide.
40 Chapter 3 AFP Service
Page 41

Changing Access Settings
The Access pane of AFP Settings in Server Admin lets you control client connections
and guest access.
To configure AFP service Access settings:
1 Open Server Admin and select AFP in the Computers & Services list.
2 Click Settings, then click Access.
3 Choose the authentication method you want to use: Standard, Kerberos, or Any
Method.
4 To allow unregistered users to access AFP share points, select “Enable Guest access.”
Guest access is a convenient way to provide occasional users with access to files and
other items, but for better security, do not select this option.
Note: After you allow guest access for Apple file service in general, you can still
selectively enable or disable guest access for individual share points.
5 To allow clients to connect using secure AFP (using SSH), select “Enable secure
connections.”
6 To allow an administrator to log in using a user’s name with an administrator password
(and thereby experience the AFP service as the user would), select “Enable
administrator to masquerade as any registered user.”
7 To restrict the number of simultaneous client connections, click next to the number
field for clients or guests and type a number.
The maximum number of simultaneous users is limited by the type of license you have.
For example, if you have a 10-user license, then a maximum of 10 users can connect at
one time.
The maximum number of guests cannot exceed the maximum number of total client
connections allowed.
8 Click Save.
From the Command Line
You can also change the AFP access settings using the serveradmin command in
Terminal or by modifying the AFP preferences file. For more information, see the file
services chapter of the command-line administration guide.
Chapter 3 AFP Service 41
Page 42

Changing Logging Settings
You use the Logging pane of the Apple File Service settings in Server Admin to
configure and manage service logs.
To configure Apple file service Logging settings:
1 Open Server Admin and select AFP in the Computers & Services list.
2 Click Settings, then click Logging.
3 To keep a record of users who connect to the server using AFP, select “Enable Access
log.”
4 To periodically close and save the active log and open a new one, select “Archive every
__ days” and type the number of days after which the log is archived.
5 Select the events that you want Apple file service to log.
An entry is added to the log each time a user performs one of the actions you select.
Consider available disk space when you choose the number of events to log. The more
events you choose, the larger the log file.
6 To specify how often the error log file contents are saved to an archive, select “Error
Log: Archive every __ days” and type the number of days.
7 Click Save.
The server closes the active log at the end of each archive period, renames it to include
the current date, and then opens a new log file.
You can keep the archived logs for your records or delete them to free disk space when
they’re no longer needed. The default setting is 7 days.
Log files are stored in /Library/Logs/AppleFileService. You can use the log rolling scripts
supplied with Mac OS X Server to reclaim disk space used by log files.
From the Command Line
You can also change the AFP service logging settings using the
command in Terminal or by modifying the AFP preferences file. For more information,
see the file services chapter of the command-line administration guide.
42 Chapter 3 AFP Service
serveradmin
Page 43

Changing Idle User Settings
You use the Idle Users pane of Apple File Service settings to specify how your server
handles idle users. An idle user is someone who is connected to the server but whose
connection has been inactive a predefined period of time.
If a client is idle or asleep for longer than the specified idle time, open files are closed,
they are disconnected, and any unsaved work is lost.
To configure idle user settings:
1 Open Server Admin and select AFP in the Computers & Services list.
2 Click Settings (near the bottom of the window), then click Idle Users.
3 To allow client computers to reconnect after sleeping for a certain time, select “Allow
clients to sleep __ hour(s)—will not show as idle” and type the number of hours clients
can sleep and still automatically reconnect to the server.
Although the server disconnects sleeping clients, their sessions are maintained for the
specified period. If they resume work within that time, they are reconnected with no
apparent interruption.
4 To specify the idle time limit, select “Disconnect idle users after __ minutes” and type
the number of minutes after which an idle computer should be disconnected.
A sleeping Mac OS X version 10.2 (and later) client will be able to resume work on open
files within the limits of the “Allow clients to sleep” setting.
5 To prevent particular types of users from being disconnected, select them under
“Except.”
6 In the “Disconnect Message” field, type the message you want users to see when they
are disconnected.
If you don’t type a message, a default message appears stating that the user has been
disconnected because the connection has been idle for a period of time.
7 Click Save.
From the Command Line
You can also change the AFP service idle user settings using the serveradmin
command in Terminal or by modifying the AFP preferences file. For more information,
see the file services chapter of the command-line administration guide.
Chapter 3 AFP Service 43
Page 44

Starting AFP Service
You start the AFP service to make AFP share points available to your client users.
To start Apple file service:
1 Open Server Admin and select AFP in the Computers & Services list.
2 Click Start Service (near the top of the window).
The service will run until you stop it and will restart automatically if your server is
restarted for any reason.
From the Command Line
You can also start the AFP service using the serveradmin command in Terminal. For
more information, see the file services chapter of the command-line administration
guide.
Managing AFP Service
This section tells you how to perform day-to-day management tasks for AFP service
once you have it up and running.
Checking Service Status
You can use Server Admin to check the status of AFP service.
To view AFP service status:
1 Open Server Admin and select AFP in the Computers & Services list.
2 Click Overview (near the bottom of the window) to see whether the service is running,
when it started, its throughput and number of connections, and whether guest access
is enabled.
3 Click Logs to review the access and error logs.
Use the Show pop-up menu to choose which log to view.
4 Click Connections to see a list of connected users.
The list includes the user name, type of connection, user’s IP address or domain name,
duration of connection, and the time since the last data transfer (idle time).
5 Click Graphs to see graphs of connected users or throughput.
Use the pop-up menu to choose which graph to view. Adjust the time scale using the
slider at the bottom of the pane.
From the Command Line
You can also check the status of the AFP service process using the ps or top
commands in Terminal, or look at the log files in /Library/Logs/AppleFileService using
the cat or tail command. For more information, see the file services chapter of the
command-line administration guide.
44 Chapter 3 AFP Service
Page 45

Viewing Service Logs
You use Server Status to view the error and access logs for AFP service (if you have
enabled them).
To view logs:
1 Open Server Admin and select AFP in the Computers & Services list.
2 Click Logs and use the Show pop-up menu to choose between the access and error
logs.
To enable logging, click Settings (near the bottom of the window), then click Logging.
From the Command Line
You can also view the AFP service logs in /Library/Logs/AppleFileService using the cat
or tail commands in Terminal. For more information, see the file services chapter of
the command-line administration guide.
Stopping Apple File Service
Important: When you stop AFP service, connected users may lose unsaved changes in
open files.
To stop Apple file service after warning users:
1 Open Server Admin and select AFP in the Computers & Services list.
2 Click Connections (near the bottom of the window), then click Stop.
3 Type the length of time the server will wait before stopping service.
4 Type a message in the Additional Message field if you want users to know why they
must disconnect. Otherwise, a default message is sent indicating that the server will
shut down in the specified number of minutes.
5 Click Send.
From the Command Line
You can also stop the AFP service immediately using the serveradmin command in
Terminal. For more information, see the file services chapter of the command-line
administration guide.
Chapter 3 AFP Service 45
Page 46

Enabling NSL and Rendezvous Browsing
You can register the service with Network Service Locator (NSL) and Rendezvous to
allow users to find the server by browsing through available servers. Otherwise, users
must type the server’s host name or IP address when connecting.
To register with NSL and Rendezvous:
1 Open Server Admin and select AFP in the Computers & Services list.
2 Click General, select “Enable Rendezvous registration,” and click Save.
AFP share points use the Rendezvous registration type afpserver.
To take advantage of NSL registration, you must also enable and configure Service
Location Protocol (SLP) service on your network router.
From the Command Line
You can also set the AFP service to register with NSL and Rendezvous using the
serveradmin command in Terminal. For more information, see the file services chapter
of the command-line administration guide.
Enabling AppleTalk Browsing
If you enable browsing with AppleTalk, Mac OS 8 and 9 users can see your servers and
other network resources using the Chooser.
Important: AppleTalk must be enabled both on the user’s computer and on the server.
On the server, you can use the Network pane of System Preferences.
To enable browsing via AppleTalk:
1 Open Server Admin and select AFP in the Computers & Services list.
2 Click General and select “Enable browsing with AppleTalk.”
3 Click Save.
From the Command Line
You can also set the AFP service to enable AppleTalk browsing using the serveradmin
command in Terminal. For more information, see the file services chapter of the
command-line administration guide.
46 Chapter 3 AFP Service
Page 47

Limiting Connections
If your server provides a variety of services, you can prevent a flood of users from
affecting the performance of those services by limiting the number of clients and
guests who can connect at the same time.
To set the maximum number of connections:
1 Open Server Admin and select AFP in the Computers & Services list.
2 Click Settings, then click Access and look under “Maximum Connections.”
3 Click the button next to the number field following “Client Connections (Including
Guests)” and type the maximum number of connections you want to allow.
4 Next to “Guest connections,” enable the number field and type the maximum number
of guests you want to allow.
5 Click Save.
The guest connections limit is based on the client connections limit, and guest
connections count against the total connection limit. For example, if you specify
maximums of 400 client connections and 50 guest connections, and 50 guests are
connected, that leaves 350 connections for registered users.
From the Command Line
You can also set the AFP service connections limit using the serveradmin command in
Terminal. For more information, see the file services chapter of the command-line
administration guide.
Keeping an Access Log
The access log can record when a user connects or disconnects, opens a file, or creates
or deletes a file or folder.
To set up access logging:
1 Open Server Admin and select AFP in the Computers & Services list.
2 Click Settings (near the bottom of the window), then click Logging.
3 Select “Enable access log.”
4 Select the events you want to record.
Consider your server’s disk size when choosing events to log. The more events you
choose, the larger the log file.
To view the log, open Server Admin, select AFP, and click Logs. Log files are stored in
/Library/Logs/AppleFileService.
From the Command Line
You can also set the AFP service to record logs using the serveradmin command in
Terminal. For more information, see the file services chapter of the command-line
administration guide.
Chapter 3 AFP Service 47
Page 48

Archiving AFP Service Logs
You can periodically save the active logs and open new logs.
To set how often logs are archived:
1 Open Server Admin and select AFP in the Computers & Services list.
2 Click Settings (near the bottom of the window), then click Logging.
3 Select “Archive every __ days” and type the number of days to specify how often the
log file contents are saved to an archive.
4 Select “Error Log: Archive every __ days” and type the number of days to specify how
often the error log file contents are saved to an archive.
5 Click Save.
The server closes the active log at the end of each archive period, renames it to include
the current date, then opens a new log file. You can keep the archived logs for your
records or delete them to free disk space when they are no longer needed. The default
setting is 7 days.
Log files are stored in /Library/Logs/AppleFileService. You can use the log rolling scripts
supplied with Mac OS X Server to reclaim disk space used by log files.
From the Command Line
You can also set the AFP service log archival interval using the serveradmin command
in Terminal. For more information, see the file services chapter of the command-line
administration guide.
Disconnecting a User
You use Server Admin to disconnect users from the Apple file server.
Important: Users lose information they haven’t saved when they are disconnected.
To disconnect a user:
1 Open Server Admin and select AFP in the Computers & Services list.
2 Click Connections.
3 Select the user and click Disconnect.
4 Enter the amount of time before the user is disconnected and type a disconnect
message.
If you don’t type a message, a default message appears.
5 Click Disconnect.
48 Chapter 3 AFP Service
Page 49

Disconnecting Idle Users Automatically
You can set AFP service to automatically disconnect users who have not used the
server for a period of time.
To set how the server handles idle users:
1 Open Server Admin and select AFP in the Computers & Services list.
2 Click Settings (near the bottom of the window), then click Idle Users.
3 To allow client computers to reconnect after sleeping for a certain time, select “Allow
clients to sleep __ hour(s)—will not show as idle” and type the number of hours clients
can sleep and still automatically reconnect to the server.
Although the server disconnects sleeping clients, the clients’ sessions are maintained
for the specified period. When a user resumes work within that time, the client is
reconnected with no apparent interruption.
4 To specify the idle time limit, select “Disconnect idle users after __ minutes” and type
the number of minutes after which an idle computer should be disconnected.
A sleeping Mac OS X version 10.2 (and later) client will be able to resume work on open
files within the limits of the “Allow clients to sleep” setting.
5 To prevent particular classes of users from being disconnected, select them under
“Except.”
6 In the “Disconnect Message” field, type the message you want users to see when they
are disconnected.
If you don’t type a message, a default message appears stating that the user has been
disconnected because the connection has been idle.
7 Click Save.
From the Command Line
You can also change the AFP service idle user settings using the serveradmin
command in Terminal. For more information, see the file services chapter of the
command-line administration guide.
Sending a Message to a User
You use Server Status to send messages to clients using AFP service.
To send a user a message:
1 Open Server Admin and select AFP in the Computers & Services list.
2 Click Connections and select the user’s name in the list.
3 Click Send Message.
4 Type the message and click Send.
Chapter 3 AFP Service 49
Page 50

Allowing Guest Access
Guests are users who can see information on your server without using a name or
password to log in. For better security, don’t allow guest access. After enabling guest
access for the service, you’ll need to enable guest access for specific share points. See
“Allowing Guest Access to a Share Point” on page 33.
To enable guest access:
1 Open Server Admin and select AFP in the Computers & Services list.
2 Click Settings (near the bottom of the window), then click Access.
3 Select “Enable Guest access.”
4 Under the “Maximum guest connections” option:
Select Unlimited if you don’t want to limit the number of guest users who can be
connected to your server at one time.
Enter a number if you want to limit how many client connections can be used by
guests.
5 Click Save.
From the Command Line
You can also set the AFP service to allow guest access using the serveradmin
command in Terminal. For more information, see the file services chapter of the
command-line administration guide.
Creating a Login Greeting
The login greeting is a message users see when they log in the server.
To create a login greeting:
1 Open Server Admin and select AFP in the Computers & Services list.
2 Click Settings (near the bottom of the window), then click General.
3 Type a message in the Logon Greeting field.
4 To prevent users from seeing the message more than once, select “Do not send same
greeting twice to the same user.”
If you change the message, users will see the new message the next time they connect
to the server.
5 Click Save.
From the Command Line
You can also change the AFP service greeting using the serveradmin command in
Terminal. For more information, see the file services chapter of the command-line
administration guide.
50 Chapter 3 AFP Service
Page 51

Supporting AFP Clients
This section describes how client computer can access Mac OS X Server AFP share
points.
Mac OS X Clients
AFP service requires the following Mac OS X system software:
• TCP/IP connectivity
• AppleShare 3.7 or later
Go to the Apple support website at www.apple/support/ to find out the latest version
of AppleShare client software supported by Mac OS X.
Connecting to the AFP Server in Mac OS X
You can connect to Apple file servers by entering the DNS name of the server or its IP
address in the Connect to Server window. Or, if the server is registered with
Rendezvous or Network Service Location, you can browse for it in the Network globe in
the Finder.
Note: Apple file service doesn’t support AppleTalk connections, so clients need to use
TCP/IP to access file services. You can use AppleTalk to find Apple file servers, but the
connection must be made using TCP/IP.
To connect to the Apple file server from Mac OS X:
1 In the Finder, choose Go > Connect to Server.
2 In the Connect to Server pane, do one of the following:
• Browse and select the server in the list (if it appears there).
• Type the DNS name of the server in the Address field. You can enter DNS names in
any of the following forms:
server
afp://server
afp://server/sharepoint
• Type the server’s IP address in the Address field.
3 Click Connect.
4 Type your user name and password, then click Connect.
5 Select the share point you want to use and click OK.
Chapter 3 AFP Service 51
Page 52

Setting Up a Mac OS X Client to Mount a Share Point Automatically
As an alternative to using the network mount feature of AFP or NFS, Mac OS X clients
can set their computers to mount server volumes automatically.
To set a Mac OS X version 10.2.6 or earlier client computer to mount a server
volume automatically:
1 Log in to the client computer as the user and mount the volume.
2 Open System Preferences and click Login Items.
3 Click Add, then locate the Recent Servers folder and double-click the volume you want
automatically mounted.
The volume is added to the list of items in the Recent Servers folder in the user’s home
Library folder.
When the client user logs in the next time, the server, if available, will be mounted
automatically.
The client user can also add the server volume to Favorites and then use the item in
the Favorites folder in the home Library.
To set a Mac OS X version 10.3 client computer to mount a server volume
automatically:
1 Log in to the client computer as the user and mount the volume.
2 Open System Preferences and click Accounts.
3 Select the user and click Startup Items.
4 Click the add button (below the list), select the server volume, and click Add.
52 Chapter 3 AFP Service
Page 53

Mac OS 8 and Mac OS 9 Clients
Apple file service requires the following Mac OS 8 or 9 system software:
• Mac OS 8 (version 8.6) or Mac OS 9 (version 9.2.2)
• TCP/IP
• AppleShare Client 3.83 or later
Go to the Apple support website at www.apple/support/ to find out the latest version
of AppleShare client software supported by Mac OS 8 and Mac OS 9.
Connecting to the Apple File Server from Mac OS 8 or Mac OS 9
Apple file service does not support AppleTalk connections, so clients need to use
TCP/IP to access file services. You can use AppleTalk to find Apple file servers, but the
connection must be made using TCP/IP.
To connect from Mac OS 8 or Mac OS 9:
1 Open the Chooser and click Server IP Address.
2 Enter the IP address or the name of the server in the window that appears and click
Connect.
3 Enter your user name and password, then click Connect.
4 Select the volume you want to use and click OK.
Setting up a Mac OS 8 or Mac OS 9 Client to Mount a Share Point
Automatically
As an alternative to using the network mount feature of AFP or NFS, clients can set
their computers to mount server volumes automatically.
To set a Mac OS 8 or Mac OS 9 client computer to mount a server volume
automatically:
1 Use the Chooser to mount the volume on the client computer.
2 In the select-item dialog that appears after you log in, check the server volume you
want to mount automatically.
Chapter 3 AFP Service 53
Page 54

Page 55

4 Windows Service
4
This chapter shows how to set up and manage the
Windows file service in Mac OS X Server.
General Information
Windows services in Mac OS X Server provide four native services to Windows clients:
• File service allows Windows clients to connect to the server using Server Message
Block (SMB) protocol over TCP/IP
• Print service uses SMB to allow Windows clients to print to PostScript printers on the
network
• Windows Internet Naming Service (WINS) allows clients across multiple subnets to
perform name/address resolution
• Browsing allows clients to browse for available servers across subnets
This chapter shows how to set up the Windows service for file sharing.
Windows services use the Windows code page setting to display the correct language
for the client.
Samba is public-domain software that provides file and print services to Windows
clients. For more information about Samba, visit www.samba.org:
Windows File Services Specifications
• Maximum number of connected users, depending on your license agreement: 1000
• Maximum volume size: 2 terabytes
• TCP port number: 139
• UDP port numbers: 37, 138
• Log file location: /Library/Logs in the WindowsFileServices folder
55
Page 56

Before You Set Up Windows Services
If you plan to provide Windows services from Mac OS X Server, read the following
sections for issues you should keep in mind. You should also check the Microsoft
documentation for your version of Windows to find out more about the capabilities of
the client software. Although Mac OS X Server does not require any special software or
configuration on Windows client computers, you may want to read “Supporting
Windows Clients” on page 66.
Ensuring the Best Cross-Platform Experience
Mac OS and Windows computers store and maintain files differently. For the best crossplatform experience, you should set up at least one share point to be used only by your
Windows users. See “Creating a Share Point and Setting Privileges” on page 22.
In addition, you can improve the user experience by following these guidelines:
• Use comparable versions of application software on both platforms.
• Modify files only with the application they were created in.
• If you have Mac OS 8 and Mac OS 9 clients, limit Windows file names to 31 characters.
• Don’t use symbols or characters with accents in the names of shared items.
Windows User Password Validation
Mac OS X Server supports several methods of validating Windows user passwords.
Password Server is the recommended method. It supports LDAP as well as NetInfo
because the directory does not store the password, just a pointer to the proper
Password Server and user ID. The Password Server database is a private root readable
file, and the contents are encrypted. Passwords are not accessible over the network for
reading—they can only be verified.
Authentication Manager is supported for upgrades from Mac OS X Server version10.1.
Existing users will continue to use Authentication Manager. (If you export from
Mac OS X Server and reimport, you do not get the tim_password set. You must
manually set the password for each user after import.) You can enable Authentication
Manager from the command line. Use Basic password validation. You should set
Authentication Manager passwords on the server hosting the domain you are editing.
Note: Authentication Manager is only supported with NetInfo.
56 Chapter 4 Windows Service
Page 57

Setting Up Windows Services
You set up Windows services by configuring four groups of settings:
• General Specify your computer name and workgroup name, and choose the role of
the server in associated Windows domains.
• Access Limit the number of clients and control guest access.
• Logging Choose how much information is recorded in the service log.
• Advanced Configure WINS registration and domain browsing services, choose a
code page for clients, and control virtual share points for home directories.
Because the default settings work well in most cases, it may be that all you need to do
is start the Windows service. Nonetheless, you should take a look at the settings and
change anything that isn’t appropriate for your network. Each settings is described in
the following sections on configuration. Following the configuration tasks, other topics
tell you how to start up Windows services.
Chapter 4 Windows Service 57
Page 58

Changing General Settings
You can use the General pane of the Windows service settings in Server Admin to
provide a server description, name, and workgroup and specify the server’s role in its
domain.
To configure Windows service General settings:
1 Open Server Admin and select Windows in the Computers & Services list.
2 Click Settings, then click General.
3 To specify how your server participates in the local domain, choose from the Role pop-
up menu.
4 In the Description field, type a description that is meaningful to you or your users.
This description appears in the Network Neighborhood window on client computers,
and is optional.
The Description cannot exceed 48 characters.
5 In the Computer Name field, type the server name you want users to see when they
connect.
The default name is the NetBIOS name of the Windows file server. The name should
contain no more than 15 characters, and no special characters or punctuation.
If practical, make the server name match its unqualified DNS host name. For example, if
your DNS server has an entry for your server as “server.apple.com,” give your server the
name “server.”
6 In the Workgroup field, type the name of the workgroup that you want users to see in
the Network Neighborhood window.
If you have Windows domains on your subnet, use one of them as the workgroup
name to make it easier for clients to communicate across subnets. Otherwise, consult
your Windows network administrator for the correct group name.
The workgroup name cannot exceed 15 characters.
From the Command Line
You can also change the Windows service settings by modifying the serveradmin
command in Terminal. For more information, see the file services chapter of the
command-line administration guide.
58 Chapter 4 Windows Service
Page 59

Changing Access Settings
You can use the Access pane of the Windows service settings in Server Admin to allow
guest users or limit the number of simultaneous client connections.
To configure Windows service Access settings:
1 Open Server Admin and select Windows in the Computers & Services list.
2 Click Settings (near the bottom of the window), then click Access (near the top).
3 To allow Windows or other SMB users to connect without providing a user name or
password, select “Allow Guest access.”
4 To limit the number of users who can be connected to the server at one time, click the
button next to “maximum” and type a number in the field.
5 Click Save.
From the Command Line
You can also change the Windows service settings using the serveradmin command
in Terminal. For more information, see the file services chapter of the command-line
administration guide.
Changing Logging Settings
You can use the Logging pane of the Windows service settings in Server Admin to
specify how much information is recorded in the Windows log file.
To configure Windows service Logging settings:
1 Open Server Admin and select Windows in the Computers & Services list.
2 Click Settings (near the bottom of the window), then click Logging (near the top).
3 Choose a level of log detail from the pop-up menu:
“Low” records errors and warning messages only.
“Medium” records error and warning messages, service start and stop times,
authentication failures, and browser name registrations.
“High” records error and warning messages, service start and stop times, authentication
failures browser name registrations, and all file access.
4 Click Save.
From the Command Line
You can also change the Windows service settings using the serveradmin command
in Terminal. For more information, see the file services chapter of the command-line
administration guide.
Chapter 4 Windows Service 59
Page 60

Changing Advanced Settings
You can use the Advanced pane of the Windows service settings in Server Admin to
choose a client code page, set the server to be a workgroup or domain master browser,
specify the server’s WINS registration, and enable virtual share points for user homes.
To configure Windows services Advanced settings:
1 Open Server Admin and select Windows in the Computers & Services list.
2 Click Settings, then click Advanced.
3 Choose the character set you want clients to use from the Code Page pop-up menu.
4 Next to Services, choose whether to enable domain browsing services.
“Workgroup Master Browser” provides browsing and discovery of servers in a single
subnet.
“Domain Master Browser” provides browsing and discovery of servers across subnets.
5 Next to WINS Registration, choose how you want the server to register with WINS.
Choose “Off” to prevent your server from registering itself with any external WINS
server or local name resolution server.
Choose “Enable WINS server” to have the file server provide local name resolution
services. This allows clients across multiple subnets to perform name/address
resolution.
Choose “Register with WINS server” if your Windows clients and Windows server are not
all on the same subnet, and your network has a WINS server. Then enter the IP address
or DNS name of the WINS server.
6 To simplify setting up share points for Windows user home directories, select “Enable
virtual share points.”
When you enable virtual share points, home directories are mounted automatically
when Windows users log in to the server, without you having to set up individual share
points for each of your users.
From the Command Line
You can also change the Windows service settings using the serveradmin command
in Terminal. For more information, see the file services chapter of the command-line
administration guide.
60 Chapter 4 Windows Service
Page 61

Starting Windows Service
You can use Server Admin to start Windows service.
To start Windows services:
1 Open Server Admin and select Windows in the Computers & Services list.
2 Click Start Service.
From the Command Line
You can also start Windows service using the serveradmin command in Terminal. For
more information, see the file services chapter of the command-line administration
guide.
Managing Windows Services
This section tells you how to perform day-to-day management tasks for Windows
services once you have the services up and running.
Stopping Windows Services
You can use Server Admin to stop Windows service.
Important: When you stop Windows services, connected users will lose any
information they haven’t saved.
To stop Windows services:
1 Open Server Admin and select Windows in the Computers & Services list.
2 Click Stop Service.
From the Command Line
You can also stop Windows service using the serveradmin command in Terminal. For
more information, see the file services chapter of the command-line administration
guide.
Chapter 4 Windows Service 61
Page 62

Changing the Windows Server Name
The default server name is the NetBIOS name of the Windows file server. The name
should contain no more than 15 characters and no special characters or punctuation.
To change the file server name:
1 Open Server Admin and select Windows in the Computers & Services list.
2 Click Settings, then click General.
3 In the Computer Name field, type the server name you want users to see when they
connect.
The name should contain no more than 15 characters, no special characters, and no
punctuation. If practical, make the server name match its unqualified DNS host name.
For example, if your DNS server has an entry for your server as “server.apple.com,” give
your server the name “server.”
4 Click Save.
From the Command Line
You can also change the server name using the serveradmin command in Terminal.
For more information, see the file services chapter of the command-line administration
guide.
Changing the Workgroup
Users see the workgroup name in the Network Neighborhood window. If you have
Windows domains on your subnet, use one of them as the workgroup name to make it
easier for clients to communicate across subnets. Otherwise, consult your Windows
network administrator for the correct name.
To change the workgroup name:
1 Open Server Admin and select Windows in the Computers & Services list.
2 Click Settings, then click General.
3 Type a name in the Workgroup field.
4 Click Save.
From the Command Line
You can also change the Windows workgroup name using the serveradmin command
in Terminal. For more information, see the file services chapter of the command-line
administration guide.
62 Chapter 4 Windows Service
Page 63

Checking Service Status
You can use Server Admin to check the status of Windows service.
To view Windows services status:
1 Open Server Admin and select Windows in the Computers & Services list.
2 Click Overview to see whether the service is running and how many users are
connected.
3 Click Logs to see the Windows file service and name service logs.
Use the Show pop-up menu to choose which log to view.
4 Click Connections to see a list of the users currently connected to the Windows
services.
The list includes the users’ names, IP addresses, and duration of connections. A button
at the bottom of the pane lets you disconnect a user.
5 Click Graphs to see graphs of connected users or throughput.
Use the slider to adjust the time scale.
From the Command Line
You can also check Windows service status using the serveradmin command in
Terminal or using the cat or tail command to view the log files in /var/log/samba. For
more information, see the file services chapter of the command-line administration
guide.
Registering with a WINS Server
Windows Internet Naming Service (WINS) matches server names with IP addresses. You
can use your server as the local name resolution server, or you can register with an
external WINS server.
To register your server with a WINS server:
1 Open Server Admin and select Windows in the Computers & Services list.
2 Click Settings, then click Advanced.
3 Select one of the options under WINS Registration.
Choose “Off” to prevent your server from registering itself with any external WINS
server or local name resolution server.
Choose “Enable WINS server” to have the file server provide local name resolution
services. This allows clients across multiple subnets to perform name/address
resolution.
Choose “Register with WINS server” if your Windows clients and Windows server are not
all on the same subnet, and your network has a WINS server. Then enter the IP address
or DNS name of the WINS server.
4 Click Save.
Chapter 4 Windows Service 63
Page 64

From the Command Line
You can also change WINS settings using the serveradmin command in Terminal. For
more information, see the file services chapter of the command-line administration
guide.
Enabling Domain Browsing
If there are no Microsoft servers on your subnet or network to control domain
browsing, you can use these options to restrict domain browsing to a single subnet or
allow browsing across your network.
To enable domain browsing:
1 Open Server Admin and select Windows in the Computers & Services list.
2 Click Settings, then click Advanced.
3 Next to Services, select Workgroup Master Browser, Domain Master Browser, or both.
Select Master Browser to let clients browse for and locate servers in a single subnet.
Select Domain Master Browser to let clients browse for and locate servers across your
network (subnets).
4 Click Save.
From the Command Line
You can also change Windows service domain browsing settings using the
serveradmin command in Terminal. For more information, see the file services chapter
of the command-line administration guide.
Limiting Connections
You can limit the potential resources consumed by Windows services by limiting the
maximum number of connections.
To set the maximum number of connections:
1 Open Server Admin and select Windows in the Computers & Services list.
2 Click Settings, then click Access.
3 Select “maximum” and type the maximum number of connections.
4 Click Save.
From the Command Line
You can also limit client connections by using the serveradmin command in Terminal
to limit the number of SMB processes. For more information, see the file services
chapter of the command-line administration guide.
64 Chapter 4 Windows Service
Page 65

Allowing Guest Access
Guests are users who can see information on your server without using a name or
password to log in. For better security, do not allow guest access.
To enable guest access to the server:
1 Open Server Admin and select Windows in the Computers & Services list.
2 Click Settings, then click Advanced.
3 Under Access, select “Allow Guest access.”
4 Click Save.
From the Command Line
You can also allow guest access using the serveradmin command in Terminal. For
more information, see the file services chapter of the command-line administration
guide.
Choosing What to Record in the Log
You can choose the level of detail you want to log for Windows services.
To specify log contents:
1 Open Server Admin and select Windows in the Computers & Services list.
2 Click Settings, then click Logging (near the top).
3 Choose the level of detail you want to record from the Log Detail pop-up menu.
The more detailed the logging, the larger the log file.
The table below shows the level of detail you get for each option.
Events logged Low Medium High
Warnings and errors Yes Yes Yes
Service startup and stop Yes Yes
User login failures Yes Yes
Browser name registrations Yes Yes
File access events Yes
4 Click Save.
From the Command Line
You can also change Windows service logging settings using the serveradmin
command in Terminal. For more information, see the file services chapter of the
command-line administration guide.
Chapter 4 Windows Service 65
Page 66

Disconnecting a User
You can use Server Admin to disconnect Windows users.
Important: Users who are disconnected will lose unsaved work in open files.
To disconnect a user:
1 Open Server Admin and select Windows in the Computers & Services list.
2 Click Connections.
3 Select the user and click Disconnect.
From the Command Line
You can also disconnect a Windows client using the serveradmin command in
Terminal. For more information, see the file services chapter of the command-line
administration guide.
Supporting Windows Clients
Mac OS X Server supports the native Windows file sharing protocol, Server Message
Block (SMB). SMB is also known as Common Internet File System (CIFS). Mac OS X
Server comes with built-in browsing and name resolution services for your Windows
client computers. You can enable Windows Internet Naming Service (WINS) on your
server, or you can register with an existing WINS server.
Windows services in Mac OS X Server include Windows Master Browser and Domain
Master Browser services. You do not need a Windows server or a primary domain
controller on your network to allow Windows users to see your server listed in the
Network Neighborhood window. Enable the master browsers to allow Windows clients
outside of your server’s subnet to access the server by name.
You can also set up your Mac OS X server to be a Primary Domain Controller for your
Windows clients.
TCP/IP
In order to have access to Windows services, Windows client computers must be
properly configured to connect over TCP/IP. See your Windows networking
documentation for information on TCP/IP configuration.
66 Chapter 4 Windows Service
Page 67

Connecting to the Server Using Network Neighborhood
Before trying to connect to the server from a Windows client computer, find out the
workgroup or domain of both the client computer and the file server.
You can find the workgroup name of a Windows client computer in the computer’s
Network Neighborhood window. To find the server’s workgroup name, open Server
Admin, click Windows in the Computers & Services list, click Settings, then click
General.
To connect to a Windows server using the Network Neighborhood:
1 On the Windows client computer, open the Network Neighborhood window. If you are
in the same workgroup or domain as the server, skip to step 4.
2 Double-click the Entire Network icon.
3 Double-click the icon of the workgroup or domain the server is located in.
4 Double-click the server’s icon.
5 Log in using your Windows login name.
Connecting to the Server by Name or Address in Windows
You can connect to the Windows server by double-clicking its name in the Network
Neighborhood. You can also connect without using the Network Neighborhood.
To connect to the Windows server without the Network Neighborhood:
1 On the Windows client computer, choose Start > Find > Computer.
2 Type the name or IP address of your Windows server.
3 Double-click the server to connect.
4 Log in using your Mac OS X Server login name.
Chapter 4 Windows Service 67
Page 68

Page 69

5 NFS Service
5
This chapter shows how to set up and manage the NFS
file service in Mac OS X Server.
Overview
Network File System is the protocol used for file services on UNIX computers. Use NFS
to provide file service for your UNIX clients (other than Mac OS X clients). You can
export a shared item to a set of client computers or to “World.” Exporting an NFS
volume to World means that anyone who can access your server can also access that
volume.
Note: The NFS term for sharing is export. This guide, therefore, uses that term to be
consistent with standard NFS terminology.
You use Server Admin to configure and manage NFS service. You also use the Sharing
module of Workgroup Manager to set privileges and access levels for the share points
or folders you want to export.
69
Page 70

Before You Set Up NFS Service
Be sure to consider the security implications of exporting in NFS before you set up NFS
service.
Security Considerations
NFS was created for a secure networking environment, in which you can trust the client
computer users and the people who administer the clients. Whereas access to Apple
file service, Windows file sharing, and FTP service share points is controlled by
authentication (user name and password), access to NFS shared items is controlled by
the client software and file permissions.
NFS allows access to information based on the computer’s IP address. This means that a
particular client computer will have access to certain share points regardless of who is
using the computer. Whenever that computer is started up, some volumes or folders
are automatically mounted or made available, and anyone using that computer can
access those volumes or folders.
With NFS, it’s possible for a user to spoof ownership of another person’s files. For
example, if a file on the server is owned by a user with user ID 1234, and you export a
folder that contains that file, someone on a remote computer can create a local user on
the remote computer, give it a user ID of 1234, mount that folder, and have the same
access to the folder’s contents as the file’s original owner.
You can take some steps to prevent this by creating unique user IDs and by
safeguarding user information. If you have Internet access and plan to export to World,
your server should be behind a firewall.
70 Chapter 5 NFS Service
Page 71
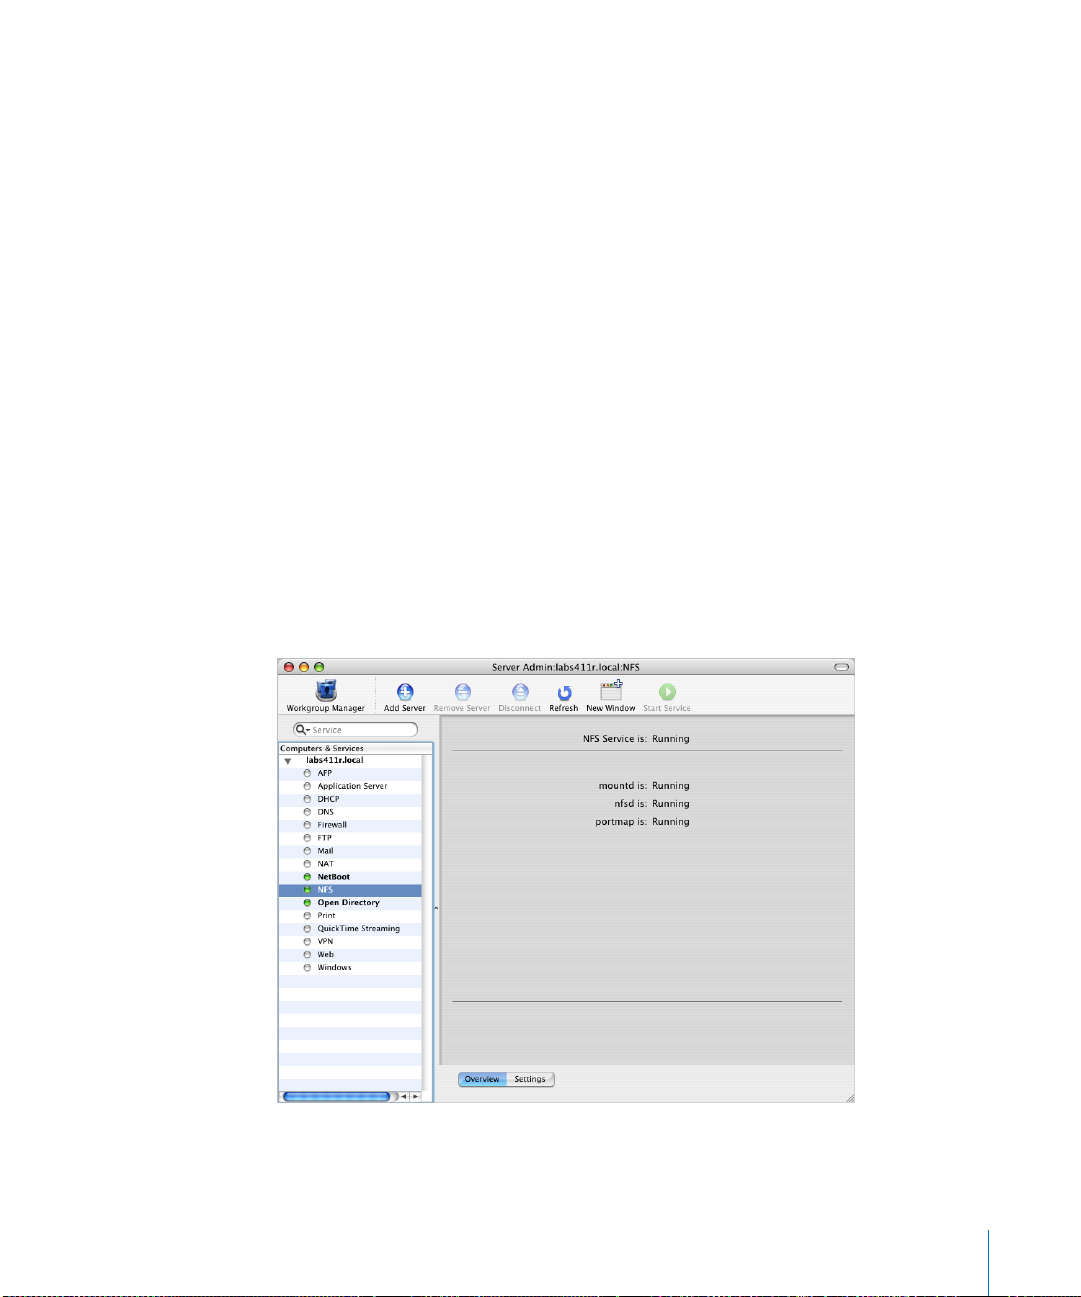
Setup Overview
Here is an overview of the major steps for setting up NFS service.
Step 1: Before You Begin
Read “Before You Set Up NFS Service” on page 70 for issues you should keep in mind
when you set up NFS service.
Step 2: Configure NFS settings
The NFS settings let you set the maximum number of daemons and choose how you
want to serve clients—via TCP, UDP, or both. See “Configuring NFS Settings” on
page 72.
Step 3: Create share points and share them using NFS
Use the Sharing module of Workgroup Manager to specify the share points you want to
export (share) using NFS. You must explicitly configure a share point to use NFS in
order for NFS users to be able to access the share point. See “Creating a Share Point
and Setting Privileges” on page 22, “Setting Up an NFS Share Point” on page 26, and
“Automatically Mounting Share Points for Clients” on page 29.
You don’t need to start or stop NFS service; when you export a share point, the service
starts automatically. When you delete all exports, the service stops. To see if NFS service
is running, open Server Admin, select NFS in the Computers & Services list, and click
Overview.
Chapter 5 NFS Service 71
Page 72

Setting Up NFS Service
You can use Server Admin to change some NFS service settings.
Configuring NFS Settings
The NFS settings let you set the maximum number of daemons and choose how you
want to serve clients—via TCP, UDP, or both.
To configure NFS settings:
1 Open Server Admin and select NFS in the Computers & Services list.
2 Click Settings (near the bottom of the window).
3 Type a number in the “Use__server daemons” field to specify the maximum number of
nfsd daemons you want to allow to run at one time.
An nfsd daemon is a server process that runs continuously behind the scenes and
processes reading and writing requests from clients. The more daemons that are
available, the more concurrent clients can be served. Typically, four to six daemons are
adequate to handle the level of concurrent requests.
4 Choose how you want to serve data to your client computers.
Select both TCP and UDP unless you have a specific performance concern. TCP provides
better performance for clients, and UDP puts a smaller load on the server.
Transmission Control Protocol (TCP) separates data into packets (small bits of data sent
over the network using IP) and uses error correction to make sure information is
transmitted properly.
User Datagram Protocol (UDP) doesn’t break data into packets, so it uses fewer system
resources. It’s more scalable than TCP, and a good choice for a heavily used server. Do
not use UDP, however, if remote clients are using the service.
5 Click Save.
From the Command Line
You can also change the NFS service settings using the serveradmin command in
Terminal. For more information, see the file services chapter of the command-line
administration guide.
72 Chapter 5 NFS Service
Page 73

Managing NFS Service
This section tells you how to perform day-to-day management tasks for NFS service
once you have it up and running.
Starting and Stopping NFS Service
When the server starts up, a startup script checks to see if any NFS exports are defined;
if so, NFS starts automatically.
If NFS is not running and you add exports, wait a few seconds for the service to launch.
To stop NFS service:
m
Delete all exports.
The nsfd daemons continue to run until the server is restarted.
From the Command Line
You can also stop the NFS service processes using the kill command in Terminal. For
more information, see the file services chapter of the command-line administration
guide.
Viewing NFS Service Status
You use Server Status to check the status of all Mac OS X Server devices and services.
To view NFS service status:
1 Open Server Admin and select NFS in the Computers & Services list.
2 Click Overview (near the bottom of the window).
3 The Overview pane tells you whether or not the service is running and if mountd, nfsd,
and portmap processes are running.
The mountd process handles mount requests from client computers (only one mountd
process will appear in the status window if you’ve defined any exports).
The nfsd process responds to read/write requests from client computers that have
mounted folders.
The portmap process allows client computers to find nfs daemons (always one
process).
From the Command Line
You can also check the NFS service status using the ps or serveradmin commands in
Terminal. For more information, see the file services chapter of the command-line
administration guide.
Chapter 5 NFS Service 73
Page 74

Viewing Current NFS Exports
You can use the Terminal application to view a list of the current NFS exports.
To view current NFS exports:
m
In Terminal, type showmount -e.
If this command does not return results within a few seconds, there are no exports and
the process is blocked (hung). Press Control-C to exit the showmount command and
return to an active command line in your Terminal window.
74 Chapter 5 NFS Service
Page 75

6 FTP Service
6
This chapter shows how to set up and manage File
Transfer Protocol (FTP) service in Mac OS X Server.
Overview
FTP (File Transfer Protocol) is a simple way for computers of any type to transfer files
over the Internet. Someone using any computer that supports FTP or an FTP client
application can connect to your FTP server and upload or download files (depending
on the permissions you set). Most Internet browsers and a number of freeware and
shareware applications can be used to access your FTP server.
FTP service in Mac OS X Server is based on the source code for Washington University’s
FTP server, known as “wu-FTPd.” However, the original source code has been
extensively modified to provide a better user experience. Some of these differences are
described in the following sections.
A Secure FTP Environment
Most FTP servers restrict users to specific directories on the server. Users can see folders
and files only in these directories, so the server is kept quite secure. Users cannot
access volumes mounted outside the restricted directories, and symbolic links and
aliases cannot reach outside these boundaries.
FTP service in Mac OS X Server expands the restricted environment to allow access to
symbolic links while still providing a secure FTP environment. You can allow FTP users
access to the FTP root directory, their home directory, or to any other directory on the
server that you set up as an FTP share point.
A user’s access to the FTP root directory, FTP share points, and their home directory is
determined by the user environment you specify (as described in the following section)
and by their access privileges.
75
Page 76

FTP Users
FTP supports two types of users:
• Authenticated users have accounts on your server (and might even have their
home directories stored on the server). Some FTP software refers to these as real
users. An authenticated user must provide a user name and password to access
server files using FTP. You use the Accounts module of Workgroup Manager to review
or set up authenticated users.
• Anonymous users do not have accounts on your server. They are also called guest
users (for example, in Workgroup Manager when you set up an FTP share point). An
anonymous user can access the FTP directories on the server files using the common
user name “anonymous” and their email address, which may be fictitious, as their
password. You use the General pane of FTP service settings in Server Admin to allow
anonymous access to your server.
The FTP Root Directory
The FTP root directory (or simply FTP root) is a portion of your server’s disk space set
aside for FTP users. When you first install the server software, the FTP root is set to
/Library/FTPServer/FTPRoot. You can change the FTP root; see “Changing the FTP Root
Directory” on page 88.
FTP User Environments
Mac OS X Server lets you choose from three different FTP environments that give users
access to some combination of the FTP root directory, other FTP share points, and user
home directories:
• FTP root and Share Points.
• Home Directory with Share Points
• Home Directory Only
Share points in this case are any share points you have set up in Workgroup Manager
to be shared using FTP.
Home directories are the home directories of users who have accounts on the server.
You can choose the user environment for your server in the Advanced pane of the FTP
service settings in Server Admin. See “Changing Advanced Settings” on page 85.
76 Chapter 6 FTP Service
Page 77

FTP Root and Share Points
The “FTP Root and Share Points” option gives access—for both authenticated and
anonymous users—to the FTP root and any FTP share points to which the users have
access privileges, as shown in the following figure.
Looks like “/ ”
when accessing
as user “Bob”
FTP Root
Bob
Users
bin
Betty
FTP Root
etc
Looks like “/ ”
when accessing
as user “Betty”
Data
Library
FTP server
FTP root
system
Photos
Data
Volumes
FTP share point
incorporated
within virtual root
Photos
Looks like “/ ”
to anonymous
FTP users
Symbolic link
Users access FTP share points through symbolic links attached to the FTP Root
directory. The symbolic links are created automatically when you create the FTP share
points.
Note that in this example, /Users, /Volumes/Data, and /Volumes/Photos are FTP share
points. All users can see the home directories of other users because they are
subdirectories of the Users share point.
Important: Regardless of the user environment setting, anonymous users and users
without home directories are always logged into the “FTP Root and Share Points”
environment.
Chapter 6 FTP Service 77
Page 78

Home Directory With Share Points
When the user environment option is set to “Home Directory with Share Points,”
authenticated users log in to their home directories and have access to the FTP root by
means of a symbolic link automatically created in their home directories. Users access
other FTP share points through symbolic links in the FTP root. As always, access to the
FTP share points is controlled by user access privileges.
bin
Users
Betty
Bob
Symbolic link
etc
Looks like “/ ”
Users
Library
server
FTP root
Data
FTP
system
Photos
Data
Volumes
FTP share point
incorporated
within virtual root
Photos
Share point
In this scenario, the /Users folder is not an FTP share point and users are not able to see
the home directories of other users.
If you change the FTP root, the symbolic link in a user’s home directory reflects that
change. For example, if you change the FTP root to /Volumes/Extra/NewRoot, the
symbolic link created in the user’s home directory would be called NewRoot.
78 Chapter 6 FTP Service
Page 79

Home Directory Only
When you choose this option, authenticated users are confined to their home
directories and do not have access to the FTP root or other FTP share points, as shown
in the following illustration.
bin
Projects
Users
Bob
Reports
Looks like “/ ”
to anonymous
FTP users
Betty
etc
Library
FTP server
FTP root
Data
system
Photos
Data
Volumes
FTP share point
incorporated
within virtual root
Photos
Share point
Symbolic link
Anonymous users and users without home directories still have access to the FTP root
and FTP share points. To keep these users from seeing the home directories of
authenticated users, the /Users folder is not set up as an FTP share point.
Chapter 6 FTP Service 79
Page 80

On-the-Fly File Conversion
FTP service in Mac OS X Server allows users to request compressed or decompressed
versions of information on the server. A file-name suffix such as “.Z” or “.gz” indicates
that the file is compressed. If a user requests a file called “Hamlet.txt” and the server
only has a file named “Hamlet.txt.Z,” it knows that the user wants the decompressed
version, and delivers it to the user in that format.
In addition to standard file compression formats, FTP in Mac OS X Server has the ability
to read files from either HFS or non-HFS volumes and convert the files to MacBinary
(.bin) format. MacBinary is one of the most commonly used file compression formats
for the Macintosh operating system.
The table below shows common file extensions and the type of compression they
designate.
File extension What it means
.gz DEFLATE compression
.Z UNIX compress
.bin MacBinary encoding
.tar UNIX tar archive
.tZ UNIX compressed tar archive
.tar.Z UNIX compressed tar archive
.crc UNIX checksum file
.dmg Mac OS X disk image
Files With Resource Forks
You can encourage Mac OS X clients to take advantage of on-the-fly conversion to help
them transfer files created using older file systems that store information in resource
forks. If you enable MacBinary and disk image auto-conversion in FTP service settings,
files with resource forks will be listed as .bin files on the FTP clients. When a client asks
to have one of these files transferred, on-the-fly conversion will recognize the .bin suffix
and convert the file to a genuine .bin file for transfer.
Kerberos Authentication
FTP supports Kerberos authentication. You choose the authentication method using
the General pane of the FTP service settings. See “Changing General Settings” on
page 83.
FTP service specifications
• Maximum number of connected users (the default setting is 50 for authenticated
users and 50 for anonymous users): 1000
• FTP port number: 21
• Number of failed login attempts before user is disconnected: 3
80 Chapter 6 FTP Service
Page 81

Before You Set Up FTP Service
Consider the type of information you need to share and who your clients are when
determining whether or not to offer FTP service. FTP works well when you want to
transfer large files such as applications and databases. In addition, if you want to allow
guest (anonymous) users to download files, FTP is a secure way to provide this service.
Server Security and Anonymous Users
Enabling anonymous FTP poses a security risk to your server and data because you
open your server to users that you do not know. The access privileges you set for the
files and folders on your server are the most important way you can keep information
secure.
Anonymous FTP users are only allowed to upload files into a special directory named
“uploads” in the FTP root. If the uploads share point doesn’t exist, anonymous users will
not be able to upload files at all.
To ensure the security of your FTP server, by default anonymous users cannot:
• Delete files
• Rename files
• Overwrite files
• Change permissions of files
Chapter 6 FTP Service 81
Page 82

Setup Overview
Here is an overview of the basic steps for setting up FTP service.
Step 1: Before You Begin
Read “Before You Set Up FTP Service” on page 81 for issues you should keep in mind
when you set up FTP service.
Step 2: Configure FTP General settings
The General settings let you display banner and welcome messages, set the number of
login attempts, and provide an administrator email address. See “Changing General
Settings” on page 83.
Step 3: Configure FTP Messages settings
The Access settings let you specify the number of authenticated and anonymous users
that can connect to the server. See “Changing the Greeting Messages” on page 84.
Step 4: Configure FTP Logging settings
The Logging settings let you specify the FTP-related events you want to log for
authenticated and anonymous users. See “Choosing Logging Options” on page 84.
Step 5: Configure FTP Advanced settings
The Advanced settings let you change the FTP root and choose which items user can
see. See “Changing Advanced Settings” on page 85.
Step 6: Create an “uploads” folder for anonymous users (optional)
If you enabled anonymous access in Step 2, you may want to create a folder for
anonymous users to upload files. The folder must be named “uploads.” It is not a share
point, but must have appropriate access privileges. See “Creating an Uploads Folder for
Anonymous Users” on page 85.
Step 7: Create share points and share them using FTP
Use the Sharing module of Workgroup Manager to specify the share points that you
want to make available through FTP. You must explicitly configure a share point to use
FTP in order for FTP users to be able to access the share point. See “Creating a Share
Point and Setting Privileges” on page 22 and “Changing FTP Settings for a Share Point”
on page 25.
Step 8: Start FTP service
After you have configured FTP, start the service to make it available. See “Starting FTP
Service” on page 86.
82 Chapter 6 FTP Service
Page 83

Setting Up File Transfer Protocol (FTP) Service
You use the Server Admin application to set up and enable FTP service.
Changing General Settings
You can use the General settings to limit the number of login attempts, provide an
administrator email address, and limit the number and type of users.
Changes you make to FTP service settings affect only new connections. Users who are
currently connected will not see the changes.
To configure the FTP General settings:
1 Open Server Admin and select FTP in the Computers & Services list.
2 Click Settings (near the bottom of the window), then click General.
3 To change the number of times a user can try to connect before they are disconnected,
type a number in “Disconnect after __ failed login attempts.”
4 To provide a contact for your users, type an email address following “FTP administrator
email address.”
5 Under Access, choose a method from the Authentication pop-up menu.
6 Type a number in the “Allow a maximum of __ authenticated users” field to limit the
number of authenticated users who can connect to your server at the same time.
Authenticated users have accounts on the server. You can view or add them using the
Accounts module of Workgroup Manager.
7 Select “Enable anonymous access” to allow anonymous users to connect to the server.
Anonymous users can log in using the name “ftp” or “anonymous.” They do not need a
password to log in, but they will be prompted to enter their email addresses.
Before selecting this option, you should review the privileges assigned to your share
points carefully to make sure there are no security holes.
8 Type a number in the “Allow a maximum of __ anonymous users” field to limit the
number of anonymous users who can connect to your server at the same time.
9 To have files with resource forks listed with a .bin suffix so that clients will take
advantage of automatic file conversion when transferring them, select “Enable
MacBinary and Disk Image auto-conversion.”
10 Click Save.
From the Command Line
You can also change FTP service settings using the serveradmin command in
Terminal. For more information, see the file services chapter of the command-line
administration guide.
Chapter 6 FTP Service 83
Page 84

Changing the Greeting Messages
Users see the banner message when they first contact your server (before they log in)
and the welcome message when they log in.
To change the banner and welcome messages:
1 Open Server Admin and select FTP in the Computers & Services list.
2 Click Settings (near the bottom of the window), then click Messages.
3 Edit the message text.
4 Select “Show banner message” and “Show welcome message.”
5 Click Save.
From the Command Line
You can also change the FTP service banner message using the serveradmin
command in Terminal or by editing the files /Library/FTPServer/Messages/banner.txt
and /Library/FTPServer/Messages/welcome.txt. For more information, see the file
services chapter of the command-line administration guide.
Choosing Logging Options
The Logging settings let you choose which FTP-related events to record.
For either authenticated or anonymous users, you can record:
• Uploads
• Downloads
• FTP commands
• Rule violation attempts
To configure the FTP Logging settings:
1 Open Server Admin and select FTP in the Computers & Services list.
2 Click Settings (near the bottom of the window), then click Logging.
3 In the “Log authenticated users” section, select events you want to record in the FTP
log for authenticated users.
4 In the “Log anonymous users” section, select events you want to record in the FTP log
for anonymous users.
5 Click Save.
To view the log, select FTP in Server Admin and click Log.
From the Command Line
You can also change the FTP service logging settings using the serveradmin
command in Terminal. For more information, see the file services chapter of the
command-line administration guide.
84 Chapter 6 FTP Service
Page 85

Changing Advanced Settings
The Advanced settings let you specify the directories that FTP users can access.
You can change the FTP root directory and choose whether users see the FTP root and
share points, home directories and share points, or home directories only.
To configure the FTP Advanced settings:
1 Open Server Admin and select FTP in the Computers & Services list.
2 Click Settings (near the bottom of the window), then click Advanced.
3 For “Authenticated users see,” choose the type of user (chroot) environment you want
to use: FTP Root and Share Points, Home Directory with Share Points, or Home
Directory Only.
For more information, see “FTP Users” on page 76.
4 To change the FTP root, enter the pathname in the FTP Root field.
For more information, see “The FTP Root Directory” on page 76.
From the Command Line
You can also change the FTP service settings using the serveradmin command in
Terminal. For more information, see the file services chapter of the command-line
administration guide.
Creating an Uploads Folder for Anonymous Users
The uploads folder provides a place for anonymous users to upload files to the FTP
server. It must exist at the top level of the FTP root directory and be named “uploads.”
(If you have changed the FTP root directory, then the uploads folder must be at the
root of that directory.)
To create an uploads folder for anonymous users:
1 Use the Finder to create a folder named “uploads” at the top level of your server’s FTP
root directory.
2 Set privileges for the folder to allow guest users to write to it.
From the Command Line
You can set up an FTP upload directory using the mkdir and chmod commands in
Terminal. For more information, see the file services chapter of the command-line
administration guide.
Chapter 6 FTP Service 85
Page 86

Starting FTP Service
Start FTP file service to make the service available to your client users.
To start FTP service:
1 Open Server Admin and select FTP in the Computers & Services list.
2 Click Start Service (near the top of the window).
From the Command Line
You can also start the FTP service using the serveradmin command in Terminal. For
more information, see the file services chapter of the command-line administration
guide.
Managing FTP Service
This section describes how to perform typical day-to-day management tasks for FTP
service once you have it up and running.
Stopping FTP Service
Important: When you stop FTP service, users are disconnected without warning.
To stop FTP service:
1 Open Server Admin and select FTP in the Computers & Services list.
2 Click Stop Service (near the top of the window).
From the Command Line
You can also stop the FTP service using the serveradmin command in Terminal. For
more information, see the file services chapter of the command-line administration
guide.
86 Chapter 6 FTP Service
Page 87

Allowing Anonymous User Access
You can allow guests to log in to your FTP server with the user name “ftp” or
“anonymous.” They don’t need a password to log in, but they will be prompted to enter
an email address.
For better security, do not enable anonymous access.
To allow anonymous FTP service:
1 Open Server Admin and select FTP in the Computers & Services list.
2 Click Settings (near the bottom of the window), then click General.
3 Under Access, select “Enable anonymous access.”
4 Click Save.
From the Command Line
You can also allow anonymous FTP access using the serveradmin command in
Terminal. For more information, see the file services chapter of the command-line
administration guide.
Changing the User Environment
You use the Advanced pane of Configure FTP Service to change the user environment.
To change the FTP user environment:
1 Open Server Admin and select FTP in the Computers & Services list.
2 Click Settings (near the bottom of the window), then click Advanced.
3 Choose the type of user environment you want to provide from the “Authenticated
users see” pop-up menu.
“FTP Root and Share Points” sets up the Users directory as a share point. Authenticated
users log in to their home directories, if they’re available. Both authenticated and
anonymous users can see other users’ home directories.
“Home Directory with Share Points” logs authenticated FTP users in to their home
directories. They have access to home directories, the FTP root, and FTP share points.
“Home Directory Only” restricts authenticated FTP to user home directories.
4 Click Save.
Regardless of the user environment you choose, access to all data is controlled by the
access privileges that you or users assign to files and folders.
Anonymous users and authenticated users who don’t have home directories (or whose
home directories are not located in a share point to which they have access) are always
logged in at the root level of the FTP environment.
Chapter 6 FTP Service 87
Page 88

Changing the FTP Root Directory
The Advanced settings allow you to change the path to the FTP root directory.
To specify a different FTP root:
1 If it doesn’t already exist, create the directory you want to use and configure it as an
FTP share point.
2 Open Server Admin and select FTP in the Computers & Services list.
3 Click Settings (near the bottom of the window), then click Advanced.
4 Type the path to the new directory in the “Authenticated user FTP root” field or click
the Browse button next to the field and select it.
From the Command Line
You can also change the FTP service root directory using the serveradmin command
in Terminal. For more information, see the file services chapter of the command-line
administration guide.
Viewing the Log
You use Server Status to view the FTP log.
To view FTP log:
1 Open Server Admin and select FTP in the Computers & Services list.
2 Click Log (near the bottom of the window).
To choose the types of events that are recorded, open Server Admin, select AFP, click
Settings, then click Logging.
From the Command Line
You can also view the FTP log using the cat or tail commands in Terminal. For more
information, see the file services chapter of the command-line administration guide.
88 Chapter 6 FTP Service
Page 89

Displaying Banner and Welcome Messages
FTP service in Mac OS X Server lets you greet users who contact or log in to your server.
Note: Some FTP clients may not display the message in an obvious place, or they may
not display it at all. For example, in recent releases of the FTP client Fetch, you set a
preference to display server messages.
The banner message is displayed when a user first contacts the server, before they log
in. The welcome message is displayed after they successfully log in.
To display banner and welcome messages to users:
1 Open Server Admin and select FTP in the Computers & Services list.
2 Click Settings (near the bottom of the window).
3 Click Messages.
4 Select “Show welcome message” and edit the text of the message.
5 Select “Show banner message,” edit the text of the message, and click Save.
From the Command Line
You can also set the FTP service to display these messages using the serveradmin
command in Terminal. For more information, see the file services chapter of the
command-line administration guide.
Displaying Messages Using message.txt Files
If an FTP user opens a directory on your server that contains a file named “message.txt,”
the file contents are displayed as a message. The user only sees the message the first
time he or she connects to the directory during an FTP session. You can use the
message to notify users of important information or changes.
Using README Messages
If you place a file called README in a directory, an FTP user who opens that directory
receives a message letting them know that the file exists and when it was last updated.
Then the user can choose whether or not to open and read the file.
Chapter 6 FTP Service 89
Page 90

Page 91

7 Solving Problems
7
This chapter lists possible solutions to common problems
you might encounter working with the file services in
Mac OS X Server.
General Problems
Users Can’t Access a CD-ROM Disc
• Make sure the CD-ROM disc is a share point.
• If you share multiple CDs, make sure each CD is shared using a unique name in the
Sharing pane.
Users Can’t Find a Shared Item
• If a user can’t find a shared item, check the access privileges for the item. The user
must have Read access privileges to the share point where the item is located and to
each folder in the path to the item.
• Keep in mind that server administrators don’t see share points the same way a user
does over AFP because administrators see everything on the server. To see share
points from a user’s perspective, log in using a user’s name and password.
• Although DNS is not required for file services, an incorrectly configured DNS could
cause a file service to fail.
Users Can’t See the Contents of a Share Point
• If you set Write Only access privileges to a share point, users won’t be able to see its
contents.
You Can’t Find a Volume or Directory to Use as a Share Point
• Make sure the volume or directory name does not contain a slash (“/”) character.
Workgroup Manager’s Sharing window, which lists the volumes and directories on
your server, does not correctly display the names of volumes and directories (folders)
that include the slash (“/”) character.
91
Page 92

Solving Problems With Apple File Service
User Can’t Find the Apple File Server
• Make sure the network settings are correct on the user’s computer and on the
computer that is running Apple file service. If you can’t connect to other network
resources from the user’s computer, the network connection may not be working.
• Make sure the file server is running. You can use a “pinging” utility to check whether
the server is operating.
• If the user is searching for the server via AppleTalk (in the Chooser), make sure you’ve
enabled browsing over AppleTalk in the General pane of the AFP service settings,
and that AppleTalk is active on both the server and the user’s computer.
• Check the name you assigned to the file server and make sure users are looking for
the correct name.
User Can’t Connect to the Apple File Server
• Make sure the user has entered the correct user name and password. The user name
is not case-sensitive, but the password is.
• Verify that logging in is enabled for the user in the Users & Groups module of
Workgroup Manager.
• Check to see if the maximum number of client connections has been reached (in the
Apple File Service Status window). If it has, other users should try to connect later.
• Make sure the server that stores users and groups is running.
• Verify that the user has AppleShare 3.7 or later installed on his or her computer.
Administrators who want to use the admin password to log in as a user need at least
AppleShare 3.8.5.
• Make sure IP filter service is configured to allow access on port 548 if the user is
trying to connect to the server from a remote location. For more on IP filtering, see
the network services administration guide.
User Doesn’t See Login Greeting
• Upgrade the software on the user’s computer. Apple file service client computers
must be using Appleshare client software version 3.7 or later.
92 Chapter 7 Solving Problems
Page 93

Solving Problems With Windows Services
User Can’t See the Windows Server in the Network Neighborhood
• Make sure users’ computers are properly configured for TCP/IP and have the
appropriate Windows networking software installed.
• Enable guest access for Windows users.
• Go to the DOS prompt on the client computer and type ping <IP address>, where
<IP address> is your server’s address. If the ping fails, then there is a TCP/IP
problem.
• If users’ computers are on a different subnet from the server, you must have a WINS
server on your network.
Note: If Windows computers are properly configured for networking and connected
to the network, client users can connect to the file server even if they can’t see the
server icon in the Network Neighborhood window.
User Can’t Log in to the Windows Server
• If you’re using Password Server to authenticate users, check to make sure that it is
configured correctly.
• If you have user accounts created in a previous version of Mac OS X Server (version
10.1 or earlier) that are still configured to use Authentication Manager, make sure that
Authentication Manager is enabled. Then reset the passwords of existing users who
will be using Windows services. Reset the user’s password and try again.
Chapter 7 Solving Problems 93
Page 94

Solving Problems With File Transfer Protocol (FTP)
FTP Connections Are Refused
• Verify that the user is entering the correct DNS name or IP address for the server.
• Make sure FTP service is turned on.
• Make sure the user has appropriate access privileges to the shared volume.
• See if the maximum number of connections has been reached. To do this, open
Server Admin, select FTP in the Computers & Services list, and click Overview. Note
the number of connected users, click Settings, click General, and compare to the
maximum user settings you have set.
• Verify that the user’s computer is configured correctly for TCP/IP. If there doesn’t
appear to be a problem with the TCP/IP settings, use a “pinging” utility to check
network connections.
• See if there is a DNS problem by trying to connect using the IP address of the FTP
server instead of its DNS name. If the connection works with the IP address, there
may be a problem with the DNS server.
• Verify that the user is correctly entering his or her short name and typing the correct
password. User names and passwords with special characters or double-byte
characters will not work. To find the user’s short name, double-click the user’s name
in the Users & Groups list.
• See if there are any problems with directory services, and if the directory services
server is operating and connected to the network. For help with directory services,
see the Open Directory administration guide.
• Verify that IP filter service is configured to allow access to the appropriate ports. If
clients still can’t connect, see if the client is using FTP passive mode and turn it off.
Passive mode causes the FTP server to open a connection to the client on a
dynamically determined port, which could conflict with port filters set up in IP filter
service.
Clients Can’t Connect to the FTP Server
• See if the client is using FTP passive mode, and turn it off. Passive mode causes the
FTP server to open a connection on a dynamically determined port to the client,
which could conflict with port filters set up in IP filter service.
Anonymous FTP Users Can’t Connect
• Verify that anonymous access is turned on.
• See if the maximum number of anonymous user connections has been reached. To
do this, open Server Admin and click FTP in the Computers & Services list.
94 Chapter 7 Solving Problems
Page 95

Solving Problems With Home Directories
Users Can’t Open Their Home Directories
• Make sure the share point used for home directories is set up as a network mount for
home directories in Workgroup Manager.
• Make sure the share point is created in the same Open Directory domain as your user
accounts.
• Make sure the client computer is set to use the correct Open Directory domain using
Directory Access.
Chapter 7 Solving Problems 95
Page 96

Page 97

Glossary
AFP (Apple Filing Protocol) A client/server protocol used by Apple file service on
Macintosh-compatible computers to share files and network services. AFP uses TCP/IP
and other protocols to communicate between computers on a network.
drop box A shared folder with privileges that allow other users to write to, but not
read, the folder’s contents. Only the owner has full access. Drop boxes should only be
created using AFP. When a folder is shared using AFP, the ownership of an item written
to the folder is automatically transferred to the owner of the folder, thus giving the
owner of a drop box full access to and control over items put into it.
everyone Any user who can log in to a file server: a registered user or guest, an
anonymous FTP user, or a website visitor.
export The Network File System (NFS) term for sharing.
Glossary
FTP (File Transfer Protocol) A protocol that allows computers to transfer files over a
network. FTP clients using any operating system that supports FTP can connect to a file
server and download files, depending on their access privileges. Most Internet browsers
and a number of freeware applications can be used to access an FTP server.
group A collection of users who have similar needs. Groups simplify the administration
of shared resources.
guest user A user who can log in to your server without a user name or password.
Network File System (NFS) A client/server protocol that uses TCP/IP to allow remote
users to access files as though they were local. NFS exports shared volumes to
computers according to IP address, rather than user name and password.
nfsd daemon An NFS server process that runs continuously behind the scenes and
processes reading and writing requests from clients. The more daemons that are
available, the more concurrent clients can be served.
NSL (Network Service Locator) The Apple technology that simplifies the search for
TCP/IP-based network resources.
97
Page 98

owner The person who created a file or folder and who therefore has the ability to
assign access privileges for other users. The owner of an item automatically has
read/write privileges for that item. An owner can also transfer ownership of an item to
another user.
privileges Settings that define the kind of access users have to shared items. You can
assign four types of privileges to a share point, folder, or file: read/write, read-only,
write-only, and none (no access).
share point A folder, hard disk (or hard disk partition), or CD that is accessible over the
network. A share point is the point of access at the top level of a group of shared items.
Share points can be shared using AFP, Windows SMB, NFS (an “export”), or FTP protocols.
SLP (Service Location Protocol) DA (Directory Agent) A protocol that registers
services available on a network and gives users easy access to them. When a service is
added to the network, the service uses SLP to register itself on the network. SLP/DA
uses a centralized repository for registered network services.
SMB (Server Message Block) A protocol that allows client computers to access files
and network services. It can be used over TCP/IP, the Internet, and other network
protocols. Windows services use SMB to provide access to servers, printers, and other
network resources.
WINS (Windows Internet Naming Service) A name resolution service used by
Windows computers to match client names with IP addresses. A WINS server can be
located on the local network or externally on the Internet.
98 Glossary
Page 99

Index
Index
.bin (MacBinary) format 80, 83
FTP auto-conversion 83
A
access logs
AFP service 42
access privileges. See privileges
administrator
privileges 11
advisory locks for NFS 27
AFP (Apple Filing Protocol)
setting up share points using 23
AFP service
access log 47
Access settings 41
allowing guest access 50
archiving logs 48
automatically disconnecting idle users 49
automatically mounting share point in Mac OS X
client 52
automounting share point on Mac OS 8 or 9
client 53
connecting to server in Mac OS 8 and 9 53
connecting to server in Mac OS X 51
described 9
enabling AppleTalk browsing 46
limiting connections 47
login greeting 50
Mac OS 8 and 9 client software requirements 53
Mac OS X client software requirements 51
monitoring 44
overview 37
problems with 92
registering with NSL 46
registering with Rendezvous 46
Rendezvous registration type 46
sending users messages 49
setting up 39
solving problems 92
specifications 38, 55
starting 44
stopping 45
viewing logs 45
anonymous FTP 81
Apple Filing Protocol. See AFP
AppleShare 92
AppleTalk 38, 40, 92
authentication
AFP service 37
Kerberos 37, 80
Windows services 56
Authentication Manager 56, 93
auto-conversion (FTP) 83
See also on-the-fly conversion
automount. See network mount
B
bin (MacBinary) format 80
C
client computers
encoding for older clients 40
client computers (Mac OS 8 and 9)
using AFP service 53
client computers (Mac OS X)
using AFP service 51
client computers (Windows)
using file services 66
using Windows services 66
compressed files 80
cross-platform issues for file service 56
custom FTP root 88
D
daemons
nfsd 72
disconnect messages 43, 49
DNS service
problems with 94
domain browsing services 60
DOS prompt 93
drop box
overview 10
setting up 34
99
Page 100

E
error logs
AFP service 42, 48
everyone
privileges 11
exporting NFS share point 26
extensions, filename 80
F
file name extensions 80
files
compressed 80
conversion in FTP 80
with resource forks (FTP) 80, 83
file services
other information sources 15
overview 9
related applications 9
file sharing
planning 14
security 14
File Transfer Protocol. See FTP
fonts
network accessible 13
FTP (File Transfer Protocol)
about 75
anonymous FTP 81
connections 94
file compression 80
guest access 81
on-the-fly conversion 80
passive mode 94
security of 75
setting up share points using 25
user environment 76
FTP root and share points user environment 77
FTP servers
security of 75, 81
FTP service 81
Access settings 84
Advanced settings 85
anonymous 81, 87
anonymous uploads folder 85
custom root 88
described 9
displaying user messages 89
General settings 83
Logging settings 84
overview 75
planning 81
preparing for setup 81
README messages 89
setup overview 82
solving problems 94
specifications 80
starting 86
stopping 86
user environment 87
viewing logs 88
G
group accounts
privileges 11
guest access
FTP service 81
restricting 14
to AFP share points 23
Windows 93
Windows services 65
guest accounts
access guidelines 14
guests
restricting access 14
guest users
accessing AFP service 50
defined 14
limiting AFP connections 50
maximum AFP connections 50
H
home directories 19, 29
problem with 95
share point requirements 19
Home Directory and FTP Root user environment 78
Home Directory Only user environment 79
I
IP filter service 92, 94
K
Kerberos authentication
AFP service 37
FTP service 80
L
locking
NFS advisory locks 27
SMB opportunistic 19
SMB strict 19
log files
AFP access logs 42
AFP logging options 42
AFP service log file location 38
error logs 42, 48
FTP 88
FTP logging options 84
Windows logging options 59, 65
Windows service log file location 55
100 Index
 Loading...