

Page 1

Setting Up Mac OS X Server
for Xserve
Includes software installation and setup information
for Mac OS X Server and Xserve
Page 2

K
Apple Computer, Inc.
©
2002 Apple Computer, Inc. All rights reserved.
Under the copyright laws, this manual may not be copied, in whole or in part, without the written consent of Apple.
Your rights to the software are governed by the accompanying software license agreement.
The Apple logo is a trademark of Apple Computer, Inc., registered in the U.S. and other countries. Use of the
“keyboard” Apple logo (Option-Shift-K) for commercial purposes without the prior written consent of Apple may
constitute trademark infringement and unfair competition in violation of federal and state laws.
Every effort has been made to ensure that the information in this manual is accurate. Apple is not responsible for
printing or clerical errors.
Apple Computer, Inc.
1 Infinite Loop
Cupertino, CA 95014-2084
408-996-1010
www.apple.com
Apple, the Apple logo, AppleScript, AppleShare, AppleTalk, FireWire, iBook, Mac, Macintosh, PowerBook,
QuickTime, and WebObjects are trademarks of Apple Computer, Inc., registered in the U.S. and other countries.
Disk First Aid, Finder, and Xserve are trademarks of Apple Computer, Inc.
Adobe and PostScript are trademarks of Adobe Systems Incorporated.
Netscape Navigator is a trademark of Netscape Communications Corporation.
Other company and product names mentioned herein are trademarks of their respective companies. Mention of
third-party products is for informational purposes only and constitutes neither an endorsement nor a
recommendation. Apple assumes no responsibility with regard to the performance or use of these products.
Simultaneously published in the United States and Canada.
Page 3

Contents
Preface About This Guide 9
1 Welcome to Mac OS X Server for Xserve 11
What’s New in This Version of Mac OS X Server 11
Command-Line Tools 12
SNMP Support 12
Server Monitor 12
Server Enhancements 12
About ACGI Support 13
Where to Start 13
Getting More Information 13
Anti-Piracy Information 14
2 Before You Begin 15
Read Mac OS X Server Administrator’s Guide 15
Filling Out the Mac OS X Server Information Worksheet 15
Exporting Existing User Account Information 16
Migrating From Mac OS X Server 10.0 or 10.1 16
Migrating From AppleShare IP 6.3.x 16
Installing Administration Software 17
Deciding On a Setup Option 18
Remote Setup 18
Local Setup 18
3 Software Setup Instructions 19
Basic Remote Setup Instructions 19
3
Page 4

Step 1:
Start the server 19
Step 2:
Run Server Assistant 20
Step 3:
Configure services 21
Step 4:
Set server network and system preferences 21
Step 5:
Install additional software 21
Remote Setup Flowchart 22
Basic Local Setup Instructions 22
Step 1:
Connect monitor and keyboard 22
Step 2:
Start the server 23
Step 3:
Run Server Assistant 23
Step 4:
Configure services 24
Step 5:
Set server network and system preferences 24
Step 6:
Install additional software 24
Step 7:
Perform any additional tasks 24
Step 8:
Disconnect the keyboard and monitor 24
Local Setup Flowchart 25
Additional Setup Tasks 26
Set NetInfo Hierarchies and Search Policies 26
Configure Services 26
4 Using Command-Line Tools 27
Using the Terminal Application 27
About UNIX Command-Line Structure 28
Using the Secure Shell (SSH) Command 29
Open a SSH Session 29
Execute Commands 30
Close a SSH Session 30
About Key Fingerprints 30
Standard UNIX Command-Line Tools 31
Check Disks for Problems 31
Partition Disk Drives 33
Initialize a File System 33
Example 1: Divide One 120 GB Disk Drive Into Two 60 GB Partitions 34
Example 2: Divide a Secondary Hard Disk Into Two Partitions 38
Contents
4
Page 5

5 Network Setup Tool 43
Using Network Setup 43
Finding More Information About the Network Setup Tool 44
Reverting to Old Network Settings 44
Getting Network Configuration Information for Your Server 45
Configuring TCP/IP Settings 45
Set the TCP/IP Configuration to Manual 45
Set the TCP/IP Configuration to DHCP 46
Set the TCP/IP and DHCP Router to Manual 46
Set BOOTP 46
Configuring DNS Servers and Search Domains 46
Designate DNS Servers 46
Designate Search Domains 47
Managing Network Services 47
Create a New Network Service 47
Duplicate an Existing Network Service 47
Rename a Network Service 48
Delete a Network Service 48
Turn a Network Service On or Off 48
Set the Order Network Services are Contacted 48
Designating Proxy Servers 49
Turn Proxy Servers On or Off 49
Designate the Proxy Bypass Domain 49
6 System Setup Tool 51
Using System Setup 51
Finding More Information About the System Setup Tool 52
About Get and Set Commands 52
Setting Server Identity and Preferences 52
Set the Computer Name 52
Designate a Startup Disk 53
Restart After Power Failure 53
Restart After a System Freeze 53
Set Remote Apple Events Preference 53
Contents
5
Page 6

Set Remote Login (SSH) 54
Setting Date and Time Preferences 54
Set the Date 54
Set the Time 54
Set the Time Zone 54
Designate a Network Time Server 55
Turn Network Time On or Off 55
Setting Sleep Preferences 55
Set Sleep Time 55
Set Server for Modem Activity 55
Set Server for Network Access 56
7 Using Software Installation Tools and Applications 57
Server Assistant 57
Software Update Tool 58
Installer Tool 58
Parameters 59
Full Operating System Installation 61
8 Administration Software 63
System Requirements 63
Server Admin 65
Install Server Admin 65
Log In to Server Admin 65
Remote Printer Setup 66
NetBoot 66
Install NetBoot 67
Configure NetBoot With Server Admin 67
Macintosh Manager 68
Install Macintosh Manager 68
Server Monitor 69
Install Server Monitor 69
Set Up Server Monitor 70
Switch Between Server Lists 70
Set the System Identifier Lights Manually 70
Contents
6
Page 7

Receive Automatic Status Change Notifications 70
Get Information About a Server 70
Streaming Server Admin 71
Install Streaming Server Admin 71
WebObjects 71
Install WebObjects 71
Install Web Server Adaptors 72
Upgrade Your License 72
Simple Network Management Protocol (SNMP) 73
9 Problem Solving 75
Solving Problems With Network Settings 75
Solving Startup Problems 76
Copy Data and Reinstall System Software Locally 76
Copy Data and Reinstall System Software Remotely 77
Resetting the Administrator Password 77
Rerun Server Assistant Locally 77
Rerun Server Assistant Remotely 78
Copying Data Between Remote Servers 78
Connecting Through the Serial Port 79
Finding a Server on the Network 79
Setting Up Administrator Permissions 81
Getting More Information 81
Help 81
Appendix A Mac OS X Server Information Worksheet 83
Mac OS X Server Information Worksheet 84
Contents
7
Page 8

Page 9

PREFACE
About This Guide
This guide provides information about installing and using this version of Mac OS X Server
on Xserve.
Use this guide as a supplement to the
included as a PDF document in the documentation folder on the Admin Tools CD. Read the
Mac OS X Server Administrator’s Guide
Then read this guide to learn
m
what’s new in this version of Mac OS X Server
m
how to use the new command-line tools and administration software to install, set up,
configure, and manage server processes
m
where to find more information about network planning and other important topics
This guide is written for both new and experienced system administrators. Basic instructions
are provided for those administrators who are new to UNIX command-line tools.
Experienced administrators should take a look at all chapters to see what’s new in Mac OS X
Server for Xserve.
Mac OS X Server Administrator’s Guide,
before you attempt to install and set up your server.
which is
9
Page 10

Page 11

CHAPTER
1
1
Welcome to Mac OS X Server for Xserve
Mac OS X Server is a powerful suite of server software that lets you manage your network
efficiently and provide a full range of services to network users. Mac OS X Server includes
services for file and printer sharing, Internet and Web hosting, email, networking and
security, desktop management, network operating system startup and software installation,
media streaming, and directory services architecture. This version of Mac OS X Server is
designed to support your new server.
What’s New in This Version of Mac OS X Server
Mac OS X Server provides tools and applications to help you set up and manage your servers.
Until now, many setup tasks had to be performed locally on a server. With this version of
Mac OS X Server, you can use a Mac OS X desktop computer, PowerBook, or iBook to
perform these tasks remotely:
m
install software
m
set system preferences
m
set network preferences
m
set up directory services
m
create AppleTalk and Line Printer Remote (LPR) print queues
m
configure NetBoot IP address ranges
11
Page 12

In addition, the applications used to set up servers and directory information have been
enhanced to permit remote configuration of servers. Included in this version of Mac OS X
Server are updates to these applications:
m
Setup Assistant (now called Server Assistant)
m
Directory Setup
m
NetInfo Domain Setup
m
Print and DHCP/NetBoot modules for Server Admin
Command-Line Tools
New command-line tools included in this version of Mac OS X Server let you take advantage
of built-in support for Secure Shell (SSH) to remotely set up servers. You can use commandline tools to perform these tasks remotely:
m
install software
m
run Software Update
m
set system preferences
m
set network preferences
SNMP Support
This version of Mac OS X Server supports Simple Network Management Protocol (SNMP), a
network protocol for monitoring and managing multi-platform computer network devices.
Read Chapter 8, “Administration Software,” for information about SNMP.
Server Monitor
Your Xserve software also includes a new application called Server Monitor. Server Monitor
allows you to remotely check the status of Xserve hardware. Read about Server Monitor in
Chapter 8, “Administration Software.”
Server Enhancements
Mac OS X Server also includes these new features to support your Xserve:
m
Network Stack and server software optimizations provide improved network performance.
m
Apple RAID (Redundant Array of Independent Disks) volume enhancements allow you to
stripe or mirror your startup disk.
m
Headless booting with hot-plug support allows you to start up your Xserve without a
monitor connected and attach a monitor or KVM (keyboard, video, mouse) switch later
without turning off the server.
m
Uninterruptable Power Supply (UPS) support allows connection to a USB UPS system.
Chapter 1
12
Page 13

About ACGI Support
Apple Event-based CGI scripts (ACGI) are not supported in this version of Mac OS X Server.
CGI scripts not based on Apple Events will run normally.
Where to Start
If you’re a novice system administrator, start by reading the
Guide.
This book is provided as a PDF document on the Admin Tools CD. The Preface and
Mac OS X Server Administrator’s
Chapter 1 will point you to the parts of the book that you need to read, depending on how
you plan to use Mac OS X Server in your network.
If you’re an experienced systems administrator with some UNIX administration experience,
take a look at the
Mac OS X Server Administrator’s Guide
to make sure you haven’t missed
anything. Then use this guide to get started installing and setting up your server.
Important
Use this guide for setting up your server instead of Chapter 1 of the
Mac OS X
Server Administrator’s Guide.
Getting More Information
Check the Mac OS X Server Web site regularly for new documentation, information about
software updates, and useful information. The Mac OS X Server Web site is located at
www.apple.com/macosx/server/
The Web site includes these useful documents:
m
Mac OS X Server Migration Guide
provides instructions for upgrading to Mac OS X Server
from Macintosh Manager and Mac OS X Server 1.2. For this release of Mac OS X Server,
Chapter 3, “Migrating AppleShare IP,” does not apply.
m
Understanding and Using NetInfo
describes the built-in Mac OS X directory service and
provides instructions for configuring NetInfo and Mac OS X Server.
m
Integrating Mac OS X With Active Directory
describes how you can use the information
stored in Microsoft’s Active Directory to authenticate Macintosh users and provide file
services and home directories for them on Mac OS X Server.
You can also check the Apple Server Web site located at
www.apple.com/servers
for information about your server hardware and the software designed to support it.
Welcome to Mac OS X Server for Xserve
13
Page 14

Anti-Piracy Information
Be sure you’re acting within the terms of the software license agreement before you install
programs on a computer. The license agreement specifies how many copies of the program
you can make for yourself and others.
Before you put programs inside shared folders, remember that copyright laws may prevent
those programs from being shared. Check the applicable licensing agreements and follow
their requirements.
If you want or need more information about when it’s OK to copy software and when it isn’t,
or about related consumer issues, you can check the Software Publishers Association (SPA)
Web site at
www.spa.org
Chapter 1
14
Page 15

CHAPTER
2
2
Before You Begin
Your server comes with Mac OS X Server and the administration applications already
installed. But before you get started, you’ll need to do some planning and preparation to
make the most of your server. Read through this chapter before you start any tasks. You can
do the tasks in any order.
Read Mac OS X Server Administrator’s Guide
If you’re setting up Mac OS X Server for the first time, look at the first few chapters of the
Mac OS X Server Administrator’s Guide
chapters help you determine how to configure your server for your network.
Filling Out the Mac OS X Server Information Worksheet
At the back of this guide, you’ll find a worksheet to help you plan your server setup. You
must know the information on this worksheet to configure your server’s Ethernet ports and
network information when you run Server Assistant. When you’re done with your setup, file
the worksheet in a secure place for future reference.
before you continue with this chapter. These
Your server comes with a sheet of serial number (license key) stickers for Mac OS X Server
and WebObjects. Affix them to the appropriate section of the worksheet and keep any
unused stickers in a safe place. The hardware serial number is located on the back of the
server and inside the server above the hard drives. Write this number on the worksheet—you
must enter the first eight characters of this serial number when you run Server Assistant.
If you have trouble filling out any of the information, you can find answers to many of your
questions in the
Internet Service Provider may also be able to help.
Mac OS X Server Administrator’s Guide.
Your network administrator or
15
Page 16

Exporting Existing User Account Information
If you have existing AppleShare IP servers or Mac OS X Servers, you may want to export
account information. You can later import this into your new Mac OS X Server. You may also
want to migrate Macintosh Manager settings to your new server network.
For detailed instructions about migrating existing information from an earlier version of
Mac OS X Server or Macintosh Manager, download the
Mac OS X Server Migration Guide
from the Mac OS X Server Web site at
www.apple.com/macosx/server
Note:
Chapter 3 of the guide, “Migrating AppleShare IP,” does not apply for Xserve
installations.
Migrating From Mac OS X Server 10.0 or 10.1
If you are replacing a server running Mac OS X Server 10.0 or 10.1 with an Xserve system, you
can use the Users & Groups module in Server Admin to export and import user and group data.
To export user and group data:
Open Server Admin and log in to the server that stores user and group information.
1
2
Click Users & Groups and choose Show Users & Groups.
Select the user and group names that you want to export and click Export to save this
3
information to a file.
After you’ve set up your new server, you can import the file you saved. To import the file:
1
Open Server Admin and log in to the server where you want the user and group information
to be stored.
2
Click Users & Groups and choose Import.
Specify the location of the file with the import information and click Choose. If you already
3
have some user and group data on your new server, choose how you want to handle
duplicate names.
Migrating From AppleShare IP 6.3.x
If you are replacing an AppleShare IP 6.3.x server with an Xserve system, you can use the
Users & Groups module in the Server Admin application to export the user and group data.
To export user and group data:
1
Open Server Admin and go to the Users & Groups module.
Choose Show Users & Groups from the menu.
2
3 Select the user and group names that you want to export and choose Export Selected Items
from the menu to save this information to a file.
Chapter 2
16
Page 17

After you set up your new server, you can import the file you saved. To import the file:
1 Open Server Admin and log in to the server where you want the user and group information
to be stored.
2 Click Users & Groups and choose Import.
3 Specify the location of the file with the import information and click Choose. If you already
have some user and group data on your new server, choose how you want to handle
duplicate names.
Installing Administration Software
The Admin Tools CD that came with your server has all the software you need to set up and
administer the services installed on your server at the factory. This same administration
software is also preinstalled on your server, should you decide to set up services locally.
Your admin computer can be a desktop or portable model with Mac OS X v10.1 or later
installed. The chart on page 64 of this guide describes the software included on the CD.
To install the administration software package:
1 Insert the Admin Tools CD in your admin computer and locate the Admin Install package.
The administration software is located here:
English/Admin Install/
2 Read the Admin Install PDF document for important information about the software and
any updates.
3 Double-click the Admin_Install.mpkg icon and follow the onscreen instructions provided by
the installer until you see Select a Destination.
4 Select a destination volume and click Continue.
5 Click Customize to choose the applications you want to install.
A basic installation includes both Mac OS X Server Admin and Mac OS X Server Admin Help.
6 Finish the installation, following the onscreen instructions.
Before You Begin 17
Page 18

Deciding On a Setup Option
You can set up your server in two ways:
m Connect to the server remotely from an admin computer and install software, set up
preferences, and configure services using Server Assistant and command-line tools.
m Connect a keyboard and monitor to the server, then install software, set up preferences,
and configure services locally on the server using Server Assistant.
Note: You can partition disks on the server remotely or locally. If you partition disks, you’ll
need to reinstall system software on the server.
Remote Setup
Setting up the server remotely involves using Server Assistant to specify basic preferences,
network settings, and service configuration. Then you’ll use command-line tools and SSH to
install additional software and make any other system and network settings that you want.
Important To set up your server or install software remotely, connect your server to the
network through the built-in Ethernet port.
If you plan to partition disks, you need to use some standard UNIX command-line tools.
Some information about these tools is included in this guide, but you should already be
familiar with these tools to use them effectively. If you partition disks, you’ll need to reinstall
the Mac OS X Server software before continuing.
Chapter 4, “Using Command-Line Tools,” describes SSH and some standard UNIX commandline tools. If you’re not familiar with them, read that chapter before you start. Then read the
chapters that follow for detailed instructions on using each command-line tool to install
software and make system and network settings.
Local Setup
To set up the server locally, you need to attach an external monitor and keyboard to your
server and perform the initial setup tasks on the server itself. Once your setup is complete,
you can disconnect the monitor and keyboard and restart the server. Then you can use the
remote administration and monitoring tools to make further adjustments and monitor the
server’s performance. You can also leave the monitor and keyboard connected and
administer the server locally.
With a local setup, you can also start the server from the hard disk, then use Disk Utility to
partition the server’s hard disks and set up a RAID (Redundant Array of Independent Disks)
scheme. If you do either of these tasks, you’ll need to reinstall the Mac OS X Server software
on the server before continuing.
Important For instructions on connecting an external monitor and keyboard, see the
Xserve User’s Guide.
18 Chapter 2
Page 19

CHAPTER
3
3 Software Setup Instructions
This chapter gives instructions for performing a basic remote setup and a basic local setup. If
you plan to partition your server’s hard disks, you can refer to the flowcharts at the end of
each section to show you the order of the tasks you need to perform. You’ll find more detail
for some of the advanced setup tasks in the chapters that follow.
Note: If you plan to set up a RAID (Redundant Array of Independent Disks) system, you
need to use Disk Utility while the server is started up from the hard drive, not from a CD.
Two local setup options are:
m Install Mac OS X Server first on a hard disk in your Xserve and then use Disk Utility locally
on the server to set up a RAID system on the remaining hard disks.
m Start up your server from an external FireWire hard disk with Mac OS X installed and use
Disk Utility to set up a RAID system on the hard disks installed in your server.
After performing a remote or local setup, turn to “Additional Setup Tasks” on page 26 and
follow the steps there.
Basic Remote Setup Instructions
These steps describe the installation and setup process for a basic remote setup. The flowchart
on page 22 illustrates the task flow for both a basic remote setup and an advanced setup
including partitioning drives. Refer to the flowchart during your setup, to keep you on track.
Step 1: Start the server
Press the power button on the server to start up from the hard disk with factory-installed
Mac OS X Server software.
To start up from the Mac OS X Server CD:
1 Press and hold the system identifier button while you press the power button.
2 Continue to hold the system identifier button until the system identifier light flashes and
the CD tray opens.
19
Page 20

3 Release the system identifier button and insert the Mac OS X Server CD in the tray.
4 Close the tray. The server starts up from the CD.
Step 2: Run Server Assistant
Start Server Assistant on your admin computer and choose whether you want to install
software or create an administrator account and configure services. For a basic remote setup,
you’ll choose “Set up a server.” Then locate the server you want to set up in the list.
Important Server Assistant only displays servers located on the local subnet.
When prompted, enter the first eight characters of the hardware serial number of the server
you’re setting up in the password box. The serial number is on the worksheet you filled out.
Server Assistant guides you through the rest of the setup.
You’ll use Server Assistant to
m enter the software serial number
m set up an administrator account
m enable encryption for Windows clients
m choose how the server will use NetInfo
m set up network configuration
m configure Ethernet ports
You can also configure these services to start automatically whenever you restart the server:
m Web service
m Print service
m Apple file service
m Macintosh Manager
m NetBoot
m QuickTime Streaming Server
If you’re not sure which options to choose during the setup, Server Assistant provides some
information—just click the question mark. You’ll find more help in the Mac OS X Server
Administrator’s Guide.
When you’re done, Server Assistant restarts the server for you.
20 Chapter 3
Page 21

Step 3: Configure services
To finish configuring Mac OS X Server services, use the Server Admin application. If you
haven’t already installed the admin software on your admin computer, read “Installing
Administration Software” on page 17.
For information about Server Admin, read “Server Admin” on page 65. When you’re finished
configuring services, you can perform any of the tasks that follow, depending on your needs.
Step 4: Set server network and system preferences
You used Server Assistant to configure some of your network and system preferences. To set
additional network and system preferences remotely for the server, you can use Secure Shell
(SSH) and the command-line tools provided in this version of Mac OS X Server. See
Chapter 5, “Network Setup Tool,” and Chapter 6, “System Setup Tool.”
If you’re new to command-line tools, read Chapter 4, “Using Command-Line Tools,” for
detailed instructions.
Step 5: Install additional software
To install software on the server from a remote computer, you use Server Assistant (to
reinstall system software), or SSH and command-line tools to install other packages.
To install software from a CD using these methods, you must have physical access to the
server so you can insert the application CD in the server’s optical drive.
You can run Software Update Tool (using SSH) to check for and install newer versions of the
software on your server. Software updates are available through an Internet connection. You
can do these updates without having physical access to the server.
Instructions for using the Installer Tool and Software Update Tool are in Chapter 7, “Using
Software Installation Tools and Applications.”
Software Setup Instructions 21
Page 22

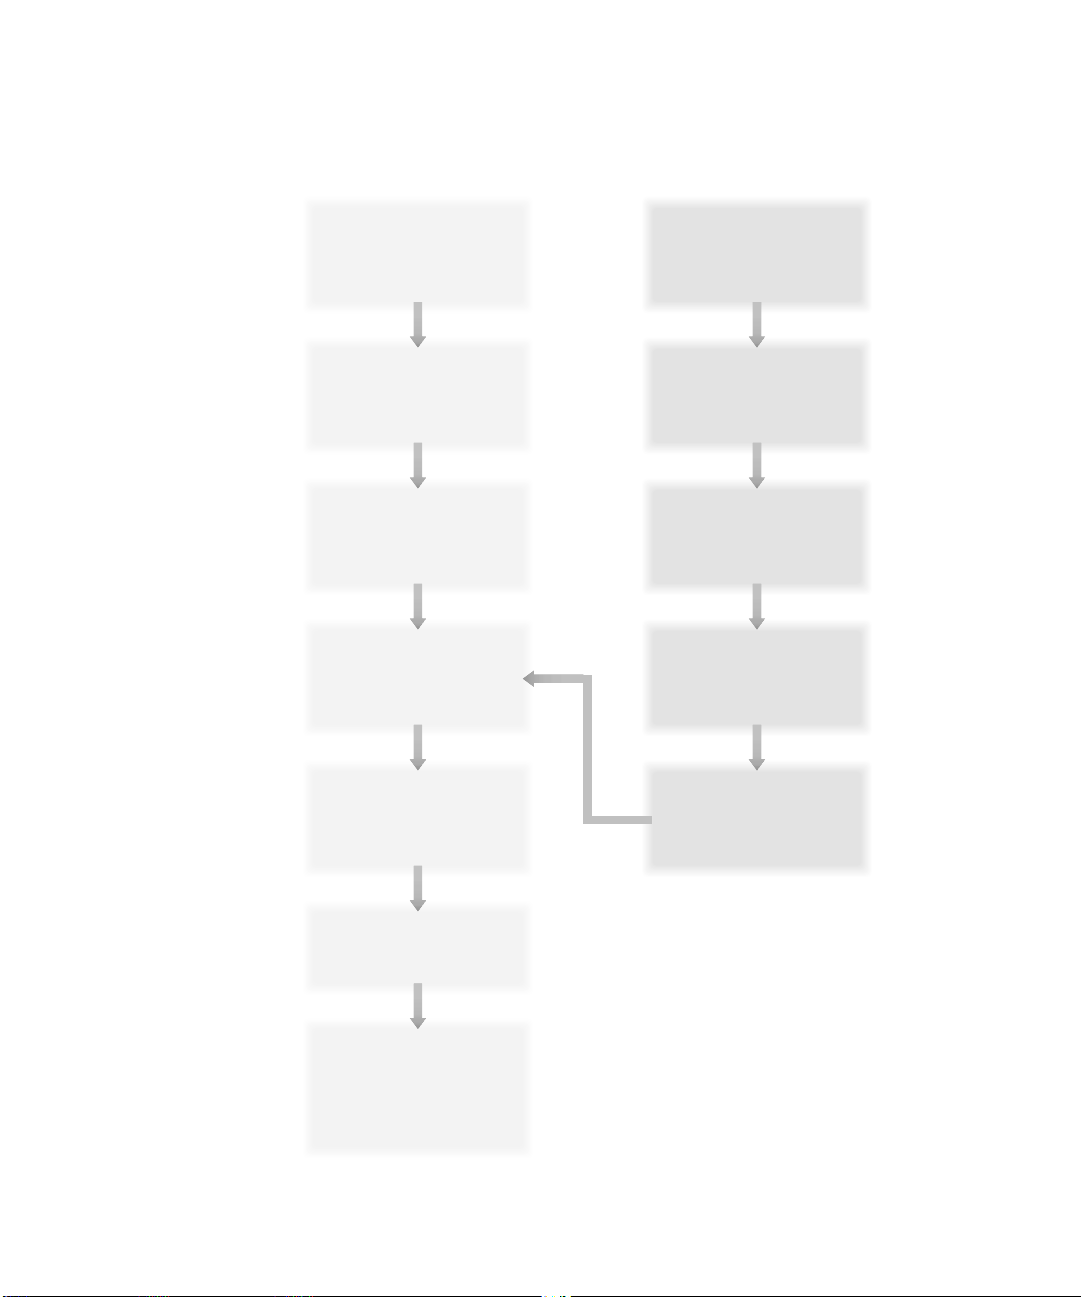
Remote Setup Flowchart
If you need to partition disks, use the Advanced Remote Setup flowchart. Otherwise, use the
Basic Remote Setup.
Basic Remote Setup Advanced Remote Setup
Start up the server
from the hard disk with
the factory-installed
server software.
Run Server Assistant
on the admin computer
to locate and set up
the remote server.
Run Server Admin on
the admin computer
to configure services
on the remote server.
Optional: Use admin
applications and command-
line tools on the admin
computer to configure
services, set preferences,
and install software
on the remote server.
Insert the Install CD in a
server with factory-installed
server software, and start
up the server from the CD.
Use command-line tools on
the admin computer to do
tasks on the remote server,
such as partition disks.
Run Server Assistant on the
admin computer to locate
the modified remote server
and reinstall server software
on the selected partition.
Start up the server from
the hard disk with newly
installed server software.
Basic Local Setup Instructions
These steps describe a basic local setup. The flowchart on page 25 illustrates the task flow for
both a basic local setup and an advanced setup that includes partitioning drives. Refer to the
flowchart during your setup, to keep you on track.
Step 1: Connect monitor and keyboard
Follow the instructions in the Xserve User’s Guide to connect a monitor and keyboard to
the server.
22 Chapter 3
Page 23

Step 2: Start the server
To start up from the hard disk with factory-installed Mac OS X Server software, press the
power button on the server.
To start up from the Mac OS X Server CD:
1 Press and hold the system identifier button while you press the power button.
2 Continue to hold the system identifier button until the system identifier light flashes and
the CD tray opens.
3 Release the system identifier button and insert the Mac OS X Server CD in the tray.
4 Close the tray. The server starts up from the CD.
Step 3: Run Server Assistant
When prompted, enter the hardware serial number of the server you’re setting up in the
password box. The serial number is on the worksheet you filled out. Server Assistant guides
you through the rest of the setup.
Use Server Assistant to
m select a keyboard language
m enter the software serial number
m set up an administrator account
m enable encryption for Windows clients
m choose how the server will use NetInfo
m set up network configuration
m configure Ethernet ports
You can also configure these services to start automatically whenever you restart the server:
m Web service
m Print service
m Apple file service
m Macintosh Manager
m NetBoot
m QuickTime Streaming Server
If you’re not sure which options to choose during the setup, Server Assistant provides some
information—just click the question mark. You’ll find more help in the Mac OS X Server
Administrator’s Guide.
When you’re done, Server Assistant restarts the server for you.
Software Setup Instructions 23
Page 24

Step 4: Configure services
To finish configuring Mac OS X Server services, use the Server Admin application. If you
haven’t already installed the admin software on your admin computer, read “Installing
Administration Software” on page 17.
For information about Server Admin, read “Server Admin” on page 65. When you’re finished
configuring services, you can perform any of the steps that follow, depending on your needs.
Step 5: Set server network and system preferences
Since you’re working directly on the server, you can set some network and system
configurations using the local System Preferences. You can change these settings later using
SSH and the command-line tools described later in this guide.
Step 6: Install additional software
To install additional software packages on the server, insert the application disc in the
server’s optical drive, and follow the instructions in the software installer.
You can also run Software Update (located in /System Preferences/Software Update) to check
for and install newer versions of the software on your server.
You can also install software on the server remotely. See Chapter 7, “Using Software
Installation Tools and Applications.”
Step 7: Perform any additional tasks
While you’re still connected to the server, you may want to perform any of the additional
setup tasks mentioned in “Additional Setup Tasks” on page 26.
Step 8: Disconnect the keyboard and monitor
When you’ve finished all the installation and configuration you planned, you can disconnect
the monitor and keyboard if you plan to administer the server remotely. You may also leave
the monitor and keyboard attached.
24 Chapter 3
Page 25
Local Setup Flowchart
If you need to partition disks or set up RAID, use the Advanced Local Setup flowchart.
Basic Local Setup Advanced Local Setup
Follow instructions in the
User's Guide to connect
a keyboard and monitor.
Start up the server from
the hard disk with factory-
installed server software.
Run Server Assistant
on the server to set
up the server.
Run Server Admin to
configure services
on the server.
Install and configure
any other software
you want to use.
Follow instructions in
the User's Guide to
connect a keyboard
and monitor.
Insert the Install CD in the
server and start up the
server from the CD.
Run Disk Utility (in the
File menu of the installer)
to partition disks.
Quit Disk Utility and install
the server software on
your partition or volume.
Restart the server from
the hard disk and use
Server Assistant to set
up the server.
Disconnect the
monitor and keyboard.
Use admin applications and
command-line tools on the
admin computer to configure
services, set preferences,
and install software on
the remote server.
Software Setup Instructions 25
Page 26

Additional Setup Tasks
After your initial setup of software, you may need to perform some other tasks.
Set NetInfo Hierarchies and Search Policies
NetInfo is the built-in directory service for Mac OS X. User information needed by directory
services is stored on Mac OS X Servers in NetInfo databases known as domains. You use
Remote Directory Setup on your admin computer to specify whether your server uses the
NetInfo or LDAP (Lightweight Directory Access Protocol) directory for User and Group
accounts.
Use Remote NetInfo Domain Setup to create NetInfo hierarchies and set the search policy for
your server.
Note: If you are setting up your server locally, use the local versions of these applications:
Directory Setup and NetInfo Domain Setup.
For information about setting up NetInfo domains and using LDAP, read Chapter 2 in the
Mac OS X Server Administrator’s Guide. The documents Understanding and Using NetInfo
and Integrating Mac OS X With Active Directory have more information about these topics,
and are available for downloading at www.apple.com/macosx/server/
Configure Services
Use the administration software you’ve installed to set up User and Group accounts and
configure services such as WebObjects, NetBoot, Macintosh Manager, and QuickTime
Streaming Server.
Read Chapter 8, “Administration Software,” for information about these applications. They
are also described in detail in the Mac OS X Server Administrator’s Guide.
26 Chapter 3
Page 27

CHAPTER
4
4 Using Command-Line Tools
Xserve can be configured remotely using command-line tools and administration
applications designed to support them. This version of Mac OS X Server includes these
new command-line tools:
m Installer Tool
m Software Update Tool
m System Setup Tool
m Network Setup Tool
To configure a server remotely with command-line tools, you use the Terminal application on
the remote computer.
Using the Terminal Application
Mac OS X Server includes the Terminal application, which you can use to open a shell
command-line session on your computer or a remote computer you are administering. The
Terminal application is located in /Applications/Utilities.
When you open Terminal, you see a prompt that usually includes the name of the local host,
the directory you’re using, your user name, and a symbol. For example:
[patsy6:/usr/sbin] liz%
In this example, patsy6 is the server’s host name, the directory you are working in is
/usr/sbin, and the user name is liz.
The percent symbol (%) is called the prompt. It indicates that you can enter a command.
Press the Return key after you type a command. Depending on what you typed, you could
see a list of information followed by another prompt, or your command will execute and give
you some type of feedback and a prompt, or no feedback and another prompt. No feedback
usually means that the command was executed properly.
27
Page 28

About UNIX Command-Line Structure
UNIX commands share some basic conventions. First you enter the name of the tool, then
any information the tool needs to carry out your request. Most tools come with help or man
(short for “manual”) pages that describe how to use the tool. Help pages give an overview of
arguments (also known as options or parameters) that the tool understands. Man pages give
more detail and examples.
To find help pages, type the name of the tool and then the argument -help. For example:
pdisk -help
installer -help
To find man pages for a tool, type man, followed by the tool name. For example:
man ssh
man installer
These conventions are used in describing tool options: italic text in <angle brackets>
represents information you need to supply, and text in [square brackets] represents optional
information you can supply.
When you supply information in a command, enclose location or item names that include
spaces in quotation marks ("like this").
Here’s an example of a command as you might see it described in a man page for the
Network Setup Tool, followed by what you would type, and the result.
Man page example:
"Usage: networksetup -setmanual <network service> <ip address> <subnet>
<
router>"
Set the <
Type this:
networksetup -setmanual "Built-in Ethernet" 192.168.00.100
To get this result:
Manual Configuration
IP Address: 192.168.100.100
Subnet Mask: 255.255.255.0
Router: 192.168.100.1
28 Chapter 4
network service> TCP/IP configuration to manual with IP Address
set to <
255.255.255.0 192.168.100.1
ip address>
Page 29

Using the Secure Shell (SSH) Command
Mac OS X Server supports Secure Shell (SSH), so an administrator can log in to a remote
server and send secure, encrypted commands over a network. With SSH turned on, you can
use the Terminal application to open a SSH session and use the command-line tools to
configure your remote server. You can also connect a terminal to Xserve through the serial
port and log in using SSH. (For information about this, see “Connecting Through the Serial
Port” on page 79.)
SSH is turned on by default when you run Mac OS X Server Assistant. You can also turn SSH
on or off for a client computer in the Sharing preferences. Click the Application tab and
check “Allow remote login.”
Important If you turn SSH off, you can’t administer the server remotely. To turn SSH back
on, you must do so locally on the server.
Open a SSH Session
To use command-line tools, you must first open a SSH session and log in to the server you
want to configure.
1 Open Terminal on your admin computer.
2 At the prompt, type ssh, then a hyphen, the flag “l” (lower case L, for “login”) followed by the
user name of the administrator of the remote server, and the server’s IP address or host
name. (You can find this information on the worksheet you filled out during server setup.)
Press Return when you’re finished.
For example, if the admin name is jsmith and the server’s IP address is 192.168.100.100, you
would type:
ssh -l jsmith 192.168.100.100
If you’re not sure of the administrator name for the server, you can also enter the
administrator information this way:
ssh admin@192.168.100.100
3 At the prompt, type the administrator password and press Return.
Note: If you don’t enter an administrator name (or
admin), SSH will use the user name of
the person currently logged in to the admin computer. If this user doesn’t have administrator
access to the server, you must enter the appropriate administrator name.
If everything is entered correctly, the prompt displays the hostname of the remote server.
For example:
[192.168.100.100:~] jsmith%
Note: If you started the server up from a CD and logged in as root, you will only see a
number sign (#) instead of the hostname of the remote server.
Using Command-Line Tools 29
Page 30

Execute Commands
Once you are logged in using SSH, you can use command-line tools to execute commands
on the remote server.
If you want to execute a single command on the server and then immediately log out of the
server, you can do it in one step. Type your login information and the command, then press
Return. For example, the command to log in to a remote server and remove a file called “Test
Data” looks like this
ssh -l root 192.168.100.100 rm "/Documents/Test Data"
The server asks for the password, then executes the command and returns you to your
admin computer.
Close a SSH Session
When you are finished with a SSH session, you should close the session, especially if you are
logged in as the root administrator with root privileges, so that no one else can make
changes on the server. Here is an example of what a session might look like if jsmith logs in
to labserver2 as an administrator and then logs out.
[labserver1:~] jsmith%
ssh -l jsmith labserver2
Welcome to Darwin!
[labserver2:~] jsmith% exit
logout
Connection to labserver2 closed.
[labserver1:~] jsmith%
About Key Fingerprints
The first time you connect to a server using SSH, your local computer adds a “fingerprint”
from the remote server to a list of known remote host computers. The next time you
connect, you won’t see this message. Here’s what jsmith might see if he logged in to a server
for the first time.
ssh -l jsmith 192.168.12.12
The authenticity of host '192.168.12.12' can’t be established.
RSA key fingerprint is
a8:0d:27:63:74:00:f1:04:bd:6a:e4:0d:a3:47:a8:f7.
Are you sure you want to continue connecting (yes/no)? yes
Warning: Permanently added '192.168.12.12' (RSA) to the list of known
hosts.
jsmith@192.168.12.12’s password:
30 Chapter 4
Page 31

If you see a warning message about a “man in the middle attack” when you try to connect
using SSH, that means the RSA key fingerprint on the server and your admin computer no
longer match. This can happen if you use command-line tools to administer a remote server,
establish an RSA key fingerprint, and later change your SSH configuration, perform a clean
install of system software, or start up from the Mac OS X Server CD.
To connect to the remote server again using SSH, you need to edit the entries
corresponding to the hosts (which can be stored by both name and IP number) in this
file: ~/.ssh/known_hosts. You can use TextEdit or another editor to find the hostname
or IP address and then delete the key. The key is a long string that may wrap to several
lines. In TextEdit you can press the Control key and type K to delete the line, then delete
the blank line that it creates.
Standard UNIX Command-Line Tools
Mac OS X Server includes support for many basic UNIX command-line tools that you can use
to manage and set up servers. Information about three of these tools is provided here, but
you should read the man pages for each tool to fully understand how to use them.
Check Disks for Problems
fsck
fsck_hfs
To check for problems with disks locally, you can use Apple’s Disk First Aid application. To do
this from a remote admin computer, you need to log in using SSH and use these commandline tools: fsck_hfs (for Mac OS Extended, or Hierarchical File System, formatted disks) or
fsck (for UNIX File System formatted disks).
You can only use these commands on unmounted volumes, so you can’t use them on the
volume the server is started from. Unmount volumes before you start.
1 Log in to the server as the root administrator.
Using Command-Line Tools 31
Page 32

2 List the volumes you currently have, as you will need the /dev/diskXsY information for each
volume. To do this, type:
df -lk
to see this type of information:
Filesystem 1K-blocks Used Avail Capacity Mounted On
/dev/disk1s9 8448000 2397216 6050784 28% /
fdesc 1 1 0 100% /dev
/dev/disk0s9 8848296 2544256 6304040 28% /Volumes/Disk1
/devdisk0s10 8848296 17680 8830616 0% /Volumes/Disk2
/devdisk0s11 102918840 3063916 99854928 2% /Volumes/Hard\Drive
/devdisk1s10 8448728 3643104 4805624 43% /Volumes/Disk3
/devdisk1s11 61247160 29544 61217616 0% /Volumes/Disk4
3 Unmount the volume from the system. To do this, type:
/usr/sbin/disktool -p <diskXsY> 0
and replace <diskXsY> with the information you found in the list. For example, to unmount
/dev/disk0s9 in the above list, type:
/usr/sbin/disktool -p disk0s9 0
Use the default flag 0 (zero) for this command.
Note: If you have a RAID volume, you will only see /dev/diskX. If so, use “disktool -u”
instead of “disktool -p” to unmount it.
4 Check the files, using fsck for UFS volumes and fsck_hfs for HFS+ volumes. To do this, type
this command (be sure to precede the disk information with “r”):
/sbin/fsck_hfs /dev/r<diskXsY>
5 If you receive no warnings or error messages, remount the disk with this command:
/usr/sbin/disktool -m <diskXsY> 0
To return to the shell prompt, press the Control key and type c.
32 Chapter 4
Page 33

Partition Disk Drives
pdisk
You can use this command-line tool to remove and replace existing hard disk partitions but
not to create new partitions. Make sure that the revised partitions use the same range of disk
blocks as the original partitions. This guide provides information for performing some
specialized tasks. To find out more, read the man pages for the tool.
To use this tool:
1 Log in to the server as the root administrator.
2 At the prompt, type:
pdisk
and at the next prompt type:
?
to see a list of top level commands you can use to perform different tasks using the pdisk
tool.
Note: If you use the df or disktool commands before you use pdisk to partition disks, you
may not be able to save your changes.
Initialize a File System
newfs
newfs_hfs
Use the newfs command-line tool to initialize a file system after you repartition hard disks
with the pdisk tool. There are many options for this tool. The steps given below produce a
wrapped HFS+ volume with default parameters. To find out more about this tool and other
parameters, read the man pages for the tool.
1 Log in to the server as the root administrator.
2 List the volumes you currently have, as you will need the /dev/diskXsY information for each
volume. To do this, type:
df -lk
to see something like this:
Filesystem 1K-blocks Used Avail Capacity Mounted On
/dev/disk1s9 8448000 2397216 6050784 28% /
Using Command-Line Tools 33
Page 34

3 Unmount the volume from the system. To do this, type this command, replacing <diskXsY>
with the information you found in the list (“0” is the default flag):
/usr/sbin/disktool -p <diskXsY> 0
For example, to unmount the device above, type:
usr/sbin/disktool -p disk1s9 0
Note: If you have a RAID volume, you will only see /dev/diskX. If so, use “disktool -u”
instead of “disktool -p” to unmount it.
4 Initialize the file system. To do this, type:
/sbin/newfs_hfs -w -v <newvolumename> /dev/rdiskXsY
5 If you receive no warnings or error messages, remount the disk with this command:
/usr/sbin/disktool -m <diskXsY> 0
To return to the shell prompt, press the Control key and type c.
Example 1: Divide One 120 GB Disk Drive Into Two 60 GB Partitions
This example illustrates how to use pdisk and newfs to partition a 120 GB disk drive into two
60 GB partitions and initialize the partitions.
Step 1: Start up from a CD
To start up from the Mac OS X Server CD:
1 Press and hold the system identifier button while you press the power button.
2 Continue to hold the system identifier button until the system identifier light flashes and
the CD tray opens.
3 Release the system identifier button and insert the Mac OS X Server CD in the tray.
4 Close the tray. The server starts up from the CD.
Step 2: Log in to the server
Open a SSH session and log in to the server as root.
34 Chapter 4
Page 35

Step 3: Use pdisk to find unmounted volumes
List all the device maps for a hard disk and choose the ones you want to mount. Type:
pdisk
L
The session, with example output, looks like this:
pdisk
Top level command (? for help): L
/dev/rdisk2 map block size =512
#: type name length base (size)
1: Apple_partition_map Apple Apple63 @ 1
2: Apple_Driver43*Macintosh 56 @ 64
3: Apple_Driver43*Macintosh 56 @ 120
4: Apple_Driver_ATA*Macintosh 56 @ 176
5: Apple_Driver_ATA*Macintosh 56 @ 232
6: Apple_FWDriver Macintosh 512 @ 288
7: Apple_Driver_IOKit Macintosh 512 @ 800
8: Apple_Patches Patch Partition 512 @ 1312
9: Apple_HFS hfs5 241252896 @ 1824 (115.0G)
Step 4: Choose a device map to partition
When prompted, type e and choose the disk you want to partition (in this case,
/dev/rdisk2). The session looks like this:
Top level command (? for help): e
Name of device: /dev/rdisk2
/dev/rdisk2
Using Command-Line Tools 35
Page 36

Step 5: Delete the existing partitions
You must delete partitions on the disk one at a time. So for each partition, when prompted,
type
d to delete the existing partition, specify the partition number, and then type p to print
the partition map. When you’re done, you will have one partition, Apple_Free Extra. The
final session looks like this:
Top level command (? for help): d
Partition number: 10
Top level command (? for help): p
/dev/rdisk2 map block size=512
#: type name length base (size)
1: Apple_Free Extra 241252896 @ 1824 (115.0G)
Device block size=512, Number of Blocks=241254720
Step 6: Create a new partition
Create a new partition for the first available block. In this example, you’ll split the hard disk in
half. The first partition block is 1824 and the length in blocks is 120626448. You will name the
block and designate the type of partition (HFS). The session, with output, looks like this:
Top level command (? for help): C
First block: 1824
Length in blocks: 120626448
Name of partition: hfs1
Type of partition: Apple_HFS
Command (? for help): p
/dev/rdisk2 map block size=512
#: type name length base (size)
1: Apple_HFS hfs1 120626448@ 1824 (57.5G)
2: Apple_Free Extra 120626448 @ 120628272 (57.5G)
Device block size=512, Number of Blocks=241254720
36 Chapter 4
Page 37

Step 7: Add a second partition
Create and name a second partition formatted as HFS out of the remaining free space listed
in the partition map. The session, with output, looks like this:
Top level command (? for help): C
First block: 120628272
Length in blocks: 120626448
Name of partition: hfs2
Type of partition: Apple_HFS
Command (? for help): p
/dev/rdisk2 map block size=512
#: type name length base (size)
1: Apple_HFS hfs1 120626448@ 1824 (57.5G)
2: Apple_HFS hfs2 120626448 @ 120628272 (57.5G)
Device block size=512, Number of Blocks=241254720
Step 8: Write the new partition map
At the prompt, type w to close the map and save (write) the new partitions. A warning
message says that writing the map destroys what was there before. This is what you want to
do, so type
Step 9: Exit
yes at the prompt.
Type q to exit the pdisk tool.
Step 10: Initialize the new partitions
Use newfs_hfs to initialize the partitions. You will now have new dev entries related to the
partition maps available in /dev/disk*. In this example, use the cd command to change to the
/dev directory, then list the partition on the first disk. The session looks like this:
# newfs_hfs -w -v HFSVolume /dev/disk2s1
Initialized /dev/disk2s1 as a 58 GB HFS Plus volume
# newfs_hfs -w -v HFSVolume1 /dev/disk2s2
Initialized /dev/disk2s2 as a 58 GB HFS Plus volume
Step 11: Mount the new volumes
Restart the server, which will automatically mount the new volumes. You can then log in
remotely to perform any additional tasks, such as installing an operating system.
Using Command-Line Tools 37
Page 38

Example 2: Divide a Secondary Hard Disk Into Two Partitions
In this example, you have a primary hard disk called disk 0 and a second 120 GB hard disk
called disk 1 that you want to divide into two 60 GB partitions.
Step 1: Start up from the hard disk
Start the server from the internal hard disk.
Step 2: Log in to the server
Open a SSH session and log in to the server as root.
Step 3: Use pdisk to find volumes
List all the device maps for the volumes. Type:
pdisk
L
The session, with example output, looks like this:
pdisk
Top level command (? for help): L
/dev/rdisk3 map block size =512
#: type name length base (size)
1: Apple_partition_map Apple Apple63 @ 1
2: Apple_Driver43*Macintosh 56 @ 64
3: Apple_Driver43*Macintosh 56 @ 120
4: Apple_Driver_ATA*Macintosh 56 @ 176
5: Apple_Driver_ATA*Macintosh 56 @ 232
6: Apple_FWDriver Macintosh 512 @ 288
7: Apple_Driver_IOKit Macintosh 512 @ 800
8: Apple_Patches Patch Partition 512 @ 1312
9: Apple_HFS part1 241252896 @ 1824 (115.0G)
Step 4: Unmount the secondary hard disk
Use disktool to unmount (or eject) all the partitions of disk 1. To do this, type:
[localhost:~] root# disktool -u disk1 0
38 Chapter 4
Page 39

Step 5: Choose a device map to partition
Use pdisk to partition the 120 GB hard disk into two 60 GB partitions. When prompted,
type
e and choose the disk you want to partition (in this case, /dev/rdisk2). Then type p to
show the partition maps. The session, with output, looks like this:
pdisk
Top level command (? for help): e
Name of device: /dev/rdisk2
/dev/rdisk2
Command (? for help): p
/dev/rdisk2 map block size=512
#: type name length base (size)
1: Apple_partition_map Apple Apple63 @ 1
2: Apple_Driver43*Macintosh 56 @ 64
3: Apple_Driver43*Macintosh 56 @ 120
4: Apple_Driver_ATA*Macintosh 56 @ 176
5: Apple_Driver_ATA*Macintosh 56 @ 232
6: Apple_FWDriver Macintosh 512 @ 288
7: Apple_Driver_IOKit Macintosh 512 @ 800
8: Apple_Patches Patch Partition 512 @ 1312
9: Apple_HFS part1 241252896 @ 1824 (115.0G)
Device block size=512, Number of Blocks=241254720
Step 6: Delete the existing partition
You must delete the partitions on the disk one at a time. So for each partition, when
prompted, type
enter
p to print the partition map. When you’re done, you will have one partition,
d to delete the existing partition, specify the partition number, and then
Apple_Free Extra. The final session looks like this:
Top level command (? for help): d
Partition number: 9
Top level command (? for help): p
/dev/rdisk2 map block size=512
#: type name length base (size)
1: Apple_Free Extra 241252896 @ 1824 (115.0G)
Device block size=512, Number of Blocks=241254720
Using Command-Line Tools 39
Page 40

Step 7: Create a new partition
Create a new partition for the first available block. In this example, you’ll create a block 1824
with a length of 120626448. The session, with output, looks like this:
Top level command (? for help): C
First block: 1824
Length in blocks: 20626448
Name of partition: vol1
Type of partition: Apple_HFS
Command (? for help): p
/dev/rdisk2 map block size=512
#: type name length base (size)
1: Apple_HFS vol1 120626448 @ 1824 (57.5G)
2: Apple_Free Extra 120626448 @ 120628272 (57.5G)
Device block size=512, Number of Blocks=241254720
Step 8: Add a second partition
Create and name a second partition formatted as HFS out of the remaining free space listed
in the partition map. The session, with output, looks like this:
Top level command (? for help): C
First block: 120628272
Length in blocks: 120626448
Name of partition: vol2
Type of partition: Apple_HFS
Command (? for help): p
/dev/rdisk2 map block size=512
#: type name length base (size)
1: Apple_HFS vol1 120626448 @ 1824 (57.5G)
2: Apple_HFS vol2 120626448 @ 120628272 (57.5G)
Device block size=512, Number of Blocks=241254720
Step 9: Write the new partition map
At the prompt, type w to close the map and save (write) the new partitions. A warning
message says that writing the map destroys what was there before. This is what you want to
do, so type
40 Chapter 4
yes at the prompt.
Page 41

Step 10: Exit
Type q to exit the pdisk tool. Then use the cd command to change to the /dev directory and
the ls command to list the partitions on the disk. The session looks like this:
Top level command (? for help): q
The end
[localhost:~] root# cd /dev
[localhost:/dev} root# ls disk2*
disk2 disk2s1 disk2s2
Step 11: Initialize the new partitions
Use newfs_hfs to initialize the partition. You will now have new dev entries related to the
partition maps available in /dev/disk*. The session looks like this:
[localhost:/dev} root# newfs_hfs -w -v HFSVolume1 /dev/disk2s1
newfs_hfs: /dev/disk2s1 is mounted on /Volumes/volume5
[localhost:/dev} root# newfs_hfs -w -v HFSVolume2 /dev/disk2s2
Initialized /dev/disk2s2 as a 58 GB HFS Plus volume
[localhost:/dev} root# reboot
Connection to 192.167.100.100 closed by remote host.
Connection to 192.167.100.100 closed.
Using Command-Line Tools 41
Page 42

Page 43

CHAPTER
5
5 Network Setup Tool
You can configure settings for network hardware ports such as your server’s built-in
Ethernet, Ethernet cards, or serial port. Mac OS X also supports multihoming, which means
that multiple network services can be active at the same time. With multihoming, you can
also have multiple IP configurations on a single network hardware port.
On a computer running Mac OS X, you can configure network services in the Network pane
of System Preferences. In Mac OS X Server, you can either connect a keyboard and monitor
to a server and edit these settings locally, or you can use the Network Setup command-line
tool to configure network services on a server remotely.
A “network service” is a complete collection of settings for a specific network hardware port.
You may have one or several network services for a given hardware port.
The Network Setup Tool allows you to
m enable or disable network services
m create new network services
m set the order of network services
m configure the TCP/IP options of the network services
m set other networking options for the services, such as proxy server information
Using Network Setup
Network Setup is a command-line tool that you use with a terminal application and SSH
(Secure Shell). Mac OS X comes with a terminal application called Terminal. You can find this
application in
/Applications/Utilities
If you’re not familiar with command-line tools and SSH, read Chapter 4, “Using CommandLine Tools.”
43
Page 44

To use Network Setup:
1 Open Terminal.
2 Open a SSH session to the target server and log in as an administrator.
3 Type networksetup followed by any arguments and options you want to set, then press
Return. For example, if you want to see a list of all the network services on the server’s
hardware ports, type
networksetup -listallnetworkservices
Finding More Information About the Network Setup Tool
Use these parameters to find information about the Network Setup Tool:
networksetup -printcommands
Displays a list of commands with no detail.
networksetup -help
Displays a list of all the commands available in the Network Setup Tool, with explanatory
information.
man networksetup
Displays the complete manual pages.
Reverting to Old Network Settings
When you change your network preference settings with the Network Setup Tool, your
previous settings are saved to the com.apple.preferences.xml.old file located in
/var/db/SystemConfiguration/com.apple.preferences.xml.old
If you want to revert to your previous settings, rename the file “com.apple.preferences.xml”
and then restart the server.
If your network settings prevent you from accessing the server using SSH, attach a monitor
and keyboard to the server, log in as root, and rename the file “com.apple.preferences.xml”
(replacing the current one). Restart the server to apply the settings.
Note: If you make changes to network settings locally on the server using Network
preferences, the settings in the com.apple.preferences.xml.old file will not match the settings
you make using Network Setup.
44 Chapter 5
Page 45

Getting Network Configuration Information for Your Server
Use these parameters when you want to find out information about the network services set
up on a remote server:
networksetup -listnetworkserviceorder
Displays a list of network services in the order they are contacted for a connection, along
with the corresponding port and device for each. An asterisk (*) next to a service means the
service is inactive.
networksetup -listallnetworkservices
Displays a list of all network services. An asterisk (*) next to a service means the service
is inactive.
networksetup -listallhardwareports
Displays a list of hardware ports with corresponding device names and Ethernet addresses.
networksetup -detectnewhardware
Detects new network hardware and creates a default network service on the hardware.
networksetup -getinfo <network service>
Displays the IP address, subnet mask, router, and Ethernet address for a network service that
you specify.
Example command:
networksetup -getinfo "Built-in Ethernet"
Configuring TCP/IP Settings
You can use these Network Setup parameters to configure TCP/IP settings.
Set the TCP/IP Configuration to Manual
Use this command to specify a manual TCP/IP configuration for the network service.
-setmanual <network service> <ip address> <subnet mask> <router>
Example command:
networksetup -setmanual "Built-in Ethernet" 192.168.100.100
255.255.255.0 192.168.100.1
Network Setup Tool 45
Page 46

Set the TCP/IP Configuration to DHCP
Use this command to set the TCP/IP configuration for the specified network service to use
DHCP. The client ID is optional.
-setdhcp <network service> [client id]
Example command:
networksetup -setdhcp "Built-in Ethernet"
Set the TCP/IP and DHCP Router to Manual
Use this command to specify a manual IP address to use for DHCP.
-setmanualwithdhcprouter <network service> <ip address>
Example command:
networksetup -setmanualwithdhcprouter "Built-in Ethernet"
192.167.100.100
Set BOOTP
Use this command to set the TCP/IP configuration for the specified network service to use
BOOTP.
-setbootp <network service>
Example command:
networksetup -setbootp "Built-in Ethernet"
Configuring DNS Servers and Search Domains
Use these parameters to specify how you want network services to use DNS.
Designate DNS Servers
Use this command to specify the IP addresses of servers you want the network service to use
to resolve domain names. You can list any number of servers (replace dns1, dns2, and so on
with the IP addresses of domain name servers).
-setdnsservers <network service> <dns1> [dns2] [...]
Example command:
networksetup -setdnsservers "Built-in Ethernet" 192.168.100.100
192.168.100.128
46 Chapter 5
Page 47

If you want to clear all DNS entries for the specified network service, type “empty” in place of
the DNS server name.
Example command:
networksetup -setdnsservers "Built-in Ethernet" empty
Designate Search Domains
Use this command to designate the search domain for the network service. List any number
of search domains (replace domain1 and so on with the name of a local domain).
-setsearchdomains <network service> <domain1> [domain2] [...]
Example command:
networksetup -setsearchdomains "Built-in Ethernet" company.com
corp.com
If you want to clear all search domain entries for the network service, type “empty” in place
of the domain name.
Example command:
networksetup -setsearchdomains "Built-in Ethernet" empty
Managing Network Services
You can use the Network Setup Tool to create or rename network services, turn them on or
off, remove them, and change the order they’re contacted. The
-listallhardwareports
command displays the names of the hardware ports.
Create a New Network Service
Use this command to create a new network service with the specified name on the specified
port.
-createnetworkservice <new network service> <hardware port>
Example command:
networksetup -createnetworkservice "Built-in Ethernet2" "Built-in
Ethernet"
Duplicate an Existing Network Service
Use this command to duplicate an existing network service and name the new service.
-duplicatenetworkservice <network service> <new network service name>
Example command:
networksetup -duplicatenetworkservice "Built-in Ethernet" "Built-in
Ethernet2"
Network Setup Tool 47
Page 48

Rename a Network Service
Use this command to rename the specified network service.
-renamenetworkservice <network service> <new network service name>
Example command:
networksetup -renamenetworkservice "Built-in Ethernet" "LocalLAN"
Delete a Network Service
Use this command to delete a network service.
-removenetworkservice <network service>
Example command:
networksetup -removenetworkservice "Built-in Ethernet2"
Note: You cannot use this command to delete the last remaining service for a hardware
port. To do so, you use the
Turn a Network Service On or Off
-setnetworkserviceenabled command.
Use this command to turn the specified network service on or off (enable or disable).
-setnetworkserviceenabled <network service> <on or off>
Example command:
networksetup -setnetworkserviceenabled "Built-in Ethernet" off
To turn AppleTalk on or off:
-setappletalk <network service> <on or off>
Example command:
networksetup -setappletalk "Built-in Ethernet" off
To turn passive FTP on or off:
-setpassiveftp <network service> <on or off>
Example command:
networksetup -setpassiveftp "Built-in Ethernet" on
Set the Order Network Services are Contacted
Use this command to designate the order network services are contacted on the specified
hardware port. Name the network you want contacted first, then the second, and so on.
-ordernetworkservices <service1> <service2> [...]
Example command:
networksetup -ordernetworkservices "Built-in Ethernet" "LocalLAN"
48 Chapter 5
Page 49

Designating Proxy Servers
You can use the Network Setup Tool to designate servers to be used as proxies for some
services. Use these commands to set up proxy servers.
-setftpproxy
-setwebproxy
-setsecurewebproxy
-setstreamingproxy
-setgopherproxy
-setsocksfirewallproxy
For each command, specify the network service, domain, and port number in this format:
-setwebproxy <network service> <domain> <port number>
Example command:
networksetup -setwebproxy "Built-in Ethernet" proxy.company.com 80
Turn Proxy Servers On or Off
Use these commands to enable or disable the proxy settings.
-setftpproxystate <on or off>
-setwebproxystate <
-setsecurewebproxystate <
-setstreamingproxystate <
-setgopherproxystate <
-setsocksfirewallproxystate <
on or off>
on or off>
on or off>
on or off>
on or off>
For each command, specify the network service in this format:
networksetup -setftpproxystate <network service> <on or off>
Example command:
networksetup -setstreamingproxystate "Built-in Ethernet" off
networksetup -setgopherproxystate "Built-in Ethernet" on
Designate the Proxy Bypass Domain
Use this command to designate the bypass domain that you want to use for the specified
network service. You can list any number of domains.
-setproxybypassdomains <network service> <domain1> [domain2] [...]
Example command:
networksetup -setproxybypassdomains “Built-in Ethernet Port”
company.com corp.com
Network Setup Tool 49
Page 50

If you want to clear all bypass domain entries for the specified network service, type “empty”
in place of the domain name.
Example command:
networksetup -setproxybypassdomains "Built-in Ethernet" empty
50 Chapter 5
Page 51

CHAPTER
6
6 System Setup Tool
In Mac OS X, you set computer and user preferences using the System Preferences
application locally on a computer. With this version of Mac OS X Server, you can use the
System Setup command-line tool to make certain computer settings on remote servers. The
System Setup Tool allows you to remotely configure
m sleep settings
m remote login (SSH)
m startup disk
m computer name
m date, time, and time zone selection
Using System Setup
System Setup is a command-line tool used with a terminal application and SSH (Secure
Shell). Mac OS X comes with a terminal application called Terminal. You can find this
application in
/Applications/Utilities
If you’re not familiar with command-line tools and SSH, read Chapter 4, “Using CommandLine Tools.”
To use System Setup:
1 Open Terminal.
2 Open a SSH session to the target server and log in as an administrator.
3 Type the name of the tool followed by any arguments and options you want to set, then press
Return. For example, if you want to set the time on the server to 11:32:06 A.M., type
systemsetup -settime 11:32:06
51
Page 52

Finding More Information About the System Setup Tool
Type these parameters to find information about the System Setup Tool:
systemsetup -printcommands
Displays a list of all the commands available for the System Setup Tool.
systemsetup -help
Displays a list of all the commands available in the System Setup Tool, with explanatory
information.
man systemsetup
Displays the complete manual pages, including usage examples.
About Get and Set Commands
For each “set” parameter, there is an equivalent “get” parameter that shows you the current
setting. For example, if you want to see whether the server is currently using a network time
server, type:
systemsetup -getusingnetworktime
and you’ll see something like this:
Network Time: Off
Then if you want to use a network time server, type:
systemsetup -setusingnetworktime on
and you’ll see this:
setUsingNetworkTime: On
Setting Server Identity and Preferences
Use these arguments to set information about the computer and how to handle startup.
Set the Computer Name
Use this command to set the computer name, which is used by file sharing and AppleTalk.
-setcomputername <computer name>
Example command:
systemsetup -setcomputername "All Purpose Server"
52 Chapter 6
Page 53

Designate a Startup Disk
Use these commands to designate the startup disk for the server. The first command tells
you the current startup disk for the server. Use the second command to list all available disks,
then use the disk name exactly as formatted in the list to set the startup disk.
-getstartupdisk
-liststartupdisks
-setstartupdisk <
disk>
Example commands:
systemsetup -getstartupdisk
systemsetup -liststartupdisks
systemsetup -setstartupdisk "/Volumes/HD1/CoreServices"
Restart After Power Failure
Use this command to specify whether the server automatically restarts after a power failure.
-setrestartpowerfailure <on or off>
Example command:
systemsetup -setrestartpowerfailure on
Restart After a System Freeze
Use this command to specify whether the server restarts automatically after the system freezes.
-setrestartfreeze <on or off>
Example command:
systemsetup -setrestartfreeze on
Set Remote Apple Events Preference
Use this command to set whether the server responds to events sent by other computers
(such as AppleScript programs).
-setremoteappleevents <on or off>
Example command:
systemsetup -setremoteappleevents on
System Setup Tool 53
Page 54

Set Remote Login (SSH)
Use this command to turn remote login off. If you don’t want to receive a warning prompt
when you turn it off (it is sometimes necessary to turn off the warning when using shell
scripts), use the flag “f ” with the command.
-setremotelogin <off>
Example commands:
systemsetup -setremotelogin off
systemsetup -f -setremotelogin off
Important If you turn off remote login, you won’t be able to administer the server using
remote command-line tools and SSH. To turn remote login back on, you’ll need to connect a
monitor and keyboard to the server to administer it locally.
Setting Date and Time Preferences
Use these arguments to set date and time preferences for the server.
Set the Date
Use this command to set the current month, day, and year.
-setdate <mm:dd:yy>
Example command:
systemsetup -setdate 07:22:01
Set the Time
Use this command to set the current hour, minutes, and seconds.
-settime <hh:mm:ss>
Example command:
systemsetup -settime 15:24:30
Set the Time Zone
Use these commands to set the local time zone. First list the time zones, then type the time
zone as formatted in the list to set the time zone.
-listtimezones
-settimezone <
timezone>
Example command:
systemsetup -settimezone US/Pacific
54 Chapter 6
Page 55

Designate a Network Time Server
Use this command to designate a network time server. Enter the IP address or DNS name for
the network time server.
-setnetworktimeserver <timeserver>
Example command:
systemsetup -setnetworktimeserver 192.168.100.100
Turn Network Time On or Off
Use this command to specify whether the server uses a network time server.
-setusingnetworktime <on or off>
Example command:
systemsetup -setusingnetworktime on
Setting Sleep Preferences
You can set when the server hard disk sleeps, and whether the server wakes for different
types of network activity.
Important If you set the system to go to sleep, you won’t be able to administer the server
remotely while it’s sleeping.
Set Sleep Time
Use this command to specify how long the server can be inactive before going to sleep. If
you don’t want the server to sleep, enter “0” or “never.”
-setsleep <minutes>
Example commands:
systemsetup -setsleep 60
systemsetup -setsleep 0
Set Server for Modem Activity
Use this command to specify whether the server wakes from sleep when modem activity
is detected.
-setwakeonmodemactivity <on or off>
Example command:
systemsetup -setwakeonmodemactivity off
System Setup Tool 55
Page 56

Set Server for Network Access
Use this command to specify whether the server wakes from sleep when a network admin
packet is sent to it.
-setwakeonnetworkaccess <on or off>
Example code:
systemsetup -setwakeonnetworkaccess on
56 Chapter 6
Page 57

CHAPTER
7
7 Using Software Installation Tools
and Applications
Mac OS X Server provides these tools to install software on Xserve:
m Server Assistant
m Software Update Tool
m Installer Tool
To use the command-line tools (Software Update Tool and Installer Tool), you need to open a
SSH (Secure Shell) session. Read Chapter 4, “Using Command-Line Tools,” to learn about
SSH and how to use command-line tools.
Be sure you’re acting within the terms of the software license agreement before you install
programs on a computer. The license agreement specifies how many copies of the program
you can make for yourself and others.
Server Assistant
You can use Server Assistant to install or reinstall Mac OS X Server software remotely on a
server. To do this, you must start the server off the Mac OS X Server CD.
To install Mac OS X Server using Server Assistant:
1 Press and hold the system identifier button while you press the power button.
2 Continue to hold the system identifier button until the system identifier light flashes and the
CD tray opens.
3 Release the system identifier button and insert the Mac OS X Server CD in the tray.
4 Close the tray. The server starts up from the CD.
5 Start Server Assistant on your admin computer, or on the server if you’re installing it locally.
Server Assistant is located in
/Applications/Utilities
57
Page 58

6 On the Welcome screen, select “Install the Mac OS X Server software.”
7 Select the server on which you want to install the software (if you’re installing locally, skip
this step). Server Assistant will lead you through the steps necessary to successfully install
the software.
Software Update Tool
You use Software Update Tool to find new versions of software and install them remotely on
a server. You can run Software Update Tool from an admin computer. If you need help with
this tool, read Chapter 4, “Using Command-Line Tools.”
1 Open Terminal and log in to the target server using SSH.
2 At the prompt, type:
softwareupdate
You’ll see a list of available updates. For example:
-BrazilianPortugueseSWU
“Brazilian Portuguese Language Support” (10.1.2), 6268K
-PrintingEpsonEU
“Epson European Printer Drivers”(1.0), 31568K
-PrintingEpsonUS
“Epson US Model Printer Drivers” (1.0), 30074K
3 Type softwareupdate and any items you want to install. For example:
softwareupdate PrintingEpsonUS PrintingEpsonEU
The tool then downloads and installs the software on the server.
4 If the software package requires that you restart the server, type:
/sbin/reboot
or
/sbin/shutdown -r
Installer Tool
You use the Installer Tool to install software packages from a CD-ROM on a mounted remote
server volume. The Installer Tool doesn’t perform any authentication, so if a package needs
authentication (set in the package’s .info file), you must log in as root or use the sudo
command (see “Setting Up Administrator Permissions” on page 81).
58 Chapter 7
Page 59

If you need help using the Installer Tool, read Chapter 4, “Using Command-Line Tools.”
Important Before you put programs inside shared folders, remember that copyright laws
may prevent those programs from being shared. Check the applicable licensing agreements
and follow their requirements.
Follow these steps to install software on a server.
1 Insert the application disc in the optical drive of the server that you want to install the
software on.
2 Open a SSH connection in Terminal and log in to the target server.
3 Type the installer command. It will be some variation of the following (parameters in square
brackets are optional):
installer [-volinfo] [-pkginfo] [-allow] [-dumplog] [-help] [-
verbose] [-vers] [-config] [-plist] [-file <
<
ISOLanguageCode>] -pkg <pathToPackage> -target
<
pathToDestinationVolume>
pathToFile>] [-lang
If the software package you’re installing requires that you restart the server, type:
/sbin/reboot
or
/sbin/shutdown -r
Note: When you type the package name or the path to the destination volume, don’t end
the string with a forward slash (/) or the command will not execute.
Parameters
This section describes the parameters of the Installer Tool.
-volInfo
Displays a list of mounted volumes into which the software package can be installed.
-pkginfo
Displays a list of packages that can be installed onto the target volume. If a metapackage is
specified, all of its subpackages are listed.
-allow
Installs an older version over a newer version if the software package supports this.
-dumplog
Sends the standard installer log to StdOut.
Using Software Installation Tools and Applications 59
Page 60

-help
Displays a list of parameters you can use with the Installer Tool.
-verbose
Displays more information than the default output, which is formatted for scripting. Use this
parameter in conjunction with information requests.
-vers
Displays the version of the tool.
-config
Formats the command-line installation arguments for later use. You can redirect the output
to a configuration file. Then you can use the
-file parameter to perform multiple identical
installs.
-plist
Formats the Installer Tool’s output into an XML file, which is sent by default to StdOut. You
use this parameter with
-file <
pathToFile
-pkginfo and -volinfo.
>
Specifies the path to an XML file containing parameter information. This file can be used
instead of the command-line parameters, and supersedes any parameters on the commandline. For example:
installer -file /temp/configfile.plist
-lang <
ISOLanguageCode
>
Specifies the default language of the installed system. You need this parameter only if you
perform a full system install. You specify the language in ISO language code format. They are:
m EN for English
m JA for Japanese
m FR for French
m DE for German
60 Chapter 7
Page 61

Full Operating System Installation
Important When you start up from the Mac OS X Server CD, volumes are not automatically
mounted. If you mount your volumes using a command-line tool such as autodiskmount (to
recover data or to use the Installer Tool), don’t use the Disk Utility and Installer applications.
Disk Utility and the Mac OS X Installer application have their own mechanism for mounting
volumes. If you use these applications after you mount volumes manually, you will get
unreliable results.
If you use command-line tools to recover data, you need to restart the server before you use
the Disk Utility or Mac OS X Installer applications.
Important Apple strongly recommends that you not store data on the hard disk or hard
disk partition where the operating system is installed. This way, should you need to reinstall
or upgrade system software, you will not risk losing data.
To use the Installer Tool to install a full operating system:
1 Insert a bootable CD and start up the server from the CD. ( You can’t install an operating
system onto the current startup volume.)
2 Open Terminal and log in to the server as root using SSH. For example, type:
ssh -l root <ip address>
3 Mount volumes using the autodiskmount tool. To do this, type:
autodiskmount
4 List the volumes you can install the software on and specify the package you want to install.
For example, type:
/usr/sbin/installer -volinfo -pkg /System/Installation/Packages/
OSInstall.mpkg
and get a list like this:
/private/var/tmp/Mount01
/private/var/tmp/Mount1
/private/var/tmp/Mount02
Using Software Installation Tools and Applications 61
Page 62

5 Install the operating system on a volume from the list. For example, type:
/usr/sbin/installer -pkg /System/Installation/Packages/
OSInstall.mpkg -target /private/var/tmp/Mount01 -lang en
-verbose
to get this result:
installer: Package name is Mac OS X
installer: Installing onto volume mounted at
/private/var/tmp/Mount01.
installer: The install was successful.
6 Type one of these commands to restart the server:
/sbin/reboot
/sbin/shutdown -r
62 Chapter 7
Page 63

CHAPTER
8
8 Administration Software
Mac OS X Server comes with applications to set up, administer, and monitor server processes
and services, including
m Server Assistant
m Server Admin
m Macintosh Manager
m NetBoot Desktop Admin
m Streaming Server Admin
m Monitor (WebObjects)
m Server Monitor
m Simple Network Management Protocol (SNMP)
System Requirements
The table below shows the operating system required for each application.
These admin programs Can be run on these computers
Server Assistant Mac OS X Server or Mac OS X
Server Admin Mac OS X Server or Mac OS X
Macintosh Manager Mac OS 9 (and later) or Mac OS X
NetBoot Desktop Admin Mac OS 9 client computers started up from the NetBoot server
Streaming Server Admin Any computer running a Web browser
Monitor (WebObjects) Any computer running a Web browser
Server Monitor Mac OS X Server or Mac OS X
63
Page 64

To use admin applications:
1 Connect to the server from the admin computer and log in to the server using the
administrator name and password.
2 Open the appropriate administration program. The table below will help you decide which
application to use.
To do this Use this admin program
Install server software on a remote
server, configure server, start
selected services
Configure File, print, Web, mail,
Server Assistant
(Use one time to set up newly installed software. Can also
be used later to reinstall and then set up system software.)
Server Admin
NetBoot, and network services
Configure Macintosh Management
Macintosh Manager
service
Configure QuickTime Streaming
Streaming Server Admin (via Web browser)
Server
Manage NetBoot disk images NetBoot Desktop Admin
Configure WebObjects Deployment Monitor (via Web browser)
Monitor server hardware and set up
Server Monitor
email notification
Choose directory plugins (NetInfo
Remote Directory Setup
and LDAP) and set search policy
Configure NetInfo and set up
Remote NetInfo Domain Setup
authentication
64 Chapter 8
Page 65

Server Admin
You use the Server Admin application to configure and manage most services, to set up and
manage server user accounts, and to configure share points (items such as folders and disks
you want users to be able to access on the server). Server Admin has an individual module
for managing each service.
You can use Server Admin locally (at the server) or remotely (from a computer running
Mac OS X or another Mac OS X Server).
Install Server Admin
To install Server Admin on a computer running Mac OS X, follow these steps:
1 On a Mac OS X computer with networking configured, insert the Admin Tools CD.
2 Open the Admin Install folder and double-click the installer package, Admin_Install.mpkg.
Server Admin is installed in
/Applications/Utilities.
Log In to Server Admin
To log in to Server Admin:
1 Open Server Admin (located in /Applications/Utilities).
2 Enter the IP address or domain name of the Mac OS X Server you want to administer. (By
default, the IP address of the local server appears in the login window.) Then enter the
administrator’s user name and password for the server.
3 Click Connect.
You can manage multiple servers simultaneously by logging in to each server and
administering it from its own toolbar.
For more information about Server Admin, see the Mac OS X Server Administrator’s Guide
beginning on page 32.
Administration Software 65
Page 66

Remote Printer Setup
This version of Mac OS X Server supports the creation of print queues for servers from within
the Server Admin application. To learn about print service and how to manage it using Server
Admin, see Chapter 6 of the Mac OS X Server Administrator’s Guide.
To set up print service for the first time and create print queues, follow these steps:
1 Open Server Admin and log in to the server you want to administer.
2 Click the File & Print tab.
3 Click Print and choose Show Print Monitor.
4 Click the New Queue button.
5 Choose the type of connection (AppleTalk, LPR Printers Using IP, or Directory Services).
6 If you choose AppleTalk or Directory Services, select a printer from the list of available printers.
7 If you choose LPR Printers Using IP, type the printer’s IP address or DNS name. If you want to
change the queue name, deselect “Use Default Queue on Server” and type a name in the
Queue Name box.
8 Click Add.
The Print module has no option for creating USB printers. If you need to set up print queues
for USB printers, you need to use the Print Center application locally on the server.
Print service in Mac OS X Server does not use printer descriptions (PPDs)—these are only
used by client computers to generate PostScript files for print jobs.
NetBoot
NetBoot allows Macintosh client computers to start up using a Mac OS 9 image provided by a
Mac OS X Server. The server hosts the startup image, which contains a System Folder and
applications folder for all Mac OS 9 computers using NetBoot. Any changes made on the
server are automatically reflected on the client computers when they restart from the image.
In this version of Mac OS X Server, you configure NetBoot by using the DHCP/NetBoot
module in Server Admin to set up IP address ranges for NetBoot clients.
Important Read Chapter 11 in the Mac OS X Server Administrator’s Guide and complete
the NetBoot Server Worksheet on page 253 in that guide before you begin. Then follow the
steps in this guide to install NetBoot and configure IP address ranges for client computers.
66 Chapter 8
Page 67

Install NetBoot
Use the NetBoot CD to install the NetBoot.pkg file on your server. You can install the
package locally on the server, or use the Installer Tool to install remotely. You should also
copy the NetBoot Desktop Admin application to your admin computer.
Configure NetBoot With Server Admin
For NetBoot client computers to start up using a particular port on your Mac OS X Server,
you need to enable NetBoot on that port. To do this, specify which version of NetBoot you
want NetBoot client computers on a port to use. NetBoot 1.0 uses static IP addresses and
NetBoot 2.0 uses DHCP to dynamically assign IP addresses to NetBoot client computers.
Important You should configure only one server on a network or subnet to use NB 1.
To enable NetBoot on a port:
1 Open Server Admin and log in to the server you want to administer.
2 Click the Network tab.
3 Click DHCP/NetBoot and choose Configure DHCP/NetBoot.
4 Click NetBoot and choose the version of NetBoot (NB 1 or NB 2) to use for each port listed.
5 If you choose NB 1, click Subnets and choose the matching port name from the pop-up
menu, then create an IP address range for the port.
If you have an existing DHCP infrastructure, you don’t need to configure an IP address range
for computers using only NetBoot 2.0.
You can choose both NetBoot versions for a port, but if you do, you must set an IP address
range for the port.
Administration Software 67
Page 68

Macintosh Manager
You use Macintosh Manager to set up authentication and define user environments for
computers with Mac OS 8.1 through Mac OS 9.2 installed. You can use Macintosh Manager
locally (at the server) or remotely (from a Mac OS 9 or Mac OS X computer on the same
network as your Mac OS X Server).
You need to use two Server Admin modules to administer Macintosh Management service:
Users & Groups and Sharing. Details about all these applications can be found starting on
page 195 of the Mac OS X Server Administrator’s Guide.
Install Macintosh Manager
To install Macintosh Manager on a computer running Mac OS X or Mac OS 9.2:
1 On a computer with networking configured, insert the Admin Tools CD.
2 Open the Admin Install folder and double-click the installer package, Admin_Install.mpkg.
3 Choose the Custom Install option, then select Macintosh Manager Admin.
In Mac OS X, Macintosh Manager is installed in /Applications/Utilities. In Mac OS 9,
Macintosh Manager is installed in the Applications (Mac OS 9) folder.
68 Chapter 8
Page 69

Server Monitor
Server Monitor is a new application, included with this version of Mac OS X Server, that
is designed to support your Xserve. You can see the following information about your
Xserve systems:
m installed operating system
m drives
m power supply and UPS
m enclosure and processor temperature
m cooling blowers
m security
m network
Install Server Monitor
Server Monitor is on the Admin Tools CD and is automatically installed when you install the
Admin_Install.mpkg.
Administration Software 69
Page 70

Set Up Server Monitor
To display the toolbar, click the oval button in the top-right corner of the Server Monitor
window.
To set up Server Monitor:
1 Open Server Monitor and click Add Server.
2 Enter the IP address or DNS name of the server you want to add.
3 Enter an administrator name and password for the server. You can save the password for this
server in your keychain.
4 Choose how often you want Server Monitor to check the server using the “Update every”
pop-up menu.
5 Click OK.
6 Repeat these steps for each server you want to monitor.
Switch Between Server Lists
When you restart Server Monitor, you see the list of servers you worked with most recently. If
you want to look at different sets of servers, you can export server lists, then import them
later. Choose Export or Import from the File menu to do this. Choose Merge from the File
menu to merge different lists into one.
Set the System Identifier Lights Manually
The system identifier lights located on the front and back of your Xserve light when service is
required. Check Server Monitor to find the reason the lights are on.
You can also turn the lights on to identify a particular server in a rack of servers. To turn the
system identifier lights on or off, select the server and click “System identifier light” on the
Info pane.
Receive Automatic Status Change Notifications
You can set Server Monitor to notify you by email when a server’s status changes. For each
server, you set up the conditions that you want notification about. The email message can
come from Server Monitor or from the server.
Get Information About a Server
Server Monitor keeps logs of Server Monitor activity for each server. (The logs do not include
system activity on the server.) The log shows, for example, the times Server Monitor
attempted to contact the server, and whether a connection was successful. The log also
shows server status changes.
You can also use Server Monitor to get an Apple System Profiler report on a remote server.
70 Chapter 8
Page 71

Streaming Server Admin
QuickTime Streaming Server (QTSS) is a technology that delivers media over the Internet in
real time. With streaming, your users can tune in to a broadcast of live or prerecorded media,
or they can view prerecorded media on demand. Users see streamed media as soon as it
reaches their computers; they don’t have to wait to download files. To set up and manage
QuickTime Streaming Server, you use the Web-based Streaming Server Admin program.
Important Before you set up QTSS, read Chapter 9, “QuickTime Streaming Server,” in the
Mac OS X Server Administrator’s Guide. It includes hardware and software requirements
and all the information you need to plan and set up your streaming server.
Install Streaming Server Admin
Streaming Server Admin is installed with Mac OS X Server. The application requires Netscape
Navigator, Netscape Communicator, or Microsoft Internet Explorer version 4.5 or later. Read
Chapter 9, “QuickTime Streaming Server,” in the Mac OS X Server Administrator’s Guide, to
find out how to access Streaming Server Admin using your Web browser.
WebObjects
WebObjects Deployment provides the architecture and tools to deploy your WebObjects
applications on an intranet or the World Wide Web. It supplies the necessary Web server
adaptors as well as WebObjects Monitor. You can also use the command-line tool wotaskd to
remotely view server instances and generate statistical data on your deployed applications.
The Admin Tools CD has more information about WebObjects, located in:
Admin Tools/Documentation/WebObjects Documents
Install WebObjects
WebObjects comes already installed on your Xserve. If you need to reinstall it (because you
partitioned disks), you can do so either locally on the server or remotely using the Installer
command-line tool.
Local Installation Instructions
1 Insert the Mac OS X Server CD and go to the WebObjects 5.1 Deployment folder located in:
Welcome to Mac OS X Server/Additional Installs
2 Double-click the item named “WebObjects_X_Deployment.mpkg.”
3 When prompted, enter an admin user name and password. Then click Continue.
4 Read the software license agreement and click Continue. If you agree to its terms, click Agree
to continue with the installation.
Administration Software 71
Page 72

5 Select the root volume to install WebObjects and click Continue.
6 Choose an installation option and click Install.
Apple recommends that you perform an Easy installation.
7 The installer launches the WebObjectsLicenseUpgrader application. Enter the WebObjects
license key from the License Keys sheet and click Install. Then click OK in the dialog that
appears.
8 The installer may need to run scripts or overwrite existing files. In these cases it presents one
or more alerts. To proceed with installation, click OK.
9 Once the installer has finished, click Close to quit the installer and then restart the server.
Remote Installation Instructions
Follow the instructions for remote software installation on page 58. To install WebObjects,
type:
/usr/sbin/installer r -pkg "/Volumes/Mac OS X Server/Welcome to
Mac OS X Server/Additional Installs/WebObjects 5.1 Deployment/
WebObjects_X_Deployment.mpkg" -target /
Install Web Server Adaptors
By default, the installer configures the Apache Web server to use the WebObjects Apache
adaptor. WebObjects also includes a CGI adaptor. To use it, follow the configuration
instructions located in:
/System/Library/WebObjects/Adaptors/CGI/installationInstructions.html
The source code for both adaptors (and adaptors for other platforms) are provided so that
you can customize them. Instructions on rebuilding the WebObjects HTTP server adaptors
are available in:
/Developer/Examples/WebObjects/Source/Adaptors/BuildingInstructions.html
Upgrade Your License
The WebObjectsLicenseUpgrader allows you to modify your WebObjects license without
reinstalling the software. To run this application, you must log in as an administrator. The
application requires the license key that came with your copy of WebObjects. The
WebObjectsLicenseUpgrader is located in:
/Applications/Utilities
72 Chapter 8
Page 73

Simple Network Management Protocol (SNMP)
SNMP is a set of protocols used to manage and monitor multi-platform computer network
devices. SNMP support is included in the basic Mac OS X Server installation, but is turned off
by default.
SNMP uses agents to contact devices such as routers and network servers and interacts with
these devices through virtual information databases known as management information
bases (MIBs). Mac OS X Server provides a variety of useful system and network usage
statistics via its default public MIB, which you can display with a suitable SNMP browser.
To use SNMP, you can use a graphical administration tool (not supplied with Mac OS X
Server) to retrieve SNMP data, or you can use the SNMP command-line tools available in
/usr/sbin. You can find SNMP information and tools on the Net-SNMP Home Page located at
www.net-snmp.com
To turn SNMP on, use TextEdit or another application to edit the /etc/hostconfig file. If you
turn SNMP on, you should run the snmpconf command to enter site-specific information
such as system location and admin email address.
You can find more information about SNMP and how to use it in the SNMP man pages.
Administration Software 73
Page 74

Page 75

CHAPTER
9
9 Problem Solving
The solutions in this chapter assume that you’ve read the other chapters in this guide. If you
need help doing any of the tasks, such as using SSH (Secure Shell) to log into a remote
computer, you will find help in the chapters that cover those topics.
If you have physical access to the server, and you have an extra monitor and keyboard that
you can attach to the server, you can fix server problems locally. You might want to do this if
you don’t have a lot of experience using command-line tools, or if you don’t know the IP
address or DNS name of the server.
If you don’t have physical access to the server, or if you’re comfortable using command-line
tools, you can also use the tools provided in Mac OS X Server to correct problems remotely.
Solving Problems With Network Settings
Despite your best intentions and careful planning, it is possible to create network settings
that don’t give you the results you expect or want. For example, if you inadvertently assign
the same IP address to different servers, you’ll see one server on the network, but not the
other. Sometimes network settings can become corrupted and need to be set again.
To fix network settings locally:
1 Shut down the server and follow the instructions in the Xserve User’s Guide for connecting a
monitor and keyboard.
2 Restart the server by pressing the power button.
3 Choose System Preferences from the Apple menu.
4 Click Network to open Network preferences. You can make whatever network settings you
need for the server in this pane.
75
Page 76

To fix network settings using the serial port:
1 Connect a terminal to the serial port of your Xserve (follow the instructions in “Connecting
Through the Serial Port” on page 79).
2 Log in to the server as root.
3 Use the Network Setup Tool to make new network settings.
For information about the Network Setup Tool and how to use it, see Chapter 5, “Network
Setup Tool.”
Solving Startup Problems
If the server has a problem and won’t restart, try reinstalling system software on the startup
disk or partition. If you have data stored on this disk or partition, copy it onto another disk or
partition before you reinstall the system software. If you have a FireWire hard disk, you may
be able to connect it to the server and copy data onto it.
Copy Data and Reinstall System Software Locally
1
Turn the server off and follow the instructions in the Xserve User’s Guide for connecting a
monitor and keyboard to the server.
2 Press and hold the system identifier button while you press the power button.
3 Continue to hold the system identifier button until the system identifier light flashes and the
CD tray opens.
4 Release the system identifier button and insert the Mac OS X Server CD in the tray.
5 Close the tray. The server starts up from the CD.
6 Copy the data on the startup disk drive or partition to another disk drive, partition, or
FireWire device.
7 Reinstall the software on the startup disk drive or partition. The server restarts at the end of
the installation.
8 After the server restarts, Server Assistant appears. Choose “Create an administrator account
and configure basic services” on the Welcome screen.
9 Follow the onscreen instructions to set up the server. The Mac OS X Server Information
Worksheet that you filled out when you first set up the server should have all the necessary
information.
10 Restart the server and remove the Mac OS X Server CD.
11 Copy any data back onto the startup disk drive or partition.
76 Chapter 9
Page 77

Copy Data and Reinstall System Software Remotely
If you have information on the server that you need to preserve, you need to copy the
information to another disk or partition, then copy it back to the server when you’re
finished. You can use the ditto command to do this.
1 Turn the server off.
2 Press and hold the system identifier button while you press the power button.
3 Continue to hold the system identifier button until the system identifier light flashes and the
CD tray opens.
4 Release the system identifier button and insert the Mac OS X Server CD in the tray.
5 Close the tray. The server starts up from the CD.
6 Open the Terminal application on your admin computer and use SSH to log in to the
target server.
7 Use the ditto command to copy the data from the corrupted startup disk drive or partition to
another disk drive, partition, or FireWire device. (See “Copying Data Between Remote
Servers” on page 78.)
8 Use Server Assistant or the Installer Tool to reinstall the system software on the startup hard
disk or partition. The server restarts at the end of the installation.
9 Run Server Assistant to set up the server again. The Mac OS X Server Information Worksheet
that you filled out when you first set up the server should have all the necessary information.
10 Copy the data back onto the server using the ditto command.
For more information about the Installer Tool, see Chapter 7, “Using Software Installation
Tools and Applications.”
Resetting the Administrator Password
You may want to set a new administrator password if you think the password is no longer
secure, or if you’ve forgotten what it is. You can do this by running Server Assistant again.
Note: If you’ve forgotten the root password, you can’t run Server Assistant remotely. You
need to know the root password to log in.
Rerun Server Assistant Locally
1
Follow the instructions in the Xserve User’s Guide for connecting a monitor and keyboard to
the server.
2 Log in to the server as the root administrator.
Problem Solving 77
Page 78

3 Drag the AppleSetupDone file to the trash and empty the trash. This file is located in:
/var/db/
4 Restart the server. Server Assistant starts automatically.
5 Choose the option to set up an administrator account and configure services, then follow the
onscreen instructions. Use the Mac OS X Server Information Worksheet that you filled out
the first time to help you re-enter the server information.
Rerun Server Assistant Remotely
1
Open the Terminal application on your admin computer and type this command to delete
the .AppleSetupDone file:
ssh -l root <
2 Use SSH to log in to the server as the root user.
3 Type this to restart the server:
/sbin/reboot
Important Make sure you are logged in to the remote server. Otherwise, when you type
server name or IP address> rm /var/db/.AppleSetupDone
this command you will restart your admin computer.
4 Open Server Assistant and choose the option to set up an administrator account and
configure services.
5 Choose the target server from the list and follow the onscreen instructions. Use the
Mac OS X Server Information Worksheet that you filled out the first time to help you re-enter
the server information.
Copying Data Between Remote Servers
You can use the ditto command to copy data from one remote server to another. It’s similar
to the cp (copy) command but allows you to keep resource forks intact. The syntax of the
ditto command is as follows:
ditto [-v] [-V] [-rsrc] <file pathname> <target directory>
These parameters can be used with the ditto command:
-v
Prints a line for each file copy (making it easier to see what’s happening).
-V
Prints a line only for special files.
78 Chapter 9
Page 79

-rsrc
Copies resource forks.
For example, to back up jmartin’s user file to another hard disk named NewDrive, type the
following:
ditto -v -V -rsrc /Users/jmartin /Volume/NewDrive
Connecting Through the Serial Port
You can connect a portable computer or terminal computer to the serial port of your Xserve
and use command-line tools over that connection to change settings on the server.
To make the connection, you’ll need a serial cable and a terminal emulation program that
allow you to set these specifications:
m DB9 connector
m 8-bit
m no parity
m 1 stop bit
m 9600 kilobits per seconds (kbps)
You can use a terminal emulation program such as ZTerm to communicate with the server
over this type of connection. The Console application can’t be used for this procedure.
Once you’ve connected successfully, you can use the Network Setup Tool described in
Chapter 5 to change the server’s network settings.
Finding a Server on the Network
To log in to the server, you’ll need to know one of the following pieces of information about
the server:
m IP address
m DNS name
m hardware address
m computer model
Then you can use the Server Assistant Searcher command to display information about the
matching servers that respond to the command. Your missing server should be in this list.
Problem Solving 79
Page 80

Follow these steps:
1 Start up the server if it’s turned off. You can either start up from the hard disk, or start up
from a bootable CD.
Note: If you start up from a bootable CD, you must know the server’s hardware serial
number to log in using SSH (it’s used to generate a dynamic password).
2 On your admin computer, open Terminal and type:
/System/Library/ServerSetup/sa_srchr 224.0.0.1
You’ll see a list of all the computers in the same subnet that could respond to the command,
and information about each one. If you don’t see the computer you’re looking for, search
again or broadcast for the computer. To broadcast for a specific server, enter the server’s IP
address in place of 224.0.0.1.
Here’s an example of what you might see for one server:
bigkahuna.lab.com#Power Macintosh
G3#192.168.100.100#00:05:02:2b:b4:27#10.1.2#HD_BOOT#1.0
The pound sign (#) separates types of information. Here’s a translation of the example:
m bigkahuna.lab.com is the DNS name of this server
m Power Macintosh G3 is the model of this computer
m 192.168.100.100 is the IP address assigned to this server
m 00:05:02:2b:b4:27 is this server’s hardware address
m 10.1.2 is the version of system software installed on this server
m HD_BOOT is the volume the server is started up from (CD_BOOT means the server is
started up from a CD-ROM disc)
m 1.0 is a private version number used by Server Assistant.
This information can help you find the server you need to fix. You can log in to the server
using SSH, the IP address, and the user ID and serial number.
Note: If the server was started up from a CD-ROM disc, you need to know the hardware
serial number of the server in order to connect to the server using SSH. You can find this
number on the server itself or noted on the Mac OS X Server Information Worksheet that
you filled out before you began the server installation and setup.
80 Chapter 9
Page 81

Setting Up Administrator Permissions
You can give specific users permission to administer servers using the sudo tool. Sudo is
short for “Superuser do,” a UNIX tool you can use to set up a list of users and the system
commands that each is allowed to perform. If you use this tool, you don’t have to reveal the
root administrator password to all network administrators.
Read the sudo man pages to learn how to create a sudo configuration file.
Getting More Information
The Mac OS X Server Administrator’s Guide, located on the Admin Tools CD as a PDF
document, is your best resource for planning your network setup, configuring services, and
administering services. It also includes recommendations for additional reading and study.
For additional documentation and information, try these resources:
m Mac OS X Server Web site:
www.apple.com/macosx/server
m Server support site:
www.apple.com/servers
Help
Don’t overlook another built-in resource in Mac OS X Server—the onscreen help. Choose
Help from any Server Admin module, type your question, and get a list of search results that
will help you complete your task. Most of the administration applications included in
Mac OS X Server come with built-in onscreen help.
Problem Solving 81
Page 82

Page 83

APPENDIX
A
A Mac OS X Server Information
Worksheet
This appendix contains a worksheet for recording information about your server. You can
make a photocopy of the worksheet and fill in the information before you begin setting up
your server. Then file the filled-out worksheet in a secure location in case you need to refer
to the information again.
83
Page 84

Mac OS X Server Information Worksheet
Server Assistant asks you for the information in this worksheet. If you don’t have all of the networking and Ethernet
port planning information, your network administrator or Internet service provider (ISP) can give it to you.
Important This worksheet contains important security information. Keep it in a safe place.
Identification information
Mac OS X Server serial number Affix a serial number sticker
from the license key sheet:
Xserve serial number Enter the first 8 characters of the serial number on your Xserve:
Security information
Administrator (owner) name Enter a name shorter than 100 characters (the name can include spaces):
Administrator short name Enter a name with 8 or fewer characters and no special characters other than a
period (.), hyphen (-), or underscore (_):
Administrator password Enter a case-sensitive password with no spaces or Option-key combinations:
QuickTime Streaming Server
administrator name
QuickTime Streaming Server
administrator password
Networking information
NetInfo data sharing (select one) The server will use the local NetInfo domain only.
Enter a name no longer than 255 characters that does not include a colon (:):
Enter a password no longer than 80 characters:
The server will access a NetInfo domain on another server.
Enter the static IP address of that server:
Enter the filename (server tag) of the NetInfo domain. Specify “network” if the
domain was set up using Server Assistant:
Note: Select the first option if you’re not sure what to select. For information
about NetInfo, see the Mac OS X Server Administrator’s Guide and
Understanding and Using NetInfo.
Page 85

Networking information (continued)
Server’s host name Enter a name that begins with a letter and contains only letters, numbers,
periods (.), or the underscore (_):
IP address(es) of domain name
server (DNS)
DNS search domain(s) If you wish, enter one or more domain names (for example, apple.com),
separated by commas:
Server’s AppleTalk name Enter a name no longer than 31 characters:
Your server has a built-in Ethernet port and may have additional ports installed on Ethernet cards. When you
use Server Assistant, you’ll specify how each port should be used (TCP/IP and/or AppleTalk) and enter address
information for the ports. While AppleTalk is optional, it can be used on one port by Apple file service and
print service.
Important To set up your server or install software remotely, connect your server to the network through the built-
in Ethernet port.
If you don’t select TCP/IP and/or AppleTalk for a port, Server Assistant won’t configure that port. For each port you
choose to configure, you’ll see a panel where you enter the address information.
Note: You should configure at least one port using Server Assistant. For a local setup, use the Network pane of
System Preferences to configure the remaining ports. For a remote setup, use the Network Setup command-line tool.
Ethernet port planning
Use for TCP/IP and/or AppleTalk? (AppleTalk can be active on only one port.)
Built-in Ethernet port: TCP/IP AppleTalk
Ethernet card port 1: TCP/IP AppleTalk
Ethernet card port 2: TCP/IP AppleTalk
Specify the following information using the IP address format (for example, 192.168.12.12):
Built-in Ethernet port Ethernet card port 1 Ethernet card port 2
IP address: IP address: IP address:
Subnet mask: Subnet mask: Subnet mask:
Router address: Router address: Router address:
Page 86

 Loading...