

Page 1
Service Source
iMac (24-inch Early 2008)
20 June 2008
© 2008 Apple Inc. All rights reserved.
Page 2

Apple Inc.
© 2008 Apple Inc. All rights reserved.
Under the copyright laws, this document may not be copied, in whole or in part, without the
written consent of Apple.
Every eort has been made to ensure that the information in this document is accurate. Apple is
not responsible for printing or clerical errors.
Apple
1 Innite Loop
Cupertino, CA 95014-2084
USA
+ 1 408 996 1010
www.apple.com
Apple, the Apple logo, Mac, and Macintosh are trademarks of Apple Inc., registered in the U.S. and
other countries.
ii
Page 3

iMac (24-inch Early 2008)
Contents
Manual Updates 7
Updated 20 June 2008 7
Product Introduced April 29, 2008 7
Take Apart
General Information 10
What’s New 10
Product Congurations 11
Opening the Computer 11
Note About Images in This Manual 11
General Tools 12
Required Special Tools 12
View of the iMac with the Front Bezel Removed 14
View of the Modules with the Display Panel Removed 14
View of the Rear Housing and Cables 15
Back View 15
I/O Ports 16
Cleaning and Handling the Glass Panel 17
Do’s and Don’ts 18
Handling a Broken Glass Panel 18
Safety 19
EMI Shielding 20
Access Door 21
Memory 23
Glass Panel 26
Cleaning and Handling the Glass Panel 27
Isopropyl Alcohol (IPA) 28
Cleaning the Silicone Roller 28
Do’s and Don’ts 28
Metal Alignment Pins on the Glass Panel 29
Magnets on the Front Bezel 29
Removing the Glass Panel 30
Replacing the Glass Panel 33
Installing a Replacement Glass Panel 38
iii
Page 4

Cleaning Tool Kit 41
Cleaning Tool Resources 41
LENSPEN Screen Cleaning Device 42
Ionizing Air Gun 43
Front Bezel 44
Camera Board 50
Battery 53
IR (Infrared) Board 56
AirPort Extreme Board 59
Bluetooth Board 63
LCD Display Panel 66
LCD Temp Sensor Cable 73
Left Speaker 79
Ambient Temp Sensor 83
Ambient Temp Sensor Cable 87
LVDS Display Cable 91
Right Speaker 97
Inverter Cable 100
Optical Drive Fan 104
CPU Fan 107
Power Supply, AC/DC 110
Hard Drive 117
Hard Drive Sensor Cable 124
Optical Drive 127
Optical Flex Cable 133
Optical Sensor Cable 136
Logic Board 140
Video Card 149
iv
Page 5

Hard Drive Fan 154
Audio Board 157
Hard Drive Data Cable 160
Clutch Cover 163
Stand 166
Clutch Mechanism 171
Chassis 175
Camera Cable 180
Microphone Cable 185
Cable, DC, Power Supply/SATA 190
Rear Cover 195
Troubleshooting
General Information 199
Serial Number 199
Power On Self Test (POST) 200
Firmware Updates 200
Diagnostic LEDs 202
Apple Hardware Test (AHT) Error Codes 204
Logic Board Sensor and Fan Connector Locations, Top Side 206
Logic Board Sensor Locations, Back Side 207
Cleaning Tools for the LCD and Glass 207
LensPen Cleaning Tool 207
Symptom Charts 208
How to Use the Symptom Charts 208
Diagnostics 208
Apple Hardware Test (AHT) Error Codes 209
Power Issues 211
Glass Panel 214
System Shuts Down 215
Display 216
Hard Drive 217
Optical Drive 219
Fan Sound 226
AirPort 231
Bluetooth (also see Wireless Issues topic) 232
v
Page 6

IR Remote 233
IR Sensor/Receiver 234
Built-in iSight Camera 235
Speakers 237
Mouse (also see Wireless Issues topic) 238
Keyboard (also see Wireless Issues topic) 239
Wireless Issues (also see Additional Wireless Topics) 241
Additional Wireless Topics 245
Error Beep(s) 246
USB 247
Views
iMac (24-inch Early 2008)—Upper Exploded View 249
iMac (24-inch Early 2008)—Lower Exploded View 250
Screw Chart 251
vi
Page 7

Manual Updates
Updated 20 June 2008
Troubleshooting
Symptom Charts:•
Added new troubleshooting symptom: Optical Drive-->• Optical drive won’t eject
media. Verify that two or three black clips (on the bezel) are positioned on top of the
optical drive mechanism. Refer to the topic for images and more information.
Added a new troubleshooting symptom: Error Beeps-->• iMac display is black and the
system beeps nine times (3 short, 3 long, 3 short), then repeats. Remove the small
coin battery located on the logic board near the right speaker. Wait 30 seconds, reinstall
the battery.
Product Introduced April 29, 2008
New images, screws, and updated text were added to the following sections:
Take Apart
Battery•
AirPort•
Bluetooth•
LCD Display•
LVDS display cable •
Right speaker•
Optical drive •
Optical drive sensor board•
Optical ex cable•
Logic board•
Audio board•
Troubleshooting
General Information: •
Apple Hardware Test (AHT) error code tabl• e was added that lists the code and the
suspect part
Logic board photo showing sensor and fan locations• front and back
Diagnostic LEDs: new photo of LEDs•
Added Cleaning Tools for the LCD and Glass section•
Added LensPen Cleaning Tool information•
iMac (24-inch Early 2008) — Manual Updates 7
Page 8

Symptom Charts: •
Updated symptoms throughout for clarity and removed irrelevant links•
Added new troubleshooting sections called • Wireless Issues and Additional Wireless
Topics to help troubleshoot wireless keyboards and mice
Added new symptoms: • Some keys not working on the wireless keyboard and
Contamination on the inside surface of the glass panel.
Exploded View
New part numbers were added to reference this iMac model•
iMac (24-inch Early 2008) — Manual Updates 8
Page 9

Service Source
Take Apart
iMac (24-inch Early 2008)
© 2008 Apple Inc. All rights reserved.
Page 10

Product View
General Information
What’s New
The iMac (24-inch Early 2008) computer has the same overall look as the previous iMac. The big
dierences are the upgraded processor (Intel Penryn chip) and the faster RAM speeds.
New features:
2.8 or 3.06 GHz (optional) Intel Core 2 Duo processor•
1066 MHz front side bus•
Mac OS X version 10.5.2 Leopard•
2 GB and 4 GB memory options, PC2-6400 (800 MHz) DDR2, 4 GB max•
iMac (24-inch Early 2008) — General Information 10
Page 11

Product Congurations
To conrm the conguration from the Apple menu, choose About This Mac. The Processor listing
will show the speed of the processor followed by the processor type.
The following table shows the iMac (24-inch Early 2008) model conguration at introduction:
Feature iMac (24-inch Early 2008)
Intel Core 2 Duo processor 2.8 GHz or 3.06 GHz (CTO)
Memory 2 GB (2 x 1 GB) 800 MHz DDR2 (4 GB max)
Hard Drive, Serial ATA
7200 rpm
Optical Drive 8x PATA SuperDrive
Display 24” wide 1920 x 1200 94.1 ppi:IPS 400 nits, 14 lamps, glossy
Graphics M76XT 256 MB/G92 GT 512MB (CTO)
Audio I/O Combo digital/analog in, Combo digital/heaphone out, Mic,
Wireless PCIe 802.11a/b/g/n, Bluetooth 2.1
Power Supply 240W universal supply
320 GB (BTR)
500/750/1TB (CTO)
Stereo speakers, 4 channel audio
Opening the Computer
Important: • The glass panel on the iMac should only be removed by Apple authorized
technicians. Removing the glass panel requires special tools and they must be used to
replace any module other than the SO-DIMMs.
Read and follow all of the handling and cleaning recommendations to prevent damaging •
the glass and LCD panel.
Follow ESD precautions when the front bezel and the LCD display are removed.•
Note About Images in This Manual
Small dierences in appearance between the images pictured and the actual computer you are
servicing may exist, however the steps and sequence are the same unless otherwise noted.
iMac (24-inch Early 2008) — General Information 11
Page 12

General Tools
The following tools are required to service the computer:
ESD-safe workstation and mat•
Soft, clean towel or cloth (to protect the display and removed parts from scratches)•
Black stick (or other non-conductive nylon or plastic at-blade tool)•
Phillips #2 screwdriver•
Torx T6 screwdriver (magnetized)•
Torx T8 screwdriver (magnetized)•
Torx T10 screwdriver (magnetized)•
Flat-blade screwdriver•
Isopropyl alcohol•
ESD bags•
Required Special Tools
Special tools are required to remove, handle, and clean the glass panel such as the following.
These are available as a starter kit too. View the tools in the Glass Panel take apart chapter.
1.
922-8252 Suction cups, Pkg. of 2
922-8261 Sticky silicone roller (6-inch) to clean the glass panel 2.
922-8262 Sticky sheet pads to clean the silicone roller 3.
922-8263 Polishing cloths, clean, anti-static, optical grade micro ber “terry” style cloth4.
922-8253 Gloves, lint-free, anti-static, Pkg. of 2 5.
922-8259 Microfoam bag to store the glass panel, Pkg. of 56.
922-8258 ESD bags, 24x20, Pkg. of 5, to store the LCD panel. 7. Note: To prevent the buildup
of static charges which may attract dust particles to the surface of the display, store the LCD
panel in an anti-static bag whenever it has been removed from the system.
8.
iKlear Apple Polish or Brillianize anti-static spray cleaning solution. A list of where iKlear/
Brillianize can be obtained is listed in the Glass Panel chapter of the service manuals. Note:
IPA (isopropyl alcohol) can be used to clean the glass if you are unable to source iKlear or
Brillianize.
iMac (24-inch Early 2008) — General Information 12
Page 13

Cleaning Tools Starter Kit
The following tools are oered in the starter kit (076-1277).
Suction cups, one pair•
Sticky silicone roller (6-inch) to clean the glass panel •
Sticky sheets to clean the silicone roller, 2 pads•
Polishing cloths, clean, anti-static, microber “terry” style cloth (5 cloths)•
Gloves, lint-free, anti-static, two pairs •
Microfoam bag to store the glass panel (5 bags)•
ESD bag for LCD display storage, (5 bags)•
Removing the Glass Panel
Rubber suction cups (922-8252) and anti-static gloves (922-8253) are required to remove the glass
panel. Lift the glass straight up and o the bezel. Review the movie in the Glass Panel chapter.
iMac (24-inch Early 2008) — General Information 13
Page 14

View of the iMac with the Front Bezel Removed
View of the Modules with the Display Panel Removed
iMac (24-inch Early 2008) — General Information 14
Page 15

View of the Rear Housing and Cables
This is a view of the rear housing with the chassis, stand and mechanism removed.
Back View
The input/output ports are located on the bottom left side on the back of the computer. The
power on button is located on the bottom right side on the back of the computer.
iMac (24-inch Early 2008) — General Information 15
Page 16

I/O Ports
The input/output ports from left to right are:
Headphone out/optical digital audio out port•
Audio in/optical digital audio in port•
USB 2.0 ports (3)•
FireWire 400 port•
Firewire 800 port•
Ethernet (10/100/1000 Base-T) port•
Mini-DVI port•
iMac (24-inch Early 2008) — General Information 16
Page 17

Cleaning and Handling the Glass Panel
Follow the cleaning procedures in this manual to ensure the glass panel is free of dust and other
particles before returning the computer to the customer.
Note: To view the movie, make sure the manual is opened in Acrobat.
The iMac (24-inch Early 2008) model has a glass panel that attaches to the outside of the •
front bezel.
The glass panel is not tempered and will break into sharp pieces if mishandled. A scratched •
or broken glass panel is not covered under warranty.
Removing the glass panel requires special tools such as lint-free gloves, rubber suction cups, •
microfoam storage bags, and the iKlear cleaning solution.
The glass panel must be removed prior to replacing any module other than the SO-•
DIMM’s.
To prevent contamination, handle the glass panel only by the edges while wearing lint-free •
gloves.
The complete list of tools and resources can be found in the Glass Panel take apart chapter.
iMac (24-inch Early 2008) — General Information 17
Page 18

Do’s and Don’ts
DO
Handle glass panel using lint free gloves.•
Use only a sticky silicone roller to clean the inside surface of the glass and the LCD panel.•
Use iKlear • ONLY on the outside surface of the glass panel or use the LENSPEN.
Place the glass panel into a clean protective microfoam bag when it is not installed on an •
iMac.
Store the glass panel in a safe area where it will not be broken or damaged.•
Store the LCD panel in an anti-static bag to prevent the buildup of static charges which may •
attract dust particles to the display’s surface.
Store the silicone roller and sticky paper within a temperature range of 39-104 degrees F •
(5-40C).
Wash the silicone roller in warm soapy water or wipe with isopropyl alcohol if the roller is no •
longer tacky. Replace the silicone roller if the tackiness does not return.
DO NOT
Touch the inside of the glass with bare hands or dirty gloves. Fingerprints will be dicult to •
remove.
Clean the inside surface of the glass or the LCD with iKlear or other cleaning solutions.•
Place the glass panel onto a work surface where it may collect dust and other contaminants •
unless it has rst been placed into its protective microfoam bag.
Use iKlear to clean the glass.•
Handling a Broken Glass Panel
The glass panel is not tempered and will break into sharp pieces if mishandled.
If the glass is broken it must be carefully removed from the iMac to prevent irreparable damage
to the front surface of the LCD. If the front surface of the LCD is scratched by the broken glass the
LCD may need to be replaced.
Do not handle broken glass unless you are wearing protective cut-resistant gloves. The lint-free
gloves used to prevent contamination of the glass panel are not suitable for handling broken
glass.
Use a broom and dust pan to sweep up as much of the broken glass as possible. Glass fragments
may have travelled several feet from the location of the glass panel so be sure to thoroughly
clean the entire area. Use a vacuum to remove the smaller fragments not picked up by the
broom
iMac (24-inch Early 2008) — Gener al I nf or mat i on 18
Page 19

Safety
WARNING: HIGH VOLTAGE: The highlighted module below is an AC/DC power supply that
poses a shock hazard. When the computer is under power, be aware that the power supply
contains high voltages that pose a potential hazard to your personal safety. Never work on or
near the power supply with the unit powered on; and as a further precaution, always make sure
the unit is unplugged when working on it with the front bezel removed. A white, shock- hazard
warning symbol is silk-screened in the middle of the power supply module.
WARNING:
Text or photographs marked by this symbol indicate that a potential hazard to your personal
safety exists from a high voltage source.
The AC/DC power supply board is a high-voltage source with the unit under power, and remains
powered up whenever the system is plugged in, whether or not the system is turned on. Use
extreme caution when troubleshooting the system with the front bezel removed.
Disconnect power to the system before performing maintenan• ce.
Disconnect ESD wrist straps when working on a plugged in system. •
Don’t work alone. In the event• of an electrical shock, it is important to have another
individual present who can provide assistance.
Keep one hand in your pocket when working on any • computer that is plugged in. This
will help ensure that your body does not provide a path to ground in the event that you
accidentally make contact with the line voltage.
Don’t wear jewelry, watches, necklaces, or other metallic articles that could present a risk •
if they accidentally make contact with the power supply circuitry.
iMac (24-inch Early 2008) — General Information 19
Page 20

EMI Shielding
The rear cover of the computer is wrapped in EMI shielding that is easily torn and damaged. To
maintain a properly shielded unit, you must repair all accidental tears and cracks to the shielding
by covering them with EMI tape that can be ordered from Apple service.
iMac (24-inch Early 2008) — G e n e ra l In fo rma tio n 20
Page 21

Access Door
Tools
Phillips #2 screwdriver•
ESD-safe workstation and mat•
Soft , clean towel or cloth•
Preliminary Steps
Before you begin, place the computer face down on a clean, soft, lint-free cloth so that the
bottom is facing you.
Part Location
iMac (24-inch Early 2008) Take Apart — Access Door 21
Page 22

Removing the Access Door
Disconnect all cables and the power cord from your iMac.1.
Place a soft, clean towel or cloth on your work surface. Hold the side of the iMac and lay it 2.
down so that the screen is against the surface and the bottom is facing you.
3.
Raise the stand and use a Phillips #2 screwdriver to loosen the captive screw on the memory
access door by turning it counterclockwise.
Important: When removing and installing the RAM access door it is important that you use
the correct size Phillips screwdriver. Using one that is too small or too big may damage the
screw head, and/or screwdriver. Before trying to remove the RAM access door screw, make
sure that the screwdriver tip is in good shape without rounded edges and that it rmly seats
into the screw head. If the screwdriver doesn’t seat well then do not use it.
If the RAM access door screw head has been severely damaged and cannot be removed with
a Phillips #2 screwdriver you may be able to use a small jewelers at blade screwdriver to
engage the screw head and carefully remove it. In some cases it may be necessary to use a
screw extractor tool. When using a screw extractor make sure that no metal shavings from
the damaged screw drop inside the system. For more information on screw extractors and
how to use them type ‘screw extractor’ into your favorite internet search engine.
4.
Remove the access door.
Replacing the Access Door
Position the computer face down on a clean, soft, lint-free cloth so that the bottom is facing 1.
you.
2.
Position the access door on the rear housing over the memory compartment.
Use a Phillips #2 screwdriver to tighten the captive screw.3.
Important: To ensure proper cooling the iMac should not be operated without the memory
access door installed.
iMac (24-inch Early 2008) Take Apart — Access Door 22
Page 23

Memory
Tools
ESD mat •
Soft , clean towel or cloth•
Preliminary Steps
Before you begin, remove the access door.
Warning: Always shut down the computer and remove the power cord before installing memory.
Do not attempt to install memory in the computer while it is plugged in.
Part Location
iMac (24-inch Early 2008) Take Apart — Memory 23
Page 24

Removing the Memory
Shut down the computer, and disconnect all cables including the power cord.1.
Holding the sides of the computer, lay it face down on a soft, clean cloth so the stand is 2.
facing you.
3.
After removing the access door, touch the metal stand or bezel to discharge any static
electricity from your body.
Important: Always discharge static before you touch any parts such as the memory board.
To avoid generating static electricity, do not walk around the room until you have nished
replacing the memory.
4.
Untuck the tab in the memory compartment. If you are replacing a memory module, untuck
the tab and pull it to eject the installed memory module.
Set the memory module(s) aside.5.
iMac (24-inch Early 2008) Take Apart — Memory 24
Page 25

Replacing the Memory
With the computer face down, orient the notch on the DIMM with the notch in the memory 1.
slot. In this case, the notch is on the left.
With your ngers, press the DIMM fully into the slot until you hear a click. Repeat for the 2.
other DIMM slot.
3.
Fold the black tab over each DIMM.
Replace the memory access door.4.
Use a Phillips #2 screwdriver to tighten the captive screw on the memory access door.5.
Make sure the computer recognizes the new memory by opening System Proler, clicking 6.
More Info, and clicking Memory.
iMac (24-inch Early 2008) Take Apart — Memory 25
Page 26

Glass Panel
Tools
This procedure requires the following tools, which are oered individually or as part of the
cleaning kit, 076-1277.
Suction cups (922-8252)•
Sticky silicone roller (6-inch) to clean the glass panel (922-8261)•
Sticky sheets to clean the silicone roller (922-8262)•
Polishing cloths, clean, anti-static, optical grade micro ber “terry” style cloth (922-8263)•
iKlear Apple Polish or Brillianize anti-static spray cleaning solution for the outside of the glass •
Isopropyl alcohol (IPA) or • LENSPEN to clean the inside of the glass
Gloves, lint-free, anti-static (922-8253)•
Microfoam bag to store the glass panel (922-8259) •
ESD bag for LCD display storage (922-8258)•
Note: Tools without part numbers can be sourced directly from the vendor. Refer to “Cleaning
Tool Resources” at the end of this chapter.
Part Location
iMac (24-inch Early 2008) Take Apart — Glass Panel 26
Page 27

This iMac model has a glass panel that attaches to the outside of the front bezel. The glass panel
is not tempered and will break into sharp pieces if mishandled. A scratched or broken glass panel
is not covered under warranty. Removing the glass panel requires special tools such as lint-free
gloves, rubber suction cups, microfoam storage bags, and the iKlear cleaning solution. The glass
panel must be removed prior to replacing any module other than the SO-DIMM’s. To prevent
contamination, the glass panel must only be handled by the edges while wearing lint-free gloves.
Cleaning and Handling the Glass Panel
Follow the cleaning procedures in this manual to ensure the glass panel is free of dust and other
particles before returning the computer to the customer.
Note: To view the movie, make sure the manual is opened in Acrobat.
iMac (24-inch Early 2008) Take Apart — Glass Panel 27
Page 28

Isopropyl Alcohol (IPA)
Cleaning the Glass
In the unfortunate event that gloves are not worn, and ngerprints and oil smudges are visible
on the inside of the glass, cleaning should be done using a lint free cloth and IPA. Spray a small
amount of IPA onto a CLEAN lint free cloth to avoid introducing any other contaminants. Gently
wipe the area and allow the glass to dry. Note: The silicone rollers are only eective in removing
dust and other particles. If ngerprints or oil smudges are not removed prior to using the roller,
the silicone roller will transfer the ngerprints and oil smudges onto the glass.
Cleaning the Silicone Roller
Clean the silicone roller by wiping it down with IPA (Isopropyl Alcohol) or washing it with warm
soapy water.
Do’s and Don’ts
Do
Handle glass panel using lint free gloves.•
Use only a sticky silicone roller to clean the inside surface of the glass and the LCD panel.•
Use iKlear • ONLY on the outside surface of the glass panel or use the LENSPEN.
Use Isopropyl alcohol or the LENSPEN to clean • ONLY the inside surface of the glass.
Place the glass panel into a clean protective microfoam bag when it is not installed on an •
iMac.
Store the glass panel in a safe area where it will not be broken or damaged.•
Store the LCD panel in an anti-static bag to prevent the buildup of static charges which may •
attract dust particles to the display’s surface.
Store the silicone roller and sticky paper within a temperature range of 39-104 degrees F •
(5-40C).
Wash the silicone roller in warm soapy water or clean it by wiping it down with isopropyl •
alcohol if the roller is no longer tacky. Replace the silicone roller if the tackiness does not
return.
Do Not
Touch the inside of the glass with bare hands or dirty gloves. Fingerprints will be very •
dicult to remove.
Clean the inside surface of the glass or the LCD with iKlear or other cleaning solutions.•
Place the glass panel onto a work surface where it may collect dust and other contaminants •
unless it has rst been placed into its protective microfoam bag.
Use single wipe iKlear packets or other cleaning solutions to clean the glass.•
iMac (24-inch Early 2008) Take Apart — Glass Panel 28
Page 29

Metal Alignment Pins on the Glass Panel
There are alignment pins at the top of the glass panel near the camera, one pin at the bottom
near the IR remote sensor, and a pin on the left and right side of the glass. Important: If the glass
is removed from the bezel at an angle, the metal alignment pins may bend, causing scratches on
the inside of the glass and possibly requiring replacement of the glass panel.
Magnets on the Front Bezel
The glass panel has a thin silver ferrous metal band axed to the perimeter which is magnetically
attracted to the fourteen magnets (circled below) which are attached to the front bezel. These
magnets hold the glass panel in place. Suction cups are used to pull the glass panel away from
the magnets on the front bezel. .
iMac (24-inch Early 2008) Take Apart — Glass Panel 29
Page 30

Removing the Glass Panel
Apple 1. strongly recommends wearing clean lint-free gloves whenever handling the glass
panel. The gloves protect the glass panel from body oils, dirt, and other contaminants. Put on
a pair of clean gloves with the rubberized-side of the gloves on the palm side of your hand.
Position the computer on the rear cover, on a soft protective lint-free surface, with the stand 2.
facing you
3.
Clean o the suction cups, making sure they are free of contaminants. It may be necessary to
wash the suction cups with a mild liquid soap in order to remove the residual release agents
applied during manufacturing.
iMac (24-inch Early 2008) Take Apart — Glass Panel 30
Page 31

4. Important:
Gently press the suction cups in opposite corners on the glass panel, as shown.
Make sure the suction cups are rmly attached to the glass before lifting the glass.
Hold onto the suction cups and gently lift the glass panel 5. straight up and o the bezel.
iMac (24-inch Early 2008) Take Apart — Glass Panel 31
Page 32

6.
Set the glass down on the microfoam bag or clean lint-free surface and remove the suction
cups. Squeeze the base of each suction cup to release them from the glass panel.
7.
Touching only the edges of the glass, slide the glass panel into the microfoam static-free
bag. Set the glass aside in a location where it won’t get damaged. The bag will help minimize
contamination of the glass.
iMac (24-inch Early 2008) Take Apart — Glass Panel 32
Page 33

Replacing the Glass Panel
Put on a pair of clean gloves with the rubberized-side of the gloves on the palm side of your 1.
hand.
Install the LCD display panel onto the computer if it was removed.2.
Replace the font bezel if it was removed, connect the microphone cable and replace the 3.
bezel screws.
4.
Locate the sticky silicone roller and the dust removal pad. Remove the protective covering
on the silicone roller and peel the protective cover o the dust removal pad.
iMac (24-inch Early 2008) Take Apart — Glass Panel 33
Page 34

5.
Holding the sticky paper with your free hand, clean the silicone roller on the sticky paper
by rolling the roller back and forth once or twice on the sticky paper. If the sticky paper has
been used multiple times and looks dirty, use a new piece of sticky paper. Note: Wash the
silicone roller in warm soapy water if the roller is no longer tacky. Replace the silicone roller if
the tackiness does not return.
Set the roller aside on its clean protective roller cover while you prepare the glass and 6.
computer.
iMac (24-inch Early 2008) Take Apart — Glass Panel 34
Page 35

7.
REMINDER: WEAR CLEAN GLOVES AND ONLY HANDLE THE GLASS BY THE EDGES.
Stand the computer upright. 8. Note: Less dust particles will settle on the LCD panel with the
computer in the vertical position.
9. Note: A larger
Roll the sticky silicone roller over the LCD panel to remove any particles.
silicone roller was used for demonstration purposes, however; the 6-inch silicone roller from
Apple service will suce.
Remove the glass panel from the microfoam bag. Place the glass on the bag with the inside 10.
surface of the glass (side with metal pins) facing up.
iMac (24-inch Early 2008) Take Apart — Glass Panel 35
Page 36

Clean the 11. INSIDE of the glass panel with the clean silicone roller to remove dust or other
loose particles. Gently roll the clean silicone roller over the inside of the glass. Note: If
ngerprints and oils are on the inside of the glass, clean the inside rst with isopropyl
alcohol or use the LENSPEN LapTop PRO.
Holding the glass by the edges, carefully line up the metal pins on the inside of the glass 12.
panel with the holes at the top of the front bezel and the hole at the bottom of the bezel.
Gently lower the glass panel onto the bezel. The magnets on the front bezel will pull panel
and hold the glass panel in place.
iMac (24-inch Early 2008) Take Apart — Glass Panel 36
Page 37

13 . Clean the outside of the glass panel with a clean microber cleaning cloth. If necessary,
spray a small amount (two pumps) of iKlear polish on the outside of the glass panel. Wipe
the glass until the solution completely disappears and there is no longer any residue or
haze. CAUTION: Do not use single wipe iKlear packets or other cleaning solutions to clean
the glass. The LENSPEN LapTop PRO is also a very eective tool to use for smudges or
ngerprints on the outside of the glass panel.
14.
Once the glass has been cleaned and polished, visually inspect the glass for any remaining
dust, ngerprints, or a hazy residue. If there are contaminates trapped between the LCD
panel and the glass panel repeat the cleaning procedure described in this section before
returning the system to the customer.
15 .
Replace the memory access door.
iMac (24-inch Early 2008) Take Apart — Glass Panel 37
Page 38

Installing a Replacement Glass Panel
Stand the computer upright. 1. Note: Fewer dust particles will settle on the LCD panel with the
computer in the vertical position.
2.
Roll the sticky silicone roller over the LCD panel to remove any particles.
Remove the new glass panel from the service packaging. 3. Note: The new panels have a
removable lm protecting the glass on both sides.
4.
Place the glass on a clean microfoam bag with the inside of the glass facing up (the side
with metal pins.) Wearing gloves, carefully remove the protective lm from the inside surface
of the glass.
iMac (24-inch Early 2008) Take Apart — Glass Panel 38
Page 39

Clean the INSIDE surface of the glass panel with the silicone roller. Gently roll the clean 5.
silicone roller over the inside surface of the glass. Note: If ngerprints and oils are on
the inside of the glass, clean the inside rst with isopropyl alcohol or use the LENSPEN
LapTop PRO.
Holding the glass by the edges, carefully line up the metal pins on the inside of the glass 6.
panel with the holes at the top of the front bezel and the hole at the bottom of the bezel.
Gently lower the glass panel onto the bezel. The magnets on the front bezel will pull and
hold the glass panel in place.
iMac (24-inch Early 2008) Take Apart — Glass Panel 39
Page 40

Peel the protective lm from the outside surface of the glass panel. If the glass panel pulls 7.
away from the front bezel, gently hold it in place while removing the protective lm.
8.
Clean the outside of the glass panel with a clean microber cleaning cloth and use the
LENSPEN LapTop PRO to remover smudges or ngerprints on the outside of the glass panel.
9.
If necessary, spray a small amount (two pumps) of iKlear polish on the outside of the glass
panel. Wipe the glass until the solution completely disappears and there is no longer any
residue or haze.
10.
Once the glass has been cleaned and polished, visually inspect the glass for any remaining
dust, ngerprints, or a hazy residue. If there are contaminates trapped between the LCD
panel and the glass panel repeat the cleaning procedure described in this section before
returning the system to the customer.
11.
Replace the memory access door.
iMac (24-inch Early 2008) Take Apart — Glass Panel 40
Page 41

Cleaning Tool Kit
The following tools are oered in the cleaning kit (076-1277).
Suction cups, Qty. of one (pair)•
Sticky silicone roller (6-inch) to clean the glass panel, Qty. of one •
Sticky sheets to clean the silicone roller, Qty. of 2 pads•
Polishing cloths, clean, anti-static, micro ber “terry” style cloth, Qty. of one (5 cloths)•
Gloves, lint-free, anti-static, Qty. of two (pair) •
Microfoam bag to store the glass panel, Qty. of one (5 bags) •
ESD bag for LCD display storage, Qty. of one (5 bags)•
Cleaning Tool Resources
MCM Portal (http://www.mcmb2b.com/appleasp)1.
LENSPEN: www.lenspen.com, the LapTop Pro or the VidiMax are very eective in removing 2.
ngerprint smudges on the LCD and on the inside surface of the glass.
3.
iKlear distributors: (http://www/iklearscreen.com/iKlear.aspx)
iKlear International dealer listing• : http://meridrew.com/international.html
iKlear US/Canada dealer listing:• http://meridrew.com/search/search.php
4.
Japan: Pleiades Digital Communications, Inc.www.pleiadesdesigns.co.jp
Brillianize is an alternative cleaning solution http://www.brillianize.com/5.
Cleaning Cloth6.
Brillianize products are listed here: http://www.brillianize.com/products2.html•
Brillianize dealer locator: http://www.brillianize.com/brillianize_dealer_locator.htm•
The micro ber “terry” style cleaning cloth can be purchased directly from iKlear or •
Brillianze
iMac (24-inch Early 2008) Take Apart — Glass Panel 41
Page 42

LENSPEN Screen Cleaning Device
LENSPEN products are simple to use and are eective at removing smudges and ngerprints on
the inside/outside of the glass panel. The two LENSPEN products that have been tested on the
iMac are shown below, the VidiMax and the LapTop-Pro. Refer to www.lenspen.com for more
information.
iMac (24-inch Early 2008) Take Apart — Glass Panel 42
Page 43

Ionizing Air Gun
The ionizing air gun is an optional tool you may want to consider when cleaning iMac glass
panels. The ionizing gun performs electrostatic elimination and dust removal instantly with ion
balanced air. Various sources can be found in Google.
iMac (24-inch Early 2008) Take Apart — Glass Panel 43
Page 44

Front Bezel
Tools
This procedure requires the following tools:
Torx T8 screwdriver•
Soft, clean towel or cloth•
Preliminary Steps
Before you begin, remove the:
• Access door
Glass panel •
Part Location
iMac (24-inch Early 2008) Take Apart — Front Bezel 44
Page 45

922-8177, 30 mm (2)
922-8178 15 mm (6)
Removing the Front Bezel
1. Place the computer on a soft protective lint-free surface such as a very clean ESD mat to
avoid damaging the nish on the stand or rear housing.
2. Position the computer on the rear cover with the stand facing you.
3. Replacement Note: Refer to the photo when
Remove the twelve screws around the bezel.
replacing the screws.
922-8176 19 mm (4)
iMac (24-inch Early 2008) Take Apart — Front Bezel 45
Page 46

4.
With the upper corners loosened, lift up—but do not remove—the bezel.
Notice the connected microphone cable at the top of the bezel. Without straining the cable, 5.
hold the bezel up, and disconnect the microphone cable from the cable extension.
iMac (24-inch Early 2008) Take Apart — Front Bezel 46
Page 47

6.
Continue lifting the front bezel toward you and o the rear housing.
iMac (24-inch Early 2008) Take Apart — Front Bezel 47
Page 48

Replacing the Front Bezel
Place the computer on a soft protective lint-free surface such as a very clean ESD mat to 1.
avoid damaging the nish on the stand or rear housing.
2.
Position the computer on the rear cover with the stand facing you.
Position the bottom of the front bezel over the bottom edge of the rear cover. 3.
Lower the front bezel, connect the microphone cable to the extension cable and tuck the 4.
cable into the computer housing. Carefully lower the bezel onto the computer, and make
sure the cable cannot be pinched.
iMac (24-inch Early 2008) Take Apart — Front Bezel 48
Page 49

922-8177, 30 mm (2)
922-8178 15 mm
5. Replace the twelve screws around the bezel. The two longer screws (30mm) attach to the
bezel along the bottom of the panel, on the right and left side of the Apple logo. The four
medium length screws (19mm) attach above and below the optical drive on the right side,
and on either side of the 30mm screws. The six shorter screws (15mm) attach around the top,
and left side.
922-8176 19 mm
Clean and replace the glass panel6. . Note: This step is very important. Follow the procedures
to ensure the glass is clean and free of particles.
7. r.
Replace the access doo
iMac (24-inch Early 2008) Take Apart — Front Bezel 49
Page 50

Camera Board
Tools
This procedure requires the following tools:
Torx T8 screwdriver•
Soft, clean towel or cloth•
Preliminary Steps
Before you begin, remove the:
Access door•
Glass pane• l
•
Front bezel
Part Location
iMac (24-inch Early 2008) Take Apart — Camera Board 50
Page 51

Removing the Camera Board
1. The camera board bracket and cable are visible after you remove the front bezel o the
computer.
2.
Remove two T8 screws on the camera bracket.
922-8171
Lift the camera bracket out of the rear housing enough to access the Kapton tape securing 3.
the camera cable.
4.
Unwrap the Kapton tape covering the camera cable and connector. Disconnect the camera
cable from the camera board. Set the camera board and attached bracket aside.
iMac (24-inch Early 2008) Take Apart — Camera Board 51
Page 52

922-8171
Replacing the Camera Board
Connect the camera cable to the camera board. Reapply the kapton tape over the cable and 1.
connector.
2.
Lower the camera bracket onto the black posts on the rear cover.
3. Replace the two T8 screws.
Replace the front bezel4. .
5. . Note: This step is very important. Follow the procedures
Clean and replace the glass panel
to ensure the glass is clean and free of particles.
6. r.
Replace the access doo
iMac (24-inch Early 2008) Take Apart — Camera Board 52
Page 53

Battery
Tools
The only tool required for this procedure is a black stick (or other nonconductive plastic or nylon
tool).
Preliminary Steps
Before you begin, remove the:
Access door•
Glass pane• l
Front bezel•
Part Location
iMac (24-inch Early 2008) Take Apart — Battery 53
Page 54

Removing the Battery
Use a black stick to pry out the battery from the battery socket on the logic board.
Replacing the Battery
Make sure the battery socket is open and free of dust.1.
Press the battery into the socket. Make sure the side with the engraved markings (+ side) is 2.
facing up .
iMac (24-inch Early 2008) Take Apart — Battery 54
Page 55

Replace the front bezel3. .
4. . Note: This step is very important. Follow the procedures
Clean and replace the glass panel
to ensure the glass is clean and free of particles.
5. r.
Replace the access doo
iMac (24-inch Early 2008) Take Apart — Battery 55
Page 56

IR (Infrared) Board
Tools
The only tool required for this procedure is a black stick (or other nonconductive plastic or nylon
tool).
Preliminary Steps
Before you begin, remove the:
Access door•
Glass pane• l
Front bezel•
Part Location
iMac (24-inch Early 2008) Take Apart — IR (Infrared) Board 56
Page 57

922-8256
Removing the IR Board
1. Remove the two T6 screws from IR board and disconnect the IR cable from either the IR
board (circled) or the logic board. Note: It doesn’t matter which board you disconnect the IR
cable from when removing the IR board.
Lift the IR board from the heatsink.2.
iMac (24-inch Early 2008) Take Apart — IR (Infrared) Board 57
Page 58

Replacing the IR Board
Connect the IR cable to the IR board.1.
Install the IR board and T6 screws.2.
If removed, connect the IR cable to the logic board. 3.
Tuck the IR cable under the black plastic cable guide.4.
Replace the front bezel5. .
6. . Note: This step is very important. Follow the procedures
Clean and replace the glass panel
to ensure the glass is clean and free of particles.
7. r.
Replace the access doo
iMac (24-inch Early 2008) Take Apart — IR (Infrared) Board 58
Page 59

AirPort Extreme Board
Tools
Torx T6 screwdriver•
Preliminary Steps
Before you begin, remove the:
Access door•
Glass pane• l
Front bezel•
Part Location
iMac (24-inch Early 2008) Take Apart — AirPort Extreme Board 59
Page 60

922-7010
Removing the AirPort Extreme Card
1. Using a T6 torx screwdriver, remove the one 5-mm long screw and disconnect the two
antenna cables from the AirPort Extreme card. Note: The antenna cables and connectors are
very delicate and should be carefully removed by pulling on the antenna cable connectors,
not on the cables.
1.
Holding the card by the edges, pull the AirPort Extreme card out of the slot.2.
iMac (24-inch Early 2008) Take Apart — AirPort Extreme Board 60
Page 61

Replacing the AirPort Extreme Card
Align the AirPort Extreme card with the slot on the logic board. Insert the board into the slot.1.
922-7010
2. Connect the antenna cables to the connectors on the AirPort Extreme card.
Note: The antenna cables might include an “L” or “R” tab near the connector end; however,
you can disregard that because the cable position can be swapped without any change in
performance. Replace the T6 screw.
iMac (24-inch Early 2008) Take Apart — AirPort Extreme Board 61
Page 62

Replace the front bezel3. .
4. . Note: This step is very important. Follow the procedures
Clean and replace the glass panel
to ensure the glass is clean and free of particles.
5. r.
Replace the access doo
iMac (24-inch Early 2008) Take Apart — AirPort Extreme Board 62
Page 63

Bluetooth Board
Tools
Torx T6 screwdriver•
Preliminary Steps
Before you begin, remove the:
Access door•
Glass pane• l
Front bezel•
Part Location
iMac (24-inch Early 2008) Take Apart — Bluetooth Board 63
Page 64

922-7010
Removing the Bluetooth Board
1. Disconnect the blue Bluetooth antenna from the top left corner of the board. Note: The
antenna cable and connector are very delicate and should be carefully removed by pulling
on the antenna cable connector, not on the cable.
2.
Disconnect the tiny, black cable Bluetooth cable that connects from the Bluetooth board to
the logic board.
3.
Using a T6 torx screwdriver, remove the T6 screw from the lower left corner of the Bluetooth
board. Lift the Bluetooth board o the logic board.
iMac (24-inch Early 2008) Take Apart — Bluetooth Board 64
Page 65

922-7010
Replacing the Bluetooth Board
Connect the tiny, black Bluetooth cable to the Bluetooth board and to the logic board.1.
Press the Bluetooth board onto the logic board connector. 2.
Connect the Bluetooth antenna to the Bluetooth board.3.
4. Replace the one T6 screw in the lower left corner of the Bluetooth board.
Replace the front bezel5. .
6. . Note: This step is very important. Follow the procedures
Clean and replace the glass panel
to ensure the glass is clean and free of particles.
7. r.
Replace the access doo
iMac (24-inch Early 2008) Take Apart — Bluetooth Board 65
Page 66

LCD Display Panel
Tools
Torx T6 screwdriver•
Torx T8 Screwdriver•
Preliminary Steps
Before you begin, remove the:
Access door•
Glass pane• l
Front bezel•
Important: To prevent the buildup of static charges which may attract dust particles to the
surface of the display, store the LCD panel in an anti-static bag whenever it has been removed
from the system.
Part Location
iMac (24-inch Early 2008) Take Apart — LCD Display Panel 66
Page 67

922-7010
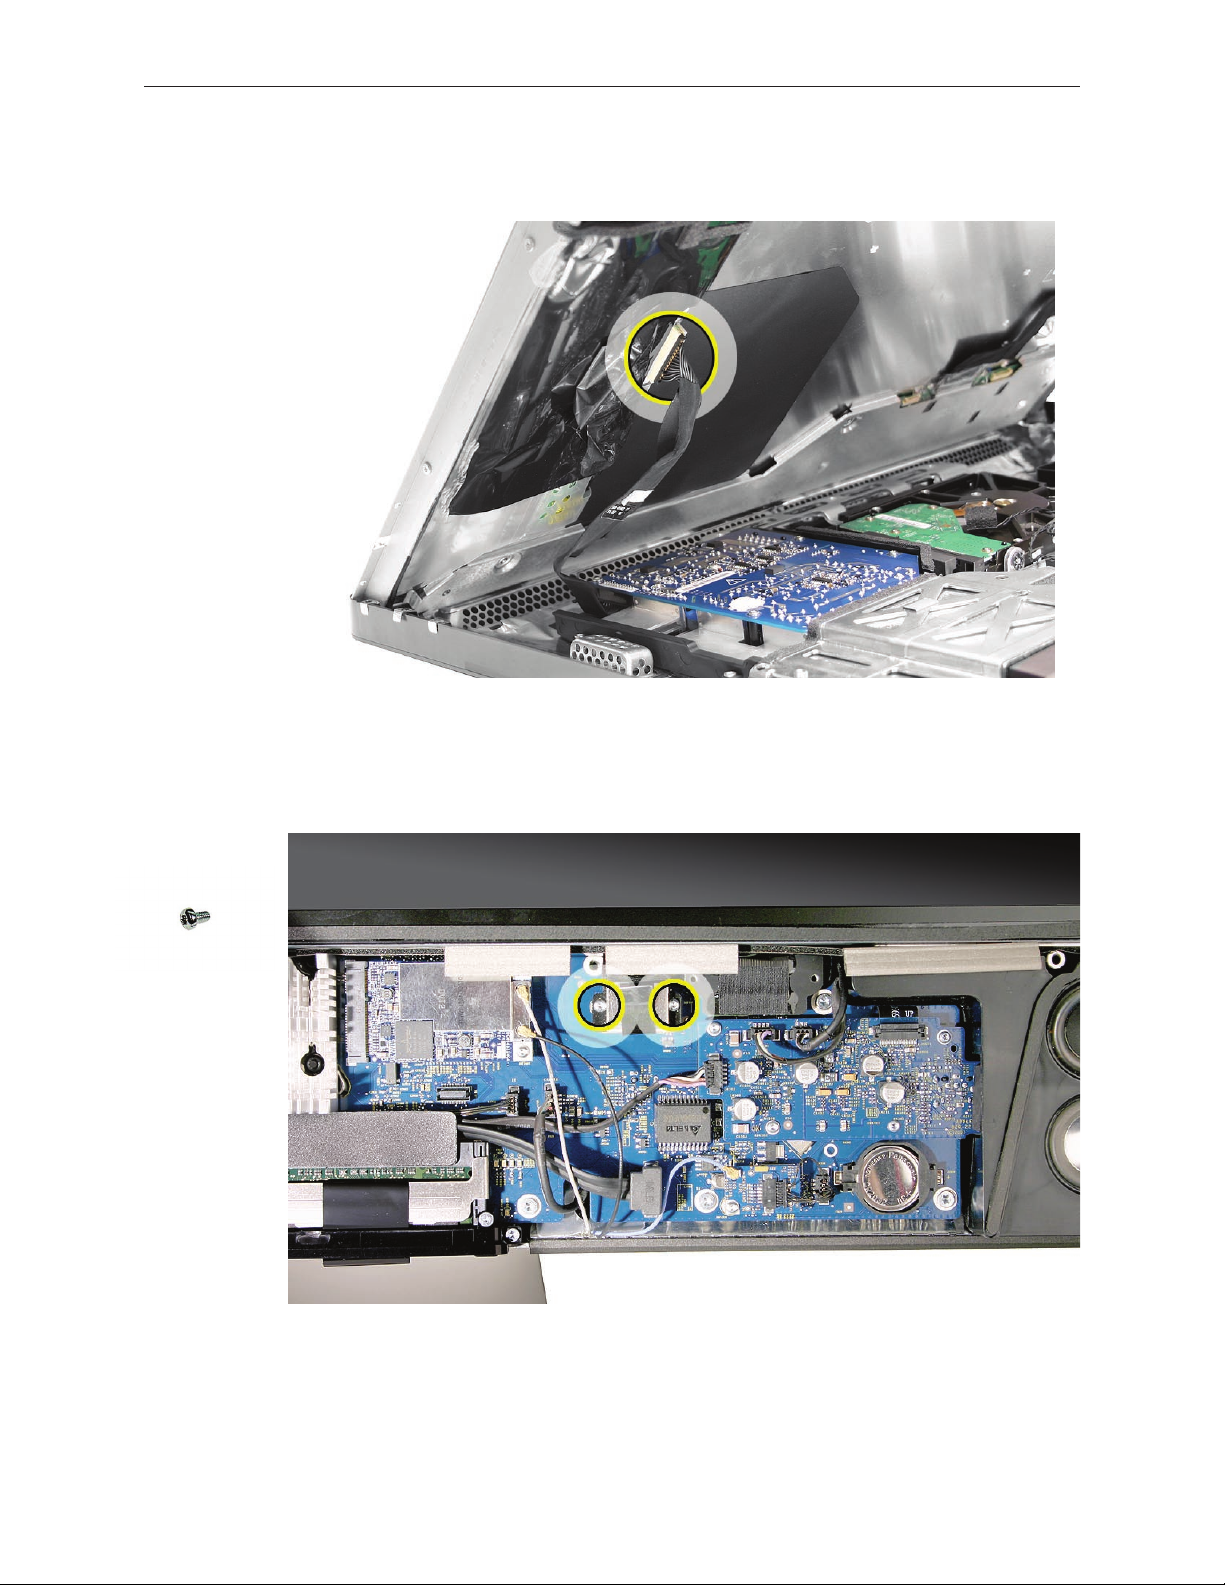
Removing the Display Panel
Place the computer with the display face up.1.
2. Remove the two T6 screws from the LVDS connector. Pull the black tab on the cable, or grasp
the connector by the edges to disconnect it from the logic board.
Disconnect the display sensor cable from the left side of the logic board3. .
iMac (24-inch Early 2008) Take Apart — LCD Display Panel 67
Page 68

922-8172
4. Remove the eight T8 screws from the sides of the panel frame.
Grasp the LCD panel at the bottom edge, and tilt up the panel. Peel back the black mylar 5.
tape covering the inverter cable connector on the back of the LCD panel. Pull the connector
straight out, toward the power supply. If you are replacing the cable, disconnect the other
end from the power supply. Lift the LCD panel o the rear housing.
Important: To prevent the buildup of static charges which may attract dust particles to
the surface of the display, store the LCD panel in an anti-static bag whenever it has been
removed from the system.
iMac (24-inch Early 2008) Take Apart — LCD Display Panel 68
Page 69

Replacement Note6. : If replacing the display panel, remove the mylar tape to disconnect the
LVDS cable. Transfer the LVDS cable and the inverter cable (previous step) to the replacement
panel. A replacement panel includes the display panel mounting brackets, the mylar tape,
the foam strips and gaskets, the display temp sensor, and the display temp sensor cable.
7. On the right side of the panel is the display temp sensor (under the foam gasket in the
top right corner) and the display temp sensor cable that connects to the lower left corner
of the logic board. These are included with the LCD panel, but they are also available
separately.
iMac (24-inch Early 2008) Take Apart — LCD Display Panel 69
Page 70

922-7010
Replacing the Display Panel
Connect the LVDS cable to the rear of the display panel.1.
Connect the inverter cable to the inverter board on the rear of the display panel. Replace the 2.
black mylar tape over the inverter cable connector.
3.
Make sure the other end of the inverter cable is connected to the power supply.
Make sure the display temp sensor and the temp sensor cable are connected at the top of 4.
the display panel and that the foam gasket is covering the sensor.
5.
Lower the LCD panel into the computer assembly.
6. Connect the LVDS cable to the logic board. Replace the two T6 screws.
iMac (24-inch Early 2008) Take Apart — LCD Display Panel 70
Page 71

7.
Connect the display temp sensor cable to the left side of the logic board.
922-8172
Install 8. the eight mounting screws.
iMac (24-inch Early 2008) Take Apart — LCD Display Panel 71
Page 72

Replace the front bezel9. .
10. . Note: This step is very important. Follow the procedures
Clean and replace the glass panel
to ensure the glass is clean and free of particles.
11. r.
Replace the access doo
iMac (24-inch Early 2008) Take Apart — LCD Display Panel 72
Page 73

LCD Temp Sensor Cable
Tools
Torx T6 screwdriver•
Torx T8 screwdriver•
Preliminary Steps
Before you begin, remove the:
Access door•
Glass pane• l
Front bezel•
LCD display panel•
Part Location
iMac (24-inch Early 2008) Take Apart — LCD Temp Sensor Cable 73
Page 74

Removing the Display Temp Sensor and Sensor Cable
Peel back any kapton tape securing the sensor cable to the panel.1.
Carefully peel back the black insulator on the right side of the panel to access the entire 2.
sensor cable.
On the top right corner of the panel, peel back the mylar tape and foam gasket covering the 3.
temp sensor. Disconnect the display temp sensor cable from the sensor. Note: Use a black
stick to pry the sensor from the top of panel.
iMac (24-inch Early 2008) Take Apart — LCD Temp Sensor Cable 74
Page 75

Replacing the Temp Sensor Cable
Connect the LCD temp sensor cable to the sensor at the top of the panel. Place the foam 1.
gasket on top of the sensor.
Route the cable along the right side on the back of the panel. Press the black sticky insulator 2.
over the top of the cable. Replace any clear tape holding the cable in place on the panel.
iMac (24-inch Early 2008) Take Apart — LCD Temp Sensor Cable 75
Page 76
3.
Connect the inverter cable to the inverter board on the rear of the display panel. Replace the
black mylar tape over the inverter cable connector.
Make sure the other end of the inverter cable is connected to the power supply.4.
922-7010
Lower the LCD panel into the computer assembly.5.
6. Connect the LVDS cable to the logic board. Replace the two T6 screws.
iMac (24-inch Early 2008) Take Apart — LCD Temp Sensor Cable 76
Page 77

7.
Connect the display temp sensor cable to the left side of the logic board.
922-8172
8. Install the eight mounting screws.
iMac (24-inch Early 2008) Take Apart — LCD Temp Sensor Cable 77
Page 78

Replace the front bezel9. .
10. . Note: This step is very important. Follow the procedures
Clean and replace the glass panel
to ensure the glass is clean and free of particles.
11. r.
Replace the access doo
iMac (24-inch Early 2008) Take Apart — LCD Temp Sensor Cable 78
Page 79

Left Speaker
Tools
Torx T10 screwdriver•
Preliminary Steps
Before you begin, remove the:
Access door•
Glass pane• l
Front bezel•
LCD display panel•
Part Location
iMac (24-inch Early 2008) Take Apart — Left Speaker 79
Page 80

922-8249
Removing the Left Speaker
1. Using a T10 torx screwdriver, remove the long screw from the left speaker.
Disconnect the speaker from the audio board. The speaker cable runs under the black plastic 2.
cable guide (above the memory slot) and connects to the audio board on the right side of
the logic board. Lift the speaker out of the rear housing.
iMac (24-inch Early 2008) Take Apart — Left Speaker 80
Page 81

Replacing the Left Speaker
1. Install the speaker in the rear housing. Secure the left speaker with the longer mounting
screw.
Route the speaker cable under the cable clip on the CPU fan and under the long cable guide 2.
above the memory slots. Connect the speaker cable to the audio board.
iMac (24-inch Early 2008) Take Apart — Left Speaker 81
Page 82

Replace the display panel3. .
4. .
Replace the front bezel
5. . Note: This step is very important. Follow the procedures
Clean and replace the glass panel
to ensure the glass is clean and free of particles.
6. r.
Replace the access doo
iMac (24-inch Early 2008) Take Apart — Left Speaker 82
Page 83

Ambient Temp Sensor
Tools
Black stick (or other nonconductive nylon or plastic at-blade tool)•
Preliminary Steps
Before you begin, remove the:
Access door•
Glass pane• l
Front bezel•
LCD display panel•
S• peaker, left
Part Location
iMac (24-inch Early 2008) Take Apart — Ambient Temp Sensor 83
Page 84

Removing the Ambient Temperature Sensor
1. Disconnect the ambient temp sensor cable and the fan cable from the logic board. Lift the
fan out of the system.
Disconnect the cable from the temp sensor board on the speaker.2.
With a black stick, pry the sensor from the fan.3.
iMac (24-inch Early 2008) Take Apart — Ambient Temp Sensor 84
Page 85

Replacing the Ambient Temperature Sensor
Replacement Note:1. If you are replacing the CPU fan transfer the sensor and the sensor cable
to the replacement fan.
Lower the fan into the rear housing. Press the foam gasket into place across the top of the 2.
fan.
iMac (24-inch Early 2008) Take Apart — Ambient Temp Sensor 85
Page 86

Connect the temp sensor cable and the fan cable to the logic board.3.
Replace the display panel4. .
5. .
Replace the front bezel
6. . Note: This step is very important. Follow the procedures
Clean and replace the glass panel
to ensure the glass is clean and free of particles.
7. r.
Replace the access doo
iMac (24-inch Early 2008) Take Apart — Ambient Temp Sensor 86
Page 87

Ambient Temp Sensor Cable
Tools
No tools are required for this procedure.
Preliminary Steps
Before you begin, remove the:
Access door•
Glass pane• l
Front bezel•
LCD display panel•
S• peaker, left
Part Location
iMac (24-inch Early 2008) Take Apart — Ambient Temp Sensor Cable 87
Page 88

Removing the Ambient Temperature Sensor Cable
Disconnect the ambient temp sensor cable and the fan cable from the logic board. Lift the 1.
fan out of the system.
Disconnect the cable from the sensor board on the speaker.2.
iMac (24-inch Early 2008) Take Apart — Ambient Temp Sensor Cable 88
Page 89

Replacing the Ambient Temperature Sensor Cable
Connect the cable to the sensor board on the speaker.1.
Lower the fan into the rear housing. Press the foam gasket into place across the top of the 2.
fan.
iMac (24-inch Early 2008) Take Apart — Ambient Temp Sensor Cable 89
Page 90

Connect the sensor cable and the fan cable to the logic board.3.
Replace the display panel4. .
5. .
Replace the front bezel
6. . Note: This step is very important. Follow the procedures
Clean and replace the glass panel
to ensure the glass is clean and free of particles.
7. r.
Replace the access doo
iMac (24-inch Early 2008) Take Apart — Ambient Temp Sensor Cable 90
Page 91

LVDS Display Cable
Tools
Torx T6 screwdriver•
Soft, clean towel or cloth•
Preliminary Steps
Before you begin, remove the:
Access door•
Glass pane• l
Front bezel•
LCD display pane• l
Part Location
iMac (24-inch Early 2008) Take Apart — LVDS Display Cable 91
Page 92

Removing the LVDS Cable
With the display face down on a soft cloth, peel up the three pieces of black mylar tape from 1.
the LVDS cable on the back of the display panel.
Press in on the LVDS connector lock release clips (1) and gently pull (2) to disconnect the 2.
LVDS cable from the back of the panel.
Lift the LVDS cable from the display panel.3.
iMac (24-inch Early 2008) Take Apart — LVDS Display Cable 92
Page 93

Replacing the LVDS Cable
Connect the LVDS cable to the rear of the display panel.1.
Route the LVDS cable as shown. Replace the black mylar tape over the cable.2.
iMac (24-inch Early 2008) Take Apart — LVDS Display Cable 93
Page 94

3.
On the rear of the panel, connect the inverter cable to the inverter board. Cover the cable
and connector with the sticky, black mylar tape.
Lower the display into the rear housing.4.
922-7010
Connect the other end of the inverter cable to the power supply.5.
6. Connect the LVDS cable to the logic board. Replace the two T6 screws.
iMac (24-inch Early 2008) Take Apart — LVDS Display Cable 94
Page 95

7.
Connect the LCD temp sensor cable to the bottom left corner of the logic board. Tuck any
extra length of the cable in the area between the CPU fan and the edge of the logic board.
922-8172
8. Install the eight mounting screws.
iMac (24-inch Early 2008) Take Apart — LVDS Display Cable 95
Page 96

Replace the display panel9. .
10. .
Replace the front bezel
11. . Note: This step is very important. Follow the procedures
Clean and replace the glass panel
to ensure the glass is clean and free of particles.
12. r.
Replace the access doo
iMac (24-inch Early 2008) Take Apart — LVDS Display Cable 96
Page 97

Right Speaker
Tools
Torx T10 screwdriver•
Preliminary Steps
Before you begin, remove the:
Access door•
Glass pane• l
Front bezel•
LCD display panel•
Part Location
iMac (24-inch Early 2008) Take Apart — Right Speaker 97
Page 98

922-7066
Removing the Right Speaker
1. Remove the T10 screw from the right speaker. Replacement Note: The shorter of the two
speaker mounting screws is used to secure the right speaker; the longer screw secures the
left speaker.
2.
Disconnect the speaker cable from the audio board.
Pull it up and out of the computer assembly.3.
iMac (24-inch Early 2008) Take Apart — Right Speaker 98
Page 99

922-7066
Replacing the Right Speaker
Install the speaker in the computer assembly.1.
Connect the speaker cable to the audio board. 2.
3. Replace the T10 screw on the speaker.
Replace the display panel4. .
5. .
Replace the front bezel
6. . Note: This step is very important. Follow the procedures
Clean and replace the glass panel
to ensure the glass is clean and free of particles.
7. r.
Replace the access doo
iMac (24-inch Early 2008) Take Apart — Right Speaker 99
Page 100

Inverter Cable
Tools
No tools are required to remove the inverter cable•
Preliminary Steps
Before you begin, remove the:
Access door•
Glass pane• l
Front bezel•
LCD display panel•
Part Location
iMac (24-inch Early 2008) Take Apart — Inverter Cable 100
 Loading...