


 Loading...
s5000/ s6000
STEREO DIGITAL SAMPLER
Software Version V2.0 Addendum
WARNING
To prevent fire or shock hazard, do not expose this appliance to rain or moisture.
Operator’s Manual

O/S UPDATE |
s5000/ s6000 |
Table of contents |
|
INTRODUCTION ................................................................................................ |
1 |
NEW FEATURES/FUNCTIONS .............................................................................................. |
1 |
IMPROVEMENTS ................................................................................................................... |
1 |
NEW SCREEN LAYOUTS ................................................................................. |
2 |
MULTI PAGE LAYOUT ........................................................................................................... |
2 |
PART PLAYBACK ................................................................................................................... |
3 |
MUTE/SOLO PART ................................................................................................................ |
4 |
KEYGROUP ZONES PAGE LAYOUT .................................................................................... |
5 |
ZONE PLAYBACK .................................................................................................................. |
6 |
KEYSPAN PAGE LAYOUT ..................................................................................................... |
7 |
MIDI SONG FILE PLAYER ................................................................................ |
9 |
PLAYING A MIDI SONG FILE ............................................................................................... |
10 |
SET LIST .............................................................................................................................. |
13 |
USING THE SETLIST ........................................................................................................... |
17 |
PORTAMENTO ................................................................................................ |
19 |
NOTES ON USING PORTAMENTO ..................................................................................... |
21 |
MONO LEGATO ................................................................................................................... |
22 |
SOUND LIBRARY SUPPORT.......................................................................... |
23 |
EMU EIV SOUND LIBRARY COMPATIBILITY ..................................................................... |
23 |
ROLAND S-7xx SERIES SOUND LIBRARY COMPATIBILITY ............................................ |
24 |
USER SETTINGS ............................................................................................. |
25 |
SAVING USER SETTINGS TO FLASHROM/FLOPPY DISK ............................................... |
25 |
LOADING SETTINGS FILES FROM DISK ........................................................................... |
27 |
FORMATTING .................................................................................................. |
28 |
FLOPPY DISK FORMAT ...................................................................................................... |
28 |
FAT32 FORMATTING OF HARD DISKS .............................................................................. |
31 |
OTHER NEW FEATURES ................................................................................ |
33 |
‘OFF THRESHOLD’ PARAMETER IN RECORD MODE ...................................................... |
33 |
SWAP LEFT/RIGHT FUNCTION IN EDIT SAMPLE ............................................................. |
34 |
MUTE/SOLO ZONES IN EDIT PROGRAM .......................................................................... |
35 |
COPY/PASTE KEYGROUP IN EDIT PROGRAM ................................................................ |
36 |
KEYGROUP CROSSFADE FUNCTION IN EDIT PROGRAM ............................................. |
38 |
MUTE FUNCTION VIA PROGRAM/BANK CHANGE ........................................................... |
39 |
CPU MEMORY USAGE ........................................................................................................ |
40 |
HOW TO REGAIN SOME CPU SPACE ..................................................................... |
41 |
SUPPORT FOR THE IB-S56USB AND AK.SYS. ................................................................. |
42 |
OTHER IMPROVEMENTS ............................................................................... |
43 |
8/07/2000
2 |
Version 2.0 |
|
|

s5000/ s6000 |
O/S UPDATE |
INTRODUCTION
Version 2.0 of the S5/6000 Operating System offers many new features and functions as well as attending some operational inconveniences with the previous software versions.
NEW FEATURES/FUNCTIONS
•New MULTI page layout
•New playback indicator to show which parts/programs are playing in a multi
•New SOLO/MUTE indicator for parts
•New KEYGROUP ZONES page layout
•New playback indicator for keygroup zones
•New KEYSPAN layout
•MIDI song file player
•Setlist
•Portamento
•Mono Legato play mode
•Emu EIV SCSI disk support
•Roland CD-ROM support
•User settings may be saved to FlashROM and/or disk.
•Floppy disk format
•FAT32 disk format
•“OFF Threshold” parameter in RECORD
•Swap Left/Right function in SAMPLE/MASTER
•New SOLO/MUTE function for keygroup zones
•Copy/Paste Keygroup allows copying and pasting of keygroups between programs
•Keygroup Crossfade parameter added in EDIT PROGRAM
•Multi Mute via Program/Bank change
•CPU Memory Free (MPKS) displayed on MULTI/PROGRAM/UTILS PAGES
•Support for the new USB card (IB-S56USB) and ak.Sys. software
IMPROVEMENTS
•More SysEx (see separate SysEx documentation for more details)
•Faster screen redrawing
•Improved Voice Stealing
•Improved display of long sample names in keygroup zones and keyspan pages
•Improvements to saving multis
•It is now possible to see the record meters during recording.
TRADEMARKS
Macintosh is a registered trademark of Apple Computer Inc. All other trademarks, product and company names are the property of their respective owners.
Version 2.0 |
1 |

SCREEN LAYOUTS |
s5000/ s6000 |
NEW SCREEN LAYOUTS MULTI PAGE LAYOUT
Following overwhelming requests from users, the MULTI pages have been changed to show a “tabular’ style of layout. The new layout replaces that found in previous versions of software. The MULTI page now looks like this:
With this new layout, you can see the parameters for up to 10 parts simultaneously thus overcoming the complaints that it was only possible to see the parameters for one part at a time in previous versions and you can see the respective levels, pan settings, output assignments, etc., at a glance.
When the cursor is on the MULTI name (as above), you may select other multis in the usual way using the DATA wheel and/or the DATA +/- keys. The same MULTI TOOLS function found in previous version is still available on F9.
New Multis are created using F8 - CREATE MULTI. This puts up the usual prompt where you may name the new multi and also select how many parts (32, 64 or 128) are required.
NOTE: You will note the addition of the CPU memory indication in this and other. This shows the percentage free for loading ‘items’ - i.e. multis, programs, keygroups and samples.
The new page is navigated using the PART SELECT keys on F15/F16 to move up and down the multi and the CURSOR </> keys to move across the columns. Data is entered in the usual way using the DATA wheel and/or numeric keypad.
When the cursor is on the Multi name (as above), to select a part, press any function key F2-F6/ F10-14:
NOTE: When the cursor is on the Multi name field, you may also use F16 [PART SELECT] to move down to the parts. However, please note that when a part is selected, F15 will not select the Multi field - you should press F1 to select the Multi name field.
2 |
Version 2.0 |

s5000/ s6000 |
SCREEN LAYOUTS |
When a part is selected, the screen changes slightly. F9 becomes PART TOOLS and F8 becomes EDIT PART and you may edit a program within the context of the selected multi as before.
F7 allows you to switch between the PART MIXER page and the TUNE/FX SEND page:
Here, you may set fine tune and transpose, low and high note ranges for the part and also the FX channel and FX send level. You can return to the main PART MIXER page using F7 again.
PART PLAYBACK
When a multi is being played, a ‘crotchet’ icon is shown to indicate which parts are currently sounding:
Version 2.0 |
3 |

SCREEN LAYOUTS |
s5000/ s6000 |
MUTE/SOLO PART
When using MUTE in the new MULTI layout, the status is shown more graphically:
A ‘crossed’ speaker icon is shown next to the part number. The MUTE status is saved to disk with the multi.
When SOLO is ON, you see this:
All the other parts are muted (this is indicated by the ‘crossed’ speaker icon). Several parts may be solo’d.
4 |
Version 2.0 |

s5000/ s6000 |
SCREEN LAYOUTS |
KEYGROUP ZONES PAGE LAYOUT
The KEYGROUP ZONES page has also been changed to a more ‘tabular’ approach:
With this new layout, you can see the parameters for all four zones simultaneously thus overcoming the inconvenience that you could only see the parameters for one zone in previous versions. Also, because of the extended sample name field, it is now possible to see all 20 characters of the sample name.
F14 takes you to the VELO/TUNE page where you may set velocity and tuning parameters:
F15 takes you to the PLAYBACK page where you can set various parameters concerned with sample playback:
In all pages, the velocity range is shown below each keygroup zone.
The pages are navigated by selecting the zone you wish to edit using F2, F3, F4 or F5 (you may also use F10, F11, F12 or F13) and using the CURSOR </> keys to move across the parameter fields.
Version 2.0 |
5 |

SCREEN LAYOUTS |
s5000/ s6000 |
A new feature of the Keygroup Zones page is that you can access the SAMPLE LIST directly by ‘double clicking’ F2, F3, F4 and F5. For example, imagine you want to assign a sample to Zone 1, instead of selecting the zone and then scrolling through a long list of samples, press F2 twice - the first press will select the zone, the second press will take you directly to the sample list where you will see the samples in memory:
You may select a sample in the usual way by moving up and down the list using F15/F16 (plus you can audition them prior to assigning them using the ENT/PLAY key). Once you have found the sample you want, it can be assigned to the zone by pressing F12 [ASSIGN TO ZONE] - this will assign the sample to the selected zone and will also return you to the ZONES page. If the sample is not the correct one (or you change your mind), pressing F2 again will return you to the SAMPLE LIST page where you can repeat the above procedure.
NOTE: Once a zone is selected using F2 - F5, you do not need to ‘double click’ to get to the SAMPLE LIST page - simply pressing the selected zone’s function key again will take you there.
ZONE PLAYBACK
When a keygroup zone is active (i.e. actually playing/sounding), a ‘crotchet’ icon is shown next to the zone number:
The icon is shown for as long as the voice sounds. If the sound sustains, it will be shown for as long as the note is held and during its release phase. For one-shot samples (drums, etc.), the icon will be shown throughout the natural duration of the sound/sample.
6 |
Version 2.0 |

s5000/ s6000 |
SCREEN LAYOUTS |
KEYSPAN PAGE LAYOUT
To overcome some inconveniences when using the KEYSPAN page, it has been re-designed. It now looks like this:
Keygroups are selected using F15/16 and/or the DATA wheel and the parameters are selected using CURSOR </>. For example, with the cursor on the name field as shown above, pressing F16 (or any function key F2-F5) would place you on KG1:
Version 2.0 |
7 |

SCREEN LAYOUTS |
s5000/ s6000 |
To set the low note, simply press CURSOR > :
Similarly, you can select (and set) the high note and you may also assign samples to Zone 1 of the selected keygroup. Use the SELECT keys (F15/16) to select other keygroups or, alternatively, press any function key F2-F5 to move the cursor to the KG field and use the DATA wheel to scroll up and down long lists of keygroups.
Other changes include:
•A larger Zone 1 Sample field which enables the full 20 characters of a name to be displayed.
•When keygroup editing is set to EDIT ALL, this is shown boldly in the centre of the screen (as shown above).
NOTE: Even though editing may be set to EDIT ALL, this is ignored in the KEYSPAN page to avoid accidentally destroying a program.
8 |
Version 2.0 |
s5000/ s6000 |
MIDI SONG FILE PLAYER |
MIDI SONG FILE PLAYER
The MIDI SONG FILE PLAYER is accessed via the UTILITIES page on F13:
This shows something like this screen:
The parameters are: |
|
F1 - NAME |
This shows the name of the currently selected MIDI Song File. Other song |
|
files may be selected using the DATA wheel or the DATA +/-keys. |
FROM BAR |
Allows you to specify which bar the song will start from. |
TO BAR |
Allows you to select which bar the song will play to. |
TEMPO MODE |
Allows you to specify whether the song’s tempo will be derived from the one |
|
stored in the MIDI Song File or one that is set manually in the MANUAL |
|
TEMPO field below. |
MANUAL TEMPO |
When TEMPO MODE is set to MANUAL, this field allows you to set the |
|
tempo. The range is 50.0 BPM to 250.0 BPM. |
MIDI OUTPUT |
Allows you to select whether the sequence data of the MIDI Song File player |
|
is also sent via the MIDI outputs. This is useful if you want to drive external |
|
sound modules as well (or instead of) the S5/6000. The options are OFF, |
|
MIDI A or MIDI B. |
SETLIST |
Takes you to the SETLIST page (see later). |
MAIN |
Returns you to the UTILITIES page. |
Version 2.0 |
9 |

MIDI SONG FILE PLAYER |
s5000/ s6000 |
PLAYING A MIDI SONG FILE
Once you have some song files loaded, they are selected using F1 in conjunction with the DATA wheel and/or DATA +/- keys and are played using F10 [PLAY], F12 [PAUSE] and F14 [STOP]. The MIDI Song File Player will always play the currently selected multi.
The playback functions should be fairly self-explanatory....
•PLAY will cause the MIDI Song File to play. You may set which bar it will play from using the FROM BAR parameter on F2. You may also set the bar at which the song will automatically stop using the TO BAR parameter on F3.
•PAUSE will stop playback. Pressing PLAY again will resume playback from that point.
•STOP will also stop playback but pressing PLAY again will cause playback to resume from the start or from the bar specified in the FROM BAR field.
As the song is playing, the play icon highlights....
Likewise, whilst playback is ‘paused’, the pause icon highlights:
As the song is playing, so the bar/beat counter elapses:
The song’s tempo is shown beneath this display:
This updates as the song is playing should there be any tempo changes within the song. The song’s time signature is also shown beneath:
This also updates according to any pre-programmed changes in time signature in the song. The multi being played is shown towards the top of the screen in the centre:
The multi cannot be changed here and if the wrong multi is playing, you should visit the MULTI mode and select the correct multi there.
10 |
Version 2.0 |
s5000/ s6000 |
MIDI SONG FILE PLAYER |
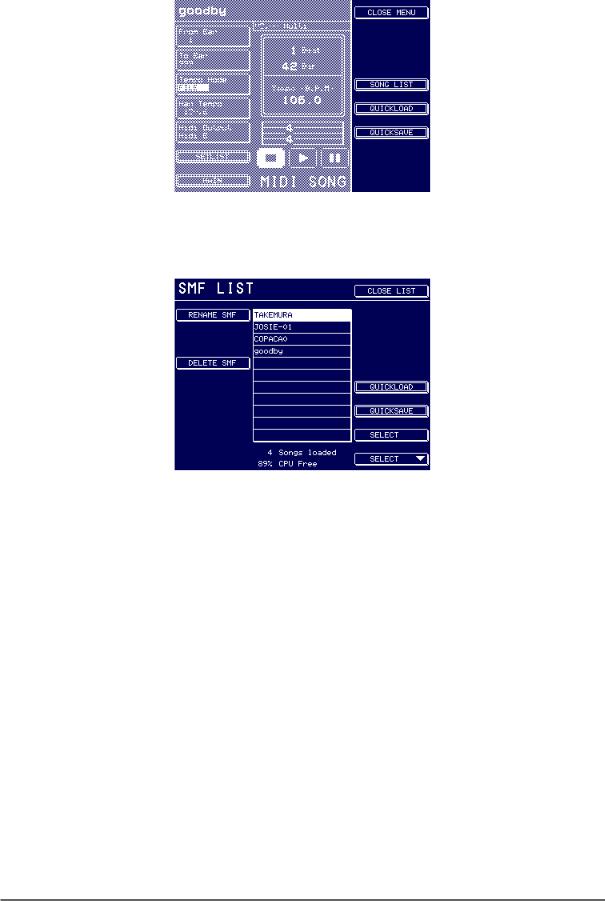
SONG TOOLS Pops up the SONG TOOLS menu: |
|
The menu items are: |
|
SONG LIST |
This takes you to the SONG LIST page: |
MIDI Song Files may be renamed and/or deleted. Song Files are selected using F15/F16.
Version 2.0 |
11 |

MIDI SONG FILE PLAYER |
s5000/ s6000 |
|
QUICKLOAD |
Available in both the SONG TOOLS menu and the SONG LIST page, this |
|
|
takes you to a ‘quickload’ disk page: |
|
Here you may load MIDI Song Files into memory. Being a ‘quickload’ function, other items that may be on the disk (such as multis, programs, samples, etc.) aren’t shown.
NOTE: SMFs are loaded into wave memory. As such, it is possible to have many songs loaded at any one time plus there is no real restriction on the length of an SMF (other than the 256MB limits of the sampler’s memory). More importantly, SMFs do not use up valuable CPU memory (see Page 40 for more information on CPU Memory).
QUICKSAVE |
Again, available in both the SONG TOOLS menu and the SONG LIST page, |
|
this takes you to a ‘quicksave’ page: |
You may choose to save the selected MIDI Song File or all of them. The file(s) will be saved to their original source disk (if you want to save
MIDI Song Files to another destination, you should use the normal SAVE function).
12 |
Version 2.0 |
s5000/ s6000 |
MIDI SONG FILE PLAYER |
SET LIST
The MIDI Song File Player is designed as a convenience for live work where you can have preprogrammed backing track sequences played from the S5/6000 without having to lug a separate sequencer around with you.
However, some means of associating multis with MIDI Song Files is required for convenient live operation otherwise it would be necessary to select a song file and then select the appropriate multi 1 .
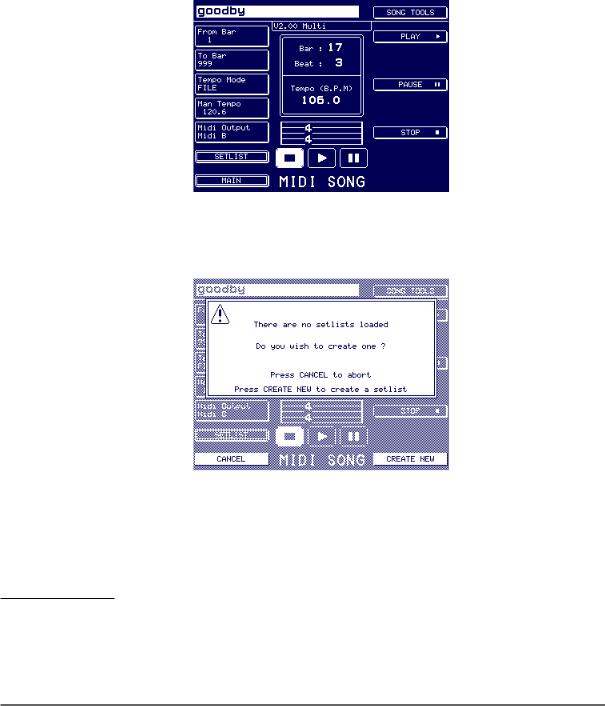
The SET LIST function has been created for that purpose - you may load MIDI SONG FILES and associate any multi loaded into memory with them. In this way, you may select a MIDI Song File and the correct Multi (and hence sounds) are automatically recalled. The SET LIST function is found in the MIDI SONG FILE page on F7:
Pressing SET LIST will take you to the SET LIST page. However, if a SET LIST hasn’t been loaded, you will receive this prompt:
1Of course, another way to associate the correct sounds with the song file is to use program change commands within the one multi as on many GM modules. As you select a different song, so program change commands select the appropriate sounds on each channel in each part.
However, this method is not without its drawbacks not least of which is the task of re-numbering programs so that they are recalled correctly by the each song file
Version 2.0 |
13 |
Loading...