

Page 1

USER GUIDE
ENGLISH ( 3 – 5 )
GUÍA DEL USUARIO
ESPAÑOL ( 6 – 8 )
GUIDE D'UTILISATION
FRANÇAIS ( 9 – 11 )
GUIDA PER L'USO
ITALIANO ( 12 – 14 )
BENUTZERHANDBUCH
DEUTSCH ( 15 – 17 )
AKAIPRO.COM
Page 2

3
Page 3
User Guide (English)
Introduction
MPC Fly merges unmatched Akai Professional technology with the power of your iPad,
embodying legendary capabilities that have made the MPC an industry standard like real MPC
pads, MPC Note Repeat and MPC Swing. Its multifunctional, double-hinged design gives you
the flexibility to produce tracks anywhere, while also acting as a protective case between
sessions and giving you total access to your iPad for normal uses.
Box Contents
• MPC Fly
• Power Adapter
• User Guide
• Safety & Warranty Manual
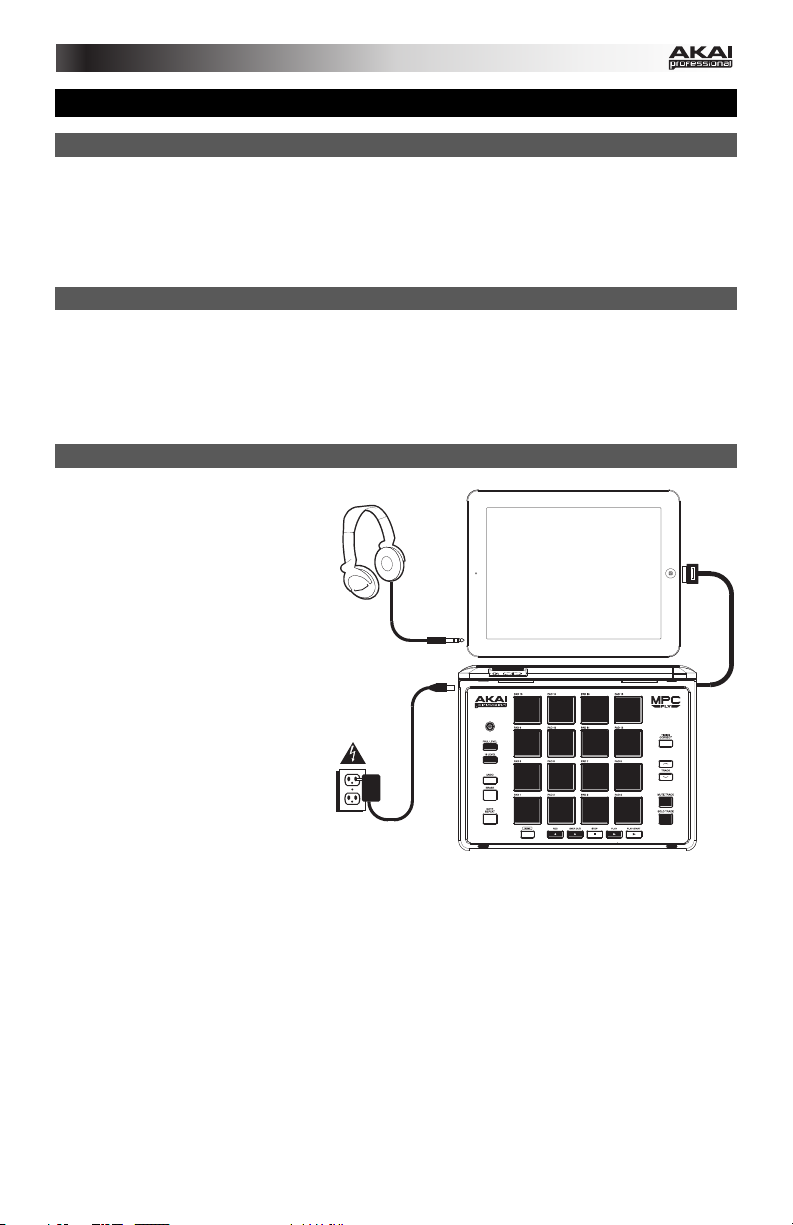
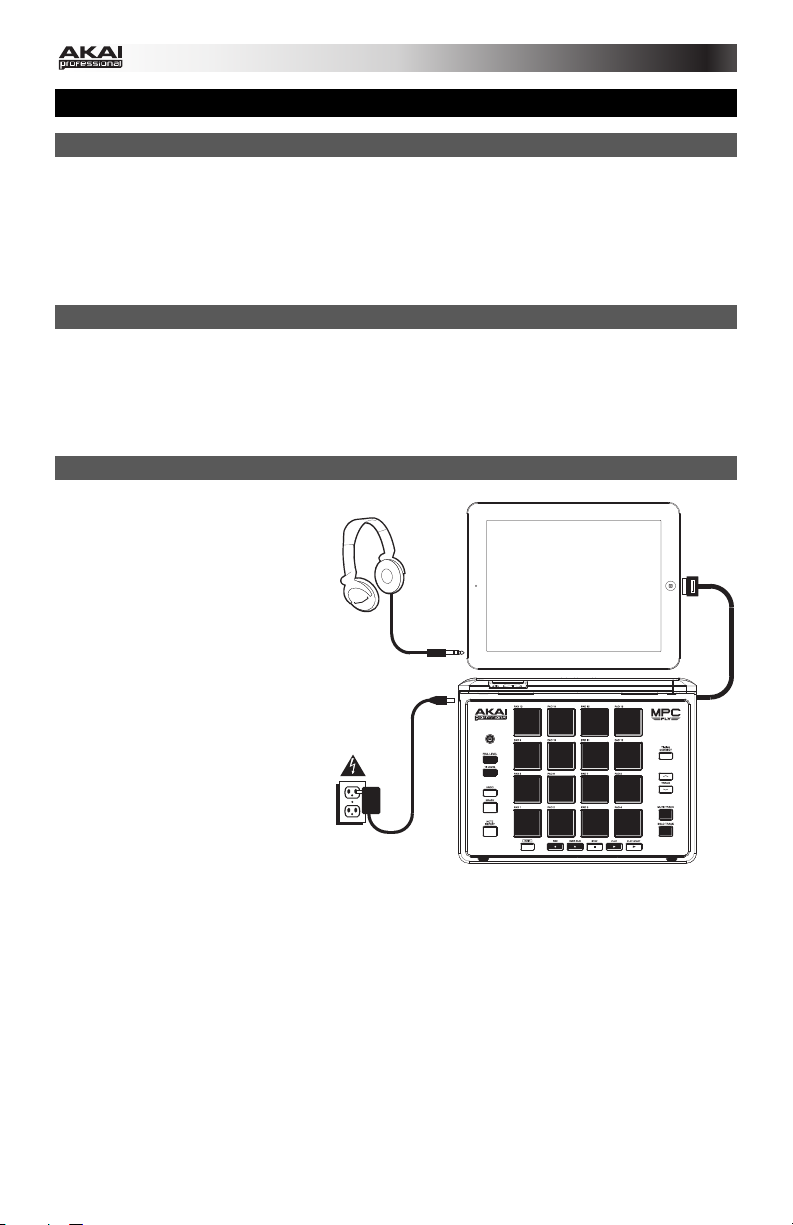
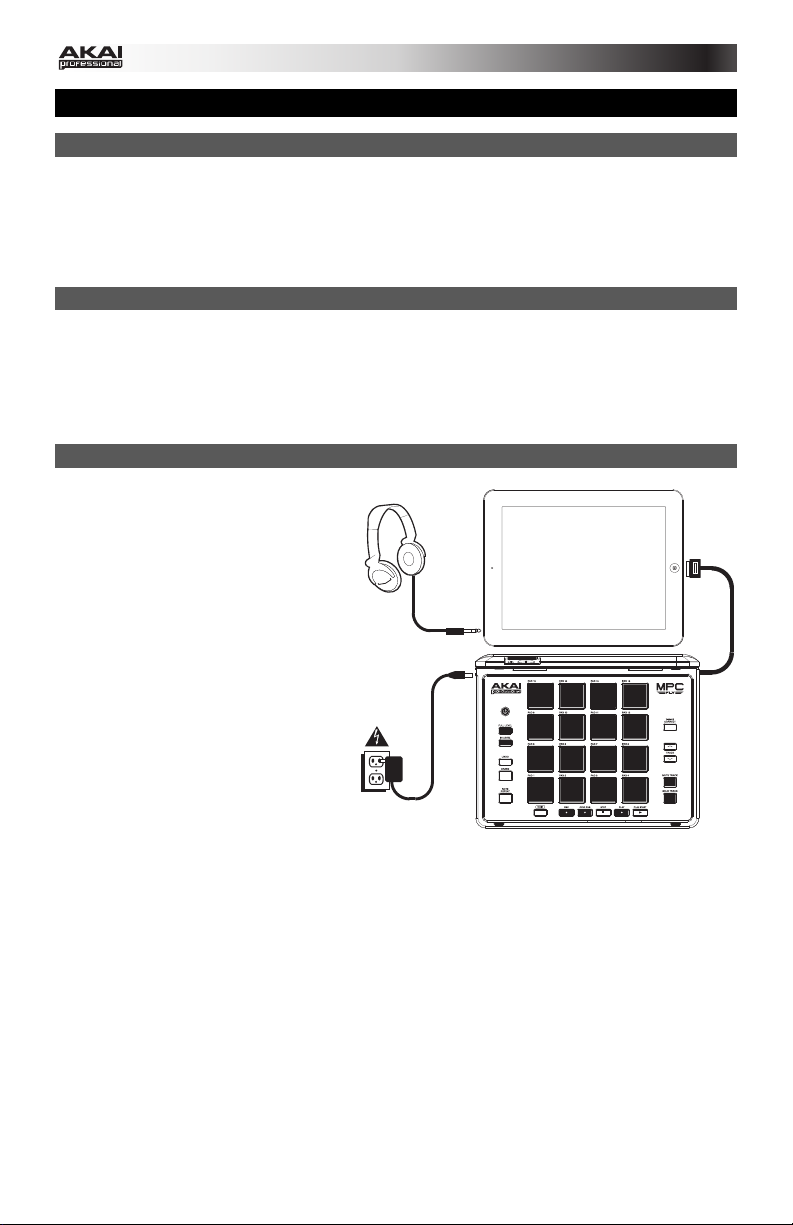
Quick Setup / Connection Diagram
Note: MPC Fly is compatible with
the following iOS devices (not
included):
• iPad (3rd generation)
• iPad 2
1. Purchase and install iMPC
from the App Store.
2. Place MPC Fly on a flat, stable
surface. Insert your iPad – with
its Home Button on the right –
into MPC Fly's case.
3. Optional: Connect MPC Fly to
a power source using the
included power adapter. This
connection will power and
charge the batteries of both
MPC Fly and your iPad.
4. Optional: Connect 1/8" stereo headphones to the headphone jack of your iPad.
5. Gently connect MPC Fly's attached dock connector cable to the dock connector port of
your iPad, and power on MPC Fly.
6. Open iMPC and start making beats! Remember to power off MPC Fly and lock your iPad
when not in use.
Note: If iMPC does not respond to MPC Fly, double-click the Home Button of your iPad,
touch and hold your finger over the app icon until it shakes, tap the minus symbol, and
click the Home Button again. Make sure your iPad is properly connected to the dock
connector. Then, reopen iMPC.
Headphones and iPad not included.
iPad and App Store are trademarks of Apple Inc., registered in the US and other countries.
Page 4
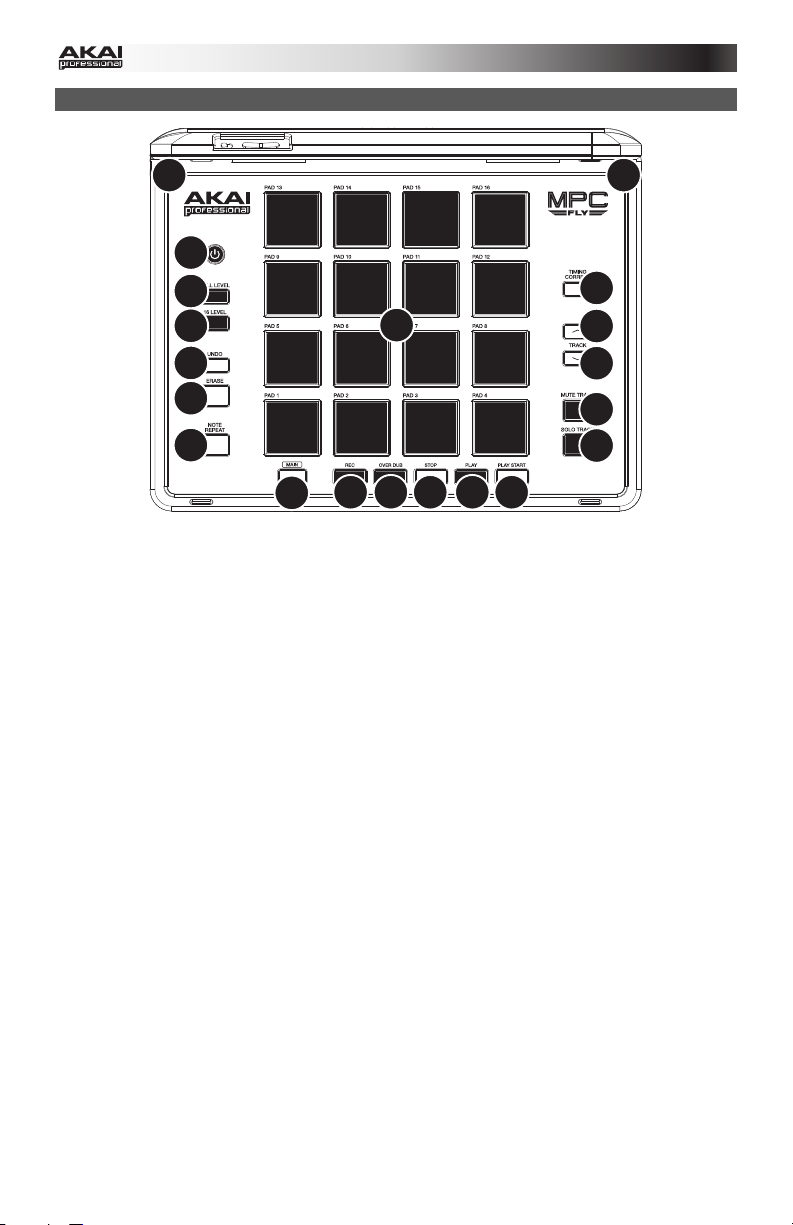
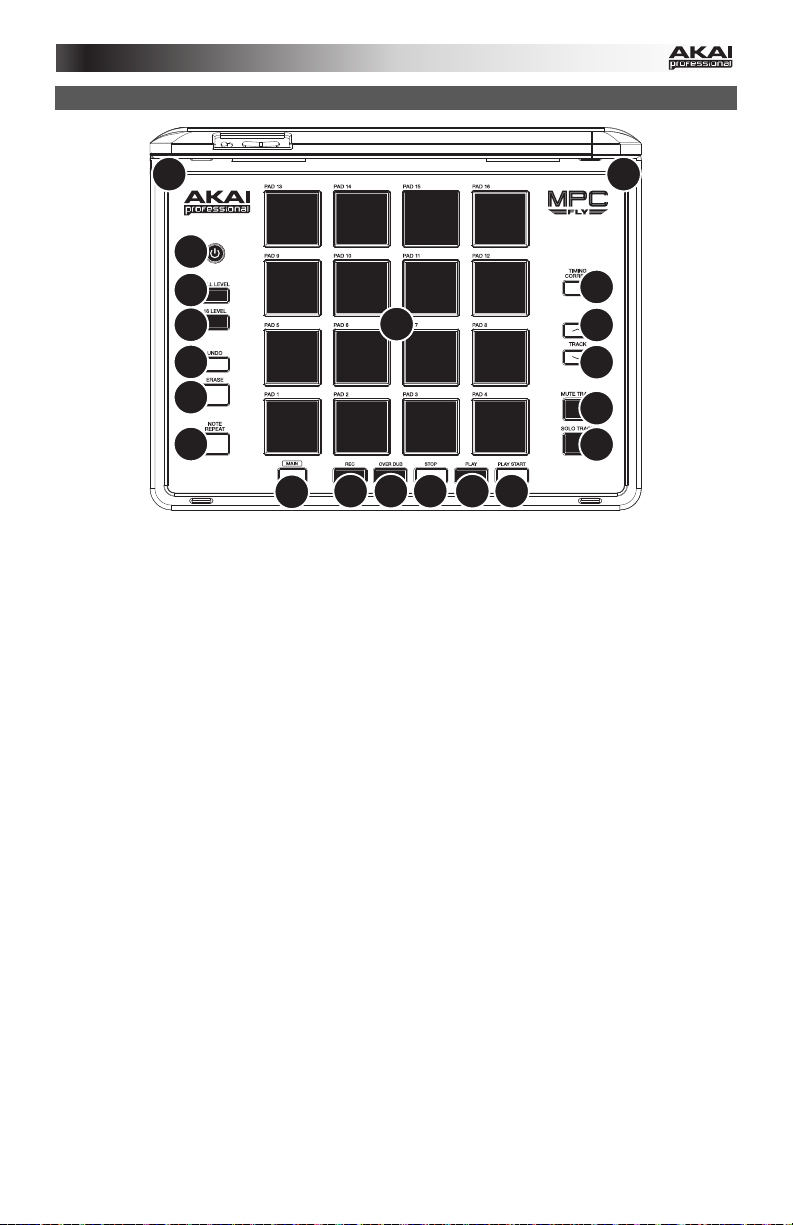
Top Panel
21
3
13
14
12
10
11
15
89
4567
1. DOCK CONNECTOR CABLE – Gently connect this attached cable to the dock
connector port of your iPad.
2. POWER INPUT – Use the included power adapter to connect the unit to a
power outlet. This connection will power and charge the batteries of both MPC
Fly and your iPad.
3. POWER BUTTON – Turns MPC Fly's power on/off. You can also use it to
determine how much power MPC Fly's battery has:
The button will light up different colors to indicate approximately how much
power is remaining:
• Green means it has 30-100% remaining.
• Amber means it has approximately 10-30% remaining.
• Red means it has 10% or less remaining.
You can press and hold the button for 2 seconds to view a more precise
indication, represented by the leftmost column of 4 pads. Each pad represents a
"battery cell."
• A green pad means that "cell" is fully charged.
• An amber pad means that "cell" is partially charged.
• An unlit pad means that "cell" has no charge.
With a full battery, all 4 pads will be green. With a nearly empty battery, the top
3 pads will be unlit, and the bottom pad will be red.
Release the button to return to normal operation.
The button will flash when:
• MPC Fly starts charging
• MPC Fly is about to enter Sleep Mode (if it has not been used in 15
minutes)
After MPC Fly has not been used for 30 minutes, it will automatically turn off.
16
17
17
18
19
4
Page 5

4. MAIN – Press this button to view the Main screen in the display and software.
5. PLAY – Press this button to play the Sequence from the audio pointer's current
position.
6. PLAY START – Press this button to play the Sequence from its start point.
7. STOP – Press this button to stop playback.
8. REC – To start recording a Sequence, press this button and simultaneously
press PLAY or PLAY START. Recording in this way (rather than using
OVERDUB) erases the events of the current Sequence. After the Sequence
plays through once while recording, Overdub will be enabled.
9. OVERDUB – Press this button and simultaneously press PLAY or PLAY START
to enable Overdub. This allows you to record note events in a Sequence without
overwriting any previously recorded note events. You can enable Overdub either
before or during recording.
10. UNDO – Press this button to undo your last action.
11. ERASE – As a Sequence is playing, hold this button down and press a pad to
delete the note event for that pad at the current playback position. This is a
quick way to delete note events from your Sequence without having to stop
playback.
12. PADS – Use these pads to trigger drum hits or other samples in your software.
The pads are velocity-sensitive and pressure-sensitive, which makes them very
responsive and intuitive to play. The pads will light up different colors,
depending on how hard you play them (ranging from yellow at a low velocity to
red at the highest velocity).
13. FULL LEVEL – Press this button to activate/deactivate Full Level. When
activated, the pads always play back at a maximum velocity (127), no matter
how hard or soft you hit them.
14. 16 LEVEL – Press this button to activate/deactivate 16 Level. When activated,
the last pad that was hit will be temporarily copied to all 16 pads. The pads will
now output the same note number as the initial pad, but a selectable parameter
will be fixed at the values shown in the diagram on the right, regardless of how
hard you hit them. The available parameters are velocity, tuning, filter, layer,
attack or decay.
15. NOTE REPEAT – Hold this button down and press a pad to retrigger that pad's
sample at a rate based on the current Tempo and Time Correct settings. Vary
the pressure on the pad to increase or decrease the velocity of the notes being
played.
16. TIMING CORRECT – Press this button to switch through the available Timing
Correct (quantization) settings.
17. TRACK UP / DOWN – Use these buttons to move to move to the next or
previous track.
18. MUTE TRACK –
19. SOLO TRACK – Press this button to solo the current track.
Press this button to mute the current track.
5
Page 6
Guía del usuario (Español)
Introducción
El MPC Fly combina la inigualable tecnología de Akai Professional con la potencia de su iPad,
dando vida a las capacidades legendarias que hicieron del MPC una norma de la industria,
como los pads MPC reales, el MPC Note Repeat y el MPC Swing. Su diseño multifuncional con
bisagra doble le brinda la flexibilidad de producir pistas en cualquier lugar, funcionando al
mismo tiempo como estuche protector entre sesiones y proporcionándole acceso total a su
iPad para los usos normales.
Contenido de la caja
• MPC Fly
• Adaptador de alimentación
• Guía del usuario
• Manual sobre la seguridad y garantía
Diagrama de instalación y conexión rápida
Nota: El MPC Fly es compatible
con los siguientes dispositivos
iOS (no incluidos):
• iPad (3ra generación)
• iPad 2
1. Adquiera e instale iMPC desde
la App Store.
2. Coloque el MPC Fly sobre una
superficie plana y estable.
Introduzca su iPad –con el
botón Home a la derecha– en
el estuche del MPC Fly.
3. Opcional: Conecte el MPC Fly
a la alimentación eléctrica
usando el adaptador de
alimentación incluido. Con esta
conexión se alimenta y se
cargan las baterías tanto del
MPC Fly como de su iPad.
4. Opcional: Conecte auriculares estéreo de 1/8 pulg. al conector hembra para auriculares
de su iPad.
5. Conecte con cuidado el cable del conector de acoplamiento fijado al MPC Fly al puerto
del conector de acoplamiento de su iPad y encienda el MPC Fly.
6. Abra iMPC y ¡comience a producir beats! Recuerde apagar el MPC Fly y bloquear su iPad
cuando no los use.
Nota: Si el iMPC no responde al MPC Fly, haga doble clic en el botón Home (Inicio) de su
iPad, toque y mantenga su dedo sobre el icono de la aplicación hasta que se sacuda,
toque el símbolo del menos y haga clic en el botón Home otra vez. Asegúrese de que el
iPad esté conectado correctamente al conector de la estación de acoplamiento. Entonces,
vuelva a abrir iMPC.
Auriculares y iPad no incluidos.
6
Page 7

Panel superior
21
3
13
14
12
10
11
15
89
4567
1. CABLE DEL CONECTOR DE LA ESTACIÓN DE ACOPLAMIENTO – Conecte
con cuidado este cable al puerto del conector de acoplamiento del iPad.
2. ENTRADA DE ALIMENTACIÓN – Use el adaptador de alimentación incluido
para conectar la unidad a un tomacorriente. Con esta conexión se alimenta y se
cargan las baterías tanto del MPC Fly como de su iPad.
3. BOTÓN DE ENCENDIDO – Permite encender y apagar el MPC Fly. Puede
usarlo también para determinar cuánta carga tiene la batería del MPC Fly:
El botón se enciende con distintos colores para indicar aproximadamente
cuánta carga remanente queda:
• Verde significa 30-100% remanente.
• Ámbar significa 10-30% remanente.
• Rojo significa 10% remanente o menos.
Puede pulsar y mantener pulsado el botón por 2 segundos para ver una
indicación más precisa, representada por la columna del extremo izquierdo de 4
pads. Cada pad representa una "celda de batería".
• Un pad verde significa que la "celda" está totalmente cargada.
• Un pad ámbar significa que la "celda" está parcialmente cargada.
• Un pad apagado significa que la "celda" está descargada.
Con carga completa, los 4 pads están encendidos con luz verde. Con una
batería casi descargada, los 3 pads superiores están apagados y el pad inferior
encendido con luz roja.
Suelte el botón para volver al funcionamiento normal.
El botón destella cuando:
• El MPC Fly comienza a cargarse
• El MPC Fly está por entrar al modo de reposo (si no ha sido usado
durante 15 minutos)
Después de que el MPC Fly no se ha usado durante 30 minutos, se apaga
automáticamente.
7
16
17
17
18
19
Page 8

4. PRINCIPAL – Pulse este botón para ver la pantalla Main (Principal) en la
pantalla y en el software.
5. REPRODUCIR – Pulse este botón para reproducir las secuencias desde la
posición actual del puntero de audio.
6. REPRODUCIR DESDE INICIO – Pulse este botón para reproducir la secuencia
desde su punto inicial.
7. PARAR – Pulse este botón para detener la reproducción.
8. GRABAR – Para comenzar a grabar una secuencia, pulse este botón y pulse
simultáneamente PLAY o PLAY START. Al grabar de esta manera (en lugar de
usar OVERDUB), se borran los eventos de la secuencia actual. Después de
que la secuencia se reproduce una vez durante la grabación, se activa la
función Overdub (Sobregrabación).
9. SOBREGRABAR – Pulse este botón y simultáneamente PLAY o PLAY START
para activar el modo Overdub. Esto le permite grabar eventos de nota en una
secuencia sin sobrescribir ningún evento de nota grabado anteriormente. Puede
activar Overdub antes o durante la grabación.
10. DESHACER – Pulse este botón para deshacer su última acción.
11. BORRAR – Mientras se reproduce una secuencia, mantenga pulsado este
botón y pulse un pad para suprimir el evento de nota de ese pad en la posición
de reproducción actual. Ésta es una manera rápida de suprimir eventos de nota
de su secuencia sin tener que detener la reproducción.
12. PADS – Use estos pads para disparar golpes de batería u otras muestras
existentes en su software. Son sensibles a la velocidad y a la presión, lo que los
hace muy responsivos e intuitivos para tocar. Los pads se encienden con
diferentes colores en función de la fuerza con que los toca (varían de amarillo a
baja velocidad hasta rojo a la velocidad máxima).
13. NIVEL MÁXIMO – Pulse este botón para activar y desactivar el nivel máximo.
Cuando se activa, los pads siempre reproducen a máxima velocidad (127),
independientemente de lo fuerte o débilmente que usted los golpee.
14. NIVEL 16 – Pulse este botón para activar y desactivar el nivel 16. Cuando se
activa, se copia temporalmente en los 16 pads el último pad que se golpeó. Los
pads producen el mismo número de nota que el pad inicial, pero un parámetro
seleccionable se fija a los valores mostrados en el diagrama de la derecha,
independientemente de la fuerza con que se golpee cada pad. Los parámetros
disponibles son velocidad, afinación, filtro, capa, ataque o decaimiento.
15. REPETICIÓN DE NOTA – Mantenga pulsado este botón y presione un pad
para volver a disparar la muestra de ese pad a una velocidad basada en los
valores de Tempo y Timing Correct (Corrección de temporización) de ese
momento. Varíe la presión sobre el pad para aumentar o disminuir la velocidad
de las notas que se reproducen.
16. CORRECCIÓN DE TEMPORIZACIÓN – Pulse este botón para cambiar entre
los ajustes de Timing Correct (cuantización) disponibles.
17. SUBIR / BAJAR A PISTA – Use estos botones para moverse a la pista
siguiente o anterior.
18. SILENCIAR PISTA – Pulse este botón para silenciar la pista actual.
19. PISTA DE SOLO – Pulse este botón para producir un solo con la pista actual.
8
Page 9

Guide d’utilisation (Français)
Présentation
Le MPC Fly combine la technologie inégalée de Akai Professional, la puissance du iPad et des
fonctionnalités légendaires qui ont fait du MPC un standard de l’industrie comme des véritables
pads MPC, la répétition de la note MPC et Swing MPC. Sa conception multifonction à double
charnière vous permet de produire des pistes n’importe où et agit comme étui de protection
pour votre iPad entre les sessions, tout en vous laissant y accéder pour vos autres utilisations.
Contenu de la boîte
• MPC Fly
• Adaptateur secteur
• Guide d’utilisation
• Consignes de sécurité et informations concernant la garantie
Installation/Schéma de connexion
Remarque : Le MPC Fly est
compatible avec les dispositifs iOS
suivants (non inclus) :
• iPad (3
• iPad 2
1. Achetez et installez iMPC à partir
2. Placez le MPC Fly sur une
3. Facultatif : Branchez le MPC Fly
4. Facultatif : Branchez un casque stéréo 3,5 mm (1/4 po) à la prise casque de votre iPad.
5. Branchez le câble de raccordement du MPC Fly sur le port de connexion de votre iPad,
6. Lancez iMPC et amusez-vous! N’oubliez pas de mettre le MPC Fly hors tension et de
Le casque d’écoute et l’iPad ne sont pas inclus.
e
génération)
du App Store.
surface plate et stable. Insérez
votre iPad dans le MPC Fly en
prenant soin de placer la touche
Accueil du côté droit.
à une prise d’alimentation à l’aide
de l’adaptateur secteur inclus.
Ceci permet d'alimenter et de
recharger les piles du MPC Fly et de votre iPad.
puis mettez le MPC Fly sous tension.
verrouiller votre iPad lorsque vous en avez terminé.
Remarque : Si iMPC ne répond pas aux commandes du MPC Fly, double-cliquez sur la
touche Acceuil de votre iPad, maintenez le doigt sur l’icône de l’application jusqu’à ce qu’il
tremble, tapez ensuite sur le signe moins et retapez sur la touche Acceuil. Veuillez vous
assurer que l’iPad est correctement branché au connecteur de la station d’accueil.
Relancez ensuite l’application iMPC.
9
Page 10

Panneau supérieur
21
3
13
14
12
10
11
15
89
4567
1. CÂBLE DE RACCORDEMENT – Branchez ce câble de raccordement au port
de connexion de votre iPad.
2. ENTRÉE D'ALIMENTATION – Utilisez le câble d’alimentation inclus pour
brancher l’appareil à une prise d’alimentation. Ceci permet d'alimenter et de
recharger les piles du MPC Fly et de votre iPad.
3. INTERRUPTEUR MARCHE/ARRÊT – Cet interrupteur permet de mettre le
MPC Fly sous et hors tension. Vous pouvez également l’utiliser afin de
déterminer la charge restante de la pile du MPC Fly :
La touche s’allume de différentes couleurs afin d’indiquer le pourcentage de la
charge restante :
• Vert signifie que la charge restante est de 30 à 100 %.
• Ambré signifie que la charge restante est de 10 à 30 %.
• Red signifie que la charge restante est de moins de 10 %.
Vous pouvez maintenir la touche enfoncée pendant 2 secondes afin d'obtenir
une indication plus précise, représentée par les quatre pads dans la colonne
d’extrême gauche. Chaque pad représente un élément pile.
• Un pad vert indique que la charge de l’élément est pleine.
• Un pad ambré indique que la charge de l’élément est partielle.
• Un pad éteint indique que la charge de l’élément est épuisée.
Lorsque la charge de la pile est pleine, les 4 pads sont verts. Lorsque la charge
de la pile est presque épuisée, les trois pads du haut seront éteints et le dernier
pad est rouge.
Relâchez la touche pour revenir au fonctionnement normal.
La touche clignote lorsque :
• Le MPC Fly se recharge
• Le MPC Fly entre en mode Veille (après 15 minutes d’inactivité)
Après 30 minutes d'inutilisation, le MPC Fly se met automatiquement hors
tension.
16
17
17
18
19
10
Page 11

4. TOUCHE MAIN – Appuyez sur cette touche afin d’afficher la fenêtre d’accueil à
l’écran et du logiciel.
5. TOUCHE PLAY – Appuyez sur cette touche afin de faire jouer la séquence à
partir de la présente position du curseur audio.
6. TOUCHE PLAY START – Appuyez sur cette touche afin de faire jouer la
séquence à partir du début.
7. TOUCHE STOP – Appuyez sur ce bouton afin de faire un arrêt de lecture.
8. TOUCHE REC – Afin de lancer l’enregistrement d’une séquence, appuyez sur
cette touche tout en appuyant sur la touche PLAY ou PLAY START. Procéder à
l’enregistrement de cette manière (au lieu d’utiliser la fonction OVERDUB)
supprime les événements de la séquence en cours. Une fois que la séquence a
joué une fois durant l’enregistrement, la fonction Overdub sera activée.
9. TOUCHE OVERDUB – Afin d’activer la fonction Overdub, appuyez sur cette
touche tout en appuyant sur la touche PLAY ou PLAY START. Ceci permet
d'enregistrer des événements de note dans une séquence sans devoir écraser
un des événements de note précédemment enregistrés. Vous pouvez activer la
fonction Overdub avant ou pendant l'enregistrement.
10. TOUCHE UNDO – Cette touche permet de supprimer la dernière opération.
11. TOUCHE ERASE – Lors de la lecture d'une séquence, maintenez cette touche
enfoncée tout en appuyant sur un pad afin de supprimer l'événement de note
pour ce pad à la position de lecture actuelle. C'est une façon rapide de
supprimer des événements de note de votre séquence sans avoir à arrêter la
lecture.
12. PADS – Utilisez ces pads afin de déclencher des sonorités de batterie ou
d’autres échantillons du logiciel. Ces pads sont sensibles à la dynamique et à la
pression, donc très nerveux et intuitifs. Ils s’illuminent de couleurs différentes,
selon la force de frappe que vous utilisez (de jaune à faible dynamique, à rouge
à la dynamique élevée).
13. FULL LEVEL – Cette touche permet d’activer ou de désactiver le mode Full
Level. Lorsque cette fonction est activée, les pads jouent toujours à la vélocité
maximale (127), peu importe la force à laquelle ils sont frappés.
14. 16 LEVEL – Cette touche permet d’activer ou de désactiver le mode 16 Level.
Lorsqu’activé, le dernier pad qui a été frappé sera temporairement copié aux 16
pads. Les pads produisent le même numéro de note que le pad initial, mais le
paramètre sélectionnable est fixé aux valeurs inscrites dans le diagramme à
droite, peu importe la force avec laquelle ils sont frappés. Les paramètres
disponibles sont vitesse, accord, filtre, niveau, attaque ou chute.
15. TOUCHE NOTE REPEAT – Maintenez cette touche enfoncée tout en appuyant
sur un pad afin de redéclencher l’échantillon de ce pad à un taux basé sur les
paramètres actuels du champ Tempo et Time Correct. Varier la pression sur le
pad permet d'augmenter ou de diminuer la dynamique de la note en cours.
16. TOUCHE TIMING CORRECT – Appuyez sur cette touche afin de parcourir les
différents paramètres Timing Correct (quantification).
17. TOUCHE DE SÉLECTION DE LA PISTE – Utilisez ces touches afin de passer
à la piste suivante ou à la piste précédente.
18. TOUCHE MUTE – Cette touche permet de mettre en sourdine la piste en cours
de lecture.
19. TOUCHE SOLO – Cette touche permet de mettre en solo la piste en cours de
lecture.
11
Page 12
Guida per l'uso (Italiano)
Introduzione
L'MPC Fly unisce l'incomparabile tecnologia di Akai Professional alla potenza del tuo iPad,
incorporando capacità leggendarie che hanno reso l'MPC uno standard del settore come i veri
pad MPC, MPC Note Repeat e MPC Swing. Il suo design multifunzionale a doppia cerniera
offre la flessibilità di produrre tracce ovunque, agendo inoltre da custodia protettiva tra una
sessione e l'altra e garantendo l'accesso totale all'iPad per un utilizzo normale.
Contenuti della confezione
• MPC Fly
• Adattatore di alimentazione
• Guida per l'uso
• Istruzioni di sicurezza e garanzia
Schema rapido di setup / dei collegamenti
Nota bene: l'MPC Fly è compatibile
con i seguenti dispositivi iOS (non in
dotazione):
• iPad (3ª generazione)
• iPad 2
1. Acquistare e installare iMPC
dall'App Store.
2. Collocare l'MPC Fly su una
superficie uniforme e stabile.
Inserire l'iPad – con il tasto Home
sulla destra – nell'alloggiamento
dell'MPC Fly.
3. Opzione: collegare l'MPC Fly ad
una fonte di alimentazione
servendosi dell'adattatore di
alimentazione in dotazione.
Questo collegamento alimenta e ricarica le batterie sia dell'MPC Fly che dell'iPad.
4. Opzione: collegare cuffie stereo da 1/8" al jack cuffie dell'iPad.
5. Collegare delicatamente il cavo del connettore del dock dell'MPC Fly alla porta del dock
dell'iPad e accendere l'MPC Fly.
6. Aprite l'iMPC e iniziate a darci dentro!! Ricordate di spegnere l'MPC Fly e di bloccare
l'iPad quando non è in uso.
Nota bene: se l'iMPC non risponde all'MPC Fly, fare doppio clic sul tasto Home dell'iPad,
tenere il dito sull'icona dell'app finché non si scuote, battere sul simbolo del meno e
cliccare nuovamente il tasto Home. Assicurarsi che l'iPad sia collegato adeguatamente al
connettore del dock. Quindi, riaprire l'iMPC.
Cuffie e iPad non in dotazione.
12
Page 13
Pannello superiore
21
3
13
14
12
10
11
15
89
4567
1. CAVO CONNETTORE DEL DOCK – Collegare delicatamente questo cavo alla
porta del connettore del dock dell'iPad.
2. INGRESSO DI ALIMENTAZIONE – Servirsi dell'adattatore di alimentazione in
dotazione per collegare l'apparecchio ad una presa di alimentazione. Questo
collegamento alimenta e carica le batterie sia dell'MPC Fly che dell'iPad.
3. TASTO DI ALIMENTAZIONE – Accende/spegne l'MPC Fly. Può anche essere
utilizzato per stabilire quanta batteria residua ha l'MPC Fly:
Il tasto si illumina di vari colori per indicare all'incirca quanta alimentazione
rimane:
• Verde indica il 30-100% rimanente.
• Giallo indica il 10-30% circa rimanente.
• Rosso indica il 10% o meno rimanente.
Tenendo premuto il tasto per 2 secondi è possibile visualizzare un'indicazione
più precisa rappresentata dalla colonna all'estrema sinistra di 4 pad. Ciascun
pad rappresenta una "batteria".
• Un pad verde indica che la "batteria" è carica.
• Un pad giallo indica che la "batteria" è parzialmente carica.
• Un pad spento indica che la "batteria" non ha carica.
A piena carica, tutti e 4 i pad saranno verdi. Con una batteria quasi scarica, i 3
pad superiori saranno spenti e quello inferiore sarà rosso.
Lasciare la pressione del tasto per tornare al funzionamento normale.
Il tasto lampeggia quando:
• l'MPC Fly inizia la ricarica
• L'MPC Fly sta per entrare in standby (se non è stato utilizzato per 15
minuti)
Se l'MPC Fly non viene utilizzato per 30 minuti, si spegne automaticamente.
16
17
17
18
19
13
Page 14

4. MAIN – Premere questo tasto per visualizzare la schermata principale nel
display e nel software.
5. PLAY – Premere questo pulsante per riprodurre la sequenza dalla posizione
attuale del puntatore.
6. PLAY START – Premere questo pulsante per riprodurre la sequenza dal suo
inizio.
7. STOP – Premere questo tasto per interrompere la riproduzione.
8. REC – Per iniziare a registrare una sequenza, premere questo tasto e
contemporaneamente premere PLAY o PLAY START. Registrando in questo
modo (anziché utilizzando OVERDUB) si cancellano gli eventi della Sequenza
corrente. Dopo che la Sequenza viene suonata una volta durante la
registrazione, Overdub viene attivato.
9. OVERDUB – Premere questo tasto e contemporaneamente premere PLAY o
PLAY START per abilitare l'Overdub. Questo consente di registrare eventi di
note in una sequenza senza sovrascrivere eventi di note registrati in
precedenza. Si può abilitare Overdub prima o durante la registrazione.
10. UNDO – Premere questo tasto per annullare l'ultima azione.
11. ERASE – Durante la riproduzione di una Sequenza, tenere premuto questo
tasto e premere un pad per cancellare l'evento da quel pad nella posizione di
riproduzione corrente. Questo è un modo rapido per cancellare eventi nota dalla
Sequenza senza interromperne la riproduzione.
12. PAD – Servirsi di questi pad per attivare suoni di batteria o altri campioni nel
software. I pad sono sensibili alla pressione e alla velocità, cosa che li rende
molto reattivi e intuitivi da suonare. I pad si accendono di colori diversi a
seconda di quanto forte vengono suonati (a partire da giallo a bassa velocità a
rosso alla velocità massima).
13. FULL LEVEL – Premere questo tasto per attivare / disattivare la modalità "Full
Level". Quando è attiva, i pad suonano sempre alla massima velocità (127),
indipendentemente dalla forza con cui vengono battuti.
14. 16 LEVEL – Premere questo tasto per attivare / disattivare la modalità "16
Level". Quando è attiva, l'ultimo pad suonato verrà temporaneamente copiato su
tutti e 16 i pad. I pad ora emetteranno lo stesso numero di nota del pad iniziale,
ma un parametro selezionabile viene fissato ai valori illustrati nello schema a
destra, indipendentemente da quanto forte vengono battuti. I parametri
disponibili sono velocità, sintonia, filtro, layer, attacco o decay.
15. NOTE REPEAT – Tenere premuto questo tasto e premere un pad per riattivare
il campione di quel pad alla frequenza basata sulle impostazioni correnti di
Tempo e Time Correct. Variare la pressione sul pad per aumentare o diminuire
la velocità delle note suonate.
16. TIMING CORRECT – Premere questo tasto per passare tra le impostazioni
disponibili di Timing Correct (quantizzazione).
17. TRACK UP / DOWN (traccia su/giù) – Servirsi di questi tasti per passare alla
traccia successiva o precedente.
18. MUTE TRACK (silenzia traccia) – Premere questo tasto per silenziare la
traccia corrente.
19. SOLO TRACK (assolo traccia) – Premere questo tasto per fare un assolo della
traccia corrente.
14
Page 15

Benutzerhandbuch (Deutsch)
Einführung
Das MPC Fly vereint die unübertroffene Technologie von Akai Professional mit der Leistung
Ihres iPad und bietet dabei jene legendären Möglichkeiten, wie die MPC Pads, MPC Note
Repeat und MPC Swing, die das MPC zum Branchenstandard gemacht haben. Das
multifunktionale Design mit 2 Scharnieren gibt Ihnen die Flexibilität, Ihre Tracks überall zu
produzieren, es dient gleichzeitig als Schutzhülle zwischen Ihren Sessions und bietet vollen
Zugriff auf Ihr iPad für den normalen Gebrauch.
Lieferumfang
• MPC Fly
• Netzteil
• Benutzerhandbuch
• Sicherheitshinweise und Garantieinformationen
Schnelles Einrichten / Anschlussdiagramm
Hinweis: MPC Fly ist mit den folgenden
iOS-Geräten (nicht im Lieferumfang
enthalten) kompatibel:
• iPad (3. Generation)
• iPad 2
1. Erwerben und installieren Sie iMPC
aus dem App Store.
2. Platzieren Sie das MPC Fly auf einer
flachen, stabilen Oberfläche. Legen
Sie Ihr iPad in die Halterung des MPC
Fly - achten Sie darauf, dass der
Home-Button auf der rechten Seite ist.
3. Optional: Verbinden Sie das MPC Fly
über das mitgelieferte Netzteil mit
einer Stromquelle. Diese Verbindung
wird sowohl das MPC Fly als auch Ihr iPad mit Strom versorgen und den Akku aufladen.
4. Optional: Schließen Sie 1/8"-Stereokopfhörer an die Kopfhörerbuchse Ihres iPad an.
5. Verbinden Sie das angeschlossene Dock Connector-Kabel des MPC Fly vorsichtig mit
dem Dock-Anschluss Ihres iPad und schalten Sie das MPC Fly ein.
6. Öffnen Sie iMPC und beginnen mit der Programmierung Ihrer Beats! Denken Sie daran,
Ihr MPC Fly abzuschalten und Ihr iPad zu sperren, wenn sie nicht in Gebrauch sind.
Hinweis: Wenn iMPC nicht auf das MPC Fly reagiert, doppelklicken Sie auf den Home
Button Ihres iPad, halten Ihren Finger auf das App-Symbol bis es zu wackeln beginnt,
tippen auf das Minus-Symbol und klicken erneut auf die Home-Taste. Sorgen Sie dafür,
dass Ihr iPad ordnungsgemäß mit dem Dock-Anschluss verbunden ist. Öffnen Sie
anschließend iMPC.
Kopfhörer und iPad sind nicht im Lieferumfang enthalten.
15
Page 16

Oberseite
21
3
13
14
12
10
11
15
89
4567
1. DOCK-ANSCHLUSSKABEL - Stecken Sie dieses befestigte Kabel vorsichtig in
den Dock-Anschluss Ihres iPad.
2. NETZEINGANG– Verwenden Sie das mitgelieferte Netzteil, um das Gerät mit
einer Steckdose zu verbinden. Diese Verbindung wird sowohl das MPC Fly als
auch Ihr iPad mit Strom versorgen und die Akkus aufladen.
3. EIN-/AUSSCHALTER - Schaltet Ihr MPC Fly ein / aus. Sie können diese Taste
auch verwenden, um den Ladestand der MPC Fly-Batterie festzustellen:
Die Taste leuchtet in verschiedenen Farben auf, um den Akkuladestand
anzuzeigen:
• Grün bedeutet, dass 30-100% verbleiben.
• Orange bedeutet, dass ca. 10-30% verbleiben.
• Rot bedeutet, dass 10% oder weniger übrig sind.
Sie können die Taste 2 Sekunden lang gedrückt halten, um eine genauere
Angabe zu erhalten, die von der linken Spalte der 4 Pads dargestellt wird. Jedes
Pad steht für eine "Batteriezelle."
• Ein grünes Pad bedeutet, dass die "Zelle" voll aufgeladen ist.
• Ein orangefarbenes Pad bedeutet, dass die "Zelle" teilweise
aufgeladen ist.
• Ein unbeleuchtetes Pad bedeutet, dass die "Zelle" nicht aufgeladen
ist.
Bei vollem Akkuladestand leuchten alle 4 Pads grün. Bei einem fast leeren Akku
bleiben die oberen 3 Pads unbeleuchtet und das untere Pad leuchtet rot.
Lassen Sie die Taste los, um zum Normalbetrieb zurückzukehren.
Die Taste blinkt, wenn:
• MPC Fly mit dem Aufladen beginnt
• MPC Fly im Begriff ist, in den Ruhemodus zu wechseln (wenn es 15
Minuten lang nicht benutzt wurde)
Wird das MPC Fly 30 Minuten lang nicht benutzt, so schaltet es sich
automatisch aus.
16
17
17
18
19
16
Page 17

MAIN - Drücken Sie diese Taste, um den Hauptbildschirm am Display und in der
4.
Software zu sehen.
5. WIEDERGABE - Drücken Sie diese Taste, um die Sequenz von der aktuellen
Position des Audio-Pointers zu spielen.
6. WIEDERGABE VOM STARTPUNKT - Drücken Sie diese Taste, um die Sequenz
von ihrem Startpunkt zu spielen.
7. STOPP – Drücken Sie diese Taste, um die Wiedergabe zu stoppen.
8. REC - Um mit der Aufnahme einer Sequenz zu starten, drücken Sie diese Taste und
die Taste WIEDERGABE oder WIEDERGABE VOM STARTPUNKT gleichzeitig.
Wenn Sie auf diese Weise aufnehmen (anstelle von OVERDUB), werden die
Ereignisse der aktuellen Sequenz gelöscht. Nachdem die Sequenz während der
Aufnahme einmal durchgespielt wurde, wird Overdub aktiviert.
9. OVERDUB - Drücken Sie diese Taste und gleichzeitig die Taste WIEDERGABE oder
WIEDERGABE VOM STARTPUNKT, um Overdub zu aktivieren. So können Sie
Notenbefehle in einer Sequenz aufnehmen, ohne zuvor aufgenommene
Notenbefehle zu überschreiben. Sie können Overdub vor oder während der
Aufnahme aktivieren.
10. RÜCKGÄNGIG - Drücken Sie auf diese Taste, um Ihre letzte Aktion rückgängig zu
machen.
11. LÖSCHEN - Wenn eine Sequenz abgespielt wird, halten Sie diese Taste gedrückt
und betätigen ein Pad, um den Noten-Befehl für dieses Pad an der aktuellen
Wiedergabe-Position zu löschen. Dies ist ein schneller Weg, um Noten-Befehle aus
Ihrer Sequenz zu löschen, ohne die Wiedergabe zu stoppen.
12. PADS – Sie können diese Pads zum Triggern von Drumsounds oder anderen
Samples in Ihrer Software verwenden. Die Pads sind anschlagdynamisch und
druckempfindlich, was sie besonders reaktionsfähig und intuitiv spielbar macht. Die
Pads leuchten in verschiedenen Farben, je nachdem, wie stark Sie sie anschlagen
(von gelb bei geringer Anschlagdynamik bis zu rot bei maximaler Anschlagdynamik).
13. MAXIMALWERT - Drücken Sie diese Taste, um den Maximalwert zu
aktivieren/deaktivieren. Bei Aktivierung geben die Pads immer die maximale
Anschlagstärke (127) wieder, egal wie stark oder schwach Sie sie anschlagen.
14. 16 LEVEL - Drücken Sie diese Taste, um 16 Level zu aktivieren/deaktivieren. Bei
Aktivierung wird das zuletzt gedrückte Pad vorübergehend auf alle 16 Pads kopiert.
Die Pads werden nun immer die gleiche Notennummer wie das ursprüngliche Pad
ausgeben, ein wählbarer Parameter behält jedoch die Werte aus dem rechts
gezeigten Diagramm bei - egal wie stark oder schwach Sie die Pads anschlagen.
Die verfügbaren Parameter sind Geschwindigkeit, Tuning, Filter, Layer, Attack oder
Abklingzeit.
15. NOTE WIEDERHOLEN - Halten Sie diese Taste gedrückt und drücken Sie ein Pad,
um das Sample dieses Pads mit den aktuellen Tempo- und
Quantisierungseinstellungen erneut zu triggern. Variieren Sie den Druck auf das
Pad, um die Geschwindigkeit der gespielten Noten zu erhöhen oder zu verringern.
16. QUANTISIEREN - Drücken Sie diese Taste, um durch die verfügbaren
Quantisierungseinstellungen zu blättern.
17. TRACK AUFWÄRTS / ABWÄRTS - Verwenden Sie diese Tasten, um zum nächsten
oder vorherigen Titel zu springen.
18. TRACK STUMMSCHALTEN- Drücken Sie diese Taste, um den aktuellen Track
stumm zu schalten.
19. TRACK SOLO SCHALTEN- Drücken Sie diese Taste, um den aktuellen Track als
Solo zu hören.
17
Page 18

Specifications
Hardware
iPad compatibility
Connections
Dimensions (H x W x D)
(closed, excluding cables)
Weight
(excluding cables and iPad)
Pads
Power
16 velocity-sensitive with aftertouch, backlit by
velocity
iPad 2
iPad (3rd generation)
Rechargeable internal lithium-ion battery
6V DC, 3A, center pin positive
Attached dock connector cable
Power adapter input (5.5 mm)
1.2" x 10.75" x 8.1"
31 mm x 273 mm x 206 mm
2.69 lbs.
1.2 kg
18
Page 19

Page 20

AKAIPRO.COM
7-51-0387-B
 Loading...