

Page 1
V.2.00
Page 2

Page 3

REFERENCE MANUAL
Version 2.00
Page 4

Page 5

Chapter 1: Introduction.................................................................................................1
Overview............................................................................................................................... 1
Top Panel ........................................................................................................................................................................... 1
Front Panel .........................................................................................................................................................................8
Rear Panel ..........................................................................................................................................................................8
Bottom Panel....................................................................................................................................................................10
Hooking Up Your MPC5000 ..................................................................................................11
Output Connectivity Example ......................................................................................................................................... 11
Analog Input Connectivity Example ...............................................................................................................................11
Digital Connectivity Example ......................................................................................................................................... 12
USB Connectivity ............................................................................................................................................................12
MIDI Connectivity ........................................................................................................................................................... 13
Footswitch / Headphone Connectivity............................................................................................................................. 13
Basic Concepts and Terminology..........................................................................................14
Sequence .......................................................................................................................................................................... 14
Tracks ............................................................................................................................................................................... 14
Song.................................................................................................................................................................................. 14
Sample..............................................................................................................................................................................14
Drum Pad .........................................................................................................................................................................15
Sample Program ............................................................................................................................................................... 15
Synth Programs ................................................................................................................................................................15
Note Number, Velocity, and Length................................................................................................................................ 15
RAM................................................................................................................................................................................. 15
Memory Card ...................................................................................................................................................................15
Operating Modes..................................................................................................................16
MAIN Mode ([MAIN]).................................................................................................................................................... 16
Q-LINK Mode ([MODE]+[Pad 1]) ................................................................................................................................. 16
DISK Mode ([MODE]+[Pad 3]) ...................................................................................................................................... 16
REC SAMPLE Mode ([MODE]+[Pad 4]) ...................................................................................................................... 16
TRIM Mode ([MODE]+[Pad 5]) .....................................................................................................................................16
PROGRAM Mode ([MODE]+[Pad 6]) ...........................................................................................................................16
MIXER Mode ([MODE]+[Pad 7].................................................................................................................................... 16
MIDI/SYNC Mode ([MODE]+[Pad 8]) .......................................................................................................................... 16
OTHER Mode ([MODE]+[Pad 9]) .................................................................................................................................. 16
ARP Mode ([MODE]+[Pad 10]) ..................................................................................................................................... 16
EFFECTS Mode ([MODE]+[Pad 11]) ............................................................................................................................ 17
SEQ EDIT Mode ([MODE]+[Pad 12]) ...........................................................................................................................17
STEP EDIT Mode ([MODE]+[Pad 13])..........................................................................................................................17
GRID EDIT Mode ([MODE]+[Pad 14]) .........................................................................................................................17
SONG Mode ([MODE]+[Pad 15]) ..................................................................................................................................17
HD RECORD Mode ([MODE]+[Pad 16]) ......................................................................................................................17
SYNTH Programs ([SYNTH]) ........................................................................................................................................17
Chapter 2: Basic Operation ........................................................................................19
MAIN Page ......................................................................................................................................................................19
Cursor, Cursor Buttons, [DATA] wheel .......................................................................................................................... 19
Function Buttons .............................................................................................................................................................. 19
[WINDOW] Button.......................................................................................................................................................... 19
[MODE] Button ...............................................................................................................................................................20
Setting Names .....................................................................................................................20
Entering letters with [DATA] wheel ............................................................................................................................... 20
Entering letters with the Numeric Keypad ...................................................................................................................... 20
Chapter 3: The Sequencer..........................................................................................21
Main Page ............................................................................................................................21
'Now'................................................................................................................................................................................. 21
'Sequence' ......................................................................................................................................................................... 22
'Track' field....................................................................................................................................................................... 22
'Track Status' field............................................................................................................................................................ 22
Recording the Performance..................................................................................................22
'Record Ready' Mode .......................................................................................................................................................23
Step Recording ................................................................................................................................................................. 23
Playing Back a Sequence .................................................................................................................................................23
Playing Several Sequences in Series ............................................................................................................................... 23
Punch In/Punch Out .........................................................................................................................................................24
Other Useful Features for Recording Sequences ..................................................................24
Page 6

Undo and Redo................................................................................................................................................................. 24
Erase....................................................................................................................................25
Deleting In Real Time......................................................................................................................................................25
Deleting From the Erase Screen ......................................................................................................................................25
Timing correct......................................................................................................................26
Real time timing correction ............................................................................................................................................. 26
Swing................................................................................................................................................................................ 26
Correcting the timing of recorded events ........................................................................................................................26
Swing................................................................................................................................................................................ 27
Shift Timing .....................................................................................................................................................................27
Strength ............................................................................................................................................................................27
Window ............................................................................................................................................................................ 27
Click/Metronome .................................................................................................................27
Note Repeat .........................................................................................................................28
Note Repeat Hold.............................................................................................................................................................28
Locate ............................................................................................................................................................................... 28
Detailed Information on the Sequence Feature....................................................................29
Setting the Length of a Sequence .................................................................................................................................... 29
Setting the Time Signature of the Sequence .................................................................................................................... 29
Setting Tempo ..................................................................................................................................................................30
Tap Tempo .......................................................................................................................................................................30
Changing Tempo of All Sequences At One Time...........................................................................................................30
About Tempo Change ...................................................................................................................................................... 30
Setting the Loop for a Sequence ...................................................................................................................................... 31
Extending the Sequence Length Automatically .............................................................................................................. 31
Changing the Default Settings .........................................................................................................................................31
Changing the Sequence Name .........................................................................................................................................31
Changing the Default Name for a Sequence.................................................................................................................... 32
Copying a Sequence......................................................................................................................................................... 32
Copying a Sequence Parameters ('Loop', 'Time Sig', 'Bars')...........................................................................................32
Deleting a Sequence......................................................................................................................................................... 32
Deleting All Sequences.................................................................................................................................................... 33
Handling the duration (the length of a note) at the loop boundary .................................................................................33
Track Features .....................................................................................................................33
Setting the Track Type ..................................................................................................................................................... 33
Selecting a Program .........................................................................................................................................................33
Sending MIDI Program Changes ..................................................................................................................................... 34
Track Velocity.................................................................................................................................................................. 34
Track Mute ....................................................................................................................................................................... 34
Setting the MIDI Output Channel....................................................................................................................................34
Changing a Track Name ..................................................................................................................................................35
Changing the Default Name for a Track..........................................................................................................................35
Copying a Track............................................................................................................................................................... 35
Deleting a Track...............................................................................................................................................................35
Deleting all Tracks ........................................................................................................................................................... 35
Track Lock .......................................................................................................................................................................36
MIDI Receive Indicator ...................................................................................................................................................36
Track Select with [SHIFT] + Pad ....................................................................................................................................36
Continuous Sample Tracks ...................................................................................................37
Selecting a Track with Function Keys ............................................................................................................................. 37
Soloing a Track ................................................................................................................................................................37
MIDI Sequencer Features ....................................................................................................38
Handling the Sustain Pedal ..................................................................................................39
Recording Aftertouch ...........................................................................................................39
Chapter 4: Editing Sequences ...................................................................................41
Selecting a region for the editing .........................................................................................41
Setting the Range .............................................................................................................................................................41
Setting the pad/note number ............................................................................................................................................41
Copying events (COPY) ..................................................................................................................................................41
Moving events (MOVE) ..................................................................................................................................................42
Transpose .........................................................................................................................................................................42
Changing the timing of an event (SHIFT TIMING) .......................................................................................................43
Changing the Velocity of an event (Velocity) ................................................................................................................. 43
Changing the duration of an event (DURATION) ..........................................................................................................44
Selecting the editing region by bar ......................................................................................44
Page 7

Copying bars (COPY) ...................................................................................................................................................... 44
Inserting a bar (INSERT) ................................................................................................................................................. 44
Deleting a bar (DELETE) ................................................................................................................................................45
Changing the order of tracks (TRACK MOVE) .......................................................................45
Chapter 5: STEP EDIT Mode.......................................................................................47
A Note about Playing Events...........................................................................................................................................47
About Step Edit................................................................................................................................................................ 47
'Now' field ........................................................................................................................................................................47
Event List .........................................................................................................................................................................47
'View' field .......................................................................................................................................................................47
'Event Time' field .............................................................................................................................................................47
Event................................................................................................................................................................................. 47
Basic operation ....................................................................................................................47
Event List .........................................................................................................................................................................47
[F1] (T.C.) ........................................................................................................................................................................47
[F2] (TRACK).................................................................................................................................................................. 48
[F6] (PLAY).....................................................................................................................................................................48
Events ..................................................................................................................................48
Pad Event .........................................................................................................................................................................48
Note Event........................................................................................................................................................................ 48
Pitch Bend Event.............................................................................................................................................................. 49
Control Change Event ...................................................................................................................................................... 49
Program Change Event ....................................................................................................................................................49
Channel Pressure Event ...................................................................................................................................................49
Poly Pressure Event ......................................................................................................................................................... 49
Exclusive Data Event ....................................................................................................................................................... 49
Editing the exclusive data ................................................................................................................................................49
Effect Select Event...........................................................................................................................................................50
Tempo Change Event.......................................................................................................................................................50
Real Time Event............................................................................................................................................................... 50
Effect Automation Event .................................................................................................................................................51
Track Mute Event............................................................................................................................................................. 51
Pad Mute Event ................................................................................................................................................................ 51
Copying / Pasting an Event..................................................................................................51
Moving an Event...................................................................................................................51
Deleting an event.................................................................................................................51
Step Recording.....................................................................................................................52
Detailed setting for step recording.......................................................................................52
'Auto step increment' field ...............................................................................................................................................52
'Duration of recorded notes' field.....................................................................................................................................52
Inserting an event ............................................................................................................................................................. 52
Track Lock .......................................................................................................................................................................53
Chapter 6: GRID EDIT Mode .......................................................................................55
About Grid Edit.....................................................................................................................55
DRUM View .................................................................................................................................................................... 55
MIDI View ....................................................................................................................................................................... 55
Now .................................................................................................................................................................................. 55
Time ruler......................................................................................................................................................................... 55
Vertical marker................................................................................................................................................................. 55
Horizontal marker ............................................................................................................................................................55
'Event Range' field ...........................................................................................................................................................55
Event Area........................................................................................................................................................................ 55
Basic operation ....................................................................................................................56
Operation in the Event area.............................................................................................................................................. 56
Relationship of Grid Value to Timing Correct. ...............................................................................................................56
Selecting an event ............................................................................................................................................................56
Editing in GRID EDIT mode ..................................................................................................57
[F1] (T.C.) Button ............................................................................................................................................................57
[F2] (TRACK) Button...................................................................................................................................................... 57
[F3] (EDIT) Button ..........................................................................................................................................................57
[F4] (DELETE) Button ....................................................................................................................................................57
[F6] (PLAY) Button......................................................................................................................................................... 57
Copying and Pasting an Event ..............................................................................................57
Page 8

Moving an event...................................................................................................................57
Deleting an event.................................................................................................................58
Entering an event.................................................................................................................58
Step recording ..................................................................................................................................................................58
Detailed Setting for Grid Edit Recording...............................................................................59
'Auto step increment' field ...............................................................................................................................................59
'Duration of recorded notes' field.....................................................................................................................................59
Real time recording..............................................................................................................59
Track Lock .......................................................................................................................................................................59
Controller View and editing individual events ......................................................................60
Chapter 7: SONG Mode...............................................................................................61
Structure of a song ..............................................................................................................61
Screens ................................................................................................................................61
Now' field ......................................................................................................................................................................... 61
'Song' field........................................................................................................................................................................ 61
Step list.............................................................................................................................................................................61
'Step' field ......................................................................................................................................................................... 62
'Sequence' field................................................................................................................................................................. 62
'Reps' field ........................................................................................................................................................................ 62
'Tempo' field..................................................................................................................................................................... 62
'Bars' field......................................................................................................................................................................... 62
Creating a song....................................................................................................................62
Deleting a step.................................................................................................................................................................. 62
Inserting a step .................................................................................................................................................................62
Playing a song......................................................................................................................63
[F5] (SUDDEN) ............................................................................................................................................................... 63
[F6] (NEXT)..................................................................................................................................................................... 63
Other features in SONG Mode ..............................................................................................63
Changing the song name .................................................................................................................................................. 63
Copying a song................................................................................................................................................................. 63
Deleting a song................................................................................................................................................................. 63
Deleting all songs............................................................................................................................................................. 64
Setting all sequences to the same tempo.......................................................................................................................... 64
Ignoring tempo change events in a sequence ..................................................................................................................64
Converting a song to a sequence......................................................................................................................................64
LOCATE .......................................................................................................................................................................... 65
Chapter 8: HD RECORD Mode ...................................................................................67
Adding Hard Disk Tracks to a Song ......................................................................................67
About the RECORD Page................................................................................................................................................ 67
Recording Hard Disk Tracks .................................................................................................68
Recording additional tracks .............................................................................................................................................68
Viewing Recorded Tracks .....................................................................................................69
Selecting the View Range.....................................................................................................69
Viewing Individual Disk Tracks ............................................................................................69
Choosing the Track to View ............................................................................................................................................70
Editing Hard Disk Tracks ......................................................................................................70
Selecting multiple tracks.................................................................................................................................................. 70
Fine Editing of a Single Track ......................................................................................................................................... 70
Individual Edit Functions .....................................................................................................70
Gain .................................................................................................................................................................................. 71
Fade .................................................................................................................................................................................. 71
Cut / Copy / Pasting Tracks .............................................................................................................................................71
Normalize ......................................................................................................................................................................... 72
Silence .............................................................................................................................................................................. 72
Deleting, importing and Exporting Tracks ............................................................................72
Deleting ............................................................................................................................................................................ 72
Importing..........................................................................................................................................................................72
Exporting.......................................................................................................................................................................... 73
Erasing HD Track Automation ........................................................................................................................................73
Page 9

Mixing Hard Disk Tracks.......................................................................................................74
Setting Track Output........................................................................................................................................................ 74
Setting the level and pan of a Track ................................................................................................................................ 74
Assigning effects to a Track ............................................................................................................................................75
Muting a Track ................................................................................................................................................................. 75
Using Q-LINK Controls with MIXER Mode .................................................................................................................. 75
Mixer Automation ................................................................................................................76
Erasing HD Track Automation ..............................................................................................76
Mixdown ..............................................................................................................................76
Mixdown to File............................................................................................................................................................... 76
Track Mix Access in HD RECORD Mode .................................................................................77
Selecting Track Mix......................................................................................................................................................... 77
Returning to HD MIX ...................................................................................................................................................... 78
Chapter 9: Functions of a Pad ...................................................................................79
Playing with pads.................................................................................................................79
Switching pad banks ........................................................................................................................................................79
Full level function ([FULL LEVEL] button)................................................................................................................... 79
16 levels function ([16 LEVEL] button) .........................................................................................................................79
Muting Sequence Tracks with Pads (Track Mute).................................................................80
Operation..........................................................................................................................................................................80
Solo Function ...................................................................................................................................................................80
Selecting Instant Track Mute ........................................................................................................................................... 80
Setting the Track Mute in Solo Mode..............................................................................................................................81
Recording Track Mutes.................................................................................................................................................... 81
Ignoring Track Mute Events ............................................................................................................................................ 81
Track Mute Groups .......................................................................................................................................................... 81
Track Mute Quantization ......................................................................................................82
TRACK MUTE Quantization .......................................................................................................................................... 82
Changing the Timing Correct for Track Mute Quantization........................................................................................... 82
Change Sequences in Track Mute Mode................................................................................82
Program with Pads (Pad Mute) ............................................................................................83
Operation..........................................................................................................................................................................83
Pad Mute Groups .............................................................................................................................................................83
Pad Mute Quantization .........................................................................................................83
PAD MUTE .....................................................................................................................................................................83
Changing the Timing Correct for Pad Mute Quantization ..............................................................................................84
Selecting a Sequence to Play with Pads ...............................................................................84
Operation..........................................................................................................................................................................84
SUDDEN Button.............................................................................................................................................................. 85
HOLD Button................................................................................................................................................................... 85
Next Sequence for Next Bar .................................................................................................85
Chapter 10: MIXER Mode..............................................................................................87
Program Mixer .....................................................................................................................87
Setting the Output ............................................................................................................................................................87
Setting the Level and Pan of a Pad ..................................................................................................................................88
Assigning Effects to a Pad ...............................................................................................................................................88
Muting Pads .....................................................................................................................................................................89
Viewing Program Info..........................................................................................................89
Track Mixer ..........................................................................................................................90
Setting the Level and Pan Position of a Track.................................................................................................................90
Muting a Track ................................................................................................................................................................. 90
Using Q-LINK Controls with MIXER Mode .................................................................................................................. 91
Viewing Track Details ..........................................................................................................91
Mixer Automation ................................................................................................................91
Shortcut between MIXER and EFFECTS mode. ............................................................................................................92
Take Over Mode ...................................................................................................................92
Input Thru ...........................................................................................................................92
Applying effects to an incoming signal ...........................................................................................................................92
Page 10

Chapter 11: Sampling ...................................................................................................95
Preparing the recording .......................................................................................................95
Starting the recording.......................................................................................................................................................96
Sampling - detailed information...........................................................................................97
Recording the digital signal .................................................................................................97
Preparing the recording .................................................................................................................................................... 97
Recording the MAIN OUT .....................................................................................................97
Preparation For Recording ............................................................................................................................................... 97
Recording the internal CD’s sound .......................................................................................97
Preparation For Recording ............................................................................................................................................... 97
Other Features .....................................................................................................................98
Monitoring feature ...........................................................................................................................................................98
Peak hold/Reset peak feature ........................................................................................................................................... 98
RECORD INFORMATION Window .............................................................................................................................99
Direct Recording feature ......................................................................................................99
Preparing the recording .................................................................................................................................................... 99
Starting the recording.....................................................................................................................................................100
Chapter 12: Sample Editing: TRIM Mode ..................................................................101
Setting the Start / End Points ............................................................................................101
About the waveform display..........................................................................................................................................101
LEFT / RIGHT / BOTH Waveform View ..................................................................................................................... 101
Adjusting the start point.................................................................................................................................................101
Adjusting the end point .................................................................................................................................................. 102
Snapping to the Next Zero Crossing (SNAP 0) ............................................................................................................. 102
Zooming in/out...............................................................................................................................................................102
Adjusting the TRIM and LOOP Points at the Same Time (LOCK).........................................102
Deleting Unused Parts from a Sample (DISCARD) .............................................................103
Deleting a Section of a Sample (DELETE) ...........................................................................103
Silencing Part of a Sample (SILENCE) ................................................................................103
Saving part of a sample as a new sample (EXTRACT) ........................................................103
Converting a Stereo Sample to Mono (STEREO TO MONO) .................................................104
Sample window features....................................................................................................104
Changing the sample name ............................................................................................................................................104
Changing the pitch of a sample...................................................................................................................................... 104
Copying a sample...........................................................................................................................................................104
Deleting a sample...........................................................................................................................................................105
Deleting all samples ....................................................................................................................................................... 105
Assign a Sample to a Pad directly in TRIM Mode ........................................................................................................ 105
Selecting a Pad’s Sample to Edit ...................................................................................................................................105
Setting the Root Note of a Sample................................................................................................................................. 106
Other editing functions ......................................................................................................106
NORMALIZE ................................................................................................................................................................106
REVERSE ...................................................................................................................................................................... 106
TIME STRETCH ...........................................................................................................................................................106
PITCH SHIFT (Changing the pitch of the sample) .......................................................................................................108
Gain ................................................................................................................................................................................ 109
Bit Reduce...................................................................................................................................................................... 109
Fade In............................................................................................................................................................................ 109
Fade Out ......................................................................................................................................................................... 110
Dividing a Phrase Sample into Several Regions .................................................................111
Chop Shop......................................................................................................................................................................111
SLICED SAMPLE/PATCHED PHRASE.....................................................................................................................111
Dividing a Sample Automatically (AUTO)...................................................................................................................112
Dividing a Sample into Regions of Equal Length (EQUALLY) ..................................................................................112
Adjusting the Start / End Point of the Region ...............................................................................................................112
Zoom ..............................................................................................................................................................................113
Converting Divided Samples to SLICED SAMPLES................................................................................................... 113
Converting PATCHED PHRASE.................................................................................................................................. 114
Changing the Tune and Tempo of a Patched Phrase Sample ..............................................114
Editing Regions ..................................................................................................................115
Page 11

EXTRACT .....................................................................................................................................................................115
DIVIDE REGION..........................................................................................................................................................115
COMBINE REGION .....................................................................................................................................................115
RESTORE ...................................................................................................................................................................... 115
Setting the loop .................................................................................................................116
Adjusting the loop point................................................................................................................................................. 116
Adjusting the end point .................................................................................................................................................. 116
Zooming In/Out of the Waveform ................................................................................................................................. 116
LINEAR and LOGARITHMIC Displays ...................................................................................................................... 117
Linking the Loop Point to the Start Point......................................................................................................................117
Auto Phrase Loop........................................................................................................................................................... 117
Popup List for Samples ......................................................................................................117
Convert Patched Phrases to Sliced Samples .................................................................................................................. 117
Chapter 13: Sample, Keygroup and Synth Programs ..............................................119
Sample Programs...............................................................................................................119
Creating a Sample Program ...........................................................................................................................................119
Assigning Samples to Pads ............................................................................................................................................119
Note On vs. One Shot ....................................................................................................................................................120
Volume and Tuning For a Sample ................................................................................................................................. 120
Velocity .......................................................................................................................................................................... 120
Velocity / Cycle / Random Sample Switching (Zone Play) ................................................................................................... 121
Velocity Sample Switching............................................................................................................................................ 121
Cycle Switching .............................................................................................................................................................121
Random Sample Switching............................................................................................................................................121
Per-Sample Panning ....................................................................................................................................................... 122
Changing Pitch with Velocity ........................................................................................................................................ 122
Playing several samples with one pad ...........................................................................................................................122
Assigning One Sample across All Pads (Auto-Chromatic)...........................................................................................122
Simultaneous Playing of Multiple Pads......................................................................................................................... 123
Setting Envelopes........................................................................................................................................................... 123
Using Filters with Sample Programs .............................................................................................................................125
Setting the Filter............................................................................................................................................................. 125
Controlling the Filter with Velocity...............................................................................................................................126
Multi Pad Edit ................................................................................................................................................................126
Program Tune.................................................................................................................................................................127
Mute groups ...................................................................................................................................................................127
Limiting the Number of Voices in a Program ............................................................................................................... 127
Setting Voice Overlap .................................................................................................................................................... 127
Mute Target feature........................................................................................................................................................ 128
Low Frequency Oscillators (LFO)................................................................................................................................. 128
Purge Unused Samples .................................................................................................................................................. 129
Sample assignment......................................................................................................................................................... 129
KEYGROUP Type Program ..................................................................................................130
Creating a Keygroup Program .......................................................................................................................................130
Adding Keygroups to a Keygroup Program .................................................................................................................. 130
Sample Layer Crossfade ................................................................................................................................................131
Panning Individual Samples .......................................................................................................................................... 131
Tuning and Root Note....................................................................................................................................................131
Keytracking .................................................................................................................................................................... 132
Keygroup Tune and Transpose ...................................................................................................................................... 132
Pitchbend / Modwheel / Aftertouch............................................................................................................................... 132
Synth Programs .................................................................................................................133
About Subtractive Synthesis .......................................................................................................................................... 133
Playing a Synth Program ............................................................................................................................................... 133
Auditioning a Synth Program ........................................................................................................................................133
The Synth Button ...........................................................................................................................................................134
Creating a Synth Program .............................................................................................................................................. 134
Editing with Q-LINK Controls ......................................................................................................................................134
Basic Editing of a Synth Program.................................................................................................................................. 134
VCOs..............................................................................................................................................................................136
VCF ................................................................................................................................................................................ 137
VCA ...............................................................................................................................................................................139
LFOs............................................................................................................................................................................... 140
MASTER........................................................................................................................................................................ 141
Other Program Functions ...................................................................................................142
Changing the program name .......................................................................................................................................... 142
Copying a program......................................................................................................................................................... 143
Deleting a program......................................................................................................................................................... 143
Deleting all programs.....................................................................................................................................................143
Page 12

Setting a Program Change Number ...............................................................................................................................143
Assigning MIDI Notes to Pads in a Sample Program ...................................................................................................144
Changing the Default Note Number Assignment .......................................................................................................... 144
Chapter 14: Arpeggiator .............................................................................................145
Editing the Arpeggiator......................................................................................................145
Latching the Arpeggiator ...................................................................................................146
Using the Arpeggiator with Pre-Recorded Tracks...............................................................147
Chapter 15: Effects......................................................................................................149
Applying Effects to a Pad ...................................................................................................149
Buss Effects vs. Insert Effects .......................................................................................................................................150
Setting an Effect as an Insert ......................................................................................................................................... 150
Adding additional Effects to the Effects Buss...............................................................................................................151
Effect Buss Chaining ..........................................................................................................151
About CPU Usage ...............................................................................................................151
Editing Effects....................................................................................................................151
Effect List.......................................................................................................................................................................152
Routing Effect Buss Output to Individual Outs ...................................................................162
Using Master Effects ..........................................................................................................162
Editing the Master Effects .............................................................................................................................................163
Editing the Effect Set .........................................................................................................163
Changing the name of the Effect Set .............................................................................................................................163
Copying the effect set ....................................................................................................................................................164
Resetting the effect set ................................................................................................................................................... 164
Copy / Paste / Swap Effect Settings ..................................................................................164
[F2] COPY .....................................................................................................................................................................164
[F3] PASTE.................................................................................................................................................................... 164
[F5] SWAP.....................................................................................................................................................................164
Easy Effect List Navigation ........................................................................................................................................... 164
Chapter 16: Saving and Loading (DISK Mode) .........................................................165
About memory cards...................................................................................................................................................... 165
Saving................................................................................................................................165
Selecting the destination ................................................................................................................................................165
Creating a New Folder ...................................................................................................................................................165
Saving a Sample............................................................................................................................................................. 166
Saving a Synth or Sample Program ............................................................................................................................... 166
Saving all Programs and Samples..................................................................................................................................167
Saving a Sequence ......................................................................................................................................................... 167
Saving All the Sequences and the Songs at the Same Time ......................................................................................... 168
Saving All Data In Memory........................................................................................................................................... 168
About Input Thru (.IPT) File .........................................................................................................................................169
Renaming a File .............................................................................................................................................................169
Deleting a File ................................................................................................................................................................ 169
Copying Files .................................................................................................................................................................169
Moving Files ..................................................................................................................................................................170
Loading ..............................................................................................................................171
Selecting a File...............................................................................................................................................................171
Loading a Sample........................................................................................................................................................... 171
Create a New Program When Loading a Sample .......................................................................................................... 172
Loading Audio from the Internal CD Drive (optional) .................................................................................................172
Loading a Program.........................................................................................................................................................172
Deleting All Programs and Samples in Memory Before Loading ................................................................................173
Loading a Sequence .......................................................................................................................................................173
Loading the ALL File ....................................................................................................................................................173
Loading Individual Sequences from the ALL File........................................................................................................173
Loading Only the Effect Set from the ALL File ........................................................................................................... 173
Loading a Folder ............................................................................................................................................................174
Automatically Create Programs from a Folder....................................................................174
Loading a Folder after Deleting All Data in Memory................................................................................................... 174
Loading a Project ...........................................................................................................................................................174
Loading an Input Thru File ............................................................................................................................................ 174
Page 13

Burning CDs .......................................................................................................................175
Audio CDs...................................................................................................................................................................... 175
Data CDs ........................................................................................................................................................................175
Erasing CD-R/Ws ..........................................................................................................................................................176
Close Session .................................................................................................................................................................176
Autoload ............................................................................................................................176
Creating an Autoload .....................................................................................................................................................176
Restoring the Factory Autoload ..................................................................................................................................... 176
Turning Autoload Off ....................................................................................................................................................177
Formatting .........................................................................................................................177
Auditioning Synth Programs.......................................................................................................................................... 177
Quick File Browser Movements ....................................................................................................................................177
Chapter 17: Program and FX Q-LINK Controllers.....................................................179
Program Q-LINK programming ....................................................................................................................................179
Configuring the Q-LINK Sliders & Knobs ............................................................................179
Resetting the Q-LINK slider / knob value ..........................................................................181
Recording the slider/knob value in a sequence .................................................................181
[AFTER] Button ............................................................................................................................................................181
Sending MIDI Continuous Controllers with a Q-LINK .........................................................182
Configuring FX Q-Links ......................................................................................................182
Configuring the FX Q-LINK Sliders & Knobs .............................................................................................................182
Default Q-LINK Mode .........................................................................................................183
Bypassing Default Q-LINK ...........................................................................................................................................183
Chapter 18: Using the MPC5000 with External Devices...........................................185
MIDI Clock .........................................................................................................................185
MIDI Sync with the MPC5000 as the master................................................................................................................ 185
MIDI Sync with the MPC5000 as the slave ..................................................................................................................185
MIDI Time Code (MTC).......................................................................................................186
Time code Display .........................................................................................................................................................186
MPC5000 as the Slave ................................................................................................................................................... 186
MPC5000 as the Master.................................................................................................................................................186
MIDI Machine Control (MMC).....................................................................................................................................187
Sending MMC to a device .............................................................................................................................................187
Receiving MMC from a device .....................................................................................................................................187
Connecting the MPC5000 to a MIDI Keyboard with Built-in Sounds ...................................188
Setting the MIDI Input Channel .........................................................................................189
Connecting the MPC5000 as a Multitimbral Sound Module .................................................189
Setting MIDI Channel .................................................................................................................................................... 189
Select Active Track or Sequence with a Program Change...................................................189
Chapter 19: Connecting the MPC5000 to Your Computer .......................................191
Connecting the MPC5000 to a Windows - based PC.................................................................................................... 191
Connecting the MPC5000 to the Macintosh.................................................................................................................. 191
Chapter 20: Other Settings.........................................................................................193
Adjusting the Master Level............................................................................................................................................ 193
Sustain Pedal to Duration............................................................................................................................................... 193
Truncate Duration ..........................................................................................................................................................194
Record Aftertouch.......................................................................................................................................................... 194
Tap Average ................................................................................................................................................................... 194
Flash Tempo LED .......................................................................................................................................................... 194
Mute / Stop of One-Shot Samples .................................................................................................................................194
Setting the ADAT Digital Output .................................................................................................................................. 195
Program Audition Note.................................................................................................................................................. 195
Using the Footswitches .................................................................................................................................................. 195
Adjustment of Pad Sensitivity and Velocity Curve....................................................................................................... 197
SYSTEM ........................................................................................................................................................................ 197
Initialize To Factory Default.......................................................................................................................................... 198
How to Upgrade the MPC5000 .....................................................................................................................................198
Specifications.....................................................................................................................200
Page 14

General ...........................................................................................................................................................................200
Sound Generator ............................................................................................................................................................200
Effects.............................................................................................................................................................................200
Sequencer .......................................................................................................................................................................200
Inputs/Outputs................................................................................................................................................................ 201
Standard accessories ......................................................................................................................................................201
Options ...........................................................................................................................................................................201
Data Compatibility.........................................................................................................................................................201
MIDI Implementation Chart...............................................................................................203
Index .................................................................................................................................205
Page 15
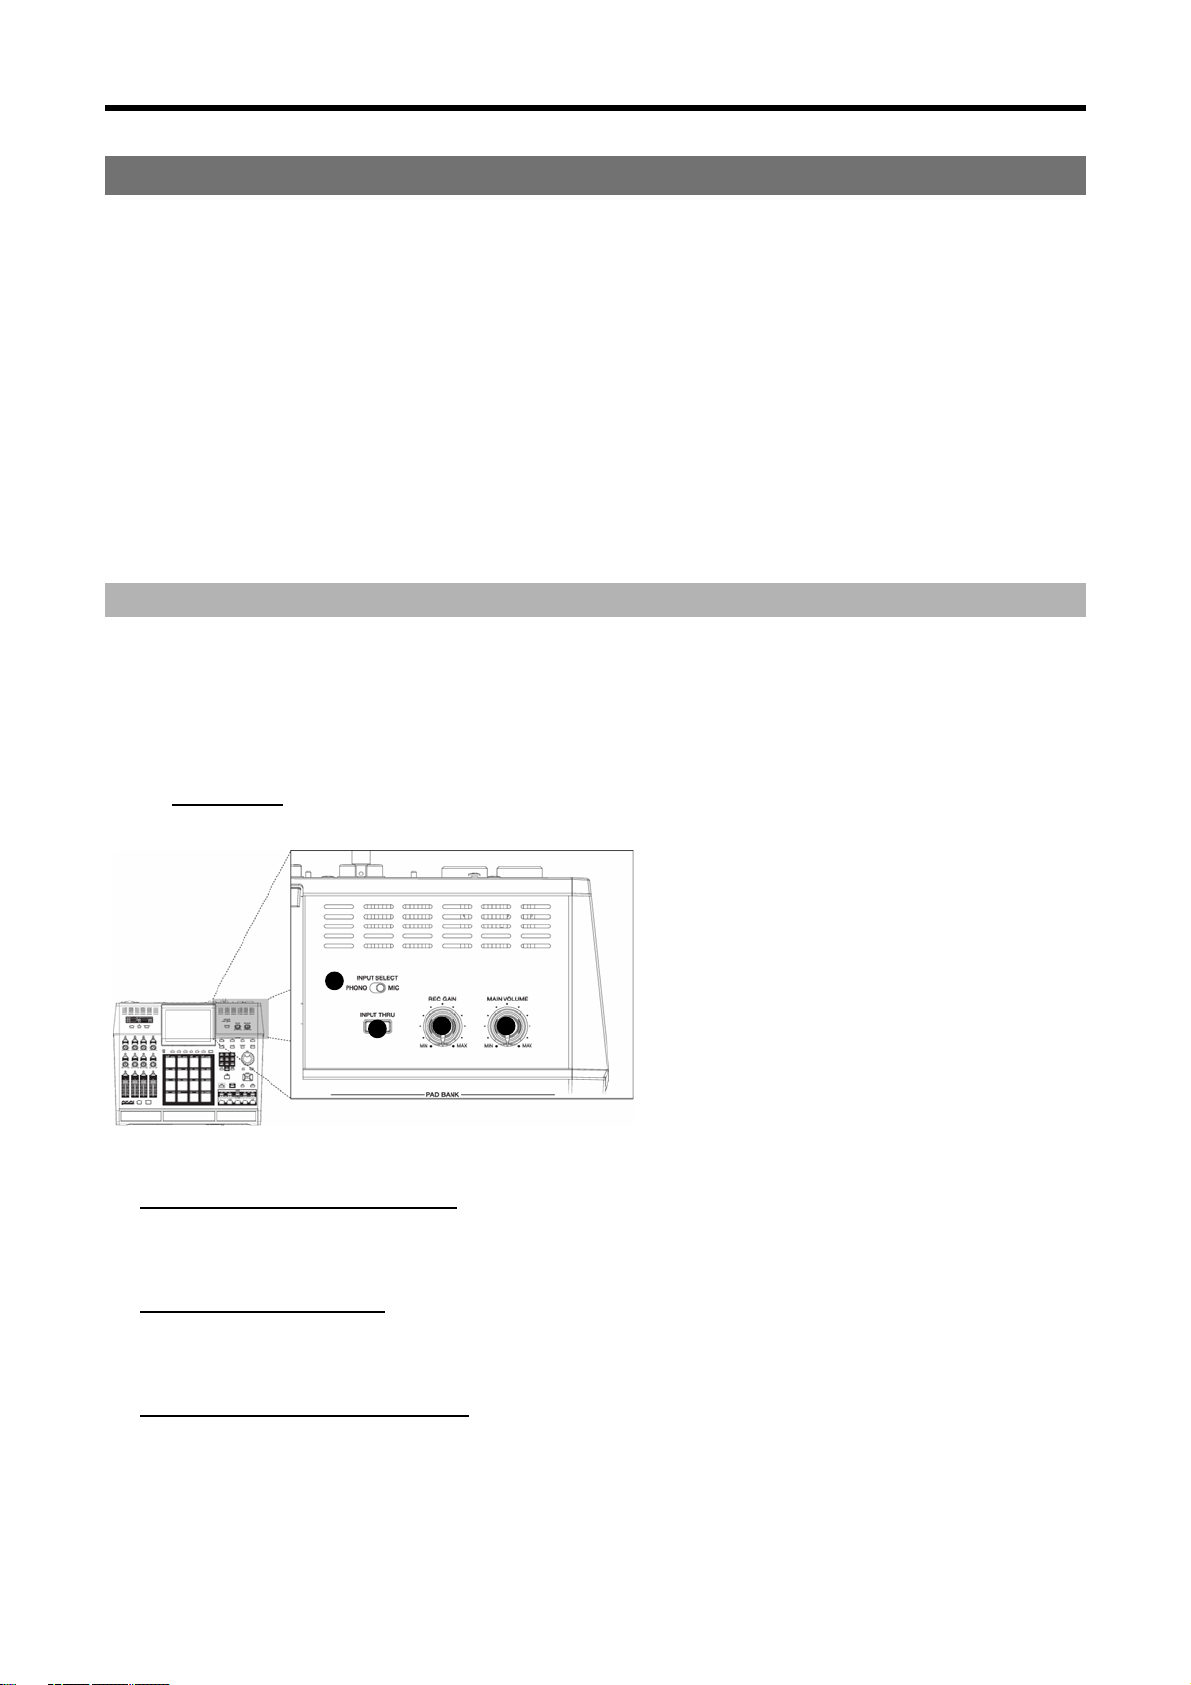
1 3 4
Chapter 1: Introduction
Thank you for purchasing the MPC5000. The MPC5000 is a powerful musical production tool and this manual describes
how to use the MPC to its fullest potential. We’re sure you’d like to jump in and start using your MPC5000 quickly. To
help you do this, check out the MPC5000’s Quickstart guide. The Quickstart guide is a separate manual that should
have everything you need to start playing quickly.
Once you’re ready for more in-depth information, this reference manual is for you. This manual will describe the
workings of every single feature and parameter on the MPC5000 and you should be able to find answers to all of your
MPC5000 questions here.
Be sure to register your MPC5000 at our website (www.akaipro.com) so we can give you the best possible service. And
since the MPC5000's operating system is upgradeable, check the site once in a while for late breaking news. Future
versions of the operating system will include things like new features requested by our users as well as improvements
to existing features. Also, you might want to check for new beats and samples every once in a while.
We hope your investment will bring you many years of creative enjoyment and help you achieve your musical goals.
Sincerely,
The MPC5000 Team
Overview
In this chapter, we’ll go over the basics of the MPC5000 including the name and function of each button, slider, knob,
and jack. Next, we’ll also cover how to hook up your MPC5000 to the rest of your studio. Finally, we’ll review the basic
MPC-related concepts and terminology that is found throughout this manual.
Note that in this manual, the names of buttons, knobs, sliders, and input/output jacks are found in brackets and in all
caps as follows: [NAME]. Names of different operating modes are displayed in all capitals, such as PROGRAM mode.
Fields and parameters on the screen will be indicated by single quotes, such as 'copy sequence'.
Top Panel
Most of the MPC5000’s controls are located on the top of the unit. These controls are as follows:
2
1. [MAIN VOLUME] Knob:
This knob controls the loudness level of the [PHONES] and [STEREO OUT] jacks on the rear of the MPC5000. Use this
knob to control the volume of your headphones or speakers.
2. [REC GAIN] Knob:
This knob controls the gain level of the [INPUT] and [PHONO] jacks on the rear of the MPC. Use this knob to set proper
input levels before you begin recording your own samples.
3. [INPUT SELECT] Switch:
This switch sets the source for your MPC5000’s [INPUT THRU] and record functions. Set this switch to the 'PHONO'
position, for sampling from the RCA jacks, (CD player, DJ mixer, Minidisk, etc.) and to the 'MIC' position for recording
from the [RECORD IN] MIC/1/4" combo jacks.
Page 16

Introduction 2
7 8
12 13
4. [INPUT THRU] Button:
Using this button, you can mix the input signal from the [RECORD IN] jacks to the [STEREO OUT] jacks. This way, an
additional source can be monitored through the MPC5000's outputs without the need for a mixing board. You can also
use the MPC5000’s internal effects on this signal. The level of the input signal is controlled by the [REC GAIN] knob. For
more information, see the 'Input Thru” section at page 92.
5. [PAD BANK] Buttons:
These buttons let you switch between pad banks A, B, C, and D, allowing you to have 64 total pads. The currently
active bank will be illuminated.
5
6
9
6. [FULL LEVEL] Button:
When this button is engaged, the MPC's pads always play back at their maximum volume. Pads will be recorded at
Maximum MIDI velocity (127). When the button is disengaged, the pads can be played using their entire dynamic
range, with the pads getting quieter as you hit softer. Pads will be recorded using the entire MIDI range of velocity (0
-127).
7. [16 LEVEL] Button:
This button allows you to use all 16 drum pads to play one sample with increasing velocity, increased filter effect, or
play a single sample at 16 different pitches.
In other words, if 16 LEVEL is set to Velocity, all of the pads play one sample but the velocity of that sample increases
as you move from [PAD 1] to [PAD 16]. See page 79 for more about this feature.
8. [TRACK MUTE] Button:
This button calls up the TRACK MUTE page where you can mute or solo your sequence’s individual tracks using the
pads, or mute individual pads in the current program. For more on Track mutes, see page 80. For more information on
Pad mutes, see page 82.
9. [NEXT SEQ] Button:
This button calls up the NEXT SEQ page, where you can switch sequences by pressing a pad. For more information, see
the 'Selecting a Sequence to Play with Pads' section on page 84.
10
11
10. NUMERIC KEYPAD
These buttons are used to enter numeric data directly. Enter numbers with these buttons into selected numeric fields
and press the [ENTER] button. If you are entering numbers with a decimal value, enter the number ignoring the
decimal point. (Example: for 120.5, enter 1205.). If you make a mistake, it is possible to cancel by pressing the
[SHIFT] button. If you use the [CURSOR] buttons, [DATA] wheel, or [MAIN] button while you are entering data with
the numeric buttons, the input will be canceled and the data returns to its original value.
Page 17

3
15 16 17
19
Also, you will notice that much like a telephone, each number also has three or four letters associated with it. These
are used for naming programs, tracks, samples etc. For more information on naming, see page 20. These buttons can
also be used in SAMPLE lists, FX lists, and in DISK Mode to quickly jump to the first item corresponding to the letter
pressed.
11. [DATA] Wheel / [+] and [-] Buttons:
This wheel lets you change the value of the currently selected field. Turning the wheel clockwise increases values, or
moves you forward in a list, whereas turning the wheel counterclockwise decreases values or moves you backwards in a
list.
Also, the [+] and [-] buttons can be used to change the selected value by single increments. These are best used for
fine adjustments.
12. [CURSOR] Buttons:
These four buttons let you move your cursor around the LCD screen to select the various parameters available on
screen. Holding [SHIFT] while in a list and pressing up or down will bring you to the top or bottom of the list,
respectively. While in [MAIN] mode, pressing [SHIFT] + [UP] will always select the 'Sequence' field, and [SHIFT] +
[DOWN] will always select the 'Track' field.
13. [TAP TEMPO] Button:
You can set a sequence’s tempo by tapping this button at the desired rate. For more about setting tempos, see 'The
Sequencer' on page 21.
14
14. [MAIN] Button:
This is the Main page of the MPC5000 and is displayed when the unit is powered on. Pressing the [MAIN] button at any
time will return you to this page. See 'Operating Modes' on page 16 for more about this button.
15. [MODE] Button:
The MPC5000 has several different operating modes and each mode is assigned to its own pad. To shift between these
modes, press the [MODE] button and then hit the pad corresponding to the mode you wish to enter. See page 16 for
more on this.
16. [SHIFT] Button:
Many of the MPC5000’s buttons and pads serve more than one function. Holding the [SHIFT] button while pressing
these buttons and pads allows you to access the secondary functions.
17. [UNDO] Button:
If you are unsatisfied with your last performance, you can quickly delete the last take by pressing the [UNDO]. You are
also able to undo certain sample editing functions, like Reverse, Discard and Normalize.
18
20
Page 18
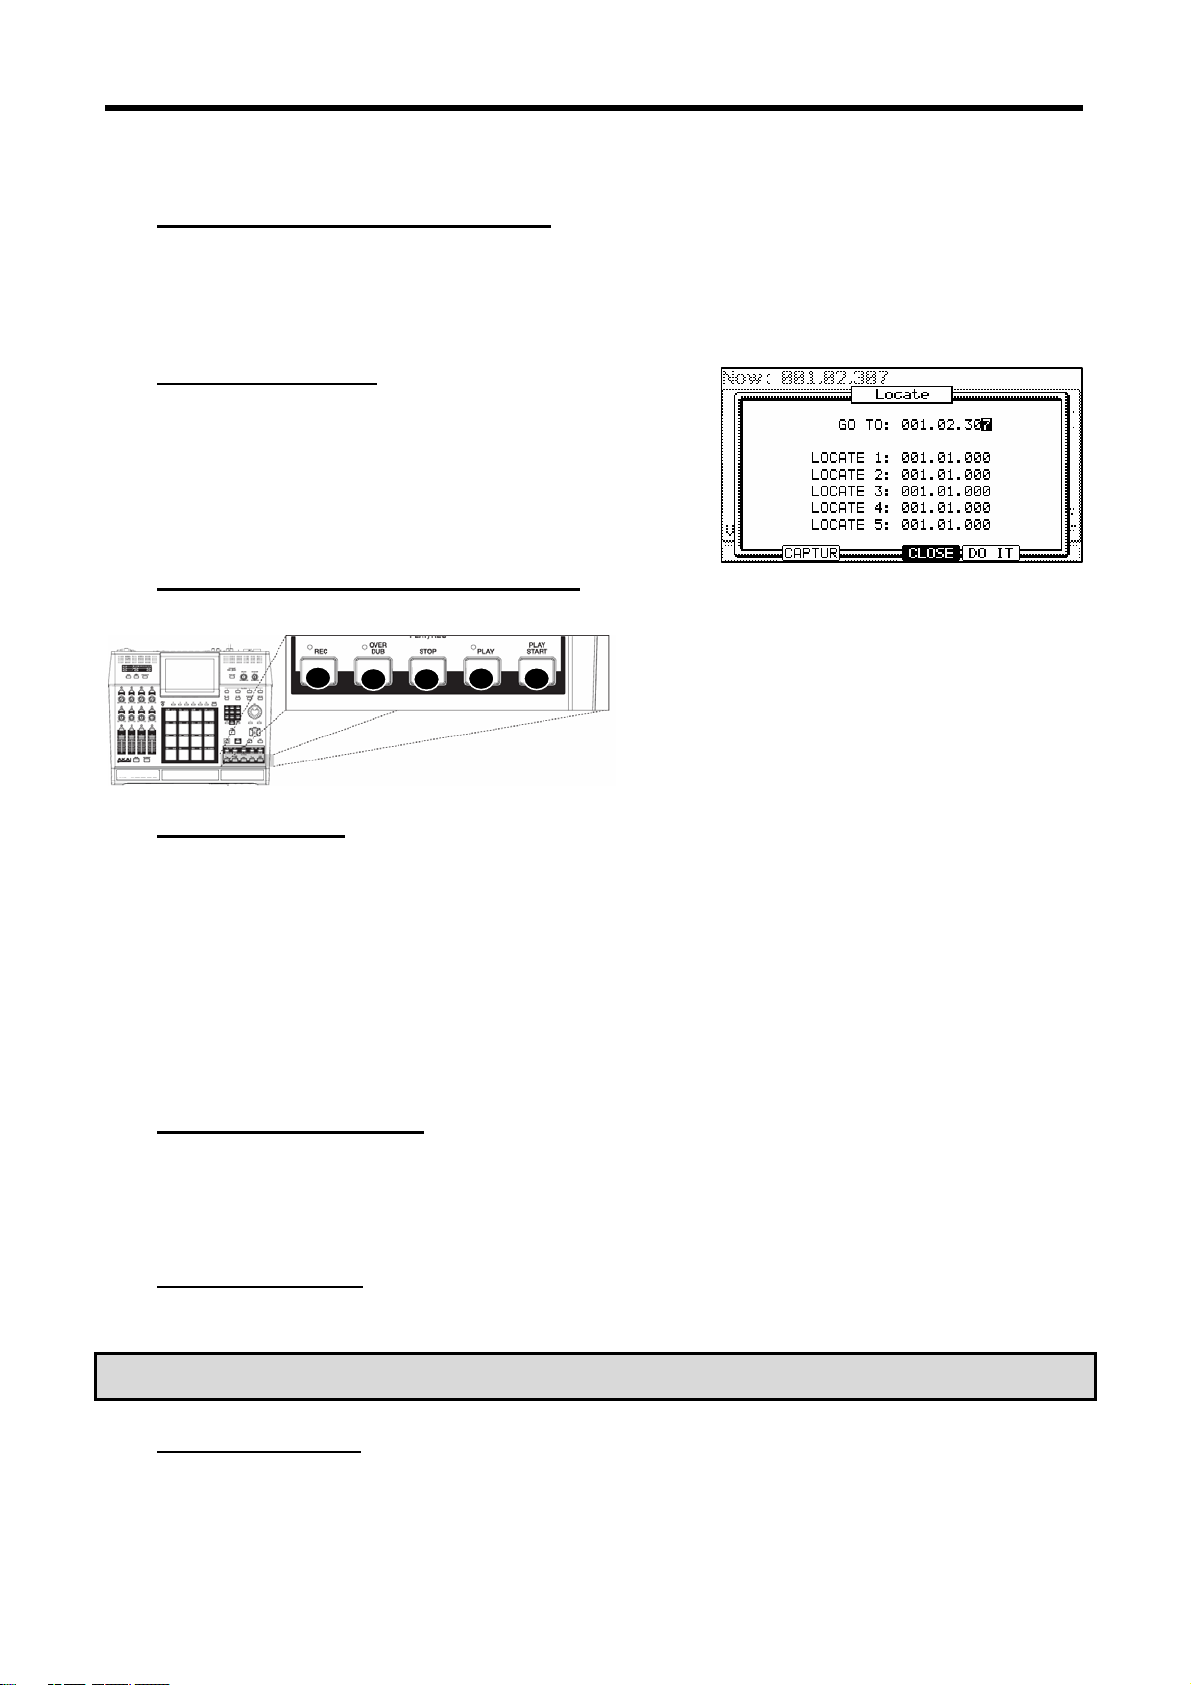
Introduction 4
22 23 24
18. [STEP] Buttons ('<' And '>'):
These buttons will step you through a sequence according to the value of the timing correct setting. See 'STEP EDIT
Mode' on page 47 for more about this.
19. [GO TO] Button:
This button displays the locate window.
Entering a locate point and then pressing [F5] (GO TO) will move you to
the selected position in the sequence.
You can also memorize a locate point. Select a point in your sequence
and press the [GO TO] button. Select number you want to memorize
and press [F2] (CAPTUR) to memorize this point.
20. [BAR] Buttons ('<<' And '>>'):
These buttons let you move through your sequence by bars. See 'STEP EDIT Mode' on page 47 for more about this.
21
25
21. [REC] Button:
This button enables recording of your performances. Pressing [REC] + [PLAY START] or [REC] + [PLAY] will begin
recording to a sequence. Any existing events in your sequence will be overwritten by your new performance.
You can punch in by pressing [PLAY] + [REC] during playback and punch out by pressing the [REC] button a second
time. See page 24 for more about punching in and out on your MPC.
New to the MPC5000 is 'Record Ready' mode. When in 'Record Ready' mode, the MPC will start recording when a MIDI
or MMC Start command is received. To enter record ready mode, simply press and release [REC]. The LED will start to
blink, indicating that the MPC is in 'Record Ready' mode. The MPC will start recording upon pressing [PLAY] or receiving
a MIDI start command. See page 23 for more about 'Record Ready' mode.
Another new function added to the MPC5000 is the ability to perform step recording from the MAIN page by holding
down either the [REC] or [OVERDUB] button. For more information, see page 23.
22. [OVERDUB] Button:
This button is quite similar in function to the [REC] button. The only difference is that [OVERDUB] lets you add events
to an existing sequence (overdub) instead of overwriting existing events in the sequence.
Press [OVERDUB] + [PLAY START] or [OVERDUB] + [PLAY] to begin overdubbing a sequence. To perform a punch-in,
press [PLAY] + [OVERDUB] while the sequence is playing. Press [OVERDUB] to punch out while recording.
23. [STOP] Button:
This button stops playback and recording. Quickly pressing this button three times sends an 'all notes off' MIDI
command stops all sounds from playing back.
Note: If your MPC5000 has a 'stuck note' or if a sample is ringing due to improper programming, you can always stop
all sounds by quickly tapping the [STOP] button three times.
24. [PLAY] Button:
This button starts playback of a sequence or song from its current position.
Page 19
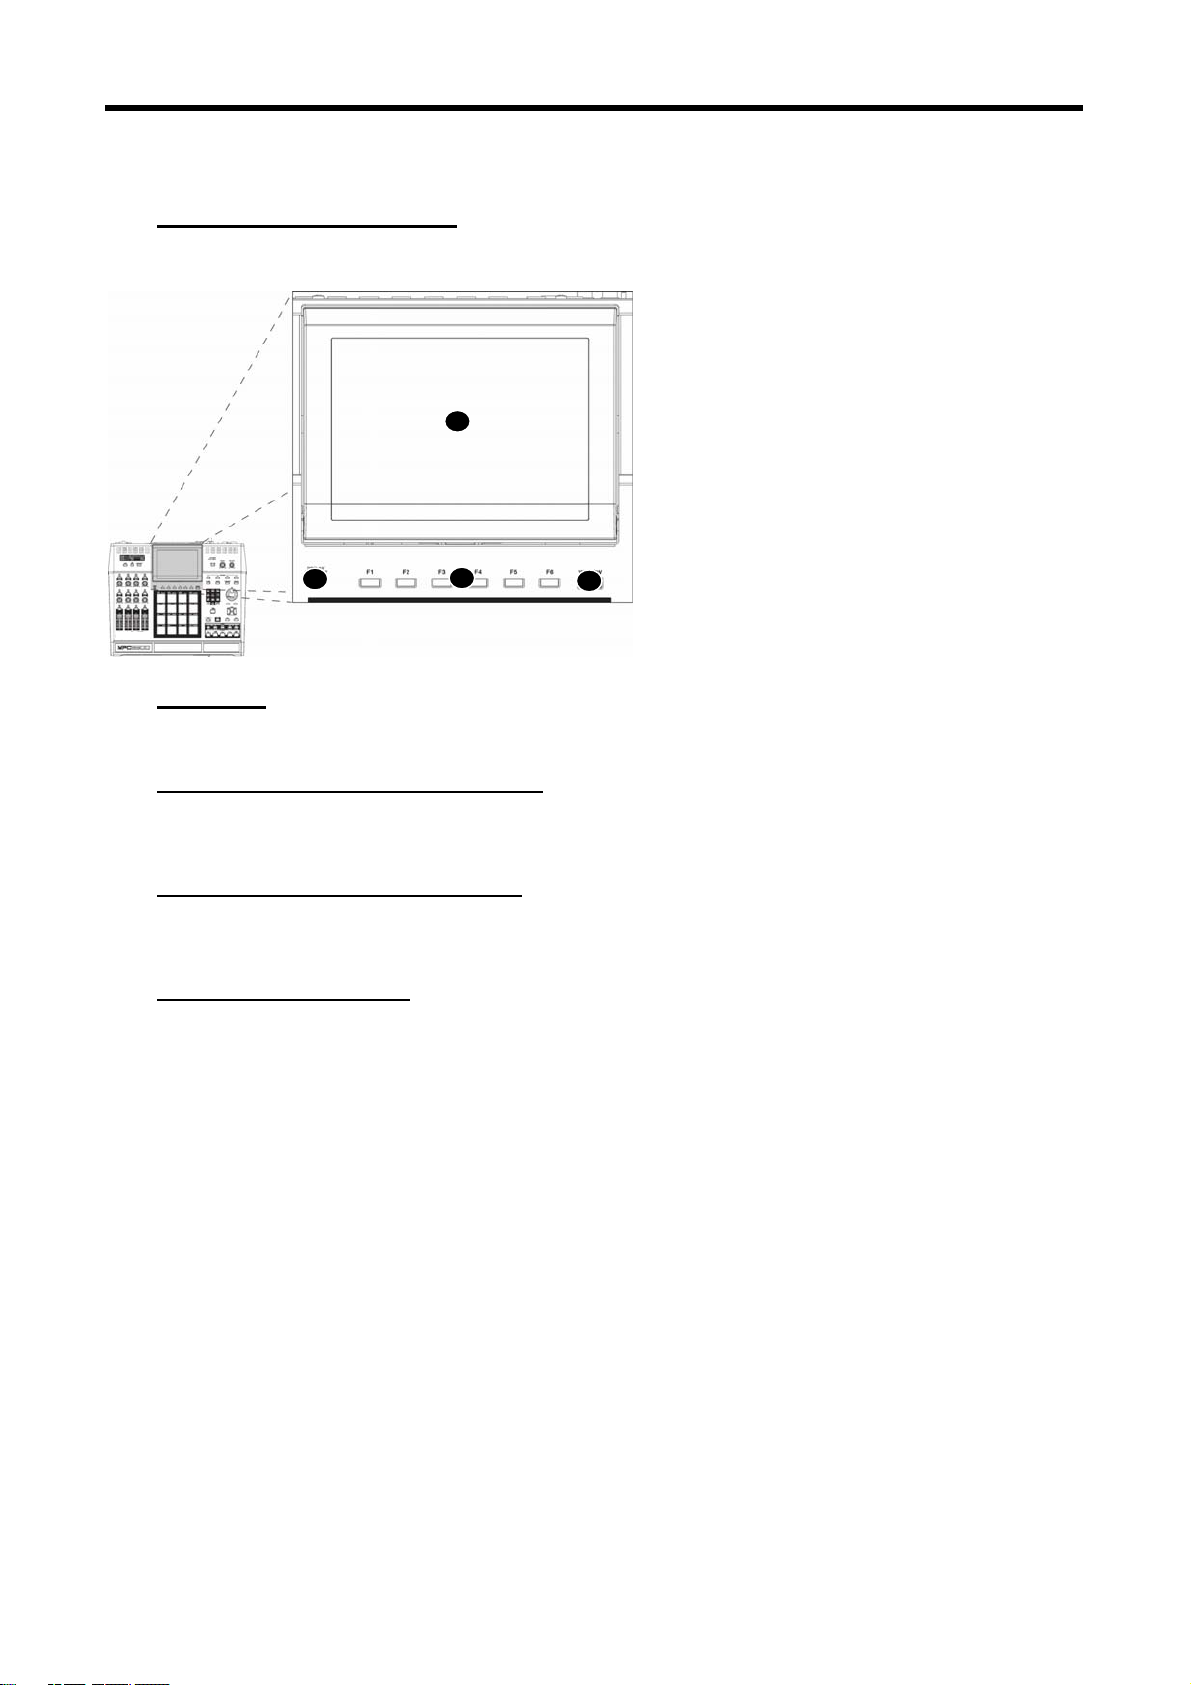
5
25. [PLAY START] Button:
When looping is disabled, this button will play a sequence from the beginning. Press [PLAY START] to start from the
beginning of the sequence regardless of whether looping is enabled or disabled.
26
27
28
29
26. Display:
This backlit LCD (Liquid Crystal Display) shows you the status of your MPC.
27. [DISPLAY CONTRAST] Knob:
This knob will change the contrast of the LCD display. This will allow the screen to be easily viewed at many different
angles.
28. [F1] through [F6] Buttons:
These buttons are used to call up pages at the bottom of the display, or to execute the feature assigned to the button.
The available feature depends on the currently displayed screen.
29. [WINDOW] Button
Pressing this button will display a pop up window where you can see more details about the parameter selected on the
screen, and allows you to access more in-depth editing of the selected function. When there is more information or
parameters available for a particular selection, the [WINDOW] button will light.
This button also acts as a drive activity light when connected via USB. When your computer is accessing the drive, the
[WINDOW] button's LED will flash repeatedly.
Page 20
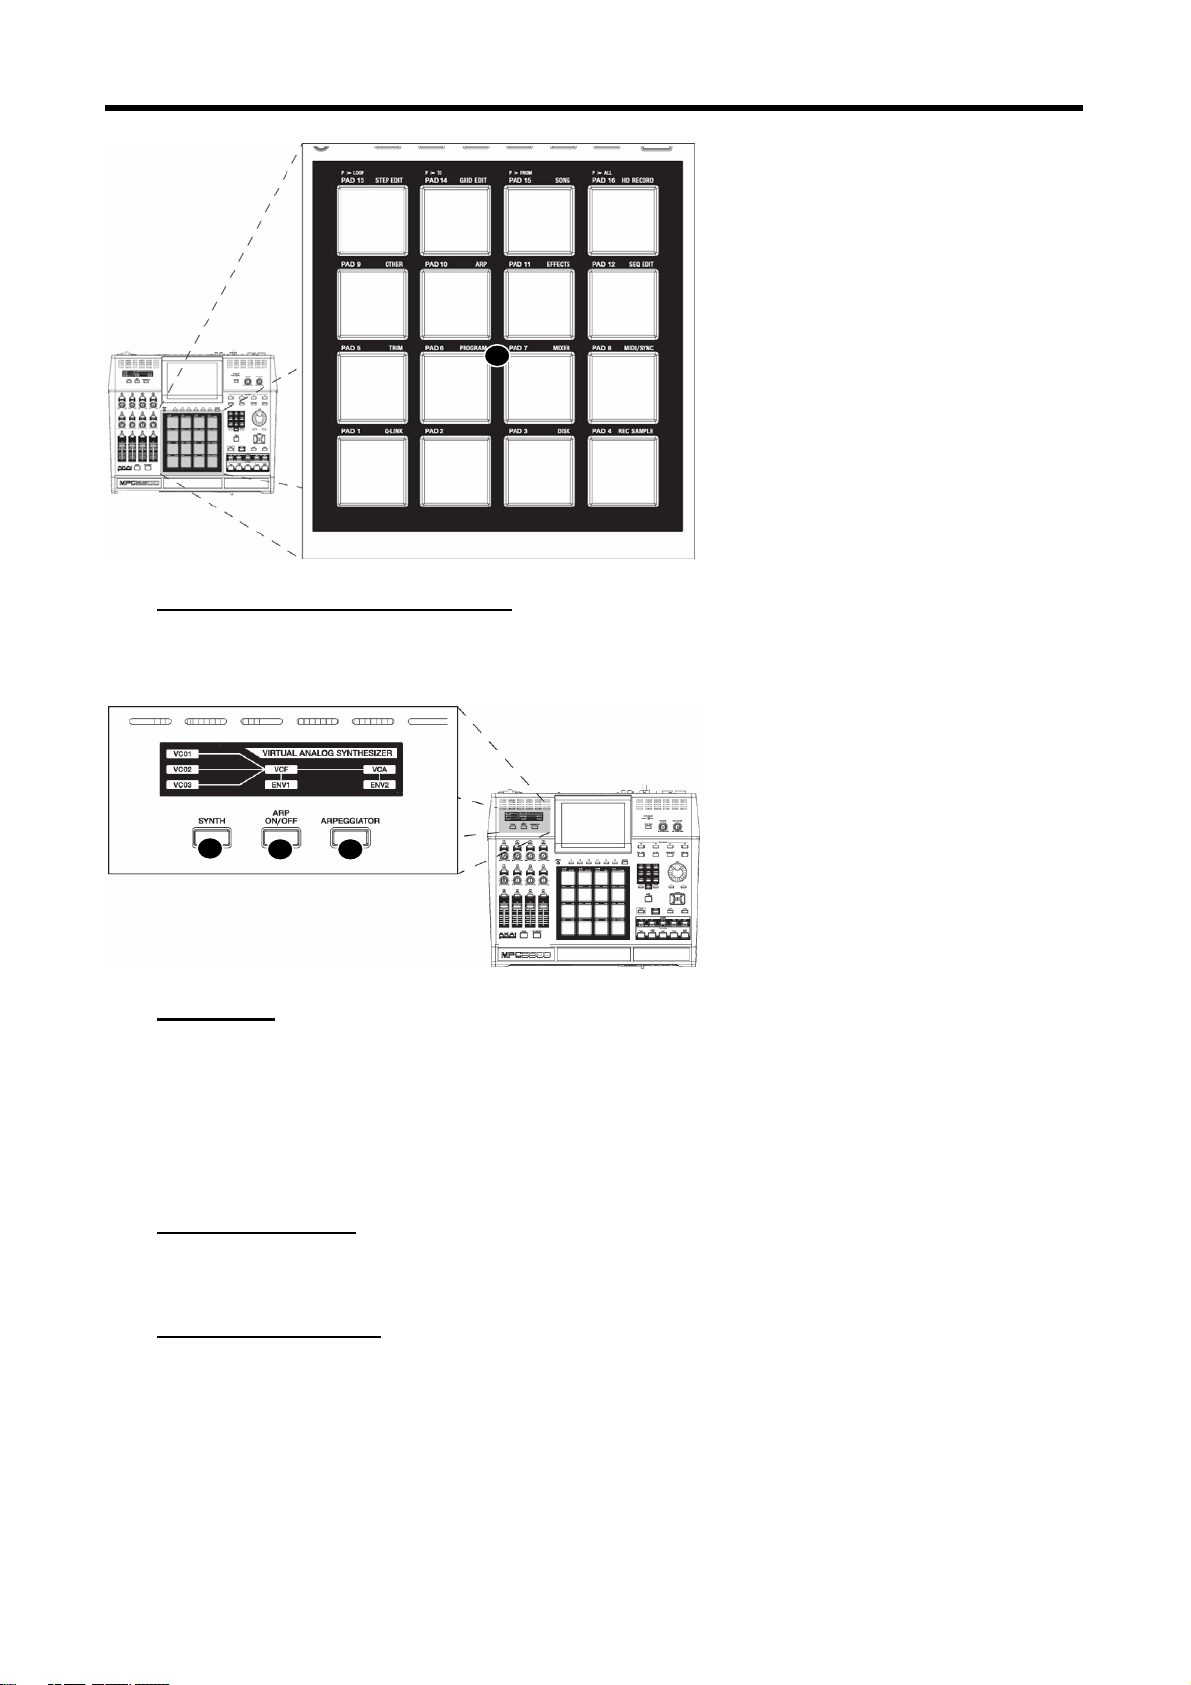
Introduction 6
33
30
30. [PAD1] Through [PAD16]:
These drum pads let you trigger the samples in your MPC, or play Synth Programs. These pads also let you enter
various modes, choose sequences, and mute tracks.
31
32
31. [SYNTH]
to the MPC 5000 is a virtual analog synth, with which you can create your own synth programs. Synth programs make
sound by a method called 'subtractive synthesis'. From smooth, whistling leads, to huge, booming basses, to lush,
spacious pads, synth programs can be used to create a vast array of sounds.
Pressing the [SYNTH] button allows for quick access to the synth program on the current track, automatically add the
first loaded synth program to the current track, or if no synth program is loaded, create a new, generic synth program
for you to work with. It's best to think of the [SYNTH] button as a quick-fix shortcut to quickly get into synth
programming.
32. [ARP ON/OFF]
This button allows you to turn on or off the arpeggiator quickly. This button will light when the arpeggiator is on for the
current track.
33. [ARPEGGIATOR]
New to the MPC5000 is the arpeggiator. The arpeggiator will play in the order the pads being held down, or any notes
being held down on an external MIDI keyboard. This will allow for rapid playing not always possible when playing
manually. This is similar to pressing [NOTE REPEAT], but the advantages of an Arpeggiator (or 'Arp' for short) are that
the notes play in a defined pattern. For more on the Arpeggiator, see page 145.
Page 21
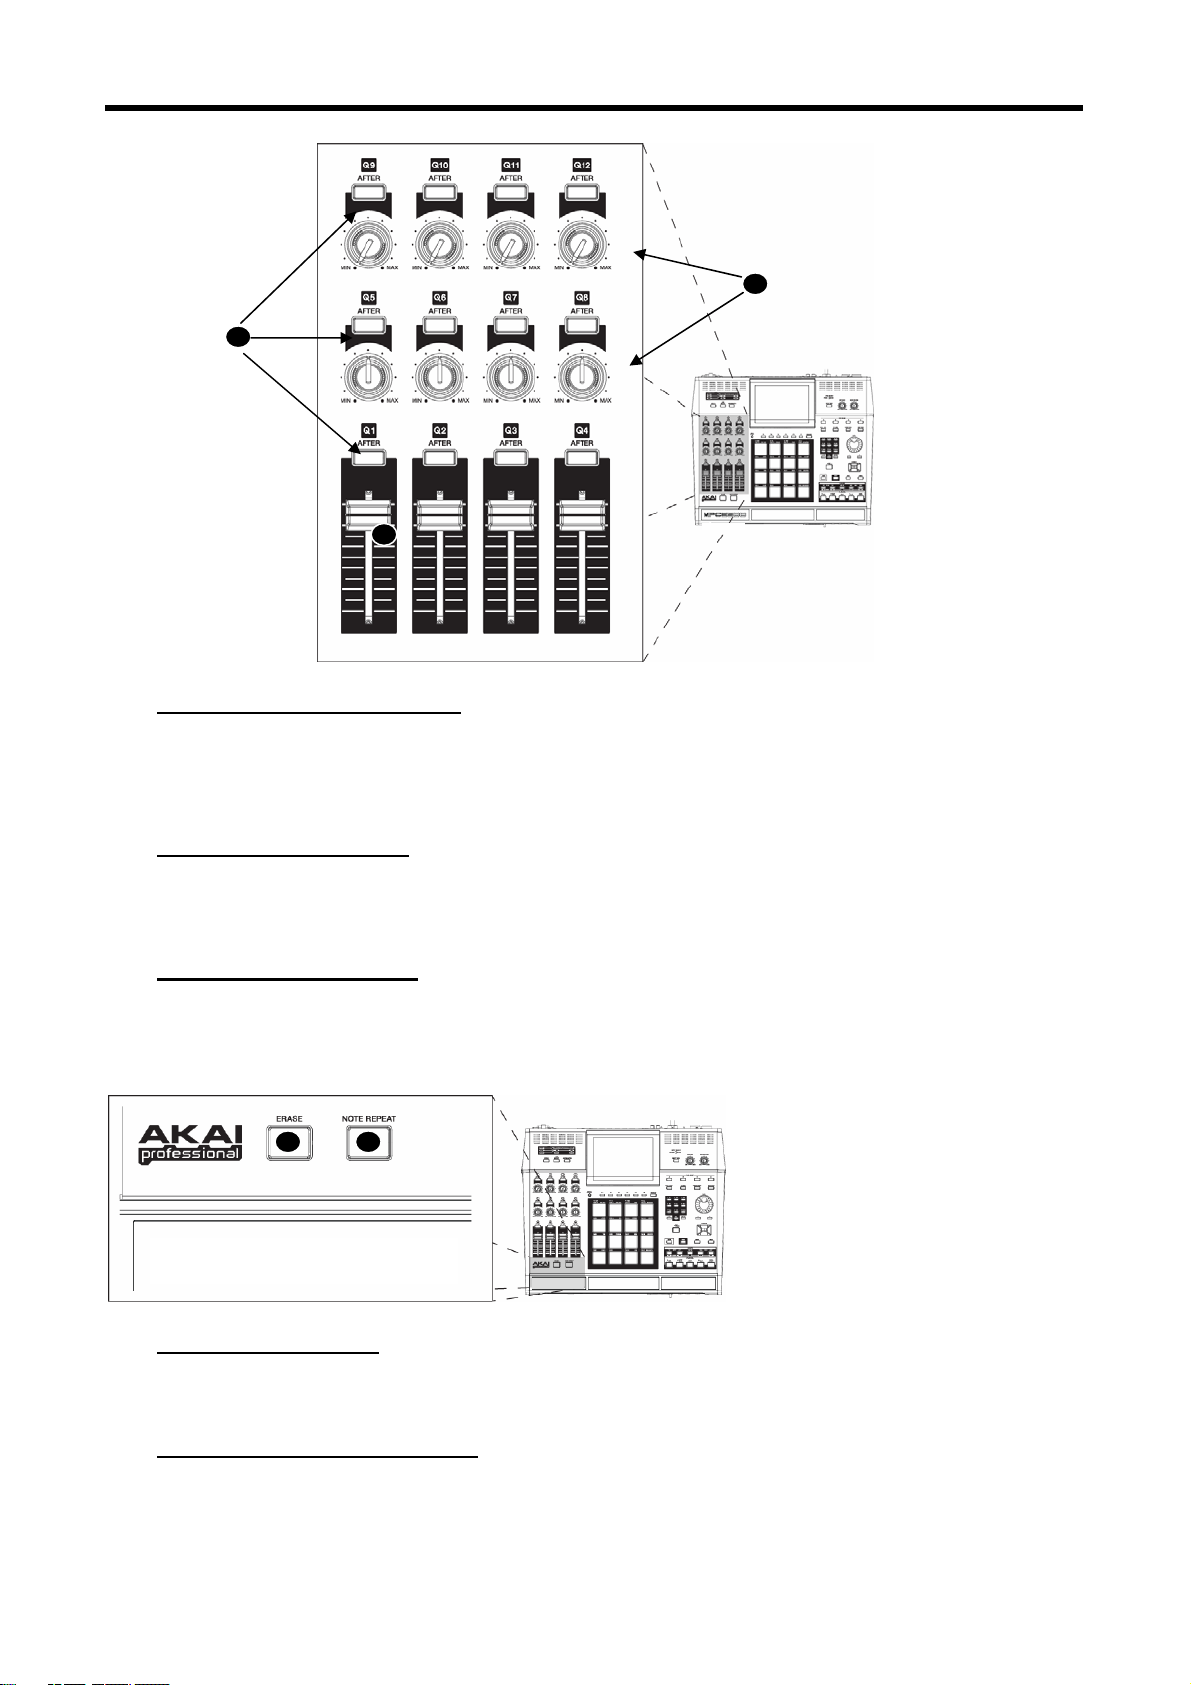
7
35
37 38
34
36
34. [AFTER] Buttons (12):
When these buttons are engaged during recording, the Q-LINK slider or knob associated with the selected [AFTER]
button will overwrite any existing slider data on your track. Additionally, these buttons can be configured to send MIDI
Continuous Controller information to control external MIDI devices. See 'Program and FX Q-LINK Controllers' on page
179 for more about this.
35. Q-LINK Knobs (8):
These knobs let you manipulate your sounds in real-time. The knobs can be assigned to control various parameters in
SLIDER mode, or to send MIDI continuous controller data to external modules. See 'Program and FX Q-LINK
Controllers' on page 179 for more about this.
36. Q-LINK Sliders (4):
These sliders let you manipulate your sounds in real-time. The sliders can be assigned to control various parameters in
SLIDER mode, or to send MIDI continuous controller data to external modules. See 'Program and FX Q-LINK
Controllers' on page 179 for more about this.
37. [ERASE] Button:
Use the [ERASE] button to delete events within a track. You can use this button in real-time during recording, or to
delete events using the ERASE window. For more information see page 25.
38. [NOTE REPEAT] Button:
Holding this button down when you strike a pad causes the pad to retrigger the sample at a rate indicated in the 'Timing
Correct' Window ([F1] (T.C.) on the MAIN page). Note Repeat allows for the playing of drum rolls, hi hat runs with
Page 22
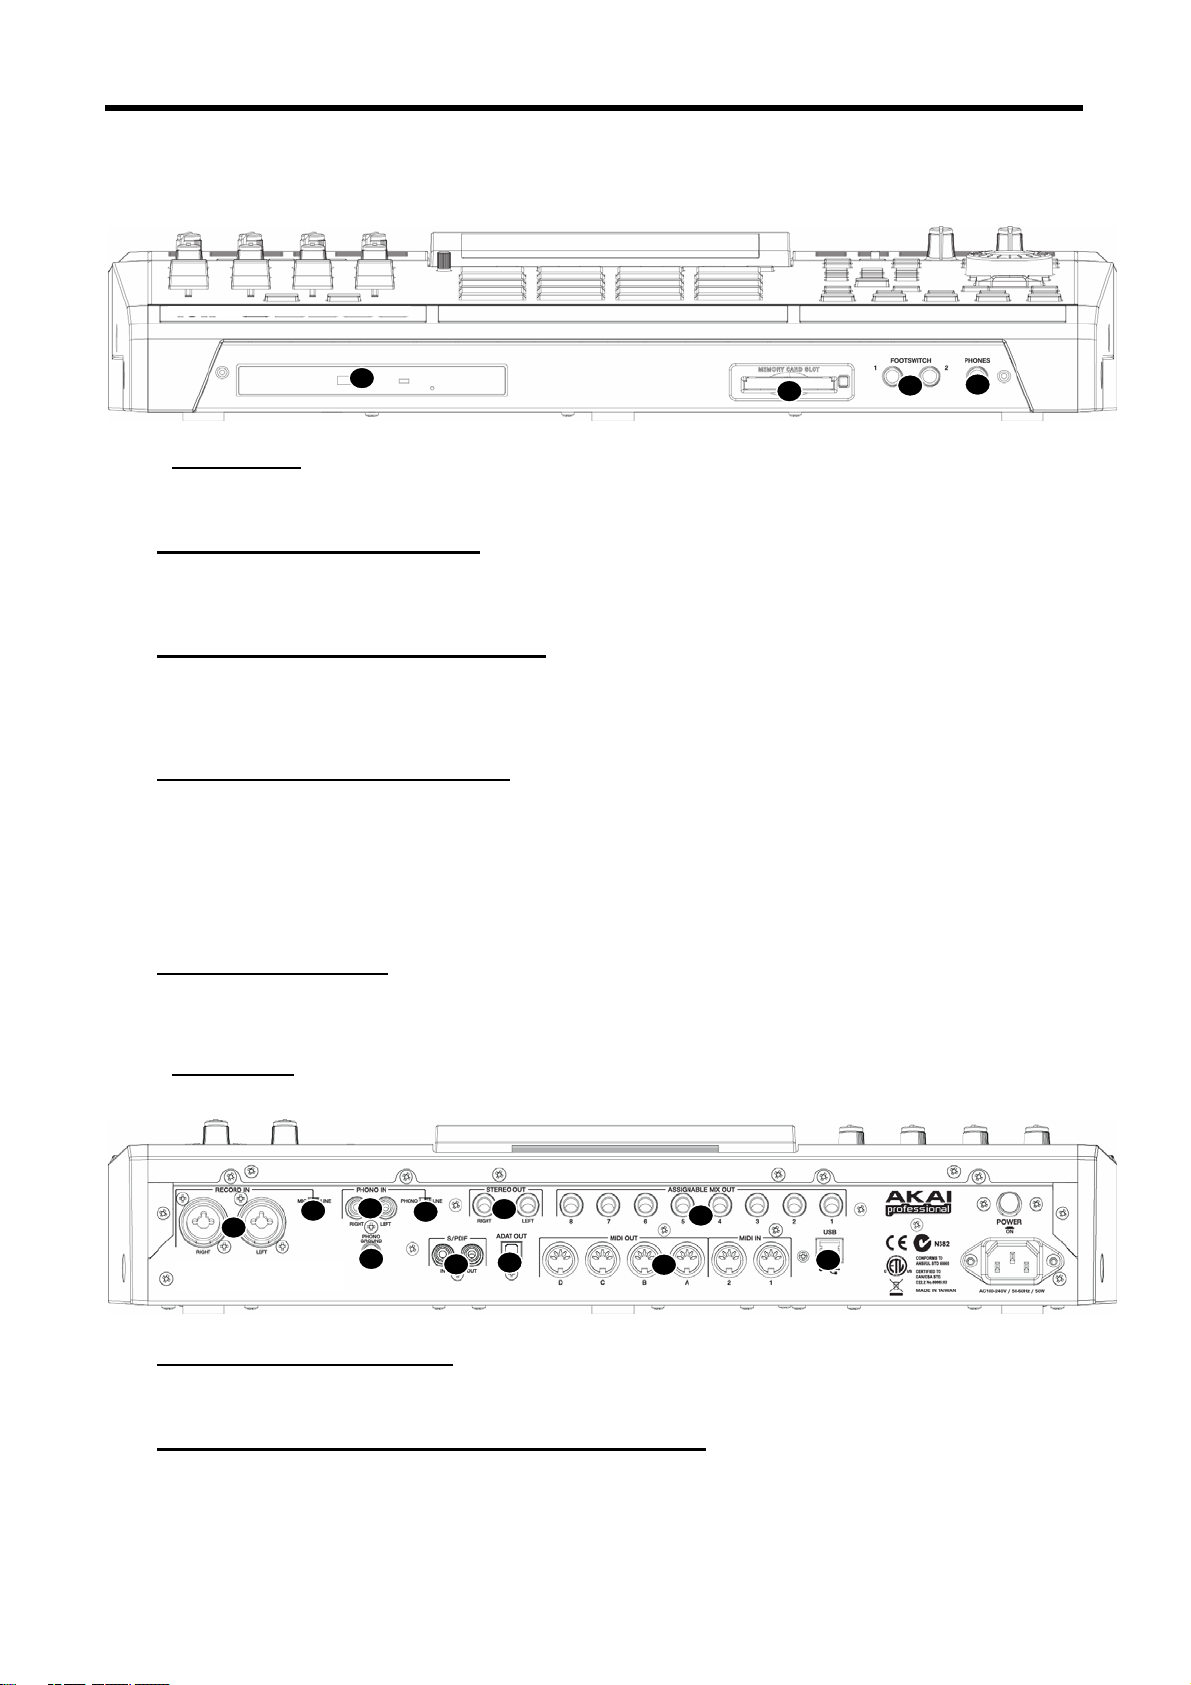
Introduction 8
40
52
varying amounts of swing, and other fast percussive effects not easily played by hand. For more information see the
section entitled 'Note Repeat' on page 28.
39
41
42
Front Panel
The MPC5000’s front panel has several noteworthy features:
39. [MEMORY CARD SLOT]:
The MPC5000’s [MEMORY CARD SLOT] accepts 'Type I' and 'Type II' Compact Flash memory cards. These cards are
used to store your audio and song data.
40. [DVD ROM] drive (Optional):
Here, you can install an optional CD-RW/DVD ROM drive (Model #CDM-25). Using this DVD drive, you can load WAV,
AIFF or SND samples from CD, sample from CDs, create data backups of your work, and record Redbook audio CDs to
be played on any CD player.
41. [FOOTSWITCH] Jacks (2):
This is where you connect a momentary footswitch. You can use a footswitch for several functions, including punching
in or out, starting and stopping the sequencer, or even playing selected pads. For more information, see 'Using the
Footswitches' on page 195.
There are two types of footswitches: normal open (the contact is open when it is not pressed), and normal closed (the
contact is closed when it is not pressed). When the MPC5000 is powered on, it automatically detects the type of foot
switch connected, so you can use either type of foot switch.
42. [PHONES] Input:
Connect your stereo headphones to this jack. This jack mirrors the signal from the [STEREO-OUT] jacks. The volume
of the headphones is controlled by the [MAIN VOLUME] knob.
Rear Panel
All of the MPC5000’s inputs and outputs can be found on the rear of the unit. They are as follows:
44
45
46
49
50
48
43
47
51
53
43. [STEREO OUT] Jacks:
These are your MPC5000’s main outputs. Connect these jacks to your recorder, mixer, or speakers.
44. [RECORD IN] Jacks (1/4” / Mic Combo):
Use these inputs to record samples into your MPC, and record streaming disk tracks to the internal Hard Disk.
The [RECORD IN] jacks are 1/4" / Mic combo jacks, allowing either type of connector to be used. The input level for
this jack is controlled using the [REC GAIN] knob.
Page 23
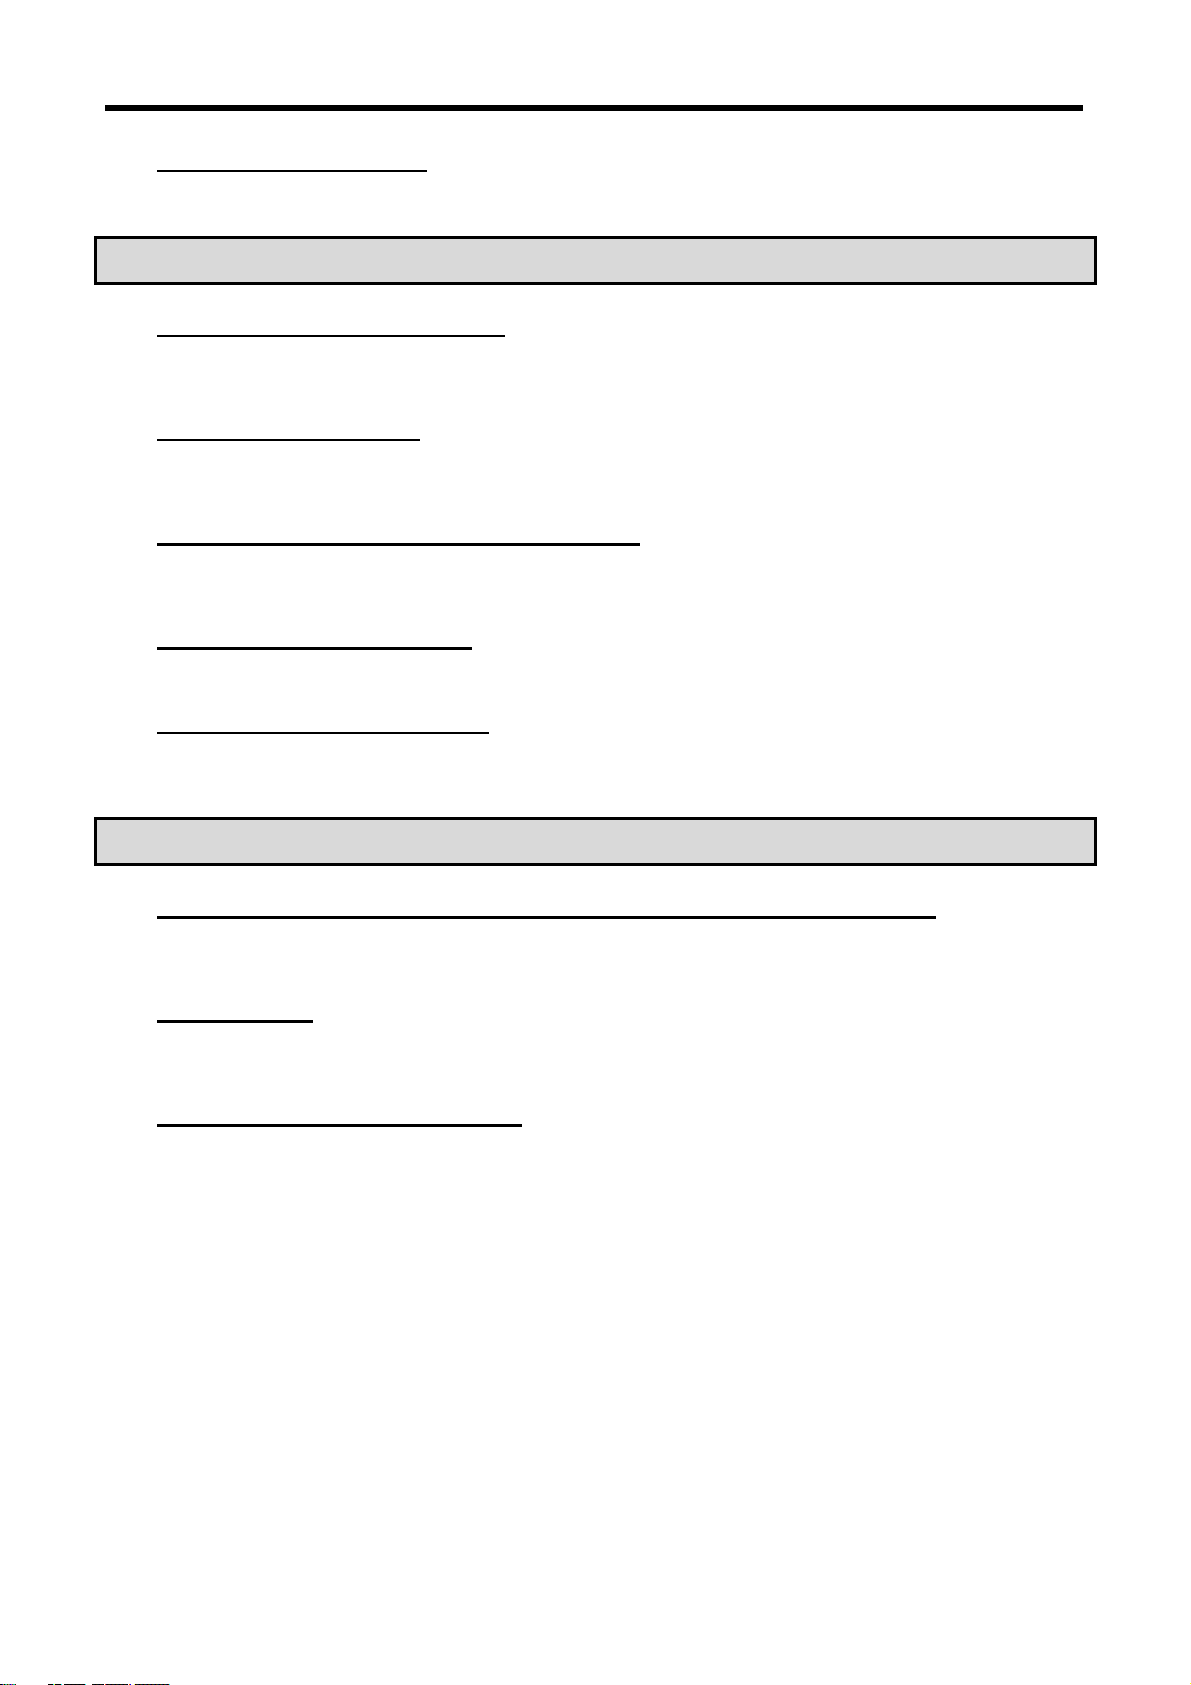
9
45. [MIC/LINE] Switch:
This switch sets whether the source plugged into the [RECORD IN] is a mic level or a line level source. If set to MIC,
the input will be preamped for optimal level.
WARNING! Incorrectly setting this switch to MIC will yield distortion on devices not requiring a MIC Preamp. Make
sure your source requires amplification BEFORE setting this switch.
46. [PHONO IN] Jacks (RCA):
Use these jacks to connect a turntable or a CD player with RCA connections to your MPC. The input level for this jack is
controlled using the [REC GAIN] knob. For best performance, be sure to set the [INPUT] phono/line switch properly.
47. [ADAT] Digital Out:
This output is used to connect ADAT capable digital devices. This connection uses an optical cable to send 8 tracks of
ADAT digital audio to a recording device. For more information on configuring outputs, see page 195.
48. [DIGITAL IN/OUT] Jacks (S/PDIF):
These are the coaxial digital input/output. This IN is to connect digital outputs such as a CD player and a DAT. This
OUT sends out the same signal as the [STEREO OUT].
49. [PHONO GROUND] nut:
If your turntable requires it, use this nut to connect the turntable ground wire.
50. [LINE / PHONO] Switch:
This switch determines whether the [PHONO IN] RCA jacks will be line or phono level. When set to PHONO, an RIAAClass phono preamp will be applied to the input. Set this switch to the 'LINE' position, for sampling a line-level source
(CD player, DJ mixer, Minidisk, etc.) and to the 'PHONO' position for recording with a turntable.
WARNING! Incorrectly setting this switch to PHONO will yield distortion on devices not requiring amplification. Make
sure your turntable requires amplification BEFORE setting this switch.
51. [ASSIGNABLE MIX OUT 1/2/3/4/5/6/7/8] Jacks (1/4”):
These individual outputs can be used to output each pad sound separately, allowing you to send individual sounds to
external mixers or effects. Using these outputs, you can perform advanced mixing for your songs.
52. [USB] Port:
This USB 2.0 port allows for connecting your MPC to you computer, and allows you high speed access to you MPC's hard
drive from your computer.
53. MIDI] Jacks (2 IN, 4 OUT):
The MPC5000 can send and receive MIDI data through these jacks. Connect one of the MPC’s outputs to the MIDI input
of an external device and one of the MPC’s inputs to an external device’s output.
Page 24

Introduction 10
Bottom Panel
54
54. Ram Expansion Slot:
This is where the optional EXM-E3 RAM expansion module can be added. This will increase overall sample time to over
36 minutes (mono), of which a single sample can be over 24 minutes long.
Page 25
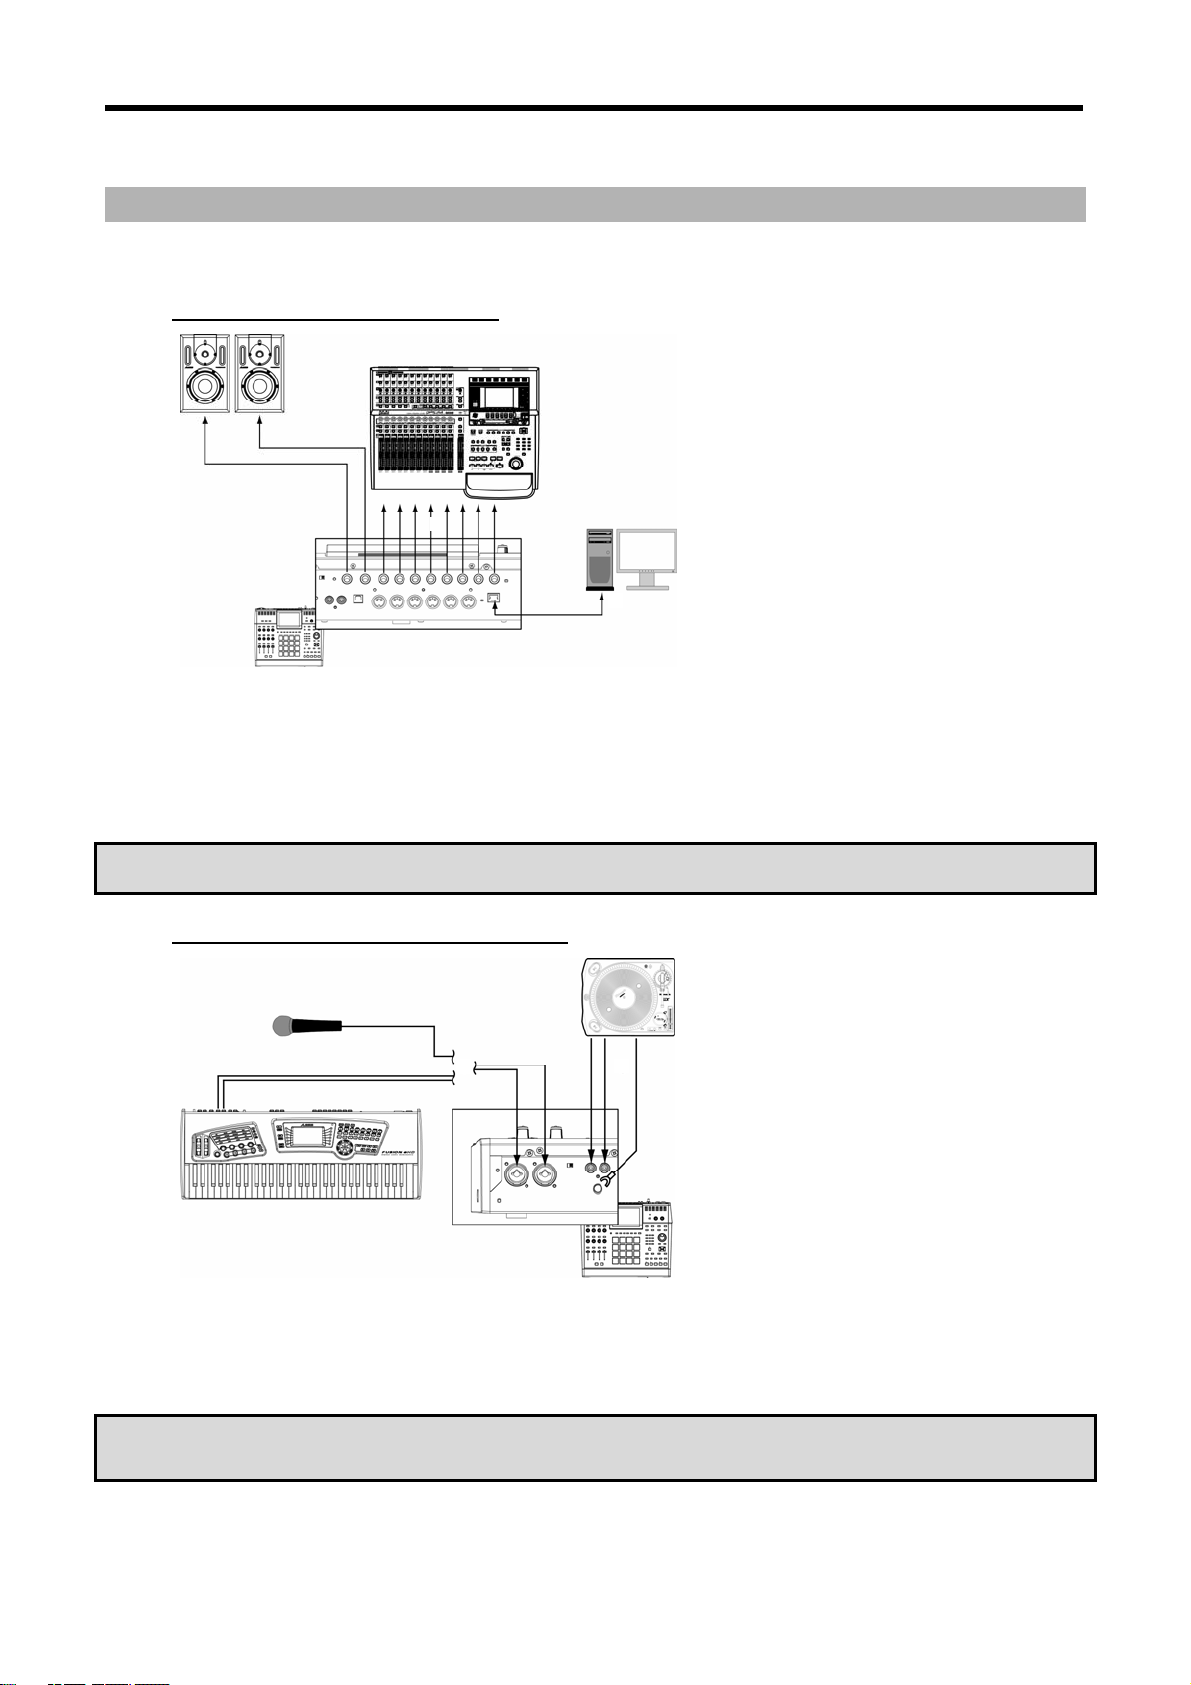
11
Hooking Up Your MPC5000
The following diagrams will demonstrate how the MPC5000 can be integrated into your recording setup. Note that the
diagrams below use every connector on the MPC and that your setup may vary from the ones shown.
Output Connectivity Example
01. Connect the [STEREO OUT] to Powered Monitors
This will allow the main mix of your MPC to be heard.
02. Connect the [ASSIGNABLE MIX OUTS] to a multi-track Hard Disk recorder.
This will allow individual samples and sounds to be sent individually to be recorded.
Other examples of ways you can connect your MPC5000's outputs include connecting the [STEREO OUT] to a mixing board to mix the MPC
alongside other instruments, and using the [ASSIGNABLE MIX OUTS] to send certain sounds to external effects processors.
Note: The MPC5000's outputs are pseudo balanced. Use 'Balanced' or 'TRS' cables wherever possible to maximize
sound quality, but no volume degradation will occur when using standard 'TS' type cables.
Analog Input Connectivity Example
01. Connect a synthesizer or a Microphone to the [RECORD IN] jacks.
Sources plugged into the [RECORD IN] jacks can be sampled to be used in Sample Programs. The [RECORD-IN] jacks are 1/4" / Mic combo
jacks, allowing either type of connector to be used. The input level for this jack is controlled using the [REC GAIN] knob.
Input sources can be monitored using the Input Thru feature. See page 92 for more information. Additionally, these
sources can be used for Hard Disk Recording. See page 67 for more information on Hard Disk Recording.
NOTE: The input sensitivity of these jacks are determined by the [LINE/MIC] switch. Setting this switch incorrectly can
cause clipping and distortion. Be sure to determine whether your source is line level or mic level before connecting your
device
Page 26

Introduction 12
02. Connect the output of a turntable to the [PHONO IN] jacks.
This will allow sampling from vinyl. If your turntable requires a preamp, make sure the [LINE/PHONO] switch is set to 'PHONO'. If the turntable
requires grounding, connect the grounding wire to the [PHONO GROUND] nut.
WARNING! Incorrectly setting this switch to PHONO will yield distortion on devices not requiring amplification. Make
sure your turntable requires amplification BEFORE setting this switch.
Digital Connectivity Example
01. Connect the [DIGITAL IN/OUT] jacks to a digital recorder
This connection is a 48 kHz S/PDIF type digital audio signal.
NOTE: The S/PDIF jack on the back of the MPC5000 looks like a standard RCA connector, but you should not use
ordinary audio cables for this connection. S/PDIF requires special 75-ohm 'digital audio' cables to work properly and will
most likely result in very loud white noise if you use the wrong type of cables. If you’re hearing clicks, pops, or white
noise when using S/PDIF, your cable is the likely culprit.
02. Connect the [ADAT] output to a Digital Recorder.
This optical digital output supports 8-channel ADAT format. See 'Setting the ADAT Digital Output' on page 195 for more information on
configuring ADAT output.
USB Connectivity
To connect your computer to the MPC5000, use a standard USB cable.
For more information on USB mode and connecting your MPC5000 to your computer, see 'Connecting the MPC5000 to
Your Computer' on page 191.
Page 27
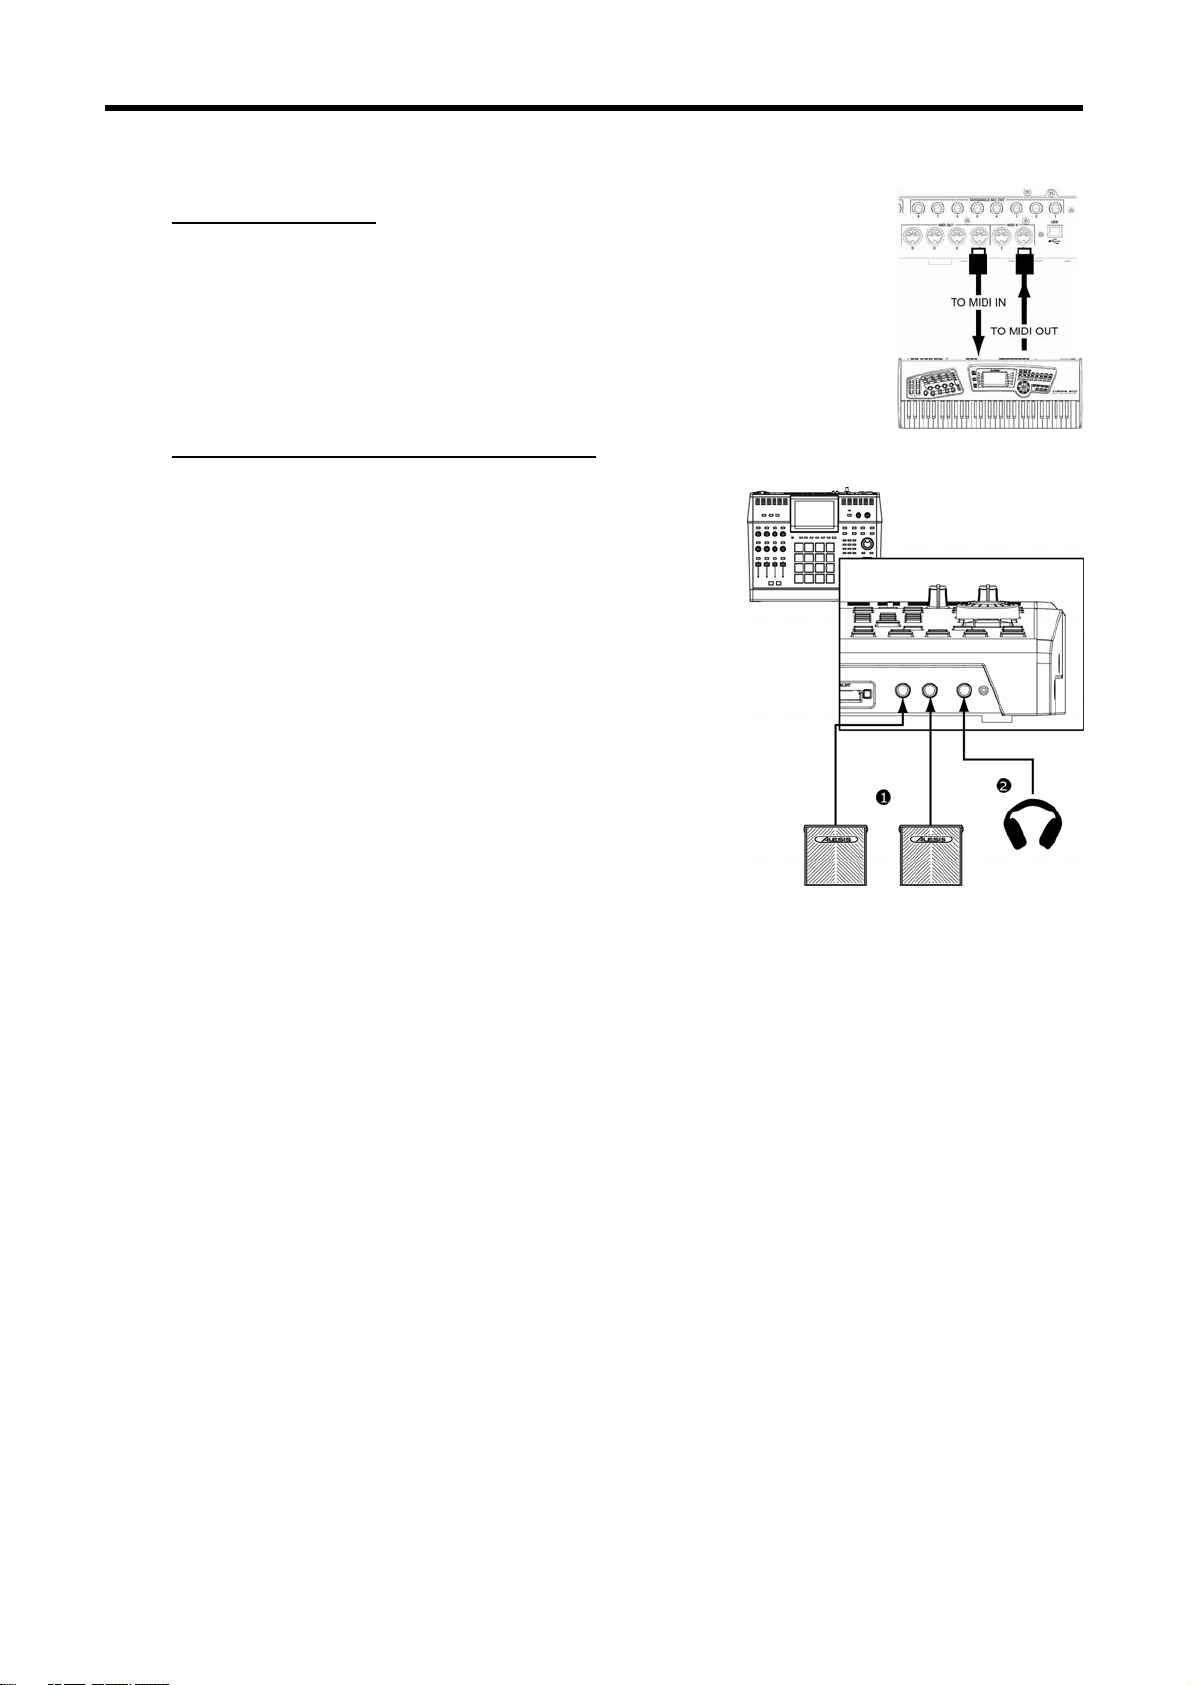
13
MIDI Connectivity
To connect your MIDI devices to the MPC5000, do the following:
03. Connect the MIDI output of your MIDI device to one of the [MIDI IN] ports of the
04. Connect the MIDI input of your MIDI device to one of the [MIDI OUT] ports on the
For more information on connecting MIDI devices to your MPC5000, see 'Using the MPC5000
with External Devices' on page 185.
MPC5000.
MPC5000.
Footswitch / Headphone Connectivity
01. Connect a footswitch to each [FOOTSWITCH] jack
Footswitches will allow you to start and stop your MPC, punch out, or do many other
functions. See page 195 for more information.
02. Connect headphones to the [PHONES] input.
This will allow you to monitor the output of the [STEREO OUTS]. The level of the
headphones is controlled with the [MAIN VOLUME] knob.
Page 28
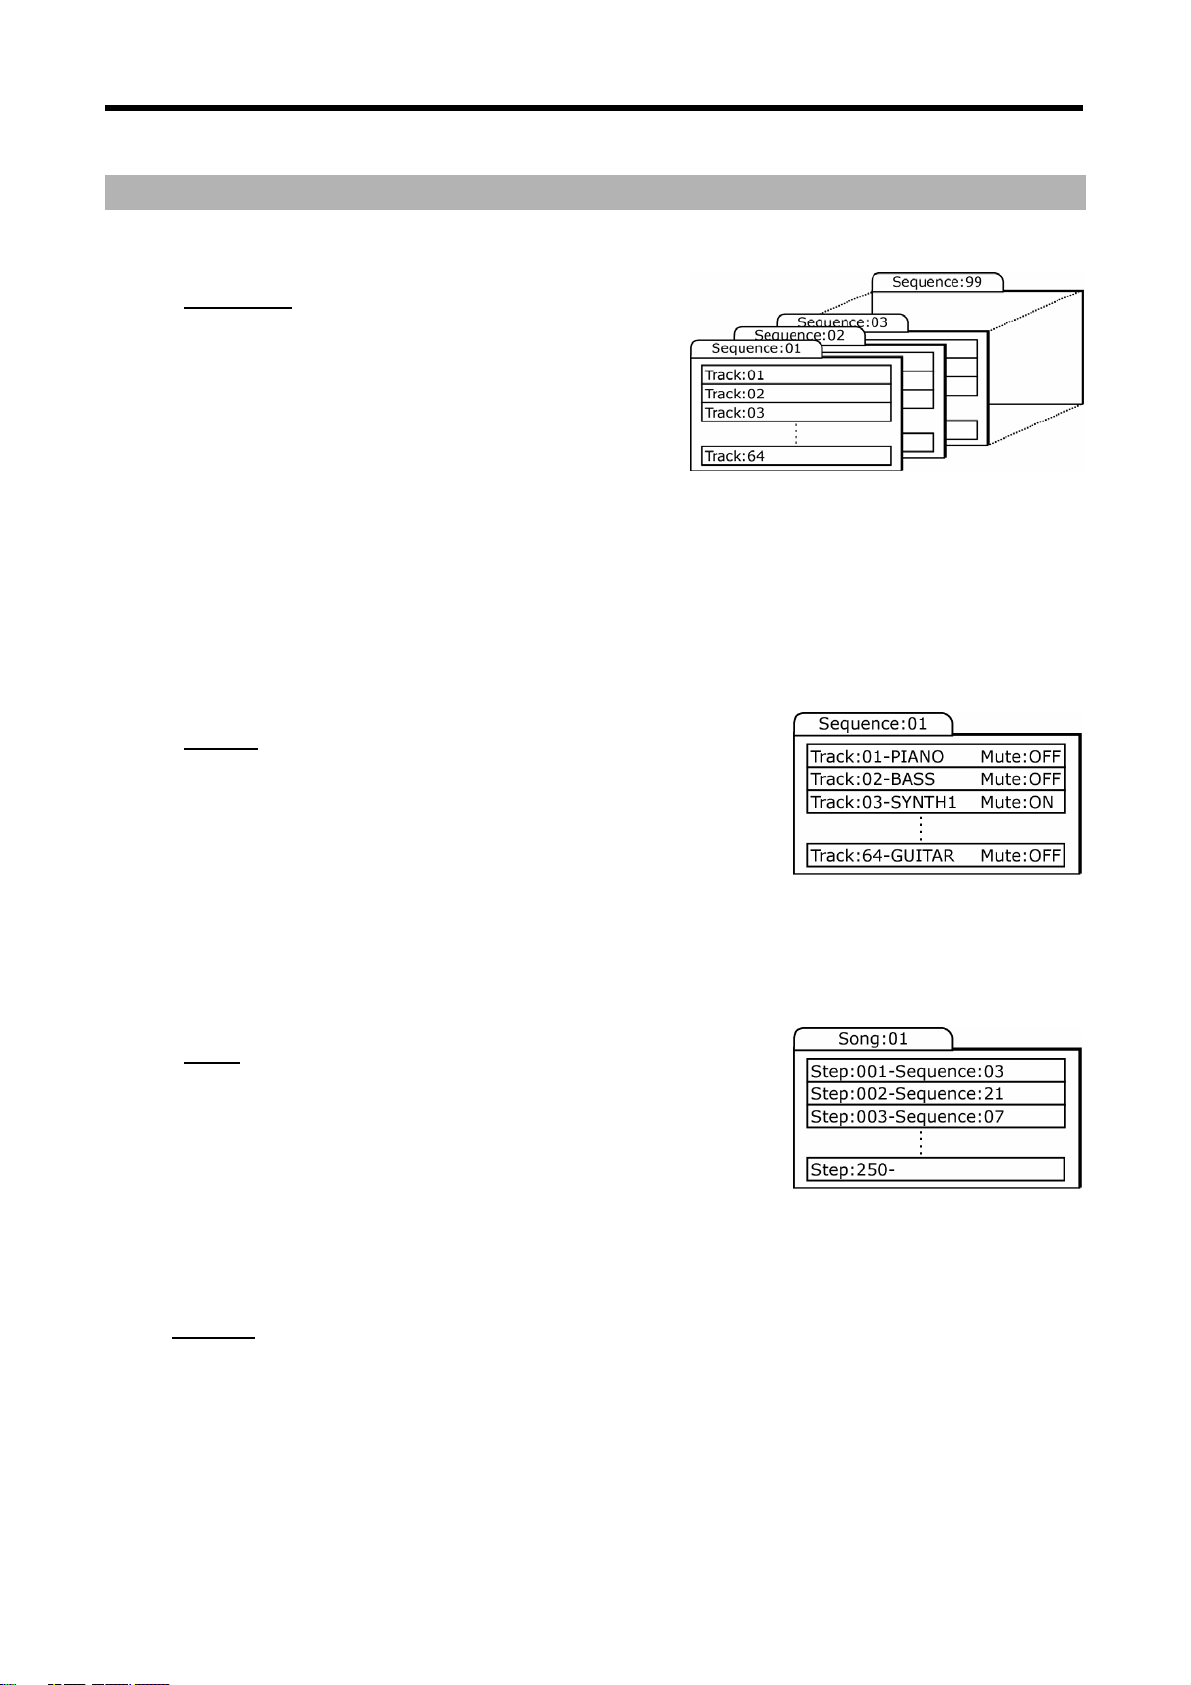
Introduction 14
Basic Concepts and Terminology
Please take a moment to familiarize yourself with the following terms and concepts since you’ll encounter them
throughout this manual.
Sequence
A sequence is the most basic 'building block' of music you can
compose on the MPC. MIDI information from the MPC’s pads,
buttons, and Q-LINK controls (or an external keyboard) are recorded
to tracks within a sequence. Each sequence has 64 tracks and the
MPC5000 can hold up to 99 separate sequences at one time.
The length of a sequence can be set from 1 to 999 bars and you can theoretically create an entire song using only one
sequence. However, the MPC has a special SONG mode that lets you arrange several short sequences together to
create a song. This allows you to create a sequence for each section of your song and to arrange and rearrange these
sections however you’d like.
For example: by creating a separate sequence for the verse, chorus, and hook of a song, you can use Song mode to
quickly arrange the verse, chorus, and hook in any order you’d like. This saves you from having to repeat the same
section (such as the chorus) many times throughout the song. More importantly, SONG mode makes editing and rearranging your song easy since you can simply change the order of sequences (or number of repetitions for each
sequence) instead of re-recording the entire song.
Song mode is also where you can record audio tracks directly to the Hard Disk. This will be discussed further later on.
Tracks
The MPC 5000 has two types of tracks - sequence tracks and Hard Disk recording
tracks. Sequence tracks are found within sequences. A sequence has 64 tracks
and each track can record a performance. For example, you can record the
verses for a song on track one while recording the choruses on track two.
Alternatively, you can record different instruments on each track.
Note that your performances are recorded as MIDI events and the actual digital audio is not recorded onto a track.
Because of this, you can edit your performance many different ways once the performance has been captured. See the
section below entitled 'Note number, velocity, and length' below for more on this.
Hard Disk recording tracks are recorded in song mode. Using Hard Disk recording, you can record a live performance,
such as vocals or guitar, and have these tracks play back with your song. The MPC5000 can have up to eight Hard Disk
tracks. Two can be recorded simultaneously.
Song
As we stated above under the 'Sequence' description, the MPC has a special
SONG mode that allows you to arrange different sequences together to form a
song. Each time a new sequence is added to a song, we say a new 'step' is
created within the song. You can use song mode to arrange different sections
(verse, chorus, hook, etc.) of a song together.
Songs are created and arranged in the MPC5000’s SONG mode. Each song can have up to 250 steps and the MPC5000
can hold 20 songs at one time. See 'SONG Mode' on page 61 for more information about this mode.
Song mode is also where you can record audio tracks directly to the Hard Disk. This will be discussed further later on.
See HD RECORD on page 67 for more information.
Sample
When you tap the pads on the MPC5000, you trigger various different sounds that we call 'samples.' Samples are
digitized snippets of audio that can be recorded using the [RECORD IN], [PHONO IN] or [DIGITAL IN] on the rear of the
MPC, loaded from a memory card, CD-ROM, internal Hard Disk, or transferred from a computer (via the USB port).
Once a sample is loaded or recorded into the MPC5000, it can be manipulated in different ways. For example, a sample
can be trimmed down in length, looped, pitch-shifted or processed using one of the various effects found within the
MPC. When you are finished editing your sample, you can assign it to one or more drum pads so that you can play the
sample with those pads.
Page 29

15
The MPC5000 supports 16-bit samples at any sample rate (audio imported at sample rates higher than 44.1k is
automatically downsampled during playback). Samples can be either mono or stereo.
Drum Pad
The MPC5000 has 16 pressure sensitive pads that are used to trigger sounds. These pads are arranged in 4 banks
called 'A,' 'B,' 'C,' and 'D.' These banks can be quickly selected using the [PAD BANK] buttons giving you easy access to
64 different sounds. Use PROGRAM mode to assign samples to these pads.
Sample Program
A Sample Program is a file that contains a list of all samples to be used, and
settings for each sample (i.e., pad assignments, loop points, pitch tuning, effects,
etc.) The MPC’s PROGRAM mode is where you can edit and assign samples. The
MPC5000 can have a total of 128 programs in memory.
There are two kinds of programs that use samples for their sound source: Sample
Programs, mostly used for creating drum programs and easy and quick assigning
of samples to a pad, and Keygroups Programs. With Keygroup Programs, you can
use one sample (or more) and spread it across two or more keys and play the
sample chromatically over a keyboard. That way there is no need to sample every
key of, for instance, a piano. For more information on Keygroups Sample
Programs see page 130.
Synth Programs
Synth (short for 'Synthesizer') programs are new to the MPC5000. The concept of a Synth is an instrument that is
capable of producing a very wide range of sounds electronically. Synths have been the basis of popular music since the
late 60's, across just about every genre of popular music. Browsing and playing through the included Synth Programs
will give you an idea of the vast variety of sounds that Synth Programs are capable of producing.
Note Number, Velocity, and Length
When you are recording a sequence, every time you tap a pad, three key pieces of data are recorded on a track:
The note number (i.e., which pad you struck)
The note velocity (i.e., how hard you struck the pad)
The note length (i.e., how long you held the pad down)
Once this information is recorded, the MPC can playback your performance exactly as it was recorded. You can also do
things like edit or delete notes, overdub (add) more notes to an existing performance, tighten up your timing through
the Timing Correct feature, and much more. These various functions are covered in detail in 'The Sequencer' on page
21.
If you are familiar with MIDI sequencing, the terms and concepts described above may already be familiar to you. If
you’re new to MIDI sequencing, don’t worry—the MPC5000 handles most tasks automatically. All other tasks that
require user input are covered throughout this manual.
RAM
RAM (Random Access Memory) is a space where you can temporarily load audio and MIDI (song) data. The MPC5000
ships with 64MB (megabytes) of RAM and can hold about 768 seconds (over 12 minutes) of mono sound. The EXM-E3
expansion module raises your memory to 192MB and increases your total recording time to over 36 minutes.
Note that RAM contents are deleted when the MPC5000 is turned off. If you wish to keep your work, you must save
your work on either a memory card or the internal Hard Disk.
Memory Card
Compact flash memory is similar to the Hard Drive, but in a portable format, allowing you to take your projects with
you, or to back up your data.
About Memory Cards: There are several types of memory cards available today. The MPC5000 supports 'type I' and
'type II' compact flash cards only, so please make sure you purchase the correct type of card.
Page 30
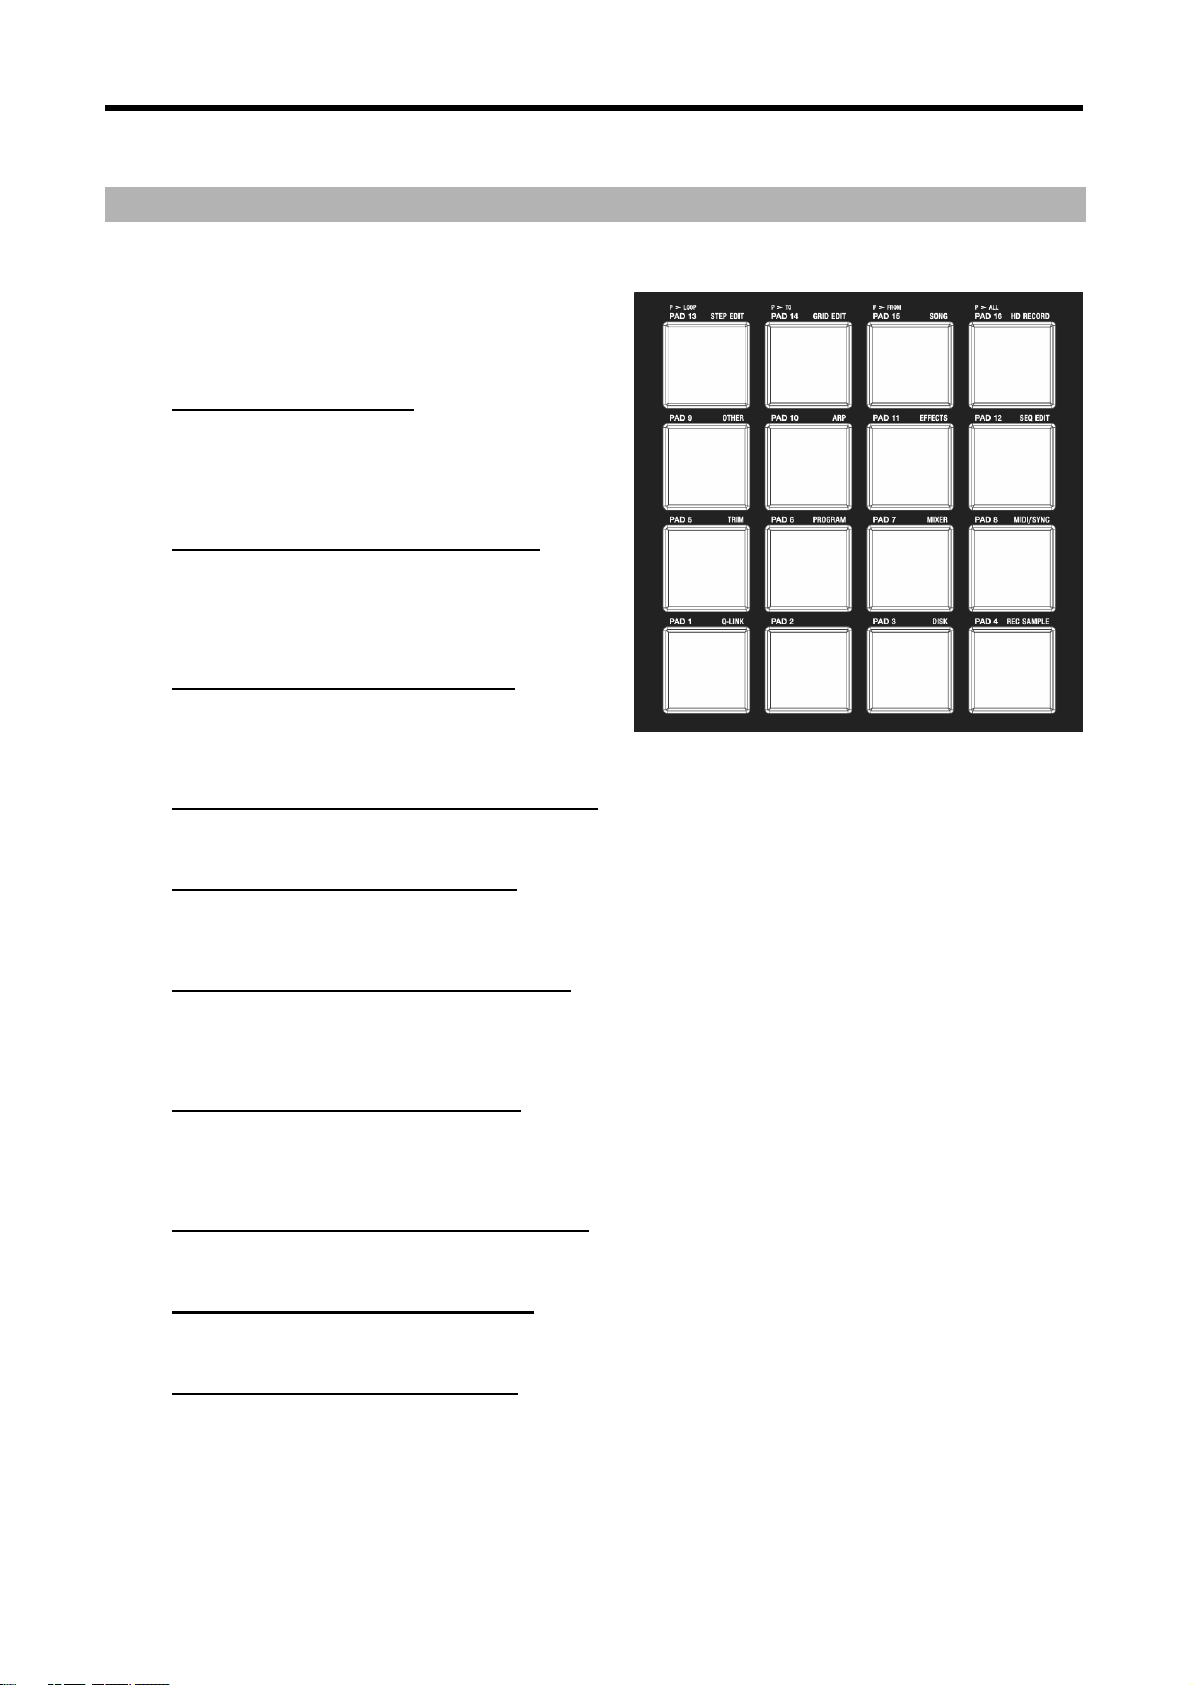
Introduction 16
Operating Modes
The MPC5000 has several different modes of operation. Each of these modes handles specific tasks such as arranging
your sequences (SONG mode) or recording your own samples (REC SAMPLE mode).
Each mode can be accessed using the MPC5000’s drum pads.
To enter these modes, press the [MODE] button and tap the
pad associated with the mode you want. The name of each
mode is listed in yellow at the upper right of each pad.
MAIN Mode ([MAIN])
This is the start page of the MPC5000 and is displayed when
the unit is powered on. Use this mode to record your
sequences. Should you get lost, pressing the [MAIN] button
will always return you to this page.
Q-LINK Mode ([MODE]+[Pad 1])
Here, the function of the Q-LINK slider can be set. Various
real-time performance data and Effect parameters can be
recorded and entered here, as well as sending MIDI
continuous controllers to external modules.
DISK Mode ([MODE]+[Pad 3])
Here, you can access the various storage media available to
you. This is where files, such as samples and sequences, can
be saved, or retrieved and edited.
REC SAMPLE Mode ([MODE]+[Pad 4])
Here is where you can record your own samples for playback on the MPC5000's pads.
TRIM Mode ([MODE]+[Pad 5])
This is where you can edit individual samples, deleting silence, adjusting overall volume of recorded samples and so
forth.
PROGRAM Mode ([MODE]+[Pad 6])
Depending on if the type of program is Sample, Keygroup or Synth, this page will allow individual samples to be
assembled into a group for playback on the individual pads, playback of a sample over several pads or allow editing of a
Synth program's virtual analog parameters.
MIXER Mode ([MODE]+[Pad 7]
This mode is where the mixing of individual pads or complete sequencer tracks can be done graphically, much like using
an external mixing board. Which output the signal is sent to, and what effect bus and how much effect is used per
sound is also determined here.
MIDI/SYNC Mode ([MODE]+[Pad 8])
Here, you can sync up your MPC5000 with other devices, and control different aspects of MIDI.
OTHER Mode ([MODE]+[Pad 9])
Here, you can find different settings that don’t fit easily into other categories, such as Master level, pad sensitivity, etc.
ARP Mode ([MODE]+[Pad 10])
This mode allows you to edit the Arpeggiator. This is mode can also be edited by pressing the [ARPEGGIATOR] button.
For more on the Arpeggiator, see page 145.
Page 31

17
EFFECTS Mode ([MODE]+[Pad 11])
This is where different digital effects, such as reverb, delay and flange can be applied to different pads etc. Also,
master effects, such as parametric EQs and compression can be applied to the Master output.
SEQ EDIT Mode ([MODE]+[Pad 12])
This is where sequences can be edited and transposed, as well as other types of editing.
STEP EDIT Mode ([MODE]+[Pad 13])
Here, the sequence can be edited with greater precision, editing the parameters of individual notes and events.
GRID EDIT Mode ([MODE]+[Pad 14])
'GRID EDIT' mode allows you to edit the individual note and pad events on a track in a graphical interface. This mode is
ideal for fine editing of different tracks in a sequence visually.
SONG Mode ([MODE]+[Pad 15])
Here is where individual sequences can be organized into a single song.
HD RECORD Mode ([MODE]+[Pad 16])
This brings you into HARD DISK RECORDING MODE. Here, performances, such as vocals, guitar, or other live
instruments can be recorded directly in to and played from the internal hard drive alongside the current song.
SYNTH Programs ([SYNTH])
Pressing the [SYNTH] button will quickly bring you to the first synth track in your sequence, bring you to the last synth
program you edited, or create a synth program on a new track. It's best to think of the [SYNTH] button as a quick-fix
shortcut to quickly get into synth programming. This mode can also be entered by selecting a track on the MAIN page
that uses a Synth-type program, and entering PROGRAM mode.
Page 32

Page 33

Chapter 2: Basic Operation
In this chapter, we will describe the basic operation of the MPC5000.
MAIN Page
This is the main screen of the MPC5000, where you record and play back
sequences. You can go back to this page at any time by pressing the
[MAIN] button. If at any time you get lost while operating the MPC5000
and want to go back to this page, simply press the [MAIN] button. You
cannot go back to the MAIN page by pressing [MAIN] button while
processing (e.g. Recording, loading/saving etc...).
Cursor, Cursor Buttons, [DATA] wheel
The highlighted reverse colored square on the screen is called the
'Cursor'.
You can move the cursor on the screen using the four [CURSOR] buttons on
the panel. Usually they move to specific locations such as to the right of a
colon (:). Those locations are called 'fields', and will be indicated in the
manual by single quotes. This is where you can make various settings, or
enter values. To change the settings of a field, select the field and turn the
[DATA] wheel on the panel. This operation, selecting a field by using a
cursor button and changing its settings with the [DATA] wheel, is the most
basic operation of MPC5000.
While in MAIN Mode, press and hold the [SHIFT] button, and press the [UP]
cursor button to quickly access the 'Sequence' field from anywhere. Press and hold the [SHIFT] button and press the
[DOWN] cursor button to quickly access the 'Track' Field.
Cursor
Function Buttons
Six buttons ([F1] to [F6]) aligned under the LCD (liquid
crystal display) are Function Buttons. Those buttons
correspond to each of the six functions that are
displayed on the bottom of the LCD. Pressing each
button activates its corresponding function. The function
that each button represents depends on where you
are.
When the LCD looks like this, pressing a function
button starts some processing or displays a window.
When the LCD looks like this, you can switch pages using function buttons [F1] to [F3]. The currently selected page is
displayed with white letters on a blue background. Pressing F4, F5 and F6 buttons does not make any changes.
Some pages display the page selection and processing
function at the same time (see below). In this case,
use [F1] and [F2] for switching pages, and [F5] and
[F6] for activating processing. You cannot use [F3]
and [F4].
In this manual, function buttons are described
something like this: '[F1] (TRIM) button'- in the bracket,
it shows the function displayed on the LCD.
[F1] [F2] [F3] [F4] [F5] [F6]
[F1] [F2] [F3] [F4] [F5] [F6]
[F1] [F2] [F3] [F4] [F5] [F6]
[WINDOW] Button
The MPC5000 has so many functions that they cannot be displayed in one screen. For efficiency, each page only
displays the most frequently used functions. If you want to make an advanced setting, press the [WINDOW] button.
This opens a window for the detailed setting of the selected field. This is not available for all fields. When you select a
field in which you can use the [WINDOW] button, the LED of the button is lit.
Page 34

Basic Operation 20
[MODE] Button
With the MPC5000, each function (such as recording samples, editing samples, assigning samples to each pad, editing
sequence data, loading from memory cards, etc…) has a separate screen. These screens are called 'modes'. For
example, you will use the RECORD mode to record samples, and the TRIM mode to edit samples etc. By pressing the
[MODE] button and hitting a pad, you can switch modes. The mode that a pad corresponds to is displayed above each
pad.
Setting Names
The MPC5000 handles various types of data, from sound data (such as samples and programs) to performance data
(such as sequences and tracks). This data is managed by naming. In this section, you will learn how to name these
items.
Select a field which you wish to name with the cursor and turn the [DATA] wheel. The Name windows will appear.
Note: In this window, the cursor is displayed as an underscore instead of highlights.
You can enter the name, either by using the keypad or by using the [DATA] wheel.
Entering letters with [DATA] wheel
You can change letters selected with a cursor by turning [DATA] wheel in the Name window.
Move the cursor with RIGHT/LEFT cursor button and enter letters. You can enter letters using
both [DATA] wheel and pads.
Entering letters with the Numeric Keypad
Much like a telephone, three or four letters are assigned to each number on the keypad. By
hitting a number, the corresponding letter is entered. Below, we will describe how to enter 'Bass 01' instead of
'Sequence 01'.
01. Press the UP cursor button to make the first letter capitalized.
Pressing the UP cursor button allows you to enter a capitalized letter.
02. Hit [2] two times.
Hitting [2] once enters 'a', twice enters 'b', three times enters 'c', four times enters '2'.
03. Press the RIGHT cursor button and move the cursor to the right.
If you enter the next letter using a different button, the cursor will move to the right automatically. However,
when you enter the letters which are assigned to the same button, you need to press the [RIGHT] cursor button
to move the cursor manually. In this example, A and B are assigned to the same button. So, you need to move
the cursor manually.
04. The next letter is a lower-case letter (' a '), so press the [DOWN] cursor button.
Pressing the [DOWN] cursor button allows you to enter lower case letters.
05. Hit [2] once.
A lower case letter 'a' is entered.
06. Hit [7] four times. The cursor will move to the right automatically and a lower-case 's' is entered.
07. Press the RIGHT cursor button to move the cursor to the right and hit the [7] four more times.
This will enter a second 's'.
08. Press the RIGHT cursor button to move the cursor to the right and press RIGHT cursor button holding the
09. Press the right cursor button to move the cursor one step to the right, and press the '0' button four times to
10. Press the '1' button four times.
11. Press the RIGHT cursor button to move the cursor to the right, and press the LEFT cursor button four times
12. Press [F5] (ENTER) to confirm the entry and close the window.
[SHIFT] button.
The [SHIFT] + RIGHT cursor button inserts space.
insert a zero.
holding the [SHIFT] button.
The [SHIFT] + LEFT cursor buttons delete selected letters. Now 'Bass 01' is entered instead of 'Sequence 01'.
Pressing [F4] (CANCEL) cancels the entry and closes the window. In this case, the name does not change.
Page 35

Chapter 3: The Sequencer
The MPC5000 has a sequencer feature that allows you to record/playback your performance. With the sequencer
feature, you can record the performance you created with the pads, and by playing back the recorded data, you can
reproduce your performance. The actual performance will be recorded on a track within a sequence. For more
information on sequences and tracks, see the section entitled 'Basic Concepts and Terminology' on page 14.
The performance data you made by hitting the pads will be recorded on a track as events A track can contain other
events, such as Q-LINK controller information, tempo change etc… When you are using the MPC5000 with an external
MIDI device, you can record the data from the external keyboard as MIDI events.
Note: The sequencer feature records only performance data (when and which pad you hit, etc…). It does not record
the actual sound. To record audio tracks, see 'HD RECORD' on page 67.
Main Page
This is the page where you record/playback sequences. This is the MPC5000’s main operation mode and, unlike the
other pages, you can display this page by pressing the [MAIN] button at any time.
'Now'
The 'Now' field, which is located in the upper left corner of the screen. When you record/playback a sequence, the
display updates constantly to show the current position of the sequence. When the sequence is stopped, you can move
the cursor to the 'Now' field to set the time manually.
The 'Now' field displays time in two ways.
Bars and Beats
Bars and Beats will display the current time of the sequence by bar, beat and
tick from left to right. For example, '002.03:000' means the third beat in the
second bar. When you record/playback a sequence, the display updates
constantly to show the current position of the sequence.
A tick is a unit that divides a beat (1/4 note) into 960 parts. For example, 1
beat equals one 1/4 note (960 ticks), so one 1/8 note equals the half of 1 beat, which is 480 ticks.
Below is the relationship between note and tick:
1/4 note = 960 ticks 1/8 note = 480 ticks 1/16 note = 240 ticks
1/4 triplets = 640 ticks 1/8 triplets = 320 ticks 1/16 triplets = 160 ticks
1/32 Note = 120 ticks 1/32 triplets = 80 ticks 1/64 note = 60 ticks
1/64 triplets = 40 ticks
Absolute Time
Another way the 'Now' field will display time is absolute time. Absolute time will show actual length of the sequence in hours, minutes,
seconds, and frames. For example, '00h03m07s03f' means three minutes, seven seconds, and three frames. Unlike when displayed
in BARS:BEATS:TICK, the 'Now' field will increase in time linearly as a sequence plays. In other words, If you have a two bar
sequence, and you let it play for 5 minutes, BARS:BEATS:TICK will show the time counting to bar two, then looping back to one, but
viewing the HOURS:MINUTES:FRAMES display will count up to '00h05m00s00f' showing the sequence played for five minutes.
Frame is a subdivision of seconds sent via MIDI in a format called MIDI TIME CODE, or MTC. MTC is a standard that has been used
as a timing standard for many years by both the Audio and the Video industry. The MPC5000 can sync to the frame rate of external
devices, or generate its own timing data to slave other devices to its internal clock. For more on MIDI TIME CODE, see page 186.
To toggle between 'Bars and Beats' and 'Absolute Time', do the following:
01. In MAIN Mode, select the 'NOW' field as shown.
02. Scroll with the [DATA] wheel, or press the [+] button.
03. The screen will change as shown.
Page 36

The Sequencer 22
'Sequence'
A Sequence is the most basic unit when creating data with the
MPC5000. Performance data from the MIDI keyboard or pad can be
recorded on each track within a sequence. You can select a sequence
in this field by turning the [DATA] wheel, or typing in a number with
the [NUMERIC KEYPAD]. You can have up to 99 sequences in memory
at any one time. Empty sequences are indicated as (unused). All the
settings in the MAIN page can be set separately for each sequence.
'Track' field
A sequence has 64 tracks. You can record different parts separately to
each track. You can, for example, record Piano sounds on track 1, Bass
on track 2, Organ on track 3 etc… In the 'Track' field, you can select a
track within the sequence selected in the 'Sequence' field. An unused
track is indicated as (unused). You can set 'Mute', 'MIDI', 'Velocity%',
'Type', and 'Program' fields separately for each track.
'Track Status' field
The 'Track Status' field shows a small representation of each of the 64
tracks in the current sequence. When an event is played on each track,
the track indicator for that particular track will blink. The Square box
indicates which track is currently active in the 'Track' field. Using the
'Track Status' field, you can find stray notes on tracks and visually see
where each event is happening.
Also, tracks set as Continuous Sample Tracks will be displayed as a '+'
symbol. For more on Continuous Sample Tracks, see page 37.
Furthermore, when you use the Mute or Solo button in Main mode on a track, you will see this in the Track Status
field(s) as well. Muted tracks will have a small 'x' on their respective dots in this ‘Track Status’ field.
Recording the Performance
In this section, you will learn how to record the performance you made with pads to tracks in a sequence.
01. To record your performance data to a sequence, you need to load a program to the MPC5000. By default, the
02. Press the [MAIN] button to open the MAIN page.
03. In the 'Sequence' field, select a sequence to which you wish to record your performance.
04. Select the 'TRACK' field and select an unused track.
05. In the 'Program' field, select the program to play.
06. Hit pads to check the sounds that are assigned to the pads.
07. Press the [PLAY START] button while holding the [REC] button.
08. Play the pads to record your performance.
MPC5000 automatically loads preset programs and demo sequences from the internal ROM. Here, we assume
that you have already loaded a program to the MPC5000. If you have not done so, do this now by loading a
program from a memory card, or by recording a sample and assigning it to a pad, etc… For more information
on loading a program, see the 'Saving and Loading (DISK Mode)' section on page 165. For more information
on recording a sample, see the 'Sampling' section on page 95.
The [MAIN] button displays the MAIN page where you record your sequences.
You can select any sequence for recording a performance, but here, select a sequence that says 'unused'.
'Unused' indicates that the sequence is not used.
Your performance will be recorded on the track you select in the 'Track' field. You can select any track, but here select the first unused track (i.e.
'01-(unused)').
Select the 'Program' field, and scroll with the [DATA] wheel until the desired program is displayed.
You can select any program currently in RAM in the 'Program' field by turning the [DATA] wheel.
This will play the program selected in the 'Program' field.
The recording will start after 4 counts.
Page 37

23
By default, the sequence is set to 2 bars. After recording for 2 bars, the MPC5000 will start playing back the recorded performance. You can add
to your original performance by continuing to play the pads when the track loops. The MPC5000 automatically switches to 'overdub' recording
and adds to the performance.
09. Stop overdub recording by pressing [STOP] button.
10. Press the [PLAY] button to play your recorded performance.
11. If you do not like the performance, you can start a new recording by pressing the [PLAY START] button while
12. To add to the already recorded performance, press the [PLAY START] button while holding the [OVERDUB]
Tip: If you select another sequence in the Main page, you can record a new performance separately. By playing back
those sequences, you can create an entire song.
Tip: By default, the MPC5000 is set to load a demo sequence automatically when you turn it on. If you wish to remove
the demo sequence and start from scratch, see 'Deleting All Sequences' section on page 33.
holding the [REC] button.
This deletes the previously recorded performance data and starts a new recording.
button.
This will play back the currently recorded performance, and you can add the new performance by playing the pads.
'Record Ready' Mode
New to the MPC5000 is 'Record Ready' Mode. When only the [REC] button is pressed and released, the RECORD light
will blink, indicating that the MPC5000 is in 'Record Ready' Mode. The MPC5000 will now wait for a MIDI START
command.
To use Record Ready mode, do the following.
13. Press and release the [REC] button.
The MPC5000's RECORD light will blink, indicating it is now in 'Record Ready' Mode.
14. When you are ready, press 'Start' on the master device.
Recording will start.
Step Recording
The MPC5000 allows step recording right from the MAIN page. When you hit a pad, or when the MPC5000 receives MIDI
data from an external device, the MPC records the event in the current time position (the time displayed in the 'Now'
field). With Step Recording, you can move to the desired time position by setting the time position in the 'Now' field,
and you can add events to the desired time position one by one. This method, recording each event individually when
MPC5000 is in the stop mode, is called step recording. This function allows for complex passages to be recorded with
ease.
To Step Record from the MAIN page, do the following:
01. Stop the current sequence if it is running.
02. Set the NOW to the time you would like to insert notes
03. Press and hold the [REC] or [OVER DUB] button.
04. The MPC is now in STEP RECORD Mode for as long as [REC] or [OVER DUB] is held.
05. Play a pad.
The MPC will record the note played in the current position. There are several options you can set to fine tune your
STEP RECORD performance. Step Recording from the Main Page shares settings with STEP EDIT. For further information
on STEP EDIT, see page 47.
Playing Back a Sequence
You can play back a recorded sequence by pressing the [PLAY START] button. The sequence will be played repeatedly
until you press the [STOP] button. If you press the [PLAY] button again, the MPC5000 will resume the playback from
where the previous play back was stopped.
Playing Several Sequences in Series
You can play back several sequences in a series by using the Next Sequence feature. The Next Sequence feature allows
you to select the next sequence to play, while playing back a sequence, so that you can play the sequences in a series.
While a sequence is playing, you can select the next sequence to be played from the Main page by turning the [DATA]
wheel or using the numeric keypad at the 'Sequence' field.
Page 38

The Sequencer 24
01. From the Main page, select a sequence and press [PLAY].
02. While the selected sequence is playing, change the 'Sequence'
03. After playing back the currently selected sequence to the end,
Tip: With the [NEXT SEQ] button, you can select the next sequence with a pad. For more information, see the 'Selecting
a sequence with pads' section on Page 84.
Tip: In SONG mode, you can set the order to play sequences. For more information, see the 'SONG mode' section on
Page 61.
field to another sequence using the [DATA] wheel. The screen
will change as follows:
The 'Sequence' field continues to show the sequence number that is currently
playing,
The '>' field shows next sequence that will be played.
the MPC5000 will start playing back the sequence you've
selected. By repeating this step, you can play back several sequences seamlessly.
When next sequence is selected, you can start to play next sequence immediately by pressing [STEP>] button.
When next sequence is selected, you can cancel selected next sequence by pressing [<STEP] button.
Punch In/Punch Out
You can start the recording in the middle of the sequence during the playback ('Punch In').
You can also stop the recording in the middle of the sequence and resume the playback ('Punch Out'). This is useful
when you re-record part of the recorded sequence.
Punch In
Press the [PLAY] or the [PLAY START] button to play back a sequence. At the point where you wish to start the recording, press the
[PLAY] button while holding the [REC] button. The MPC5000 will start recording.
If you press the [PLAY] button and the [OVERDUB] button instead, the MPC5000 will start the overdubbing.
Punch Out
If you press the [REC] or the [OVERDUB] button during the recording/overdubbing, the MPC5000 will stop the recording/overdubbing
and resume the playback.
Other Useful Features for Recording Sequences
Undo and Redo
When overdubbing sequences, you can cancel the last recording and reset to the setting before the recording.
To UNDO a sequence recording, just press the [UNDO] button. The LED of the [UNDO] button will be off and only the
last added recording will be deleted. To restore the last recording, press the [UNDO] button again to light the LED.
Note: You can use the [UNDO] button only for the last recording.
Tips: The MPC5000 is the first MPC to be able to undo and redo sequence recordings while the sequence is playing. This
allows you to actively audition the recording while the sequence plays to decide if you wish to keep the last recording.
Page 39

25
Erase
You can delete a certain pad performance by using [ERASE] button. There are two ways to use this feature: by deleting
in real-time during overdub, or by selecting a pad and part to delete in the Erase page.
Deleting In Real Time
01. Press [PLAY START] and [OVERDUB] to start overdub recording.
02. Press the pad you wish to delete while holding down the [ERASE] button.
While the [ERASE] button is held, pressing a pad will not record the pad, but delete any instances of the pad while it is being held down.
Deleting From the Erase Screen
Performance data will be recorded in a track as an event. In the Erase window, you can select specific events in a track
to delete.
01. Press the [STOP] button to stop the sequence.
02. Press the [ERASE] button.
03. Select the track you wish to delete events from in the 'Track'
04. Select the range of time you would like the selected events from
05. In the 'Erase' field, select the type of events to be deleted.
06. Select the 'Note/Pad' field.
field.
This field will default to the current track, but can be switched to any of the 64
sequence tracks. To erase events from ALL Tracks, scroll to '00-ALL TRACKS'.
This will default to the entire length of the sequence, but you can set this to any range you wish. For example, to delete only the event in the first
bar from 2-bar sequence, set '001.01.00 - 002.01.00'. In this case, the event at 002.01.00 point will not be deleted.
If you set the end point '002.01.00' like this, the area right before the end point will be included in the area.
This will default to 'NOTE ONLY',
The following are also available:
ALL EVENTS
EXCEPT NOTE
PITCH BEND
CTRL CHANGE
PRG CHANGE
CH PRESS
EXCLUSIVE
EFFECT
TEMPO
REAL TIME
TRACK MUTE
PAD MUTE
POLY PRESS
With CTRL CHANGE, POLY PRESS and REAL TIME you can be even more specific, selecting individual controller numbers or erasing poly
pressure events associated only with a certain note.
This field will default to PADS or NOTES, depending on the track type. ALL is selected in the 'Value' field as the default. While Pads is selected
on 'Parameter' field, you can select individual pads in the 'Value' field by hitting the specific pads you would like to delete directly. You can also
select a pad with the [DATA] Wheel.
If the selected track is a MIDI type track, instead of DRUM, this field will display
Notes as follows:
0(C -2) - 127(G 8)
The field for 'Notes' consists of two parts, Low note and High note. Low note (left)
sets lower range of MIDI note and High note (right) sets high range of MIDI note. In
this page, you can set note range with an external MIDI keyboard. The range is
updated whenever a MIDI note is received.
For example, when the MPC5000 receives only one note, such as C 3, the range is
set to C 3-C 3. When MPC5000 receive multiple notes, for example C 3, D 3 and E
3, then the range is set to C 3-E 3.
If you wish to delete all events, leave it as ALL. To delete only events on a specific
pad, hit the pad to delete. You can select several pads. If you hit a different pad by mistake, you can cancel the selection by hitting the pad again.
To restart the pad selection, turn the [DATA] wheel to the left. The value in the Note field will be reset to ALL so that you can select pad from the
beginning.
Page 40

The Sequencer 26
07. Press [F5] (DO IT).
The operation starts and the events of the selected pad within the selected area will be deleted.
Erase can also be used to delete events from tracks other than the currently selected track, or to delete only specific types of events. You can
also specify only a certain time range from which to delete events.
Tip: When you delete events with the Erase field set to ALL EVENT, the MPC5000 will delete other events in the selected
area as well as pad events. When you delete events with the Erase field set to EXCEPT Note, the MPC5000 will delete
the other events other than the pad events in the selected area.
Timing correct
When recording a pad performance, it is hard to play the pads to the tempo. By using the timing correct feature, you
can correct the timing of the pad event you recorded by hitting pads. There are two ways to use this feature: by
correcting the timing in real time during the recording, and by correcting the recorded event after the recording.
Real time timing correction
You can correct the timing in real-time during the recording.
01. When a sequence is playing, press [F1] (T.C.) button in the MAIN page.
02. In the 'Note Value' field, set the value for timing correction.
For example, if you set '1/16', each position of the performance data will be moved to the nearest 1/16 note.
You can set the Note values as follows.
1/4 note 1/8 note 1/16 note
1/4 triplets 1/8 triplets 1/16 triplets
1/32 Note 1/32 triplets 1/64 note
1/64 triplets OFF
Tip: If you press [F1] (T.C.) button during recording/playback, a small Timing Correct window will be displayed while
you are holding the button. You can use the 'Note value' field of this window to change the value for timing correction.
It makes it easier to change the value during the recording.
Swing
You can set the swing value in the 'Swing%' field. With the swing feature, the even numbered events set in the 'Note
value' field will be off the rhythm according to the value in the 'Swing%' field. With this feature you can create the
shuffle groove.
01. Press [F4] (CLOSE) button.
This closes the window.
Tip: Thanks to an ultra-high sequencer resolution of 960 pulses per quarter note, the MPC5000 is the first MPC to be
able to apply MPC Style SWING to triplets.
Correcting the timing of recorded events
You can correct the timing of recorded events.
01. When a sequence is stopped, press the [F1] (T.C.) button in the MAIN page.
Timing Correct window will be displayed as above.
02. In the Note value' field, set the value for timing correction.
For example, if you set '1/16', each position of the performance data will be moved to the nearest 1/16 note.
You can set the Note values as follows:
1/4 note 1/8 note 1/16 note
1/4 triplets 1/8 triplets 1/16 triplets
1/32 Note 1/32 triplets 1/64 note
1/64 triplets OFF
03. Press the [F5] (FIX) button.
Timing Correct window will be displayed.
Page 41

27
04. In the 'RANGE' field, select the area to correct the timing.
05. In the 'Note' field, hit the pad you wish to correct the timing.
To correct the timing of all events, leave it as ALL. To correct the timing of only events on a specific pad, hit the pad. You can select several pads.
If you hit a different pad by mistake, you can cancel the selection by hitting the pad again. To restart the pad selection, turn the [DATA] wheel to
the left. The value in the 'Note' field will be reset to ALL so that you can select pad from the beginning.
06. Press [F3] (DO IT) button.
The timing correction will start and the window will be closed.
Swing
You can set the swing value in the 'Swing%' field. With the swing feature, the even numbered events set in the 'Note
value' field will be off the rhythm according to the value in the Swing%' field. With this feature you can create the
shuffle groove.
Shift Timing
'Shift Timing' can be used to align notes ahead of the beat (allowing for a rushed feel) or behind the beat, to create a
more 'backbeat' type feel. Set this value to 0 for no timing shift.
Strength
Strength controls how rigidly the track will be quantized. In other words, a 0% setting will not quantize the track at all,
whereas a 100% setting will cause every note to snap perfectly into position within the beat. Settings closer to 0% will
allow note timing to be more relaxed and true to the original performance, while settings closer to 100% will make the
track more precise.
Experimentation with the 'Strength' parameter can yield accurate tracks that still maintain a 'human' feel.
Window
This parameter lets you set the width of the affected area surrounding each timing point. At 100% all notes move
toward the nearest timing correct point. At lower percentages, notes far from a quantization point may not be moved.
Using this parameter, you can set how far away a note has to fall from an "ideal" Timing Correct position before the
Timing Correct process ignores that note.
Click/Metronome
In this section, you will learn about various settings for the metronome (click sound).
01. When a sequence is in stop mode, Press [F2] (CLICK) button in the MAIN page.
The Click/Metronome window will be displayed as on the right.
'Count In' field
You can set how soon the recording/playback should start after the [PLAY] or the [PLAY START] button is pressed; right after the key
is pressed, or after a 1-bar count.
OFF
Recording/playback will start right after the key is
pressed without a count.
REC ONLY
There will be a count only for recording/overdub.
Playback will be started without a count.
REC+PLAY
There will be a count for both recording and
playback.
'Rate' field
You can select the rhythm for the metronome sound. The metronome will be played with 1/4 note if you set '1/4', and 1/8 note if you
set '1/8' Range goes from '1/4' to '1/32(3)'
'In play' field
You can select this if you want the metronome sound during playback. If you select YES, you will hear the metronome sound during
playback.
'In Record' field
You can select this if you want the metronome sound during recording/overdub. If you select NO, you will not hear the metronome
sound during the recording/overdub.
Page 42

The Sequencer 28
'Sound' field
Here, you can select what your metronome will sound like. Seven different sounds are available to use.
MPC CLICK
METRO TICK
CLAP
SHAKER
TAMBOURINE
SIDESTICK 1
SIDESTICK 2
'Volume' field
Controls the overall level of the Metronome from 10% to 100%.
'Out' field
Selects the output that the Metronome signal will be sent to. The following outputs are available:
LR
The Metronome will be output to the stereo out.
1/2
The Metronome will be output stereo to [ASSIGNABLE MIX OUT] 1/2.
3/4
The Metronome will be output stereo to [ASSIGNABLE MIX OUT] 3/4.
5/6
The Metronome will be output stereo to [ASSIGNABLE MIX OUT] 5/6.
7/8
The Metronome will be output stereo to [ASSIGNABLE MIX OUT] 7/8.
1-8
The Metronome will be output in MONO to the corresponding [ASSIGNABLE MIX OUT] output.
Note Repeat
If you press a pad while holding the [NOTE REPEAT] button, the pad sound will be played repeatedly according to the
value of the timing correct until you release the pad. You can also control its velocity by changing the strength used to
press the pad. With the Note repeat feature, you can record a difficult phrase to record in real time, such as 16 beat hi
hat, snare rolls, etc…
01. Press and hold the [NOTE REPEAT] button during recording /
02. While holding the [NOTE REPEAT] button, press the pad to play
03. While holding down the [NOTE REPEAT] button, the bottom of
You can also latch 'Note Repeat' by holding down the [NOTE REPEAT] button and then pressing [SHIFT]. Pressing [NOTE
REPEAT] again will unlatch the 'Note Repeat' feature.
The [GO TO] button is used to move to a specific position within a
sequence. You can memorize up to five locate points.
01. In the MAIN page, press the [GO TO] button while the sequence
playback.
repeatedly.
The pad’s sound will be played repeatedly according to the value of the timing
correct until you release the pad. You can also control its velocity by changing the
strength with which you press the pad.
display is changed as shown on the right. You can change the
Timing correct value directly with pressing the [F1] through [F6] button.
The selected Timing correct value is highlighted. You can select triplets of each timing correct value by pressing [F6].
Note Repeat Hold
Locate
Saving a Locate point
is stopped.
Page 43

29
The Locate window will be displayed as shown on the right. In the Go to' field, the now time in the MAIN page is displayed. You can enter the
locate point you wish to save by using the numeric keys or the [DATA] wheel.
02. Move the cursor to a one of the 'Locate' fields and press the [F2] (CAPTUR) button.
Locating to a saved Locate point
01. In the MAIN page, press the [GO TO] button while the sequence is stopped.
The Locate window will be displayed.
02. Move the cursor to one of the 'locate' fields (Locate 1 – Locate 5) and press the [F5] (GO TO) button.
The Now Time instantly changes to the saved Locate point.
Detailed Information on the Sequence Feature
Setting the Length of a Sequence
By default, a sequence is set to a 2-bar length, but you can set this length between 1 to 999 bars.
01. In the MAIN page, select the 'Bars' field.
The 'Bar' field displays the current sequence length.
02. Turn the [DATA] wheel, or press [WINDOW] button.
The CHANGE SEQUENCE LENGTH window will be displayed as shown. .
03. In the 'New Length' field, select the new number of bars.
If you set a larger number than the current value, empty bars will be added at the
end of the sequence. If you set a smaller number, the bars in the end of the
sequence will not be played.
04. Press [F5] (DO IT) button
That applies the new setting and closes the window.
Tip: when you increase the length of the sequence, blank bars are added at the end of your sequence. If you decrease
the length of a sequence, the last bars of the existing sequence are not played, but unlike previous MPC's, these bars
are NOT truncated. This means that the length can be adjusted without losing the end bars of your sequence!
Tip: In SONG mode, you can also set a specific order for sequences playback. For more information, see 'SONG Mode'
on page 61.
Setting the Time Signature of the Sequence
By default, the time of a sequence is set to the 4/4 time, but you can change the setting.
01. In the MAIN page, select 'Time Sig' field.
The 'Time Sig' field displays the current value.
02. Turn the [DATA] wheel or press the [WINDOW] button.
The TIME SIGNATURE window will be displayed.
The upper part of the screen indicates the number of bars. The currently selected
time is displayed below it.
03. Select the desired time signature, and set to this.
Select the bar to change the time with the right/left cursor keys and change the time
with [DATA] wheel.
04. Press [F5] (DO IT)
That changes the time signature of the bars and closes the window.
Note: if a bar becomes lengthened due to a time signature change, blank space is added to the end of the bar. If you
decrease the length of a sequence, the last bars of the existing sequence are not played, but unlike previous MPC's,
these bars are NOT truncated. This means that the length of a sequence can be adjusted without losing the end bars of
your sequence!
Page 44

The Sequencer 30
Setting Tempo
You can set the beats per minute, or tempo, in the MAIN page by selecting the 'BPM' field.
You can set the BPM for a sequence between 30.0 and 300.0 beats per minute.
When the MPC5000 is set to follow an external source via MIDI clock, the 'BPM' field
will display 'EXT', along with the tempo being received in brackets for external
tempo.
You can change the BPM after you create the sequence, or change the BPM
mode. (See page 47 for more information.)
anywhere in a sequence by inserting the tempo change event in the STEP EDIT
Tap Tempo
You can set the tempo using the [TAP TEMPO] button as well as in the 'Tempo' field.
Press the [TAP TEMPO] button along to the desired tempo, and the MPC5000 will calculate the tempo based on the
timing that you tap. The sequence’s tempo will automatically be set to the tapped value.
The MPC5000 takes the average of four taps of the pad, but you can adjust the number of taps used to calculate BPM in
the 'Tap average' field in OTHER mode.
Changing Tempo of All Sequences At One Time
You can change the tempo of all sequences to the same tempo at one time. You can change the tempo of each
sequence at any time after you create the sequence, but it is useful to change all the sequence at one time when you
are creating one song with several sequences.
01. In the MAIN page, select the 'BPM' field and press the
02. Press [F5] (FIX) button.
03. In the 'Fix tempo' field, set the tempo.
04. Press [F5 (DO IT) button.
[WINDOW] button.
The TEMPO CHANGE window will be displayed.
The FIX TEMPO window will be displayed.
It changes the tempo of all of the sequences to the value set in the 'Fix Tempo' field.
About Tempo Change
With the Step Recording feature in the STEP EDIT mode, you can insert tempo changes in a track, so that you can
change the tempo within a sequence. When you use the Tempo Change feature, select the 'BPM' field in the MAIN mode
and press the [WINDOW] button to open the TEMPO CHANGE window and set the 'Tempo change' field to ON.
When you turn the tempo change feature on, the 'BPM' field in the MAIN page will be displayed as below.
The tempo display on the left is the original tempo set for the sequence.
On the right, the tempo you changed with the tempo change event will
be displayed.
The sequence will actually be played at the tempo in the right.
To enter STEP EDIT mode, press [F2] (EDIT) while in the TEMPO
CHANGE window.
Page 45

31
Setting the Loop for a Sequence
By default, the MPC5000 has the sequence loop feature on. It is useful
when you create a short sequence. With the sequence loop feature, you
can overdub a new performance on top of a previous performance,
allowing you to layer your tracks while playing back a sequence
repeatedly.
However, when you are working on a long song, created as a single
sequence, it may be better to loop only the part of the song that you are
working on. Also, when you wish to play freely without worrying about
the bars or times, it is better to turn the loop feature off. In this section
you will learn how to set the loop feature.
01. In the MAIN page, select the 'Loop' field.
You can switch the sequence loop features on or off by turning the [DATA] wheel. In this field, you can only set whether the loop is on or off. You
can set the start and end points of the loop in the LOOP window.
02. Press the [WINDOW] button.
The Loop window will be displayed as shown on the right. The MPC5000 will repeat the part you set in the 'First Bar' and 'Last Bar' fields.
If you set END in the 'Last Bar' field, the last bar of the sequence is always the end of the loop. Even if you edit a sequence and change its length,
the last bar of the sequence is still the end of the loop.
The 'Total Bars' field displays the length of the bars to loop. The 'Last Bar' field and the Total Bars' field work together. Changing the value in the
'Last Bar' field also changes the value in the Number 'Total Bars' field.
03. Press [F4] (CLOSE) button.
This closes the window and goes back to MAIN page.
Extending the Sequence Length Automatically
Usually, the length of a sequence is set based on the value of the 'Bars' field in the MAIN page. However, when you are
recording or overdubbing with the 'Loop' field set to OFF, the length of a sequence will be extended automatically. For
example, when the 'Bars' field is set to 2, if you start recording with the 'loop' field set to OFF, the recording will
continue after second bar until you press the [STOP] button. And the number of the bar when you actually pressed the
[STOP] button will be set as the new length for the sequence. This is useful when you do not know how long the part
you are composing will continue.
Tip: When you press the [PLAY START] button when the First bar is not 1, the MPC5000 will start the playback from the
bar set in the 'First Bar' field instead of from the beginning of the sequence.
Changing the Default Settings
Some settings for a sequence (such as number of the bars, time, tempo,
and loop) are automatically set to the default setting when you create a
new sequence. You can change the default settings for your convenience.
01. In the MAIN page, set the 'Loop', 'Time Sig' and 'Bars' fields as
02. Select the 'Sequence' field and press the [WINDOW] button.
03. Press [F5] (USER) button.
04. Press [F5] (DO IT) button.
you like.
The NAME SEQUENCE window will be displayed as shown.
The USER DEFAULT window will be displayed as shown.
The values currently set in the 'Loop', 'Time Sig' and 'Bars' fields in the MAIN page
will be saved as default. The next time you create a new sequence these values
will be applied to it.
Changing the Sequence Name
01. In the 'Sequence' field in the MAIN page, select a sequence that
02. Press the [WINDOW] button.
you wish to change the name of.
The NAME SEQUENCE windows will open.
Page 46

The Sequencer 32
03. In the 'Sequence name' field, enter the new name.
For more information for setting the name, see the 'Setting the name' section on Page 20.
04. Press [F4] (CLOSE) button.
This will close the window and goes back to MAIN page.
Changing the Default Name for a Sequence
Usually, when you create a new sequence, the name will be set to the
default name as 'Sequence## (## will be the sequence number)'
automatically. You can change the default name.
01. In the MAIN page, select the 'Sequence' field.
02. Press the [WINDOW] button.
The NAME SEQUENCE window will be displayed.
03. In the 'Default name' field, enter the new name.
For more information for setting the name, see the 'Setting the name' section on
Page 20.
04. Press [F4] (CLOSE) button.
This closes the window and goes back to the MAIN page.
Copying a Sequence
You can copy a sequence to another sequence.
01. In the 'Sequence' field in MAIN mode, select a sequence to
02. Press the [WINDOW] button.
03. Press [F3] (COPY) button.
04. In the 'Sequence' field (below), select the sequence number
05. Press [F5] (DO IT) button.
copy.
The SEQUENCE WINDOW will be displayed.
The COPY SEQUENCE window will be displayed as shown.
you wish to copy the selected sequence to.
If the selected sequence number is not blank, the name of the sequence will be displayed.
Copying the sequence will start. To cancel the operation, press [F4] (CANCEL).
Copying a Sequence Parameters ('Loop', 'Time Sig', 'Bars')
You can copy a sequence's parameters, including the 'Loop', 'Time Sig' and 'Bars' parameters to another sequence
01. In the 'Sequence' field in MAIN mode, select a sequence whose parameters you wish to copy.
02. Press the [WINDOW] button
The NAME SEQUENCE window will be displayed.
03. Press [F3] (COPY) button.
The COPY SEQUENCE window will be displayed.
04. In the 'Sequence' field (below), select a sequence to copy to.
05. Press [F3] (PARAMS) button
Copying the sequence's parameters will start. To cancel the operation, press [F4] (CANCEL).
Deleting a Sequence
You can remove a sequence from the memory of the MPC5000.
01. In the 'Sequence' field in MAIN mode, select a sequence to
02. Press the [WINDOW] button.
03. Press [F2] (DELETE) button.
delete.
The NAME SEQUENCE window will be displayed.
Page 47

33
The DELETE SEQUENCE window will be displayed.
04. Press [F5] (DO IT) button.
This will delete the selected sequence and changes its name to 'unused'.
Deleting All Sequences
You can delete all the sequence data in the memory at one time.
01. In the MAIN mode, select the 'Sequence' field and press the
[WINDOW] button.
The NAME SEQUENCE window will be displayed.
02. Press [F1] (DELETE) button.
The DELETE SEQUENCE window will be displayed.
03. Press [F3] (ALLSEQ) button.
The DELETE ALL SEQUENCES window will be displayed.
04. Press [F5] (DO IT) button.
That deletes all sequences. Sequence numbers will display 'unused' as a name until new data is recorded.
Handling the duration (the length of a note) at the loop boundary
When you are recording a sequence in the loop mode, you can specify how the MPC5000 should operate when it
reaches the boundary of the loop (it reaches the end of the sequence and jumps back to the beginning) while you are
holding a pad. To set this, go to OTHER mode and select the 'Truncate Duration' Field.
This setting allows you to choose how note lengths are handled at the
end of the sequence.
TO SEQ LENGTH
The MPC5000 records a note as played up to sequence length. In other
words, if the sequence is two measures long, the longest note that would
be recorded will be 2 measures as well. This is useful when a note is
intended to cross from the end of the sequence to the beginning and still
continue playing.
TO SEQ END
The MPC5000 cuts the note at the end of the sequence even if you hit
the pad. You cannot record beyond the loop. This is useful for making sure all notes end exactly on the beat at the end of the
sequence, and is useful for tightening up drum loops or long samples set to "NOTE ON"
AS PLAYED
The MPC5000 records your performance as it is played. This is useful for when it's desirable to have a note play for a long time as a
sequence loops.
Track Features
Setting the Track Type
You can set the track type in the 'Type' field in the MAIN page. There are two types of track: DRUM and MIDI. Below are
the differences of each track type.
DRUM
Select this track type when you play the MPC5000’s internal sampler by
hitting pads. The DRUM track data will be managed per pad.
MIDI
Select this track type when you use the MPC5000 as a MIDI sequencer
with external MIDI devices (MIDI keyboard etc…). The MIDI track data is
managed per MIDI note event. For more information, see 'MIDI
Sequencer Features' section on Page 38.
Selecting a Program
Playing Internal Programs
In the 'Program:' field, select the internal program loaded in the internal memory by turning the [DATA] wheel. You can play the
selected program by hitting the pads. If you select 'OFF' or 'No.', the MPC5000 does not play the internal programs/samples.
Page 48

The Sequencer 34
Playing an External Sound Module
In the 'Program:' field, select 'OFF' or select a program number to play by choosing the 'Program Number' field (Displayed as 'No.')
and select the desired program number. The MPC5000 will not play an internal program, but instead will 'trigger' an external sound
module such as a synth via MIDI.
Sending MIDI Program Changes
When you select 'No.' in the 'Program:' field, the 'MIDI Program number' field will appear in the right side of the
'Program:' field. You can set the MIDI Program Number from 1 to 128. The selected MIDI Program Number will be
transmitted from the selected MIDI OUT in 'MIDI' field when the sequence is selected or the [PLAY START] button is
pressed.
While selecting the 'No.' in the 'Program:' field, pressing the [WINDOW] button will open the 'Program Change' window.
You can set a 'MIDI Bank Select' message to transmit together with a
'MIDI Program Change' message in this window. You can also set
whether a 'MIDI Program Change' message recorded in the track is
transmitted or not.
Bank Select: (ON/OFF)
Selects whether a 'Bank Select' message is transmitted or not.
MSB: / LSB: (0-127)
Sets the 'MSB' (Control Change # 0) and 'LSB' (Control Change #32) of
a MIDI Bank Select message from 0 to 127.
Transmit Program Changes in This Track
Selects whether a 'MIDI Program Change' message recorded in the track is transmitted or not.
Transmit Prog Change every loop
Selects whether the sequence will send program changes whenever the sequence loops, or only on start.
Track Velocity
Track Velocity allows you to adjust the Velocity ratio on the selected Track while the
sequence is playing.
Select the 'VELOCITY%:' field in the MAIN page and adjust the Velocity ratio by
turning the [DATA] wheel from 1% to 200%.
Note: Changing the 'VELOCITY%' has no effect while recording sequence data; it will only affect the playback of a
sequence. If the velocity is set to 127 (maximum), any setting over 100% will have no effect.
Track Mute
You can set the mute for each track independently. For example, let’s assume you
have recorded a Piano solo on track 1 and another piano solo on track 2. By setting
either track to mute, you can compare these two piano solos and choose the better
one. If you set the mute ON for a track, the MPC5000 won’t play back that track.
Tip: using TRACK MUTE, you can set the track mutes with a pad. For more information, see the 'Muting Sequence
Tracks with Pads' section on Page 80.
Setting the MIDI Output Channel
You can set the MIDI output channel for each track independently.
You need to set the output channel when you use the MPC5000 to play an external
MIDI sound module. You do not have to set this when you are using the internal
sampler.
MIDI OUT A, MIDI channels 1B through 16B will be sent out via MIDI OUT B, MIDI channels 1C through 16C will be sent
out via MIDI OUT C, and MIDI channels 1D through 16D will be sent out via MIDI OUT D.
The MPC5000 has four MIDI outputs. Channels 1A through 16A will be sent out via
Page 49

35
Changing a Track Name
01. In the 'Track' field in the MAIN page, select a track you wish to
02. Press the [WINDOW] button.
03. In the 'Track Name' field, enter the new name.
04. Press [F4] (CLOSE) button.
change the name on.
The TRACK NAME window will be displayed as shown.
For more information for setting the name, see the 'Setting the name' section on
Page 20.
This closes the window and goes back to the MAIN page.
Changing the Default Name for a Track
Usually, when you create a new track, the name will be automatically set as default 'Track##' (## indicates track
number). You can change the default track name.
01. In the MAIN page, select the 'Track' field.
02. Press the [WINDOW] button.
The TRACK NAME window will be displayed as shown.
03. In the 'Default Name' field, enter the new name.
For more information about setting the name, see the 'Setting the name' section on
Page 20.
04. Press [F4] (CLOSE).
This closes the window and goes back to the MAIN page.
Copying a Track
You can copy a track to another track.
01. In the 'Track' field of the MAIN mode, select a track to copy.
02. Press the [WINDOW] button.
The TRACK NAME window will be displayed.
03. Press [F5] (COPY) button.
The COPY TRACK window will be displayed as shown.
04. In the 'Track' field (below), select a track to copy to.
05. Press [F5] (DO IT) button.
Copying the sequence will start. To cancel the operation, press [F4] (CANCEL).
Deleting a Track
You can remove a track from the memory of the MPC5000.
01. In the 'Track' field in MAIN mode, select a track to delete.
02. Press the [WINDOW] button.
The TRACK NAME window will be displayed.
03. Press [F2] (DELETE).
The DELETE TRACK window will be displayed as shown.
04. Press [F5] (DO IT).
That deletes the selected track and changes its name to 'unused'.
Deleting all Tracks
You can delete all the track data in the memory at one time.
05. In the MAIN mode, select the 'Track' field and press the
[WINDOW] button.
The TRACK NAME window will be displayed.
Page 50

The Sequencer 36
06. Press [F2] (DELETE) button.
The DELETE TRACK window will be displayed.
07. Press [F3] (ALLTRK) button.
The DELETE ALL TRACKS window will be displayed as shown.
08. Press [F5] (DO IT) button.
That deletes all the tracks and changes their names to 'unused'.
Track Lock
Individual tracks in a sequence can be locked for editing. This will allow
data on that track to be protected when performing global functions, and
protects from accidental adding, deleting or changing the sequence data
on the track. All data, including MIDI notes, controller changes, Q-LINK
events etc will be preserved. Programs can be changed to allow you to
audition different sounds on the locked track while preserving the data
from editing.
A Track's LOCK Status is indicated by the padlock icon to the left of the
TRACK field as indicated on the right. To lock or unlock a track, do the
following:
01. Select the TRACK LOCK icon
The TRACK LOCK icon appears as a padlock to the left of the TRACK field as shown on the right.
02. Turn the [DATA] Wheel, or press the [+] button to lock the track. Press [-] to unlock the track.
The icon will indicate the track status as shown below:
Track is unlocked.
Track is locked.
MIDI Receive Indicator
When Incoming MIDI is detected at MIDI IN I or II, the indicator will light
as shown on the right.
Track Select with [SHIFT] + Pad
While on the MAIN Page, press the [SHIFT] button and hit a pad to select the corresponding Track. Tracks are selected
by number as follows:
Pad Number Track Number
Pads A01-A16 Tracks 1-16
Pads B01-B16 Tracks 17-32
Pads C01-C16 Tracks 33-48
Pads D01-D16 Tracks 49-64
Page 51

37
Continuous Sample Tracks
The MPC5000 plays samples assigned to pads when triggering the pad event. So that, if you have the sequence which
has a long sample and start playing the sequence from a point which is past the actual pad event, the sample may not
be played, because the pad event for the sample may be earlier than the sequence play start point.
A Continuous Sample Track allows samples assigned to the selected Pad in each track to be played from their current
position, whenever [PLAY] or [PLAY START] is pressed. This way, if you are working with say, a four measure loop,
pressing start at bar two will start the loop playing from its correct location at bar two immediately, without having to
wait for a NOTE ON event.
Tip: New to the MPC5000 is the ability to have up to 64 continuous sample tracks, each assigned to a specific pad. This
allows you to have multiple loops, assigned to multiple tracks, usable with the TRACK MUTE function. For more
information on Track Mute, see page 80.
To enable 'Continuous Sample Track' on a selected track, do the
following:
01. In the MAIN mode, select the 'Track' field and press the
02. Select the 'Continuous Sample Track' field, and select 'ON'.
03. Choose the pad you wish to have play continuously.
[WINDOW] button.
The TRACK NAME window will be displayed.
The 'Pad' field will be displayed below the 'Continuous Sample Track' field.
The selected pad will play as a continuous sample. Tracks set to Continuous will be displayed as a '+' in the 'Track Status' field. For more on the
'Track Status' field, see page 22.
Selecting a Track with Function Keys
You can quickly switch tracks using [F3] (TR -)
button and [F4] (TR +) buttons. With [F3] (TR-)
and [F4] (TR +) buttons, you can easily select a
track without moving a cursor to the 'Track' field.
Soloing a Track
When you are working on a sequence that has
many tracks, it is useful to use the solo function to
play back only the selected track. For example,
when you are recording various instruments on
several tracks, you can check the contents of each
track with this feature.
01. In the 'Track' field in the MAIN page, select a track you wish to play back.
02. Press [F6] (SOLO) button and start recording/playback of the sequence.
The [F6] (SOLO) button will be highlighted and the MPC5000 plays back only the selected track and mutes all the other tracks. All Track
Indicators in the Track Status field in MAIN Mode will have an ‘x’ except the select track, to indicate the SOLO feature is on. For more
information on the Track Status field, see page 22.
03. To cancel the solo, press [F6] (SOLO) button again.
The MPC5000 plays back all tracks.
Page 52

The Sequencer 38
MIDI Sequencer Features
When you are playing the internal sound module with the pads, you can start recording just by selecting the desired
program in the 'Program' field in the MAIN page. However, the MPC5000 can be used as a MIDI sequencer. By
connecting an external MIDI keyboard to it, you can record the data from the keyboard and control the external sound
module.
About MIDI...
MIDI is a standard for transferring the performance data between electronic instruments regardless of the
manufacturer. Devices are connected using a special cable called MIDI cable. For example, when you connect the
keyboard’s MIDI OUT to MIDI IN of the MIDI sound module, the performance data you made with your keyboard will be
sent to the MIDI sound module, which plays the sound. MIDI can transfer only the performance data, not the actual
sound. To transfer as much data as possible through one MIDI cable, there are MIDI channels. By using a MIDI channel,
you can transfer different performance data to each channel separately. You can transfer the performance data to up to
16 channels. The MIDI channel is very important when you handle MIDI.
You must set the same MIDI channels for both the keyboard and the sound module even if you play the sound from the
keyboard. For example, if the keyboard’s output channel is set to 1, the sound module’s input channel should also be 1.
Some sound modules can receive several channels. In that case, you can assign a separate instrument (Piano, Bass,
Strings etc…) to each separate channel.
About MIDI sequencers…
A MIDI sequencer is a device that can record and play back MIDI data. The MPC5000 can be used as a MIDI sequencer.
When you connect an external MIDI keyboard to use the MPC5000 as a MIDI sequencer, connect the keyboard’s MIDI
OUT to MPC5000’s MIDI IN, and the MPC5000’s MIDI OUT to the external MIDI sound module’s MIDI IN. Thus, you can
record the keyboard performance to the MPC5000 and play sounds from the MIDI sound module. In this section, you
will learn how to record the performance data from the external MIDI keyboard to the MPC5000 and play sounds from
the external sound module.
01. Connect the external MIDI devices as described in the 'Using the MPC5000 with External Devices' section on
Page 185.
Connect the MIDI OUT of the keyboard to the MPC5000’s MIDI IN, and the MPC5000’s MIDI OUT to MIDI IN of the external sound module.
Note: You may still want to connect the MPC5000’s stereo out to a mixer so that you can hear a metronome sound
even when you use the MPC5000 as a MIDI sequencer.
02. In the 'Type' field, select MIDI.
03. In the 'Program' field, select OFF or No.
If you select it to the OFF or No., the MPC5000 does not play internal programs. If you select it to the No. and set MIDI Program number,
MPC5000 transmit the MIDI Program number to the external sound module for selecting the sound in it when the sequence is selected.
04. In the 'MIDI' field, select a MIDI channel.
Here, you set the MIDI channel to send the MIDI data on. Set the same channel as the one on the sound module.
Tip: By default the MPC5000’s input MIDI channel is set to receive all MIDI channels, so you don’t have to set the
channel to the keyboard’s MIDI channel.
05. Play the keyboard to make sure the sound module works.
If you don’t hear any sound, check the connection and make sure you have the correct settings for the keyboard and the sound module.
06. Press the [PLAY START] button while holding the [REC] button.
The recording starts after 4 counts.
07. Play the keyboard in time with the click sound.
By default, sequence is set to 2 bars. After recording for 2 bars, the MPC5000 will start playing back the recorded performance. If you make
another performance with pads, you can add the performance to the currently recorded one. This is called 'overdub'.
08. You can stop overdub by pressing the [STOP] button.
09. Press the [PLAY] button to play the recorded performance.
10. If you don’t like the performance, you can start the new recording by pressing [REC] and [PLAY START].
This cancels the currently recorded performance data and starts the new recording.
11. To add the recording to the already recorded data, press the [PLAY START] button while holding [OVERDUB]
button.
This plays back the currently recorded performance and you can add the new performance by hitting pads.
Page 53

39
Tip: If you select another sequence in the 'Sequence' field, you can record a new performance separately. By playing
back those sequences, you can create one whole song.
Handling the Sustain Pedal
In this section, you will learn how to handle sustain pedal information when you are using an external MIDI keyboard
with the MPC5000 as a sequencer.
Sustain pedal data is a MIDI event used to make the sound continue after a key on the keyboard is released. Usually a
foot switch controls this data. The keyboard sends out Sustain pedal data as a separate event from a note event, so
normally the sequencer recognizes this data as separate data. However, when you are overdubbing on a short sequence
loop, it might be better to convert the sustain pedal's data to the recorded note’s duration (the length of the note). For
example, if you record the sustain pedal's data as it is, once you press the sustain pedal during the loop, sustain will be
applied to all the data after that. If you convert the sustain pedal's data to note duration, the movement of the sustain
pedal will not affect the other notes. Thus, the MPC5000 is set to convert the sustain pedal's data to note duration by
default, but you can change the setting to record the data as sustain pedal data.
12. Press the [MODE] button and then [PAD 9] (OTHER).
This switches the MPC5000 to OTHER mode.
13. Select the 'Sus Pedal to Duration' field.
14. Use the [DATA] wheel to select one of the following choices for
how the MPC5000 will interpret the sustain pedal's MIDI data,
depending on the desired behavior.
YES
The MPC5000 is set to convert the sustain pedal data to note duration.
NO
The MPC5000 records sustain pedal data as it is.
Recording Aftertouch
Aftertouch - also called Channel Pressure - is a specific controller event, which is generated when a pad is triggered,
and then pressure is varied by pressing heavier or lighter. The pads on the MPC5000 are capable of sending aftertouch
messages to both the MPC5000's internal synth, and to external devices via MIDI. Whether this aftertouch information
is recorded or not can be selected by doing the following.
01. Press the [MODE] button and then [PAD 9] (OTHER).
This switches the MPC5000 to OTHER mode.
02. Select the 'Record Aftertouch' field.
03. Use the [DATA] wheel to select yes or no to decide if the MPC
will record Aftertouch.
Page 54

Page 55

Chapter 4: Editing Sequences
There are two ways to edit sequences. Using SEQ EDIT mode, you can edit entire regions of events at one time with
one sweeping action. Using STEP EDIT and GRID EDIT mode, you can edit your sequences in finer detail, manipulating
every event individually. In this section, you will learn about the SEQ EDIT mode, where you can edit entire regions at
one time. SEQ EDIT Mode can be accessed by pressing the [MODE] button and then [PAD 12].
Selecting a region for the editing
In the EVENTS page, there are six different editing options in the 'Edit' field: COPY, MOVE, TRANSPOSE, SHIFT TIME,
VELOCITY, and DURATION. The procedure to select the editing region is the same for all six options. Let us begin with
the selection of the editing region.
Tips: see page 25 for information on how to ERASE.
Setting the Range
Select the 'Range' field in the EVENTS page of the SEQ EDIT mode.
In the 'Range' field, you can set the start and end points of the editing
region. For example, to edit the first bar of a 2-bar sequence, set this
field to '001.01.000 - 002.01.000'. In this case, the event at the
'002.01.000' point will not be edited.
If you set the end point '002.01.000', like in this picture, the area right
before this point will be included in the area.
Setting the pad/note number
01. Select the 'Pads' field in the EVENTS page of the SEQ EDIT mode.
The display of the 'Pads' field depends on the type of the track that you have
selected.
When DRUM track is selected:
By default, the field is set to ALL, which means the MPC5000 will edit all
the pads. If you wish to edit only a specific pad, position the cursor in the
'Pads' field and hit the desired pad. The pad number will be displayed in
the 'Notes' field. You can select several pads. If you hit a different pad by
mistake, you can cancel the selection by hitting the pad again. To restart
the pad selection, turn the [DATA] wheel to the left. The value in the
'Note' field will be reset to ALL so that you can select the pad that you
want from the beginning.
When MIDI track is selected:
The display changes to show the selected region by note number.
You will set the upper limit and the lower limit of the note in the field, The
MPC5000 will edit only the events within the note numbers set in this
field.
Copying events (COPY)
You can copy events within the selected region to another place. The source data will remain in the original location.
01. Select the 'Edit' field in the EVENT page of the SEQ EDIT mode,
02. In the 'Range' field and the 'Pads/Notes' field, select the region
03. In the 'From sq' field and the 'Tk' field in the right, select the
04. In the 'To sq' and the 'Tk' field in the right, select the
and select COPY.
The various fields necessary for the copying will be displayed.
and notes that you wish to copy.
source sequence and track.
destination sequence and track.
Page 56

Editing Sequences 42
05. In the 'Mode' field, specify how to copy the data to the destination.
REPLACE
The MPC5000 will overwrite the destination with the source data. The data that is already in the destination will be removed.
MERGE
The MPC5000 will merge the source data with the data that is already in the destination.
06. In the 'Start' field, set the start point of destination time. The MPC5000 will start the copy to the time set here.
07. In the 'Copies' field, set the number of times to copy.
To copy the same phrase repeatedly, enter the number of copies in the 'Copies' field. You can copy it repeatedly with one operation.
08. Press the [F6] (DO IT) button.
The MPC5000 will start copying the data.
Moving events (MOVE)
You can move events within the selected region to another location. Unlike the copy function, this function will remove
the source data from the original location.
01. Select the 'Edit' field in the EVENT page of the SEQ EDIT mode,
02. In the 'Range' field and the 'Pads/Notes' field, select the region
03. In the 'From Sq' field and the 'Tk' field on the right, select the
04. In the 'to Sq' and the 'Tk' field on the right, select the
05. In the 'Mode' field, specify how to move the data to the destination.
06. In the 'Start' field, set the start point of destination time.
07. Press the [F6] (DO IT) button.
and select MOVE.
The various fields necessary for moving will be displayed.
that you wish to move.
source sequence and track.
destination sequences and tracks.
REPLACE
The MPC5000 will overwrite the destination with the source data. The data that is already in the destination will be removed.
MERGE
The MPC5000 will merge the source data with the data that is already in the destination.
The MPC5000 will start moving the event to the time selected here.
The MPC5000 will start moving the event.
Transpose
You can transpose (change the key of) the note events. This operation changes the selected track, whether it’s a DRUM
track or a MIDI track.
01. Select the 'Edit' field in the EVENT page of the SEQ EDIT mode,
02. In the 'Range' field and the 'Pads/Notes' field, select the region
03. In the 'Edit Sq' field and the 'Tk' field on the right, select the
04. Press the [F6] (DO IT) button.
and select TRANSPOSE.
The various fields necessary for the transpose will be displayed.
that you wish to edit.
sequence and track that you wish to edit.
When the MIDI track is selected, the 'Amount' field is displayed. Set the amount of
the transpose in the 'Amount' field. The unit of the amount is semi tone. When the
DRUM track is selected, the 'Pad' field is displayed. You can change the selected pad event to another pad event. To do this, select the pad event
you wish to change in the 'Pad/Notes' field and then select the destination Pad in the 'Pad' field.
The MPC5000 will start processing your changes.
Page 57

43
Changing the timing of an event (SHIFT TIMING)
You can shift the timing of the note event.
01. Select the 'Edit' field in the EVENT page of the SEQ EDIT mode, and select SHIFT TIMING.
The various fields necessary for the Shift Timing will be displayed.
02. In the 'Range' field and the 'Pads/Notes' field, select the region
that you wish to edit.
03. In the 'Edit Sq' field and the 'Tk' field on right, select the
sequence and track that you wish to edit.
04. In the 'Amount' field, set the amount of Shift timing.
This is a value in clock ticks the selected region will be moved.
05. Select the direction of Shift Timing.
EARLIER: Shifts forward
LATER: Shifts back
06. Press the F6 (DO IT) button
The MPC5000 will start processing your changes.
Changing the Velocity of an event (Velocity)
You can change the velocity of any note event.
01. Select the 'Edit' field in the EVENT page of the SEQ EDIT mode, and select Velocity.
The various fields necessary for changing the velocity will be displayed.
02. In the 'Range' field and the 'Pads/Notes' field, select the region
03. In the Edit 'Sq' field and the 'Tk' field on the right select the
04. In the 'Mode' field, choose the method of velocity change.
05. In the 'Value' field, set the value to be adjusted. You can set the Value between 0 and 127. When you select
06. Press the F6 (DO IT) button
that you wish to edit.
sequence and track that you wish to edit.
ADD VALUE
Adds the value selected in the 'Value:' field to the note.
SUB VALUE
Subtracts the value selected in the 'Value:' field from the note.
MULTI VAL%
Multiplies the Velocity (percent) by the value selected in the 'Value:' field.
SET TO VALUE
Sets the note to the Velocity selected in the 'Value:' field.
'MULTI VAL%' in the 'Mode' field, you can set the Value between 0 and 200.
The MPC5000 will start processing your changes.
Page 58

Editing Sequences 44
Changing the duration of an event (DURATION)
You can change the Duration of any note event.
01. Select the 'Edit' field in the EVENT page of the SEQ EDIT mode,
02. In the 'Range' field and the 'Pad/Notes' field, select the region
03. In the Edit 'Sq' field and the 'Tk' field on the right select the
04. In the 'Mode' field, select how you want to change the Duration.
05. Press the F6 (DO IT) button
and select DURATION.
The various fields necessary for changing the duration will be displayed.
that you wish to edit.
sequence and track that you wish to edit.
ADD VALUE
Adds the value in MIDI pulses selected in the 'Value:' field to the note.
SUB VALUE
Subtracts the value in MIDI pulses selected in the 'Value:' field from the note.
MULTI VAL%
Multiplies the Duration (percent) by the value in MIDI pulses selected in the 'Value:' field.
SET TO VALUE
Sets the note to the duration in MIDI pulses selected in the 'Value:' field.
The MPC5000 will start processing your changes.
Selecting the editing region by bar
You can edit the sequence by bar. This is done in the BARS page in the SEQ EDIT mode, which can be accessed by
pressing the [MODE] button and then the [PAD 12].
Copying bars (COPY)
You can copy bars within the selected region to another place. The length of the destination sequence will be extended
to add the copied bars.
01. Select the 'Edit' field in the BARS page of the SEQ EDIT mode,
02. In the 'From Sequence' field, select the source sequence.
03. In the 'To Sequence' field, select the destination sequence.
04. In the 'First bar' field, select the first bar of the source
05. In the 'Last bar' field, select the last bar of the source sequence.
06. In the 'After bar' field, select the destination.
07. In the 'Copies' field, select the number of times to copy the data.
08. Press the [F6] (DO IT) button.
and select COPY.
The various fields necessary for copying will be displayed.
sequence.
The selected bars will be copied to the end of the bar set here.
To copy the same phrase repeatedly, enter the number of copies in the Copies field. You can copy it repeatedly with one operation.
The MPC5000 will start copying the bars.
Inserting a bar (INSERT)
To insert empty bars in the sequence, proceed as follows:
01. Select the 'Edit' field in the BARS page of the SEQ EDIT mode, and select INSERT.
The various fields necessary for inserting bars will be displayed.
02. In the 'Sequence' field, select the sequence that you wish to insert the bars.
Page 59

45
03. In the 'After bar' field, select the location to insert the bars in.
The selected bars will be inserted at the end of the bar set here.
04. In the 'Number of bars' field, set the number of bars to insert.
05. In the 'Time signature' field, select the time signature of the
06. Press the [F6] (DO IT) button.
bars to insert.
The number of empty bars selected will be inserted at the selected location.
Deleting a bar (DELETE)
To delete the selected bar(s) in the sequence, proceed as follows:
01. Select the 'Edit' field in the BARS page of the SEQ EDIT mode,
02. In the 'Sequence' field, select the bars to delete.
03. In the 'First bar' field, specify the first bar to delete.
04. In the 'Last bar' field, specify the last bar to delete.
05. Press the [F6] (DO IT) button.
and select DELETE
The fields necessary for deleting the bars will be displayed.
The selected bar(s) will be deleted.
Changing the order of tracks (TRACK MOVE)
When you are creating a song by combining several short sequences, normally you would use the SONG feature to play
back sequence in the specified order. The MPC5000 can convert the song data with short sequences to one long
sequence. To do this, you need to arrange the order of the tracks in each sequence. In this section, you will learn how
to use the track move function to change the order of the tracks in a sequence.
You can move tracks in the TrMOVE (Track move) page of the SEQ EDIT
mode, which can be accessed by pressing the [MODE] button and then
the [PAD 12].
01. In the SEQ EDIT mode, press the [F3] (TrMOVE) button. The
02. In the 'Sequence' field, select the track that you wish to change
03. In the 'Reference Sequence' field, select the sequence to be
04. Using the down cursor key, move the cursor to the track list.
05. You can scroll through the list by turning the [DATA] wheel.
06. Press the [F6] (SELECT) button.
07. Select the destination by turning the [DATA] wheel.
08. Press the [F6] (MOVE) button.
TrMOVE (Track move) page will be displayed.
the order.
used as the reference when changing the order.
For example, if you want other tracks to follow the order in sequence 01, you should select sequence 01 in the 'Reference Sequence' field.
Select the track that you wish to move.
This selects the track.
To select a track again, press the [F5] (CANCEL) button.
The list will scroll with the track selected in steps 5 and 6 fixed.
Refer to the list on the left to select the destination position.
The track will move to the selected location and the order will be changed.
Page 60

Page 61

Chapter 5: STEP EDIT Mode
Unlike SEQ EDIT Mode, STEP EDIT allows you a way to easily edit individual events one at a time. In this section, you
will learn about the STEP EDIT mode, where you can edit each event in detail. STEP EDIT mode is accessed by pressing
[MODE]+[PAD13].
A Note about Playing Events
You can audition events while in STEP EDIT Mode by selecting the event and pressing the [F6] (PLAY) button.
About Step Edit
Each track has the performance data you made with pads or
MIDI note information from an external MIDI keyboard. The
Step Edit function allows you to edit each event separately,
including individual note velocity, pitch, and duration, as well as
MIDI controller data, program changes, and other types of
events. There are also events specific to the MPC5000, such as
Q-LINK controllers, pad tuning and tempo.
'Now' field
The 'Now' field is displayed in the upper left corner on the
screen. The 'Now' field always displays the current position of a
sequence. This is the same as the 'Now' field on the MAIN page.
'Now' field
'View' field
Event List
The event list is displayed below the 'Now' field and the 'View'
field. This is where the events of a track are listed, their parameters, and at what time they each occur. This is where
the editing of specific events is performed.
Note: The sequencer of the MPC5000 divides the quarter note into 960 parts. These divisions are called ticks.
'Event Time' field
Event list
'View' field
The 'View' field allows you to simplify the event list by setting what is to be displayed. The event list will only display the
events specified in this field. This is useful for customizing what's displayed, and filtering out unneeded events.
'Event Time' field
The 'Event time' field is displayed on the left of the event list. It displays the positions of the events within the track.
Event
The 'Event' field is displayed to the right of the 'Event time' field. The display will differ depending on the type of event.
You can change the value by moving the cursor to each parameter and adjusting the values with the [DATA] wheel.
Numerical values can also be entered using the [NUMERIC KEYPAD].
Basic operation
Event List
When the cursor is in the 'Now' field or 'View' field, pressing the down [cursor] will move the cursor to the event list.
This is where the events in the track are listed. You can select the events with up/down [cursor] buttons and the field
with the right/left [CURSOR] buttons. You can change the value in the field by turning the [DATA] wheel.
In the event list, you can select several events at one time by pressing the down [CURSOR] while holding the [SHIFT]
button.
[F1] (T.C.)
This velocity works the same as the [F1] (T.C.) button in the MAIN page. For more information, see the 'Timing correct'
section on page 26.
The Timing Correct setting will determine the time division for Step Recording. See page 52 for more on Step
Recording.
Page 62

STEP EDIT Mode 48
[F2] (TRACK)
Pressing and holding this button displays the window to change tracks. Using this button, you can select a track without
switching back to the MAIN page.
[F6] (PLAY)
Pressing this button will audition the selected event.
Events
Pad Event
This is the event that is recorded when you hit the pads in the DRUM track.
'P (pad)' field
You can set the pad number in this field.
'Note Variation' field
In the above picture, the area that displays 'T' is the 'Note
Variation' field. You can select the type of note variation data to
record with the Q-LINK sliders.
T Tune (pitch)
F Filter
L Layer
A Attack time
D Decay time
P Pan
Q Resonance
V Level
R Release
X Effect Send
'Pad' field
'Note Variation' field
'Velocity' field
'Duration' field
Tip: Note variation data, which is used for the Q-LINK sliders or [16 LEVELS] function, is the information used to control
the sound of a pad, and is saved in the track along with the pad event. With the note variation data, you can switch the
sounds of the pad even when you are playing back the same pad.
'Note variation value' field
In this field, displayed to the right of the 'Note Variation' field, you can set the note variation value.
'D (duration)' field
Here, you can set the duration of notes and pad events. This parameter determines how long the pad or MIDI note is held. The value
is displayed in MIDI Ticks.
'V (velocity)' field
Here, you can set the velocity of a pad. Velocity is a measure of how hard the pad was hit. The velocity is shown in 127 steps, with
127 the maximum. This can be used to play sounds softer, louder, or control the filter cutoff etc. For more information on velocity, see
'Note Number, Velocity, and Length' on page 15.
Note Event
This is a MIDI note event.
'N (Note number)' field
You can set the note number in this field. A note number indicates the location on a keyboard as a numbers, with the middle C of the
piano as note number 60.
'D (duration)' field
You can specify how long a note is held (length of a note). In the MIDI standard, pressing a key is called 'Note on', releasing a key is
called 'Note off'. In this field, you will set the time from Note on to Note off.
Page 63

49
'V (velocity)' field
You can set the velocity of the note event. In the MIDI standard, the speed used to trigger a note is called velocity. The velocity is
shown in 127 steps, with 127 the maximum.
Pitch Bend Event
You can set the pitch bend. Normally this event is used to control the pitch in real time.
Control Change Event
The control change, which is used for various applications, is the most versatile
event in the MIDI standard. The control change event consists of a control number, which determines the type of the
control change, and the control change value.
'CC' field
You can select the type of the control change in this field, and the control change value in the field on the right.
Program Change Event
You can set the program change. This event is normally used to switch the sound of an
external sound module. If program numbers are assigned to programs in the internal sampler section, you can switch
the programs that are assigned to the track within the sequence.
Channel Pressure Event
You can set the channel pressure. Normally, a Channel pressure event is used
for aftertouch. This feature allows you to control the sound depending on the pressure used to press the keyboard.
Poly Pressure Event
The Poly pressure event is used for aftertouch much like the
channel pressure event, however the Poly pressure event can be set to different values for each individual note.
Exclusive Data Event
System Exclusive events are used by different manufactures to control a specific devices
non-standard functions such as different program parameters, or to send preset editing data, tuning information, and so
forth. These commands are most typically device specific, and not able to be edited using standard MIDI CC#s. The
MPC5000 can edit exclusive data in addition to record and play them back. To learn what data is required for each of
your devices, please consult the devices user manual.
Editing the exclusive data
To Edit an EXCLUSIVE Event, select the field as shown on the right and
press the [WINDOW] button.
The data of each byte will be displayed. You can scroll through the
display with right/left cursor buttons. Select the byte that needs change,
and change the setting with the DATA wheel or the -/= buttons.
To change the length of the exclusive data, press the [F2] (F7 EOX) key.
Pressing the [F2] (F7 EOX) key enters “F7”, which indicates the end of
the exclusive data, to the selected byte. Pressing the [F5] (SEND) key
sends out the currently set exclusive data. When you finish editing, press
the [F4] (CLOSE) key and close the window.
To send the Exclusive data to your device, press the [F5] (SEND) button.
Page 64

STEP EDIT Mode 50
Effect Select Event
This event is used to switch the effect sets within the sequence.
Tempo Change Event
Tempo change event is used to change the tempo within the sequence.
The tempo change event is different from other events. It does not
belong to a specific track. By selecting TEMPO in the 'View' field, you can display the tempo change event information
separately, regardless of the selected track. Even when you have selected ALL EVENTS in the 'View' field, the tempo
change event will not be displayed in the event list.
'%' field
You can set the amount of the tempo change.
Current / New Tempo
Setting the '%' field will display the new destination tempo. D=120.0 shows the original tempo set in the
tempo filed of the sequence. >xxx.x will show the new tempo based on the changed percentage.
For instance: setting BPM to 70.00% will make the new tempo 84.0 (when the current tempo was set to 120.0).
Real Time Event
This is the real time event assigned on Q-LINK sliders and knobs.
'Pad' Field
You can set the pad number in this field.
'Event' Field
You can set the event variation in this field. The events described here are specific events to the MPC5000. Each note event can have
any one of these modifiers set, one per note.
TUNE
The pitch of the sample
CUTOFF
The cutoff frequency of the Filters
LAYER
This allows you to alter the HIGH and LOW Range at which the Event will be triggered. (Sample Programs only)
ATTACK
This controls the attack time of the Amp Envelope.
DECAY
This controls the decay time of the Amp Envelope.
RELEASE
This controls the release time of the Amp Envelope
PAN
The panning position
RESON
The resonance value of the Filter
The resonance value of the Filter
LEVEL
The volume level of the sample
FX SEND
This parameter sets the amount signal the selected sample or synth program will be sent to the selected FX Buss.
Note: Both the LEVEL and PAN events share the Q-LINK value. For more information, see 'Program and FX Q-LINK
Controllers' on page 179.
Below are the MIDI events that you use when using the MPC5000 as a MIDI sequencer.
Note: How a MIDI event affects an external sound module depends on the specification of the sound module. For more
information about the effect of each MIDI event, see the operation manual of your sound module.
Page 65

51
Effect Automation Event
This is the event you will get when you record FX Q-link controller data with sliders and knobs.
Track Mute Event
This is the event you will get when you record a Track Mute Event.
Pad Mute Event
This is the event you will get when you record a Pad Mute Event.
Copying / Pasting an Event
To copy the selected event and paste it to another location, proceed as follows.
01. In the event list, select the event that you wish to copy.
You can select several events by pressing the down cursor button while holding the
[SHIFT] button.
02. Press [F3] (EDIT) and [F4] (COPY) at the same time.
When you press [F3] (EDIT), the display of the [F4] and [F5] buttons will change to
(COPY) and (PASTE) respectively until you release the button.
03. In the 'Now' field, select the time position that you wish to
04. Press [F3] (EDIT) and [F5] (PASTE) button at the same time.
paste the event to.
The selected event will be pasted.
Moving an Event
To move the selected event to another location, proceed as follows. This
differs from the Copy/Paste command in that the selected event is
deleted from the original location after the Move function.
01. In the Event list, select the Event that you wish to move. You
02. Press [F3] (EDIT) and [F2] (MOVE) at the same time.
03. Move Event window will be displayed.
04. Press [F5] (DO IT).
can select several Events by pressing the down cursor button
while holding the [SHIFT] button.
When you press [F3] (EDIT), the display of the [F2], [F4], and [F5] buttons will
change to (MOVE), (COPY), and (PASTE) respectively until you release the button.
Time=
The selected event time (the start point) is displayed. You can not change this value.
Move to
You set the time where you wish to move the selected event.
The selected event will be moved.
Deleting an event
To delete the selected Event, proceed as follows.
01. In the Event list, select the Event that you wish to delete.
You can select several Events by pressing the down cursor button while holding the [SHIFT] button.
02. Press the [F4] (DELETE) button.
The selected Event will be deleted.
Note: You can also delete the Event by pressing the [Erase] button in Step Edit mode.
After copying / deleting an Event, you can revert back the previous status by pressing the [UNDO] button.
Page 66

STEP EDIT Mode 52
Step Recording
In the STEP EDIT mode, when you hit a pad, or when the MPC5000 receives MIDI data from an external device, you can
record the event in the current time position (the time displayed in the 'Now' field). Move the event to the desired time
position by moving through the event list with the up/ down cursor buttons, or by setting the time position in the 'Now'
field, and you can add events to the desired time position one by one. This method, recording each event individually
when MPC5000 is in the stop mode, is called step recording.
01. In the STEP EDIT mode, Press [REC] or [OVERDUB].
The LED of [OVERDUB] will be lit, which indicates that you can now enter events by hitting a pad.
02. Move through the list with the up/down cursor buttons, or select the 'Now' field, to select the time position to
03. Hit a pad.
04. Press [STOP].
insert event.
The event of the pad will be recorded.
The LED of [OVERDUB] will be turned off and you can finish the step recording.
Detailed setting for step recording
Pressing [WINDOW] in the STEP EDIT mode brings up the Step Edit Options window, where you can make various
settings for the step recording.
'Auto step increment' field
If you select YES, the MPC5000 will automatically update the sequence according to the setting of the timing correct
when it receives a pad event or a note event. Use the [< STEP] and [STEP >] buttons to skip a note and move to the
next position.
'Duration of recorded notes' field
You can determine how the length that a pad (MIDI keyboard) is pressed
affects the event to record during step recording.
AS PLAYED
The length that a pad (MIDI keyboard) is pressed will be applied to the
event.
When you hit a pad or play a MIDI keyboard, the metronome sound will
start automatically. Refer to the metronome sound to set the length to
press a button. When you release a pad (MIDI keyboard), the length that
a key was pressed will be entered in the 'D (duration)' field.
TC VALUE%
When this is selected, the duration of events recorded in 'Step Record' mode will be automatically set to a percentage of the Timing
Correct Setting. For example, if Timing Correct is set to 1/8th notes, a TC VALUE% of 50% will set the duration of each event to onehalf the length of the Timing Correct setting. In this case, the length of each recorded event will be 16th notes.
Setting a TC VALUE% of 100% will insert events equal to the Timing Correct length.
Inserting an event
During the step recording, you can enter events using the insert function as well as using pads and MIDI keyboard.
01. Move to the time position that you wish to insert the event, and press [F5] (INSERT).
The Insert Event window will be displayed.
02. In the 'Type' field, select the event to insert, and press [F5] (DO IT).
The selected event will be inserted.
Hint: After completing the Step recording, you can go back the previous status by pressing the [UNDO] button.
Page 67

53
Track Lock
Individual tracks in a sequence can be locked for editing. This will allow
data on that track to be protected when performing global functions,
and protects from accidental adding, deleting or changing the
information on the track.
A Track's LOCK Status is indicated by the padlock icon in the upper
right corner of the display. To lock or unlock a track, do the following:
01. Select the TRACK LOCK icon
02. Turn the [DATA] Wheel, or press the [+] button to lock the
track. Press [-] to unlock the track.
This will toggle the TRACK LOCK Icon. The icon will indicate the track status as shown below:
Track is unlocked.
Track is locked.
Page 68

Page 69

Chapter 6: GRID EDIT Mode
The MPC5000 has the GRID EDIT mode for editing or entering Pad events and Note events in a sequence. In GRID EDIT
mode, you can enter and edit Events in the Graphic Matrix Editor.
About Grid Edit
Each track in the MPC5000 contains performance data entered with the pads, or with an external MIDI keyboard. In
GRID EDIT mode, you can enter or edit (Copy, Delete, Move, etc.) the Pad Event, MIDI notes, or controller data on a
graphical matrix. Pressing the [MODE] button and then pressing [PAD 14] (GRID EDIT) will allow you to enter GRID
EDIT mode. GRID EDIT mode's view will change, depending on what type of track is being viewed.
DRUM View
When the current track 'TYPE' is set to 'DRUM' on the main page (See
page 21), the track will be displayed in a 'Step-Sequencer' style as
above. This allows for easy editing of 'DRUM' type tracks in a matrix
display.
MIDI View
When the current track 'TYPE' is set to 'MIDI' on the main page (See
page 21), the track will be displayed in a 'Piano Roll' style as above. This
allows for easy editing of 'MIDI' type tracks in a matrix display. This view
is useful to also see the duration of each note played.
Which octave is being viewed can be selected by changing the field on
the right of the screen.
Both of these views share the following parameters:
Now
The 'Now' field is displayed in the upper left corner on the screen. The 'Now' field always displays the current position of
a sequence. This is the same as the 'Now' field
on the MAIN page.
'NOW' field
Time Ruler
Time ruler
This indicates the time axis of the track. The
number in the ruler shows the bar number.
Horizontal
Vertical marker
This indicates the current location. You can use it
to select the editing region on the time ruler.
Horizontal marker
This selects the pad number or note that you
wish to edit.
Pad
List
Vertical
Marker
'Event Range' field
This displays the range of events being viewed. This will change to show pad numbers, note octaves, or a 0-127 scale
depending on the selected view.
Event Area
This area graphically displays the note events recorded in the track. The unit of the grid for editing is changed by the
Timing Correct parameter.
Page 70

GRID EDIT Mode 56
Basic operation
Operation in the Event area
When the cursor is in the 'Now' field, pressing the down cursor button moves the cursor to the Event area. The cursor in
the Event area is at the grid where the vertical and horizontal markers intersect. Your editing operations will be affected
in the selected grid.
You can move the cursor in the Event area by the cursor buttons. You can also move the cursor to horizontal directions
by turning the [DATA] wheel.
If the Event area is not shown in the grid, the time ruler will move and the next event area will be shown by turning the
[DATA] wheel.
When the horizontal marker is the upper side of the Event area, pressing the up cursor button will move the cursor to
the 'Now' field.
Relationship of Grid Value to Timing Correct.
The unit of the grid in the Event area is changed by the Note value in the Timing Correct window which is shown by
pressing the [F1] (T.C.) button.
When you set the Note value to 1/16, one unit of the grid is 1/16 notes. When you set the Note value to 1/8, one unit
of the grid is set to 1/8 notes.
Example: First, the Note value has been set to 1/32 and the Pad Events are recorded as in the drawing below
If you change the Note value to 1/16, the even area will be changed as follows.
In this case, every single event is displayed in the first four grids but each grid actually has two Pad Events.
When you edit (such as copy/paste/delete/move) the grid, all the events in the grid are edited.
Note: If you only wish to change how the units are displayed in the grid, press the [F4] (CLOSE) button after changing
the Note Value in Timing Correct window. If you press the [F5] (FIX), the MPC50000 will begin processing the Timing
Correct change.
Selecting an event
When you select the Pad Event, move the cursor to the grid of the Pad Event by pressing the cursor buttons.
For example, if you wish to select the PAD A03 event at 001.04.00 in the display, press the right cursor button several
times (or turn the [DATA] wheel) and move the cursor to the position of 001.04.00. The vertical marker moves and the
display in the 'Now' field becomes to '001.04.000'. Next, move the cursor to the PAD A03 row by pressing the down
the event in the grid is selected.
In the Event area, you can select several pads and regions by pressing the [SHIFT] button and moving the cursor
button.
When the cursor is in the event area, pressing the [WINDOW] button will
display the 'Events' window. The selected Pad Events are displayed in this
window. If you select several grids, all the Pad Events in the grid will be
displayed.
'Tick' field (left side)
This shows the tick value of the Event. It cannot be edited.
'P' (pad) or 'N' (note) field
You can select the Pad Number or Note in this field
In the above picture, the area that displays 'T' is the 'Note Variation' field.
You can select the type of note variation.
cursor button. The display will looks like this.
The event will now be displayed as a white '
' symbol within the Now Time marker. Now
Page 71

57
Tip: Note variation data, which is used for the Q-LINK sliders or [16 LEVELS] function, is the information used to control
the sound of a pad, and is saved in the track along with the pad event. With the note variation data, you can switch the
sounds of the pad even when you are playing back the same pad. See STEP EDIT mode on page 47 for more info on the
various Note Variation parameters.
'Note Variation Value' field
In this field, displayed to the right of the 'Note Variation' field, you can select the Note Variation Value.
'D (duration)' field
You can specify how long a note is held (length of a note). In the MIDI standard, pressing a key is called 'Note on', releasing a key is
called 'Note off'. In this field, you will set the time from Note on to Note off.
'V (velocity)' field
You can set the velocity of the note event. In the MIDI standard, the speed used to trigger a note is called velocity. The velocity is
shown in 127 steps, with 127 the maximum.
Editing in GRID EDIT mode
You can edit events in GRID EDIT mode as well as in STEP EDIT mode.
[F1] (T.C.) Button
This button works the same as the [F1] (T.C.) button on the MAIN page. It allows you to select the Timing Correction.
For more information, see the section entitled 'Timing correct' on page 26.
[F2] (TRACK) Button
Holding in this button displays a window which will allow you to choose a
different track to edit.
When you have made your selection with the [DATA] wheel, simply let
go of [F2] (TRACK). This way, you can select a track without having to
switch back to the MAIN page.
[F3] (EDIT) Button
Pressing this button will display (MOVE), (EDIT), (COPY), and (PASTE)
on [F2] – [F5] buttons as shown here.
The function of these will be discussed in the next section.
[F4] (DELETE) Button
You can delete a selected Event by pressing this button.
[F6] (PLAY) Button
This button allows you to play the selected event as it was recorded.
This is useful for auditioning specific notes in a complicated recording.
Copying and Pasting an Event
To copy the selected Event and paste it to another location, proceed as follows.
01. In the Event list, select the grid and the range that you wish to copy.
You can select several Pads by pressing the up/down [CURSOR] buttons while holding in [SHIFT]. You can then select several Grids by pressing
the right/left [CURSORS] or turning the [DATA] wheel while holding [SHIFT].
02. Hold down [F3] (EDIT) and then press [F4] (COPY).
When you press [F3] (EDIT), the display of the [F4] and the [F5] buttons will change to ( COPY) and (PASTE) respectively until you release the
button.
03. Move the cursor to the Grid or select the Time Position in the 'Now' field you wish to paste the event to.
04. Press in and hold [F3] (EDIT) and then press [F5] (PASTE).
The selected Event will be pasted.
Moving an event
You can move an Event to another position. After moving the Event, it does not remain at the original position, which is
different from copying/pasting an Event.
Page 72

GRID EDIT Mode 58
01. In the Event list, select the Grid and the Range that you wish to move.
You can select several Pads by pressing the up/down [CURSOR] buttons while
holding in [SHIFT]. You can then select several Grids by pressing the right/left
[CURSORS] or turning the [DATA] wheel while holding [SHIFT].
02. Press in and hold [F3] (EDIT) and then press [F2] (MOVE).
When you press [F3] (EDIT), the display of [F2] will change to (MOVE) until you
release the button.
03. The Move Events window will be displayed.
Time =: The selected Event time (the start point) is displayed. You cannot change
this value.
Move to: You select the time that you wish to move the selected Events to.
04. Press [F5] (DO IT).
The selected event will be moved.
Deleting an event
To delete a selected Event, proceed as follows.
01. In the Event list, select the Grid and the Range that you wish to delete.
You can select several Pads by pressing the up/down cursor button while holding in the [SHIFT] button. You can then select several Grids by
pressing the right/left cursor or turning the [DATA] wheel if you continue to hold in the [SHIFT] button.
02. Press the [F4] (DELETE) button.
The selected Event will be deleted.
Note: you can delete an Event in the ERASE window by pressing [ERASE] in GRID EDIT mode. For more information,
see page 25.
After copying / deleting an Event, you can revert back the previous status by pressing the [UNDO] button.
Entering an event
Step recording
In the GRID EDIT mode, when you hit a pad, or when the MPC5000 receives MIDI data from an external device, you
can record the event in the current time position (the time displayed in the 'Now' field). You can add events to the
desired time position one by one. This is called Step Recording.
01. In the GRID EDIT mode, press the [REC] button or the [OVERDUB] button.
The LED of the [OVERDUB] button will be lit, which indicates that you can now enter events by hitting a pad.
02. Move the cursor to the time position you want to insert an event by pressing the right/left cursor button.
You can also move the cursor by turning the [DATA] wheel or selecting the time position in the 'Now' field.
03. Hit a pad.
The Event will be recorded and the cursor will move to the next grid automatically.
If you select NO in 'Auto step increment' field in the Step Edit Options in STEP EDIT mode, the MPC5000 will stop the auto step increment. See
the 'Detailed setting for Step Recording' in the next section for more information.
04. Press the [STOP] button.
The LED of the [OVERDUB] button will be turned off and you can finish the Step Recording.
Page 73

59
Detailed Setting for Grid Edit Recording
Pressing [WINDOW] when the 'NOW' field is selected will bring up the
STEP EDIT OPTIONS window. Here you can make various settings for the
step recording.
'Auto step increment' field
If you select YES, the MPC5000 will automatically update the sequence
according to the setting of the timing correct when it receives a pad
event or a note event.
'Duration of recorded notes' field
You can determine how the length that a pad (MIDI keyboard) is pressed affects the event to record during step
recording.
AS PLAYED
The length that a pad (or MIDI keyboard) is pressed will be applied to the event.
When you hit a pad (MIDI keyboard), the metronome sound will start automatically. Refer to the metronome sound to set the length to
press a button. When you release a pad (MIDI keyboard), the length that a key was pressed will be entered in the 'D (duration)' field.
TC VALUE%
When this is selected, the duration of events recorded in 'Step Record' mode will be automatically set to a percentage of the Timing
Correct Setting. For example, if Timing Correct is set to 1/8th notes, a TC VALUE% of 50% will set the duration of each event to onehalf the length of the Timing Correct setting. In this case, the length of each recorded event will be 16th notes.
Setting a TC VALUE% of 100% will insert events equal to the Timing Correct length.
Real time recording
In the GRID EDIT mode, you can record the sequence data in real time by pressing [REC] or [OVERDUB] and pressing
[PLAY] at the same time.
Note: The event you recorded by real time recording displays on the grid after stopping the recording.
Track Lock
Individual tracks in a sequence can be locked for editing. This will allow
data on that track to be protected when performing global functions, and
protects from accidental adding, deleting or changing the information on
the track.
A Track's LOCK Status is indicated by the padlock icon in the upper right
corner of the display. To lock or unlock a track, do the following:
01. Select the TRACK LOCK icon
02. Turn the [DATA] Wheel, or press the [+] button to lock the
track. Press [-] to unlock the track.
The icon will indicate the track status as shown below:
Track is unlocked.
Track is locked.
Page 74

GRID EDIT Mode 60
Controller View and editing individual events
Individual Q-LINK Controllers, Pitchbend, FX Automation Events and MIDI CCs can be viewed in GRID EDIT Mode in a
linear graph view.
To open Controller View, do the following:
01. In GRID EDIT Mode, select the 'View' field, select the type of
02. To edit individual events in Controller View, use the [DATA] Wheel, or the [CURSOR] LEFT/RIGHT buttons to
03. To edit an individual event with more detail, select the event and
parameter you wish to view.
The following events are available:
PITCH
Displays Pitchbend events on the selected track.
CONTROL
This selection displays the MIDI continuous controllers on the track. When this parameter is selected, an additional field will be
displayed, which allows you to choose individual MIDI CC#s, or to view all.
CH PRES
Displays Channel Pressure on the selected track.
PY PRES
Displays all Poly Pressure events on the selected track.
REALTIM
This field displays realtime Q-LINK Events on the selected track. When this parameter is selected, additional fields will be displayed
which allows you to select the particular pad and event type you are viewing.
FX AUTO
This field displays FX Automation Events on the selected track. When this parameter is selected, additional fields will be displayed
which allows you to select the particular Effect Bus and parameter number (1-12).
select the event.
You can choose to DELETE this event by pressing the [F4] (DELETE) button. You
can also COPY/PASTE and MOVE Events by pressing and holding [F3] (EDIT) and
selecting the corresponding edit button.
press the [WINDOW] button.
This will display the EVENTS Window. Here, events can be individually edited with
more detail, or deleted by pressing the [F5] (DELETE) button.
Page 75

Chapter 7: SONG Mode
In SONG mode, you can set the order of multiple sequences and play them in a series. SONG mode is useful when you
are creating a song by combining short sequences. You can check the structure of an entire song while working, so you
can finish the song easily.
You can also perform direct to Hard Disk recordings here in SONG mode as well. For more on Hard Disk recording, see
HD RECORD on page 67.
Note: MIDI recording is disabled in SONG Mode.
Structure of a song
The MPC5000 can handle up to 20 songs. Each song has 250 steps. You can
create a song by assigning sequences to each step in the list. For each step, you
can assign a sequence, and also set the number of times the MPC5000 should
repeat the sequence. You can create a song in the SONG mode, which can be
accessed by pressing [MODE] and [PAD 15].
Screens
Now' field
The time display on the upper left corner on the screen is the 'Now' field. The 'Now' field always displays the current
position of a sequence. This is the same as the 'Now' field in the MAIN page.
'Song' field
You can set the song number in this field. The song name will be displayed to the right of the number. If there is an
unused song, it is displayed as (unused).
Step list
The list that is displayed below the 'Now' field and the 'Song' field is the step list, which is used to assign the sequences
to each step. Pressing the down cursor button when the 'Now' field or the 'Song' field is selected moves the cursor to
the step list. When there are many steps with different sequences assigned, you can scroll through the list with the
up/down cursor buttons. Pressing the left cursor button in the 'Step' field of the step list moves the cursor to the 'Now'
field.
Page 76

SONG Mode 62
'Step' field
This field displays the step number. You can scroll through the list by turning the [DATA] wheel.
'Sequence' field
You can assign the sequences in this field by turning the [DATA] wheel.
'Reps' field
You can set the number of times to repeat the sequence.
'Tempo' field
This field displays the tempo of the selected sequence. You can change the tempo of the sequence, but if you are using
the same sequence in another step, the tempo of that sequence will be changed as well.
'Bars' field
This field displays the number of bars of the selected sequence. This field only displays the number of bars; you cannot
make any changes in this field.
Creating a song
01. Press [MODE] and then [PAD 15] (SONG).
The SONG page will be displayed.
02. In the 'Song' field, select a song whose name is (unused).
03. Move the cursor to (end of song) and select the sequence to play first using the [DATA] wheel.
Turning the [DATA] wheel creates the new step and you can select a sequence. Then the new song will be created and its name will change from
(unused) to Song## (## indicates the song number).
04. In the 'Reps' field, set the times to repeat a sequence.
The MPC5000 will repeat the sequence the number of times set here before starting to play the next step.
1 - 99
The MPC5000 will repeat the sequence the selected number of times.
HOLD
The MPC5000 will repeat the sequence until you press the [F4] (SUDDEN) or the [F6] (NEXT) button.
If you set the 'Reps' field to 0, the MPC5000 will finish the play back after the previous step. It will not play the next step.
05. Select the '(end of song)' field by pressing the down cursor button, and select the sequence that you want
06. Press [PLAY START].
played back next.
Assign the sequences in the desired order by repeating the steps 03 and 04.
The assigned sequence will be played in the selected order.
Deleting a step
To delete a step in the list, proceed as follows.
01. Select the step that you wish to delete.
You can select the step by using the up/down cursor buttons in the step list.
02. Press [F5] (DELETE).
The selected step will be deleted and the following steps will be moved forward.
Inserting a step
To insert a step in a song, proceed as follows.
01. In the Step list, select a step that you wish to insert a new step into.
The new step will be inserted before the selected step.
02. Press [F6] (INSERT).
A new step with the same contents as the select step will be inserted right before the selected step.
Page 77

63
Playing a song
You can play the song by pressing [PLAY START]. To play from the middle of the song, select the position that you wish
to start the playback, using the cursor, and press [PLAY].
During the playback, the function buttons will change as follows.
[F5] (SUDDEN)
If you press this button during the playback, the MPC5000 will skip to the next step before it finishes the current
sequence, or when no next step has been choosen, pressing the button will make the MPC5000 jump immediately to
the start of the already playing sequence.
[F6] (NEXT)
If you press this button during the play back, the MPC5000 will skip to the next step after it finishes playing back the
current sequence regardless of the number of repeats in the 'Reps' field.
Tip: If HOLD is selected for a step in the 'Reps' field, the MPC5000 will not go to the next step until you press the [F5]
(SUDDEN) button or the [F6] (NEXT) button.
Other features in SONG Mode
Changing the song name
01. In the 'Song' field of the SONG page, select a song that you wish to change the name of.
02. Press [WINDOW].
The Song window will be displayed.
03. In the 'Song name' field, enter the new name.
For more information for setting the name, see the 'Setting Names' section on Page
20.
04. Press [F4] (CLOSE).
It closes the window and goes back to the SONG page.
Copying a song
To copy a song to another song, proceed as follows.
01. In the 'Song' field of the SONG mode, select a song that you wish to copy.
02. Press [WINDOW].
The Song window will be displayed.
03. Press [F5] (COPY).
The Copy Song window will be displayed.
04. In the 'Song' field (below), select a song that you wish to copy the selected song to.
05. Press [F3] (DO IT).
The MPC5000 will start copying the song. To cancel the operation, press [F4] (CANCEL) instead.
Deleting a song
To remove the selected song from the memory of MPC5000, proceed as follows.
01. In the 'Song' field of the SONG mode, select a song that you wish to delete.
02. Press [WINDOW]
The Song window will be displayed.
03. Press [F2] (DELETE)
The Delete Song window will be displayed.
04. Press [F5] (DO IT)
This deletes the selected song and changes its name to 'unused'.
Page 78

SONG Mode 64
Deleting all songs
You can delete all the song data in the memory at one time. Proceed as follows.
01. In the SONG mode, select the 'Song' field and press [WINDOW].
The Song window will be displayed.
02. Press [F2] (DELETE)
The Delete Song window will be displayed.
03. Press [F3] (ALL SG)
The Delete ALL Songs window will be displayed.
04. Press [F5] (DO IT)
All the songs will be titled (unused).
Setting all sequences to the same tempo
Each sequence has its own tempo. When you are creating a song in the
Song mode, it is useful to change all the sequences to have the same
tempo at once. With this feature, you can change all the sequences that
you are using for a song to the same tempo at once.
01. In the 'Tempo' field of the step list, press [WINDOW]
The Tempo Change window will be displayed.
02. Press [F5] (FIX)
The Fix Tempo window will be displayed.
03. In the 'Fix tempo' field, select the desired tempo.
04. Press [F5] (DO IT)
All the sequences used in the song will be set to the tempo that is set in the 'Fix tempo' field.
Ignoring tempo change events in a sequence
You can set the MPC5000 to ignore tempo change events that are set in a sequence.
01. In the 'Tempo' field in the step list, press the [WINDOW] button.
The TEMPO CHANGE window will be displayed.
02. Select a setting in the 'Ignore tempo change events in sequence' field.
NO
The MPC5000 will execute the tempo change events in the sequence.
YES
The MPC5000 will ignore the tempo change events in the sequence.
03. Press the [F4] (CLOSE) button.
This closes the window.
Converting a song to a sequence
You can convert a song to one long sequence. You can record or overdub to the converted sequence in the MAIN mode
like other sequences. You can also edit the sequence in the STEP EDIT mode or the SEQ EDIT mode.
01. In SONG mode, select any sequence shown in the Step List and
02. In the 'Song' field, select the song that you wish to convert.
03. In the 'Sequence' field, select the destination sequence.
04. In the 'Track status' field, select the track status after
press [WINDOW].
The CONVERT SONG window will be displayed.
conversion to a sequence.
REFERENCED TO 1ST SQ
The setting data (such as MIDI output, Mixer setting, Tempo, etc) of each track in the 1st Sequence of the Song will be used for all
tracks in the following sequences.
Page 79

65
MUTE TRACKS IGNORED
The muted tracks in the sequences of the Song will not be converted.
MERGED ON MIDI CHANNEL
The track in the sequence of the Song will be merged to the track according to the MIDI output channel.
For example:
The track data of MIDI output channels 1A-16A will be merged to tracks 1-16.
The track data of MIDI output channels 1B-16B will be merged to track 17-32.
The track data of MIDI output channels 1C-16C will be merged to track 33-48.
The track data of MIDI output channels 1D-16D will be merged to track 49-64.
Note: When using MERGED ON MIDI CHANNEL, if the track is set to OFF in the 'MIDI' field in the MAIN page, the data
in the track will not be merged after Convert Song to Seq. If you wish to convert the tracks for an internal program, set
the MIDI output channel for the track temporarily.
05. Press [F5] (DO IT)
The song will be converted to a sequence.
Note: during Song Conversion
(When selected 'REFERENCED TO 1ST SQ' and 'MUTE TRACKS IGNORED')
When you convert a song, the specific settings used in each track within the sequence, such as track type, MIDI channel
setting, selection of the program, etc, will be set to the values that you set in the sequence in the first step of the song.
If the track setting of the sequence in another step is different from those in the first song step, the song may not be
converted properly. To avoid this, it is better to make the track settings and the order of each sequence the same. For
more information on how to change the order of the tracks, see the 'Changing the order of the tracks' section on page
30.
LOCATE
Locate is available in SONG Mode, as well as MAIN Mode.
To access Locate in SONG Mode, press the [LOCATE] button.
Entering a locate point and then pressing [F5] (GO TO) will move you to
the selected position in the song.
You can also memorize a locate point. Select a point in your sequence and press the [GO TO] button. Select number
you want to memorize and press [F2] (CAPTUR) to memorize this point.
Page 80

Page 81

Chapter 8: HD RECORD Mode
Another function that is new to MPC line with the MPC5000 is Hard Disk Recording. Using the [RECORD IN], [PHONO
IN], or [S/PDIF IN] jacks on the back of your MPC, you can record performances, such as vocals, live guitar, live
keyboards -just about anything you can imagine – to your song. Up to eight tracks can be recorded per song.
Since this audio is recorded directly to the Hard Drive, no RAM is used, so the only limit to how much you can record is
the size of the Hard Drive. Many hours of sound can be recorded on the MPC5000's Hard Drive. You can also apply
effects to your Hard Disk tracks, edit your recorded audio, and mix down your song along with your song to create a
finished product.
Adding Hard Disk Tracks to a Song
To add a Hard Disk track to your current song, do the following.
01. Press [MODE] and [PAD16] (HD RECORD) to enter the HD REC
Note: this page is also accessible from SONG mode by pressing [F2] (HD
REC).
page.
The following page will be displayed as shown. Here, you can select whether you
would like to add audio tracks to the current song.
02. Select a song you would like to add Hard Disk tracks to in the
'Song' field.
See page 61 for more information on SONG mode.
03. Press [F6] (DO IT).
This will add audio tracks to the current song, and the screen will be displayed as
shown on the right. For recording audio tracks, see the next section.
Note: an important thing to note is that once audio tracks are added to a song, when attempting to select another
song, you will be prompted to save the current song if anything regarding the current song has changed. This is to
avoid wasted hard drive space. Unsaved audio will be deleted when you switch to a different song.
About the RECORD Page.
Many recording functions are handled here on this page. Track arming for recording, selecting inputs and monitoring of
levels are all done on this page.
Now
This is a display of time. This is the same as the 'Now' field on the MAIN page.
Song
This is where the name of the current song is displayed. Pressing the [WINDOW] button on
this page will allow you to rename the song. For more on naming, see page 20.
Source
This parameter selects whether the recording tracks will use the analog [RECORD IN] jacks, or the
[DIGITAL] S/PDIF input as a source. You can also resample the MAIN OUTS, or resample any pair
of ASSIGNABLE MIX OUTS.
Rec In L/R to Track
Each of these settings determine which Hard Disk track will be recorded to for each input. Any
of the eight tracks are available for recording.
Level Meters
These meters display the input level of the left and right inputs. When the source is set to
analog, the overall input level can be adjusted using the [REC GAIN] knob.
Page 82

HD RECORD Mode 68
[F5] (L ARM) and [F6] (R ARM)
These buttons are used to arm the tracks for recording. When selected, the button will darken,
and the tracks indicated in the corresponding 'Rec In' fields will be recorded to. The incoming
audio will be monitored through the [STEREO OUT] jacks, so you can hear what you are
recording. When unselected, you will be able to hear back what was recorded.
Track Matrix
The Track Matrix shows which track the left and right inputs are being recorded to, allowing for quick
reference. These will illuminate when the selected track is armed.
Recording Hard Disk Tracks
To record your first Hard Disk tracks, do the following.
01. Add Hard Disk tracks to the song you wish to record to.
This is accomplished as detailed in the previous section, 'Adding Hard Disk Tracks to a Song' on page 67.
02. Select the 'Source' field and select the desired input source.
For our example, let's choose 'ANALOG'.
03. Select which tracks the left and right inputs should be recorded to by selecting the corresponding tracks in the
04. Arm the desired tracks in the song by pressing the [F5] (L ARM) and [F6] (R ARM) buttons.
05. Play the source you wish to record.
06. Press [REC] and [PLAY START].
07. Record your performance along with your song.
'Rec In L/R' fields.
For our example, let's select tracks 1 and 2.
Adjust the [GAIN] knob to get the best volume level without clipping or distortion.
This will start the recording process.
Press the [STOP] button to end the recording when you are finished.
Recording additional tracks
To record additional tracks to the song, do the following.
01. Select the 'Rec In L/R' fields and select the next tracks you wish to record to.
For our example, let's choose channels 3 and 4.
02. Arm the tracks by pressing the [F5] (L ARM) and [F6] (R ARM) buttons.
03. Play the source you wish to record.
Adjust the [GAIN] knob to get the best volume level without clipping or distortion.
04. Press [REC] and [PLAY START].
This will start the recording process.
05. Record your performance along with your song.
Press the [STOP] button to end the recording when you are finished.
Page 83

69
Viewing Recorded Tracks
To view the tracks you’ve recorded, press [F4] (TkVIEW). Here, you will see each of the eight tracks, and waveform
data recorded to each track. Like the RECORD page, the 'Now' and 'Song' fields are available.
Edit
This check box selects which tracks will be edited. This selection can be
navigated to by using the [CURSOR] buttons, and checked or
unchecked by turning the [DATA] wheel. In the example to the right,
tracks 1 and 2 are selected for editing.
Arm
This read-only column shows you which tracks are set to be recorded in
the RECORD tab.
ST and END Times
This is where the range for selected edit functions are selected. The time range selected will be displayed by highlighting in white. For
example, in the picture shown, the range of 002.00.001 to 003.00.000 is selected. You can edit these fields by scrolling with the
[DATA] wheel. If you press the left or right [CURSOR] buttons while holding [SHIFT], you can move the cursor to higher points within
the numeric display to allow for quicker value selection. You can also enter the value directly with the numeric keypad.
Additionally, the start point can be edited by moving the [Q1] Q-LINK slider while the field is selected.
Note: only tracks selected for editing will be highlighted.
Selecting the View Range
You can zoom in to get a better look and more accurately set start and end points for editing. This allows you to view
the entire song, or just view a single bar.
To Select the View Range, do the following:
01. Press [F5] (RANGE)
The View Range page will be displayed.
02. In the "Number of Bars" field, select the desired view range.
You can select a view range as small as one measure, up to the entire range of the
song.
03. Press the [F4] (DO IT) button.
This will return you to the 'Track View' page, with the selected range displayed.
Viewing Individual Disk Tracks
You can zoom in on the waveforms for fine editing individual tracks to get a better look and more accurately set start
and end points for editing.
To finely view a recorded track, do the following:
01. Select the 'Start' or 'End' field.
Fine View will zoom to the start or the end point depending on which you select.
02. Press the [WINDOW] button.
The FINE page will be displayed.
03. Zoom out or in by pressing the [F2] (ZOOM-) and [F3]
04. Select the 'End' field and Zoom out or in by pressing the [F2] (ZOOM-) and [F3] (ZOOM+) buttons,
(ZOOM+) buttons, respectively.
The screen will zoom in or out, with the point selected in the 'St' field justified to the
left.
respectively.
The screen will zoom in or out, with the point selected in the 'End' field justified to the right.
Page 84

HD RECORD Mode 70
Choosing the Track to View
You can select other tracks to view by doing the following:
01. Press and hold the [F5] (TRACK) button.
The screen will change as shown on the right, with a popup to select which track to
view.
02. Select the track you would like to view by scrolling with the
[DATA] wheel.
Editing Hard Disk Tracks
Various edit functions are able to be performed on recorded Hard Disk tracks. To select the tracks to be edited, do the
following.
Selecting multiple tracks
01. On the TkVIEW page, select the first track to be edited.
02. Select the 'Edit' field
You can navigate to field by using the [CURSOR] buttons.
03. Place a check in this track's 'Edit' field.
04. Repeat steps 1-3 for each track you wish to edit.
05. Using the 'St' and 'End' fields, select the time range you wish to edit.
You can edit this field by scrolling with the [DATA] wheel. If you press the left or right [CURSOR] buttons while holding [SHIFT], you can move the
cursor to higher points within the numeric display to allow for quicker value selection. You can also enter the value directly with the numeric
keypad.
Additionally, the start point can be edited by moving the [Q1] Q-LINK slider.
06. Press the [F6] (EDIT) button.
This will open the AUDIO EDIT page. For information on the individual edit functions, see page 70.
Fine Editing of a Single Track
01. Select the track you wish to edit.
02. Press the [F5] (ZOOM) button.
When editing from the Zoom page, only the selected track will be edited.
03. Using the 'St' and 'End' fields, select the time range you wish to edit.
You can edit this field by scrolling with the [DATA] wheel. If you press the left or right [CURSOR] buttons while holding [SHIFT], you can move the
cursor to higher points within the numeric display to allow for quicker value selection. You can also enter the value directly with the numeric
keypad.
Additionally, the start point can be edited by moving the [Q1] Q-LINK slider.
04. Press the [F6] (EDIT) button.
This will open the AUDIO EDIT page. For information on the individual edit functions, see page 70.
Individual Edit Functions
When the [F6] (EDIT) button is pressed, the AUDIO EDIT page is opened. This page differs depending on the edit
function selected. The following parameters are shared among all the pages.
Tracks
This displays what tracks are to be edited. This displays the tracks that
were selected on the TKVIEW page.
Edit
This field selects the different edit functions. The different edit functions
are explained individually below.
Start / End
This is the start and end point for the edit function to be applied. This will
default to what was set on the TKVIEW or ZOOM pages, but can be further adjusted here.
Page 85

71
The following edit functions are available to be applied to recorded audio tracks.
Gain
This function will increase or decrease the amount of volume for the
selected tracks and ranges. Press [F5] (DO IT) to execute the selected
edit function. Press [F4] (CANCEL) to close the AUDIO EDIT page without
affecting the audio.
Up to 18dB or gain can be added or subtracted to a track at once.
Fade
Linear Fade In / Out
This function sets an automatic fade in or out to an audio track. The following fade types are available:
Linear Fade In / Out
This selection fades in or out the audio with a linear curve. A linear curve will go from start to end with
no curve, creating a straight line.
Logarithmic Fade In / Out
This selection fades in or out the audio with a Logarithmic curve. A logarithmic curve will quickly rise,
and then even out for the middle section, surging quickly again as it nears the end.
Exponential Fade In / Out
This selection fades in or out the audio with an Exponential curve. An exponential curve will slowly rise
in the beginning, and then quickly rise for the middle section, and then slowing again as it nears the
end.
Cut / Copy / Pasting Tracks
Cut and Copy allows you to duplicate a selected portion of your track.
You can then paste this portion elsewhere in your song using the 'Paste'
process. When using the 'cut' function, the selection copied is deleted.
When 'Copy' is selected, the original is left intact.
To copy a section of audio into another track, do the following:
01. Select the track you wish to copy by checking the 'Edit' field.
02. Select the entire range of the track.
Scroll with the [DATA] wheel on the 'End' field to select the entire track.
03. Press [F6] (EDIT)
This will open the AUDIO EDIT page.
04. In the 'Edit' field, select 'Copy'.
05. Press [F5] (DO IT) to copy the audio selection.
This will return you to the TKVIEW page.
06. Select the track you wish to paste the copied data into.
07. Press [F6] (EDIT)
Note that the 'Edit' field defaulted to 'Paste'. If paste is not selected in 'Edit', then select it now.
08. Choose how you would like your track pasted with the 'Paste Type'
09. In the 'Number of copies' field, select the number of consecutive copies you would like to paste.
10. Press [F5] (DO IT) to execute the paste.
The audio data you copied will now be pasted into place.
Page 86

HD RECORD Mode 72
Normalize
Normalize is a process that analyzes your recording and adjusts the
volume to make the loudest part of your audio track equal to 0 dB (i.e.,
the loudest possible level).
Press [F5] (DO IT) to execute this function.
Silence
This process allows you to silence a section of a track, or silence an
entire track. Press [F5] (DO IT) to execute this function.
Deleting, importing and Exporting Tracks
The MPC5000 can import .wav files as tracks to be used in your song, and export Hard Disk tracks to allow for editing
with a computer, or even loading the exported track as a sample. You can also delete one or more tracks from your
song.
Deleting
To delete an audio track do the following.
01. Press [MODE] + [PAD 16] to enter HD RECORD mode.
02. In the 'Song' field, select the song you wish to delete an audio
03. Press the [F4] (TkVIEW) button to open the TRACK VIEW tab.
04. Select the track you wish to delete, and select the EDIT
05. Press [F6] (EDIT) to open the AUDIO EDIT page as shown on the right.
06. In the 'Edit' field, select 'Delete Track'
07. To delete the track, press DO IT.
track from.
checkbox.
Importing
To import an audio track as a Hard Disk track, do the following.
08. Press [MODE] + [PAD 16] to enter HD RECORD mode.
09. In the 'Song' field, select the song you wish to import an audio
10. Press the [F4] (TkVIEW) button to open the TRACK VIEW tab.
11. Select the track you wish to import the file in to, and select the EDIT checkbox.
12. Press [F6] (EDIT) to open the AUDIO EDIT page as shown on the right.
13. In the 'Edit' field, select 'Import Track'
14. In the 'Destination' field, select the track to import your track to.
track into.
If no Hard Disk tracks are added to the current song, add audio to this song as
detailed in the section entitled 'Adding Hard Disk Tracks to a Song' on page 67.
Note: if the destination track has audio recorded to it already, this audio will be deleted and replaced with the imported
track!!
Page 87

73
15. Press [F5] (DO IT)
This will open the following window. Here, you can select the track you wish to load.
16. Choose the drive and directory for the file to be imported.
You can navigate to different folders using the up and down [CURSOR] buttons and
open and close folders by pressing the left or right [CURSOR] buttons.
For more on loading files and browsing drives, see 'Saving and Loading (DISK
Mode)' on page 165.
17. Press [F5] (DO IT) to import the selected file.
This will import the selected file into the selected track.
Exporting
To Export an audio track as either a 16 or 24-bit wave file to the Hard
Disk, do the following.
01. Press [MODE] + [PAD 16] to enter HD RECORD mode.
02. In the 'Song' field, select the song you wish to export audio
03. Press the [F4] (TkVIEW) button to open the TRACK VIEW tab.
04. Press [F6] (EDIT) to open the AUDIO EDIT page as shown on
05. In the 'Edit' field, select 'Export Track'
06. In the 'Track' field, select the track to Export.
07. For 'Format', choose 16 or 24-bit.
08. Press [F5] (DO IT)
09. In the 'Save to' field, choose the drive you wish to export track
10. Select the directory to save to in the 'File browser' field.
11. Press [F5] (DO IT) to export the selected file.
tracks from.
the right.
You can choose any of the eight Hard Disk tracks to export, or you can export all of them by selecting 'ALL'.
If you will be burning this track to a CD, select 16-bit. If you will be importing the file
into a 24-bit capable audio application, select 24-bit.
This will open the window shown to the right. Here, you can select device and
destination you wish to save the exported track to.
to.
You can navigate to different folders using the up and down [CURSOR] buttons and open and close folders by pressing the left or right
[CURSOR] buttons.
For more on loading files and browsing drives, see 'Saving and Loading (DISK Mode)' on page 165.
This will export the selected file into the selected directory.
Erasing HD Track Automation
It is possible to cut or copy Automation, Audio Only, or both from a Track
in HD VIEW. To do so, do the following:
01. In HD RECORD Mode, press the [F4] (HDVIEW) button to open
02. Select the track you wish to edit by placing a check in the EDIT
03. Press [F6] (EDIT) to open the AUDIO EDIT page.
04. In the 'Edit' field, select either CUT or COPY
05. In the 'Type' field, select one of the following:
the HD VIEW Page.
box.
AUDIO+AUTOMATION
Both Audio and Automation will be copied or cut.
Page 88

HD RECORD Mode 74
AUDIO ONLY
Only audio will be cut / copied.
AUTOMATION ONLY
Only Automation will be cut / copied.
Mixing Hard Disk Tracks
Output level, pan and effects settings can all be set for each Hard Disk track. To access the Hard Disk track mixer, do
the following.
01. Press [MODE]+[PAD 16] (HD RECORD) to access the HD
02. Press [F3] (HD MIX) to access the HARD DISK TRACK MIX page
To set which out each Hard Disk track will be routed to, do the following.
01. In HD RECORD mode, press [F3] (HD MIX).
02. Hit the pad that corresponds with the desired track.
03. Select the desired output in the OUT row.
RECORD mode.
as shown on the right.
The Columns shown represent each of the eight Hard Disk tracks. Each Track
Number will be displayed next to the LEVEL indicator in the LVL row.
Setting Track Output
The HDMIX page will be displayed.
Each column indicates Hard Disk tracks 1-8 and the currently selected track is highlighted. The row at the top is the 'OUT' field, where you where
you will assign a track to a specific assignable output.
The column for the selected track will now be highlighted.
You may also select each track by using the [CURSOR] buttons.
You can use the [CURSOR] buttons to move to each field in MIXER mode, and you can adjust each level with the [DATA] wheel. The following
choices are available:
ST
The track will be sent to the [STEREO OUT]. The track can be panned.
1/2 to 7/8
The track will be output to the corresponding [ASSIGNABLE MIX OUT]. The track can be panned.
1 to 8
The track will be output in MONO to the corresponding [ASSIGNABLE MIX OUT] output. Panning is disabled.
Tip: You can also easily change the settings for tracks by using the Q-LINK controls. For more information on using the
Q-LINK with MIXER Mode, see 'Using Q-LINK Controls with MIXER Mode' on page 91.
Track Matrix
The Track Matrix shows which track the left and right inputs are armed as set in the RECORD
page, allowing for quick reference.
Setting the level and pan of a Track
01. Press [MODE]+[PAD 16] (HD RECORD) to access the HD RECORD mode.
02. Press [F3] (TRKMIX) to access the HARD DISK TRACK MIX page.
03. Hit the pad corresponding to the desired track.
The column of the selected track will be highlighted. You can select several tracks by hitting pads while holding down the [SHIFT] button.
Tip: When you select several tracks and change a parameter (Level or Pan), the parameter on each pad will be changed
relative to the current setting.
04. Adjust the PAN value in the PAN row.
The fourth row down is labeled 'PAN'. Here is where the pan setting of each track is set. The knob graphic indicates the pan setting. The location
of the line within the circle indicates the current pan setting.
05. Adjust the Level value in the LVL row.
Page 89

75
The bottom row is labeled 'LVL'. Here is where the level setting of each track is set. The dark line in each column represents the relative level of
each track, much like faders on a mixing board. You can use the [CURSOR] buttons to move to each field in MIXER mode, and you can adjust
each level with the [DATA] wheel.
Tip: You can also easily change the settings for tracks by using the Q-LINK controls. For more information on using the
Q-LINK with MIXER Mode, see 'Using Q-LINK Controls with MIXER Mode' on page 91.
Assigning effects to a Track
With the MPC5000, you can route HD tracks to any of four (4) internal FX buses. In this section, we will discuss routing
tracks to the FX buses.
Note: Each FX bus can be assigned to a separate output, allowing for the dry signal and the affected signal to be routed
independently. For more information, see page 162.
01. In HD RECORD mode, press [F3] (TRKMIX).
The TrkMix page will be displayed. Each column indicates tracks 1 though 8 from the left to right and the currently selected track is highlighted.
02. Hit the pad corresponding to the desired track.
The column of the selected track will be highlighted.
03. Select which FX Bus to send the track to.
To adjust this value: simply move the cursor to the FX row, and use the [DATA] wheel.
OF
No effect will be used.
1 to 4
The effect bus number selected (1 to 4) will be used. The track sound will be sent to the selected effect section.
04. Adjust the SEND level by selecting the control in the SEND row by turning the [DATA] wheel.
The display in the SEND row indicates the output setting. The graphical knob display in the FX row indicates the current send level. Increasing
this level will increase the amount of effect for the selected track.
Note: the SEND knob in the SEND row will be disabled if the selected FX bus has DIRECT OUT Disabled. For more
information on DIRECT OUT, see page 150.
Note: Each FX bus can be assigned to a separate output, allowing for the dry signal and the affected signal to be routed
independently. For more information, see page 162.
Muting a Track
Each Hard Disk track can be muted from TRKMIX mode. To mute a Hard Disk track, do the following:
01. In the HD RECORD mode, press [F3] (TRKMIX).
The TRKMIX page will be displayed.
Each column indicates track 1 though 8 from the left and the currently selected track is highlighted.
02. Hit the pad corresponding to the desired track.
The column for the selected track will now be highlighted.
03. In the MUTE row (Displayed as 'M'), scroll with the [DATA] wheel to select one of the following.
-
Track will play as normal
M
Track is muted
Additionally, if this field is scrolled while the [SHIFT] button is held down, the following is available:
S
Track is soloed.
Using Q-LINK Controls with MIXER Mode
In addition to the [DATA] wheel, the Q-LINK controls can be used to change settings within TRKMIX mode. When track
1-4 is selected, the four Q-LINK knobs and sliders will control tracks 1-4. When track 5-8 is selected, the four Q-LINK
knobs and sliders will control tracks 5-8. The selected tracks are indicated with a bold line.
The function of each Q-LINK control is detailed in the section entitled 'Using Q-LINK Controls with MIXER Mode' on page
91.
Page 90

HD RECORD Mode 76
Mixer Automation
The MPC5000 can record information such as Level and Pan changes and Track Mute events so that they will automate
during sequence play back.
01. In the HD RECORD mode, press the [F3] (TRKMIX) button.
02. Press the [WINDOW] button to open the HD MIXER SETUP
03. In the 'Record Mix Changes' field, select YES with the [DATA]
Note: To record Mixer Automation in HD RECORD Mode, the current song must have at least one sequence assigned.
page.
wheel. In the ‘Record Track Mute Events’ you can select OFF
or ON to record track mute events or not.
If you set the 'Record mix changes' field to YES and change the LEVEL, SEND,
MUTE, or PAN in the TRKMIX page while recording in SONG mode, the changed
data will be recorded into the song. The song will be played with changing the Level or the Pan as you did during the recording. The mix data
recorded in the song is displayed in STEP EDIT page as follows and you can edit it the same as other MIDI event. These
LEVEL and PAN events in STEP EDIT Mode.
events are viewed as
Erasing HD Track Automation
It is possible to cut or copy Automation, Audio Only, or both from a Track
in HD VIEW. To do so, do the following:
01. In HD RECORD Mode, press the [F4] (HDVIEW) button to open
02. Select the track you wish to edit by placing a check in the EDIT
03. Press [F6] (EDIT) to open the AUDIO EDIT page.
04. In the 'Edit' field, select either CUT or COPY
05. In the 'Type' field, select one of the following:
the HD VIEW Page.
box.
For more information on HD Track editing, see page xxx.
AUDIO+AUTOMATION
Both Audio and Automation will be copied or cut.
AUDIO ONLY
Only audio will be cut / copied.
AUTOMATION ONLY
Only Automation will be cut / copied.
Mixdown
The MPC5000 can mix down songs, including internal sounds, Hard Disk tracks, and effects into a single file. Using this
function, a 16 bit / 44.1 kHz stereo wav mixdown of the current song can be created, ready to burn to CD as your final
master, or you can bounce the tracks to a two track mix in the current song.
Note: only parts assigned to the Main Outputs will be applied to the mixdown. Programs, Effects, and Hard Disk Tracks
assigned to the [ASSIGNABLE MIX OUTS] will not be mixed.
Mixdown to File
To perform a mixdown of the current song to an audio file, do the
following:
01. Select the RECORD tab by pressing [F2].
02. Press the [WINDOW] button to open the MIXDOWN page.
The page shown on the right will be displayed.
03. In the 'Destination' field, select 'Save as file'.
04. In the Tracks field, you will see the tracks select for mixing
05. For 'Format', choose 16 or 24-bit.
down.
For more information on naming, see page 20.
Page 91

77
If you will be burning this track to a CD, select 16-bit. If you will be importing the file into a 24-bit capable audio application, select 24-bit.
06. Select what you would like to be included in the mixdown.
You can select from the following parameters. Each parameter can be set to 'YES' or 'NO'.
Sequence Tracks
Internal Sequence tracks will be included in the mixdown. This includes all tracks created using internal programs such as drums,
virtual analog synth programs, etc.
Note: MIDI tracks will not mix down, as their sources are external to the MPC5000. In order to mix down external
devices with the MPC5000, they must be plugged into the [RECORD IN] and mixed down as Input Thru.
Recorded Audio
The eight Hard Disk tracks will be included in the mixdown.
Effects
Effects will be included in the mixdown.
Mixer Automation
Mixer automation will be performed on the mixdown.
Input Thru
The input thru will be recorded as the mixdown is performed.
Note: The level of the source being played via Input Thru is controlled by the [REC GAIN] knob. Make sure the level is
set properly before mixing down.
07. Press [F5] (DO IT)
The MPC5000 will begin mixing down the track. You will be able to monitor the
mixdown by listening to either the [STEREO OUT] or by listening through the
[PHONES] jacks. At any time, you may cancel the mixdown by pressing the [F4]
(CANCEL) button.
When the mixdown is complete, you will be asked for a location to save the
mixdown.
08. Select the folder and drive to save the mixdown to.
09. Press [F5] (DO IT).
The mixdown will be saved.
Track Mix Access in HD RECORD Mode
When in HD RECORD Mode, it is possible to access the Sequence Track Mixer. This will allow the mixing of Sequence
tracks while recording HD tracks.
Selecting Track Mix
To access the Track Mixer from HD RECORD Mode and on the HD MIX
page, press the [F5] (TrkMIX) button.
Page 92

HD RECORD Mode 78
Returning to HD MIX
To return to the HD Mixer from the Track Mixer, press [F3] (HD MIX).
Page 93

Chapter 9: Functions of a Pad
The MPC5000 has 16 drum pads. The pads perform various function besides making sounds when hit. In this section,
you will learn about various functions of the pad.
Playing with pads
By assigning the sounds in memory to a pad, you can play those
sounds.
Below are some useful functions when playing with pads.
Switching pad banks
The MPC5000 has 16 pads, but you can play up to 64 samples by
switching between the four pad banks.
The LED of the currently selected pad bank (from banks A
through D) is turned on. By pressing the desired [PAD BANK]
button, you can switch pad banks.
Full level function ([FULL LEVEL] button)
You can control the level of the sound by the velocity used to hit
the pads, but if you press the [FULL LEVEL] button, the MPC5000
will play the sample at the maximum level regardless of the
velocity.
If you press the [FULL LEVEL] button, the LED will be lit, and the
full level function will be activated. To deactivate this function,
press the [FULL LEVEL] button again.
16 levels function ([16 LEVEL] button)
You can play a sound using 16 parameter levels assigned to the 16
pads.
01. Hit the pad that you wish to play in 16 levels.
02. Press the [16 LEVELS] button.
The Assign 16 Levels window will be displayed.
The 'Pad' field displays the pad you selected in step 1.
03. In the 'Type' field, select the type of the parameter that you
04. Press the [F5] (TurnON) button.
wish to play in 16 levels.
You can select the following parameters;
VELOCITY
The MPC5000 will play the velocity in 16 levels.
TUNE
The MPC5000 will play a single pad in a sample program by varying pitch in 16 levels by semitone.
FILTER
The MPC5000 will play the filter cutoff value in 16 levels.
LAYER
The MPC5000 will play the layer value in 16 levels.
DECAY
The MPC5000 will play the decay value in 16 levels.
ATTACK
The MPC5000 will play the attack value in 16 levels.
When TUNE is selected, the Original key 'Pad' field will be displayed. In this field, you can specify the pad that plays the original key pad.
Page 94

Functions of a Pad 80
The window closes and the LED of the [16 LEVELS] button is turned on, which indicates you can play in 16 levels. Pressing the [16 LEVELS]
button turns its LED off and deactivates the 16 levels function.
Tip: When you select VELOCITY in the 'Type' field, the velocity of the pad event can be played in 16 levels, but if you
select an option other than VELOCITY, the note variation value will be played in 16 levels. The note variation data can
change the value of a specific parameter when you play the pad’s sample. For example, if you select TUNE in the 'Type'
field, when you hit the pad, the note variation data of TUNE will be sent to the sampler section with the pad event, and
the TUNE value will be changed according to the pad you played.
During Sequence recording, the Note variation data will be recorded with the note event and you can play back the sequence exactly what was
played. The note variation value is also used for the Q- Link slider function.
Muting Sequence Tracks with Pads (Track Mute)
You can mute/unmute sequencer tracks in real time during playback by hitting the pads. This is useful when you have
several instruments assigned to different tracks, so that you can play a song and switch tracks on/off using the pads
while playing back your sequence.
01. Press the [TRACK MUTE] button
02. Press [F1] (TkMUTE)
This brings up the Track Mute page.
'Now' field
Like the 'Now' field in the MAIN page, this field displays the current time
position of the sequence.
'Sequence' field
Like the 'Sequence' field in the MAIN page, you can select a sequence in this field.
Track list
The track list is displayed under the 'Now' field and the 'Sequence' field.
The track list displays the first 8 letters of the track name. The tracks are displayed according to the position of
the pads; Track 1 on the lower left and track 16 on the upper right. You can display 16 pads at one time, but
you can display 1 to 64 tracks by switching pad banks. The track whose track mute is set to off will be
highlighted.
Operation
Hitting a pad when the track mute page is displayed switches the track mute setting of that track instead of playing the
sound.
Solo Function
With the Solo function, you can play back only the selected track.
01. Hit the pad that corresponds to the track that you wish to play, while pressing the [F6] (SOLO) button.
[F6] (SOLO) will be highlighted and MPC5000 will play only the selected track while it mutes the other tracks. You can switch the tracks to play,
by hitting a pad.
02. Pressing [F6] (SOLO) deactivates the solo function.
Selecting Instant Track Mute
The MP5000 has the ability to mute tracks using two different methods. Method one ignore Note On messages. This is
how legacy MPC track muting has worked. This method allows samples and notes that are playing to finish playing
through their entire length. This is useful when using loops, and you want to have a loop finish playing to the end of a
measure, then not play the next time the sequence loops.
Method two is Instant Track Muting, which sends MIDI track volume. This is a method that is new to the MPC5000,
which is useful for when you want to have the track muted immediately. The advantage of this method is that the loop
will continue to play, but at zero volume, allowing the loop to continue playing when the track is unmuted. Using this
method, stuttering, beat juggling between two loops, and other DJ style techniques can be employed.
Page 95

81
To Turn on Instant Track Mute, do the following:
01. From the MAIN page, select the 'MUTE' field.
02. Press [WINDOW]
The MUTE EVENTS window will be displayed.
03. Select the 'Instant Track Mute' field, and select the desired
option.
ON
Tracks will be muted instantly by sending MIDI Volume.
OFF
Tracks will be muted like legacy MPCs, by ignoring Note Off events.
Setting the Track Mute in Solo Mode
Solo function switches the track mute setting temporarily. Turning off the solo function resets the track mute settings
for each track to the same status as before the solo function was activated. However, you can also turn off the solo
function while keeping the track mute setting unchanged. With this feature, you can make a performance starting with
many tracks followed by only a simple rhythm track and then gradually add tracks.
Operation
When the solo function is on, press [F6] (SOLO) while holding the [SHIFT] button.
The Solo function will be deactivated and the mute setting for the track set to solo will be turned off. The setting for other tracks will be
turned on.
Recording Track Mutes
The MPC5000 has the ability to record track mute events. Track mute recording is off by default. To turn on track mute
recording, do the following:
01. From the MAIN page, select the 'MUTE' field.
02. Press [WINDOW]
The MUTE EVENTS page will open.
Select the 'Record Track Mute Events' field and change it to ON.
Also note that there is a convenient shortcut to the SEQ EDIT page here. Press [F2]
(EDIT) to access the SEQ EDIT page. As further convenience, the 'VIEW' field in
SEQ EDIT is set to TRACK MUTE automatically when SEQ EDIT is accessed in this
way.
Once 'Record Track Mute Events' has been set to ON, pressing [PLAY] and [REC] or [OVERDUB] in the Track Mute page will allow track mute
events to be recorded. Track mute events are only recorded when in the Track Mute page. Timing Correct settings will affect the recording of
track mute events.
Ignoring Track Mute Events
To hear your sequence without playing back recorded or inserted track mute events, do the following:
01. From the MAIN page, select the 'MUTE' field.
02. Press [WINDOW]
The MUTE EVENTS page will open.
03. Select the 'Play Track Mute Events' field and change it to OFF.
This will allow you to play back sequences while ignoring track mutes. To play track mute events in your sequences, set this field to ON.
Track Mute Groups
Pads can be grouped together, so hitting one pad will affect the other
pads in the same group. TRACK MUTE GROUPS are accessed by
pressing [F2] (TkGRP) from the Track Mute page.
To add a pad to a group, do the following:
01. Press a pad. For an example, press PAD A01
The mute group selection for [PAD01] is selected.
02. Change the selection from OFF to 1.
Page 96

Functions of a Pad 82
03. Press another pad. For example, press PAD A02
The mute group selection for [PAD02] is selected.
04. Change the selection from OFF to 1.
05. Press [F1] (TkMUTE) to return to the TRACK MUTE page.
06. Play PAD A01
Notice that now PAD A02] mutes along with PAD A01. Up to 16 different mute groups can be created.
Note: When a pad is pressed while holding the [SHIFT] button, the track mute status of only the pressed pad is
changed, and mute group settings are ignored.
Track Mute Quantization
Track and Pad Mutes can be quantized. This will allow Mutes to occur in time with the sequence.
TRACK MUTE Quantization
To turn on Track Mute Quantization, do the following:
01. Press the [TRACK MUTE] Button
This will open the TRACK MUTE Page as shown on the right.
02. Press the [F1] (TkMUTE) button to select the TRACK MUTE Tab.
03. Press the [F5] (T.C.) button.
The [F5] button will darken to indicate it is active as shown to the right.
04. Press a pad corresponding to the Track you would like to mute.
The MPC5000 will mute the selected track on the next division of the T.C.
setting. For more information on setting the TC Value for Track and Pad
Mutes, see the next section.
Changing the Timing Correct for Track Mute Quantization
To change the Timing Correct value while in TRACK or PAD MUTE Mode,
press the [WINDOW] Button. This is separate from the MAIN Timing
Correct, and is used exclusively for Pad / Track Mute. The following
divisions are available:
2 Bar
1 Bar
1/4
1/4(3)
1/8
1/8(3)
1/16
Off
Change Sequences in Track Mute Mode
You have the ability to change sequences when in TRACK MUTE Mode. To
change Sequences in TRACK MUTE Mode, do the following:
01. Press the [TRACK MUTE] Button
This will open the TRACK MUTE Page as shown on the right.
02. Press the [F1] (TkMUTE) button to select the TRACK MUTE Tab.
03. Select the 'SQ' field.
Page 97

83
04. Press the [+] / [-] buttons or turn the [DATA] wheel to select the next sequence.
The next sequence to be played will be indicated with an '>' as shown on the right. The Sequence will change to the selected sequence at the end
of the current sequence.
Program with Pads (Pad Mute)
You can mute/unmute individual sounds in a particular program on a
particular track in real time by hitting the pads. This is useful when you
have several samples assigned to different pads and you wish to remove
a particular sound, or isolate specific drum hits.
01. Press the [TRACK MUTE] button
02. Press [F3] (PdMUTE)
This brings up the Pad Mute page.
'Now' field
Like the Now' field in the MAIN page, this field displays the current time position of the sequence.
'Prg' (Program)' field
This displays which program is being affected with pad mute.
'Trk' field
Displays which track number is currently being affected.
The 16 blocks displayed represent the pads. The pad whose sample mute is set to off will be highlighted. Using
the 'Trk' field, it is possible to have the same program muted different ways for multiple tracks.
Operation
Hitting a pad when the pad mute page is displayed switches the pad mute setting from off to on for that pad on the
selected track, instead of playing the sound.
Pad Mute Groups
Pads can be grouped together, so hitting one pad will affect the other pads in the same group. PAD MUTE GROUPS are
accessed by pressing [F4] (PdGRP) from the Track Mute page.
To add a pad to a group, do the following:
03. Press a pad. For an example, press PAD A01
The mute group selection for [PAD01] is selected.
04. Change the selection from OFF to 1.
05. Press another pad. For example, press PAD A02
The mute group selection for [PAD02] is selected.
06. Change the selection from OFF to 1.
07. Press [F3] (PdMUTE) to return to the PAD MUTE page.
08. Play PAD A01
Notice that now PAD A02 mutes along with PAD A01. Up to 16 different mute groups can be created.
Note: When a pad is pressed while holding the [SHIFT] button, the track mute status of only the pressed pad is
changed, and mute group settings are ignored.
Pad Mute Quantization
PAD MUTE
To turn on Pad Mute Quantization, do the following:
01. Press the [TRACK MUTE] Button
This will open the TRACK MUTE Page.
Page 98

Functions of a Pad 84
02. Press the [F3] (PdMUTE) button to select the PAD MUTE Tab.
03. Press the [F5] (T.C.) button.
The [F5] button will darken to indicate it is active as shown on the right.
04. Press a pad you would like to mute.
The MPC5000 will mute the selected pad on the next division of the T.C. setting.
Changing the Timing Correct for Pad Mute Quantization
To change the Timing Correct value while in TRACK or PAD MUTE Mode, press the [WINDOW] Button. This is separate
from the MAIN Timing Correct, and is used exclusively for Pad / Track Mute. The following divisions are available:
2 Bar
1 Bar
1/4
1/4(3)
1/8
1/8(3)
1/16
Off
Selecting a Sequence to Play with Pads
You can select a sequence that you wish to play next, by hitting the pads.
This is useful for live performances, which change a song structure in real
time. Also, you can check the relationship between sequences while you
are working on a song with several short sequences.
Pressing the [NEXT SEQ] button brings up the next sequence page.
'Now' Field
Like the 'Now' field in the MAIN page, it displays the current time position
of the sequence.
'Sequence' Field
Like the 'Sequence' field in the MAIN page, you can select a sequence in this field.
Sequence List
The sequence list is displayed under the 'Now' field and the 'Sequence' field.
The sequence list displays the first 8 letters of the sequence name. The sequences are displayed according to the
position of the pads; Sequence 1 on the lower left and sequence 16 on the upper right.
You can display 16 pads at one time, allowing you to display 1 to 64 sequences by switching pad banks.
Note: you cannot select a sequence between 65 and 99 using pads, but you can select them in the 'Sequence' field.
Operation
01. In the 'Sequence' field, select a sequence that you wish to play
02. Start to play back the Sequence.
03. Select another sequence that you wish to play next, using a
first.
pad.
The number and name of the selected sequence will be displayed below the
Sequence list as shown in the image to the right. The MPC5000 will switch to the
next sequence after it plays the current sequence to the end.
Tip: You can change the next sequence by hitting the pads until the current sequence ends.
Tip: When no other sequence is selected, the MPC5000 will continue to playback the current sequence over and over.
Tip: You can cancel the next sequence that is displayed below the sequence list, by pressing the [F6] (CLEAR) button.
Page 99

85
SUDDEN Button
Normally, the MPC5000 will switch to the next sequence after it plays the current sequence to the end.
However, you can also switch to the next sequence before the MPC5000 finishes playing back the current sequence by
pressing the [F4] (SUDDEN) button.
It is useful for the live performance, where you need to switch to the next phrase at a certain cue.
01. Select the next sequence with the pads, and press the [F4] (SUDDEN) button.
The MPC5000 will switch to the next sequence at the point the button is pressed.
Tip: If you press the pad while holding the [F4] (SUDDEN) button, the MPC5000 will switch to the next sequence at the
point the pad is hit.
HOLD Button
Normally, when the next sequence is selected, the MPC5000 will switch to the next sequence after it finishes playing the
current sequence. If you press the [F5] (HOLD) button, the MPC5000 will keep playing back the current sequence until
you press the [F5] (HOLD) again. It is useful for the live performance, where you wish to change the phrase according
to the response of the audience.
01. Select the next sequence with the pad, and press the [F5] (HOLD) button.
The button will be highlighted and the MPC5000 will keep playing back the current sequence, instead of switching to the next sequence.
If you press the [F5] (HOLD) button again, the Hold function will turn off and the MPC5000 will switch to the next sequence after it finishes playing
back the current sequence.
Tip: If you press the [F4] (SUDDEN) button when the hold function is on, the MPC5000 will switch to the next sequence
right away.
Next Sequence for Next Bar
Changing sequences in NEXT SEQUENCE Mode can be switched at the
beginning of the next bar.
In NEXT SEQUENCE Mode, switch to the next sequence on the next bar
by doing the following:
01. While the MPC is playing, hit the pad corresponding to the
02. Press the [F3] (NXTBAR) button.
Sequence you would like to switch to.
The Sequence Selected will be indicated in the lower left of the screen as shown to
the right.
The [NXTBAR] Button will darken to indicate that it is active. The MPC5000 will change sequences at the top of the next bar.
Page 100

 Loading...