


QUICK START GUIDE
UK 
 DE
DE 
 FR
FR 
 NL
NL 
 IT
IT 
 SW
SW 
 PL
PL 
 GR
GR 
 DK
DK 
 BUL
BUL
 CZ
CZ
CORDED
TELEPHONE
Voxtel C100
V1

2
P1
1
2
3
4
5
6
7

 9
9
8
P2
P3
10
3
1BECAUSE WE CARE
Thank you for purchasing this product. This product has been designed and assembled with utmost care for you and the environment. This is why we supply this product with a quick installation guide to reduce the number of paper (pages) and therefor save trees to be cut for making this paper. Thank you for supporting us to protect our environment.
2UNPACKING YOUR PHONE
In the box you will find: tBase unit
tHandset
tCoiled handset cord tTelephone line cord for ase unit tUser manual
tWall mount bracket
Keep the packing materials in a safe place in case you later need to transport the unit.
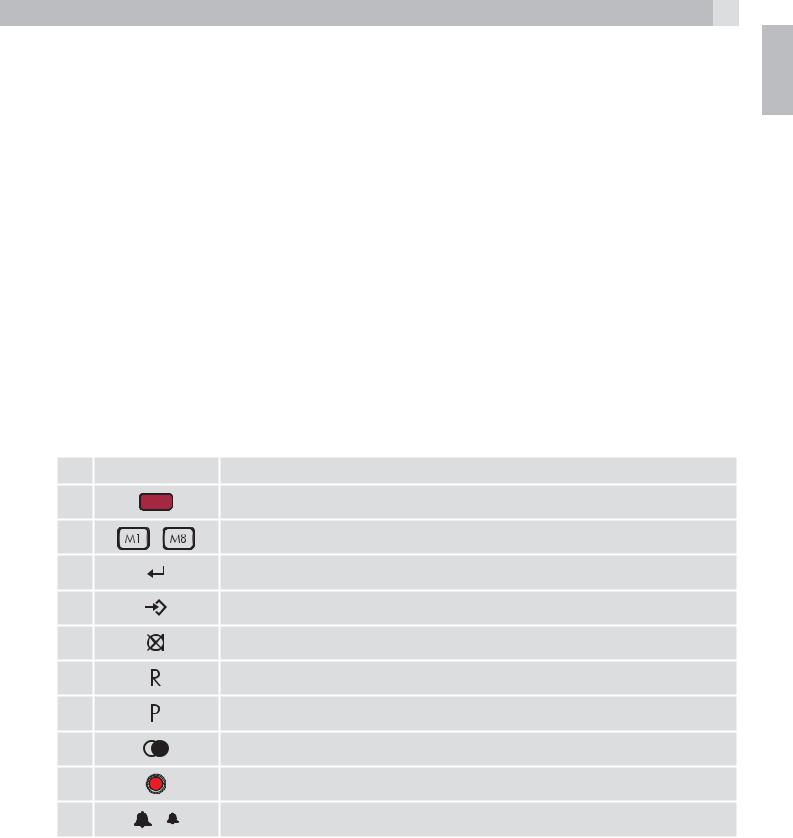
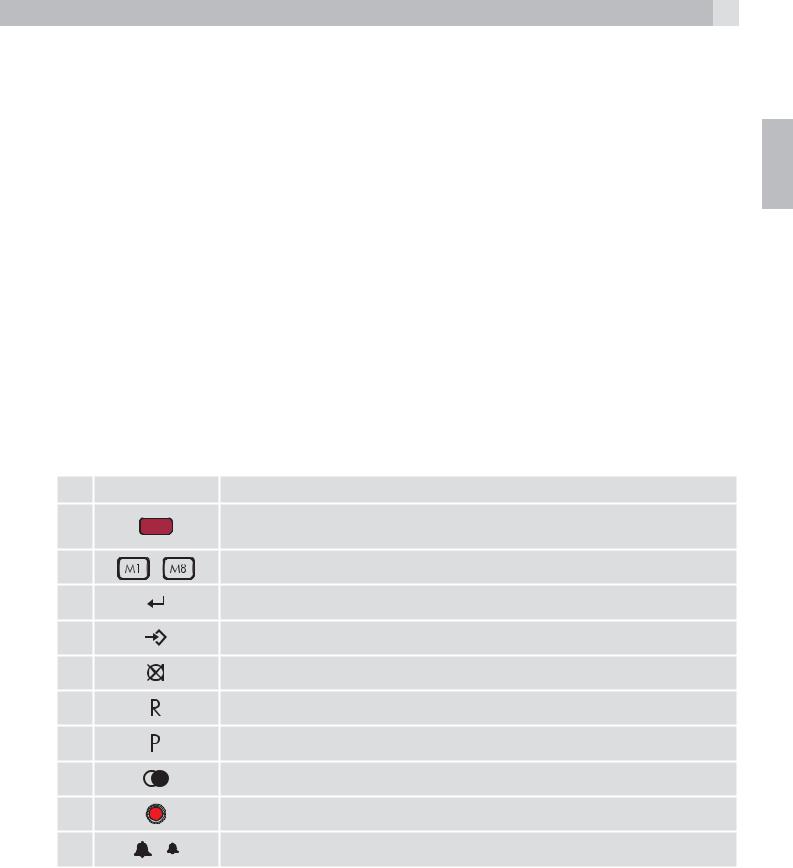
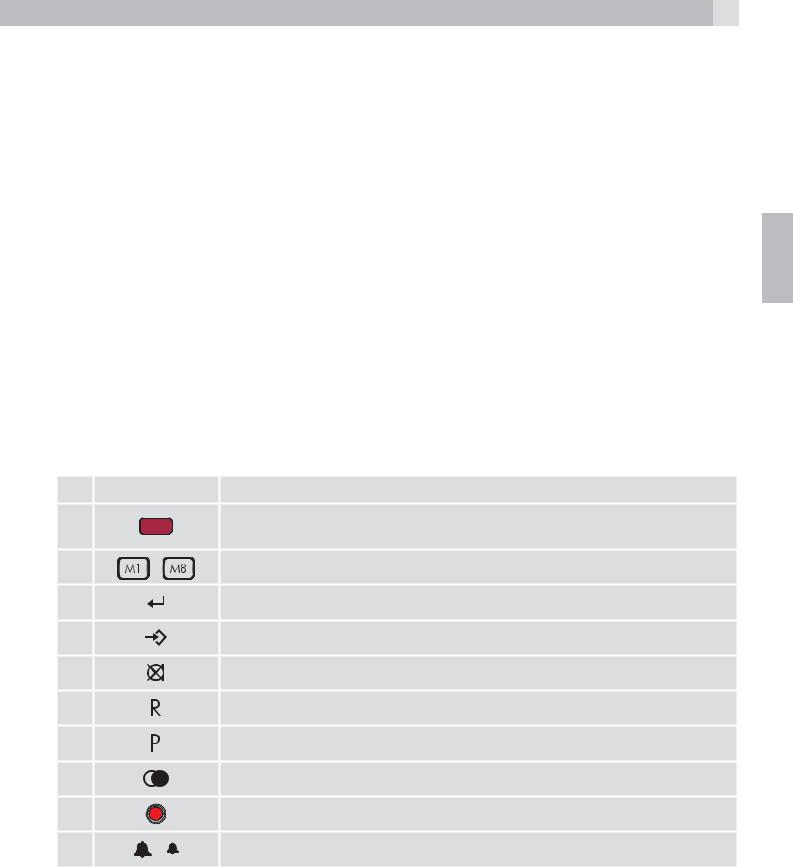
3GETTING TO KNOW YOUR PHONE
(See P1)
# |
|
Meaning |
1 |
|
Ringer light - This flashes when the phone is ringing for an incoming call. |
2 |
- |
M1-M8 one -touch memory buttons |
3 |
|
Store button |
4 |
|
Two-touch memory button |
5 |
|
Mute button |
6 |
|
Recall button |
7 |
|
Pause button |
8 |
|
Last number redial button |
9 |
|
In use light - turns on when on a call |
10 |
|
Ringer hi/low switch |
<![endif]>UK
4
4INSTALLATION
1.Locating the base unit (See P2 and P3)
The base unit should be placed on a level surface, in a position where:
tthe telephone line cable will reach your telephone line socket or extension socket. tit is not close to a sink, bath or shower, or anywhere else where it might get wet.
tit is not close to other electrical equipment - fridges, washing machines, microwave ovens, TVs, fluorescent lights, etc.
2.Plug the coiled handset cord into the handset. Plug the other end into the socket on the side of the base unit.
3.Place the handset on the base unit.
4.Plug the telephone line cord into the phone line socket at the back of the base unit and the other end into your telephone line socket.
5.Lift the handset and check for dial tone in the earpiece.
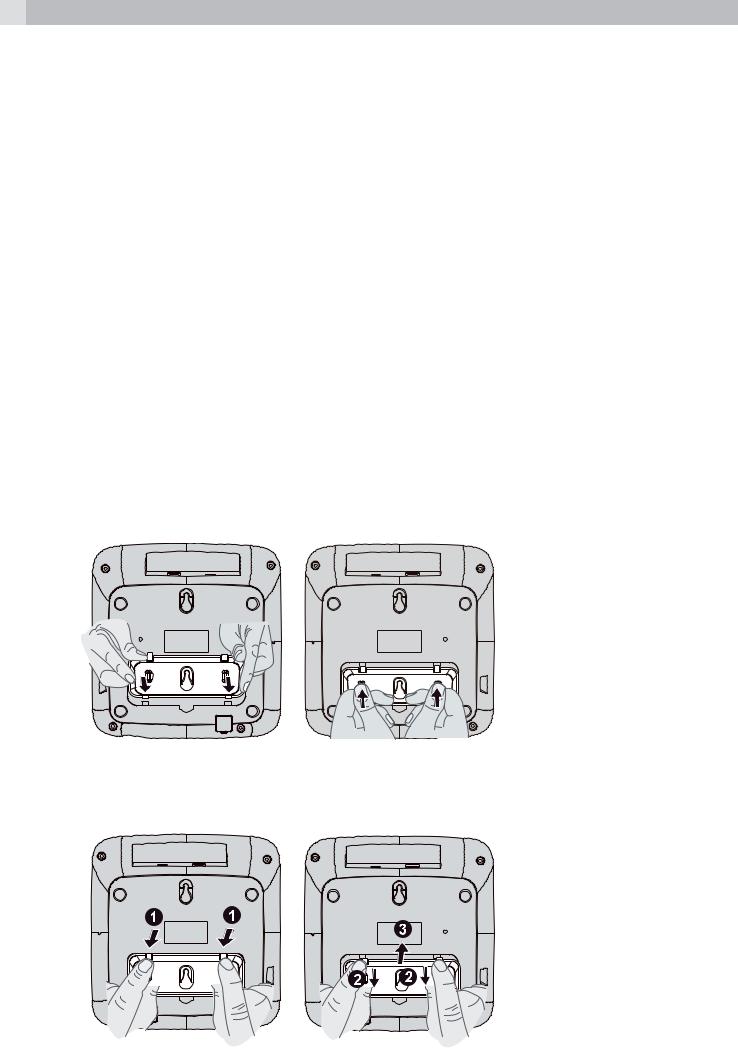
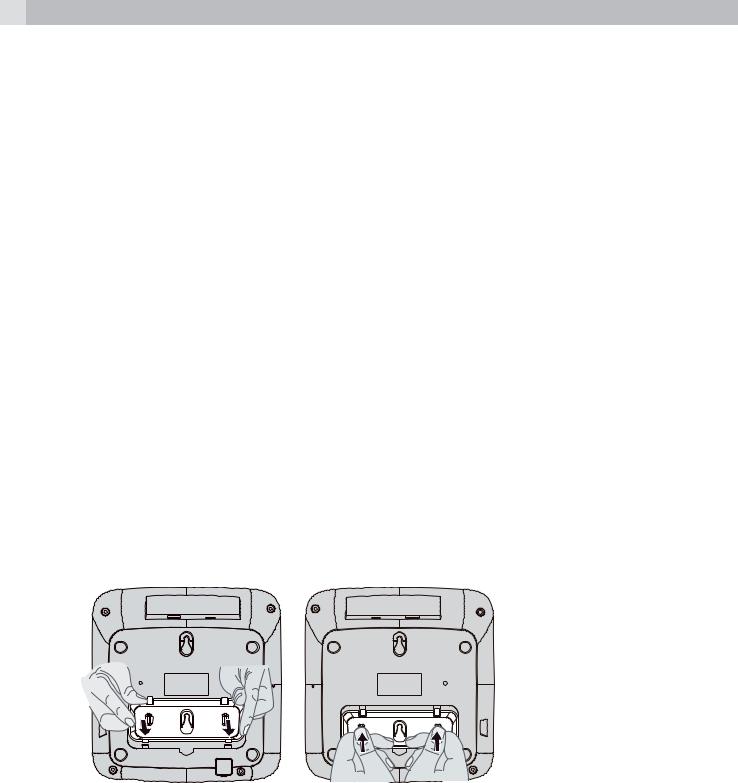
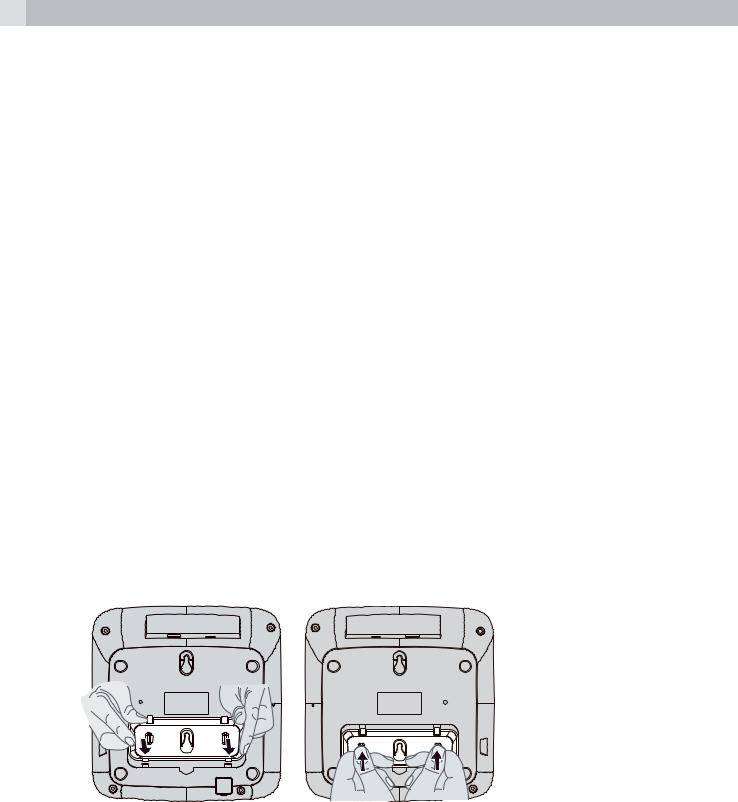
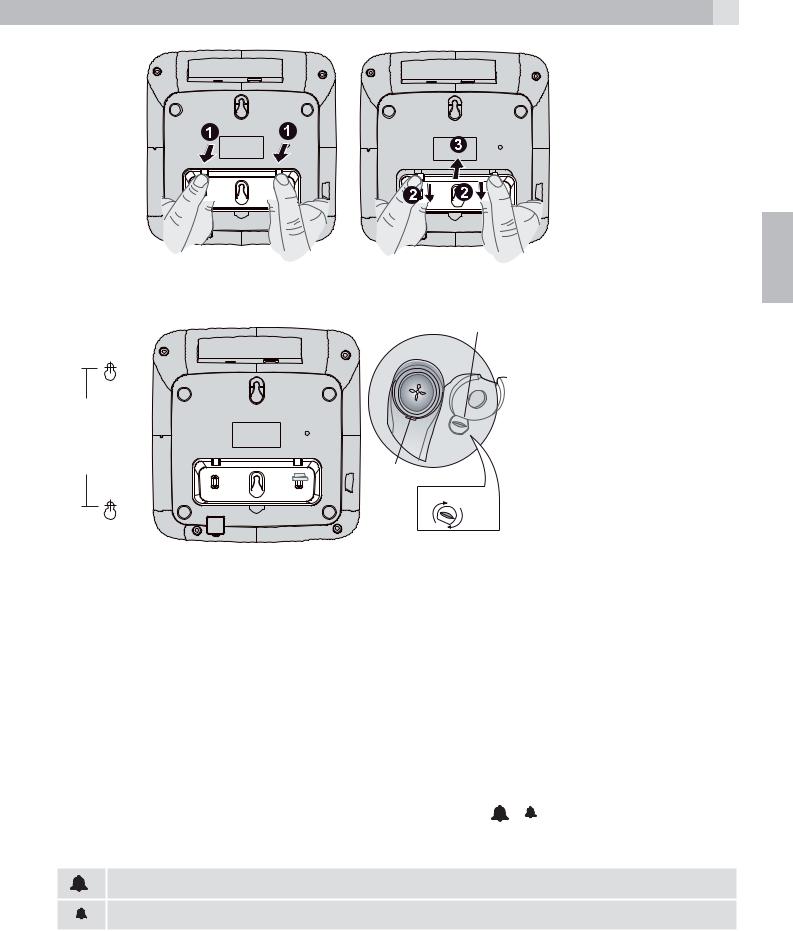
5WALL MOUNT INSTALLATION
To place the Voxtel C100 on a wall, connect the wall mount bracket to the bottom of the phone in the slots near the front of the base as shown below.
Insert the rigid clips of the bracket into the slots on the bottom of the phone (nearer the front of the base). Press down firmly until the flexible clips click into place in the slots nearer the centre of the base. To remove the bracket, (1) pinch the flexible clips, (2) back the bracket, and then (3) slide up and forward as shown below.
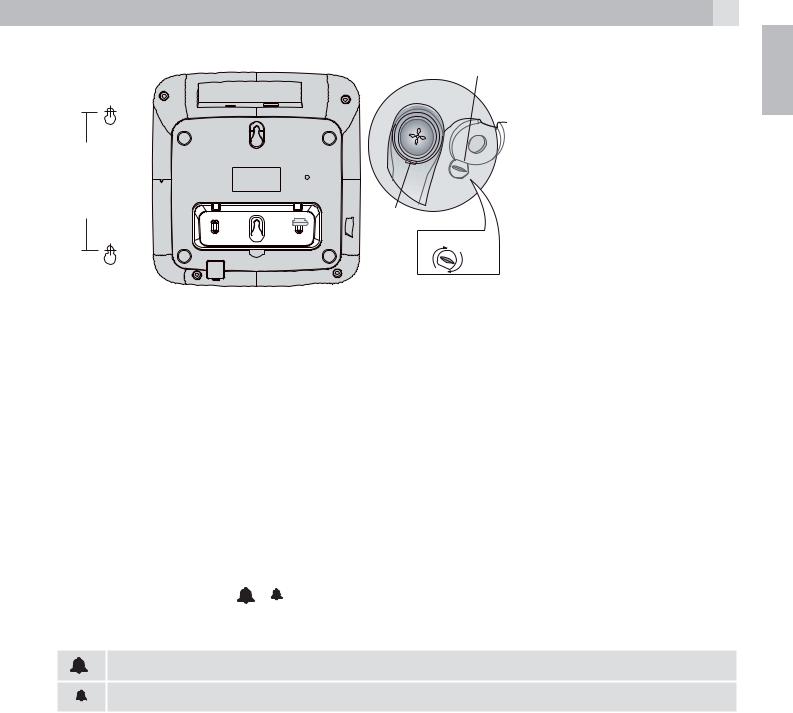
Mark two points on the wall that are 80 mm apart to lay the fixing centres as shown below. parking hook
lay the |
centres as |
<![endif]>80 mm
parking recess rotate
5
<![if ! IE]><![endif]>UK
BE CAREFUL to check that there are no pipes or electrical wires hidden in the wall.
Fix two screws (7mm head screws required, not supplied) at the marked locations, leaving approximately 7mm between the wall and the screw head.
Hang the telephone on the screws using the wall mount slots. You may need adjust the screws so that the telephone is securely fixed and does not wobble.
Place the handset on the cradle with the parking hook on the cradle arranged to fit in the parking recess under the earpiece on the handset.
6TELEPHONE OPERATION
6.1Ringer volume
The ringer high/low switch |
located at the back of the base unit allows you to adjust the volume |
of the ringer. |
|
High volume
Low volume
6.2Making a call
tLift the handset, listen for a dial tone. tDial the telephone number you wish to call.
tTo end the call, return the handset to the base unit.
6.3To answer a call
tLift the handset to answer a call.
6.4To end a call
tReplace the handset on the base unit cradle.
6.5Last number redial
tLift the handset and listen for dial tone. tPress the redial button  .
.
>The phone automatically dials the last number you called (maximum of 32 digits).
6
6.6Mute Function
tDuring a call press the mute button  .
.
>When the mouthpiece is muted, the person at the other end of the call cannot hear you out you can hear his side.
tTo get back to the call, press the mute button  again.
6.7Use on PBX
If you are using your Voxtel C100 phone on a PBX, and the PBX user guide tells you to press recall or flash;
tPress the recall button  on your phone.
6.8Inserting a pause in the dialling sequence
For some switchboard systems, an access number must be dialled (usually an 0 or 9) to get another dial tone and an outside line.
tPress the pause button  immediately after the access number, a pause of about 3.6 seconds will be entered, and the desired number can be dialled immediately.
Note:
If you use the  , the pause will be included automatically.
tPress the pause button  to insert a pause when storing numbers in memories, if a pause is required.
6.9Storing a number in M1-M8 one-touch memories
tLift up the handset, press the store button  . tKey in the telephone number you wish to store.
>Up to a maximum 32 digits.
tPress one of the M1-M8 buttons 


 -
- 


 to store the number in the selected memory. >If you try to store more than 32 digits, only the first 32 digits will be saved.
6.10Storing a number in (0-9) two-touch memories
tLift up the handset, press the store button  . tKey in the telephone number you wish to store.
>Up to a maximum 32 digits.
tPress store button  and then one of the 0-9 buttons to store the number in the selected memory location.
tReplace the handset on the base unit cradle.
6.11Dial out a one-touch memory number
tLift up the handset, press the M1-M8 button 


 -
- 


 for the selected number. >The number dials automatically.
6.12Dial out a (0-9) two-touch memory number
To dial a number stored in a two-touch memory (0-9) tLift up the handset.
tPress the memory button  .
.
tKey in the memory location number (0-9) for the selected number. >The number dials automatically.
Warning:
All one-touch, two-touch and redial memories will be erased if the phone is disconnected from the telephone line for longer than about 2 hours, and they will need to be stored again, if required.

7
7GUARANTEE AND SERVICE
The unit is guaranteed for 24 months from the date of purchase shown on your sales receipt. This guarantee does not cover any faults or defects caused by accidents, misuse, fair wear and tear, neglect, faults on the telephone line, lightning, tampering with the equipment, or any attempt at adjustment or repair other than through approved agents.
Please keep your sales (till) receipt this is your proof for guarantee.
7.1While the unit is under Guarantee
tDisconnect the base unit from the telephone line and the mains electricity supply. tPack up all parts of your unit, using the original package.
tReturn the unit to the shop where you bought it, making sure you take your sales receipt. tRemember to include the mains adapter. (if applicable)
7.2After the Guarantee has expired
If the unit is no longer under Guarantee, contact us via www.aegtelephones.eu
8CE DECLARATION 

This product is in compliance with the essential requirements and other relevant provisions of the R&TTE directive 1999/5/EC.
The Declaration of conformity can be found on: www.aegtelephones.eu
9DISPOSAL OF THE DEVICE (ENVIRONMENT)
At the end of the product lifecycle, you should not throw this product into the normal household garbage but bring the product to a collection point for the recycling of electrical and electronic equipments. The symbol on the product, user guide and/or box indicate this. Some of the product materials can be re-used if you bring them to a recycling point. By reusing some parts or raw materials from used products you make an important contribution to the protection of the environment. Please contact your local authorities in case you need more information on the collection points in your area.
Batteries must be removed before disposing of the device. Dispose of the batteries in an environmental manner according to your country regulations.
10 CLEANING AND CARE
Do not clean any part of your phone system with benzene, thinners or other solvent chemicals as this may cause permanent damage which is not covered by the Guarantee.
When necessary, clean it with a damp cloth.
Keep your phone system away from hot, humid conditions or strong sunlight, and don‘t let it get wet.
11 INTENDED USE
<![endif]>UK
This telephone is intended to be connected to a public analogue telephone network or to an analogue extension of an approved compatible PBX system.

8
9
1UNSER EINSATZ FÜR DIE UMWELT
Vielen Dank, dass Sie sich für dieses Produkt entschieden haben. Dieses Gerät wurde mit größter Sorgfalt entwickelt und zusammengebaut, um Ihnen ein exzellentes Produkt zu bieten und gleichzeitig die Umwelt zu schonen. Deshalb liegt diesem Produkt eine Kurzanleitung bei, um die Papiermenge zu reduzieren. So müssen weniger Bäume für die Herstellung von Papier abgeholzt werden. Vielen Dank, dass Sie uns beim Umweltschutz unterstützen.
2LIEFERUMFANG
Im Lieferumfang ist Folgendes enthalten: tBasisstation
tTelefonhörer
tSpiralkabel für den Telefonhörer tTelefonanschlusskabel für die Basisstation tBenutzerhandbuch
tWandhalterung
Bewahren Sie das Verpackungsmaterial für spätere Transporte Ihres Telefons an einem sicheren Ort auf.
3EINFÜHRUNG
(siehe P1)
# |
|
Bedeutung |
1 |
|
Rufanzeige - Blinkt, wenn das Telefon bei einem eingehenden Anruf |
|
klingelt. |
|
|
|
|
2 |
- |
One-Touch-Direktwahlspeichertasten |
3 |
|
Speichertaste |
4 |
|
Kurzwahlspeichertaste |
5 |
|
Stummschalttaste |
6 |
|
Rückruftaste |
7 |
|
Pausentaste |
8 |
|
Wahlwiederholungstaste |
9 |
|
Betriebsanzeige - Leuchtet während eines Telefonats auf |
10 |
|
Ruftonlautstärkeregler |
<![endif]>DE
10
4AUFSTELLEN
1.Die Basisstation (siehe P2 und P3)
Die Basisstation sollte folgendermaßen auf einer ebenen Unterlage aufgestellt werden:
tDas Telefonanschlusskabel muss mit Ihrer Telefonbuchse oder einem Verlängerungskabel verbunden werden können.
tEs darf sich kein Waschbecken, keine Dusche oder Badewanne oder eine andere Wasserquelle, durch die das Telefon nass werden könnte, in der Nähe befinden.
tDas Gerät darf sich nicht in der Nähe von anderen elektrischen Geräten, wie z. B. von Kühlschränken, Waschmaschinen, Mikrowellenherden, Fernsehern, Neonröhren usw., befinden.
2.Stecken Sie das Spiralkabel in den Telefonhörer. Stecken Sie das andere Ende in den Anschluss an der Seite der Basisstation.
3.Legen Sie den Telefonhörer auf die Basisstation.
4.Stecken Sie das Telefonanschlusskabel an der Rückseite der Basisstation in die Telefonanschlussbuchse und das andere Ende in Ihre Telefonanschlussbuchse.
5.Nehmen Sie den Telefonhörer ab und prüfen Sie, ob das Freizeichen in der Hörmuschel ertönt.
5WANDMONTAGE
Um das Voxtel C100 an der Wand zu befestigen, setzen Sie die Wandhalterung an der Unterseite des Telefons in die Schlitze nahe der Vorderseite ein, wie unten dargestellt.
Setzen Sie die starren Klammern der Halterung in die Schlitze an der Unterseite des Telefons ein (nahe der Vorderseite der Basisstation). Drücken Sie die Halterung fest nach unten, bis die flexiblen Klammern in den Schlitzen, die sich nahe der Mitte der Basisstation befinden, hörbar einrasten. Um die Halterung zu entfernen, (1) drücken Sie die flexiblen Klammern ein, (2) ziehen Sie die Halterung zu sich hin und (3) schieben Sie diese nach oben und anschließend nach vorne, wie unten dargestellt.
11
<![if ! IE]><![endif]>DE
Markieren Sie zwei Punkte mit einem Abstand von 80 mm an der Wand, um dort Löcher für die Befestigungspunkte zu bohren, wie unten dargestellt.
Aufhängungshaken
lay the |
centres as |
<![endif]>80 mm
Aufhängung
Drehen
PRÜFEN SIE SORGFÄLTIG, ob sich keine Rohre oder elektrischen Leitungen an dieser Stelle in der Wand befinden.
Drehen Sie zwei Schrauben (zwei 7 mm Kopfschrauben, nicht im Lieferumfang enthalten) an den markierten Positionen ein und lassen Sie ca. 7 mm Abstand zwischen der Wand und dem Schraubenkopf.
Hängen Sie das Telefon an den Schlitzen für die Wandhalterung an den Schrauben ein. Die Schrauben müssen möglicherweise noch etwas nachgestellt werden, damit das Telefon fest sitzt und nicht wackelt. Hängen Sie den Telefonhörer auf die Gabel. Dabei muss der Aufhängungshaken auf der Gabel so ausgerichtet sein, dass er in die Aufhängung unter der Hörmuschel des Telefonhörers passt.
6DAS TELEFON
6.1Ruftonlautstärke
Mit dem Lautstärkeregler |
an der Rückseite der Basisstation können Sie die Ruftonlautstärke |
einstellen. |
|
Hohe Lautstärke
Niedrige Lautstärke

12
6.2Anrufen
tNehmen Sie den Telefonhörer ab und warten Sie auf das Freizeichen. tWählen Sie die Telefonnummer, die Sie anrufen möchten.
tUm den Anruf zu beenden, legen Sie den Telefonhörer wieder auf die Basisstation.
6.3Anrufe annehmen
tNehmen Sie den Telefonhörer ab, um so den Anruf anzunehmen.
6.4Anrufe beenden
tLegen Sie den Telefonhörer wieder auf die Gabel der Basisstation.
6.5Wahlwiederholung
tNehmen Sie den Telefonhörer ab und warten Sie auf das Freizeichen. tDrücken Sie auf die Wahlwiederholungstaste  .
.
>Das Telefon wählt automatisch die zuletzt eingegebene Telefonnummer (maximal 32 Ziffern).
6.6Stummschaltung
tDrücken Sie während eines Telefonats die Stummschalttaste  .
.
>Wenn die Sprechmuschel stummgeschaltet ist, kann die Person am anderen Ende der Leitung Sie nicht hören, während Sie diese Person hören können.
tUm die Funktion zu deaktivieren, drücken Sie die Stummschalttaste  erneut.
6.7PBX-Telefonanlagen
Wenn Sie Ihr Voxtel C100 in einer PBX-Telefonanlage verwenden möchten und Sie gemäß der Bedienungsanleitung der PBX-Telefonanlage die Rückrufoder Flash-Taste drücken müssen: tDrücken Sie die Rückruftaste  auf Ihrem Telefon.
6.8Pausen in Anwahlfolgen
Bei einigen Telefonanlagen muss eine Zugangsnummer gewählt werden (in der Regel eine 0 oder 9), um ein anderes Freizeichen und eine externe Leitung zu erhalten.
tDrücken Sie direkt nach der Zugangsnummer die Pausentaste  . Eine Pause von 3,6 Sekunden wird eingefügt und Sie können die gewünschte Nummer sofort wählen.
Hinweis:
Wenn Sie danach die Pausentaste  verwenden, wird die Pause automatisch eingefügt. tVerwenden Sie die Pausentaste
  , um eine Pause beim Speichern von Nummern einzufügen, wenn
eine Pause erforderlich ist.
6.9Im One-Touch-Direktwahlspeicher (M1-M8) speichern
tNehmen Sie den Telefonhörer ab und drücken Sie die Speichertaste  . tGeben Sie die Telefonnummer ein, die Sie speichern möchten.
>Diese kann bis zu 32 Ziffern enthalten.
tDrücken Sie eine der M1-M8-Tasten 


 -
- 


 , um die Nummer in dem gewählten Speicher zu speichern.
>Wenn Sie versuchen, mehr als 32 Ziffern zu speichern, werden nur die ersten 32 Ziffern gespeichert.
6.10Im Two-Touch-Kurzwahlspeicher (0-9) speichern
tNehmen Sie den Telefonhörer ab und drücken Sie die Speichertaste  . tGeben Sie die Telefonnummer ein, die Sie speichern möchten.
>Diese kann bis zu 32 Ziffern enthalten.
tDrücken Sie die Speichertaste  und dann eine der Tasten 0-9, um die Nummer an dem gewählten Speicherplatz zu speichern.
tLegen Sie den Telefonhörer wieder auf die Gabel der Basisstation.

13
6.11Mit dem One-Touch-Direktwahlspeicher anrufen
tNehmen Sie den Telefonhörer ab, drücken Sie die M1-M8-Taste 


 -
- 


 , um die gewünschte Nummer zu wählen.
>Die Nummer wird automatisch gewählt.
6.12Mit dem Two-Touch-Kurzwahlspeicher (0-9) anrufen
Um eine Nummer aus dem Two-Touch-Kurzwahlspeicher (0-9) zu wählen: tNehmen Sie den Telefonhörer ab.
tDrücken Sie die Speichertaste  .
.
tGeben Sie die Speicherplatznummer (0-9) der gewünschten Nummer ein. >Die Nummer wird automatisch gewählt.
Achtung:
Alle gespeicherten Rufnummern des One-Touch-Direktwahlspeichers, des Two-Touch- Kurzwahlspeichers und der Wahlwiederholung werden gelöscht, wenn das Telefon für mehr als zwei Stunden von der Telefonleitung getrennt wird. Diese Nummern müssen anschließend ggf. erneut eingegeben werden.
7GARANTIE UND WARTUNG
Für das Telefon gilt ab dem Kaufdatum, das auf Ihrem Kassenbon angegeben ist, eine Garantie von 24 Monaten. Diese Garantie deckt keine Fehler oder Defekte ab, die durch Unfälle, Missbrauch, normalen Verschleiß, Nachlässigkeit, Fehler in der Telefonleitung, Blitzeinschlag, Manipulation des Geräts oder jeglichen Versuch durch nicht autorisierte Servicevertreter, das Gerät zu verändern oder zu reparieren, entstanden sind.
Bitte bewahren Sie Ihren Kaufbeleg (Kassenbon) auf; dieser gilt als Garantiebeweis.
7.1Während der Garantielaufzeit
tTrennen Sie die Basisstation von der Telefonleitung und der Stromversorgung. tVerpacken Sie alle Teile des Telefons in der Originalverpackung.
tBringen Sie das Gerät zu dem Händler, bei dem Sie es gekauft haben. Vergessen Sie nicht, Ihren Kaufbeleg mitzunehmen.
tDenken Sie daran, das Netzteil ebenfalls einzupacken.
7.2Nach Ablauf der Garantielaufzeit
Wenn für das Gerät keine Garantie mehr besteht, kontaktieren Sie uns bitte über www.aegtelephones.eu
8 CE-KONFORMITÄTSERKLÄRUNG 

<![endif]>DE
Dieses Produkt entspricht den maßgeblichen Anforderungen und anderen relevanten Bestimmungen der FuTKEE-Richtlinie 1999/5/EG.
Die Konformitätserklärung liegt vor unter: www.aegtelephones.eu

14
9ENTSORGUNG DES GERÄTS (UMWELTSCHUTZ)
Am Ende des Produktlebenszyklus sollten Sie dieses Gerät nicht über den normalen Hausmüll entsorgen, sondern es zu einer Sammelstelle für das Recycling von elektrischen und elektronischen Geräten bringen. Das Symbol auf dem Produkt, auf der Bedienungsanleitung und/oder der Verpackung weist darauf hin. Einige der Materialien können wiederverwendet werden, wenn sie an einer Recyclingstelle abgegeben werden. Mit der Verwertung einiger Teile oder Rohstoffe aus gebrauchten Produkten leisten Sie einen wichtigen Beitrag zum Umweltschutz. Bitte setzen Sie sich mit Ihren örtlichen Behörden in Verbindung, falls Sie weitere Informationen zu den Sammelstellen in Ihrer Gegend benötigen.
Die Batterien müssen entfernt werden, bevor das Gerät entsorgt wird. Die Batterien sind umweltschonend und gemäß den nationalen Bestimmungen an Ihrem Wohnort zu entsorgen.
10 REINIGUNG UND PFLEGE
Reinigen Sie keine Teile Ihres Telefons mit Benzin, Verdünnungsmitteln oder Chemikalien auf Lösungsmittelbasis, da dies zu bleibenden Schäden führen kann, die nicht von der Garantie abgedeckt werden.
Reinigen Sie das Gerät falls notwendig mit einem feuchten Tuch.
Halten Sie Ihr Telefon von Hitze, Feuchtigkeit oder starker Sonneneinstrahlung fern und vermeiden Sie, dass es nass wird.
11 VERWENDUNGSZWECK
Dieses Telefon ist für den Anschluss an ein öffentliches analoges Telefonnetz oder an eine analoge Verlängerung einer zugelassenen kompatiblen PBX-Telefonanlage vorgesehen.
15
1NOTRE ENGAGEMENT
Merci d‘avoir fait l‘acquisition de ce produit. Lors de la conception et de l‘assemblage de ce produit, nous avons tout mis en œuvre afin de vous protéger vous, ainsi que l‘environnement. Voilà pourquoi nous accompagnons ce produit d‘un guide d‘installation rapide afin de réduire le nombre de pages et de faire en sorte que moins d’arbres soient abattus pour fabriquer ce papier. Merci de nous aider à protéger l‘environnement.
2DÉBALLAGE DE VOTRE TÉLÉPHONE
Le carton d‘emballage contient : tune unité de base
tun combiné
tle cordon extensible du combiné
tun câble téléphonique pour l‘unité de base tle manuel de l‘utilisateur
tun support de montage mural
Conservez l‘emballage en lieu sûr au cas où vous seriez amené à transporter l‘unité ultérieurement.
3DESCRIPTION DE VOTRE TÉLÉPHONE
(Voir P1)
# |
|
Légende |
1 |
|
Voyant de la sonnerie : clignote lorsque le téléphone sonne, indiquant ainsi |
|
un appel entrant. |
|
|
|
|
2 |
- |
Touches de mémoire directe M1 à M8 |
3 |
|
Touche de mémorisation |
4 |
|
Touche de mémoire indirecte |
5 |
|
Touche muet |
6 |
|
Touche de rappel |
7 |
|
Touche de pause |
8 |
|
Touche de rappel du dernier numéro composé |
9 |
|
Voyant de fonctionnement : s‘allume pendant un appel |
10 |
|
Commutateur d‘augmentation/de diminution du volume de la sonnerie |
<![endif]>FR
16
4INSTALLATION
1.Repérage de l‘unité de base (voir P2 et P3)
L‘unité de base doit être placée sur une surface plane et dans une position respectant les critères suivants :
tLe câble téléphonique doit être en mesure d‘atteindre votre prise téléphonique ou la prise de votre rallonge.
tL‘unité ne doit pas se trouver à proximité d‘un évier, d‘un lavabo, d‘une baignoire, d‘une douche ou de toute autre source d‘humidité.
tL’unité ne doit pas se trouver à proximité d‘un autre équipement électrique (réfrigérateur, lave-linge, micro-ondes, téléviseur, éclairages fluorescents, etc.)
2.Branchez le cordon extensible du combiné sur le combiné. Branchez l‘autre extrémité sur la prise située située de l’autre coté de l‘unité de base.
3.Placez le combiné sur l‘unité de base.
4.Branchez le cordon téléphonique sur la prise téléphonique située à l‘arrière de l‘unité de base, et l’autre extrémité sur votre prise téléphonique murale.
5.Soulevez le combiné et vérifiez que vous entendez la tonalité dans l‘écouteur.
5INSTALLATION MURALE
Pour fixer le téléphone Voxtel C100 à un mur, emboîtez le support mural sous le téléphone dans les logements situés près de l‘avant de la base, comme illustré ci-dessous.
Insérez les clips rigides du support dans les logements situés sous le téléphone (près de l‘avant de la base). Appuyez fermement jusqu‘à ce que les clips flexibles s‘enclenchent dans les logements situés près du centre de la base. Pour retirer le support, (1) pincez les clips flexibles, (2) soutenez le support, puis faites-le glisser vers le haut et vers l‘avant (3), comme illustré ci-dessous.
17
<![if ! IE]><![endif]>FR
Marquez deux points au mur, à 80 mm de distance l’un de l’autre, afin de mettre en place les centres de fixation comme illustré ci-dessous.
crochet de fixation
lay the |
centres as |
<![endif]>80 mm
cavité de fixation faites pivoter
VEILLEZ À VÉRIFIER l‘absence de tuyaux ou de fils électriques dissimulés dans le mur.
Fixez deux vis (des vis de 7 mm, non fournies, s’avèrent nécessaires) au niveau des marques, en conservant environ 7 mm entre le mur et la tête des vis.
Suspendez le téléphone aux vis à l‘aide des logements de montage mural. Vous pourriez être amené à régler les vis de manière à ce que le téléphone soit bien fixé et stable.
Placez le combiné dans le réceptacle du téléphone en insérant le crochet de fixation de ce dernier dans la cavité située sous l‘écouteur du combiné.
6FONCTIONNEMENT DU TÉLÉPHONE
6.1Volume de la sonnerie
Le commutateur d‘augmentation/de diminution de la sonnerie |
, situé à l’arrière de l’unité de |
base, permet de régler le volume de la sonnerie. |
|
Volume élevé
Volume faible
6.2Pour passer un appel
tSoulevez le combiné et vérifiez que vous entendez une tonalité. tComposez le numéro de téléphone que vous souhaitez appeler. tPour mettre fin à l‘appel, reposez le combiné sur l‘unité de base.

18
6.3Pour répondre à un appel
tSoulevez le combiné pour répondre à un appel.
6.4Pour mettre fin à un appel
tReplacez le combiné sur le réceptacle de l‘unité de base.
6.5Pour rappeler le dernier numéro composé
tSoulevez le combiné et vérifiez que vous entendez une tonalité. tAppuyez sur la touche de renumérotation  .
.
>Le téléphone compose automatiquement le dernier numéro composé (au maximum 32 chiffres).
6.6Fonction muet
tPendant un appel, appuyez sur la touche muet  .
.
>Lorsque le microphone du téléphone est en mode muet, votre interlocuteur ne peut pas vous entendre (par contre, vous pouvez toujours entendre sa voix).
tPour reprendre l‘appel, appuyez à nouveau sur la touche muet  .
.
6.7Utilisation sur un standard téléphonique
Si vous utilisez votre téléphone Voxtel C100 sur un standard téléphonique et que le guide de l‘utilisateur de ce dernier vous indique d‘appuyer sur la touche de rappel ou qui clignote : tAppuyez sur la touche de rappel  de votre téléphone.
6.8Observation d‘une pause dans la séquence de composition d‘un numéro
Sur certains standards téléphoniques, un numéro d‘accès doit être composé (en règle générale, le 0 ou le 9) pour obtenir une autre tonalité et une ligne extérieure.
tAppuyez immédiatement sur la touche de pause  , juste après le numéro d‘accès. Une pause d‘environ 3,6 secondes est observée, puis le numéro souhaité peut être composé immédiatement.
Remarque :
Si vous utilisez  ensuite, la pause est insérée automatiquement.
tAppuyez sur la touche de pause  pour insérer au besoin une pause lors de la mémorisation des numéros.
6.9Mémorisation d‘un numéro à l‘aide des mémoires directes M1 à M8
tSoulevez le combiné et appuyez sur la touche de mémorisation  . tComposez le numéro de téléphone à mémoriser.
>Il ne doit pas comporter plus de 32 chiffres. |
|
|
tAppuyez sur l‘une des touches M1 à M8 |
à |
pour mémoriser le numéro dans la mémoire |
correspondante. |
|
|
>Si vous tentez de mémoriser un numéro comportant plus de 32 chiffres, seuls les 32 premiers chiffres seront enregistrés.
6.10Mémorisation d‘un numéro dans les mémoires indirectes (0 à 9)
tSoulevez le combiné et appuyez sur la touche de mémorisation  . tComposez le numéro de téléphone à mémoriser.
>Il ne doit pas comporter plus de 32 chiffres.
tAppuyez sur la touche de mémorisation  , puis sur l‘une des touches de 0 à 9 pour mémoriser le numéro dans la mémoire correspondante.
tReplacez le combiné sur le réceptacle de l‘unité de base.

19
6.11Composition d‘un numéro mémorisé dans une mémoire directe
tSoulevez le combiné, puis appuyez sur une touche de M1 à M8 


 à
à 


 correspondant au numéro souhaité.
>Le numéro est composé automatiquement.
6.12Composition d‘un numéro mémorisé dans une mémoire indirecte (0 à 9)
Pour composer un numéro mémorisé dans une mémoire (0 à 9) tSoulevez le combiné.
tAppuyez sur la touche de mémorisation  .
.
tAppuyez sur le numéro de la mémoire (0 à 9) correspondant au numéro souhaité. >Le numéro est composé automatiquement.
<![if ! IE]><![endif]>FR
Avertissement :
Toutes les mémoires directes, indirectes et de renumérotation sont supprimées si le téléphone demeure déconnecté de la ligne téléphonique pendant plus de 2 heures. Vous devrez, le cas échéant, les mémoriser à nouveau.
7GARANTIE ET SERVICE
Le téléphone est garanti 24 mois à compter de la date d‘achat indiquée sur votre facture. Cette garantie ne couvre pas les défaillances ou défauts dûs à des accidents, à une utilisation non conforme, à l‘usure ordinaire, à une négligence, à des défaillances de la ligne téléphonique, à la foudre, à une altération de l‘équipement ou à toute tentative de réglage ou de réparation qui ne serait pas réalisée par des agents agréés.
Conservez bien votre facture : elle constitue votre garantie.
7.1Pendant que l‘unité est sous garantie
tDébranchez l‘unité de base de la ligne téléphonique et du secteur.
tEmballez l‘ensemble des pièces de votre téléphone en les replaçant dans l‘emballage d‘origine. tRetournez l‘unité au magasin où vous l‘avez achetée et veillez à apporter votre facture. tN‘oubliez pas d‘inclure l‘adaptateur secteur dans l‘emballage.
7.2Une fois la garantie expirée
Si l‘unité n‘est plus sous garantie, contactez-nous via www.aegtelephones.eu.
8DÉCLARATION CE 

Ce produit est conforme aux exigences essentielles et à d‘autres dispositions applicables de la directive R&TTE 1999/5/CE.
La déclaration de conformité se trouve sur le site www.aegtelephones.eu.

20
9MISE AU REBUT DE L‘APPAREIL (RESPECT DE L‘ENVIRONNEMENT)
Lorsque le produit est usagé, ne le jetez pas dans les ordures ménagères : apportez-le à un point de collecte où ses composants électriques et électroniques pourront être recyclés. Le symbole figurant sur le produit, dans le guide de l‘utilisateur et/ou sur l‘emballage l‘indique. Certains matériaux du produit sont réutilisables si vous l‘apportez à un point de recyclage. En permettant la réutilisation de certaines pièces ou matières premières de ces produits usagés, vous contribuez fortement à la protection de l’environnement. Veuillez contacter les autorités locales si vous avez besoin de davantage d‘informations concernant les points de collecte de votre région.
Les piles doivent être retirées avant la mise au rebut de l‘appareil. Jetez les piles en respectant l‘environnement et la réglementation de votre pays.
10 NETTOYAGE ET ENTRETIEN
Vous ne devez nettoyer aucune pièce de votre téléphone avec du benzène, des diluants ou d‘autres produits chimiques solvants : cela risquerait en effet d’entraîner des dommages irréversibles non couverts par la garantie.
Au besoin, nettoyez le téléphone avec un chiffon humide.
Faites en sorte que votre téléphone ne soit pas soumis à des conditions chaudes et humides, ni à un fort ensoleillement. Evitez en outre qu’il soit mouillé.
11 UTILISATION CONFORME
Ce téléphone est destiné à être raccordé à un réseau téléphonique analogique public ou à l‘extension analogique d‘un standard téléphonique compatible et agréé.
21
1ONZE ZORG
Wij willen u bedanken voor de aankoop van dit product. Bij de ontwikkeling en montage van dit product stonden u en het milieu centraal. Daarom krijgt u bij dit product een verkorte installatiehandleiding, zodat er minder papier wordt gebruikt en er dus minder bomen moeten worden gekapt. Bedankt dat u ons steunt in onze zorg voor het milieu.
2DE VERPAKKING VAN UW TELEFOON VERWIJDEREN
In de doos zit het volgende: tBasisstation
tHandset
tSpiraalsnoer van de handset tTelefoonsnoer voor basisstation tGebruikershandleiding tMuursteun
Bewaar het verpakkingsmateriaal op een veilige plek zodat u het later kunt gebruiken als u het toestel moet vervoeren.
3UW TELEFOON
(Zie P1)
# |
|
Betekenis |
1 |
|
Bel LED - Deze LED knippert als de telefoon overgaat bij een |
|
binnenkomende oproep. |
|
|
|
|
2 |
- |
Direkte-geheugentoetsen M1-M8 |
3 |
|
Toets opslaan |
4 |
|
Indirekte-geheugentoets |
5 |
|
Mute toets (microfoon uit) |
6 |
|
Flash toets |
7 |
|
Pauze toets |
8 |
|
Toets laatste nummerherhaling |
9 |
|
LED In gebruik - licht op tijdens gesprek |
10 |
|
Schakelaar beltoonvolume (hoog/laag) |
<![endif]>NL

22
4INSTALLATIE
1.Het basisstation plaatsen (zie P2 en P3)
Het basisstation moet op een vlakke ondergrond worden geplaatst, rekening houdend met het volgende:
tHet telefoonsnoer moet bij de telefooncontactdoos of verlengcontactdoos kunnen komen.
tZet het toestel niet dicht bij een spoelbak, bad of douche of op een andere plek waar het nat kan worden.
tHet toestel mag niet dicht bij andere elektrische apparatuur staan (koelkasten, wasmachines, magnetrons, tv‘s, tl-verlichting enz.).
2.Steek het spiraalsnoer van de handset in de handset. Steek het andere uiteinde in het contact dat u op de zijkant van het basisstation.
3.Plaats de handset op het basisstation.
4.Steek het telefoonsnoer in de telefoonaansluiting op de achterkant van het basisstation en het andere uiteinde in de telefooncontactdoos.
5.Neem de handset op en controleer of u een kiestoon hoort.
5MONTAGE AAN DE MUUR
Als u de Voxtel C100 aan de muur wilt hangen, bevestig de wandsteun dan aan de onderkant van de telefoon in de sleuven aan de voorkant van het station, zie hieronder.
Steek de lipjes van de steun in de sleuven op de onderkant van de telefoon (aan de voorkant van het basisstation). Druk er stevig op totdat de flexibele lipjes op hun plek in de sleuven in het midden van het basisstation klikken. U kunt de steun verwijderen door (1) de flexibele lipjes in te drukken, (2) de steun naar achteren te trekken en (3) de steun omhoog en naar voren te schuiven, zie hieronder.
 Loading...