AEG Voxtel roam User Manual [en, de, fr, it]
USER GUIDE
UK 
 DE
DE 
 FR
FR 
 NL
NL 
 IT
IT 
 SW
SW 
 PL
PL 
 CZ
CZ
HEADSET
Voxtel Roam
V1
2
P1 |
1 |
|
|
2 |
3 |
P2
P3

3
1 BECAUSE WE CARE
Thank you for purchasing this product. This product has been designed and assembled with utmost care for you and the environment. This is why we supply this product with a quick installation guide to reduce the number of paper (pages) and therefor save trees to be cut for making this paper. Thank you for supporting us to protect our environment.
UK
2IMPORTANT SAFETY INSTRUCTIONS
When using your device, basic safety precautions should always be followed to reduce the risk of fire, electric shock and injury, including the following:
1.Read and understand all the instructions.
2.Follow all warnings and instructions marked on the product.
3.Unplug this product from the wall outlet before cleaning. Do not use liquid cleaners or aerosol cleaners. Use a damp cloth for cleaning.
4.Keep your unit away from hot, humid conditions or strong sunlight and don’t let it get wet or use this product near water (for example, near a bath tub , kitchen sink, swimming pool).
5.Do not overload wall outlets and extension cords as this can result in the risk of fire or electric shock.
6.Unplug this product from the wall outlet under the following conditions:
tWhen the power supply cord or plug is damaged or frayed.
tIf the product does not operate normally by following the operating instructions.
tIf the product has been dropped and the cabinet has been damaged.
tIf the product exhibits a distinct change in performance.
7.Do not use third party charging pods. Damage may be caused to the batteries.

4
3INTENDED USE
Accessory headset, it requires a DECT base to operate.
4UNPACKING YOUR DEVICE
In the box you will find: t1 Headset
t1 Charger pod t1 Power adapter t1 User manual
Keep the packing materials in a safe place in case you later need to transport the device.
5GETTING TO KNOW YOUR DEVICE
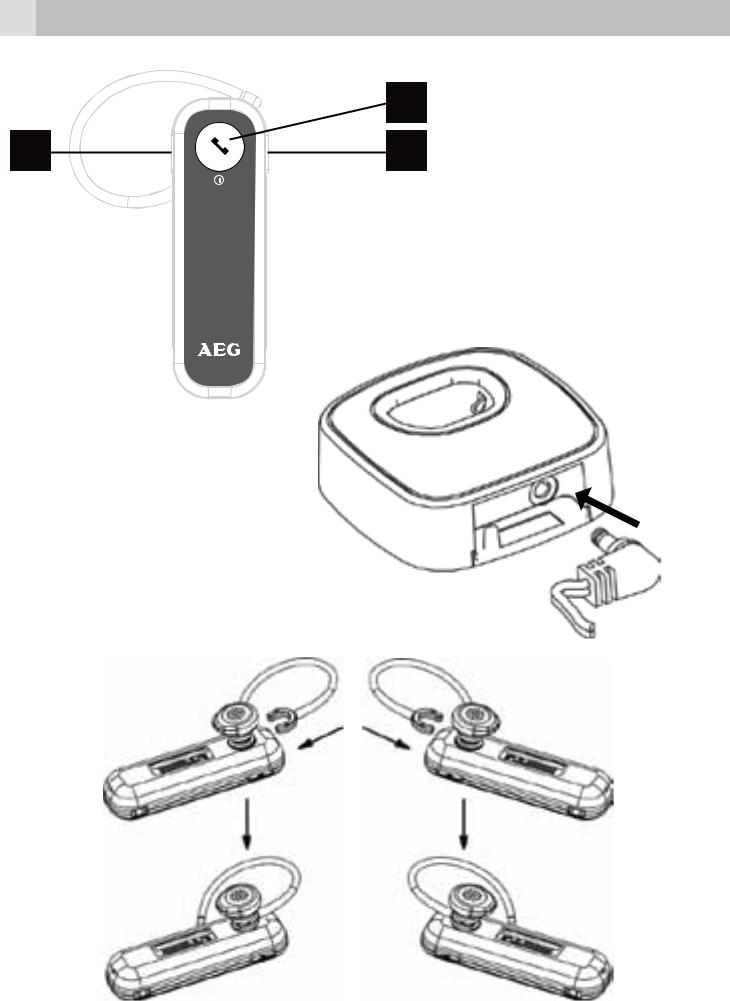
5.1Headset overview (see P1)
# |
Meaning |
Power/talk on/off
tIn idle mode: press and hold to power the headset
1
on or off.
tDuring a call: press to end the call.
tDuring registration: press to exit the registration mode.
Volume up
tDuring a call: press to increase the earpiece volume.
2+ tDuring a call: press and hold to answer a second
incoming call.
t During ringing: press to increase the ringer volume.
Volume down
3- tDuring a call: press to decrease the earpiece volume. tDuring ringing: press to decrease the ringer volume.

5
5.2Headset LED indicators
|
Meaning |
|
|
tSteadily on: the wireless headset is unregistered. |
|
Purple |
tFlashing: the wireless headset is registered but the |
|
|
base is not available (searching or out of range). |
|
|
tSteadily on: when the headset is seated in the base |
|
|
and fully charged. Once the headset is successfully |
|
|
registered, the blue light will flash on then off, for |
|
|
about three seconds at a time and emit a long beep. |
|
|
tLong flashing: the wireless headset is in idle mode |
|
Blue |
and off the base. |
|
|
tDouble flashing: the wireless headset is on and if |
|
|
the signal becomes weak, three short beeps will be |
|
|
heard. |
|
|
tContinuously flashing: the wireless headset is ringing |
|
|
and can be heard through the earpiece. |
|
|
tSteadily on: when the wireless headset is charging |
|
|
on the base. |
|
|
tLong flashing: indicates that the battery is low, the |
|
|
unit is not on the base. The headset will emit short |
|
|
double beeps. |
|
Red |
tDouble flashing: indicates that the battery is low |
|
|
while the headset is in use and short double beeps |
|
|
will be emitted. |
|
|
tTriple flashing: indicates powering on/off the headset |
|
|
and three short beeps will be emitted through the |
|
|
earpiece. |
|
|
tToggling display: the wireless headset is in |
|
Red/blue |
registration mode. When the headset is registered |
|
successfully, the headset will beep for around 2 |
||
|
||
|
seconds. |
UK

6
6INSTALLING YOUR DEVICE
6.1Connecting the charger (see P2)
tPlug the power adapter into the charger pod.
tPlug the other end of the power adapter into a power outlet.
Warning:
Use only the power adapter supplied with the product.
6.2Installing and charging the wireless headset (see P3)
tAttach the ear hook to the headset body as indicated. The ear hook can be attached according to your preference to wear the headset on the left or right ear.
tPut the installed wireless headset in the charger pod When the wireless headset is fully charged, the LED on the headset will light on steadily blue.
6.3Registration
To work as the handset extension, the headset must be registered to a GAP compatible DECT telephone. You can check this in the user guide of your telephone.
tBefore starting the registration process the base pin should be set to 0000. This is the usual default for most DECT telephones. If you need to change it, then follow the instructions in the user guide supplied with your telephone.
tPut the DECT base in registration mode. Press and hold the paging key for 4 seconds on the base and then release. (Refer to DECT telephone user manual.)
tWhen the headset is ON, press and hold the volume up together with the volume down key until the LED on wireless headset toggling between red and blue.
tPlace the unregistered wireless headset in the charger pod.
>A long beep tone is generated and the LED turns on blue for a while if the registration is successful.

7
7GUARANTEE AND SERVICE
The unit is guaranteed for 24 months from the date of purchase shown on your sales receipt. This guarantee does not cover any faults or defects caused by accidents, misuse, fair wear and tear, neglect, faults on the telephone line, lightning, tampering with the equipment, or any attempt at adjustment or repair other than through approved agents.
Please keep your sales (till) receipt this is your proof of guarantee.
7.1While the unit is under guarantee
tPack up all parts of your unit, using the original package.
tReturn the unit to the shop where you bought it, making sure you take your sales receipt.
tRemember to include the mains adapter.
7.2After the guarantee has expired
If the unit is no longer under Guarantee, contact us via www. aegtelephones.eu
UK
8TECHNICAL DETAILS
Standard |
DECT |
Frequency range |
1.88 to 1.9 GHz (bandwidth = 20 MHz) |
Operating range |
Up to 150 m outdoors; up to 25 m indoors. |
Operating time |
Standby: 50 hours; talking: up to 6 hours |
|
Battery charge time: 15 hours |
Temperature range |
Operating 0° C to 40° C |
|
Storage -20° C to 60° C |
Electrical power |
Charger unit: |
|
S004LB0600030 / S004LV0600030 |
|
Input 100-240 V AC 50/60 Hz 150 mA |
|
Output 6 V DC 300 mA |

8
9CE DECLARATION 

This product is in compliance with the essential requirements and other relevant provisions of the R&TTE directive 1999/5/EC.
The Declaration of conformity can be found on: www.aegtelephones.eu
10 DISPOSAL OF THE DEVICE
(ENVIRONMENT)
At the end of the product lifecycle, you should not throw this product into the normal household garbage but bring the product to a collection point for the recycling of electrical and electronic equipment. The symbol on the product, user guide and/or box indicate this. Some of the product materials can be re-used if you bring them to a recycling point. By reusing some parts or raw materials from used products you make an important contribution to the protection of the environment. Please contact your local authorities in case you need more information on the collection points in your area.
Batteries must be removed before disposing of the device. Dispose of the batteries in an environmental manner according to your country regulations.
11 CLEANING AND CARE
Do not clean any part of your unit with benzene, thinners or other solvent chemicals as this may cause permanent damage which is not covered by the Guarantee.
When necessary, clean it with a damp cloth.
Keep your phone system away from hot, humid conditions or strong sunlight, and don‘t let it get wet.

9
1 UNSER EINSATZ FÜR DIE UMWELT
Vielen Dank, dass Sie sich für dieses Produkt entschieden haben. Dieses Gerät wurde mit größter Sorgfalt entwickelt und zusammengebaut, um Ihnen ein exzellentes Produkt zu bieten und gleichzeitig die Umwelt zu schonen. Deshalb liegt diesem Produkt eine Kurzanleitung bei, um die Papiermenge zu reduzieren. So müssen weniger Bäume für die Herstellung von Papier abgeholzt werden. Vielen Dank, dass Sie uns beim Umweltschutz unterstützen.
DE
2WICHTIGE SICHERHEITSANWEISUNGEN
Beim Gebrauch Ihres Telefons sollten die grundlegenden Sicherheitsvorkehrungen befolgt werden, um das Risiko von Feuer, Stromschlag und Verletzungen zu vermeiden. Dies gilt einschließlich dem Folgenden:
1.Lesen sie Sich die Anleitung aufmerksam durch um alle Anweisungen zu verstehen.
2.Befolgen Sie alle auf dem Produkt markierten Warnungen und Anweisungen.
3.Ziehen Sie vor der Reinigung den Stecker des Geräts aus der Steckdose. Benutzen Sie keine flüssigen Reinigungsmittel oder Sprühreiniger. Benutzen Sie zum Reinigen ein feuchtes Tuch.
4.Setzen Sie Ihr Telefon weder Hitze, feuchten Bedingungen noch starkem Sonnenlicht aus und lassen Sie es nicht nass werden. Benutzen Sie es auch nicht in der Nähe von Wasser (zum Beispiel in der Nähe einer Badewanne, einer Küchenspüle oder eines Swimming-Pools).
5.Überlasten Sie die Steckdosen und Verlängerungskabel nicht, weil dies zum Risiko eines Feuers oder eines Stromschlags führen kann.
6.Ziehen Sie den Netzstecker bei den folgenden Umständen aus
der Steckdose:
tWenn das Netzkabel oder der Netzstecker beschädigt oder ausgefranst sind.
tWenn das Produkt bei Befolgung der Bedienungsanweisungen nicht ordnungsgemäß funktioniert.

10
tWenn das Produkt herunter gefallen ist und das Gehäuse beschädigt wurde.
tWenn bei dem Produkt eindeutige Leistungsänderungen auftreten.
7.Verwenden Sie keine Ladegeräte von anderen Herstellern. Die Akkus könnten beschädigt werden.
3BESTIMMUNGSGEMÄSSE VERWENDUNG
Dieses schurlose DECT Headset dient zum Betrieb, als zusätzliches Mobilteil, an einer bestehenden DECT Basisstation. Dazu muss das Headset an der funktionsfähigen DECT Basisstation angemeldet werden.
4LIEFERUMFANG
t1 Headset t1 Ladestation
t1 Netzadapter
t1 Benutzerhandbuch
Bewahren Sie das Verpackungsmaterial für spätere Transporte Ihres Telefons an einem sicheren Ort auf.
5EINFÜHRUNG
5.1Übersicht Headset (siehe P1)
# |
Symbolund Zeichenerklärung |
Ein/Aus bzw. Abheben/Auflegen
tIm Ruhezustand: Gedrückt halten, um das Headset einbzw. auszuschalten.
1tWährend eines Anrufs: Drücken, um einen Anruf zu
beenden.
tWährend der Registrierung: Drücken, um den Registrierungsmodus zu verlassen.

11
Lautstärke erhöhen
tWährend eines Anrufs: Drücken, um die Lautstärke der Höreinheit zu erhöhen.
2+ tWährend eines Anrufs: Gedrückt halten, um einen
zweiten eingehenden Anruf entgegen zu nehmen. tWährend dem Klingeln: Drücken, um die Lautstärke
des Ruftons zu erhöhen.
Lautstärke reduzieren
tWährend eines Anrufs: Drücken, um die Lautstärke
3- der Höreinheit zu reduzieren.
tWährend dem Klingeln: Drücken, um die Lautstärke des Ruftons zu reduzieren.
5.2LED-Anzeigen des Headsets
Symbolund Zeichenerklärung
tKonstant sichtbar: Das Headset ist nicht an einer DECT Basisstation angemeldet.
Violett tBlinkend: Das Headset ist an einer DECT Basisstation angemeldet, aber die Basisstation ist nicht verfügbar (außerhalb der Reichweite).
tKonstant sichtbar: Wenn sich das Headset in der Ladestation befindet und vollständig geladen ist. Sobald das Headset erfolgreich an einer DECT Basisstation angemeldet ist, geht das blaue Licht blinkend an und aus (ca. 3 Sekunden pro Blinken) und erzeugt einen langen Piepton.
Blau tLanges Blinken: Das Headset ist im Ruhezustand und befindet sich nicht in der Ladestation.
tDoppeltes Blinken: Das Headset ist eingeschaltet. Wenn das Signal schwach wird, ertönen drei kurze Pieptöne.
tKonstant blinkend: Das Headset klingelt und kann durch die Höreinheit gehört werden.
DE

12
|
tKonstant sichtbar: Wenn das Headset in der |
|
|
Ladestation auflädt. |
|
|
tLanges Blinken: Zeigt an, dass der Ladezustand des |
|
|
Akkus schwach ist und das Gerät sich nicht in der |
|
|
Ladestation befindet. Das Headset erzeugt kurze |
|
Rot |
Doppel-Pieptöne. |
|
tDoppeltes Blinken: Zeigt an, dass der Akku- |
||
|
||
|
Ladezustand während der Headset-Benutzung |
|
|
schwach ist und es kurze Doppel-Pieptöne erzeugt. |
|
|
tDreifaches Blinken: Zeigt an, dass das Headset ein- |
|
|
bzw. ausgeschaltet wird und drei kurze Pieptöne sind |
|
|
über die Höreinheit zu hören. |
|
|
tDisplay schaltet hin und her: Das Headset befindet |
|
Rot/Blau |
sich im Registrierungsmodus. Wenn das Headset |
|
erfolgreich an einer DECT Basisstation angemeldet |
||
|
wurde, gibt es für circa zwei Sekunden einen Piepton |
|
|
von sich. |
6INSTALLATION DES GERÄTES
6.1Das Ladegerät anschließen (siehe P2)
tStecken Sie den Netzteilstecker in die Buchse der Ladestation. tStecken Sie das andere Ende des Netzadapters in eine
Stromanschlussdose.
Achtung:
Verwenden Sie nur den beiliegenden Netzadapter.
6.2Installieren und Laden des drahtlosen Headsets (siehe P3)
tBringen Sie den Ohrbügel wie vorgegeben am Headset an. Der Ohrbügel kann, ganz nach ihrem Wunsch, links oder rechts am Headset angebracht werden.
tLegen Sie das Headset in die Ladestation. Wenn es vollständig geladen ist, leuchtet das LED des Headsets dauerhaft blau.

13
6.3Anmeldung an eine bestehende DECT Basisstation
Um als weiteres Mobilteil zu funktionieren, muss das Headset an einem GAP-kompatiblen DECT-Telefon angemeldet werden. Sie können das im Handbuch Ihres Telefons nachschlagen.
tVor Beginn des Anmeldeprozesses sollte die PIN der Basisstation auf 0000 stehen. Dies ist der übliche Vorgabewert für die meisten DECT-Telefone. Wenn Sie das noch ändern müssen, befolgen Sie bitte die Anweisungen im Handbuch, das Ihrem Telefon beiliegt. tStellen Sie die DECT-Basisstation auf den Registriermodus ein. Halten sie die Paging-Taste vier Sekunden lang gedrückt und lassen
Sie sie dann los. (Informieren Sie sich bitte auch im Handbuch.) tWenn das Headset AN ist, halten Sie die Lauter-Taste zusammen
mit der Leiser-Taste gedrückt bis das LED auf dem Headset abwechselnd rot und blau leuchtet.
tLegen Sie das unregistrierte Headset in die Ladestation.
>Ein langer Piepton wird hörbar und das LED leuchtet eine Weile blau, wenn die Registrierung erfolgreich war.
DE
7GARANTIE UND SERVICE
Für das Gerät gilt ab dem Kaufdatum, das auf Ihrem Kassenbon angegeben ist, eine Garantie von 24 Monaten. Diese Garantie deckt keine Fehlfunktionen oder Defekte ab, die durch Unfälle, Missbrauch, normalen Verschleiß, Nachlässigkeit, Defekte im Telefonnetz, Blitzeinschlag, jeglichen Versuch zur Modifikation/Reparatur des Geräts seitens des Kunden oder nicht autorisierten Servicepersonals entstanden sind.
Bitte bewahren Sie Ihren Kaufbeleg (Kassenbon) auf; dieser gilt als Garantiebeweis.
7.1Während der Garantielaufzeit
tVerpacken Sie alle Teile des Geräts in der Originalverpackung. tBringen Sie das Gerät zu dem Händler, bei dem Sie es gekauft
haben. Vergessen Sie nicht, Ihren Kaufbeleg mitzunehmen. tDenken Sie daran, das Netzteil ebenfalls einzupacken.

14
7.2Nach Ablauf der Garantielaufzeit
Wenn für das Gerät keine Garantie mehr besteht, kontaktieren Sie uns bitte über www.aegtelephones.eu
8TECHNISCHE DATEN
Standard |
DECT |
Frequenzbereich |
1,88 - 1,9 GHz (Bandbreite = 20 MHz) |
Betriebsbereich |
Bis zu 150 m im Freien; Bis zu 25 m in |
|
Gebäuden |
Betriebsdauer |
Standby: 50 Stunden; Gespräch: bis zu |
|
6 Stunden |
|
Akkuladezeit: ca. 15 Stunden |
Temperaturbereich |
Betrieb bei 0° C bis 40° C, |
|
Lagerung bei -20° C bis 60° C |
Stromversorgung |
Ladeeinheit: |
|
S004LB0600030 / S004LV0600030 |
|
Netzspannung 100-240 V AC 50/60 Hz |
|
150 mA |
|
Ausgangsspannung 6 V DC 300 mA |
9CE-KONFORMITÄTSERKLÄRUNG

Dieses Produkt entspricht den maßgeblichen Anforderungen und anderen relevanten Bestimmungen der FuTKEE-Richtlinie 1999/5/EG. Die Konformitätserklärung liegt vor unter: www.aegtelephones.eu

15
10 ENTSORGUNG DES GERÄTS (UMWELTSCHUTZ)
Am Ende des Produktlebenszyklus sollten Sie dieses Gerät nicht über den normalen Hausmüll entsorgen, sondern es zu einer Sammelstelle für das Recycling von elektrischen und elektronischen Geräten bringen. Das Symbol auf dem Produkt, auf der Bedienungsanleitung und/oder der Verpackung weist darauf hin. Einige der Materialen können wiederverwendet werden, wenn sie an einer Recyclingstelle abgegeben werden. Mit der Verwertung einiger Teile oder Rohstoffe aus gebrauchten Produkten leisten Sie einen wichtigen Beitrag zum Umweltschutz. Bitte setzen Sie sich mit Ihren örtlichen Behörden in Verbindung, falls Sie mehr Informationen zu den Sammelstellen in Ihrer Gegend benötigen.
Die Akkus müssen entfernt werden, bevor das Gerät entsorgt wird. Die Akkus sind umweltschonend und gemäß den nationalen Bestimmungen an Ihrem Wohnort zu entsorgen.
11 REINIGUNG UND PFLEGE
Reinigen Sie keine Teile Ihres Telefons mit Benzin, Verdünnungsmitteln oder Chemikalien auf Lösungsmittelbasis, da dies zu bleibenden Schäden führen kann, die nicht von der Garantie abgedeckt werden.
Reinigen Sie das Gerät, falls notwendig, mit einem feuchten Tuch.
Halten Sie Ihr Telefon von Hitze, Feuchtigkeit/Nässe oder starker Sonneneinstrahlung fern.
DE

16
1 NOTRE ENGAGEMENT
Merci d‘avoir fait l‘acquisition de ce produit. Lors de la conception et de l‘assemblage de ce produit, nous avons tout mis en œuvre afin de vous protéger vous, ainsi que l‘environnement. C‘est la raison pour laquelle nous accompagnons ce produit d‘un guide d‘installation rapide visant à réduire le nombre de pages et ainsi à faire en sorte que moins d‘arbres soient abattus pour fabriquer ce papier. Merci de nous aider à protéger l‘environnement.
2INSTRUCTIONS DE SÉCURITÉ IMPORTANTES
Afin de réduire le risque d‘incendie, de choc électrique et de blessures lorsque vous utilisez votre appareil, les précautions de sécurité de base doivent toujours être respectées, y compris les mises en garde suivantes :
1.Veillez à avoir lu et compris toutes les instructions.
2.Respectez tous les avertissements et les instructions figurant sur le produit.
3.Débranchez ce produit de la prise murale avant le nettoyage. N‘utilisez pas de produits de nettoyage liquides ou sous forme d‘aérosol. Utilisez un chiffon humide pour le nettoyage.
4.Maintenez votre appareil à l‘abri des conditions chaudes et humides, ne l‘exposez pas à un fort ensoleillement et évitez de le mouiller. Ne l‘utilisez pas à proximité d‘une source d‘eau (par exemple, près d‘une baignoire, d‘un évier, d‘une piscine).
5.Ne surchargez pas les prises murales et rallonges, car cela entraînerait un risque d‘incendie ou de choc électrique.
6.Débranchez ce produit de la prise murale dans les conditions suivantes :
tle cordon d‘alimentation électrique ou la prise sont endommagés ou dénudés ;
tle produit ne fonctionne pas normalement lorsque vous respectez les instructions de fonctionnement ;
tle produit est tombé et le boîtier a été endommagé ;
tle produit montre une baisse indéniable de performances.
7.N‘utilisez jamais de socles de chargement tiers. Les piles pourraient s‘en trouver endommagées.

17
3UTILISATION CONFORME
Oreillette disponible en tant qu‘accessoire. Pour fonctionner, une base DECT est nécessaire.
4DÉBALLAGE DE VOTRE APPAREIL
Le carton d‘emballage contient : t1 oreillette
t1 socle de chargement t1 adaptateur secteur t1 manuel de l‘utilisateur
Conservez l‘emballage en lieu sûr au cas où vous seriez amené à transporter l‘appareil ultérieurement.
FR
5DESCRIPTION DE VOTRE APPAREIL
5.1Présentation de l‘oreillette (voir P1)
# |
Légende |
Allumer/éteindre et répondre/terminer un appel tEn mode inactif : appuyez et maintenez la touche
1
enfoncée pour allumer ou éteindre l‘oreillette. tPendant un appel : appuyez pour terminer l‘appel. tPendant l‘enregistrement : appuyez pour quitter le
mode enregistrement.

18
Augmentation du volume
tPendant un appel : appuyez pour augmenter le volume de l‘écouteur.
2 + tPendant un appel : appuyez et maintenez la touche enfoncée pour répondre à un deuxième appel entrant.
tPendant que la sonnerie retentit : appuyez pour augmenter le volume de la sonnerie.
Diminution du volume
tPendant un appel : appuyez pour réduire le volume
3- de l‘écouteur.
tPendant que la sonnerie retentit : appuyez pour réduire le volume de la sonnerie.
5.2Témoins lumineux de l‘oreillette
Légende
tFixe : l‘oreillette sans fil n‘est pas enregistrée.
Violet
tClignotant : l‘oreillette sans fil est enregistrée, mais la base n‘est pas disponible (en cours de recherche ou hors portée).
tFixe : lorsque l‘oreillette est placée dans la base et entièrement chargée. Une fois l‘enregistrement de l‘oreillette réussi, le témoin lumineux bleu clignote environ toutes les trois secondes et émet un long bip sonore.
Bleu
tClignotement long : l‘oreillette sans fil est en mode inactif et n‘est pas présente sur la base.
tClignotement double : l‘oreillette sans fil est activée. Si le signal s‘affaiblit, trois bips sonores courts sont émis.
tClignotement continu : l‘oreillette sans fil émet une sonnerie que l‘on peut entendre à travers l‘écouteur.
 Loading...