


USER GUIDE
UK
MOBILE
Voxtel M800
V6

2
1 |
|
|
|
2 |
3
4 |
|
|
|
5 |
|
|
6

3
1 BOX CONTENT
In the box you will find:
•mobile handset
•charging cradle (supplied with all models)
•mains power adapter with USB connection cable
•user guide
•Lanyard
Keep the packing materials in a safe place in case you later need to transport the device.
Warning
The torch uses a high-brightness LED. Do not shine directly into eyes or view with optical instruments.
Important
Your mobile is not supplied with a SIM card, you will need to insert a SIM card for the mobile to work correctly.
Display language
You can change the display language in your handset :
1. Press Menu then press Settings icon .
2.Select Phone settings.
3.Select Language .
4.Press OK to confirm your preferred language.
UK

4
2 GETTING TO KNOW YOUR PHONE
2.1Keys and parts
# |
|
Meaning |
|
|
|
• Press to answer a call |
|
|
|
during ringing |
|
1 |
Talk key |
• Press to open the dial |
|
|
|
keypad in standby |
|
|
|
• Press to dial a number |
|
|
|
• Press to end a call |
|
2 |
End key |
• Press to return to standby |
|
• Press and hold to : |
|||
|
|||
|
|
Power On / Off, Reboot |
|
|
|
or set to Flight mode |
|
|
Home |
• Press to return to the |
|
|
main menu |
||
3 |
key |
||
• Press and hold in standby |
|||
|
|
||
|
|
to Lock/Unlock |
|
4 |
SOS |
• Press and hold to start |
|
key |
the SOS procedure |
||
|
|||
|
|
• Press to change ring |
|
|
Volume |
volume in standby or |
|
|
earpiece / speaker |
||
5 |
control / |
volume during a call or |
|
scroll |
FM radio ,audio player |
||
|
|||
|
button |
volume |
|
|
• Press to scroll up/down in |
||
|
|
||
|
|
menu lists |
|
6 |
Camera |
•Press to enter Camera |
|
key |
mode |
||
|

5
2.2Display icons
The standby screen shows the following information:
# |
Meaning |
|
Radio link |
|
On with signal strength when linked to |
|
mobile network. |
|
Battery charge level |
|
Shows the battery level (Internal segments |
|
cycle during battery charging.) |
|
Alarm |
|
On if an alarm is set. |
|
Ring and Vibrate off |
|
Ringer and vibration are both turned off. |
|
Ring on |
|
On if only the ringer is enabled. |
|
Vibrate on |
|
On if only vibration is enabled. |
|
Vibrate and ring on |
|
On if both are enabled. |
|
Vibrate then ring |
|
On if vibrate then ring is enabled. |
|
New SMS |
|
Indicates you have new text messages. |
|
Lock |
|
On when the keypad is locked. |
|
Bluetooth |
|
On when Bluetooth is activated. |
|
Earphone |
|
On when earphone is plugged in or when |
|
Paired and connected to a BT headset. |
UK

6
3 MAIN MENU ICONS
#Icon Name
Dialer
Phonebook
Gallery
Messages
Clock
Camera
Calculator
Settings
Calendar
FM Radio
Web
Music
Torch
Bluetooth
Touch Menu to open the main menu. Slide the screen to the left ,to display the second or third menu screen, touch any menu icon to open.
7
4 INSTALLATION AND SETUP
Before operating a SIM card must be installed. Keep the SIM card out of reach of small children.
The SIM card and its contacts can be damaged easily by scratches or bending, so handle the card carefully.
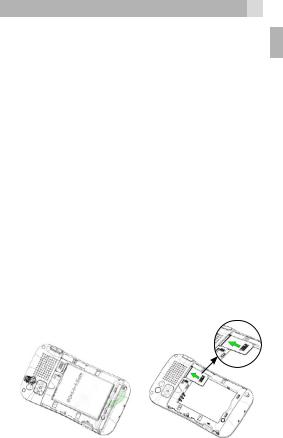
4.1Install the SIM card and battery
•Switch off the phone, disconnect the power adaptor.
•To remove the back cover, unclip and lift it, starting from the slot at the bottom right edge.
•Remove the battery, if fitted, by lifting from the bottom edge.
•Carefully slide the SIM card into the holder with the gold connectors face down.
•To insert a memory card, carefully slide a microSD card, with the gold connectors face down, into the slot under the SIM card.
•Replace the battery by aligning the gold connectors on the battery with those on the phone and push the end of the battery down until it click into place.
•Replace the back cover by placing it flat on the back of the handset and pushing down until it click into place.
UK

8
4.2Charging the battery
Warning:
Use only the supplied/approved batterie and charger. Using others may be dangerous and will invalidate warranty. A battery must be fitted.
Do not charge with the back cover removed.
•Connect the charger lead firmly into the micro-
USB socket on the top of the handset or place the handset directly in the charging cradle.
•Plug the mains power adapter into an AC mains socket. If the handset is turned on, “Charger connected” displays for a few seconds and the battery symbol bars scroll to indicate that charging has started.
If the handset is turned off, the display shows a large battery symbol with segments cycling for about 1 minute to indicate it is charging.
•If the ‘Charger connected’ does not display, disconnect and retry.
•The battery is fully charged when the bars within the battery symbol are continuously on. Disconnect the charger from the phone and the AC outlet. “Charger removed” displays for a few seconds to indicate the charging has
stopped.
Note:
The battery can also be charged if the handset is connected to a USB port of a computer. “USB
charger connected” appears briefly and then gives the option of “Mass storage” or “COM port”. Select “Mass storage” if you want to transfer data

9
or read files. Or select “COM port” for debug or updating. When unplugged “USB removed” displays.
4.3Switching on and off
•To switch on, press and hold End key 

 until the display turns on.
•To switch off, press and hold End key 

 and select Power off from the list.
4.4Locking the screen and keys
•To lock the screen and keys : from the home screen tap Lock at the bottom right on the screen. A locked message appears on the screen
and the “Lock icon”  on the status bar.
•To unlock the keypad : from the home screen press and hold the “Home” key until the lock icon turns off.
4.5Display backlight
•The display backlight automatically turns off after a period of inactivity. The first press of any key will turn the display back on, but the key function will be ignored.
•The backlight time can be set between 5 and 60 seconds in Settings > Phone settings > Misc. settings > LCD backlight.
Note:
You can also set an automatic screen and key lock feature in Settings > Phone settings > Display > Screen auto lock : between 15 sec and 5 minutes, so the keys are locked automatically after the set period of inactivity.
UK

10
5MAKING AND ANSWERING CALLS
5.1To make a call
Ensure the phone is switched on and in service.
• In standby, press the Talk key  to display the dialler interface.
OR
•Touch Menu, then select the Dialer icon  to open the dialler interface.
•Input the telephone number, including the area code. (To add ‘+’ touch and hold the 0 key.)
•Press the Talk key  or touch the Call icon
 to dial out.
•To end the call press the End Call  button or touch End Call icon
  .
.
5.2Last number redial
•In standby, press the Talk key  to display the dialler interface, then touch the call log icon
  to view the All calls log list – touch the tabs at the top to view Dialled calls, Missed calls, Received calls or All calls.
•Scroll up and down to go to the number you want using volume up/down or using the touch screen.
•Press the Talk key  or touch the Call icon
 to dial out.
5.3To answer a call
•When the phone rings, press theTalk key  or touch the Answer icon
  to answer the call.
11
5.4 |
Earpiece volume |
|
UK |
• During a call, press the Volume control button to change the volume.
The volume level is displayed and remains for future calls.
5.5To switch to speakerphone (handsfree)
•During a call, touch H-Free to turn the
Loudspeaker on and touch Handset to turn the Loudspeaker off.
• To end the call, press the End Call  button or touch the End call icon
  .
.
5.6To mute the microphone
•During a call select Options then select Mute to turn the mute On or Off.
•Or touch the Mute icon or Unmute icon to turn the mute on or off.

12
6PHONEBOOK
The phone store names and phone numbers in the internal Phonebook(up to 500) and in the SIM card (SIM dependant, but maximum 250).
6.1To access the Phonebook
In standby mode:
• Touch Menu then touch the Phonebook icon  to enter the contacts list.
• Or press the Talk key |
|
to enter the dialler |
interface, then touch the Phonebook icon  to enter the contacts list.
Note:
 Indicates entries on the SIM card

 Indicates entries in the Internal phone book.
6.2Add a new contact
•Touch Menu, then touch Phonebook  .
.
•Touch Add new contact, then Select To SIM or
To Phone .
•Touch the Name bar to display the keyboard and input the name, then hide the keyboard by touching “ “.
“.
•Touch the Number bar to display the number keypad and input the telephone number then hide the keyboard by touching “ “.
“.
•Touch Options then touchSave to store the new contact.

13
6.3Make a call from the Phonebook
• Open the contact list, slide up and down to find the name you want or use the volume up/down keys to step through the list.
UK
• Press the Talk key 

 or touch theCall icon
  to dial the number.
6.4Edit a contact
•Open the contact list, slide up and down to find the entry you want to change.
•Touch Options then selectEdit, touch theName bar to display the keyboard and modify the name
then hide the keyboard by touching“

 “.
“.
•Touch the Number bar to display the number keypad and modify the Number, then hide the
keyboard by touching “ “.
“.
• Touch Options then Save to save the change(s).
6.5To delete a contact
•Open the contact list, slide up and down to find the entry you want to delete.
•TouchOptions then Delete, thenYes to confirm.
6.6Copy an entry to the phone or SIM card
•Open the contact list, slide up and down to find the entry you want to copy.
•Touch Options then Copy, then select copy To Phone or To SIM or To file.
6.7Add an entry to Blacklist
•Open the contact list, slide up and down to find the entry you want to add to your blacklist.
•Touch Options then select
Add to Blacklist , then Yes to confirm.

14
Note:
Once you put a number in the blacklist, this number will be blocked to call you. The calling party will get a busy signal when they try to call and your phone will not ring for this incoming number.
Note:
To block blacklisted numbers, you first need to activate Reject numbers in blacklist in the following menu options:
Settings > Call settings > Blacklist > Reject numbers in blacklist>On.
6.8Phonebook settings
•When in the phonebook list, touch Options then select Phonebook settings and you have following options:
Preferred |
Select to save contacts in SIM/Phone/ |
storage |
Both. |
|
|
Speed dial |
To set speed dial numbers. Long press |
|
numbers (2-9 ) number key in dial |
|
interface, to dial out. |
|
|
Extra numbers |
To set the phone so you can only call |
|
specific programmed numbers. (This |
|
requires a compatible SIM card.) |
Memory status |
To view the SIM/Phone /Group memory |
|
status. |
|
|
Copy contacts |
To copy contacts from SIM to Phone or |
|
from Phone to SIM. |
|
|
Move contacts |
To move contacts from SIM to Phone or |
|
from Phone to SIM. |
Delete all |
To delete all contacts from the SIM or |
contacts |
Phone phonebooks. |

15
7 CALL LOG
In standby, press the Talk key 

 to display the dialler interface, then touch the call log icon


to see the calls log list – touch the tabs at the top to view Dialled calls, Missed calls, Received calls or All calls.
7.1To view a call log entry
•When in a call log list, slide up and down to find the call entry you want.
•Press Options :
View |
View details of the selected call, |
|
including Name, Number, Call time |
|
and Times of call. |
|
|
Call |
Call the selected number. |
|
|
Send text |
Send an SMS message to the |
message |
selected number. |
|
|
Send multimedia |
Send an MMS message to the |
message |
selected number. |
|
|
Save to |
Save the selected number to your |
Phonebook |
phonebook. |
|
|
Add to Blacklist |
Add the number to the blacklist. |
|
|
Edit before call |
Edit the selected number before |
|
dialling it out. |
|
|
Delete |
Delete the selected number from |
|
the log. |
Delete all |
Delete all entries from the log. |
|
|
Advanced |
Display details of the Call timers, Call |
|
cost and GPRS counter. |
UK
 Loading...