


 BPK722910M
USER MANUAL
EN User Manual
Oven

2 |
www.aegaustralia.com.au | www.aegnewzealand.co.nz |
|
CONTENTS |
|
|
1. |
SAFETY INFORMATION........................................................... |
3 |
2. |
CONDITIONS OF USE ............................................................. |
4 |
3. |
SAFETY INSTRUCTIONS ........................................................ |
4 |
4. |
PRODUCT DESCRIPTION........................................................ |
8 |
5. |
CONTROL PANEL................................................................... |
10 |
6. |
BEFORE FIRST USE.............................................................. |
12 |
7. |
DAILY USE.............................................................................. |
12 |
8. |
CLOCK FUNCTIONS............................................................... |
15 |
9. |
ROAST MODES...................................................................... |
16 |
10. |
USING THE ACCESSORIES................................................... |
17 |
11. |
ADDITIONAL FUNCTIONS..................................................... |
21 |
12. |
HINTS AND TIPS..................................................................... |
22 |
13. |
CARE AND CLEANING........................................................... |
35 |
14. |
TROUBLESHOOTING............................................................. |
39 |
15. |
INSTALLATION........................................................................ |
40 |
16. |
ENERGY SAVINGS................................................................. |
45 |
17. |
WARRANTY............................................................................. |
46 |
FOR PERFECT RESULTS
Thank you for choosing this AEG product. We have created it to give you impeccable performance for many years, with innovative technologies that help make life simpler features you might not find on ordinary appliances. Please spend a few minutes reading to get the very best from it. Visit our website for:
Get usage advice, brochures, trouble shooter, service information: www.aegaustralia.com.au/support/ | www.aegnewzealand.co.nz/support/
Register your product for better service:
www.aegaustralia.com.au/support/product-registration/
www.aegnewzealand.co.nz/support/product-registration/
Buy accessories, consumables and original spare parts for your appliance www.aegaustralia.com.au | www.aegnewzealand.co.nz
CUSTOMER CARE AND SERVICE
Always use original spare parts.
When contacting our Authorised Service Centre, ensure that you have the following data available: Model, PNC, Serial Number. The information can be found on the rating plate.

English 3
1. SAFETY INFORMATION
The symbols you will see in this booklet have these meanings
 Warning / Caution-Safety information
 General information and tips
 Environmental information
Subject to change without notice.
Before the installation and use of the appliance, carefully read the supplied instructions. The manufacturer is not responsible for any injuries or damages that are the result of incorrect installation or usage. Always keep the instructions in a safe and accessible location for future reference.
IMPORTANT INFORMATION
Important – check for any damages or marks.
•If you find the oven is damaged or marked, you must report it within 7 days if you wish to claim for damage/marks under the manufacturer’s warranty. This does not affect your statutory rights.
•Discolouration of the enamel has no effect on the performance of the appliance.
ENVIRONMENT
Information on disposal for users
•Most of the packing materials are recyclable. Please dispose of those materials through your local recycling depot or by placing them in appropriate collection containers.
•If you wish to discard this product, please contact your local authorities and ask for the correct method of disposal.
1.1 Children and vulnerable people safety
•This appliance is not intended for use by persons (including children) with reduced physical, sensory or mental capabilities, or lack of experience and knowledge, unless they have been given supervision or instruction concerning use of the appliance by a person responsible for their safety.
•Do not let children play with the appliance.
•Keep all packaging away from children and dispose of it appropriately.
•Keep children and pets away from the appliance when it operates or when it cools down. Accessible parts are hot.
•If the appliance has a child safety device, this should be activated.
•Children shall not carry out cleaning and user maintenance of the appliance without supervision.
•Children aged 3 years and under must be kept away from this appliance when it is in operation at all times.
1.2 General Safety
•Only a qualified person must install this appliance and carry out servicing. (Certificate of Compliance to be retained).

4 |
www.aegaustralia.com.au | www.aegnewzealand.co.nz |
WARNING! The appliance and its accessible parts become hot during use. Care should be taken to avoid touching heating elements.
Children shall be kept away unless continuously supervised.
•Always use oven gloves to remove or put in accessories or ovenware.
•Before carrying out any maintenance, disconnect the appliance from the power supply.
•Ensure that the appliance is switched off before replacing the lamp to avoid the possibility of electric shock.
•Do not use a steam cleaner to clean the appliance.
•Do not use harsh abrasive cleaners or sharp metal scrapers to clean the glass door since they can scratch the surface, which may result in shattering of the glass.
•Excessive spillage must be removed before the pyrolytic cleaning. Remove all parts from the oven.
•To remove the shelf supports first pull the front of the shelf support and then the
rear end away from the side walls. Install the shelf supports in the opposite sequence.
•The means for disconnection must be incorporated in the fixed wiring in accordance with the wiring rules.
•Use only the food sensor (core temperature sensor) recommended for this appliance.
2.CONDITIONS OF USE
This appliance is intended to be used inhousehold and similar applications such as:
•Farm houses
•By clients in serviced apartments, holiday apartments and other residential type environments.
•Staff kitchen areas in shops, offices and other working environments, Bed and breakfast type environments
3.SAFETY INSTRUCTIONS
3.1Installation
WARNING! Only a qualified person must install this appliance and carry out servicing. (Certificate of Compliance to be retained)
•Remove all the packaging
•Do not install or use a damaged appliance.
•Follow the installation instruction supplied with the appliance.
•Always take care when moving the appliance as it is heavy. Always use safety gloves and enclosed footwear.
 CAUTION! Avoid sharp edges during handling.
•Do not pull the appliance by the handle.
•Keep the minimum distance from the other appliances and units.
•Make sure that the appliance is installed below and adjacent safe structures.
•Where the appliance is built into a cabinet, the cabinet material must be capable of withstanding 70°C. If adjacent to vinyl-wrapped surfaces, use installation kit from vinyl wrap supplier.
•The sides of the appliance must stay adjacent to appliances or to units with the same height.
•The appliance is equipped with an electric cooling system. It must be operated with the electric power supply.
3.2 Electrical connection
WARNING! Risk of fire and electrical shock.
•All electrical connections should be made by a qualified electrician.
•The appliance must be earthed.
•Make sure that the parameters on the rating plate are compatible with the electrical ratings of the mains power supply.
•Use only correct isolation devices: line protecting cut-outs, fuses (screw type fuses removed from the holder), earth leakage trips and contactors.
•The electrical installation must have an isolation device which lets you disconnect the appliance from the mains.
The isolation device must have a contact opening width of minimum 3 mm.
•A means for disconnection must be incorporated in fixed wiring in accordance with the wiring rules.
•Switch the appliance off before removing the oven light glass for globe replacement
3.3Use
WARNING! Risk of injury, burns and electrical shock or explosion.
•Do not change the specification of this appliance.
•Make sure that the ventilation openings are not blocked.
•Do not let the grill operation stay unattended during operation.
•Deactivate the appliance after each use.
•Be careful when you open the appliance door while the appliance is in operation. Hot air can release.
•Do not operate the appliance with wet hands or when it has contact with water.
•Do not apply pressure on the open door.
•Do not use the appliance as a work surface or as a storage surface.
English 5
•Open the appliance door carefully. The use of ingredients with alcohol can cause a mixture of alcohol and air.
•Do not let sparks or open flames to come in contact with the appliance when you open the door.
•Do not put flammable products or items that are wet with flammable products in, near or on the appliance.
CAUTION! Risk of damage to the appliance.
•To prevent damage or discoloration to the enamel:
–do not put ovenware or other objects in the appliance directly on the base of the oven.
–do not put aluminium foil directly on the bottom of cavity of the appliance.
–do not put water directly into the hot appliance.
–do not keep moist dishes and food in the appliance after you finish the cooking.
–be careful when you remove or install the accessories.
•Discoloration of the enamel or stainless steel has no effect on the performance of the appliance.
•Use a deep pan for moist cakes. Fruit juices cause stains that can be permanent.
•This appliance is for cooking purposes only. It must not be used for other purposes, for example room heating.
•Always cook with the oven door closed.

6 |
www.aegaustralia.com.au | www.aegnewzealand.co.nz |
3.4 Care and cleaning
WARNING! Risk of injury, fire, or damage to the appliance.
•Before maintenance, deactivate the appliance and disconnect the mains
•Make sure the appliance is cold. There is the risk that the glass panels can break.
•Care must be taken when wiping exposed stainless steel edges. They can be sharp!
•Replace immediately the door glass panels when they are damaged. Contact the Authorised Service Centre.
•The door glass on this appliance is made from a tough, durable material that withstands heating and cooling without breaking. As a precaution however, do not put cold water on hot glass.
•Clean regularly the appliance to prevent the deterioration of the surface material.
•Ensure fats and oils do not accumulate around elements, burners or fans.
•Clean the appliance with a moist soft cloth. Only use neutral detergents.
•Do not use any abrasive products, abrasive cleaning pads, solvents or metal objects.
•If you use an oven spray, follow the safety instruction on it’s packaging.
•Always clean the appliance immediately after any food spills.
3.5Pyrolytic cleaning
WARNING! Risk of Injury / Fires
/ Chemical Emissions (Fumes) in
Pyrolytic Mode.
•Before carrying out a Pyrolitic selfcleaning function or the First Use please remove from the oven cavity:
–any excess food residues, oil or grease spills / deposits.
–any removable objects (including shelves, side rails, food sensor, etc., provided with the product) particularly any non-stick pots, pans, trays, utensils etc.
•Read carefully all the instructions for Pyrolytic cleaning.
•Keep children away from the appliance while the Pyrolytic cleaning is in operation.
The appliance becomes very hot and hot air is released from the front cooling vents.
•Pyrolytic cleaning is a high temperature operation that can release fumes from cooking residues and construction materials, as such consumers are strongly advised to:
–provide good ventilation during and after each Pyrolytic cleaning.
–provide good ventilation during and after the first use at maximum temperature operation.
•Unlike all humans, some birds and reptiles can be extremely sensitive to potential fumes emitted during the
cleaning process of all Pyrolytic Ovens.
–Remove any pets (especially birds) from the vicinity of the appliance location during and after the
Pyrolytic cleaning and first use maximum temperature operation to a well ventilated area.
•Small pets can also be highly sensitive to the localized temperature changes in the vicinity of all Pyrolytic Ovens when the Pyrolytic self cleaning program is in operation.
•Non-stick surfaces on pots, pans, trays, utensils etc., can be damaged by the high temperature Pyrolytic cleaning operation of all Pyrolytic Ovens and can be also a source for low level harmful fumes.
•Fumes released from all Pyrolytic Ovens / Cooking Residues as described are not harmful to humans, including infants.

English 7
3.6Internal light
•The type of light bulb or halogen lamp used for this appliance is only for household appliances Do not use it for house lighting.
WARNING! Risk of electrical shock.
•Before replacing the lamp, disconnect the appliance from the power supply.
•Only use lamps with the same specifications.
3.7 Disposal
WARNING! Risk of injury or suffocation.
•Disconnect the appliance from the mains supply.
3.8Service
•To repair the appliance contact an Authorised Service Centre.
•Use original spare parts only.
•To maintain safe operation, it is recommended that the product be inspected every 5 years by an authorised service person.
8 |
www.aegaustralia.com.au | www.aegnewzealand.co.nz |
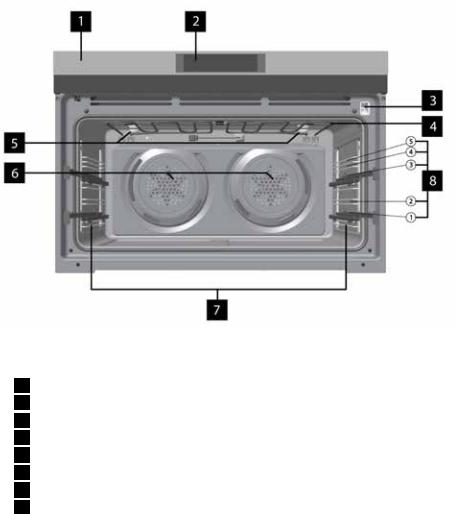
4.PRODUCT DESCRIPTION
4.1General overview
1 Control panel
2Electronic programmer
3Socket for the food temperature sensor
4Heating element
5Lamp
6Fans and heating elements
7Shelf support, removable
8Shelf positions

English 9
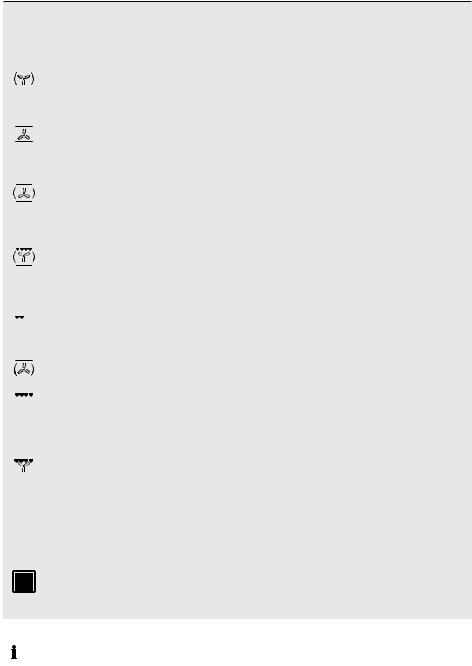
4.2 Accessories |
Food Sensor |
Wire shelf |
For cookware, cake tins, roasts.
Grill shelf
Grill- / Roasting pan
To bake and roast or as a pan to collect fat.
Grill insert
For roasting and grilling.
Use the grill insert only with the Grill- / Roasting pan.
To measure the temperature inside the food.
Telescopic runners
2 x Left |
2 x Right |
For shelves and trays.
Shelf support / Side racks
Left Right
10 www.aegaustralia.com.au | www.aegnewzealand.co.nz
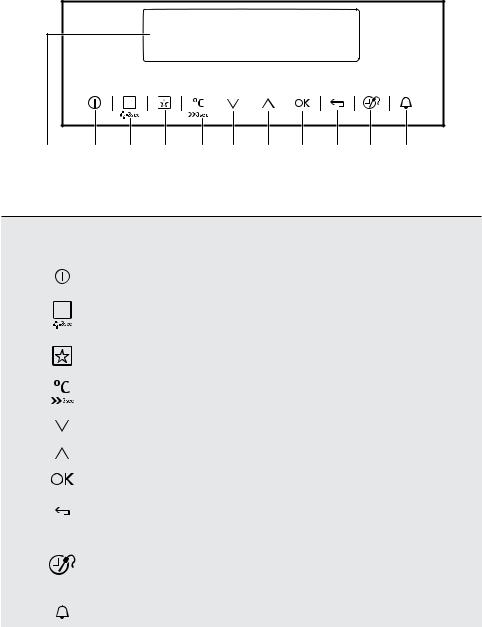
5.CONTROL PANEL
5.1Electronic programmer
1 |
|
2 |
|
3 |
|
4 |
|
5 |
|
6 |
|
7 |
|
8 |
|
9 |
|
10 |
|
11 |
|
|
|
|
|
|
|
|
|
|
|
|
|
|
|
|
|
|
|
|
|
Use the sensor fields to operate the appliance.
|
|
Sensor field |
Function |
Comment |
|
|
|
|
|
|
|
- |
Display |
Shows the current settings of the appliance. |
1 |
||||
|
|
|
|
|
|
|
|
ON / OFF |
To turn on and off the appliance. |
2 |
|
|||
|
|
|
|
|
|
|
|
|
Press the sensor field to choose the menu: Heating Functions. |
|
3 |
|
Heating Functions |
To turn on or turn off the light, press the field for 3 seconds. |
|
|
|
|
You can turn on the light also when the appliance is turned off. |
|
|
|
|
|
|
|
|
Favourites |
To save and access your favourite programmes. |
4 |
|
|||
|
|
|
|
|
|
|
|
|
To set the temperature or show the current temperature in the |
|
5 |
|
Temperature selection |
appliance. Press the field for 3 seconds to turn on or turn off |
|
|
|
|
the function: Fast heat up. |
|
|
|
|
|
|
|
|
Down key |
To move down in the menu or to adjust settings. |
6 |
|
|||
|
|
|
|
|
|
|
|
Up key |
To move up in the menu or to adjust settings. |
7 |
|
|||
|
|
|
|
|
|
|
|
OK |
To confirm the selection or setting. |
8 |
|
|||
|
|
|
|
|
|
|
|
|
To go back one level in the menu. To show the |
|
9 |
|
Back key |
|
|
|
main menu, press the field for 3 seconds. |
||
|
|
|
|
|
|
|
|
|
|
|
|
|
|
To set different functions. When a heating function operates, press |
|
|
|
Time and additional |
the sensor field to set the timer or the functions: Function Lock, |
|
10 |
|
||
|
|
functions |
Favourites, Heat + Hold, Set + Go. You can also change the settings |
|
|
|
|
||
|
|
|
|
of the food sensor. |
|
|
|
|
|
|
|
|
Minute Minder |
To set the function: Minute Minder. |
11 |
|
|||
|
|
|
|
|
English 11
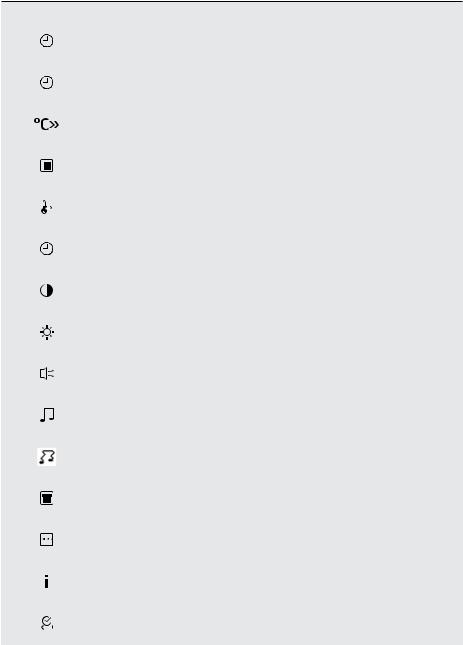
5.2 Display
A B C
A. Heating function B. Time of day
C. Heat-up indicator D. Temperature
E. Duration time or end time of a function
ED
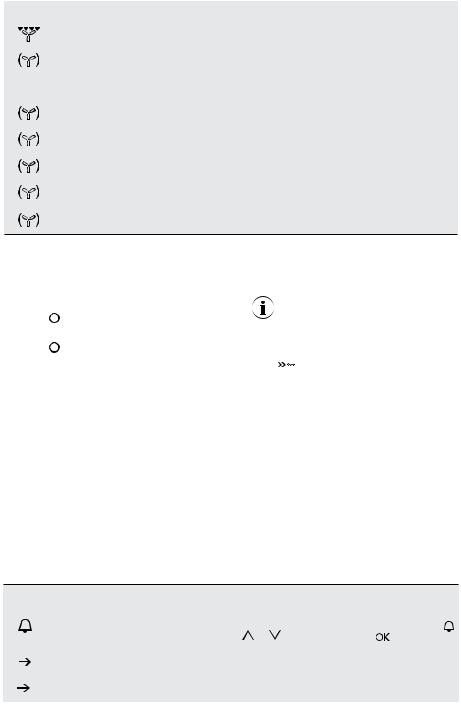
Other indicators of the display:
|
Icon |
Function |
|||
|
|
|
|
|
|
|
|
|
|
Minute Minder |
The function operates. |
|
|
|
|
|
|
|
|
|
|
Time of day |
The display shows the current time. |
|
|
|
|
|
|
|
|
|
|
Duration |
The display shows the necessary time for cooking. |
|
|
|
|
||
|
|
|
|
|
|
|
|
|
|
End Time |
The display shows when the cooking time is complete. |
|
|
|
|
||
|
|
|
|
|
|
|
|
|
|
Temperature |
The display shows the temperature. |
|
|
|
|
|
|
|
|
|
|
Time Indication |
The display shows how long the heating function operates. |
|
|
|
|
Press and at the same time to reset the time. |
|
|
|
|
|
|
|
|
|
|
|
|
|
|
|
|
|
Calculation |
The appliance is calculating the time for cooking. |
|
|
|
|
|
|
|
|
|
|
Heat-up Indicator |
The display shows the temperature in the appliance. |
|
|
|
|
|
|
|
|
|
|
Fast Heat Up Indicator |
The function is active. It decreases the heat up time. |
|
|
|
|
||
|
|
|
|
|
|
|
|
|
|
Weight Automatic |
The display shows that the automatic weight system is active |
|
|
|
|
or that weight can be changed. |
|
|
|
|
|
|
|
|
|
|
|
|
|
|
|
|
|
Heat + Hold |
The function is active. |
|
|
|
|
||
|
|
|
|
|
|
|
|
|
|
Food Sensor |
The food sensor function is active |
|
|
|
|
|
|

12 www.aegaustralia.com.au | www.aegnewzealand.co.nz
6. BEFORE FIRST USE
 WARNING! Refer to Safety chapters.
6.1 Initial Cleaning
Remove all accessories and removable shelf supports from the appliance.
 Refer to “Care and cleaning” chapter.
Clean the appliance and the accessories before first use. Put the accessories and the removable shelf supports back to
their initial position.
6.2 First Connection
When you connect the appliance to the mains or after the power cut, the display contrast, the display brightness and the time of the day need to be set.
1.Press  or
or  to set the value.
2.Press 
 to confirm.
7. DAILY USE
 WARNING! Refer to Safety chapters.
7.1Navigating the menus
1.Activate the appliance using
2.Press or
or to select the menu option.
3. Press to move to the submenu or accept the setting
At each point you can go back to the main menu with
7.2 The menus in overview
Main menu
Symbol Menu item |
Application |
|
|
Heating Functions |
Contains a list of heating functions. |
|
|
Favourites |
Contains a list of favourite cooking programmes created by the user. |
|
|
Pyrolysis |
Pyrolytic cleaning. |
|
|
Basic Settings |
Used to set the appliance configuration. |
|
|
Specials |
Contains a list of additional heating functions. |
|
|
English 13
7.2 The menus in overview
Submenu for: Basic Settings
Sensor field |
Submenu |
Description |
|||||
|
|
|
|
|
|
Set Time of Day |
Sets the current time on the clock. |
|
|
|
|
|
|
|
|
|
|
|
|
|
|
Time Indication |
When ON, the display shows the current time when you |
|
|
|
|
|
|
deactivate the appliance. |
|
|
|
|
|
|
|
|
|
|
|
|
|
|
|
|
|
|
|
|
|
|
|
Fast heat up |
When ON, the function decreases the heat-up time. |
|
|
|
|
|
|
|
|
|
|
|
|
|
|
Set + Go |
To set a function and activate it later with a press of any symbol |
|
|
|
|
|
|
on the control panel. |
|
|
|
|
|
|
|
|
|
|
|
|
|
|
|
|
|
|
|
|
|
|
|
Heat + Hold |
Keeps the prepared food warm for 30 minutes after a cooking |
|
|
|
|
|
|
cycle finished. |
|
|
|
|
|
|
|
|
|
|
|
|
|
|
|
|
|
|
|
|
|
|
|
Time Extension |
Activates and deactivates the time extension function. |
|
|
|
|
|
|
|
|
|
|
|
|
|
|
Display Contrast |
Adjusts the display contrast |
|
|
|
|
|
|
|
|
|
|
|
|
|
|
Display Brightness |
Adjusts the display brightness |
|
|
|
|
|
|
|
|
|
|
|
|
|
|
Buzzer Volume |
Adjusts the volume of press-tones and signals by degrees. |
|
|
|
|
|
|
||
|
|
|
|
|
|
|
|
|
|
|
|
|
|
Key Tones |
Activates and deactivates the tone of the touch fields. It is not |
|
|
|
|
|
|
possible to deactivate the tone of the ON / OFF touch field. |
|
|
|
|
|
|
|
|
|
|
|
|
|
|
|
|
|
|
|
|
|
|
|
Alarm/Error Tones |
Activates and deactivates the alarm tones. |
|
|
|
|
|
|
|
|
|
|
|
|
|
|
Cleaning Reminder |
Reminds you when to clean the appliance. |
|
|
|
|
|
|
|
|
|
|
|
|
|
|
DEMO mode |
Activation / deactivation code: 2468 |
|
|
|
|
|
|
|
|
|
|
|
|
|
|
Service |
Shows the software version and configuration. |
|
|
|
|
|
|
|
|
|
|
|
|
|
|
Factory Settings |
Resets all settings to factory settings. |
|
|
|
|
|
|
|
|
14 www.aegaustralia.com.au | www.aegnewzealand.co.nz
7.3 Heating Functions
Submenu for: Basic Settings
Heating Function |
Application |
|||
|
|
|
|
|
|
|
|
Conventional |
|
|
|
|
Cooking (Top / |
To bake and roast food on one shelf position. |
|
|
|
Bottom Heat) |
|
|
|
|
||
|
|
|
|
|
|
|
|
True Fan Cooking |
To bake on up to three shelf positions at the same time and to dry food. Set the |
|
|
|
temperature 10 - 20°C lower than for the function: Conventional Cooking. |
|
|
|
|
|
|
|
|
|
|
|
|
|
|
|
Heat comes from two elements, one above and one below the food. The fan |
|
|
|
|
circulates the hot air around the oven cavity so that you can put the food in different |
|
|
|
Fan Assist Cooking |
places in the oven and still cook them at the same time. You should only use a |
|
|
|
maximum of two shelves with ‘Fan Assist Bake’. Do not use the bottom shelf. If |
|
|
|
|
|
|
|
|
|
|
the two shelves are used, food on the shelf in the higher position will cook first and |
|
|
|
|
should then be removed to allow the food on the lower shelf to finish cooking. |
|
|
|
|
|
|
|
|
|
To bake food on one shelf position for a more intensive browning and a crispy |
|
|
|
Pizza Setting |
bottom. Set the temperature 20 - 40 °C lower than for the function: Conventional |
|
|
|
|
Cooking. |
|
|
|
|
|
|
|
|
|
The Roast function is designed for roasting meats and poultry by utilising heat |
|
|
|
|
from all elements in combination with the fan to surround the food. This provides |
|
|
|
Roast |
even cooking throughout and enhanced browning. This function starts at a higher |
|
|
|
temperature to seal the meat. The oven will then automatically reduce to the selected |
|
|
|
|
|
|
|
|
|
|
temperature to cook the meat for as long as desired. For example, if you use the |
|
|
|
|
default 200°C the “Roast” cycle will start at 220°C and then lower to 200°C. |
|
|
|
|
|
|
|
|
|
The ‘Left Grill’ directs radiant heat from only one of the powerful upper elements onto |
|
|
|
Left Grilling |
the food. The ‘Left Grill’ function is used instead of ‘Full Grill’ when only half the amount |
|
|
|
|
of grill area is needed. Grill with the oven door closed. |
|
|
|
|
|
|
|
|
Frozen Foods |
To make convenience food like e.g. french fries, potato wedges or spring rolls crispy. |
|
|
|
|
|
|
|
|
Full Grilling |
To grill flat food and to toast bread. |
|
|
|
|
|
|
|
|
|
‘Turbo Grill’ offers you the benefits of both fan assist bake and traditional grill |
|
|
|
|
functions. The grill element turns on and off to maintain set temperature while the |
|
|
|
|
fan circulates the heated oven air. Grill with the oven door closed.You can use ‘Turbo |
|
|
|
Turbo Grilling |
Grill’ for large cuts of meat, which gives you a result similar to ‘rotisserie’ cooked |
|
|
|
|
meat. Put your food on a shelf in the second lowest shelf position. Put the grill dish |
|
|
|
|
on the lowest shelf position to catch any spills. When using ‘Turbo Grill’ it is not |
|
|
|
|
necessary to turn the food over during the cooking cycle. |
|
|
|
|
|
|
|
|
Bottom Heat |
To bake cakes with crispy bottom and to preserve food. |
|
|
|
|
|
|
|
|
|
To bake breads, cakes and cookies. To save energy during cooking. This function |
|
|
|
|
must be used in accordance with the Moist Fan Baking table in order to achieve the |
|
|
|
Moist Fan Baking |
desired cooking result. To get more information about the recommended settings, |
|
|
|
|
refer to the Hints and Tips chapter, Moist Fan Baking table. This function was used |
|
|
|
|
to define the energy efficiency class acc. to EN 60350-1. |
|
|
|
|
|
The lamp may automatically deactivate at a temperature below 60°C during some oven functions.
|
|
|
|
English |
15 |
7.4 Specials |
|
|
|||
|
|
|
|
|
|
|
Heating Function |
Application |
|
||
|
|
|
Keep Warm |
To keep food warm. |
|
|
|
|
|
||
|
|
|
|
|
|
|
|
|
Plate Warming |
To preheat plates for serving. |
|
|
|
|
|
|
|
|
|
|
Preserving |
To preserve fruits and vegetables in sterilized cans and jars |
|
|
|
|
|
|
|
|
|
|
|
|
|
|
|
|
Drying |
To dry sliced fruit (e.g. apples, plums, peaches) and vegetables |
|
|
|
|
(e.g. tomatoes, zucchini, mushrooms). |
|
|
|
|
|
|
|
|
|
|
|
Dough Proving |
For controlled rising of yeast dough before baking. |
|
|
|
|
|
|
|
|
|
|
Slow Cooking |
To prepare tender, succulent roasts. |
|
|
|
|
|
|
|
|
|
|
Bread Baking |
To bake bread. |
|
|
|
|
|
|
|
|
|
|
|
This function can be used for defrosting frozen foods, such as vegetables and |
|
Defrost |
fruits. The defrosting time depends on the amount and size of the frozen food. |
|
7.5Activating a heating function
1.Activate the appliance
2.Select the menu: Heating Functions
3.Press  to confirm
4.Select a heating function.
5.Press  to confirm.
6.Set the temperature.
7.Press to confirm.
7.6Heat-up indicator
When you activate a heating function, the bar on the display comes on. The bar shows that the temperature increases. When temperature is reached the buzzer sounds 3 times and the bar flashes and then disappears.
7.7 Activating a fast heat up
This function decreases the heat-up time.
Do not put food in the oven when the Fast heat up function operates.
To activate / deactivate the function, hold  for 3 seconds. The heat-up indicator alternates. (This function is enabled by default)
7.8 Residual heat
When you deactivate the appliance, the display shows the residual heat. You can use the heat to keep the food warm.
8.CLOCK FUNCTIONS
8.1Clock functions table
Clock Function |
Application |
|
|
|
||
|
|
|
|
|||
|
|
|
To set a countdown (max. 2 h 30 min). This function has no effect on the operation |
|||
|
|
Minute Minder |
of the appliance. You can also activate it when the appliance is deactivated. Use |
|||
|
|
|
to activate the function. Press |
or |
to set the minutes and |
to start |
|
|
|
|
|
||
|
|
Duration |
To set the length of a cooking operation (max. 23 h 59 min). |
|
||
|
|
|
||||
|
|
|
|
|
|
|
|
|
End Time |
To set the switch-off time for a heating function (max. 23 h 59 min). |
|
||
|
|
|
||||
|
|
|
|
|
|
|
 Loading...