

Page 1

Table of Contents
Safety
……………………………………………………………… 1
Electrical safety ……………………………………………………………… 1
Installation safety ……………………………………………………………… 1
Cleaning safety ……………………………………………………………… 1
Special notes on LCD
……………………………………………………………… 2
monitors
Package contents
Installation
……………………………………………………………… 2
……………………………………………………………… 3
instructions
Placement ……………………………………………………………… 3
Installation ……………………………………………………………… 3
External controls ……………………………………………………………… 4
Image adjustment ……………………………………………………………… 5
Screen adjustment ……………………………………………………………… 7
Attachments
……………………………………………………………… 8
Plug and play ……………………………………………………………… 8
Power saver ……………………………………………………………… 8
Troubleshooting ……………………………………………………………… 8
Technical
……………………………………………………………… 9
specifications
Display modes ……………………………………………………………… 10
Page 2

Safety
Electrical
safety
Installation
safety
Note: To ensure your safety and prolong the life of the product, read
the following safety recommendations carefully before using the product
for the first time.
y Do not touch the inside of the monitor. Only authorized and qualified
technicians should open the LCD monitor case.
y Hold the plug (not the power cable) when you connect the plug to
the socket. Make sure your hands are dry.
y This product should only be operated with the type of power indicated
on the marking label. If you are not sure of the type of power
available, consult your dealer or local power company.
y This product is equipped with a 3-prong plug, (a plug having a third
grounding pin). This plug will only fit into a grounded power outlet.
If you are unable to insert the grounded plug into the outlet, contact
your electrician to replace your obsolete outlet. Do not use a
two-prong adapter instead of the grounded plug.
y Don’t expose your LCD monitor to water, or any environment with
a high temperature or humidity, such as kitchens or swimming pools.
Flower vases filled with water are also dangerous.
y If your LCD monitor
or a smell), remove the plug immediately and contact your authorized
dealer or service center.
y Don't touch your LCD monitor with your fingers or any hard object.
Avoid scratching or leaving any oil sludge on the surface of the
display.
operates abnormally (i.e., releases smoke, noise
Cleaning safety
y Protect your LCD monitor by installing it in a place that is
well-ventilated, moisture proof, and dust-free.
y Don’t install your LCD monitor near a heat source, (i.e., ovens,
space heaters, fire places, furnaces or in the sun).
y To avoid electric shock, or dropping, install your LCD monitor in
a place where children will not touch it. Secure your LCD monitor
firmly and explain the safety rules to children, if required.
y When installing your LCD monitor or adjusting its angle, attention
should be paid to the loading capability and leveling of the
structure supporting the LCD monitor.
y Don’t spray cleanser or water onto your LCD monitor or its case.
y When cleaning your LCD monitor, make sure that no liquid permeates
into the inside of the LCD monitor or any accessory.
y Moisten a clean, soft, lint-free cloth with water or glass cleaner
without alcohol. Squeeze it so it's just a little damp and wipe
the surface of your LCD monitor gently. It is recommended to use
a silk cloth that is exclusively used to clean the display.
1
Page 3
Special notes on LCD monitors
The following symptoms are normal for LCD monitors and do not indicate a problem with
the device:
y Due to the nature of the fluorescent light, the screen may flicker during initial
use. Turn off the power switch and then turn it on again to make the flicker disappear.
y You may find slightly uneven brightness on the screen depending on the desktop pattern
you use.
y The LCD screen has effective pixels of 99.99% or more. It may include blemishes
of 0.01% or less (caused by a missing pixel or a pixel that is always lit).
y When the same image is displayed for hours on end, its afterimage may remain after
switching to a new image. When this happens, the screen will recover slowly by changing
the image. Turning the LCD monitor off for several hours will also correct this
problem.
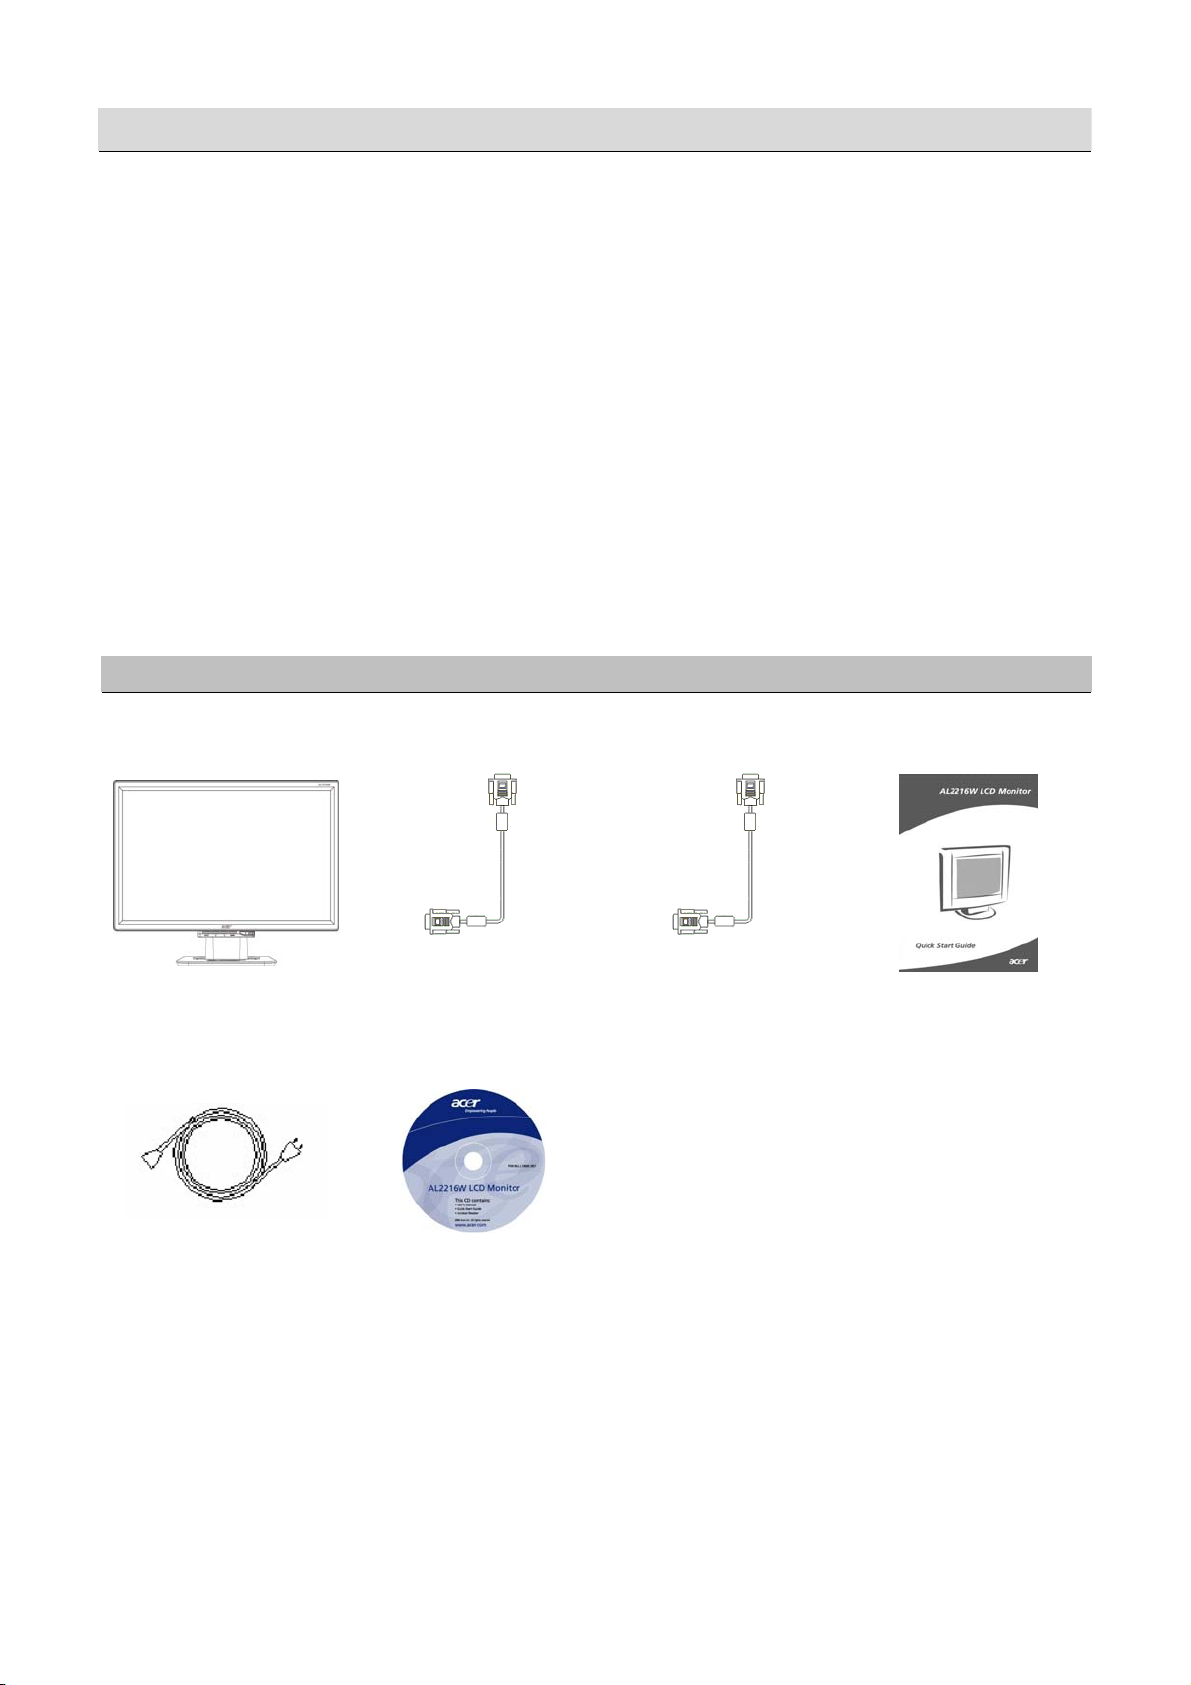
Package contents
LCD display
(with speakers)
Power cable
D-Sub signal cable
User's Guide (CD)
DVI signal cable
(optional)
Quick Start Guide
2
Page 4
Installation instructions
Placement
Installati
on
Note: Read the Safety section carefully before starting the installation.
When installing your LCD monitor, consider the placement of the monitor:
y To minimize the reflection of the monitor, protect your eyes, and ensure
premium quality, don’t install your LCD monitor near windows or where
there is backlight. Keep the monitor at least 30 cm away from your eyes.
y The upper edge of the monitor should be just a little higher than your
line of sight.
y Adjust the front and back dip angles of the monitor, so that you can
view the display comfortably.
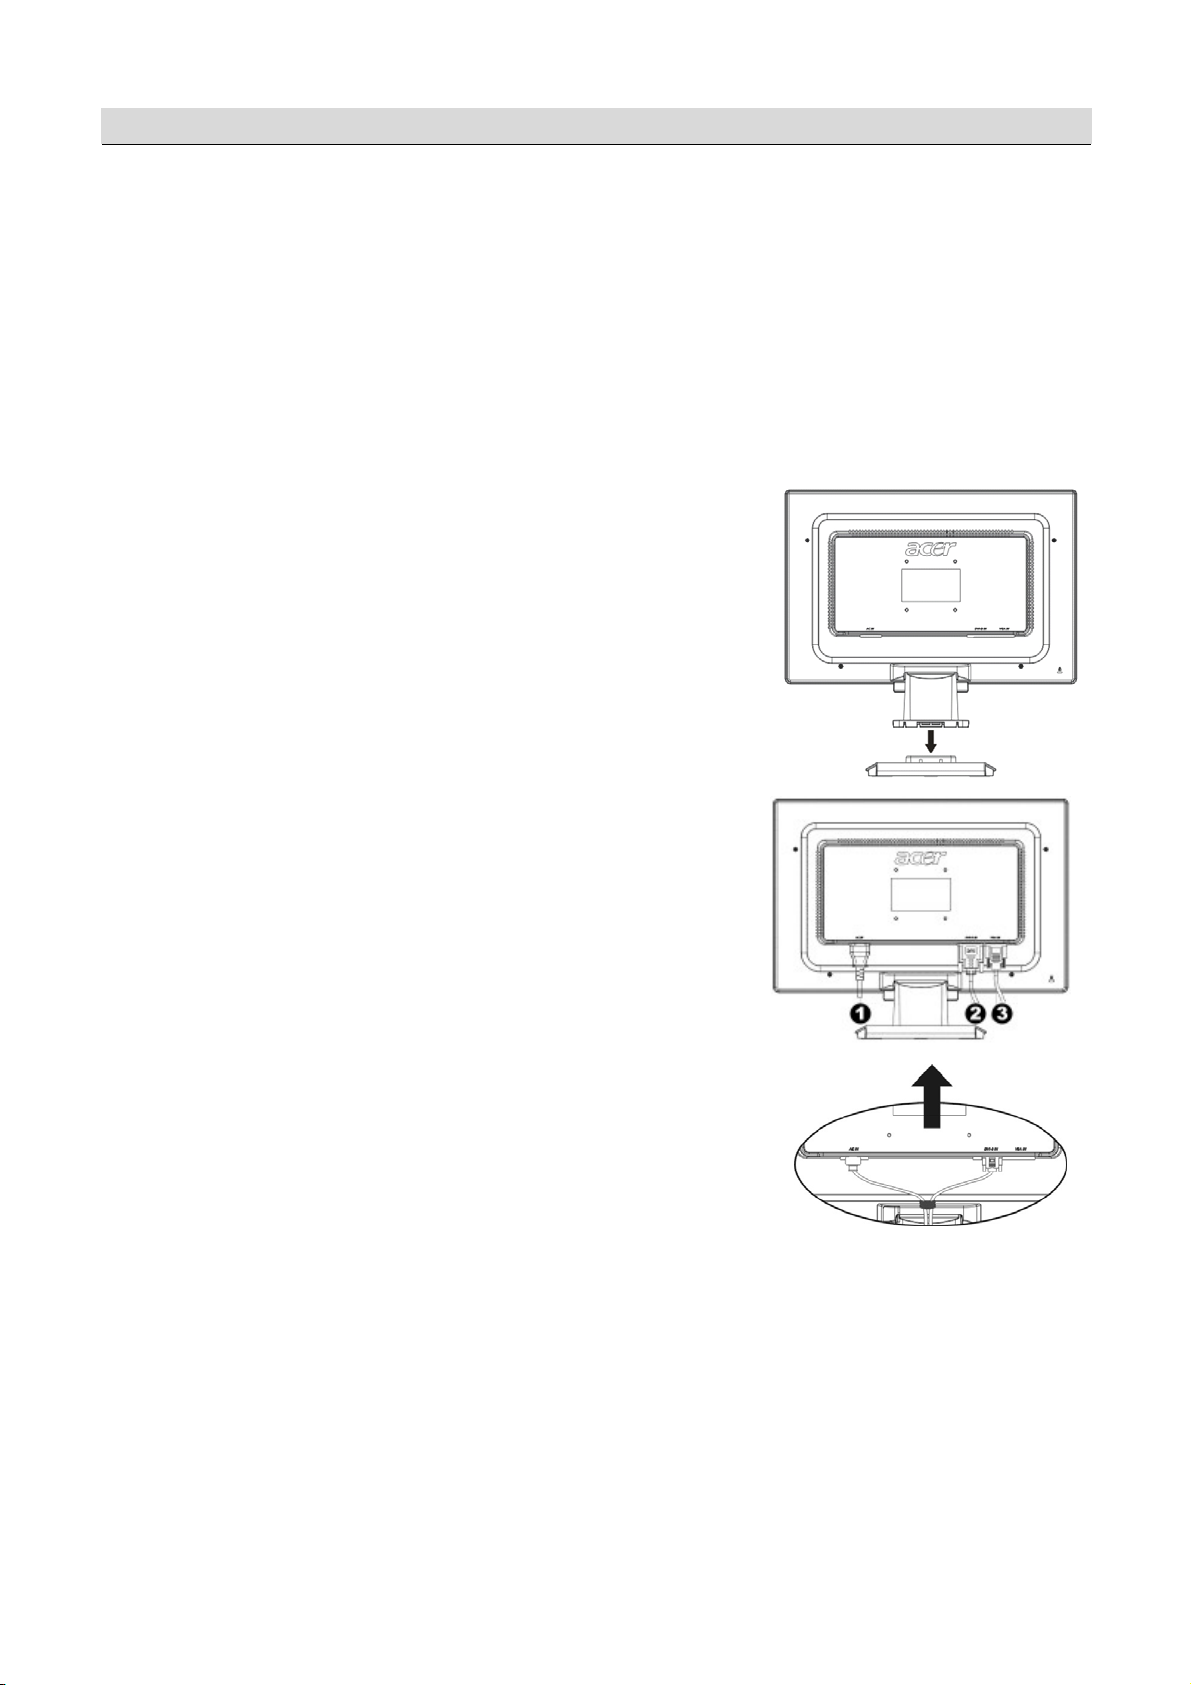
Connecting the base to the monitor
Take the base out of the box and place it on a
flat table.
y Position the monitor on top of the base.
y Connect the base into the neck of the monitor
along the track.
y You will hear a click sound when the base
and the monitor are properly connected.
Connecting the LCD monitor to a PC
y Make sure that the power supply of your PC
is turned off and the power plug is removed.
y Connect and fasten both ends of the signal
cable to your PC host and LCD monitor,
respectively.
y Connect the attached power cable to your LCD
monitor.
y Plug the power cable into the receptacle.
y Use the cable tie to bind up the power cord
and the D-sub signal cable / DVI-D cable.
y Turn on the power supplies of your PC and
LCD monitor.
X Power cable
Y DVI signal cable
(optional)
Z D-Sub signal cable
3
Page 5
External
controls
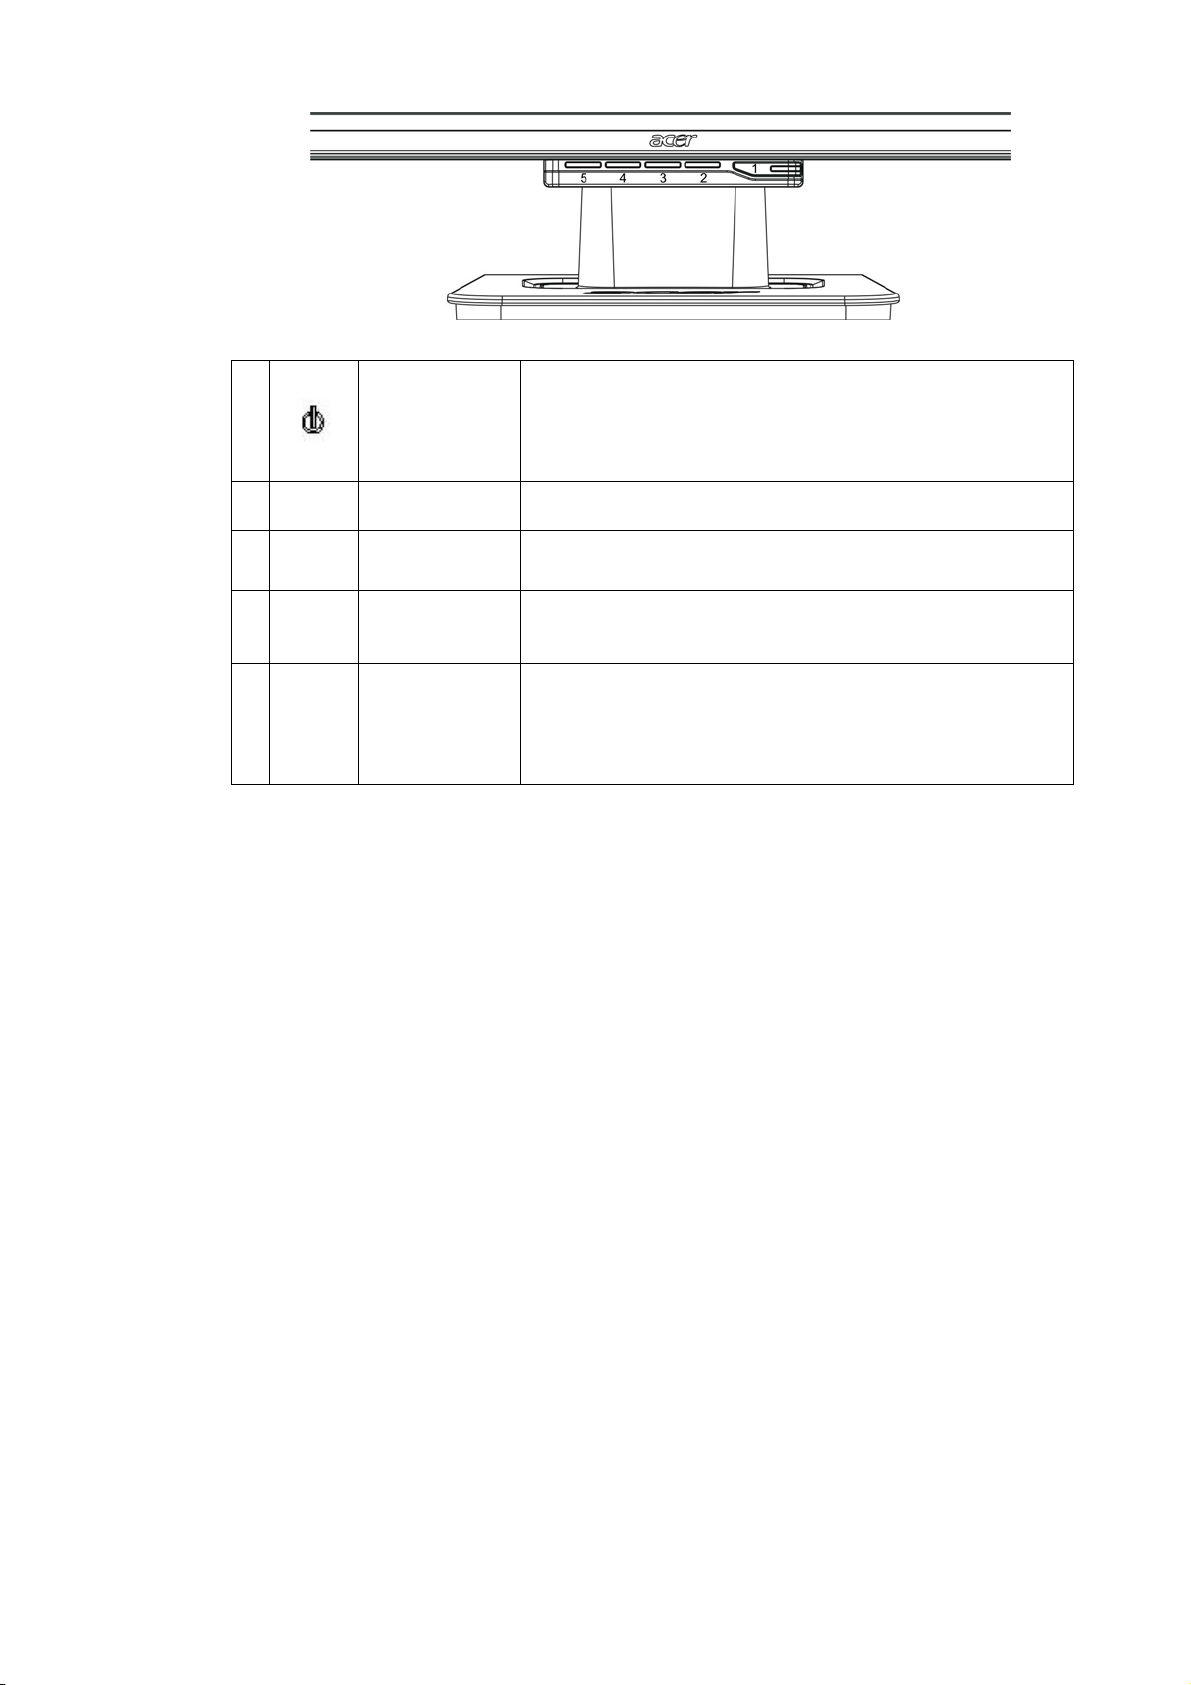
1
2 Menu OSD Menu
3 > Plus
4 < Minus
5 Auto
Power source
Automatic
adjustment
Power On/Off
Green indication: Power is on and normal.
Orange indication: Sleep status in the energy-saving
mode.
Colorless indication: Power off.
Press this button to enter OSD. Press it again to exi
OSD.
Press this button for selection or adjustment when
OSD is started.
Press this button and click < and > to adjust volume
when OSD is not started (for the model with speakers
only).
Press this button to exit the manual when OSD is
started.
Press this button for the display to optimize the
position, phase and clock pulse automatically when
OSD is not started.
4
Page 6
Image
adjustment
for analog
The image settings of your LCD monitor were adjusted to their optimal status
for analog TV before shipment. (See Page 9). If you want to adjust the image
settings to suit your personal preference, follow the steps below:
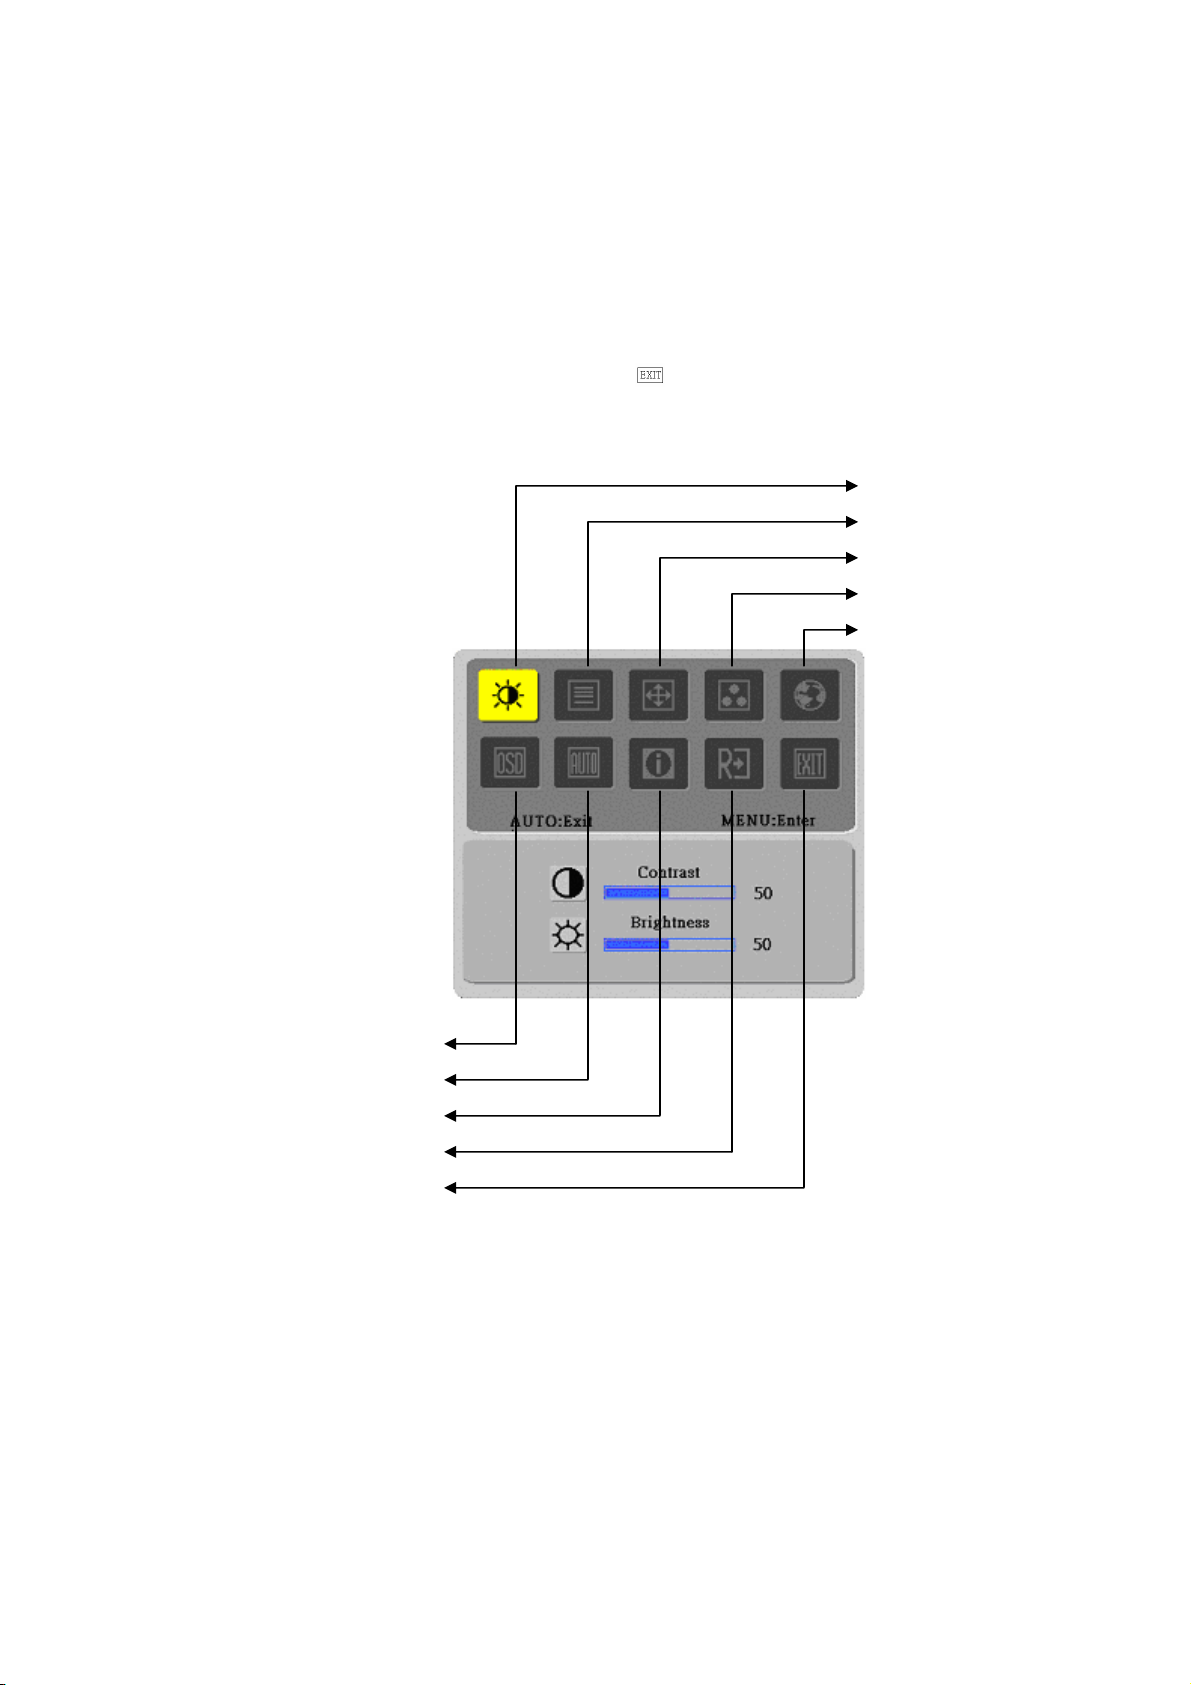
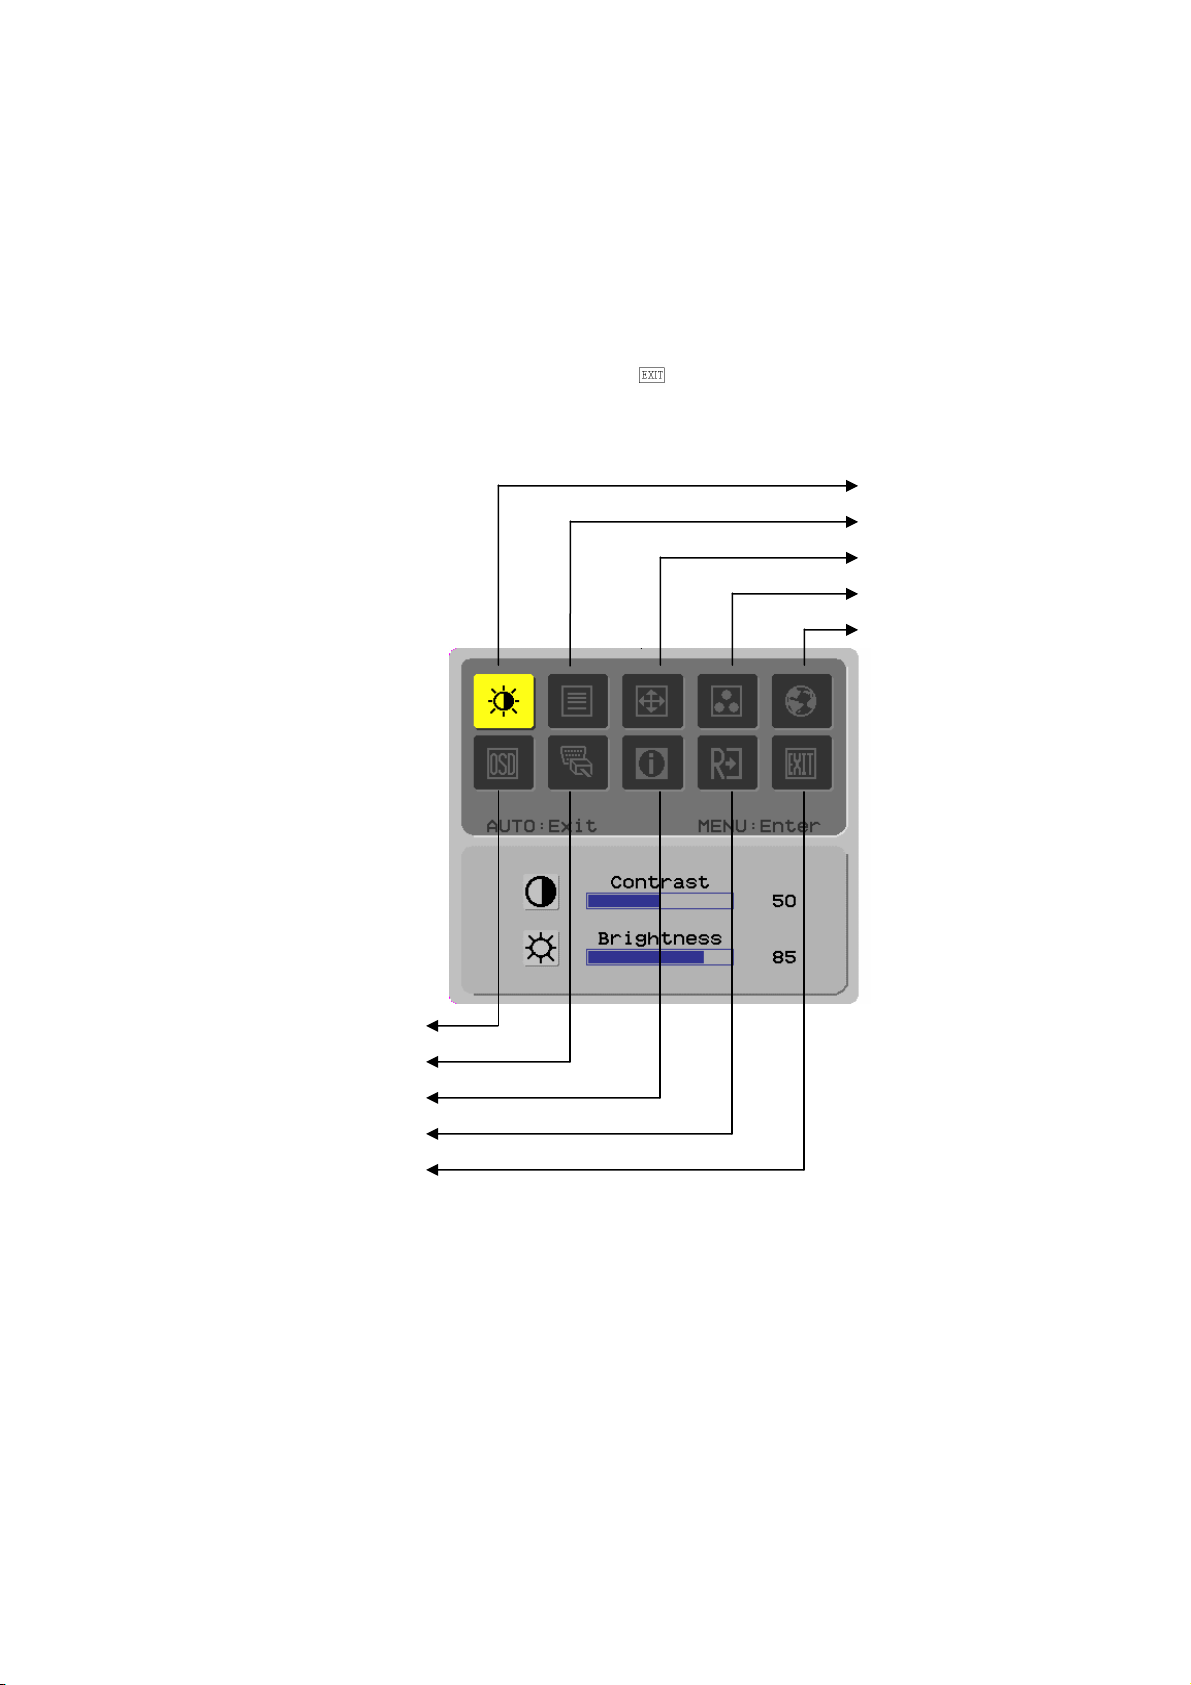
1. Click Menu to display the OSD window as shown in the following figure.
2. Click Plus or Minus to select the function to be adjusted as shown in
the following figure.
3. Click the Menu again to select the function to be adjusted.
4. Click Plus or Minus to change current settings.
5. To exit the OSD window, select "
other settings, repeat steps 2-4.
" to close and save changes. To change
Bright/Contract
Phase/Clock pulse
Horizontal/Vertical
Color Temp. Adjustment
Language Selection
OSD Setting
Auto
Message
Restore
Exi
(Analog)
5
Page 7
Image
adjustment
for
digital
The image settings of your LCD monitor were adjusted to their optimal status
for digital TV before shipment. (See Page 9). If you want to adjust the image
settings to suit your personal preference, follow the steps below:
1. Click Menu to display the OSD window as shown in the following figure.
2. Click Plus or Minus to select the function to be adjusted as shown in
the following figure.
3. Click the Menu again to select the function to be adjusted.
4. Click Plus or Minus to change current settings.
5. To exit the OSD window, select “
other settings, repeat steps 2-4.
” to close and save changes. To change
Bright/Contrast
Phase/Clock Pulse
Horizontal/Vertical
Color Temp. Adjustment
Language Selection
OSD Setting
Input Selectio
Message
Restore
Exit
(Digital)
6
Page 8
Screen adjustment
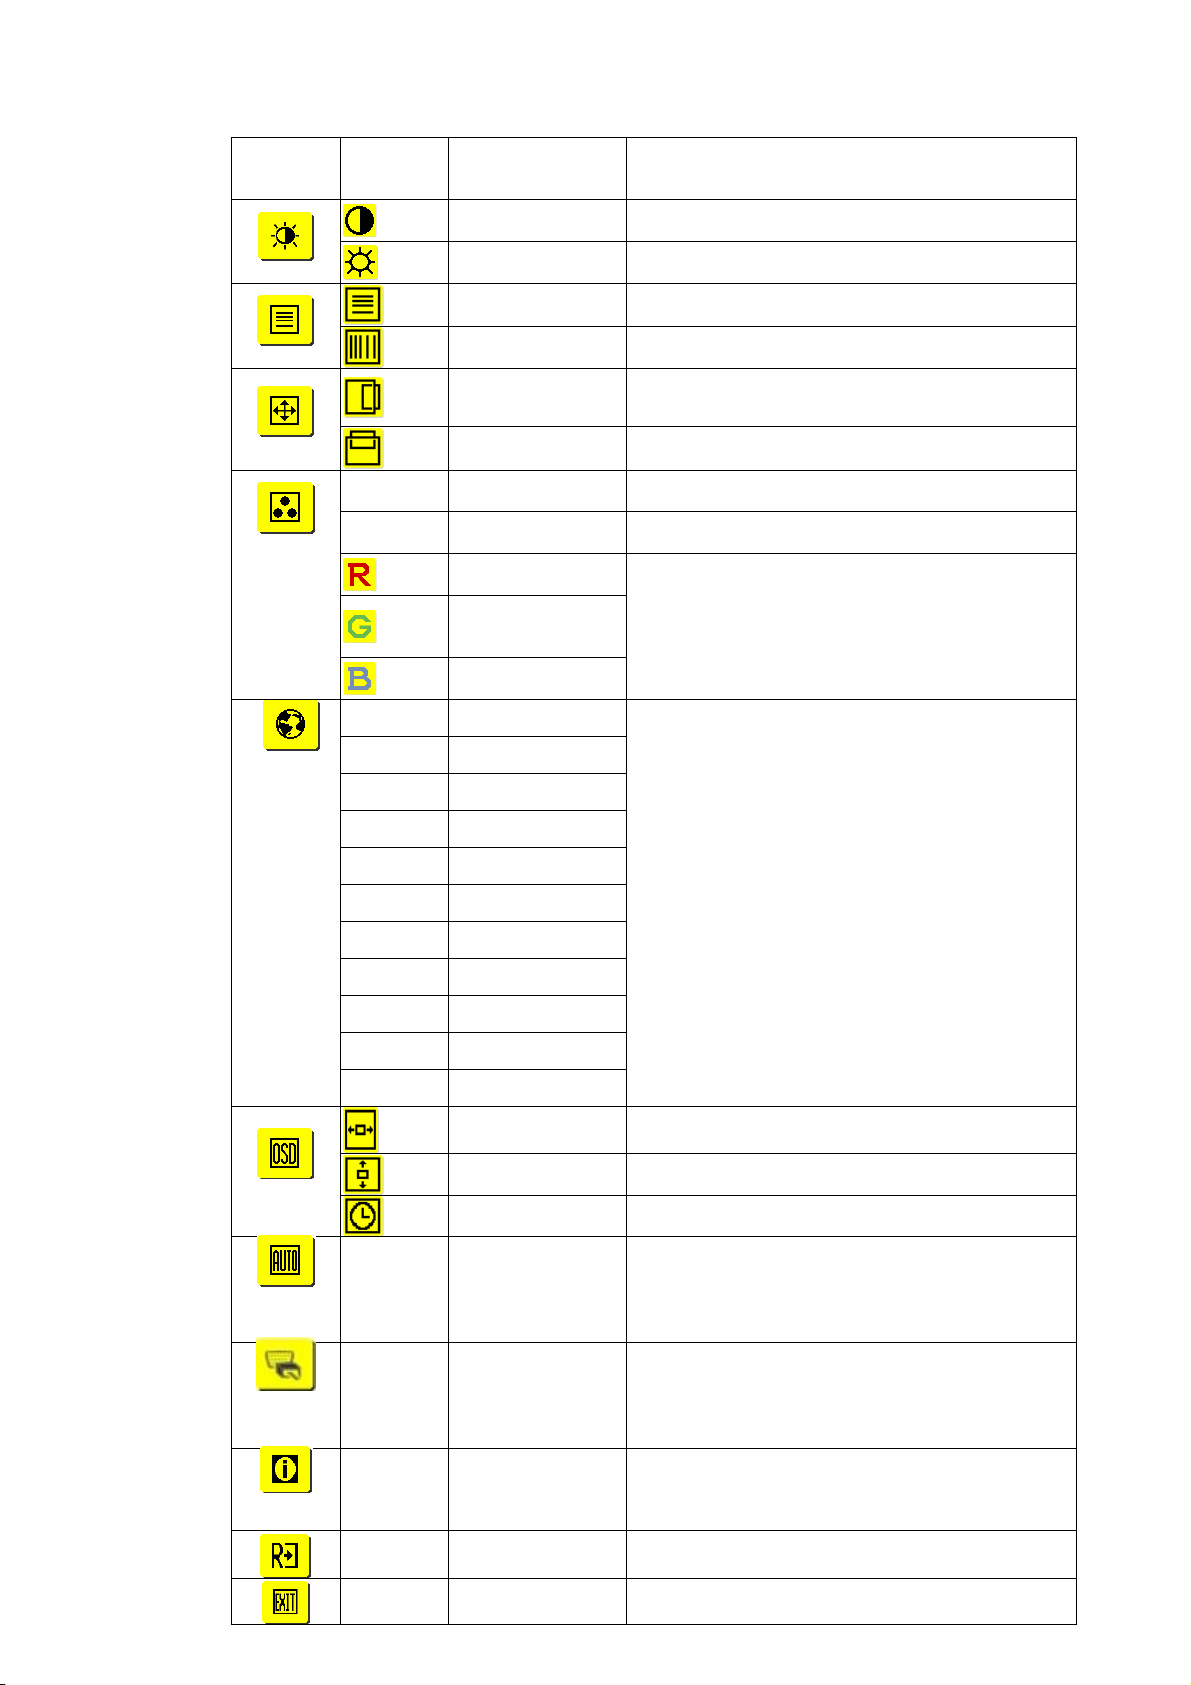
Function Definition
Primary
directory
symbol
Secondary
directory
symbol
N/A
N/A
N/A
Secondary
directory items
Contrast
Brightness
Phase
Clock pulse
Horizontal
Vertical
Warm color
temperature
Cold color
temperature
User
Definition/Red
User
Definition/Gree
n
User
Definition/Blue
English
Description
Adjusts the contrast between the foreground
and background of an image on the screen.
Adjusts the background brightness of the
screen.
Adjusts the focus of the image
(for analog input adjustment only).
Adjusts the clock pulse of the image
(for analog input adjustments only).
Moves the image left and right on the screen
(for analog input adjustments only).
Moves the image up and down on the screen
(for analog input adjustments only).
Sets the color temperature to warm white.
Sets the color temp to cold white.
Adjusts red/green/blue gain.
N/A
N/A
N/A
N/A
N/A
N/A
N/A
N/A
N/A
N/A
N/A Auto adjustment
Deutsch
Français
Español
Italiano
Hollands
Suomalainen
Русский
Horizontal Moves OSD left and right.
Vertical Moves OSD up and down.
OSD time display Adjusts OSD time display settings.
Used to select the language you want.
Sets up horizontal, vertical, sequence and
focus automatically (for analog input only).
N/A Analog digital
N/A Message
N/A Restore Restores system to default settings.
N/A Exit Closes the OSD window and saves changes.
Used to select the input source you want (for
DVI input only).
Display resolution, H/V frequency and the
input port used for current input timing
function.
7
Page 9

Attachmen
Plug and play
Power saver
ts
The pr duct the lat
y
compl ated consum d
play f ature r co r
easil and s func
The LCD moni ansfers t Data
y
(EDID) to your computer sys
so that your an u LCD
monitor.
The LCD moni uilt
y
y When the LCD monitor is not
Contro Sys tical
to save power. Move the mouse slightly or press any key to return
t
y The Power Saver function can only be operated by the display card
of the ut can set up this function from your computer.
y The LCD mon EK when used
with SA D
To save power and extend the life of the product, turn off the LCD
y
o
ic
e
y
o al o
norm peration.
comp er sy
VE PMS.
provides
and time-
allows you
et u its
p
tor tr
computer c se the self-setting function of the
tor has a b -in Power Control System (Power Saver).
stem. You
itor is compati
est VESA plug and play feature to prevent
ing installation procedures. The plug an
mputer system to identify the LCD monito
tions automatically.
he Extended Display Identification
tem via the Display Data Channel (DDC),
operated for a period of time, the Power
ly sets the system at low voltage statusl tem automa
ble with EPAENERGY STAR NÜT
Troubleshooting
Power LED does
not light
Icon off
Color default
Instability
or ripple
y Check that the power switch is turned on.
y Ma re t cable
y Check that the power switch is turned on.
y Make sure the power cable is connected.
y Ensure that the signal cable is inserted in the receptacle
y The Power Saver may he monitor automatically during the
y
y R
y Check the signal cable of the monitor to ensure that none of the pins
monitor power supply when it is idle for a long time or not being
us
ed.
ke su he power is connected.
app riate
rop ly.
turn off t
operation. Make sure the monitor is restored when you press any key
from e ke
th yboard.
Refer to "Color Temp. Adjust or or select color
temper ture
in renc
a
s.
emove any electronic equip
terfe e.
ment" to adjust RGB col
ment in the vicinity that may cause EMI
Image offset
or wrong size
are bent.
y Pr he au t
y Set up the reference position.
ess t to adjustment bu ton to automatically optimize the screen.
8
Page 10
Technical specifications
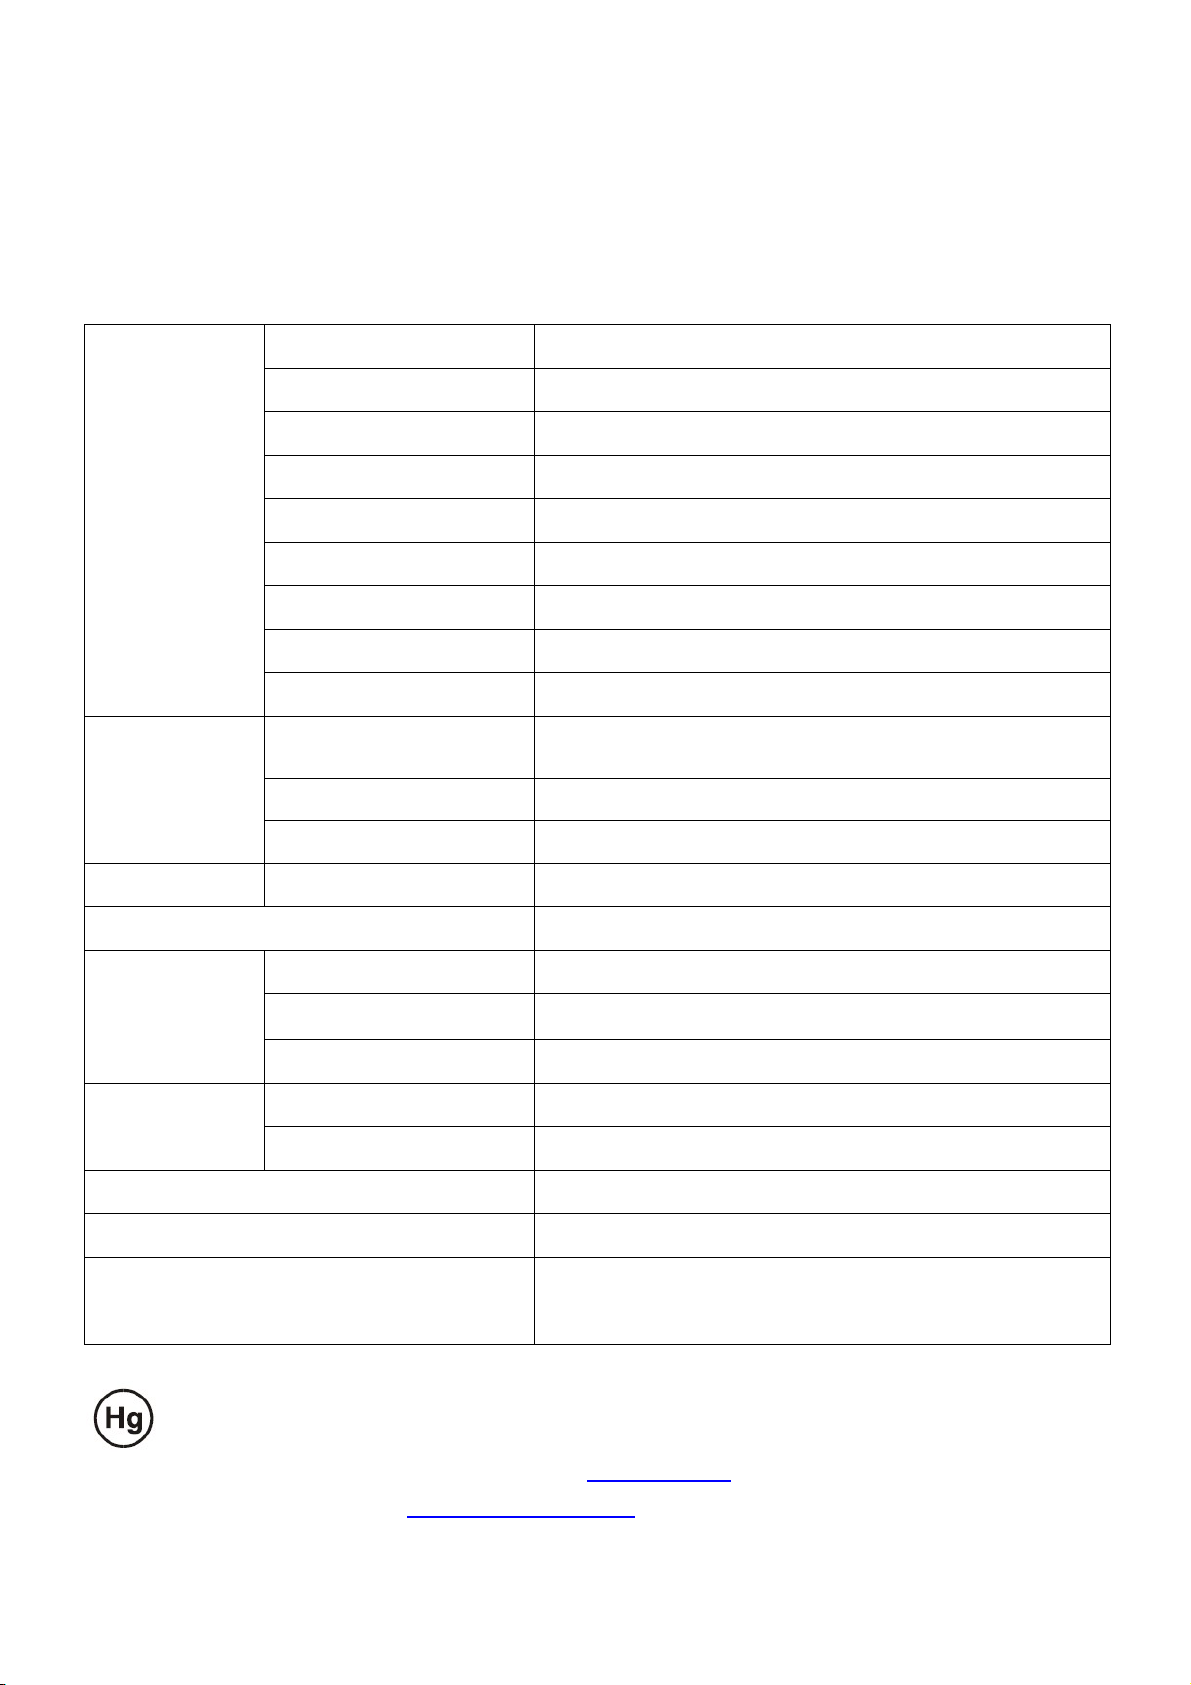
Panel dimension Diagonal 559 mm (22 inch) LCD monitor
Max. resolution 1,680 x 1,050 / WXGA+
Max. pixel Up to 16.2 M true color
Pixel span Horizontal 0.282mm x Vertical 0.282mm
LCD panel
(backlight
source)
Brightness 300 cd/m
Contrast 700 : 1
LC response time 5 ms
Vis
ual angle
2
Horizontal 170 / Vertical 160
° °
Effective display Horizontal 473.8 mm x Vertical 296.1 mm
Signal mode
Input signal
Input terminal I-D (Optional) Image D-Sub 15 PIN (VESA) / DV
Power trans rm – 60 Hz fo er AC100 – 240 Volts, 50
Power
consumption
Environmental
conditions
Actual dimensions (W x D x H) 513.5 x 198.2 x 405.2 mm
Net weight 4.9 kg
Safety standard
Lamp disposal
SYNC
frequency
Max. pixel clock 135MHz
O ration mode 48W pe
Power saving sleep
mode
Power saving off mode 1W @230VAC 50Hz
Tem
perature
Humidity 20% – 80% (operation) / 20% – 85% (storage)
Simulated video frequency: 0.7 Vpp, 75Ω
(separate SYNC and composite SYNC)
Horizontal 30 kHz – 82 kHz x Vertical 56 Hz – 76
Hz
2W @230VAC 50Hz
°C – 35°C (operation) / -20°C – 55°C (storage)
5
TCO03;UL/CUL;TÜV-GS;CE/LVD;TÜV-ERGO;CB;CCC;FCC-B;V
CCI-B;
CE/EMC;C-Tick; BSMI; ISO
13406-2;EPA;PCT;NOM;WEEE;PSB;HG
Lamp(s) i ide this product contain mercury
according to local, state or federal laws. For more information, contact the
Electronic Industries Alliance at
information, check
ns and must be recycled or disposed of
www.eiae.org
www.lamprecycle.org.
9
. For lamp-specific disposal
Page 11
This device complies with Part 15 of the FCC rules. Operation is subject to the
following two conditions: (1) this device may not cause harmful interference, and
(2) this device must accept any interference received, including interference that
may cause undesired operation.
This Class B digital apparatus meets all requirements of the Canadian Interference-
Causing Equipment
Cet appa la cl Réglement
sur le m r du
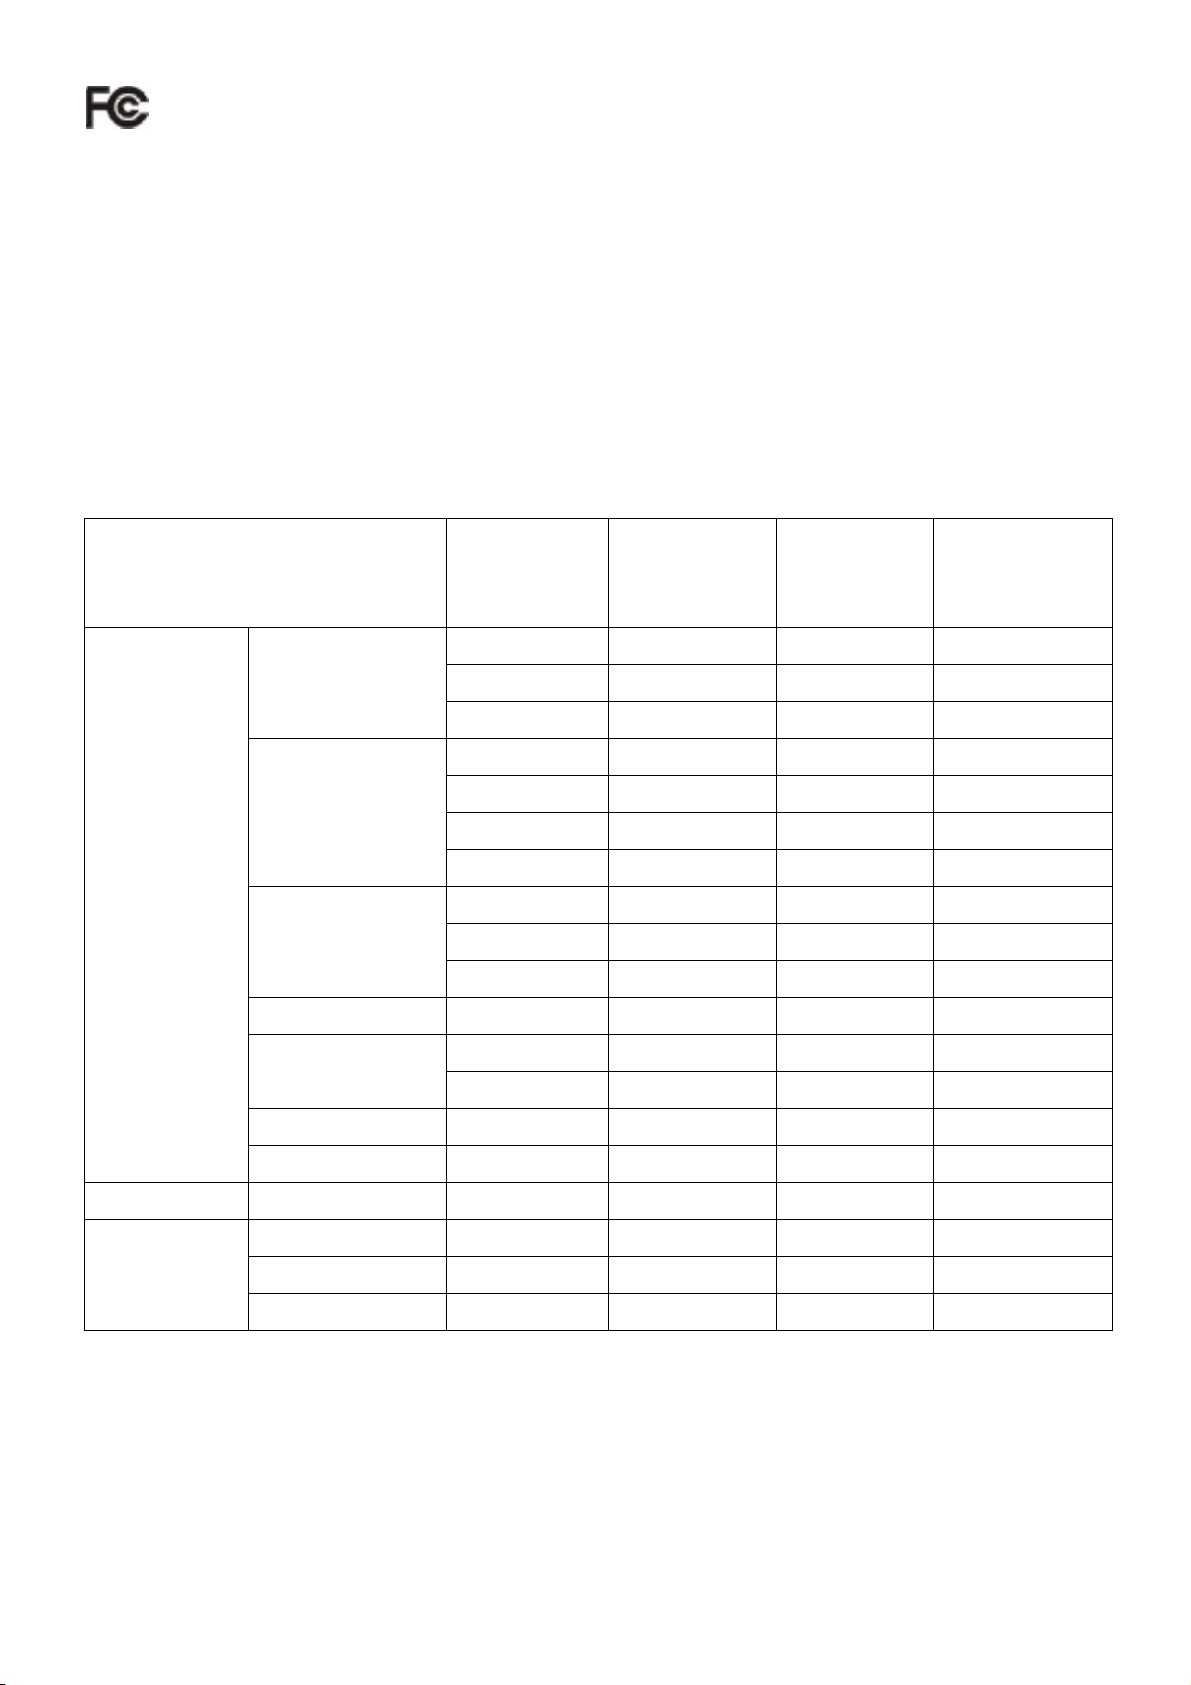
Display modes
Display
VESA
Regulations.
reil numérique de ass B respecte toures les exigencies du
ateriel brouilieu Canada.
If f your PC s the following reference
the signal o ystem is the same as one of
signal modes, the screen he screen
wi ay or only formation
ab stment mod o the instructions of your display card.
out the adju e, refer t
Mode ency
Frequ
VGA 640x480
will be adjusted automatically. If not, t
the LED lights will display. For more inll not displ
Hor
(kH
.
z)
Vert.
Frequency
(Hz)
Pixel
Frequency
(MHz)
SYNC Polarity
31.4 -/- 69 59.940 25.175
(H/V)
37.8 - 61 72.809 31.500 -/
37.500 75.000 31.500 -/-
SVGA 800x600
35.1 +/+ 56 56.250 36.000
37.879 60.317 40.000 +/+
48.077 72.188 50.000 +/+
46.875 75.000 +/+ 49.500
XGA 1024x768
48.363 60.004 -/- 65.000
56.4 -/- 76 70.069 75.000
60.023 75.029 78.750 +/+
SXGA 1152x864 67.5 108.000 +/+ 00 75.000
XGA 1280x1024
63.981 60.020 108.000 +/+ S
79.9
76 75.025 135.000 +/+
WXGA+ 1440x900 55.935 55.887 106.5 -/+
WXGA+ 1680x1050
65.29 59.954 146.25 -/+
V 1.4 .322 -/+ GA TEXT 720x400 3 69 70.087 28
M
acintosh
640x480 35.000 66.667 30.240 -/832x624 49.725 74.500 57.283 -/-
4x768 60.1 0.000 -/-
102 50 74.720 8
10
 Loading...