


Before operating the monitor please read this manual thoroughly. This manual should be retained for future reference.
Contents |
|
Packing list ---------------------------------------------------- |
1 |
Precautions ---------------------------------------------------- |
2 |
Installation Instructions ------------------------------------- |
3 |
Swivel Base -------------------------------------------------- |
3 |
Power cord -------------------------------------------------- |
3 |
Video cable -------------------------------------------------- |
4 |
Operating Instructions -------------------------------------- |
5 |
General Instructions -------------------------------------- |
5 |
Front panel control ---------------------------------------- |
6 |
How to adjust a setting ----------------------------------- |
6 |
Adjusting the picture ------------------------------------- |
7-8 |
Plug and play -------------------------------------------------- |
9 |
Technical Support (FAQ) ----------------------------------- |
10 |
Appendix A – Specifications ------------------------------- |
11-12 |
Appendix B – Factory Preset Timing Table ------------ |
13 |
PACKING LIST |
|
The product package should include the following items: |
|
1.Monitor
2.Owner's Manual
3.Power Cord
4.Swivel Base
41A604-786-2A |
1 |
PRECAUTIONS
zDo not use the monitor near water, e.g. near a bathtub, washbowl, kitchen sink, laundry tub, swimming pool or in a wet basement.
zDo not place the monitor on an unstable cart, stand, or table. If the monitor falls, it can injure a person and cause serious damage to the appliance. Use only a cart or stand recommended by the manufacturer or sold with the monitor. If you mount the monitor on a wall or shelf, use a mounting kit approved by the manufacturer and follow the kit instructions.
zSlots and openings in the back and bottom of the cabinet are provided for ventilation. To ensure reliable operation of the monitor and to protect it from overheating, be sure these openings are not blocked or covered. Do not place the monitor on a bed, sofa, rug, or similar surface. Do not place the monitor near or over a radiator or heat register. Do not place the monitor in a bookcase or cabinet unless proper ventilation is provided.
zThe monitor should be operated only from the type of power source indicated on the label. If you are not sure of the type of power supplied to your home, consult your dealer or local power company.
zThe monitor is equipped with a three-pronged grounded plug, a plug with a third (grounding) pin. This plug will fit only into a grounded power outlet as a safety feature. If your outlet does not accommodate the threewire plug, have an electrician install the correct outlet, or use an adapter to ground the appliance safely. Do not defeat the safety purpose of the grounded plug.
zUnplug the unit during a lightning storm or when it will not be used for long periods of time. This will protect the monitor from damage due to power surges.
zDo not overload power strips and extension cords. Overloading can result in fire or electric shock.
zNever push any object into the slot on the monitor cabinet. It could short circuit parts causing a fire or electric shock. Never spill liquids on the monitor.
zDo not attempt to service the monitor yourself; opening or removing covers can expose you to dangerous voltages and other hazards. Please refer all servicing to qualified service personnel.
zTo ensure satisfactory operation, use the monitor only with UL listed computers which have appropriate configured receptacles marked between 100 - 240 VAC, Min. 1.5A.
zThe wall socket shall be installed near the equipment and shall be easily accessible.
41A604-786-2A |
2 |
INSTALLATION INSTRUCTIONS
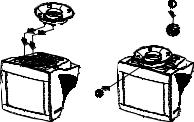
Swivel Base
To attach the swivel base to the monitor, do the following:
•Carefully turn the monitor on its side or upside down. ( see figure 1 )
•Locate the cavities at the bottom front of the monitor.
•Insert the pegs on the swivel base into these cavities. Push the swivel base forward until the swivel base locks in place.
•To remove the swivel base, hold the bottom of the swivel base, then push it out.
Install Remove
Figure 1 Installing and Removing the Swivel Base
Power Cord
Power Source:
1.Make sure the power cord is the correct type that required in your area.
2.This monitor has a universal power supply that allows operation in either 100/120V AC or 220/240V AC voltage area ( No user adjustment is required. )
3.Connect the power cord into your monitor’s power input socket, and then
plug the other end into a 3-pin AC power outlet. The power cord may be connected to either a wall power outlet or the power outlet socket on your PC, depending on the type of power cord supplied with your monitor.
41A604-786-2A |
3 |

Video cable
Connecting the Video Cable: The monitor comes with a built-in video cable. Plug the signal cable's 15-pin connector into the computer's video port and tighten the two screws on the cable connector.
Caution:Don’t bend the signal cable, otherwise it will break the inner wire.
Connecting the Power Cord: Plug the power cord into the monitor's AC power socket. Then plug the power cord into a grounded AC outlet or ULapproved power strip or the power output socket on your PC.
Caution: If the AC outlet is not grounded (with three holes), install the proper grounding adapter (not supplied).
|
|
|
|
|
|
|
|
|
|
|
|
|
|
|
|
|
|
|
|
|
|
|
|
|
|
|
|
|
|
|
|
|
|
|
|
|
|
|
|
|
|
|
|
|
|
|
|
|
|
|
|
|
|
|
|
|
|
|
|
|
|
|
|
|
|
|
|
|
|
|
|
|
|
|
|
|
|
|
|
|
|
|
|
|
|
|
|
|
|
|
|
|
|
|
|
|
|
|
|
|
|
|
|
|
|
|
|
|
|
|
|
|
|
|
|
|
|
|
|
|
|
|
|
|
|
|
|
|
|
|
|
|
|
|
|
|
|
|
|
|
|
|
|
|
|
|
|
|
|
|
|
|
|
|
|
|
|
|
|
|
|
|
|
|
|
|
|
|
|
|
|
|
|
|
|
|
|
|
|
|
|
|
|
|
|
|
|
|
|
|
|
|
|
|
|
|
|
|
|
|
|
|
|
|
|
|
|
|
|
|
|
|
|
|
|
|
|
|
|
|
|
|
|
|
|
|
|
Figure 2 |
Connecting Cables |
||||||||||||||||||||||
|
|
|
|
||||||||||||||||||||||||
|
|
|
|
||||||||||||||||||||||||
|
|
|
|
||||||||||||||||||||||||
|
|
|
|
||||||||||||||||||||||||
|
|
|
|
||||||||||||||||||||||||
|
|
|
|
|
|
|
|
|
|
|
|
|
|
|
|
|
|
|
|
|
|
|
|
||||
1. |
Power Cord |
|
|
|
|
2. |
|
Signal Cable |
|||||||||||||||||||
41A604-786-2A |
4 |
 Loading...