


. |
TABLE OF CONTENTS |
|
|
|
|
|
FOR YOUR SAFETY -------------------------------------------------- |
1 |
|
SAFETY PRECAUTIONS -------------------------------------- |
2 |
|
SPECIAL NOTES ON LCD MONITORS ------------------- |
3 |
|
BEFORE YOU OPERATE THE MONITOR --------------------- |
3 |
|
FEATURES -------------------------------------------------------- |
3 |
|
PACKING LIST --------------------------------------------------- |
3 |
|
INSTALLATION INSTRUCTIONS --------------------------- |
4 |
|
CONTROLS AND CONNECTORS -------------------------- |
5 |
|
ADJUSTING THE VIEWING ANGLE ----------------------- |
6 |
|
OPERATING INSTRUCTIONS ------------------------------------- |
7 |
|
GENERAL INSTRUCTIONS ---------------------------------- |
7 |
|
HOW TO ADJUST A SETTING ------------------------------ |
9 |
|
ADJUSTING THE PICTURE ----------------------------- |
10-11 |
|
PLUG AND PLAY ----------------------------------------------- |
12 |
|
TECHNICAL SUPPORT(FAQ) -------------------------------- |
13-14 |
|
ERROR MESSAGE & POSSIBLE SOLUTION ------- |
15 |
|
APPENDIX ------------------------------------------------------------- |
16 |
|
SPECIFICATIONS ------------------------------------------ |
16-17 |
|
FACTORY PRESET TIMING TABLE --------------------- |
18 |
|
CONNECTOR PIN ASSIGNMENT ------------------------ |
19 |

read this manual thoroughly. This manual should be retained for future reference.
FCC Class B Radio Frequency Interference Statement
WARNING: (FOR FCC CERTIFIED MODELS)
NOTE: This equipment has been tested and found to comply with the limits for a Class B digital device, pursuant to Part 15 of the FCC Rules. These limits are designed to provide reasonable protection against harmful interference in a residential installation. This equipment generates, uses and can radiate radio frequency energy, and if not installed and used in accordance with the instructions, may cause harmful interference to radio communications. However, there is no guarantee that interference will not occur in a particular installation. If this equipment does cause harmful interference to radio or television reception, which can be determined by turning the equipment off and on, the user is encouraged to try to correct the interference by one or more of the following measures:
1.Reorient or relocate the receiving antenna.
2.Increase the separation between the equipment and receiver.
3.Connect the equipment into an outlet on a circuit different from that to which the receiver is connected.
4.Consult the dealer or an experienced radio/TV technician for help.
NOTICE:
1.The changes or modifications not expressly approved by the party responsible for compliance could void the user's authority to operate the equipment.
2.Shielded interface cables and AC power cord, if any, must be used in order to comply with the emission limits.
3.The manufacturer is not responsible for any radio or TV interference caused by unauthorized modification to this equipment. It is the responsibilities of the user to correct such interference.
As an ENERGY STAR Partner our company International has determined that this product meets the ENERGY STAR guidelines for energy efficiency.
WARNING:
To prevent fire or shock hazard, do not expose the monitor to rain or moisture. Dangerously high voltages are present inside the monitor. Do not open the cabinet. Refer servicing to qualified personnel only.
1

zDo not use the monitor near water, e.g. near a bathtub, washbowl, kitchen sink, laundry tub, swimming pool or in a wet basement.
zDo not place the monitor on an unstable cart, stand, or table. If the monitor falls, it can injure a person and cause serious damage to the appliance. Use only a cart or stand recommended by the manufacturer or sold with the monitor. If you mount the monitor on a wall or shelf, use a mounting kit approved by the manufacturer and follow the kit instructions.
zSlots and openings in the back and bottom of the cabinet are provided for ventilation. To ensure reliable operation of the monitor and to protect it from overheating, be sure these openings are not blocked or covered. Do not place the monitor on a bed, sofa, rug, or similar surface. Do not place the monitor near or over a radiator or heat register. Do not place the monitor in a bookcase or cabinet unless proper ventilation is provided.
zThe monitor should be operated only from the type of power source indicated on the label. If you are not sure of the type of power supplied to your home, consult your dealer or local power company.
zThe monitor is equipped with a three-pronged grounded plug, a plug with a third (grounding) pin. This plug will fit only into a grounded power outlet as a safety feature. If your outlet does not accommodate the three-wire plug, have an electrician install the correct outlet, or ground the appliance safely. Do not defeat the safety purpose of the grounded plug.
zUnplug the unit during a lightening storm or when it will not be used for long period of time. This will protect the monitor from damage due to power surges.
zDo not overload power strips and extension cords. Overloading can result in fire or electric shock.
zNever push any object into the slot on the monitor cabinet. It could short circuit parts causing a fire or electric shock. Never spill liquids on the monitor.
zDo not attempt to service the monitor by yourself; opening or removing covers can expose you to dangerous voltages and other hazards. Please refer all servicing to qualified service personnel.
zTo ensure satisfactory operation, use the monitor only with UL listed computers which have appropriate configured receptacles marked between 100 - 240V AC, Min. 5A.
zThe wall socket shall be installed near the equipment and shall be easily accessible.
zFor use only with the attached power adapter (Output 12Vdc) which have UL, CSA listed license
2

SPECIAL NOTES ON LCD MONITORS
The following symptoms are normal with LCD monitor and do not indicate a problem.
NOTES
•Due to the nature of the fluorescent light, the screen may flicker during initial use. Turn off the Power Switch and then turn it on again to make sure the flicker disappears.
•You may find slightly uneven brightness on the screen depending on the desktop pattern you use.
•The LCD screen has effective pixels of 99.99% or more. It may include blemishes of 0.01% or less such as a missing pixel or a pixel lit all of the time.
•Due to the nature of the LCD screen, an afterimage of the previous screen may remain after switching the image, when the same image is displayed for hours. In this case, the screen is recovered slowly by changing the image or turning off the Power Switch for hours.
BEFORE YOU OPERATE THE MONITOR
FEATURES
•43.2cm(17”) TFT Color LCD Monitor
•Crisp, Clear Display for Windows
•Recommened Resolutions: 1280 X 1024 @60Hz
•EPA ENERGY STAR®
•Dual Input (DVI + Analog) (Only Dual-Input Model)
•Ergonomic Design (TCO’99 Approved)
•Space Saving, Compact Case Design
CHECKING THE CONTENTS OF THE PACKAGE
The product package should include the following items:
1.LCD Monitor
2.Owner's Manual
3.Power Cord
4.External Adapter
5.15-pin D-Sub Cable
6.DVI Cable (only Dual-Input Model)
7.Audio Cable
3

POWERCORD
Power Source:
1.Make sure that the power cord is the correct type required in your area.
2.This LCD monitor has an External universal power supply that allows operation in either 100/120V AC or 220/240V AC voltage area (No user adjustment is required.)
3.Connect the AC-power cord into your LCD monitor’s DC-power-input. The ACpower cord may be connected to either a wall power outlet or the power outlet socket on your PC, depending on the type of power cord supplied with your LCD monitor.
NOTES
A certified power supply cord has to be used with this equipment. The relevant national installation and/or equipment regulations shall be considered. A certified power supply cord not lighter than ordinary polyvinyl chloride flexible cord according to IEC 60227 (designation H05VV-F 3G 0.75mm2 or H05VVH2-F2 3G 0.75mm2) shall be used. Alternative a flexible cord be of synthetic rubber according to IEC 60245 (designation H05RR-F 3G 0.75mm2) shall be used.
Installing the wall mounting bracket (not included)
This monitor display can be connected to the wall mounting bracket that is sold separately. Please see the following diagram for information on how to disconnect it from the power cable and fold the monitor:
Installation of the wall mounting bracket is as follows:
1.Place the wall mounting bracket on the underside of the monitor. Attach to monitor through the holes in the bracket and on the underside of monitor;
Attach (7.5cm X 7.5cm) as shown in figure a.
2.Place four screws into the holes as shown and tighten;
3.Re-connect the cable. For instructions on how to attach the monitor to the wall,
see the Users’ Manual included with the wall mounting bracket;(This product is not provided with wall mounting bracket, which is sold seperately)
4.Fighre b shows how the bracket should sit against the wall;
a |
b |
|
4 |
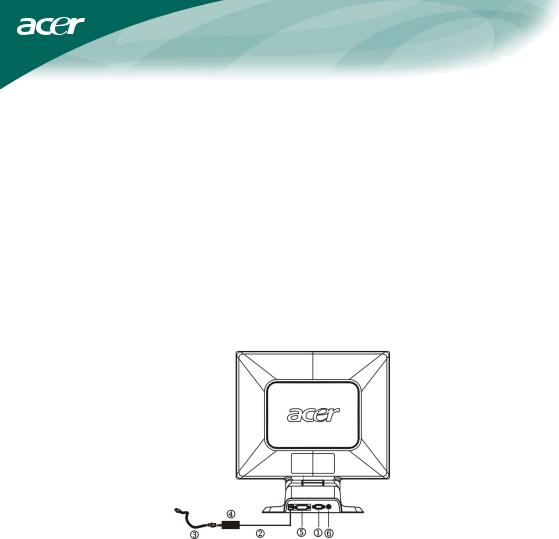
CABLE CONNECTIONS
Turn off your computer before performing the procedure below.
1.Connect the power adapter dc cable to the DC-In port on the back of the monitor.
2.Connect one end of the 15-pin D-Sub cable to the back of the monitor and connect the other end to the computer’s D-Sub port.
3.(only Dual-Input Model)Connect one end of the 24-pin DVI cable to the back of the monitor and connect the other end to the computer’s DVI port.
4.Connect the audio cable between the monitor's audio input and the PC's audio output (green port).
5.Plug the power cable of your monitor into a nearby outlet. Plug the other end of the power cord into the power adapter.
6.Turn on your monitor and computer.
|
Figure 1 |
Connecting Cables |
||
|
|
|
|
|
1. |
D-SUB Cable |
|
4. |
External Adapter |
2. |
DC-Jack Power Cable |
|
5. |
DVI Cable |
3. |
AC Power Cord |
|
6. |
Audio cable |
5
 Loading...