


 Loading...
AcerPower series
User's Guide
Copyright© 2005 Acer Incorporated
All Rights Reserved
AcerPower series
User's Guide
Changes may be made periodically to the information in this publication without obligation to notify any person of such revisions or changes. Such changes will be incorporated in new editions of this manual or supplementary documents and publications. This company makes no representations or warranties, either expressed or implied, with respect to the contents hereof and specifically disclaims the implied warranties of merchantability or fitness for a particular purpose.
Record the model number, serial number, purchase date, and place of purchase information in the space provided below. The serial number and model number are indicated on the label affixed to your computer. All correspondence concerning your unit should include the serial number, model number, and purchase information.
No part of this publication may be reproduced, stored in a retrieval system, or transmitted, in any form or by any means, electronically, mechanically, by photocopy, recording, or otherwise, without the prior written permission of Acer Incorporated.
Model number: __________________________________
Serial number: ___________________________________
Purchase date: ___________________________________
Place of purchase: ________________________________
Acer and the Acer logo are registered trademarks of Acer Inc. Other companies' product names or trademarks are used herein for identification purposes only and belong to their respective companies.
System tour |
1 |
Front panel |
1 |
Rear panel |
1 |
System features |
2 |
Performance |
2 |
Multimedia |
2 |
Connectivity |
2 |
System peripherals |
2 |
Mouse (PS/2 or USB, manufacturing option) |
3 |
Keyboard (PS/2 or USB, manufacturing option) |
3 |
Speakers |
3 |
Setting up your computer |
4 |
Necessary to know before setup |
4 |
Selecting a location |
4 |
Opening the package |
4 |
Connecting peripherals |
5 |
Starting your computer |
5 |
Shutting down your computer |
5 |
System upgrade |
6 |
Opening the computer |
6 |
Setting up new components |
6 |
Troubleshooting |
7 |
Taking care of your computer |
9 |
Important tips |
9 |
Cleaning and servicing |
9 |
To clean your computer and keyboard |
9 |
To clean your pointing device |
10 |
To clean your optical mouse |
10 |
To clean your monitor |
10 |
When to contact a service technician |
10 |
Asking for technical assistance |
10 |
ENERGY STAR guidelines compliance |
11 |
Declaration of conformity for EU countries |
11 |
Modem notices |
11 |
TBR 21 |
11 |
Important safety instructions |
11 |
Lithium battery statement |
13 |
Laser compliance statement |
14 |
Declaration of conformity for CE marking |
15 |
Federal Communications Comission |
|
declaration of conformity |
17 |
Contents
25
menDisposal instruction
Do not throw this electronic device into the trash when discarding. To minimize pollution and ensure utmost protection of the global environment, please reuse and recycle it.
USA
For electronic products containing an LCD/CRT monitor or display:
Lamp(s) inside this product contain mercury and must be recycled or disposed of according to local, state or federal laws. For more informatin, contact the electronic industries alliance at www.eiae.org. For lamp-specific disposal information, check www.lamprecycle.org.
1
System tour
Your computer consists of the following:
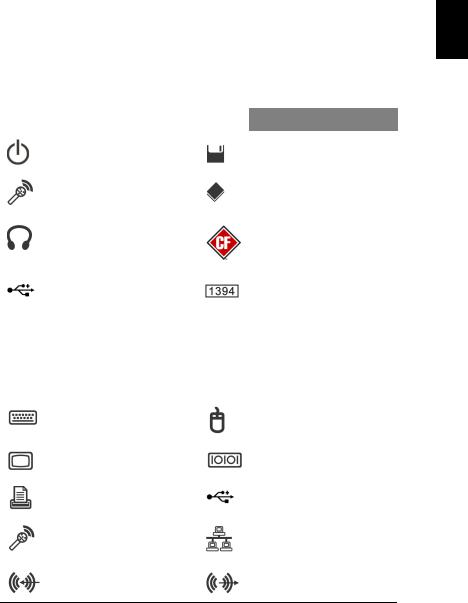
Front panel
Icon |
Description |
Icon |
Description |
|
|
|
|
|
Power button |
|
Floppy drive |
|
|
|
(selected models only) |
|
|
|
|
|
Microphone jack |
|
Optical drive |
|
|
|
(selected models only) |
|
|
|
|
|
Speaker or |
|
Media card reader |
|
headphone jack |
|
(selected models only) |
|
|
|
|
|
USB port |
|
IEEE 1394 port |
|
|
|
(selected models only) |
|
|
|
|
Rear panel
Icon |
Description |
Icon |
Description |
|
|
|
|
|
PS/2 keyboard connector |
|
PS/2 mouse connector |
|
|
|
|
|
VGA port |
|
Serial port |
|
|
|
(selected models only) |
|
|
|
|
|
Printer connector |
|
USB port |
|
|
|
|
|
Microphone-in jack |
|
RJ-45 Ethernet connector |
|
|
|
|
|
Line-in jack |
|
Line-out / Speaker-out |
|
|
|
jack |
English
Remark: All images are for reference purposes only. Actual configuration may vary.

English
2 |
System tour |
System features
Performance
•Intel® mainstream high-performance processor
•Expandable system memory
•Power management functionality
•3.5" inch floppy drive (optional)
•Multimedia card reader (optional)
•CD-ROM, DVD-ROM, CD-RW (52X/24X), DVD/CD-RW combo or DVD writer (optional)
•High-capacity, PATA / SATA HDD (optional)
•Supports USB 2.0 high-performance peripherals
Multimedia
•Stereo-surround audio system via onboard audio controller
•Audio-in/line-in, audio-out/line-out, headphone-out and external microphone-in jacks
Connectivity
•Two PS/2 ports for keyboard and mouse
•One parallel port
•USB 2.0 ports (two front, others rear)
•High-speed V.92, 56K fax/data modem (optional)
•Ultra-fast Ethernet connection
System peripherals
The AcerPower series computer consists of the system itself and system peripherals, like a mouse, keyboard, and a set of speakers (all optional). This section provides a brief description of basic system peripherals.

3
Mouse (PS/2 or USB, manufacturing option)
The included mouse is a standard two-button wheel mouse. Connect the mouse to the PS/2 mouse port or USB port on the back panel of the system.
Keyboard (PS/2 or USB, manufacturing option)
Connect the keyboard to the PS/2 keyboard port or USB port on the back panel of the system.
Speakers
For systems bundled with speakers, before powering on the system, connect the speaker cable to the audio-out (external speaker) port on the back panel of the system.
English
Note: All images are for reference purposes only. Actual configuration may vary.
Loading...