


PLEASE DO NOT MAKE ILLEGAL COPIES OF THIS
SOFTWARE.
The software you are using was produced through the efforts of many people: designers, artists, programmers, distributors, retailers, and other dedicated professionals. The costs of developing this and other software programs are recovered through software sales. The unauthorized duplication of personal computer software raises the cost to all legitimate users.
This software is protected by federal copyright law. Copying software for any reason other than to make a backup is a violation of this law. Individuals who make unauthorized copies of software may be subject to civil and criminal penalties.
Harpoon IITM
Three-SixtyTM
Copyright©1995IntraCorp,Inc.Miami,Fl.
AllRightsReserved
Harpoon®is a registered trademark of GDW Inc. BattleSet® is a registered trademark of ACSI.
MicrosoftTM and WindowsTM are trademarks of Microsoft Corp.

Table ofContents |
|
Credits.......................................................... |
iii |
Introduction .................................................. |
ix |
Table ofContents......................................... |
xiii |
Part One: Operating Instructions ................. |
1 |
Overview.............................................................. |
3 |
About this Manual ............................................ |
4 |
For the PC User................................................ |
5 |
For the MacintoshTM User .................................. |
5 |
Attention New Harpoon User!............................ |
6 |
For New and Veteran Harpoon Users ................. |
6 |
Interface Basics .................................................... |
9 |
Menu Buttons .................................................. |
9 |
Toolbar Buttons ............................................... |
9 |
Tutorial............................................................... |
1 5 |
Lesson I: Orientation ..................................... |
21 |
Lesson II: Course & Speed............................. |
4 1 |
Lesson III: Using Sensors ............................... |
49 |
Lesson IV: Using Weapons ............................. |
59 |
Lesson V: Submarine Operations ................... |
69 |
Lesson VI: Air Operations............................... |
7 3 |
Lesson VII: Using the Mission Editor .............. |
79 |
Lesson VIII: The Formation Editor ................... |
89 |
Reference Section............................................... |
95 |
Pull-down Menu Selections ............................. |
97 |
PC or Apple............................................... |
97 |
About Harpoon II ................................... |
97 |
xiii

Harpoon II |
|
|
|
|
|
|
F i l e........................................................ |
|
|
|
|
|
97 |
Open |
.................................................. |
|
|
|
97 |
|
Save |
.................................................. |
|
|
|
98 |
|
Save |
As |
............................................ |
|
|
98 |
|
Load |
BattleSet ................................ |
98 |
||||
Difficulty |
Levels............................ |
98 |
||||
Resign............................................. |
|
|
|
103 |
||
Quit................................................. |
|
|
|
|
103 |
|
Settings.............................................. |
|
|
|
|
104 |
|
Start/Resume |
or Pause .............. |
104 |
||||
Time |
Compression....................... |
104 |
||||
Toggle Rng/Bearing [ON/OFF ]... |
104 |
|||||
Set |
Flagship ................................. |
|
105 |
|||
Edit |
|
Waypoint |
Orders.................. |
105 |
||
Colors ............................................. |
|
|
|
105 |
||
Symbol |
Set .................................... |
|
109 |
|||
Setting |
Game |
Preferences ......... |
109 |
|||
Missions ............................................. |
|
|
|
113 |
||
Creating |
|
a Mission ...................... |
114 |
|||
Edit |
Mission ................................. |
|
122 |
|||
Window |
............................................... |
|
|
|
126 |
|
Game |
Status ................................. |
|
126 |
|||
Unit |
Status .................................... |
|
126 |
|||
Platform |
|
Display......................... |
126 |
|||
Order |
of |
Battle ............................ |
127 |
|||
Legends |
.......................................... |
|
|
127 |
||
Memory |
|
Remaining....................... |
128 |
|||
Messages ........................................ |
|
128 |
||||
Current |
Orders ............................. |
128 |
||||
Scenario |
|
Info ............................... |
|
128 |
||
Toolbar |
Buttons..................................... |
|
129 |
|||
Zoom |
In ............................................... |
|
|
|
129 |
|
Zoom |
Out............................................. |
|
|
|
129 |
|
xiv |
|
|
|
|
|
|
Table ofContents
|
|
|
|
|
|
Creating Zoom |
..................Windows |
129 |
|
||
Track |
Unit/Group ............................. |
|
130 |
|
|
Map |
Preferences |
|
130 |
|
|
Attack ................................................. |
|
|
136 |
|
|
Manual |
Engagements ................... |
136 |
|
||
Close-to-Attack.......................... |
|
137 |
|
||
Bearing |
Only |
Attacks .................. |
138 |
|
|
Surface-to-Surface Missiles.... |
139 |
|
|||
Air-to-Air Missiles.................... |
139 |
|
|||
Surface-to-Air Missiles............ |
139 |
|
|||
Anti-Radiation |
Missiles ............ |
139 |
|
||
Torpedoes ...................................... |
|
140 |
|
||
Aircraft |
Guns............................... |
|
140 |
|
|
Naval Gunfire ............................... |
|
140 |
|
||
Air |
Intercepts.............................. |
|
141 |
|
|
Automatic Engagements............. |
141 |
|
|||
Active & Passive Counter-measures |
|||||
141 |
|
|
|
|
|
Sensors ............................................... |
|
|
142 |
|
|
Active |
Sensors ............................ |
|
142 |
|
|
Passive |
Electronic Support Measures |
||||
143 |
|
|
|
|
|
Intermittent .................. |
Setting |
143 |
|
||
Passive |
Sonar .............................. |
|
144 |
|
|
Electronic Counter-Measures (ECM) |
|||||
144 |
|
|
|
|
|
Communications .......................... |
|
144 |
|
||
Sonobuoys ...................................... |
|
144 |
|
||
Dipping |
Sonar............................... |
|
145 |
|
|
Navigation.......................................... |
|
|
146 |
|
|
Speed/Altitude/Depth..................... |
147 |
|
|||
Air Operations ................ |
Ops) |
148 |
|
||
Ready |
Aircraft............................. |
|
148 |
|
|
xv

Harpoon II |
|
|
|
|
|
|
Launching |
Aircraft...................... |
149 |
||||
Landing |
|
Aircraft.......................... |
|
149 |
||
Manual |
Air |
Interception............. |
149 |
|||
Air Interception |
Missions ......... |
150 |
||||
Manual |
Air |
Strikes ...................... |
150 |
|||
Mission Editor Strike Missions 150 |
||||||
Aerial |
Re - fueling ........................ |
|
150 |
|||
Using the |
Formation |
Editor............ |
151 |
|||
Logistics |
............................................ |
|
|
|
|
155 |
Underway ........... |
|
Replenishment |
155 |
|||
Magazine ................... |
Allocation |
156 |
||||
Reloading ......................... |
|
Mounts |
|
156 |
||
Nav Zones ........................................... |
|
|
|
|
|
157 |
Create a ........................ |
Nav |
Zone |
|
157 |
||
Editing ....................... |
a |
Nav |
Zone |
158 |
||
Technical ............................... |
Notes |
|
|
161 |
||
PART TWO: Guide to Naval Warfare ... 171
Author's |
Introduction .............................. |
173 |
|||
Mission |
Planning........................................ |
175 |
|||
The Order |
of |
Engagement......................... |
181 |
||
Formation |
and |
Stationing |
Considerations185 |
||
The Electronic |
Battlefield ...................... |
193 |
|||
Anti-Submarine |
Warfare ......................... |
205 |
|||
Commanding |
Submarines ......................... |
219 |
|||
Strike |
Warfare |
........................................... |
227 |
||
Anti-Air |
|
Warfare....................................... |
241 |
||
Anti-Surface |
Warfare.............................. |
253 |
|||
Glossary ...................................................... |
|
|
|
261 |
|
Technical |
Support...................................... |
279 |
|||
Index ............................................................ |
|
|
|
|
283 |
xvi |
|
|
|
|
|

Overview
Welcome Aboard!
You are about to take command of the awesome power of modern naval and air forces. If you are new to Harpoon then there is much to learn to successfully command these forces under the most difficult scenarios. If you are a seasoned “Harpooner,” we believe we have put together an experience that, like the first computer Harpoon, will provide you with thousands of hours of entertainment and challenging modern conflict. Harpoon II has plenty of things the veteran Harpoon user will find familiar, and yet there are many new features that will demand both your attention and newly acquired familiarity.
Not Just a Game
This is more than just a game. It is a simulation that accurately represents the capabilities and limitations of modern naval and air forces. A painstakingly detailed labor of love went into providing Harpoon II with the most accurate data that can be obtained from open or unclassified sources. You will not find another entertainment product on the market that has the amount of data contained in the
Harpoon II database.
Flexibility of Interface
One of the most striking things about Harpoon II is the use of a windowing interface. Using this interface will provide you with the flexibility to arrange the layout of your tactical display suit to your own particular needs and tastes. You may choose to display either one or multiple windows at the same time. Each window can be resized or “iconized” for later viewing by a simple double-click of the mouse. Each window has its own display preferences settings so you can have one window containing terrain and depth information, while another window displays weather information. There are many combinations available. There is an enormous amount of information in a Harpoon II scenario; the unprepared may easily become overwhelmed. Your use of the interface to create a screen layout will make obtaining and managing the information easier. The interface gives you the versatility to customize the game display and set the level of detail that best suits your style of play and the tactical
situations at hand.
Do your Homework!
The dedicated efforts of many people went into making this product the most accurate and exciting simulation you can run without
3
Harpoon II |
Operating Instructions |
|
|
security clearance. Harpoon II is not difficult to play. It is, however, a challenge to play Harpoon II well. While we want you to start enjoying the experience right away, we heartily recommend taking some time to become familiar with the manual before you set sail for the new challenges that await you. You will be a more proficient commander if you log a few hours doing the head work necessary to be the cool, confident, modern commander required to meet the contingencies and conflicts found in Harpoon II. As mentioned above, with the vast amount of information that you will receive as you command your forces, it is not uncommon to become overwhelmed. The greater your familiarity with the interface, and the custom features it offers, the better prepared you will be to lead your forces to the successful completion of the mission objectives.
About this Manual
This manual is divided into two parts. Part One contains the Operating Instructions. These instructions include both the Tutorial, and the Descriptive Instructions. Both provide detailed information on how to use the Harpoon II interface. Part Two is the Guide to Naval Warfare. This guide is a comprehensive reference source that will give the user an orientation into the complexity of modern naval warfare.
Included in the Operating Instructions is a step-by-step tutorial that will get you up and running Harpoon II by taking you through a series of basic scenarios. The tutorial will give the user the opportunity to become familiar with utilizing the interface, commanding units, and using the vast platform database to make informed tactical decisions.
It is recommended you take a moment to, at the very least, read through the tutorial to become familiar with the interface and the use of the toolbar. The tutorial has been designed to provide you with a working knowledge of the most important basic commands. Veteran Harpoon users should not view using the Tutorial as a “demotion,” instead it is a wise investment of your time and will make you a better commander.
After you have read through the Tutorial, you may then decide whether you desire to actually run the tutorial scenarios or skip them and dive into the first tactical scenario. We recommend reading the
Guide to Naval Warfare at your leisure, using it to hone your tactical skills. The Guide was written by a former Naval Officer with years of experience. Investing the time in study could make the difference
4

Overview
once you find yourself on the simulated high seas.
For the PC User
For the PC, most of the Harpoon II interface can be utilized with your mouse and the toolbar. All mouse clicks described in this manual refer to a click with the left mouse button. The only exception is the use of the right mouse button to center the map display on whatever point you click using the right mouse button. In addition to the toolbar, major commands can also be given using the keyboard. A guide to the keyboard commands can be found on the Harpoon II Command Card. In addition, 'PC Only' symbols are placed in the manual next to items that apply only to those users with a PC version of Harpoon II.
For the Macintoshtm User
For the Macintoshtm, most of the Harpoon II interface can be utilized with your mouse and the toolbar. The only exception is the use of the Option key and the mouse button simultaneously to center the map display on whatever point that you click. In addition to the toolbar, major commands can also be given using “hot keys”; individual or combination keys on your keyboard. A guide to the keyboard commands can be found on the Harpoon II Command Reference Card. Also, 'Mac Only' symbols can be found next to items that apply only to those users with the MacintoshTM version of Harpoon II .
Attention New Harpoon User!
Welcome to the exciting world of modern naval warfare. We hope you enjoy Harpoon II and that you too will find yourself spending many hours commanding contemporary naval and air forces. To be a successful Harpoon II commander, it is important for you to invest time to become familiar with how the interface for Harpoon II works. Just as important is learning the tactics required to bring about the successful completion of the missions that await you. Because Harpoon II is a complex simulation, learning how to access and use the information that will be made available to you as you play is paramount to your success. Be sure to familiarize yourself with how
to give commands to your forces. Modern naval warfare is often
PC Only
symbol
Macintosh Only
symbol
5
Harpoon II |
Operating Instructions |
|
|
described as “hours of boredom, interrupted by moments of stark terror.” Use those “hours of boredom” to improve the flow of information or “intelligence” required to make your “Commander’s estimate of the situation.” Doing this will better prepare you for when those “moments of stark terror” arrive. And trust us, those moments
are going to arrive!
View yourself as a naval officer assuming a new command. Become familiar with your forces. Know your capabilities. Equally important is becoming familiar with the capabilities of the enemy. Harpoon II provides an extensive platform database containing detailed information about the capabilities of every platform (surface vessel, submarine, or aircraft) used in the game. In Harpoon II, as in real life, it is often true that victory goes to the commander that “gets there first with the most.” A successful commander has to also know how and when to use “the most.” Before using your firepower, it is wise that you have the best information about your situation and the situation(s) surrounding you. Those familiar with current events know this may mean the difference between destroying a threatening enemy contact or shooting down an unarmed civilian airliner.
For New and Veteran Harpoon Users
If you are a veteran of the first computer Harpoon we believe you will be very pleased with what we have accomplished with Harpoon II . Besides the interface, another noticeable feature of Harpoon II that differs from its predecessor are the maps. The maps in Harpoon II are vector-generated and are based upon data obtained from a variety of government agencies from several nations, including the Central Intelligence Agency, the Defense Mapping Agency, and the National Oceanic and Atmospheric Administration. These maps are very accurate and when future BattleSets and the Harpoon II Scenario Editor are released, players will see even more versatility from the Harpoon II mapping routines. We are no longer limited to one specific region of the world as was the case in each of the original computer Harpoon BattleSets.
The database for Harpoon II is extensive. Every ship, submarine, aircraft, weapon, and sensor in the database is made up of individual propulsion, mount, and warhead components. The entire database is cross-referenced so that the database of available platforms for the Harpoon II Scenario Editor increases every time you purchase a new Harpoon II BattleSet. We put a great amount of effort and
planning into the Harpoon II database. To obtain the amount of data
6

Overview
available to you in Harpoon II by other means would cost you thousands of dollars and take hundreds of hours of research.
The data is used by the complex and realistic modeling to determine movement, sensor detection and performance, weapon effectiveness and the adjudication of hits, damage, and kills.
Weapons and sensors are not the only things modeled in Harpoon II. Nature itself is part of the Harpoon II modeling. Realistic weather conditions are represented in the simulation as wind & sea state, precipitation, and cloud cover.
Harpoon II introduces the use of neutral and unknown contacts. Unlike the first computer Harpoon, you will now make contact with other platforms (a platform is a ship, aircraft, or submarine) but will not know their identity unless you improve your visual or electronic means of detection. Many of the scenarios contain neutral civilian ship and aircraft traffic that may be operating in your area. This adds a degree of realism and will challenge your decision-making process.
You will find there is less “micro-management” required in Harpoon II. Your ships, subs, and aircraft can be assigned to missions providing them with mission profiles that are based upon their abilities and the threat situation. This allows you to give the orders and watch what happens. Of course, you can intervene at anytime and give orders to individual platforms as you see fit.
We have also introduced logistics elements to the game. You can no longer expect to have an unlimited supply of ordnance and fuel. If your aircraft land at a base that does not have the type of ordnance your planes require then they will probably just be making a fuel stop. Conventional ships (non-nuclear powered) can now be refueled and replenished at sea. Fuel and ordnance supplies are not unlimited and are factors to be considered during operations. For air operations, the capability for aerial refueling has been included with Harpoon II .
7
Harpoon II |
Operating Instructions |
|
|
8
Interface Basics
Interface Basics
In order to make Harpoon II easier to use, we gave it a windowing interface. If you are familiar with windowing interfaces (like Microsoft_ WindowsTM or MacintoshTM interfaces), you might want to skip this section. If you haven’t used windowing interfaces before,
read on.
Menu Buttons
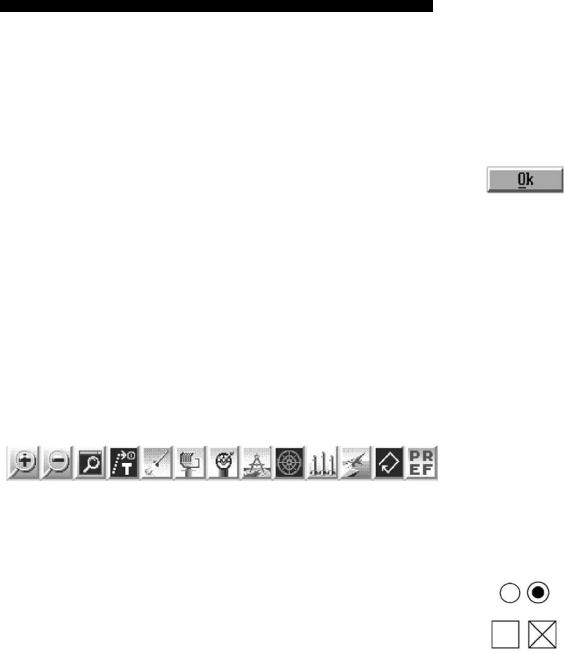
Buttons are raised areas (actually, they are drawn to look raised) on the screen. They generally represent options available to you within that window or box. For example, the only button in some dialog boxes is the one labeled OK, because all you can do is acknowledge that you have received the information. By contrast, the zoom map windows have multiple buttons to control game functions.
Toolbar Buttons
Each map window in Harpoon II has a row of colored buttons along the top of the map. These toolbar Buttons are used to issue a variety of orders to your groups, units, or bases as well as provide visual information for each map. Use of each toolbar Button differs slightly.
Each button will be explained later in this manual.
Toolbar Buttons
Radio Buttons/Check Boxes
Many of the dialog boxes and windows in Harpoon II use radio buttons and check boxes to enable certain game options. Unlike Menu and Toolbar buttons, Radio buttons and Check boxes have two states:
selected and non-selected.
Mouse Basics
In the interest of making the rest of this manual easier to
MenuButton
Radio Buttons
Check Boxes
9
Harpoon II |
Operating Instructions |
|
|
read, we need to define a few basic mouse concepts.
Click
When we talk about a mouse click, we mean quickly pressing the mouse button and letting it go. In Harpoon II (and other windowing applications), this is generally the method for selecting an item from a menu or marking a point on a map. You don’t need to worry about holding down the mouse; how long it takes to make the click doesn’t matter. For the PC all clicks are made with the left mouse button with the exception of map centering which uses a right mouse click. MacintoshTM uses Option-click to center the map.
Double-Click
A double-click is two clicks as fast as you can do it. In Harpoon II, double-clicks serve several purposes. As in other windowing programs, double-clicking in a window’s upper left corner closes the window (except on MacintoshTM computers, where one click will suffice). Most menu selections will allow you to double-click to highlight the particular selection and simultaneously select it, thus eliminating the need to hit another button such as an OK or CANCEL button. Also, double-clicking on a target finishes the targeting procedure for all appropriate functions (from assigning
attacks to landing aircraft).
Drag
A drag is performed by holding down the mouse button and moving the mouse to a new location. Generally, this operation is used for making a user-defined box (like a Zoom Map - see below) or drag-selecting several units. A Drag can also be used to move an Icon or a Window, both of which will be explained in detail below.
Mouse Pointer
The mouse pointer (generally an arrow) changes shape at different times to indicate different modes. Thus, when you are choosing a target for an attack, the mouse pointer will look like a targeting crosshair, while at other times it will be the traditional arrow, a pointer finger, or one of several other possibilities.
10

Interface Basics
Hot Keys
Although the use of a mouse is required to play Harpoon II, many commands and options may be selected using the keyboard. Throughout this manual the use of individual keystrokes and combinations of keystrokes are referred to as “hot keys.” Some of the hot keys differ between PC and MacintoshTM. The Harpoon II Command Card has been provided with a list of every hot key and toolbar button. Please review this card to become familiar with the hot keys for your type
of computer.
Windows
A window is a rectangular area of the screen bounded by a border. To differentiate it from a box, a window is sizable (that is, you can change its size).
Window Size and Re-sizing
To change the size (and shape) of a window, move the mouse cursor to the edge of the window; when the cursor changes to a split arrow, hold down the mouse button and drag the edge of the window to where you want it. You can also change the size of a window by clicking on the up arrow in the upper-right corner; doing so will enlarge the window to its maximum size. If you want to restore a window to its former size after you’ve enlarged it, click on the button in the upper right corner with both up and down arrows. Note that when changing the size of the Main Map window it will stay proportional at all times since it represents the entire scenario map area. Zoom and Tracking windows behave differently as you will see later in the tutorials.
Closing Windows
To close a window, double-click on the bar in the upper left corner. Note that there is no close button on the Main Map Window since
it can’t be closed.
Moving Windows
To move a window, move the mouse cursor to the title bar, hold down the mouse button, and drag the window wherever you would like the window placed. Release the mouse button when the window is in the area you desire. You should be careful about
dragging a window too far off to the edge of the screen; once you
Mouse Pointers
Window
11

Harpoon II |
Operating Instructions |
|
|
do so, it will become difficult to manipulate it any longer. Also, if you encounter a situation where one window covers another
there are five ways to gain access to the window “underneath”:
•Closethecoveringwindow.
•Movethecoveringwindow.
•Sendthecoveringwindowtoanicon.
•Clickonaportionofthecoveredwindowto bringittothefront.
•UsetheWindowpull-downmenuandselect themenuiteminthelowerportionofthe menulistthatbearsthenameofthewindow thatiscovered.
Iconizing or Minimizing Windows
To reduce a window to an icon, click on the down arrow in the upper right corner. An icon will appear bearing the name that was in the title bar of the window. You can then drag this icon to some out-of-the-way spot for later use by clicking on it and dragging it to the new location.
 TheMacintoshtminterfacedoesnotsupporttheiconizingorminimizing
ofwindows.
Icons
Icons are reduced, miniature windows that you can arrange on the screen to keep useful information out of the way but still at hand. For example, if you create a window around a unit to closely follow its course, you could then iconize that window and move the icon into a corner of the screen - nicely out of the way. When you want to see that window again, double-click on it to restore it to its former size and screen placement.
Enlarging Icons
To restore an iconized window, double click on the icon. The window will reappear in its original location.
12
Interface Basics
Dialog Boxes
A dialog box is a fixed area of the screen bounded by a rectangle. Unlike a window, a dialog box is not sizable, and often it is not moveable either. In Harpoon II , dialog boxes give you information from your staff, allow you to give orders to your units, and allow you to modify game settings like time compression.
Selecting
To do almost anything in Harpoon II, you have to select some item (a window, a unit, a menu choice, etc.). To select an item, move the
mouse cursor to that item and click the mouse button once.
Selecting Multiple Items
A special case of selecting items is Harpoon II’s ability to allow you to select multiple items (units, groups, bases, and reference points). Harpoon II allows you to use two methods of selecting multiple items. First, you may drag a rectangle around all the items in an area; all of the items will be selected (though only appropriate ones will be included in the action). Second, you can use the mouse pointer and the shift key to select multiple targets. To do so, hold down the shift key and click on each item you want to select; then double-click while holding the shift key down on the last item. This method is useful for selecting some items in a crowded area with many items (units, bases, or reference points). Shift-click can also be used to deselect individual items
as well.
Icon
Dialog Box
13
Harpoon II |
Operating Instructions |
|
|
14

Tutorial
Tutorial
The Harpoon II Tutorial has been designed to take you through a series of lesson scenarios. These lessons will familiarize you with the interface while demonstrating how to use each command and menu function in Harpoon II. The Harpoon II Tutorial is a wise investment of your time. We understand that you are anxious to start playing and we have designed the Tutorial so that you may learn while you play.
Running Harpoon II
If you have not already installed Harpoon II, we recommend you do so now. Consult the Installation Instructions. Begin the lessons by running the Harpoon II executable file. Harpoon II was installed in either the HARPOON2 sub-directory for PC, or the HARPOON II Folder for the MacintoshTM. Once Harpoon II has loaded and the title screen and credits have passed, you will see the BattleSet/Scenario Selection Screen. This screen is used to select the BattleSet and scenario you wish to play during the current Harpoon II session.
Selecting the Tutorial
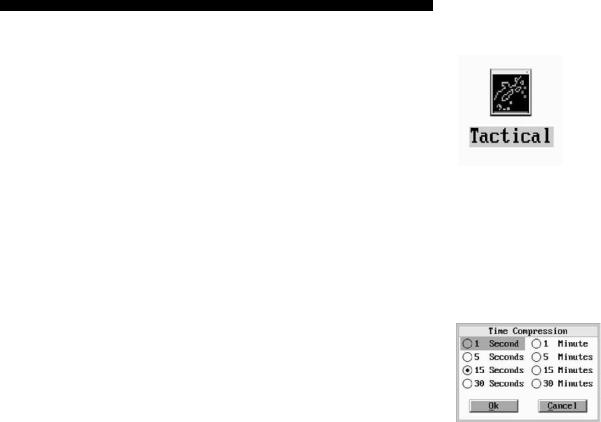
Select the Tutorial by placing the mouse cursor on the word “Tutorial” and clicking with your left mouse button
 MacintoshTM userssimplyclickthesinglemousebutton.
Tutorial Scenarios
Once you have selected the Tutorial from the Scenario Selection dialog box, you will see a set of Lesson Scenarios displayed to the right side of the dialog box. Each of these lessons focuses on a particular series of commands and functions in Harpoon II .
The following are the Tutorial Lessons for Harpoon II:
Lesson I: |
Orientation |
17

Harpoon II |
|
|
|
Operating Instructions |
|
|
|
|
|
|
|
Lesson |
II: |
Course |
and |
Speed |
|
Lesson |
III: |
Using |
Sensors |
||
Lesson |
IV: |
Using |
Weapons |
||
Lesson |
V: |
Submarine |
Operations |
||
Lesson |
VI: |
Air |
Operations |
||
Lesson |
VII: |
Using |
the |
Mission Editor |
|
Lesson |
VIII: |
The |
Formation Editor |
||
Loading a Scenario
We will start with Lesson I: Orientation . Select the first scenario of the tutorial by either double-clicking on the scenario name or by clicking once on the scenario name and then once on the OK button located in the lower left area of the Scenario Selection dialog box.
Scenario Load Status
While the scenario is loading watch the Incoming Message Window to see the various portions of the scenario as they are loaded into the computer’s memory.
Cross Platform Loading and Saving
Harpoon II supports cross-platform loading and saving. Scenarios and saved game files can be opened and saved on either the PC or the MacintoshTM. NOTE: Attempting to load a game saved from a scenario that was part of a Battleset you do not own will produce unpredictable results.
Choosing Sides
Once the scenario has loaded, you will be asked to choose sides. Click on Good Guys.
Setting Difficulty Level
Press the Difficulty button to set the level of difficulty for the scenario you will be playing.
On the PC, You have four choices:
18

Tutorial
•Easy Beginnersettings
•Average Novicesettings
•Hard Expertsettings
•Default Userdefinedsettings
•Custom Modifiesdifficultysettings
The initial setting for Harpoon II is Default. For this tutorial select Easy and then OK. A more detailed explanation of Difficulty Levels and how to customize your default settings can be found in the
Reference Section.
 OntheMacintoshTMversionthereisaDifficultySettingsdialogboxthat allowsyoutotoggletheindividualdifficultysettings.SelectingOKsaves thosesettingstoapreferencesfile,whichwillthenbeusedeachtimethegame isplayed.
Macintosh Difficulty Settings Dialog box
Viewing Orders
After selecting your side and setting difficulty level, it is time to review your orders. Take a moment to read the scenario orders on the right side of the Side Selection window. You can use the scroll bar at the side of the orders window to read all of the orders. These
orders can also be viewed at anytime while you are playing the game. Once you have reviewed your orders, click on OK.
19
Harpoon II |
Operating Instructions |
|
|
20

Tutorial Lesson I: Orientation
Lesson I: Orientation
Now that you have selected your side, examined your orders, and the scenario has been loaded, it is time to become familiar with the
Harpoon II screen and the components of the interface.
Main Window
The Main Window depicts the entire map area of the scenario. In the Lesson I scenario the Main Window is currently in icon form and labeled “Lesson I.” Go ahead and double-click on the icon. The window will expand and the entire map area will be displayed. For this first Tutorial scenario the only map features that are active are the coastlines and a single unit symbol. The unit represented here is the USS Lewis B. Puller. We’ll learn more about the Puller later in this lesson.
Map Preferences
Let’s go over the components of the map. The map area itself is where the ocean, coastlines, groups, units, and bases are displayed. At the top of the display area is a toolbar containing the buttons used to issue orders to your units or change the window’s features. To activate the various display options, click on the toolbar button marked PREF. This is the Map Preferences button and will display an options screen with a variety of display options which may be selected. It is important to note that you may set a combination of display preferences in each individual window. Each window may have an independent set of preferences. Use this feature to create windows containing a variety of display information. Let’s try out the various Preferences. Go ahead and select the PREF toolbar button from the Main Window. The Map Preferences box should now be in the center of your screen.
PREF Toolbar
Button
21

Harpoon II |
Operating Instructions |
|
|
Map Preferences Dialog Box
Window Name
To change the name you see displayed in the title bar of a window, click on the text field containing the current window name and type the name you desire. Go ahead and change “Lesson I” to “Lesson One” or to whatever you want to name the window. You can change the window names to whatever you want during a game to keep track of various areas, units, or groups. Be aware that large window names will not be practical when you have the map window in icon form. Use small names or abbreviations when
naming windows.
Water Depths
Water depths are represented by colored tick marks every 30 minutes of map distance. This is one-half degree or 30 nautical miles at the equator. The water depth scale is represented for three levels, sea level to 10 meters, 10 to 100 meters, and 100 to 1000+ meters. Select Water Depths and click on OK. You should now see colored tick marks representing the various depths of the ocean represented on the map. Go ahead and click the PREF button again to return to the Map Preferences window.
Click the Water Depths selection so it is turned off.
22

Tutorial Lesson I: Orientation
Land Elevations
Land elevations can be displayed in 500 meter bands starting at sea level (0 meters) and going up to 2500 meters. Each band can be represented by a colored tick mark. Like water depths, tick marks are placed in 30 minute intervals on the map. The color of the tick mark indicates the elevation for that particular area on the map. The size of the tick mark will depend on the size of the map area represented by the map window and the level at which the map is magnified. We will learn more about changing the magnification level of the map and how to determine the various altitude colors later in this tutorial. For now, select the Land Elevations box and click the OK button. You should now see various colored tick marks representing the elevations of the land masses on the map. Go ahead and click the Map Preferences button again to return to the Preferences window. We are going to leave the elevations off for now while we look at some other display features. Click the Land Elevations selection so it is turned
off.
Ice Pack Borders
To display the polar ice pack borders, click on the Ice Pack Borders selection. The ice packs will only be displayed in scenarios taking place close to the polar regions of the world. Surface ships cannot traverse across polar ice. The ice packs are represented on the map as a line similar to coastlines. Think of it as a variable coastline which changes with the seasons. Because this scenario does not take place in a polar region, ice packs can not be viewed from this first tutorial scenario. Leave this selection off (no “X” in the small square) for now.
Polar Ice Data
Polar Ice Data is provided every half-degree of map distance. When this selection is ON, the entire area defined by the Polar Ice Borders will be displayed. Leave this selection off for now.
National Borders
To display national borders on the map click on this item in the Preferences window. The selection is active if there is an “X” in the small square. Borders are represented as lines within the land masses on the map. Select this box and click on the OK button. You should notice there are now several lines representing
borders on the land masses. Now select the PREF toolbar button
23
Harpoon II |
Operating Instructions |
|
|
again to bring back the preferences listing. You can leave the borders on or off, the choice is yours.
Latitude & Longitude Lines
Latitude and longitude can be represented on any map. You can choose to have no lines, or lines at either 1, 5, or 10 degree intervals. Go ahead and try it out. When you have finished looking at the lines, select No Lines to avoid cluttering the screen as we examine other aspects of the display.
Weather Data
Harpoon II contains a global weather model that creates the weather conditions most likely to be found in the geographic region in which the scenario takes place. The following weather display choices are available:
No Weather
No weather information will be displayed on the map.
Wind & Sea State
Color coded tick marks similar to the land elevation and depth information will be displayed. The colors vary with the speed of the wind in each half degree interval.
Cloud Cover
The color tick marks represent the type of cloud cover in a given area. The categories for cloud cover are clear, scattered, partly cloudy, and overcast.
Precipitation
The color tick marks represent nine categories of precipitation. The categories include three levels of fog, three levels of rain, and three levels of snow. No precipitation is present if no tick marks are displayed.
Nav Zones
Navigation or “Nav” Zones are areas that you can designate as off-limits to all or some of your units. We will explore how to create and use Nav Zones later in the tutorial. For now, we are
24

Tutorial Lesson I: Orientation
interested in the types of Nav Zones and how to display them on the map.
Surface Threat
A Surface Threat Nav Zone will exclude all surface ships from entering the zone. Aircraft and submarines are unaffected by this type of Nav Zone. You may create, modify, or delete this
type of Nav Zone.
Sub Threat
A Sub Threat Nav Zone will exclude all submarines from entering the zone. Aircraft and ships are unaffected by this type of Nav Zone. You may create, modify, or delete this type
of Nav Zone.
Aircraft Threat
An Aircraft Threat Nav Zone will exclude all aircraft from entering the zone. Submarines and ships are unaffected by this type of Nav Zone. You may create, modify, or delete this type of Nav Zone.
General Exclusion
A General Exclusion Nav Zone will exclude all units, aircraft, ships, and submarines, from entering the zone. You may create, modify, or delete this type of Nav Zone.
Neutral
Similar to a General Exclusion Nav Zone, a Neutral Nav Zone will exclude all units, aircraft, ships, and submarines, from entering the zone. You may NOT create, modify or delete a Neutral Nav Zone. Most Neutral Nav Zones will be created when the scenario is designed and will be present from the start of the
scenario.
To display the various Nav Zones, you would select each one so an “X” appears in the boxes. There are no Nav Zones in this first lesson. We will explore their use later in the tutorial.
25
Harpoon II |
Operating Instructions |
|
|
Weapon Ranges
To display the approximate ranges of your weapons, place an “X” in the boxes next to the following:
Anti-Air Warfare (AAW)
Displays a ring depicting the approximate range of the farthest reaching AAW weapon for each platform.
Anti-Surface Warfare (ASuW)
Displays a ring depicting the approximate range of the farthest reaching ASuW weapon for each platform.
Anti-Submarine Warfare (ASW)
Displays a ring depicting the approximate range of the farthest reaching ASW weapon for each platform.
Once you have all the items selected with an “X”, click on the OK button. You should see several colored rings around the Puller
representing the approximate ranges of its weapons.
Sensor Ranges
To display the approximate ranges of your sensors, place an “X” in the boxes next to the following:
Air Search
Displays a ring depicting the approximate range of the farthest reaching AAW sensor for each platform.
Surface Search
Displays a ring depicting the approximate range of the farthest reaching ASuW sensor for each platform.
Sonar
26

Tutorial Lesson I: Orientation
Displays a ring depicting the approximate range of the farthest reaching ASW sensor for each platform.
Once you have all the sensor items selected with an “X”, click on the OK button. Since we do not have any sensors activated, the only sensor range circle that you should see is the Puller’s passive
sonar.
Range Rings and Groups
Range rings are not displayed while in group view. To view approximate range rings, make sure all desired display options are set in the Map Preferences dialog box, then press the Unit View
hot key.
Data Links
Data Links are used to relay communications, sensor, and contact information between platforms. Data links can only be established between units with operational communications equipment that are in range of one another. A data link provides the ability to “see” things from the point of view of another platform. Think of a data link system as a network of sensors and communications equipment. If you select the Data Links selection, the links will be represented by thin lines between the data link capable platforms on your side. We will take a look at data links later in the tutorial when we have more platforms on the map. Go ahead and leave the Data Link selection on.
Show Sonobuoys
Place an “X” here to display individual sonobuoys on the map. Sonobuoys are dropped into the water by Anti-Submarine aircraft and have their own sensor range circles and data link lines. Because many sonobuoys on the screen can clutter the view, it is a good idea to only use the Show Sonobuoys display option in windows that are being used for ASW operations.
Endurance Range
Place an “X” here to show the approximate range each platform has based upon its current fuel state. The endurance circle for the Puller is very large so it will not show up on your map, so we will not select it at this time. Endurance circles for aircraft are more
27
Harpoon II |
Operating Instructions |
|
|
noticeable as they have much shorter ranges and use fuel at a faster rate than either ships or submarines.
Tutorial Settings
For the purposes of this tutorial you should have the following settings for Map Preferences:
Water Depths: |
OFF |
Land Elevations: |
OFF |
Ice Pack Borders: |
OFF |
Polar Ice Data: |
OFF |
National Borders: |
OFF |
Latitude/Longitude: |
NO LINES |
Weather: |
NO WEATHER |
Nav Zones: |
All OFF |
Weapon Ranges: |
All ON |
Sensor Ranges: |
All ON |
Data Links: |
ON |
Show Sonobuoys: |
ON |
Endurance Range: |
OFF |
Creating Zoom Windows
A Zoom Window can be created by first clicking on the Zoom Window toolbar button. The mouse cursor should now resemble a “+”. Place the mouse cursor at any location on the Main Map area and drag a box as you hold the mouse button down. Once you release the mouse button, a new map window will appear. The new window is a Zoom Window labeled “Zoom Map 1.” Note this new window has its own toolbar buttons. A Zoom Window will have the same preferences as the map from which it was originally created. If you wish to have
different settings, use the Map Preferences button (PREF) for this
28

Tutorial Lesson I: Orientation
new window to give it its own display parameters. Click on the PREF button in this new Zoom Window and rename it “Tactical View”. Now grab the corner of Tactical View zoom window and stretch the window so it’s big enough for you to see all of the toolbar buttons for this window. Unlike the Main Map window, zoom windows do not stay proportional and can be stretched to any size without distorting the map.
Centering the Screen
Since the map area displayed in the new Zoom Window is smaller than the Main Map, you can move around within the map and center it on any location. To center the map place the mouse cursor on the point you wish to designate as the new center of the map and click the right mouse button for PC or Option-click for MacintoshTM. The map should now be centered on the point where you clicked. Try it by clicking around and making various points on the map the center. This is a rapid means of traversing across the map surface in any direction.
Zoom In & Out
The new window has three toolbar buttons that were absent from the Main Map. The first two buttons are Zoom In and Zoom Out. Use these buttons to magnify or expand your view in the map. Try clicking the Zoom In button three times and watch what happens to the view in Tactical View. It should zoom in towards the map. Now click on the Zoom Out button three times. Doing this should have expanded the view back to where it was prior to using the Zoom In button. Go ahead and center the map on several areas using the center map feature described above and use the Zoom In and Zoom Out buttons to change the magnification of the view. For example, try centering the map on a coastline and then zoom in and out or center on the Puller and change the magnification. When you are comfortable with how these two buttons function, center the map around the Puller and zoom out enough to where you can see the Puller and some of the coastlines.
Creating Tracking Windows
Another toolbar button not found on the Main Map is the Tracking Window button. A Tracking Window allows the user to select a unit or group and center the map screen continuously on that unit or group. This means the window will keep the selected unit or group in the center of the window as it moves across the map. To create a Tracking Window, select the Puller. Next, click on the Tracking
Window toolbar button. This should center the window on the Puller
Zoom Window
Toolbar Button
29
 Loading...