


IL-2 STURMOVIK
EDITORIAL NOTES
"This simulator was in development for more than 3 years. It was the serious and
hard work of aviation engineers, designers, programmers and real pilots - the staff
of 1C:Maddox Games. We were in constant contact with the players community
during the development period and tried to implement as many player's suggestions
as possible to try to satisfy all user groups. The work is now finally complete. We
would like to express our thanks to the thousands of players who helped and
supported us during those years. We are also very grateful to all the pilots that were
involved in the long tests of the flight models. Finally, we would like to say many
thanks to our beta testers, who helped us to eliminate any bugs."
Oleg Maddox, Lead Designer of IL-2 Sturmovik.
"I was a pilot at the 'Bundeswehr' and had the opportunity to fly a rebuilt variant of
the ME-109. After testing IL-2 for many hours I have to say that a new generation
of flight simulators is born. IL-2 has the best flight models that I have ever seen in a
flight simulator. It is not only the best, it is very close to the real thing. Also the
graphics and the damage model are amazing...with IL-2 you feel like you are flying
in a real WWII surrounding. I say such words about a flight Simulator for the first
time, IL-2 is really fantastic."
Andreas Preusse, Pilot, Germany.
"It has been an honour for me to be involved in testing this product. I am one of the
few people in the world who realises the amount of effort and dedication that went
into this sim - and I'm nevertheless amazed by the results. I think a combination of
the IL-2 team's engineering knowledge, real-world flying experience, passion for
history and most of all complete devotion to perfection have created something
more than a sum of all the parts. IL-2 takes flight simulators to a whole new level.
It's the first sim that I enjoy flying more than real planes."
Ilya Shevchenko, Private Pilot, USA.
"For me, IL-2 is a very impressive flight simulator. It brings the feeling of aerial
combat very close to real life, as opposed to other sims I've played. It is almost
frightening how real the graphics and the flight models are. I also admire how one
can now experience everything in front of the computer, fr om air combat to bomber
escort. I almost feel like I'm an active fighter pilot with the German Luftwaffe again.
For me, IL-2 represents the most realistic flight simulator ever made, mostly because
of the German fighters and the feeling of air combat."
Georg Adam, Lieutenant in the German Luftwaffe, WWII.
“Every WWII computer flight simulator I've seen or flown has been more game than
simulator. Il-2 is the first one that looks, feels and sounds like the real thing.I've never
seen a flight simulator that made you feel like you were really a ground
attack/fighter pilot till I flew IL-2. Now when my Grandsons ask what I did in WWII
I'll just sit them down in front of the computer and let them see for themselves.”
LT. Chuck Walters. P-47 pilot E.T.O 1943/44
1
CONTENTS
EDITORIAL NOTES 1
GENERAL FEATURES 3
INSTALLATION 4
HARDWARE SETTINGS 4
TUTORIAL 14
BEFORE YOU START 40
PILOT ROSTER 41
CONTROLS 42
VIEW OBJECTS 43
PLAY TRACK 44
TRAINING 45
SINGLE PLAYER 45
PILOT CAREER 46
QUICK MISSION BUILDER 63
MULTIPLAY 65
FULL MISSION BUILDER 70
GAME GLOSSARY 81
List of Reference and
Recommended Literature 83
CREDITS 84
SPECIAL THANKS 86
TECHNICAL SUPPORT 87
1 GENERAL FEATURES:
1. Fly 31 types of Russian, German and American aircraft. See them in different
camouflage and paint schemes for different times of the year.
2. Fly as pilot or rear gunner.
3. Choose between realistic and simple flight models with many adjustments to various
realism settings.
4. See 40 other types of aircraft engaged in large-scale air battles (with camouflage paint
schemes changing from summer to winter).
5. Engage in air-to-air and air-to-ground battles.
6. Destroy any ground object, such as buildings, bridges, airfields, etc.
7. Play quick missions using full mission parameter settings.
8. Play different types of single missions.
9. Play campaign missions and track your career (with ranks and awards).
10.Fight against intelligent AI opponents.
11.Play two different multiplayer modes: dog-fighting or cooperative missions across a
LAN or the Internet with dedicated servers for online play.
12.Multiplay: up to 32 players in dogfight and 16 players in cooperative missions. Use
custom paint schemes, squadron nose art, numbering on wings and national
markings for each single plane.
13.Record a flight track of your flights and edit these tracks. Then play and enjoy your track
files or send them to others (the Internet sim community can use these to confirm their
online wins/kills).
14.Use network and Internet voice communications for multiplayer sessions.
15.Build new missions and scenarios with an easy-to-use mission builder. Create missions
for single or multiplayer sessions.
16.Play new scenarios designed by other players.
17.Use new plane sets and new scenarios from free and/or commercial add-ons,
designed by original developers after the release of the sim.
18.See aircraft and ground unit graphics of an exceptionally high quality.
19.See massive air and ground battles between German and Russian airplanes and tanks.
20.See realistic dynamic damage modeling.
21.See realistic 3D environments, including terrain, sky, unique clouds and
weather conditions.
22.See realistic smoke, explosions, fire and other special effects.
23.Hear absorbing radio exchanges.
24.Compatible with a wide variety of 3D sound cards or drivers (Aureal 3D 3.0 or EAX 1.0,
EAX 2.0).
2
3
Minimum system requirements:
VIDEO
PII 400, 128 Mb RAM, 3D Accelerator.
Recommended system:
PIII 600 or faster, 256 Mb RAM, 32-bit 3D accelerator with 32 Mb RAM or higher.
Overall quality will depend directly on the user’s processor speed and
3D graphics accelerator.
2 INSTALLATION
1. Insert the IL-2 CD in your CD-ROM drive. The Autorun menu should start
automatically. If you disabled Autorun for your CD-ROM, you may need to run the
Install procedure manually (using the Windows Explorer) from the CD.
2. Left-click the "Install" button on the displayed Autorun menu.
3. Follow the installation program's instructions to complete the setup. In case of any
problems, the installation will stop and notify you of the nature of the matter.
Y ou can also r emove (uninstall) the game fr om your har d drive either fr om the
Autorun menu, or by clicking the Start button, and selecting Programs / Ubi
Soft / IL-2 Sturmovik / Uninstall.
3 HARDWARE SETTINGS
Once the installation is complete, the Setup program starts automatically. The
program enables you to select the correct settings for your video driver, video
card, sound and input devices. In order to do this, you need to know at least
the basic hardware types of the devices installed on your PC.
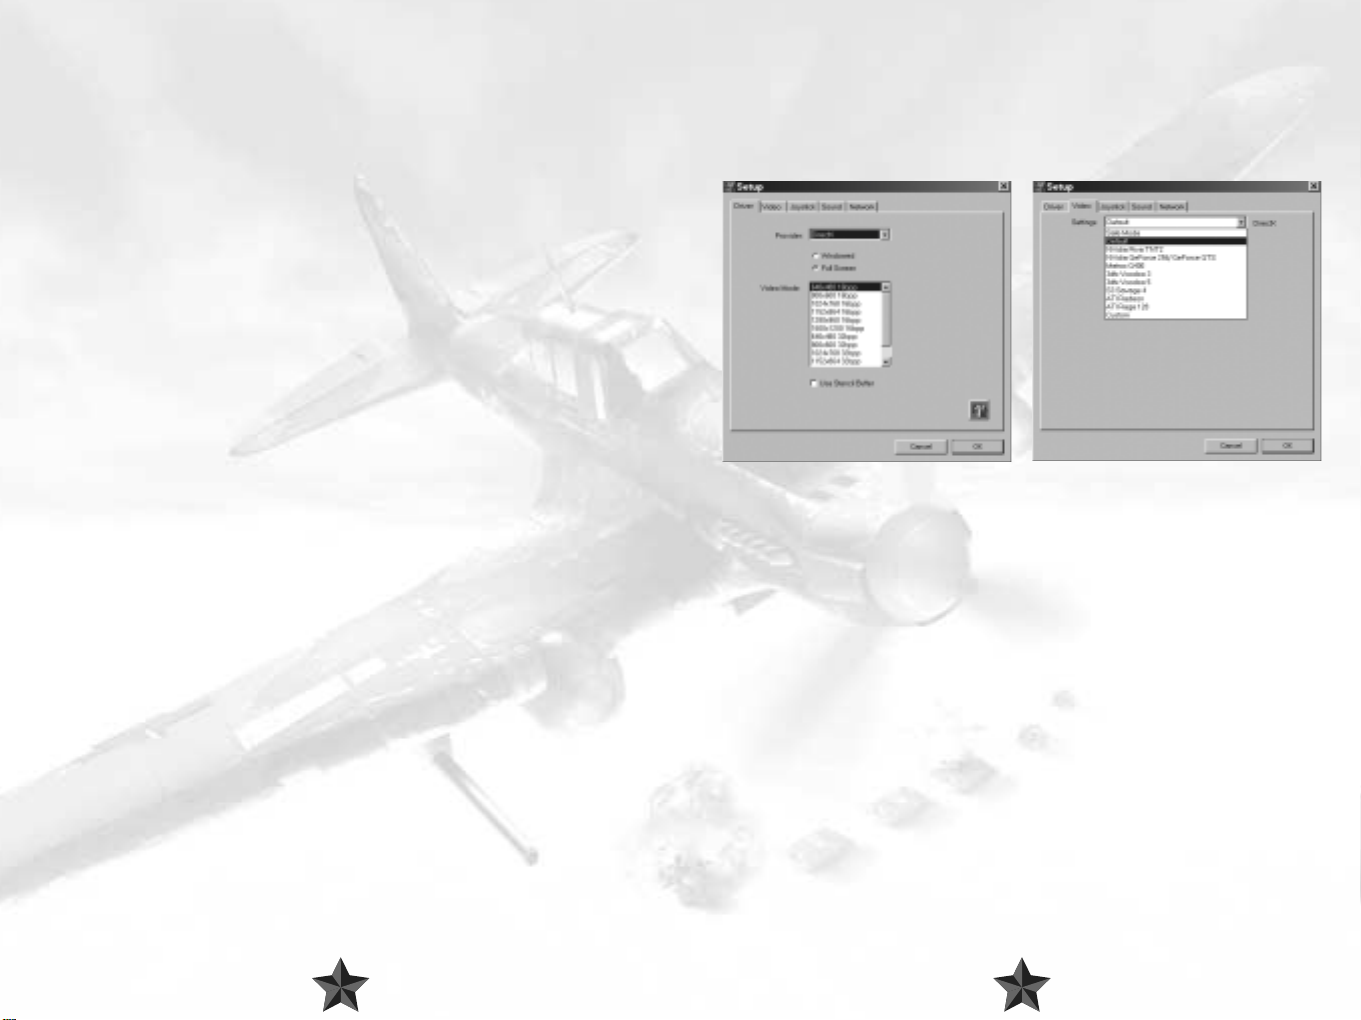
1. Driver - Driver and video mode setup.
These settings are similar to the internal Il-2 Video Modes dialog.
See the corresponding section concerning in-game menus below for a description.
2. Video - Video driver adjustment.
Used to adjust the game for correct operation with the appropriate driver.
OpenGL/DirectX settings are defined separately.
It is recommended that the latest video card drivers be installed.
If you should have any problems, check your driver settings in Windows. These can be
found in Control Panel/Display Properties/Advanced.
If the game locks up or if the screen refreshes very slowly, check that other 3D applications
or games (OpenGL/DirectX) start up and function properly. We advise against overclocking
your video card or processor, or using non-standard settings for them. Otherwise,
uninterrupted game functioning is not guaranteed!
Settings – Drop-down menu for video card selection and setup.
Special options in the Settings menu for detailed video driver adjustment.
Safe - operating mode with minimum demand on the driver (the lowest quality and
speed).
Default - operating mode with average demand on the driver.
Custom - detailed adjustment (at your own risk).
54
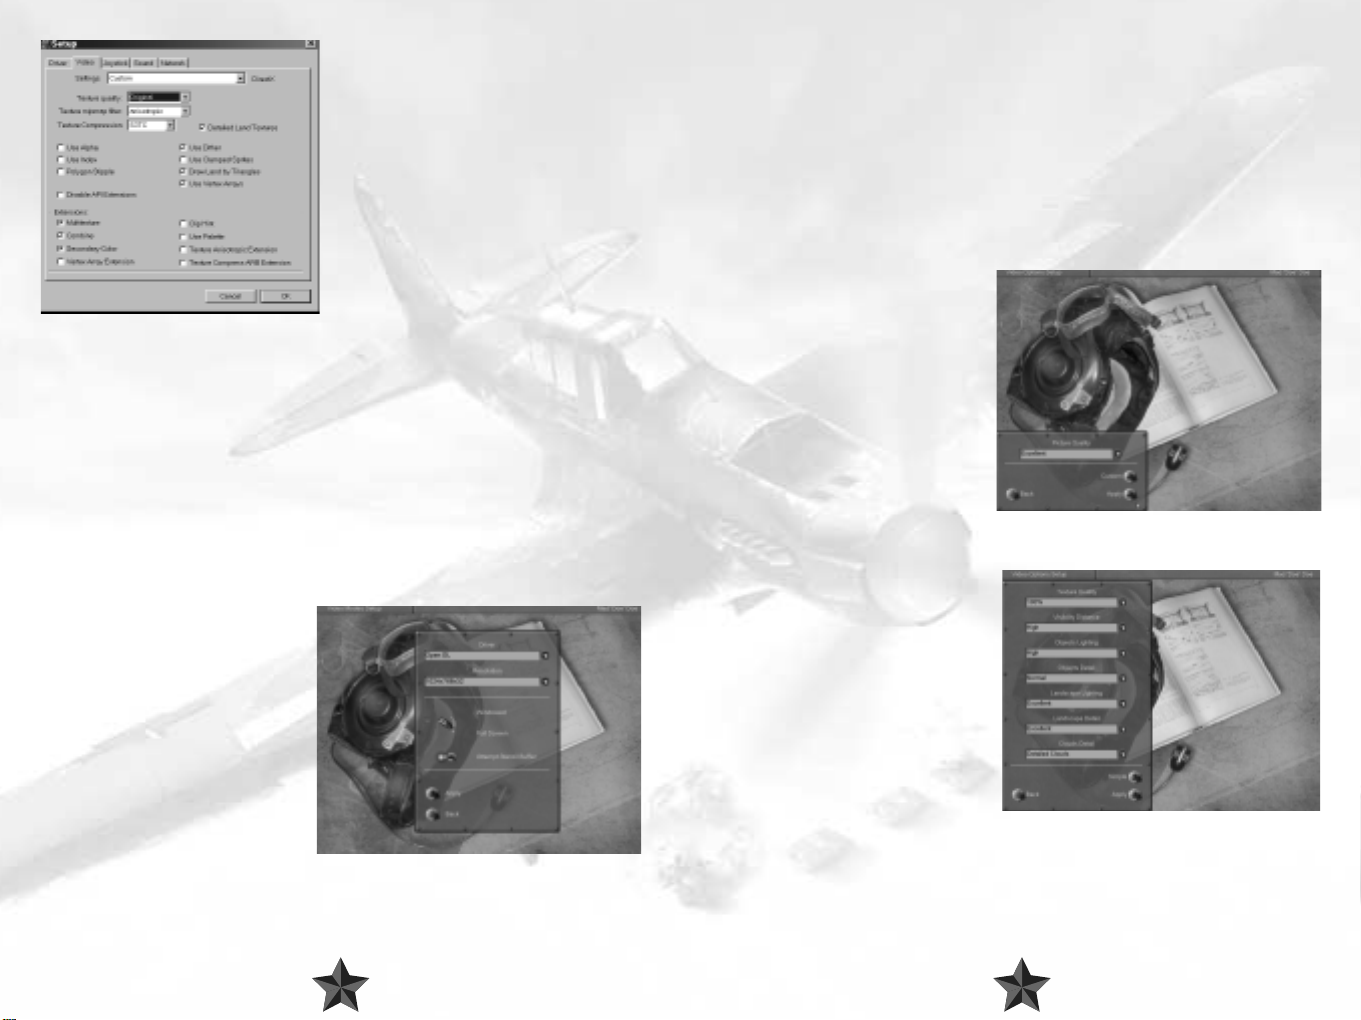
Texture quality - Texture resolution
(see below).
Texture mipmap filter - Quality of texture
filtering.
Texture Compression - Saves on memory
considerably (the highest quality is obtained
with S3TC).
Detailed land textures - Use highresolution textures for landscapes
(large amount of video memory and texture
compression required).
Use Alpha / Use Index - Use additional
texture formats.
Polygon Stipple - Emulate shadow
transparency in the absence of a Stencil Buffer.
Dither - Controls dither mode for 16-bit modes.
Use Clamped Sprite - Cuts down the number of polygons on sprite objects and effects.
Draw Land by Triangles - Displays landscapes with simple triangles.
Use Vertex Arrays - Reproduces geometry via vertex arrays.
Disable API Extensions - Forbids the use of video driver extensions.
Multitexture - For multitextures.
Combine - Improved texture combining.
Secondary Color - Used for fog and lighting.
Texture Anisotropic Extensions - enables anisotropic texture filtering.
Texture Compress ARB Extension - enables S3TC compression.
3. Video Modes - Choosing video modes
Driver - Choosing between DirectX8/OpenGL drivers.
Choose the driver that best suits your
video card in terms of rendering speed
and quality.
Resolution - Choosing the screen
resolution and color depth.
Low resolution, e.g. 800x600x16 is
recommended for earlier video cards,
1024x768x32 and higher should only
be used on newer cards.
This setting has the greatest effect on
quality and frame rate.
Windowed/Full Screen - Switches the main game display between windowed or full
screen mode.
Only full-screen mode is currently recommended.
Attempt Stencil Buffer - Utilize stencil buffer.
The Stencil Buffer is used to switch over to translucent shadows, etc.
It mostly works in 32-bit modes. It usually produces a dramatic drop in the frame rate on a
number of older video cards.Recommended for GF3.
Apply - Apply new settings and return to the previous menu.
Back - Return to the previous menu.
4. Video Settings – Graphic Settings.
This dialog box is used to define quality
and efficiency. The result of the settings
depends on the video settings in the IL2
Setup (i.e., maximum quality is achieved
with maximum video settings and when
your video card supports a maximum
number of options).
Simple – Move to simplified settings
Very Low/Low/Medium/ High/
Excellent Settings – Choose between
overall quality: minimum to maximum.
Apply – Apply new settings.
Back – Return to previous menu.
Custom – Go to detailed settings.
Texture Quality – Texture resolution.
Influences the amount of memory taken
up by textures and the game in general.
You can also use texture compression to
reduce the memory used.
Visibility Distance – Visibility distance
for objects.
Objects Lighting – Quality of object
lighting.
Objects Detail – Detail of object
geometry.
Landscape Lighting – Landscape lighting and shadows from objects.
Landscape Detail – Landscape detail (forest/trees/terrain/geometry).
Cloud Detail – Cloud visualization distance (their complete shutoff can be blocked in
network play).
6
76
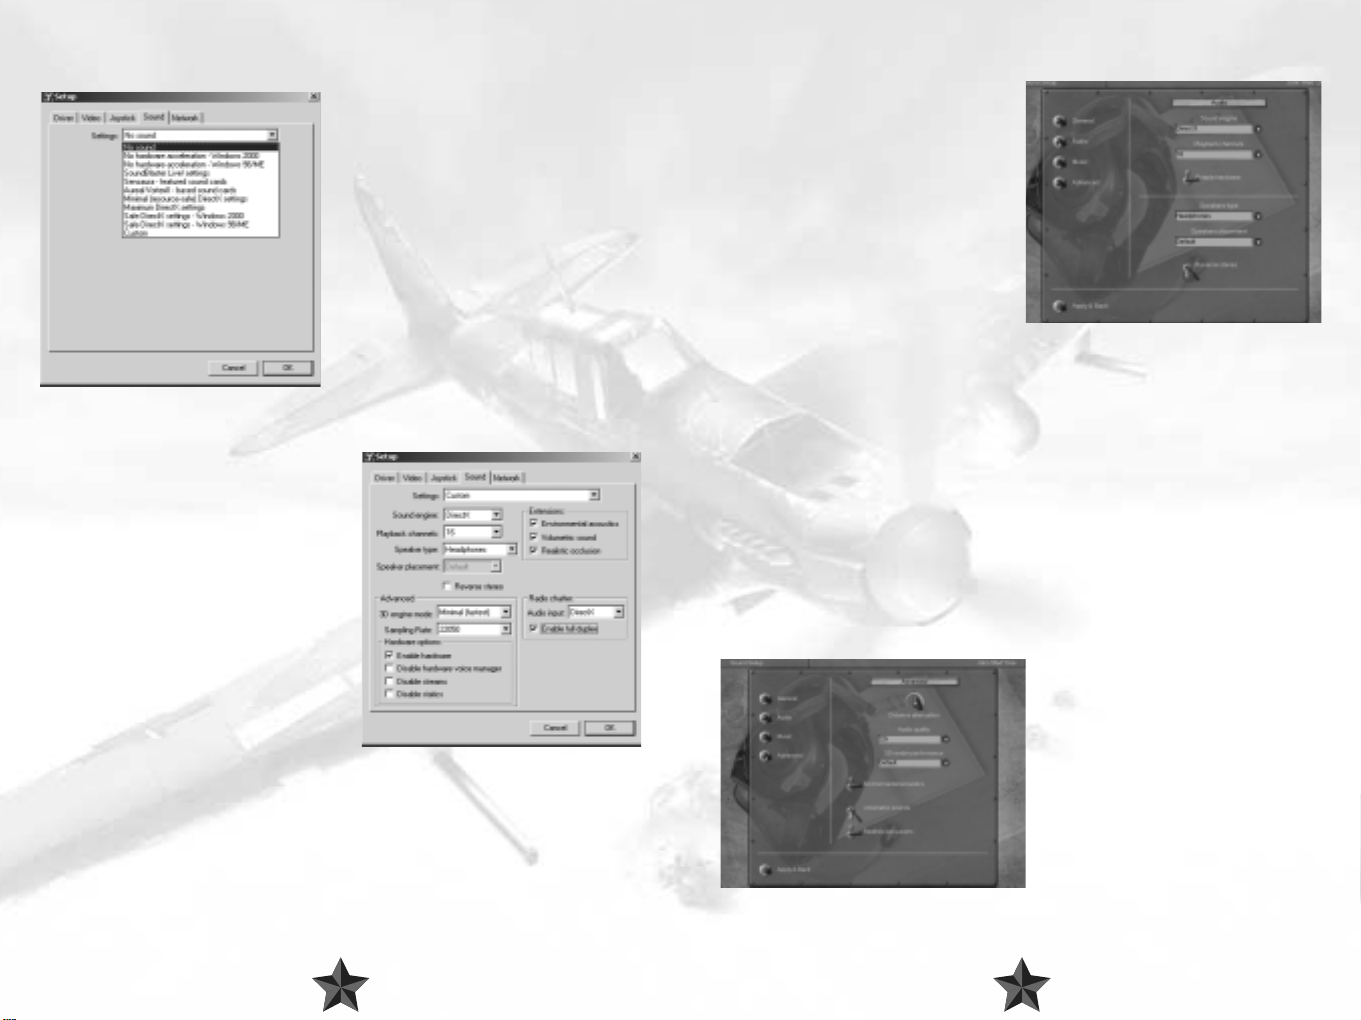
SOUND SETUP
MAIN IN-GAME SETTINGS
Once the installation is completed, a separate
IL2Setup configuration program will start up.
You can also use this program for a more
detailed adjustment of hardware settings
(at your own risk).
The easiest way to adjust the sound is to
choose from existing configurations.
Please choose your sound card from the list. If
it does not figure in the list, follow the
instructions below:
If your card supports 3D sound hardware
acceleration or you are unsure about it, choose
Minimal or Maximal settings.
If your card does not support 3D sound
hardware acceleration or you experience
sound-related problems, choose No hardware acceleration in accordance with the OS
you are using.
If you want to adjust all the settings yourself,
choose Custom settings.
The options in this dialog box reuse those in
the game's sound menu (see below) with the
exception of:
Disable hardware voice manager - select
this option if you have an accelerated sound
card and the sound occasionally fades away
and disappears.
Disable streams - select this option if there
are gaps in the sound. However, you will not
be able to use the network telephone or listen
to music.
Disable statics - select this option if the sound
effects are out of sync with the image.
Audio input - devices used for the input of signals from the network telephone mike.
DirectX required. "None" switches the telephone off.
Enable full duplex - this option should be selected.
Adjusted in the Sound Setup->Audio
menu. This menu is used to adjust the main
sound settings.
“Sound engine" switch
If you have a sound card based on Aureal
Vortex chips, use Aureal3D. In all other
cases, use DirectX. To switch off the sound,
use Disable sound.
Caution! If you have switched on the
A3D mode and your card uses a chip
other than Aureal, the game will most
probably hang up.
"Enable hardware" switch
If your sound card has hardware acceleration, flick the switch on. This enhances the
sound quality considerably and reduces CPU load. If there is no acceleration, the position
of the switch is irrelevant. Should any sound-related problems occur, the switch must be
turned off.
"Playback channels" switch
If your sound card has no hardware acceleration or if the hardware acceleration has been
switched off with the Enable Hardware switch, the parameter has a great effect on the
CPU load. Use the Default or 16 values. We recommend that you use value 8 for
Windows 2000 and NT.
"Speakers type" and "Reverse stereo" switches
Specify the type of audio device you are using: headphones, desktop speakers or system
5.1 (surround).
If the stereo channels seem to be reversed, use the Reverse Stereo switch.
Advanced Menu
This menu is used to adjust additional
settings. The Audio quality and 3D
rendering performance settings
determine the ratio of sound quality to the
rate of CPU load; the other settings affect
the sound.
The Audio quality and 3D Rendering
performance switches affect the sound
quality and for the most part the CPU load.
The optimal Audio quality value is
22kHz.
98
The value of the 3D Rendering performance only applies if your sound card has no
hardware acceleration or if the hardware acceleration has been switched off with the
Enable Hardware switch. In this case, CPU operation is fast when the switch is at the
Minimum position; CPU operation is correspondingly slow if the switch is at Maximum. It
is recommended that you use the Default or Minimum values.
The Distance attenuation regulator sets the rate at which the sound volume decreases,
if the distance to its source is increased.
The Environmental acoustics switch enables the use of EAX or A3D virtual acoustics
interfaces, if they are supported by your sound card.
The Volumetric soundsswitch activates 3D sound sources using Sensaura technology (it
should be mentioned that with the current Sensaura driver version - 2101 - this technology
does not work very well).
The Realistic occlusions switch determines whether the obstacles (for example the hull
of the aircraft) will reduce the sound volume. If it is switched on and you are inside the
aircraft, it becomes more difficult to distinguish the sounds from the outside. If your card
supports EAX or A3D, you should flick the Environmental acoustics switch on. You can
use the other two switches at your discretion.
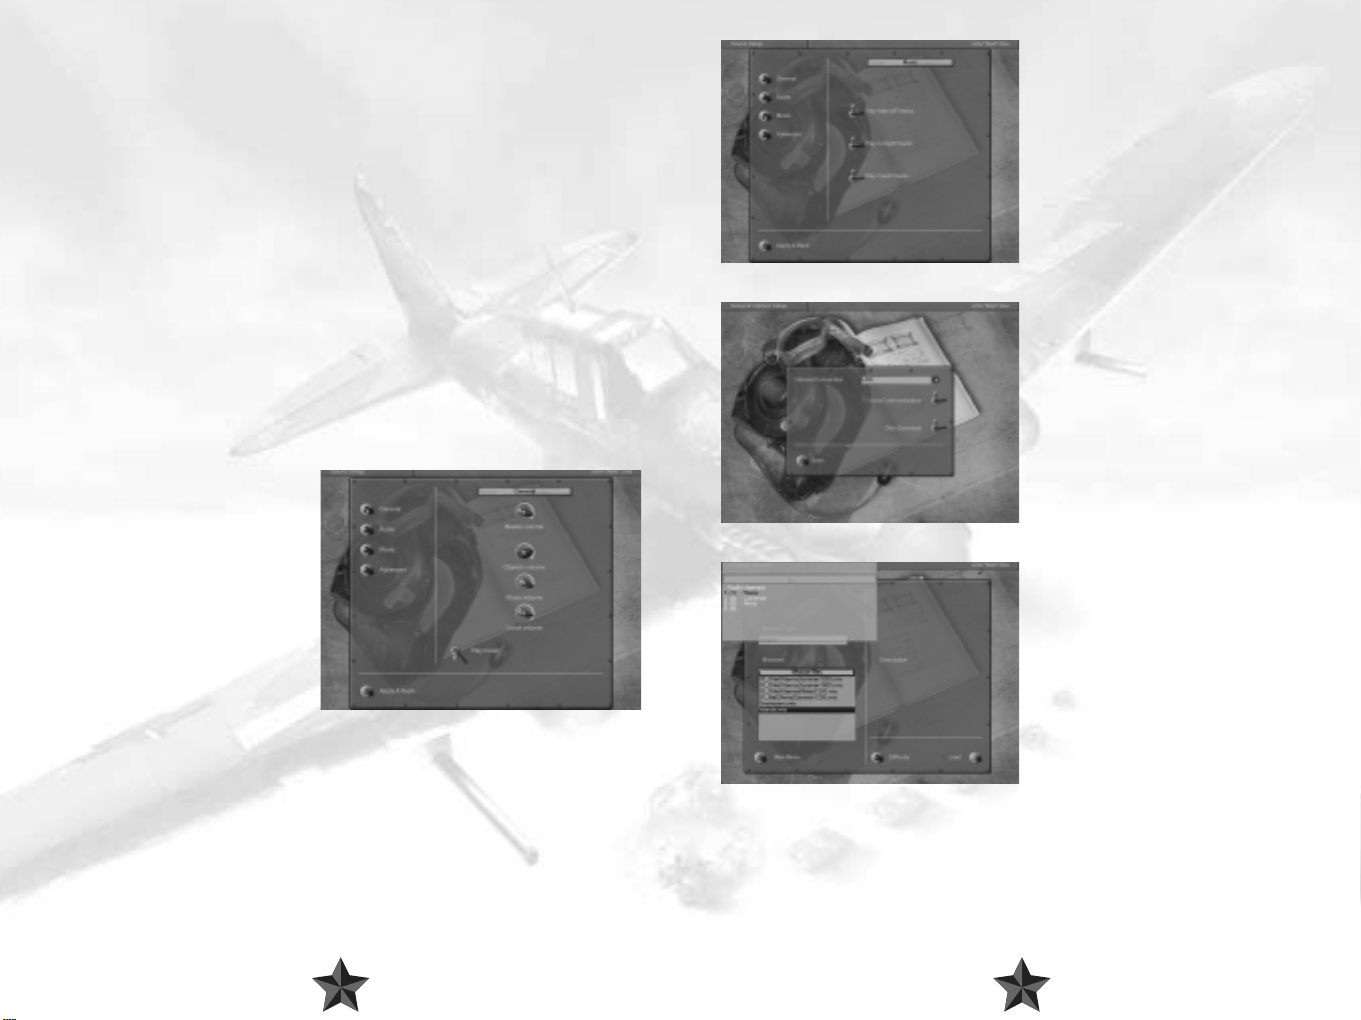
Adjusting sound volume
Sound volume is adjusted using the corresponding controls in the
Sound Setup->General menu:
Master volume - general level of
volume for all sources.
Objects volume - relative effects
volume.
Music volume - relative music volume.
Voice volume- relative volume of voice
messages and network telephone.
Music playback
Music in the game is activated via the
Play music switch in the Sound
Setup->General menu.
The music volume is adjusted using the Music Volume control in the General menu.
Whether the music is to be switched on or off in a given gameplay episode is defined in
Sound Setup->Music menu.
Play take-off tracks - play music during
take-off.
Play in-flight tracks - play music in flight.
Play crash tracks - play music when
damaged.
You can add music files at your own
discretion via Samples/Music/directory. The
music should be in Windows WAVE-file,
MPEG 1.3 format. The files for playback are
chosen at random.
Network voice communication is activated
using the Voice Communications switch
in the Network menu. It starts working
when you subsequently enter the next LAN
or Internet game. The volume is adjusted
using the Voice volume switch in the
Sound Setup->General menu.
The channel for communication is chosen
in the chat window. Only players using the
same channel can hear each other. If you
enter "." (dot) in the text box window, a list
of channels will appear at the bottom of the
screen. You can use this list to select the
working channel by pressing the UP and
DOWN arrows or by entering its number.
The list gives the channel number and
name. The number of players switched on
to the channel is indicated in brackets. The
current working channel is highlighted in a
different color, and has a "*" symbol.
1110
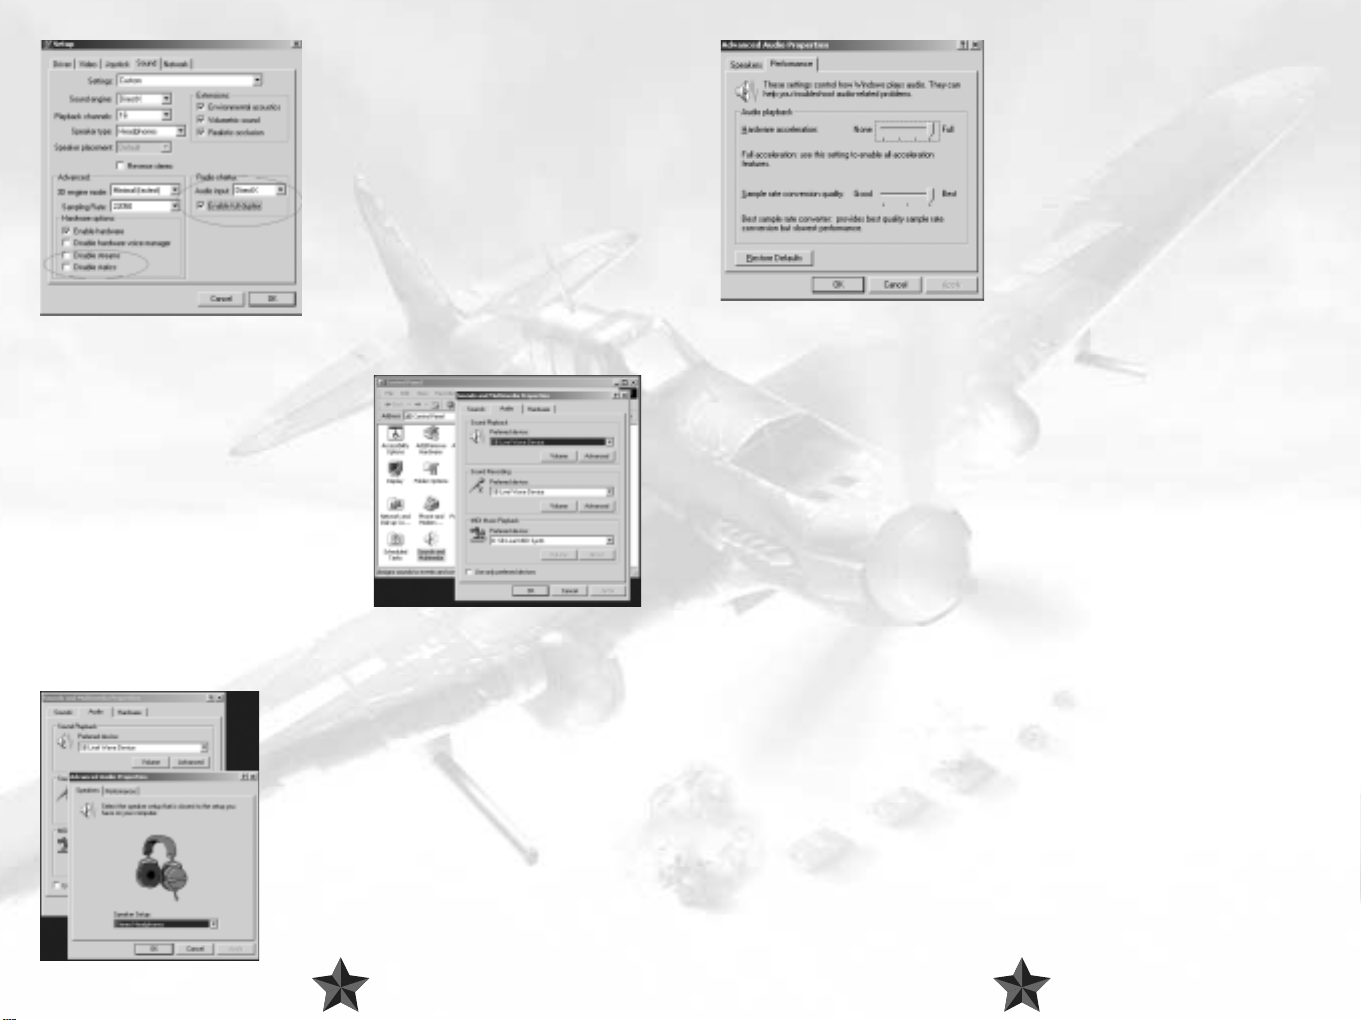
If you are experiencing problems of any kind
related to network voice communication, make sure
the following settings are chosen in the separate
il2setup.exe program, Sound Setup section:
Choose the Hardware acceleration->Full position
of the switch in the Performance dialog box. If
this creates problems with the sound, select Basic
acceleration or, as a last resort, Emulation only.
"Advanced" group
Disable streams - deselected.
Disable static - deselected.
"Radio chatter" group
Audio input - "DirectX".
Enable full duplex - selected.
If the game does not run well with active voice
comms, these can be switched off by choosing
Audio input -> None in the il2setup.
Adjusting the sound in Windows
DirectX sound settings in Windows can be found
in the Control Panel->Sounds and
Multimedia->Audio dialog box. Sounds and
Multimedia may simply be called Sounds in some
versions of Windows
To adjust the sound hardware acceleration,
choose Sound Playback->Advanced (see
below).
If you have several sound devices installed (for
example, a chip on the motherboard and a
separate card), choose the one you prefer in the
Preferred devices list and select the Use only preferred devices option.
In addition to this dialog box, your sound card may have additional adjustment options.
Choose the sound device you are using in the
Speakers dialog box.
Troubleshooting
No sound.
Make sure the sound is not switched off in the
Sound Setup->Audio menu.
Make sure the volume is not muted in the Sound
Setup->General menu.
No music.
Make sure the volume is not muted in the Sound
Setup->General menu and that the music is selected in the menu.
Make sure, using the il2setup program, that the Disable Streams option on the Sound
page is not switched on (to see all the components on the page, you should install
Settings->Custom).
No network voice comms
You can hear messages of other players in Windows NT4.0, but you cannot talk yourself in
most cases. This does not hold for Windows 2000.
Make sure your telephone is switched on (see above).
Go through all the options in the No music paragraph.
JOYSTICK SETUP
The game generally supports a vast range of basic joysticks by different manufacturers.
Select Use Joystick in the setup program. Press the Properties button and make sure
that the Joystick drivers have been installed and work correctly with your Joystick. If the
setup program detected your joystick's Force Feedback feature and displays it, you can
enable or disable this feature. Read about other features and the control settings in the
CONTROLS section of this manual.
1312
4 TUTORIAL
If you are already familiar with the basics of flight – either from real life experience, or from
playing other sims, you can skip this chapter completely. However, don’t subsequently
complain that you haven’t been informed about something particularly crucial! And as for
the rest of you, just read on to find out what this flying business is all about!
1. Flying Essentials
At this stage in history we are all used to the sight of planes soaring above us. But do you
actually know how aircraft manage to get up in the air and stay there? Well, if you’re not
entirely sure about the answer to that one, there’s no need to panic - we won’t be
smothering you with a load of old formulas from physics classes, which by now you’ve
probably forgotten anyway. What you should know, however, is that the interaction of a
number of forces has a key part to play in the whole wonderful business of flying. These
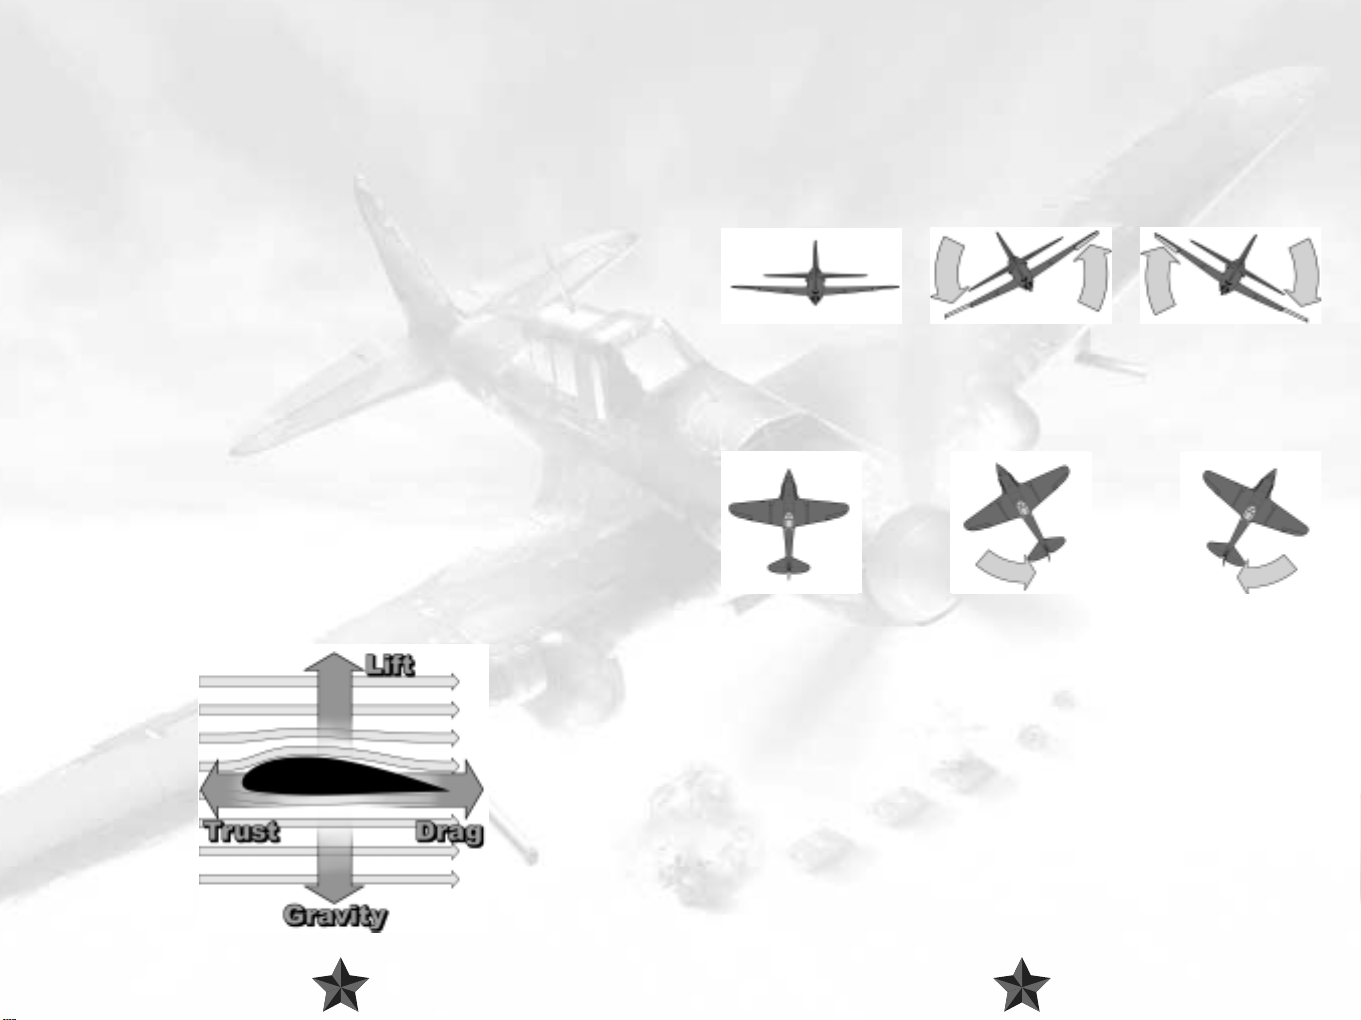
forces are as follows:
Thrust – the force that pulls an aircraft forward.
Drag – the resistance of the environment that has to be overcome by thrust, befor e a body
can engage in any sort of movement (sound familiar at all?).
Gravity – the force which would just love to keep every single object on this earth (plane
or no plane!) fixed very firmly to the ground; and, finally,
Lift – This is generated when the air pushes the plane upwards because of the specially
formed wings.
If a plane has enough thrust, it can overcome drag and start moving. Once sufficient speed
has been attained, enough lift will build up at the wings to defy gravity and allow the plane
to take off. Simple, isn’t it? In reality things ar e a little mor e complex than that, but we’ll leave
it there for the moment.
2. A Plane’s Axes of Movement
Unlike ground vehicles, a plane can move in an extra direction, or, if you prefer, an up and
down dimension. It can even be argued that a plane can move in TWO extra directions,
even though both types of movement concern the same direction. These additional
movements are pitch and roll – more on them later.
Movement along a plane’s three different axes are made possible via special flight control
surfaces, which a pilot operates via the stick and the rudder pedals. There are different
names for the various movement options, and you should make sure that you take careful
note of these, as they are extremely important for making sense of the chapters that follow.
Movements around the plane’s roll axis are carried out with the so-called ailerons. They
cause the plane to revolve around the direction where its nose is pointing, and allow it to
perform turns. This movement is known as ‘rolling’ (not to be confused with the ‘taxiing’
the plane on the ground). To move the plane around the roll axis, the pilot moves the stick
in the desired turn direction, which can be either left or right.
Turning movements around the yaw axis are known as ‘yawing’ and are carried out with
the rudder. A plane responds tio this exactly like a car responds to the steering wheel. Even
more like a car, a plane is also steered via the rudder when it is on the ground; on modern
planes the rudder is connected to the steerable landing gear, for example. Left rudder
allows the plane to be ‘yawed’ (turned) to the left, and, logically enough, right rudder
enables yawing to the right.
1514
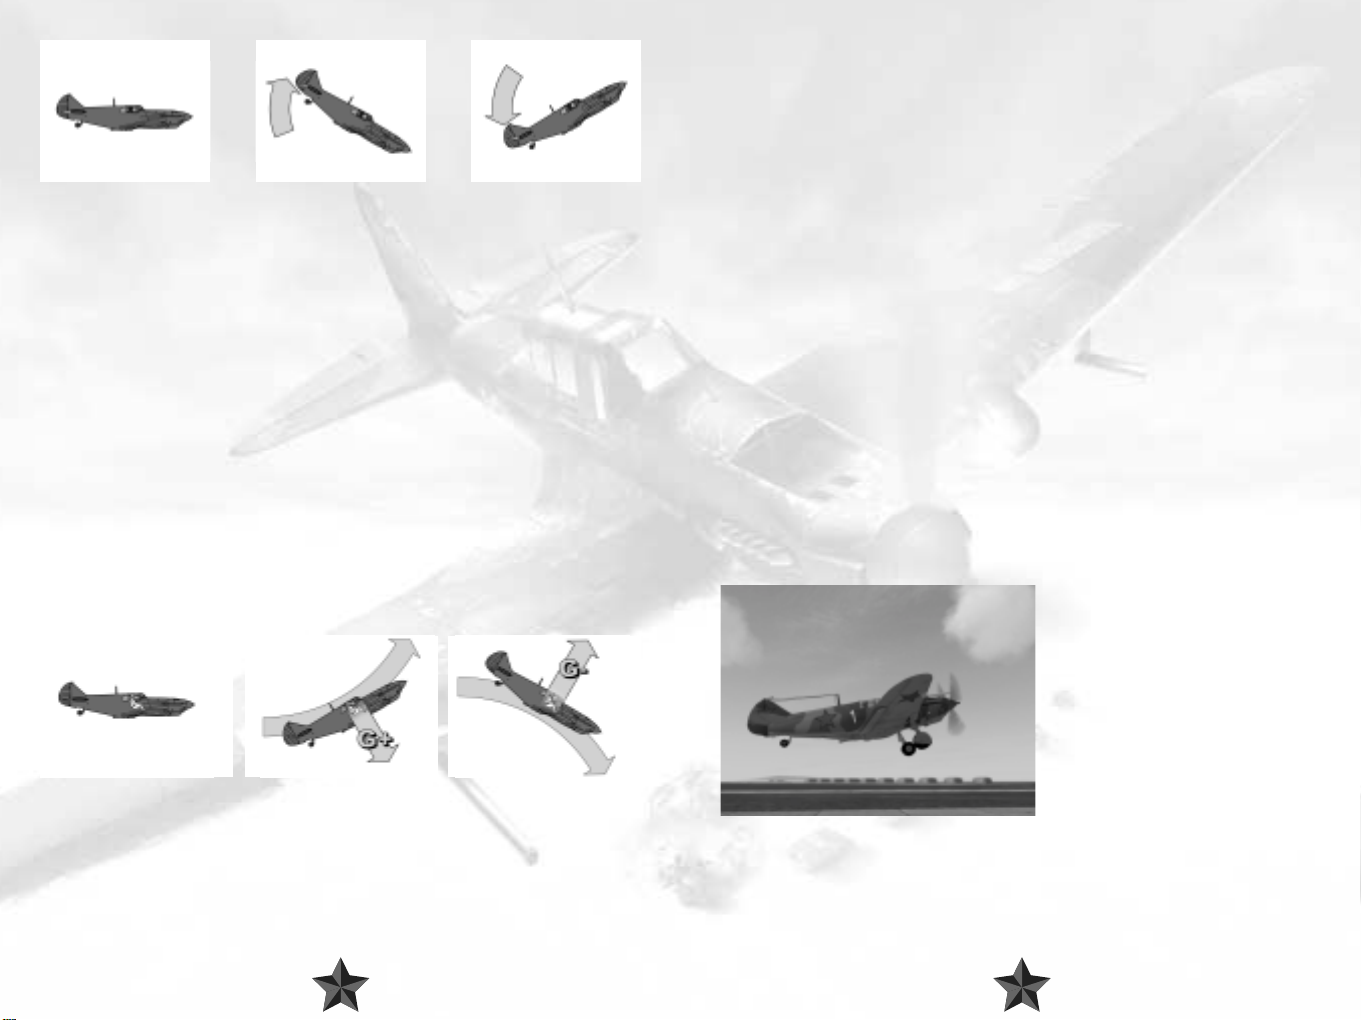
Movements around the pitch axis allow the plane to ascend or descend. This is known as
‘pitching’. You pull the stick back to pitch the plane upwards, and push the stick forward
to carry out a downward pitching movement.
Positive and Negative G-Forces
G-forces start to take their toll as soon as you start to carry out maneuvers at high speed
and with quick direction changes. The ‘G’ stands for gravitational and ‘1G’ is the basic force
of attraction exerted by the earth. If you fly a tight high-speed turn, the drag involved
means that your body cannot keep up with the rapid movement, and you will be forced
into the other direction by a multiple of the force of attraction. If the level of G-forces
becomes excessive, you can even experience a blackout, which will eventually lead to loss
of consciousness. Trained jet pilots can put up with 9G for short periods of time with special
equipment, but it’s not exactly their idea of fun!
You can experience the effects of negative G-forces if you force your aircraft downwards at
high speed out of level flight. You will be practically lifted out of your seat and will be
weightless for a short while. If you take things too far, you will have a (literal!) rush of blood
to the head and become rather red in the face, to say the least. Your body can deal with
positive G-forces better than with negative ones.
When playing IL-2, if your screen goes black in mid-flight, this probably has nothing to do
with your graphics card, but with the effects of excessively high positive G-forces. G-forces
can be turned off in the “Difficulty/Realism’ menu.
3. Basic Flying Maneuvers
Takeoff
Now that you know which instruments are really important (please take a look at the
reference card - the main indicators are Altimeter, Climb, Artificial Horizon, Turn, Course),
you could start thinking about getting your plane into the air! And while you’re at it you
can ponder over the fact that the planes of this era were, for the most part, equipped with
a small wheel at the rear - the tail wheel. Unfortunately, this meant that the plane’s nose
was raised in front of your cockpit, and therefor e these planes had a very poor view (if any!)
of the ground in front when taxiing and in the first part of take off. Try to compensate for
this by looking out of the side of the cockpit and using the edge of the runway for
orientation. And there’s no point in moaning either - that’s just how it’s done, ok! Of course,
you could always make things nice and simple and switch to one of the external views
using either the F2 or the F7 keys.
Once you have lined up on the runway you should proceed as follows: extend the flaps
to Takeoff level (F key twice). Start to accelerate slowly and check the tachometer to see
whether or not the engine is reacting to your movements on the throttle. Now push the
throttle lever all the way forward. As your aircraft gains speed, you may have to
compensate for the engine’s torque by gently applying the rudder. Make sure you keep a
close eye on the turn indicator during this process! To begin with, you should keep the
stick held towards you in order to exert pressure on the tail wheel and thus prevent a
premature takeoff. Once you have attained sufficient speed, press on the stick slightly so
as to lift the tail wheel off the ground. Don’t press too hard or the propeller may touch the
ground (if you are flying the P-39 Airacobra, forget everything we said about the tail
wheel: the P-39 already had the tricycle landing gear which is standard nowadays).
The aircraft should now build up speed
quickly. Once you have reached an
adequate speed, draw back the stick
gently. Make sure you don’t pull too
strongly and do not try to make a sharp
turn straight away. This could result in
the plane stalling and you will not have
enough space beneath you to put this
right in time. First retract the landing gear
(G key) and then the flaps (V). Monitor
your speed closely, and do not pull your
nose too sharply right away. Let your
airspeed get at least above 180-200
km/h, then start climbing and make sure that you keep gaining speed and altitude. Once
you have reached your desired height, throttle back so as not to overburden the engine
and adopt a level flight attitude. Many congratulations - you’re flying!
1716
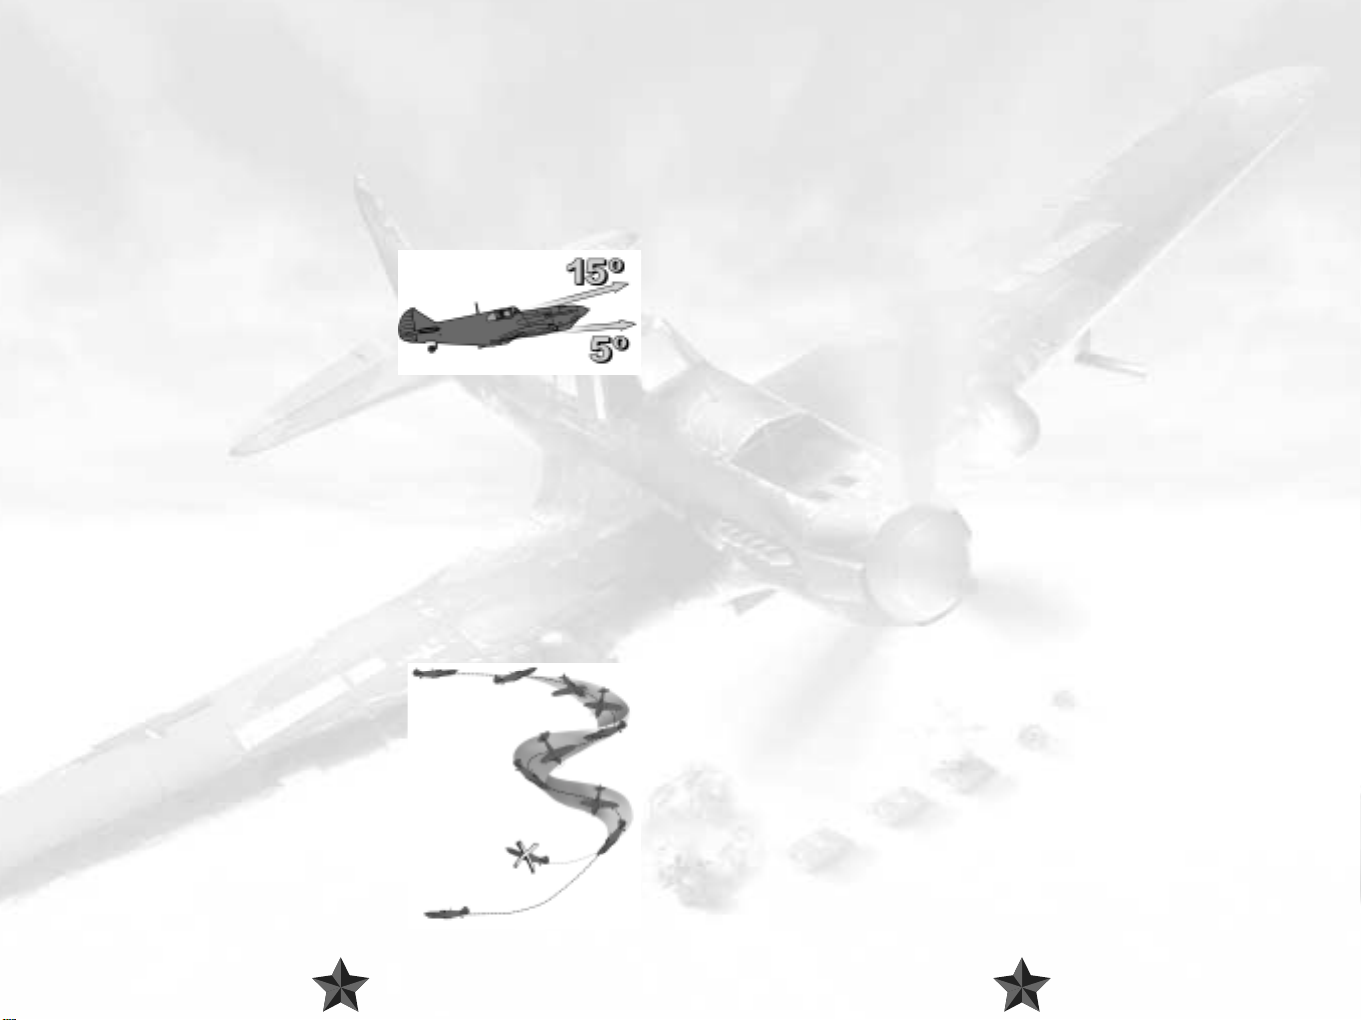
Climbing
To get the aircraft to climb, simply increase the throttle! You will start moving more quickly
and thanks to the increased flow speed of the air moving over the wings, more lift is
generated. The more impatient flight simmers amongst you may be tempted to simply pull
the stick back. The more you pull, the steeper the plane will climb upwards. A glance at the
airspeed indicator will suffice to confirm that you are losing speed at the same time. Lower
the nose a little so as not to slow down too much, but make sure that it remains above the
horizon. If you are lucky enough to be sitting in a luxury cockpit, you may find an artificial
horizon with which you can control your angle of ascent. An incline of about 20° generally
represents a good compromise between your climb rate and your airspeed.
Once you have determined the direction of the spin, you can try your luck and have a
go at the rescue operation. Move the stick into a neutral position. Under no
circumstances should you operate the ailerons, that’s to say by moving the stick to one
side or the other - this would only make the spin worse! Instead you should step on the
rudder in the opposite direction to the one in which the plane is spinning. After that it’s
just a question of waiting until the plane stops spinning. If you can’t see any
improvement, your best bet is just to try again. If the plane has actually stopped spinning
then your battle is almost over: all you have to do then is to wait until the plane has
picked up sufficient speed for the control surfaces to start reacting again. Then you can
put an end to the dive and return to normality! Well, it’s certainly worked before….
Stalling
If you get carried away with pulling back the stick,
your speed will ultimately drop to an unacceptable
level: the airflow over the wings will reduce and
you will soon find your plane lacking the necessary
lift to keep you in the air. You have stalled the
aircraft, gravity has regained its grip on you and the next stop will be a rather premature
reunion with mother earth. In a situation like this, though, panicking is the very last thing
you should do: simply center the stick and let the plane go. Don’t carry out any steering
operations at all - these are pointless in a situation like this anyway. The nose should be
pointing down towards the ground and the air craft will be dropping rapidly in much the
same direction. As this happens, the plane will regain speed, causing the contr ol surfaces
to react again. Once you have reached sufficient airspeed, bring the plane out of its fall
and return it to level flight. Do try this maneuver out, as you will probably find that you
stall at inconvenient moments (like in the heat of battle, for example) and so a certain
amount of practice in a non-critical situation will pay off. But do please make sure that
you always have a sufficient amount of space between your plane and the ground
before you embark on a training session…
Spins
If you are really unlucky, you may find that your
plane doesn’t just stall, but also goes into a spin.
Spinning means (amongst other things) that your
plane keeps rotating uncontrollably around its roll
axis. A spin occurs when a stall has affected only one
wing, in an excessively tight turn for example.
Rescuing a plane that has gone into a spin is
considerably more difficult than righting an aircraft
that has merely stalled, and sometimes this is simply
not possible. The first thing you have to establish is
the direction in which the plane is rotating around
the roll axis. If you can’t identify this, you should
have no reservations about switching to an external
view via F2 or F7.
We hope that you will notice to your dismay just how much height you have lost. If you
do happen to fall into a spin at low altitude, time really is of the essence and you should
bail out without further ado (CTRL + E). Then again, you may find that the maneuver
described above doesn’t actually achieve anything. In some cases you may even have
fallen into a flat spin, a particularly unpleasant variety in which you find yourself spinning
around your yaw axis. Rescuing an aircraft which has fallen into a flat spin is very nearly
impossible, and abandoning the plane to its fate via CTRL + E is by far your best option.
Level Flight
Sounds wonderfully simple, doesn’t it? Which is true for the most part, at least once you
have grasped the basics of this skill. Level flight involves flying straight ahead without
changing altitude, with all the forces which act upon the plane in balance. This balance
means that the plane can fly in a straight line more or less of its own accord, without too
much intervention from the pilot. Ok, we said this is relatively simple, but that doesn’t
mean that an aircraft can just adopt this mode without any help on your part!
Depending on the load on board (weapons, fuel, personnel etc.) the plane’s center of
gravity changes, which in turn has an effect on the flight attitude.
You can, and indeed should, counter these factors by adjusting your aircraft’s trimming.
This involves fine-tuning the control surfaces to enable a constant, balanced flight
attitude. If your plane is dipping to the left slightly, for example, this is not necessarily due
to any movement of the stick. Instead, trim the plane to make it lean to the right by
holding down the ‘CTRL’ key and pressing the right arrow key until you have fully
countered the lean to the left. If, on the other hand, the plane is inclining upwards, you
can try to counter this tendency by simply easing off the gas slightly. Less thrust = less
speed = less lift - remember? If that doesn’t work, trim your plane by using the CTRL and
down arrow keys to make it slightly nose-heavy. Feel free to experiment a little with the
trimming and do make sure that you are familiar with the key commands involved
(chapter 6).
1918
Turns
To turn the aircraft, you first have to bank it around the roll axis - in the direction in which
you wish to turn, logically enough. To do this, gently move the stick in your chosen
direction until you have reached an angle of about 20 - 25°. And that’s enough for the
moment. The plane will describe a gentle curve, moving the nose down slightly in doing
so. You should therefore gently move the stick back so as not to lose too much height.
Gently use the rudder and keep a very close eye on the turn indicator: if you want to
become a really good pilot, your operation of the rudder should cause the ball in the
indicator’s spirit level to move as little as possible, remaining in the center of the display. This
sort of a turn is known as a coordinated turn: the plane is not forced to one side but follows
the radius of the curve without
lurching to the side. And do
bear in mind that although your
stick may return to a central
position of its own accord, in
order to return to level flight you
will have to steer it into the
opposite direction yourself.
Controlled Descent
‘You always get down
eventually,’ so the saying goes.
Which is true enough in itself,
but you have to remember that there are all sorts of ways of getting your feet, and your
plane, firmly back on the ground, some of which are a good deal safer than others. If you
just point your plane’s nose at the ground, you will gain speed - an awful lot of speed. You
will certainly be traveling too fast for the majority of planes from the Second World War
period. On your way down you are likely to feel a little bit shaky, and then it won’t be long
at all until the first parts are doing their own flying around you. Try explaining that particular
strategy to your mechanic if you are still able to!
You should always ensure that you prepare for
your descent and landing carefully. The first
thing you should do is to decelerate. The plane
will embark on a gentle descent due to the
reduction in thrust resulting fr om its lower speed.
Check this by taking a look at your rate of climb
indicator. Then press the stick forward slightly, all
the time keeping the airspeed indicator in view.
Depending on the type of plane you are flying,
there is a varying range of speeds which can be
flown safely at this stage. If you are flying too fast,
simply reduce your angle of descent and gently pull the stick towards you.
If your cockpit has an artificial horizon, check your flight attitude if you’re not totally sure
that you can rely on your instincts.
You can also try flying broad descending curves, as you automatically slow down when
banking. You should always watch your speed very carefully during this procedure, or you
could run the risk of stalling.
There is one handy trick which can help you to
lose altitude without speeding up: gently roll the
plane to one side and at the same time counter
this movement with the rudder so that you don’t
actually turn. This will mean that you are flying at
a slant, but this will be useful in your descent.
This maneuver is known as a ‘slip’ or ‘side-slip’,
and was invented by WW1 pilots to compensate
for the fact that their planes were a good deal
more fragile than the ones you will meet in IL-2
Sturmovik.
If you and your plane are of a robust constitution, you can use the so-called ‘Split-S figure’
explained in section 5.4.3. This will expose you to high levels of G-forces, so don’t say you
haven’t been warned!
If you need to get down to the ground fast, like in case of crash-landing after battle
damage, chop your throttle to idle and drop full flaps. Point your nose downwards, which
will take more strength than usual as the flaps will generate excessive lift. Keep your nose
down to still allow for your airspeed to drop. Once at speeds below 300 km/h, drop your
gear – then level out as close to the ground as you can and continue flying forward at a
very shallow angle until you touch down.
4. Key Air Combat Maneuvers
If you have studiously digested the previous sections and taken the advice contained there
to heart, you should be in a good position to perform clean takeoffs and landings and to
squeeze in a few nice, coordinated turns in between. All this is, of course, admirable, and
we are extremely pr oud of you! But we trust that you won’t be too crestfallen when we tell
you that these skills alone are not enough to make you into a flying ace. It may be of some
comfort to hear that you are not alone in this regar d. Many of the world’s most famous aces
had to put in many a long hour of practice, learning from their mistakes all along before
they were able to acquire the talents which set them apart from less successful or merely
average pilots. And then there are just some things which can probably never be learnt;
abilities which you either have or have not got. For more on this topic, take a look at
section 5.5. Don’t start turning the pages just yet, though – first of all we’re going to
introduce you to the key maneuvers of air combat.
2120
4.1. Offensive Maneuvers
".you have to get up to a distance of about 70 meters from the target before you
can open fire. A big mistake which is often made lies in losing speed when you
move up to shoot at the last minute. This doesn’t work - the distance simply gets
bigger and bigger and you can even lose touch with the target completely. If you
shoot from too great a distance away, you just let the enemy know where you are
because of the trail your shots leave, and the enemy can frequently get away.
Another frequent error lies in gaining ground on the enemy too quickly and then
not being able to brake in time, which means that you end up in front of the target.
John Cunningham, R.A.F. night fighter pilot.
Quote from: Sims, Edward H.: Fighter Tactics And Strategy 1914 – 1970.
If you will permit us to make a very broad
generalization, air combat maneuvers can be
divided into two categories: offensive and
defensive maneuvers. An offensive maneuver, in
a one on one air battle (also known as a
dogfight), for instance, focuses on shooting
down the enemy as quickly as possible. This
generally involves taking an opposing pilot
completely by surprise (the ideal situation!) or
outmaneuvering him to such a degree that you a) get into a good firing position and b)
stay out of trouble as much as you can. As is often the case, theory is considerably easier
than practice here. But with a little of the latter you should be able to achieve a certain
amount of success before too long.
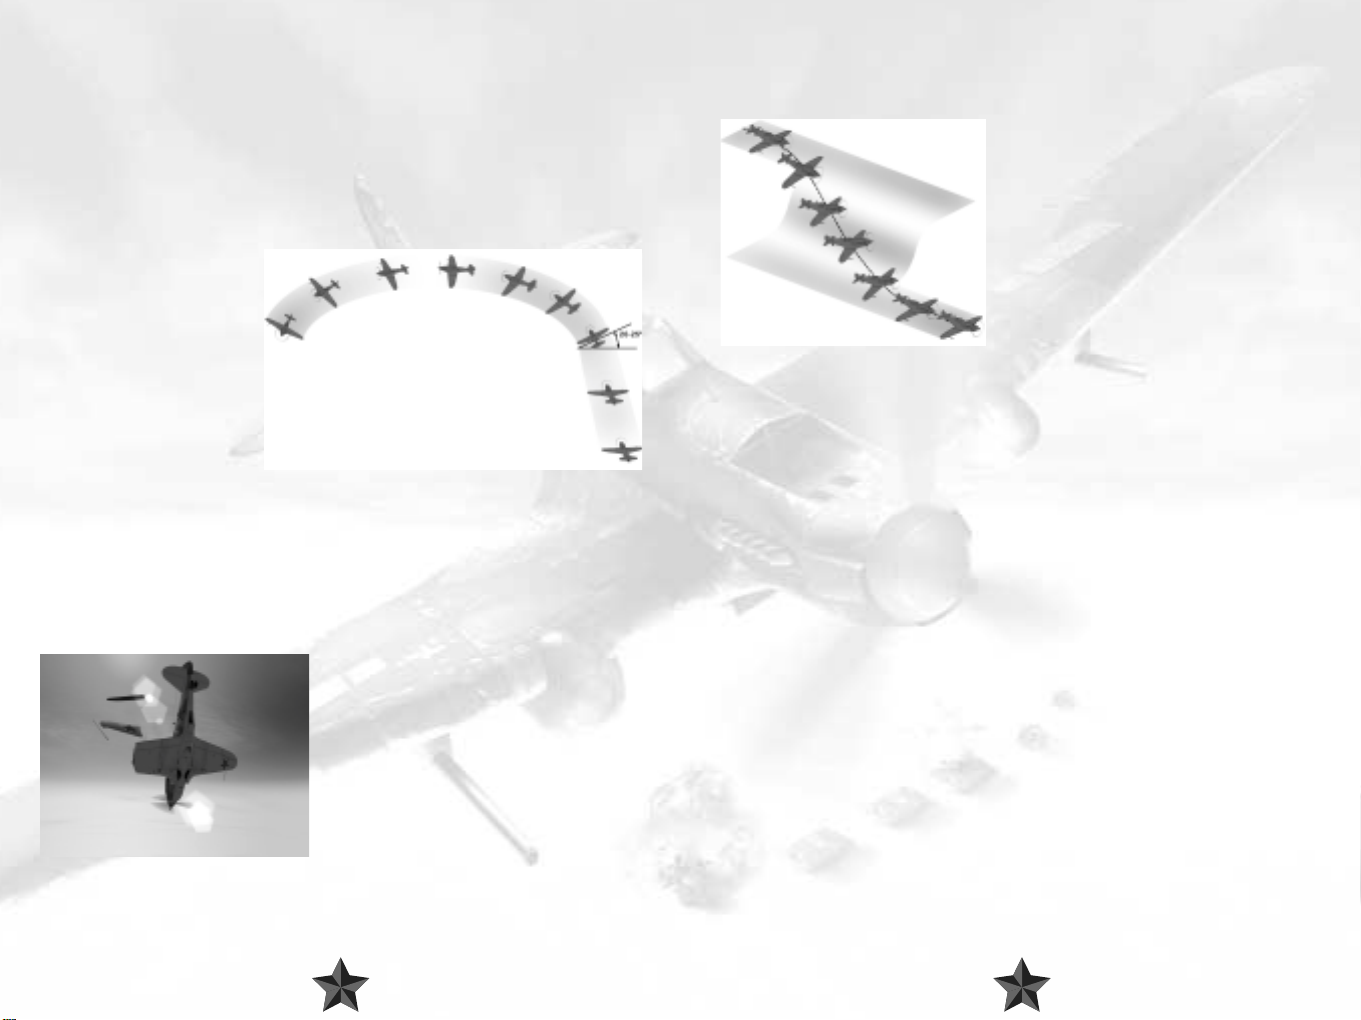
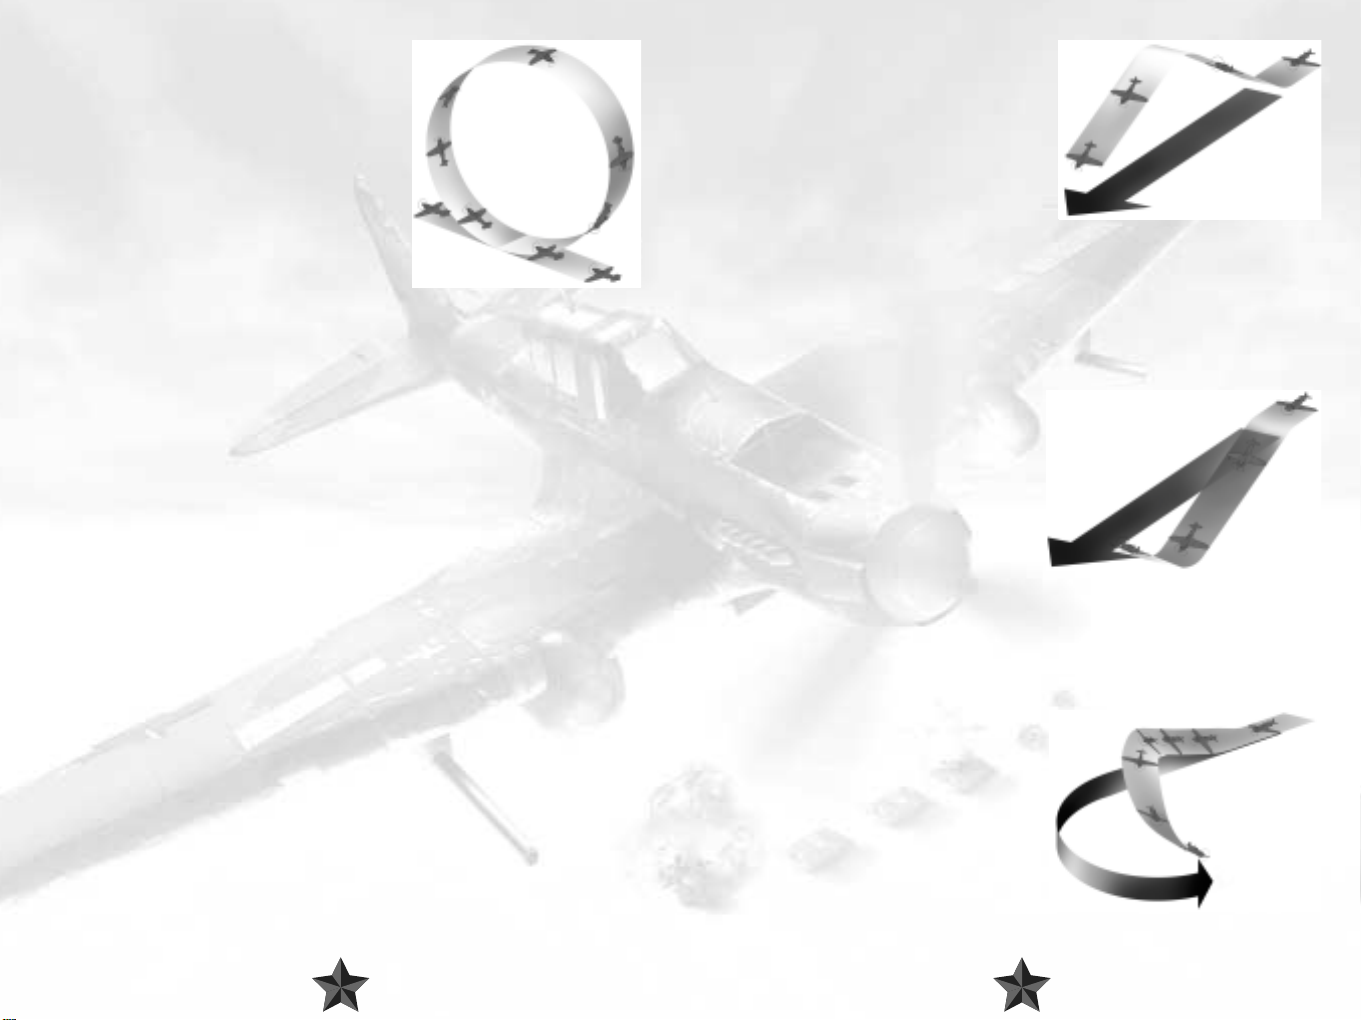
Hammerhead
This maneuver was known as “Immelmann” in WW-I,
named so after a famous German ace Max Immelmann.
Whether he was really the first pilot to carry out this
maneuver is open to question, but what is beyond doubt is
that he could perform it to perfection. However, since then
the terms changed and Immelman in WW-II is something
completely different.
A typical hammerhead involves flying the plane straight up
in the sky until shortly before a stall, then using full rudder
to carry out a 180° turn about the yaw axis and
subsequently going into a dive. The point of this piece of
aerial acrobatics is to enable you to tuck yourself in behind
an aircraft which was flying in the opposite direction to you
before you carried out the maneuver. To execute it to
perfection you will need good timing and a good reserve
of speed to be able to carry out the steep climb at the
beginning.
Make sure you are flying at an adequate speed to begin with. If need be, lower the plane’s
nose to pick up a little extra speed. Gently but firmly, pull your plane around so that it is
climbing straight up. Don’t lose sight of your airspeed indicator! Before you lose too much
speed and therefore stall, step on the rudder pedals. Do we really need to mention that
you should by now have decided which way you’re planning to turn? Good, we knew
that wouldn’t be necessary. Then turn the plane through 180° so that the nose is pointing
down to the ground, gently using the ailerons as you do so. Pay careful attention to your
course indicator or a compass – if everything has gone according to plan you should now
be pointing in exactly the opposite direction from the one in which you started. At the same
time you should also pick up speed. Recover the plane from the dive once you have
reached your desired altitude. In combat situations you should aim to end up slightly
beneath the enemy aircraft, thus putting you out of the range of any gunners on board
and with any luck you won’t be detected by enemy pilots.
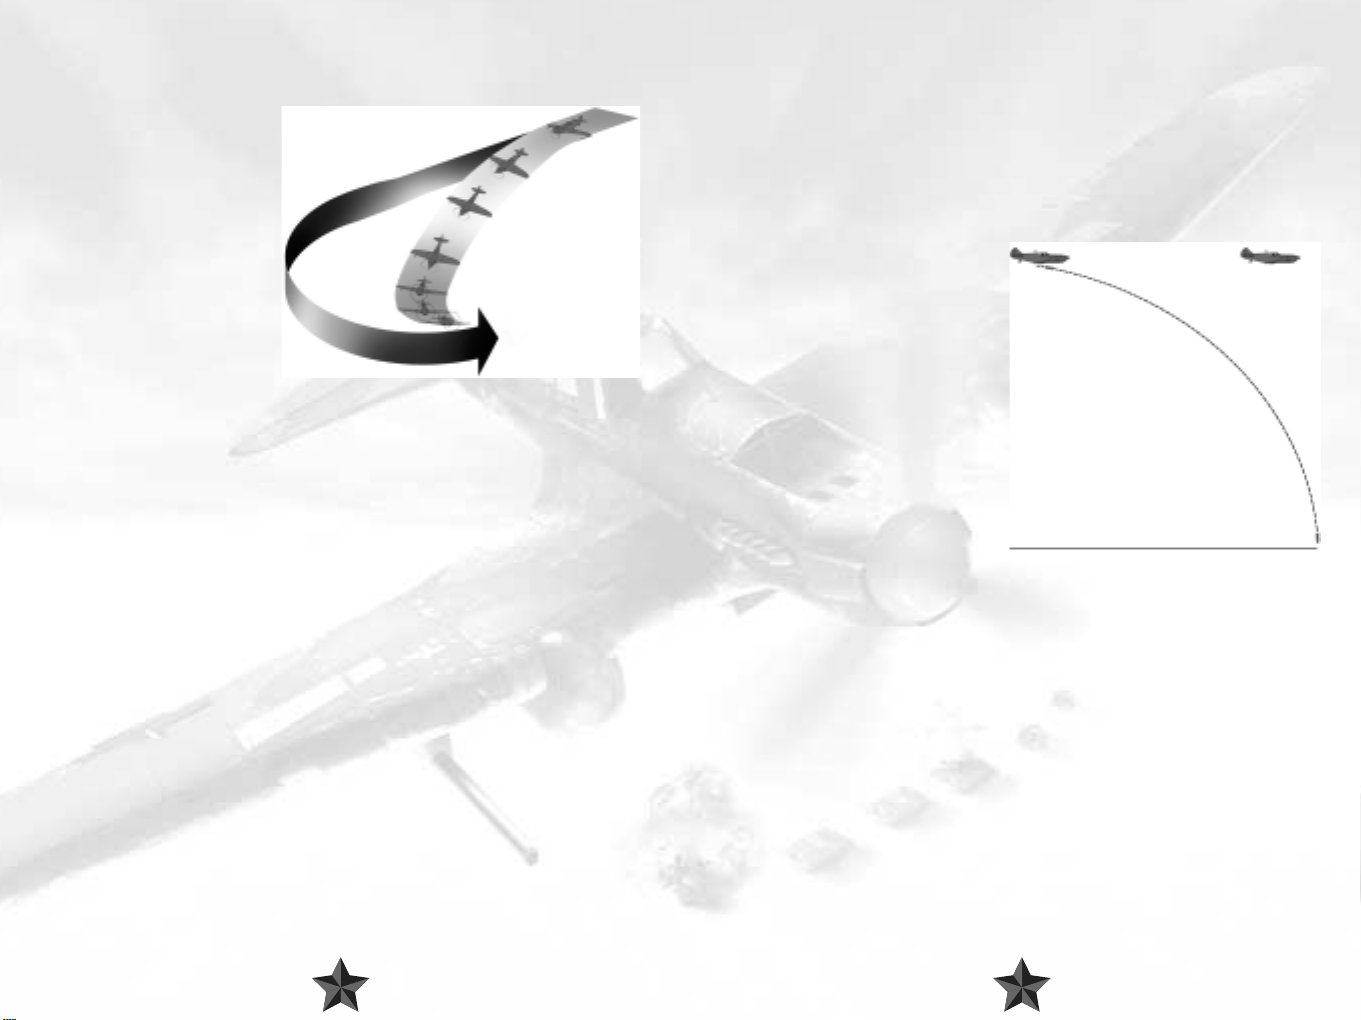
Immelmann
These days the term ‘Immelmann’ is
generally used to refer to a maneuver
also known as a ‘half-loop’. This also
involves trying to change the plane’s
direction by 180 degrees in as little time
as possible, but the pilot achieves this in
a different way, flying an upwards half
loop instead of the maneuver described
above.
Before you begin an Immelmann, you
should again make sure that you are
traveling at sufficient speed, as you will
need to be moving fast to accomplish
the maneuver that follows. Keep the
wings nice and level, pull back on the
stick and move your plane upwards. While you are climbing you should roll to one side
slightly – again, you choose which side. Keep pulling back on the stick until your plane is
flying in the opposite direction to the one in which you started. While you’re doing this you
should keep a close eye on the course indicator or the compass. Using the ailerons, turn
the plane around the roll axis until you ar e flying in a normal flight attitude once again. You
will now have gained altitude and will gradually be picking up speed again, flying in the
opposite direction to the one in which you started.
2322
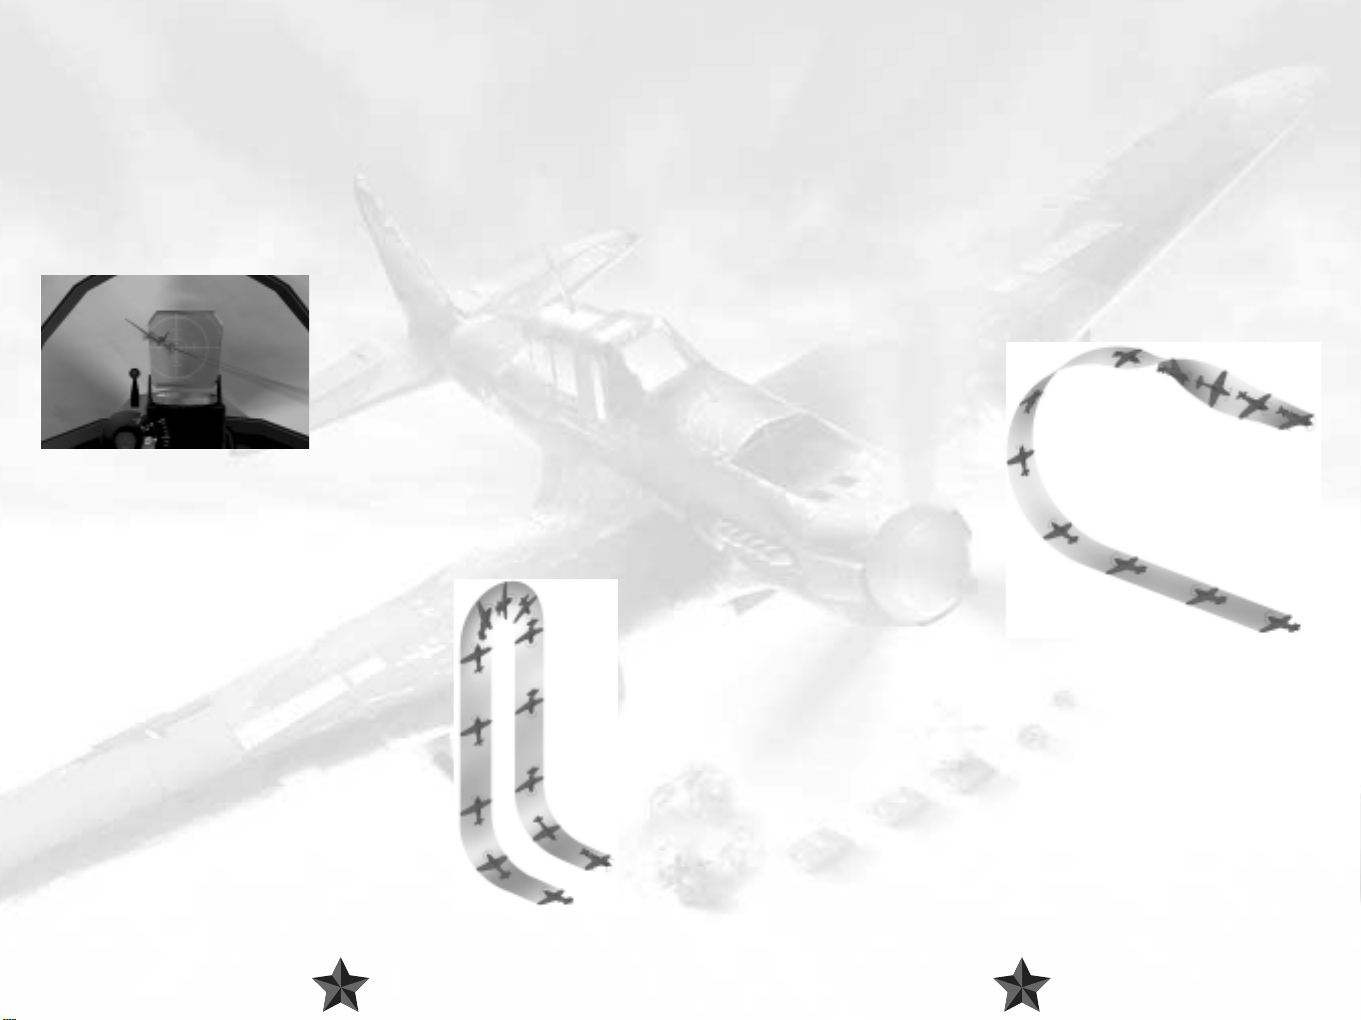
Loop
This well-known maneuver is perhaps the least useful
of all in combat – at least that’s probably the answer
you would get if you could still ask Manfred von
Richthofen, the famous ‘Red Baron’, for his esteemed
opinion of looping. Some pilots, however, just cannot
get enough of this tactic. There are indeed good
reasons not to carry out this maneuver during an air
battle, particularly because it takes a good deal of time
and also requires sufficient speed and altitude to
complete a loop fully. However, you should certainly
be acquainted with this particular trick, if only so that
you know how to react should an opponent in front
of you decide to try it out himself.
Sufficient speed is essential before you can think about attempting a loop. If requir ed, lower
your plane’s nose a little to gain speed. Pull the plane up into the sky with its wings level.
Keep the stick pulled towards you and just wait until you are traveling in your original
direction again. That’s it – it’s as simple as that! Oh yes, to be on the safe side and make sure
that you describe as good a loop as you can, you may find the following trick useful: look
out of the cockpit to one side and keep your eye on the wing tip. If you get everything
right, the tip will describe a perfect circle. Then again, beauty alone doesn’t count for all
that much up in the sky…but it won’t be long before you find that out for yourself anyway!
Yo-Yos 1: High and Low Yo-Yos
“The Y o-Yo is very difficult to explain. It was first perfected by the well-known Chinese
fighter pilot Yo-Yo Noritake, He also found it difficult to explain, being quite devoid
of English”
Squadron Leader K.G. Holland, RAF. Quote from L. Shaw's "Fighter Tactics".
These flying configurations may well have
amusing names, but the idea behind them is
deadly serious. They are offensive maneuvers
which are geared towards the fact that in air
combat it is only very rarely the case that you will
be up against an equivalent opponent in terms
of identical performance data. To put it simply,
never expect to be able to just fly behind your
adversary and thus automatically find yourself in
a good firing position.
He could well have a much more easily maneuverable, quicker plane. Or it could be the
other way round and the (apparent) advantages could be on your side, which
unfortunately doesn’t necessarily make things easier. If you perform a yo-yo maneuver
correctly, you can manage to sneak in behind the enemy directly despite the difference in
speed or turn performance. And that in itself is very often half the battle!
A low yo-yo is a suitable option if the opponent
flying in front of you is quicker than you are, as
it may enable you to catch up with him and
attack him.
Gain speed by allowing your plane to descend.
This also takes you underneath your adversary,
whose view of you will then be impaired or
even obscured completely. Once you have
been able to get close enough and the enemy
is almost directly above you, pull your aircraft
right up. You should have enough surplus
speed to be able to get into a firing position
before your plane slows down too much and
perhaps even stalls.
Yo-yos 2: High and Low Yo-yos: Banking
A yo-yo maneuver can also be deployed
during banking in order to stay behind an
adversary whose plane is more maneuverable
than yours. Again, the trick here lies in using
space as efficiently as you can in order to make
up for any comparative disadvantages which
your plane may have.
2524
Pursue an adversary flying ahead of you and turn at the same time as he does. But instead
of trying to follow him directly, pull back on the stick, thus lifting you above your target
for a moment. Watch out though: you will probably lose sight of him temporarily. Now
roll your plane into a slightly
tighter turn, thus moving yourself
more sharply into the radius of
your opponent’s turn. When he
has turned a bit further, you will
be able to use your height
advantage to pounce on him
from above and should land right
behind him – if you’ve got all your
sums right, that is!
Follow the opponent ahead of
you into the turn, and push
forward on the stick to make your
plane descend. Cut back on the throttle so as not to gain too much speed. Then fly a
longer distance before cutting into your enemy’s tighter turn radius. Pull back on the stick
as you are doing this, lifting your plane straight up. With a little practice you should land
right behind your enemy and thus in a good firing position.
The thing is, there’s no real difference between low and high yo-yos that can be easily
explained. Both can be used in the same situation, often with the exact same end result.
In both you dive and climb, just in different order. It can be argued that you turn better in
a high yo-yo as your plane spends more time at lower speeds – but this is all a matter of
individual plane’s characteristics. The truth is, turns are almost never perfectly horizontal in
combat. If their opponent is climbing, pilots tend to counter with high yo-yos. If an
opponent is diving or is generally below, a low yo-yo is recommended.
4.2 Attacks on Ground Targets
Right, that’s enough about dogfights. In IL-2 Sturmovik, attacks on ground targets play a
particularly important role, and the rules for this type of combat are somewhat different.
Attacking ground targets is all about trying to score a direct hit in as few attempts as
possible whilst remaining in one piece. As you can no doubt imagine, the enemy won’t
exactly welcome your attacks with open arms, and being able to counter his defenses is
of prime importance.
Bombing from High Altitudes
To try and escape fire from ground objects such as tanks, artillery and flak, you can opt to
release your bombs from high altitudes. This strategy certainly helps to protect you, but is,
unfortunately, relatively imprecise, requiring a high degree of skill and practice to be truly
successful. What makes dropping bombs from such great heights so difficult is the speed
which also has to be considered: your bombs won’t just drop to the ground in a straight
line, but will cover a certain distance in flight depending on the speed at which you were
flying when they were released. Large bombers have a bombardier to direct the bombs
and release them, but in an IL-2, for instance, you have to take on these duties yourself.
Why not try this out for yourself? Once
you have identified a target , fly towards it
at high altitude. As you’re making your
way towards your goal, you may wish to
switch to an external view using the F2 or
F7 keys. To hit the target you will have to
release the bombs a long way before the
point at which you actually fly over it.
Have fun practicing!
Dive-Bombing
To improve the accuracy of bombing
missions, dive-bombing tactics were
developed after the First World War. The
idea behind this strategy is to plunge
down on to the target in nearly a straight
line, so that there is almost no horizontal distance between the target and the plane when
the bomb is released. This release technique was developed by the US Air Force and
adopted by the German Luftwaffe, which ultimately led to the development of notorious
aircraft such as the Junkers Ju-87 and Ju-88, which were specially adapted for this type of
bombing. But that’s another story…
2726
 Loading...