


JAGGED ALLIANCE

Jagged Alliance
Game Manual

Gaming Questions?
Hints Hotline Support!
Available 7 Days a Week
If you have a question about Jagged Alliance or need a game hint,
we have someone waiting to help you.
In the United States and Canada
4:00 to 8:00 p.m. Eastern Time
Monday through Friday
12:00 noon to 4:00 p.m. Eastern Time
Weekends and Holidays
Phone (315) 393-6633
Need Technical Support? Phone (315) 393-6644, 9:00 a.m. to 5:00 p.m.
Eastern Time, Monday through Friday. This line is not for game hints.
We could give you answers, but then again, we'd just be making them up.
See Extra: Customer Support for
More Services
1234567890
Jagged Alliance application software
Copyright © 1995 by Sir-tech Software, Inc.
All logos, printed graphic designs and printed materials
Copyright © 1995 by Sir-tech Software, Inc.
All rights reserved. No part of this software or printed material may be reproduced in any way,
or transmitted, in any form or by any means, electronic, mechanical, photocopying, recording, or
otherwise without prior permission in writing from the publisher, except by reviewers, who may
quote brief written passages to be printed or quoted in a magazine, newspaper, radio or television.
Jagged Alliance ® is a registered trademark of Sir-tech Software, Inc. Other trademarked names
are the property of their individual owners and use of such names without mention of trademark
status is not a challenge to their status.

Credits
Developed by .......................................... Madlab Software
Produced by .......................................................Linda(Sirotek)Currie
Original Concept ........................................................... Ian Currie
Game Design ........................ Ian Currie, Shaun Lyng, Linda (Sirotek) Currie
Additional Design ...................................................... Alex Meduna
Storyline & Dialogue ....................................................Shaun Lyng
Programming ............................................... Ian Currie, Alex Meduna
Additional Programming ...................... Ray E. Bornert II, Bret Rowdon
Mike Poullas, David Smoth
Graphics & Animation ........................................ Mohanned Mansour
Additional Graphics ........................... Dave Menehan, Harry Akalestos
Music ........................................................................... Steve Wener
Sound ..................................................................... Sean McDermott
Game Manual .............................................................. Brenda Garno
Playtesters ....................... Glen Anderson, Marty Berkman, Les Berkman,
Steven Berra, Nathan Bruyere, Bill Dedi, Paul Gittens,
Steven Al Hartzell, Megan Hartzell, Nathan Koch,
Phil Lewis, Jim McDonnell, Gila Monster, Moon Mulligan,
Joseph Pacelli, Michael Percell, Declan Rodrigues,
Clancy Shaffer, Dan Sherry, Norman Sirotek,
Robert J. Sowerwine, Jr., F.O. Soup, Quentin Spooner
Voice & Casting Director ............................................... Rick Jones
Associate Director .......................................................Shaun Lyng
Sound Engineer ....................................... Randy Hes Sleeping Young
Voices ........................................ Carl Alacchi, Sonja Ball, Tyrone Benskin
Thor Bishopric, Mark Camancho, Aidon Devine,
Teddy Lee Dillon, Richard Dumont, Hubert Fielden
Sergie Golikov, Al Goulem, Dean Hugopian,
A.J. Henderson, Matt Holland, Gary Jewel, Rick Jones,
John Keonsgen, Alan Legros, Pierre Lenoir, Shaun Lyng,
Liz Macrea, John Moore, Nancy Neilson, Kevin ONeil,
Howard Rsyhpan, Michael Rudder, Terrance Scammel,
Roland Smith, Wayne Spencer, Mark Trafford
Recorded at Playhouse Studio, Ville St-Laurent, Quebec, Canada.

AcknowledgementS
THANKS & GREETINGS TO
Linda (Sirotek) Currie & the rest of the Currie Clan, Lee-Ann Reny, Brandan, Paul,
James, Sandra & Kevin Lyng (and the rest of the family), Big Paul, Nancy and Ron (and
yes, Dad, its finished yet!), Alex Meduna, Mr. & Mrs. Mansour, Mohammed Mansour,
Sabrina Toglia, Everyone at Sir-tech (especially Norm & Rob), Ray Bornert, John Miles,
Vince De Nardo, Mike Poullas, Guido Henkel, Sandra Eber, Eramelinda Boquer
(A.K.A. The Bug), the Pontano Bros., Lloyd Mitchell, Garry Prokosh & everyone at
C.N. - H.R., Cyrus Hogg, Jeff Pasternak, Mr. Stephan Anastasiue, Mark Kasens,
Camelot Info, Crazy Irving, Dantek Computers, Tetrode, C. & H..

Table of Contents
Welcome to Metavira ................................................................ 1
Your Office In Paradise............................................................ 2
Selecting Your Difficulty Level 2
Main Office Screen 2
Contact A.I.M., Sleep (Begin Game) 3
Control Panel, View Team, Save Game 3
Restore Game, Quick Start Party, Leave 3
Step 1: Contacting A.I.M. .......................................................... 4
Contact A.I.M., The A.I.M. Screen 4
The Portrait (Hire), Biography 4
Gear, Info, Basic Statistics 5
Basic Skills, Experience Class 6
Step 2: Hiring Mercs ................................................................ 7
Deciding Who To Take 7
Offering a Contract, Getting the Contract 7
Being Turned Down, Firing a Mercenary 7
Heading to Metavira 7
Step 3: Preparing for the Day ................................................ 8
The Calm Before the Storm 8
Reviewing Your Position 8
The Assignment Screen, Giving Orders 9
How Will the Doctor or Mechanic Perform 10
The Inventory Screen, The Members Inventory 10
The Inventory Pool, Getting Rid of Items 11
Trading Items, Returning to the Map Screen 11
Step 4: Hiring a Workforce ................................................... 12
The Main Screen - Workers Section 12
How Many Workers 12
The Current Employment Situation 12
Hiring Tappers, Hiring Guards, Salary, Cost 13
Step 5: Reviewing Expenses .................................................... 14
The Big Production Picture 14
The Financial Panel 14
Returning to the Map Screen 15
Overview of a Complete Pre-Mission Sector 15
Step 6: Hitting the Beach ...................................................... 16
Hitting Metaviras Beachs 16
The Main Play Screen, Adjusting Your view 16
Automap 16
Mercenary Panels, Locating a Member 17
Sector Number, Quick Inventory, The Cursor 18
Selecting a Mercenary for Action 19

Table of Contents
Destination Cursor - Moving 19
Using Items 20
Moving Items Between Mercenaries, Using Hands 20
DONE (Combat Only), TRAVerse 21
INVentory, MAP 21
OPTions, ABORT 22
Step 7: Moving Out .................................................................. 23
Checking Things Out, Line of Sight 23
Hearing, Waterways 23
Buildings, Finding Objects, Detecting Buried Objects 24
Keeping Your Eyes Open 24
Step 8: The Rules of War ....................................................... 25
Traversing Sectors, Gaining Control of a Sector 25
Gaining Linked Sectors 25
Losing Sectors, Meeting the Enemy 26
Action Points 27
Step 9: Military Maneuvers .................................................... 29
These times, they are a changin 29
Taking Turns & Action Points 29
Targeting an Enemy, Guards Help 29
The Firing Process, Moving to Another Merc 30
Firing Features, Once the bullets on its way 31
Taking a Bullet, Reloading, Jammed Guns 31
Explosives & Deadly Gases, Taking Damage 32
Medic!!! 32
Worker Casualties, Enemy Health 33
Before alls said and you click DONE 33
About Santino & His Troops 33
Step 10: At Days End ............................................................... 34
Its Killer Time, The Post Day Screen - I 34
The Post Day Screen - II 35
Reviewing Statistics, Wrapping it Up 35
Extra: Bobs Bullet Bunker ...................................................36
Extra: Mercenary Profiles .................................................... 38
Extra: Customer Support .......................................................48
Index ........................................................................................50

Disclaimer
Neither Sir-tech Software, Inc., the author(s), distributor(s) or seller(s) of this
product shall have any liability or responsibility to the purchaser or any other person
or entity with respect to any liability, loss or damage caused or alleged to be caused
directly or indirectly by this product, including but not limited to an interruption
of service, loss of business and anticipatory profits or consequential damages
resulting from the use or operation of this product. This product will be exchanged
if defective in the manufacture, labeling or packaging, but except for such
replacement the sale or subsequent use of this program material is without warranty
or liability.
Note: This product is copyrighted and all rights are reserved. The distribution and
sale of this product are intended for the personal use of the original purchaser only,
and for use only on the computer system(s) specified herein. Renting this product,
or duplicating and selling or renting or otherwise distributing this product, in any
form, is hereby expressly prohibited.
Epilepsy Warning
A very small percentage of individuals may experience epileptic seizures when
exposed to certain light patters or flashing lights. Exposure to certain light patterns
or backgrounds on a television or a computer screen or while playing video or
computer games may induce an epileptic seizure in these individuals. Certain
conditions may induce undetected epileptic symptoms even in persons who have
no history of prior seizures or epilepsy. If you, or anyone in your family, has an
epileptic condition, consult your physician prior to playing. If you experience any
of the following symptoms while playing a video or computer game: dizziness,
altered vision, eye or muscle twitches, loss of awareness, disorientation, any
involuntary movement or convulsions, IMMEDIATELY discontinue use of this
product and consult your physician before resuming play.

WELCOME TO METAVIRA
Jagged Alliance is the first in a new series and a new genre of strategy role-
playing games. Combining a delicate mix of high technology, tactical
maneuvers and strategic planning with a nerve-racking storyline, Jagged
Alliance will take your strategic and role-playing talents to their very limits.
Landing on Metavira, you learn the plight of the island, the Fallow tree and
its precious and precariously rare medicinal sap. You'll meet Jack and Brenda
Richards, the father and daughter team whose very experiments with the
Fallow's liquid have the ability to save countless numbers of lives. And you'll
learn of Lucas Santino, the once trusted, fellow research scientist, who has
nearly taken over the island . . . his greed means more than any life or
lifesaving discovery possibly could.
But you're here to change all that by getting Jack and Brenda back into
business and their processed sap out to those who need it desperately.
You'll call upon your contacts within A.I.M., the Association of Interna-
tional Mercenaries, and check out the dossiers of each hired gun while
reviewing their wartime toys. You'll interview and attempt to sign on a group
of mercenaries who meet the rigorous demands of your campaign. Then, if
they agree to join you, it's off to Metavira and with Jack's help, you'll try
to take the island back.
From your headquarters, you'll review your position each morning and set
your strategy for the day. Through strategic planning and tactical maneuver-
ing, you'll determine how, when and where the mercenaries move. Then,
you'll put your plan into action. Of course, Santino's thugs will be on the
move, too.
As you muscle sectors into your control, you'll gain access to Fallow trees
holding the sap that Jack and Brenda urgently need. By recruiting natives as
tappers and guards, you'll harvest the trees' bounties and earn cold, hard cash
to support your continuing efforts. Eventually, Jack and Brenda hope you'll
rid Metavira of Santino once and for all.
And so it begins . . . an individual campaign among campaigns, your effort to
take back the island sector by precious sector.
The shortest and surest way of arriving at real knowledge
is to unlearn the lessons we have been taught,
to remount first principles,
and to take nobody's word about them.
Bolingbroke
Shut up and get on with it.
Frank Hitman Hennessy
1

YOUR OFFICE IN PARADISE
The helicopter touches down as the sun burns the afternoon sky. Palm leaves
whip in the wind, and great clouds of whirling dust sting the faces of those who
have been waiting for your arrival.
They approach the craft, urging you off the 'copter and into their compound.
Jack and Brenda Richards are people with no time to waste. Their quick but
unceremonious welcome is all you receive before you're ushered inside to
begin preparations for the days ahead.
So begins your jagged alliance with this island, Metavira, its people, your
adversaries and the members of A.I.M. Setting up your equipment, you steel
yourself for the tasks ahead.
Select START NEW GAME from the main menu to begin Jagged Alliance.
Selecting
Your
Difficulty
Level
Main
Office
Screen
Before you head off to blast Santino's men, Jagged Alliance allows you to select
a difficulty l evel that's fitting with your talents and yearning for challenge. Once
you select the level of difficulty for a particular game, it may not be changed later on.
So, make sure you choose it carefully.
In general, your choice will determine how tough your campaign will be. It
affects the size of the enemy's army, their aggressiveness and their cunning
among other things. If this is your first shot at a strategy or a role-playing game,
you might want to try it on the Easier level. The Harder setting is
recommended only for seasoned, hard-core gaming veterans who want the very
best (worst?) that Metavira and Lucas Santino and his grunts are capable of.
Once you select the level of difficulty, you'll arrive at your headquarter base on
the island. From here, you can access many of the game's features and, most
importantly, you can contact A.I.M. As you move the mouse around the
screen, the options will become available to you.
Restore GameSave GameView Team
Control
Panel
2
Sleep
(Begin Game)
Contact
A.I.M.
Leave

YOUR OFFICE IN PARADISE
On your desk rests your sole method of communicating wi th A. I .M. Selecting
CONTACT A.I.M. opens the gateway and gives you access to the biographies and
dossiers of each of the mercenaries represented by The Association of
International Mercenaries. From here, you'll be able to check out and
hopefully hire on the beginnings of your team.
Once you've sent for the mercenaries that will form your team, select SLEEP to
rest up and to prepare for the next day's activities. (It's a good time to save your
game, too.) You'll wake up refreshed and ready to tackle a new day on
Metavira.
Only players who have at least one mercenary in their team can
sleep through the night and begin the game. Otherwise, you'd
just toss and turn... provided Santino didn't take your bed out
from under you. If you haven't hired mercenaries yet, CONTACT
A.I.M.
Clicking on the metal cabinet allows you to customize the game configuration
to your liking. Complete information on the CONTROL PANEL's features is in
the Quick Reference Card.
Sliding the loose board on the window gives you a chance to review your team
and your status on Metavira as it exists in the game you are currently playing.
You may use this option to review each of your saved games by loading another
game and returning to this panel.
As you and your mercenaries gain ground on Metavira, you'll likely want to
save your progress. To do so, just click the top half the wall calendar. Jagged
Alliance will ask you to select a slot for your SAVE GAME and will also allow you
to give it a descriptive title. You may save up to ten different games.
Contact
A.I.M.
Sleep
(Begin
Game)
Control
Panel
View
Team
Save
Game
Move the pointer over the bottom-half of the wall calender, and select
RESTORE GAME to load a previously saved game. Jagged Alliance will show you
a list of your saved games. Just click one to restore it. You can use the View
Team option to review the particular game you've loaded.
If you want to get right into the meat of the Metavira, select RESTORE GAME and
choose QUICK START, NORMAL DIFF. The Quick Start Team consists
of a well-balanced, carefully chosen group of eight mercenaries with all the
necessary skills and equipment to give you a good start on your campaign. Keep
in mind, though, that this team is by no means the best possible starting team.
What works best for you depends on your personal preferences. There's lots of
mercs to choose from.
When your day's adventure has come to an end, move the cursor over the door
and select LEAVE. Jagged Alliance will return you to the main menu.
Restore
Game
Quick
Start
Party
Leave
3
STEP 1: CONTACTING A.I.M.
Contact
A.I.M.
The
A.I.M.
Screen
The Association of International Mercenaries acts as the sole agent for those
individuals making a name for themselves in the shady underworld of the hired
gun. By selecting CONTACT A.I.M. from the Main Office menu, the complete
files on these mercenaries are available for your inspection.
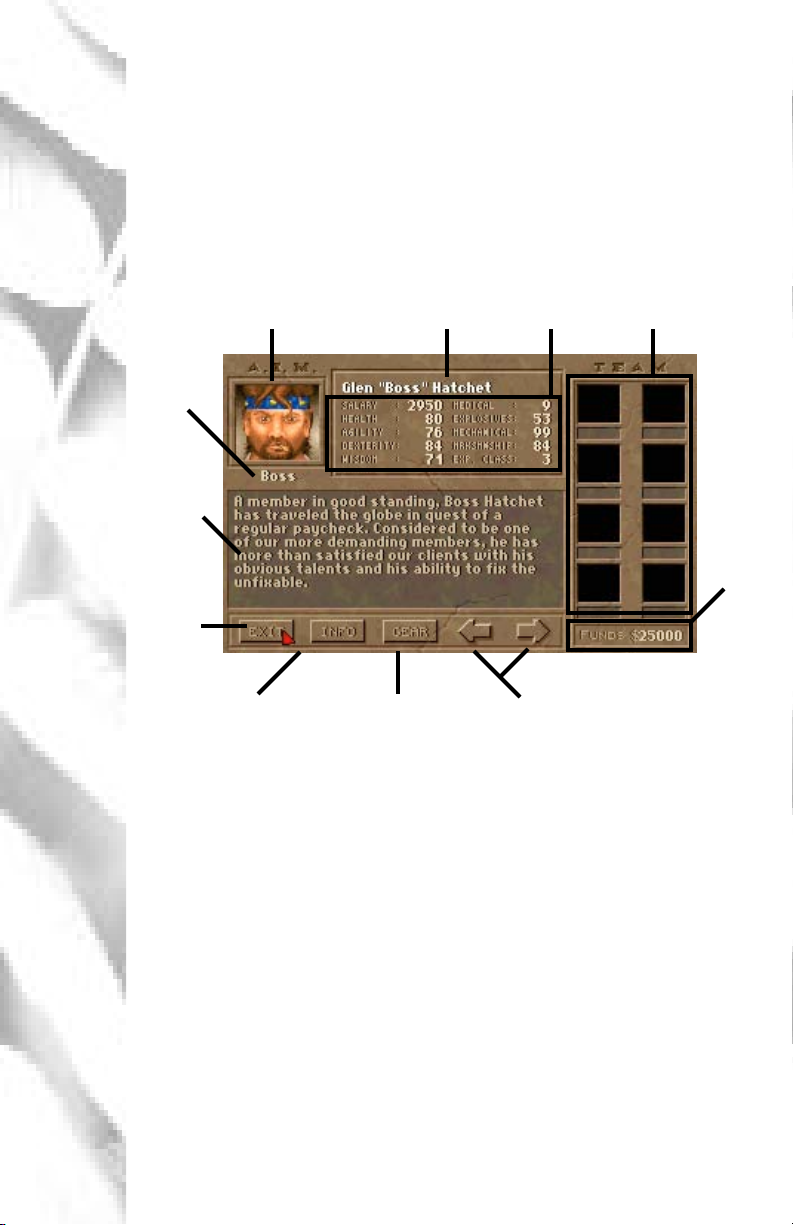
When you first CONTACT A.I.M., you'll see a mercenary's screen similar to the
one below.
New Mercs & Current
Team Members
Your
Funds
(Click here to hire)
Field
name
BIO or
Gear
Info
Exit
A.I.M.
Portrait
Name Statistics
The
Portrait
(Hire)
Biography
4
Detailed Status
Information
Toggles Between
BIO and GEAR
Windows
Move to the Next or
Previous Mercenary
Reviewing the mercenaries' files, you hope to gather a team up to the rigors
of Metavira. Of course, they will be reviewing your credentials, too.
A mercenary's portrait gives you a look at who you're dealing with. Mercenar-
ies who are not currently available for hire will have "On Assignment stamped
across the file's portrait (after all, you're not the only one who's hiring).
Left clicking on a mercenary's portrait offers him a contract with your
[
team. Should the merc accept, his file moves to the Team Member
section. If he's on assignment, it tells you when he'll return.
Right clicking on a member's portrait scrolls you through A.I.M.'s files
]
quickly.
Through A.I.M.'s intense network, biographies are kept of all its mercenaries.
These snapshots allow you a look into the personality and skills of a potential
member, and give you a chance to judge his or her suitability for your team.

STEP 1: CONTACTING A.I.M.
Clicking on the GEAR button toggles to the gear screen. Mercenaries may carry
a personal collecti on of goodies that they consider necessary tools for their trade
(medical bags, lockpicks, etc.). Click on an item to get its description.
Selecting INFO, Jagged Alliance reveals to you details on your current team. By
checking out the team's average marksmanship, intelligence and other mean
stats, you'll be able to get an idea of how they'll perform in the field.
In general, a mercenary's statistics represent his or her overall ability in an area
and are shown as a number between 1 and 100 with 100 being the top of the
line. Through training and field missions, though, some mercenaries may even
increase some of their statistics. As their statistics increase, naturally,
mercenaries become more valuable in the overall scheme of things and may
want to up the price of their . . .
Salary. Representing the amount the mercenary charges for a day of his or her,
uh, services, this payroll comes directly from your pocket. Be careful not to
spend yourself dry with high-priced guns until you can afford their exceptional
talents.
Health represents the general, physical well-being of a mercenary and the
amount of damage he can take before death. A mercenary with 100 health
is in perfect physical condition. A mercenary with 10 health, let's say, would
be better off carried in another member's backpack. Health also determines
the overall performance of a mercenary and the effectiveness of other statistics
and skills. It's hard to perform any job well when your arm's falling off.
Gear
Info
Basic
Statistics
Salary
Health
Agility is a measure of how well a mercenary reacts physically to a situation,
whether it be a blast from a shotgun or something as simple as avoiding a crack
in the sidewalk. Generally, agility affects the merc's traveling speed and the
speed, coordination and control he or she displays while recognizing and
reacting to an event.
Dexterity measures a mercenary's ability to perform delicate or precise move-
ments correctly. For certain skills, like medical talents, a high dexterity is very
important - having read all the books doesn't do much if your hands shake
during surgery. In general, dexterity affects a member's ability to use his skills
to the best of his ability and the success of any movement requiring hand
precision.
A mercenary's wisdom affects his ability to learn from experience and training.
Naturally, it also affects his interpretation of things. (What gunshot? I thought
you burped.) Highly intelligent members have no difficulty learning the
complex inner-workings of intense military items. Those not so mentally
blessed take more time to absorb the intricacies of a skill or action. (It's all
right, Norm. Next time, keep the pin and throw the grenade, okay?)
Agility
Dexterity
Wisdom
5

STEP 1: CONTACTING A.I.M.
Basic Skills
Medical
Explosives
Mechanical
All A.I.M. members have four basic skills that define the heart of the mercenary
trade. Like statistics, skills range from 1 to 100 and may increase with practice.
Mercenaries tend to get hurt; it's all a part of the job. Whether it be a life-
threatening bullet wound or something as mild as a thorn's scratch, medical
treatment is required. Metavira, though, doesn't have a hospital (unless of
course you count Bob's Wala Wala Band-Aid® and Bullet Bunker), and so,
mercenaries must rely on one another for treatment.
A member's medical skill represents his or her current medical knowledge and
ability to heal the wounded. A highly skilled mercenary could perform surgery
with plastic cutlery, while a low skill mercenary would fatally wound himself
shaving.
A member's explosives skill shows his understanding of the fine art of
pyrotechnics and determines his ability to create and use explosives without
blowing himself through the roof and destroying surrounding fauna. It also
reflects his ability to detect and diffuse explosives hidden by enemies.
Many items that a mercenary uses or comes into contact with on a daily basis
are mechanical in nature. Their firearms, radios, locks . . . and a myriad of other
goodies consist of tumblers, assemblies and electronic do-hickeys that require
a mechanically skilled hand to keep them in top operational order. Mechani-
cal skill rates a merc's ability to repair damaged, worn-out or broken items,
jimmy jammed locks and bypass locked devices, to create mechanical objects
from basic supplies and to manipulate existing objects to form new objects.
Marksmanship
Experience
Class
6
A keen eye and a steady hand contribute to the sought-after talents of the
marksman. A mercenary's marksmanship skill reflects his or her ability to hit,
precisely, any given target with a firearm.
Of all mercenaries' traits, experience class is the most importantit reflects
the sum of their abilities, their years in A.I.M., the amount of combat they've
seen and how knowledgeable they are in the field. All in all, it reflects a level
of talent and of hardcore exper ience. Without question, a member's experience
class is the definitive statement of who they are.
As mercenaries move through A.I.M.'s ranks and gain in experience class, they
also gain certain benefits:
Their ability to detect boobytraps and ambushes improves
They, too, become sneakier and their stealth increases
They are able to focus their sights on an enemy target more quickly
and accurately
Their overall proficiency in field operations and skill increases
Their salary may increase (mind you, it's a benefit to them)

STEP 2: HIRING MERCS
After reviewing the files of A.I.M., you likely have ideas about certain
mercenaries and may want them to join your team. Assembling a teama well-
balanced team that won't get laughed at (Hey, look, Bob, it's the Wimp Brigade
with their big, bad waterguns! Ooooooo!)isn't as easy as you might think. So,
before you wantonly offer contracts to every mercenary and his or her brother,
take some time to think things over.
How many mercenaries do you need on your team? Take the
minimum number necessary to complete your objectives.
Try to get a good mix of skills on your team. A group of four
mechanics isn't going to scare anybody (surrender those trees now,
buddy, or we'll fix your car).
When you've decided who you want for your team, click his or her portrait,
and the meeting begins. The mercenary mulls over your offer, and may or may
not accept a position on your team.
Once you successfully contract a mercenary for your team, his or her portrait
will appear in the Team Members section of the A.I.M. screen, and worldwide
the file will be stamped ON ASSIGNMENT. The portraits of the mercenaries who
have just signed on are grayed. Those mercenaries, meanwhile, get ready for
their flight to Metavira. Those in your employ and already on the island are
in full color.
Sometimes negotiations don't go so well. Mercenaries can turn down your
offer of employment for many reasons, all of which depend on their personali-
ties and how they react to your actions (or lack thereof) in the field.
Remember, these men and women have their own attitudes, allies and
enemies, and, since you're not their only employer, you really need them more
than they need you.
Deciding
Who to
Take
Offering a
Contract
Getting the
Contract
Being
Turned
Down
To remove a mercenary from your team, left click on his or her portrait in the
Team Members section. To just check out their stats, right click.
Members who have been hired but have not been transported to
Metavira won't be too upset. No time lost, they figure.
Members who have been transported to the island, on the other hand,
may not take firing so lightly. Hey, they're just like you and me. (You
want to fire me because you hate the manual? Oh. Okay, no problem.
Hey, listen Norm. You wanna go out for a beer after I clean out my
desk?)
Select EXIT from the A.I.M. screen to end your communications. If you've
hired on any new members, A.I.M. will transport them to the island for a fee.
Soon, they'll be flying in, getting their first look at a war zone they'll eventually
know very well. Note: Only one helicopter transport may be made per day,
and A.I.M. will not be open for discussions until the following day.
Firing a
Mercenary
Heading to
Metavira
7
STEP 3: PREPARING FOR THE DAY
The Calm
Before the
Storm
Once you have selected your team or added new members and are secure at
headquarters, select SLEEP to give your body and mind the only R&R either are
likely to see in the next 24 hours. As you wake with the sun's rise, you'll find
your mercenaries on the island and ready to tear into the day.
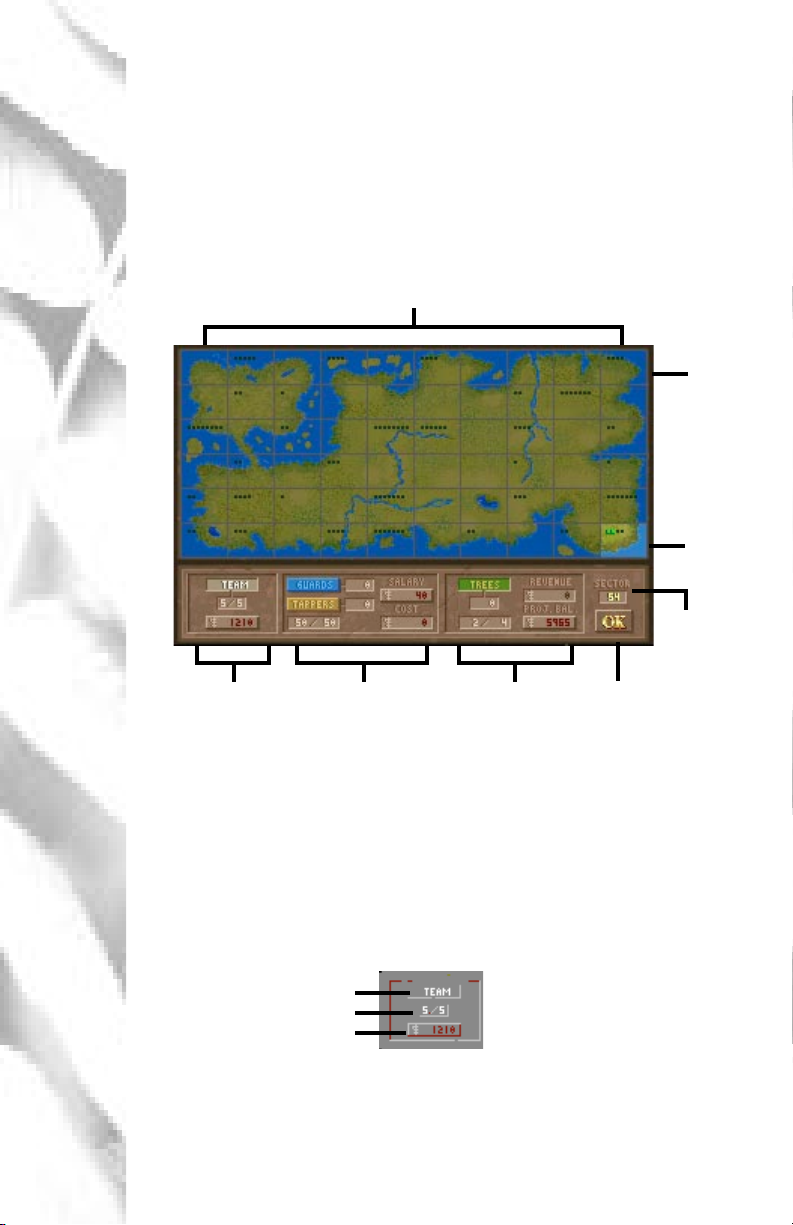
From the Map Screen below, you'll set the day's strategy by determining the
activities of your team members.
Sectors 1 through 60
Enemy
Sectors
(dark)
Sector
Owned
Sector
Highlighted
Team
Section
Worker
Section
Production &
Income Section
Begin
Work
Reviewing
Your
Position
Placing
Your Team
8
When your campaign first begins, you won't have a choice of starting
locations. You have only one in your control! Later, though, when you've
fought to regain control, you can place mercenaries in any sector you own that
is linked by land to the home base. Of course, your team always travels as a
team, and can only occupy one sector at a time.
To place your mercenaries in a sector, first click on the TEAM button in the
Team Section of the Map Screen. Next, move the pointer over Metavira's
map. Jagged Alliance traces each sector with a white box as you pass over it.
Team Button
On Duty Mercs/Total Mercs
TOTAL SALARY Button
Left click in the sector
[
to place your team.
You'll see a white icon
for each team member.
Right click to remove
]
your team.
With a starting point selected, hand out assignments for the day. Click the
TOTAL SALARY button in the Team Section to move to the Assignment Screen.
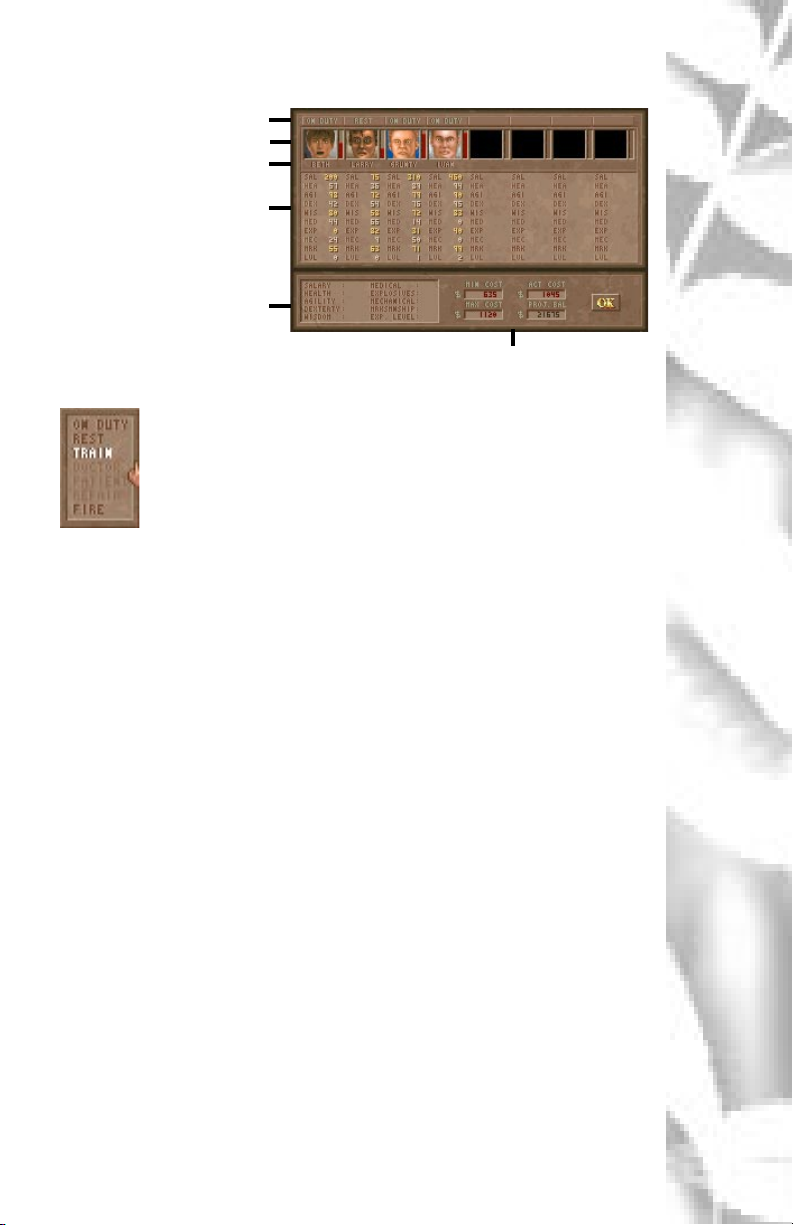
STEP 3: PREPARING FOR THE DAY
Assignment Button
Portrait (click to view inventory)
Name
Statistics
Mercenary Statistics
(when only one is selected)
Team Finance shows you what you're spending as
well as minimum and maximum budgets
When you begin Jagged Alliance, all your mercs are ON DUTY,
just the way they should be fresh off the 'copter. However, as
the campaign progresses, you might need your merc to tend to
other matters. Whatever the case, click the desired assignment
to dish out your orders.
ON DUTY (Full Salary): Off to the field to tear Santino apart.
REST (Half Salary): Taking a break. Resting heals some wounds, and
although natural healing is a slow process, it helps recoup some energy to
face another day. It's cheap, too.
TRAIN (Full Salary): Grunts may choose to stay at the base camp to hone
their marksmanship, medical, mechanical or explosives skills. Mercs
training in marksmanship must have a gun in their main hand. They may
also opt for a physical workout that might improve their health, dexterity
and agility. Grunts who are already quite proficient in an area will gain little
if anything, while novices may initially improve their skills quite rapidly. A
mercenary's ability and willingness to learn affects the training's outcome.
DOCTOR (Full Salary): Administering proper treatment and permanent
healing to fellow members who are PATIENTS. Naturally, a doctor with
actual medical skill is preferred and a medical or first aid kit must be in the
doctor's hand. Additional kits may be required (in any pocket) to use a
doctor's healing potential fully. Doctors requiring treatment will tend to
themselves first and will then divide their attention to all patients equally.
PATIENT (Half Salary): Receiving permanent healing and attention for
medical wounds by an assigned doctor. Unlike Rest, the grunts receive
the benefits of rest and doctoring. Note: should a medically skilled
mercenary require healing, select Doctor; he or she will tend to his or her
own wounds first (remember, while doctoring, he or she makes full salary).
REPAIR (Full Salary): Repairing items that wear out in the high heat,
humidity and action of Metavira. To repair items, a mechanic must have
a tool box in his or her main hand and the broken item in his or her
secondary hand. Other items needing repair may be placed in the merc's
pockets; he or she will fix the items in the pockets in a top-down order. The
location of the main hand, pockets, etc. is covered in the next section.
FIRE (Ah... No Salary): Ciao!
The
Assignment
Screen
Giving
Orders
9
STEP 3: PREPARING FOR THE DAY
How will
the Doctor
or Mechanic
Perform?
The
Inventory
Screen
Picking Up
& Checking
Out Items
The
Member's
Inventory
Doctors and mechanics may see the potential effectiveness of the day's healing
or repairs on their portrait. You'll see something like 28/32. In this case, the
mercenary's best rating is 32 points. Because of outside factors, maybe his
equipment isn't up to par, he'll only be able to provide 28 points of healing or
repair to the patients or objects.
While on the assignment screen, you may also review and manipulate your
mercenary's inventory. Left clicking on his or her portrait moves you to the
Inventory Screen.
Right click on an item to get its description.
]
Left click on an item to pick it up. You may then move the item to
another slot, the inventory pool or another member. Left click again
[
to place it.
Shift/Left click on a group of items (like three grenades) to pick all
S
of them up.
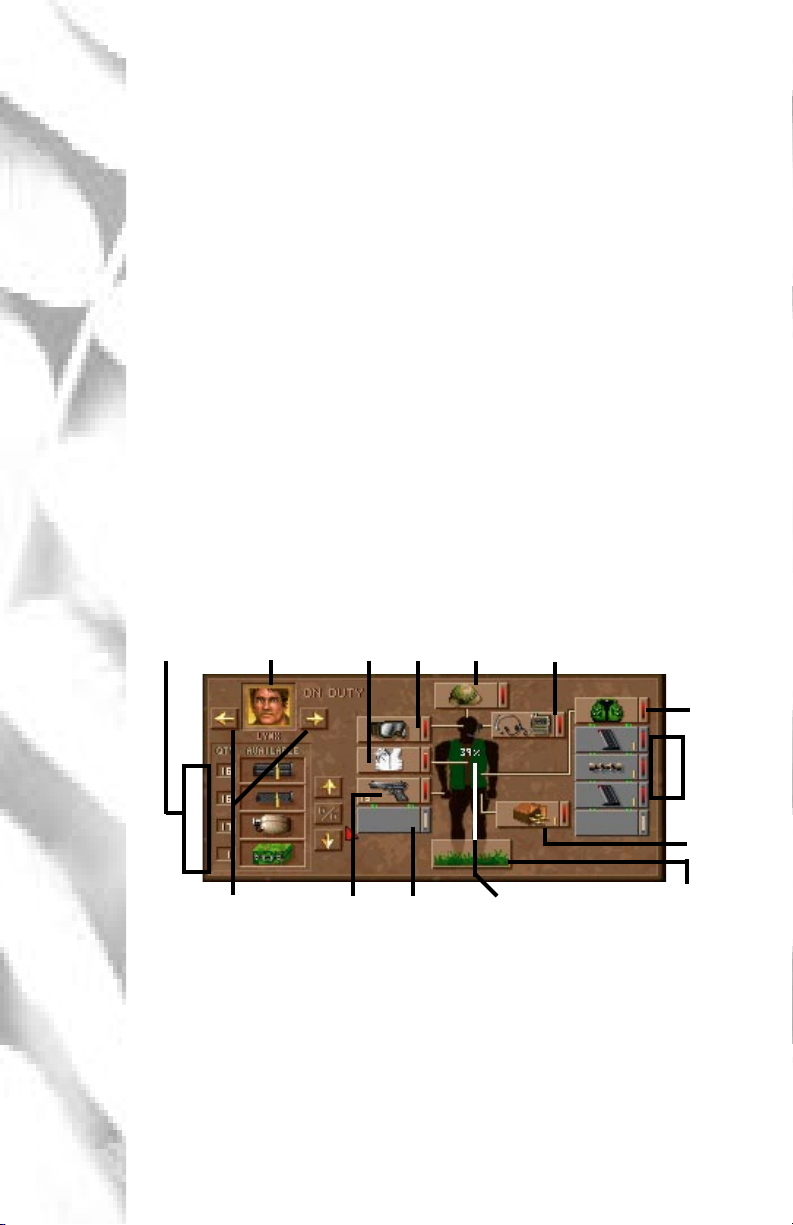
There are two parts to the inventory screen: the member's inventory on the
right and the inventory pool on the left.
The member's inventory contains items that he or she is currently equipped
with and has sole access to.
Inventory
Pool
Exit
Chest
Cover
Face
Gear
Head
Gear
Communications
Device
10
Vest
Vest
Pockets
Secondary
Hand
Next/Previous
Merc
Main
Hand
Attachment
Position
Protection
Percentage
Drop Item to
Ground
Within each slot you'll see a picture of the item, and its working status if
applicable. For grouped items, the number of individual items is also shown.
For items that hold ammunition, you'll see the remaining ammo amount
instead.
The Head Gear, Communications Device, Face Gear and Chest Cover slots
hold corresponding items. The Main Hand, Attachment Position, Secondary
Hand and Vest slots, though, are somewhat different and a bit more complex.

STEP 3: PREPARING FOR THE DAY
Vests have a varied number of pockets that may be used to store single or
grouped objects. Jagged Alliance will add an inventory slot for each pocket the
vest has. You can transfer the vest to another member or the inventory pool
with its pockets full, or you may empty the pockets one at a time.
The Main Hand holds whatever a mercenary plans to use. Most often, the
grunt will be holding a rifle or handgun or some other article of war. Other
times, depending on the situation, it could be his medical bag or toolkit.
Mercenaries use their Attachment Position to hold and manipulate items.
When an item is placed in the Main Hand, the open slot below may be used
to add an attachment to the item or to permanently combine items. Rifles, for
example, may be fitted with scopes. The working status of any new object
created or improved upon typically depends on the mercenary's talent and the
quality of the items themselves. The attachment position can also be used to
take things apart, like a message in a bottle, for instance. Not all items can be
put together and taken apart like this, but Jagged Alliance always displays an
attachment slot so you can be creative and experiment.
Mercenaries have a secondary position and hand where they hold items that
may be called into play. Items in the secondary hand can be transferred to the
main hand quickly and easily during play by right clicking on the item in the
secondary hand on the main play screen.
The inventory pool is a stockpile of items at home base. While still at
headquarters, members can grab anything from or put anything into the pool.
While in the field, items in the inventory pool remain at headquarters and
aren't accessible . . . nor are they subject to the normal wear and tear of military
maneuvers. Using the arrows to the right of the pool, you can scroll through
the collection. Clicking on the % button toggles between the working
percentage status and quantity of an item. When you add items to the
inventory pool by clicking on any slot, occupied or not, the pool automatically
adds a slot and places the item with others like it (guns go together for
instance).
Vests
Main Hand
Main Hand
Attachment
Position
(Hold or
Manipulate
Items)
Secondary
Hand
The
Inventory
Pool
Before the day actually begins, your mercenaries can PERMANENTLY rid
themselves of unwanted items. While in the inventory screen, just pick the
item and drop it to the ground at the mercenary's feet. Click the item in the
garbage can followed by OK to permanently drop it.
The arrows to the right and left of the mercenary's portrait allow you to scroll
through the team. You can also move items between members this way. Left
click on an item to pick it up, and scroll through to the desired recipient.
Once you've hired your personnel, equipped them and given them their daily
assignments, click on mercenary's portrait (if you're still in the inventory
screen). From the Assignment Screen, click OK to return to the Map
screen.
Getting
Rid of Items
Trading
Items
Returning
to the Map
Screen
11
 Loading...