


RAS 115.04 E
465 282_001
Instruction manual |
Sander |
Page 2 - 7 |
|
IMPORTANT: Read and understand all instructions before using. |
|
Guide d’utilisation |
Ponceuse |
Page 8 - 13 |
|
IMPORTANT: Lire et comprendre toutes les instructions avant de |
|
démarrer les travaux. |
|
Manual de instrucciones |
Lijadora |
IMPORTANTE:
Página 14 - 19 Lea y comprende todas las instrucciones antes de usar.
1

GENERAL SAFETY RULES
WARNING! Read and understand all instructions. Failure to follow all instructions listed below, may result in electric shock, fire and/or serious personal injury.
SAVE THESE INSTRUCTIONS
Work area
1 Keep your work area clean and well lit.
Cluttered benches and dark areas invite accidents.
2 Do not operate power tools in explosive atmospheres, such as in the presence of flammable liquids, gases, or dust. Power tools create sparks which may ignite the dust or fumes.
3 Keep bystanders, children, and visitors away while operating a power tool.
Distractions can cause you to lose control.
Electrical safety
4a Grounded tools must be plugged into an outlet properly installed and grounded in accordance with all codes and ordinances. Never remove the grounding prong or modify the plug in any way. Do not use any adapter plugs. Check with a qualified electrician if you are in doubt as to whether the outlet is properly grounded. If the tool should electrically malfunction or break down, grounding provides a low resistance path to carry electricity away from the user.
4b Double insulated tools are equipped with a polarized plug (one blade is wider than the other.) This plug will fit in a polarized outlet only one way. If the plug does not fit fully in the outlet, reverse the plug. If it still does not fit, contact a qualified electrician to install a polarized outlet. Do not change the plug in any way. Double insulation eliminates the need for a three wire grounded power cord and grounded power supply system.
5 Avoid body contact with grounded surfaces such as pipes, radiators, ranges and refrigerators. There is an increased risk of electric shock if your body is grounded.
6 Don’t expose power tools to rain or wet conditions. Water entering a power tool will increase the risk of electric shock.
7 Do not abuse the cord. Never use the cord to carry the tools or pull the plug from an outlet. Keep cord away from heat, oil, sharp edges or moving parts. Replace damaged cords immediately. Damaged cords increase the risk of electric shock.
8 When operating a power tool outside, use an outdoor extension cord marked ”W-
A” or ”W”. These cords are rated for outdoor use and reduce the risk of electric shock.
Personal safety
9 Stay alert, watch what you are doing and use common sense when operating a power tool. Do not use while tired or under the influence of drugs, alcohol, or medication. A moment of inattention while operating power tools may result in serious personal injury.
10 Dress properly. Do not wear loose clothing or jewellery. Contain long hair. Keep your hair, clothing, and gloves away from moving parts. Loose clothes, jewellery, or long hair can be caught in moving parts.
11 Avoid accidental starting. Be sure switch is off before plugging in. Carrying tools with your finger on the switch or plugging in tools that have the switch on invites accidents.
12 Remove adjusting keys or switches before turning the tool on. A wrench or key that is left attached to a rotating part of the tool may result in personal injury.
13 Do not overreach. Stand on both feet an maintain proper footing and balance at all times. Proper footing and balance enables better control of the tool in unexpected situations.
14 Use safety equipment. Always wear eye protection. Dust mask, non-skid safety shoes, hard hat, or hearing protection must be used for appropriate conditions.
Tool use and care
15 Use clamps or other practical way to secure and support the workpiece to a stable platform. Holding the work by hand or against your body is unstable and may lead to loss of control.
16 Do not force tool. Use the correct tool for your application. The correct tool will do the job better and safer at the rate for which it is designed.
17 Do not use tool if switch does not turn it on or off. Any tool that cannot be controlled with the switch is dangerous and must be repaired.
18 Disconnect the plug from the power source before making any adjustments, changing accessories, or storing the tool.
Such preventive safety measures reduce the risk of starting the tool accidentally.
19 Store idle tools out of reach of children and other untrained persons. Tools are dangerous in the hands of untrained users.
20 Maintain tools with care. Keep cutting tools sharp and clean. Properly maintained tools, with sharp cutting edges are less likely to bind and are easier to control.
2
21 Check for misalignment or binding of moving parts, breakage of parts, and any other condition that may affect the tools operation. If damaged, have the tool serviced before using. Many accidents are caused by poorly maintained tools.
22 Use only accessories that are recommended by the manufacturer for your model. Accessories that may be suitable for one tool, may become hazardous when used on another tool.
Service
23 Tool service must be performed only by qualified repair personnel. Service or maintenance performed by unqualified personnel could result in a risk of injury.
24 When servicing a tool, use only identical replacement parts. Follow instructions in the Maintenance section of this manual. Use of unauthorised parts or failure to follow Maintenance instructions may create a risk of electric shock or injury.
sanding, sawing,Variousgrinding,dust createddrilling andby powerother construction activities contains chemicals known (to the State of California) to cause cancer, birth defects or other reproductive harm. Some examples of these chemicals are: •lead from lead-based paints,
•crystalline silica from bricks and cement and other masonry products, and
•arsenic and chromium from chemicallytreated lumber.
The risk from these exposures varies, depending on how often you do this type of
work. To reduce your exposure to these chemicals: work in a well ventilated area, and work with approved safety equipment, such as dust masks that are specially designed to filter out microscopic particles.
Technical data |
RAS 115.04 E |
||
Wattage |
500 Watt |
||
No load speed |
1500 - 4000 rpm |
||
Tool dia. |
up to 115 mm / 4.5" |
||
Spindle thread |
M 14 |
||
Weight |
|
1.6 kg / 3.5 lbs |
|
Safety standard |
/ II acc. to UL 745, |
||
Symbols |
CSA C22.2 No. 745 |
||
|
|||
V |
volts |
|
|
A |
amperes |
|
|
Hz |
hertz |
|
|
W |
watt |
|
|
n |
|
alternating current |
|
0 |
no load speed |
|
|
|
Class II Construction |
||
rpm |
revolutions per minute |
||
Use for intended purpose
The RAS 115.04 E is designed for sanding wood, plastics, stone, composite materials, paints / lacquers, fillers, stoppers and similar materials.
The tool may not be used for grinding or cutting metal.
On the tool no grinding disks may be fastened. It may be worked only with the provided sanding pad and whereupon fastened abrasives.
The device is unsuitable for wet sanding for reasons of electrical safety.
If explosive or self-inflammable dusts are produced when sanding certain materials, refer
to the processing instructions of the material manufacturer. The user is liable for any damage and injury resulting from incorrect usage!
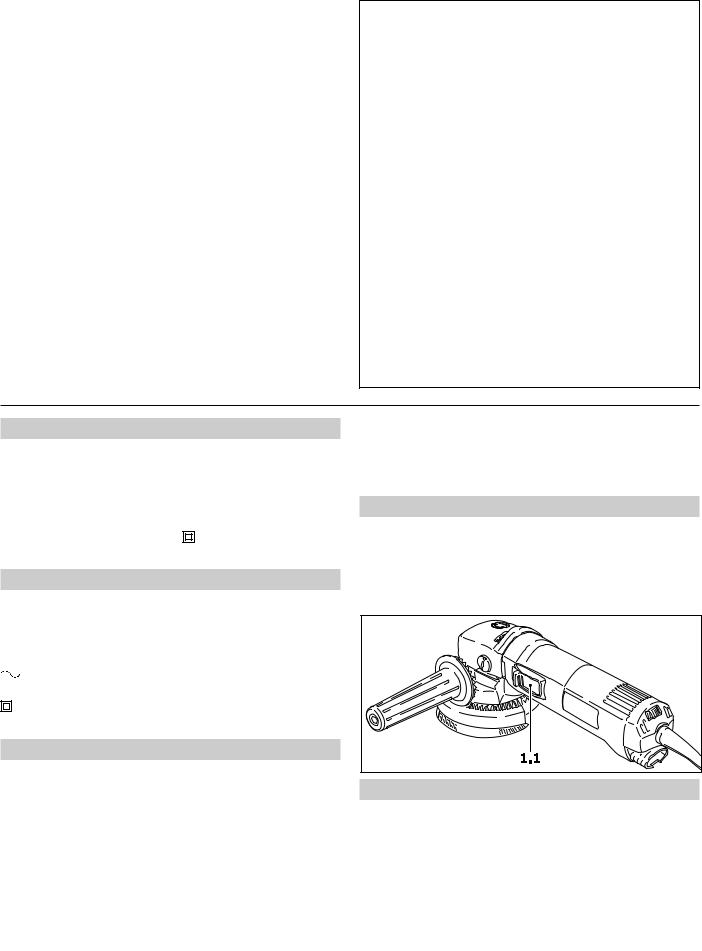
Electrical connection and operation
The supply voltage must correspond with the voltage figure on the voltage on the rating plate. To switch the tool on, push the safety sliding switch (1.1) forwards. The tool is switched off by gently pressing the rear end of the switch.
Extension cord
If an extension power cord is required, it must have sufficient cross-section to prevent an excessive drop in voltage or overheating. An excessive drop in voltage reduces the output and can lead to failure of the motor. The table shows the correct size to use, depending on cord length and the tool’s ampere rating. Use only U.L. and CSA listed extension cords. Never use two extension cords together. Instead, use one longer one.
3

Note: The lower the A.W.G. number, the thicker the cord.
Electronic control
The sander is fitted with full-wave electronic control offering the following
ELECTRONIC facilities:
Smooth run-up
The electronically controlled smooth run-up ensures jolt-free starting.
Speed control
The speed controller (2.1) allows stepless adjustment of the drive spindle speed.
The numbers on the speed controller correspond approximately to the following idling speed values:
Constant speed
The selected motor speed is kept constant by electronic control. This provides a constant working speed, even under load.
Temperature protection
Extreme overload in continuous operation will cause the motor to heat up. An electronic temperature monitor is fitted to prevent overheating (burning-out of the motor). The electronic safety device switches the motor off before a critical motor temperature is reached. The rotary sander operational again and capable of delivering full power after a cooling period of approx. 3 - 5 minutes. The cooling period can be reduced by keeping the motor running (under no-load conditions).
Do not use the sander if the electronic control is defective, since this can lead to excessive speeds. A defect of this kind can be recognized by the fact that the smooth run-up is absent, the noise level under no-load conditions is higher or the speed cannot be controlled.
Extraction hood AH-RAS D 115
The extraction hood AH-RAS D 115 (3.1) can be used in conjunction with the sanding pad STF D 115.
a) Fitting
Before fitting the extractor hood, ensure that the clamping lever is in “released" position (3.4). Press the extractor hood onto the clamping throat (3.2) of the rotary sander and secure the hood by moving the clamping lever forward (3.3).
Do not work with the machine unless the extractor hood is clamped firmly and securely to the clamping throat. If the clamping force is reduced as the result of frequent use, the clamping lever can be re-adjusted:
-
 Release the screw

 (4.1) on the clamping lever and remove the lever (4.2).
- Tighten the square-headed screw (4.3) by hand until a tension is obtained.
- Re-fit the clamping lever and secure it with the screw. The optimum clamping force can be determined by closing the clamping lever before the clamping screw is tightened.
4
b) Repositioning the rotatable handle
The rotatable additional handle can, if required, also be fitted to the right-hand side of the extractor hood. For this purpose, the handle and the clamping lever should be interchanged. - Release the screw (4.1) on the clamping lever and remove the lever (4.2).
- Remove the square-headed screw (4.3).
- Detach the additional handle (4.5), using a 6 mm A/F Allen key.
The clamping lever and the additional handle can now be interchanged. Fitting is carried out in the reverse of the above sequence. The locking nut (4.4) can be used to vary the turning resistance of the rotatable additional handle by tightening the nut against the housing, using a 13 mm A/F open-ended wrench, before fully tightening the additional handle.
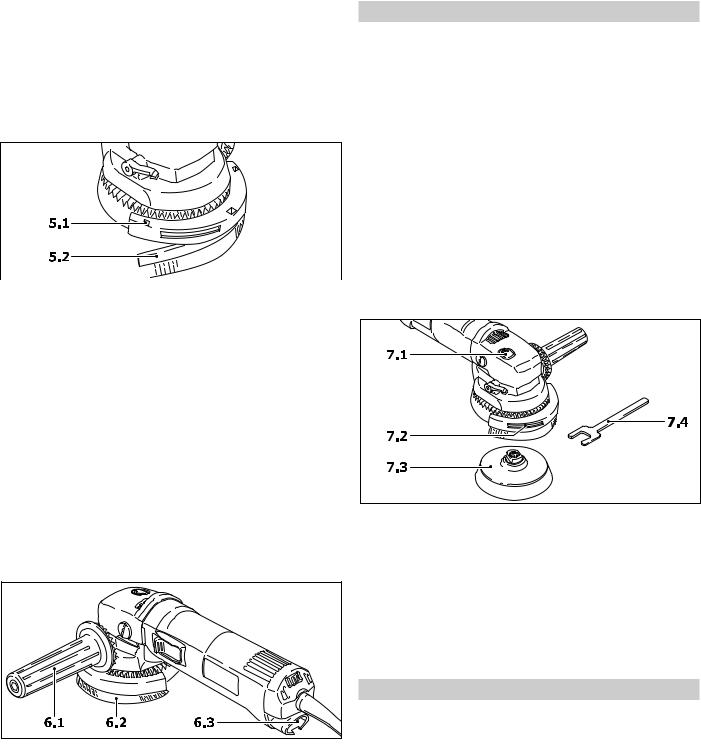
c) Replacing the brush insert
In order to replace this, press out the brush insert by inserting a screwdriver through the square apertures (5.1). Insert the new brush strip (5.2) into the groove, slightly bend this to obtain the correct radius and press in firmly until the brush strip is in contact with the base of the hood. The inclination of the brush bristles must point outwards.
Two different brush inserts are available:
• AH-RAS D 115 Poly (order no. 484 727): Pack of 2 polyamide brushes (replacement for worn originals)
• AH-RAS D 115 metal (order no. 484 728): Pack of 1 metal brush (for use with sparkgenerating materials)
d) Sanding with dust extraction
For dust extraction, the suction hose
 (27 mm dia.) of a Festool dust extractor should be
inserted into the connection socket (6.3) at the end of the rotary sander housing.
The brush ring (6.2) can be adjusted by means of the additional rotatable handle (6.1). This makes it possible to achieve an optimum setting for the working position used. Always turn the brush ring into the direction of travel of the sanding dust. A considerable quantity of airborne sparks are generated during the sanding of metals and other spark-generating materials. For safety reasons, therefore, a spark-trap (order no. 484 733) must be fitted between the extractor hood and the rotary sander.
Fitting tool inserts
Use only tool inserts whose maximum permissible speed is at least equal to the speed given on the rating plate of the rotary sander. This is the case with all original Festool accessories.
The Stickfix sanding pad STF D 115 as well as all brush tool inserts are provided with an M 14 thread which enables these to be screwed directly onto the drive spindle.
It is normally possible to unscrew the sanding pad (7.3) by hand from the drive spindle after pressing the spindle stop (7.1).
Actuate the spindle stop only when the drive spindle is stationary. Do not switch on the motor when the spindle stop is pressed in.
In case the pad should seize: - Remove the brush insert.
- Insert the special spanner (7.4) through the slot (7.2) and place on spanner flats of tool. - Release the tool with the spindle stop pressed by turning the special spanner.
Please note: Always screw the sanding pad onto the drive spindle by hand. This will make it considerably easier to remove it subsequently.
Stickfix abrasive materials
5
Stickfix is a hook-and-loop fastening system. Stickfix sanding pads allow the use of self-adhesive hook-and-loop abrasives such as Stickfix sandpapers and sanding cloths.

The abrasive is simply pressed onto the sanding pad and pulled off again after use.
Please note: Use only abrasives with an undamaged Stickfix hook-and-loop coating. Before use, check that the coating has not been damaged by incorrect use (e. g. overheating). Please note: The Mini-Stickfix D 52 sanding pad was developed for use in confined spaces and with small areas. This small-diameter pad and the affixed abrasive will inevitably heat up in use more than larger pads, since the same pressure is distributed over a smaller area. Sand only with moderate pressure and do not sand continuously for too long. Lift the sander off the workpiece at intervals to allow friction heat to dissipate.
Working with the tool
Electronic control position:
• Material to be sanded, work operation 6:
• Sanding hard GRP components (limited suitability).
3 - 6:
• Sanding off dry, cracked paint.
• Stripping anti-fouling paints.
• Sanding wood. 2 - 4:
• Sanding paint/varnish with tendency to smear.
• Light sanding of thin top coats of paint.
• Cleaning sandstone, concrete, formwork materials.
1 - 2:
• Sanding thermoplastic materials.
• Smoothing treated woods with sanding brush.
Maintenance and care
Always remove the plug from the mains supply socket before doing any work on the tool!
Any maintenance or repair work requiring the motor housing to be opened may only be carried out by an authorized service workshop. Maintenance or repair work carried out by an unauthorized person can lead to the wrong connection of the power leads or other components, which in turn can lead to accidents with serious consequences.
Always keep the tool and especially the ventilation slots clean.
The tool is fitted with special motor brushes with an automatic cut-out. When the brushes become worn the power supply is shut off automatically and the tool comes to a standstill.
Accessories, tools
For safety reasons, only use original Festool accessories and tools!
The accessory and tool order number can be found in the Festool catalog or on the Internet under ”www.festool.com”.
Warranty
Conditions of 1+2 Warranty
You are entitled to a free extended warranty (1 year + 2 years = 3 years) for your Festool power tool. Festool shall be responsible for all shipping costs during the first year of the warranty. During the second and third year of the warranty the customer is responsible for shipping the tool to Festool. Festool will pay for return shipping to the customer using UPS Ground Service. All warranty service is valid 3 years from the date of purchase on your receipt or invoice.
Festool Limited Warranty
This warranty is valid on the pre-condition that the tool is used and operated in compliance with the Festool operating instructions. Festool warrants, only to the original consumer purchaser, that the specified tool will be free from defects in materials and workmanship for a term of one year from the date of procurement. Festool makes no other warranty, express or implied, for Festool portable power tools. No agent, representative, distributor, dealer or employee of Festool has the authority to increase or otherwise change the obligations or limitations of this warranty. The obligations of Festool in its sole discretion under this warranty shall be limited to the repair or replacement of any Festool portable power tool that is found to be defective as packaged with the User Manual.
Excluded from coverage under this warranty are: normal wear and tear; damages caused by misuse, abuse or neglect; damage caused by anything other than defects in material and workmanship. This warranty does not apply to accessory items such as circular saw blades, drill bits, router bits, jigsaw blades, sanding belts, and grinding wheels. Also excluded are ”wearing parts”, such as carbon brushes, lamellas of air tools, rubber collars and seals, sanding discs and pads, and batteries.
Festool portable power tools requiring replacement or repair are to be returned with the receipt of purchase to Festool (call 800- 554-8741 for address details).
IN NO EVENT SHALL FESTOOL BE LIABLE FOR ANY CONSEQUENTIAL OR
6
 Loading...