


RO 150 E
Rotex®
Instruction manual |
Eccentric sander |
Page 4 - 8
IMPORTANT: Read and understand all instructions before using.
464 262_002
Guide d’utilisation |
Ponceuse excentrique |
Page 9 - 14 |
|
IMPORTANT: Lire et comprendre toutes les instructions |
|
avant de démarrer les travaux. |
|
Manual de instrucciones |
Lijadora excéntrica |
Página 15 - 20
IMPORTANTE: Lea y comprende todas las instrucciones antes de usar.
1

3

GENERAL SAFETY RULES
 Read and understand all instructions. Failure to follow all instructions
listed below may result in electric shock, fire and/ or serious personal injury.
SAVE THESE INSTRUCTIONS
1)Work area safety
a)Keep work area clean and well lit.
Cluttered and dark areas invite accidents.
b)Do not operate power tools in explosive atmospheres, such as in the presence of flammable liquids, gases or dust. Power tools create sparks which may ignite the dust or fumes.
c)Keep children and bystanders away while operating a power tool. Distractions can cause you to lose control.
2)Electrical safety
a)Power tool plugs must match the outlet. Never modify the plug in any way. Do not use any adapter plugs with earthed (grounded) power tools. Unmodified plugs and matching outlets will reduce risk of electric shock.
b)Avoid body contact with earthed or grounded surfaces such as pipes, radiators, ranges and refrigerators. There is an increased risk of electric shock if your body is earthed or grounded.
c)Do not expose power tools to rain or wet conditions. Water entering a power tool will increase the risk of electric shock.
d)Do not abuse the cord. Never use the cord for carrying, pulling or unplugging the power tool. Keep cord away from heat, oil, sharp edges or moving parts. Damaged or entangled cords increase the risk of electric shock.
e)When operating a power tool outdoors, use an extension cord suitable for outdoor use. Use of a cord suitable for outdoor use reduces the risk of electric shock.
3)Personal safety
a)Stay alert, watch what you are doing and use common sense when operating a power tool. Do not use a power tool while you are tired or under the influence of drugs, alcohol or medication. A moment of inattention while operating power tools may result in serious personal injury.
b)Use safety equipment. Always wear eye protection. Safety equipment such as dust
mask, non-skid safety shoes, hard hat, or hearing protection used for appropriate conditions will reduce personal injuries.
c)Avoid accidental starting. Ensure the switch is in the off position before plugging in. Carrying power tools with your finger on the switch or plugging in power tools that have the switch on invites accidents.
d)Remove any adjusting key or wrench before turning the power tool on. A wrench or a key left attached to a rotating part of the power tool may result in personal injury.
e)Do not overreach. Keep proper footing and balance at all times. This enables better control of the power tool in unexpected situations.
f)Dress properly. Do not wear loose clothing or jewellery. Keep your hair, clothing and gloves away from moving parts. Loose clothes, jewellery or long hair can be caught in moving parts.
g)If devices are provided for the connection of dust extraction and collection facilities, ensure these are connected and properly used. Use of these devices can reduce dust related hazards.
4)Tool use and care
a)Do not force the power tool. Use the correct power tool for your application. The correct power tool will do the job better and safer at the rate for which it was designed.
b)Do not use the power tool if the switch does not turn it on and off. Any power tool that cannot be controlled with the switch is dangerous and must be repaired.
c)Disconnect the plug from the power source before making any adjustments, changing accessories, or storing power tools. Such preventive safety measures reduce the risk of starting the power tool accidentally.
d)Store idle power tools out of the reach of children and do not allow persons unfamiliar with the power tool or these instructions to operate the power tool.
Power tools are dangerous in the hands of untrained users.
e)Maintain power tools. Check for misalignment or binding of moving parts, breakage of parts and any other condition that may affect the power tools operation. If damaged, have the power tool repaired before use. Many accidents are caused by poorly maintained power tools.
f)Keep cutting tools sharp and clean.
Properly maintained cutting tools with sharp
4
cutting edges are less likely to bind and are easier to control.
g) Use the power tool, accessories and tool bits etc., in accordance with these instructions and in the manner intended for the particular type of power tool, taking into account the working conditions and the work to be performed. Use of the power tool for operations different from those intended could result in a hazardous situation.
5)Service
a)Have your power tool serviced by a qualified repair person using only identical replacement parts. This will ensure that the safety of the power tool is maintained.
To reduce the risk of injury, user must read and understand instruction
manual.
 Various dust created by power sanding, sawing, grinding, drilling and other
construction activities contains chemicals known (to the State of California) to cause cancer, birth defects or other reproductive harm. Some examples of these chemicals are:
•Lead from lead-based paints,
•Crystalline silica from bricks and cement and other masonry products,
•Arsenic and chromium from chemicallytreated lumber.
The risk from these exposures varies, depending on how often you do this type of work.
To reduce your exposure to these chemicals work in a well ventilated area and use approved safety equipment, such as dust masks that are specially designed to filter out microscopic particles.
Technical data
Wattage |
|
500 W |
No load speed |
|
2000 - 5600 rpm |
Sanding stroke |
|
5 mm (0.2 in.) |
Sanding base dia. |
150 mm (5.9 in.) |
|
Weight |
|
2.3 kg (5.1 lbs.) |
Safety level |
UL 745, CSA C22.2 No. 745 |
|
The illustrations mentioned can be found at the beginning of the operating instructions.
Symbols
V |
Volts |
A |
Amperes |
Hz |
Hertz |
W |
Watt |
~Alternating current
n0 |
No load speed |
|
Class II Construction |
rpm |
Revolutions per minute |
ØDiameter
Intended use
The sanders are designed for sanding and polishing wood, plastic, metal, stone, composite materials, paint/varnish, filler and similar materials.
Do not use with materials containing asbestos.
The tools must not be used when wet or damp, or operated in a damp environment, for electrical safety reasons. Use this sander only for dry sanding.
The user bears sole responsibility for any damage or accidents resulting from
incorrect use.
Electrical connection and operation
The mains voltage must correspond to the voltage on the rating plate!
To start the tool, push the switch (1.1) forwards. Slight pressure on the rear end of the switch is sufficient to switch the tool off.
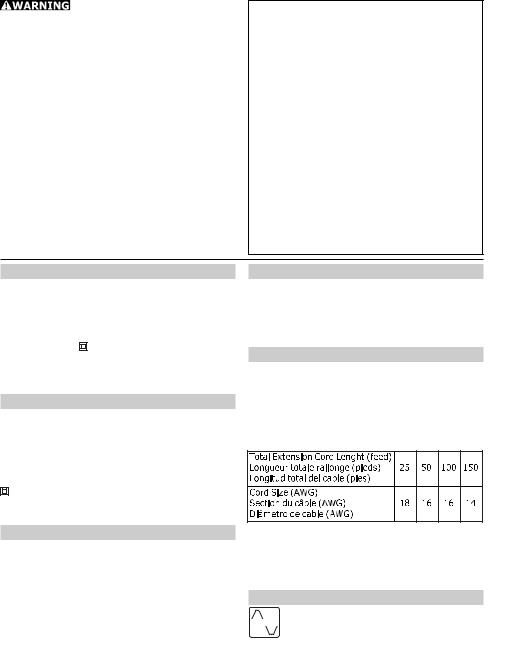
Extension cord
If an extension cord is required, it must have sufficient cross-section to prevent an excessive drop in voltage or overheating. An excessive drop in voltage reduces the output and can lead to failure of the motor. The table below shows you the correct cord diameter as a function of the cord length for the RO 150 E.
Use only U.L. and CSA listed extension cords. Never use two extension cords together. Instead, use one long one.
Note: The lower the AWG number, the stronger the cord.
Electronic control
The tool has full-wave electronics with ELECTRONIC the following features:
Smooth start-up
The smooth start-up ensures jolt-free startup.
5

Speed adjustment
You can regulate the speed steplessly between 2000 and 5600 rpm using the adjusting wheel (2.1). This lets you optimize the sanding speed to suit the material.
Constant speed
The pre-selected speed remains constant whether the tool is in operation or in neutral position.
Temperature control
To prevent overheating, the safety electronics switch the tool off when it reaches a critical motor temperature. Let the tool cool down for approx. 3-5 minutes before using it again. The tool requires less time to cool down if it is running, i.e. in neutral position.
Two-hand operation
The optional hand grip (1.2) can be attached to the tool on the right or left-hand side of the gearbox cover.
Dust extraction
Always connect the tool to a dust extractor.
You can connect a Festool extractor with an extractor hose diameter of 27 mm to the dust extraction port (2.2).
Tool settings
Always remove the power plug from the socket before carrying out any work
on the power tool.
Sanding motion
You can use the switch (1.3) to set two different sanding motions.
Change from one motion to the other by switching the rocker lever (1.3) away from the gearbox by 90°, turning it 180° in a clockwise or anticlockwise direction and then locking it, while inserting the locking nose on the lever into the slot (1.4) on the gearbox. The resistance encountered when rotating the lever through 180° can be eliminated by rotating the sanding pad a little.
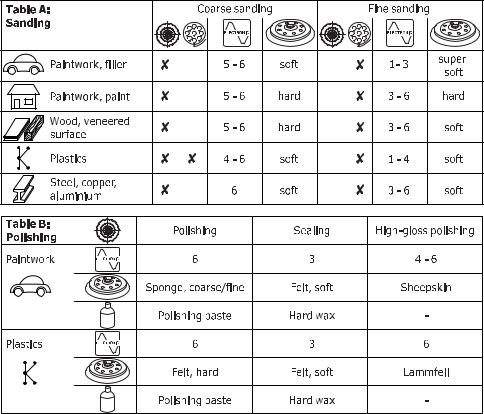
Rotex rotary motion (coarse sanding, polishing)
The Rotex rotary motion is a combination of rotary and eccentric motions. This motion is recommended for sanding with aggressive material removal (coarse sanding) and polishing.
Slide the switch into the position (3.2).
Eccentric motion (fine sanding)
This motion is recommended for sanding with low material removal for a scratchfree finish (fine sanding).
Slide the switch into the position (3.1).
Choice and installation of sanding pads
Choice of sanding pad
The tool can be fitted with three sanding pads of different hardnesses depending on the surface to be sanded.
Hard: Coarse sanding on surfaces, sanding at edges.
Soft: Universal use for coarse and fine sanding for flat and curved surfaces.
Super-soft: Fine sanding on formed parts, curves, radii. Do not use on edges!
Installation
The sanding pad must be located positively with the alignment spigot on the tool (3.3). Check to ensure that the pad is positioned correctly before screwing it firmly into place. This will prevent it from coming loose when the tool is in operation.
Attaching the abrasive
Stickfix is a hook-and-loop fastening
system. Stickfix sanding pads allow the
use of self-adhesive hook-and-loop abrasives such as Stickfix sandpapers and sanding cloths.
Simply press the abrasive onto the sanding pad and pull it off again after use.
Use only abrasives with an undamaged Stickfix hook-and-loop coating.
Before use, check that the coating has not been damaged by improper use (such as overheating).
Securing polishing attachments
To prevent damage, use PoliStick polishing attachments (sponges, felt, lambswool bonnets) only with the special polishing pad fitted on the tool instead of a sanding pad. Like StickFix abrasives, the PoliStick polishing attachments are simply pressed onto the polishing pad and pulled off after use.
Pad brake
The tool has a pad brake for eccentric sanding which prevents the sanding pad from accelerating in an uncontrollable manner when the machine is raised from the workpiece.
6

Working with the tool
 Always secure the workpiece in such a manner that it cannot move while being
sanded.
 Never overload the tool by using too much pressure! The best sanding results
are achieved when applying moderate pressure. Sanding performance and quality depend primarily on the choice of the right abrasive.
For safe guidance, hold the tool with both hands.
Application
Tables A and B show the settings we recommend for different sanding and polishing work.
Metalworking
 Observe the following safety precautions when working on metals:
•Pre-connect a residual current circuit-breaker.
•Connect the tool to a suitable dust extractor.
•Regularly clear out any dust accumulations in the motor housing.
• Wear protective goggles.
Maintenance and care
All maintenance or repair work requiring the motor housing to be opened must
be carried out only by an authorized service workshop. Maintenance or repair work carried out by an unauthorized person can lead to the incorrect connection of the wiring or other components, which in turn can lead to accidents with serious consequences.
Always remove the plug from the mains supply socket before carrying out any
work on the machine!
Always keep the tool and in particular the ventilation slots clean.
Rubber collar
The rubber collar (4.2) protects the drive unit against din. Dirt in the drive unit leads to increased wear and thus a shorter service life of the drive components. The collar should thus be checked regularly for damage. A damaged collar should be immediately replaced by a new one (Order No. 484 561 ). Proceed as follows:
-Release screw holding the sanding pad and remove sanding pad
-Remove seal (4.1)
-Release screw (4.4)
-Remove and replace collar (4.2)
Grease the collar opening (4.3) before fitting.
We recommend that the collar be replaced at the latest when the brushes are changed.
Accessories, tools
 For safety reasons, only use original Festool accessories and tools!
The accessory and tool order number can be found in the Festool catalog or on the Internet under www.festool-usa.com.
Warranty
Conditions of 1+2 Warranty
You are entitled to a free extended warranty (1 year + 2 years = 3 years) for your Festool power tool. Festool shall be responsible for all shipping costs during the first year of the warranty. During the second and third year of the warranty the customer is responsible for shipping the tool to Festool. Festool will pay for return shipping to the customer using UPS Ground Service. All warranty service is valid 3 years from the date of purchase on your receipt or invoice.
Festool Limited Warranty
This warranty is valid only on condition that the tool is used and operated in compliance with the Festool operating instructions. Festool warrants, only to the original consumer purchaser, that the specified tool will be free from defects in materials and workmanship for a term of one year from the date of procurement. Festool makes no other warranty, express or implied, for Festool portable power tools. No agent, representative, distributor, dealer or employee of Festool has the authority to increase or otherwise change the obligations or limitations of this warranty. The obligations of Festool in its sole discretion under this warranty shall be limited to the repair or replacement of any Festool portable power tool that is found to be defective as packaged with the User Manual.
Excluded from coverage under this warranty are: normal wear and tear; damages caused by misuse, abuse or neglect; damage caused by anything other than defects in material and workmanship. This warranty does not apply to accessory items such as circular saw blades, drill bits, router bits, jigsaw blades, sanding belts, and grinding wheels. Also excluded are “wearing parts”, such as carbon brushes, vanes of air tools, rubber collars and seals, sanding discs and pads, and batteries.
Festool portable power tools requiring replacement or repair are to be returned with
7
the receipt of purchase to Festool (call 800- 554-8741 for address details).
IN NO EVENT SHALL FESTOOL BE LIABLE FOR ANY CONSEQUENTIAL OR INCIDENTAL DAMAGES FOR BREACH OF THIS OR ANY OTHER WARRANTY, EXPRESSED OR IMPLIED WHATSOEVER. ALL WARRANTIES IMPLIED BY STATE LAW, INCLUDING THE IMPLIED WARRANTIES OF MERCHANTABILITY AND FITNESS FOR A PARTICULAR PURPOSE, ARE HEREBY LIMITED TO THE DURATION OF THREE YEARS.
Some states in the U.S. and some Canadian provinces do not allow the limitations on how long an implied warranty lasts, so the above limitation may not apply to you. With the exception of any warranties implied by state or province law as hereby limited, the foregoing express limited warranty is exclusive and in lieu of all other warranties, guarantees, agreements and similar obligations of Festool.
This warranty gives you specific legal rights and you may also have other rights which vary from state to state in the U.S. and province to province in Canada.
8
 Loading...