


LAVADORA
WASHING MACHINE
ZWF388
|
MANUAL DE USO |
E |
|
|
|
35.293.017/1 |
USER MANUAL |
GB |
|
|

Child safety
•Children are often not aware of how dangerous electrical appliances can be. When the machine is working, children should be carefully supervised and not be allowed to play with the appliance.
•The packaging components (e.g. plastic film, polystyrene) can be dangerous to children - danger of suffocation! Keep them out of children’s reach.
•Keep all detergents in a safe place out of children’s reach.
•Make sure that children or pets do not climb into the drum.
•When the appliance is to be scrapped, cut off the electrical supply cable and destroy the plug with the remaining cable. Disable the door catch in order to prevent children from becoming trapped inside while playing.
 Disposal
Packaging materials
The materials marked with the symbol 
 are recyclable.
>PE<=polyethylene
>PS<=polystyrene
>PP<=polypropylene
This means that they can be recycled by disposing of them properly in appropriate collection containers.
Machine
The symbol  on the product or on its packaging indicates that this product may not be treated as household waste. Instead it shall be handed over to the applicable collection point for the recycling of electrical and electronic equipment. By ensuring this product is disposed of correctly, you will help prevent potential negative consequences for the environment and human health, which could otherwise be caused by inappropriate waste handling of this product. For more detailed information about recycling of this product, please contact your local city office, your household waste disposal service or the shop where you purchased the product.
 Tips for environmental protection
To save water, energy and to help protect the environment, we recommend that you follow these tips:
•Normally soiled laundry may be washed without prewashing in order to save detergent, water and time (the environment is protected too!).
•The machine works more economically if it is fully loaded.
•With adequate pre-treatment, stains and limited soiling can be removed; the laundry can then be washed at a lower temperature.
•Measure out detergent according to the water hardness, the degree of soiling and the quantity of laundry being washed.
ENGLISH
29

Installation instructions
 It is dangerous to alter the specifications or attempt to modify this product in any way.
 Care must be taken to ensure that the appliance does not stand on the electrical supply cable.
Any electrical work required to install this appliance should be carried out by a qualified electrician or competent person.
Any plumbing work required to install this appliance should be carried out by a qualified plumber or competent person.
 The power supply cable only can be replaced by a person of our Service Force Centre.
Technical specifications
DIMENSIONS |
Height |
85 cm |
|
Width |
60 cm |
|
Depth |
60 cm |
|
|
|
MAXIMUM RECOMMEND LOAD |
Cotton, linen |
5 kg |
|
Synthetics |
2 kg |
|
Delicates |
2 kg |
|
Woollens |
1 kg |
|
|
|
SPIN SPEED |
|
800 rpm máx. |
|
|
|
POWER SUPPLY VOLTAGE/FREQUENCY |
230 V/50 Hz |
|
TOTAL POWER ABSORBED |
|
2100 W |
MINIMUM FUSE PROTECTION |
|
10 A |
|
|
|
WATER PRESSURE |
Minimum |
50 kPa |
|
Maximum |
800 kPa |
This appliance complies with the following EEC Directives: 73/23/EEC of 19/02/73 relating to low voltage
89/336/EEC of 03/05/89 relating to electromagnetic compatibility.
30

Installation
Transit security bars
Before starting the machine up, the transport security bars must be removed as follows: You are advised to keep all the transport security bars. In case the appliance has to be transported again.
1. Unscrew and remove the three rear screws by means of a key.
2. Lean the appliance back on the rear and fit one of the polystyrene angles between the appliance and the floor.
Make sure the hoses are not squashed.
1 2 |
AL009 |
3.Carefully remove the plastic bags on the left and the right, pulling them to the centre of the appliance
P0001
4.Place the machine in an upright position and remove the three plastic bolts.
5.Plug the 3 holes with the plastic plugs which you can find in the envelope containing the instruction booklet.
Hydraulic connection
There should be a COLD WATER tap near the washing machine with a screwing on connection pipe of 3/4 gas for the water supply, a sink, a wash basin or a drainage system in the wall.
Previously check if:
—it is not a hot water tap.
—the running water is clean. If not, run off a reasonable amount of water to flush out any debris that may have collected in the pipes.
Have the permanent drainage system in the wall checked by a plumber.
1. Carefully screw the pipe to the tap taking care not to damage the screwdrive and fix the nut well on to the end in order to avoid leaking.
2. If necessary turn the hose adequately by unscrewing the nut at the rear of the appliance. Now tighten the nut anew to avoid leaks. (Open the tap and assure that it does not leak and close it again.)
3. Place the discharging hose in a washbasin or
sink with the aid of the
bent piece delivered
separately. The bent
piece has to be entered
into the tube’s mouth in
order to assure the
support. Aforesaid piece allows the hose to be
fixed to the wall by means of an opening on the upper part and that way the hose does not move and its falling is avoided.
ENGLISH
31

1,5 m. Max. |
|
60 cm. Min. |
90 cm. Max. |
IMPORTANT: The distance from the floor to the highest part of the hose should be between 60 to 90 cm. (It is advised to be between 60 and 70 cm). The hose must not be bent nor twisted to avoid clogging. Should a prolongation of the discharging hose be unavoidable this must never surpass 1.5 m and must be of the same diameter as the original hose.
Make sure the hoses are not too tense.
Levelling
Level the appliance by loosening or tightening the feet. Once in the right position fix the feet by pushing the nuts (A) (see graphic P0254) against the base of the case. Accurate levelling will prevent vibration, noise and displacement of the appliance during operation.
Some vibration is inevitable, especially if placed on a wooden floor. Wooden floors are particularly susceptible to vibrations. If possible always place the appliance on a solid floor.
P0254 |
Electrical connections
Before plugging the appliance make sure that:
1º. the mains of your installation is the same as on the rating plate of your appliance (the plate is sticked to the rear of the appliance).
2º. The meter, the fuses, the wiring and the socket outlet can support the max. power absorbed stated on the rating plate.
3º. The socket base and the plug must fit in adequately without any reducing interposition, multiple outlets or adapters. If necessary replace the socket outlet by an adequate one.
The applicable rules for electrical security require an adequate earthing. The plug of the appliance is provided with such a device.
Make sure your socket outlet is provided with an adequate earthing too.
The manufacturer declines any liability in case of accidents or incidents should these safety measures not be observed.
The power supply cable only can be replaced by a person of our Service Force Centre.
32
Your new washing machine
This new machine meets all modern requirements for effective treatment of laundry with low water, energy and detergent consumption.
•The balance control device reduces the risk of instability in machine movement and it guarantees a quieter operation.
ENGLISH
Description of the appliance
1 Detergent dispenser drawer
2 Programme chart
3 Control panel
4 Door handle
5 Drainage area door
6 Adjustable feet
Detergent dispenser drawer
Prewash
Main wash
Fabric softener, starch
33

Use
Control panel
1. Detergent dispenser drawer
Programme option buttons
Depending on the programme, different option buttons can be combined.
When these buttons are pressed, the corresponding lights come on. When they are pressed again, the lights go off.
If an incompatible option with the selected programme has been chosen, the corresponding light flashes for about 2 seconds.
The option buttons: PRELAVADO/MANCHAS; MEDIA CARGA and LAVADO RAPIDO must be selected after the required programme has been chosen, by turning the programme selector (see section 9) and before starting the machine, by pressing INICIO / PAUSA button.
2. PRELAVADO/ MANCHAS button
Adds a pre-wash phase at the start of the cycle with water heating to 30° C.
In COTTON and SYNTHETIC cycles, performs a short spin before passing to the washing phase.This option cannot be selected for LANA and LAVADO A MANO cycles.
3. MEDIA CARGA button
Select this button to reduce water consumption on the rinse cycle when washing a smaller load of cottons or linens (maximum load size = 2.25 kg). The machine will perform 2 rinses instead of 3.
4. LAVADO RAPIDO button
Using this option, you can get good washing results in a short period of time, since with option, the COTTON, SYNTHETICS, and DELICATES programmes are modified in order to obtain short washing times (recommended for small or lightlysoiled loads).
This modification consists of reducing the number of rinse cycles (one less) and also increases the water level used in the remaining two rinse cycles.
5. INICIO / PAUSA button
After selecting the required programme, by the programme selector (see section 9), press this button to start the machine; the corresponding light stops flashing and will keep lighting until the programme finishes.
To interrupt the running programme, depress INICIO / PAUSA button: the corresponding light starts to flash.
To restart the programme from the point at which it was interrupted, press INICIO / PAUSA button again.
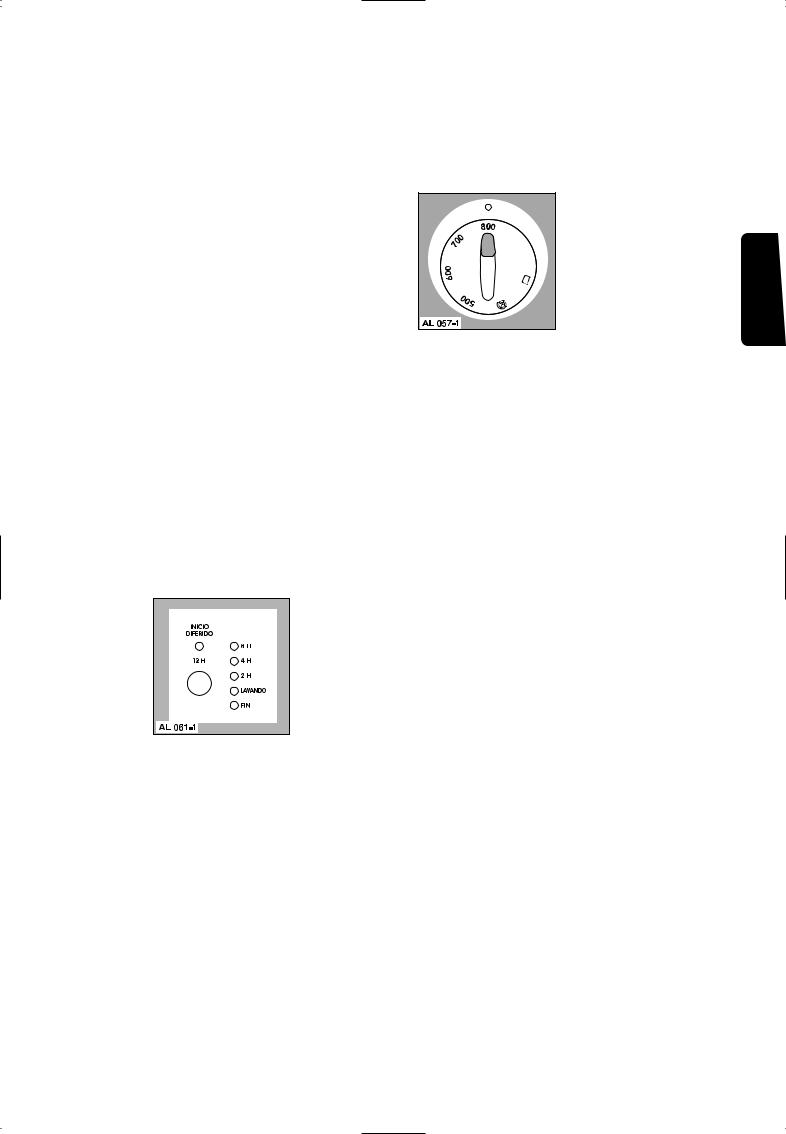
6. DELAY START button
This button allows the delay of starting of the washing programme by 12, 8, 4 and 2 hours. The delay which has been selected is indicated when the corresponding light comes on.
To use this option proceed as follows:
1.Select the required programme by the programme selector (see section 9).
2.Press the required option buttons.
3.Push DELAY START button, as many times as necessary to get the required delay until the corresponding light comes on
4.Press START / PAUSE button.
IMPORTANT!
• If you would like to cancel DELAY START option or to change the selected delay, proceed as follows:
1.Turn the dial programme selector to position “O”.
2.Start the normal process to select a programme again.
34
• If you need to stop the machine to put in more laundry (having selected DELAY START option first), proceed as follows:
1.Depress START / PAUSE button.
2.Turn the dial programme selector to position “O”.
3.Wait two or three minutes before opening the door to give the electric locking mechanism time to release.
4.Place the laundry in the drum.
5.Follow the normal operating sequence to select a programme.
DELAY START OPTION CAN'T BE SELECTED WITH SPIN and
  DRAIN programmes.
7. Programme progress display
When DELAY START option is chosen, the light relevant to the selected delay lights up.
After the machine has started, the remaining time is shown by the corresponding indicator light.
During programme cycle the light WASHING will remain lit.
The light END will illuminate to indicate that the selected programme has finished.
The light END flashes in the event of operating problems:
•4 flashes: door open.
•2 flashes: problem with water draining.
•1 flash: problem with water supply.
For more information see paragraph "Something not working?" at the end of this booklet.
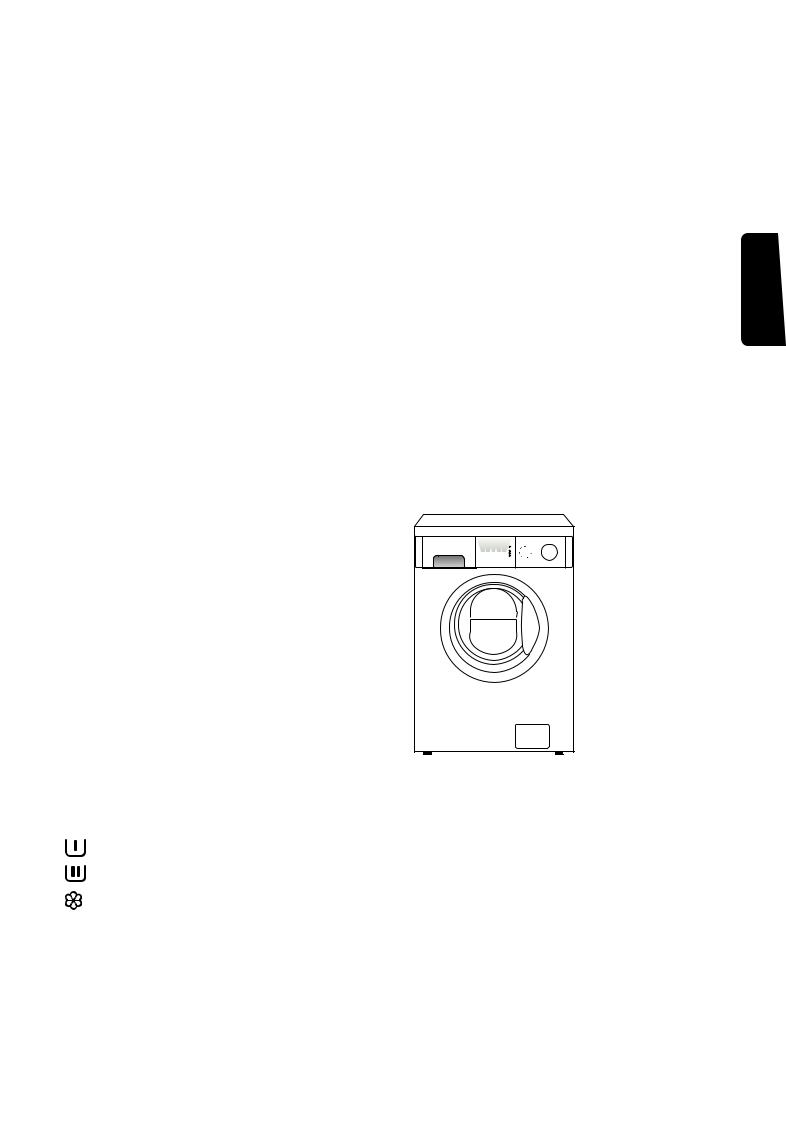
8. Spin speed selector dial or
 no spin /
  rinse hold options
ENGLISH
This dial allows the reduction of the final and the intermediate spin speed or to select  NO SPIN or
  RINSE HOLD options.
The position 800 r.p.m. corresponds to 700 r.p.m. for delicates.
Position 500 r.p.m. is common for all fabrics.
• NO SPIN: by selecting this option all the spinning phases are turned off. To be used for extremely delicate items. The washing machine will add 3 rinses in the cotton programmes and 1 rinse in the synthetics programmes.
• RINSE HOLD: by selecting this option, the water of the last rinse is not drained, in order to prevent the fabrics from wrinkling. When the programme has finished, FIN light will illuminate.
To drain the water follow these three steps: A) Turn the programme selector dial to “O”. B) Select  DRAIN or
  SPIN programme. C) Press INICIO / PAUSA button.
35
 Loading...