


Zanussi ZWF 10070 W, ZWF 16070 S, ZWF 12070 W, ZWF 12070 S, ZWF 14070 W User Manual
...
User manual
Washing
Machine
ZWF 10070 W ZWF 12070 W ZWF 12070 S ZWF 14070 W ZWF 16070 W ZWF 16070 S
Centrifugeren |
95° |
|
|
|
|
|
Startuitstel |
|
Pompen |
|
eco |
|
|
|
|
|
|
|
|
|
|
3u |
6u |
9u |
||
|
|
|
60° |
|
|
|||
Spoelen |
|
|
1300 |
|
|
|
|
|
|
|
|
|
|
|
|
||
Inweken |
|
|
40° |
900 |
Voorwas |
|
|
|
|
|
|
|
700 |
|
|
|
Hoofdwas |
Gordijnen 40° |
|
|
30° |
500 |
|
|
|
Spoelen/ |
|
|
|
|
|
Centrifugeren |
|||
|
|
|
60° |
Spoel- |
Extra kort |
|
|
Einde |
intensiefSport 40° |
|
|
stop |
|
|
|
|
|
|
|
|
Centrifugeren |
Opties |
Extra spoelen |
Start/Pauze |
||
Wol |
|
|
40° |
|
|
|
|
|
|
|
|
|
|
|
|
|
|
Handw |
30° |
40°Anti-kreuk |
|
|
|
|
|
|
Handwas 40° |
|
|
|
|
|
|
|
|
Thank you for selecting our appliance
We wish you lots of enjoyment with your new appliance and we hope that you will consider our brand again when purchasing household appliances.
Please read this user manual carefully and keep it throughout the product life cycle as a reference document. The user manual should be passed on to any future owner of the appliance.
The following symbols are used in this manual:
Important information concerning your personal safety and information on how to avoid damaging the appliance.
General information and tips
Environmental information
Content
Safety information - - - - - - - - - - - - - - - - - - -3 Description of the appliance - - - - - - - - - - - -5 Detergent dispenser drawer - - - - - - - - - - - -5 Control panel and functions - - - - - - - - - - - -6 Programme table - - - - - - - - - - - - - - - - - - -7 Programme information - - - - - - - - - - - - - - -9 Washing Hints - - - - - - - - - - - - - - - - - - - - -10 Before the first use - - - - - - - - - - - - - - - - -12 Operating Sequence - - - - - - - - - - - - - - - -13
Care and cleaning - - - - - - - - - - - - - - - - - -17 Something not working - - - - - - - - - - - - - - 19 Technical data- - - - - - - - - - - - - - - - - - - - - 22 Consumption values - - - - - - - - - - - - - - - - 23 Installation instruction - - - - - - - - - - - - - - - 24 Environmental concerns - - - - - - - - - - - - - 28 Guarantee conditions - - - - - - - - - - - - - - - 29 European guarantee - - - - - - - - - - - - - - - - 30
2
Safety information
In the interest of your safety and to ensure the correct use, before installing and first using the appliance, read this user manual carefully, including its hints and warnings. To avoid unnecessary mistakes and accidents, it is important to ensure that all people using the appliance are thoroughly familiar with its operation and safety features. Save these instructions and make sure that they remain with the appliance if it is moved or sold, so that everyone using it through its life will be properly informed on appliance use and safety.
General safety
●It is dangerous to alter the specifications or attempt to modify this product in any way.
●During high temperature wash programmes the door glass may get hot. Do not touch it!
●Make sure that small pets do not climb into the drum. To avoid this, please check into the drum before using.
●Any objects such as coins, safety pins, nails, screws, stones or any other hard, sharp material can cause extensive damage and must not be placed into the machine.
●Only use the advised quantities of fabric softener and detergent. Damage to the fabric can ensue if you over-fill. Refer to the manufacturer’s recommendations of quantities.
●Wash small items such as socks, laces, washable belts etc in a washing bag or pillow case as it is possible for such items to slip down between the tub and the inner drum.
●Do not use your washing machine to wash articles with whalebones, material without hems or torn material.
●Always unplug the appliance and turn off the water supply after use.
●Under no circumstances should you attempt to repair the machine yourself. Repairs carried out by inexperienced persons may cause injury or serious malfunctioning. Contact your local Service Centre. Always insist on genuine spare parts.
Installation
●This appliance is heavy. Care should be taken when moving it.
●When unpacking the appliance, check that it is not damaged. If in doubt, do not use it and contact the Service Centre.
●All packing and transit bolts must be removed before use. Serious damage can occur to the product and to property if this is not adhered to. See relevant section in the user manual.
●After having installed the appliance, check that it is not standing on the inlet and drain hose and the worktop is not obstructing the electrical supply cable.
●If the machine is situated on a carpeted floor, please adjust the feet in order to allow air to circulate freely under the appliance.
●Always be sure, that there is no water leakage from hoses and their connections after the installation.
●If the appliance is installed in a location subject to frost, please read the «dangers of freezing» chapter.
●Any plumbing work required to install this appliance should be carried out by a qualified plumber or competent person.
●Any electrical work required to install this appliance should be carried out by a qualified electrician or competent person.
3
Use
●This appliance is designed for domestic use. It must not be used for purposes other than those for which it was designed.
●Only wash fabrics which are designed to be machine washed. Follow the instructions on each garment label.
●Do not overload the appliance. See the relevant section in the user manual.
●Before washing, ensure that all pockets are empty and buttons and zips are fastened. Avoid washing frayed or torn articles and treat stains such as paint, ink, rust, and grass before washing. Underwired bras must NOT be machine washed.
●Garments which have been in contact with volatile petroleum products should not be machine washed. If volatile cleaning fluids are used, care should be taken to ensure that the fluid is removed from the garment before placing in the machine.
●Never pull the power supply cable to remove the plug from the socket; always take hold of the plug itself.
●Never use the washing machine if the power supply cable, the control panel, the working surface or the base are damaged so that the inside of the washing machine is accessible.
Child safety
●This washing machine is not intended for use by young children or infirm persons without supervision.
●Young children should be supervised to ensure that they do not play with the appliance.
●The packaging components (e.g. plastic film, polystyrene) can be dangerous to children - danger of suffocation! Keep them out of children’s reach
●Keep all detergents in a safe place out of children’s reach.
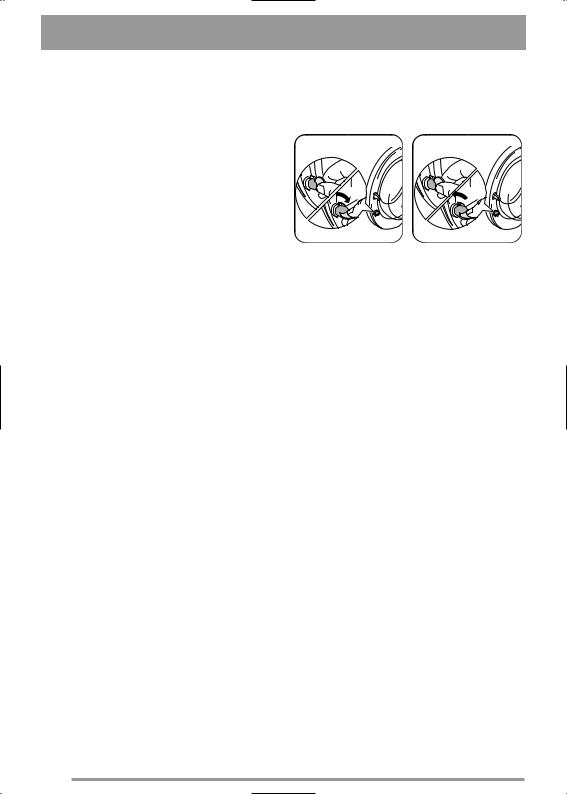
●Make sure that children or pets do not climb into the drum. To avoid this the machine incorporates special feature.
To activate this device, rotate the button (without pressing it) inside the door clockwise until the groove is horizontal. If necessary use a coin.
4
Description of the appliance
1 2
1000 6kg
3
4
5
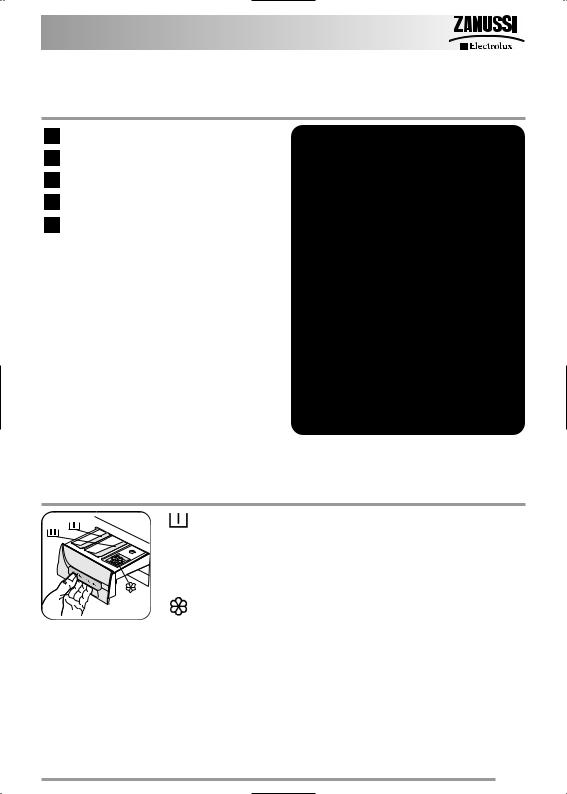
Detergent dispenser drawer
Prewash
 Wash
Wash
Fabric Softener
5
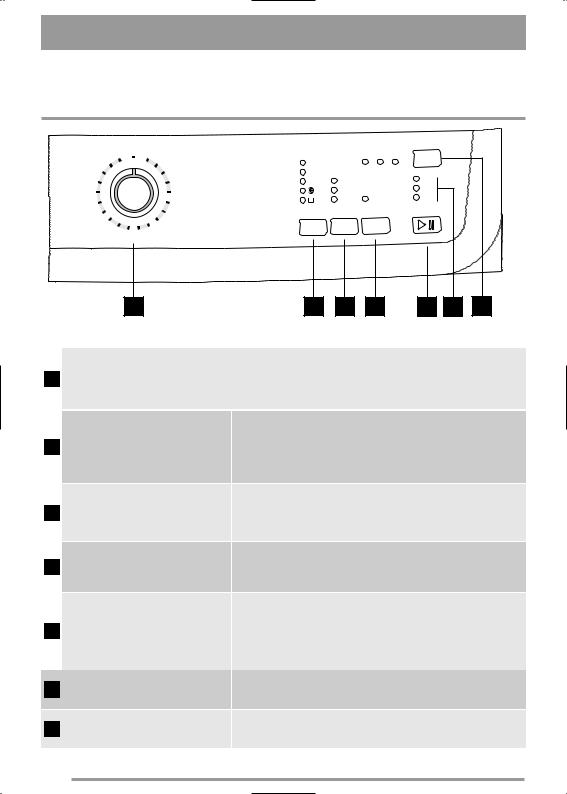
Control panel and functions
Special |
Sport 40° |
Off |
|
95° |
Cottons |
||
|
|
|
|
|
|||
Sport Shoes 40° |
|
|
|
|
60° Eco |
||
|
Silk |
|
|
|
|
60° |
|
Mini 30' |
|
|
|
|
|
40° Eco |
|
Cold |
|
|
|
|
|
40° |
|
Hand |
|
|
|
|
|
|
Synthetics |
Wash |
30° |
|
|
|
|
|
50° |
|
|
|
|
|
|
|
|
|
Wool |
|
|
|
|
|
40° |
|
|
Spin |
|
|
|
|
Easy Iron 40° |
|
|
Drain |
Rinse |
30° |
40° |
|
|
|
|
|
Delicates |
||||
|
|
|
|
|
|
||
1
1000
900
700
Spin
2
|
|
|
Delay Start |
|
|
|
3h |
6h |
9h |
|
|
Prewash |
|
|
Wash |
|
|
Intensive |
|
|
Door |
|
|
Super |
|
|
End |
|
|
Quick |
|
|
|
|
|
Options |
Extra Rinse |
Start/Pause |
|
|
|
|
|
|
ZWF10070W |
|
|
3 |
|
4 |
5 |
6 |
7 |
●The programme selector dial allows you to select a
1Programme selector dial and programme and/or to switch the machine on/off. It can be On/Off switch turned either clockwise or anticlockwise. The light,
2Spin reduction button
3Options button
Start/Pause starts to flash.
●Press the Spin button repeatedly to change the spin speed, if you want your laundry to be spun at a speed different from the one proposed by the washing machine or to select the Night cycle and Rinse Hold. The relevant light will light up.
●By means of the Options button, you can select only one of the following options: Prewash, Intensive, Super Quick (see the relevant chapter «Operating sequence»).
●The relevant light will light up.
4Extra Rinse button
5Start/Pause button
6Programme progress display
7Delay Start button
●By means of this button, the machine performs some additional rinses.
●The Start/Pause button allows you to start the selected programme; the corresponding green pilot light stops flashing.
●This button also interrupts a programme which is running, the corresponding green pilot light starts to flash.
●The different pilot lights illuminate depending on the running programme phase.
●This button makes it possible to delay the start of the washing programme by 3, 6, or 9 hours.
6
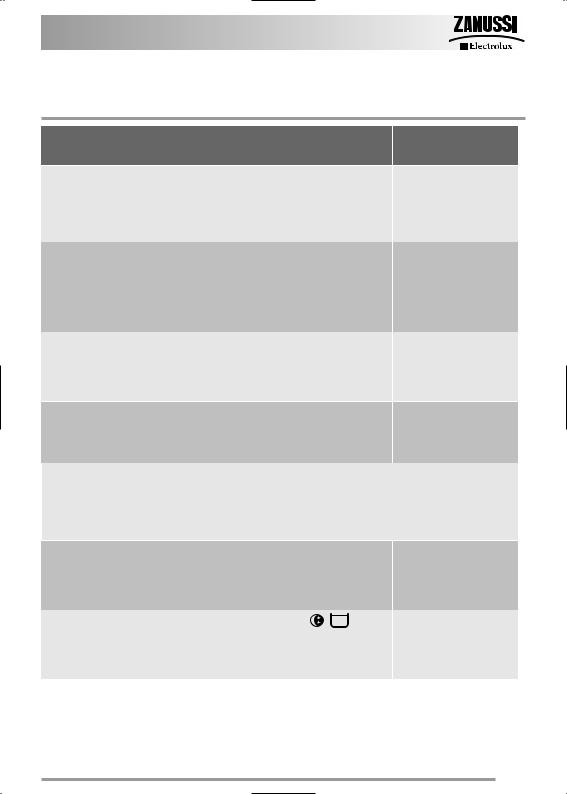
Programme table
Programme/
Temperature
Cottons
95°
Cottons
60° Eco
Cottons
60° - 40°
Cottons
40° Eco
Synthetics
50° - 40°
Synthetics Easy iron 40°
Delicates
40° - 30°
Type of laundry |
Options |
White cotton (heavy soiled cotton items): e.g. sheets, tablecloths, household linen, towels.
White and fast coloured cotton
(normally soiled cotton items): sheets, household linen, underwear,
Coloured cotton lightly soiled, shirts, blouses, towels, underwear.
Coloured cotton lightly soiled, shirts, blouses, underwear.
Synthetic or mixed fabrics, underwear, coloured garments, nonshrink shirts, blouses.
Synthetic or mixed fabrics to be gentle washed and spun.
Delicate fabrics, for example curtains.
Spin red. 
 Prewash, Intensive, Super Quick
Extra rinse
Spin red. 
 Prewash, Extra rinse
Spin red. 
 Prewash, Intensive, S. Quick, Extra rinse
Spin red. 
 Prewash, Extra rinse
Spin red. 
 Prewash, Intensive, Super Quick
Extra rinse
Spin red.  Prewash, Extra rinse
Prewash, Intensive,
Super Quick,
Extra Rinse
Max load for Cottons.................................. |
6 kg |
Max load for Synthetics.............................. |
3 kg |
Max load for Delicates .............................. |
3 kg |
Description of
programme
Main wash at 95°C 3 rinses
Long spin
Main wash at 60°C 3 rinses
Long spin
Main wash at 60° - 40°C
3 rinses Long spin
Main wash at 40° 3 rinses
Long spin
Main wash at 50° - 40°
3 rinses Short spin
Main wash at 40° 4 rinses
Short spin
Main wash at 40°-30°C
3 rinses Short spin
7

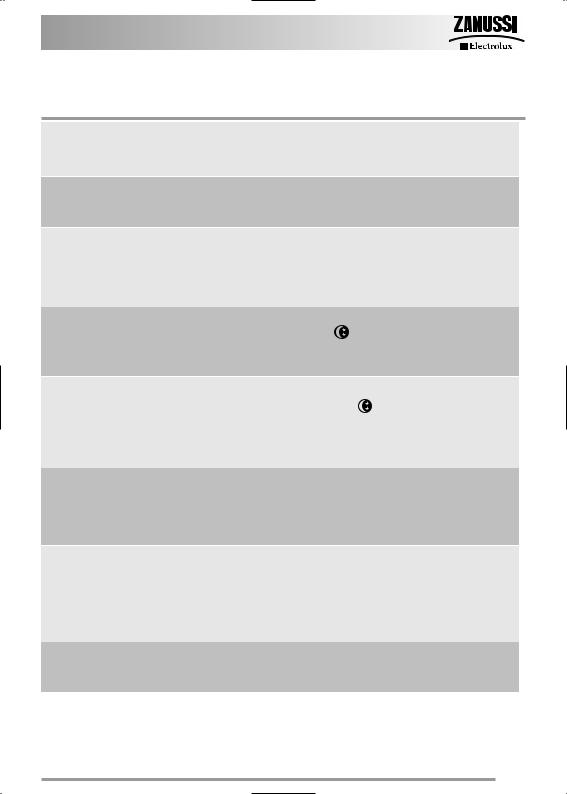
Programme table
Programme/
Temperature
Wool
40°
Handwash
30° - Cold
Mini 30’
30°
Silk
30°
Sport
Shoes 40°
Sport 40°
Rinse
Drain
Spin
Type of laundry
Programme for wool «Pure new wool, nonshrink, machine washable» label.
Special programme for hand washing fabrics
Short cycle for lightly soiled fabrics
Silk items to be gentle washed and spun.
Short cycle for 1 pair of sport shoes
(2 pairs if they are small)
Programme for heavily soiled synthetics items
Separate rinse cycle for hand washed items of cotton fabric.
For emptying out the last rinse water in programmes with the Rinse Hold or Night Cycle option.
Separate spin for cottons.
Options
Spin red.,  ,
, 
Spin red.,  ,
, 
 ,
, 
Spin Red., 
 Prewash, Extra rinse
Spin Red.,  ,
, 
Extra rinse
Spin red. 
 Extra rinse
Description of
programme
Main wash at 40° 3 rinses
Short spin
Main wash at 30° - Cold
3 rinses Short spin
Main Wash at 30°C 2 rinses
Short spin
Main wash at 30°C 2 rinses
Short spin
Main Wash at 40°C 3 rinses
Short spin
Prewash at 30°C Main wash at 40°C 3 rinses
Short spin
3 rinses Long spin
Draining of water
Spin red. |
Drain and long spin |
Max load for Wool/Handwash |
.............................. 2 kg |
Max load for Mini 30‘ .......................................... |
2.5 kg |
Max load for Silk .................................................... |
1 kg |
Max load for Sport Shoes 40° |
............................1 pair |
Max load for Sport 40° .......................................... |
3 kg |
8
Programme information
Wool and
Handwash
Easy Iron
Rinse
Drain
Spin
Sport shoes 40°
Sport 40°
Off = Cancelling
Washing programme for machine washable wool as well as for hand washable woollens and delicate fabrics with the «hand washing» care symbol  .
.
Selecting this programme the laundry is gently washed and spun to avoid any creasing. In this way ironing is easier. Furthermore the machine will perform additional rinses.
With this programme it is possible to rinse and spin cotton garments which have been washed by hand.
The machine performs 3 rinses, followed by a final spin at maximum speed.
The spin speed can be reduced by depressing Spin button.
For emptying out the water of the last rinse in programmes with the Rinse Hold  or Night Cycle option.
Turn first the programme selector dial to «Off», then select programme Drain and depress the Start/Pause button.
Separate spin for hand washed garments and after programmes with Rinse Hold  or Night Cycle option. Before selecting this programme the selector dial must be turned to «Off». You can choose the speed by means of the relevant button to adapt it to the fabrics to be spun.
With this programme it is possible to wash one pair of sport shoes. The shoes would be gently washed and spun. Washing temperature 40°C.
Note! Do not wash your sport shoes together with laundry.
This programme is suitable for washing heavily soiled sport items of synthetic fabrics. The machine will add automatically a prewash phase before the main wash to eliminate mud stains.
Note ! We recommend you do NOT put the detergent into the compartment  of the detergent drawer.
The spin speed is reduced to 900 rpm.
To reset a programme and to switch off the machine turn the selector dial to Off. Now a new programme can be selected.
9

Washing hints
Sorting the laundry
Follow the wash code symbols on each garment label and the manufacturer’s washing instructions. Sort the laundry as follows: whites, coloureds, synthetics, delicates, woollens.
Temperatures
90° or 95° |
|
for normally soiled white cottons |
|
and linen (e.g. tea cloths, towels, |
|
|
|
tablecloths, sheets...) |
|
|
|
|
|
for normally soiled, colour fast |
|
|
garments (e.g. shirts, night |
50°/60° |
|
dresses, pyjamas....) in linen, |
|
cotton or synthetic fibres and for |
|
|
|
|
|
|
lightly soiled white cotton (e.g. |
|
|
underwear). |
|
|
|
|
|
for delicate items (e.g. net |
30°-40°-Cold |
|
curtains), mixed laundry including |
|
synthetic fibres and woollens |
|
|
|
bearing the label «pure new wool, |
|
|
machine washable, non-shrink». |
|
|
|
Before loading the laundry
Never wash whites and colours together. Whites may lose their «whiteness» in the wash.
New coloured items may run in the first wash; they should therefore be washed separately the first time.
Make sure that no metal objects are left in the laundry (e.g. hair clips, safety pins, pins). Button up pillowcases, close zip fasteners, hooks and poppers. Tie any belts or long tapes.
Remove persistent stains before washing. Rub particularly soiled areas with a special detergent or detergent paste.
Treat curtains with special care. Remove hooks or tie them up in a bag or net.
Maximum loads
Recommended loads are indicated in the programme charts.
General rules:
Cotton, linen: drum full but not too tightly packed;
Synthetics: drum no more than half full;
Delicate fabrics and woollens: drum no more than one third full.
Washing a maximum load makes the most efficient use of water and energy.
For heavily soiled laundry, reduce the load size.
Laundry weights
The following weights are indicative:
bathrobe |
|
1200 g |
napkin |
|
100 g |
quilt cover |
|
700 g |
sheet |
|
500 g |
pillow case |
|
200 g |
tablecloth |
|
250 g |
towelling towel |
|
200 g |
tea cloth |
|
100 g |
night dress |
|
200 g |
ladies’ briefs |
|
100 g |
man’s work shirt |
|
600 g |
man’s shirt |
|
200 g |
man’s pyjamas |
|
500 g |
blouse |
|
100 g |
men’s underpants |
|
100 g |
Removing stains
Stubborn stains may not be removed by just water and detergent. It is therefore advisable to treat them prior to washing.
Blood: treat fresh stains with cold water. For dried stains, soak overnight in water with a special detergent then rub in the soap and water.
10
 Loading...