


G
TV Surround System
Système Surround TV
Owner’s Manual Mode d’emploi Bedienungsanleitung Bruksanvisning Manuale di istruzioni
Manual de Instrucciones Gebruiksaanwijzing
Инструкция по эксплуатации
CAUTION: READ THIS BEFORE OPERATING YOUR UNIT.
•To assure the finest performance, please read this manual carefully. Keep it in a safe place for future reference.
•Install this unit in a well ventilated, cool, dry, clean place - away from direct sunlight, heat sources, vibration, dust, moisture, and/or cold. For proper ventilation, allow the following minimum clearances (excludes a TV placed on top of this unit).
Top: 5 cm (2 in), Rear: 5 cm (2 in), Sides: 5 cm (2 in)
•Locate this unit away from other electrical appliances, motors, or transformers to avoid humming sounds.
•Do not expose this unit to sudden temperature changes from cold to hot, and do not locate this unit in an environment with high humidity (i.e. a room with a humidifier) to prevent condensation inside this unit, which may cause an electrical shock, fire, damage to this unit, and/or personal injury.
•Avoid installing this unit where foreign objects may fall onto this unit and/or this unit may be exposed to liquid dripping or splashing. On the top of this unit, do not place:
−Other components, as they may cause damage and/or discoloration on the surface of this unit.
−Burning objects (i.e. candles), as they may cause fire, damage to this unit, and/or personal injury.
−Containers with liquid in them, as they may fall and liquid may cause electrical shock to the user and/or damage to this unit.
•Do not cover this unit with a newspaper, tablecloth, curtain, etc., in order not to obstruct heat radiation. If the temperature inside this unit rises, it may cause fire, damage to this unit, and/or personal injury.
•Do not plug in this unit to a wall outlet until all connections are complete.
•Do not operate this unit upside-down. It may overheat, possibly causing damage.
•Do not use force on switches, knobs and/or cords.
•When disconnecting the power cable from the wall outlet, grasp the plug; do not pull the cable.
•Do not clean this unit with chemical solvents; this might damage the finish. Use a clean, dry cloth.
•Only voltage specified on this unit must be used. Using this unit with a higher voltage than specified is dangerous and may cause fire, damage to this unit, and/or personal injury. Yamaha will not be
held responsible for any damage resulting from use of this unit with a voltage other than specified.
•To prevent damage by lightning, keep the power cable and outdoor antennas disconnected from a wall outlet or the unit during a lightning storm.
•Do not attempt to modify or fix this unit. Contact qualified Yamaha service personnel when any service is needed. The cabinet should never be opened for any reasons.
•When not planning to use this unit for long periods of time (i.e. vacation), disconnect the AC power plug from the wall outlet.
•Be sure to read the “Troubleshooting” section on common operating errors before concluding that this unit is faulty.
•Before moving this unit, press  to set this unit in standby mode, and disconnect the power supply cable from the wall outlet.
•Condensation will form when the surrounding temperature changes suddenly. Disconnect the power supply cable from the outlet, then leave the unit alone.
•Install this unit near the wall outlet and where the AC power plug can be reached easily.
•The batteries shall not be exposed to excessive heat such as sunshine, fire or like.
•Secure placement or installation is the owner’s responsibility. Yamaha shall not be liable for any accident caused by improper placement or installation of speakers.
Notes on remote controls and batteries
•Do not spill water or other liquids on the remote control.
•Do not drop the remote control.
•Do not leave or store the remote control in the following places:
−places of high humidity, such as near a bath
−places of high temperatures, such as near a heater or a stove
−places of extremely low temperatures
−dusty places
•Do not expose the remote control sensor of this unit to direct sunlight or lighting such as inverted fluorescent lamps.
•If the batteries grow old, the effective operation range of the remote control decreases
considerably. If this happens, replace the batteries with two new ones as soon as possible.
•Do not use old batteries together with new ones.
•Do not use different types of batteries (such as alkaline and manganese batteries) together. Read the packaging carefully as these different types of batteries may have the same shape and color.
•Exhausted batteries may leak. If the batteries have leaked, dispose of them immediately. Avoid touching the leaked material or letting it come into contact with clothing, etc. Clean the battery compartment thoroughly before installing new batteries.
•Do not carry batteries in a pocket or purse with metal objects like coins, etc.
•Do not throw away batteries with general house waste. Dispose of them correctly in accordance with your local regulations.
•Keep batteries away from children. If a battery is accidentally swallowed, contact your doctor immediately.
•When not planning to use the remote control for long periods of time, remove the batteries from the remote control.
•Do not charge or disassemble the supplied batteries.
WARNING
TO REDUCE THE RISK OF FIRE OR ELECTRIC SHOCK, DO NOT EXPOSE THIS UNIT TO RAIN OR MOISTURE.
As long as this unit is connected to the AC wall outlet, it is not disconnected from the AC power source even if you turn off this unit by  . In this state, this unit is designed to consume a very small quantity of power.
 (Power key)
Turns on the power of this unit or sets it to the standby mode.
Do not use this unit within 22 cm (9 inches) of persons with a heart pacemaker implant or defibrillator implant.
Radio waves may affect electro-medical devices. Do not use this unit near medical devices or inside medical facilities.
We, Yamaha Music Europe GmbH hereby declare that this unit is in compliance with the essential requirements and other relevant provisions of Directive 1999/5/EC.
FOR U.K. CUSTOMERS
If the socket outlets in the home are not suitable for the plug supplied with this appliance, it should be cut off and an appropriate 3 pin plug fitted. For details, refer to the instructions described below.
NOTE
The plug severed from the mains lead must be destroyed, as a plug with bared flexible cord is hazardous if engaged in a live socket outlet.
SPECIAL INSTRUCTIONS FOR U.K. MODEL
IMPORTANT
THE WIRES IN THE MAINS LEAD ARE COLOURED IN ACCORDANCE WITH THE FOLLOWING CODE:
Blue: NEUTRAL
Brown: LIVE
As the colours of the wires in the mains lead of this apparatus may not correspond with the coloured markings identifying the terminals in your plug, proceed as follows:
The wire which is coloured BLUE must be connected to the terminal which is marked with the letter N or coloured BLACK. The wire which is coloured BROWN must be connected to the terminal which is marked with the letter L or coloured RED.
Making sure that neither core is connected to the earth terminal of the three pin plug.
iEn

Contents |
|
Supplied items ....................................................................... |
2 |
Features .................................................................................. |
3 |
Frequently asked questions.................................................. |
3 |
Part names and functions of the unit................................... |
4 |
Connections ........................................................................... |
5 |
Analog connection of an external device (game console) .................... |
6 |
Digital connection of an external device ..................................................... |
6 |
Installations............................................................................ |
7 |
Operations.............................................................................. |
8 |
Setting a surround sound effect for the installation position (SRT |
|
position) ................................................................................................................ |
10 |
Selecting a surround sound effect of your choice ................................. |
10 |
Adjusting the volume level of each channel (CH LEVEL)..................... |
11 |
Listening to the sound from a Bluetooth device .............. |
12 |
Settings................................................................................ |
14 |
Programming the unit with the TV’s remote control (TV’s remote |
|
control learning function)............................................................................... |
14 |
Using an external subwoofer......................................................................... |
16 |
Making sound easy to listen at low volume............................................. |
16 |
Setting the auto power standby function ................................................ |
17 |
Initializing the settings of the unit............................................................... |
17 |
Troubleshooting ................................................................. |
18 |
Specifications...................................................................... |
22 |
About this manual
•This manual explains operations using the supplied remote control.
•Marks used in this manual
NOTE
This indicates precautions for use of the product and its feature limitations.
HINT
This indicates supplementary explanations for better use.
En 1

Supplied items
Make sure you have received all of the following items. How to use the remote control
Preparing the remote control
Peel off the protection sheet before use.
Unit
Remote control |
Battery x 2 |
Optical cable (1.5 m [4.9 ft]) |
Operating range of the remote control |
|
(AAA, R03, UM4) |
|
|
|
|
Remain within the operating range shown below. |
|
|
|
|
|
|
|
|
Within 6 m |
|
|
|
(20 ft) |
Owner’s Manual
(This manual)
2 En

Features
Enjoy powerful and realistic sound from the unit. The unit is a home theater system which can be easily installed and connected to a TV and other devices.
• Digital sound projection
Integrated multiple small speakers optimize the individual sound beams. The surround sound effect is enhanced by reflecting the beams onto the walls of the room (p.10).
• Surround mode
Enjoy realistic surround sound. Select one of the five surround modes (movie, music, sports, game, TV program) for the source to be played back (p.10).
• Clear voice
Make voice sound (such as dialogues and narrations) clear with just one touch (p.9).
• UniVolume
Maintains consistent sound volume when inputs or sound sources switch (p.9).
• Bluetooth® connection
Play back sound from a connected Bluetooth device (p.12).
You can enjoy deep and fresh sound as close to the original by the Compressed Music Enhancer. This unit is also compliant with the aptX codec, which enables you to enjoy better sound from your smartphone.
• HOME THEATER CONTROLLER
You can operate the unit easily by installing the dedicated controlling application “HOME THEATER CONTROLLER.”
• TV remote control learning function
Operate the unit with the TV’s remote control (p.14).
Frequently asked questions
The following section covers popular functions and frequently asked questions about the unit.
Q1 What size TVs can I place on the unit?
A1 Flat screen TVs that weigh no more than 40 kg (88.1 lbs), have bases no wider than 750 mm (29-1/2") and no deeper than 340 mm (13-3/8"), and have screens no larger than 55 inches can be placed on the unit.
Q2 Can I operate the unit using the remote control of the TV? Switching between the remote controls of the TV and unit is inconvenient.
A2 Yes. You can control the unit using your TV’s remote control by the “TV’s remote control learning” function (p.14).
This function is available only for the IR (infrared) remote control. Check your TV’s remote control type.
Q3 Can I make voice sound more clearly?
A3 Yes. Dialogue in movies, TV news or sports programs, etc., can be made clearer using the “clear voice” function (p.9).
En 3

Part names and functions of the unit
Front panel
AIndicators
Indicate the status of the unit. The indicators will dim automatically if no operations are performed for 5 seconds.
Refer to “Operations” (p.8 to 9) for the main functions of the indicators.
BRemote control sensor
Receives infrared signals from the remote control of the unit (p.2).
CINPUT key
Selects an input source to be played back (p.8).
DMUTE key
Mutes the audio output. Press the key again to unmute (p.8).
EVOLUME (+/–) keys
Adjust the volume (p.8).
Rear panel
Overhead view
ASUBWOOFER OUT jack
For connecting an external subwoofer with a monaural pin cable (p.16).
BANALOG input jacks
For connecting an external device with an RCA stereo cable (p.6).
CCOAXIAL input jack
For connecting an external device with a coaxial digital cable (p.6).
DBD/DVD input jack
For connecting a playback device, such as a Blu-ray Disc (BD) player, with an optical cable (p.5).
F |
(power) key |
ETV input jack |
|
Turns on or off (standby) the unit (p.9). |
For connecting a TV with an optical cable (p.5). |
GDual built-in subwoofers
The built-in subwoofers are located in the bottom part of the unit.
HINT
• The unit may automatically turn off when the auto power standby function is enabled (p.17).
4 En
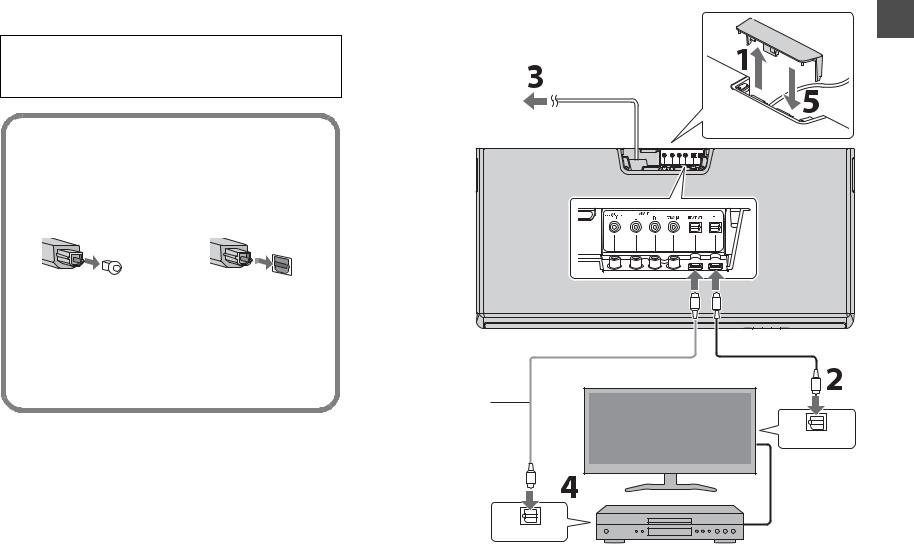
Jack cover
Power cable
To AC wall outlet
Unit (rear)
Overhead view
HINT
Optical cable
In the following cases, connect the optical output of the playback device to the BD/DVD input of the unit with an optical cable (commercially available), then select the BD/DVD key on the remote control for the input source.
•The TV does not have an optical output.
•The TV does not output audio (or outputs low volume audio) from the connected playback device.
•The audio from the playback device connected to the TV cannot be heard as surround sound.
Optical cable (commercially available)
OPTICAL OUTPUT
TV |
HDMI cable (etc.) |
OPTICAL OUTPUT
Playback device (such as a BD player)
Set top box
En 5
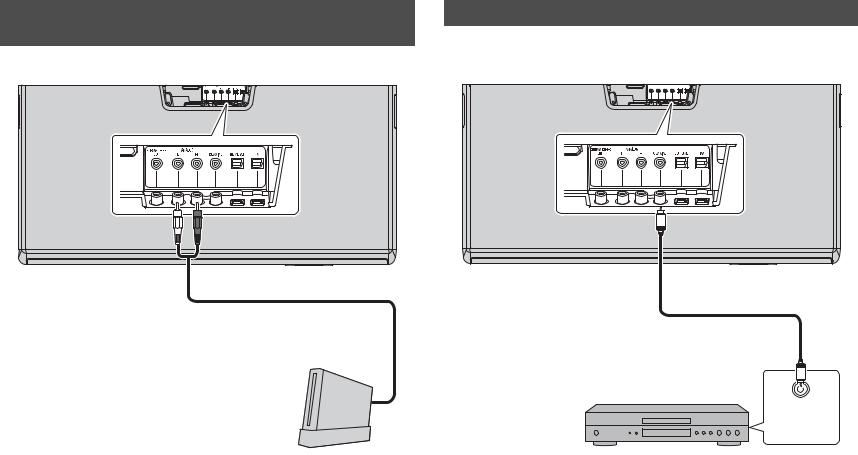
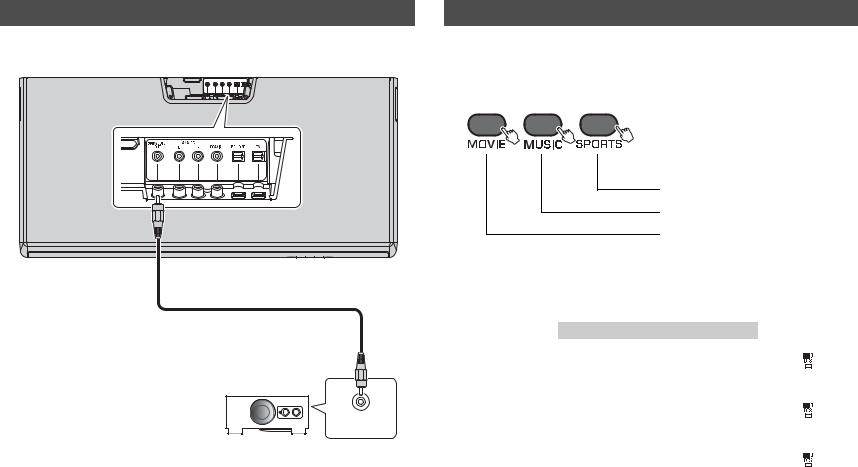
Analog connection of an external device (game console)
You can connect an external device, such as a game console or TV that does not have an optical output, to the ANALOG input jacks of the unit.
Unit (rear)
Overhead view
RCA stereo cable (etc.) (commercially available)
Game console (etc.)
NOTE
•Make sure the left (L) and right (R) channels are connected correctly.
•Select the ANALOG key on the remote control for the input source.
Digital connection of an external device
You can connect an external device that has a coaxial digital audio output, such as a DVD player, to the COAXIAL input jack of the unit.
Unit (rear)
Overhead view |
Coaxial digital cable |
|
(commercially available) |
Coaxial digital audio output (orange)
NOTE
• Select the COAXIAL key on the remote control for the input source.
6 En
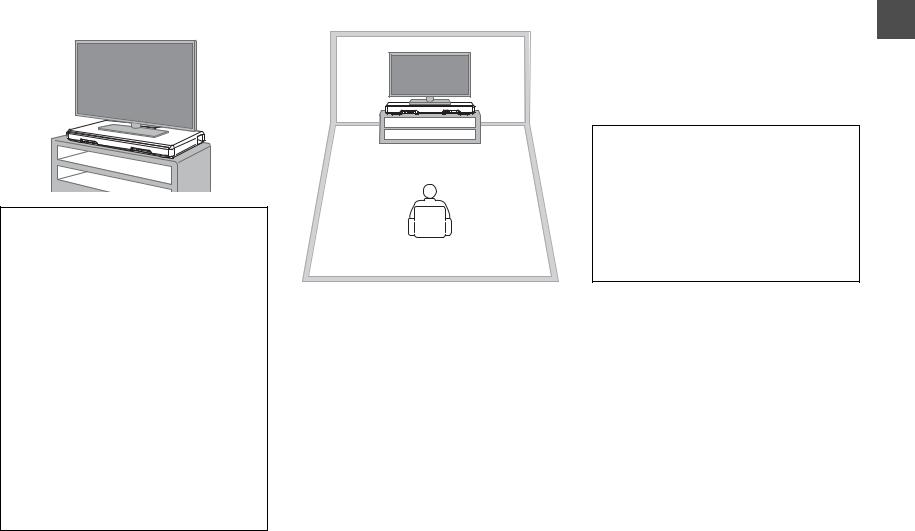
Installations
Place the unit on a flat surface such as on top of a TV cabinet, and then place a TV on top of the unit.
Cautions
•TVs that can be placed on the unit are flat-screen TVs that weigh no more than 40 kg (88.1 lbs), have bases no wider than 750 mm (29-1/2") and no deeper than 340 mm (13-3/8"), and have screens no larger than 55 inches. CRT TVs cannot be placed on the unit.
•Place the TV so that its base does not protrude from the unit’s edges. If the TV base is too large to fit on top of the unit, place the unit in another location such as on an open shelf. In that case, make sure that the shelf is well-ventilated with enough clearance around the unit to prevent the heat from accumulating inside the unit.
•Place the unit so that it does not protrude from the TV cabinet’s edges.
•Do not place any device other than a TV on the unit. If a device such as a BD player is placed on the unit, a malfunction due to vibrations may occur, or the TV installation may become unstable. Furthermore, if a hard object is placed on the unit, it may cause scratches on the unit.
•Never fix the unit to a wall or other surface using a fall prevention device, such as wire or bracket, supplied with the TV. Doing so may cause the unit fall together with the TV if an accident such as an earthquake occurs. Read the instruction manual of your TV carefully and fix the TV to a wall or sturdy object following the instruction.
•The unit contains non-magnetic shielding speakers. Do not place magnetically sensitive items (hard disk drive, etc.) near the unit.
•Determine the installation location considering the connection with external devices (such as a TV).
Obtaining effective surround sound effect
To obtain effective surround sound effect, observe the following.
•Keep a distance of more than 2 meters (6.6 ft) between the unit and listener.
•Install the unit in front of the listening position.
•If the sound beams are blocked by obstacles such as furniture, adjust the position of the unit or the obstacles.
Optimizing the surround sound effect for the installation position
The unit achieves surround sound by reflecting sound beams off walls. The optimum surround sound effect is achieved by setting an SRT position according to the installation position of the unit. After turning on the unit, hold down the SRT POSITION key that corresponds to the installation position for more than 3 seconds.
For details, refer to “Setting a surround sound effect for the installation position (SRT position)” (p.10).
Cautions
Effective surround effect may not be achieved in the following environment.
•Sound beams are blocked by obstacles such as furniture.
•The room size is not within the following dimensions; Width: 3 meters to 7 meters (9.8 ft to 23 ft)
Depth: 3 meters to 7 meters (9.8 ft to 23 ft) Height: 2 meters to 3.5 meters (6.6 ft to 11.5 ft)
•Listening position is too close to the unit.
•The unit is installed too close to the left or right wall.
•The unit is installed in the corner of the room.
•There is no wall for reflecting sound beam on the path of the sound beams.
En 7

Operations
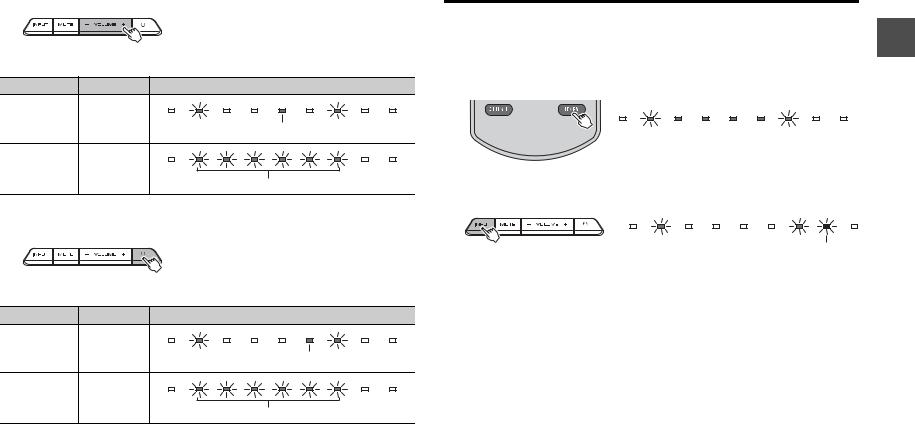
Indicators
The indicators on the front panel flash or light up, to indicate the operation and setting status.
In this manual, illustrations of the nine in-line indicators are used for explanation.
: Off
 : Lights up
  : Flashes
(Example: When the STATUS indicator flashes and the TV indicator lights up)
|
|
|
|
1 |
: Keys that require pressing for more than 3 seconds |
||
|
|
|
|
BLUETOOTH STANDBY, AUDIO DELAY, SRT POSITION (L, C, |
|||
|
|
|
|
|
|||
Input keys |
|
R), CH LEVEL, LEARN |
|||||
|
|
|
Remote control |
||||
Select an input source to be played back. |
|
|
|
signal transmitter |
|||
The indicator for the selected input source lights up. |
|
|
Transmits infrared signals. |
||||
(Example: when TV is selected) |
|
|
|
|
|||
|
|
|
|
||||
|
|
|
|
|
|
|
|
|
|
|
|
|
|
|
|
|
|
|
|
|
|
|
|
TV .................... |
TV audio |
BD/DVD ........... |
Audio from a device connected to |
COAXIAL |
the BD/DVD input jack |
Audio from a device connected to |
|
ANALOG |
the COAXIAL input jack |
Audio from a device connected to |
|
BLUETOOTH |
the ANALOG input jack |
Audio from a Bluetooth connected |
|
|
device |
HINT
•To play audio of the playback device connected to the TV or to watch videos of the playback device, set the TV’s input source to the playback device.
•For details on Bluetooth connection, refer to “Listening to the sound from a Bluetooth device” (p.12).
SUBWOOFER keys (+/–) |
2 |
Adjust the volume of the subwoofer.
Volume down (–)  Volume up (+)
VOLUME keys (+/–)
Adjust the volume of the unit.
Volume down (–)  Volume up (+)
MUTE key
Mutes the audio output. Press the key again to unmute.
Flash (on mute)
|
|

|
|
CH LEVEL key |
3 |
While you listen to the test-tone, you can adjust the volume level of each channel (p.11).
8 En
(power) key |
4 |
Turns on or off (standby) the unit.
Green (turned on)
Red (Bluetooth standby) (p.13)
Off (turned off)
BLUETOOTH STANDBY key
Enables/disables the Bluetooth standby mode (p.13).
Surround mode / STEREO keys 5
Choose from five different types of surround playback (surround mode keys), or stereo (2- channel) playback. When the surround playback is selected, the sound field program “CINEMA DSP” provides realistic surround effects (p.10).
MOVIE / MUSIC /
SPORTS / GAME / 


 Lights up (surround playback)
TV PROGRAM
STEREO |
Off (stereo playback) |
HINT
•When 2-channel stereo signals are played in surround with Dolby Pro Logic II, the  PLII indicator lights up.
Lights up (Dolby Pro Logic II)
LEARN key |
6 |
Sets the unit to the TV remote control learning mode (p.14).
|
CLEAR VOICE key |
7 |
|
Enables/disables the clear voice function.
When this function is enabled, you can enjoy clear voice sounds while watching movies, TV dramas, news programs or sports programs.
Flash 3 times (enabled), flash once (disabled)
UNIVOLUME key
Enables/disables the UniVolume function.
When this function is enabled, consistent volume is maintained when inputs or sound sources switch.
Flash 3 times (enabled), flash once (disabled)
AUDIO DELAY key
Adjusts the audio delay to synchronize the sound with the video when the video image on the TV may seem delayed with respect to the sound. Follow the procedure below to adjust the audio delay.
1Hold down the AUDIO DELAY key for more than 3 seconds.
The left most indicator flashes.
2Press the SUBWOOFER (+/–) key to adjust the audio delay.
Pressing the SUBWOOFER (+) key delays the audio output timing.
|
|
|
|
|
|
|
|
|
|
|
|
(–) |
(+) |
|
3To finish the adjustment, press the AUDIO DELAY key.
HINT
•The adjustment will be finished automatically if no operations are performed for 20 seconds.
SRT POSITION (SRT position) keys 8
For optimum surround sound effect, select a preset position mode according to where the unit is installed (p.10).
Decoder indication
The unit supports the following audio signals. You can check the type of the input audio signal by the color of the indicator.
Green (Dolby Digital), Red (DTS Digital Surround)
Off (PCM)
En 9
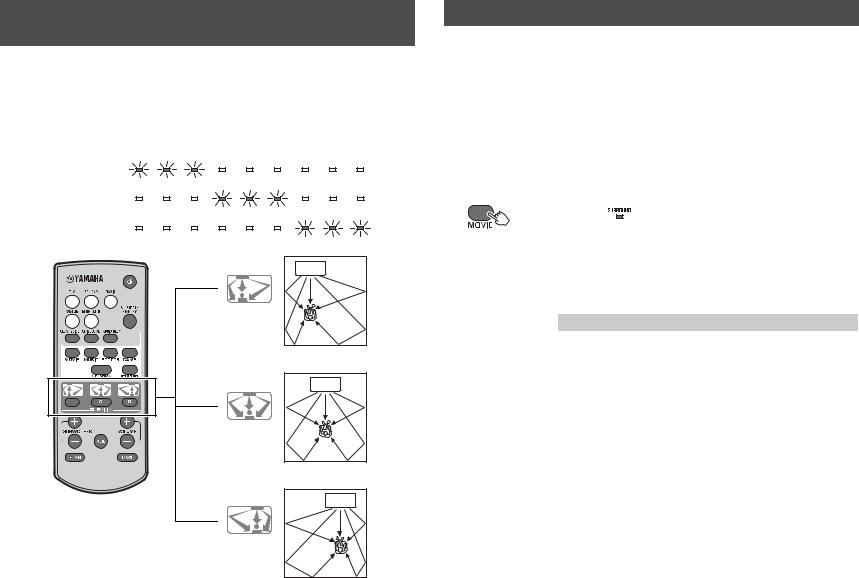
Setting a surround sound effect for the installation position (SRT position)
The surround sound is achieved by reflecting the sound beams off walls as shown in the illustration below. For optimum surround effect, turn on the unit and select the SRT POSITION key according to the installation position of the unit.
1Hold down the SRT POSITION key that corresponds to the installation position of the unit for more than 3 seconds.
The indicators on the front panel flash according to the set position.
Left
Center
Right
L (Left)
Left side of room
C (Center) (default setting)
Center of room
R (Right)
Right side of room
Selecting a surround sound effect of your choice
Select the surround mode key to enjoy realistic surround effects that closely resemble a movie theater, the middle of a music concert, or a sports field event, by Yamaha’s sound field program, “CINEMA DSP.” You can select a surround mode key that best suits the source from MOVIE, MUSIC, SPORTS, GAME, or TV PROGRAM.
1 Play back the source.
2Press one of the surround mode keys (MOVIE, MUSIC, SPORTS, GAME, or TV PROGRAM).
The SURROUND indicator on the front panel lights up. (Example: when MOVIE is selected)
Lights up
Surround mode
The surround modes are described below.
Select the surround mode that best suits the playback source and your personal taste.
Sound field program |
Features |
|
|
MOVIE |
Creates a broad and expansive cinematic space. With Dolby or |
|
DTS surround effects, this program enriches your cinematic |
|
experience. |
|
|
MUSIC |
Creates the palpable excitement, as if you were standing at the |
|
front center of a live concert hall event. |
|
|
SPORTS |
Creates the realistic atmosphere of a live sports event or talk |
|
show. |
|
|
GAME |
Enjoy three-dimensional sound effects with computer or video |
|
games. |
|
|
TV PROGRAM |
Creates optimum surround sound for TV programs. |
|
|
HINT
•When the source is a 2-channel stereo signal, the sound is played back as surround sound by the Dolby Pro Logic II technology.
10 En
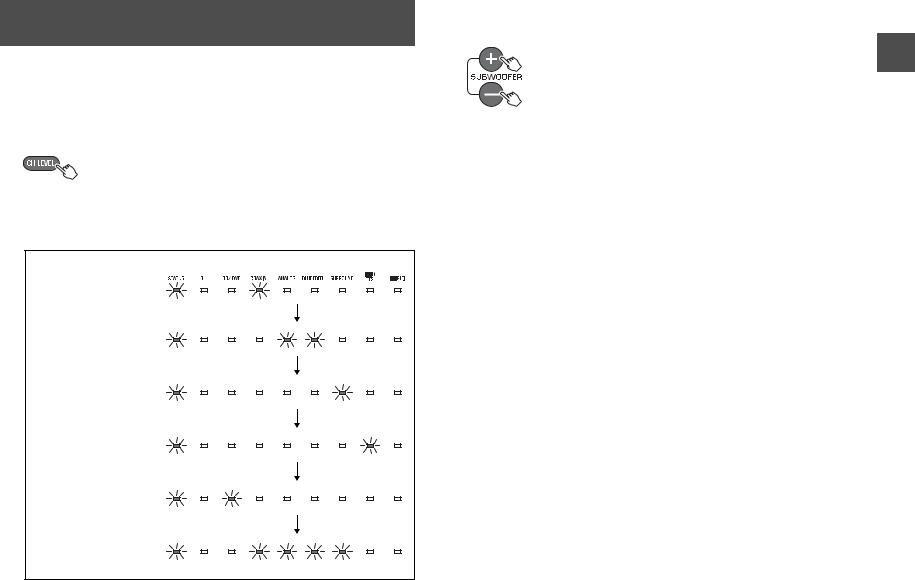
Adjusting the volume level of each channel (CH LEVEL)
The surround effect is achieved using six channels (audio outputs) of the unit. While listening to a series of test-tones from the unit, you can adjust the volume level of each channel to balance the sound heard from your listening position. (Volume level adjustment of each channel is not available when the unit is in stereo playback mode.)
1Hold down the CH LEVEL key on the remote control for more than 3 seconds.
The STATUS indicator flashes in green during test-tone output. The test-tone cycles through the channels in the order below. The test-tone is output from each channel in turn for two seconds. You can confirm which channel is playing the testtone by the way the indicators flash.
Test-tone flow
Front (left)
Center
Front (right)
Surround (right)
Surround (left)
Subwoofer
Back to beginning
2While the test-tone is output from the channel to be adjusted, press the SUBWOOFER key (+ or –) to balance the volume level with the other channels.
During volume adjustment, the cycle of the test tone stops. When you have finished adjusting the current channel level, release the + or – key and wait a moment for the test-tone cycle to resume. You can check the volume level by the indicator lights.
3After adjustment is complete, press the CH LEVEL key again.
The test-tone stops.
HINT
•Press the VOLUME key (+ or –) to adjust the overall volume while the test-tone is being played back.
•When the SRT position setting is changed (p.10), the channel level setting will be overwritten.
En 11

Listening to the sound from a
Bluetooth device
You can play back wirelessly from Bluetooth devices, such as smartphones or digital
music players.
See also the operating manual of the Bluetooth device for more details.
Bluetooth devices
Perform the following steps to use a Bluetooth device with the unit.
For the first Bluetooth |
For subsequent |
connection |
Bluetooth connection |
Pairing a
Bluetooth device with the unit
Playing back audio from a Bluetooth device on the unit
Pairing a Bluetooth device with the unit
When connecting to a Bluetooth device for the first time, “pairing” between the device and unit is required. Once “pairing” with a device is completed, subsequent connection with that device will not require “pairing.”
1Press the BLUETOOTH key on the supplied remote control to select Bluetooth as the input source.
The BLUETOOTH indicator on the front panel lights up in green.
Lights up
2Turn on the Bluetooth function of the device to be paired, and perform pairing.
The operation varies depending on the device. Refer to the operation manual of the device.
3Select “SRT-1000 Yamaha” in the Bluetooth device list on the device.
If a passkey (PIN) is required, enter the number “0000.”
When pairing is completed,  or a completion message appears on the device.
NOTE
•Perform pairing with the Bluetooth device and unit within 10 meters (33 ft) of each other.
•Up to eight Bluetooth devices can be paired with the unit. If a ninth device is paired, the oldest pairing information is deleted.
•If pairing information for a device is deleted, to use that device again, pairing of the device is required again.
•If a Bluetooth device is already connected to the unit, terminate that Bluetooth connection (p.13), then perform pairing with the new device.
•Refer to “Bluetooth” (p.20) in “Troubleshooting” if pairing cannot be achieved.
12 En
Playing back audio from a Bluetooth device on the unit
1With the unit turned on, press the BLUETOOTH key on the supplied remote control to select Bluetooth as the input source.
The BLUETOOTH indicator on the front panel lights up in green.
Lights up
2Turn on the Bluetooth function of the device.
When Bluetooth connection is made correctly, the BLUETOOTH indicator of the unit flashes 3 times.
Flashes 3 times
3 Play back a song on the device.
NOTE
•Perform Bluetooth connection with the device and unit within 10 meters (33 ft) of each other.
•It may be necessary to select “SRT-1000 Yamaha” in the Bluetooth device list again, in the event that a
connection problem occurs. You may have to change the output setting to output audio to the unit, depending on the Bluetooth device you are using.
•Adjust the volume level of the Bluetooth device as required.
•If a Bluetooth device is already connected to the unit, terminate that Bluetooth connection, then connect with the new device.
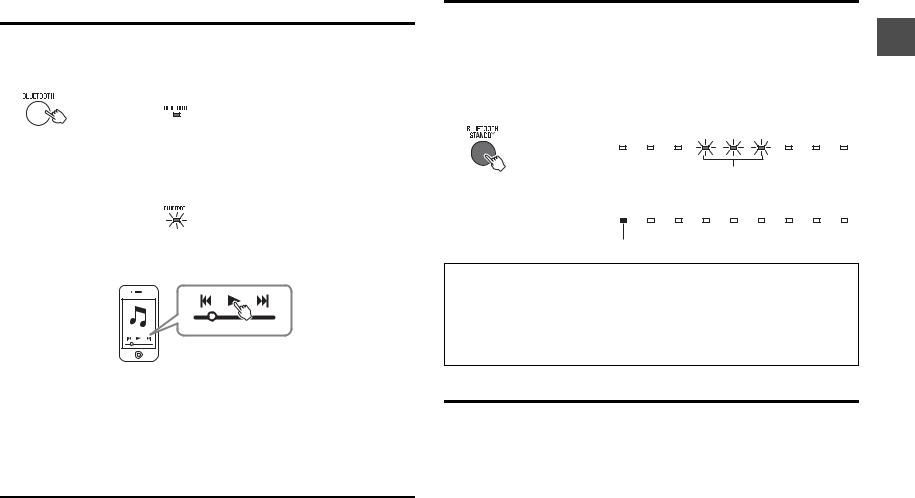
Terminating Bluetooth connection
Bluetooth connection is terminated in the following cases. When the unit is turned on and the Bluetooth connection is terminated, the BLUETOOTH indicator flashes once.
•The Bluetooth function is turned off on the compatible device.
•The BLUETOOTH key is pressed for more than 3 seconds.
•The unit is turned off.
Using the Bluetooth standby mode
The Bluetooth standby mode allows you to turn on (or off) the unit automatically, that interlocked by the operation of the Bluetooth device.
1With the unit turned on, hold down the BLUETOOTH STANDBY key for more than 3 seconds.
Holding down the BLUETOOTH STANDBY key for 3 seconds each time toggles the mode between enabled and disabled.
Flash 3 times (enabled), flash once (disabled)
When the Bluetooth standby mode is enabled and the unit is turned off, the STATUS indicator lights up in red. (Bluetooth standby)
Lights up (red)
Functions available on Bluetooth devices with Bluetooth standby mode enabled
Power on interlock function (when the unit is turned off)
When Bluetooth connection is made on the device, the unit will turn on and will be ready to play back sound from the device.
Power off interlock function (when the unit is turned on)
The unit will be turned off when Bluetooth connection is terminated on a Bluetooth device. (Only when BLUETOOTH is selected as the input source.)
Using the HOME THEATER CONTROLLER application
By installing the dedicated free application “HOME THEATER CONTROLLER” to a Bluetooth device, such as a smartphone, you can perform various operations easily and conveniently with the Bluetooth device.
(Setting items: basic operation, surround mode, sound adjustments)
For details on “HOME THEATER CONTROLLER,” see the product information on our website.
En 13
Settings
Programming the unit with the TV’s remote control (TV’s remote control learning function)
Once you program the unit, you can control it with your TV’s remote control for functions such as turning on/off the TV and unit simultaneously, or volume up/down and muting/ unmuting of the unit.
•This function is available only when your TV’s remote control uses IR (infrared) signal.
•An RF (Radio Frequency) remote control will not work.
•If you want to use a cable or satellite set top box’s remote control to operate the unit, use your original TV’s IR (infrared) remote control to program the unit, then use the set top box’s remote control to operate.
•If by changing the volume of the unit the TV’s volume also changes, set the TV’s volume to minimum, or disable speaker output.
1 Turn off the TV.
2 Turn off the unit.
3Hold down the LEARN key on the unit’s remote control for more than 3 seconds to set the unit to the learning mode.
When the unit is in the learning mode, the indicators on the front panel flash as shown below.
NOTE
•Steps 4 to 7 require only the TV’s remote control and the keys on the front panel of the unit. The remote control of the unit is not necessary.
•If the unit has already learned functions, the following indicators light up.
Mute: BD/DVD, Volume (-): COAXIAL, Volume (+): ANALOG, Power: BLUETOOTH
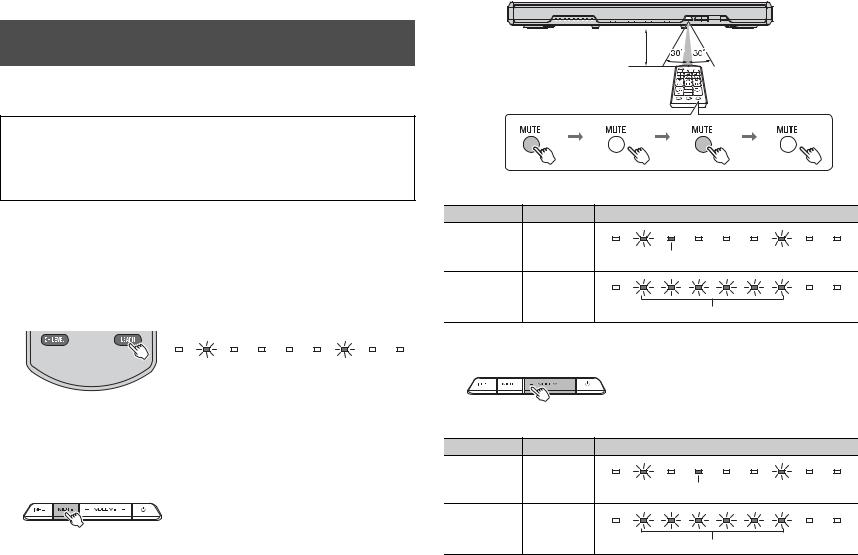
4 Teach the unit the “Mute” code of the TV’s remote control.
4-1 Press MUTE on the front panel of the unit.
4-2 While pointing your TV’s remote control at the remote control sensor, hold down the mute key for more than 1 second twice or three times.
Approx. 30 cm (1 ft)
TV’s remote control
|
Hold down |
Release |
Hold down |
Release |
(more than 1 second) (more than 1 second) (more than 1 second) |
(...) |
|||
Result |
Bleep/buzzer |
Indicators |
|
|
Successfully |
Once |
|
|
|
learned |
|
Lights up |
|
|
|
|
|
||
|
|
|
|
|
Failed to learn |
|
|
|
|
* Repeat from |
Twice |
|
|
|
Step 4-1. |
|
|
Flash |
|
|
|
|
|
|
5 Teach the unit the “Volume (–)” code of the TV’s remote control.
5-1 Press VOLUME (–) on the front panel of the unit.
5-2 While pointing your TV’s remote control at the remote control sensor, hold down the volume (–) key for more than 1 second twice or three times.
Result |
Bleep/buzzer Indicators |
|
Successfully |
Once |
|
learned |
||
Lights up |
||
|
||
Failed to learn |
|
|
* Repeat from |
Twice |
|
Step 5-1. |
Flash |
|
|
14 En
6 Teach the unit the “Volume (+)” code of the TV’s remote control.
6-1 Press VOLUME (+) on the front panel of the unit.
6-2 While pointing your TV’s remote control at the remote control sensor, hold down the volume (+) key for more than 1 second twice or three times.
Result |
Bleep/buzzer Indicators |
|
Successfully |
Once |
|
learned |
||
Lights up |
||
Failed to learn |
|
|
* Repeat from |
Twice |
|
Step 6-1. |
Flash |
|
|
7 Teach the unit the “Power” code of the TV’s remote control.
7-1 Press  (power) on the front panel of the unit.
7-2 While pointing your TV’s remote control at the remote control sensor, hold down the power key for more than 1 second twice or three times.
Result |
Bleep/buzzer Indicators |
|
Successfully |
Once |
|
learned |
||
Lights up |
||
|
||
Failed to learn |
|
|
* Repeat from |
Twice |
|
Step 7-1. |
Flash |
|
|
8To finish the learning mode, press the LEARN key on the unit’s remote control.
This completes the necessary settings. Now you can operate the unit with the TV’s remote control’s mute key, volume keys, or power key.
HINT
•The learning mode will be finished automatically if no operations are performed for 5 minutes.
•Set the TV volume to minimum. When you turn up the volume of the unit with the TV’s remote control, the volume of the TV may be turned up at the same time. In this case, follow Step 4 in “Connections” (p.5) to change the TV setting.
•You can press the  (power) key on the unit’s remote control to finish learning mode.
Clearing all learned operations
1With the unit turned off, hold down the LEARN key on the supplied remote control for more than 3 seconds (for entering the learning mode).
When the unit is in the learning mode, the indicators on the front panel flash as shown below.
2Hold down INPUT on the front panel of the unit for more than 3 seconds.
Flashes in red (cleared)
If the clearing is completed, you will hear the bleep sound three times.
3 Press the LEARN key on the supplied remote control.
En 15
Using an external subwoofer
The unit has dual built-in subwoofers; however you can connect an external subwoofer when you want to enhance low frequency sound. Connect a subwoofer to the SUBWOOFER OUT jack of the unit.
Unit (rear)
Overhead view
Pin cable for subwoofer (commercially available)
Mono input
NOTE
• Use an external subwoofer with built-in amplifier.
Making sound easy to listen at low volume
You can change the dynamic range to make sounds easy to hear at a low volume.
1 Turn off the unit.
2 Hold down the key for the desired mode for more than 5 seconds.
Returns to Normal
Sets to Standard
Sets to Maximum
The unit turns on with the selected setting.
Three settings are available (see below).
You can confirm the setting status by the lights of the indicator, when the unit is turned on.
Setting |
Description |
Indicator |
|||
|
|
|
|
|
|
Normal |
Automatically adjusts the dynamic range |
|
|
|
|
|
based on the volume level of the source. |
|
|
|
|
|
|
Lights up in green |
|||
|
|
|
|
|
|
Standard |
Compresses the dynamic range to suit a |
|
|
|
|
|
living room environment, etc. |
|
|
|
|
|
|
Lights up in orange |
|||
|
|
|
|
|
|
Maximum |
Does not compress the dynamic range. |
|
|
|
|
|
|
|
|
|
|
|
|
Lights up in red |
|||
|
|
|
|
|
|
NOTE
• Normal is set as default.
16 En
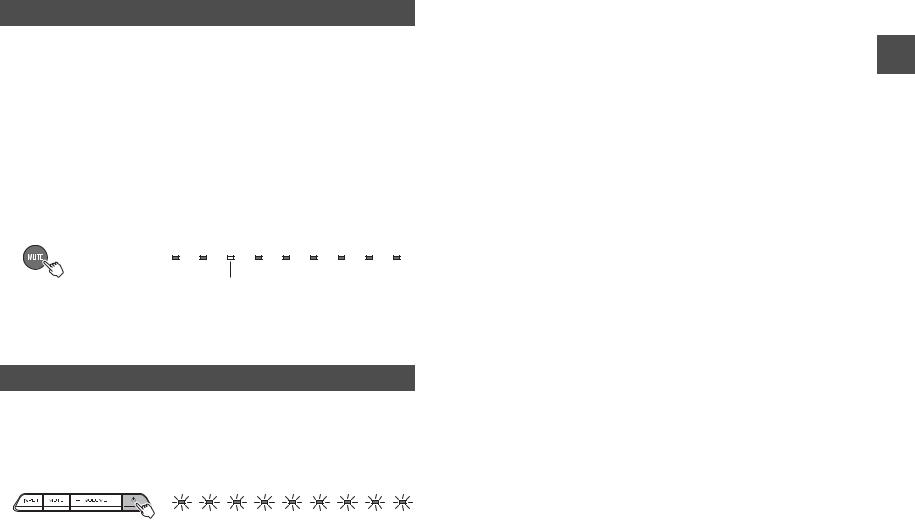
Setting the auto power standby function
By enabling the auto power standby function, you can avoid forgetting to turn off the unit after use, or if you fall asleep while watching TV.
NOTE
•When the auto power standby function is enabled and one of the following conditions is met, the unit will automatically turn off.
−No operation for 8 hours
−No audio input and no operations for 20 minutes when BLUETOOTH is selected as the input source.
1With the unit turned off, hold down the MUTE key on the unit’s remote control for more than 5 seconds to enable/disable the auto power standby function.
You can check the status of the auto power standby function with the BD/DVD indicator when turning on the unit.
Off (enabled), lights up (disabled)
HINT
•Initial setting varies depending on the country or region.
−U.K. and Europe models: enabled
−Other models: disabled
Initializing the settings of the unit
Follow the procedure below to initialize the unit.
1
2
Turn off the unit.
Hold down  (power) on the front panel of the unit for more than 3 seconds.
Flash (initialized)
En 17

Troubleshooting
Refer to the table below when the unit does not function properly. If the problem you are experiencing is not listed below or if the instructions below do not help, turn off the unit, disconnect the power cable, and contact the nearest authorized Yamaha dealer or service center.
First, check the following:
A The power cables of the unit, TV and playback devices (such as BD players) are connected to AC wall outlets securely.
B The unit, TV and playback devices (such as BD players) are turned on.
C The connectors of each cable are securely inserted in to jacks on each device.
Power and system
Problem |
Cause |
Remedy |
|
|
|
|
|
The power turns |
The auto power standby function |
Turn on the unit again. To stop the unit |
|
off suddenly. |
worked. |
from turning off automatically, disable |
|
|
When the auto power standby |
the auto power standby function |
|
|
function is enabled and one of the |
(p.17). |
|
|
following conditions is met, the |
|
|
|
unit will automatically turn off. |
|
|
|
- No operation for 8 hours |
|
|
|
- No audio input and no |
|
|
|
operations for 20 minutes when |
|
|
|
BLUETOOTH is selected as the |
|
|
|
input source. |
|
|
|
|
|
|
|
The internal microcomputer is |
Hold down |
(power) on the front |
|
frozen, due to an external electric |
panel of the unit for more than 10 |
|
|
shock (such as lightning or |
seconds to reboot it. (If the problem |
|
|
excessive static electricity) or to a |
persists, disconnect the power cable |
|
|
drop in the power supply voltage. |
from the AC wall outlet and plug it |
|
|
|
again.) |
|
|
|
|
|
|
The protection circuitry has been |
After confirming that all connections |
|
|
activated. (The STATUS indicator |
are made properly, turn on the unit |
|
|
on the front panel of the unit |
again. If the power often suddenly |
|
|
flashes.) |
turns off, unplug the power cable from |
|
|
|
the AC wall outlet and contact the |
|
|
|
nearest authorized Yamaha dealer or |
|
|
|
service center. |
|
|
|
|
|
|
Bluetooth connection is |
Disable the Bluetooth standby mode |
|
|
terminated on a Bluetooth device |
(p.13). |
|
|
when the Bluetooth standby mode |
|
|
|
is enabled. |
|
|
|
|
|
|
The power |
The protection circuitry has been |
To protect the product, the power |
|
cannot be turned |
activated three times |
cannot be turned on. Unplug the |
|
on. |
consecutively. (If you try to turn on |
power cable from the AC wall outlet |
|
|
the power in this condition, the |
and contact the nearest authorized |
|
|
STATUS indicator flashes.) |
Yamaha dealer or service center. |
|
|
|
|
|
The unit is not |
The internal microcomputer is |
Hold down |
(power) on the front |
responding |
frozen, due to an external electric |
panel of the unit for more than 10 |
|
correctly. |
shock (such as lightning or |
seconds to reboot it. (If the problem |
|
|
excessive static electricity) or to a |
persists, disconnect the power cable |
|
|
drop in the power supply voltage. |
from the AC wall outlet and plug it |
|
|
|
again.) |
|
|
|
|
|
The unit |
Another Bluetooth device is being |
Terminate Bluetooth connection of the |
|
operates by |
operated nearby. |
unit and connect the unit and device |
|
itself. |
|
again (p.13). |
|
|
|
|
|
Audio
Problem |
Cause |
Remedy |
|
|
|
|
|
No sound. |
Another input source is selected. |
Select an appropriate input source |
|
|
|
(p.8). |
|
|
|
|
|
|
The mute function is activated. |
Cancel the mute function (p.8). |
|
|
|
|
|
|
The volume is too low. |
Turn up the volume (p.8). |
|
|
|
|
|
No sound is |
The volume of the subwoofer is |
Turn up the volume of the subwoofer |
|
coming from the |
too low. |
(p.8). |
|
subwoofer. |
|
|
|
The playback source does not |
-- |
||
|
|||
|
contain low-frequency signals. |
|
|
|
|
|
|
The volume |
The automatic volume adjustment |
If necessary, turn up the volume (p.8). |
|
decreases when |
function worked. To prevent |
|
|
the unit is turned |
excessive loudness, the unit |
|
|
on. |
automatically controls its volume |
|
|
|
within a certain level when the unit |
|
|
|
is turned on. |
|
|
|
|
|
18 En
No surround |
Stereo playback is selected. |
Select the surround mode key to |
effect. |
|
change for surround playback (p.10). |
|
|
|
|
The volume is too low. |
Turn up the volume (p.8). |
|
|
|
|
The volume of the surround left |
Turn up the volume of the surround left |
|
and right channels is low. |
and right channels (p.11). |
|
|
|
|
The TV or playback device is set |
Change the digital audio output setting |
|
to output 2-channel audio (such |
on the TV or playback device. |
|
as PCM) only. |
|
|
|
|
|
The correct SRT position mode is |
Select a SRT POSITION key on the |
|
not selected. |
remote control which is best suited for |
|
|
your listening environment. |
|
|
|
|
Sound beams are not reflected |
Use of the sound reflection board (sold |
|
effectively off walls because of the |
separately) is recommended (p.21). |
|
shape of the room, etc. |
|
|
|
|
Noise is heard. |
The unit is too close to another |
Move those devices away from the |
|
digital or high-frequency device. |
unit. |
|
|
|
Remote control
Problem |
Cause |
Remedy |
|
|
|
|
|
The unit cannot |
The unit is out of the operating |
Use the remote control within the |
|
be controlled |
range. |
operating range (p.2). |
|
using the remote |
|
|
|
The batteries are weak. |
Replace with new batteries (p.2). |
||
control. |
|||
|
|
||
The remote control sensor of the |
Adjust the lighting angle, or reposition |
||
|
|||
|
unit is exposed to direct sunlight |
the unit. |
|
|
or strong lighting. |
|
|
|
|
|
|
The unit does |
The TV remote control key was |
Hold down the key for more than 1 |
|
not learn TV |
not held down long enough. |
second twice or three times (p.14). |
|
remote control |
|
|
|
The TV remote control does not |
The TV remote control learning |
||
operations. |
|||
use infrared signals. (Some |
function cannot be used in this case. |
||
|
|||
|
remote controls may not work |
Use the supplied remote control to |
|
|
even if it uses infrared signals.) |
operate the unit. |
|
|
|
|
|
|
The position where you operated |
Operate the TV remote control at the |
|
|
the TV remote control is not |
appropriate position (p.14). |
|
|
appropriate. |
|
|
|
|
|
|
|
The batteries of the TV remote |
Replace with new batteries. |
|
|
control are weak. |
|
|
|
|
|
|
|
The remote control sensor of the |
Adjust the lighting angle, or reposition |
|
|
unit is exposed to direct sunlight |
the unit. |
|
|
or strong lighting. |
|
|
|
|
|
|
|
The transmission of the remote |
Turn off the TV and perform the |
|
|
control signal was disturbed by |
learning operation again (p.14). |
|
|
the TV screen light. |
|
|
|
|
|
Sound is coming |
Audio output is enabled on the |
Change the TV setting to disable the |
|
|
from the TV |
TV. |
TV speaker output. If a setting to |
|
|
when the unit |
|
disable the speaker output is not |
|
|
volume is turned |
|
available on your TV, try the following |
|
|
|
|
|||
up with the TV |
|
methods. |
|
|
remote control. |
|
- Connect headphones to the |
|
|
|
headphone jack on the TV. |
|
||
(when TV remote |
|
|
||
|
- Set the TV volume to minimum. |
|
||
control learning |
|
|
||
|
|
|
|
|
function is used) |
|
|
|
|
|
|
|
|
|
The power of the |
The power of the TV was on when |
Press the power key on the TV and |
|
|
unit and of the |
you performed the learning |
(power) on the front panel of the |
|
|
TV switch in the |
operation. |
unit to turn them on and then press the |
|
|
opposite |
|
power key on the TV remote control to |
|
|
direction. (For |
|
turn them off. |
|
|
example, the TV |
|
|
|
|
is turned off if |
|
|
|
|
the unit is turned |
|
|
|
|
on.) |
|
|
|
|
(when TV remote |
|
|
|
|
control learning |
|
|
|
|
function is used) |
|
|
|
|
|
|
|
|
|
En 19
Bluetooth
Problem |
Cause |
Remedy |
|
|
|
|
|
Cannot make the |
Bluetooth is not selected as the |
Select Bluetooth as the input source. |
|
unit paired with |
input source. |
|
|
the Bluetooth |
|
|
|
A Bluetooth adaptor, etc., that you |
Use a Bluetooth adaptor, etc., whose |
||
device. |
|||
want to pair with the unit has a |
password is “0000.” |
||
|
|||
|
password other than “0000.” |
|
|
|
|
|
|
|
The unit and device are too far |
Move the device closer to the unit. |
|
|
apart. |
|
|
|
|
|
|
|
There is a device (microwave |
Move this unit away from the device |
|
|
oven, wireless LAN, etc.) outputs |
that is emitting radio frequency |
|
|
signals in the 2.4 GHz frequency |
signals. |
|
|
band nearby. |
|
|
|
|
|
|
|
Another Bluetooth device is |
Terminate current Bluetooth |
|
|
connected. |
connection, and perform pairing with |
|
|
|
the new device. |
|
|
|
|
|
Cannot make a |
Another Bluetooth device is |
The unit cannot make multiple |
|
Bluetooth |
connected. |
Bluetooth connections. Terminate |
|
connection. |
|
current Bluetooth connection, and |
|
|
|
make connection for the desired |
|
|
|
device. |
|
|
|
|
|
|
More than nine devices are paired |
Perform pairing again. The unit can |
|
|
and the oldest pairing information |
retain pairing information for up to |
|
|
is deleted. |
eight devices. When pairing a ninth |
|
|
|
device, the oldest pairing information |
|
|
|
will be deleted. |
|
|
|
|
|
No sound is |
The Bluetooth connection of the |
Perform Bluetooth connection |
|
produced or the |
unit with the device is |
operations again (p.13). |
|
sound is |
disconnected. |
|
|
interrupted |
|
|
|
Bluetooth is not selected as the |
Select Bluetooth as the input source. |
||
during playback. |
|||
input source. |
|
||
|
|
|
|
|
The unit and device are too far |
Move the device closer to the unit. |
|
|
apart. |
|
|
|
|
|
|
|
There is a device (microwave |
Move this unit away from the device |
|
|
oven, wireless LAN, etc.) outputs |
that is emitting radio frequency |
|
|
signals in the 2.4 GHz frequency |
signals. |
|
|
band nearby. |
|
|
|
|
|
|
|
The device is not set to send |
Change the audio output setting and |
|
|
Bluetooth audio signals to the |
connection setting on the device. |
|
|
unit. |
|
|
|
|
|
|
|
Playback on the device has not |
Perform playback on the device. |
|
|
been performed. |
|
|
|
|
|
|
|
The device’s volume is set to |
Turn up the volume level. |
|
|
minimum. |
|
|
|
|
|
20 En
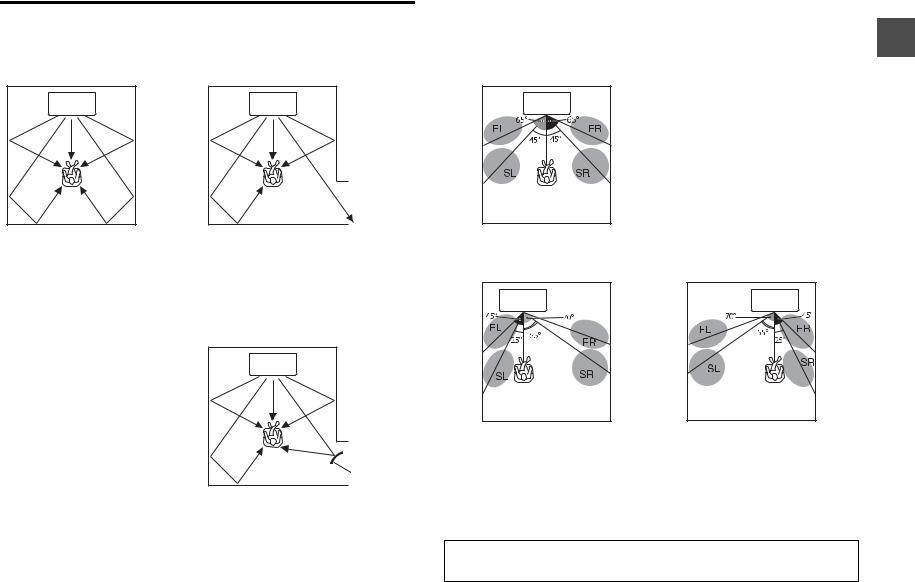
When surround effect is not enough
The unit achieves its surround sound effects by projecting sound beams which reflect off walls. The sound beams are not reflected toward to the listening position caused by furniture, etc., in the path of sound beams, or the room shape. In this case, the sound may become unbalanced.
How to install YRB-100
The unit outputs sound beams according to the “SRT position” settings (p.9) as shown in the following illustrations.
Install the YRB-100 in the path of the sound beam.
 shows the recommended install position.
FL: Front left
FR: Front right
SL: Surround left
SR: Surround right
Figure 1. Ideal condition |
Figure 2. Surround (right) beam is not being |
SRT position: Center |
|
reflected because there is no wall. |
|
Sound beams are reflected correctly and surround sound effects are balanced.
Surround (right) is quieter than surround (left), or surround (right) is in front of its proper location.
If the sound beams are not reflected toward to the listening position (figure 2), you can adjust for this by installing the optional sound reflection board (YRB-100).
YRB-100 |
Figure 3. With a sound reflection board installed
The sound beam for surround (right) is reflected correctly, and correct surround sound effect is achieved.
NOTE
• YRB-100 may not be available depending on the country or region.
SRT position: Left |
SRT position: Right |
•After installing the sound reflection board, refer to the YRB-100 owner’s manual to adjust the height and angle. It is recommended to use the test-tone (by holding down the CH LEVEL key) when adjusting the board (p.11).
•By installing the board close to your listening position, you can achieve clear surround sound positioning.
NOTE
This unit does not have the function to automatically adjust sound beam angles. It is not necessary to adjust the sound beam angles, although the procedure is described in the owner’s manual.
En 21

Specifications
Item |
|
TV Surround System (SRT-1000) |
|
|
|
|
|
|
Maximum Rated |
Array speakers 2 W x 8 |
|
Amplifier |
|
||
Woofer 30 W x 2 |
|||
Output Power |
|||
|
|
||
|
|
Subwoofer 60 W |
|
|
|
|
|
|
Type |
Acoustic suspension type |
|
|
|
|
|
|
Driver |
Full range |
|
Array |
2.8 cm (1-1/8") cone magnetic shielding type x 8 |
||
|
|||
speakers |
|
|
|
Frequency |
500 Hz to 22 kHz |
||
|
Response |
||
|
|
||
|
|
|
|
|
Impedance |
4 Ω |
|
|
|
|
|
|
Type |
Acoustic suspension type |
|
|
|
|
|
|
|
Full range |
|
|
Driver |
4 x 10 cm (1-1/2 x 4") cone non-magnetic shielding |
|
Woofer |
|
type x 2 |
|
|
|
|
|
|
Frequency |
150 Hz to 22 kHz |
|
|
Response |
||
|
|
||
|
|
|
|
|
Impedance |
6 Ω |
|
|
|
|
|
|
Type |
Bass reflex type |
|
|
|
|
|
|
Driver |
8.5 cm (3-1/4") cone non-magnetic shielding type x 2 |
|
Subwoofer |
|
|
|
Frequency |
45 Hz to 150 Hz |
||
|
Response |
||
|
|
||
|
|
|
|
|
Impedance |
6 Ω |
|
|
|
|
|
|
Supported audio |
PCM (2ch) |
|
Decoder |
signal (TV, BD/ |
Dolby Digital |
|
|
DVD) |
DTS Digital Surround |
|
|
|
|
|
|
Digital (Optical) |
2 (TV, BD/DVD) |
|
|
|
|
|
Input Jacks |
Digital (Coaxial) |
1 (COAXIAL) |
|
|
|
||
|
Analog |
1 (ANALOG) |
|
|
(RCA/stereo) |
||
|
|
||
|
|
|
|
Output Jack |
Analog |
1 (SUBWOOFER OUT) |
|
(RCA/monaural) |
|||
|
|
||
|
|
|
|
|
Bluetooth |
Ver. 2.1 +EDR |
|
|
version |
|
|
|
|
|
|
|
|
|
|
|
Supported |
A2DP |
|
|
protocols |
|
|
|
|
|
|
|
|
|
|
|
Supported |
SBC, aptX |
|
|
codecs |
|
|
|
|
|
|
|
|
|
Bluetooth |
Wireless output |
Bluetooth Class 2 |
|
|
|
||
|
|
Maximum |
|
|
|
communication |
10 m ([33 ft] without obstructions) |
|
|
distance |
|
|
|
|
|
|
|
Supported |
|
|
|
content |
SCMS-T |
|
|
protection |
|
|
|
|
|
|
|
method |
|
|
|
|
|
|
|
|
U.S.A. and Canada models: AC 120 V, 60 Hz |
|
|
Power Supply |
Taiwan model: AC 110-120 V 50/60 Hz |
|
|
|
Other models: AC 220-240 V, 50/60 Hz |
|
|
|
|
|
|
Power |
24 W |
|
|
Consumption |
|
General |
|
|
|
|
|
|
|
|
Standby Power |
0.3 W (When Bluetooth Standby is enabled) |
|
|
|
||
|
|
Consumption |
0.2 W (When Bluetooth Standby is disabled) |
|
|
|
|
|
|
Dimensions |
780 x 77 x 370 mm |
|
|
(W x H x D) |
(30-3/4" x 3" x 14-5/8") |
|
|
|
|
|
|
Weight |
8.8 kg (19.4 lbs) |
|
|
|
|
* Specifications are subject to change without notice.
The “ ” logo and “Cinema DSP” are registered trademarks of Yamaha Corporation.
“UniVolume” is a trademark of Yamaha Corporation.
Bluetooth is a registered trademark of the Bluetooth SIG and is used by Yamaha in accordance with a license agreement.
Manufactured under license from Dolby Laboratories. Dolby, Pro Logic and the double-D symbol are trademarks of Dolby Laboratories.
22 En

For DTS patents, see http://patents.dts.com. Manufactured under license from DTS Licensing Limited. DTS, the Symbol, & DTS and the Symbol together are registered trademarks, and DTS Digital Surround is a trademark of DTS, Inc. © DTS, Inc. All Rights Reserved.
© 2013 CSR plc and its group companies.
The aptX® mark and the aptX logo are trade marks of CSR plc or one of its group companies and may be registered in one or more jurisdictions.
“Blu-ray Disc™”, “Blu-ray™”, and the logos are trademarks of the Blu-ray Disc Association.
Bluetooth
•Bluetooth is a technology for wireless communication between devices within an area of about 10 meters (33 ft) employing the 2.4 GHz frequency band, a band which can be used without a license.
Handling Bluetooth communications
•The 2.4 GHz band used by Bluetooth compatible devices is a radio band shared by many types of equipment. While Bluetooth compatible devices use a technology minimizing the influence of other components using the same radio band, such influence may reduce the speed or distance of communications and in some cases interrupt communications.
•The speed of signal transfer and the distance at which communications is possible differs according to the distance between the communicating devices, the presence of obstacles, radio wave conditions and type of equipment.
•Yamaha does not guarantee all wireless connections between this unit and devices compatible with Bluetooth function.
Information for Users on Collection and Disposal of Old Equipment and Used Batteries
These symbols on the products, packaging, and/or accompanying documents mean that used electrical and electronic products and batteries should not be mixed with general household waste. For proper treatment, recovery and recycling of old products and used batteries, please take them to applicable collection points, in accordance with your national legislation and the Directives 2002/96/ EC and 2006/66/EC.
By disposing of these products and batteries correctly, you will help to save valuable resources and prevent any potential negative effects on human health and the environment which could otherwise arise from inappropriate waste handling.
For more information about collection and recycling of old products and batteries, please contact your local municipality, your waste disposal service or the point of sale where you purchased the items.
[Information on Disposal in other Countries outside the European Union]
These symbols are only valid in the European Union. If you wish to discard these items, please contact your local authorities or dealer and ask for the correct method of disposal.
Note for the battery symbol (bottom two symbol examples):
This symbol might be used in combination with a chemical symbol. In this case it complies with the requirement set by the Directive for the chemical involved.
En 23

ATTENTION : LISEZ CE QUI SUIT AVANT D’UTILISER VOTRE APPAREIL.
•Pour utiliser l’appareil au mieux de ses possibilités, lisez attentivement ce mode d’emploi. Conservez-le soigneusement pour référence.
•Installez cet appareil audio dans un endroit bien aéré, frais, sec et propre - à l’abri de la lumière directe du soleil, des sources de chaleur ou de vibration, des poussières, de l’humidité et du froid. Pour une ventilation correcte, respectez les espaces libres conseillés lors de l’installation (sauf pour un téléviseur placé au-dessus de cet appareil). Au-dessus: 5 cm, À l’arrière: 5 cm, Sur les côtés: 5 cm
•Placez l’appareil loin des équipements, moteurs et transformateurs électriques, pour éviter les ronflements parasites.
•N’exposez pas l’appareil à des variations brutales de température, ne le placez pas dans un environnement très humide (par exemple dans une pièce contenant un humidificateur) car cela peut entraîner la condensation d’humidité à l’intérieur de l’appareil qui elle-même peut être responsable de décharge électrique, d’incendie, de dommage à l’appareil ou de blessure corporelle.
•Evitez d’installer l’appareil dans un endroit où des objets peuvent tomber, ainsi que là où l’appareil pourrait être exposé à des éclaboussures ou des gouttes d’eau. Sur le dessus de l’appareil, ne placez pas:
−d’autres appareils qui peuvent endommager la surface de l’appareil ou provoquer sa décoloration.
−des objets se consumant (par exemple, une bougie) qui peuvent être responsables d’incendie, de dommage à l’appareil ou de blessure corporelle.
−des récipients contenant des liquides qui peuvent être à l’origine de décharge électrique ou de dommage à l’appareil.
•Ne couvrez pas l’appareil d’un journal, d’une nappe, d’un rideau, etc. car cela empêcherait l’évacuation de la chaleur. Toute augmentation de la température intérieure de l’appareil peut être responsable d’incendie, de dommage à l’appareil ou de blessure corporelle.
•Ne branchez pas la fi che du câble d’alimentation de l’appareil sur une prise secteur aussi longtemps que tous les raccordements n’ont pas été effectués.
•Ne pas faire fonctionner l’appareil à l’envers. Il risquerait de chauffer et d’être endommagé.
•N’exercez aucune force excessive sur les commutateurs, les boutons et les cordons.
•Pour débrancher la fiche du câble d’alimentation au niveau de la prise secteur, saisissez la fiche et ne tirez pas sur le câble.
•Ne nettoyez pas l’appareil au moyen d’un solvant chimique, ce qui pourrait endommager la finition. Utilisez un chiffon sec et propre.
•N’alimentez l’appareil qu’à partir de la tension prescrite. Alimenter l’appareil sous une tension plus élevée est dangereux et peut être responsable d’incendie, de dommage à l’appareil ou de blessure corporelle. Yamaha ne saurait être tenue responsable des dommages résultant de l’alimentation de l’appareil sous une tension autre que celle prescrite.
•Pour empêcher tout dommage causé par les éclairs, déconnectez la câble d’alimentation et toute antenne extérieure de la prise murale pendant un orage.
•Ne tentez pas de modifier ni de réparer l’appareil. Consultez le service Yamaha compétent pour toute réparation qui serait requise. Le coffret de l’appareil ne doit jamais être ouvert, quelle que soit la raison.
•Si vous envisagez de ne pas vous servir de l’appareil pendant une longue période (par exemple, pendant les vacances), débranchez la fiche du câble d’alimentation au niveau de la prise secteur.
•Lisez la section intitulée « Guide de dépannage » où figurent une liste d’erreurs de manipulation communes avant de conclure que l’appareil présente une anomalie de fonctionnement.
•Avant de déplacer l’appareil, appuyez sur  pour placer l’appareil en veille puis débranchez la fiche du câble d’alimentation au niveau de la prise secteur.
•La condensation se forme lorsque la température ambiante change brusquement. En ce cas, débranchez la fiche du câble d’alimentation et laissez l’appareil reposer.
•Installez cet appareil à proximité de la prise secteur et à un emplacement où la fiche du câble d’alimentation est facilement accessible.
•Les piles ne doivent pas être exposées à une chaleur extrême, par exemple au soleil, à une flamme, etc.
•Le propriétaire est responsable d’installer correctement les composants. Yamaha ne peut être tenue responsable de toute installation incorrecte des enceintes.
Remarques à propos des télécommandes et piles
•Ne renversez aucun liquide sur la télécommande.
•Ne laissez pas tomber la télécommande.
•Ne laissez pas et ne rangez pas la télécommande dans les endroits suivants :
−endroits très humides, par exemple près d’une baignoire
−endroits très chauds, par exemple près d’un poêle ou d’un appareil de chauffage
−endroits très froids
−endroits poussiéreux
•N’exposez pas le capteur de télécommande de ce système à la lumière directe du soleil ou à une lampe fluorescente à onduleur.
•Si les piles sont vieilles, la portée de la télécommande risque de diminuer considérablement. Le cas échéant, remplacez les piles le plus rapidement possible par deux piles neuves.
•N’utilisez pas à la fois des piles neuves et des piles usagées.
•N’utilisez pas non plus des piles de deux types différents (par exemple, des piles alcalines et des piles au manganèse). Lisez les instructions de l’emballage, car ces types de piles peuvent être de forme et de couleur différentes.
•Des piles épuisées risquent de fuir. En cas de fuite, jetez les piles immédiatement. Évitez de toucher le liquide qui a fui et veillez à ce qu’il n’entre pas en contact avec vos vêtements, etc. Nettoyez soigneusement le logement d’insertion des piles avant d’insérer de nouvelles piles.
•Ne transportez pas les piles dans une poche ou un sac avec des objets métalliques comme des pièces de monnaie, etc.
•Ne jetez pas les piles avec les ordures ménagères. Mettez-les au rebut conformément aux réglementations locales en vigueur.
•Tenez les piles à l’écart des enfants. En cas d’ingestion accidentelle, contactez immédiatement un médecin.
•Si vous pensez ne pas utiliser la télécommande pendant une période prolongée, retirez les piles.
•Ne chargez pas et ne démontez pas les piles fournies.
AVERTISSEMENT
POUR RÉ DUIRE LES RISQUES D’INCENDIE OU DE SECOUSSE ÉLECTRIQUE, N’EXPOSEZ PAS CET APPAREIL À LA PLUIE OU À L’HUMIDITÉ.
Aussi longtemps qu’il est branché sur la prise de courant, cet appareil n’est pas déconnecté du secteur, même si vous le mettez hors tension à l’aide de la touche  . Dans cet état, l’appareil consomme une très faible quantité de courant.
 (touche d’alimentation)
Cette touche permet de mettre l’appareil sous tension ou en mode veille.
N’utilisez pas cet appareil à moins de 22 cm des personnes disposant d’un stimulateur cardiaque ou d’un défibrillateur.
Les ondes radio peuvent avoir une incidence sur les équipements électroniques médicaux. N’utilisez pas cet appareil à proximité d’équipements médicaux ou à l’intérieur d’institutions médicales.
Yamaha Music Europe GmbH certifie la conformité de cet appareil aux exigences essentielles et aux autres dispositions pertinentes de la Directive 1999/5/EC.
iFr

Table des matières |
|
Éléments livrés....................................................................... |
2 |
Fonctions ................................................................................ |
3 |
Foire aux questions ............................................................... |
3 |
Nom des pièces et des fonctions du système ...................... |
4 |
Raccordements ...................................................................... |
5 |
Connexion analogique d’un appareil externe (console de jeux)......... |
6 |
Connexion numérique d’un appareil externe ............................................ |
6 |
Installations............................................................................ |
7 |
Fonctionnement .................................................................... |
8 |
Réglage de l’effet sonore surround pour la position d’installation |
|
(position SRT)....................................................................................................... |
10 |
Sélection d’un effet sonore surround de votre choix ........................... |
10 |
Réglage du niveau de volume de chaque canal (CH LEVEL).............. |
11 |
Écoute du son à partir d’un appareil Bluetooth................ |
12 |
Réglages .............................................................................. |
14 |
Programmation du système avec la télécommande du téléviseur |
|
(fonction d’apprentissage de la télécommande du téléviseur)........ |
14 |
Utilisation d’un caisson de graves externe............................................... |
16 |
Écoute du son à faible volume...................................................................... |
16 |
Réglage de la fonction de mise en veille automatique........................ |
17 |
Initialisation des réglages du système ....................................................... |
17 |
Guide de dépannage .......................................................... |
18 |
Caractéristiques techniques .............................................. |
22 |
Quelques mots sur ce mode d’emploi
•Ce mode d’emploi décrit les opérations réalisables avec la télécommande fournie.
•Symboles utilisés dans ce mode d’emploi
REMARQUE
Ce symbole signale les précautions à prendre concernant l’utilisation du produit et les limites de ses fonctions.
ASTUCE
Ce symbole signale des explications supplémentaires permettant une meilleure utilisation.
Fr 1
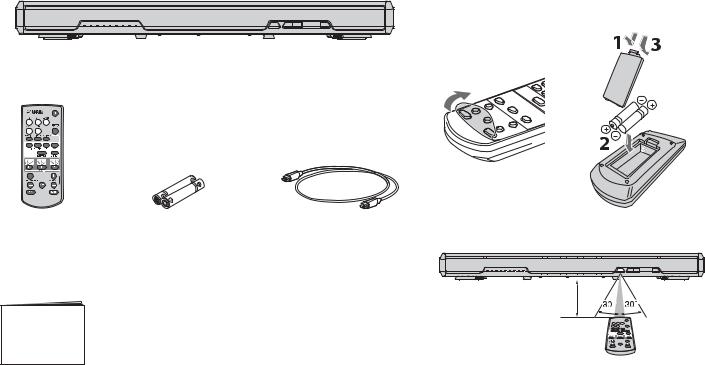
Éléments livrés
Assurez-vous d’avoir reçu l’ensemble des éléments suivants : Comment utiliser la télécommande
Préparation de la télécommande
Retirez la feuille de protection avant d’utiliser la télécommande.
Système
Télécommande |
Pile x 2 |
Câble optique (1,5 m) |
Rayon d’action de la télécommande |
|
(AAA, R03, UM4) |
|
|
|
|
Respectez le rayon d’action indiqué ci-dessous. |
|
|
|
|
|
|
|
|
6 m maximum |
Mode d’emploi (le présent manuel)
2 Fr
Fonctions
Profitez d’un son puissant et réaliste grâce à ce système. Vous pouvez facilement installer et raccorder ce système home cinéma à un téléviseur ou à d’autres périphériques.
• Projection de son numérique
Plusieurs petites enceintes intégrées permettent d’optimiser les faisceaux acoustiques individuels. L’effet sonore surround est amélioré par réflexion des faisceaux sur les murs de la pièce (p.10).
• Mode Surround
Profitez d’un son surround réaliste. Sélectionnez l’un des cinq modes surround disponibles (Film, Musique, Sports, Jeu, Programme TV) pour reproduire le son de la source de votre choix (p.10).
• Voix distincte
Les voix (dialogues et narrations, par exemple) sont distinctes grâce à une simple touche (p.9).
• UniVolume
Maintient le même volume lors de la commutation des entrées ou des sources sonores (p.9).
• Connexion Bluetooth®
Reproduisez le son d’un périphérique connecté via Bluetooth (p.12). L’amplificateur de musique compressée vous fait profiter d’un son nouveau et profond très proche de l’original. Ce système est également compatible avec le codec aptX, qui améliore le son de votre smartphone.
• HOME THEATER CONTROLLER
Vous pouvez utiliser le système facilement en installant l’application de contrôle dédiée « HOME THEATER CONTROLLER ».
• Fonction d’apprentissage de la télécommande du téléviseur
Contrôlez le système à l’aide de la commande du téléviseur (p.14).
Foire aux questions
La section suivante aborde les fonctions les plus populaires et les questions fréquemment posées au sujet du système.
Q1 Quelle taille de téléviseur puis-je placer sur le système ?
R1 Les téléviseurs à écran plat ne pesant pas plus de 40 kg, dont le socle ne dépasse pas 750 mm de largeur et 340 mm de profondeur, et dont l’écran ne dépasse pas 55 pouces peuvent être placés sur le système.
Q2 Puis-je utiliser le système à l’aide de la télécommande du téléviseur ? Il est peu pratique de basculer entre la télécommande du téléviseur et celle du système.
R2 Oui. Vous pouvez commander le système avec la télécommande de votre téléviseur en utilisant la fonction « Apprentissage de la télécommande du téléviseur » (p.14).
Cette fonction est disponible uniquement pour la télécommande IR (infrarouge). Vérifiez quel type de télécommande possède votre téléviseur.
Q3 Puis-je rendre les voix plus distinctes ?
R3 Oui. Vous pouvez rendre le son des dialogues de film, des journaux télévisés ou des émissions sportives, etc., plus distinct en utilisant la fonction « Voix distincte » (p.9).
Fr 3
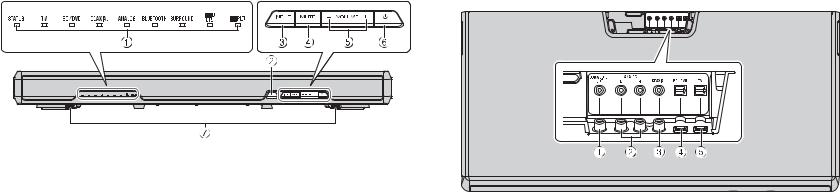
Nom des pièces et des fonctions du système
Panneau avant |
Panneau arrière |
|
Vue du dessus |
ATémoins
Les témoins indiquent l’état du système. Les témoins s’estompent automatiquement après 5 secondes d’inactivité.
Pour plus d’informations sur les fonctions principales des témoins, reportez-vous à la section « Fonctionnement » (p.8 à 9).
BCapteur de la télécommande
Reçoit les signaux émis par la télécommande de l’appareil (p.2).
CTouche INPUT
Cette touche permet de sélectionner la source d’entrée à lire (p.8).
APrise SUBWOOFER OUT
Cette prise permet de raccorder un caisson de graves externe à l’aide d’un câble mono à broches (p.16).
BPrises d’entrée ANALOG
Ces prises permettent de raccorder un appareil externe à l’aide d’un câble stéréo RCA (p.6).
DTouche MUTE
Met la sortie audio en silencieux. Appuyez à nouveau sur la touche pour désactiver le silencieux (p.8).
ETouches VOLUME (+/–)
Ces touches permettent de régler le volume (p.8).
F Touche (Alimentation)
Cette touche permet de mettre le système sous ou hors tension (en veille) (p.9).
GDouble caisson de graves intégré
Les caissons de graves intégrés sont situés sur la partie inférieure du système.
ASTUCE
•Le système peut se mettre hors tension automatiquement lorsque la fonction de mise en veille automatique est activée (p.17).
CPrise d’entrée COAXIAL
Cette prise permet de raccorder un appareil externe à l’aide d’un câble numérique coaxial (p.6).
DPrise d’entrée BD/DVD
Cette prise permet de raccorder un appareil de lecture, tel qu’un lecteur Blu-ray Disc (BD), à l’aide d’un câble optique (p.5).
EPrise d’entrée TV
Permet de raccorder un téléviseur à l’aide d’un câble optique (p.5).
4 Fr
 Loading...