


DTXPLORER
Table of contents
 Loading...
2
ADVARSEL!
Lithiumbatteri—Eksplosionsfare ved fejlagtig håndtering.
Udskiftning må kun ske med batteri af samme fabrikat og type.
Levér det brugte batteri tilbage til leverandoren.
VARNING
Explosionsfara vid felaktigt batteribyte. Använd samma batterityp
eller en ekvivalent typ som rekommenderas av apparattillverkaren.
Kassera använt batteri enlight fabrikantens instruktion.
VAR OITUS
Paristo voi räjähtää, jos se on virheellisesti asennettu.
Vaihda paristo ainoastaan laitevalmistajan suosittelemaan tyyppiin.
Hävitä käytetty paristo valmistajan ohjeiden mukaisesti.
Caution
Use ONLY a Yamaha PA-3C AC Power Adaptor (or other adaptor specifically recom-
mended by Yamaha) to power your instrument from the AC mains. The use of other
adaptors may result in irreparable damage to both the adaptor and the instrument.
92-BP (others)
This product utilizes batteries or an external power supply (adapter).
DO NOT connect this product to any power supply or adapter other than one described in
the manual, on the name plate, or specifically recommended by Yamaha.
WARNING: Do not place this product in a position where anyone could walk on, trip
over ,or roll anything over power or connecting cords of any kind. The use of an extension
cord is not recommended! If you must use an extension cord, the minimum wire size for
a 25' cord (or less ) is 18 AWG. NOTE: The smaller the AWG number ,the larger the
current handling capacity. For longer extension cords, consult a local electrician.
This product should be used only with the components supplied or; a cart, rack, or stand
that is recommended by Yamaha. If a cart, etc., is used, please observe all safety mark-
ings and instructions that accompany the accessory product.
SPECIFICATIONS SUBJECT TO CHANGE:
The information contained in this manual is believed to be correct at the time of printing.
However, Yamaha reserves the right to change or modify any of the specifications with-
out notice or obligation to update existing units.
This product, either alone or in combination with an amplifier and headphones or speaker/
s, may be capable of producing sound levels that could cause permanent hearing loss.
DO NOT operate for long periods of time at a high volume level or at a level that is
uncomfortable. If you experience any hearing loss or ringing in the ears, you should
consult an audiologist.
IMPORTANT: The louder the sound, the shorter the time period before damage occurs.
Some Yamaha products may have benches and / or accessory mounting fixtures that
are either supplied with the product or as optional accessories. Some of these items are
designed to be dealer assembled or installed. Please make sure that benches are stable
and any optional fixtures (where applicable) are well secured BEFORE using.
NOTICE:
Service charges incurred due to a lack of knowledge relating to how a function or effect
works (when the unit is operating as designed) are not covered by the manufacturer’s
warranty, and are therefore the owners responsibility. Please study this manual carefully
and consult your dealer before requesting service.
ENVIRONMENTAL ISSUES:
Ya maha strives to produce products that are both user safe and environmentally friendly.
We sincerely believe that our products and the production methods used to produce
them, meet these goals. In keeping with both the letter and the spirit of the law, we want
you to be aware of the following:
Battery Notice:
This product MAY contain a small non-rechargeable battery which (if applicable) is
soldered in place. The average life span of this type of battery is approximately five
years. When replacement becomes necessary, contact a qualified service representa-
tive to perform the replacement.
This product may also use “household” type batteries. Some of these may be recharge-
able. Make sure that the battery being charged is a rechargeable type and that the
charger is intended for the battery being charged.
When installing batteries, do not mix batteries with new, or with batteries of a different
type. Batteries MUST be installed correctly. Mismatches or incorrect installation may
result in overheating and battery case rupture.
Warning:
Do not attempt to disassemble, or incinerate any battery. Keep all batteries away from
children. Dispose of used batteries promptly and as regulated by the laws in your area.
Note: Check with any retailer of household type batteries in your area for battery dis-
posal information.
Disposal Notice:
Should this product become damaged beyond repair, or for some reason its useful life
is considered to be at an end, please observe all local, state, and federal regulations
that relate to the disposal of products that contain lead, batteries, plastics, etc. If your
dealer is unable to assist you, please contact Yamaha directly.
NAME PLATE LOCATION:
The name plate is located on the bottom of the product. The name plate lists the product’s
model number, power requirements, and other information. The serial number is lo-
cated on the rear panel. Please record the model number, serial number, and date of
purchase in the spaces provided below, and keep this manual as a permanent record
of your purchase.
Model
Serial No.
Purchase Date
SPECIAL MESSAGE SECTION
PLEASE KEEP THIS MANUAL
NEDERLAND / THE NETHERLANDS
• Dit apparaat bevat een lithium batterij voor geheugen back-up.
• This apparatus contains a lithium battery for memory back-up.
• Raadpleeg uw leverancier over de verwijdering van de batterij op het
moment dat u het apparaat ann het einde van de levensduur afdankt of de
volgende Yamaha Service AfdeIIng:
Yamaha Music Nederland Service AfdeIIng
Kanaalweg 18-G, 3526 KL UTRECHT
Tel. 030-2828425
•For the removal of the battery at the moment of the disposal at the end of
the service life please consult your retailer or Yamaha Service Center as
follows:
Ya maha Music Nederland Service Center
Address : Kanaalweg 18-G, 3526 KL UTRECHT
Te l: 030-2828425
• Gooi de batterij niet weg, maar lever hem in als KCA.
• Do not throw away the battery. Instead, hand it in as small chemical waste.
(lithium caution)
(lithium disposal)
FCC INFORMATION (U.S.A.)
1. IMPORTANT NOTICE: DO NOT MODIFY THIS UNIT!
This product, when installed as indicated in the instructions contained
in this manual, meets FCC requirements. Modifications not expressly
approved by Yamaha may void your authority, granted by the FCC, to
use the product.
2. IMPORTANT: When connecting this product to accessories and/or
another product use only high quality shielded cables. Cable/s sup-
plied with this product MUST be used. Follow all installation instruc-
tions. Failure to follow instructions could void your FCC authorization
to use this product in the USA.
3. NOTE: This product has been tested and found to comply with the
requirements listed in FCC Regulations, Part 15 for Class “B” digital
devices. Compliance with these requirements provides a reasonable
level of assurance that your use of this product in a residential envi-
ronment will not result in harmful interference with other electronic
devices. This equipment generates/uses radio frequencies and, if not
installed and used according to the instructions found in the users
manual, may cause interference harmful to the operation of other
electronic devices. Compliance with FCC regulations does not guaran-
tee that interference will not occur in all installations. If this product is
found to be the source of interference, which can be determined by
turning the unit “OFF” and “ON”, please try to eliminate the problem
by using one of the following measures:
Relocate either this product or the device that is being affected by the
interference.
Utilize power outlets that are on different branch (circuit breaker or
fuse) circuits or install AC line filter/s.
In the case of radio or TV interference, relocate/reorient the antenna.
If the antenna lead-in is 300 ohm ribbon lead, change the lead-in to
co-axial type cable.
If these corrective measures do not produce satisfactory results,
please contact the local retailer authorized to distribute this type of
product. If you can not locate the appropriate retailer, please contact
Yamaha Corporation of America, Electronic Service Division, 6600
Orangethorpe Ave, Buena Park, CA90620
The above statements apply ONLY to those products distributed by
Yamaha Corporation of America or its subsidiaries.
*
This applies only to products distributed by YAMAHA CORPORATION OF AMERICA.
(class B)
3
承蒙購買雅馬哈
DTXPLORER
,謹此致謝。
DTXPLORER
是個小型鼓触發器模組,含有丰富而高質量的鼓聲、一個
多功能節拍器和聲音播放功能。
要使
DTXPLORER
充分發揮其性能,請先仔細閱讀本使用說明書。
閱讀完了之后,請妥加保管以供日后參考。
鼓觸髮器摸組
使用說明書
包裝內容
包裝內含有如下物件。打開包裝之后,請先确認下列項目如數包裝在內,并一一加以清點。
• DTXPLORER
• 電源轉接器*
• 使用說明書(本書)
*可能在您所在的地方不包含。請向雅馬哈經銷店詢問。
注意
本使用說明書上所示的插圖和液晶顯示屏只用于說明,与您的樂器上的可能有所不同。
關于說明
本使用說明書使用下列准則來描述按鈕和說明。
• [DRUM KIT], [CLICK], 等 頂板上的按鈕用[ ](括弧)來表示。
• [SHIFT]+[DRUM KIT], 等 表示按住[SHIFT]按鈕時同時按[DRUM KIT]按鈕。
•[<]/[>], 等 表示使用[<]按鈕或[>]按鈕。
•“Completed!”, 等 “ ”內的詞表示顯示屏上顯示的信息。
m P. 12, 等 表示可以找到更詳細信息的參考頁次。
中文
4
注意事項
使用之前,請先仔細閱讀
*請妥加保存以便日后隨時取用。
警告
請務必遵守下列基本注意事項,以免導致嚴重受傷或甚至于因電震、短路、損坏火災或其它災難而身亡。注意事項包括
下列所述,但不只限于此:
電源∕交流電轉接器
• 只能使用适合于本樂器的規定電壓。要求電壓印刷在本樂器的
名牌上。
• 只能使用規定的轉接器(PA-3C或雅馬哈推荐的同等品)。使用
錯誤的轉接器會導致樂器損坏或過熱。
• 定期檢查電气插頭,并去除上面所積留的臟污或灰塵。
• 請勿將交流轉接器軟線放在加熱器或散熱器等熱源的附近,也
不可過度地彎曲,以免損坏軟線,不要在它上面放置笨重物
体,或將它放在會被人踩到、踏上或讓任何物体在它上面滾
動。
請勿打開
• 請勿打開本樂器或試圖分解內部零件,或用任何方法對它進行
改造。本樂器不含有可供使用者維修的零部件。若發現有故
障,請立即停止使用,并交由有資格的雅馬哈維修人員進行檢
查。
關于水的警告
• 請勿使本樂器淋到雨,或在水近旁或潮濕環境下使用,也不可
把含有會溢流到任何開口的液体的容器放在它上面。
• 切勿用潮濕的手插入或拔出電气插頭。
關于火的警告
• 請勿將蜡燭等燃燒物放在本產品上面。燃燒物會翻倒而導致火
災。
如果發現什么异常
• 如果交流轉接器軟線或插頭磨損或損坏,或者在演奏樂器時聲
音突然丟失,或有似乎是由它導致的异常气味或冒煙,請立即
關閉電源,把轉接器插頭從插座中拔出,并將本樂器交由有資
格的雅馬哈維修人員進行檢查。
注意
請務必遵守下列基本注意事項,以免導致自己或他人受傷或損害到樂器或其它財物。注意事項包括下列所述,但不只限
于此:
(3)-7
維修
• 清洁本樂器時,請使用柔軟的干布。切勿使用由器稀釋劑、溶
劑、清洁液或浸漬化學藥品的抹布。
使用上的注意事項
• 請勿將乙稀、塑料或橡膠物体放在本樂器上,以免導致面板或
鍵盤褪色。
• 請勿將身体依靠在樂器上,或把笨重物体放在其上面,也不可
在按鍵、開關或連接器上施加過大的力量。
• 請勿在太高或不舒服的音量電平下長時間演奏,因為這樣做,
會導致永久性的听覺喪失。如果感到听覺喪失或耳鳴,請去看
醫生。
備用電池
• 本樂器有內置備用鋰基電池。當您把電源軟線的插頭從交流插
座中拔出時,內部數据會保留下來。可是,如果備用電池已放
完電,這數据將會喪失。當備用電池電力低時,顯示屏幕會顯
示出 “Battery Low”(電池低)字樣。在此情況下,請立即把數
据設定記下,然后找有資格的雅馬哈維修人員更換備用電池。
對于因使用不當或改造儀器而導致的損坏、喪失或破坏的數
据、雅馬哈一概不負責任。
樂器不使用時,請務必關閉電源。
即使電源開關置于 “STANDBY” 位置,電气仍以最小電平流到樂
器上。長期不使用樂器時,請務必將交流電轉接器的插頭從交流
插座中拔出。
用過的電池一定要根据當地的法規丟棄報廢。
電源∕交流電轉接器
• 從樂器或插座中拔出電气插頭時,請務必拿著插頭本身而不是
軟線。
• 不使用樂器或遇到電扰時,請將交流轉接器的插頭拔出。
• 請勿用复式連接器將本樂器連接于電气插座,以免導致音質降
低或插座過熱。
位置
• 本樂器請勿放在多塵、振動或极冷、极熱的地方(例如陽光直
射處、加熱器附近、或白天的汽車內),以免導致面板變形或
損坏內部部件。
• 請勿在電視,收音机、立体聲音響設備、移動電話或其它電气
設備的附近使用本樂器,以免本樂器、電視机或收音机發生噪
聲。
• 請勿將本樂器放在不平穩的地方,以免因故翻倒。
• 移動本樂器之前,請先取出所有連接著的轉接器及其他電纜。
• 只能使用本樂器專用台架。安裝台或架時,只能使用附送的螺
釘,以免損坏內部部件或導致樂器翻倒。
連接
• 將本樂器連接于其它電子部件之前,請先關閉所有部件的電
源。打開或關閉所有部件的電源之前,請將所有音量電平調到
最小。還請務必把所有部件的音量調到最小,然后一面演奏樂
器,一面把音量控制器逐漸調高到最适合于聆听的電平。

5
DTXPLORER的主要特點
小型設計的DTXPLORER裝備有能產生逼真聲音的高質量32多音音頻發生器、高性能節拍器和各种歌曲。
DTXPLORER時一种通用的樂器,能用于現場表演、個人練習等各种情況。
■ 鼓触發器功能
• 設備內置有9個触發器輸入插孔和1個hi-hat控制器插孔。還附送有能与邊緣開關和裝備有墊座的3區触發
器兼容的插孔。除了触發器墊座兼容性之外,本設備還能与雅馬哈DT20鼓触發器等器具搭配使用。
• 墊座輸入形式、敏感性設定值等設置數据以4种預置形式被存儲下來。這使您能簡單地選擇适合您演奏需
要的系統。本設備還配備有一种用戶存儲器的形式,能創作并存儲自己為墊座或鼓触發器自作的設定。
• 本設備還含有32套預置鼓。成套聲學鼓种類很多,從搖擺舞曲、早期爵士樂、爵士樂、雷蓋音樂、拉丁
打擊樂等都可供使用。
還有10套用戶存儲器,可供您任意地混頻、配音和編輯各种鼓∕打擊樂器的聲音來制作自己獨創的成套
鼓。
■ 音頻發生器
• DTXPLORER裝備有高質量16位AWM2(PCM)32多音音頻發生器。
• 聲音包括有鼓和打擊樂器的聲音和鍵盤聲。聲音种類很多,例如:逼真度高的回聲,獨特的電子打擊樂
聲,印象樂聲等等。
• 另一特點是具有与GM/XG兼容式音頻發生器的雅馬哈MU系列中的內部數据回響部分相同的設備。
■ 高性能節拍器
• 各音符值的聲音可以調整。各音符值可以指定其個別敲聲和音高。您也可以設定定時器,來确定節拍器
停止的時間,并設定節拍器要演奏多少拍子然后再靜音的間隔時間。
• 還具有“輕敲”功能,可供您為節拍器設定拍子,或通過按拍子輕敲墊座歌唱,直到适合自己喜愛的拍
子。
■ 預置歌曲
• 序列發生器含有22曲預置歌曲(兩曲示范歌曲和20曲樣板歌曲)。有兩种功能使DTXPLORER便于練習,一
种是低音獨奏功能,可供您只隨著歌曲的低音部分演奏,另一种是鼓靜音功能,能使特定的鼓部分靜音。
■ 最佳狀態檢查功能
• 最佳狀態檢查功能對練習很有幫助,告訴您如何准确地演奏,并檢查您的動態一致性(輸出電平)。此
功能對于想提高演奏准确性的人是非常有益的。
■ 接口
• 后面板上的MIDI OUT插孔可供您播放奏來自外接音頻發生器的聲音,或使節拍器和外接序列發生器同
步。
•AUX IN(輔助輸入)插孔可供您把插頭插入激光唱机、MD播放机等外接聲頻器具,一起演奏。
• 頭戴耳机插孔也包括在內。

6
目錄
各部分名稱 ................................................................................ 7
頂面板 .......................................................................................... 7
后面板 .......................................................................................... 8
連接 ........................................................................................... 9
把DTXPLORER的墊座連接于主体 .............................................. 9
与成套回響鼓搭配使用DTXPLORER ........................................... 9
■ 連接揚聲器或頭戴耳机 .......................................................... 10
■ 連接電源 ................................................................................ 11
演奏時間 .................................................................................. 12
調整Hi-Hat ................................................................................. 13
隨節拍器伴奏........................................................................... 14
輕敲聲輸出選擇 ......................................................................... 16
隨歌伴奏 .................................................................................. 17
輕敲拍子功能 ............................................................................. 18
使用最佳狀態檢查功能 ............................................................ 19
制作自己獨特的成套鼓 ............................................................ 20
工厂設定 .................................................................................... 23
触發器設置編輯 ....................................................................... 24
選擇觸發器設置 ......................................................................... 24
編輯觸發器設置 ......................................................................... 24
錯誤信息 .................................................................................. 28
故障診斷 .................................................................................. 28
規格 ......................................................................................... 30
MIDI數据格式 .......................................................................... 31
MIDI傳送聲音號碼 ................................................................... 31
全球顯示圖 .............................................................................. 32
MIDI工具表 .............................................................................. 34
鼓聲表 ..................................................................................... 35
成套預置鼓表........................................................................... 35
預置歌曲表 .............................................................................. 35
7
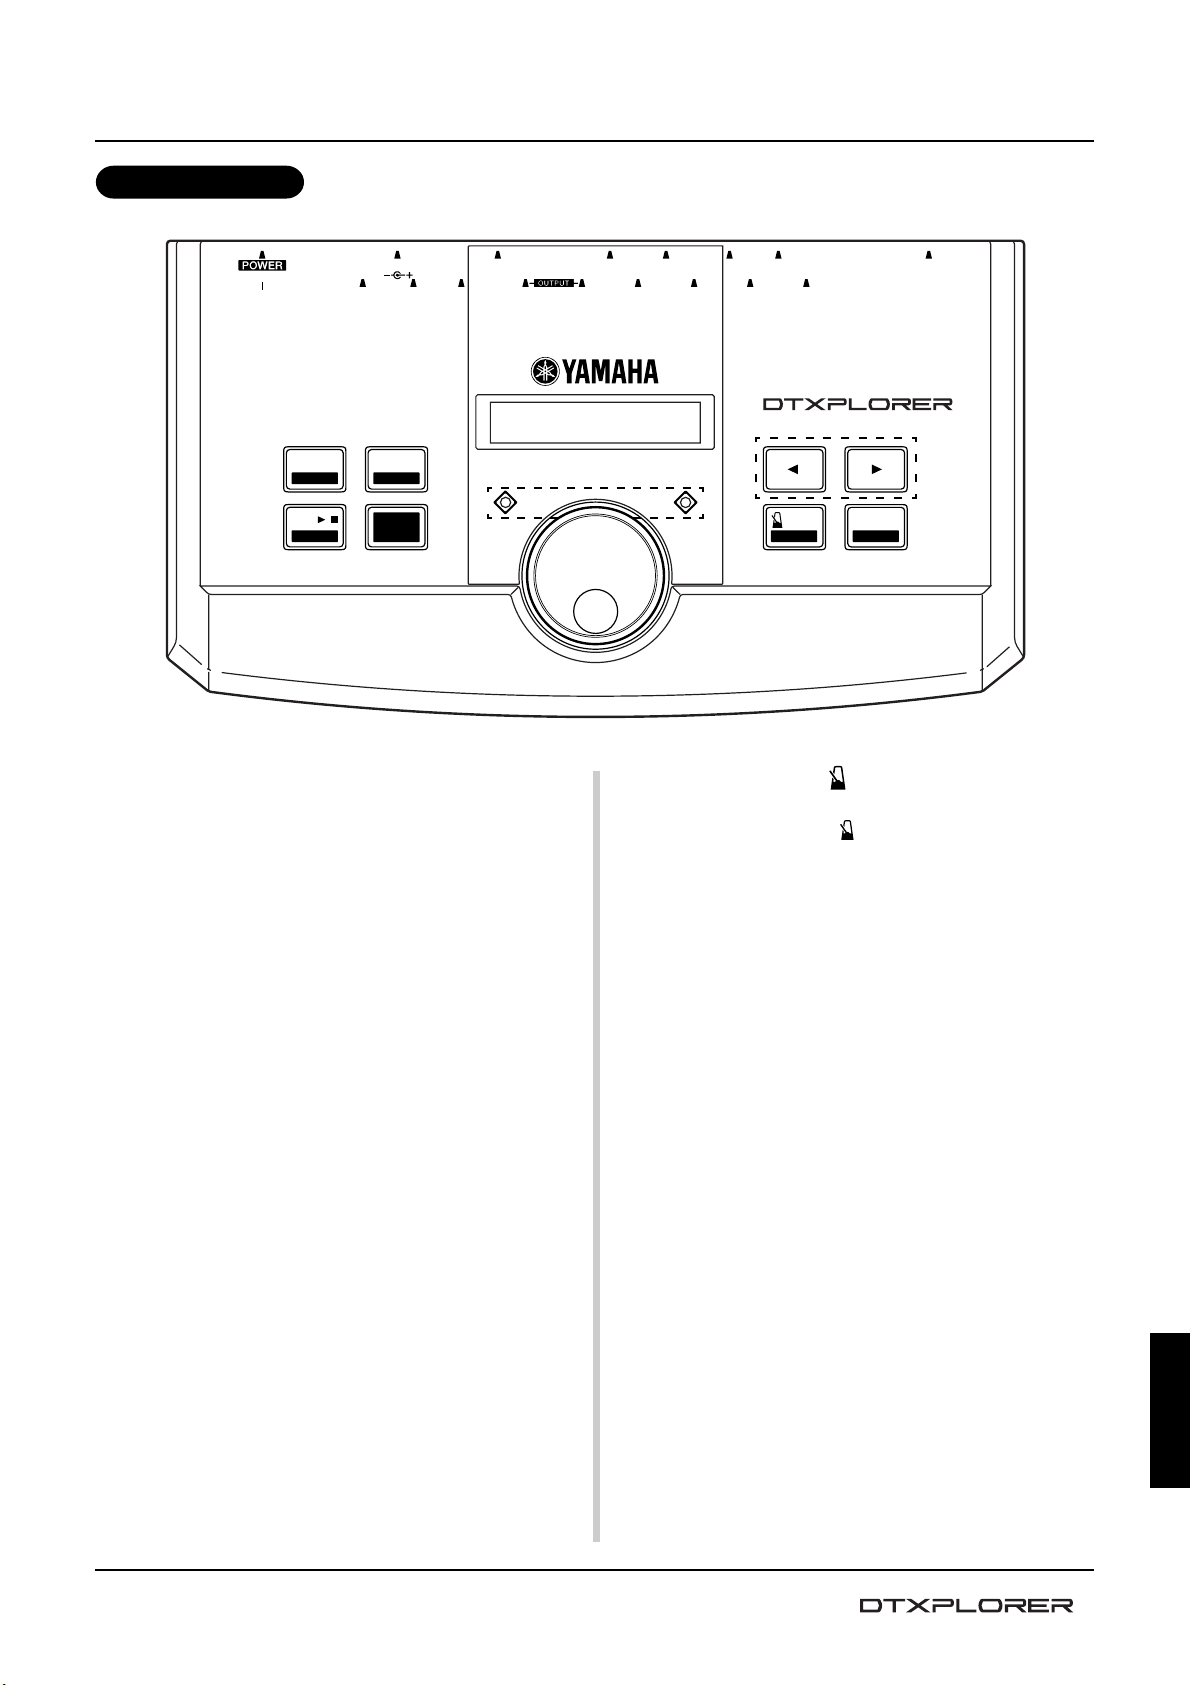
各部分名稱
q 成套鼓按鈕 (DRUM KIT)
• 此按鈕用來輸入成套鼓選擇顯示屏幕。(P.12)
• 按住[SHIFT]按鈕,并按[DRUM KIT]按鈕,輸入触發器設
置選擇顯示屏幕。(P.24)
• 停止正在制作的任何聲音制作。
w 輕敲按鈕 (CLICK)
• 此按鈕用來輸入輕敲(節拍器)設定顯示屏幕。(P.14)
• 按住[SHIFT]按鈕,并按[CLICK]按鈕,輸入最佳狀態檢查
設置選擇顯示屏幕。(P.19)
e 歌曲按鈕 (SONG >/■)
• 此按鈕用來輸入歌曲選擇顯示屏幕。(P.17)
• 按住[SHIFT]按鈕,并按[SONG >/■]按鈕,放音時只使鼓
部分靜音。(鼓靜音功能)
• 按此按鈕來開始或停止歌曲放音。
r 移位按鈕 (SHIFT)
按住此鈕來選取另一按鈕的次級功能。
t 選擇按鈕 (<, >)
• 這些按鈕用來選擇(被選擇的項目閃爍起來)想要編輯的
項目。如果有多數頁,在當前顯示的頁的前后,該按鈕用
來觀看下一頁或上一頁。按住該按鈕,可以連續移動閃爍
的光標。
• 按住[SHIFT]按鈕,當可以編輯的頁打開時,按[<]/[>]按鈕
來選擇想要編輯的項目。
頂面板
y 節拍器開∕關按鈕 ( ON/OFF)
• 此按鈕用來開始或停止節拍器放音(輕敲聲)。(P.14)
• 按住[SHIFT]按鈕,并按[
ON/OFF]按鈕,輸入輕敲拍子
設定顯示屏幕。(P.18)
u 保存∕執行按鈕 (SAVE/ENT)
• 此按鈕用來執行指令(Enter),或保存數据。
• 按住[SHIFT]按鈕,并按[SAVE/ENT]按鈕,輸入實用模式
(Utility Mode),用來進行操作DTXPLORER的全部設定。
• 歌曲顯示時,此鈕用來開始或停止歌曲放音。
i 液晶顯示器
顯示操作DTXPLORER所需的信息或數据。
o 輕敲指示燈
當節拍器或歌曲在演奏時,每一小節的第一拍響起,紅燈就
點亮。其它拍子都用綠燈來指示。
!0 緩動盤
轉動緩動盤,用屏幕上閃爍的光標(要編輯的項目)來改變
所選擇的數值。向右轉動緩動盤,數值增加;向左轉動緩動
盤,數值減少。按住[SHIFT]按鈕,轉動緩動盤,可以10為單
位增∕減數值。
qw
!0
i
o
er
t
yu
SAVE/ENT
ON/OFF
UTILITYTAP
CLICKCLICK
GRV.CHECK
DRUM KIT
TRIGGERTRIGGER
SONGSONG
DRUM MUTE
//
BEAT
CLICK
1 SNARE2 TOM13 TOM24 TOM3
DC IN 12V 5 RIDE
PHONES
6
CRASH
7 HI HAT8 KICK/9
L/MONO R
MIDI OUTHI HAT
CONTROL
AUX INVOLUME
STANDBY
ON
DRUM TRIGGER MODULE
SHIFTSHIFT
* DTXPLORER *
* Welcome! *

8
1 SNARE1 SNARE 2 TOM12 TOM1 3 TOM23 TOM2 4 TOM 34 TOM3
DC IN 12VDC IN 12V
5 RIDE5 RIDE
PHONESPHONES
6 CRASH6 CRASH 7 HI HAT7 HI HAT 8 KICK/98 KICK/9
MIDI
OUT
MIDI
OUT
HI HAT
CONTROL
HI HAT
CONTROL
AUX INAUX IN VOLUMEVOLUME
STANDBY
ON
L/MONOL/MONORR
MIN MAX
各部分名稱
后面板
!1 MIDI OUT插孔
此插孔用來把數据從DTXPLORER送到外接的MIDI設備上
去。
使用這個插孔,您可以把DTXPLORER當作控制器使用,用
來触發來自外接音頻發生器的聲音,或使DTXPLORER的聲
音或節拍器放音与外接序列發生器的放音同步。(P.11)
!2 触發器輸入插孔 (1 SNARE thru 7 HI HAT)
這些插孔用來把墊座或触發傳感器連接于主体。請根据各輸入
端下面的指示把響弦小鼓、印度手鼓等墊座連接起來。 (P. 9)
3區插孔 ........................................ 1 SNARE插孔
立体聲(帶開關)插孔 .............. 5 RIDE, 6 CRASH插孔
單耳聲插孔 .................................. 2 TOM1, 3 TOM2, 4 TOM3,
7 HI HAT插孔
!3 触發器輸入插孔 (8 KICK/9)
此插孔用來把腳墊座連接于主体。
用附帶的立体聲電纜將KP65腳墊座連接到主体上,便可通過
KP65上的外接墊座輸入插孔將另一個墊座連接到輸入插孔9。
!4 Hi-Hat控制器插孔 (HI HAT CONTROL)
此插孔用來連接hi-hat控制器。(P.9)
* 連接hi-hat控制器時,請使用帶立体聲插頭(如下所示)的電纜。
!5 輸出插孔 (OUTPUT L/MONO, R)
這些插孔用來把DTXPLORER連接于外接放大器、混頻器
等。對于單耳聲放音,請使用L/MONO插孔。對于立体聲放
音,請把左右(L/R)插孔都連接起來。
!6 頭戴耳机插孔 (PHONES)
將一對頭戴耳机連接于此插孔來監听DTXPLORER。(P.10)
!7 輔助輸入(AUX IN)插孔
將外接聲頻設備等的輸出端連接于此插孔(立体聲迷你插
孔)(P.10)
這對于隨著來自CD或盒帶放音机的音樂演奏是很方便的。
* 使用外接設備(激光唱片、盒帶放音机等)上的音量控制器來調
節音量平衡。
!8 主音量旋鈕 (VOLUME)
調節DTXPLORER的總音量(輸出OUTPUT插孔和耳机
PHONE插孔傳輸的信號電平)。
順時針轉動旋鈕可提高音量;反時針轉動旋鈕可降低音量。
!9 電源插孔 (DC IN 12V)
將交流轉接器連接于此插孔。為了要防止轉接器插頭脫落、
請把塞繩緊固在塞繩鉤上@0。
@0 塞繩鉤
防止電源塞繩插頭偶爾脫落。(P.11)
@1 電源開關 (POWER)
這是DTXPLORER的電源開關。
!1
!2
!5!2
!4!3
!6 !7 !8
!9 @0 @1
雙絕緣体
9
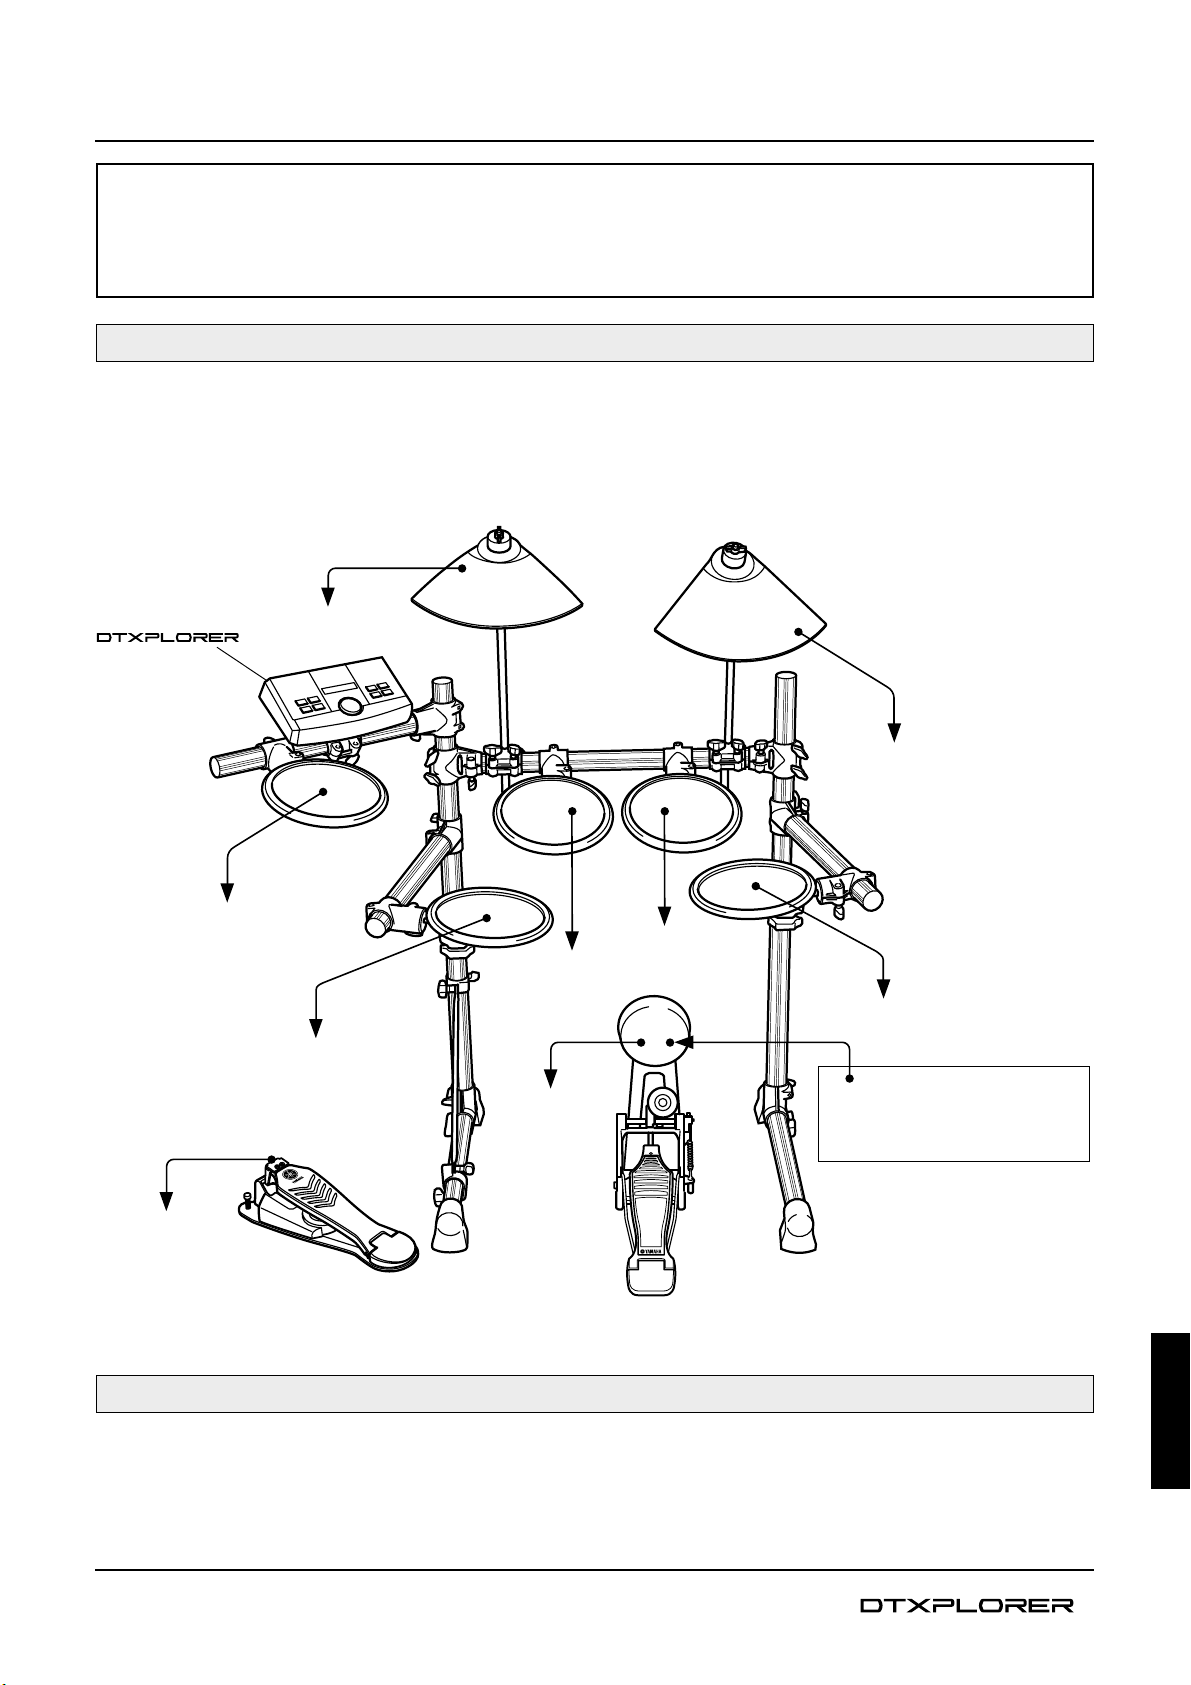
連接
把
DTXPLORER
的墊座連接于主体
參照下圖,把各墊座的輸出電纜連接于DTXPLORER的后面板上的触發器輸入插孔。
所有触發器輸入插孔都貼有標簽(1 SNARE等),請确認每個墊座都連接于相對應的触發器輸入插孔。
* 當墊座(1 SNARE等) 連接于相對應的触發器輸入插孔時,DTXPLORER的設定將會提供最佳效果。但如果有工作特性不同的其它墊座或鼓
觸發器連接于插口上時,“觸發器設置編輯”一節 (P.24) 所述的靈敏度設定將會變更。
注意
為了防止發生電震和損坏到器件,在連接于DTXPLORER的輸入和輸出插孔之前,請先确認DTXPLORER和有
關器件上的電源都關閉。
如果成套回響鼓适合于雅馬哈DX20鼓触發器的選購套件,而且該触發器連接于DTXPLORER的輸入插孔,DTXPLORER可以從成
套回響鼓進行演奏。
* 連接后,請确認DTXPLORER的觸發器設置中的設定(P.24)正當調整好。
与成套回響鼓搭配使用
DTXPLORER
接至8 KICK/9
接至1 SNARE
接至2 TOM1
接至3 TOM2
接至4 TOM3
接至5 RIDE
接至6 CRASH
接至7 HI HAT
接至HI HAT
CONTROL
* 將選購的單耳聲墊座(PCY65等)
連接到KP65上的外接墊座輸入插
孔,可以擴展套件。
10
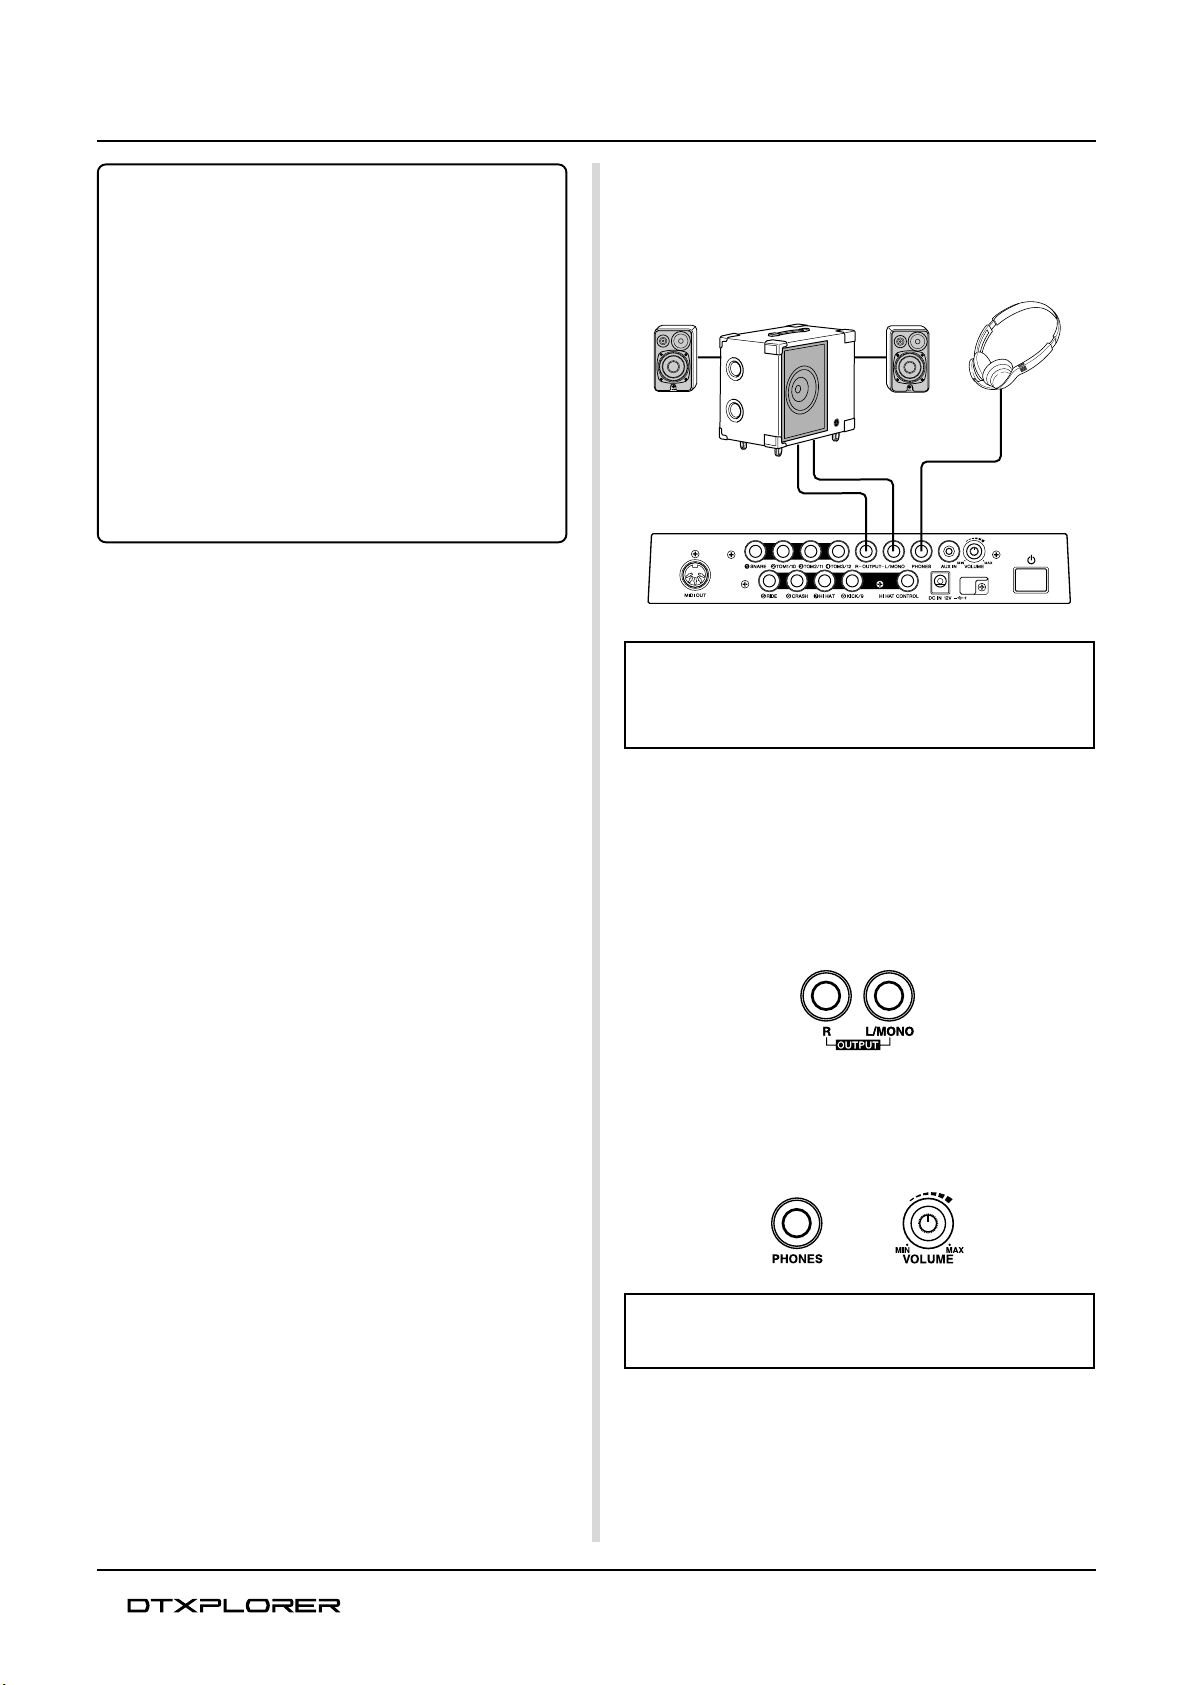
■ 連接揚聲器或頭戴耳机
DTXPLORER未配備內置揚聲器。必須將該裝置連接到外接
放大器+揚聲器系統或頭戴耳机進行聲音輸出。
注意
每當進行接線時,都要确認正在使用的電纜裝備有与該特
定器件上的插孔形式相對應的插頭。
連接
● 接線上的一些器件
• 触發器輸入插孔5RIDE和6CRASH是立体聲輸入型插
孔。這些插孔可以連接于裝備有TP65S、PCY65S、
PCY130S等墊座的開關。
• 像TP65S、PCY65S等那樣的3區墊座可以連接于触發器
輸入插孔1 SNARE。
• 墊座靈敏度在触發器設置編輯的[TRIG2型(墊座型)]設
定(P.25)中已經設定好。
‧此插孔用來把腳墊座連接于主体。
用附帶的立体聲電纜將KP65腳墊座連接到主体上,便
可通過KP65上的外接墊座輸入插孔將另一個墊座連接
到輸入插孔9。
● OUTPUT L/MONO, R插孔(單耳聲標准耳机插孔)
使用這些插孔可以把DTXPLORER連接于混頻器或聲頻設
備,來播放來自外接揚聲器的聲音,或把DTXPLORER連接
于錄音設備,來錄下您自己的演奏。
* 當連接于帶單耳聲輸入端的器件時,請使用DTXPLORER的OUT-
PUT L/MONO插孔。
● PHONES插孔(標准立体聲耳机插孔)
請使用后面板上的VOLUME(音量)旋鈕來調節頭戴耳机音
量。
每當使用頭戴耳机時,注意不要傷害听覺。把音量調節到
舒适的電平后再使用該設備。
PHONES插孔
DTX系列的監听系統
MS100DRJ、MS50DRJ等
頭戴耳机
OUTPUT L/MONO和R插孔

11
連接
■ 連接電源
專用電源轉接器用來供電給DTXPLORER。
确認電源關閉,并將電源轉接器連接于后面板上的DC IN(直
流輸入)。
為了要防止塞繩的插頭脫落,請把塞繩繞在塞繩鉤上并加以
緊固。
注意
請使用雅馬哈PA-3C交流電源轉接器(或雅馬哈特定推薦
的其它轉接器)。使用其它轉接器會導致轉接器和樂器
的不能彌補的損壞。
DTXPLORER長期不使用時,請將電源轉接器的插頭拔
出。
接通電源之前
• 為了要保護揚聲器、頭戴耳机和DTXPLORER免受損
坏,在接通電源之前,請將POWER/VOL(電源∕音量)
完全轉到左邊(最小音量)。
• 确認連接于DTXPLORER的所有外接器件的電源都關
閉。DTXPLORER的電源接通后,再將其它器件的電
源接通。
● AUX IN插孔(立体聲迷你耳机插孔)
您可以把來自激光唱机或其它外接聲頻信號源的聲頻輸出連
接于AUX IN插孔,以便把來自外接信號源的信號和來自
DTXPLORER的信號混合起來。混合了的聲頻可以經由
DTXPLORER的輸出插孔被送到外接設備上去。要隨著喜愛
的曲子演奏或与朋友表演時,也可以使用此插孔。
警告
把塞繩繞在挂鉤上時,确認電源轉接器的塞繩彎曲角度
不過銳,否則會導致電源塞繩損坏或火災。
使用外接設備(激光唱机等)上的音量控制器來調節音量
平衡。
● MIDI OUT插孔
DTXPLORER的MIDI功能,可供您用DTXPLORER的墊座,
在外接音頻發生器上播放聲音,或使DTXPLORER的歌曲或
節拍器的放音与外接序列發生器的放音同步。
關于MIDI
MIDI(樂器數碼接口)是一种世界標准,提供連接樂器与電腦
的方法,并使它們可以傳輸或接收演奏及其它數据。此標准能讓
不同厂牌和种類的電腦与樂器進行通信。
連接器件時,請務必使用標准MIDI電纜。還要使用長度
不大于15米的MIDI電纜。使用過長的電纜會導致不規則
的運行及其它問題。
Loading...