

Page 1

ITT
Commercial Water Systems
CentriPro
TM
CentriPro
FloStandard
SIMPLEX PUMP CONTROL PANEL
Installation and Operation Manual
CentriPro is a brand of ITT
Residential and Commercial Water.
www.centripro.com
Engineered for life
Page 2

ITT
OWNER’S INFORMATION
Pump Model No:
__________________________
Commercial Water Systems
Pump Serial No:
CENTRIPRO
________________________________
Control Model No:
Dealer Phone No:
Date of Purchase:
_________________________
__________________________
__________________________
Control Panel Serial No:
Dealer:
Installation Date:
________________________________________
_________________________
_______________________________
CURRENT READINGS AT SETUP
1Ø 3Ø L1 L2 L3
Amps: Amps:
Volts: Volts:
MOTOR INFORMATION
______________________________________
HP:
____________________________________
Volts:
_________________________________________
RPM:
Service Factor:
_________________________________
Frequency:
Enclosure:
________________________________
Phase:
2
________________________________________
_____________________________________
Page 3

ITT
CENTRIPRO
Commercial Water Systems
TABLE OF CONTENTS
Safety Instructions ............................................................................................................................. 4
Pre-Installation Checks ...................................................................................................................... 4
Pump Control Panels and Wiring ....................................................................................................... 5
Wiring and Grounding ...................................................................................................................... 5
Selecting Control Panels ....................................................................................................................5
Warning Pump Control Panels and Switches .....................................................................................5
Panel Operation ................................................................................................................................5
Check Rotation ..................................................................................................................................5
Combination Starter and Overload Relay ..........................................................................................7
Controller Functions ..........................................................................................................................8
Specifications
General Specifications ............................................................................................................... 8
Electrical ................................................................................................................................... 8
Interpreting Model Numbers ............................................................................................................. 9
Suggested Fuse, Wire, and Conduit Sizes ................................................................................ 11
Schematics ...................................................................................................................................... 12
Recommended Spare Parts For Five Years Of Operation ..................................................................22
Limited Warranty .............................................................................................................................24
3
Page 4

ITT
CENTRIPRO
daNgER
WARNING
CAUTION
WARNING
WARNING
WARNING
daNgER
daNgER
WARNING
Commercial Water Systems
saFETY INsTRUCTIONs
TO AVOID SERIOUS OR FATAL PERSONAL
INJURY OR MAJOR PROPERTY DAMAGE,
READ AND FOLLOW ALL SAFETY
INSTRUCTIONS IN MANUAL AND ON
PUMP.
THIS MANUAL IS INTENDED TO ASSIST
IN THE INSTALLATION AND OPERATION
OF THIS UNIT AND MUST BE KEPT WITH
THE PUMP.
This is a SAFETY ALERT
SYMBOL. When you see this
symbol on the pump or in the
manual, look for one of the
following signal words and
be alert to the potential for
personal injury or property
damage.
Warns of hazards that WILL
cause serious personal injury,
death or major property
damage.
Warns of hazards that CAN
cause serious personal injury,
death or major property
damage.
Warns of hazards that CAN
cause personal injury or
property damage.
NOTICE: INDICATES SPECIAL
INSTRUCTIONS WHICH ARE
VERY IMPORTANT AND MUST BE
FOLLOWED.
THOROUGHLY REVIEW ALL
INSTRUCTIONS AND WARNINGS
PRIOR TO PERFORMING ANY WORK
ON THIS PUMP.
MAINTAIN ALL SAFETY DECALS.
All electrical work must be per-
formed by a qualified technician.
Always follow the National Electrical Code (NEC),
or the Canadian Electrical Code, as well as all
local, state and provincial codes. Code questions
should be directed to your local electrical inspector. Failure to follow electrical codes and OSHA
safety standards may result in personal injury or
equipment damage. Failure to follow manufacturer’s installation instructions may result in electrical
shock, fire hazard, personal injury or death, damaged equipment, provide unsatisfactory performance, and may void manufacturer’s warranty.
See specific pump and motor name-
plates for all agency Listings.
Check motor nameplate and Flo-
Standard nameplate for all electrical ratings.
The FloStandard fixed-speed pump
panel may have safety devices that
will stop the motor in the event of electrical,
mechanical load or external faults. This does not
remove power to the panel.
The FloStandard may have an auto
reset feature in the event of faults,
which can result in the pump motor restarting
unexpectedly. You must remove all main power to
the pump and motor before attempting a repair.
PRE-INsTallaTION ChECks
Open all cartons and inspect for
shipping damage. Report any damage to you supplier or shipping carrier immediately.
Verify that all equipment is the correct voltage and
phase. Warranty does not cover damage caused
by connecting pumps and controls to an incorrect
power source (voltage/phase supply).
Record the model numbers and serial numbers
from the pumps and control panel on the front of
this instruction manual for future reference. Give
it to the owner or place it in the plastic protective
pocket inside the panel cabinet when finished with
the installation.
4
Page 5
ITT
CENTRIPRO
WARNING
WARNING
WARNING
WARNING
WARNING
Commercial Water Systems
PUmP CONTROl PaNEls aNd WIRINg
NOTE: CONSULT MOTOR AND
PUMP MANUALS FOR SPECIFIC
WIRING INSTRUCTIONS.
WIRINg aNd gROUNdINg
IMPORTANT NOTICE: Read
Safety Instructions before proceed-
ing with any wiring.
Use only stranded copper wire to pump/motor and ground. The ground wire must be
at least as large as the power supply wires.
Wires should be color coded for ease of
maintenance and troubleshooting.
Install wire and ground according to the
National Electrical Code (NEC), or the
Canadian Electrical Code, as well as all local,
state, and provincial codes.
Disconnect and lockout electrical power before performing any service or installation.
All splices must be waterproof. If using splice
kits follow manufacturer’s instructions.
Seal all panel connections tightly from gases
or moisture present which may damage electrical components.
FAILURE TO PERMANENTLY
GROUND PUMP, MOTOR,
AND CONTROLS BEFORE CONNECTING
TO POWER CAN CAUSE SHOCK, BURNS, OR
DEATH.
sElECTINg CONTROl PaNEls
MATCH EQUIPMENT TO
POWER SUPPLY: It is important
always to match the pump motor voltage, phase,
and HP ratings to your control panel and power
supply. Record the motor nameplate HP, voltage
and phase in the Owner Information table on the
cover page. Make sure that the power supply, motor nameplate, and panel nameplate data match.
Incorrect voltage or phase can cause fire, motor
and control damage and voids the warranty.
WaRNINg PUmP CONTROl PaNEls
aNd sWITChEs
It is important to use the wiring
diagrams furnished in the manual
and to wire all connections as indicated. Please
refer to Figure 1 on page 4 and pages 9-12.
Motor Lead Connections: Locate the terminal
block labeled T1, T2, T3 and ground screw.
Connect wires to terminal block and route wires
through one of the knock out ports on the bottom
of the panel. There is room allowed to wire with
service loops to avoid wire strain.
Input Power Cable Installation: The main power
cable is connected to the terminal block labeled
L3, L2, and L1. Room is allowed in the panel to
wire with service loops to avoid wire strain.
PaNEl OPERaTION
Operation is with a Hand/Off/Auto (HOA) threeposition switch on the panel cover. The pump may
be started and stopped at the panel cover by setting the switch to the Hand (manual start) or Off
positions. When the three-position switch is in the
Auto position, start and stopping is controlled only
by the wired remote contact or control device.
ChECk ROTaTION
Always verify correct rotation. Correct rotation
is usually indicated on the pump casing. Motor
direction is reversible. Consult pump and motor
manuals for specific instructions.
A full three-phase supply consisting of three individual transformers or one three-phase transformer is recommended. “Open” delta or wye connections using only two transformers can be used,
but are more likely to cause poor performance,
overload tripping or early motor failure due to
current unbalance.
Check the current in each of the three motor leads
and calculate the current unbalance as explained
below.
• If the current unbalance is 2% or less, leave
the leads as connected.
5
Page 6
ITT
CENTRIPRO
Commercial Water Systems
• If the current unbalance is more than 2%,
current readings should be checked on each
leg using each of the three possible hook-ups.
Roll the motor leads across the starter in the
same direction to prevent motor reversal.
To calculate percent of current unbalance (see,
Example below):
1. Add the three-line amp values together.
2. Divide the sum by three, yielding average
current
3. Pick the amp value, which is furthest from
the average current (either high or low).
4. Determine the difference between this amp
value (furthest from average) and the average.
5. Divide the difference by the average. Multi-
ply the result by 100 to determine percent of
unbalance.
Current unbalance should not exceed 5% at service factor load or 10% at rated input load. If the
unbalance cannot be corrected by rolling leads, the
source of the unbalance must be located and corrected. If, on the three possible hookups, the leg
farthest from the average stays on the same power
lead, most of the unbalance is coming from the
power source.
Contact your local power company to resolve
imbalance.
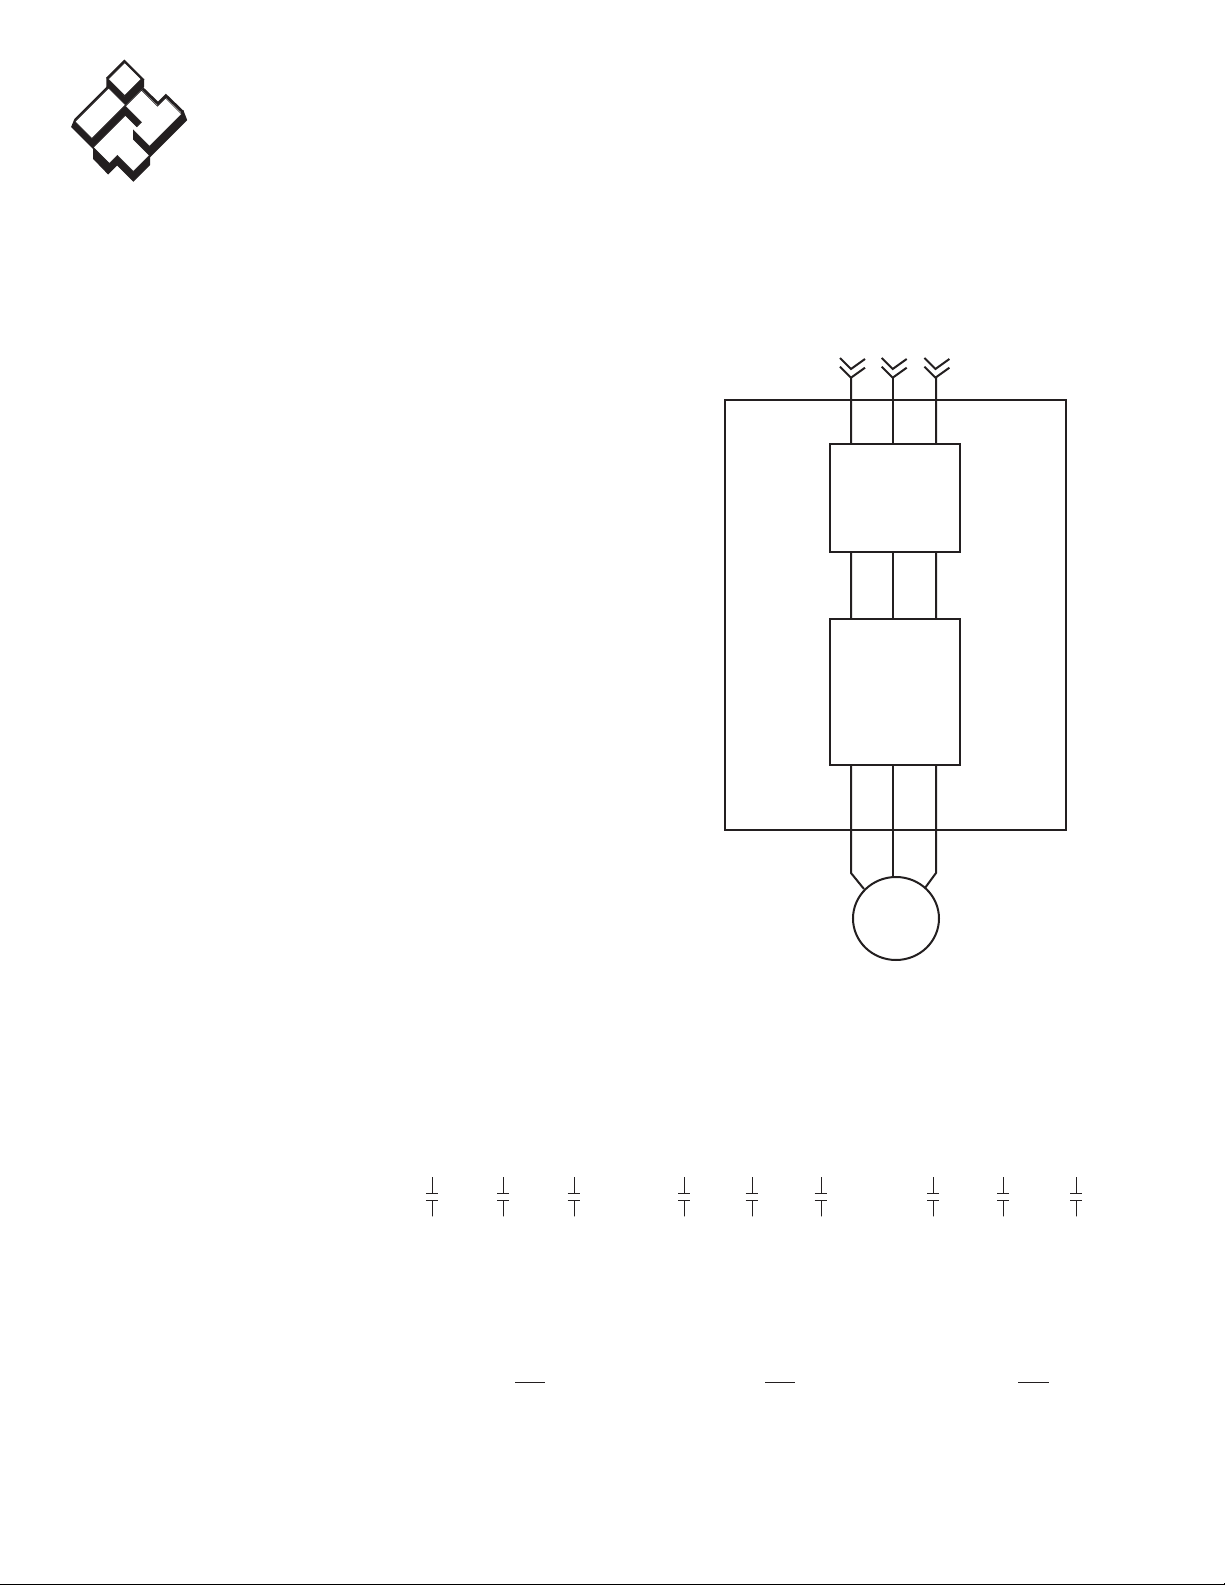
Main Power Supply
L1 L2 L3
Disconnect
‡
Starter
T1 T2 T3
Motor
‡ Class J Fuses are not included. Supplied by other vendors.
Figure 1 – Panel Connection Points
Hookup 1 Hookup 2 Hookup 3
Starter Terminals L1 L2 L3 L1 L2 L3 L1 L2 L3
Motor Leads T3 T1 T2 T2 T3 T1 T1 T2 T3
Example:
T3 = 51 amps T2 = 50 amps T1 = 50 amps
T1 = 46 amps T3 = 48 amps T2 = 49 amps
T2 = 53 amps T1 = 52 amps T3 = 51 amps
Total = 150 amps Total = 150 amps Total = 150 amps
÷ 3 = 50 amps ÷ 3 = 50 amps ÷ 3 = 50 amps
– 46 = 4 amps – 48 = 2 amps – 49 = 1 amps
4 ÷ 50 = .08 or 8% 2 ÷ 50 = .04 or 4% 1 ÷ 50 = .02 or 2%
6
Page 7

ITT
CENTRIPRO
Commercial Water Systems
COmbINaTION sTaRTER aNd
OvERlOad RElaY
FloStandard is furnished with a combination
starter and overload relay to protect the motor from overload during start-up or operation.
Panels designed for use on three phase power also
incorporate circuitry that will protect motors from
phase loss or phase imbalance, in addition to overload during start-up or operation.
Figure 2 – Starter/Overload Relay
The following are field adjustments and indications
are available and can be referenced from Figure 2
above:
• Setting Based on Motor Service Factor: For
continuous-rated motors having a service
factor (SF) of 1.0, set the current adjustment
dial to 90% of the motor’s full-load current
(MFLC). For continuous-rated motors having
a service factor of 1.15 to 1.25, set the FLA
dial indicator current to the MFLC.
• Visible Trip Indication: A viewing window on
the front of the solid-state overload relay provides visible trip indication. A yellow marker
appears when the device is tripped.
When the overload relay detects motor current in
excess of 125% of the current adjustment dial setting, the overload contacts open and the optional
auxiliary contacts change state (N.O. contacts
close and N.C. contacts open). The time required
for the overload relay to trip depends upon:
• Current value.
• Time elapsed since last trip.
The phase loss/phase imbalance circuitry can
detect a phase loss and initiate a trip within three
seconds. Phase loss detection extends to a phase
loss in either the primary or the secondary of a
wye-delta or delta-wye transformer. The circuitry
also detects a phase imbalance and initiates a trip
when any phase current drops 25% below or rises
25% above the average of the three phase currents.
Reset Bar: The overload relay is reset by depressing the reset bar on the front of the device. Since
the overload relay trip function is of the “tripfree” design, it cannot be overridden by holding
down the reset bar.
Overload Relay Power On Light: A red LED
indicates that the power necessary to operate the
overload relay protective circuitry is present. This
power is derived from the current flowing in the
motor leads. When sufficient power is extracted to
enable normal operation, the LED blinks. It blinks
faster as the current being monitored increases.
Functional Test: To test for proper operation
of the overload contacts, de-energize the starter
and disconnect the control circuit power. With a
small, flat-blade screwdriver, slide the TEST switch
located on the bottom of the overload relay to the
right. This operates the trip mechanism, opening
the N.C. overload contacts at terminals 95 and 96.
Verify proper operation of the overload contacts,
and then reset the device by depressing the red
RESET bar. Reconnect the control circuit power
and reenergize the starter as required.
Inspecting and Replacing Contacts: Discoloration
and slight pitting do not harm contacts. Do not file
contacts; this wastes contact material. Replace contacts only when worn thin. To inspect or replace
contacts, disconnect all power. Do not remove any
wiring. Loosen the four captive screws holding
the contact actuator to the contact block. Lift the
contact actuator to expose the contacts. Manually
operate the contactor or starter with a screwdriver
by pushing down the contact carrier. There is a
step on the outside of the contact carrier suitable
for this use. Replacement starter contacts may be
obtained from a local electrical supply house.
7
Page 8

ITT
CENTRIPRO
Commercial Water Systems
Loss of Phase/Phase Imbalance: The overload
relay has phase loss and phase imbalance monitoring circuitry. Loss of phase or a phase imbalance
of 25% or more of the average of the three phases
will result in a trip. Disconnect the unit from the
main power supply, find and correct cause for
phase loss of phase imbalance. Possible causes
would be blown fuse(s) or loose wiring connections. Reset the overload relay with the reset bar
on the front of the combination starter. Restart the
pump.
CONTROllER FUNCTIONs
FloStandard is designed to accept a variety of
inputs to function as a pump controller. Pressure
Switches, Level Sensors, Flow Switches, etc. can
be used as a dry contact signal to automatically
start and stop the pump. Caution should be used
to prevent pump cycling when utilizing remote
controllers.
sPECIFICaTIONs
GENERAL SPECIFICATIONS:
Enclosure Type
Outdoor Use
Operating Temperature 4º F to 122º F
Storage Temperature 20º F to 149º F
Humidity 0-95% non-condensing
ELECTRICAL:
Voltage Input
Voltage
Input Line Frequency 50/60 Hz +/- 2 Hz
Line Voltage / 115 Volts
Control Voltage AC with control power
transformer option
Overload Capacity
current for 60 seconds
NEMA 3R Suitable for
+/- 10% Rated Panel
125% of rated RMS
Overload Class 10 or 20
Adjustable setting for
Time Overload 125% of rated motor
current
Agency Listing UL508A or equivalent
8
Page 9
ITT
CENTRIPRO
Commercial Water Systems
INTERPRETINg mOdEl NUmbERs
The model number of the FloStandard appears on the shipping carton label and on the technical data
label affixed to the panel. The information provided by the model number is shown below:
FloStandard™ Simplex Pump Control Panels J
Units supplied with Class 20 adjustable Overload Protection (For Above Ground Pumps)
Order Max. Input
Number HP Voltage
(Amps)
FV2070027A1 7½ 1 27 30
FV2015045A2 15 2 45 60 55
FV2030090A3 30 230 3 90 100
FV2050130A4 50 4 135 200 170
FV2100311A5 100 5 270 400 73”H x 22”W x 18”D 440
FV4010018B1 10 1 27 30
FV4025045B2 25 2 45 60 55
FV4050090B3 50 460 3 90 100
FV4100200B4 100 4 135 200 170
FV4200311B5 200 5 270 400 73”H x 22”W x 18”D 440
‡Class J fuses are not supplied.
Units supplied with Class 10 Overload Protection (For Submersible Pumps)
Order Max. Input
Number HP Voltage
(Amps)
FV2070027A1T 7½ 1 27 30
FV2015045A2T 15 2 45 60 55
FV2030090A3T 30 230 3 90 100
FV2050130A4T 50 4 135 200 170
FV2100311A5T 100 5 270 400 73”H x 22”W x 18”D 440
FV4010018B1T 10 1 27 30
FV4025045B2T 25 2 45 60 55
FV4050090B3T 50 460 3 90 100
FV4100200B4T 100 4 135 200 170
FV4200311B5T 200 5 270 400 73”H x 22”W x 18”D 440
‡Class J fuses are not supplied.
Starter
Starter
Max. Fuse
NEMA
NEMA
Max. holder Enclosure Weight
Amps Size Size lbs.
Size
Max. Fuse
Max. holder Enclosure Weight
Amps Size Size lbs.
Size
‡
36”H x 16”W x 9”D
45”H x 20”W x 11”D
36”H x 16”W x 9”D
45”H x 20”W x 11”D
‡
36”H x 16”W x 9”D
45”H x 20”W x 11”D
36”H x 16”W x 9”D
45”H x 20”W x 11”D
40
111
40
111
40
111
40
111
9
Page 10

ITT
Commercial Water Systems
Units supplied with Class 10 Overload Protection with
Pump Monitor (777) and Lightning Protection
CENTRIPRO
Order Max. Input
Number HP Voltage
(Amps)
FV2070027A1W 7½ 1 27 30
FV2015045A2W 15 2 45 60 55
FV2030090A3W 30 230 3 90 100
FV2050130A4W 50 4 135 150 170
FV2100311A5W 100 5 270 400 73”H x 22”W x 18”D 440
FV4010018B1W 10 1 27 30
FV4025045B2W 25 2 45 60 55
FV4050090B3W 50 460 3 90 100
FV4100200B4W 100 4 135 200 170
FV4200311B5W 200 5 270 400 73”H x 22”W x 18”D 440
‡Class J fuses are not supplied.
Accessories sold separately. Field installation required.
FloStandard™ Simplex Pump Control Panels J
Note: Recommended class “R” Fuse Type, dual element, time delay (not Included).
Starter
Max. Fuse
NEMA
Max. holder Enclosure Weight
Amps Size Size lbs.
Size
‡
36”H x 16”W x 9”D
45”H x 20”W x 11”D
36”H x 16”W x 9”D
45”H x 20”W x 11”D
40
111
40
111
Option Description Weight (Lbs)
FSCT 120 V Control Transformer 7
FSSP Surge/Lightning Protection
FSPP Pump Monitor (777) Includes class 10 overload 2
FSTC Time Clock†
FSPH Condensation Header†
FSGN Green Run Light†
FSRN Red Alarm Light†
FSOP Class 10 Overload Protection†
†Requires control transformer option FSCT. For specials or other options, consult factory.
1
10
Page 11

ITT
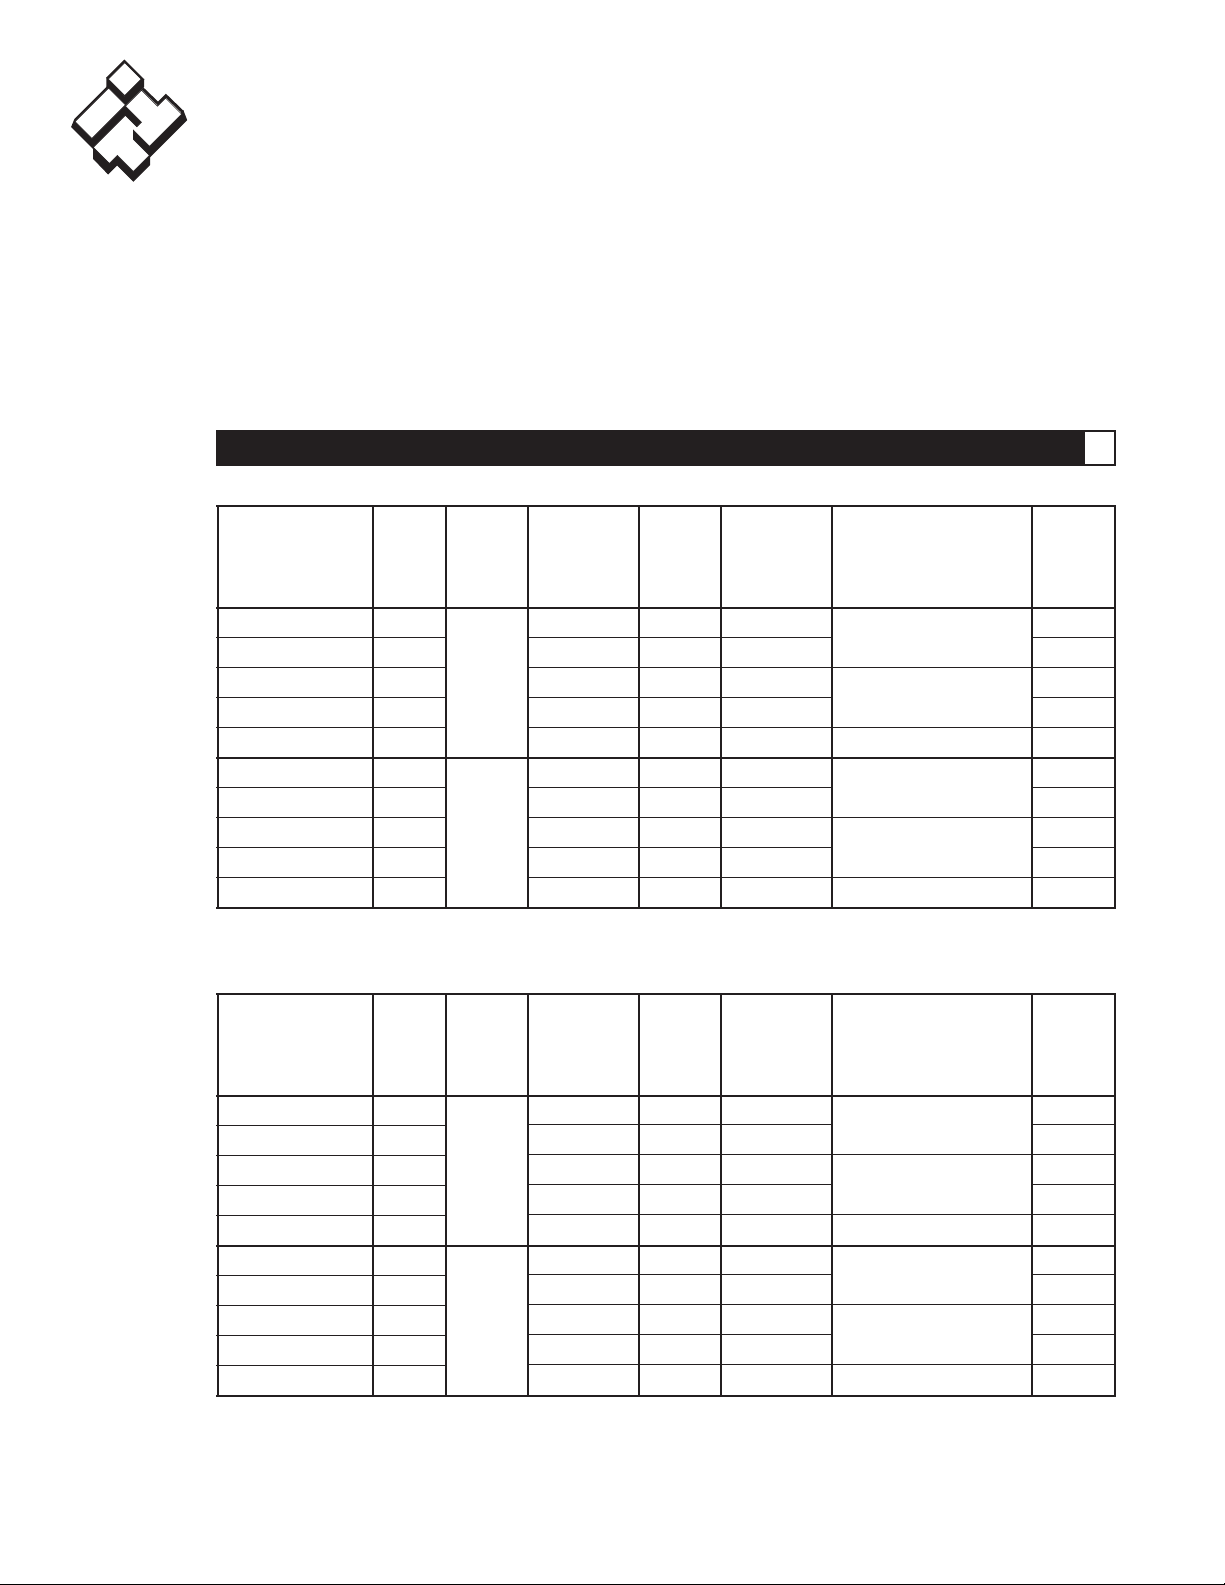
sUggEsTEd FUsE, WIRE aNd CONdUIT sIzEs
CENTRIPRO
Commercial Water Systems
208 Volt
HP Fuse Wire Conduit
3 17.5 14 0.50
5 30 10 0.50
7½ 40 8 0.75
10 50 8 0.75
15 80 6 1.00
20 100 4 1.00
25 125 3 1.25
30 150 2 1.25
NOTE:
Fuses are for main disconnect. Recommended dual element, time-delay type fuse.
Wire is copper, type “THW,” 75º C.
All sizes are recommended only and are not a substitute for hiring a local electrician to properly size
according to NEC and local codes.
230 Volt
HP Fuse Wire Conduit
3 15 14 0.50
5 25 12 0.50
7½ 35 10 0.50
10 45 8 0.75
15 70 6 1.00
20 90 4 1.00
25 110 4 1.00
30 125 3 1.25
460 Volt
HP Fuse Wire Conduit
5 12 14 0.50
7½ 17.5 14 0.50
10 25 12 0.50
15 35 10 0.50
20 45 8 0.75
25 60 8 0.75
30 70 6 1.00
40 90 6 1.00
50 110 4 1.00
60 125 3 1.25
11
Page 12

ITT
sChEmaTICs
CENTRIPRO
Commercial Water Systems
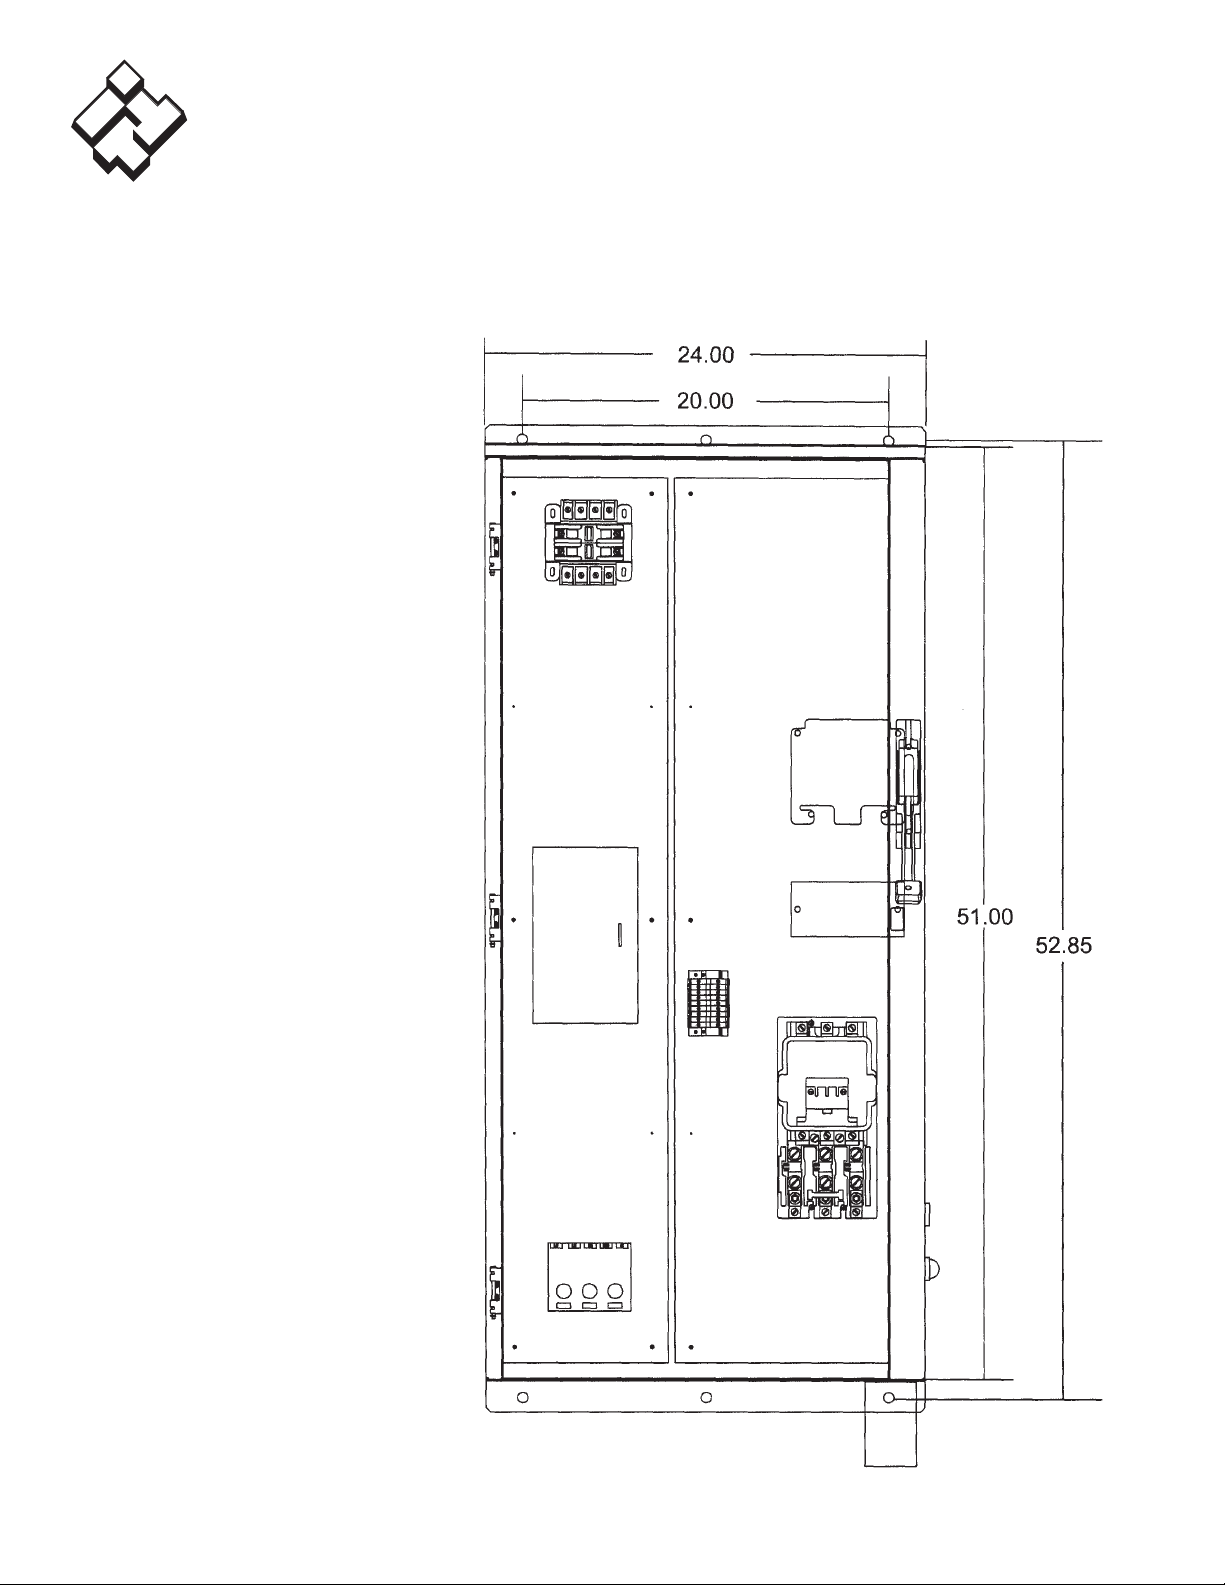
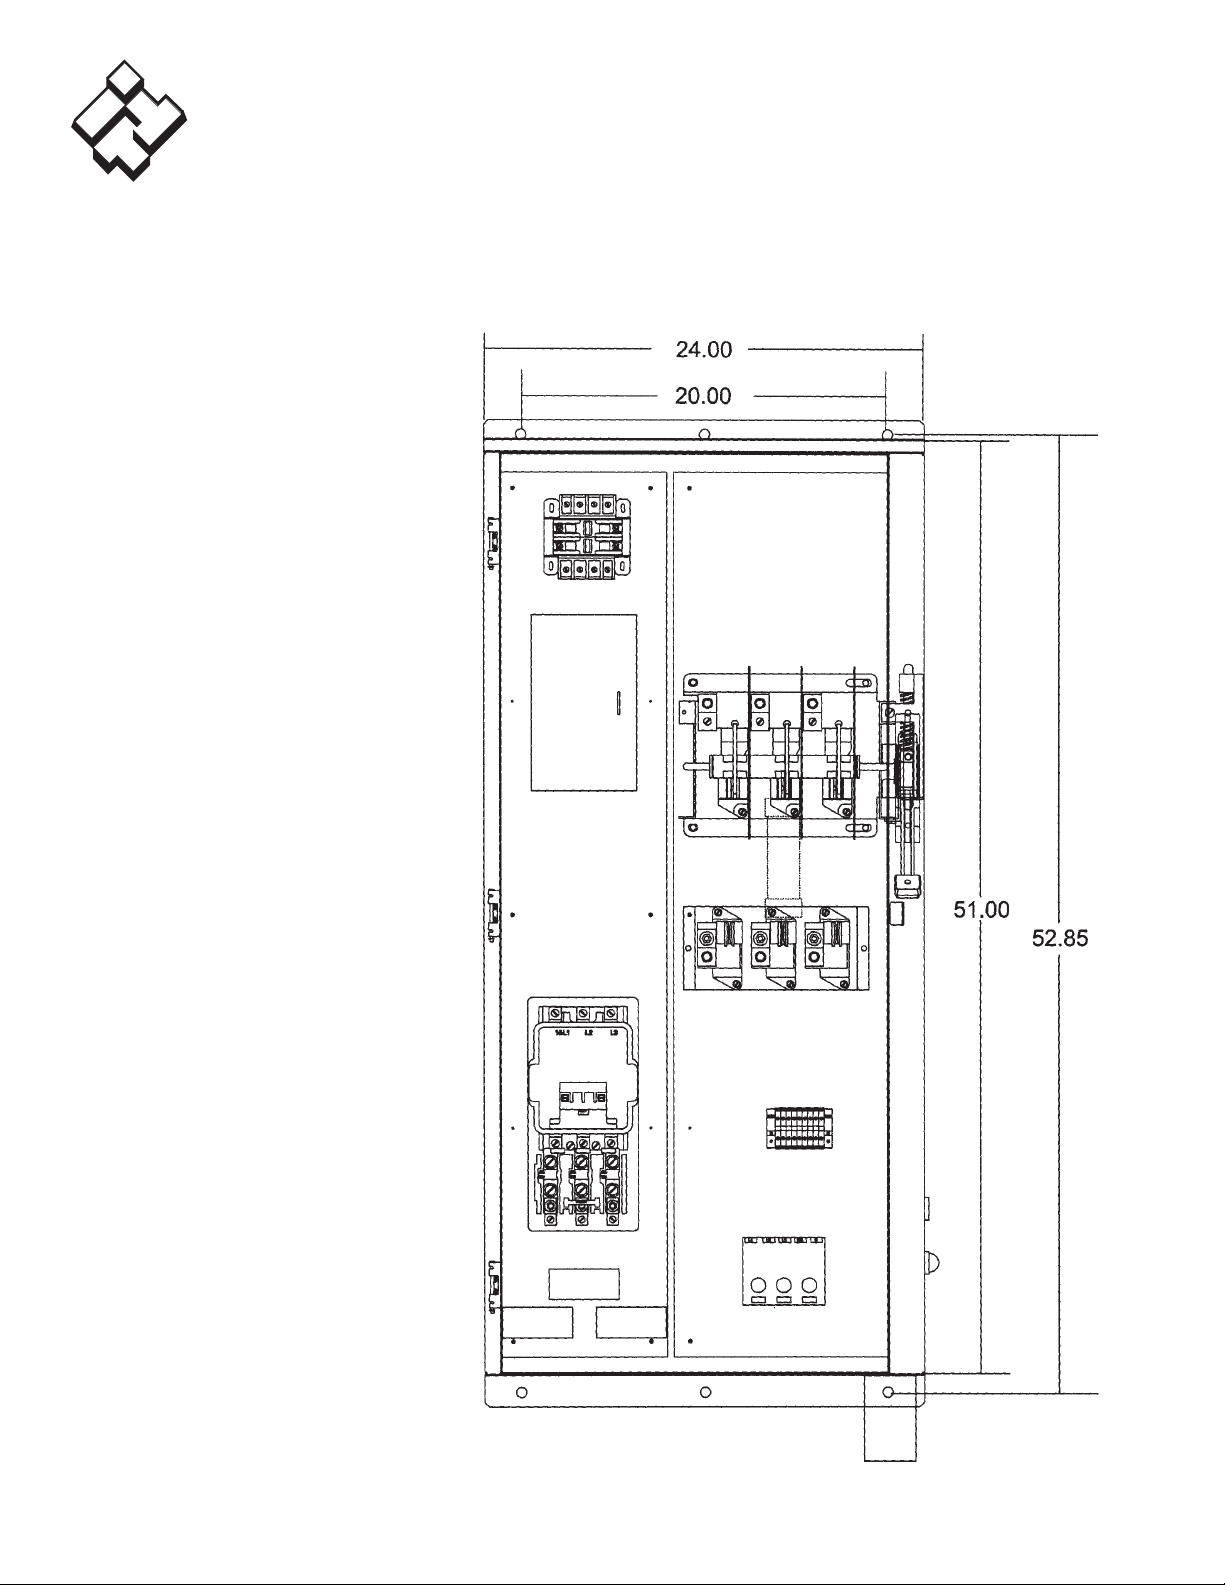
SIZE 1 & 2 PUMP PANEL
WITH OPTIONS INSTALLED
TIMECLOCK, CPT WITH
FUSING, RUN PILOT LIGHT
SYMCOM PUMP SAVER,
LIGHTNING ARRESTOR.
APPROXIMATE SHIPPING
WEIGHT 65 POUNDS.
Figure 3 – Size 1 and 2 Pump Panel Dimensions
12
Page 13

ITT
CENTRIPRO
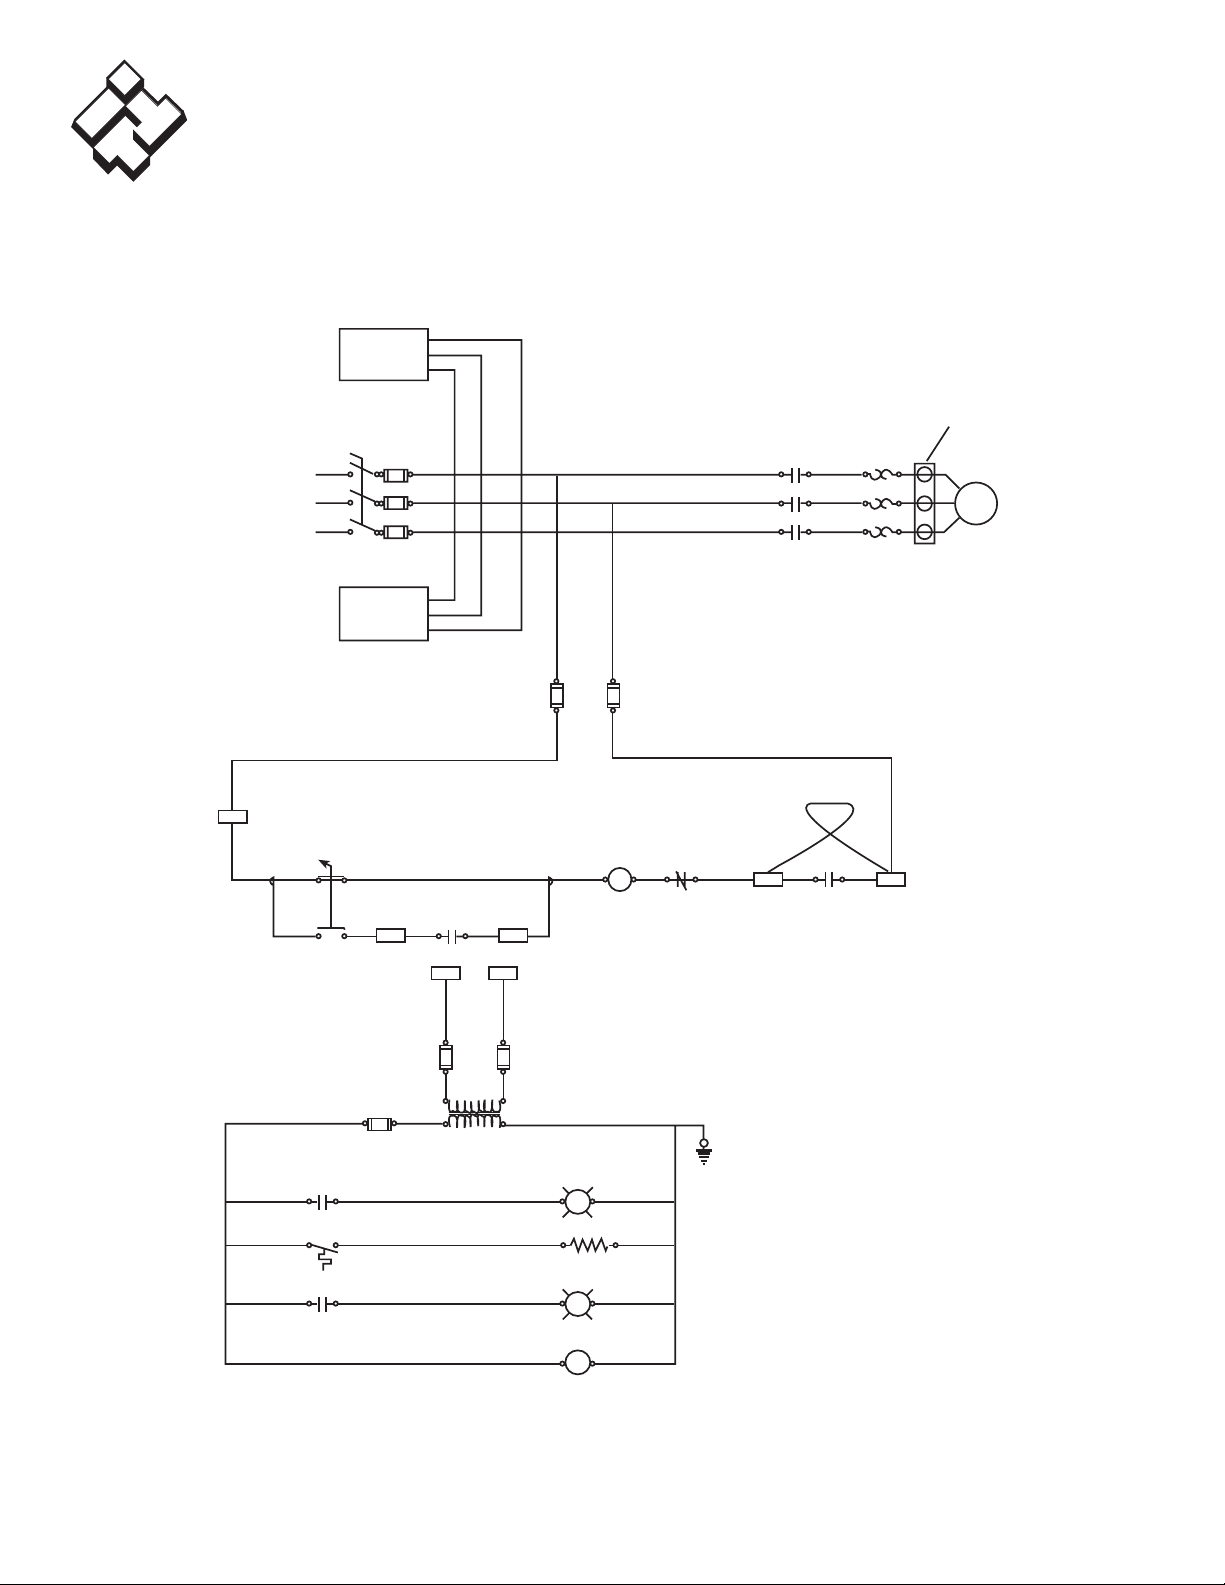
M1 OL1
L1 T1 L1 T1
M1
L2 T2 L2 T2
L3 T3 L3 T3
PUMP 1
ROUTE MOTOR LEADS
THROUGH PUMPSAVER OR CT’S IF PROVIDED
ROUTE MOTOR LEADS
THROUGH PUMPSAVER
IF PROVIDED (AS REQUIRED)
L1
L2
L3
PUMP
SAVER
L1
L2
L3
PUMPSAVER
ORDER KIT #FSPP
MAIN DISCONNECT
SEE PART
NUMBER
RJ 1-3
LA
LIGHTING
ARRESTOR
LIGHTING ARRESTOR
ORDER KIT #FSSP
FU43AFU5
3A
1
4 2
H A
O
2 3
X00
X00
TC-1
M1
X2
X2A
OL 1-1 OL 1-1
X2A X2
YELLOW JUMPER
FACTORY INSTALLED
REMOVE IF
PUMPSAVER IS USED
1 X2
FU61AFU7
FNQR1
FU8
FNM11/4
120VAC
100VA
CPT PART #FSCT
M1
G
OL
R
TC
GREEN RUN LIGHT PART #FSGN*
* REQUIRES CPT
CONDENSATION HEATER PART #FSPH*
* REQUIRES CPT
RED ALARM LIGHT PART #FSRN*
* REQUIRES CPT
TIME CLOCK PART #FSTC*
* REQUIRES CPT
Commercial Water Systems
Loops through A, B & C
5 HP 15.2 FLA FRNR25 1 2
75 HP 96 FLA FRNR30 1 2
Figure 4 – Simplex Panel with Accessories Size 1, 2 and 3
CT Size Chart (CTs must be installed in the field for selected HP)
Size 1 240VAC
HP FLA Fuse Size
‡ The number of loops may differ from the number of conductors through the current transformers.
Always double check based on HP and FLA.
Number of Number of Conductors
13
‡
Page 14

ITT
CENTRIPRO
Commercial Water Systems
CT Size Chart (CTs must be installed in the field for selected HP)
Size 1 480VAC
Loops through A, B & C
5 HP 7.6 FLA FRSR15 3 4
7.5 HP 11FLA FRSR20 2 3
10 HP 14FLA FRSR20 1 2
Loops through A, B & C
10 HP 28FLA FRNR40 0 1
HP FLA Fuse Size
‡ The number of loops may differ from the number of conductors through the current transformers.
Always double check based on HP and FLA.
HP FLA Fuse Size
Number of Number of Conductors
Size 2 240VAC
Number of Number of Conductors
‡
‡
15 HP 42FLA FRSR250 0 1
‡ The number of loops may differ from the number of conductors through the current transformers.
Always double check based on HP and FLA.
Size 2 480VAC
Loops through A, B & C
15 HP 21FLA FRSR35 1 2
20 HP 27FLA FRSR40 0 1
25 HP 34FLA FRSR50 0 1
HP FLA Fuse Size
‡ The number of loops may differ from the number of conductors through the current transformers.
Always double check based on HP and FLA.
Number of Number of Conductors
‡
14
Page 15
ITT
sChEmaTICs
CENTRIPRO
Commercial Water Systems
SIZE 3 PUMP PANEL WITH
OPTIONS INSTALLED
TIMECLOCK, CPT WITH
FUSING, RUN PILOT LIGHT
SYMCOM PUMPSAVER,
LIGHTNING ARRESTOR.
APPROXIMATE SHIPPING
WEIGHT 150 POUNDS.
Figure 5 – Size 3 Dimensions
15
Page 16

ITT
CENTRIPRO
Commercial Water Systems
CT Size Chart (CTs must be installed in the field for selected HP)
Size 3 240VAC
Loops through A, B & C
25 HP 68FLA FRNR100 0 1
30 HP 80FLA FRNR150 0 1
Loops through A, B & C
30 HP 40FLA FRSR60 0 1
40 HP 52FLA FRSR80 0 1
HP FLA Fuse Size
‡ The number of loops may differ from the number of conductors through the current transformers.
Always double check based on HP and FLA.
HP FLA Fuse Size
Number of Number of Conductors
Size 3 480VAC
Number of Number of Conductors
‡
‡
50 HP 65FLA FRSR100 0 51
‡ The number of loops may differ from the number of conductors through the current transformers.
Always double check based on HP and FLA.
16
Page 17
ITT
sChEmaTICs
CENTRIPRO
Commercial Water Systems
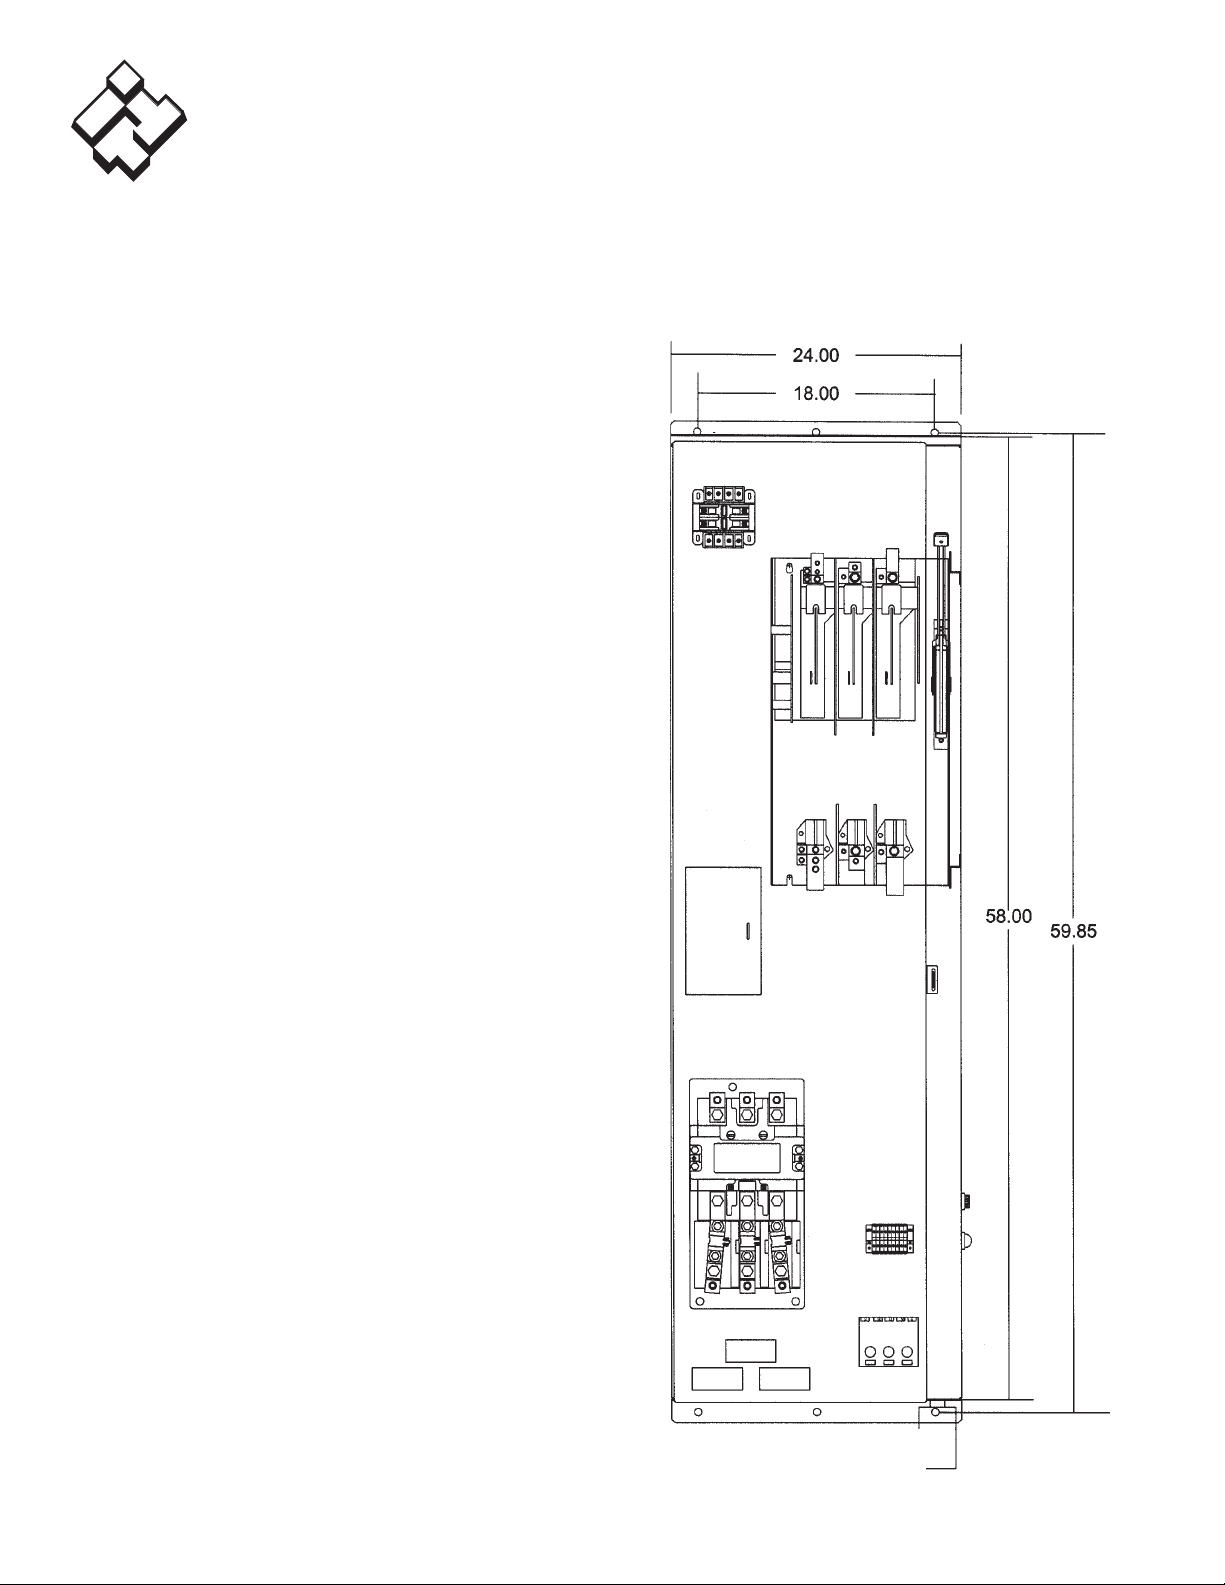
SIZE 4 PUMP PANEL WITH
OPTIONS INSTALLED
TIMECLOCK, CPT WITH
FUSING, RUN PILOT LIGHT
SYMCOM PUMPSAVER,
LIGHTNING ARRESTOR.
APPROXIMATE SHIPPING
WEIGHT 150 POUNDS.
Figure 6 – Size 4 Dimensions
17
Page 18
ITT
CENTRIPRO
M1 OL1
L1 T1 L1 T1
M1
L2 T2 L2 T2
L3 T3 L3 T3
PUMP 1
ROUTE MOTOR LEADS
THROUGH PUMPSAVER OR CT’S IF PROVIDED
ROUTE MOTOR LEADS
THROUGH PUMPSAVER
IF PROVIDED (AS REQUIRED)
L1
L2
L3
PUMP
SAVER
L1
L2
L3
PUMPSAVER
ORDER KIT #FSPP
MAIN DISCONNECT
SEE PART
NUMBER
RJ 1-3
LA
LIGHTING
ARRESTOR
LIGHTING ARRESTOR
ORDER KIT #FSSP
FU43AFU5
3A
1
4 2
H A
O
2 3
X00
X00
TC-1
M1
X2
X2A
OL 1-1 OL 1-1
X2A X2
YELLOW JUMPER
FACTORY INSTALLED
REMOVE IF
PUMPSAVER IS USED
1 X2
FU61AFU7
FNQR1
FU8
FNM11/4
120VAC
100VA
CPT PART #FSCT
M1
G
OL
R
TC
GREEN RUN LIGHT PART #FSGN*
* REQUIRES CPT
CONDENSATION HEATER PART #FSPH*
* REQUIRES CPT
RED ALARM LIGHT PART #FSRN*
* REQUIRES CPT
TIME CLOCK PART #FSTC*
* REQUIRES CPT
Commercial Water Systems
Figure 7 – Simplex Panel with Accessories Size 4 and 5
18
Page 19

ITT
CENTRIPRO
Commercial Water Systems
CT Size Chart (CTs must be installed in the field for selected HP)
Size 4 480VAC
Loops through A, B & C
60 HP 77FLA FRSR100 No CT 0 1
75 HP 96FLA FRSR150 100:5 4 5
100 HP 124FLA FRSR170 150:5 4 5
HP FLA Fuse Size CT Size
‡ The number of loops may differ from the number of conductors through the current transformers.
Always double check based on HP and FLA.
Size 4 240VAC
Loops through A, B & C
50 HP 130FLA FRNR200 150:5 4 5
HP FLA Fuse Size CT Size
‡ The number of loops may differ from the number of conductors through the current transformers.
Always double check based on HP and FLA.
Number of Number of Conductors
Number of Number of Conductors
‡
‡
19
Page 20
ITT
sChEmaTICs
CENTRIPRO
Commercial Water Systems
SIZE 5 PUMP PANEL WITH OPTIONS INSTALLED TIMECLOCK, CPT WITH FUSING,
RUN PILOT LIGHT SYMCOM PUMPSAVER,
LIGHTNING ARRESTOR. APPROXIMATE
SHIPPING WEIGHT 300 POUNDS.
Figure 8 – Size 5 Dimensions
20
Page 21

ITT
CENTRIPRO
Commercial Water Systems
CT Size Chart (CTs must be installed in the field for selected HP)
Size 5 480VAC
Loops through A, B & C
125 HP 156FLA FRSR200 150:5 4 5
150 HP 180FLA FRSR250 200:5 4 5
200 HP 240FLA FRSR350 300:5 4 5
HP FLA Fuse Size CT Size
‡ The number of loops may differ from the number of conductors through the current transformers.
Always double check based on HP and FLA.
Size 5 240VAC
Loops through A, B & C
75 HP 193FLA FRNR300 200:5 4 5
HP FLA Fuse Size CT Size
Number of Number of Conductors
Number of Number of Conductors
‡
‡
100 HP 248FLA FRNR350 300:5 4 5
‡ The number of loops may differ from the number of conductors through the current transformers.
Always double check based on HP and FLA.
21
Page 22

ITT
CENTRIPRO
Commercial Water Systems
RECOmmENdEd sPaRE PaRTs FOR FIvE YEaRs OF OPERaTION
• A set of spare main and control voltage fuses.
• A set of replacement contactors for the starter.
22
Page 23

ITT
NOTEs
CENTRIPRO
Commercial Water Systems
23
Page 24

ITT
Commercial Water Systems
CentriPro
TM
CENTRIPRO LIMITED WARRANTY
This warranty applies to all water systems pumps manufactured by CentriPro.
Any part or parts found to be defective within the warranty period shall be replaced at no charge to
the dealer during the warranty period. The warranty period shall exist for a period of twenty-four (24)
months from date of installation or thirty (30) months from date of manufacture, whichever period is
shorter.
A dealer who believes that a warranty claim exists must contact the authorized CentriPro distributor
from whom the pump was purchased and furnish complete details regarding the claim. The distributor
is authorized to adjust any warranty claims utilizing the CentriPro Customer Service Department.
The warranty excludes:
(a) Labor, transportation and related costs incurred by the dealer;
(b) Reinstallation costs of repaired equipment;
(c) Reinstallation costs of replacement equipment;
(d) Consequential damages of any kind; and,
(e) Reimbursement for loss caused by interruption of service.
For purposes of this warranty, the following terms have these definitions:
(1) “Distributor” means any individual, partnership, corporation, association, or other legal
relationship that stands between CentriPro and the dealer in purchases, consignments or
contracts for sale of the subject pumps.
(2) “Dealer” means any individual, partnership, corporation, association, or other legal
relationship which engages in the business of selling or leasing pumps to customers.
(3) “Customer” means any entity who buys or leases the subject pumps from a dealer. The
“customer” may mean an individual, partnership, corporation, limited liability company,
association or other legal entity which may engage in any type of business.
CentriPro, FloStandard and the ITT Engineered Blocks Symbol
are registered trademarks and tradenames of ITT Corporation.
SPECIFICATIONS ARE SUBJECT TO CHANGE WITHOUT NOTICE.
IM192R00 August, 2006
© 2006 ITT Corporation
Engineered for life
THIS WARRANTY EXTENDS TO THE DEALER ONLY.
 Loading...