


W10150624A
Whirlpool W10150624A, 20-48KITRC, PT220L, PT400L, PT600L User Instructions
...
®
WASHER/DRYER USER INSTRUCTIONS
INSTRUCTIONS POUR L’UTILISATEUR
DE LA LAVEUSE/SÉCHEUSE
Table of Contents / Table des matières
ASSISTANCE OR SERVICE.................... 1
ACCESSORIES........................................ 2
WASHER/DRYER SAFETY..................... 2
WASHER USE.......................................... 4
DRYER USE............................................. 6
WASHER/DRYER CARE......................... 6
TROUBLESHOOTING WASHER............ 8
TROUBLESHOOTING DRYER ..............10
WARRANTY ............................................12
ASSISTANCE OU SERVICE.......................................................13
ACCESSORIES...........................................................................13
SÉCURITÉ DE LA LAVEUSE/SÉCHEUSE................................13
UTILISATION DE LA LAVEUSE.................................................15
UTILISATION DE LA SÉCHEUSE .............................................17
ENTRETIEN DE LA LAVEUSE/SÉCHEUSE .............................17
DÉPANNAGE DE LA LAVEUSE ................................................19
DÉPANNAGE DE LA SÉCHEUSE .............................................22
GARANTIE ..................................................................................24
Para obtener acceso al manual de uso y cuidado en español, o para obtener información adicional acerca de su producto, visite:
www.whirlpool.com.
Tenga listo su número de modelo completo. Puede encontrar el número de modelo y de serie dentro de la cavidad superior de la
puerta.
Assistance or Service
If you need assistance or service, first see the “Troubleshooting”
section. Additional help is available by calling our Customer
eXperience Center at 1-800-253-1301 from anywhere in the
U.S.A., or write:
Whirlpool Corporation
Customer eXperience Center
553 Benson Road
Benton Harbor, MI 49022-2692
Information may also be obtained by visiting our website at
www.whirlpool.com.
In Canada, for assistance, installation or service, call us at
1-800-807-6777, or write:
Whirlpool Canada LP
Customer Interaction Centre
1901 Minnesota Court
Mississauga, Ontario L5N 3A7
In Canada, visit www.whirlpool.ca.
Please include a daytime phone number in your correspondence.
Keep this book and your sales slip together for future
reference. You must provide proof of purchase or installation
date for in-warranty service.
Write down the following information about your appliance to
help you obtain assistance or service if you ever need it. You will
need to know your complete model number and serial number.
You can find this information on the model and serial number
label, located at the top inside dryer door well.
Dealer name____________________________________________________
Serial number __________________________________________________
Address ________________________________________________________
Phone number __________________________________________________
Model number __________________________________________________
Purchase date __________________________________________________
W10150624A
Accessories
Enhance your dryer with these premium accessories. For more high-quality items or to order, call 1-800-901-2042, or visit us at
www.whirlpool.com/accessories. In Canada call 1-800-807-6777, or visit us at www.whirlpoolparts.ca.
Part Number Accessory
20-48KITRC 4 ft (1.2 m) gas line dryer connector installation kit
PT220L 4 ft (1.2 m) dryer cord, 3-wire, 30 amp
PT400L 4 ft (1.2 m) dryer cord, 4-wire, 30 amp
PT600L 6 ft (1.8 m) dryer cord, 4-wire, 30 amp
8212614 Dryer vent lint brush
31682 All-purpose appliance cleaner
1903WH Laundry supply storage cart
3404351 Drying rack - fits 29" (73.7 cm) Super Capacity, 6.5 cu. ft (0.184 cu. m) - side swing or hamper door
3406839 Drying rack - fits 29" (73.7 cm) Super Capacity Plus, 7.0 cu. ft (0.198 cu. m) - side swing door only
49971 Compact dryer stand - white
49572 LP gas conversion kit
WASHER/DRYER SAFETY
Your safety and the safety of others are very important.
We have provided many important safety messages in this manual and on your appliance. Always read and obey all safety
messages.
This is the safety alert symbol.
This symbol alerts you to potential hazards that can kill or hurt you and others.
All safety messages will follow the safety alert symbol and either the word “DANGER” or “WARNING.”
These words mean:
You can be killed or seriously injured if you don't immediately
DANGER
WARNING
All safety messages will tell you what the potential hazard is, tell you how to reduce the chance of injury, and tell you what can
happen if the instructions are not followed.
follow instructions.
can be killed or seriously injured if you don't
You
instructions.
follow
2
WARNING: For your safety, the information in this manual must be followed to minimize
the risk of fire or explosion, or to prevent property damage, personal injury, or death.
– Do not store or use gasoline or other flammable vapors and liquids in the vicinity of this
or any other appliance.
– WHAT TO DO IF YOU SMELL GAS:
Do not try to light any appliance.
•
Do not touch any electrical switch; do not use any phone in your building.
•
Clear the room, building, or area of all occupants.
•
Immediately call your gas supplier from a neighbor's phone. Follow the gas supplier's
•
instructions.
If you cannot reach your gas supplier, call the fire department.
•
– Installation and service must be performed by a qualified installer, service agency, or
the gas supplier.
IMPORTANT SAFETY INSTRUCTIONS
To reduce the risk of fire, electric shock, or injury to persons when using the washer/dryer, follow basic
WARNING:
precautions, including the following:
■ Read all instructions before using the washer/dryer.
■ Do not place items exposed to cooking oils in your dryer.
Items contaminated with cooking oils may contribute to a
chemical reaction that could cause a load to catch fire.
■ Do not wash or dry articles that have been previously
cleaned in, washed in, soaked in, or spotted with gasoline,
dry-cleaning solvents, other flammable, or explosive
substances as they give off vapors that could ignite or
explode.
■ Do not add gasoline, dry-cleaning solvents, or other
flammable, or explosive substances to the wash water.
These substances give off vapors that could ignite or
explode.
■ Do not allow children to play on or in the washer/dryer.
Close supervision of children is necessary when the
washer/dryer is used near children.
Before the washer/dryer is removed from service or
■
discarded, remove the doors to the washer/dryer
compartments.
■ Do not reach into the washer/dryer if the tub, agitator or
drum is moving.
■ Do not install or store the washer/dryer where it will be
exposed to the weather.
■ Do not tamper with controls.
■ Clean dryer lint screen before or after each load.
SAVE THESE INSTRUCTIONS
■ Under certain conditions, hydrogen gas may be produced
in a hot water system that has not been used for 2 weeks
or more. HYDROGEN GAS IS EXPLOSIVE. If the hot water
system has not been used for such a period, before using
the washing machine, turn on all hot water faucets and let
the water flow from each for several minutes. This will
release any accumulated hydrogen gas. As the gas is
flammable, do not smoke or use an open flame during
this time.
■ Do not repair or replace any part of the washer/dryer or
attempt any servicing unless specifically recommended in
this Use and Care Guide or in published user-repair
instructions that you understand and have the skills to
carry out.
■ Do not use fabric softeners or products to eliminate static
unless recommended by the manufacturer of the fabric
softener or product.
■ Do not use heat to dry articles containing foam rubber or
similarly textured rubber-like materials.
■ Keep area around the exhaust opening and adjacent
surrounding areas free from the accumulation of lint, dust,
and dirt.
■ The interior of the machine and dryer exhaust vent should
be cleaned periodically by qualified service personnel.
■ See “Electrical Requirements” section for grounding
instructions.
3
Checking Your Vent
Your dryer must be properly installed and vented to achieve
maximum drying efficiency and shorten drying times. Use the
minimum recommended installation clearances found in the
Installation Instructions. See the Installation Instructions for more
information.
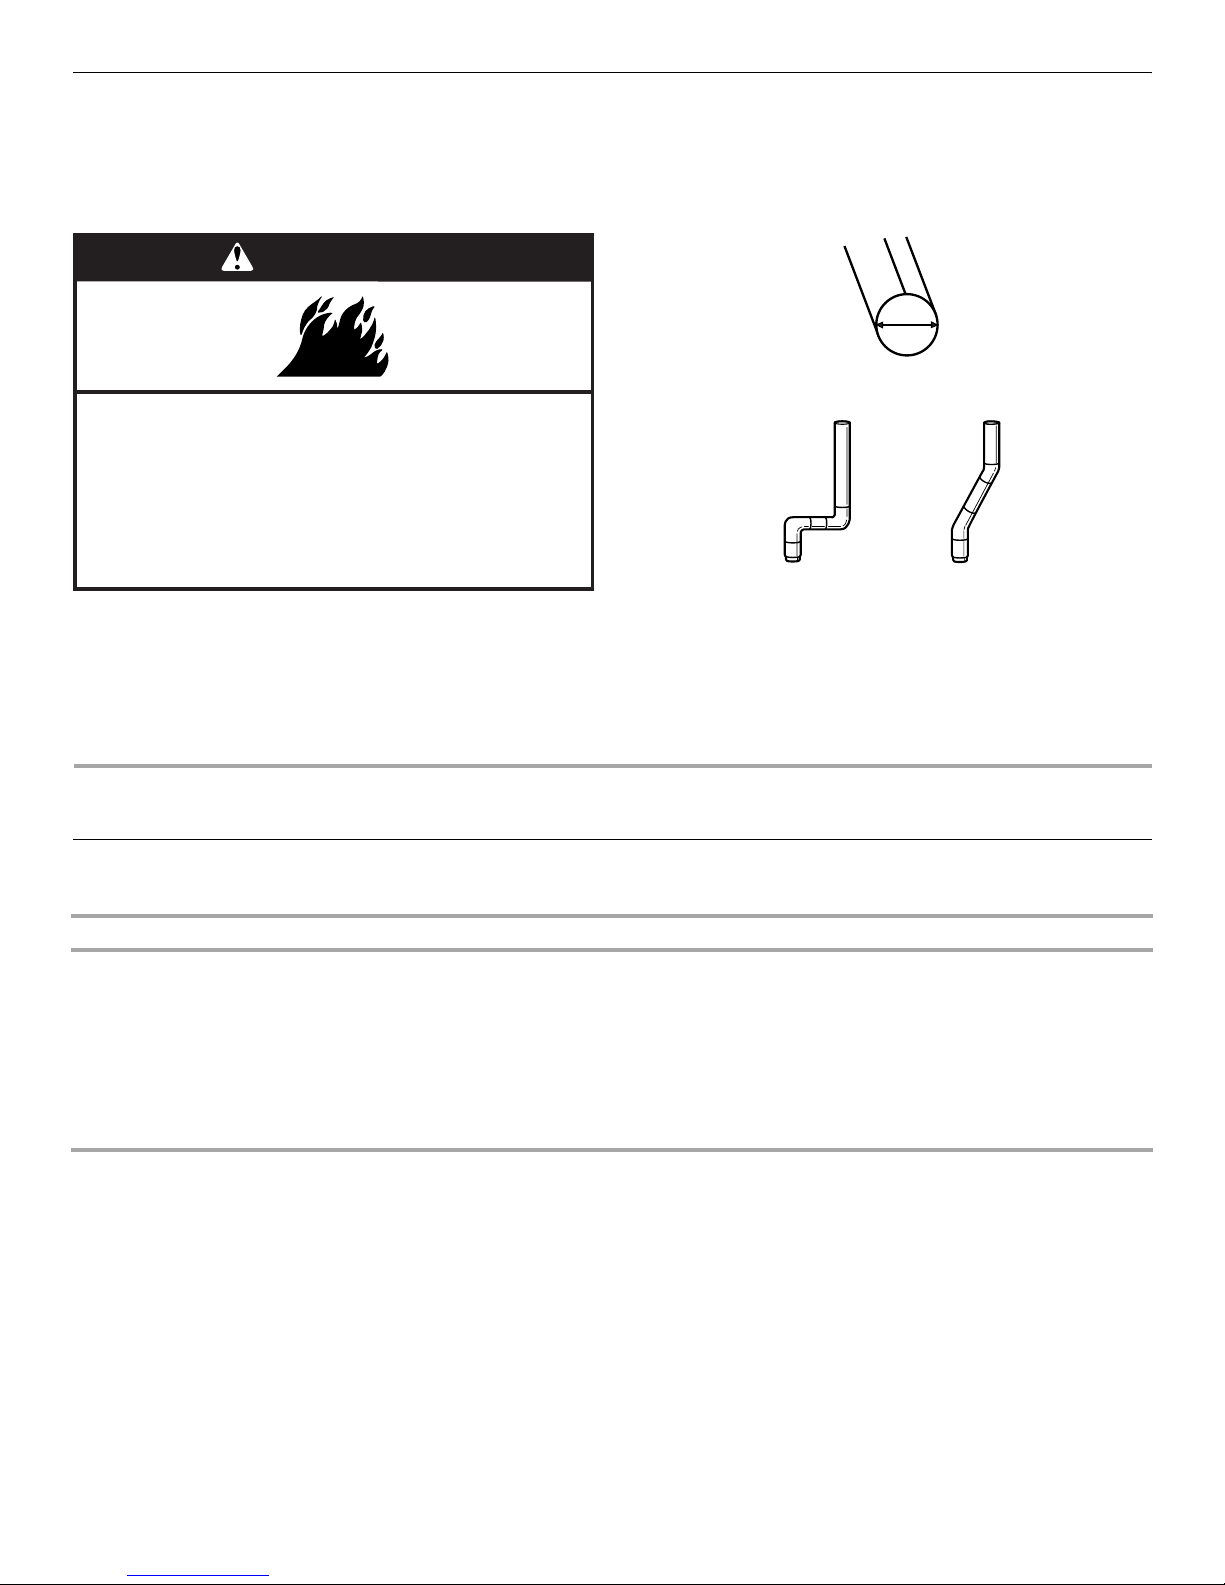
WARNING
Fire Hazard
Use a heavy metal vent.
Do not use a plastic vent.
Do not use a metal foil vent.
Failure to follow these instructions can result in death
or fire.
If the dryer is not properly installed and vented, it will not be
covered under the warranty. Proper venting of your dryer is
important for satisfactory drying results. See the Installation
Instructions for more detail.
NOTE: Service calls caused by improper venting will be paid for
by the customer, whether it was a paid installation or selfinstalled.
1. Do not use plastic vent or metal foil vent. Use 4" (10.2 cm)
metal or flexible metal vent. Do not kink or crush flexible
metal vent. It must be completely extended to allow adequate
exhaust air to flow. Check vent after installation. Refer to the
Installation Instructions for proper length requirements of
vent.
4"
10.2 cm
2. Use a 4" (10.2 cm) exhaust hood.
3. Use the straightest path possible when routing the vent.
Good Better
4. Use clamps to seal all joints. Do not use duct tape, screws or
other fastening devices that extend into the interior of the
vent to secure vent.
5. Clean exhaust vent periodically, depending on use, but at
least every 2 years, or when installing your dryer in a new
location. When cleaning is complete, be sure to follow the
Installation Instructions supplied with your dryer for final
product check.
WASHER USE
Loading
For these suggested full-sized loads, set the LOAD SIZE selector to the highest load size setting.
LARGE CAPACITY WASHERS
Heavy Work Clothes
2 pair of pants
3 shirts
3 jeans
1 coverall
Mixed Load
2 double sheets
4 pillowcases
6 T-shirts
6 pair of shorts
2 shirts
2 blouses
6 handkerchiefs
Towels
8 bath towels
8 hand towels
10 washcloths
1 bath mat
Delicates
2 camisoles
4 slips
6 undergarments
2 sets of sleepwear
1 child’s outfit
Permanent Press
1 double sheet
1 tablecloth
1 dress
1 blouse
2 pair of pants
3 shirts
2 pillowcases
Knits
2 pair of pants
2 blouses
4 shirts
4 tops
2 dresses
4
Starting Your Washer
WARNING
Fire Hazard
Never place items in the washer that are dampened
with gasoline or other flammable fluids.
No washer can completely remove oil.
Do not dry anything that has ever had any type of oil on
it (including cooking oils).
Doing so can result in death, explosion, or fire.
1. Measure detergent and pour it into the washer. If desired, add
powdered or liquid color safe bleach. Drop a sorted load of
clothes loosely into your washer.
■ Load evenly to maintain washer balance. Mix large and
small items. Items should move easily through the wash
water. Overloading can cause poor cleaning.
2. (OPTIONAL) Add liquid chlorine bleach.
Always measure liquid chlorine bleach. Do not guess. Do not
use more than 1 cup (250 mL) for a full load. Follow
manufacturer’s directions for safe use. Use a cup with a
pouring spout to avoid spilling.
Let the washer fill and begin agitating the load. Add bleach to
the wash cycle so it can be removed in the rinse cycle. Pour
bleach around the agitator, not directly onto the load.
■ Follow directions on the care labels. Do not use chlorine
bleach on wool, silk, spandex, acetates, or some flameretardant fabrics.
NOTE: Undiluted bleach will damage any fabric it touches.
The damage appears as rips, holes, tears, or color loss and
may not show up until several washings later.
3. (OPTIONAL) Add liquid fabric softener.
NOTE: Do not spill or drip any fabric softener onto the
clothes. Undiluted fabric softener can stain fabrics. Always
dilute fabric softener with warm water. Too much fabric
softener can make some items (diapers and towels)
nonabsorbent. If this happens, do not use it in every load, or
use less of it in each load.
Style 1: With liquid fabric softener dispenser (on some
models)
■ Use only liquid fabric softener in this dispenser. Pour
measured liquid fabric softener into the dispenser.
Softener is added automatically during the rinse portion
of the cycle. Dilute liquid fabric softener by filling the
dispenser with warm water until liquid reaches the
crossbar in the dispenser opening.
Style 2: Without liquid fabric softener dispenser (on some
models)
■ In the final rinse ONLY, add fabric softener that has been
diluted with ¹⁄₂ to 1 cup (125 to 250 mL) warm water.
4. Close the washer lid. Washer will not agitate or spin with the
lid open.
5. Turn the WATER LEVEL selector to the correct setting for your
wash load and the type of fabric being washed. You may
change the load size or water level selection after the washer
has started filling by turning the selector to a different setting.
6. Set the TEMPERATURE selector to the correct setting for the
type of fabric and soils being washed. Use the warmest water
safe for fabric. Follow garment label instructions.
NOTE: In wash water temperatures colder than 60ºF (15.6ºC),
detergents do not dissolve well. Soils can be difficult to
remove. Some fabrics can retain wear wrinkles and have
increased pilling (the formation of small lint-like balls on the
surface of garments).
7. Push in the Cycle Control knob and turn it clockwise to the
wash cycle you want. Reduce the wash time when using a
small load size setting. Pull out the Cycle Control knob to
start the washer.
To stop or restart your washer:
■ To stop the washer at any time, push in the Cycle
Control knob.
■ To restart the washer, close the lid (if open) and pull out
the Cycle Control knob.
5
DRYER USE
Starting Your Dryer
WARNING
Explosion Hazard
Keep flammable materials and vapors, such as
gasoline, away from dryer.
Do not dry anything that has ever had anything
flammable on it (even after washing).
Failure to follow these instructions can result in death,
explosion, or fire.
Before using your dryer, wipe the dryer drum with a damp cloth to
remove dust from storing and shipping.
1. Clean lint screen before each load. See “Cleaning the Lint
Screen.”
2. Load clothes loosely into the dryer and close the door. Do not
pack the dryer. Allow space for clothes to tumble freely.
3. Turn the Cycle Control knob to the recommended cycle for
the type of load being dried. Use the Energy Preferred
Automatic Setting to dry most heavy to medium weight
fabrics.
4. (OPTIONAL) Your dryer may have an END OF CYCLE
SIGNAL. The signal is helpful when drying items that should
be removed from the dryer as soon as it stops. The End of
Cycle signal is part of the Start button and is selectable. Turn
the Start button to ON or OFF. The signal will sound only if the
selector is set to On.
WARNING
Fire Hazard
No washer can completely remove oil.
Do not dry anything that has ever had any type of oil on
it (including cooking oils).
Items containing foam, rubber, or plastic must be dried
on a clothesline or by using an Air Cycle.
Failure to follow these instructions can result in death
or fire.
5. If desired, add fabric softener sheet. Follow package
instructions.
6. Press the PUSH TO START button.
Stopping and Restarting
You can stop your dryer anytime during a cycle.
To stop your dryer
Open the dryer door or turn the Cycle Control knob to OFF.
NOTE: The Cycle Control knob should point to an Off area when
the dryer is not in use.
To restart your dryer
Close the door. Select a new cycle and temperature (if desired).
Press the PUSH TO START button.
Cleaning the Washer/Dryer Location
Keep washer/dryer area clear and free from items that would
obstruct the flow of combustion and ventilation air.
WARNING
Explosion Hazard
Keep flammable materials and vapors, such as
gasoline, away from dryer.
Failure to do so can result in death, explosion, or fire.
6
WASHER/DRYER CARE
Cleaning Your Washer
Cleaning the exterior
Use a soft, damp cloth or sponge to wipe up any spills such as
detergent or bleach. Occasionally wipe the outside of your
washer to keep it looking new.
Cleaning the interior
Clean your washer interior by mixing 1 cup (250 mL) of chlorine
bleach and 2 scoops or caps full of detergent. Pour this into your
washer and run it through a complete cycle using hot water.
Repeat this process if necessary.
NOTE: Remove any hard water deposits using only cleaners
labeled as washer safe.
Cleaning the liquid fabric softener dispenser (on some
models):
1. Remove dispenser by grasping top with both hands and
squeezing, while pushing upward with thumbs.

2. Rinse dispenser under a warm water faucet, then replace it.
NOTE: If your model has a liquid fabric softener dispenser, do not
wash clothes with this dispenser removed. Do not add detergent
or bleach to this dispenser; it is for liquid fabric softener only.
Water Inlet Hoses
Replace inlet hoses after 5 years of use to reduce the risk of hose
failure. Periodically inspect and replace inlet hoses if bulges,
kinks, cuts, wear or leaks are found.
When replacing your inlet hoses, mark the date of replacement
on the label with a permanent marker.
Cleaning the Lint Screen
Clean the lint screen before each load. A screen blocked by lint
can increase drying time.
IMPORTANT:
■ Do not run the dryer with the lint screen loose, damaged,
blocked or missing. Doing so can cause overheating and
damage to both the dryer and fabrics.
■ If lint falls off the screen into the dryer during removal, check
the exhaust hood and remove the lint.
Cleaning the Dryer Interior
To clean dryer drum
1. Apply a nonflammable household cleaner to the stained area
of the drum and rub with a soft cloth until stain is removed.
2. Wipe drum thoroughly with a damp cloth.
3. Tumble a load of clean cloths or towels to dry the drum.
NOTE: Garments that contain unstable dyes, such as denim blue
jeans or brightly colored cotton items, may discolor the dryer
interior. These stains are not harmful to your dryer and will not
stain future loads of clothes. Dry unstable dye items inside out to
avoid transfer of dye.
Removing Accumulated Lint
From Inside the Dryer Cabinet
Lint should be removed every 2 years, or more often, depending
on dryer usage. Cleaning should be done by a qualified person.
From Inside the Exhaust Vent
Every Load Cleaning
Style 1:
1. The lint screen is located inside the dryer on the back wall.
Pull out the lint screen and its cover.
2. Separate the cover and the screen by squeezing the screen
and pulling on the cover at the same time.
3. Roll lint off the screen with your fingers. Do not rinse or wash
screen to remove lint. Wet lint is hard to remove.
4. Put the lint screen and cover back together and push firmly
back into place.
Style 2:
1. The lint screen is located inside the dryer in the front door
well. Pull the lint screen straight up.
2. Roll lint off the screen with your fingers. Do not rinse or wash
screen to remove lint. Wet lint is hard to remove.
3. Push the lint screen firmly back into place.
As Needed Cleaning
Laundry detergent and fabric softener residue can build up on the
lint screen. This buildup can cause longer drying times for your
clothes, or cause the dryer to stop before your load is completely
dry. The screen is probably clogged if lint falls off the screen.
Clean the lint screen (as outlined following) every 6 months, or
more frequently if it becomes clogged due to a residue buildup.
1. Roll lint off the screen with your fingers.
2. Wet both sides of lint screen with hot water.
3. Wet a nylon brush with hot water and liquid detergent. Scrub
lint screen with the brush to remove residue buildup.
4. Rinse screen with hot water.
5. Thoroughly dry lint screen with a clean towel. Replace screen
in dryer.
Lint should be removed every 2 years, or more often, depending
on dryer usage.
Vacation, Storage and Moving Care
Install and store your washer/dryer where it will not freeze.
Because some water may stay in the hoses, freezing can damage
your washer/dryer. If storing or moving your washer/dryer during
freezing weather, winterize it.
Non-use or vacation care
Operate your washer/dryer only when you are at home. If you will
be on vacation or not using your washer/dryer for an extended
period of time, you should:
■ Unplug washer/dryer or disconnect power.
■ Turn off the water supply to the washer. This helps avoid
flooding (due to a water pressure surge) while you are away.
To winterize washer/dryer
1. Shut off both water faucets.
2. Disconnect and drain water inlet hoses.
3. Put 1 qt (1 L) of R.V.-type antifreeze in the basket.
4. Run washer on a drain and spin setting for about 30 seconds
to mix the antifreeze and water.
5. Unplug washer/dryer or disconnect power.
To use washer/dryer again
1. Flush water pipes and hoses.
2. Reconnect water inlet hoses.
3. Turn on both water faucets.
7

4. In the U.S.A.
5. Run the washer through a complete cycle with 1 cup
(250 mL) of detergent to clean out antifreeze.
WARNING
Electrical Shock Hazard
Plug into a grounded 3 prong outlet.
Do not remove ground prong.
Do not use an adapter.
Do not use an extension cord.
Failure to follow these instructions can result in death,
fire, or electrical shock.
■ Plug in washer/dryer or reconnect power.
In Canada
WARNING
To transport the washer/dryer
1. Shut off both water faucets.
2. Disconnect and drain water inlet hoses.
3. If washer/dryer will be moved during freezing weather, put in
a qt (1 L) of R.V.-type antifreeze in the basket. Run washer on
a spin setting for about 30 seconds to mix the antifreeze and
water.
4. Disconnect the drain from the drain system.
5. Unplug washer/dryer or disconnect power. Disconnect wiring
if washer/dryer is direct wired.
6. Disconnect the exhaust vent.
7. Wash lint screen.
8. Make sure leveling legs are secure.
9. Place the inlet hoses into the basket.
10. Drape the power cord and drain hose over edge and into the
basket.
11. Use masking tape to secure the washer lid and dryer door.
Reinstalling your washer/dryer
1. Follow the “Installation Instructions” to locate, level and
connect the washer/dryer.
2. Run the washer through a complete cycle with 1 scoop or
capful of detergent to clean the washer and remove the
antifreeze, if used.
Electrical Shock Hazard
Plug into a grounded 4 prong outlet.
Failure to do so can result in death or electrical shock.
■ Plug in washer/dryer or reconnect power.
TROUBLESHOOTING WASHER
First try the solutions suggested here or visit our website and reference FAQs (Frequently Asked Questions)
to possibly avoid the cost of a service call...
In U.S.A www.whirlpool.com/help - In Canada www.whirlpool.ca
Washer and Components
Noisy, vibrating, off-balance
■ Is the floor flexing, sagging or not level? Flooring that
flexes or is uneven can contribute to noise and vibration of
the washer. A ³⁄₄" (1.9 cm) piece of plywood under the washer
will reduce the sounds. See the Installation Instructions.
■ Is the washer/dryer level? The washer/dryer must be level.
See the Installation Instructions.
■ Is the load balanced? Evenly distribute the load in the
washer basket and make sure the height of the load does not
exceed the top row of basket holes.
■ Did you completely remove the yellow shipping strap with
cotter pins? See the Installation Instructions.
■ Are the gears engaging after the drain and before spin, or
is the upper part of agitator clicking during wash? These
are normal washer noises.
■ Is the washer gurgling or humming? When the washer
drains, the pump will make a continuous humming with
periodic gurgling or surging sounds as the final amounts of
water are removed. This is normal.
■ The washer basket moves while washing. This is normal.
Leaking
■ Are the fill hoses tight?
■ Are the fill hose gaskets properly seated? Check both
ends of each hose. See the Installation Instructions.
■ Is the drain hose properly installed? The drain hose should
be secured to the drainpipe or laundry tub. See the
Installation Instructions.
8
 Loading...