


Whirlpool UXT2030AY, UXT2036AY, UXT3030AY, UXT3036AY, UXT4030AY RANGE HOOD POWER SUPPLY CORD CONNECTION KIT INSTRUCTIONS
...
RANGE HOOD POWER SUPPLY CORD CONNECTION KIT
INSTRUCTIONS
Parts Supplied
Remove parts from packages. Check that all parts are included. ■■ Power cord
■■ Strain relief
■■ UL Listed wire connectors (3)
Grounding Instructions
 WARNING
Electrical Shock Hazard Disconnect power before servicing.
Replace all parts and panels before operating.
Failure to do so can result in death or electrical shock.
ARNING
Fire Hazard Electrically ground the blower. Use copper wire.
Connect ground wire to green ground screw or green wire in terminal box.
Failure to do so can result in death, fire, or electrical shock.
This range hood must be grounded. In the event of an electrical short circuit, grounding reduces the risk of electrical shock
by providing an escape wire for the electric current. This appliance is equipped with a cord having a grounding wire with a grounding plug. The plug must be plugged into an outlet that is properly installed and grounded.
WARNING: Improper grounding can result in a risk of electrical shock.
Consult a qualified electrician if the grounding instructions are not completely understood or if doubt exists as to whether the appliance is grounded.
Do not use an extension cord. If the power supply cord is too short, have a qualified electrician install an outlet near the appliance.
CAUTION: To reduce the risk of fire and electrical shock, this Range Hood Power Supply Cord Connection Kit should be used only with the range hood models listed.
LI31NB/W10454972D
Make Electrical Connections
Style 1 – Ground Screw
For use with the following range hood base models:
UXT2030AY, UXT2036AY, UXT3030AY, UXT3036AY, UXT4030AY, UXT4036AY, UXT4230AY, UXT4236AY, UXT5230AY, UXT5236AY, IH1400YW, IH3402YS, WVU10UV0, WVU11UV0, WVU15UN0, WVU15UN6, WVU17UC0, WVU17UC6, WVU31UC0, WVU31UC6, WVU33UC0, WVU33UC6, WVU35UC0, WVU35UC6, and WVU36UC0.
1.Disconnect power.
2.Remove the range hood knockout that the power cord will be routed through.
3.Remove the nut from the strain relief. Insert the strain relief into the knockout hole and secure in place with the nut.
B
A
A.Strain relief
B.Removable knockouts
4.Insert the power cord through the strain relief, but do not tighten onto the power cord yet.
a.Pass the power cord through the strain relief. It is important that the cable ties pass completely through the strain relief.
A B
C
A.Strain relief
B.Power cord
C.Cable ties
b.Pull the power cord backward until the cable ties are inside the strain relief.
A B C
A.Power cord
B.Strain relief
C.Cable ties
5.Securely tighten the strain relief to hold the power cord in position.
6.Use a UL listed wire connector and connect black wires (G) together.
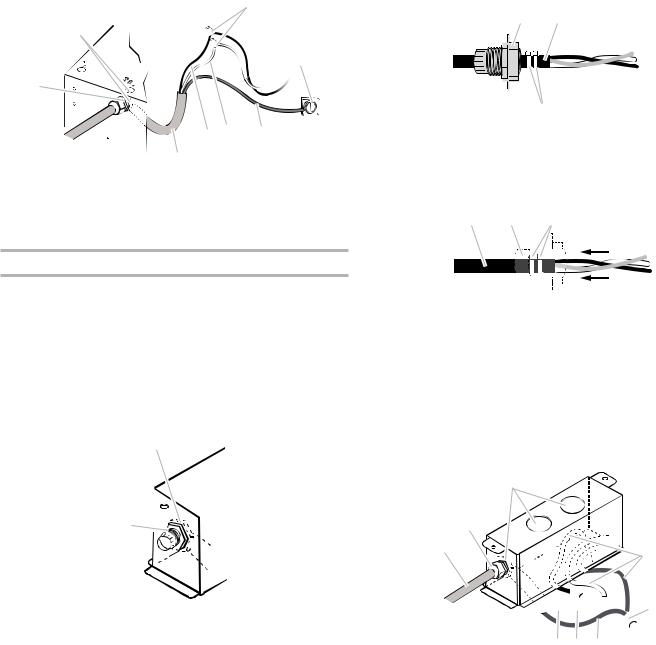
7.Use a UL listed wire connector and connect white wires (F) together.
8.Insert the green wire (E) under the green ground screw (D) and securely tighten.
C
B
D
A
|
G F |
E |
|
H |
|
A. Strain relief with nut |
E. Green wire |
|
B Removable knockouts |
F. White wires |
|
C. UL listed wire |
G. Black wires |
|
connectors |
H. Power supply cord |
|
D. Green ground screw |
|
|
Style 2 – Ground Wire
For use with the following range hood base models:
KXW2530Y, KXW2536Y, KXU4230Y, KXU4236Y, KXW4330Y, KXW4336Y, KXW4430Y, KXW4436Y, JXW8230W, JXW8236W, JXW8030W, JXW8036W, GXW6530DX, GXW6536DX, WVU37UC0, WVU37UC6, WVU37UC4, WVU57UC0, and WVU57UC6.
1.Disconnect power.
2.Remove the range hood knockout that the power cord will be routed through.
3.Remove the nut from the strain relief. Insert the strain relief into the knockout hole and secure in place with the nut.
A
B

A.Removable knockouts
B.Strain relief
4.Insert the power cord through the strain relief, but do not tighten onto the power cord yet.
a.Pass the power cord through the strain relief. It is important that the cable ties pass completely through the strain relief.
A B
C
A.Strain relief
B.Power cord
C.Cable ties
b.Pull the power cord backward until the cable ties are inside the strain relief.
A B C
A.Power cord
B.Strain relief
C.Cable ties
5.Securely tighten the strain relief to hold the power cord in position.
6.Use a UL listed wire connector and connect black wires (H) together.
7.Use a UL listed wire connector and connect white wires (G) together.
8.Use a UL listed wire connector and connect green wires (F) together.
C
B
A
A.Power supply cord
B.Strain relief with nut
C.Removable knockouts
D.Wires from range hood
D


 E H G F
E.UL listed wire connector
F.Green wires
G.White wires
H.Black wires
2
 Loading...