


ENGLISH Instructions for use Page 3
21 
3 
1
2

Contents
Before Using The Washing Machine
Accessories/Supplied Parts
Installation
Precautions and General Recommendations
Description Of The Washing Machine
Door
Child Safety
Before The First Wash Cycle
Preparing The Wash
Detergent And Additives
Removing The Filter
Draining Residual Water
Care And Maintenance
Troubleshooting Guide
After-Sales Service
Transport/Handling
Electrical connection
3
Before Using The Washing Machine
1. Remove the packaging and check
•After unpacking, make sure that the washing machine is undamaged. If in doubt, do not use the washing machine. Contact After-Sales Service or your local retailer
•Check that the accessories and supplied parts are all present
•Keep the packing material (plastic bags, polystyrene parts, etc.) out of reach of children, as they are potentially dangerous
2. Remove the transport bolts
•The washing machine is fitted with a transport bolts to avoid any possible damage to the interior during transport. Before using the washing machine, it is imperative that the transport bolts are removed
3. Install the washing machine
•Remove the protective foil from the control panel
•Move the appliance without lifting it by the worktop
•Install the appliance on a solid and level floor surface, preferably in a corner of the room
•Make sure that all four feet are resting firmly on the floor and check that the appliance is perfectly level (use a spirit level)
4. Water inlet
•Connect the water supply inlet hose in accordance with regulations of your local water company
•Water inlet: Cold water only
• Tap: |
3/4 threaded |
|
hose |
|
connection |
• Water |
100-1000 kPa |
pressure |
(1-10 bar) |
(flow |
|
pressure): |
|
5. Drain hose
•Connect the drain hose to the siphon or hook it over the edge of a sink by means of the “U” bend supplied
•If the washing machine is connected to a built-in pumping out system, ensure that the latter is equipped with a vent to avoid simultaneous loading and draining of water (siphoning effect)
6. Electrical connections
•Electrical connections must be carried out by a qualified technician in compliance with the manufacturer's instructions and local safety regulations
•Data concerning voltage, consumption and fuses are located on the inside of the appliance door
•The appliance must be connected to the mains exclusively by means of a socket with an earth connection in accordance with established regulations. The washing machine must be earthed by law. The manufacturer declines all liability for damage to property or injury to persons or animals due to noncompliance with the directions given above
•Do not use extension leads or multi sockets
•Before any maintenance on the washing machine disconnect it from the mains supply
•Access to the mains plug or to disconnection from mains supply via a double-pole switch must be ensured at all times following the installation
•Do not operate the washing machine if it has been damaged during transport. Inform the After-Sales Service
•Mains cable replacement is only to be carried out by After-Sales Service
•The washing machine must only be used in the household for the prescribed uses
Minimum housing dimensions:
Width: 600 mm Height: 825 mm Depth: 600 mm
4

Accessories/Supplied Parts
Fastened on the rear of the appliance:
Water inlet hose
Plastic bag containing:
Instructions for use
Quick reference guide with programme summary
(Information and tips for daily use)
Mesh filter for inlet hose (if not premounted)
Four plastic caps
Spanner
5
Installation
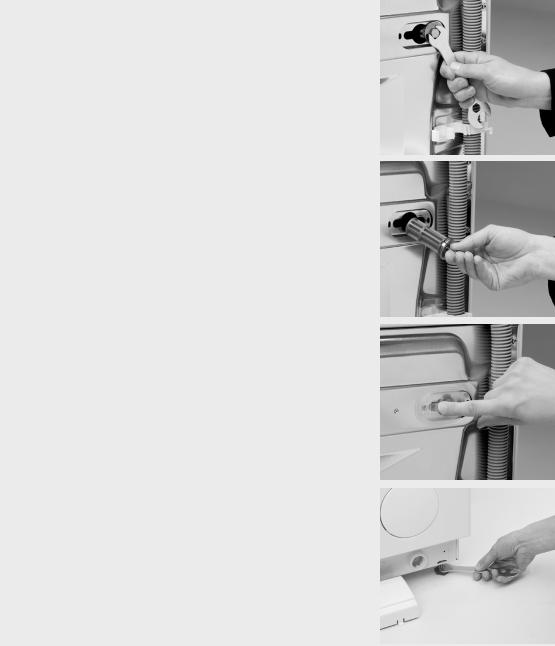
Remove the transport bolts
1.Slacken the four bolts with the spanner supplied.
2.Remove by hand.
3.Grip the bolt and remove it through the large aperture.
4.Seal the resulting holes using the plastic caps supplied; insert the covers in the wide part of the hole and slide them toward the narrow part until they click into place.
5.Retain transit bolts.
Secure the washing machine before transporting it:
1.Pry off the plastic covers with a screwdriver, slide them in the opposite direction of the arrow and remove.
2.Refit the transit bolts in reverse order.
Adjusting the feet
Small unevennesses in the floor can be compensated for by screwing the four appliance feet up or down (never use pieces of wood, cardboard or similar material):
1.Loosen the locknut using the wrench provided.
2.Adjust the height of the foot by hand.
3.Tighten the locknut anticlockwise towards the washing machine.
If the appliance is to be installed on a wooden floor, place it on a sheet of plywood at least
60x60 cm in size and 3 cm thick. Secure the plywood sheet to the floor.
6

|
|
|
|
|
|
|
|
|
|
|
Worktop for built-under |
1. Pull out the power plug. |
4. Refit the fixing screws and |
|
|
models |
2. Remove the worktop fixing |
tighten them. |
|
|
The appliance must only be |
screws on the rear of the |
5. Connect the appliance to the |
|
|
installed beneath a continuous |
appliance. |
electricity. |
|
|
worktop. |
3. Slide the worktop fully |
|
|
|
The appliance may only be |
|
|
|
|
backwards, lift it up and |
|
|
|
|
built under using the |
|
|
|
|
remove it. |
|
|
|
|
intermediate cover panel of the |
|
|
|
|
Install the base set following |
|
|
|
|
UBS base set. This can be |
|
|
|
|
the relevant instructions. |
|
|
|
|
obtained from specialist dealers |
|
|
|
|
|
|
|
|
|
or After-Sales Service. |
|
|
|
|
|
|
|
|
Connect the water inlet hose
For models with straight hose:
1.Insert the mesh filter (already premounted on the hose end or included in the accessories) into the threaded tap coupling.
2.Carefully screw the water inlet hose connection onto the tap by hand.
3.Make sure there are no kinks in the drain hose.
4.Turn the tap on fully and check that the joints at the washing machine and the tap are watertight.
If the hose is too short, replace it with a suitable length of pressure resistant hose (1000 kPa min, EN 50084 approved type).
Check the hose regularly for brittleness and cracks and replace if necessary.
The washing machine can be connected without a nonreturn valve.
For models with Water Stop hose:
1.Screw the threaded connection with the mesh filter onto the tap.
2.Turn the tap on fully and check that the tap joint is watertight.
If the flexible hose is too short, replace it with a 3 m Water Stop hose (available from After-Sales Service or from your dealer).
This replacement is only to carried out by a trained electrician.
The appliance must not be connected to the mixing tap of an un-pressurized water heater.
Depending on the design, the inlet hose and the plastic enclosure at the tap connection contain electrical components.
Do not cut the hose and do not immerse the plastic enclosure in water.
Isolate the appliance from the mains immediately if the hose is damaged.
Connect the water drain hose
1.Connect the drain hose to the siphon or hook it over the edge of a sink by means of the “U” bend supplied.
2.Make sure there are no kinks in the drain hose.
3.Secure the hose so that it cannot fall down while the appliance is running.
Small hand basins are not suitable.
To make an extension, use a hose of the same type. Secure the connections with clips.
Max. Overall drain hose length: 2.50 m
Maximum drain height: 1.25 m
Depending on the model, the drain hose can be:
A.installed in the upper part of the washing machine. In this case the hose can be undone from both fastenings.
B.Installed in the lower part of the washing machine.
Important:
In this case never undo the hose from the right-hand fastening, otherwise the appliance could overflow when operating.
7
 Loading...