


Whirlpool ADN512, ADN518, ADN504, ADN500, ADN513 OPERATING AND MAINTENANCE INSTRUCTIONS
...FORNI A CONVEZIONE - VAPORE ISTRUZIONI PER L’USO E LA MANUTENZIONE
HEISSLUFTDÄMPFER
BEDIENUNGSUND
WARTUNGSANLEITUNG
HORNOS CONVECCIÓN-VAPOR INSTRUCCIONES PARA EL USO Y EL MANTENIMIENTO
CONVECTION-STEAM OVEN OPERATING AND MAINTENANCE INSTRUCTIONS
FOURS MIXTES À CONVECTION-VAPEUR INSTRUCTIONS POUR L’EMPLOI ET LA MAINTENANCE
CDA-107 / 111 / 207 / 211
ADN500 - ADN501 - ADN502 - ADN503 ADN504CDE- ADN505-107 / 111-ADN506/ 207 /- 211ADN507
ADN512 - ADN513 - ADN514 - ADN515
Mod. Analogic-Electronic
ADN518 – ADN519

ISTRUZIONI PER L’UTENTE |
|
INSTRUCTIONS FOR THE USER |
|
ANLEITUNGEN FÜR DEN BENUTZER |
|||||
NOTICE POUR L'USAGER |
|
INSTRUCCIONES PARA EL USUARIO |
|
|
|
||||
|
|
|
|
|
|
|
|||
COMPACT |
Direct combination ovens, gas and electric models, |
Electronic and Analogic |
|
||||||
|
|
|
|
|
|
|
|
|
|
INDICE |
CONTENTS |
INHALTSVERZEICHNIS |
INDEX |
|
INDICE |
|
|||
|
|
|
|
|
|
|
|
|
|
4.0 |
Premessa |
|
|
Vorwort |
|
|
Preámbulo |
|
|
Foreword |
|
|
Avant-propos |
|
|
|
|
|
|
|
|
|
|
|
|
|
|
||
|
|
|
|
|
|
|
|
||
4.1 |
Programmazione e funzionamento |
|
Programmierung und Betrieb |
|
|
Programación y funcionamiento |
|
||
Programming and operation |
|
Programmation et fonctionnement |
|
|
|
|
|||
|
|
|
|
|
|
||||
4.2 |
Avviamento |
|
|
Inbetriebnahme |
|
|
Arranque |
|
|
Starting. |
|
|
Mise en marche |
|
|
|
|
|
|
|
|
|
|
|
|
|
|
||
4.3 |
Descrizione componenti cruscotto Analogic |
|
Beschreibung der Analogic-Bedienblende |
|
Descripción componentes |
Analogic |
|||
Components description of Analogic control panel |
Description des éléments |
|
|
|
|
||||
|
|
|
|
|
|
||||
4.4 |
Comandi e controlli ausiliari |
|
Zusätzliche Steuerund Regelvorrichtungen |
|
Mandos y controles auxiliares |
|
|||
Auxiliary commands and controls |
|
Commandes et contrôles auxiliaires |
|
|
|
|
|||
|
|
|
|
|
|
||||
4.5 |
Spegnimento del forno |
|
Ausschalten des Backofens |
|
|
Apagado del horno |
|
||
Turning the oven off |
|
Arrêt du four |
|
|
|
|
|
||
|
|
|
|
|
|
|
|||
|
|
|
|
|
|
|
|
||
5.0 |
Programmazione e funzionamento |
|
Programmierung und Betrieb |
|
|
Programación y funcionamiento |
|
||
Programming and operation |
|
Programmation et fonctionnement |
|
|
|
|
|||
|
|
|
|
|
|
||||
5.1 |
Descrizione componenti cruscotto Electronic |
|
Beschreibung der Electronic-Bedienblende |
|
Descripción components |
|
|||
Components descript. of Electronic control panel |
|
Description des éléments |
|
|
|
|
|
||
|
|
|
|
|
|
|
|||
5.2 |
Istruzioni sul sistema di controllo elettronico |
|
Anleitungen zur elektronischen Steuerung |
|
Instruccions sobre el sist. de control electrónico |
|
|||
Instructions for the electronic control system |
|
Instructions sur système de contrôle électronique |
|
|
|
|
|||
|
|
|
|
|
|
||||
5.3 |
Avviamento |
|
|
Inbetriebnahme |
|
|
Arranque |
Electronic |
|
Starting |
|
|
Mise en marche |
|
|
|
|
||
|
|
|
|
|
|
|
|
||
5.4 |
Comandi e controlli ausiliari |
|
Zusätzliche Steuerund Regelvorrichtungen |
|
Mandos y controles auxiliares |
|
|||
Auxiliary commands and controls |
|
Commandes et contrôles auxiliaires |
|
|
|
|
|||
|
|
|
|
|
|
||||
5.5 |
Spegnimento del forno |
|
Ausschalten des Backofens |
|
|
Apagado del horno |
|
||
Turning the oven off |
|
Arrêt du four |
|
|
|
|
|
||
|
|
|
|
|
|
|
|||
5.6 |
Segnalazione e visualizzazione anomalie e guasti |
Signalisier. und Anzeige von Störungen und Schäden |
|
Señalización y visualización de anomalías y averías |
|
||||
Signalling and displaying malfunct. and breakdowns |
Signalisation et affichage d'anomalies et pannes |
|
|
|
|
||||
|
|
|
|
|
|||||
|
|
|
|
|
|
||||
7.0 |
Sistema lavaggio camera cottura |
|
Automatisches Garraum Reinigungssystem |
|
Lavado cámara cocción |
Electronic |
|||
Cooking chamber washing system |
|
Lavage de la chambre de cuisson |
|
|
|
||||
|
|
|
|
|
|
||||
|
|
|
|
|
|
|
|
|
|
8.0 |
Manutenzione |
|
|
Wartung |
|
|
Mantenimento |
|
|
Maintenance |
|
|
Maintenance |
|
|
|
|
|
|
|
|
|
|
|
|
|
Analogic |
||
|
Comportamento in caso di guasto e/o di un |
|
Anweisungen bei Störungen bzw Längerem |
|
Comportamiento en caso de avería y/o de un largo |
||||
8.1 |
prolungato non funzionamento |
|
Gerätestillstand |
|
|
plazo de inactividad |
Electronic |
||
What to do in the case of a breakdown and/or |
|
Que faire en cas de panne et/ou d’arrêt prolongé de |
|
|
|
|
|||
|
|
|
|
|
|
||||
|
extended period of non use |
|
l’appareil |
|
|
|
|
|
|
|
|
|
|
|
|
|
|
||
9.0 |
Consigli per le cotture |
|
Nützliche Garhinweise |
|
|
Consejos para las cocciones |
|
||
Cooking tips |
|
|
Conseils pour les cuissons |
|
|
|
|
|
|
|
|
|
|
|
|
|
|
||
9.1 |
Modalita’ e suggerimenti per le cotture a convezione |
Methoden und Ratschläge beim garen mit |
|
Modalidades y sugerencias para las cocc.por |
Analogic |
||||
Konvektion |
|
|
convección |
||||||
|
|
|
|
|
Electronic |
||||
|
Tips for convection cooking |
|
Modalités et conseils pour les cuissons à convection |
|
|
|
|||
|
|
|
|
|
|
||||
9.2 |
Rimedi alle anomalie di cottura |
|
Abhilfe bei Abnormalen Garen |
|
Remedios para las anomalías de cocción |
|
|||
Remedies to cooking hitches |
|
Que faire pour résoudre les problèmes de cuisson |
|
|
|
|
|||
|
|
|
|
|
|
||||
1

ISTRUZIONI PER L’UTENTE |
INSTRUCTIONS FOR THE USER |
ANLEITUNGEN FÜR DEN BENUTZER |
NOTICE POUR L'USAGER |
INSTRUCCIONES PARA EL USUARIO |
|
COMPACT Direct combination ovens, gas and electric models, Electronic and Analogic
4.0 PREMESSA
Leggere attentamente le istruzioni per l’uso, con particolare attenzione alle norme relative ai dispositivi di sicurezza. Questa apparecchiatura dovrà essere destinata solo all’uso per il quale è stata espressamente progettata e costruita e cioè: per tutte le cotture o lessature di carni, pesci e verdure, per la gratinatura, la grigliatura e per il rigenerazione dei cibi precotti e/o surgelati.
4.0 FOREWARD
Read the instructions for use very carefully paying particular attention to the rules concerning safety devices. This appliance must only be used for what it has been designed for and built for and that is: all baking and boiling of meat, fish and vegetables, for browning, grilling and regenerating pre-cooked and/or frozen food.
4.0 VORWORT
Lesen Sie sorgfältig diese Bedienungsanleitung und beachten Sie insbesondere die gültigen Richtlinien bezüglich der Sicherheitsvorrichtungen.
Das Gerät darf nur für den ursprünglich vorgesehenen Zweck, d. h. zum Garen und Kochen von Fleisch, Fisch und Gemüse, zum Gratinieren, Grillen und Regenerieren von vorgekochten bzw. tiefgekühlten Speisen verwendet werden.
4.0 AVANT-PROPOS
Lire attentivement la notice d'emploi en faisant particulièrement attention aux normes qui concernent les dispositifs de sécurité. Cet appareil ne devra être destiné qu’à l’emploi pour lequel il a été expressément conçu et construit, à savoir: pour toutes les cuissons au four ou à l’eau de viandes, poissons et légumes, pour les gratins, la cuisson au gril et la régénération d’aliments précuits et/ou surgelés.
4.0 PREÁMBULO
Leer detenidamente las instrucciones de uso, con particular atención para las normas correspondientes a los dispositivos de seguridad. Este aparato debe ser destinado sólo para el uso para el cual ha sido expresamente diseñado y fabricado, es decir: para todas las cocciones o salcochados de carnes, pescados y verduras, para gratinar, asar a la parrilla y regenerar comidas precocidas y/o congeladas.
4.1 PROGRAMMAZIONE E FUNZIONAMENTO
Modelli ANALOGIC (Fig. 4)
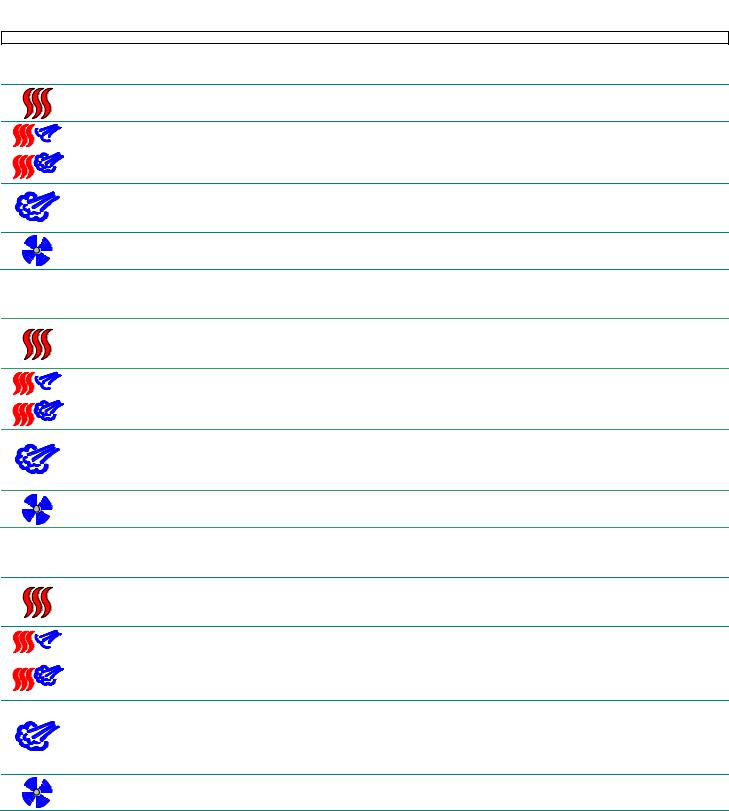
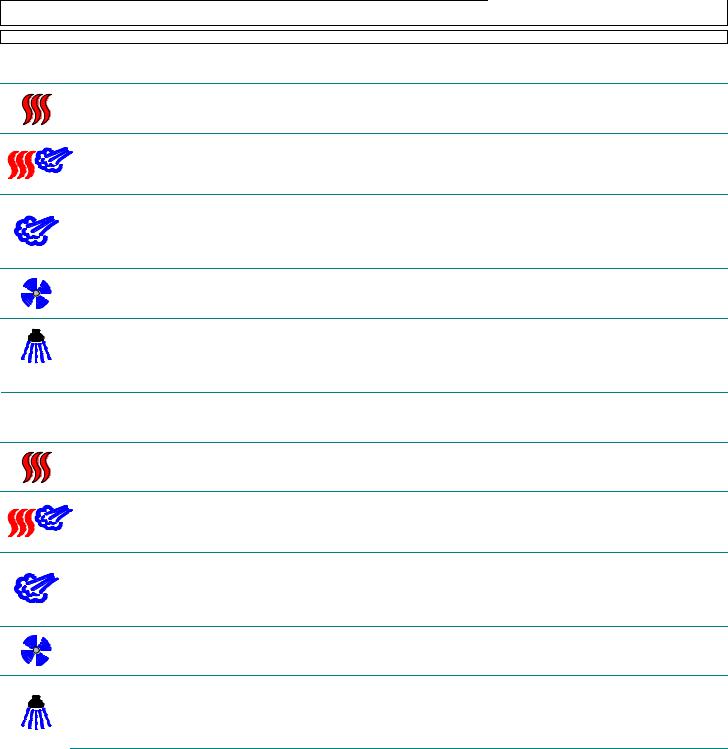
4.1A Ciclo convezione aria calda
(campo temperatura 50-270°C)
Posizionare la manopola del selettore cicli (A) in corrispondenza del simbolo riportato a sx e selezionare la temperatura di cottura agendo sulla manopola del termostato (B).
4.1B Ciclo misto, aria calda e vapore
(campo temperatura 50-270°C)
Posizionare la manopola del selettore cicli (A) su una delle sette posizioni di regolazione comprese tra i simboli riportati a sx (c/flusso vapore da minimo a massimo) e selezionare la temperatura di cottura agendo sulla manopola del termostato (B).
Il selettore (A) permette sette stadi di regolazione del vapore.
4.1C Ciclo vapore
(campo temperatura 50-100°C)
Posizionare la manopola del selettore cicli (A) in corrispondenza del simbolo riportato a sx e selezionare la temperatura di cottura agendo sulla manopola del termostato (B).
N.B. La massima. temperatura di funzionamento sarà di 100°C, anche se la manopola dell termostato verrà posizionata su valori di temperatura superiori.
4.1D Ciclo raffreddamento
Aprire la porta del forno e posizionare la manopola del selettore cicli (A) in corrispondenza del simbolo riportato a sx. Questo ciclo permette il funzionamento del motoventilatore, con la porta aperta, favorendo il rapido raffreddamento della camera di cottura.
4.1 PROGRAMMING AND OPERATION ANALOGIC models (Fig. 4)
4.1A Hot air convection cycle
(temperature range 50-270°C)
Turn the cycle selector knob (A) to the symbol shown on the left and select the cooking temperature using thermostat knob.(B)
4.1B Combined hot air convection cycle with steam
(temperature range 50-270°C)
Turn the cycle selector knob (A) to one of the seven adjustment positions between the symbols shown on the left (w/ steam output from minimum to maximum) and select the cooking temperature with the thermostat knob (B).
The selector (A) allows seven steps for steam adjustment.
4.1C Steam cycle
(temperature range 50-100°C)
Turn the cycle selector knob (A) into the position shown on left side and select the cooking temperature with the thermostat knob (B). N.B. Maximum operating temperature is 100°C, even if the thermostat knob is selected at a higher temperature.
4.1D Cooling cycle
Open the oven door and turn the cycle selector knob (A) to the symbol shown on the left. This cycle allows the fan to work with the door open to help cool down the oven quickly.
F |
A |
G |
B |
D |
E |
C |
Z |
Fig. 4
Abb. 4
2
ISTRUZIONI PER L’UTENTE |
INSTRUCTIONS FOR THE USER |
ANLEITUNGEN FÜR DEN BENUTZER |
NOTICE POUR L'USAGER |
INSTRUCCIONES PARA EL USUARIO |
|
COMPACT Direct combination ovens, gas and electric models, Electronic and Analogic
4.1 PROGRAMMIERUNG UND BETRIEB
Modelle ANALOGIC (Abb. 4)
4.1A Heißluftbetrieb
(Temperaturbereich 50-270°C)
Den Zykluswählschalter (A) auf das links abgebildete Symbol drehen und mit demThermostatknopf (C) die Gartemperatur einstellen.
4.1B Mischbetrieb Heißluft mit Dampf
(Temperaturbereich 50-270°C)
Den Zykluswählschalter (A) auf eine der sieben Stufen zwischen den links abgebildeten Symbolen stellen (von Mindestbis Höchstdampfeinspeisung) und mit dem Thermostatknopf (B) die Gartemperatur einstellen.
Der Wahlschalter (A) verfügt über sieben Stufen zur Dampfregulierung.
4.1C Dampfzyklus
(Temperaturbereich 50-100°C)
Den Zykluswählschalter (A) auf das links abgebildete Symbol drehen und mit demThermostatknopf (C) die Gartemperatur einstellen. NB: Die max. Gartemperatur beträgt 100°C, auch wenn der Thermostatknopf auf einen höheren Wert eingestellt wird.
4.1D Abkühlungszyklus
Die Backofentür öffnen und den Zykluswählschalter (A) auf das links abgebildete Symbol drehen.
Dieser Zyklus erlaubt die Zuschaltung des Gebläses bei geöffneter Tür, wodurch sich der Garraum rasch abkühlt.
4.1 PROGRAMMATION ET FONCTIONNEMENT
Modèles ANALOGIC (Fig. 4)
4.1A Cycle Air -pulsé air chaud
(plage température 50-270°C)
Placer le bouton du sélecteur de cycles (A) sur le symbole air-pulsé (voir symbole à gauche) et régler la température de cuisson avec le bouton du thermostat (B).
4.1B Cycle mixte Air-pulsé air chaud avec vapeur
(plage température 50-270°C)
Placer le bouton du sélecteur de cycles (A) sur un des sept points de réglage (voir symbole à gauche) (avec flux de vapeur de minimum à maximum) et régler la température de cuisson avec le bouton du thermostat (B).
Le sélecteur (A) permet de régler sept niveaux de vapeur.
4.1C Cycle vapeur
(plage température 50-100°C)
Placer le bouton du sélecteur de cycles (A) sur le symbole vapeur (voir symbole à gauche) et régler la température de cuisson avec le bouton du thermostat (C)
N.B. La température maximum de fonctionnement est de 100°C, même si le bouton du thermostat est placé sur des valeurs supérieures.
4.1D Cycle de refroidissement
Ouvrir la porte du four et placer le bouton du sélecteur de cycles (A) sur le symbole refroidissement (voir symbole à gauche). Ce cycle met en marche le moto-ventilateur, avec la porte ouverte, il permet de refroidir rapidement l'enceinte de cuisson.
4.1 PROGRAMACIÓN Y FUNCIONAMIENTO
Modelos ANALOGIC (Fig. 4)
4.1A Ciclo convección aire caliente
(campo temperaturas 50-270°C)
Colocar el mando del selector de ciclos (A) en correspondencia con el símbolo que se muestra a la izda. y seleccionar la temperatura de cocción maniobrando el mando del termóstato (B).
4.1B Ciclo misto convección aire caliente con vapor
(campo temperaturas 50-270°C)
Colocar el mando del selector de ciclos (A) en una de las siete posiciones de regulación que se incluyen entre los símbolos que se muestran a la izda. (con flujo de vapor del mínimo al máximo) y seleccionar la temperatura de cocción maniobrando el mando del termóstato (B).
El selector (A) permite siete niveles de regulación del vapor.
4.1C Ciclo vapor
(campo temperatura 50-100°C)
Colocar el mando del selector de ciclos (A) en correspondencia con el símbolo que se muestra a la izda. y seleccionar la temperatura de cocción maniobrando el mando del termóstato (C).
N.B. La temperatura máxima de funcionamiento será de 100°C, aunque el mando del termóstato esté colocado para valores de temperatura superiores.
4.1D Ciclo enfriamiento
Abrir la puerta del horno y colocar el mando del selector de ciclos (A) en correspondencia con el símbolo que se muestra a la izda. Este ciclo permite que el ventilador funcione, con la puerta abierta, permitiendo un enfriamiento rápido de la cámara de cocción.
3

ISTRUZIONI PER L’UTENTE |
INSTRUCTIONS FOR THE USER |
ANLEITUNGEN FÜR DEN BENUTZER |
NOTICE POUR L'USAGER |
INSTRUCCIONES PARA EL USUARIO |
|
COMPACT Direct combination ovens, gas and electric models, Electronic and Analogic
4.2 AVVIAMENTO
Modelli ANALOGIC (Fig. 4)
Aprire le valvole di intercettazione dell’acqua, eventualmente del gas, e l’interruttore elettrico di protezione installato a monte dell’apparecchio. Selezionare il tempo di cottura sul timer (C) che è regolabile fino ad un massimo di 60 min.; per tempi più lunghi selezionare la posizione (∞) di durata illimitata. L’inserimento del timer, con la porta chiusa, dà l’avvio al ciclo di cottura con l’avviamento del motoventilatore, l’attivazione del riscaldamento e la generazione del vapore, se selezionato. Al termine del tempo impostato un segnale acustico avvertirà la fine del ciclo di cottura con relativo arresto di tutte le funzioni.
Nel selezionare il tempo di cottura occorre tenere sempre in considerazione il tempo necessario per preriscaldare il forno. E’ buona norma osservare questa avvertenza prima di introdurre i cibi da cuocere nella camera di cottura.
4.2 STARTING ANALOGIC models (Fig. 4)
Ensure that water and gas supply (for gas ovens) are turned on and that the electricity supply is switched on.
Select the cooking time with the timer (C) that goes up to a maximum of 60 minutes; for longer cooking times, select the (∞) non stop position. When the timer is on and the door is closed the cooking cycle starts together with the electric fan, heating and steam generation, if selected. When the set time is finished a buzzer signals that cooking is finished and all the functions stop.
When selecting the cooking time always remember the time needed to pre-heat the oven. The oven should always be heated before food is put in.
4.2 INBETRIEBNAHME
Modelle ANALOGIC (Abb. 4)
Zuerst die Wasserabsperrventile (und die Gasventile bei den Gasöfen) öffnen und dann den dem Gerät vorgeschalteten Schutzschalter einschalten.
Mit der Zeitschaltuhr (C) die Garzeit wählen, die max. 60 Minuten betragen darf. Für längere Garzeiten ist die Stellung (∞)(stufenlos) zu wählen. Durch das Einschalten der Zeitschaltuhr bei geschlossener Tür wird der Garzyklus gestartet und werden das Gebläse, Heizung und, falls ausgewählt, die Dampfzufuhr eingeschaltet. Nach Ablauf der eingestellten Zeit zeigt ein akustisches Signal das Ende des Garprogramms an und werden sämtliche Funktionen abgeschaltet.
Bei der Einstellung der Garzeit ist immer die Vorheizzeit zu berücksichtigen. Der Backofen sollte vor dem Eingeben der Speisen in den Garraum stets vorgewärmt werden.
4.2 MISE EN MARCHE
Modèles ANALOGIC (Fig. 4)
S’assurer que la vanne d’arrivée eau, éventuellement du gaz, et l’interrupteur électrique de protection installé en amont de l'appareil soient ouverts. Choisir le temps de cuisson avec la minuterie (C) qui est réglable jusqu'à un maximum de 60 min; pour des durées supérieures, choisir la position (∞) de durée continue. La mise en marche de la minuterie, lorsque la porte est fermée, fait démarrer le cycle de cuisson, le moto-ventilateur, le chauffage et la génération de vapeur , si le cycle a été choisi. Lorsque le temps programmé s’est écoulé, un signal acoustique annonce la fin du cycle de cuisson et toutes les fonctions s’arrêtent.
En choisissant le temps de cuisson, il faut toujours tenir compte du temps nécessaire pour préchauffer le four. Nous conseillons de préchauffer le four avant d'introduire les aliments dans l'enceinte de cuisson.
4.2 ARRANQUE
Modelos ANALOGIC (Fig. 4)
Abrir las llaves de paso del agua y el interruptor eléctrico de protección instalado aguas arriba del aparato.
Seleccionar el tiempo de cocción en el temporizador (C), que es regulable hasta como máximo 60 minutos; para tiempos más largos seleccionar la posición (∞) de duración ilimitada. La activación del temporizador, con la puerta cerrada, activa el ciclo de cocción con el arranque del motoventilador, la activación del calentamiento y la generación del vapor, si seleccionada. Al final del tiempo configurado una señal acústica avisa que ha terminado el ciclo de cocción, con correspondiente parada de todas las funciones.
Cuando se selecciona el tiempo de cocción es preciso tener siempre presente el tiempo necesario para precalentar el horno. Es buena norma ajustarse a esta advertencia antes de introducir las comidas en la cámara de cocción.
|
DESCRIZIONE COMPONENTI CRUSCOTTO ANALOGIC |
|
|
|
|
COMPONENT DESCRIPTION ON THE ANALOGIC CONTROL PANEL |
|
|
|
4.3 |
BESCHREIBUNG DER BEDIENBLENDE |
|
|
Fig. 4 |
DESCRIPTION DES ÉLÉMENTS |
|
|
Abb. 4 |
|
|
|
|
||
|
DESCRIPCIÓN COMPONENTES |
|
|
|
|
|
|
|
|
A |
Selettore cicli |
Zykluswählschalter |
Selector ciclos |
|
Cycle selector-switch |
Sélecteur de cycles |
|
|
|
|
|
|
||
B |
Termostato camera cottura |
Thermostat Garraum |
Termóstato cámara cocción |
|
Cooking chamber thermostat |
Thermostat enceinte cuisson |
|
|
|
|
|
|
||
C |
Timer |
Zeitschaltuhr |
Temporizador |
|
Timer |
Minuteur |
|
|
|
|
|
|
||
D |
Pulsante comando lampada illuminazione |
Ein-Ausschalter Innenbeleuchtung |
Botón encendido y apagado lámpara iluminación |
|
Cooking chamber light on/off push button |
Bouton d'allumage et d'extinction éclairage |
|
|
|
|
|
|
||
E |
Lampada spia timer in funzione |
Kontrollleuchte Zeischaltuhr in Betrieb |
Lámpara piloto temporizador en marcha |
|
Timer ON pilot light |
Voyant minuteur en fonction |
|
|
|
|
|
|
||
F |
Lampada spia forno sotto tensione. |
Backofen-Betriebsanzeige |
Lámpara piloto horno alimentado eléctricamente |
|
Oven power supply ON pilot light. |
Voyant four sous tension |
|
|
|
|
|
|
||
G |
Lampada spia riscaldamento camera cottura in funzione |
Betriebsanzeige Garraumheizung |
Lámpara piloto calentam. cámara coc. en función |
|
Heating cooking chamber ON pilot light |
Voyant chauffage enceinte de cuiss. en fonction |
|
|
|
|
|
|
||
H |
|
|
|
|
|
|
|
|
|
Z |
Pulsante ripristino accensione bruciatori gas |
Taste zur Wiedereinschaltung des Gasbrenners |
Botón de restablecimiento de los quemadores |
|
Gas burner ignition re-set button |
Bouton rétablissement allumage bruleur gaz |
|
|
|
|
|
|
||
4
ISTRUZIONI PER L’UTENTE |
INSTRUCTIONS FOR THE USER |
ANLEITUNGEN FÜR DEN BENUTZER |
NOTICE POUR L'USAGER |
INSTRUCCIONES PARA EL USUARIO |
|
COMPACT Direct combination ovens, gas and electric models, Electronic and Analogic
4.4 COMANDI E CONTROLLI AUSILIARI Modelli ANALOGIC
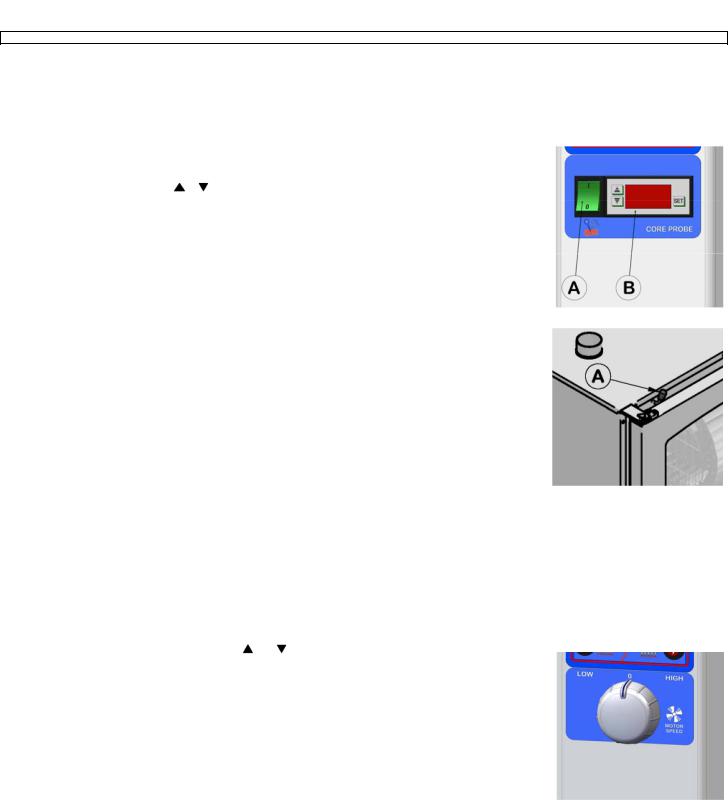
4.4A Sonda al cuore (Fig. 4.4A)
I modelli “Analogic” possono, su richiesta, essere consegnati corredati del termostato elettronico con sonda a spillone per controllare l’esatta temperatura al cuore degli alimenti da cuocere. Questo dispositivo è estremamente utile quando si devono cuocere grosse pezzature di cibo. Per l’inserimento della sonda procedere come segue: dopo aver programmato il ciclo di cottura come prima descritto, infilare lo spillone al cuore del
prodotto; attivare il termostato elettronico digitando l’interruttore (A). La temperatura visibile nel termostato |
|
|
|
|
|
|
|
elettronico (B) è quella rilevata dallo spillone al nucleo del cibo. Il campo di regolazione varia da 20° a 99°C; i |
|
|
|
|
|
|
|
valori della temperatura vengono selezionati come segue: premere il pulsante SET sulla dx; nel display apparirà |
|
|
|
|
|
|
|
la temperatura precedentemente selezionata; si accende e lampeggia il LED rosso, entro 15 secondi, modificare |
|
|
|
|
|
|
|
il valore impostato usando i tasti |
e confermare il nuovo valore premendo il tasto SET. Il lampeggio per 2 |
|
|
|
|
|
|
secondi del nuovo valore conferma la memorizzazione del nuovo dato. Al rilascio del pulsante SET il display |
|
|
|
|
|
|
|
segnalerà la temperatura rilevata dalla sonda a spillone. Selezionare nel timer la posizione (∞), il forno inizierà |
|
|
|
|
|
|
|
la cottura segnalata dall’accensione del LED verde. Al raggiungimento della temperatura impostata nel |
|
|
|
|
|
|
|
termostato elettronico, una suoneria segnalerà la fine della cottura, si accenderà il led rosso e tutte le funzioni |
|
|
|
|
|
|
|
verranno disabilitate automaticamente. |
|
|
|
|
|
|
|
4.4B Selezione velocità motori |
(Fig. 4.4B) |
|
|
|
|
|
|
|
|
|
Fig. 4.4A |
|
|
||
I modelli “ANALOGIC” possono essere forniti con il dispositivo per selezionare la velocità di rotazione dei |
|
|
|
|
|
||
|
|
|
Abb. 4.4A |
|
|
||
ventilatori tra 1400 e 2800 giri/min. |
|
|
|
|
|
|
|
La velocità va scelta in base ai tipi di cibo da cuocere, tenendo presente che nella bassa velocità è consigliabile |
|
|
|
|
|
|
|
non superare temperature di cottura di 230°C. |
|
|
|
|
|
|
|
4.4C Luce interna per l’ illuminazione della camera di cottura (Fig. 4) |
|
|
|
|
|
|
|
|
|
|
|
|
|
||
Tutti i modelli “ANALOGIC” sono corredati di lampada di illuminazione interna. La sua attivazione viene |
|
|
|
|
|
|
|
comandata dal pulsante (D). |
|
|
|
|
|
|
|
4.4D Preriscaldo camera cottura |
|
|
|
|
|
|
|
E’ sempre consigliabile eseguire questa operazione prima di introdurre nella camera del forno i cibi da cuocere; |
|
|
|
|
|
|
|
il tempo necessario al preriscaldamento va impostato tenendo in considerazione che, nel ciclo convezione aria |
|
|
|
|
|
|
|
calda, sono necessari 10 minuti circa per raggiungere la temperatura di 220°C. |
|
|
|
|
|
|
|
Selezionate il tempo e la temperatura desiderata, avviate il forno senza introdurre cibo; al termine del tempo |
|
|
|
|
|
|
|
impostato la suoneria segnalerà che si potrà iniziare la cottura. Nel ciclo vapore si consiglia di eseguire sempre |
|
|
|
|
|
|
|
il preriscaldamento con la manopola del regolatore vapore in posizione di MAX per una durata di 10 minuti, |
|
|
|
|
|
|
|
|
Fig. 4.4C |
|
|
|
|
||
senza aprire la porta. |
|
|
|
|
|||
|
|
Abb. 4.4C |
|
|
|
|
|
4.4E Valvola sfiato camera (Fig. 4.4C) |
|
|
|
||||
|
|
|
|
|
|
||
Tutti i modelli “ANALOGIC” sono dotati di questo sistema che ha la funzione di regolare l’umidità all’interno |
|
|
|
|
|
|
|
|
|
|
|
|
|
||
della camera di cottura. L’apertura e la chiusura della valvola di sfiato si eseguono ruotando il pomello (A). |
|
|
|
|
|
|
|
4.4 AUXILIARY COMMANDS AND CONTROLS |
|
|
|
|
|
|
|
ANALOGIC models |
(Fig. 4.4A) |
|
|
|
|
|
|
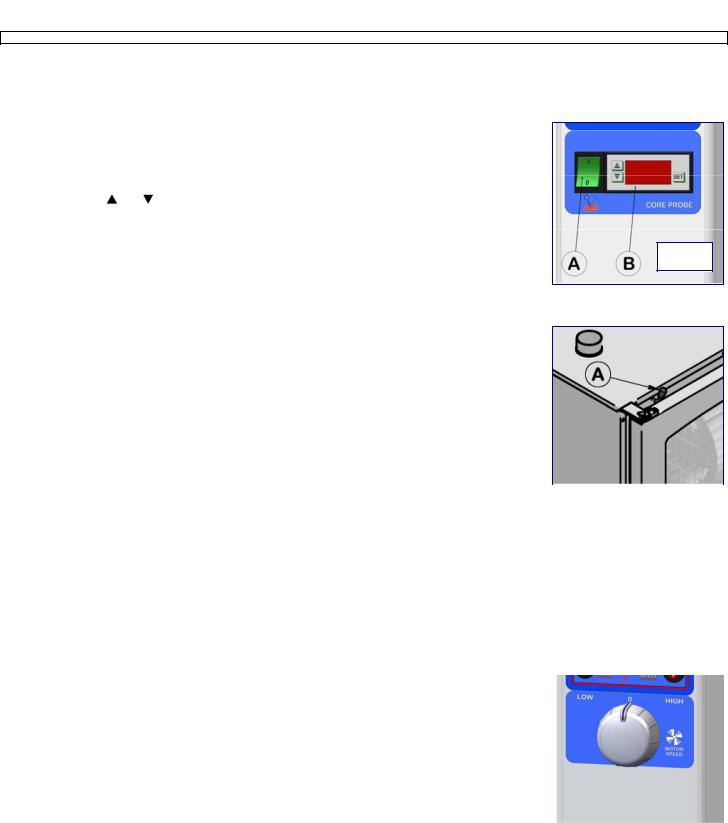
4.4A Core temperature probe |
|
|
|
|
|
|
|
On request the “ANALOGIC” models can be fitted with the electronic thermostat with core probe to control the exact temperature right in the middle of the food to cook. This probe is extremely useful when you have to cook something big. Proceed as follows to use this system:
after having programmed the cooking cycle as described above, insert the probe into the heart of the product; turn the electronic thermostat on by pressing the black switch (A). The temperature shown on the electronic thermostat (B) is what the probe detects in the centre of the food.
The adjustment range varies from 20 to 99°C and the temperature values are selected as follows:
press the SET push button on the right; the temperature selected previously is shown on the display; the red LED turns on and flashes; within 15
seconds, modify the value set using the buttons and |
and confirm the new value by pressing the button SET. |
|
|
|
|
Flashing of the new value for 2 seconds confirms its storage. When the button SET is released the temperature |
|
|
|
||
detected by the core probe is shown on the display. |
|
|
|
|
|
Select the (∞) position on the timer: the oven starts cooking, signalled by the green LED that turns on. When the |
|
|
|
||
temperature set on the electronic thermostat is reached, a ring indicates the end of cooking, the red LED turns on |
|
|
|
||
and all the functions are disabled automatically. |
|
|
|
|
|
4.4B Motor speeed selection |
(Fig. 4.4B) |
|
|
|
|
The “ANALOGIC” models can be supplied with device to select fans rotation speed, from 1400 and 2800 rpm. |
|
|
|
||
The speed is chosen on the basis of the type of food being cooked, bearing in mind that at low speed a cooking |
|
|
|
||
temperature of 230°C should not be exceeded. |
|
|
Fig. 4.4B |
|
|
4.4C Cooking chamber light |
(Fig. 4) |
|
|
Abb. 4.4B |
|
All ovens have an inside light, switched on with the cycle selector push button (D). |
|
|
|
||
4.4D Pre-heating of cooking chamber
It is always advisable to pre-heat the oven before cooking food. The time needed to heat the oven should be set taking into account that in the hot air convection cycle it takes about 10 minutes to reach 220°C.
Having selected the desired time and temperature, switch the oven on without food inside. At the end of the set time the ring signals that cooking can start.
In the steam cycle it is always advisable to preheat the oven, turning the steam adjuster knob round to MAX, for 10 minutes without opening the door.
4.4E Steam release valve (Fig. 4.4C)
All “ANALOGIC” models are equipped with this system, which controls the humidity inside the cooking chamber. The steam relief valve is opened and closed by rotating knob (A).
5
ISTRUZIONI PER L’UTENTE |
INSTRUCTIONS FOR THE USER |
ANLEITUNGEN FÜR DEN BENUTZER |
NOTICE POUR L'USAGER |
INSTRUCCIONES PARA EL USUARIO |
|
COMPACT Direct combination ovens, gas and electric models, Electronic and Analogic
4.4 ZUSÄTZLICHE STEUERUND REGELVORRICHTUNGEN Modelle ANALOGIC
4.4A Kerntemperaturfühler (Abb. 4.4A)
Die Modelle „Analogic“ können auf Anfrage mit einem elektronischen Thermostat mit Kerntemperaturfühler geliefert werden, mit dem die Kerntemperatur der Speisen genau überwacht werden kann. Dies ist vor allem bei dickeren Fleischstücken
sinnvoll. Dabei folgendermaßen vorgehen: Nach Programmierung des Garvorgangs, wie vorher beschrieben, |
|
den Kerntemperaturfühler bis in die Mitte der zu garenden Speisen einstecken; den elektrischen |
|
Temperaturregler mit dem Schalter (A) einschalten. Die am Elektronikthermostat (B) angezeigte Temperatur |
|
entspricht der gemessenen Speisenkerntemperatur. Der Einstellungsbereich liegt zwischen 20 und 99°C. Bei |
|
der Einstellung auf folgende Weise vorgehen: Die SET-Taste auf der rechten Seite drücken; auf dem Display |
|
erscheint die vorher gewählte Temperatur; die rote Kontrolllampe leuchtet auf und blinkt; der eingestellte Wert |
|
ist mit den Tasten und binnen 15 Sekunden zu ändern; den neuen Wert durch Drücken der SET-Taste |
|
bestätigen. Die Speicherung des neuen Werts wird durch ein 2 Sekunden langes Blinken angezeigt. Nach dem |
|
Loslassen der SET-Taste zeigt das Display die vom Kernfühler gemessene Temperatur an. Die Zeitschaltuhr |
|
auf die Position (∞) stellen: der Garvorgang wird gestartet, die grüne Kontrolllampe leuchtet auf. Nach Erreichen |
|
der mit dem Thermostat gewählten Kerntemperatur zeigt ein akustisches Signal das Ende des Garvorgangs an, |
Fig. 4.4A |
die rote Kontrolllampe leuchtet auf und alle Funktionen werden automatisch ausgeschaltet. |
Abb. 4.4A |
4.4B Auswahl der Motordrehzahl (Abb. 4.4B) |
|
Die Backofenmodelle können mit einer Vorrichtung zur Auswahl der Gebläsedrehzahl im Bereich von 1400 bis 2800 U/min ausgestattet werden.
Die Drehzahl wird aufgrund der Art des Garguts ausgewählt, wobei zu beachten ist, dass bei niedriger Drehzahl eine maximale Gartemperatur von 230°C nicht überschritten werden sollte.
4.4C Innenbeleuchtung (Abb. 4) |
|
|
|
Die Backöfen sind mit eingebauter Beleuchtung ausgestattet. Sie wird durch den Zykluswählschalter (D) |
|
|
|
eingeschaltet. |
|
|
|
4.4D Vorheizen des Garraums |
|
|
|
Der Backraum sollte vor Eingabe der Speisen immer vorgeheizt werden. Der Zyklus Umluft/Heißluft benötigt |
|
|
|
ca. 10 Minuten, um 220°C zu erreichen, so dass die nötige Zeit für das Vorheizen immer unter Beachtung der |
|
|
|
Aufwärmzeiten eingestellt werden muss. |
|
|
|
Die gewünschte Zeit und Temperatur wählen, den Backofen ohne Speisen einschalten – nach Ablauf der |
|
|
|
eingegebenen Zeit ertönt ein Signal, das anzeigt, dass jetzt der Garvorgang beginnen kann. |
|
|
|
|
Fig. 4.4C |
|
|
Beim Dampfzyklus ist es empfehlenswert, das Vorheizen immer 15 Minuten lang mit Dampfregler auf Stellung |
|
|
|
|
Abb. 4.4C |
|
|
MAX und bei geschlossener Tür durchzuführen. |
|
|
|
|
|
|
|
4.4E Entlüftungsventil des Garraums (Abb. 4.4C) |
|
|
|
|
|
|
Alle Modelle “ANALOGIC” sind mit dieser Vorrichtung ausgerüstet, die die Aufgabe hat, den Feuchtegrad im Backrohr zu regeln. Der Knopf (A) drehen, um das Entlüftungsventil zu öffnen oder zu schließen.
4.4 COMMANDES ET CONTRÔLES AUXILIAIRES Modèles ANALOGIC
4.4A Sonde à cœur (Fig. 4.4A)
Les modèles “Analogic” peuvent être livrés, sur demande, équipés d'un thermostat électronique avec sonde à coeur pour contrôler la température exacte à cœur des aliments à cuire. Ce dispositif est extrêmement utile lorsque l’on doit cuire des gros morceaux. Pour la mise en marche de ce dispositif, procéder comme suit: après avoir programmé le cycle de cuisson décrit ci-dessus, piquer la sonde à cœur dans l'aliment; agir sur le thermostat électronique en appuyant sur l’interrupteur noir (A). La température qui apparaît sur le thermostat électronique (B) est celle relevée par la sonde au cœur de l'aliment. La plage des températures est réglable de 20 à 110°C et les températures peuvent être programmées comme suit: appuyer sur la touche SET qui se trouve à droite; l'écran affiche la température sélectionnée précédemment; lorsque le voyant rouge s'allume et qu'il commence à clignoter, modifier la valeur programmée en utilisant les touches  et
et  dans les 15 secondes qui suivent puis confirmer la nouvelle
température en appuyant sur la touche SET. Cette nouvelle valeur clignotera pendant 2 secondes pour confirmer |
|
|
|
qu'elle est mémorisée. Au relâchement de la touche SET, la température relevée par la sonde s'affichera sur |
|
|
|
l'écran. Enclencher la minuterie en sélectionnant la position (∞): le four commencera alors la cuisson et le voyant |
|
|
|
vert s'allumera. Lorsque la température programmée sur le thermostat électronique est atteinte, une sonnerie |
|
|
|
indiquera la fin de la cuisson, le voyant rouge s'allumera et toutes les fonctions seront automatiquement |
|
|
|
désactivées. |
|
|
|
4.4B Sélection de la vitesse du moteur (Fig. 4.4B) |
|
|
|
Les modèles ANALOGIC peuvent être fournis avec le dispositif quii permet de sélectionner la vitesse de rotation |
|
|
|
des ventilateurs de 1400 à 2800 tours/min. |
|
|
|
La vitesse est choisie en fonction de l'aliment à cuire, en tenant compte qu'avec la vitesse basse, il est conseillé |
|
Fig. 4.4B |
|
de ne pas dépasser une température de cuisson de 230°C. |
|
Abb. 4.4B |
|
4.4C Éclairage interne de l'enceinte de cuisson (Fig. 4) |
|
|
|
Tous les modèles « ANALOGIC » sont équipés d’une lampe pour l’éclairage intérieur du four. L’éclairage est |
|
|
|
commandé par le bouton (D) |
|
|
|
4.4D Préchauffage de l'enceinte du four
Il est toujours conseillé effectuer cette opération avant d'introduire des aliments dans l'enceinte du four. Le temps nécessaire au préchauffage est d’ au moins 10 minutes pour atteindre la température de 220°C pour le cycle à air pulsé air chaud.
Sélectionner le temps et la température souhaitée, allumer le four sans aliments et à la fin du temps programmé, la sonnerie indiquera que l'on peut commencer la cuisson.
Pour le cycle vapeur, nous conseillons d’ effectuer toujours le préchauffage en mettant le bouton du régulateur vapeur en position MAX pendant 15 minutes, sans ouvrir la porte.
4.4E Soupape de l’enceinte de cuisson (Fig. 4.4C)
Tous les modèles “ANALOGIC” sont équipés de ce système dont la fonction est de régler le niveau d’humidité à l’intérieur de l’enceinte de cuisson. Pour ouvrir et fermer la soupape, tourner le bouton (A).
6

ISTRUZIONI PER L’UTENTE |
INSTRUCTIONS FOR THE USER |
ANLEITUNGEN FÜR DEN BENUTZER |
NOTICE POUR L'USAGER |
INSTRUCCIONES PARA EL USUARIO |
|
|
|
|
COMPACT Direct combination ovens, gas and electric models, Electronic and Analogic |
|
|
4.4 MANDOS Y CONTROLES AUXILIARES |
|
|
Modelos ANALOGIC |
(Fig. 4A) |
|
4.4A Sonda en el centro |
|
|
Los modelos “Analogic” pueden ser entregados, a demanda, con el termóstato electrónico con sonda de aguja para controlar la temperatura exacta en el centro de los alimentos a cocer. Este dispositivo es muy útil cuando es preciso cocer comidas de gran tamaño. Para activar el sistema proceder como sigue: tras haber programado el ciclo de cocción como descrito anteriormente, introducir la aguja en el centro del producto; activar el termóstato electrónico apretando el interruptor negro (A). La temperatura mostrada en el termóstato electrónico (B) es aquella detectada por la sonda en el centro de la comida. El campo de ajuste va desde 20 hasta 110°C y los valores de la temperatura son seleccionados como sigue: apretar el botón SET a mano derecha; en el display aparece la temperatura precedentemente seleccionada; se enciende y se pone intermitente el LED rojo, dentro de 15 segundos, modificar el valor configurado empleando los botones  y
y  y confirmar el nuevo valor apretando el botón SET. La intermitencia por 2 segundos del nuevo valor confirma que el nuevo valor ha sido memorizado. Cuando se suelta el botón SET el display muestra la temperatura detectada por la sonda de aguja. Seleccionar en el temporizador la posición (∞), el horno comienza la cocción indicada por el encendido del LED verde. Cuando se alcanza la temperatura configurada en el termóstato electrónico, un aviso acústico indica que la cocción ha terminado, se enciende el LED rojo y todas las funciones quedan automáticamente inhabilitadas.
4.4B Selección velocidad (Fig. 4B)
Los modelos “ANALOGIC” pueden ser suministrados con el dispositivo (V) ver fig.13, para seleccionar la velocidad de giro de los ventiladores entre 1400 y 2800 rpm.
La velocidad debe ser elegida según el tipo de alimento a cocer, teniendo presente que a baja velocidad se aconseja no sobrepasar temperaturas de cocción de 230°C.
4.4C Luz interna para iluminar la cámara de cocción (Fig. 4)
Los hornos tienen una lámpara para iluminar su cámara. Su activación se realiza mediante el botón del selector de ciclos (D).
4.4D Precalentamiento cámara horno
Se aconseja efectuar siempre esta operación antes de poner los alimentos a cocer en la cámara del horno; el tiempo necesario para el precalentamiento debe ser configurado teniendo presente que en el ciclo convección aire caliente se precisan 10 minutos aproximadamente para alcanzar la temperatura de 220°C.
Seleccionar el tiempo y la temperatura deseada, poner en marcha el horno sin comida; al final del tiempo configurado un aviso acústico indica que se puede comenzar la cocción.
En el ciclo vapor se aconseja efectuar siempre el precalentamiento con el mando del regulador del vapor en la posición MAX por una duración de 15 minutos sin abrir la puerta.
4.4E Válvula purga cámara (Fig. 4)
Todos los modelos “ANALOGIC” poseen este sistema, que tiene la función de regular la humedad dentro de la cámara de cocción. La apertura y el cierre de la válvula de alivio se efectúan girando el mando redondo (A).
4.5 SPEGNIMENTO DEL FORNO
Modelli ANALOGIC (Fig. 4)
Lo spegnimento del forno avviene con la selezione della manopola del selettore cicli sulla posizione 0.
4.5 TURNING THE OVEN OFF ANALOGIC models (Fig. 4)
The oven is turned off by turning the cycle selector knob round to position 0.
4.5 AUSSCHALTEN DES BACKOFENS
Modelle ANALOGIC (Abb. 4)
Zum Ausschalten des Backofens den Zykluswählschalter auf Stellung (0) drehen.
4.5 ARRÊT DU FOUR
Modèles ANALOGIC (Fig. 4)
Le four s'éteint lorsqu'on met le bouton du sélecteur de cycles sur la position 0.
4.5 APAGADO DEL HORNO
Modelos ANALOGIC (Fig. 4)
El horno se apaga colocando el mando del selector de ciclos en la posición 0.
7
ISTRUZIONI PER L’UTENTE |
INSTRUCTIONS FOR THE USER |
|
ANLEITUNGEN FÜR DEN BENUTZER |
||
NOTICE POUR L'USAGER |
INSTRUCCIONES PARA EL USUARIO |
|
|
||
COMPACT |
Direct combination ovens, gas and electric models, |
Electronic and Analogic |
|
|
|
5.0 PROGRAMMAZIONE E FUNZIONAMENTO |
|
|
|
||
Versioni ELECTRONIC (Fig. 5) |
|
|
|
|
|
|
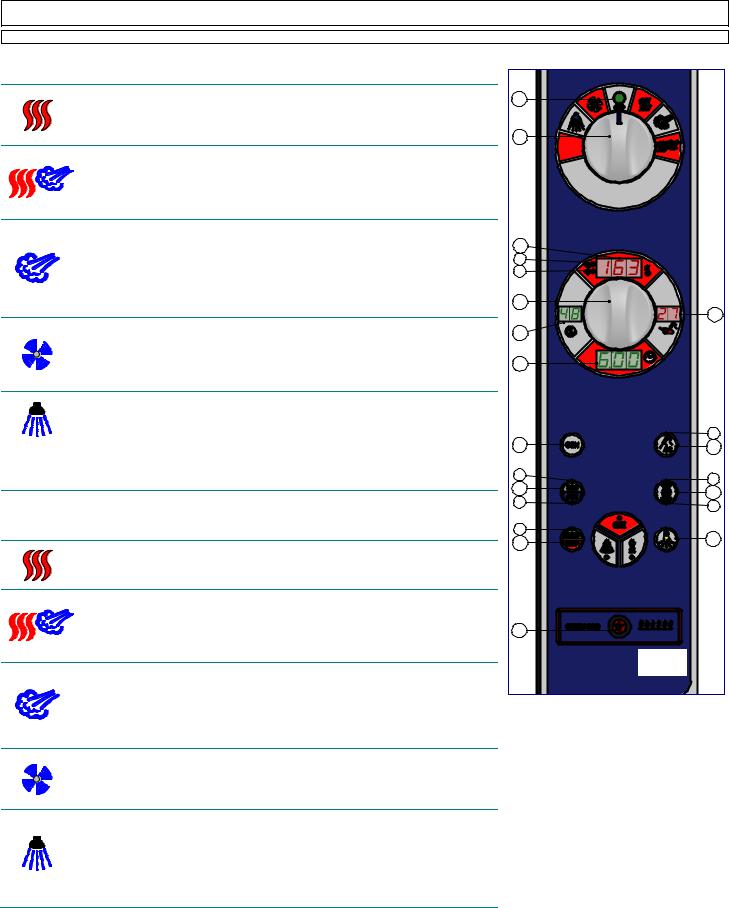
5.0A Ciclo convezione aria calda |
|
P |
|
|
|
(campo temperatura 20-270°C) |
|
|
|
|
|
Posizionare la manopola del selettore cicli (A) in corrispondenza del simbolo riportato a |
|
|
||
|
sx e selezionare la temperatura di cottura sul display (L) agendo sulla manopola |
A |
|
||
|
dell’encoder (B) |
|
|
|
|
|
5.0B Ciclo misto, convezione aria calda e vapore |
|
|
|
|
|
(campo temperatura 20-270°C) |
|
|
|
|
|
Posizionare la manopola del selettore cicli (A) in corrispondenza del simbolo riportato a |
|
|
||
|
sx, selezionare la temperatura di cottura sul display (L), il tempo di cottura sul display |
|
|
||
|
(N) o in alternativa la temperatura della sonda al cuore sul display (O) e il valore |
|
|
||
|
dell’umidità desiderata sul display (M) tramite la manopola dell’encoder (B). |
|
|
||
|
5.0C Ciclo vapore |
|
|
|
|
|
(campo temperatura 20-100°C) |
|
|
L |
|
|
Posizionare la manopola del selettore cicli (A) in corrispondenza del simbolo riportato a |
|
|||
|
L1 |
|
|||
|
sx, selezionare la temperatura di cottura sul display (L), il tempo di cottura sul display |
|
|||
|
L2 |
|
|||
|
(N) o in alternativa la temperatura della sonda al cuore sul display (O). Il valore |
|
|||
|
|
|
|||
|
dell’umidità sul display (M) verrà automaticamente regolato dal sistema elettronico al |
|
|
||
|
max. valore. |
|
|
B |
|
|
N.B. La massima temperatura di funzionamento sarà di 100°C. |
|
O |
||
|
5.0D Ciclo raffreddamento |
|
|
M |
|
|
Aprire la porta del forno e posizionare la manopola del selettore cicli (A) in |
|
|||
|
corrispondenza del simbolo riportato a sx. Questo ciclo permette il funzionamento del |
|
|
||
|
motoventilatore, con la porta aperta, favorendo il rapido raffreddamento della camera di |
N |
|
||
|
cottura. |
|
|
|
|
|
La sigla COL nel display (N) segnalerà che il ciclo è in funzione. |
|
|
||
|
5.0 Ciclo lavaggio camera cottura |
|
|
|
|
|
Dopo aver provveduto a stendere un velo di detergente idoneo alla rimozione dei grassi |
|
|
||
|
essiccati nelle superfici in acciaio inox della camera, posizionare la manopola del |
|
|
||
|
selettore cicli (A) in corrispondenza del simbolo riportato a sx. |
|
H1 |
||
|
Nei display (L) e (N) compariranno rispettivamente le scritte Chb e cLn. |
G |
H |
||
|
Premendo il pulsante (U) o (V) si darà inizio al ciclo di lavaggio. |
|
|
||
|
Se il forno non è dotato del |
sistema di lavaggio, nei |
display (L) e (N) verranno |
E1 |
F1 |
OPTIONAL visualizzate le scritte Fun e dIS. |
|
|
E |
||
|
|
F |
|||
|
|
|
|
||
|
|
|
|
E2 |
|
|
|
|
|
F2 |
|
|
|
|
|
|
|
5.0 PROGRAMMING AND OPERATION |
|
|
C1 |
|
|
ELECTRONIC models (Fig. 5) |
|
|
D |
||
|
|
C |
|||
|
5.0A Hot air convection cycle |
|
|
||
|
|
|
|
||
|
(Temperature range 20-270°C) |
|
|
|
|
|
Turn the cycle selector knob (A) to the symbol shown on the left, and select the cooking |
|
|
||
|
temperature on the display (L), using the encoder knob (B). |
|
|
|
|
|
5.0B Combined hot air and steam cycle |
|
|
|
|
|
(temperature range 20-270°C) |
|
|
|
|
|
Turn the cycle selector knob (A) to the symbol shown on the left, select the cooking |
Z |
|
||
|
temperature on the display (L), the cooking time on the display (N), or as an alternative |
|
|||
|
the core probe temperature on the display (O), and the required humidity value on the |
|
|
||
|
display (M) using the encoder knob (B). |
|
|
Fig. 5 |
|
|
5.0C Steam cycle |
|
|
|
Abb. 5 |
|
(temperature range 20-100°C) |
|
|
|
|
|
Turn the cycle selector knob (A) to the symbol shown on the left, and select the cooking |
|
|
||
|
temperature on the display (L), the cooking time on the display (N), or as an alternative, |
|
|
||
|
the core probe temperature on the display (O). The humidity value on the display (M) |
|
|
||
|
will be automatically adjusted by the electronic system to the max. value. |
|
|
||
|
N.B. Maximum operating temperature is 100°C. |
|
|
|
|
|
5.0D Cooling cycle |
|
|
|
|
|
Open the oven door and turn the cycle selector knob (A) to the symbol shown on the |
|
|
||
|
left. This cycle allows the fan to work with the door open to help cool the oven quickly. |
|
|
||
|
The letters COL on the display (N) indicate that the cooking chamber cooling cycle is in |
|
|
||
|
operation. |
|
|
|
|
|
5.0E Washing cycle for cooking chamber |
|
|
|
|
|
After placing a layer of detergent, suitable for removing dried fat, on the stainless steel |
|
|
||
|
surfaces, turn the cycle selector knob (A) to the symbol shown on the left. |
|
|
||
|
On displays (L) and (N) the letters Chb and cLn will appear respectively. |
|
|
||
|
Push button (U) or (V) to start the washing cycle. |
|
|
|
|
|
If the oven is not equipped with a washing system, the letters Fun and dIS will appear |
|
|
||
OPTIONAL |
on displays (L) and (N). |
|
|
|
|
|
|
|
|
|
|
8
ISTRUZIONI PER L’UTENTE |
INSTRUCTIONS FOR THE USER |
ANLEITUNGEN FÜR DEN BENUTZER |
||
NOTICE POUR L'USAGER |
INSTRUCCIONES PARA EL USUARIO |
|
||
COMPACT |
Direct combination ovens, gas and electric models, |
Electronic and Analogic |
|
|
5.0 PROGRAMMIERUNG UND BETRIEB |
|
|
||
Modelle ELECTRONIC (Abb. 5) |
|
|
|
|
|
5.0A Heißluftbetrieb |
|
|
|
|
(Temperaturbereich 20-270°C) |
|
|
|
|
Den Zykluswählschalter (A) auf das links abgebildete Symbol drehen und mit dem Drehknopf des Encoders (B) die Gartemperatur auf |
|||
|
dem Display (L) einstellen. |
|
|
|
|
5.0B Mischbetrieb Heißluft mit Dampf |
|
|
|
|
(Temperaturbereich 20-270°C) |
|
|
|
|
Den Zykluswählschalter (A) auf das links abgebildete Symbol drehen, auf dem Dispay (L) die Gartemperatur, auf dem Display (N) die |
|||
|
Garzeit oder alternativ auf dem Display (O) die Kernfühlertemperatur und auf dem Display (M) den gewünschten Feuchtegrad mit dem |
|||
|
Drehschalter des Encoders (B) auswählen. |
|
|
|
|
5.0C Dampfzyklus |
|
|
|
|
(Temperaturbereich 20-100°C) |
|
|
|
|
Den Zykluswählschalter (A) auf das links abgebildete Symbol drehen, auf dem Dispay (L) die Gartemperatur, auf dem Display (N) die |
|||
|
Garzeit oder alternativ auf dem Display (O) die Kernfühlertemperatur auswählen.Der Feuchtegrad wird auf dem Display (M) automatisch |
|||
|
auf den Höchstwert eingestellt. |
|
|
|
|
Achtung: Die max. Gartemperatur beträgt 100°C. |
|
|
|
|
5.0D Abkühlung |
|
|
|
|
Die Ofentür öffnen und den Zykluswählschalter (A) auf das links abgebildete Symbol drehen. Bei diesem Zyklus ist der Gebläsebetrieb |
|||
|
auch bei geöffneter Tür möglich, wodurch sich der Garraum rasch abkühlt. |
|
||
|
Das auf dem Display (N) eingeblendete Kürzel CoL zeigt den Kühlbetrieb an. |
|
||
|
5.0 Spülzyklus des Garraums |
|
|
|
|
Einen Film fettlösendes |
Reinigungsmittel auf die Edelstahlflächen auftragen, um das |
verkrustete Fett zu lösen, und den |
|
|
Zykluswählschalter (A) auf das links abgebildete Symbol drehen. |
|
||
|
Auf den Displays (L) und (N) werden die Meldungen Chb und cLn eingeblendet. |
|
||
|
Die Taste (U) oder (V) drücken, um den Spülzyklus zu starten. |
|
||
OPTIONAL Bei Backöfen ohne Spülsystem zeigen die Displays (L) und (N) die Meldungen Fun und dIS an. |
|
|||
5.0 PROGRAMMATION ET FONCTIONNEMENT |
|
|
||
Modèles ELECTRONIC (Fig. 5) |
|
|
|
|
|
5.0A Cycle à air pulsé air chaud |
|
|
|
|
(plage température 20-270°C) |
|
|
|
|
Placer le bouton du sélecteur de cycles (A) sur le symbole correspondant puis avec le bouton de l’encodeur (B), sélectionner la |
|||
|
température de cuisson (affichage L). |
|
|
|
|
5.0B Cycle mixte à air pulsé air chaud-vapeur |
|
|
|
|
(plage température 20-270°C) |
|
|
|
|
Placer le bouton du sélecteur de cycles (A) sur le symbole correspondant, puis avec le bouton de l’encodeur (B), sélectionner la |
|||
|
température de cuisson (affichage L), le temps de cuisson |
(affichage N) ou en alternative, la température de la sonde à cœur (affichade |
||
|
O) et le niveau d’humidité souhaité (Affichage M). |
|
|
|
5.0C Cycle vapeur
(plage température 20-100°C)
Placer le bouton du sélecteur de cycles (A) sur le symbole correspondant, puis sélectionner la température de cuisson (Affichage L), le temps de cuisson (Affichage N) ou en alternative, la température de la sonde à cœur (Affichage O). La valeur de l’humidité sur l’affichage
(M) sera réglée par le système électronique à la valeur maximale. N.B. La température maximale de fonctionnement sera de 100°C.
5.0D Cycle de refroidissement
Ouvrir la porte du four et placer le bouton du sélecteur de cycles (A) sur le symbole correspondant.
Ce cycle met en marche le moto-ventilateur avec la porte ouverte et permet de refroidir rapidement l'enceinte de cuisson. L’affichage (N) reporte la mention COL et indique que le cycle est en fonction.
5.0E Cycle de lavage de l’enceinte de cuisson
Après avoir appliqué sur les surfaces en acier inox de l’enceinte, un voile de détergent apte à enlever les graisses sèches, placer le bouton du sélecteur de cycles (A) sur le symbole correspondant.
Les sigles Chb et cLn s’affichent respectivement sur les écrans (L) et (N). Le lavage démarre en appuyant sur les boutons (U) ou (V).
Si le four n’est pas équipé du système de lavage, les sigles Fun et dIS s’affichent sur les écrans (L) et (N).
9
 Loading...