

PC 5200
Owner’s manual
Mode d’emploi
Bedienungsanleitung
Gebruiksaanwijzing
Istruzioni d’uso
Instrucciones de manejo
English
FrançaisDeutschNederlandsItaliano
Bruksanvisning
Betjeningsvejledning
Käyttöohje
www.vdodayton.com
Dansk Svenska Español
Suomi

Contents
1
Contents
General information . . . . . . . . . . . . . . . . . . . . . . . . . . . . . . . . . . . . .2
Explanation of symbols . . . . . . . . . . . . . . . . . . . . . . . . . . . . . . . . . . 2
For your safety! . . . . . . . . . . . . . . . . . . . . . . . . . . . . . . . . . . . . . .3
Functions of your navigation system . . . . . . . . . . . . . . . . . . . . . . . . . . . 4
Maintenance and care . . . . . . . . . . . . . . . . . . . . . . . . . . . . . . . . . . . 5
Operation . . . . . . . . . . . . . . . . . . . . . . . . . . . . . . . . . . . . . . . . . . . 6
Remote controls . . . . . . . . . . . . . . . . . . . . . . . . . . . . . . . . . . . . . . 6
Switching on / off . . . . . . . . . . . . . . . . . . . . . . . . . . . . . . . . . . . . . 8
Volume adjustment . . . . . . . . . . . . . . . . . . . . . . . . . . . . . . . . . . . . 8
Inserting/changing SD cards . . . . . . . . . . . . . . . . . . . . . . . . . . . . . . . . 9
Menu operation . . . . . . . . . . . . . . . . . . . . . . . . . . . . . . . . . . . . . . 9
Start Menu . . . . . . . . . . . . . . . . . . . . . . . . . . . . . . . . . . . . . . . .10
Navigation . . . . . . . . . . . . . . . . . . . . . . . . . . . . . . . . . . . . . . . . . . 11
Quick reference guide . . . . . . . . . . . . . . . . . . . . . . . . . . . . . . . . . . 11
Destination input . . . . . . . . . . . . . . . . . . . . . . . . . . . . . . . . . . . . . 12
Via points . . . . . . . . . . . . . . . . . . . . . . . . . . . . . . . . . . . . . . . . . 16
Tours. . . . . . . . . . . . . . . . . . . . . . . . . . . . . . . . . . . . . . . . . . . . 17
Guidance . . . . . . . . . . . . . . . . . . . . . . . . . . . . . . . . . . . . . . . . .20
TMC traffic information . . . . . . . . . . . . . . . . . . . . . . . . . . . . . . . . . 25
Dynamic route planning . . . . . . . . . . . . . . . . . . . . . . . . . . . . . . . . . 28
The “Info” menu . . . . . . . . . . . . . . . . . . . . . . . . . . . . . . . . . . . . . 29
Trip computer . . . . . . . . . . . . . . . . . . . . . . . . . . . . . . . . . . . . . . .29
Address book . . . . . . . . . . . . . . . . . . . . . . . . . . . . . . . . . . . . . . . 30
Settings . . . . . . . . . . . . . . . . . . . . . . . . . . . . . . . . . . . . . . . . . . . 32
Adapting the navigation system . . . . . . . . . . . . . . . . . . . . . . . . . . . . . 32
Extras. . . . . . . . . . . . . . . . . . . . . . . . . . . . . . . . . . . . . . . . . . . . . 38
Info Points function. . . . . . . . . . . . . . . . . . . . . . . . . . . . . . . . . . . . 38
Travel info. . . . . . . . . . . . . . . . . . . . . . . . . . . . . . . . . . . . . . . . . 38
Appendix . . . . . . . . . . . . . . . . . . . . . . . . . . . . . . . . . . . . . . . . . . 40
TMC symbols . . . . . . . . . . . . . . . . . . . . . . . . . . . . . . . . . . . . . . . 40
Default settings . . . . . . . . . . . . . . . . . . . . . . . . . . . . . . . . . . . . . .41

2
General information
Explanation of symbols
The following symbols are used in this manual:
This symbol is used to indicate safety instructions and warnings. These contain important
A
information for the safe use of the unit. Failure to observe this information may result in
material damage or personal injury. Therefore, please observe this information with particular
care.
asks you to perform an action.
☞
shows the unit’s reaction.
:
provides extra info.
✎
identifies a list.
❑
“ ” Text in quotation marks identifies a screen menu option.
Hotlines are available in many countries to handle queries regarding our multimedia
systems. You will find up-to-date telephone numbers on the Internet at:
www.vdodayton.com
© 2006 Siemens VDO Trading GmbH
All rights reserved.
These operating instructions are subject to copyright.
Subject to technical and visual changes and typing errors.

General information
For your safety!
The use of the navigation system by no means relieves the driver of his/her
A
responsibilities. Always observe the applicable traffic regulations and take the current traffic
conditions into consideration. You always have priority over the information provided by the
navigation system if the actual traffic situation and the information from the navigation
system conflict.
The system does not take the relative safety of the suggested routes into consideration.
A
Road blocks, building sites, height or weight restrictions, traffic or weather conditions or
other influences which affect the route safety or travel time are not taken into consideration
for the suggested routes. Use your own discretion in order to decide on the suitability of the
suggested routes. Use the “Alternative Route” function to receive better routing suggestions,
or simply follow your preferred route and the automatic routing recalculation will plan the
route for the remainder of your journey.
For the sake of traffic safety, perform inputs to the navigation system only prior to the
A
trip or when the vehicle is stationary.
The current statutory speed limit on the road always takes priority over the values stored
A
in the selected navigation database. It is impossible to provide an assurance that the speed
values of the navigation system will always match those of the current traffic regulations in
every situation.
In certain areas one-way streets, turn-off and entry restrictions (e.g. to pedestrian zones)
A
have not been surveyed. In areas such as these the navigation system will issue a warning. Pay
particular attention to one-way streets, turn-off and entry restrictions.
Please make certain that all persons using your multimedia system have access to this
A
manual, and that they read the instructions and suggestions concerning system operation
prior to use.
A
If your screen is installed on a flexible support, adjust it so that you can see the screen
contents quickly and easily, and reflections and dazzle or glare are avoided. Find a suitable
spot to stop the vehicle prior to performing adjustments.
A
If your monitor is installed on a fixed support, check that your dealer has installed it in
accordance with the above recommendations. The screen must not be installed in a position
where it obstructs the view of any items necessary for the safe operation of the vehicle (e.g.
road, mirrors, instruments, surroundings). In addition, the monitor may not be installed within
deployment range of the airbag.
A
Only look at the monitor if it is safe to do so. Find a suitable place to stop should you
need to look at the screen for a longer period of time.
A
Always store the remote control in a safe place. Unsecured objects could be flung around
in the event of emergency braking or an accident and cause injuries to occupants.
A
The values displayed on the system’s “Trip computer” giving the current speed, driving
time and the elapsed distance are calculated values. Accuracy cannot always be guaranteed.
In the case of speed, the vehicle speedometer must always be given priority.
A
Do not rely exclusively on the navigation system when attempting to locate an
emergency service (police, fire service, etc.). It cannot be guaranteed that all available
emergency services in your vicinity are stored in the database. Use your own discretion and
abilities to secure help in such situations.
3

4
General information
Functions of your navigation system
By buying this Multimedia System you have purchased a high-performance instrument
which has been designed to assist drivers in daily traffic. Simply enter the destination
prior to setting off, activate “Guidance” and you are ready to go. The navigation
system will provide driving instructions in audible and visual form. The system is simple
to use, because of the small number of operating elements and its clear menu
structure.
Range of functions
■
Some of the functions described in this manual are only to be used in conjunction with
optional accessories. It may also be that use cannot be made of certain functions in
some countries because the data has not been surveyed. Due to the large range of
functions, a conscious decision was taken not to allow all the settings to be used in any
combination in the interests of ensuring ease of use and functionality.
Distance indications
■
On main roads, the distances to exits indicated by the system deviate from those on
road signs. The road signs on main roads refer to the start of the exit, while the
navigation system always indicates the distance to the end of the slip road. This is the
point where the driving lanes fork (separate).
Operating restrictions (country-specific)
■
If a symbol depicting a crossed-out hand appears in the bottom status line it means
that only limited operating options are available whilst driving. Whether or not this
function is activated will depend upon the prevailing national regulations.
■ GPS reception
The system has been designed to remain operational even when there is poor GPS
reception. However, positional accuracy may be impaired.

General information
Start-up characteristics
■
If the vehicle has been parked for some time, the satellites will have continued on
their orbits. As a result, once the ignition has been switched on, it may take several
minutes before a sufficient number of satellites are being received and the system can
start analysing their signals. Sufficient reception (three-dimensional position) is
indicated by the satellite symbol Ù in the display in the selected text colour. The
satellite symbol remains red if GPS reception is inadequate.
During the start-up process, the navigation system may report the message: “Please
proceed to the planned route”. The system assumes that the vehicle is located off a
stored road. If other roads exist in this area, the navigation system may issue incorrect
messages. The system assumes that the vehicle is located on a different road.
Automatic route re-calculation
■
If you do not follow the instructions of the system, the system will automatically plan a
new route.
Areas with limited road information
■
In some areas, not all of the information on a road is available in the selected
navigation database. Thus, for example, turn-off prohibitions, information on the
direction of travel in a one-way street or prohibited entry into a pedestrian zone may
be missing. The navigation system will display a warning if you drive into such an area.
Information concerning the functions of the navigation system can be found on the
✎
internet at www.vdodayton.com.
Maintenance and care
Do not clean using cleaning fluid, alcohol or other solvents. A damp cloth is best
suited.
5
6
Operation
Remote controls
Depending on the scope of supply, various remote controls might be used. Full
functionality can only be ensured if the correct remote control is activated.
Activating the correct remote control
■
Select “Settings –> Remote control” and activate the desired remote control by
☞
pressing the OK button.
If you additionally use a steering wheel remote control, activate this with a tick.
☞
Please do not expose the remote control with inserted batteries to direct sunlight.
A
Active holder (accessory)
■
If you only use your remote control in its active holder, we recommend that you
remove the batteries from the remote control. The system can be operated when the
remote control is in its holder.
Battery change display
■
If the system no longer responds when the buttons are pressed or the battery symbol
( appears in the status line, the batteries of the remote control must be changed.
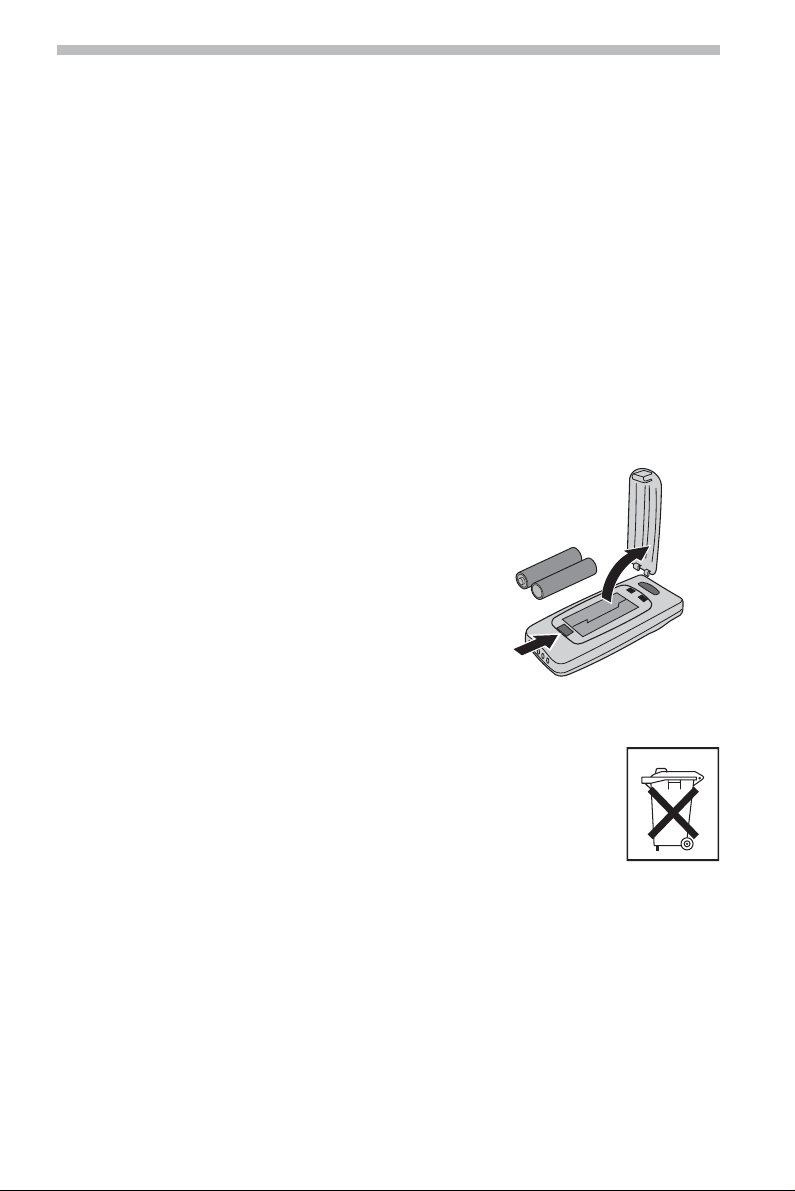
Replacing batteries (RC 5400)
■
Open the battery compartment on the back of the
☞
remote control.
Remove the flat batteries.
☞
Insert two new Type AAA (micro) batteries. Ensure
☞
correct polarity (marked in the battery
compartment).
Close the battery compartment.
☞
Notes:
In many countries, flat batteries may not be disposed of together with
the normal domestic rubbish. Please determine how to dispose of flat
batteries in accordance with local regulations.
Use only leak-proof batteries. Battery leakage can cause damage to
the remote control or to your vehicle.
Never expose the remote control to direct sunlight or extreme heat.
The batteries discharge at high temperatures and there is a risk of
leakage.

Operation
RC 5400
1 VOICE / ALT-R . . . Press briefly: Calls up the current audible guidance message.
Press and hold: Switches to the “Alternative Route” menu.
2 4, 6, 8, 2. . . . . Cursor buttons, move the cursor in the menus.
3 OK . . . . . . . . . . . . Confirms a selection.
4 ESC . . . . . . . . . . . Press briefly: Jumps back to the previous menu.
Press and hold: Jumps directly to the Start Menu.
5 NAVIGATION . . . . Press briefly: Switches the display type of the guidance screen.
Press and hold: Moves directly to the Start Menu.
6 ENTERTAIN . . . . . Press briefly: Calls up the previously used entertainment source.
7 FAVOURITE . . . . . This button is freely programmable to provide direct access to
selected functions. Detailed information on programming this
button can be found in the “Settings” section, page 32.
8 W, V . . . . . . . . . Volume setting.
9 HOME . . . . . . . . . Press briefly: Adopts the address stored under “Home” for
directional guidance.
Press and hold: Adopts the address stored under “Work” for
directional guidance.
The buttons y, z and x have no function in relation to the navigation system.
7

8
Operation
Switching on / off
The navigation computer is switched on and off together with the ignition.
Switch on the ignition.
☞
As soon as the navigation system is operational, an instruction about using the
:
system appears in the display.
Read this instruction and confirm it by pressing the OK button on the remote
☞
control.
The Start Menu appears.
:
Stand-by mode
■
You can switch the system into stand-by mode as follows:
Select “Stand-by” in the Start Menu.
☞
The display and the audible guidance messages are deactivated.
:
Press one of the cursor buttons 4, 6, 8, 2 or the OK button on the remote control
☞
to exit stand-by mode again.
If an external speaker is connected, in standby mode you will continue to hear the
✎
audible information.
If you do not wish to hear the audible information, select “Stop guidance” before
switching the system into stand-by mode.
If the navigation system is switched off in stand-by mode, it restarts in stand-by
✎
mode when the ignition is switched on again.
■ Shutdown delay time
Immediately after switching off the ignition, the monitor is deactivated, but the
navigation computer remains active for a period that can be set. This has the
advantage that you can continue the directional guidance after a short stop (e.g. at
the petrol station), without the navigation computer having to calculate the route
again.
The shutdown delay time can be set between 1 and 10 minutes in the “Settings –>
General settings –> Shut-down timer” menu. See page 36.
Volume adjustment
You can set the volume of the audible guidance messages as follows:
Press the V button once or several times to increase the volume of the audible
☞
messages.
Press the W button once or several times to decrease the volume of the audible
☞
messages.
Operation
Inserting/changing SD cards
Inserting the card
■
Insert the card into the SD card slot with the label facing up and the slanted corner
☞
on the right.
Press the card into the slot until it engages.
☞
Removing the card
■
Carefully press the centre of the card.
☞
The SD card is released.
:
Pull the card straight back to remove it from the SD card slot.
☞
Information on SD memory cards
■
Only insert SD memory cards in the SD card slots. Inserting other card types can result
in malfunction or destruction of the unit and the card.
Only use SD memory cards from well-known manufacturers. The use of other cards
may result in malfunctions.
Do not use miniSD™ cards with adapters. The miniSD™ card could become detached
from the adapter when removing it from the card slot. The adapter could then get
stuck in the device.
SD is a trademark of the Toshiba Corporation.
The SD logo is a registered trademark.
Menu operation
The important controls for menu
operation are the cursor buttons 4, 6,
8 and 2 as well as the OK button.
Press the cursor buttons to move
☞
the cursor (coloured mark) to the
desired menu option.
Press the OK button to confirm the
☞
selection and activate the function.
Press the OK button to adopt the
☞
settings.
Press the ESC button to quit a
☞
menu without adopting the set
value or to jump back one menu level.
All the available options are highlighted in colour.
✎
Unavailable options are skipped automatically.
✎
9

10
Operation
Start Menu
The Start Menu appears after you have
confirmed the user instruction.
In the Start Menu, the following menu
options are available:
Navigation: . . . . . . . Calls up the main navigation menu (e.g. for destination input,
Map: . . . . . . . . . . . . . Calls up the previously selected guidance screen.
Travel info: . . . . . . . . Calls up the menu with the available travel information products
Info: . . . . . . . . . . . . . Calls up the Info menu with TMC traffic information.
Trip computer: . . . . . Calls up the trip computer display with the trip data and the
Settings: . . . . . . . . . . For the individual adjustment of the navigation system.
TV/Video*: . . . . . . . . Switches to the connected TV/video source (e.g. TV tuner).
Stand-by: . . . . . . . . . Switches the system into stand-by mode.
* Only available if the option has been activated in the Settings menu.
guidance, address book, etc.).
(e.g. travel guide, restaurant and hotel guide).
Other information relating to the current route is also available.
current GPS position.
Press the OK button to reactivate the system.
Navigation
11
Quick reference guide
Below you will find a quick reference guide which describes the process for entering a
new destination and starting guidance, in simple, brief steps.
A detailed description of the individual navigation functions can be found after that.
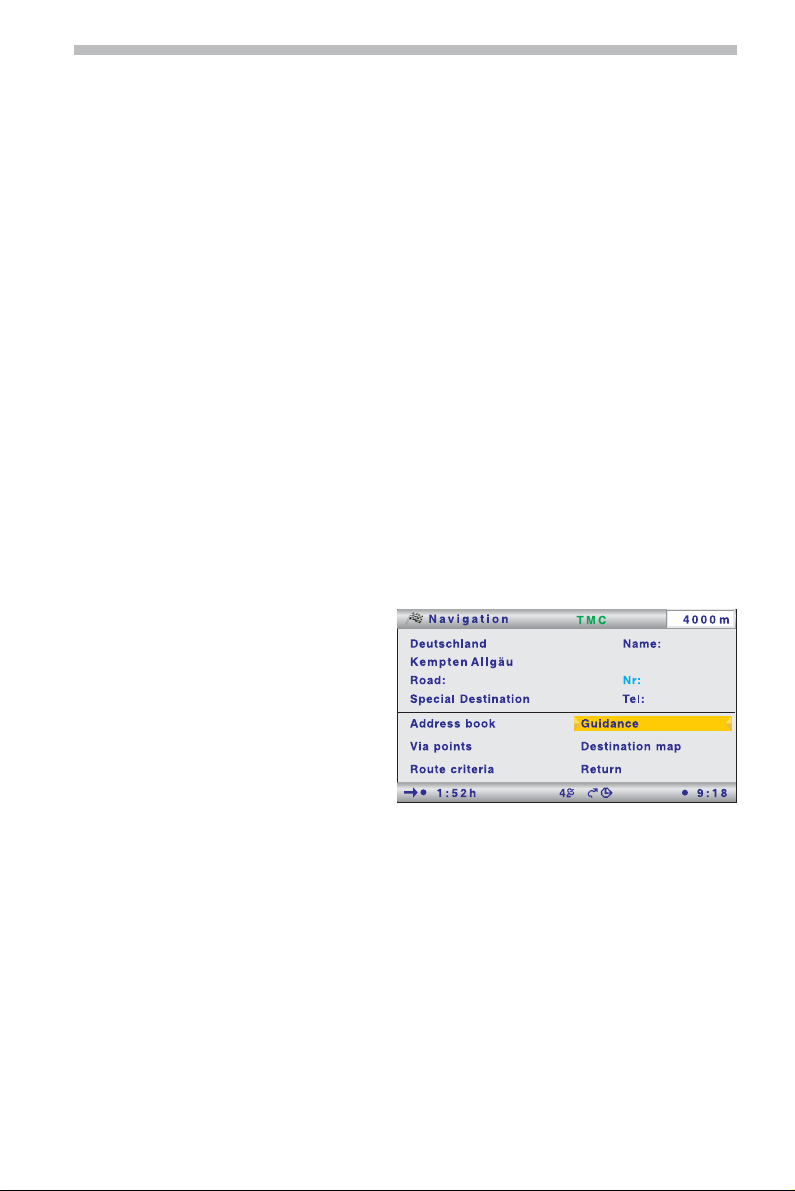
Entering a destination and navigating
Select “Navigation” in the “Start Menu”.
☞
The “Navigation” menu appears.
:
Selecting the navigation database
■
You have the option of storing several navigation databases on a navigation SD card.
If you have not yet selected a database, the menu option “Database” appears first in
the navigation menu.
In order to enter a destination, you
✎
must first select the desired
database.
To chose another database,
☞
highlight the country’s name and
then press OK.
Then select “Database” in order to
☞
choose the desired database.
■ Selecting the country
If your destination is in a country other than the displayed country or if a country has
not yet been selected, first select the destination country from the list of available
countries.
If your destination is in a country other than the displayed country, first select the
✎
destination country from the list of available countries.
■
Entering destination and road
Enter the destination address under “City/ZIP:” and “Road:”.
☞
To do so, highlight the relevant characters and then confirm with the OK button.
If the character sequence is unequivocal, the system will complete the entry
✎
automatically and the cursor jumps to “OK”.
If house numbers for the relevant road are stored in the navigation database, you
✎
can restrict the destination address even further with “Nr:”.
If you would like to enter a junction, select “Special Destination –> Junction”.
☞
Under “Name” and “Tel:”, you can give the address a name of your choice and also
✎
program the relevant telephone number. You can the save the destination address
in the address book.
Select “Route criteria” to specify the preferred route planning criteria.
☞
Select “Guidance” to start guidance.
☞
You will receive the first guidance message after just a brief wait.
:
12
Navigation
Destination input
The following types of destination input can be used:
Direct address input via town/city or postcode (ZIP), road, house number or
❑
junction.
Input of special destinations (hotels, restaurants, filling stations, public institutions,
❑
etc.).
Adopting addresses stored in the address book.
❑
Destination map.
❑
Input via GPS coordinates (geographical longitudes and latitudes).
❑
Adopting destination from travel info (e.g. travel guide).
❑
Destination input via postcodes and travel info is not supported by all navigation
✎
databases.
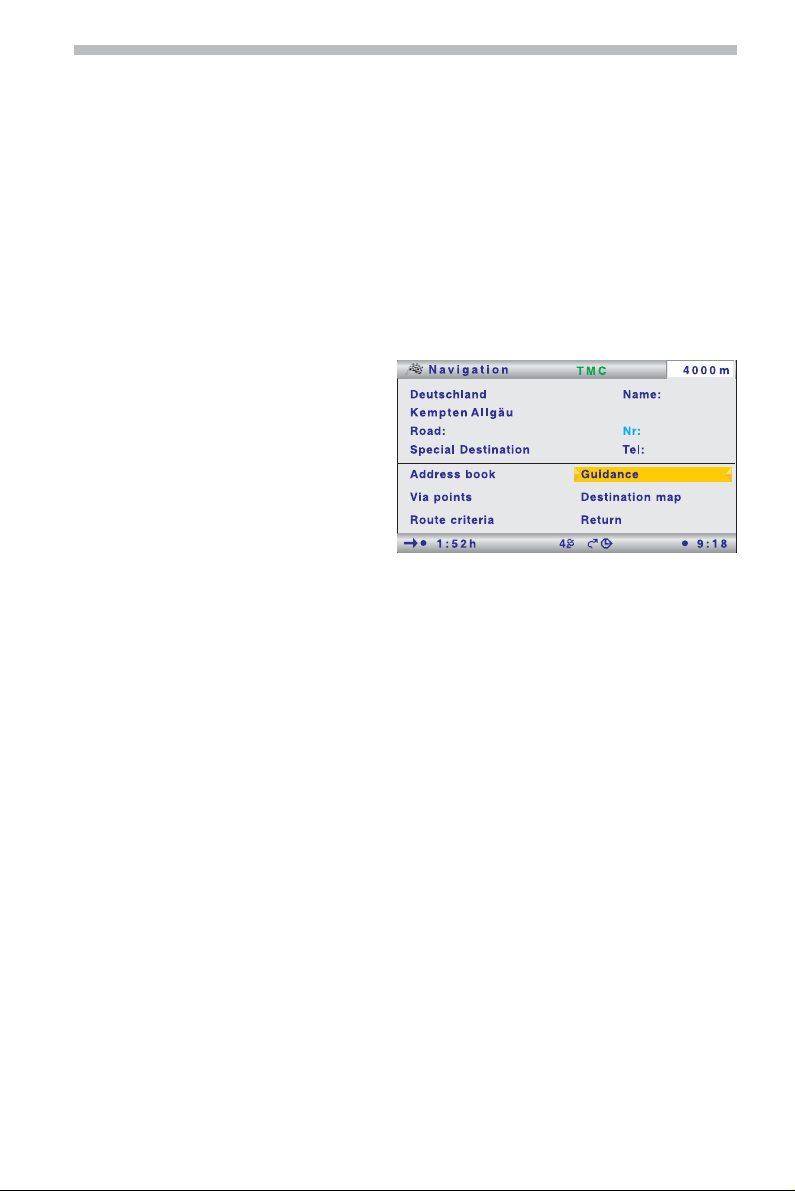
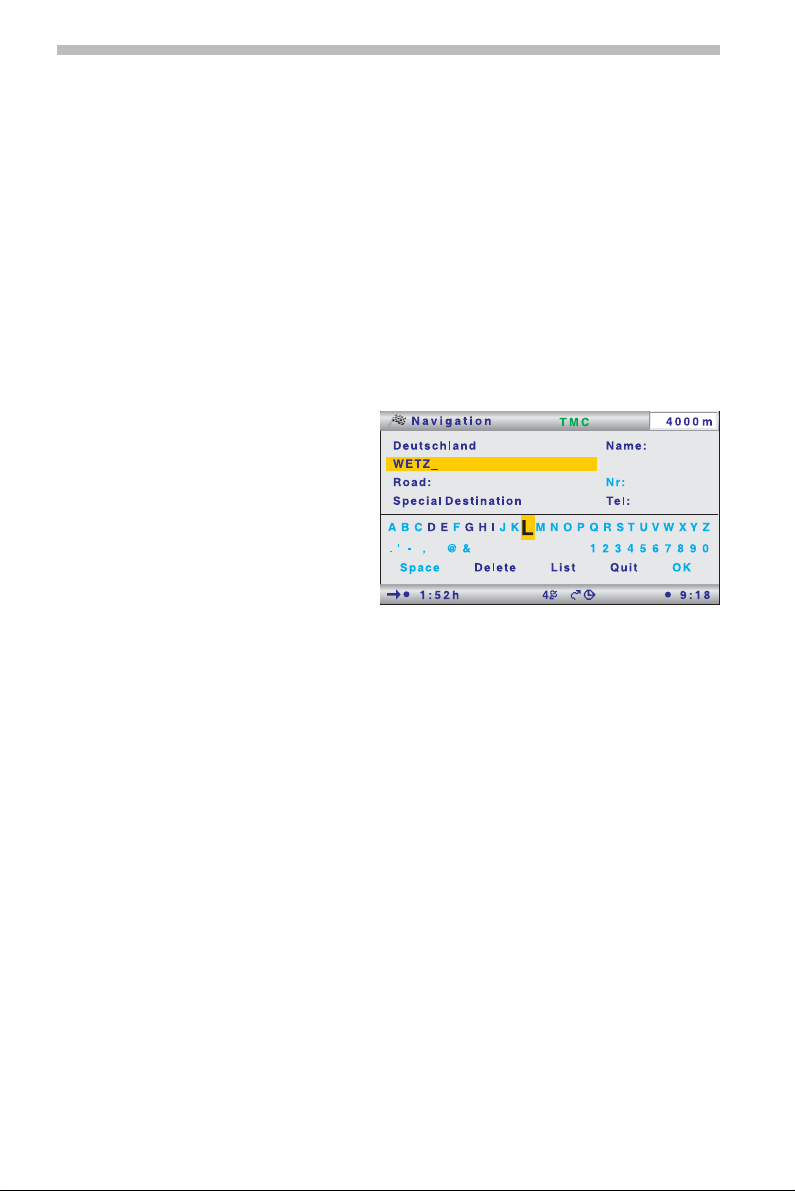
Direct address input
Select “Navigation” in the “Start
☞
Menu”.
Using the keypad, enter the
☞
destination address under
“Country:”, “City/ZIP:”, “Road:” as
well as “Nr:” for the number of the
house (if available).
Confirm each letter with the OK
☞
button.
Under “Special Destination” you can enter a junction instead of a house number.
✎
This is particularly suitable for long roads if the house number is not known.
If the destination is to be stored in the address book, it is also possible to enter
✎
“Name” and “Tel:”.
Character sequences for which no names exist cannot be selected. If a character
✎
sequence is clear, the input is automatically completed.
■
Options for character input
The following options are available for character input:
❑
Space: Inserts a space into the character sequence.
❑
Delete: Deletes the character entered last.
❑
List: Displays all entries in the selected navigation database which begin with the
character sequence entered so far.
❑
Quit: Cancels the input and moves to the next higher menu level.
❑
OK: Accepts the entered character sequence.

Navigation
Selecting the town using the post code
Under “City/ZIP:” enter the post code for the desired town.
☞
Then select “List” to obtain a display of all the corresponding parts of the town.
☞
Select the desired town from the list.
☞
The town name is also sufficient for a destination input. The navigation system will
✎
then route you to the edge of the town. A unique input is made by means of the
postal code and the town name. Please note, however, that the availability of
postal codes depends on the data stored in the selected navigation database on the
inserted SD card.
“List” function
If several towns or roads with the same name are available, using the “List” function
you can view all options having additional information.
Select the desired town or the desired road.
☞
The list of all names matching the characters entered thus far can be displayed at
✎
any time using the “List” function. If no letter is entered, the list will start with the
first entry alphabetically.
You can quit the list display without transferring a list entry by using “Quit” or
✎
pressing the cursor button 4.
Special destinations
Under “Special Destination” in the “Navigation” menu you can enter the following
destinations:
❑ Points of interest: Interesting and/or useful facilities, the addresses of which are
stored in the navigation database. These include hotels, petrol stations, workshops,
hospitals, airports, etc.
❑ Junction: If town and street have already been entered
■ Points of interest
Select “Special Destination” in the “Navigation” menu.
☞
Select “Points of interest”.
☞
Select the following search options from the list:
☞
❑
Search at destination: Displays the search screen for facilities in the vicinity of the
destination.
❑
Search close to car: Displays the search screen for facilities in the vicinity of the
current position.
For further information about searching for special destinations, see the chapter
✎
entitled “Travel Info” on page 38.
■
Junction
For longer destination streets, it might be sensible to enter a junction:
Select “Special Destination” in the “Navigation” menu.
☞
Select “Junction”.
☞
Enter the desired junction using the keypad or the list function.
☞
13

14
Navigation
Loading destination from the address book
If the desired destination address is already in the address book, or happens to be one
of the last 20 destinations entered, the address can easily be used as a destination
address:
Select “Address book” in the “Navigation” menu.
☞
Select “Retrieve address”.
☞
Select the category of the address book in which the address is stored (Private,
☞
Business, Home or Work).
Using “Prev. destinations” you can load one of the 20 last used destinations.
☞
Select the desired list entry and confirm with the OK button if you would like to
☞
transfer the address as a new destination address.
Using the 6 button on the remote control you can first view the details of the
✎
address.
You can quit the list display without transferring a list entry by using “Quit” or
✎
pressing the 4 button.
If maps from different providers are used it may be necessary to adapt the stored
✎
addresses.

Navigation
Destination map
The destination map can be used to enter a destination by means of:
Transferring a destination using a cursor.
❑
Direct entry of the geographical position (GPS coordinates).
❑
Cursor
■
If the destination is not near to the vehicle location, then enter the destination as
precisely as possible beforehand using the direct address input.
Select “Destination map” in the “Navigation” menu.
☞
Or:
Press a cursor button if the map is
☞
already displayed.
The destination map is displayed
:
featuring a cursor. The cursor
marks the current vehicle location
if no destination data has been
entered.
The cursor can then be moved
☞
using the cursor buttons.
Press the OK button and select
☞
“Store”.
Press the OK button again to transfer the marked position as a destination.
☞
First select a large scale for an approximate destination definition. Then choose a
✎
smaller scale to mark the destination accurately with the cursor.
Destinations which are not in the digitised map area can also be selected.
✎
Ensure that correct side of the road is selected when targeting a destination on
✎
motorways.
■ Co-ordinates
Select “Destination map” in the “Navigation” menu.
☞
The destination map is displayed.
:
Press OK.
☞
Select “Co-ordinates” and press the OK button.
☞
Select “Longitude” or “Latitude” and press the OK button.
☞
Pressing the OK button each time selects the next digit of the coordinates. Each
☞
digit can be changed using the cursor buttons and confirmed using the OK button.
Should you wish to skip a digit, press the OK button.
☞
Select “Set co-ordinates” to transfer the coordinates as the destination address.
☞
15

16
Navigation
Via points
If you wish to visit other locations en route to the entered destination address, these
can be stored as via points. The navigation system then plans the route to include the
via points in the given sequence before the destination address is reached.
Once a via point has been passed it is automatically deleted from the list.
✎
A maximum of 25 via points can be stored.
✎
If a via point is active, all route information such as distance or travel time relates to
✎
that via point.
Entering via points
■
Select “Via points” in the navigation menu.
☞
The “Via points” menu is displayed.
:
Via points can be entered in exactly the same way as destinations. Also see
☞
“Destination input”, page 12.
In the “Via points” menu, the following options are also available:
Store viapoint: Stores the currently entered via point.
❑
List via points: Displays the list of previously entered via points.
❑
Delete via point: Deletes via points from the list of via points.
❑
Via points which you have not reached or which are no longer required must be
✎
deleted from the via point list so that the navigation system may plan the route to
the next via point or to the final destination. If a via point that has not been
reached is not deleted, the system will continue to try and guide you to this via
point.
■ Defining a flexible route point
As well as the normal via points, you can also ask the navigation system to plan the
route so that the route passes as close as possible to a specific point on the map.
Select the map display during guidance.
☞
Move the cursor using the cursor buttons 4, 6, 8 or 2 to the point on the map
☞
which you would like to define as a flexible route point.
Press OK.
☞
In the pop-up menu, select “Store –> Flex. route point”.
☞
You can only define one flexible route point.
✎
A flexible route point can only be defined via the map display when the guidance
✎
function is activated.
A flexible route point is not driven to directly. It only represents a rough guide for
✎
the route to be travelled.
The flexible route point is deleted as soon as you enter a new destination or a new
✎
regular via point (see above) or stop the guidance function.
In contrast to a normal via point, you do not receive a message when you have
✎
reached the flexible route point.
■
Deleting a flexible route point
Select “Info” in the Start menu.
☞
Select “Via points” in the “Info” menu.
☞
Select “Delete flexible route point”.
☞

Navigation
17
Tours
The Tours menu provides you with the option of driving to a series of various
destinations one after the other without having to enter each destination individually.
You only need to enter the individual stages of the tour once via the destination input
or the address book and store this tour under a freely selectable name.
The tour memory can store a total of 7 tours each with a maximum of 10 stages.
Select “Via points” in the navigation menu.
☞
Select “Tour editor” in the pop-up menu that appears.
☞
The “Tour editor” menu is displayed.
:
Select “New tour” to create a new tour,
☞
or:
select one of the saved tours to display options for this tour.
☞
The following options are available in the pop-up menu:
Return: Returns to the Tour menu.
❑
Start tour: Starts navigation to the first stage of the tour.
❑
Start tour at: Starts the selected tour from a certain stage.
❑
Start reverse: Starts the selected tour in reverse from the last stage.
❑
Show list: Displays the stages of the selected tour.
❑
❑ Edit tour: Opens the menu for editing the selected tour.
Entering new tour
Select the “New tour” menu item in the Tours menu.
☞
This displays the menu for editing the new tour.
:
You can now enter tour stages (intermediate destinations) as described under
☞
“Editing tour”. See the following page.
Starting tour
Select the desired tour from the Tours menu.
☞
Then select “Start tour” to start guidance to the first stage of the tour.
☞
Starting tour at ...
You have the option of starting a tour from a certain stage.
Select the desired tour from the Tours menu.
☞
Select “Start tour at”.
☞
The list of tour stages in the selected tour is displayed.
:
Select the desired stage from the list to start guidance to the selected stage of the
☞
tour.
Starting tour in reverse
The stages of a tour can also be covered in reverse order.
Select the desired tour from the Tours menu.
☞
Select “Start reverse”.
☞

18
Showing tour
With this function it is possible to view the list of tour stages (intermediate
destinations) for the selected tour.
Select “Show list”.
☞
The list of intermediate destinations for the selected tour is displayed.
:
If you select one of the tour stages from the list, the details of the address are
☞
displayed.
Editing tour
Select the desired tour from the Tours menu.
☞
Select “Edit tour”.
☞
The “Edit tour” menu offers the following options:
Add destination: Here you can add new destinations to the tour.
❑
Rearrange: Here you can move stages within the selected tour.
❑
Save as: Here you can save the selected tour under a name of your choice.
❑
Delete: Here you can delete individual stages of the selected tour or the entire tour.
❑
Adding tour stages
■
In the “Edit tour” menu select the option “Add destination”.
☞
Enter a new destination or select a destination from the address book.
☞
Select “OK” to add the selected destination to the tour.
☞
The list of stages already stored for the tour is displayed.
:
Then move the cursor to the position in the list in front of which the new stage is to
☞
be inserted.
Press the OK button to position the new stage in front of the highlighted entry.
☞
Select “add to the end…” if the new stage is to be placed at the end of the list.
☞
■ Moving tour stages
In the “Edit tour” menu select the option “Rearrange”.
☞
The list of tour stages in the selected tour is displayed.
:
Highlight the stage to be moved using the cursor.
☞
Press OK.
☞
Then move the cursor to the position in the list in front of which the stage to be
☞
moved is to be inserted.
Press the OK button again to place the stage at the selected position.
☞
Select “add to the end…” if the stage is to be moved to the end of the list.
☞
Navigation

Navigation
Saving tour as ...
■
Use this function if you have created a new tour or would like to save an existing tour
under a different name.
In the “Edit tour” menu select the option “Save as”.
☞
Using the keypad enter a name for the tour that is no more than 16 characters long.
☞
The original tour is retained. This function is therefore also suitable for simply
✎
copying a tour.
Deleting tour stages
■
In the “Edit tour” menu select the option “Delete”.
☞
Then select “Delete destination”.
☞
The list of tour stages in the selected tour is displayed.
:
Highlight the stage to be deleted and then confirm using the OK button.
☞
The desired stage is deleted from the tour.
:
Deleting entire tour
■
In the “Edit tour” menu select the option “Delete”.
☞
Then select “Delete tour”.
☞
The selected tour is deleted.
:
19

20
Navigation
Guidance
When you have entered all of the available data for the destination address, you can
start the guidance function.
For guidance purposes, it is sufficient if you enter a town/city name. The navigation
✎
system then guides you to the town or city limit.
Select “Guidance” in the “Navigation” menu.
☞
The route is planned and the guidance screen appears on the monitor.
:
Depending on the previously selected option, the display may be in symbol, map or
split-screen view (see also the “Screen displays” section, page 21).
The navigation system will then guide you to the input destination with graphic
:
and audible messages.
Stopping guidance
If you are in one of the guidance screens, guidance can be stopped at any time.
Press OK.
☞
Select the “Stop guidance” option and press the OK button.
☞
Guidance in non-digitised areas
If the specified destination is not located on a digitised road, the directions will take
you to the position (linear distance) closest to the destination. The display shows the
note “Destination is outside the digitised area”. In all display modes, rather than
being provided as directions, guidance takes the form of an arrow which points to the
destination.
Guidance in partly digitised areas
In rural areas and in small townships not all the streets may be stored in the selected
navigation database. Whenever you leave a digitised road, the guidance screen
changes. Instead of the usual guidance information, an arrow which points in the
direction of the planned route is now shown. The linear distance to the route is given
in the status line.
Guidance in areas with limited road information
In some areas, not all of the information on a road is available in the selected
navigation database. Thus, for example, turn-off prohibitions, information on the
direction of travel in a one-way street or prohibited entry into a pedestrian zone may
be missing. The navigation system will display a warning if you drive into such an area.
Local traffic laws always take precedence over navigation system instructions.
In the guidance screen, you will see the ! symbol, as long as you are in an area with
limited road information.
A
Always observe the road signs and motor vehicle traffic regulations.

Navigation
Audible messages
As soon as guidance is activated, acoustic routing information is provided in addition
to the symbols on the guidance screens.
You didn’t hear the information?
■
Press the VOICE button on the remote control.
☞
The last direction is repeated and/or updated driving directions are provided.
:
If the symbol l flashes in the status line, the audible information is switched off.
✎
Press the V or W button on the remote control to activate the information again.
Planning an alternative route
During guidance it is possible for the navigation system to plan an alternative route to
cover a distance which you can select. Use this function, e.g. if you wish to avoid
stationary traffic, or if you do not agree with the current routing. The alternative
route will be calculated for the specified distance from the vehicle’s current location.
Press ALT-R.
☞
The system now displays the distance for which the alternative route is to be
:
planned. This can be set from 1 to 50 km.
Select the value after “Distance:” and press the OK key.
☞
Set the value using the cursor buttons and press the OK button.
☞
Select the option “Yes” if you want to transfer the entered value and start the
☞
planning of the alternative route.
Select “No” if you want to cancel the planning of an alternative route.
✎
21
Screen displays
Four types of screen display are available for guidance:
❑ Symbols: Graphic display of the “turn-now” advice
❑ Map: Map display of the planned route. The arrow shows the current vehicle
position
and the combination of both display types (split screen):
❑
Map / symbols
❑
Map / trip computer
■
Switching display type
By pressing the NAVIGATION button, you can switch between the various display
☞
types:
k

22
Navigation
Symbol display
The symbol display provides the following information:
1 Distance to destination or to next via point.
2 Directional arrow (linear distance) to destination or to next via point.
3 Menu title*
4 Distance to the next change of direction.
5 Name of the street to turn into (next change of direction).
6 Directional arrow and, if necessary, early warning for next junction or crossing.
Detailed turn-now advice appears as soon as you approach a junction or crossing. In
addition, turn-offs are announced with audible messages.
7 Current location of the vehicle: road name, town name and area if available in the
selected navigation database.
8 Status line*
* Configurable, refer to the “Settings -> Screen configuration” section, page 32.
■ Menu options in the symbol display
Press the OK button to display a menu with the following options:
☞
❑
Return: Returns to the Navigation menu.
❑
Map: Switches to map display.
❑
Info: Opens the Info menu.
❑
Stop guidance: Stops guidance.
❑
Local detour: Upon request, plans a detour if there is a road obstruction in less than
50 km on the planned route.
This option is only displayed if dynamic route planning is deactivated and TMC
traffic information is activated. See “Dynamic route planning”, page 25 and
“Settings –> Message selection”, page 32.
❑
Plan new route: Upon request, plans a new route in light of the current traffic
situation.
This option is only displayed if dynamic route planning is activated. See “Dynamic
route planning”, page 25.

Navigation
Map display
The map display shows the following information:
1 Selected scale.
2 Planned route (shown in white).
3 Compass: The black arrow points north.
4 Distance to the next change of direction.
5 Simplified diagram of the driving direction, the next junction or crossing.
6 Vehicle position; the arrow indicates current direction of travel.
■ Menu options in the map display
Press the OK button to display a pop-up menu with the following options:
☞
❑ Return: Returns to the Navigation or Start Menu.
❑ Scale: Opens the window for adjusting the scale.
❑ Map mode: Switches the map display (“Northwards”, “Steer direction” and “2D/
3D”). Using “3D angle” you can change the viewing angle of the 3D display in
4 stages. Use the 8 or 2 button for making the setting.
The display type “Steer direction” is not available in the scales 50 km to 1,000 km.
✎
The display type “3D” is not available in the scales 50 km to 1,000 km and is always
✎
given in the direction of travel.
When switching to “Steer direction” or “3D” the navigation system switches the
✎
scale automatically if necessary.
❑
Info: Opens the Info menu.
❑
Stop guidance: Stops guidance.
❑
Traffic view: Activates the cursor for the selection of TMC symbols on the map. See
“TMC traffic information” section.
The option “Traffic view” is only available in the “2D/Northwards” map mode.
✎
❑
Local detour: Upon request, plans a detour if there is a road obstruction in less than
50 km on the planned route.
This option is only displayed if dynamic route planning is deactivated and TMC
traffic information is activated. See “Dynamic route planning”, page 25 and
“Settings –> Message selection”, page 32.
❑
Plan new route: Upon request, plans a new route in light of the current traffic
situation. This option is only displayed if dynamic route planning is activated. See
“Dynamic route planning”, page 25.
23

24
Navigation
Split-screen display (combined display)
The two split-screen displays combine
the map display on the left side with
the symbol or the trip-computer
display on the right.
The menu options for the split-
✎
screen display are the same as for
the map display.
In this display type, the “Traffic
✎
view” menu option is not available.
Display of statistics data (trip computer)
■
The split-screen display with trip
computer provides the following
information:
Current speed: Speed at that
❑
moment
Avg. speed*: Average speed so far
❑
❑ Elapsed distance*: Distance
travelled
❑ Elapsed time*: Time travelled
The data is deleted automatically
✎
when a new destination is entered.
A
The speed display serves only as additional information. Only the vehicle’s speedometer
should be used to determine actual speed.
* This data is updated only during active guidance.
Status lines
At the upper and lower edges of the screen, two status lines are displayed, which
show a variety of information for navigating and about the system status.
Much of the displayed information can be selected for display in the “Settings –>
Screen config.” menu. Refer to the “Settings” section, page 32.
The top status line shows the menu title of the active menu. The “Statusline top left”
can be configured for the navigation screens.
In the bottom status line, you can find the following symbols, which are not
configurable:
❑
5 Ù: Display of the GPS reception status (number of satellites).
❑
Ú: The dynamic route planning is activated/deactivated.
❑
l: The audible navigation messages are deactivated
(flashing in the position of the Ú symbol).
❑
t: Selected route criterion for the route planning (in this case, “Fast”).

Navigation
TMC traffic information
Your navigation system receives traffic information via its integrated Dynamic TMC
Receiver, which is then used for the dynamic route planning.
You can also collect information about the current traffic situation, either as a text
message or in the map display.
To be able to use this TMC information, the following prerequisites must be fulfilled:
The TMC data are supported by the selected navigation database in this region.
❑
TMC traffic information is broadcast in this region.
❑
You have activated any TMC messages which you would like to have displayed or
❑
taken into account under “Message selection” in the “Info” or “Settings” menu.
You can see the TMC status in the status line on the screen*:
“TMC” green . . . . . . TMC information is available. Alternatively, the name
“TMC” black . . . . . . . No TMC data available in the selected navigation database for
“TMC” red . . . . . . . . Currently no TMC reception.
If the currently received TMC station transmits the provider name, this is displayed
✎
in the status line instead of “TMC”.
* The display of “TMC” must be activated in the status line. Refer to the “Settings”
section, page 32.
Selecting TMC station
Select “Info” in the Start Menu.
☞
Select “TMC Station list”.
☞
The list of available TMC stations is displayed.
:
Select the desired station from the list.
☞
If the selected TMC station can no longer be received, the system automatically
✎
switches to TMC station with the strongest signal.
Activate “Automatic mode” for the station with the best reception to be
☞
automatically selected for evaluation of the TMC data.
Every time the ignition is switched off, “Automatic mode” mode is activated.
✎
■
TMC products subject to a fee (Pay TMC)*
In some countries or regions, extended TMC information might be available for an
additional charge.
Pay TMC stations are generally identified by a coin in the TMC station list.
✎
of the provider (TMC provider) may be displayed.
the region.
25
* These TMC services subject to a fee are only supported by the Pay-TMC version of the
navigation system.

26
Navigation
Display of road obstructions
In the status line
■
In the top right status line, the system displays whether there are any road
obstructions on the planned route.
“T” red: . . . . . . . . Road obstructions on the planned route that would cause a
“T” green: . . . . . . Less than 50 km to the road obstruction on the planned route. It
“T” orange: . . . . . Accepted or avoided traffic jams on the original route
In the map display
■
If traffic information is available, the system will show the positions of accidents or
stationary traffic on the map.
1 Obstructions on the route (with a red border).
2 Affected section of route.
3 Symbols with a grey or orange border are not on the planned route and are not
relevant to the guidance.
The system only displays TMC messages which you have activated under “Message
✎
selection” in the “Info” or “Settings” menu.
■
TMC symbols
The TMC symbols are displayed differently depending on the scale of the map:
❑
Map scales of over 10 km: The traffic obstructions are displayed as triangles with a
directional arrow. The arrow indicates the travel direction of the road obstruction.
❑
Map scales of 10 km or less: The symbol indicates the type of traffic obstruction (e.g.
accident, roadblock). The road section affected is marked with arrows.
See the appendix for an overview of the TMC symbols.
✎
severe delay.
is possible to plan a detour using the “Local detour” function
(available only with dynamic route planning deactivated).
(with dynamic route planning activated).

Navigation
View TMC messages in detail
■
Press the OK button to open the pop-up
☞
menu.
Select “Traffic view”.
☞
A cursor appears on the map as black
:
brackets.
Move the cursor to the desired TMC
☞
symbol with the cursor buttons and then
press the OK button.
Detailed information on the selected
:
traffic information is displayed.
In the symbol display
■
1 TMC symbol of the next road obstruction on the planned route.
If a number of obstructions exist, this is indicated by means of a second TMC symbol
which is partially obscured by the first.
2 Length of the section in which the traffic obstruction is located.
If you are already located in the affected section: distance to end of the section of
route with the road obstruction.
3 Distance to the next road obstruction on the planned route.
4 Simplified presentation of the route (black bar) and location of the road
obstruction (red segment). Vehicle position is shown as a circle with an arrow inside.
The system only displays TMC messages which you have activated under “Message
✎
selection” in the “Info” or “Settings” menu.
In the case of urgent traffic messages within a radius of 50 km of the vehicle’s
✎
current position, a special message appears on the screen (e.g. vehicle on wrong
carriageway). This message can be hidden by confirming with the OK button. In
addition, this information is provided as an audible message.
Road obstructions on the route are only displayed when the guidance function is
✎
activated.
27

28
Navigation
Dynamic route planning
With the help of the TMC traffic information, the dynamic route planning integrates
the entire traffic situation in an adjustable radius (traffic horizon) around the current
position into its calculation of the route. If a traffic obstruction (e.g. stationary traffic)
is reported via TMC for the planned route, the navigation system will analyse the
information and calculate the anticipated delay.
If there is a traffic problem on the planned route, you will be informed of this by the
navigation system and may decide whether the system should take a detour by
changing the route in order to avoid the segment concerned or whether it would be
more sensible just to drive through the problem.
The basis for the possible delay due to a traffic obstruction and calculated by the
navigation system is data that the system receives via the currently selected TMC
station. The actual delay may deviate from the calculation.
If you have activated the automatic mode, the system automatically plans the route so
that you are guided extensively around the road obstructions without the system
issuing a message.
During guidance, the system checks continuously on the basis of the traffic
information whether there is a better route for route guidance and a new route is
sometimes calculated, for example, if a traffic jam has disappeared.
Depending on the setting in the dynamic route planning, there are two different types
of detour:
■ Extensive detour (with activated dyn. route planning only)
As soon as the navigation system has received information about one or more traffic
obstructions via RDS-TMC that would mean a relatively long delay for navigation to
your destination, the system offers you the option well in advance of detouring the
traffic obstructions extensively.
The criteria that influence a new planning of the route (Re-routing level, Traffic
✎
horizon and Entire delay) can be set under “Settings –> Dynamic route”.
It is possible to replan the route manually at any time in light of the current traffic
✎
situation with the “Plan new route” menu item on the guidance screen.
■
Local detour (with deactivated dyn. route planning only)
With the local detour, it is possible to bypass the next traffic obstruction ahead which
is announced by TMC.
As soon as you have arrived up to approx. 50 km from the road obstruction, you will
receive an appropriate message.
With the “Local detour” menu item on the guidance screen, you can bypass the
✎
imminent road obstruction if required.
■
Activating dynamic route planning
Select “Info” in the Start Menu.
☞
Select “Route criteria” in the Info menu.
☞
Activate “Dynamic route”.
☞
Select “Return” to save the setting.
☞

Navigation
The “Info” menu
The “Info” menu can be selected from the Start Menu and from all guidance screens.
From a guidance screen:
Press the OK button from one of the navigation screens.
☞
Select “Info”, press the OK button.
☞
From the Start Menu, select “Info” and press the OK button
☞
The following options are available:
TMC Station list: Selection of a TMC station from the list of receivable TMC stations.
❑
Message selection: Selection of the TMC messages that are to be displayed on the
❑
screen and output acoustically.
Traffic on route: List of the road obstructions on the planned route.
❑
Local traffic info: List of road obstructions in a circumference of 400 km from the
❑
current vehicle position if these are provided by the TMC supplier.
Traffic at dest.: List of road obstructions in a circumference of 400 km from the next
❑
via point/destination if these are provided by the TMC supplier.
Route criteria: Selection of criterion for route planning as well as route options and
❑
activation of the dynamic route planning. Refer also to “Settings”, page 32.
❑ Route list: List of the segments on the planned route.
❑ Points of interest: Selection of up to 5 categories of points of interest that are to be
displayed in the map display.
❑ Via points: Display of via points list and deletion of via points.
Trip computer
Select “Trip computer” in the Start menu.
☞
The integrated trip computer displays the following information:
❑
Current speed: Speed at that moment
❑
Avg. speed: Average speed (since reset)
❑
Elapsed distance: Route distance (since reset)
❑
Elapsed time: Travel time (since reset)
❑
Longitude: geographic position
❑
Latitude: geographic position
29
A
The speed display serves only as additional information. Only the vehicle’s speedometer
should be used to determine actual speed.
■
Resetting the trip computer
Select “Reset” to reset the data for average speed, distance travelled and time
☞
travelled to “0”.

30
Navigation
Address book
The navigation system provides the
capability of storing at least 200
destination addresses in a personal
address book. The address book is
divided into the two categories
“Private” and “Business”.
You can also store an address for quick
access (e.g. via the remote control)
under “Home” and “Work”.
With the “Retrieve address –> Prev. destinations” option, you can also call up the
previous addresses used for guidance.
Calling up the address book
■
Select “Address book” in the “Navigation” menu or in the “Via points” menu, if
☞
you would like to use the address book for entering via points.
A pop-up menu with the following options appears:
:
Retrieve address: Loads an address already stored in the address book as the
❑
destination or as a via point.
❑ Store address: Stores the currently entered address in the address book.
❑ Delete address: Deletes an address or entire categories of addresses from the
address book.
❑ Store car position: Stores the current vehicle position in the address book.
■ Storing addresses
Enter the address (see destination entry).
☞
If desired, enter a name and a telephone number for the address to be stored.
✎
Select “Store address” and confirm with the OK button.
☞
Select the desired address book category (Home, Work, Private or Business) and
☞
confirm with the OK button.
The address displayed is stored.
:
You will receive a corresponding message if the address memory is full. In this case,
✎
you will have to delete one or more addresses that are no longer required before
you can save further addresses.

Navigation
Deleting addresses
■
Select “Delete address” and confirm with the OK button.
☞
If you would like to delete a particular address, select “Specific address” and then
☞
the desired address book category.
A list with the names of the stored addresses is displayed.
:
Select the desired address and press the OK button.
☞
The selected address is deleted.
:
If you would like to delete entire address book categories, select “Empty category”.
☞
Then highlight the desired address book categories that you would like to empty.
☞
Select “Delete” and press the OK button.
☞
All the addresses in the selected address book categories will be deleted.
:
Storing car position
■
Select “Store car position” and press the OK button.
☞
Select the desired address book category. Press OK.
☞
In order to edit the address (e.g. to add a name), this must first be loaded from the
✎
address book, edited and then stored in the address book again.
31

32
Settings
Adapting the navigation system
You can change several settings to adapt the navigation system to meet your personal
requirements.
Select “Settings” in the Start Menu.
☞
The “Settings” menu appears.
:
The following settings can be made:
Map view
Activating and changing settings for the automatic map scale (“Auto-scale”).
When the function is active, the scale for the map display is automatically set to the
specified value, depending on the current location of the car. You can specify the scale
for the following regions:
Highway
❑
Rural areas
❑
Urban areas
❑
Screen config.
Setting of the following screen properties:
■ Statuslines
There are four possible screen areas available for displaying numerous parameters
(e.g. time, date, estimated time of arrival, remaining travel time, etc.):
❑ Statusline top left: Selection of information that is to be displayed in the top left
status line.
This information is only displayed in the guidance screens. In all other menus this is
✎
displayed in the area of the menu title.
❑ Statusline top right: Selection of information that is to be displayed in the top right
status line.
❑ Statusline bottom left: Selection of information that is to be displayed in the bottom
left status line.
❑
Statusline bottom right: Selection of information that is to be displayed in the
bottom right status line.
■
Day colour
Selection of the colour scheme for a bright environment.
■
Night colour
Selection of the colour scheme for a dark environment.
The colour schemes can be switched either manually or automatically:
❑
Automatic switching: The colour scheme is dependent on the setting of the
headlights.
❑
Always day colour: The colour scheme for day is always used.
❑
Always night colour: The colour scheme for night is always used.

Settings
Message selection
Selection of the type of TMC traffic messages that should be displayed by the
navigation system and are to be taken into account for dynamic route planning.
Select “Select all” or “Deselect all” if you would like to activate/deactivate all the
☞
message types simultaneously.
Store the modified settings using “Store”.
☞
Press the ESC or the 4 button to exit the menu without changes.
☞
Urgent traffic messages (e.g. vehicle on wrong carriageway) cannot be deselected
✎
and are always displayed.
Route criteria
Various criteria can be selected for route calculation:
Fast: The route is optimized for the shortest possible driving time.
❑
Suited to all situations.
Short: The route is optimized for the shortest possible driving distance.
❑
Recommended for trips within cities.
Main roads: The route is calculated using the greatest number of main roads.
❑
No main roads: The route is calculated using the greatest number of secondary
❑
roads. Recommended if you prefer to avoid routes via motorways.
The symbol for the selected route criterion is displayed in the bottom status line.
✎
You can also activate the following route options:
❑ Minimize toll roads*: Avoids toll roads.
❑ Minimize ferry usage*: Avoids ferries when calculating the route.
❑ Minimize tunnel usage*: Avoids tunnels when calculating the route.
❑ Dynamic route: Activates/deactivates the dynamic route planning.
You can find the settings for the dynamic route planning under “Dynamic route”,
✎
see below.
Store the modified settings using “Return”.
☞
Press the ESC or the 4 button to exit the menu without changes.
☞
* Availability of these functions depends on the map data used. If route planning is
not possible without the selected exceptions, toll roads, ferries and tunnels are
included in route planning.
33

34
Settings
Dynamic route
You can set the following parameters for the dynamic route planning:
Re-routing level: Use this setting to specify whether or not the navigation system
❑
should plan a detour in the event of traffic obstructions. Five levels are available.
The lowest level (1) means that the direct route will go through the stationary
traffic depending on the conditions and the anticipated delay. If the highest level is
selected, an alternative route will be planned in most cases.
Level 3 is a standard setting for dynamic route planning. It is the factory setting
✎
(default).
Traffic horizon: This setting determines the radius in which the navigation system
❑
should take traffic obstructions into account when planning your route.
Entire delay: Use this value to indicate the anticipated delay time due to a traffic
❑
obstruction at or above which the navigation system should suggest that a new
route be planned.
The anticipated delay is calculated on the basis of the data received from the TMC
✎
station and may deviate from the actual situation.
Automatic mode: When this function is activated, the dynamic route planning
❑
automatically guides you around traffic jams. There is no further query.
Store the modified settings using “Return”.
☞
Press the ESC or the 4 button to exit the menu without changes.
☞
Speed warning
Settings for the messages and warnings if the statutory or manual speed limits are
exceeded:
❑ Warning … over limit: Setting for the tolerance value for exceeding the statutory
speed limits in the selected navigation database. When the set value is exceeded,
the speed display in the status line is displayed red.
For this purpose, the speed display in the status line must be activated. See also the
✎
“Screen config. –> Statusline” section.
Availability of the legal speed limit depends on the selected navigation database
✎
and on the relevant country.
A
WARNING: No responsibility is accepted for the correctness of the speed limit information
provided by the navigation system; it may not always reflect the currently valid regulations.
Always observe the applicable legal speed limits and traffic regulations. The vehicle
speedometer must always be given priority for display of the vehicle speed.
❑
Warn. at: Setting of an absolute value for a speed warning. A warning is displayed
when this value is exceeded.
This function is suitable e.g. in the case of a speed limit for winter tyres.
✎
❑
P. sp. lim. warn. on/off: Activates/deactivates an audible message for the speed
warning.
Store the modified settings using “Return”.
☞
Press the ESC or the 4 button to exit the menu without changes.
☞

Settings
Remote control
Settings for the support of various remote controls:
Activate the remote control with which your system can be operated (e.g. if you
☞
also use a steering wheel remote control).
Store the modified settings using “Return”.
☞
Press the ESC or the 4 button to exit the menu without changes.
☞
Favourite function
Definition of the functions which should be assigned to the FAVOURITE button on the
remote control.
Select a function for both the short press on button and the long press on button.
☞
Store the modified settings using “Store”.
☞
Press the ESC or the 4 button to exit the menu without changes.
☞
General settings
The following options are available in the menu for general settings:
Language
■
Selection of the language for menu texts and voice information.
The language for menus can be set independently of the language for navigation
✎
instructions.
An SD card with the corresponding language files is needed for loading a language
✎
other than the two language files displayed.
The language files can be transferred from the supplied CD-/DVD-ROM to an SD
card using the PC Copy Tool.
Selecting a language for menu texts:
Select one of the installed languages.
☞
The menu texts are switched to the selected language.
:
Information on the safe use of the system then appears in the selected language.
:
Selection of an installed language for navigation information:
Select one of the installed languages.
☞
The voice information is switched to the selected language.
:
Installing different languages for navigation information:
Select “Other language” to replace one of the two loaded languages with another
☞
language from the SD card.
Insert the SD card with the language files into the unit.
☞
All the languages and speakers (male/ female) on the SD card are displayed.
:
Select the required language.
☞
Then select the language to be replaced.
☞
The selected language will be loaded.
:
Some of the extended voice information may not be available for all voices. We
✎
therefore recommend only loading the languages in curly brackets (e.g. “German
{female voice 2}”).
35

36
Audible settings.
■
Settings for the audible guidance messages:
SDVC: Adjustment for speed-dependent volume increase.
❑
Small (1) to large (5) increase in volume on acceleration. For “0” there is no
increase.
Volume: Setting of the volume for the guidance messages.
❑
Voice on/off: Activates/deactivates the audible guidance messages.
❑
With the audible announcements switched off, the l symbol flashes in the bottom
✎
status line.
Store the modified settings using “Return”.
☞
Press the ESC or the 4 button to exit the menu without changes.
☞
Measuring units
■
Setting of Time format and Date format, measuring units for distance specifications
and adjustment of the current Time zone.
Store the modified settings using “Return”.
☞
Press the ESC or the 4 button to exit the menu without changes.
☞
Device config.
■
The device configuration contains the connection settings which have to be carried
out once when the system is installed and/or in the case of subsequent system
upgrades.
Activate the corresponding addition.
☞
Store the modified settings using “Return”.
☞
Press the ESC or the 4 button to exit the menu without changes.
☞
■ Shut-down timer
Setting of the shutdown delay time for the navigation computer (sensible e.g. for
short intermediate stops). The current planned route remains stored, the navigation
computer is immediately ready for use after switching off the ignition without any
start-up phase.
Set the desired shutdown delay time to between 1 ... 10 minutes.
Store the modified settings using “Return”.
☞
Press the ESC or the 4 button to exit the menu without changes.
☞
The device will shut down completely after the set time.
✎
Settings
System information
The following options are available in the “System information” menu:
❑
Diagnosis: Code-protected menu for installation and service purposes.
❑
Default settings: Resets the user-specific settings to the factory values.
An overview of the default settings can be found in the appendix on page 41.
✎
❑
Configuration: Display of unit identification and hardware and software versions for
service purposes.
❑
Speed correction: The navigation system uses an average cruising speed to calculate
the remaining travel time and the estimated time of arrival. If required, you can
adapt this speed to your actual average speed. However, we do not recommend
you deviate significantly from the standard value of 100%.

Settings
Info Points
Selection and activation/deactivation of the messages concerning Info Points (e.g.
tourist attractions, petrol stations, etc.).
More information on this function can be found under “Info Points function” in the
“Extras” section, page 38.
37

38
Extras
Info Points function
Some databases support your navigation system’s Info Points function with a visual
and audible indication of important points along your route. Different providers of
travel and traffic information have optimised these specifically for navigation systems.
Select “Info Points” in the “Settings” menu.
☞
Select the required product from the list of available products.
☞
Activate or deactivate the desired categories.
☞
In the product list, activate the options next to the speaker symbol to receive an
☞
audible message when you approach the selected info points.
Store the modified settings with “Store”.
☞
As you approach an Info Point, the navigation system displays a corresponding
✎
message about this point.
“INFO” will give you more details about this info point. With some categories (e.g.
✎
in the case of hotels and restaurants), it is possible to transfer the info point directly
into the guidance facility and plan a route to it.
Travel info
Through the “Travel info” function you have easy access to travel guide information
from various suppliers. Depending on the travel info product used, a range of
information can be called up from external providers. This could be hotel, restaurant
and shopping guides and tourist information, for example.
A search engine is used for searches within the travel info. This has a similar structure
to the search engines on the internet.
The information displayed may contain text, pictures, links, addresses and telephone
numbers. You can transfer the address of a hotel to the navigation system directly
from the travel guide, for example.
■ Searching in travel info
Select “Travel info” in the Start Menu.
☞
The overview of travel info products is displayed.
:
Select the required product from the list.
☞
Select the following search options from the list:
☞
❑
Search at destination: Displays the search screen for facilities in the vicinity of the
destination.
❑
Search close to car: Displays the search screen for facilities in the vicinity of the
current position.
❑
Search near a city: Displays the search screen for facilities in the vicinity of the
location of your choice.
❑
Search near via point: Displays the search screen for facilities in the vicinity of an
entered via point.
❑
Go to the homepage: Displays the homepage for the selected supplier (if available).
To narrow down the search, this may be followed by a multistage query, presented in
the form of lists, from which the respective subcategories can be selected (e.g. “Car/
Travel –> Car –> Car repair”).

Extras
Search engine operation
■
Press the 4 or 6 button to go from one option to another in the search screen.
☞
The option selected will have a dark background.
:
Confirm the highlighted option to activate the relevant function.
☞
Press the 8 or 2 button to scroll forwards or backwards on the screen, page by
☞
page.
Depending on the supplier and product, there will then be numerous functions
available in the search screen for narrowing your search. For example these may be:
A list with distances within which the facilities required should be located.
❑
The keypad for entering a keyword for the search.
❑
A list of available brands (e.g. all the vehicle manufacturers found in the Car repair
❑
section).
Then start your search with the “Search” option.
☞
Display of the search results
■
After you have started a search, the
navigation system displays the results
of the search in the form of a list.
The results include the address of the
facilities and the distance from the
current location.
You can display detailed
✎
information on the facilities using
the
symbol.
You can open the next page of
✎
results using the
You can open the previous page of results using the symbol.
✎
■ Transfer to the navigation system
In the detail view, you can transfer the selected facility to the navigation system as a
new destination via the
symbol.
symbol.
39

40
Appendix
TMC symbols
This list provides an overview of all the TMC symbols used in the guidance and map
displays.
Symbol Meaning Symbol Meaning
For small scales
>
In the detailed display and in the guidance
display
R
6
F
Y
K
N
Road obstruction in the direction of
travel indicated
Road obstruction in both directions
T
of travel
Roadworks
Danger
Slippery road
Poor weather conditions
Bad roadway
Bad visibility
Accidents
U
Slow or queuing traffic
B
Stationary traffic
J
Delays, waiting times
W
Exceptional vehicles
g
Narrow road sections
v
No parking possibility
p
Vehicle on wrong carriageway
G
Closed roads
c
Smog alert
S
H
Heavy wind
Overhead clearance restriction
D
Listen to your radio
r

Appendix
Default settings
If the “Settings–> System information –> Default settings” function is implemented,
the following settings are reset to the factory values:
Settings Default value
Time zone 0
Time format 24-hour format
Date format day.month.year
Measuring units km/m
Audible info. On
Volume Middle setting
SDVC Off
Day colour Blue
Night colour Dark blue
Map colour Automatic switching
Map mode Northwards
Auto-scale (map scale) Off
Statusline bottom left Remaining driving distance
Statusline bottom right Estimated time of arrival
Statusline top left No information
Statusline top right TMC
Route criteria Fast
Minimize toll roads Deactivated
Minimize ferry usage Deactivated
Minimize tunnel usage Deactivated
Dynamic route Activated
Re-routing level Medium
Entire delay Low
Automatic mode Off
Speed correction 100%
Device config. Multimediabox deactivated
TV Tuner deactivated
Rear view camera deactivated
Remote control RC 5400
41
 Loading...