

Page 1
Bedienungsanleitung
Instructions for use | Notice d´utilisation
Gebruiksaanwijzing | Istruzioni per l’uso
Instrucciones de uso | Návod k obsluze
Instrukcja obsługi
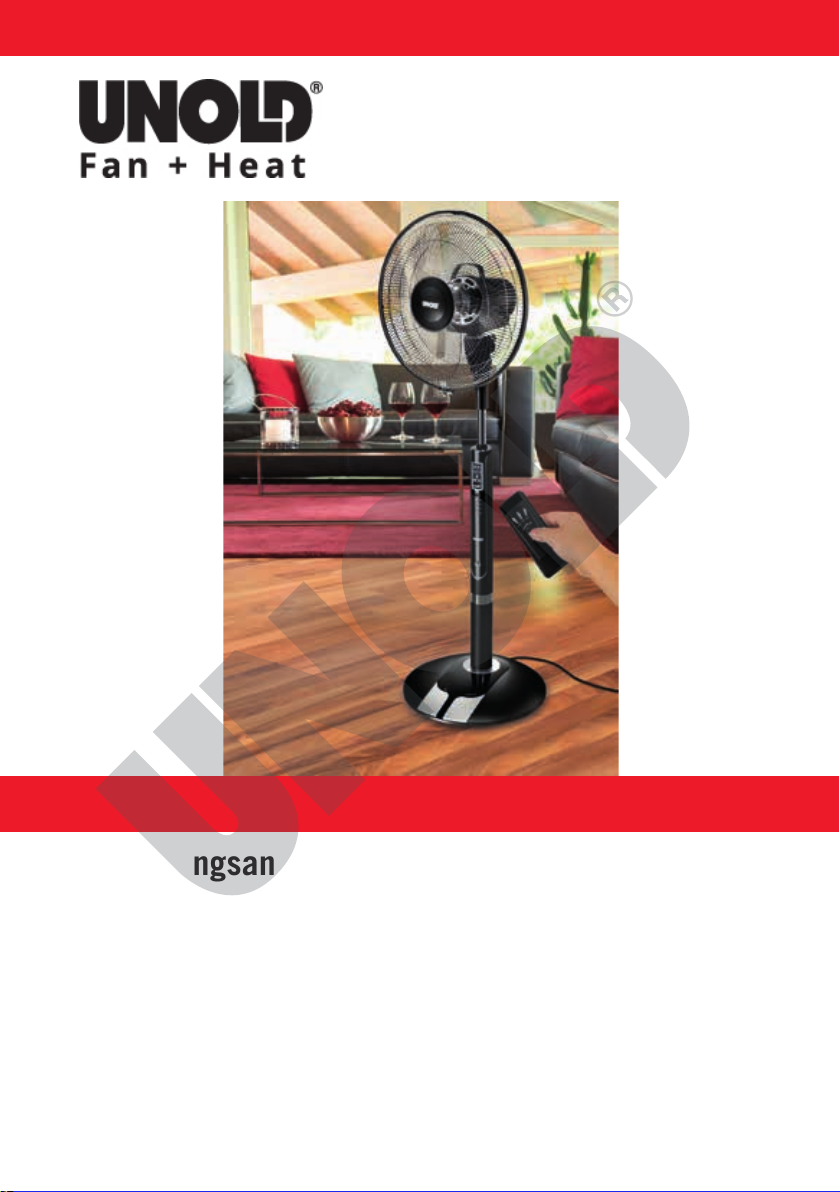
Modell 86880/86885/86886
STANDVENTILATOR
Copyright UNOLD AG | www.unold.de
Page 2

Impressum:
Copyright UNOLD AG | www.unold.de
Bedienungsanleitung Modell 86880/86885/86886
Stand: Juli 2016 /nr
Copyright ©
Mannheimer Straße 4
68766 Hockenheim
Telefon +49 (0) 62 05/94 18-0
Telefax +49 (0) 62 05/94 18-12
E-Mail info@unold.de
Internet www.unold.de 86880/86885/86886_12
Page 3

Weitere Informationen zu unserem Sortiment erhalten Sie unter www.unold.de
Copyright UNOLD AG | www.unold.de
Page 4
INHALTSVERZEICHNIS
Copyright UNOLD AG | www.unold.de
Bedienungsanleitung Modell 86880/86885/86886
Technische Daten .................................... 6
Symbolerklärung ...................................... 6
Für Ihre Sicherheit ................................... 6
Montieren ............................................... 9
Fernbedienung ........................................ 10
Bedienen ................................................ 11
Reinigen und Pflegen ............................... 13
Garantiebestimmungen ............................ 13
Entsorgung / Umweltschutz ...................... 13
Informationen für den Fachhandel ............. 13
Service-Adressen ..................................... 14
Instructions for use Model 86880/86885/86886
Technical Specifications ........................... 15
Explanation of the symbols ....................... 15
For your safety ......................................... 15
Assembly ................................................ 18
Remote control unit ................................. 19
Operation ................................................ 20
Cleaning and care .................................... 22
Guarantee Conditions ............................... 22
Waste Disposal /
Environmental Protection ......................... 22
Service ................................................... 14
Notice d´utilisation Modèle 86880/86885/86886
Spécification technique ........................... 23
Explication des symboles .......................... 23
Pour votre sécurité ................................... 23
Montage ................................................. 26
Télécommande ........................................ 27
Utilisation ............................................... 28
Nettoyage et entretien .............................. 30
Conditions de Garantie ............................. 30
Traitement des déchets /
Protection de l’environnement ................... 30
Service ................................................... 14
Gebruiksaanwijzing Model 86880/86885/86886
Technische gegevens ............................... 31
Verklaring van de symbolen ....................... 31
Voor uw veiligheid .................................... 31
Monteren ................................................ 34
Afstandsbediening ................................... 35
Bedienen ................................................ 36
Reiniging en onderhoud ........................... 38
Garantievoorwaarden ................................ 38
Verwijderen van afval /
Milieubescherming .................................. 38
Service ................................................... 14
Istruzioni per l’uso Modello 86880/86885/86886
Dati tecnici ............................................ 39
Significato dei simboli ............................. 39
Per la vostra sicurezza .............................. 39
Montaggio ............................................... 42
Telecomando ........................................... 43
Uso ........................................................ 44
Pulizia e cura .......................................... 46
Norme die garanzia .................................. 46
Smaltimento / Tutela dell’ambiente ........... 46
Service ................................................... 14
Manual de instrucciones
Modelo 86880/86885/86886
Datos técnicos ........................................ 47
Explicación de símbolos ........................... 47
Para su seguridad .................................... 47
Montar.................................................... 50
Control remoto......................................... 51
Manejo ................................................... 52
Limpieza y cuidado .................................. 54
Condiciones de Garantia ........................... 54
Disposición/Protección del
medio ambiente ...................................... 54
Service ................................................... 14
Page 5

INHALTSVERZEICHNIS
Copyright UNOLD AG | www.unold.de
Návod k obsluze Modelu 86880/86885/86886
Technické údaje ..................................... 55
Vysvětlení symbolů ................................... 55
Pro Vaši bezpečnost ................................. 55
Montáž ................................................... 58
Dálkové ovládání ...................................... 59
Obsluha .................................................. 60
Čištění a péče ......................................... 61
Záruční podmínky .................................... 62
Likvidace / Ochrana životného prostředí .... 62
Service ................................................... 14
Instrukcja obsługi Model 86880/86885/86886
Dane techniczne ...................................... 63
Objaśnienie symboli ................................. 63
Dla bezpieczeństwa użytkownika ............... 63
Montaż ................................................... 66
Pilot ....................................................... 67
Obsługa .................................................. 68
Czyszczenie i pielęgnacja ......................... 70
Warunki gwarancji.................................... 70
Utylizacja / ochrona środowiska ................. 70
Service ................................................... 14
Page 6
BEDIENUNGSANLEITUNG MODELL 86880/86885/86886
Copyright UNOLD AG | www.unold.de
TECHNISCHE DATEN
Leistung: 65 Watt, 220–240 V~, 50 Hz
Maße: Ca. 45,5 x 39,0 x 132,5 cm (T/B/H), ø 40 cm
Gewicht: Ca. 8,2 kg
Luftgeschwindigkeit: ≥ 4,9 m/s
Luftdurchsatz: > 3480 m3/h
Geräuschpegel: ≤ 65 dB
Kabellänge: Ca. 180 cm
Farbe: 86880 weiß, 86885 schwarz, 86886 silber
Ausstattung: 3 Oszillation-Varianten (horizontal, vertikal, 3D), Fuß-
schalter am Sockel Zeitvorwahl (0,5 bis 7,5 Stunden),
Fernbedienung, Halterung für Fernbedienung am Gerät, Display am Gerät, 3 Geschwindigkeitsstufen
Zubehör: Bedienungsanleitung
Änderungen und Irrtümer in Ausstattungsmerkmalen, Technik, Farben und Design
vorbehalten
SYMBOLERKLÄRUNG
Dieses Symbol kennzeichnet eventuelle Gefahren, die Verletzungen
nach sich ziehen können oder zu Schäden am Gerät führen.
FÜR IHRE SICHERHEIT
Bitte lesen Sie die folgenden
Anweisungen und bewahren Sie
diese auf.
Personen im Haushalt
1. Das Gerät kann von Kindern
ab 8 Jahren und von Personen mit verringerten physischen, sensorischen oder
mentalen Fähigkeiten oder
Mangel an Erfahrung und/
oder Wissen benutzt werden, wenn sie beaufsichtigt werden oder bezüglich
des sicheren Gebrauchs des
Gerätes unterwiesen wurden
und die daraus resultierenden Gefahren verstanden
6
haben. Das Gerät ist kein
Spielzeug. Das Säubern und
die Wartung des Geräts dürfen von Kindern nur unter
Aufsicht durchgeführt werden.
Kinder dürfen nicht mit dem
2.
Gerät spielen und müssen
beaufsichtigt werden, um
dies sicher zu stellen.
3. Das Gerät an einem für Kinder unzugänglichen Ort aufbewahren.
Page 7
Sicherheitshinweise zum Aufstel-
Copyright UNOLD AG | www.unold.de
len und Betrieb des Gerätes
Schalten Sie das Gerät nur
4.
ein, wenn es ordnungsgemäß montiert wurde.
Achten Sie auf ausreichend
5.
Platz am Standort des Gerätes. Es müssen mindestens
cm zwischen dem Gerät
50
und anderen Gegenständen
eingehalten werden.
6. Verwenden Sie das Gerät
nicht in besonders staubhaltigen Räumen oder in der
Nähe brennbarer Substanzen.
Gerät nur an Wechselstrom
7.
mit Spannung gemäß Typenschild anschließen.
Dieses Gerät darf nicht mit
8.
einer externen Zeitschaltuhr
oder einem Fernbedienungssystem betrieben werden.
Tauchen Sie das Gerät oder
9.
die Zuleitung keinesfalls in
Wasser oder andere Flüssigkeiten ein – es besteht
Lebensgefahr!
Öffnen Sie auf keinen Fall
10.
das Gehäuse des Gerätes,
es besteht die Gefahr eines
Stromschlages!
11. Das Gerät ist ausschließlich
für den Haushaltsgebrauch
oder ähnliche Verwendungszwecke bestimmt, z. B.
in Teeküchen in Geschäf-
ten, Büros oder sonstigen
Arbeitsstätten,
zur Verwendung durch Gäste
in Hotels, Motels oder sonstigen Beherbergungsbetrieben,
in Privatpensionen oder
Ferienhäusern.
12. Achten Sie darauf, dass die
Zuleitung so verlegt wird,
dass ein Stolpern über die
Zuleitung ausgeschlossen
ist.
13. Um Schäden am Kabel zu
vermeiden, wickeln Sie die
Zuleitung nie um das Gerät.
14. Um Schäden am Kabel zu
vermeiden, ziehen Sie den
Netzstecker immer am Stecker aus der Steckdose,
ziehen Sie dabei nie an der
Zuleitung.
Achten Sie darauf, dass die
15.
verwendete Steckdose leicht
zugänglich ist, damit der
Stecker bei Gefahr schnell
herausgezogen werden kann.
16. Achten Sie darauf, die Zuleitung nicht einzuklemmen
oder über Ecken zu ziehen,
um Schäden an der Zuleitung zu vermeiden.
Verwenden Sie nach Mög-
17.
lichkeit kein Verlängerungskabel. Wenn dies nicht vermeidbar ist, wickeln Sie das
Verlängerungskabel bitte
vollständig ab und
beachten
Sie die Leistungsgrenzen
des jeweiligen Kabels.
18. Das Gerät darf nicht in nassen/nasskalten oder feuchten Räumen betrieben werden – Stromschlaggefahr!
Vermeiden Sie starke Son-
19.
neneinstrahlung auf das
Gerät.
Es dürfen niemals Gegen-
20.
stände wie Finger, Nadeln,
7
Page 8
Stifte etc. durch das Korb-
Copyright UNOLD AG | www.unold.de
gitter in das Innere des Gerätes gesteckt werden – Verletzungsgefahr!
Achten Sie darauf, dass sich
21.
lange Haare nicht im Flügelrad verfangen können.
Prüfen Sie regelmäßig das
22.
Gerät, den Stecker und die
Zuleitung auf Verschleiß
oder Beschädigungen. Bei
Beschädigung senden Sie
das Gerät bitte zur Überprüfung und Reparatur an unseren Kundendienst. Unsachgemäße Reparaturen können
zu erheblichen Gefahren für
den Benutzer führen und
haben den Ausschluss der
schließlich durch den
Hersteller bzw. dessen Kundenservice oder einer anderen, entsprechend fachlich
qualifizierten Person ausge
tauscht werden, um Gefahren zu vermeiden.
Um Schäden zu vermeiden,
24.
darf das Gerät nicht mit
Zubehör anderer Hersteller
oder Marken benutzt werden.
Nach Gebrauch sowie vor
25.
dem Reinigen den Netzstecker aus der Steckdose
ziehen. Das Gerät niemals
unbeaufsichtigt lassen,
wenn der Netzstecker eingesteckt ist.
Garantie zur Folge.
Wenn die Zuleitung beschä-
23.
digt ist, darf diese aus-
Es dürfen niemals Gegenstände wie Finger, Nadeln, Stifte etc.
durch das Korbgitter in das Innere des Gerätes gesteckt werden
– Verletzungsgefahr!
Das Gerät nur auf einem ebenen, stabilen Untergrund betreiben,
damit dieses nicht umkippt.
Der Hersteller übernimmt keine Haftung bei fehlerhafter Montage, bei unsachgemäßer oder fehlerhafter
Verwendung oder nach Durchführung von Reparaturen durch nicht autorisierte Dritte.
-
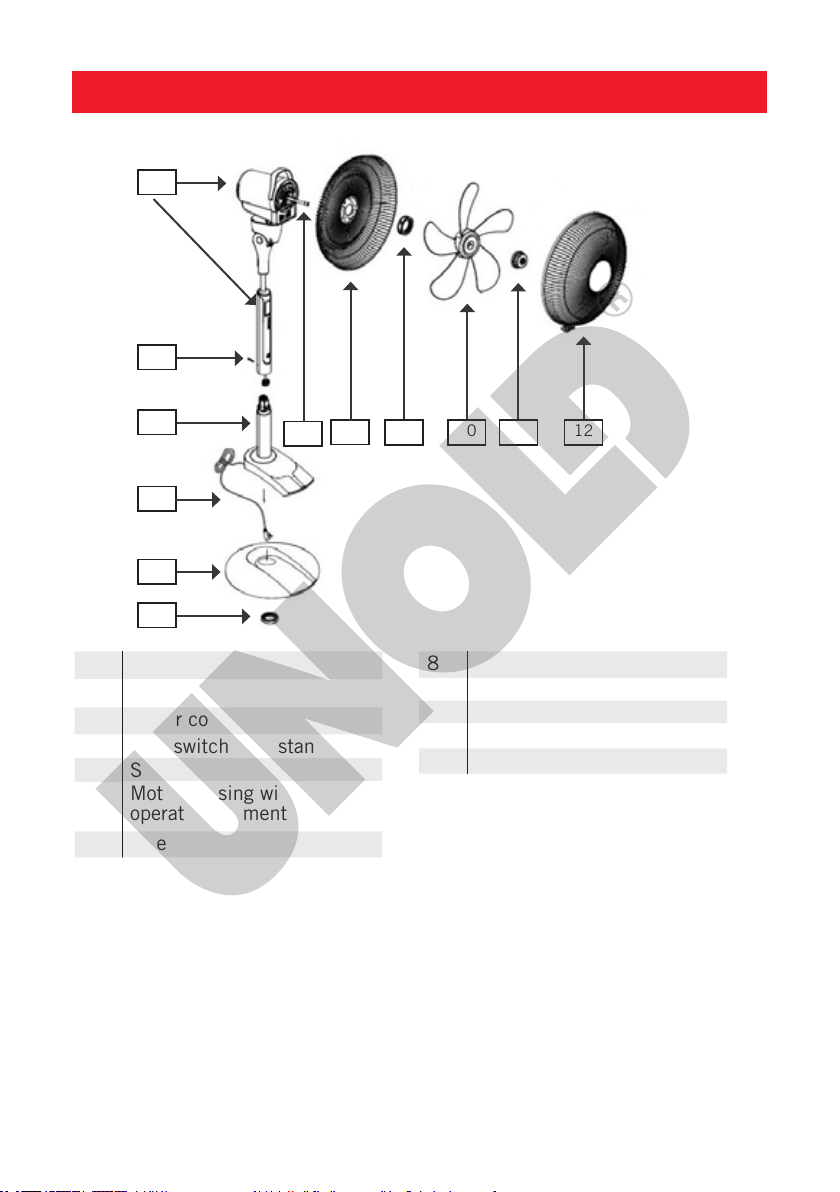
MONTIEREN
1 Feststellmutter (bereits am
Sockel vormontiert
2 Sockel
3 Zuleitung
4 Fußschalter mit unterem
Standrohr
5 Schraube
Motorgehäuse mit Bedien-
6
element und vierpoligem
Stecker
8
7 Achse
8 Hintere Korbabdeckung
9 Mutter
10 Flügelrad
11 Befestigungsring
12 Vordere Korbabdeckung
Page 9
6
Copyright UNOLD AG | www.unold.de
5
4
3
2
1
8
7
9 10 11 12
1. Stellen sie vor der Montage sicher,
dass Sie das Gerät auf einem ebe-
nen, trockenen Untergrund mon-
tieren.
2. Entfernen Sie alle Verpackungs-
materialien und Transportsiche-
rungen. Halten Sie Verpackungsmaterial wie z. B. Kunststoffbeutel
oder Styropor von Kleinkindern
fern – Erstickungsgefahr!
3. Prüfen Sie, ob alle benötigten
Teile vorhanden sind.
4. Ziehen Sie die Zuleitung (3) durch
den Sockel (2). Achten Sie darauf, dass das Ende der Zuleitung,
an dem der Netzstecker befestigt
ist, an der Unterseite des Sockels
herauskommt.
5. Am Sockel befindet sich eine
kleine Aussparung für die Zuleitung. Achten Sie darauf, dass Sie
die Zuleitung in diese Aussparung
drücken, damit das Gerät stabil
stehen kann.
6. Setzen Sie das untere Standrohr
(4) passgenau auf den Sockel (2).
Achten Sie dabei darauf, dass die
beiden „Nasen“ des Standrohrs
erst vorn in den Sockel eingesetzt
werden, und das Standrohr erst
dann nach hinten in den Sockel
einrasten. Der Fußschalter des
Sockels muss genau in die dafür
vorgesehene Aussparung im
Sockel passen. Das Standrohr ist
mit einer Feststellmutter (1) am
Sockel fixiert.
7. Stecken Sie das Motorgehäuse
(6) auf das Standrohr (4). Vergewissern Sie sich dabei, dass das
untere Ende des Motorgehäuses
genau auf die dafür vorgesehe-
9
Page 10
nen Löcher passt. Prüfen Sie
Copyright UNOLD AG | www.unold.de
außerdem, ob der vierpolige Stecker vom Motorgehäuse mit der
Buchse am unteren Standrohr
verbunden ist. Fixieren Sie beide
Bauteile mit der Schraube (5).
8. Befestigen Sie die hintere Korbabdeckung (8) am Motorgehäuse,
indem Sie die Abdeckung mit der
Mutter (9) fixieren.
9. Entfernen Sie die schwarze Hülse
von der Achse. Setzen Sie das
Flügelrad (10) auf die Achse (7)
am Motorgehäuse ein. Flügelrad
mit dem Befestigungsring (11)
fixieren. Achtung: Linksgewinde!
10. Verbinden Sie die vordere Korbabdeckung mit der hinteren Korb-
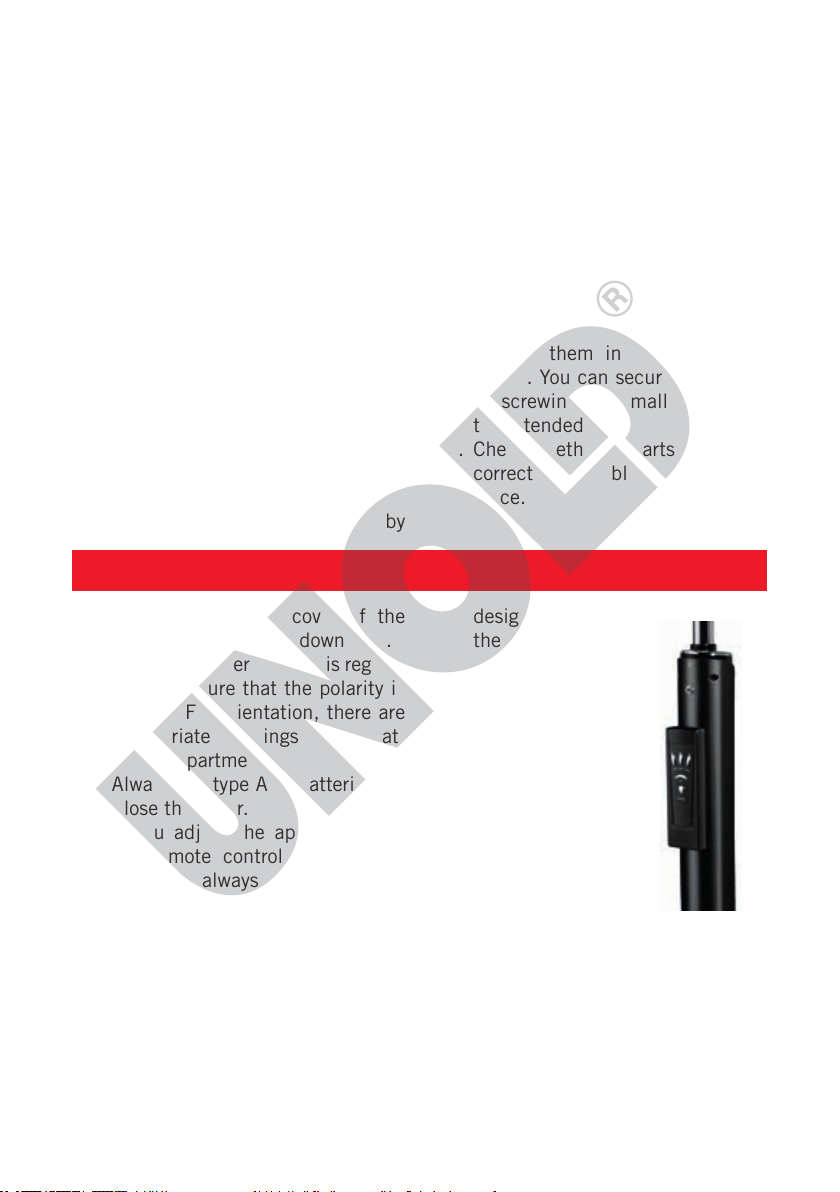
FERNBEDIENUNG
abdeckung. Prüfen Sie, ob der
schwarze Ring in der richtigen
Position ist (beide Korbhälften
müssen exakt im Ring sitzen),
und fixieren Sie diesen mit der
Klammer. Sie können die Klammer sichern, indem Sie die kleine
Schraube in das vorgesehen Loch
schrauben.
11. Prüfen Sie, ob alle Teile korrekt
montiert und fixiert wurden.
12. Achtung: Die Aluminiumfolienstücke
am Korbinneren dienen als
Verbindung zum Sensor. Nicht
beschädigen oder entfernen!
1. Schieben Sie die Abdeckung des
Batteriefachs vorsichtig nach
unten.
2. Setzen Sie die Batterien ein. Achten Sie hierbei bitte unbedingt
auf die richtige Polung. Zur Orien-
tierung sind entsprechende Markierungen in dem Batteriefach
angebracht.
3. Verwenden Sie nur Batterien vom
Typ AAA.
4. Schließen Sie die Abdeckung.
5. Wenn Sie das Gerät mit der Fernbedienung einstellen, achten Sie
darauf, diese während der Einstellungen immer in Richtung des
Ventilators zu halten.
10
6. Die Bezeichnungen
auf der Fernbedienung sind identisch
mit den Tasten am
Gerät.
7. Um Schäden zu vermeiden, lassen Sie
die Fernbedienung
bitte nicht aus großer Höhe fallen.
8. An der Rückseite
des Bedienelementes befindet sich
eine kleine Halterung, an der Sie die Fernbedienung praktisch aufbewahren können.
Page 11
BEDIENEN
Copyright UNOLD AG | www.unold.de
1. Vergewissern Sie sich, dass das
Gerät auf einem geeigneten, ebenen Untergrund steht und sicher
und stabil aufgestellt wurde.
2. Stecken Sie den Stecker in eine
Steckdose.
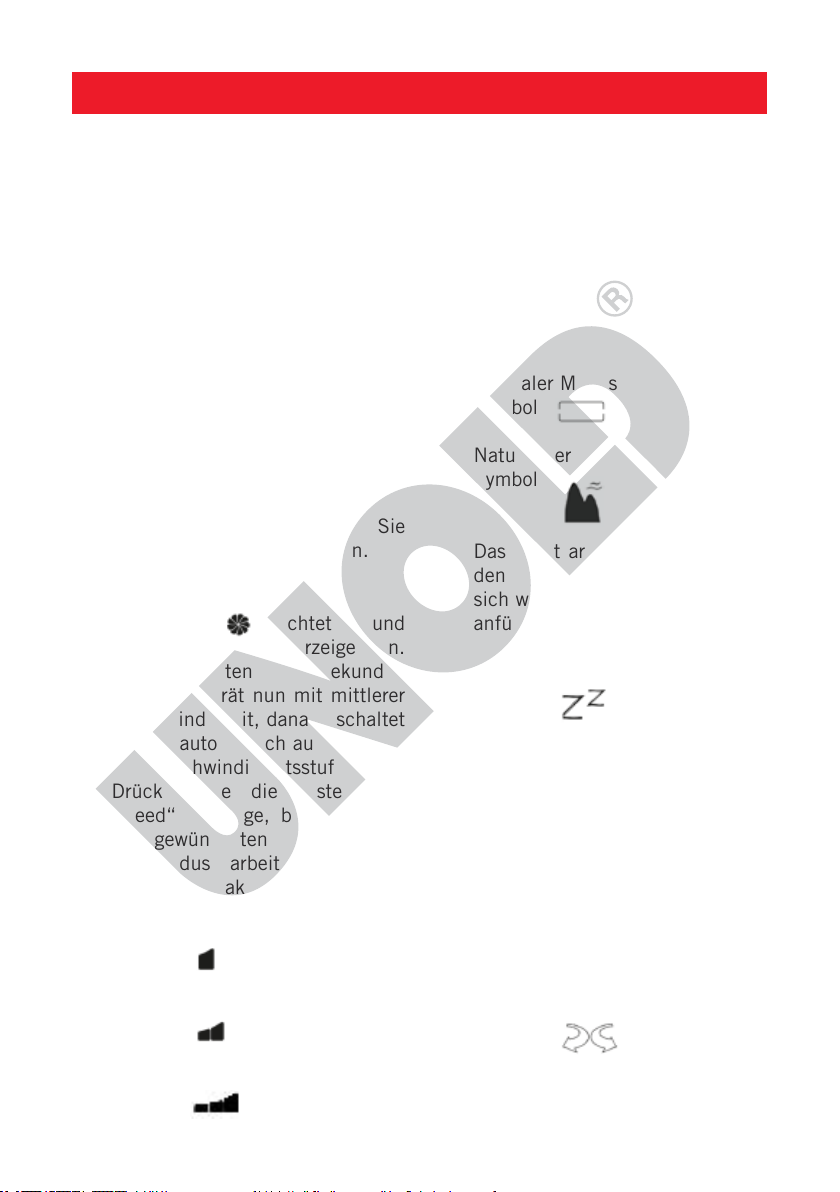
3. Drücken Sie die Taste „ON/
Speed“ (Fuß-Taste am Sockel
oder über die Fernbedienung).
Neigewinkel einstellen
4. Sie können das Motorgehäuse
in gewissem Umfang horizontal
neigen. Drücken Sie hierfür das
Motorgehäuse in den gewünschten Neigewinkel. Um Schäden am
Gerät zu vermeiden, wenden Sie
hierbei bitte keine Gewalt an.
Geschwindigkeit einstellen
5. Das Symbol
leuchtet auf und
bewegt sich im Uhrzeigersinn.
Für die ersten drei Sekunden
läuft das Gerät nun mit mittlerer
Geschwindigkeit, danach schaltet
es sich automatisch auf die niedrige Geschwindigkeitsstufe.
6. Drücken Sie die Taste „ON/
Speed“ so lange, bis das Gerät
im gewünschten Geschwindigkeitsmodus arbeitet. Die entsprechende aktuelle Einstellung
erscheint im Display.
Niedrige Geschwindigkeit:
Symbol
Mittlere Geschwindigkeit:
Symbol
Modus einstellen
7. Drücken Sie die Taste „Modus“
und wählen Sie die gewünschte
Betriebsart aus. Sie können zwischen Standard-, Naturnah- und
Schlaf-Modus wählen. Drücken
Sie die Taste „Modus“ so oft hintereinander, bis die gewünschte
Einstellung im Display angezeigt
wird.
Normaler Modus
Symbol
Naturnaher Modus
Symbol
Das Gerät arbeitet mit wechselnden Geschwindigkeiten, welche
sich wie natürliche Luftbewegung
anfühlen.
Schlaf-Modus
Symbol
Das Gerät arbeitet wie im naturnahem Modus mit wechselnden
Geschwindigkeiten, schaltet aber
nach jeweils 30 Minuten eine
Geschwindigkeitsstufe herunter.
Schwenkfunktion/Oszillation
8. Drücken Sie die Taste „Swing“
so lange, bis das Gerät mit der
gewünschten Schwenkfunktion
arbeitet.
Oszillation ausgeschaltet:
Symbol
Hohe Geschwindigkeit:
Symbol
11
Page 12

Horizontale Oszillation:
Copyright UNOLD AG | www.unold.de
Symbol
Vertikale Oszillation:
Symbol
3-D-Oszillation:
Alle Oszillationssymbole leuchten
Anionen-Funktion
Die Anionen-Funktion erfrischt
die ventilierte Luft. Bei aktivierter Anionen-Funktion blinkt
das Symbol. Werksseitig ist die
Anionen-Funktion immer deaktiviert. Möchten Sie die AnionenFunktion nutzen, müssen Sie
diese einschalten, indem Sie die
Taste „ANION“ drücken. Die nun
erzeugten Negativ-Ionen reinigen
die Raumluft, Staubteilchen werden bekämpft. Zum Ausschalten
der Funktion erneut die Taste
„ANION“ drücken. Diese Einstel-
lung kann nur direkt am Gerät,
und nicht über die Fernbedienung
vorgenommen werden.
Zeitvorwahl
9. Über die Taste „Timer“ können
Sie die gewünschte Laufzeit
des Gerätes auswählen. Dies ist
im Bereich 0,5 bis 7,5 Stunden möglich. Drücken Sie die
Taste „Timer“ so lange, bis die
gewünschte Stundenzahl im Display erscheint. Nach Ablauf dieser Zeit schaltet sich das Gerät
automatisch aus (vorher ertönt
ein Signalton). Wenn Sie keine
Zeiteinstellung vornehmen, läuft
das Gerät durchgehend.
Speicherfunktion
10. Wenn Sie das Gerät ausschalten,
wird die aktuell gewählte Einstellung gespeichert und das Gerät
startet beim nächsten Einschalten im gleichen Modus. Lediglich
Zeitwahl- und Schlaf-Modus können nicht gespeichert werden.
Sicherheitsfunktion
11. Achtung: Sobald der Korb des
Gerätes berührt wird, schaltet sich
das Gerät aus Sicherheitsgründen
sofort aus. Alle Display-Anzeigen
blinken auf, der Ventilator dreht
sich nicht mehr. Nach einigen
Sekunden schaltet sich das Gerät
automatisch wieder ein.
Ausschalten
12. Drücken Sie den Fußschalter
„OFF“ oder die Taste „OFF“ an
der Fernbedienung, um das Gerät
auszuschalten. Ziehen Sie den
Stecker aus der Steckdose, wenn
Sie das Gerät nicht mehr verwenden.
REINIGEN UND PFLEGEN
Schalten Sie das Gerät aus,
indem Sie die Taste „OFF“ drücken, und ziehen Sie den Stecker aus der Steckdose.
1. Achten Sie darauf, das Gerät niemals in Wasser zu tauchen. Motor
oder elektrische Bauteile des Gerätes dürfen nicht feucht werden.
12
2. Verwenden Sie grundsätzlich
keine scharfen Scheuermittel,
Stahlwolle, metallischen Gegenstände, heiße Reinigungsmittel
oder Desinfektionsmittel.
3. Wischen Sie Standrohr und Gitter
des Ventilators mit einem leicht
feuchten Tuch ab.
Page 13
4. Bewahren Sie den Ventilator an
Copyright UNOLD AG | www.unold.de
einem trockenen und sicheren Ort
Hitze und Feuchtigkeit zu schützen.
auf, um ihn vor Staub, Stößen,
GARANTIEBESTIMMUNGEN
Wir gewähren auf unsere Geräte eine Garantie von 24 Monaten, bei gewerblichem Gebrauch 12 Monate, ab dem
Kaufdatum für Schäden, die bei bestimmungsgemäßem Gebrauch nachweislich auf Werksfehler zurückzuführen sind. Innerhalb der Garantiezeit beheben wir Material- und Herstellungsfehler nach unserem Ermessen
durch Reparatur oder Umtausch. Unsere Garantieleistungen gelten ausschließlich für in Deutschland und
Österreich verkaufte Geräte. Bei anderen Ländern wenden Sie sich bitte an den zuständigen Importeur. Geräte,
für die eine Mängelbeseitigung beansprucht wird, senden Sie bitte zusammen mit einer Kopie des maschinell erstellten Kauf belegs, aus dem das Kaufdatum ersichtlich sein muss, sowie einer Fehlerbeschreibung gut
verpackt und freigemacht an unseren Kundendienst. Im Garantiefall werden dem Kunden in Deutschland und
Österreich entstandene Versandkosten zurückerstattet. Von der Garantie ausgeschlossen sind Schäden durch
Verschleiß, unsachgemäße Handhabung und Nichteinhaltung der Wartungs- und Pflegeanweisungen. Der Garantieanspruch erlischt, wenn Reparaturen oder Eingriffe am Gerät von dritter Stelle vorgenommen werden.
Eventuelle Ansprüche des Endverbrauchers gegenüber dem Verkäufer oder Händler werden durch diese Garantie
nicht eingeschränkt.
ENTSORGUNG / UMWELTSCHUTZ
Unsere Geräte werden auf hohem Qualitätsniveau für eine lange Nutzungsdauer her ge stellt.
Regelmäßige Wartung und fachge rechte Reparaturen durch unseren Kunden dienst können die
Nutzungsdauer des Gerätes verlängern. Wenn ein Gerät defekt und nicht mehr zu reparieren ist,
beachten Sie bitte: Dieses Produkt darf nicht zusammen mit dem normalen Hausmüll entsorgt
werden. Sie müssen dieses Produkt an einer ausgewiesenen Sammelstelle zum Recycling von
elektrischen oder elektronischen Geräten ab liefern. Durch das separate Sammeln und Recyceln
von Abfallprodukten helfen Sie mit, die natürlichen Ressourcen zu schonen und stellen sicher,
dass das Produkt in gesundheits- und umweltverträglicher Weise entsorgt wird.
Verbrauchte Batterien gehören nicht in den Hausmüll. Bitte entsorgen Sie diese über Ihren
Elektrohändler oder die jeweilige kommunale Sammelstelle.
INFORMATIONEN FÜR DEN FACHHANDEL
Hiermit erklärt die UNOLD AG, dass sich der Ventilator 86880/86885/86886 in Übereinstimmung
mit den grundlegenden Anforderungen der europäischen Richtlinie für elektromagnetische
Verträglichkeit (2004/108/EG) und der Niederspannungsrichtlinie (2006/95/EC) bendet.
Die Übereinstimmung mit den Regularien bezieht sich auf den Tag der Erstellung dieser Erklärung.
Hockenheim, 28.5.2013
UNOLD AG, Mannheimer Straße 4, 68766 Hockenheim
13
Page 14
SERVICE-ADRESSEN
Copyright UNOLD AG | www.unold.de
DEUTSCHLAND
Kundendienst
Telefon +49 (0) 62 05/94 18-27
Mannheimer Straße 4
68766 Hockenheim
Sie möchten innerhalb der Garantiezeit ein Gerät zur Reparatur einsenden? Auf unserer
Internetseite www.unold.de/ruecksendung können Sie sich einen Rücksendeschein ausdrucken,
um damit das Paket kostenlos bei der Post abzugeben (nur für Einsendungen aus Deutschland
und Österreich).
ÖSTERREICH SCHWEIZ
Telefax +49 (0) 62 05/94 18-22
E-Mail service@unold.de
Internet www.unold.de
Reparaturabwicklung, Ersatzteile:
ESC Electronic Service Center GmbH
Kelsenstraße 2
A-1030 Wien
Telefon +43 (0) 1/9 71 70 59
Telefax +43 (0) 1/9 71 70 59
E-Mail office@esc-service.at
MENAGROS AG
Hauptstr. 23
CH 9517 Mettlen
Telefon +41 (0) 71 6346015
Telefax +41 (0) 71 6346011
E-Mail info@bamix.ch
Internet www.bamix.ch
POLEN TSCHECHIEN
Quadra-Net
Dziadoszanska 10
61-248 Poznań
Internet www.quadra-net.pl
befree.cz s.r.o.
Škroupova 150
537 01 Chrudim
Telefon +42 0 46 46 01 881
E-Mail obchod@befree.cz
Diese Anleitung kann im Internet unter www.unold.de als pdf-Datei heruntergeladen werden.
14
Page 15
INSTRUCTIONS FOR USE MODEL 86880/86885/86886
Copyright UNOLD AG | www.unold.de
TECHNICAL SPECIFICATIONS
Power: 65 watt, 220–240 V~, 50 Hz
Dimensions: Approx. 45.0 x 39.0 x 132.5 cm (D/W/H), ø 40 cm
Weight: Approx. 8.2 kg
Air speed: ≥ 4.9 m/s
Air flow rate: > 3480 m
Noise level: ≤ 65 dB
Cable length: Approx. 180 cm
Color: 86880 white, 86885 black, 86886 silver
Features: 3 oscillation variants (horizontal, vertical, 3D), footswitch on
the base, time preselect (0.5 to 7.5 hours), remote control unit,
holder for the remote control unit on the appliance, display on
the appliance, 3 speed levels
Accessories: Operating instructions
Equipment features, technology, colours and design are subject to change without
notice.
EXPLANATION OF THE SYMBOLS
This symbol indicates potential hazards that may result in injury or
damage to the appliance.
3
/h
FOR YOUR SAFETY
Please read the following
instructions and keep them on
hand for later reference.
Instructions for persons in the
household
1. The appliance can be used
by children age 8 and up
and by persons with limited
physical, sensory or mental abilities or with lack of
experience or limited knowledge, if they are supervised
or have been instructed how
to use appliance safely and
have understood the dangers associated with using
the product. The appliance
is not a toy. Children may
clean and care for the appliance only under supervision.
Children should be super-
2.
vised to ensure that they do
not play with the appliance.
Keep the appliance out of
3.
the reach of children.
Safety instructions for set-up and
operation of the appliance
4. Only switch the appliance
on when it has been properly
assembled.
5. Ensure that there is sufficient space where the appli-
15
Page 16
ance is located. A minimum
Copyright UNOLD AG | www.unold.de
distance of 50 cm must be
maintained between the
appliance and other objects.
6. Do not use the appliance
in rooms that are extremely
dusty or in the vicinity of
flammable substances.
7. Only connect the appliance
to alternating current with
voltage in accordance with
the rating plate.
8. This appliance may not be
operated with an external
timer or a remote control
system.
9. Never immerse the appli
ance or the power cord in
water or other liquids - life-
threatening danger!
10.
Do not open the motor
housing under any circumstances, there is danger of
electric shock!
The appliance is intended
11.
for household use only, or for
similar areas of use, such as,
in kitchenettes in busines-
ses, offices or other workplaces,
for use by guests in hotels,
motels or other lodgings,
in private guest houses or
holiday homes.
12. Ensure that the power cord
is laid out in such a manner
that there is no possibility of
stumbling over it.
13. To avoid damage to the cord,
never wrap the power cord
around the appliance.
14. To avoid damage to the cord,
always unplug the mains
plug from the electrical out
let by grasping the plug,
never pull the power cord to
unplug the appliance.
15.
Ensure that the electrical
outlet used is easily accessible, in order to unplug the
appliance in an emergency.
To avoid damage to the
16.
power cord, ensure that it is
not pinched or pulled over
corners.
17. If possible, do not use an
extension cord. If you must
use an extension cord, completely unwind the extension
cord and comply with the
power limits of the respective extension cord.
The appliance must never
18.
be used in wet/wet and cold
rooms - danger of electric
shock!
19. Keep the appliance out of
direct sunlight.
20. Never stick objects such as
fingers, needles, pins, etc.
through the basket grille into
the interior of the appliance
- danger of injury!
21. Ensure that long hair cannot
be caught by the impeller.
22. Regularly check the appli
ance, the plug and the power
cord for wear or damage.
In
case of damage, please send
the appliance for inspection
and repair to our customer
service department. Unauthorised repairs can result in
serious hazards for the user
and void the warranty.
16
Page 17

Pull the mains plug out of
Copyright UNOLD AG | www.unold.de
23. If the supply cord is damaged, it must be replaced by
the manuafacture, its service
agent or similarly qualified
persons to avoid a hazard.
To avoid damage, do not use
24.
25.
the socket after use, as well
as before cleaning. Never
leave the appliance unattended if the mains plug is
plugged in.
the appliance with accessories of other manufacturers
or brands.
Never stick objects such as fingers, needles, pins, etc. through
the basket grille
into the interior of the appliance - danger of
injury!
Only operate the appliance on a level, stable substrate, so that
it does not tip over.
The manufacturer will not be liable in the event of incorrect assembly, improper or incorrect use or if
repairs are carried out by unauthorized third parties.
17
Page 18
ASSEMBLY
Copyright UNOLD AG | www.unold.de
6
5
4
3
2
1
8
7
9 10 11 12
1 Fixing nut
2 Base
3 Power cord
4 Foot switch with stand tube
5 Screw
Motor housing with
6
operating element
7 Axle
1. Before assembling, ensure that
you are assembling the appliance
on a level, dry, substrate.
2. Remove all packaging materials
and transport safeguards. Keep
the packaging material, such as
plastic bags or Styrofoam away
from small children - danger of
suffocation!
8 Rear basket cover
9 Nut
10 Impeller
11 Fastening ring
12 Front basket cover
3. Check whether all needed parts
are present.
4. Pull the power cord (3) through
the base (2). Ensure that end
of the power cord on which the
mains plug is fastened, comes out
on the underside of the base.
5. On the base there is a small aperture for the power cord. Ensure
18
Page 19
that you press this power cord
Copyright UNOLD AG | www.unold.de
into this aperture so that the
appliance can stand stable.
6. Precisely fit the stand tube (4)
onto the base (2). Ensure that
the foot switch on the base fits
precisely into the aperture on the
base intended for this purpose.
The stand tube is fixed in place
on the base with a fixing nut (1).
7. Fit the motor housing (6) onto the
stand tube (4). In this process,
ensure that the lower end of the
motor housing fits precisely onto
the holes intended for this purpose. Fix the components in place
with the screw (5).
8. Fasten the rear basket cover (8)
on the motor housing (6), by
REMOTE CONTROL UNIT
fixing the cover in place with the
nut (9).
9. Place the impeller (10) on the
axle (7) on the motor housing. Fix
the impeller in place with the fastening ring (11).
10. Connect the front basket cover to
the rear basket cover. Check whether the black ring is in the right
position (both halves of the basket must sit precisely in the ring)
and fix them in place with the
clamp. You can secure the clamp
by screwing the small screw into
the intended hole.
11. Check whether all parts have been
correctly assembled and fixed in
place.
1. Carefully slide the cover of the
battery compartment downward.
2. Insert the batteries. In this regard,
strictly ensure that the polarity is
correct. For orientation, there are
appropriate markings in the battery compartment.
3. Always use type AAA batteries.
4. Close the cover.
5. If you adjust the appliance with
the remote control unit, ensure
that you always hold it in the
direction of the fan while you are
making the settings.
6. The designations on the remote
control unit are identical to the
designations of
the buttons on the
appliance.
7. To avoid damage,
never allow the
remote control unit
to fall from a significant height.
8. On the rear of the
operating element,
there is a small holder on which you
can practically store
the remote control
unit.
19
Page 20

OPERATION
Copyright UNOLD AG | www.unold.de
1. Ensure that the appliance is
standing on a suitable, level
substrate, and has been set up so
that it is safe and stable.
2. Plug the power cord into an
electrical outlet.
3. Press the „On/Speed“ button
(foot button on the base, or via
the remote control unit).
Setting the tilt angle
4. You can tilt the motor housing
horizontally to a certain extent. To
do this, press the motor housing
into the desired tilt angle. To
avoid damage to the appliance,
do not use force.
Setting the speed
5. The symbol
lights up and
moves clockwise. For the first
three seconds, the appliance is
now running at medium speed,
thereafter it switches automati-
cally to the low speed.
6. Press the „On/Speed“ button
repeatedly until the appliance
is working in the desired speed
mode. The current setting appears
in the display.
Low speed:
Symbol
Medium speed:
Symbol
High speed
Symbol
Setting the mode
7. Press the „Mode“ button and
select the desired operating
mode. You can select Standard
mode, Near Natural mode, and
Sleep mode. Press the „Mode“
button repeatedly until the desired setting appears in the display.
Standard mode
Symbol
Near Natural mode
Symbol
The appliance works with alternating speeds that feel like the
natural movement of air.
Sleep mode
Symbol
The appliance works as in natural
mode, with changing speed. Every
30 minutes speed will change.
Swing function/oscillation function
8. Press the „Swing“ button repeatedly until the appliance is working with the desire swing function.
Oscillation switched off:
Symbol
Horizontal oscillation:
Symbol
20
Page 21
Vertical oscillation:
Copyright UNOLD AG | www.unold.de
Symbol
3D oscillation:
All oscillation symbols are illuminated.
Anion function
The anion function refreshes
the ventilated air. With the
anion function activated, the
symbol is flashing. The anion
function is always deactivated in
the factory. If you want to use the
anion function, you must switch
it on by pressing the „ANION“
button. The negative ions that are
now generated, clean the room
air, dust particles are reduced.
To switch off the function, press
the „ANION“ button again. This
setting can only be made directly
on the appliance and not via the
remote control unit.
Timer
9. Via the „Timer“ button you can
select the desired runtime of the
appliance. This is possible in the
range from 0.5 hour to 7.5 hours.
Press the „Timer“ button until the
desired number of hours appears
in the display. After this time
elapses the appliance switches off
automatically. If you do not make
a time setting, the appliance will
run continuously.
Memory function
10. When you switch off the appliance, the currently selected settings will be saved and the appliance will start in the same mode,
the next time you switch on the
appliance. Only the time preselect and sleep mode cannot be
saved.
Safety function
11. Caution: When the basket of the
appliance is touched, the appliance will switch off immediately
for safety reasons. All displays
will flash on, the fan will no longer turn. After several seconds the
appliance will switch on automatically.
Switching off
Press the foot switch „OFF“ or the
„OFF“ button on the remote control unit to switch off the appliance. When you are no longer
using the appliance, unplug the
plug from the electrical outlet.
21
Page 22
CLEANING AND CARE
Copyright UNOLD AG | www.unold.de
Switch off the appliance, by
pressing the „OFF“ button, and
unplug it from the electrical
outlet.
1. Ensure that the appliance is never
immersed in water. The motor
and electrical components of the
appliance must not get wet.
hot cleaning agents or disinfectants.
3. Wipe off the stand tube, and grille
of the fan with a slightly damp
cloth.
4. Store the fan in a dry, safe place
so that it is protected from dust,
shocks, heat and moisture.
2. Never use any abrasive scouring
agents, steel wool, metal objects,
GUARANTEE CONDITIONS
We grant a 24 months guarantee, and in case of commercial use a 12 months guarantee, starting from the date
of purchase for any damage demonstrably due to manufacturing defects and when the appliance has been used
according to its intended use. Within the warranty period we will remedy defective materials or workmanship
through repair or replacement, at our option. Our warranty terms apply only to appliances sold in Germany
and Austria. For other countries, please contact the responsible importer. In the event of a claim for remedy of
defects, please send the appliance to our after sales service, properly packaged and postage paid, together with
a copy of the automatically generated sales receipt, which must show the date of purchase, and a description
of the defect. If the defect is covered by the warranty, the customer will be reimbursed for the shipping costs
only in Germany and Austria. The warranty does not cover damage from normal wear, improper handling and
failure to comply with the maintenance and care instructions. The warranty is void if repairs or modifications
are made to the appliance by third parties. Any claims of the end consumer vis-à-vis the retailer are not limited
by this warranty.
WASTE DISPOSAL / ENVIRONMENTAL PROTECTION
Our appliances are produced on a high quality level for a long lifetime. Regular maintenance
and expert repairs by our after-sales service can extend the useful life of the appliance. If an
appliance is defective and repair is not possible we ask you to follow the following instructions
for disposal. Do not dispose this appliance together with your standard household waste. Please
bring this product to an approved collection point for recycling of electric and electronic products. By separate collection and disposal of waste products you help to protect natural resources
and ensure, that the product is disposed in an adequate way to protect health and environment.
Do not dispose of used batteries as household waste. Dispose of this product via
your appliance dealer or take it to the municipal collection point.
The instruction booklet is also available for download: www.unold.de
22
Page 23

NOTICE D´UTILISATION MODÈLE 86880/86885/86886
Copyright UNOLD AG | www.unold.de
SPÉCIFICATION TECHNIQUE
Puissance : 65 Watts, 220–240 V~, 50 Hz
Dimensions : Env. 45,5 x 39,0 x 132,5 cm (p/l/h), ø 40 cm
Poids : Env. 8,2 kg
Vitesse de l‘air : ≥ 4,9 m/s
Débit d‘air : > 3 480 m
Niveau sonore : ≤ 65 dB
Couleur : 86880 blanc, 86885 noir, 86886 argent
Équipement : 3 variantes d‘oscillation (horizontale, verticale, 3D), interrupteur
à pédale sur le socle, pré-sélection de durée (0,5 à 7,5 heures),
télécommande, support pour télécommande sur l‘appareil,
écran sur l‘appareil, 3 niveaux de vitesse
Accessoires : Mode d‘emploi
Modifications et erreurs des caractéristiques de l‘équipement, de la technique, des
couleurs et du design réservées
EXPLICATION DES SYMBOLES
Ce symbole vous indique des risques possibles qui puissent entraîner
des lésions ou des endommagements de l’appareil.
POUR VOTRE SÉCURITÉ
3
/h
Veuillez lire les indications
suivantes et les conserver.
Personnes dans le foyer
1. L‘appareil peut être
utilisé par des enfants de
plus de 8 ans et par des
personnes dont les capacités
physiques, sensorielles ou
intellectuelles sont limitées
ou dont l‘expérience et/
ou les connaissances sont
insuffisantes, si ceux-ci
sont surveillés ou s‘ils ont
été formés à une utilisation
sûre de l‘appareil et aux
dangers pouvant en résulter.
L‘appareil n‘est pas un
jouet. Le nettoyage et la
maintenance de l‘appareil
peuvent être exécutés par
des clients, exclusivement
sous surveillance.
2. Les enfants doivent être
surveillés et ne doivent pas
jouer avec l’appareil.
3. Conserver l’appareil hors de
portée des enfants.
23
Page 24
Remarques de sécurité relatives à
Copyright UNOLD AG | www.unold.de
l‘installation et au fonctionnement
de l‘appareil
4. Allumer l‘appareil
uniquement s‘il a été monté
correctement.
5. S‘assurer que l‘espace
est suffisant à l‘endroit
où l‘appareil est installé.
Dégager au moins 50 cm
entre l‘appareil et les autres
objets.
6. Ne pas utiliser l‘appareil dans
des espaces poussiéreux ou
à proximité de substances
inflammables.
7. Raccorder exclusivement
l’appareil au courant
alternatif à la tension se
conformant au panneau
signalétique.
8. Cet appareil ne doit pas être
utilisé avec un minuteur
externe ou un système de
commande à distance.
9. Ne plonger en aucun cas
l’appareil ou son cordon
d’alimentation dans l’eau
ou dans tout autre liquide :
danger de mort !
10. N‘ouvrir en aucun cas le
boîtier de l‘appareil : risque
d‘électrocution !
11. L‘appareil est exclusivement
destiné à un usage ménager
ou à des fins similaires, par
ex.
dans une kitchenette dans
des boutiques, des bureaux
ou d‘autres lieux de travail,
à l‘usage des clients dans
des hôtels, motels ou autres
dans des pensions privées ou
des résidences de vacances.
12. Veiller à ce que le cordon
d‘alimentation ne puisse pas
être source de trébuchement.
13. Afin de ne pas endommager
le cordon, ne l‘enroulez
jamais autour de l‘appareil.
14. Afin de ne pas endommager
le cordon, débranchez
toujours au niveau de la
prise de courant. Ne tirez
jamais sur le cordon.
15. Attention : la prise de courant
utilisée doit être aisément
accessible afin de pouvoir
débrancher rapidement
l‘appareil en cas de danger.
16. Attention : ne pas pincer le
cordon ou le faire passer sur
des angles afin d‘éviter toute
détérioration.
17. Si besoin, utiliser une
rallonge. Si cela ne peut
pas être évité, dérouler
totalement la rallonge et
respecter les puissances
maximales admissibles du
câble en question.
18. L‘appareil ne doit pas être
utilisé dans des locaux
humides / froids ou moites :
risque d‘électrocution !
19. Évitez tout rayonnement
intense du soleil sur
l‘appareil.
20. Ne jamais introduire des
objets comme des doigts,
des ongles, des crayons, etc.
à travers la grille de la cage
à l‘intérieur de l‘appareil :
risque de blessure !
lieux d‘hébergement,
24
Page 25

21. Attention à ne pas coincer
Copyright UNOLD AG | www.unold.de
des cheveux longs dans
l‘hélice.
22. Vérifiez régulièrement
l’usure et la détérioration
de l’appareil, de la prise et
du câble. Si l’appareil est
abîmés, envoyer l’appareil
pour contrôle et réparation
à notre service après-vente.
Toute réparation nonconforme peut provoquer
des risques importants pour
l’utilisateur et entraîner
l’exclusion de la garantie.
de service ou toute autre
personne professionnel
qualifié afin d‘éviter un
danger.
24. L’appareil ne doit pas être
utilisé avec des accessoires
d‘autres fabricants ou
marques, afin d’éviter des
détériorations.
25. Débrancher l’appareil du
secteur après utilisation
et avant le nettoyage. Ne
jamais laisser l’appareil sans
surveillance lorsque la prise
est branchée.
23. Si le câble est endommagé,
il doit être remplacé par
le fabricant ou son agent
Ne jamais introduire des objets comme des doigts, des ongles,
des crayons, etc. à travers la grille de la cage à l‘intérieur de
l‘appareil : risque de blessure !
L‘appareil doit uniquement être utilisé sur un support stable et
plat afin qu‘il ne bascule pas.
Le fabricant n’est nullement responsable en cas de montage non conforme, d‘utilisation irrégulière ou non
conforme ou suite à l’exécution de réparations par des tiers non autorisés.
25
Page 26

MONTAGE
Copyright UNOLD AG | www.unold.de
6
5
4
3
2
1
8
7
9 10 11 12
1 Écrou de fixation
2 Socle
3 Câble d’alimentation
4 Interrupteur à pédale avec
tube
5 Vis
Carter moteur avec élément
6
de commande
7 Axe
1. Avant le montage, s‘assurer que
l‘appareil sera installé sur un
support sec et plat.
2. Retirer tous les matériaux
d‘emballage et les protections
de transport. Tenir les matériaux
d‘emballage, comme les sacs en
plastique ou le polystyrène, hors
8 Capot de cage arrière
9 Écrou
10 Hélice
11 Anneau de fixation
12 Capot de cage avant
de portée des enfants en bas âge :
risque d‘asphyxie !
3. Vérifier si toutes les pièces
nécessaires sont présentes.
4. Faire passer le cordon
d‘alimentation (3) à travers le
socle (2). Attention : l‘extrémité
du cordon à laquelle la prise est
26
Page 27

fixée doit ressortir en-dessous du
Copyright UNOLD AG | www.unold.de
socle.
5. Un petit évidement se situe
sur le socle pour le cordon
d‘alimentation. Attention :
appuyer sur le cordon pour le
coincer dans cet évidement afin
que l‘appareil soit stable.
6. Installer le tube (4) précisément
sur le socle (2). Veiller à ce que
l‘interrupteur à pédale sur le socle
soit exactement installé dans le
logement prévu à cet effet dans le
socle. Le tube est fixé au socle à
l‘aide d‘un écrou de fixation (1).
7. Installer le carter moteur (6) sur le
tube (4). Ce faisant, s‘assurer que
l‘extrémité inférieure du carter
moteur est exactement placée sur
les trous prévus à cet effet. Fixer
les deux éléments à l‘aide de la
vis (5).
TÉLÉCOMMANDE
8. Fixer le capot de cage arrière (8)
sur le carter moteur (6), en fixant
le capot à l‘aide de l‘écrou (9).
9. Placer l‘hélice (10) sur l‘axe (7)
au niveau du carter moteur. Fixer
l‘hélice avec l‘anneau de fixation
(11).
10. Relier le capot de cage avant avec
le capot de cage arrière. Vérifier
si l‘anneau noir est dans la bonne
position (les deux demi-cages
doivent être exactement placées
sur l‘anneau) et fixer ce dernier à
l‘aide de l‘attache. Il est possible
de bloquer l‘attache en vissant la
petite vis dans le trou prévu.
11. Vérifier que toutes les pièces
ont été montées et fixées
correctement.
1. Pousser délicatement le capot du
compartiment à piles vers le bas.
2. Installer les piles. Ce faisant, res-
pecter la polarité. Pour s‘en assurer, se conformer aux marquages
correspondants présents dans le
compartiment à piles.
3. Utilisez que des piles de type
AAA.
4. Fermer le capot.
5. Si vous réglez l‘appareil avec
la télécommande, assurez-vous
de toujours la pointer sur le
ventilateur durant les réglages.
6. Les mentions sur la télécommande
sont identiques aux touches
situées sur l‘appareil.
7. Afin d‘éviter toute
détérioration,
ne laissez pas la
télécommande
chuter de grande
hauteur.
8. Un petit support
permettant de ranger astucieusement
la télécommande se
situe à l‘arrière de
l‘élément de commande.
27
Page 28

UTILISATION
Copyright UNOLD AG | www.unold.de
1. S‘assurer que l‘appareil est placé
sur une surface plate et appropriée, et qu‘il est parfaitement stable et immobile.
2. Brancher la prise sur le secteur.
3. Appuyer sur la touche « ON/
Speed » (interrupteur à pédale sur
le socle ou sur la télécommande).
Régler l‘angle d‘inclinaison
4. Vous pouvez incliner le carter
moteur horizontalement dans
une certaine mesure. Pour cela,
appuyer sur le carter moteur
pour l‘orienter dans l‘angle
d‘inclinaison souhaité. Afin de ne
pas détériorer l‘appareil, ne faites
pas usage de force pour y parve-
nir.
Régler la vitesse
5. Le symbole
s‘allume et se
déplace dans le sens des aiguilles d‘une montre. Durant les trois
premières secondes, l‘appareil
fonctionne à vitesse moyenne,
puis il passe automatiquement
sur le niveau de vitesse le plus
faible.
6. Appuyer sur la touche « ON/
Speed » jusqu‘à ce que l‘appareil
travaille à la vitesse souhaitée. Le
réglage actuel s‘affiche à l‘écran.
Vitesse faible :
Le symbole
Vitesse moyenne :
Le symbole
Vitesse élevée :
Le symbole
Régler le mode
7. Appuyer sur la touche « Mode »
et choisir le mode de fonctionnement souhaité. Vous pouvez
choisir le mode standard, naturel
ou repos. Appuyer sur la touche
« Mode » plusieurs fois successivement jusqu‘à ce que le réglage
souhaité s‘affiche à l‘écran.
Mode normal
Le symbole
Mode naturel
Le symbole
L‘appareil fonctionne à vitesses
variables s‘apparentant au
mouvement naturel de l‘air.
Mode repos
Le symbole
L‘appareil fonctionne comme
mode natural à vitesse réduite variable. Après 30 minutes,
l‘appareil passe un niveau plus
bas
Fonction de pivotement / Oscillation
8. Presser plusieurs fois la touche «
Swing » successivement jusqu‘à
ce que l‘appareil travaille avec la
fonction de pivotement souhaitée.
Oscillation éteinte :
Le symbole
Oscillation horizontale :
Le symbole
28
Page 29

Oscillation verticale :
Copyright UNOLD AG | www.unold.de
Le symbole
Oscillation 3D :
Tous les symboles d‘oscillation
s‘allument.
Fonction Anions
La fonction Anions rafraîchit
l‘air ventilé. Lorsque la fon-
ction Anions est active, le
symbole clignote. La fonction
Anions est toujours désactivée en
usine. Si vous souhaitez utiliser
la fonction Anions, vous devez
l‘activer en appuyant sur la touche « ANION ». Les ions négatifs désormais générés purifient
l‘air ambiant et les particules de
poussière sont éliminées. Afin
de désactiver la fonction, presser une nouvelle fois la touche «
ANION ». Ce réglage peut unique-
ment être effectué directement
sur l‘appareil, mais pas à partir
de la télécommande.
Présélection de la durée
9. La touche « Timer » permet de
sélectionner la durée de fonctionnement de l‘appareil souhaitée.
La plage de réglage s‘étend de
0,5 à 7,5 heures. Appuyer sur la
touche « Timer » jusqu‘à ce que
la durée souhaitée s‘affiche à
l‘écran. Une fois ce temps écoulé,
l‘appareil s‘éteint automatiquement. Si vous ne réglez pas de
durée, l‘appareil fonctionne en
permanence.
Fonction de sauvegarde
10. Lorsque vous éteignez l‘appareil,
le réglage actuel est sauvegardé
et l‘appareil redémarre dans le
même mode la fois suivante. La
pré-sélection de durée et le mode
repos sont les seuls réglages qui
ne peuvent pas être sauvegardés.
Fonction de sécurité
11. Attention : dès que quelqu‘un
/ quelque chose touche la cage,
l‘appareil s‘arrête immédiatement
pour des raisons de sécurité. Tous
les affichages sur l‘écran clignotent et le ventilateur ne tourne
plus. Après quelques secondes,
l‘appareil redémarre automatiquement.
Éteindre
12. Appuyer sur l‘interrupteur à
pédale « OFF » ou sur la touche
« OFF » sur la télécommande
pour éteindre l‘appareil. Débrancher l‘appareil si vous ne devez
plus l‘utiliser.
29
Page 30

NETTOYAGE ET ENTRETIEN
Copyright UNOLD AG | www.unold.de
Éteindre l‘appareil en appuyant sur la touche « OFF » et
débrancher la prise.
1. Attention : ne jamais plonger
l‘appareil dans l‘eau. Le moteur
ou les éléments électriques de
l‘appareil ne doivent jamais être
humides.
2. En principe, n‘utilisez aucun
de détergent chaud ou de désinfectant.
3. Essuyer le tube et la grille du ventilateur avec un chiffon légèrement humidifié.
4. Conserver le ventilateur dans un
endroit sec et sûr, à l’abri de la
poussière, des chocs, de la chaleur et de l’humidité.
abrasif puissant, pas de laine de
verre, d’objets métalliques, pas
CONDITIONS DE GARANTIE
En cas d’utilisation conforme et lors de dégâts manifestement dus à des défauts de fabrication, nos appareils
sont garantis 24 mois, lors d’utilisation professionnelles 12 mois, à dater de l’achat. Notre garantie n’est
valide que pour les appareils vendus en Allemagne et en Autriche. Dans tout autre pays veuillez contacter
l’importateur. Veuillez envoyer à notre adresse les appareils, pour lesquels vous réclamez une suppression de
défauts, avec le bon d’achat montrant la date d’achat, port payé et proprement emballé. Les coûts de transport
seront remboursés en cas de garantie en Allemagne et en Autriche. Les défauts causés par usure, utilisation
incorrecte ou non-respect des instructions de maintenance sont exclus. Notre obligation de garantie cesse, si
de réparations ou des interventions sont accomplies par des tiers. Cette garantie n’affecte pas les droits du
consommateur contre le commerçant.
TRAITEMENT DES DÉCHETS / PROTECTION DE L’ENVIRONNEMENT
Nos appareils sont produits selon un standard élevé de qualité pour une longue durée
d’utilisation. Un entretien régulier et des réparations compétentes par notre service après-vente
prolongent cette durée d’utilisation. Si néanmoins l’appareil est endommagé et ne peut plus être
réparé, veuillez suivre les instructions suivantes. Ne jamais disposer ce produit avec les dégâts
de ménage. Apportez ce produit à une station de collection pour récupération de produits électriques et électroniques. Par la collection séparée vous aidez à protéger les ressources naturelles
et prenez soin, que le produit est démonté sans risque pour la santé et l’environnement.
Ne pas jeter les piles usées dans les ordures ménagères. Veuillez les éliminer
chez un revendeur en électricité ou dans votre déchetterie communale.
30
Page 31

GEBRUIKSAANWIJZING MODEL 86880/86885/86886
Copyright UNOLD AG | www.unold.de
TECHNISCHE GEGEVENS
Vermogen: 65 Watt, 220–240 V~, 50 Hz
Afmetingen: Ca. 45,5 x 39,0 x 132,5 cm (d/b/h), ø 40 cm
Gewicht: Cca. 8,2 kg
Luchtsnelheid: ≥ 4,9 m/s
Luchtstroom: > 3480 m
Geluidsniveau: < 65 dB
Kleur: 86880 wit, 86885 zwart, 86886 zilver
Uitvoering: 3 oscillatie-varianten (horizontaal, verticaal, 3D) voetschakelaar
aan de sokkel, timer (0,5 tot 7,5 uur), afstandsbediening,
houder voor de afstandsbediening aan het apparaat, display aan
het apparaat, 3 snelheidstrappen
Toebehoren: Gebruiksaanwijzing
Wijzigingen en vergissingen in de uitrustingskenmerken, techniek, kleuren en design
voorbehouden
VERKLARING VAN DE SYMBOLEN
Dit symbool wijst op eventuele gevaren die letsel tot gevolg kunnen
hebben of tot schade aan het apparaat leiden.
VOOR UW VEILIGHEID
3
/h
Lees de volgende aanwijzingen
a.u.b. door en bewaar ze goed.
Personen in het huishouden
1. Het apparaat kan door kinderen van 8 jaar en ouder
gebruikt worden en door personen met beperkte fysieke,
sensorische of mentale vaardigheden of met gebrek aan
ervaring en/of kennis, mits
zij onder toezicht staan of
instructies over het gebruik
van dit apparaat hebben
gekregen en de hieruit
resulterende gevaren begrepen hebben. Het apparaat
is geen speelgoed. Het
apparaat mag uitsluitend
door kinderen gereinigd en
onderhouden worden, indien
deze onder toezicht staan.
Kinderen moeten onder toe-
2.
zicht staan, om ervoor te
zorgen dat ze niet met het
apparaat spelen.
Bewaar het apparaat op een
3.
plaats die ontoegankelijk is
voor kinderen.
31
Page 32

Veiligheidsinstructies voor het
Copyright UNOLD AG | www.unold.de
opstellen en gebruik van het apparaat
Schakel het apparaat pas in,
4.
als het volgens de voorschriften gemonteerd werd.
Let op dat er genoeg ruimte
5.
voorhanden is op de plaats
waar het apparaat opgesteld
is. Er moet minstens 50 cm
afstand tussen het apparaat
en andere voorwerpen aangehouden worden.
Gebruik het apparaat niet in
6.
bijzonder stoffige ruimtes of
in de buurt van brandbare
substanties.
7. Sluit het apparaat uitsluitend aan op wisselstroom
met spanning overeenkoms-
tig het typeplaatje.
Dit apparaat mag niet met
8.
een externe tijdklok of met
een afstandsbediening
bediend worden.
9. Dompel het apparaat of de
aansluitkabel nooit in water
of andere vloeistoffen – er
bestaat levensgevaar!
10. Open de behuizing van het
apparaat nooit, er bestaat
gevaar voor een elektrische
schok!
11. Het apparaat is uitsluitend
bestemd voor huishoudelijk
gebruik of voor soortgelijke
doeleinden, bijv.
in kitchenettes in winkels,
kantoren of andere werk
-
plaatsen,
voor gebruik door gasten
van hotels, motels of andere
overnachtingsbedrijven,
in particuliere pensions of
vakantiehuisjes.
12. Let op dat de aansluitkabel
zodanig gelegd wordt dat er
niemand over kan struikelen.
13. Wikkel de aansluitkabel
nooit om het apparaat, om
schade aan de kabel te ver
-
mijden.
14.
Trek de netstekker steeds
direct aan de stekker uit het
stopcontact en trek nooit aan
de aansluitkabel, om schade
aan de kabel te vermijden.
15. Let op dat het gebruikte
stopcontact gemakkelijk
toegankelijk is, zodat de
stekker bij gevaar snel uit
het stopcontact kan worden
getrokken.
16. Let op dat de aansluitka
bel niet ingeklemd wordt of
langs een hoek wordt gelegd,
om schade aan de kabel te
vermijden.
17.
Maak zo mogelijk geen
gebruik van een verlengkabel. Als dit onvermijdelijk
is, rol de verlengkabel dan
a.u.b. helemaal af en neem
de prestatiegrenzen van de
betreffende kabel in acht.
Het apparaat mag niet in
18.
natte/natkoude of vochtige
ruimtes worden gebruikt –
gevaar voor een elektrische
schok!
32
Page 33

19. Stel het apparaat niet bloot
Copyright UNOLD AG | www.unold.de
aan sterk zonlicht.
20. Er mogen nooit voorwerpen
door het rooster heen in het
binnenste van de ventilator
worden gestoken, zoals vingers, naalden, pennen enz.
– verwondingsgevaar!
Let op dat lange haren niet
21.
in het schoepenwiel verstrikt
kunnen raken.
22. Controleer het apparaat, de
stekker en de aansluitkabel regelmatig op slijtage
of beschadiging. Als de
apparaat beschadigd zijn,
stuur het apparaat dan a.u.b.
ter controle en reparatie naar
onze klantenservice. Ondes-
kundige reparaties kunnen
ernstige
gevaren voor de
gebruiker veroorzaken en
Er mogen nooit voorwerpen door het rooster heen in het binnenste van de ventilator worden gestoken, zoals vingers, naalden, pennen enz. – verwondingsgevaar!
Het apparaat uitsluitend op een effen, stabiele ondergrond gebruiken, zodat het niet kan omvallen.
hebben uitsluiting van de
garantie tot gevolg.
23.
Als de kabel is beschadigd,
moet deze alleen worden
vervangen door de fabrikant
of zijn vertegenwoordiger of
een andere gekwalificeerde
professional persoon om
gevaar te voorkomen.
24. Om schade te vermijden,
mag het apparaat niet met
toebehoren van andere fab
rikanten of andere merken
worden gebruikt.
25.
Trek de netstekker uit het
stopcontact nadat u het
apparaat heeft gebruikt en
voordat u het gaat reinigen.
Laat het apparaat nooit zonder toezicht achter, als de
netstekker in het stopcontact steekt.
De fabrikant is niet aansprakelijk, indien het apparaat verkeerd gemonteerd, ondeskundig of foutief
gebruikt of door niet geautoriseerde derden gerepareerd werd.
33
Page 34

MONTEREN
Copyright UNOLD AG | www.unold.de
6
5
4
3
2
1
8
7
9 10 11 12
1 Vastzetmoer
2 Sokkel
3 Aansluitkabel
4 Voetschakelaar met
standbuis
5 Schroef
Motorbehuizing met
6
bedieningselement
7 As
1. Controleer vóór de montage of
de ondergrond voor het apparaat
effen en droog is.
2. Verwijder alle verpakkingsmaterialen en transportbeveiligingen.
Houd verpakkingsmaterialen,
zoals bijv. kunststof zakken of styropor uit de buurt van kleine kinderen – verstikkingsgevaar!
34
8 Achterste roosterafdekking
9 Moer
10 Schoepenwiel
11 Bevestigingsring
12 Voorste roosterafdekking
3. Controleer of alle benodigde
onderdelen compleet voorhanden
zijn.
4. Trek de aansluitkabel (3) door de
sokkel (2). Zorg ervoor dat het
uiteinde van de aansluitkabel
waaraan de stekker bevestigd is,
aan de onderkant van de sokkel
uitsteekt.
Page 35

5. Aan de sokkel bevindt zich een
Copyright UNOLD AG | www.unold.de
kleine uitsparing voor de aansluitkabel. Let erop dat u de aansluitkabel in deze uitsparing drukt,
zodat het apparaat stabiel kan
staan.
6. Plaats de standbuis (4) exact passend op de sokkel (2). Let op dat
de voetschakelaar van de sokkel
precies in de hiervoor voorziene
uitsparing in de sokkel past. De
standbuis wordt met een vastzetmoer (1) aan de sokkel bevestigd.
7. Steek de motorbehuizing (6) op
de standbuis (4). Controleer of het
onderste uiteinde van de motorbehuizing precies op de hiervoor
voorziene gaten past. Bevestig de
beide componenten met behulp
van de schroef (5).
8. Bevestig de achterste roosterafdekking (8) aan de motorbehu-
AFSTANDSBEDIENING
izing door de afdekking met de
moer (9) te bevestigen.
9. Plaats het schoepenwiel (10) op
de as (7) van de motorbehuizing.
Het schoepenwiel bevestigen met
de bevestigingsring (11).
10. Verbind de voorste roosterafdekking met de achterste roosterafdekking. Controleer of de zwarte
ring zich in de juiste positie
bevindt (beide helften van de roosterafdekking moeten zich exact in
de ring bevinden) en bevestig deze
met de klem. U kunt de klem borgen door de kleine schroef in het
hiervoor voorziene gat te draaien.
11. Controleer of alle onderdelen
correct gemonteerd en bevestigd
werden.
1. Schuif de afdekking van het batterijvak voorzichtig omlaag.
2. Plaats de batterijen in het vak.
Zorg hierbij absoluut voor de
juiste poling. Als oriëntatie zijn
desbetreffende markeringen in
het batterijvak aangebracht.
3. Let er dan op dat u uitsluitend batterijen van het type AAA gebruikt.
4. Sluit de afdekking.
5. Als u het apparaat met de
afstandsbediening wilt instellen,
let er dan op dat u dit tijdens de
instellingen steeds in de richting
van de ventilator houdt.
6. De aanduidingen op de afstandsbediening zijn identiek met de
knoppen aan het apparaat.
7. Laat de afstandsbediening niet vanuit
een grote hoogte
naar beneden vallen, om schade te
vermijden.
8. Aan de achterkant
van het bedieningselement bevindt
zich een kleine
houder waarin u de
afstandsbediening
heel praktisch kunt
opbergen.
35
Page 36

BEDIENEN
Copyright UNOLD AG | www.unold.de
1. Controleer of het apparaat op een
geschikte, effen ondergrond staat
en veilig en stabiel neergezet
werd.
2. Steek de stekker in een stopcontact.
3. Druk op de knop „ON/Speed“
(voetschakelaar aan de sokkel of
m.b.v. de afstandsbediening).
Kantelhoek instellen
4. U kunt de motorbehuizing in
bepaalde mate horizontaal kantelen. Druk de motorbehuizing hiervoor in de gewenste kantelhoek.
Oefen hierbij echter geen geweld
uit, om schade aan het apparaat
te vermijden.
Snelheid instellen
5. Het symbool is verlicht en
beweegt zich met de klok mee. De
eerste 3 seconden lang draait het
apparaat nu op gemiddelde snel-
heid, daarna schakelt het automa-
tisch naar de lage snelheidsstand.
6. Druk zo vaak op de knop „ON/
Speed“ totdat het apparaat in de
gewenste snelheidsmodus werkt.
De desbetreffende actuele instelling verschijnt in het display.
Lage snelheid:
Symbool
Gemiddelde snelheid:
Symbool
Modus instellen
7. Druk op de knop „Modus“ en stel
de gewenste modus in. U kunt
kiezen tussen de standaardmodus, de modus dicht bij de natuur
en de slaapmodus. Druk zo vaak
op de knop „Modus“ totdat de
gewenste instelling in het display
weergegeven wordt.
Normale modus
Symbool
Modus dicht bij de natuur
Symbool
Het apparaat werkt met wisselende snelheden die het gevoel
van een natuurlijke luchtbeweging geven.
Slaap-modus
Symbool
Het apparaat werkt als modus
dicht bij de natuur met een gereduceerde, veranderende snelheid.
Na 30 minuten, schakelt het toestel naar beneden één niveau
Zwenkfunctie/oscillatie
8. Druk zo vaak op de knop „Swing“,
totdat het apparaat met de
gewenste zwenkfunctie werkt.
Oscillatie uitgeschakeld:
Symbool
Hoge snelheid:
Symbool
36
Horizontale oscillatie:
Symbool
Page 37

Verticale oscillatie:
Copyright UNOLD AG | www.unold.de
Symbool
3-D-oscillatie:
Alle oscillatiesymbolen zijn verlicht.
Anionen-functie
De anionen-functie verfrist de
geventileerde lucht. Als de
anionen-functie geactiveerd
is, knippert het symbool. Af fabriek is de anionen-functie steeds
gedeactiveerd. Als u van de anionen-functie gebruik wilt maken,
moet u deze inschakelen door op
de knop „ANION“ te drukken. De
negatieve ionen die nu gegenereerd worden, reinigen de kamer-
lucht en gaan stofdeeltjes tegen.
Om deze functie uit te schakelen, moet u opnieuw op de knop
„ANION“ drukken. Deze instelling
kan enkel direct aan het apparaat
en niet m.b.v. de afstandsbediening uitgevoerd worden.
Timer
9. Via de knop „Timer“ kunt u de
gewenste werkingsduur van het
apparaat instellen. Deze duur
kan tussen een 0,5 uur en 7,5
uur ingesteld worden. Druk zo
vaak op de knop „Timer“, tot het
gewenste aantal uren in het display verschijnt. Na afloop van
deze tijd schakelt het apparaat
automatisch uit. Wanneer u geen
tijd instelt, werkt het apparaat
ononderbroken door.
Opslagfunctie
10. Als u het apparaat uitschakelt,
wordt de actuele instelling opgeslagen en als het apparaat weer
ingeschakeld wordt, start het in
dezelfde modus. Alleen de timeren de slaapmodus kunnen niet
opgeslagen worden.
Veiligheidsfunctie
11. Attentie: Zodra de roosterafdekking van het apparaat aangeraakt
wordt, schakelt het apparaat om
veiligheidsredenen onmiddellijk
uit. Alle display-weergaves knipperen, de ventilator draait niet
meer. Na enkele seconden schakelt het apparaat zich automatisch weer in.
Uitschakelen
Druk op de voetschakelaar
„OFF“ of op de knop „OFF“ aan
de afstandsbediening, om het
apparaat uit te schakelen. Trek
de stekker uit het stopcontact,
wanneer u het apparaat niet meer
gebruikt.
37
Page 38

REINIGING EN ONDERHOUD
Copyright UNOLD AG | www.unold.de
Schakel het apparaat uit door
op de knop „OFF“ te drukken
en trek dan de stekker uit het
stopcontact.
1. Denk eraan dat u het apparaat nooit
in water dompelt. De motor of de
elektrische componenten mogen
niet vochtig worden.
2. Gebruik nooit scherpe schuurmiddelen, staalwol, metalen voorwer-
pen, hete schoonmaakmiddelen
of desinfecterende middelen.
3. Veeg de standbuis en het rooster
van de ventilator met een licht
vochtige doek af.
4. Berg de ventilator op een droge en
veilige plaats op, om deze tegen
stof, stoten, hitte en vocht te
beschermen.
GARANTIEVOORWAARDEN
Wij geven op onze apparaten een garantietermijn van 24 maanden (12 maanden bij commerciële gebruik), gerekend vanaf de dag van aanschaf. Deze garantie geldt voor schade, die bij correct gebruik aantoonbaar is veroorzaakt door een fout in de productie. Binnen de garantietermijn verhelpen wij materiaal- en productiefouten
door herstelling of vervanging naar onze keuze. Onze garantie is slechts geldig voor in Duitsland en Oostenrijk
verkopte apparaten. In andere landen a.u.b. de importeur aanspreken. Apparaaten, waarvoor garantie in aanspraak wordt genomen, moeten ons samen met een kopie van de machineel gegenereerde kassabon waaruit de
koopdatum duidelijk wordt, alsmede een beschrijving van de fout goed verpakt aan onze klantenservice worden
toegezonden, porto betaald. Als er sprake van garantie is, worden de verzendingskosten in Duitsland en Oostenrijk aan de klant vergoed. De garantie dekt geen schade veroorzaakt door slijtage, onbehoorlijk gebruik/foutieve
handelingen en niet-naleving van de onderhouds- en reinigingsaanwijzingen. Het recht op garantie vervalt,
wanneer reparaties of manipulaties aan het apparaat door derden worden doorgevoerd. Eventuele rechten van
de eindgebruiker t.o.v. de verkoper of distributeur worden door deze garantie niet aangetast.
VERWIJDEREN VAN AFVAL / MILIEUBESCHERMING
Onze apparaten zijn geproduceerd met een hoge qualiteit voor een lange gebruik. Regelmatige
onderhoud en vakkundig reparaties door onze klantenservice verlengt de gebruiksduur. Wanneer het apparat defekt is en kan niet meer gerepareerd worden, let op de volgende instructies.
Dit product mag niet samen met het normale huishoudelijke afval worden afgevoerd. U dient
dit product bij een voor het recycleren van elektrische of elektronische apparaten aangewezen
verzamelplaats in te leveren. Door het separaat inzamelen en recycleren van afvalproducten
helpt u mee bij het zuinig omgaan met de natuurlijke hulpbronnen en zorgt u ervoor dat het
product op een gezondheids- en milieuvriendelijke manier afgevoerd wordt.
Verbruikte batterijen horen niet bij het gewone huisvuil. Geef uw verbruikte batterijen alstublieft af bij uw elektrohandelaar of bij de desbetreffende gemeentelijke inzamelplaats.
38
Page 39

ISTRUZIONI PER L’USO MODELLO 86880/86885/86886
Copyright UNOLD AG | www.unold.de
DATI TECNICI
Potenza: 65 Watt, 220–240 V~, 50 Hz
Misure: Circa 45,5 x 39,0 x 132,5 cm (P/L/H), ø 40 cm
Peso: Circa 8,2 kg
Velocità dell‘aria: ≥ 4,9 m/s
Portata d‘aria: > 3480 m
Livello di rumore: ≤ 65 dB
Colore: 86880 bianco, 86885 nero, 86886 argento
Dotazioni: 3 varianti di oscillazione (orizzontale, verticale, 3D),
pedale della base, preselezione tempo (0,5 - 7,5 ore),
telecomando, sostegno telecomando dell‘apparecchio,
display dell‘apparecchio, 3 livelli di velocità
Accessori: Istruzioni per l‘uso
Con riserva di modifiche ed errori relativi a caratteristiche delle dotazioni, tecnica,
colore e design
SIGNIFICATO DEI SIMBOLI
Questo simbolo segnala possibili pericoli in grado di provocare lesioni a
persone o danni all‘apparecchio.
PER LA VOSTRA SICUREZZA
3
/h
Si raccomanda di leggere e con-
servare le presenti istruzioni.
Persone in ambito domestico
L‘apparecchio può essere
1.
utilizzato da bambini a partire dagli 8 anni di età e
da persone che presentano
ridotte capacità fisiche, sensoriali o mentali o che difettano della necessaria esperienza e/o conoscenze solo
se adeguatamente sorvegliati o addestrati sull‘uso in
sicurezza dell‘apparecchio
e se a conoscenza dei rischi
correlati. L‘apparecchio
non è un giocattolo. La
pulizia e la manutenzione
dell‘apparecchio possono
essere effettuate da bambini
soltanto sotto sorveglianza.
I bambini devono essere
2.
sorvegliati per accertarsi
che non giochino con
l’apparecchio.
3. Conservare l‘apparecchio
fuori dalla portata dei bam
-
bini.
Avvertenze di sicurezza per
l‘installazione e l‘esercizio
dell‘apparecchio
4.
Accendere l‘apparecchio
soltanto se è stato correttamente montato.
39
Page 40

5. Fare attenzione che nel
Copyright UNOLD AG | www.unold.de
posto in cui l‘apparecchio
è installato sia disponibile
uno spazio sufficiente. Tra
l‘apparecchio e altri oggetti
deve essere mantenuta una
distanza di almeno 50 cm.
6. Non utilizzare l‘apparecchio
in spazi particolarmente polverosi o nelle vicinanze di
sostanze infiammabili.
Collegare l’apparecchio sol-
7.
tanto a corrente alternata
con la tensione indicata
sulla targhetta.
Questo apparecchio non
8.
deve essere comandato tramite timer esterni o sistemi
di telecomando.
Non immergere mai
9.
l‘apparecchio o il cavo di alimentazione in acqua o altri
liquidi – sussiste pericolo di
morte!
Non aprire mai la scocca
10.
dell‘apparecchio, sussiste il
pericolo di scosse elettriche!
11. L’apparecchio è progettato
esclusivamente per l’uso
domestico o per impieghi
similari, ad es.
in aree cucina di negozi,
uffici o altri luoghi di lavoro,
per l‘uso da parte degli
ospiti di hotel, motel o altre
strutture ricettive,
in pensioni private o case di
vacanza.
12. Fare attenzione che il cavo
di alimentazione sia posato
in modo da escludere che si
possa inciamparvi sopra.
13. Per evitare danni al cavo,
non avvolgere mai il cavo
di alimentazione attorno
all‘apparecchio.
14. Per evitare danni al cavo,
staccare la spina di rete
dalla presa elettrica affer
rando sempre la spina, mai
il cavo di alimentazione.
Fare attenzione che la presa
15.
elettrica usata sia facilmente
accessibile, in modo che
in caso di pericolo la spina
possa essere staccata velocemente.
Prestare attenzione a non
16.
incastrare il cavo di alimentazione o a non tirarlo sugli
spigoli, al fine di evitare di
danneggiarlo.
Se possibile, non usare pro-
17.
lunghe. Se ciò è inevitabile,
si raccomanda di srotolare
completamente la prolunga
e di osservare i limiti prestazionali del relativo cavo.
Non far funzionare
18.
l‘apparecchio in ambienti
umidi o umidi e freddi –
pericolo di scossa elettrica!
19. Evitare radiazioni solari
intense sull‘apparecchio.
20. Non introdurre mai oggetti
come dita, aghi, spine
ecc. attraverso la griglia
all‘interno dell‘apparecchio
– pericolo di ferirsi!
21. Prestare attenzione che i
capelli lunghi non possano
impigliarsi nella ruota a pale.
22. Controllare regolarmente
che l’apparecchio, la spina
40
Page 41

e il cavo di alimentazi-
Copyright UNOLD AG | www.unold.de
one non presentino tracce
di usura o danni. Qualora
l‘apparecchio è danneggiato
inviare l‘apparecchio alla
nostra assistenza clienti per
la verifica e la riparazione.
Riparazioni non idonee possono infatti causare notevoli
pericoli per l‘utente e comportano il decadere della
garanzia.
Se il cavo è danneggiato,
23.
deve essere sostituito solo
dal costruttore o dal suo
agente di servizio o qualsiasi
altra persona professionista
qualificato al fine di evitare
situazioni pericolose.
24. Per evitare danni,
l‘apparecchio non deve
essere utilizzato con acces
sori di altri produttori o altri
marchi.
25.
Dopo l’utilizzo, nonché
prima della pulizia, staccare la spina dalla presa
elettrica. Non lasciare mai
l’apparecchio incustodito
quando la spina è inserita.
Non introdurre mai oggetti come dita, aghi, spine ecc. attraver
so la griglia all‘interno dell‘apparecchio – pericolo di ferirsi!
Far funzionare l‘apparecchio soltanto su un sottofondo piano e
stabile, di modo che non si rovesci.
Il produttore declina qualunque responsabilità in caso di montaggio errato, utilizzi errati o non idonei o
qualora le riparazioni siano eseguite da terzi non autorizzati.
-
41
Page 42

MONTAGGIO
Copyright UNOLD AG | www.unold.de
6
5
4
3
2
1
8
7
9 10 11 12
1 Dado di arresto
2 Base
3 Cavo di alimentazione
4 Pedale con colonna montante
5 Vite
Scocca del motore con
6
elemento di comando
7 Asse
1. Prima del montaggio accertarsi
che l‘apparecchio sia montato su
un sottofondo piano e asciutto.
2. Rimuovere tutti i materiali da
imballo e le protezioni da trasporto. Tenere i materiali da
imballo, come ad es. sacchetti in
plastica o polistirolo, fuori dalla
8 Copertura posteriore della
griglia
9 Dado
10 Ruota a pale
11 Anello di fissaggio
12 Copertura anteriore della
griglia
portata dei bambini – pericolo di
soffocamento!
3. Controllare che tutte le parti
richieste siano presenti.
4. Far passare il cavo di alimentazione (3) attraverso la base
(2). Prestare attenzione che
l‘estremità del cavo di alimentazi-
42
Page 43

one a cui è fissata la spina di rete
Copyright UNOLD AG | www.unold.de
fuoriesca dal lato inferiore della
base.
5. Sulla base è presente una piccola feritoia per il cavo di alimentazione. Prestare attenzione
a spingere il cavo di alimentazione in tale feritoia, di modo che
l‘apparecchio sia posizionato in
maniera stabile.
6. Posizionare la colonna montante
(4) sulla base (2) in maniera che
si inserisca perfettamente. Controllare che il pedale entri perfettamente nell‘apposita apertura
della base. La colonna montante
è fissata alla base con un dado di
arresto (1).
7. Inserire la scocca del motore (6)
sulla colonna montante (4) accer-
tandosi che l‘estremità inferiore
della scocca vada a inserirsi esat-
tamente negli appositi fori. Fis-
TELECOMANDO
sare entrambi i componenti con
la vite (5).
8. Agganciare la copertura posteriore
della griglia (8) alla scocca del
motore (6), fissando la copertura
con il dado (9).
9. Posizionare la ruota a pale (10)
sull‘asse (7) della scocca del
motore. Fissare la ruota a pale
con l‘anello di fissaggio (11).
10. Collegare la copertura anteriore
della griglia con quella posteriore.
Verificare che l‘anello nero sia in
posizione corretta (le due metà
della griglia devono essere perfettamente inserite nell‘anello) e
fissarlo con la graffa. E‘ possibile
bloccare la graffa avvitando la
vitina nel foro previsto.
11. Verificare che tutte le parti siano
state correttamente montate e fissate.
1. Spingere cautamente verso il
basso il coperchio del vano bat-
terie.
2. Inserire le batterie facendo assolutamente attenzione alla polarità
corretta. Quale riferimento nel
vano batterie sono presenti apposite marcature.
3. Utilizzare soltanto pile tipo AAA.
4. Chiudere il coperchio.
5. Nel regolare l‘apparecchio con il
telecomando, stare attenti che
durante le regolazioni questo sia
puntato sempre in direzione del
ventilatore.
6. Le designazioni sul telecomando sono identiche a quelle
dell‘apparecchio.
7. Per evitare danni,
non far cadere il
telecomando da
grandi altezze.
8. Sul retro
dell‘elemento di
comando è presente
un sostegno di piccole dimensioni,
su cui è possibile
conservare il telecomando in maniera
molto pratica.
43
Page 44

USO
Copyright UNOLD AG | www.unold.de
1. Assicurarsi che l‘apparecchio
sia posizionato su un sottofondo
piano idoneo e che sia stato installato in maniera stabile e sicura.
2. Inserire la spina in una presa elettrica.
3. Premere il tasto „ON/Speed“
(pedale della base oppure tramite
il telecomando).
Impostazione dell‘angolo di inclinazione
4. La scocca del motore può essere
inclinata, in una certa misura,
in senso orizzontale spingendola verso l‘angolo di inclinazione desiderato. Per evitare danni
all‘apparecchio, non usare assolu-
tamente la forza.
Regolazione della velocità
5. Il simbolo si illumina e si
muove in senso orario. Per i primi
tre secondi l‘apparecchio funziona a velocità media, quindi si
porta automaticamente sul livello
di velocità basso.
6. Premere il tasto „ON/Speed“ finché l‘apparecchio lavora nella
modalità velocità desiderata.
Sul display compare la rispettiva
impostazione attuale.
Velocità bassa:
Il simbolo
Impostazione della modalità
7. Premere il tasto „Modo“ e selezionare la modalità operativa desiderata. E‘ possibile scegliere tra
le modalità Standard, Naturale e
Sonno. Premere il tasto „Modo“
in sequenza finché il display visualizza l‘impostazione desiderata.
Modo Normale
Il simbolo
Modo Naturale
Il simbolo
L‘apparecchio lavora a velocità
mutevoli, che assomigliano ai
movimenti dell‘aria naturale.
Modo Sonno
Il simbolo
L‘apparecchio funziona come
modo naturale con spogliatoi
velocità. Dopo 30 minuti, l‘unità
passa basso di un livello.
Funzione Swing/oscillazione
8. Premere il tasto „Swing“ finché
l‘apparecchio lavora con la funzione Swing desiderata.
Oscillazione disattivata:
Il simbolo
Velocità media:
Il simbolo
Velocità alta:
Il simbolo
44
Oscillazione orizzontale:
Il simbolo
Oscillazione verticale:
Il simbolo
Page 45

Oscillazione 3-D:
Copyright UNOLD AG | www.unold.de
Tutti i simboli di oscillazione si
illuminano.
Funzione anioni
La funzione anioni depura
l‘aria ventilata. Se la funzione
anioni è attivata il simbolo
lampeggia. Nell‘impostazione
di fabbrica la funzione anioni
è disattivata. Se si desidera
utilizzare la funzione anioni, è
necessario attivarla premendo
il tasto „ANION“. Gli ioni
negativi così prodotti depurano
l‘aria ambientale, abbattendo
le particelle di polvere. Per
disattivare la funzione premere
nuovamente il tasto „ANION“.
Questa impostazione può essere
eseguita soltanto direttamente
sull‘apparecchio e non tramite il
telecomando.
Temporizzazione
9. Tramite il tasto „Timer“ è pos-
sibile selezionare il tempo di
funzionamento desiderato per
l‘apparecchio nell‘intervallo tra
0,5 e 7,5 ore. Premere il tasto
„Timer“ finché sul display compare il numero di ore desiderato.
Dopo che è trascorso tale lasso
di tempo l‘apparecchio si disat-
tiva automaticamente. Se non è
eseguita alcun‘impostazione temporale, l‘apparecchio funziona in
maniera continua.
Funzione memoria
10. Quando l‘apparecchio è spento,
l‘impostazione attualmente selezionata è memorizzata e alla successiva accensione l‘apparecchio
si avvia nella medesima modalità.
Soltanto le modalità Temporizzazione e Sonno non possono essere
memorizzate.
Funzione di sicurezza
11. Attenzione: Non appena la griglia
dell‘apparecchio è toccata, per
ragioni di sicurezza, l‘apparecchio
si spegne immediatamente.
Tutte le indicazioni del display
lampeggiano, il ventilatore non
gira più. Dopo qualche secondo
l‘apparecchio si riaccende automaticamente.
Spegnimento
12. Per spegnere l‘apparecchio premere il pedale „OFF“ oppure il
tasto „OFF“ del telecomando.
Quando l‘apparecchio non viene
più utilizzato staccare la spina
dalla presa elettrica.
45
Page 46

PULIZIA E CURA
Copyright UNOLD AG | www.unold.de
Spegnere l‘apparecchio premendo il tasto „OFF“ e staccare
la spina dalla presa elettrica.
d’acciaio, oggetti metallici, disinfettanti o detergenti caldi.
3.
4. Strofinare la colonna montante e
1. Prestare attenzione a non immer-
gere l‘apparecchio in acqua. Il
motore o i componenti elettrici
dell‘apparecchio non devono diventare umidi.
la griglia del ventilatore con un
panno leggermente inumidito.
5. Conservare il ventilatore in un
luogo asciutto e sicuro al riparo
da polvere, urti, calore e umidità.
2. In linea di principio non bisogna usare prodotti abrasivi, lana
NORME DIE GARANZIA
I nostri prodotti sono garantiti per 24 mesi, 12 mesi in caso di uso professionale, dalla data di acquisto
per i guasti manifestatisi durante un utilizzo conforme alle disposizioni e attribuibili in modo dimostrabile a
difetti di fabbricazione. Nel periodo di garanzia porremo rimedio ai difetti materiali e di produzione secondo
la nostra valutazione, procedendo alla riparazione o alla sostituzione dell’apparecchio. Le nostre prestazioni
di garanzia valgono esclusivamente per gli apparecchi venduti in Germania e Austria. In tutti gli altri casi
rivolgersi all‘importatore. Gli apparecchi per i quali si richiede la riparazione di guasti ci devono essere inviati
con spedizione affrancata e debitamente imballati, unitamente a una copia del documento di acquisto redatto
a macchina dal quale risulti la data di vendita, nonché la descrizione del guasto. In caso di garanzia al cliente
verranno rimborsati i costi di spedizione sostenuti in Germania e Austria. Sono esclusi dalla garanzia i guasti
dovuti all’usura, all’uso inappropriato o al mancato rispetto delle regole di manutenzione. Il diritto di garanzia
decade qualora siano state effettuate riparazioni o interventi da parte di terzi. Eventuali diritti del consumatore
finale verso il venditore o negoziante non vengono limitati dalla presente garanzia.
SMALTIMENTO / TUTELA DELL’AMBIENTE
I nostri apparecchi vengono prodotti rispettando un elevato standard qualitativo per una lunga
durata di utilizzo. Una corretta manutenzione e riparazioni adeguate a cura dal nostro servizio
clienti possono prolungare la durata di utilizzo del prodotto. Se un apparecchio è difettoso e non
più riparabile, per il suo smaltimento si presti attenzione ai punti che seguono. Questo prodotto
non deve essere smaltito unitamente ai comuni rifiuti domestici. Consegnare il prodotto a un
centro di raccolta per il riciclaggio dei rifiuti elettrici o elettronici. Con la raccolta differenziata
dei rifiuti e dei prodotti riciclabili è possibile contribuire alla tutela delle risorse naturali e far
smaltire il prodotto nel rispetto dell’ambiente e della salute.
Le batterie esauste non devono essere smaltite tramite i rifiuti domestici. Si
raccomanda di smaltirle tramite il rivenditore di forniture elettriche di fiducia
oppure tramite il punto di raccolta municipale.
46
Page 47

MANUAL DE INSTRUCCIONES MODELO 86880/86885/86886
Copyright UNOLD AG | www.unold.de
DATOS TÉCNICOS
Potencia: 65 vatios, 220–240 V~, 50 Hz
Medidas: Aprox. 45,5 x 39,0 x 132,5 cm (Pr/An/Al), ø 40 cm
Peso: Aprox. 8,2 kg
Velocidad de aire: ≥ 4 m/s
Paso de aire: > 3480 m
Nivel de ruido: ≤ 65 dB
Color: 86880 blanco, 86885 negro, 86886 plata
Equipamiento: 3 variantes de oscilación (horizontal, vertical, 3D),
conmutador de pedal en la base, preselección de
tiempo (de 0,5 a 7,5 horas), control remoto, soporte
para control remoto en el equipo, pantalla en el equipo,
3 niveles de velocidad
Accesorios: Manual de instrucciones
Salvo modificaciones y errores a nivel de las características de equipamiento, la
tecnología, los colores y el diseño
EXPLICACIÓN DE SÍMBOLOS
Este símbolo se asocia con riesgos eventuales que pueden provocar
lesiones o daños en el aparato.
PARA SU SEGURIDAD
3
/h
Lea y conserve las siguientes
instrucciones.
Personas en el hogar
1. Este aparato puede ser
manejado por niños a partir
de 8 años y por personas
con una capacidad física,
mental o sensorial reducida
o carentes de experiencia y/o
conocimientos siempre que
estén supervisados o hayan
sido correspondientemente
instruidos en el manejo
seguro de dicho aparato y
comprendan los peligros
que conlleva. Este aparato
no es ningún juguete. Los
niños solo pueden llevar
a cabo la limpieza y el
mantenimiento del mismo
si están supervisados por un
adulto.
2. Se debe vigilar a los niños
para asegurarse de que no
jueguen con el aparato.
3. Guarde el aparato fuera del
alcance de los niños.
Indicaciones de seguridad para la
colocación y el uso del aparato
4. Conecte el aparato solamente
si está correctamente
montado.
5. Asegúrese de que haya
espacio suficiente en el
lugar de emplazamiento del
aparato. Como mínimo debe
47
Page 48

haber 50 cm entre el aparato
Copyright UNOLD AG | www.unold.de
y otros objetos.
6. No utilice el aparato en
recintos con mucho polvo
o cerca de sustancias
inflamables.
7. Conecte el aparato solo a
corriente alterna con una
tensión de acuerdo con la
placa de características.
8. Este aparato no debe
utilizarse con un reloj
programador externo ni con
un sistema de mando a
distancia.
9. No sumerja nunca el aparato
o el cable de alimentación
en agua o en otros líquidos.
¡Peligro mortal!
10. De ninguna manera abra la
carcasa del aparato. ¡Existe
peligro de descarga eléctrica!
11. El aparato está destinado
exclusivamente a un uso
doméstico o similares, p. ej.
en cocinas tipo office en
comercios, oficinas u otros
lugares de trabajo,
para el uso por parte de
clientes en hoteles, moteles
u otros establecimientos de
alojamiento colectivo,
en pensiones privadas o en
casas vacacionales.
12. Asegúrese de tender el cable
de alimentación de manera
que quede excluido el riesgo
de tropiezos.
13. No enrolle nunca el cable de
alimentación alrededor del
aparato para evitar daños en
el mismo.
14. Con el fin de evitar daños
en el cable, desenchufe el
aparato sujetando siempre
la clavija. No tire nunca del
cable de alimentación.
15. Asegúrese de que la toma
de corriente utilizada sea
fácilmente accesible,
de manera que pueda
desenchufar rápidamente el
aparato en caso de peligro.
16. Preste atención a que el
cable de alimentación no
quede aprisionado ni tendido
en las esquinas para evitar
daños en el mismo.
17. De ser posible, no use ningún
cable de prolongación. Si
fuera inevitable hacerlo,
desenrolle completamente
el cable de prolongación
y observe los límites de
potencia del cable en
cuestión.
18. El aparato no se debe operar
en ambientes húmedos,
mojados y fríos. ¡Peligro de
descarga eléctrica!
19. Evite exponer el aparato a la
radiación solar excesiva.
20. No se deben introducir
nunca los dedos ni objetos
como agujas, bolígrafos, etc.
por la rejilla hasta el interior
del aparato. ¡Peligro de
lesiones!
21. Asegúrese de que el cabello
largo no pueda enredarse en
la rueda de aletas.
22. Controle periódicamente
si el aparato, el enchufe y
el cable de alimentación
48
Page 49

presentan desgaste o daños.
Copyright UNOLD AG | www.unold.de
En caso de daños en el
aparato envíe el aparato para
su verificación y reparación a
nuestro servicio de atención
al cliente. Las reparaciones
inadecuadas pueden
ocasionar considerables
peligros para el usuario y
tienen como consecuencia
la exclusión de la garantía.
23. Si el cable está dañado,
debe ser sustituido por el
fabricante o su agente de
servicio o cualquier otro
profesional cualificado con
el fin de evitar situaciones
de peligro.
24. Para evitar daños en el
aparato, este no debe ser
usado con accesorios de
otros fabricantes o marcas.
25. Desenchufe el aparato
después de su uso y antes de
la limpieza. No deje nunca
el aparato sin vigilancia
cuando esté enchufado.
No se deben introducir nunca los dedos ni objetos como agu
jas, bolígrafos, etc. por la rejilla hasta el interior del aparato.
¡Peligro de lesiones!
Operar el aparato solo sobre una base plana y estable para que
no vuelque.
El fabricante no es responsable en caso de montaje erróneo, uso inapropiado o equivocado o después de
haber sido efectuadas reparaciones por terceros no autorizados.
-
49
Page 50

MONTAR
Copyright UNOLD AG | www.unold.de
6
5
4
3
2
1
8
7
9 10 11 12
1 Tuerca de bloqueo
2 Base
3 Cable de alimentación
4 Conmutador de pedal con
tubo vertical
5 Tornillo
Carcasa del motor con
6
elemento de mando
7 Eje
1. Antes del montaje, asegúrese de
montar el aparato sobre una base
plana y seca.
2. Retire todos los materiales de
embalaje y los seguros de transporte. Mantenga el material de
embalaje como, p. ej., bolsas de
plástico o poliestireno alejado de
los niños. ¡Peligro de asfixia!
8 Rejilla trasera
9 Tuerca
10 Rueda de aletas
11 Anillo de fijación
12 Rejilla delantera
3. Compruebe que todas las piezas
necesarias estén disponibles.
4. Introduzca el cable de alimentación (3) a través de la base (2).
Presta atención a que el extremo
del cable de alimentación, donde
está fijado el enchufe de red,
salga por la parte inferior de la
base.
50
Page 51

5. En la base se encuentra un
Copyright UNOLD AG | www.unold.de
pequeño hueco para el cable de
alimentación. Asegúrese de pasar
el cable de alimentación por este
hueco para que el aparato esté
colocado de forma estable.
6. Coloque el tubo vertical (4) con
precisión sobre la base (2). Preste
atención a que el conmutador de
pedal de la base encaje exactamente en el hueco de la base previsto para ello. El tubo vertical se
fija con una tuerca de bloqueo (1)
en la base.
7. Coloque la carcasa de motor (6)
sobre el tubo vertical (4). Asegúrese de que el extremo inferior
de la carcasa de motor encaje
perfectamente sobre los agujeros
previstos para ello. Fije los dos
componentes con el tornillo (5).
CONTROL REMOTO
8. Fije la rejilla trasera (8) en la carcasa de motor (6) bloqueando la
rejilla con la tuerca (9).
9. Coloque la rueda de aletas (10)
sobre el eje (7) en la carcasa de
motor. Fije la rueda de aletas con
el anillo de fijación (11).
10. Una la rejilla delantera con la
rejilla trasera. Compruebe si el
anillo negro se encuentra en la
posición correcta (las dos mitades
de la rejilla deben quedar exactamente en el anillo) y fíjelo con la
horquilla. Puede asegurar la horquilla atornillando un pequeño
tornillo en el agujero previsto.
11. Compruebe si todas las piezas
están correctamente montadas y
fijadas.
1. Deslice con cuidado la cubierta
del compartimento de pilas hacia
abajo.
2. Coloque las pilas. Preste especial
atención a la polaridad correcta.
Para la orientación se dispone de
marcas correspondientes en el
compartimento de pilas.
3. Utilice solo pilas de tipo AAA.
4. Cierre la cubierta.
5. Si ajusta el aparato con el control
remoto, preste atención a mantener el control remoto durante los
ajustes siempre en la dirección
del ventilador.
6. Las denominaciones
en el control remoto
son idénticas a la
teclas del aparato.
7. Para evitar daños,
no deje caer el control remoto desde
una gran altura.
8. En la parte trasera
del elemento de
mando se encuentra
un pequeño soporte
donde puede guardar el control remoto.
51
Page 52

MANEJO
Copyright UNOLD AG | www.unold.de
1. Asegúrese de que el aparato esté
sobre una base adecuada y plana
y de que se haya colocado de
forma segura y estable.
2. Inserte el enchufe en una toma de
corriente.
3. Pulse la tecla „ON/Speed“ (interruptor de pie en la base o mediante el control remoto).
Ajustar ángulo de inclinación
4. Puede inclinar la carcasa de
motor horizontalmente hasta
cierto nivel. Para ello, empuje la
carcasa de motor en el ángulo de
inclinación deseado. Para evitar
daños en el aparato, no aplique
fuerza durante la inclinación.
Ajustar velocidad
5. El símbolo se ilumina y se
mueve en el sentido de las agu-
jas del reloj. Ahora, durante los
primeros tres segundos, el aparato funciona a velocidad media
y después conmuta automática-
mente al nivel de velocidad bajo.
6. Pulse la tecla „ON/Speed“ varias
veces hasta que el aparato opere
en el modo de velocidad deseado.
El ajuste actual correspondiente
se muestra en la pantalla.
Velocidad baja:
el símbolo
Ajustar modo
7. Pulse la tecla „Modo“ y seleccione el modo de servicio deseado.
Puede seleccionar entre modo
estándar, modo natural o modo
de espera. Pulse la tecla „Modo“
varias veces seguidas hasta que
se indique el ajuste deseado en la
pantalla.
Modo normal
el símbolo
Modo natural
el símbolo
El aparato funciona con velocidades alternas que parecen movimientos de aire naturales.
Modo de espera
el símbolo
El aparato funciona como modo
natural con velocidad alterna.
Después de 30 minutos, el equipo
pasa abajo un nivel.
Función de giro/oscilación
8. Pulse la tecla „Swing“ varias
veces hasta que el aparato opera
con la función de giro deseada.
Oscilación apagada:
el símbolo
Velocidad media:
el símbolo
Velocidad alta:
el símbolo
52
Oscilación horizontal:
el símbolo
Page 53

Oscilación vertical:
Copyright UNOLD AG | www.unold.de
el símbolo
Oscilación en 3 D:
Todos los símbolos de oscilación
se iluminan.
Función de aniones
La función de aniones refresca
el aire ventilado. Con la función
de aniones activada parpadea
el símbolo. Por defecto, la
función de aniones está siempre
desactivada. Si desea utilizar la
función de aniones debe conectarla pulsando la tecla „ANION“.
Los iones negativos ahora generados limpian al aire ambiente
eliminando partículas de polvo.
Para desconectar la función pulse
de nuevo la tecla „ANION“ Este
ajuste solo puede realizarse direc-
tamente en el aparato y no a tra-
vés del control remoto.
Preselección de tiempo
9. Mediante la tecla „Timer“ puede
seleccionar el tiempo de ejecu-
ción deseado del aparato. Este se
encuentra en el rango de 0,5 a
7,5 horas. Pulse la tecla „Timer“
varias veces hasta que se indi-
quen las horas deseadas en la
pantalla. Una vez transcurrido
este tiempo, el aparato se desconecta automáticamente. Si no realiza ningún ajuste de tiempo, el
aparato funcionará de forma continua.
Función de memoria
10. Al desconectar el aparato se
guarda el ajuste actualmente
seleccionado y, en la siguiente
conexión, el aparato se inicia con
el mismo modo. Los modos de
selección de tiempo y de reposo
no se pueden guardar.
Función de seguridad
11. Atención: En cuanto se toque la
rejilla, el aparato se desconecta
de inmediato por razones de seguridad. Todas las indicaciones en
pantalla se iluminan y el ventilador deja de girar. Después de unos
segundos, el aparato se conecta
de nuevo automáticamente.
Desconectar
Pulse el interruptor de pedal
„OFF“ o la tecla „OFF“ en el control remoto para desconectar el
aparato. Retire el enchufe de la
toma de corriente cuando no utilice el aparato.
53
Page 54

LIMPIEZA Y CUIDADO
Copyright UNOLD AG | www.unold.de
Desconecte el aparato pulsando la tecla „OFF“ y retire
el enchufe de la toma de corriente.
1. Procure no sumergir nunca el aparato en agua. El motor o los componentes eléctricos del aparato no se
deben mojar.
2. No utilice productos de limpieza
limpieza calientes ni desinfectantes.
3. Limpie el tubo vertical y la rejilla
del ventilador con un paño ligeramente húmedo.
4. Guarde el ventilador en un lugar
seco y seguro para protegerlo contra el polvo, los golpes, el calor y
la humedad.
agresivos, lana o estopa de acero,
objetos metálicos, productos de
CONDICIONES DE GARANTIA
La garantía para nuestros equipos es de 24 meses, y de 12 meses en el caso de uso comercial, a partir de la
fecha de compra, cubriendo los daños que con un uso acorde a lo prescrito pueden atribuirse fehacientemente
a defectos de fabricación. Dentro del período de garantía, solucionamos errores de material y de fabricación a
consideración nuestra mediante reparación o cambio. Nuestros servicios de garantía son válidos únicamente
para los aparatos que han sido vendidos en Alemania y Austria. Para todos los demás casos diríjase por favor
al importador correspondiente. Aquellos aparatos que se presentan para eliminar errores, por favor enviarlos
junto a una copia del comprobante de compra extendido a máquina, del cual debe desprenderse la fecha de
compra, así como una breve descripción de las deficiencias, apropiadamente embalado y con los sellos correspondientes a nuestro servicio al cliente. En caso de garantía, los gastos de envío serán restituidos al cliente
solamente en Alemania y Austria. Aquellos daños causados por desgaste están excluidos de la garantía, así
como manipulación incorrecta, e incumplimiento de las condiciones de mantenimiento y cuidado. El derecho a
garantía expira si las reparaciones o mantenimiento son realizadas por terceros. Todo reclamo del consumidor
final ante el vendedor, comerciante no se ve afectado por esta garantía.
DISPOSICIÓN/PROTECCIÓN DEL MEDIO AMBIENTE
Nuestros aparatos se fabrican con un alto nivel de calidad por un largo período de uso. El
mantenimiento regular y las reparaciones de tipo técnico a través de nuestro servicio al cliente
pueden prolongar la duración del aparato. Cuando un aparato está defectuoso y ya no puede
repararse, por favor considere en la disposición final los siguientes puntos: Este producto no
puede ser eliminado junto a la basura domiciliaria. Usted debe entregar este producto a un lugar oficial para el reciclaje de aparatos eléctricos o electrónicos. Mediante la clasificación por
separado y el reciclaje de productos residuales, Usted contribuye a proteger los recursos naturales y asegura que el producto sea eliminado de forma salubre y acorde con el medio ambiente.
No deseche las pilas agotadas en la basura doméstica. Elimínelas a través de
las tiendas de artículos eléctricos o el punto de recogida local correspondiente.
54
Page 55

NÁVOD K OBSLUZE MODELU 86880/86885/86886
Copyright UNOLD AG | www.unold.de
TECHNICKÉ ÚDAJE
Výkon: 65 W, 220–240 V~, 50 Hz
Rozměry: Cca 45,5 x 39,0 x 132,5 cm (H/Š/V), ø 40 cm
Hmotnost: Cca 8,2 kg
Rychlost vzduchu: ≥ 4 m/s
Průtok vzduchu: > 3480 m
Hladina hluku: ≤ 65 dB
Barva: 86880 bílá, 86885 černá, 86886 stříbro
Vybavení: 3 varianty oscilací (horizontální, vertikální, 3D) nožní
spínač na podstavci, předvolba času (0,5 až 7,5 hodin),
dálkové ovládání, držák pro dálkové ovládání na přístroji,
displej na přístroji, 3 stupně rychlosti
Příslušenství: Návod k použití
Je vyhrazeno právo na omyly a změny vybavení, techniky, barev a designu.
VYSVĚTLENÍ SYMBOLŮ
Tento symbol označuje eventuální nebezpečí, která mohou mít za
následek zranění nebo poškození přístroje.
PRO VAŠI BEZPEČNOST
3
/h
Následující pokyny si přečtěte a
uložte.
Osoby v domácnosti
1. Přístroj může být používán
dětmi od 8 let a osobami se
sníženými fyzickými, smys-
lovými nebo duševními schopnostmi nebo s nedostatkem
zkušeností a/nebo nedostatkem znalostí, pokud jsou
pod dohledem nebo pokud
byly poučeny o
používání přístroje a
porozuměly z něj vyplývajícím rizikům. Přístroj není
hračka. Čištění a
přístroje smí provádět děti
pouze pod dohledem.
bezpečném
údržbu
2. Je nutné dohlížet na děti,
aby bylo zajištěno, že si s
přístrojem nehrají.
3. Uchovávejte přístroj na místě
nepřístupném dětem.
Bezpečnostní pokyny k postavení
a provozu přístroje
4. Zapínejte přístroj jen tehdy,
když byl předpisově sesta-
ven.
5.
Dbejte na dostatek místa
na stanovišti přístroje. Je
nutné dodržet vzdálenost
minimálně 50 cm mezi
přístrojem a jinými předměty.
6. Nepoužívejte přístroj v
mimořádně prašných prosto-
55
Page 56

rech ani v blízkosti hořlavých
Copyright UNOLD AG | www.unold.de
látek.
7. Přístroj připojujte pouze na
střídavý proud s napětím
16. Dbejte na to, abyste přívod
podle typového štítku.
8. Tento přístroj nesmí být
používán s externími
časovými spínacími hodi-
17. Pokud možno nepoužívejte
nami nebo se systémem pro
dálkové ovládání.
V žádném případě přístroj
9.
nebo jeho přívod neponořujte
do vody nebo do jiné kapa-
liny – hrozí ohrožení života!
V žádném případě těleso
10.
18. Přístroj nesmí být používán
přístroje neotevírejte, hrozí
nebezpečí úderu elektrickým
proudem!
19. Vyvarujte se silného
11. Přístroj je určen výhradně
pro domácí použití nebo
20. Skrz mřížku krytu ventilátoru
podobné účely, např.
pro kuchyňky v obchodech,
kancelářích nebo podob-
ných pracovištích,
pro použití hosty v hotelu,
21. Dbejte na to, aby se dlouhé
motelu nebo jiných ubyto-
vacích zařízeních,
v soukromých penziónech
22. Pravidelně kontrolujte
nebo rekreačních objektech.
12. Dbejte na to, aby byl přívod
položen tak, aby bylo
vyloučeno zakopnutí o něj.
13. Abyste se vyvarovali
poškození kabelu, nikdy
nenavíjejte přívodní vedení
kolem přístroje.
14. Abyste se vyvarovali
poškození kabelu, vytahujte
síťovou zástrčku ze zásuvky
vždy za zástrčku, nikdy
23.
přitom netahejte za kabel.
15. Dbejte na to, aby použitá
zásuvka byla snadno
přístupná, aby bylo možné
zástrčku v případě nebezpečí
rychle vytáhnout.
neskřípli nebo netahali
přes rohy, aby se předešlo
poškození přívodního kabelu.
prodlužovací kabel. Pokud to
je nevyhnutelné, kompletně
prodlužovací kabel odviňte
a dbejte na mezní výkon
daného kabelu.
v mokrých/sychravých
nebo vlhkých prostorech –
nebezpečí úrazu proudem!
slunečního záření na přístroj.
se do vnitřku přístroje nikdy
nesmí strkat předměty jako
prsty, jehly, tužky atd. –
nebezpečí zranění!
vlasy nemohly zachytit v
lopatkovém kole.
přístroj, zástrčku a přívodní
kabel, zda nejsou opotřebeny
nebo poškozeny. Při
poškození přívodního kabelu
nebo jiných dílů pošlete
prosím přístroj na kontrolu
a opravu do našeho servisu.
Neodborné opravy mohou
vést k značnému nebezpečí
pro uživatele a mají za nás
-
ledek ztrátu záruky.
Pokud je kabel poškozen,
musí být vyměněn pouze
výrobcem nebo jeho servisním zástupcem nebo jiným
56
Page 57

kvalifikovaným odborníkem,
Copyright UNOLD AG | www.unold.de
aby nedošlo k úrazu.
24. Aby se předešlo poškození,
nesmí být přístroj používán
s příslušenstvím jiných
25. Po použití i před čištěním
vyndejte síťovou zástrčku ze
zásuvky. Nikdy nenechávejte
přístroj bez dozoru, když je
připojen do sítě.
výrobců nebo značek.
Skrz mřížku krytu ventilátoru se do vnitřku přístroje nikdy nesmí strkat předměty jako prsty, jehly, tužky atd. – nebezpečí
zranění!
Postavte přístroj pouze
na rovný, stabilní podklad, aby se ne-
mohl převrátit.
Výrobce nepřebírá žádné ručení při chybné montáži, neodborném nebo chybném použití nebo po provedení
opravy neautorizovanými třetími osobami.
57
Page 58

MONTÁŽ
Copyright UNOLD AG | www.unold.de
6
5
4
3
2
1
8
7
1 Zajišťovací matice
2 Podstavec
3 Přívod
4 Nožní spínač s trubkou stojanu
5 Šroub
Těleso motoru s ovládacím
6
prvkem
7 Osa
1. Před montáží zajistěte, abyste
přístroj montovali na rovném,
suchém podkladu.
2. Odstraňte všechny části balení
a transportní pojistky. Materiál
balení jako např. plastové sáčky
nebo polystyren udržujte mimo
dosah malých dětí – nebezpečí
udušení!
9 10 11 12
8 Zadní kryt ventilátoru
9 Matice
10 Lopatkové kolo
11 Upevňovací kroužek
12 Přední kryt ventilátoru
3. Zkontrolujte, zda jsou všechny
potřebné části dodány.
4. Přívodní kabel (3) protáhněte
podstavcem (2). Dbejte na to,
aby konec kabelu, na kterém je
upevněna zástrčka, vyčníval ze
spodní strany podstavce.
5. Na podstavci se nachází malé
vybrání pro kabel. Dbejte na to,
58
Page 59

abyste kabel zamáčkli do tohoto
Copyright UNOLD AG | www.unold.de
vybrání, aby přístroj mohl stát
stabilně.
6. Nasaďte trubku stojanu (4)
přesně na podstavec (2). Dbejte
na to, aby nožní spínač podstavce
přesně zapadl do příslušného vyb-
rání v podstavci. Trubka stojanu
se na podstavci upevní zajišťovací
maticí (1).
7. Nasaďte těleso motoru (6) na
trubku stojanu (4). Ujistěte se
přitom, že spodní konec tělesa
motoru přesně pasuje na k tomu
určené otvory. Upevněte oba díly
šroubem (5).
8. Upevněte zadní kryt ventilátoru
(8) na těleso motoru (6) tím, že
kryt ventilátoru zajistíte maticí
(9).
DÁLKOVÉ OVLÁDÁNÍ
9. Na osu (7) na tělese motoru
nasaďte lopatkové kolo (10).
Lopatkové kolo upevněte
upevňovacím kroužkem (11).
10. Spojte přední kryt ventilátoru se
zadním krytem ventilátoru. Zkon-
trolujte, zda je černý kroužek
ve správné pozici (obě poloviny
krytu ventilátoru musí v kroužku
přesně sedět) a zajistěte jej svorkou. Svorku můžete zajistit tím,
že do k tomu určeného otvoru
zašroubujete malý šroub.
11. Zkontrolujte, zda jsou všechny
části správně namontovány a
upevněny.
1. Kryt přihrádky na baterie opatrně
posuňte směrem dolů.
2. Vložte baterie. Bezpodmínečně
přitom dávejte pozor na správ-
nou polaritu. Pro orientaci jsou
v přihrádce na baterie příslušné
značky.
3. Použijte pouze baterie typu AAA.
4. Zavřete kryt.
5. Když přístroj nastavujete dálkovým ovládáním, dbejte na to, aby-
ste jej během nastavování vždy
drželi směrem k ventilátoru.
6. Označení na dálkovém ovládání
jsou shodná s tlačítky na přístroji.
7. Abyste předešli
poškození, vyvarujte
se pádu dálkového
ovládání z velké
výšky.
8. Na zadní straně
ovládacího prvku se
nachází malý držák,
do kterého můžete
dálkové ovládání
prakticky uložit.
59
Page 60

OBSLUHA
Copyright UNOLD AG | www.unold.de
1. Ujistěte se, že přístroj stojí na
vhodném, rovném podkladu a byl
postaven bezpečně a stabilně.
2. Zapojte zástrčku do zásuvky.
3. Stiskněte tlačítko „ON/Speed“
(nožní tlačítko na podstavci nebo
pomocí dálkového ovládání).
Nastavení úhlu sklonu
4. Těleso motoru můžete v určitém
rozsahu vodorovně naklápět. K
tomu natočte těleso motoru do
požadovaného úhlu sklonu. Abyste
se vyvarovali poškození přístroje,
nepoužívejte přitom žádné násilí.
Nastavení rychlosti
5. Symbol se rozsvítí a pohybuje
se ve směru hodinových ručiček.
Během prvních třech vteřin běží
nyní přístroj střední rychlostí,
potom se automaticky přepne na
nižší stupeň rychlosti.
6. Stiskněte tlačítko „ON/Speed“
tolikrát, až přístroj pracuje v
požadovaném režimu rychlosti.
Příslušné aktuální nastavení se
zobrazuje na displeji.
Nízká rychlost:
Symbol
režimem, přírodním režimem
a režimem spánku. Stiskněte
tlačítko „Modus“ tolikrát, dokud
se na displeji neobjeví požadované
nastavení.
Normální režim
Symbol
Přírodní režim
Symbol
Přístroj pracuje s různými
rychlostmi, které působí podobně
jako pohyb vzduchu v přírodě.
Režim spánku
Symbol
Zařízení pracuje jako semipřirozeného režimu s měnícími
rychlostmi. Po 30 minutách se
přístroj přepne o jednu úroveň
Funkce otáčení/oscilace
8. Stiskněte tlačítko „Swing“
tolikrát, až přístroj pracuje s
požadovanou funkcí otáčení.
Oscilace vypnuta:
Symbol
Střední rychlost:
Symbol
Vysoká rychlost:
Symbol
Nastavení režimu
7. Stiskněte tlačítko „Modus“ a
zvolte požadovaný druh provozu.
Můžete volit mezi standardním
60
Vodorovná oscilace:
Symbol
Svislá oscilace:
Symbol
3D oscilace:
Svítí všechny symboly oscilace.
Page 61

Iontová funkce
Copyright UNOLD AG | www.unold.de
Iontová funkce osvěžuje ventilovaný vzduch. Při aktivované
iontové funkci bliká symbol. Z
výroby je iontová funkce vždy
deaktivována. Když chcete iontovou funkci využívat, musíte ji
zapnout tím, že stisknete tlačítko
„ANION“. Nyní vytvářené záporné
ionty čistí vzduch v místnosti,
prachové částice jsou likvidovány.
Pro vypnutí této funkce znovu
stiskněte tlačítko „ANION“. Toto
nastavení lze provádět pouze
přímo na přístroji a nikoli dálko-
vým ovládáním.
Předvolba času
9. Tlačítkem „Timer“ můžete zvolit požadovanou dobu chodu
přístroje. To je možné v rozsahu
0,5 až 7,5 hodin. Stiskněte
tlačítko „Timer“ tolikrát, dokud se
na displeji neobjeví požadovaný
počet hodin. Po uplynutí této doby
se přístroj automaticky vypne.
Když neprovedete žádné nastavení času, běží přístroj trvale.
Paměťová funkce
10. Když přístroj vypnete, je aktuálně
zvolené nastavení uloženo a při
příštím zapnutí se přístroj spustí
ve stejném režimu. Uložit nelze
pouze volbu času a režim spánku.
Bezpečnostní funkce
11. Pozor: Jakmile dojde k doteku
krytu ventilátoru, přístroj se z
bezpečnostních důvodů okamžitě
vypne. Všechna zobrazení na dis-
pleji se rozblikají, ventilátor se již
neotáčí. Po několika vteřinách se
přístroj opět automaticky zapne.
Vypnutí
Pro vypnutí přístroje stiskněte
nožní spínač „OFF“ nebo tlačítko
„OFF“ na dálkovém ovládání.
Vytáhněte zástrčku ze zásuvky,
jestliže přístroj již nebudete
používat.
ČIŠTĚNÍ A PÉČE
Vypněte přístroj stisknutím
tlačítka „OFF“ a vytáhněte
zástrčku ze zásuvky.
1. Dbejte na to, aby se přístroj nikdy
neponořil do vody. Motor ani elektrické části přístroje nesmí zvlhnout.
2. Zásadně nepoužívejte abrazivní
čisticí prostředky, drátěnku,
kovové předměty, horké čisticí
prostředky ani dezinfekční
prostředky.
3. Otřete trubku stojanu a mřížku
ventilátoru mírně navlhčenou
utěrkou.
4. Uložte ventilátor na suché a
bezpečné místo, aby byl chráněn
před prachem, nárazy, horkem a
vlhkem.
61
Page 62

ZÁRUČNÍ PODMÍNKY
Copyright UNOLD AG | www.unold.de
Na naše přístroje poskytujeme záruku v trvání 24 měsíců (u průmyslového využití 12 měsíců) od data koupě
výrobku, záruka se vztahuje na poškození, která prokazatelne vznikla při správném použití v důsledku výrobních
vad. Po dobu záruky budeme odstraňovat materiální i výrobní vady opravou nebo výměnou podle našeho uvážení.
Poskytnutí záruky výhradně platí pro zařízení prodány v Německu i Rakousku. V jiných zemích se obrat’te prosím
na kompetentní dovozce. Přístroje, na které bylo uplatňováno odstranění vad, zašlete prosím smechanicky
vyhotovenou kopií nákupního dokladu, ze kterého musí být bezpodmínečně patrný datum nákupu i s popisem
vad, přístroj musí být bezpečně zabalen a nafrankován na náš záruční servis. V připadě opravněné záruky jsou
kupujícím vraceny poštovní poplatky v Německu i Rakousku. Tato záruka se nevztahuje na poškození způsobená
opotřebením, nesprávným zacházením a nedodržováním návodů kúdržbě a obsluze. Záruční doba zaniká, když
opravy nebo manipulace s přístrojem byly provedeny třetí osobou. Eventuální nároky zákazníka vůči prodejci/
obchodníku nejsou touhle zárukou omezeny.
LIKVIDACE / OCHRANA ŽIVOTNÉHO PROSTŘEDÍ
Naše vyrobené přístroje mají vysoce kvalitní standard pro zajišt’ění jejich dlouhé životnosti.
Pravidelné údržby i opravy odborně provedeny naším prodejním servisem mohou mít vliv na
prodloužení provozní životnosti přístroje. Když je přístroj vadný a už ho nelze opravit, neopomeňte
prosím: Toto zařízení nepatří do běžného domovního odpadku, ale musí být předáno do autorizované sběrny pro recyklování elektrických nebo elektronických zařízení. Separátní sběr a recyklování odpadních produktů umožňuje šetření přírodních zdrojů a zajišt’uje, aby byly odpady
likvidovány způsobem, který je pro zdraví a kologii přijatelný.
Vypotřebované baterie nepatří do domovního odpadu. Zlikvidujte je prostřednictvím
prodejce elektro nebo příslušné sběrny komunálního odpadu.
62
Page 63

INSTRUKCJA OBSŁUGI MODEL 86880/86885/86886
Copyright UNOLD AG | www.unold.de
DANE TECHNICZNE
Moc: 65 W, 220-240 V~, 50 Hz
Wymiary: Ok. 45,5 x 39,0 x 132,5 cm (gł./sz./wys.), ø 40 cm
Ciężar: Ok. 8,2 kg
Prędkość powietrza: ≥ 4 m/s
Wydatek powietrza: > 3480 m3/h
Poziom hałasu: ≤ 65 dB
Kolor: 86880 biały, 86885 czarny, 86886 srebrny
Wyposażenie: 3 warianty oscylacji (poziomo, pionowo, 3D), wyłącznik
Akcesoria: Instrukcja obsługi
Zmiany i błędy w opisie wyposażenia, technice, kolorach i konstrukcji są zastrzeżone.
OBJAŚNIENIE SYMBOLI
Symbol ten oznacza ewentualne niebezpieczeństwa, które mogą prowadzić do
obrażeń lub uszkodzenia urządzenia.
DLA BEZPIECZEŃSTWA UŻYTKOWNIKA
nożny w podstawie, wybór czasu (od 0,5 do 7,5 h),
pilot, uchwyt na pilota na urządzeniu, wyświetlacz na
urządzeniu, 3 stopnie prędkości
Prosimy przeczytać poniższe
instrukcje i zachować je do użytku
w przyszłości.
Wskazówki dotyczące osób w
gospodarstwie domowym
1. Urządzenie może być
używane przez dzieci w wieku
powyżej 8 lat lub osoby o
ograniczonej sprawności
fizycznej, sensorycznej
czy umysłowej lub nie
posiadające doświadczenia i/
lub wiedzy, jeśli są one nadzorowane lub zostały przesz-
kolone w zakresie bezpieczn-
ego użytkowania urządzenia
i zrozumiały wynikające
tego niebezpieczeństwa.
Urządzenie nie jest zabawką.
Dzieci mogą czyścić i
konserwować urządzenie
tylko pod nadzorem.
2. Dzieci powinny być pod nad-
zorem, aby upewnić się, że
nie bawią się urządzeniem.
Urządzenie należy
3.
przechowywać w miejscu
niedostępnym dla dzieci.
Wskazówki bezpieczeństwa
dotyczące ustawienia i obsługi
urządzenia
4. Włączać urządzenie tylko
wtedy, gdy zostało ono
prawidłowo zmontowane.
5. Zwrócić uwagę na
z
wystarczającą ilość
miejsca w miejscu ustawi-
enia urządzenia. Między
63
Page 64

urządzeniem a innymi prze-
Copyright UNOLD AG | www.unold.de
dmiotami zachowany musi
być odstęp min. 50 cm.
Nie używać urządzenia w
6.
bardzo zakurzonych pomieszczeniach lub w pobliżu substancji palnych.
Urządzenie należy podłączać
7.
wyłącznie do prądu zmiennego o napięciu podanym na
tabliczce znamionowej.
Urządzenie nie może
8.
pracować z zewnętrznym
programatorem czasowym
lub systemem zdalnego sterowania.
W żadnym wypadku nie
9.
zanurzać urządzenia lub
przewodu w wodzie lub w
innych płynach – istnieje
zagrożenie dla życia!
10. W żadnym wypadku nie
otwierać obudowy urządzenia,
istnieje niebezpieczeństwo
porażenia prądem elektrycz-
nym!
Urządzenie przeznaczone
11.
jest wyłącznie do użycia w
gospodarstwie domowym
lub w podobnych zastosowaniach, np.
aneksach kuchennych
w sklepach, biurach lub
innych zakładach,
do użycia przez gości w
hotelach, motelach lub
innych noclegowniach,
w prywatnych pensjonatach
lub domach letniskowych.
12. Zwrócić uwagę na to,
aby przewód zasilający
był ułożony w sposób
wykluczający potknięcie się
o niego.
13. Aby uniknąć uszkodzenia
kabla, nigdy nie należy owijać
kabla wokół urządzenia.
14. Aby uniknąć uszkodze
nia kabla, wtyczkę należy
wyciągać z gniazdka
zawsze
trzymając za wtyczkę, a nie
ciągnąc za przewód.
15. Zwrócić uwagę na to, aby
używane gniazdko było
łatwo dostępne, aby w razie
niebezpieczeństwa wtyczkę
można było łatwo wyciągnąć.
16. Aby uniknąć uszkodzenia
kabla, należy zwrócić uwagę
na to, aby nie zakleszczać
przewodu i nie przeciągać go
po narożnikach.
17. W miarę możliwości
nie używać przewodów
przedłużających. Jeśli
nie można tego uniknąć,
odwinąć całkowicie prze
wód przedłużający i nie
przekraczać mocy maksym
alnej dla każdego kabla.
Nie używać urządzenia w
18.
mokrych / mokrych i zimnych
lub wilgotnych pomieszcze-
niach – niebezpieczeństwo
porażenia prądem elektrycz
nym!
Unikać silnego nasłone-
19.
cznienia urządzenia.
20. Nigdy nie wkładać do
osłony wentylatora palców
lub przedmiotów takich
jak igły, długopisy itp. –
niebezpieczeństwo obrażeń!
-
-
-
-
64
Page 65

21. Uważać na to, aby w wir-
Copyright UNOLD AG | www.unold.de
nik nie zaplątały się długie
włosy.
Regularnie sprawdzać
22.
urządzenie, wtyczkę i kabel
pod kątem śladów zużycia
lub uszkodzenia. Gdy uszkodzony jest kabel lub inne
części, prosimy odesłać
urządzenie
do sprawdzenia
i naprawy do naszego ser-
wisu klienta. Nieprawidłowo
wykonane naprawy mogą
powodować
znaczne
niebezpieczeństwo dla
użytkownika i prowadzą do
wyłącznie przez producenta
lub jego przedstawiciela serwisu lub jakiejkolwiek innej
osoby wykwalifikowanej
zawodowej w celu
uniknięcia
zagrożenia.
24. Aby uniknąć szkód, nie
wolno urządzenia używać z
akcesoriami innych producentów lub marek.
Po użyciu i przed czyszcze-
25.
niem wyjąć wtyczkę z gniazdka. Nigdy nie pozostawiać
urządzenia bez nadzoru,
wtyczka włożona jest do
gdy
gniazdka sieciowego.
unieważnienia gwarancji.
23. Jeśli kabel jest uszkodzony, musi być wymieniony
Nigdy nie wkładać do osłony wentylatora palców lub przedmiotów takich jak igły, długopisy itp. – niebezpieczeństwo
obrażeń!
Używać urządzenia tylko
ustawionego na równym, stabilnym
podłożu, aby uniknąć jego przewrócenia się.
Producent nie przejmuje odpowiedzialności za nieodpowiednie bądź wadliwe użytkowanie lub po
przeprowadzonych naprawach przez nieautoryzowane zakłady bądź niekompetentne osoby.
65
Page 66

MONTAŻ
Copyright UNOLD AG | www.unold.de
6
5
4
3
2
1
8
7
1 Nakrętka blokująca
2 Podstawa
3 Przewód zasilający
4 Wyłącznik nożny z rurą
5 Śruba
Obudowa silnika z elementem
6
obsługowym
7 Oś
1. Przed montażem należy upewnić
się, że urządzenie jest montowane
na równym, suchym podłożu.
2. Usunąć całkowicie materiał
opakowaniowy i zabezpiecze-
nia transportowe. Przechowywać
materiał opakowaniowy, np.
plastykowe worki lub styro-
9 10 11 12
8 Tylna osłona wentylatora
9 Nakrętka
10 Wirnik
11 Pierścień mocujący
12 Przednia osłona wentylatora
pian, z dala od małych dzieci –
niebezpieczeństwo uduszenia!
3. Sprawdzić, czy obecne są wszystkie potrzebne części.
4. Przeciągnąć kabel (3) przez
podstawę (2). Zwrócić uwagę na
to, aby koniec kabla zakończony
66
Page 67

wtyczką znajdował się od spodu
Copyright UNOLD AG | www.unold.de
podstawy.
5. W podstawie znajduje się mały
otwór na kabel. Zwrócić uwagę na
to, aby wcisnąć kabel w ten otwór,
aby urządzenie stało stabilnie.
6. Włożyć rurę (4) dokładnie do
podstawy (2). Zwrócić uwagę na
to, aby wyłącznik nożny podstawy
pasował dokładnie w odpowiedni
otwór w podstawie. Rura moco-
wana jest do podstawy nakrętką
mocującą (1).
7. Nałożyć obudowę silnika (6) na
rurę (4). Upewnić się, że dolny
koniec obudowy silnika dokładnie
pasuje do odpowiednich otworów.
Przymocować obydwie części
śrubą (5).
8. Przymocować do obudowy silnika
(6) tylną osłonę wentylatora (8)
PILOT
przez przykręcenie nakrętki (9) na
osłonie wentylatora.
9. Nałożyć wirnik (10) na oś (7) na
obudowie silnika. Przymocować
wirnik pierścieniem mocującym
(11).
10. Połączyć przednią część osłony
wentylatora z tylną częścią osłony.
Sprawdzić, czy czarny pierścień
jest ustawiony w prawidłowej
pozycji (obydwie części osłony
muszą być dokładnie osadzone
w pierścieniu) i przymocować
go klamrą. Zabezpieczyć klamrę
przez wkręcenie małej śruby w
odpowiedni otwór.
11. Sprawdzić, czy wszystkie części
zostały prawidłowo zamontowane
i przymocowane.
1. Przesunąć osłonę schowka na
baterie ostrożnie na dół.
2. Włożyć baterie. Zwrócić konie-
cznie uwagę na prawidłową
biegunowość. Dla orientacji w
schowku na baterie znajdują się
odpowiednie oznaczenia.
3. Używać tylko baterii typu AAA.
4. Zamknąć pokrywę.
5. Gdy urządzenie ustawia się pilo-
tem, podczas ustawiania kierować
pilota zawsze w kierunku wentylatora.
6. Oznaczenia przycisków na pilocie
są identyczne z oznaczeniami na
urządzeniu.
7. Aby uniknąć szkód,
nie należy upuścić
pilota z większej
wysokości.
8. W tyle elementu
obsługowego znajduje się mały
uchwyt, w którym
można praktycznie przechowywać
pilota.
67
Page 68

OBSŁUGA
Copyright UNOLD AG | www.unold.de
1. Upewnić się, że urządzenie stoi
na odpowiednim, równym podłożu
i jest ustawione w sposób pewny i
stabilny.
2. Włożyć wtyczkę do gniazdka.
3. Nacisnąć przycisk „ON/Speed“
(przycisk nożny na podstawie lub
pilocie).
Ustawianie kąta pochylenia
4. Obudowa silnika daje się w
określonym zakresie pochylić
poziomo. Nacisnąć w tym celu
na obudowę silnika i ustawić pod
żądanym kątem. Aby uniknąć uszkodzenia urządzenia, nie należy
tego wykonywać przy użyciu siły.
Ustawianie prędkości
5. Symbol zapala się i przesuwa
w kierunku zgodnym z ruchem
wskazówek zegara. Przez pierwsze
trzy sekundy urządzenie pracuje
ze średnią prędkością, potem
automatycznie przełącza się na
niską prędkość.
6. Naciskać przycisk „ON/Speed“
tak długo, aż urządzenie będzie
pracować z żądaną prędkością.
Odpowiednie aktualne ustawienie
wyświetla się na wyświetlaczu.
Niska prędkość:
Symbol
Średnia prędkość:
Symbol
Wysoka prędkość:
Symbol
Ustawianie trybu
7. Nacisnąć przycisk „Tryb“ i wybrać
żądany rodzaj pracy. Można
wybrać między trybem standar-
dowym, naturalnym i nocnym.
Naciskać przycisk „Tryb“ tak
często, aż na wyświetlaczu pojawi
się żądane ustawienie.
Tryb normalny
Symbol
Tryb naturalny
Symbol
Urządzenie pracuje ze zmienną
prędkością zbliżoną do naturaln-
ego ruchu powietrza.
Tryb nocny
Symbol
Urządzenie pracuje w trybie półnaturalny ze zmieniającymi się
prędkościami. Po 30 minutach
urządzenie przełącza o jeden
poziom
Funkcja obracania/oscylacji
8. Naciskać przycisk „Swing“ tak
często, aż urządzenie będzie
pracować z żądaną funkcją obra-
cania.
Oscylacja wyłączona:
Symbol
Oscylacja pozioma:
Symbol
68
Page 69

Oscylacja pionowa:
Copyright UNOLD AG | www.unold.de
Symbol
Oscylacja 3D:
Świecą się wszystkie symbole
oscylacji.
Funkcja anionowania
Funkcja anionowania odświeża
wentylowane powietrze. Gdy
aktywowana jest funkcja anionowania, miga symbol. Fabry-
cznie funkcja anionowania jest
zawsze dezaktywowana. Jeżeli
ma być używana funkcja anionowania, należy ją włączyć przez
naciśnięcie przycisku „ANION“.
Teraz wytworzone jony ujemne
oczyszczają powietrze w pomies-
zczeniu zwalczając cząstki
kurzu. W celu wyłączenia funkcja
nacisnąć przycisk „ANION“. To
ustawienie można wybrać tylko
bezpośrednio na urządzeniu,
nie da się go wybrać za pomocą
pilota.
Wybór czasu
9. Za pomocą przycisku „Timer“
można wybrać żądany czas pracy
urządzenia. Jest to możliwe w
zakresie od 0,5 do 7,5 h. Naciskać
przycisk „Timer“ tak długo, aż na
wyświetlaczu pojawi się żądana
liczba godzin. Po upływie tego
czasu urządzenie automatycznie
wyłącza się. Jeżeli nie zostanie
wybrany czas, urządzenie pracuje
przez cały czas.
Funkcja pamięci
10. Gdy urządzenie zostanie
wyłączone, aktualnie wybrane
ustawienie zostaje zapisane, a
urządzenie uruchamia się przy
następnym włączeniu w tym
samym trybie. Tylko tryb wyboru
czasu i tryb nocny nie mogą
zostać zapisane.
Funkcja bezpieczeństwa
11. Uwaga: Gdy dotknięta zostanie
osłona wentylatora, urządzenie
natychmiast wyłącza się ze
względów bezpieczeństwa. Wszystkie wskazania na wyświetlaczu
migają, a wentylator nie
obraca się. Po kilku sekundach
urządzenie automatycznie ponownie włącza się.
Wyłączenie
Nacisnąć wyłącznik nożny „OFF“
lub przycisk „OFF“ na pilo-
cie, aby wyłączyć urządzenie.
Wyciągnąć wtyczkę z gniazdka,
gdy urządzenie nie jest używane.
69
Page 70

CZYSZCZENIE I PIELĘGNACJA
Copyright UNOLD AG | www.unold.de
Wyłączyć urządzenie przez
naciśnięcie przycisku „OFF“
i wyciągnąć wtyczkę z gniaz-
dka.
1. Zwrócić uwagę na to, aby nigdy
nie zanurzać urządzenia w wodzie. Silnik i podzespoły elektryczne
urządzenia nie mogą się zmoczyć.
gorących środków czyszczących
lub środków dezynfekujących.
3. Rurę i kratkę wentylatora należy
wycierać lekko zwilżoną szmatką.
4. Przechowywać wentylator w
suchym i bezpiecznym miejscu,
zabezpieczonym przed kurzem,
wstrząsami, ciepłem i wilgocią.
2. Z zasady nie używać ostrych
środków szorujących, wełny sta-
lowej, przedmiotów metalowych,
WARUNKI GWARANCJI
Udzielamy na nasze produkty 24 miesięcznej gwarancji od daty zakupu (warunkiem jest zachowanie faktury zakupu lub paragonu) na szkody, które przy użytkowaniu zgodnym z przeznaczeniem wskazują na wadę fabryczną.
W czasie trwania gwarancji usuniemy wady materiałowe bądź fabryczne zgodnie z naszym osądem poprzez
naprawę lub wymianę. Gwarancja udzielana jest na produkty sprzedawane na terenie Niemiec i Austrii. W innych
krajach proszę zwrócić się do właściwego Importera. Urządzenia, w których wymagane jest usunięcie wady,
proszę przesłać razem z kopią faktury zakupu, na której musi być widoczna data zakupu, z załączonym opisem
wady, w oryginalnym pudełku, dobrze zapakowane i na własny koszt na adres serwisu. Gwarancja nie obejmuje szkód wynikających ze zużycia, użytkowania niezgodnie z przeznaczeniem i nieprzestrzegania wskazówek
dotyczących konserwacji i pielęgnacji. Roszczenie gwarancji wygasa, jeżeli naprawa bądź otwarcie przedmiotu
będą przeprowadzone przez stronę trzecią. Ewentualne roszczenia użytkownika końcowego wobec sprzedawcy/
dealera nie są ograniczone tą gwarancją.
UTYLIZACJA / OCHRONA ŚRODOWISKA
Nasze urządzenia wyprodukowane zostały na wysokim poziomie do długiego użytkowania. Regularna konserwacja i fachowe naprawy poprzez nasz serwis mogą wydłużyć pracę urządzenia. W
razie kiedy urządzenie jest uszkodzone i nie nadaje się do naprawy, proszę przestrzegać zaleceń:
Ten produkt nie może być zutylizowany razem z normalnymi odpadami domowymi. Muszą
Państwo dostarczyć ten produkt do zbiorczego punktu recyklingowego dla urządzeń elektrycznych
i elektronicznych. Poprzez oddzielne zbieranie i recykling odpadów pomagają Państwo chronić
naturalne zasoby i sprawiają, że ten produkt będzie zutylizowany w sposób bezpieczny dla zdrowia i środowiska naturalnego.
Zużyte baterie nie należą do śmieci i odpadów z gospodarstw domowych. Należy
je usuwać za pośrednictwem sklepów elektronicznych lub komunalnych placówek
zbiorczych.
70
Page 71

Copyright UNOLD AG | www.unold.de
71
Page 72

Aus dem Hause
Aus dem Hause
Copyright UNOLD AG | www.unold.de
 Loading...