

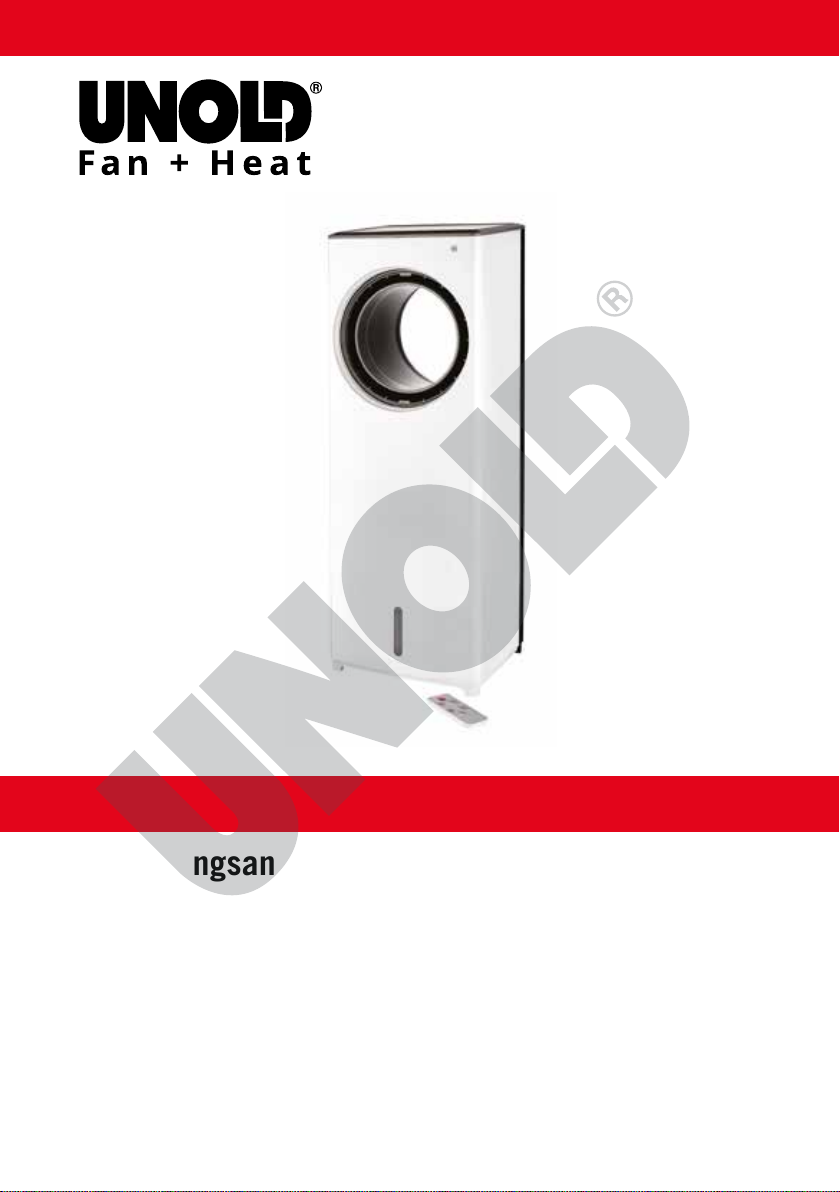
AIR COOLER FRESH
Copyright UNOLD AG | www.unold.de
Bedienungsanleitung
Instructions for use | Notice d´utilisation
Gebruiksaanwijzing
Instrucciones de uso
Modell 86990
| Istruzioni per l’uso
| Instrukcja obsługi

Impressum:
Copyright UNOLD AG | www.unold.de
Bedienungsanleitung Modell 86990
Stand: März 2020 /nr
Copyright ©
Mannheimer Straße 4
68766 Hockenheim
Telefon +49 (0) 62 05/94 18-0
Telefax +49 (0) 62 05/94 18-12
E-Mail info@unold.de
Internet www.unold.de 86990_2

Weitere Informationen zu unserem Sortiment erhalten Sie unter www.unold.de
Copyright UNOLD AG | www.unold.de
INHALTSVERZEICHNIS
Copyright UNOLD AG | www.unold.de
Bedienungsanleitung Modell 86990
Technische Daten .................................... 8
Symbolerklärung ...................................... 8
Für Ihre Sicherheit ................................... 8
Erklärung der Tasten ................................ 11
Fernbedienung ........................................ 12
Vor dem ersten Gebrauch.......................... 12
Der ideale Standort .................................. 12
Wassertank ............................................. 13
Spezial-Kühlakkus ................................... 14
Filter einsetzen ........................................ 15
Bedienen ................................................ 16
Reinigen und Aufbewahren ....................... 18
Garantiebestimmungen ............................ 19
Entsorgung / Umweltschutz ...................... 19
Informationen für den Fachhandel ............. 19
Service-Adressen ..................................... 20
Bestellformular ........................................ 8
Instructions for use Model 86990
Technical Specifications ........................... 21
Explanation of the symbols ....................... 21
For your safety ......................................... 21
Explanation of the buttons ........................ 24
Remote control ........................................ 25
Before using the appliance for the
first time................................................. 25
The ideal location .................................... 25
Water reservoir ........................................ 26
Cooling packs .......................................... 27
Inserting the filter .................................... 28
Operation ................................................ 29
Cleaning and storage ................................ 30
Guarantee Conditions ............................... 31
Waste Disposal/Environmental Protection ... 31
Service ................................................... 20
Notice d´utilisation Modèle 86990
Spécification technique ........................... 32
Explication des symboles .......................... 32
Pour votre sécurité ................................... 32
Explication des touches ............................ 35
Télécommande ........................................ 36
Avant la première utilisation ..................... 36
L‘emplacement idéal ................................ 36
Réservoirs d’eau ...................................... 37
Accumulateurs de froid ............................ 38
Mettre le filtre ......................................... 39
Utilisation ............................................... 40
Nettoyage et rangement ........................... 41
Conditions de Garantie ............................. 42
Traitement des déchets /
Protection de l’environnement ................... 42
Service ................................................... 20
Gebruiksaanwijzing Model 86990
Technische gegevens ............................... 43
Verklaring van de symbolen ....................... 43
Voor uw veiligheid .................................... 43
Verklaring van de knoppen ........................ 46
Afstandsbediening ................................... 47
Vóór het eerste gebruik ............................. 47
De ideale standplaats ............................... 47
Watertanks .............................................. 48
Koelelementen ........................................ 49
Filter plaatsen ......................................... 50
Bediening ............................................... 51
Reiniging en opslag ................................. 52
Garantievoorwaarden ................................ 53
Verwijderen van afval/Milieubescherming ... 53
Service ................................................... 20
INHALTSVERZEICHNIS
Copyright UNOLD AG | www.unold.de
Istruzioni per l’uso Modello 86990
Dati tecnici ............................................ 54
Significato dei simboli ............................. 54
Per la vostra sicurezza .............................. 54
Spiegazione dei tasti ................................ 57
Telecomando ........................................... 58
Prima del primo utilizzo ........................... 58
Ubicazione ideale .................................... 58
Serbatoio dell‘acqua ................................ 59
Accumulatori di freddo ............................. 60
Inserimento del filtro ............................... 61
Uso ........................................................ 62
Pulizia e conservazione ............................ 63
Norme die garanzia .................................. 64
Smaltimento / Tutela dell’ambiente ........... 64
Service ................................................... 20
Manual de instrucciones Modelo 86990
Datos técnicos ........................................ 65
Explicación de símbolos ........................... 65
Para su seguridad .................................... 65
Explicación de las teclas .......................... 68
Control remoto......................................... 69
Antes del primer uso ................................ 69
El emplazamiento ideal ............................ 69
Depósitos de agua ................................... 70
Acumuladores refrigerantes ...................... 71
Colocar el filtro ........................................ 72
Manejo ................................................... 73
Limpieza y almacenamiento ...................... 74
Condiciones de Garantia ........................... 75
Disposición/Protección del
medio ambiente ...................................... 75
Service ................................................... 20
Instrukcja obsługi Model 86990
Dane techniczne ...................................... 76
Objaśnienie symboli ................................. 76
Dla bezpieczeństwa użytkownika ............... 76
Objaśnienie przycisków ............................ 79
Pilot ....................................................... 79
Przed pierwszym użyciem ......................... 80
Idealna lokalizacja ................................... 80
Zbiorniki na wodę .................................... 81
Wkłady chłodzące .................................... 82
Włożenie filtra ......................................... 83
Obsługa .................................................. 84
Czyszczenie i przechowywanie ................... 85
Warunki gwarancji.................................... 86
Utylizacja / ochrona środowiska ................. 86
Service ................................................... 20
DE
Copyright UNOLD AG | www.unold.de
EN
FR
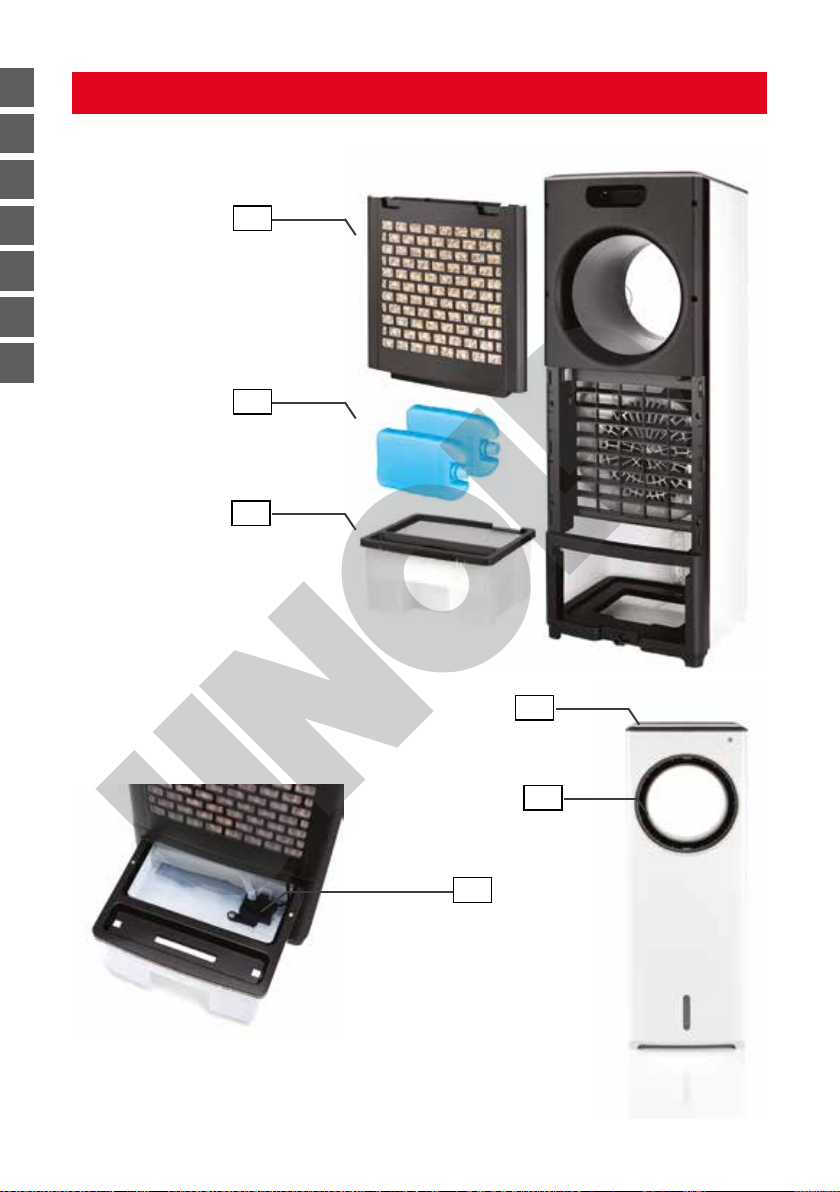
EINZELTEILE
NL
IT
ES
PL
1
2
3
4
5
6
6 von 88
Stand 3.3.2020
EINZELTEILE
Copyright UNOLD AG | www.unold.de
DE
DE Ab Seite 8
1 Filterabdeckung mit Filter
2 Kühlakku 2 x
3 Wassertank
4 Bedienfeld
5 Luftauslass
6 Pumpe
EN Page 21
1 Filter
2 Cooling pack 2x
3 Water reservoir
4 Control panel
5 Air outlet
6 Pump
FR Page 32
1 Filtre
2 Accumulateur de froid 2 x
3 Réservoir d’eau
4 Panneau de commande
5 Sortie d'air
6 Pompe
NL Pagina 43
1 Filter
2 Koelelement 2x
3 Watertank
4 Bedieningspaneel
5 Luchtuitlaat
6 Pomp
IT Pagina 54
1 Filtro
2 Accumulatore di freddo 2 x
3 Serbatoio dell’acqua
4 Pannello comandi
5 Uscita dell'aria
6 Pompa
ES Página 65
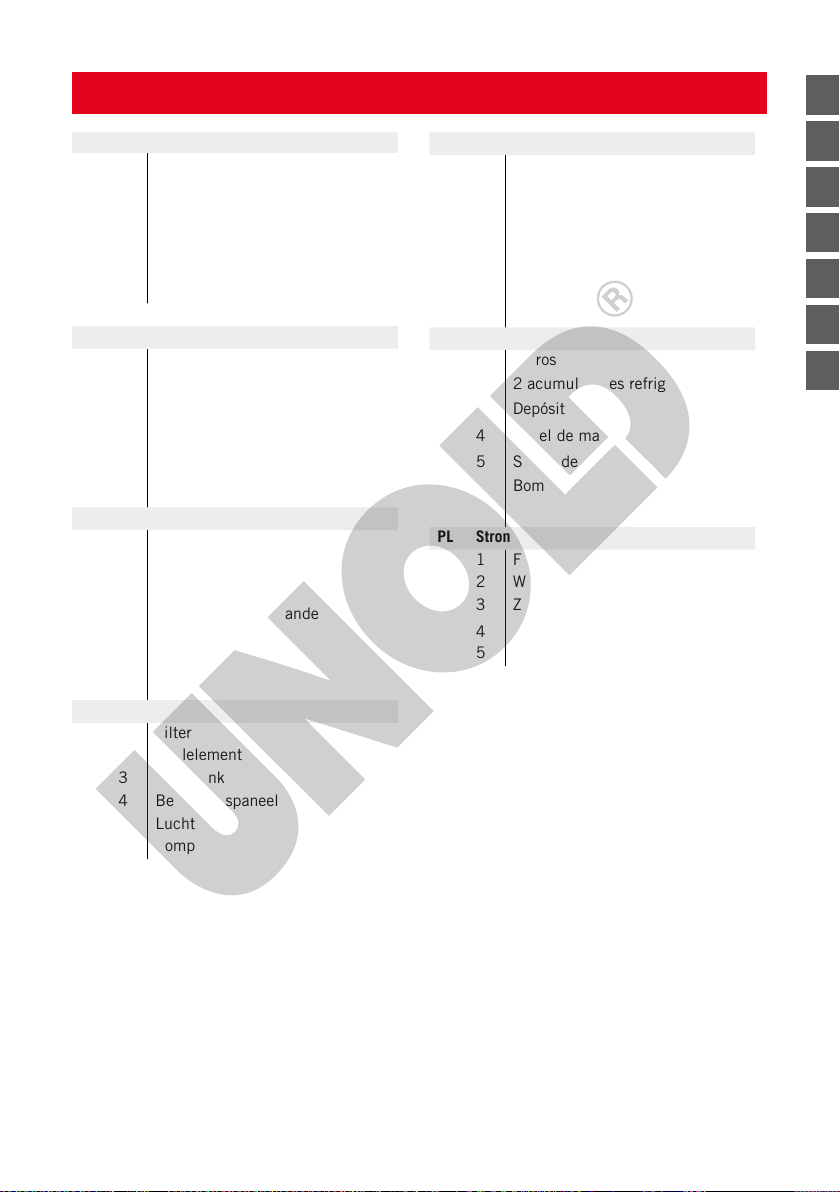
1 Filtros
2 2 acumuladores refrigerantes
3 Depósito de agua
4 Panel de mando
5 Salida de aire
6 Bompa
PL Strony 76
1 Filtr
2 Wkłady chłodzące 2 x
3 Zbiornik na wodę
4 Panel obsługowy
5 Wylot powietrza
6 Pompa
EN
FR
NL
IT
ES
PL
Stand 3.3.2020
7 von 88
DE
Copyright UNOLD AG | www.unold.de
BEDIENUNGSANLEITUNG MODELL 86990
EN
FR
NL
IT
ES
PL
TECHNISCHE DATEN
Leistung: 110 Watt, 220-240 V~, 50-60 Hz
Maße: ca. 26,0 x 21,5 x 73,5 cm B/T/H
Gewicht: ca. 5,1 kg
Kabellänge: ca. 150 cm
Wassertank: ca. 2 Liter
Schutzklasse: II
Farbe: Weiß
Ausstattung: Ventilatorbetrieb, Luftkühlerbetrieb, 3 Geschwindigkeitsstufen,
3 Windarten, Zeitvorwahl (1 bis 8 Stunden), Oszillation 40°,
Fernbedienung, Wassertank, Filter
Zubehör: Bedienungsanleitung, Fernbedienung inklusive Batterie,
2 Spezial-Kühlakkus mit Kristalltechnologie
Änderungen und Irrtümer in Ausstattungsmerkmalen, Technik, Farben und Design
vorbehalten
SYMBOLERKLÄRUNG
Dieses Symbol kennzeichnet eventuelle Gefahren, die Verletzungen
nach sich ziehen können oder zu Schäden am Gerät führen.
FÜR IHRE SICHERHEIT
Bitte lesen Sie die folgenden Anweisungen und bewahren Sie diese auf.
Personen im Haushalt
1. Dieses Gerät kann von Kindern ab 8 Jahren sowie von Personen
mit reduzierten physischen, sensorischen oder mentalen
Fähigkeiten oder Mangel an Erfahrung und/oder Wissen benutzt
werden, wenn sie beaufsichtigt oder bezüglich des sicheren
Gebrauchs des Gerätes unterwiesen wurden und die daraus
resultierenden Gefahren verstanden haben.
2. Kinder dürfen nicht mit dem Gerät spielen.
3. Reinigung und benutzerseitige Wartung dürfen nicht durch
Kinder durchgeführt werden, es sei denn, sie sind älter als
8 Jahre und werden beaufsichtigt.
4. Bewahren Sie das Gerät und das Kabel außerhalb der Reichweite
von Kindern unter 8 Jahren auf.
8 von 88
Stand 3.3.2020
Sicherheitshinweise zum Aufstellen und Betrieb des Gerätes
Copyright UNOLD AG | www.unold.de
5. Verwenden Sie das Gerät nur in Innenräumen.
6. Achten Sie auf ausreichend Platz am Standort des Gerätes. Es
müssen mindestens 50 cm zwischen dem Gerät und anderen
Gegenständen eingehalten werden.
7. Legen Sie keinesfalls Gegenstände auf das Gerät, während es in
Betrieb ist.
8. Gerät nur an Wechselstrom mit Spannung gemäß Typenschild
anschließen.
9. Dieses Gerät darf nicht mit einer externen Zeitschaltuhr oder
einem Fernbedienungssystem (wie z. B. Funksteckdosen) betrie
ben werden. Die mitgelieferte Fernbedienung ist davon ausgenommen.
10.
Tauchen Sie das Gerät oder die Zuleitung keinesfalls in Wasser
oder andere Flüssigkeiten ein – es besteht Lebensgefahr!
11. Öffnen Sie auf keinen Fall das Gehäuse des Gerätes, es besteht
die Gefahr eines Stromschlages!
12. Das Gerät ist ausschließlich für den Haushaltsgebrauch oder
ähnliche Verwendungszwecke bestimmt, z. B. in Teeküchen in
Geschäften, Büros oder sonstigen Arbeitsstätten, zur Verwen
dung durch Gäste in Hotels, Motels oder sonstigen Beherbergungsbetrieben, in Privatpensionen oder Ferienhäusern.
13.
Achten Sie darauf, dass die Zuleitung so verlegt wird, dass ein
Stolpern über die Zuleitung ausgeschlossen ist.
14. Um Schäden am Kabel zu vermeiden, wickeln Sie die Zuleitung
keinesfalls um das Gerät.
15. Um Schäden am Kabel zu vermeiden, ziehen Sie das Netzkabel
immer am Stecker aus der Steckdose, keinesfalls an der Zulei
-
tung.
16.
Achten Sie darauf, dass die verwendete Steckdose leicht zugäng-
lich ist, damit der Stecker bei Gefahr schnell herausgezogen
werden kann.
17.
Achten Sie darauf, die Zuleitung nicht einzuklemmen oder über
Ecken zu ziehen. Andernfalls kann die Zuleitung beschädigt
werden.
18. Stellen Sie das Gerät nicht direkt unter eine Steckdose.
DE
EN
FR
NL
IT
ES
PL
Stand 3.3.2020
9 von 88
DE
Copyright UNOLD AG | www.unold.de
EN
FR
NL
IT
ES
PL
19. Das Gerät darf nicht in nassen/nasskalten oder feuchten Räumen betrieben werden – Stromschlaggefahr!
20.
Vermeiden Sie starke Sonneneinstrahlung auf das Gerät.
21. Keinesfalls die Finger oder Gegenstände wie Nadeln, Stifte usw.
durch die Öffnungen in das Innere des Gerätes stecken – Verlet
-
zungsgefahr!
22.
Prüfen Sie regelmäßig das Gerät, den Stecker und die Zuleitung
auf Verschleiß oder Beschädigungen. Bei Beschädigung senden
Sie das Gerät bitte zur Überprüfung und Reparatur an unseren
Kundendienst. Unsachgemäße Reparaturen können zu erhebli
chen Gefahren für den Benutzer führen und haben den Ausschluss der Garantie zur Folge.
23.
Wenn die Zuleitung beschädigt ist, darf diese ausschließlich
durch den Hersteller bzw. dessen Kundendienst oder eine
andere, entsprechend fachlich qualifizierte Person ausgetauscht
werden, um Gefahren zu vermeiden.
24. Um Schäden zu vermeiden, darf das Gerät nicht mit Zubehör
anderer Hersteller oder Marken benutzt werden.
25. Nach Gebrauch sowie vor dem Reinigen den Netzstecker aus der
Steckdose ziehen. Das Gerät keinesfalls unbeaufsichtigt lassen,
wenn der Netzstecker eingesteckt ist.
Umgang mit Wassertank und Spezial-Kühlakkus
26. Füllen Sie ausschließlich Leitungswasser in den Wassertank.
Verwenden Sie kein destilliertes Wasser oder andere Flüssigkei
-
ten.
27.
Tritt etwas aus einem der Spezial-Kühlakkus aus, muss der
Kühlakku ersetzt werden.
28. Die in den Spezial-Kühlakkus enthaltene Substanz (Super Absor
-
ber Polymer) ist nicht zum Verzehr geeignet.
29.
Verzehren Sie keinesfalls die Eisschicht, die sich beim Lagern
auf den Spezial-Kühlakkus bilden kann.
30. Halten Sie Kinder und Tiere von den Spezial-Kühlakkus fern.
10 von 88
Stand 3.3.2020
Es dürfen niemals Gegenstände wie Finger, Nadeln, Stifte etc.
Copyright UNOLD AG | www.unold.de
durch die Öffnungen in das Innere des Gerätes gesteckt werden
– Verletzungsgefahr!
Das Gerät nur auf einem ebenen, stabilen Untergrund betreiben,
damit dieses nicht umkippt.
Der Hersteller übernimmt keine Haftung bei fehlerhafter Montage, bei unsachgemäßer oder fehlerhafter
Verwendung oder nach Durchführung von Reparaturen durch nicht autorisierte Dritte.
DE
EN
FR
NL
IT
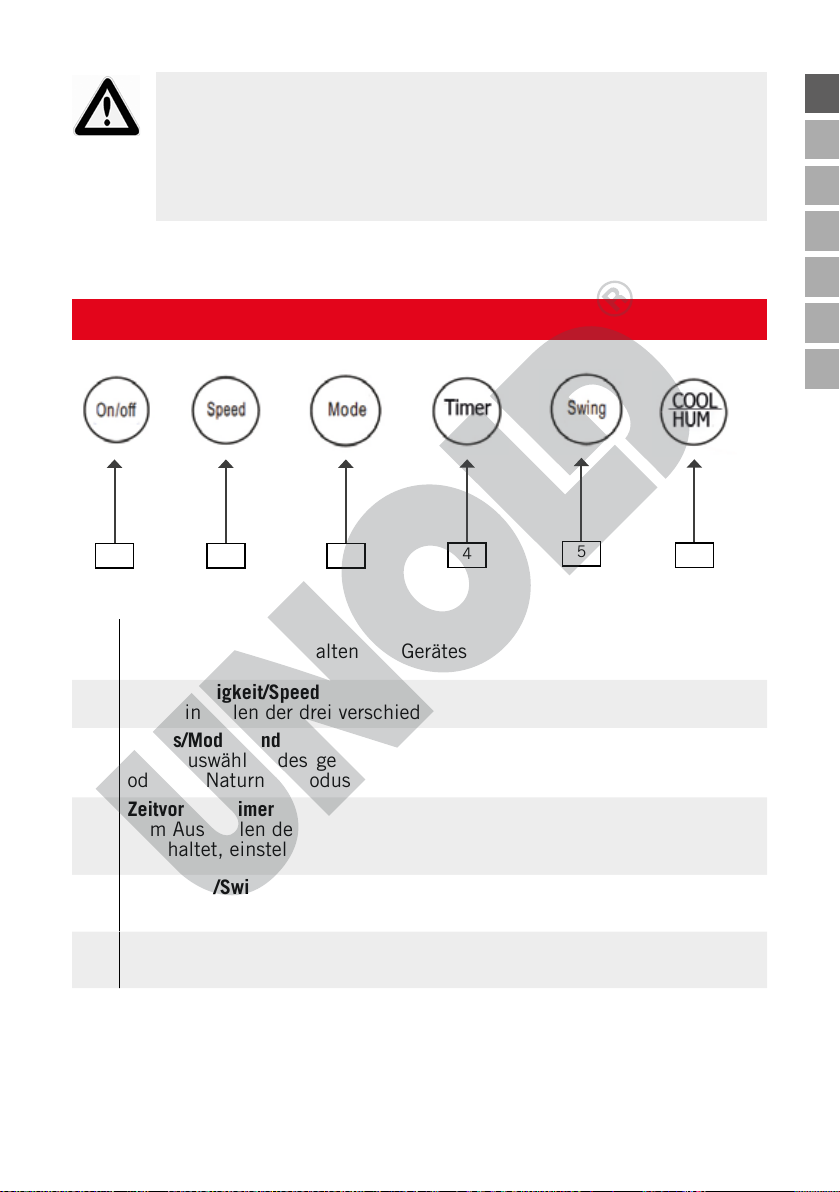
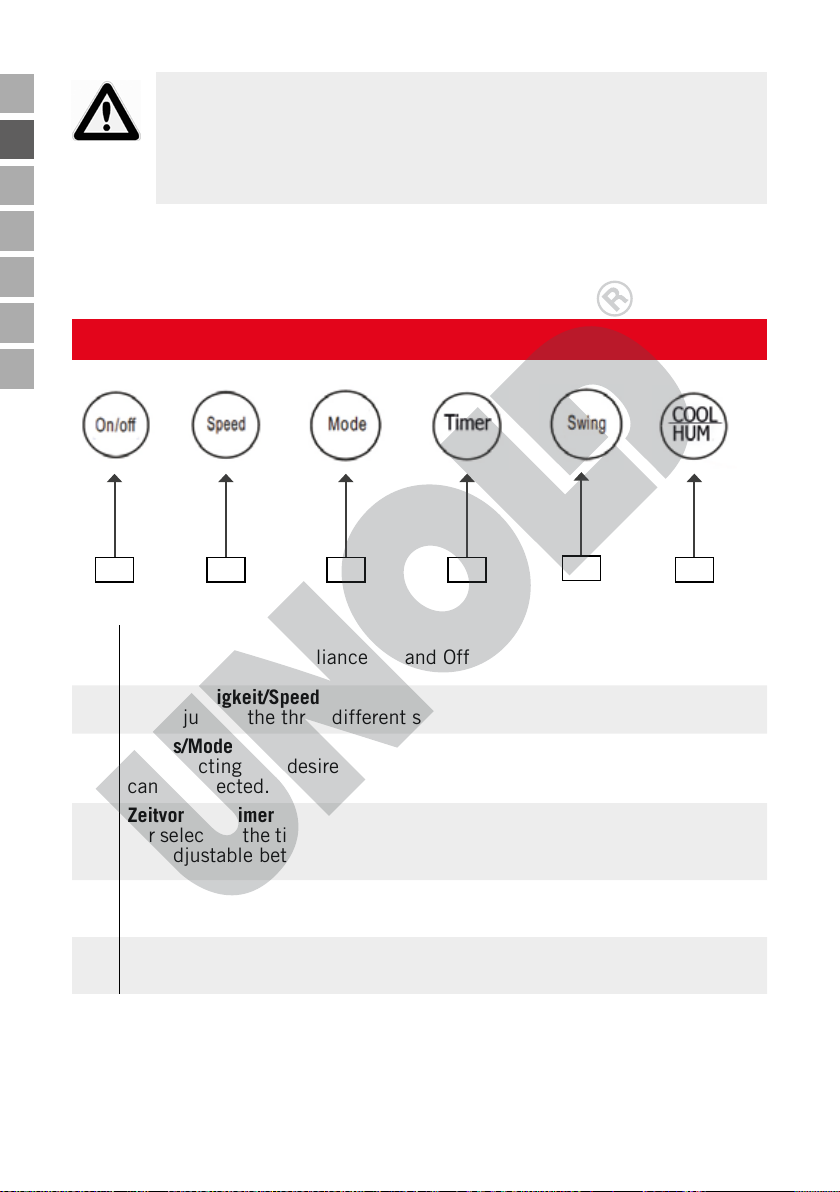
ERKLÄRUNG DER TASTEN
1 2 3
1
EIN/AUS/ON OFF
4
5
Zum Ein- und Ausschalten des Gerätes
2
Geschwindigkeit/Speed
Zum Einstellen der drei verschiedenen Geschwindigkeitsstufen
3
Modus/Mode/Wind
Zum Auswählen des gewünschten Modus. Wählbar sind der Standardoder der Naturnah-Modus.
4
Zeitvorwahl/Timer
Zum Auswählen der Zeit, nach der sich das Gerät automatisch
abschaltet, einstellbar zwischen 1 und 8 Stunden
5
Oszillation/Swing
Zum Ein-und Ausschalten der Schwenkfunktion/Oszillation
ES
PL
6
6
Cold/Cool/Hum.
Zum Ein-und Ausschalten der Kühlfunktion
Stand 3.3.2020
11 von 88
DE
Copyright UNOLD AG | www.unold.de
FERNBEDIENUNG
EN
FR
NL
IT
ES
PL
1. Ziehen Sie die Abdeckung des Batteriefachs vorsichtig aus der Fernbedienung.
2. Setzen Sie die Batterie in die vorgesehene Halterung ein.
3. Wenn Sie eine andere Batterie einsetzen möchten, achten Sie darauf, eine
Knopfzelle vom Typ CR2025 zu verwenden.
4. Schieben Sie die Abdeckung wieder vorsichtig in die Fernbedienung.
5. Verwenden Sie nur Batterien des passenden Typs.
6. Wenn Sie das Gerät mit der Fernbedienung einstellen, achten Sie darauf,
diese während der Einstellungen immer in Richtung des Ventilators zu halten.
7. Die Bezeichnungen auf der Fernbedienung sind identisch mit den Tasten
am Gerät.
8. Um Schäden zu vermeiden, lassen Sie die Fernbedienung bitte nicht aus
großer Höhe fallen.
VOR DEM ERSTEN GEBRAUCH
1. Entfernen Sie alle Verpackungsmaterialien und ggf. Transportsicherungen.
Halten Sie Verpackungsmaterialien von Kindern fern – Erstickungsgefahr!
2. Wickeln Sie die Zuleitung vollständig ab.
3. Prüfen Sie, ob alle Teile vollständig und intakt sind. Nehmen Sie das Gerät
bei Beschädigungen nicht in Betrieb, sondern wenden Sie sich an Ihren
Händler oder unseren Kundendienst.
4. Machen Sie sich mit allen Funktionen des Gerätes vertraut.
5. Lagern Sie die mitgelieferten Spezial-Kühlakkus für mindestens vier Stunden in einem Gefrierfach.
DER IDEALE STANDORT
1. Halten Sie ausreichenden Sicherheitsabstand (mindestens 50 cm zu anderen Gegenständen wie Möbeln, Vorhängen usw. ein.
2. Das Gerät darf nur senkrecht in Betrieb genommen werden.
3. Sorgen Sie dafür, dass die Luft ungehindert ein- und ausströmen kann – die
Luftein- und auslässe des Gerätes dürfen auf keinen Fall verdeckt werden.
12 von 88
Stand 3.3.2020
4. Stellen Sie das Gerät nur auf einen festen, ebenen Untergrund. Nicht auf
Copyright UNOLD AG | www.unold.de
weiche Flächen (Sofa, Bett) stellen, da das Gerät umkippen kann.
5. Achten Sie außerdem darauf, das Gerät nicht auf langflorigen Teppichen
oder in staubreicher Umgebung aufzustellen.
6. Das Gerät darf aus Sicherheitsgründen nicht in der Nähe von Waschbecken,
Badewannen oder Wasseranschlüssen verwendet werden.
7. Achten Sie darauf, dass die verwendete Steckdose jederzeit leicht zugänglich ist.
8. Prüfen Sie, ob die Zuleitung so liegt, dass niemand darüber stolpern kann.
9. Wenn Sie das Gerät mit Ventilator- und Kühlfunktion betreiben, halten Sie
Türen und Fenster geschlossen. So wird eine effektive, energiesparende
Kühlung gewährleistet.
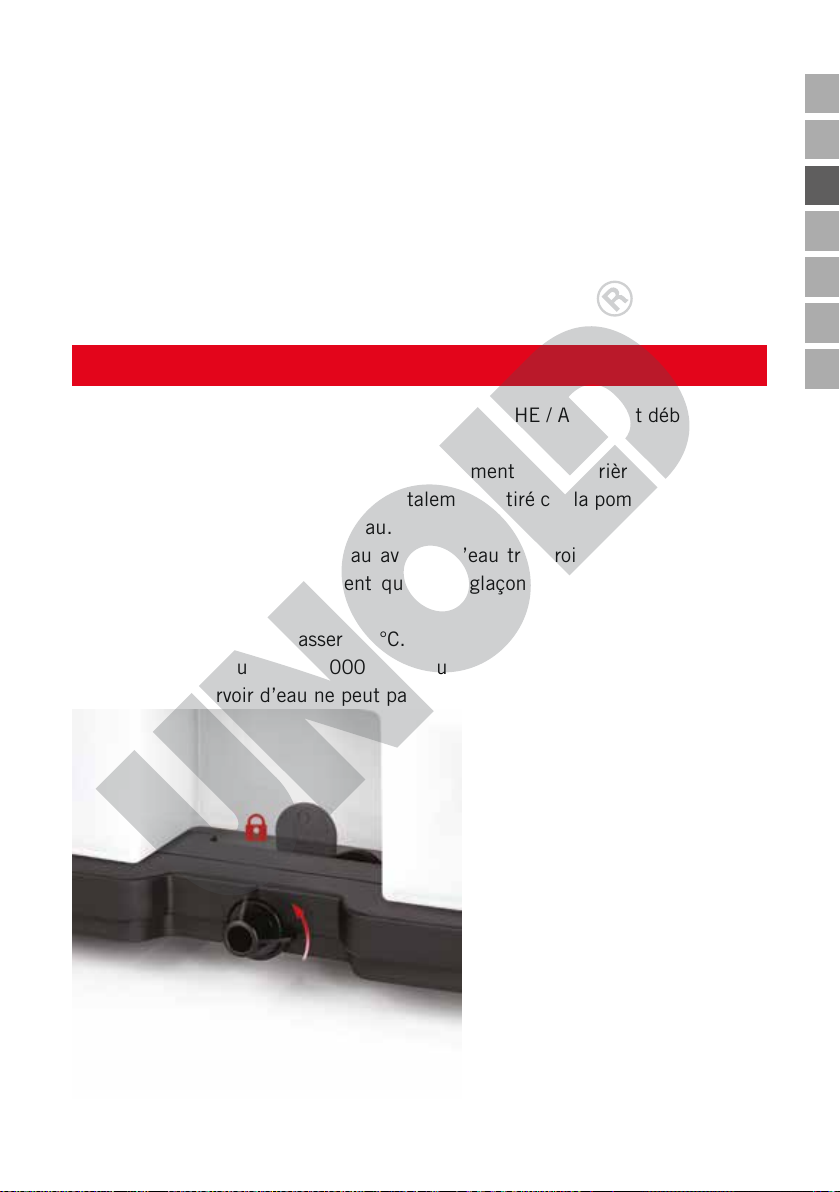
WASSERTANK
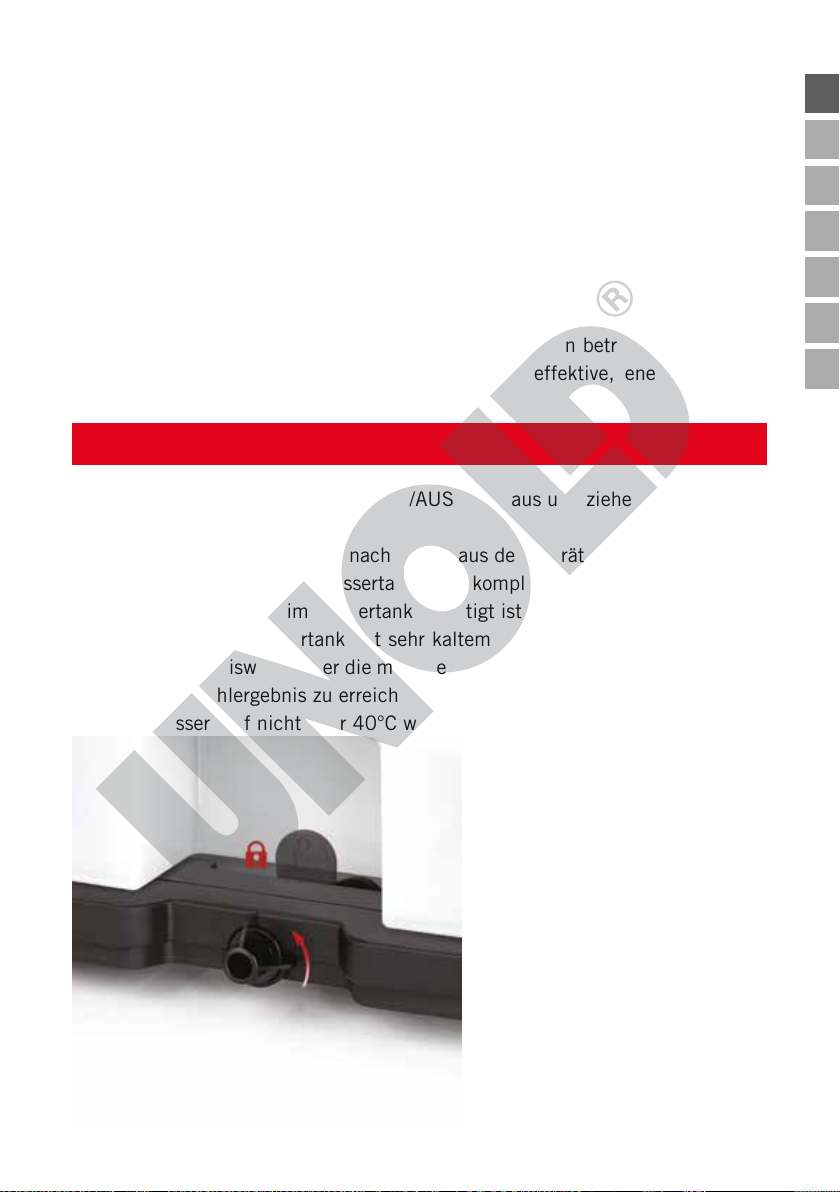
1. Schalten Sie das Gerät an der EIN/AUS-Taste aus und ziehen Sie den Netzstecker aus der Steckdose.
2. Ziehen Sie den Tank leicht nach hinten aus dem Gerät heraus. Bitte beachten Sie dabei, dass der Wassertank nicht komplett entnommen wird, da die
Pumpe des Gerätes im Wassertank befestigt ist.
3. Füllen Sie den Wassertank mit sehr kaltem Wasser, bei Bedarf können Sie
auch einige Eiswürfel oder die mitgelieferten Kühlakkus hinzufügen, um ein
besseres Kühlergebnis zu erreichen.
4. Das Wasser darf nicht über 40°C warm sein.
5. Es müssen mindestens
1.000 ml Wasser (max.
2.000 ml) eingefüllt werden,
da die Pumpe im Wassertank
sonst nicht ordnungsgemäß
arbeiten kann.
6. Schieben Sie den Tank wieder
in das Gerät.
7. Zum vollständigen Entleeren
entriegeln Sie den Wassertank, indem Sie den Verriegelungsbügel am Gehäuse nach
links oder rechts drehen.
DE
EN
FR
NL
IT
ES
PL
Stand 3.3.2020
13 von 88
DE
Copyright UNOLD AG | www.unold.de
EN
FR
NL
IT
ES
PL
8. Ziehen Sie den Wassertank vorsichtig etwas aus dem Gerät.
9. Drehen Sie die sich im Wassertank befindliche Halterung der Pumpe nach
vorn, bis sich die Pumpe vorsichtig nach oben abziehen lässt.
10. Achten Sie darauf, das Kabel und den Schlauch der Pumpe nicht zu beschädigen oder zu lösen.
11. Entnehmen Sie den Wassertank und entleeren Sie das Wasser. Reinigen
Sie den Wassertank mit einem Tuch und ggf. einem milden Spülmittel und
reiben Sie den Wassertank innen und außen gut trocken.
12. Füllen Sie den Wassertank erneut mit Wasser, wenn Sie das Gerät weiter
betreiben möchten, andernfalls setzen Sie den leeren Wassertank wieder
ein.
13. Gehen Sie in umgekehrter Reihenfolge vor, um den Wassertank wieder einzusetzen.
14. Achten Sie dabei darauf, die Pumpe richtig einzusetzen und mit dem Verriegelungsclip fest zu verschließen.
Achtung: Wechseln Sie das Wasser im Wassertank aus hygienischen
Gründen einmal täglich aus, um Bakterienbildung zu vermeiden.
Füllen Sie keinesfalls Wasser direkt in das Gerät!
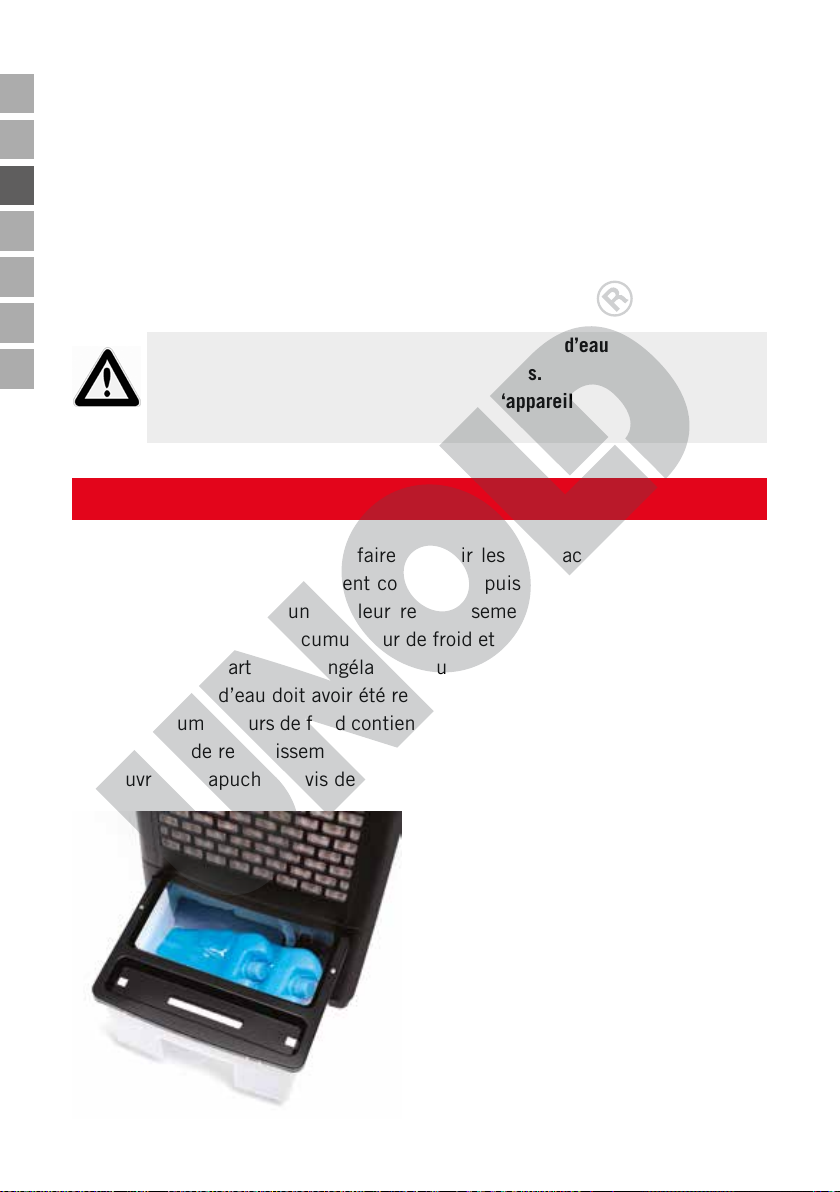
SPEZIAL-KÜHLAKKUS
1. Bei Bedarf können Sie die beiden mitgelieferten Spezial-Kühlakkus im
Gefrierfach einfrieren lassen und anschließend ebenfalls in den Wassertank
legen, um einen noch größeren Kühlungseffekt zu erlangen. Wir empfehlen,
immer einen Kühlakku zu verwenden und den anderen Kühlakku für den
nächsten Tag im Gefrierfach zu lagern.
2. Der Wassertank muss vorher mit Wasser gefüllt sein.
3. Die Kühlakkus enthalten ein Spezialgranulat, das dafür sorgt, dass die
Kühlleistung der Kühlakkus höher ist.
4. Öffnen Sie den Schraubverschluss des Kühlakkus.
5. Füllen Sie den Kühlakku mit Leitungswasser bis zur Markierung.
6. Verschließen Sie den Kühlakku sorgfältig und legen Sie ihn für einige Stunden in ein Gefrierfach.
7. Legen Sie den Kühlakku in den Wassertank. Beachten Sie, dass sich durch
den Kühlakku der Wasserstand erhöht. Der Wasserstand darf jedoch keinesfalls über die Max-Markierung steigen. Verschließen Sie den Wassertank,
14 von 88
Stand 3.3.2020
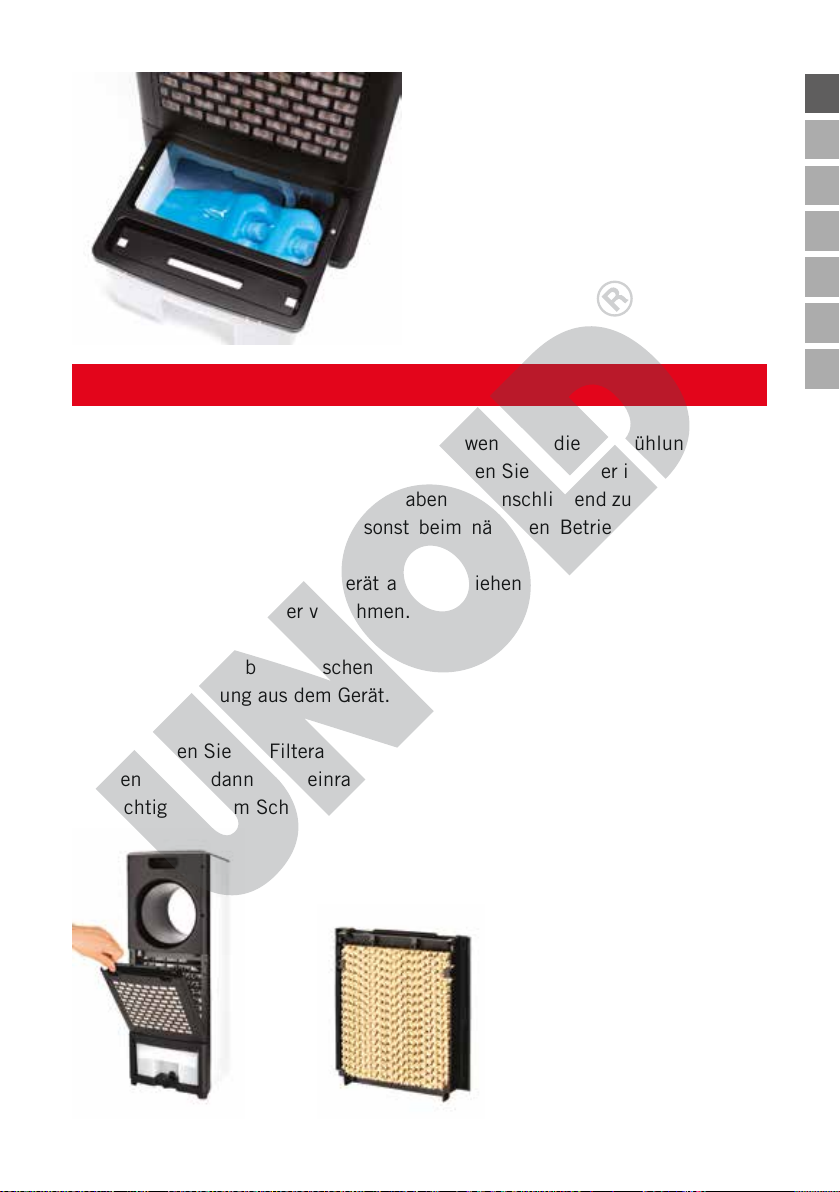
wie im vorangegangen Kapitel
Copyright UNOLD AG | www.unold.de
beschrieben.
8. Achtung: Bei sehr warmen
Temperaturen kann sich Kondensat am Wassertank bilden,
welches auf den Boden tropfen
kann. Schützen Sie daher den
Boden entsprechend.
FILTER EINSETZEN
1. Der Filter muss immer eingesetzt sein, wenn Sie die Luftkühlung nutzen,
um Schäden am Gerät zu vermeiden. Lassen Sie den Filter immer gut trocknen, wenn Sie das Gerät genutzt haben und anschließend zum Aufbewahren
wegstellen. Der Filter kann sonst beim nächsten Betrieb einen muffigen
Geruch verursachen.
2. Schalten Sie immer das Gerät aus und ziehen Sie den Netzstecker, bevor
Sie Arbeiten am Filter vornehmen.
Entnehmen
3. Greifen Sie in beide Laschen an der Filterabdeckung und ziehen Sie die
Filterabdeckung aus dem Gerät.
Einsetzen
4. Platzieren Sie die Filterabdeckung zunächst unten am Filtereinsatz und lassen Sie sie dann oben einrasten (siehe Abbildung). Prüfen Sie, ob der Filter
richtig sitzt, um Schäden am Gerät zu vermeiden.
5. Eine Ersatzfiltermatte können Sie bei Bedarf
bei unserem Kundenservice bestellen
(Bestellformular Seite 87).
DE
EN
FR
NL
IT
ES
PL
Stand 3.3.2020
Filtermatte
15 von 88
DE
Copyright UNOLD AG | www.unold.de
BEDIENEN
EN
FR
NL
IT
ES
PL
1. Hinweis: Sie können die Ventilatorfunktion auch ohne Kühlfunktion nutzen.
2. Vergewissern Sie sich, dass das Gerät auf einem geeigneten, ebenen Untergrund steht und sicher und stabil aufgestellt wurde.
3. Stecken Sie den Stecker in eine Steckdose.
4. Drücken Sie einmal auf die Taste „EIN/AUS“. Das Gerät startet. In der
Grundeinstellung läuft das Gerät auf niedriger Geschwindigkeit im normalen
Modus.
Geschwindigkeit einstellen
5. Drücken Sie die Taste „Geschwindigkeit“ wiederholt, bis das Gerät mit der
gewünschten Geschwindigkeit arbeitet. Die entsprechende Einstellung wird
durch die jeweilige Kontrollleuchte angezeigt:
Niedrige Geschwindigkeit: Low
Mittlere Geschwindigkeit: Med
Hohe Geschwindigkeit: High
Schwenkfunktion/Oszillation
6. Drücken Sie die Taste „Oszillation“, um die Schwenkfunktion des Luftauslasses einzuschalten. Wenn Sie diese Taste erneut drücken, stoppt das
Gerät in der aktuellen Position, der Ventilator läuft jedoch weiter.
Zeitvorwahl
7. Über die Taste „Zeitvorwahl“ können Sie die gewünschte Laufzeit des Gerätes auswählen. Dies ist im Bereich 1, 2, 4 und 8 Stunden möglich. Drücken
Sie die Taste „Zeitvorwahl“ so lange, bis die gewünschte Stundenzahl im
Display erscheint. Nach Ablauf dieser Zeit schaltet sich das Gerät automatisch aus. Wenn Sie keine Zeiteinstellung vornehmen, läuft das Gerät
durchgehend.
Modus einstellen
8. Drücken Sie die Taste „Modus“ und wählen Sie die gewünschte Betriebsart
aus. Sie können zwischen Standard-Modus, Naturnah-Modus (das Gerät
arbeitet mit wechselnden Geschwindigkeiten, welche sich wie natürliche
Luftbewegung anfühlen) oder Schlaf-Modus (das Gerät arbeitet ebenfalls mit
wechselnden Geschwindigkeiten von hoher zu niedriger Geschwindigkeit)
16 von 88
Stand 3.3.2020

wählen. Drücken Sie die Taste „Modus“ wiederholt, bis die gewünschte
Copyright UNOLD AG | www.unold.de
Einstellung durch die Kontrollleuchte angezeigt wird.
Luftkühlung zuschalten
9. Vergewissern Sie sich, dass ausreichend Wasser im Wassertank enthalten
ist.
10. Drücken Sie die Taste „Cool/Hum“.
11. Die Pumpe im Wassertank wird eingeschaltet und das Wasser im Wassertank wird durch den Filter an der Rückseite des Gerätes geleitet, um die
zirkulierende Luft abzukühlen.
12. Wenn der Wassertank leer ist, füllen Sie diesen auf, wie im Kapitel „Wasser-
tank“ beschrieben. Prüfen Sie regelmäßig den Füllstand.
13. Ziehen Sie den Wassertank keinesfalls aus dem Gerät, wenn die Luftkühlung eingeschaltet ist. Andernfalls kann das Gerät durch fließendes Wasser
im Geräteinneren beschädigt werden.
14. Drücken Sie erneut die Taste „Cool/Hum“, um die Funktion auszuschalten.
Ausschalten
Tipp: wir raten dazu, erst die Luftkühlung auszuschalten und die Ventilatorfunktion
zunächst noch einige Minuten länger laufen zu lassen. So kann der Filter schneller
trocknen.
15. Drücken Sie erneut die Taste „EIN/AUS“ am Gerät oder auf der Fernbedienung, um das Gerät auszuschalten. Ziehen Sie den Stecker aus der Steckdose, wenn Sie das Gerät nicht mehr verwenden.
16. Entnehmen Sie anschließend die Filterabdeckung und lassen Sie den Filter
trocknen, bevor Sie das Gerät wieder verwenden.
DE
EN
FR
NL
IT
ES
PL
Stand 3.3.2020
17 von 88
DE
Copyright UNOLD AG | www.unold.de
REINIGEN UND AUFBEWAHREN
EN
FR
NL
IT
ES
PL
Schalten Sie das Gerät aus, indem Sie die Taste „EIN/AUS“ drücken, und
ziehen Sie den Stecker aus der Steckdose.
Achten Sie darauf, das Gerät keinesfalls in Wasser zu tauchen. Motor oder
elektrische Bauteile des Gerätes dürfen nicht feucht werden.
1. Verwenden Sie grundsätzlich keine scharfen Scheuermittel, Stahlwolle,
metallischen Gegenstände, heißen Reinigungsmittel oder Desinfektionsmittel.
2. Wischen Sie Gehäuse und Gitter des Ventilators mit einem leicht feuchten
Tuch ab.
3. Vor jedem längeren Aufbewahren muss der Wassertank entleert werden
(siehe Kapitel „Wassertank“.).
4. Entnehmen Sie die Filterabdeckung und lassen Sie den Filter vollständig trocknen, da sich sonst bei der nächsten Inbetriebnahme ein muffiger
Geruch verbreiten kann.
5. Bewahren Sie das Gerät aufrecht stehend an einem trockenen, staubfreien
Ort auf. Schützen Sie das Gerät vor Kälte und Hitze.
6. Lagern Sie keine anderen Gegenstände auf dem Gerät. Andernfalls kann das
Gerät beschädigt werden.
18 von 88
Stand 3.3.2020
GARANTIEBESTIMMUNGEN
Copyright UNOLD AG | www.unold.de
DE
Wir gewähren auf unsere Geräte eine Garantie von 24 Monaten, bei gewerblichem Gebrauch 12
Monate, ab dem Kaufdatum für Schäden, die bei bestimmungsgemäßem Gebrauch nachweislich
auf Werksfehler zurückzuführen sind. Innerhalb der Garantiezeit beheben wir Material- und Herstellungsfehler nach unserem Ermessen durch Reparatur oder Umtausch. Unsere Garantieleistungen
gelten ausschließlich für in Deutschland und Österreich verkaufte Geräte. Bei anderen Ländern
wenden Sie sich bitte an den zuständigen Importeur. Geräte, für die eine Mängelbeseitigung beansprucht wird, senden Sie bitte zusammen mit einer Kopie des maschinell erstellten Kaufbelegs, aus
dem das Kaufdatum ersichtlich sein muss, sowie einer Fehlerbeschreibung gut verpackt an unseren
Kundendienst. Auf unserer Internetseite www.unold.de/ruecksendung können Sie sich einen Rücksendeschein ausdrucken. (nur für Einsendungen aus Deutschland und Österreich). Von der Garantie
ausgeschlossen sind Schäden durch Verschleiß, unsachgemäße Handhabung und Nichteinhaltung
der Wartungs- und Pflegeanweisungen. Der Garantieanspruch erlischt, wenn Reparaturen oder Eingriffe am Gerät von dritter Stelle vorgenommen werden. Eventuelle Ansprüche des Endverbrauchers
gegenüber dem Verkäufer oder Händler werden durch diese Garantie nicht eingeschränkt.
ENTSORGUNG / UMWELTSCHUTZ
Unsere Geräte werden auf hohem Qualitätsniveau für eine lange Nutzungsdauer herge stellt. Regelmäßige Wartung und fachge rechte Reparaturen durch unseren Kundendienst können die Nutzungsdauer des Gerätes verlängern. Wenn ein Gerät defekt und
nicht mehr zu reparieren ist, beachten Sie bitte: Dieses Produkt darf nicht zusammen
mit dem normalen Hausmüll entsorgt werden. Sie müssen dieses Produkt an einer ausgewiesenen Sammelstelle zum Recycling von elektrischen oder elektronischen Geräten
ab liefern. Durch das separate Sammeln und Recyceln von Abfallprodukten helfen Sie
mit, die natürlichen Ressourcen zu schonen und stellen sicher, dass das Produkt in
gesundheits- und umweltverträglicher Weise entsorgt wird.
Verbrauchte Batterien gehören nicht in den Hausmüll. Bitte entsorgen Sie diese über Ihren
Elektrohändler oder die jeweilige kommunale Sammelstelle.
EN
FR
NL
IT
ES
PL
INFORMATIONEN FÜR DEN FACHHANDEL
Hiermit erklärt die UNOLD AG, dass sich der Ventilator 86990 in Übereinstimmung mit den
grundlegenden Anforderungen der europäischen Richtlinie für elektromagnetische Verträglichkeit
(2014/30/EU) und der Niederspannungsrichtlinie (2014/35/EC) bendet.
Die Übereinstimmung mit den Regularien bezieht sich auf den Tag der Erstellung dieser Erklärung.
Hockenheim, 8.9.2019, UNOLD AG, Mannheimer Straße 4, 68766 Hockenheim
Stand 3.3.2020
19 von 88
DE
Copyright UNOLD AG | www.unold.de
EN
FR
NL
IT
SERVICE-ADRESSEN
DEUTSCHLAND
Mannheimer Straße 4
68766 Hockenheim
Kundendienst
Telefon +49 (0) 62 05/94 18-27
Telefax +49 (0) 62 05/94 18-22
E-Mail service@unold.de
Internet www.unold.de
ES
PL
Sie möchten innerhalb der Garantiezeit ein Gerät zur Reparatur einsenden? Auf unserer
Internetseite www.unold.de/ruecksendung können Sie sich einen Rücksendeschein ausdrucken,
um damit das Paket kostenlos bei der Post abzugeben (nur für Einsendungen aus Deutschland
und Österreich).
SCHWEIZ POLEN
MENAGROS AG
Hauptstr. 23
CH 9517 Mettlen
Telefon +41 (0) 71 6346015
Telefax +41 (0) 71 6346011
E-Mail info@bamix.ch
Internet www.bamix.ch
Quadra-Net
Dziadoszanska 10
61-248 Poznań
Internet www.quadra-net.pl
Diese Anleitung kann im Internet unter www.unold.de als pdf-Datei heruntergeladen werden.
20 von 88
Stand 3.3.2020
INSTRUCTIONS FOR USE MODEL 86990
Copyright UNOLD AG | www.unold.de
DE
TECHNICAL SPECIFICATIONS
Power: 110 watts, 220-240 V~, 50-60 Hz
Dimensions: approx. 26.0 x 21.5 x 73.5 cm W/D/H
Weight: approx 5.1 kg
Power cord length: approx. 150 cm
Protection class: II
Colour: White
Features: Fan mode, Air cooler mode, 3 speed levels, 3 breeze types,
timer (1 to 8 hours), oscillation 40°, remote control, water
reservoir, filter
Accessories: Operating instructions, remote control, incl. battery, 2
cooling packs
Equipment features, technology, colours and design are subject to change without
notice.
EXPLANATION OF THE SYMBOLS
This symbol indicates potential hazards that may result in injury or
damage to the appliance.
FOR YOUR SAFETY
Please read the following instructions and keep them on hand for later
reference.
Instructions for persons in the household
1. This appliance can be used by children 8 years and older, as
well as by persons with reduced physical, sensory or mental
abilities or with lack of experience and/or knowledge, if they are
supervised or if they have been instructed with regard to safe
use of the appliance and have understood the dangers that can
result from use of the appliance.
2. Children must not play with the appliance.
3. Children are not allowed to perform cleaning and user
maintenance, unless they are 8 years of age or older and are
supervised.
4. Keep the appliance and the power cord out of the reach of
children under 8 years of age.
Stand 3.3.2020
21 von 88
EN
FR
NL
IT
ES
PL
DE
Copyright UNOLD AG | www.unold.de
EN
FR
NL
IT
ES
PL
Information on set-up and operation of the appliance
5. Only use the appliance indoors.
6. Ensure that there is sufficient space where the appliance is
located. A minimum distance of 50 cm must be maintained
between the appliance and other objects.
7. Do not use the appliance in rooms that are extremely dusty or in
the vicinity of flammable substances.
8. Do not, under any circumstances, place objects on the appli
-
ance, while it is in operation.
9.
Only connect the appliance to an AC power supply with voltage
corresponding to the voltage specified on the rating plate.
10. This appliance must not be operated with an external timer or
a remote control system (such as radio-controlled sockets). The
provided remote control is an exception to the preceding instruc
-
tion.
11.
Never immerse the appliance or the power cord in water or other
liquids – life-threatening danger!
12. Do not open the motor housing under any circumstances, there
is danger of electric shock!
13. The appliance is intended for household use only, or for similar
areas of use, such as in kitchenettes in businesses, offices or
other workplaces, for use by guests in hotels, motels or other
lodgings, in private guest houses or holiday homes.
14. Ensure that the power cord is laid out in such a manner that
there is no possibility of stumbling over it.
15. To avoid damage to the power cord, do not, under any circum
-
stances wrap the power cord around the appliance.
16.
To avoid damage to the power cord, always unplug the mains plug
from the electrical outlet by grasping the plug, do not, under any
circumstances, pull on the power cord to unplug the appliance.
17. Ensure that the electrical outlet that is used is easily accessible,
in order to unplug the appliance in an emergency.
18. Ensure that the power cord is not pinched or pulled over corners.
Wrapping the power cord around the appliance can damage the
power cord.
22 von 88
Stand 3.3.2020
19. If possible, do not use an extension cord. If you must use an
Copyright UNOLD AG | www.unold.de
extension cord, completely unwind the extension cord and comply with the power limits of the respective extension cord.
20.
Never place the appliance directly under an electrical outlet.
21. The appliance must never be used in wet/wet and cold or damp
rooms – danger of electric shock!
22. Keep the appliance out of direct sunlight.
23. Do not, under any circumstances, stick fingers or objects, such
as needles, pins, etc. through the openings and into the interior
of the appliance – danger of injury!
24. Check the appliance, the plug and the power cord regularly for
wear or damage. If there is damage, please send the appliance
for inspection and repair to our customer service organization.
Unauthorised repairs can result in serious hazards for the user
and void the warranty.
25. If the power cord is damaged, it must only be repaired by the
manufacturer, the manufacturer’s customer service organiza
tion, or some other person with the appropriate technical qualifications, to avoid hazards.
26.
To avoid damage, do not use the appliance with accessories of
other manufacturers or brands.
27. Unplug the mains plug from the electrical outlet after use and
before cleaning. Do not, under any circumstances, leave the
appliance unattended when the mains plug is plugged in.
Handling the water reservoir and cooling packs
28. Only fill the water reservoir with tap water. Do not use distilled
water or other liquids.
29. If cooling liquid escapes from one of the cooling packs the cool
-
ing pack must be replaced.
30.
The fluid (Super Absorber Polymer) in the cooling pack is not
suitable for consumption. Do not, under any circumstances eat
the layer of ice that can form on the cooling packs in storage.
31. Keep children and animals away from the cooling packs.
DE
EN
FR
NL
IT
ES
PL
Stand 3.3.2020
23 von 88
DE
Copyright UNOLD AG | www.unold.de
EN
FR
NL
IT
ES
PL
Never stick objects such as fingers, needles, pins, etc. through
the openings into the interior of the appliance – danger of injury!
Only operate the appliance on a level, stable substrate, so that
it does not tip over.
The manufacturer will not be liable in the event of incorrect assembly, improper or incorrect use or if
repairs are carried out by unauthorized third parties.
EXPLANATION OF THE BUTTONS
1 2 3
1
EIN/AUS/ON OFF
4
5
For switching the appliance On and Off
2
Geschwindigkeit/Speed
For adjusting the three different speed levels
3
Modus/Mode
For selecting the desired mode. Standard mode or Near-Natural mode
can be selected.
4
Zeitvorwahl/Timer
For selecting the time, after which the appliance will automatically switch
off, adjustable between 1 and 8 hours
5
Oszillation/Swing
For switching the Oscillation/Swing function on and off
6
Cool/Hum.
For switching the cooling function On and Off
24 von 88
6
Stand 3.3.2020
REMOTE CONTROL
Copyright UNOLD AG | www.unold.de
DE
1. Carefully pull the cover of the battery compartment out of the remote control.
2. Insert the battery into the intended holder.
3. If you want to insert a different battery, ensure that you use a CR2025 button cell battery.
4. Carefully slide the cover back into the remote control.
5. Only use the right type of batteries.
6. If you adjust the appliance with the remote control, ensure that you always
hold it in the direction of the fan while you are making the settings.
7. The designations on the remote control are identical to the designations of
the buttons on the appliance.
8. To avoid damage, never allow the remote control to fall from a significant
height.
BEFORE USING THE APPLIANCE FOR THE FIRST TIME
1. Remove all packaging materials and any transport safeguards. Keep
packaging materials away from children – danger of suffocation!
2. Carefully unwind the power cord completely.
3. Check whether all parts are complete and intact. If the appliance is damaged, do not place it in service. But rather contact your dealer or our customer service organisation.
4. Familiarise yourself with all functions of the appliance.
5. Store the provided cooling packs in a freezer compartment for at least four
hours.
EN
FR
NL
IT
ES
PL
THE IDEAL LOCATION
1. Maintain an adequate safety distance (at least 1 meter) to other objects,
such as furniture, curtains, etc.
2. Only place the appliance in operation in a vertical position.
3. Ensure that air can flow in and out unhindered – do not, under any circumstances, cover the air inlets of the appliance.
4. Only place the appliance on a solid and level substrate. Do not place the
appliance on soft surfaces (sofa, bed) because the appliance can tip over.
Stand 3.3.2020
25 von 88
DE
Copyright UNOLD AG | www.unold.de
EN
FR
NL
IT
ES
5. In addition, ensure that the appliance is not set up on deep-pile carpets or
in dusty environments.
6. For safety reasons, the appliance must not be used in the vicinity of sinks,
bathtubs, or water connections.
7. Ensure that the electrical outlet that is used is easily accessible at all times.
8. Check whether the power cord is routed in such a manner that no one can
stumble over it.
9. When you operate the appliance with fan and cooling function, keep doors
and windows closed. This ensures effective, energy-efficient cooling.
PL
WATER RESERVOIR
1. Switch off the appliance via the ON/OFF button and unplug the power plug
from the electrical outlet.
2. Pull the reservoir slightly to the rear and out of the appliance. Please note
that in this process the water reservoir cannot be taken out completely,
because the pump of the appliance is fastened in the water reservoir.
3. Fill the reservoir with extremely cold water, if need be you can add ice cubes
to obtain a better cooling result.
4. The water must not be over 40°C.
5. The water reservoir must be filled with 1,000 ml of water (max. 2,000 ml),
otherwise the pump in the reservoir cannot function properly.
6. Slide the reservoir back into the appliance.
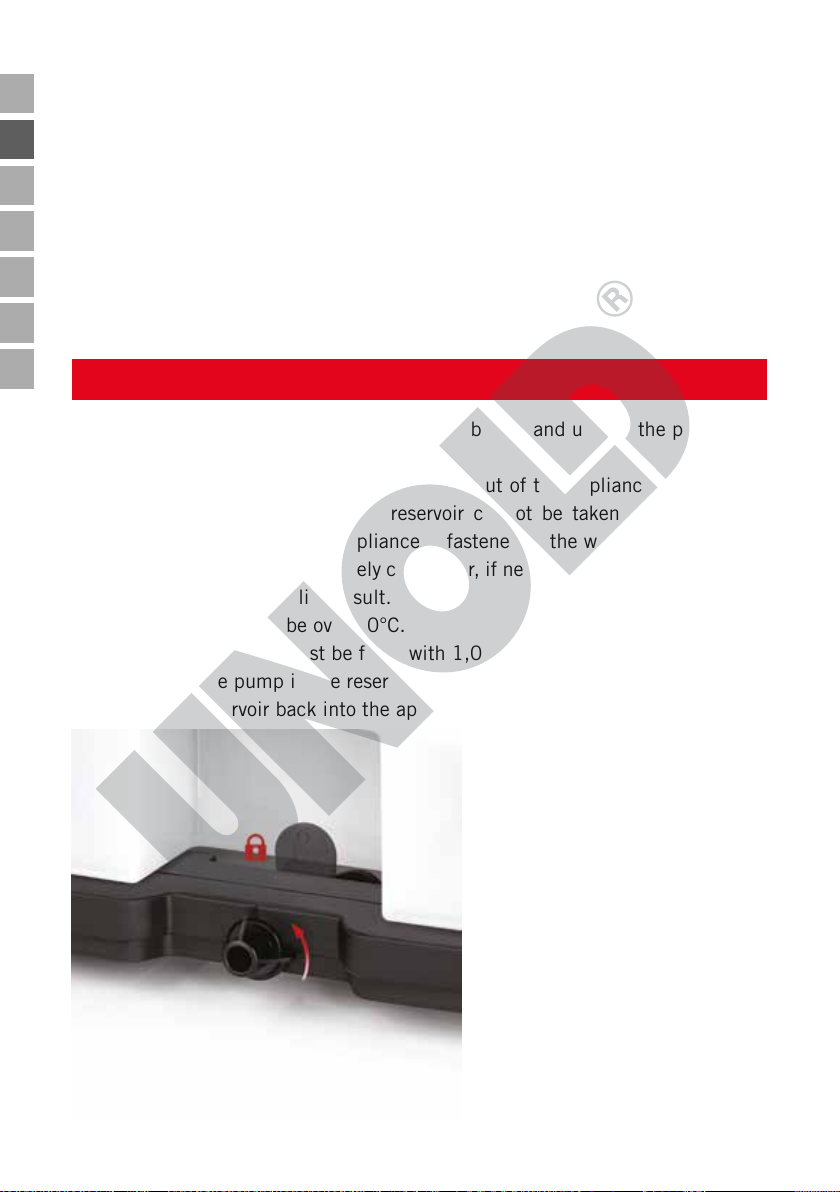
7. To empty completely, unlock
the water tank by turning the
locking clip on the housing to
the left or right.
8. Gently pull the water tank
slightly out of the appliance.
9. Turn the pump support located in the water tank forward
until the pump can be gently
pulled upwards.
10. Be careful not to damage or
loosen the cable and hose of
the pump.
26 von 88
Stand 3.3.2020

11. Remove the water tank and drain the water. Clean the water tank with a
Copyright UNOLD AG | www.unold.de
cloth and, if necessary, with a mild detergent and then thoroughly dry the
water tank inside and outside.
12. Fill the water tank with water again if you want to continue to operate the
unit, otherwise replace the empty water tank.
13. Proceed in reverse order to replace the water tank.
14. Be sure to insert the pump properly and secure it with the locking clip.
Attention: For hygienic reasons replace the water in the water reservoir
once a day to avoid bacterial growth.
Do not, under any circumstances, pour water directly into the appliance!
COOLING PACKS
1. If need be you can freeze the two provided cooling packs in the freezer compartment and then likewise place them in the water reservoir to obtain an
even greater cooling effect. We recommend that you always use one cooling
pack and store the other cooling pack in the freezer compartment for the
next day.
2. The water reservoir must be filled with water beforehand.
3. The cooling packs contain a special granulate, which ensures that the cooling capacity is higher.
4. Open the screw cap of the cooling pack.
5. Fill the cooling pack with water to the mark.
6. Close the cooling pack carefully and place it in a freezer compartment for
a few hours.
7. Place the cooling pack in the water
reservoir. Bear in mind that the cooling pack causes the water level to
increase. The water level must not rise
above the Max mark, under any circumstances. Close the water reservoir
as described in the preceding section.
8. Attention: At extremely high
temperatures condensation can form
on the water reservoir and drip onto
the floor. Therefore, protect the floor
appropriately.
Stand 3.3.2020
27 von 88
DE
EN
FR
NL
IT
ES
PL
DE
Copyright UNOLD AG | www.unold.de
INSERTING THE FILTER
EN
FR
NL
IT
ES
PL
1. The filter must always be inserted, when you are using the air cooler to prevent appliance damage. Always let the filter dry thoroughly when you have
used the appliance and then want to put it away for storage. A wet filter can
cause a musty odour the next time the appliance is operated.
2. Always switch off the appliance and unplug the power plug before working
on the filter.
Removal
3. Reach into both straps on the filter cover and pull the filter cover out of the
appliance.
Insertion
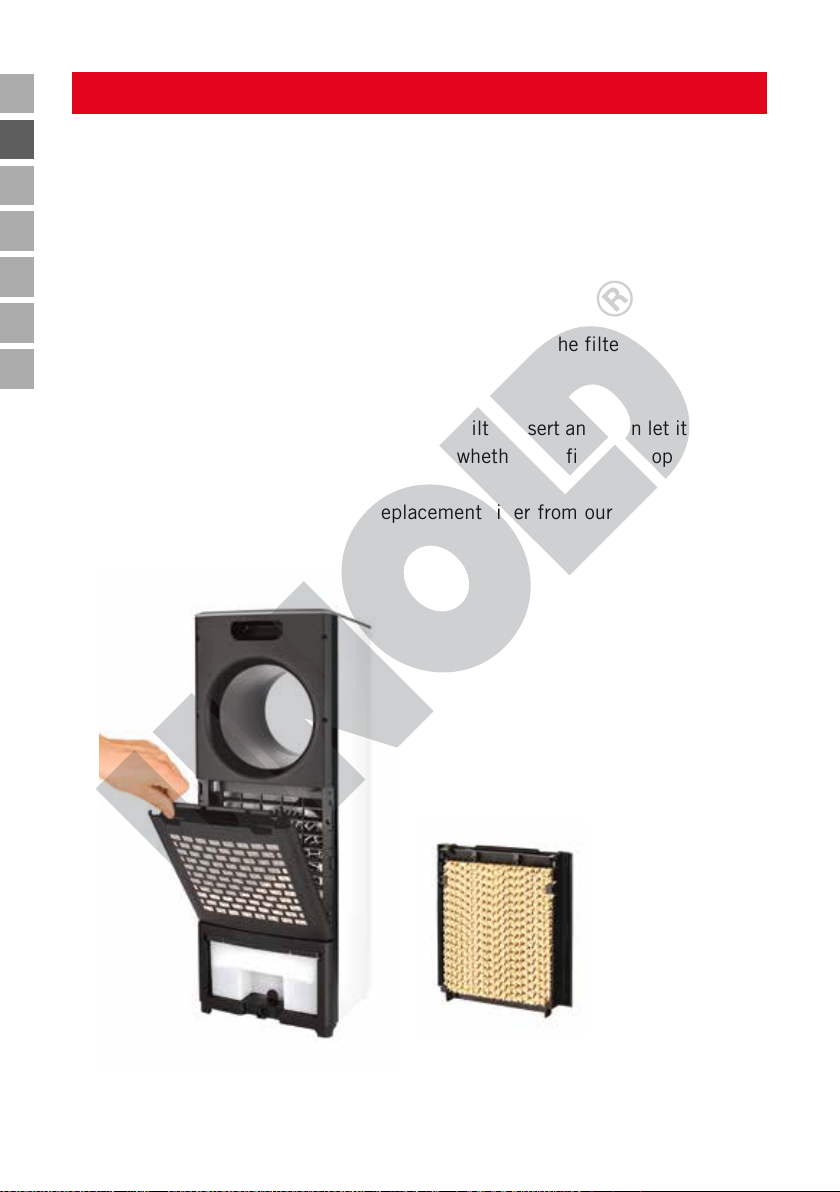
4. First place the filter at the bottom of the filter insert and then let it lock into
place upwards (see illustration). Check whether the filter is properly seated
to prevent appliance damage.
5. If necessary, you can order a replacement filter from our customer service
(order form page 87).
Filter mate
28 von 88
Stand 3.3.2020

OPERATION
Copyright UNOLD AG | www.unold.de
DE
1. Note: You can also use the fan function without cooling function.
2. Ensure that the appliance is standing on a suitable, level substrate, and has
been set up so that it is safe and stable.
3. Plug the mains plug into an electrical outlet.
4. Press the „ON/OFF“ button once. The appliance starts. In the basic setting
the appliance runs at low speed in Normal mode.
Setting the speed
5. Press the „Speed“ button repeatedly until the appliance is working at the
desired speed. The appropriate setting is shown by the respective indicator
light:
Low speed: Low
Medium speed Med
High speed: High
Swing function/oscillation
6. Press the „Oscillation“ button to switch on the swing function. Press the
button again to stop the appliance at the current position, the fan however
keeps running.
Timer
7. Via the „Timer“ button you can select the desired runtime of the appliance.
This is possible in the range of 1, 2, 4 and 8 hours. Press the „Timer“ button until the desired number of hours appears in the display. After this time
elapses the appliance switches off automatically. If you do not make a time
setting, the appliance will run continuously.
EN
FR
NL
IT
ES
PL
Setting the mode
8. Press the „Mode“ button and select the desired operating mode. You can
choose from Standard mode, Near-Natural mode (the appliance works with
alternating speeds, that feels like natural air movement) or Sleep mode (the
appliance likewise works with alternating speeds, from higher to lower).
Press the „Mode“ button repeatedly, until the desired setting is shown by
the indicator light.
Stand 3.3.2020
29 von 88

DE
Copyright UNOLD AG | www.unold.de
EN
FR
NL
IT
ES
PL
Adding air cooling
9. Ensure that a sufficient amount of water is in the water reservoir.
10. Press the „Cool/Hum.“ button.
11. The pump in the water reservoir will be switched on and the water in the
water reservoir will be routed through the filter on the rear of the appliance
to cool the circulating air.
12. When the water reservoir is empty, fill it up as described in the „Water
reservoir“ section.
13. Do not, under any circumstances, pull the water reservoir out of the appliance when air cooling is switched on. Otherwise the appliance can be damaged due to flowing water in the interior of the appliance.
14. Press the „Cool/Hum.“ button again to switch off the function.
Switching off
Tip: we recommend to first switch off the air cooling and let the fan function run for a
few minutes longer. This allows the filter to dry faster.
15. Press the „ON/OFF“ button on the appliance or on the remote control again
to switch off the appliance. When you are no longer using the appliance,
unplug the power plug from the electrical outlet.
16. Then remove the filter and let it dry, before using the appliance again.
CLEANING AND STORAGE
Switch off the appliance, by pressing the „ON/OFF“ button, and unplug it
from the electrical outlet.
Ensure that the appliance is never immersed in water. The motor or electrical
components of the appliance must not get wet.
1. Never use any abrasive scouring agents, steel wool, metal objects, hot
cleaning agents or disinfectants.
2. Wipe off the housing and grille of the fan with a slightly damp cloth.
3. Before any longer period of storage, the water reservoir must be emptied
(see the „Water reservoir“ section).
4. Remove the filter and let it dry completely, otherwise a musty odour can be
emitted the next time the appliance is placed in service.
5. Store the appliance standing vertically in a dry, dust-free location. Protect
the appliance from hot and cold temperatures.
30 von 88
Stand 3.3.2020

6. Do not store any objects on the appliance. Otherwise the appliance could
Copyright UNOLD AG | www.unold.de
be damaged.
DE
EN
GUARANTEE CONDITIONS
We grant a 24 months guarantee, and in case of commercial use a 12 months guarantee, starting from the
date of purchase for any damage demonstrably due to manufacturing defects and when the appliance has been
used according to its intended use. Within the warranty period we will remedy defective materials or workmanship through repair or replacement, at our option. Our warranty terms apply only to appliances sold in Germany
and Austria. For other countries, please contact the responsible importer. In the event of a claim for remedy of
defects, please send the appliance to our after sales service, properly packaged, together with a copy of the
automatically generated sales receipt, which must show the date of purchase, and a description of the defect.
You can print out a return receipt on our website www.unold.de/ruecksendung. (only for entries from Germany
and Austria). The warranty does not cover damage from normal wear, improper handling and failure to comply
with the maintenance and care instructions. The warranty is void if repairs or modifications are made to the
appliance by third parties. Any claims of the end consumer vis-à-vis the retailer are not limited by this warranty.
WASTE DISPOSAL / ENVIRONMENTAL PROTECTION
Our appliances are produced on a high quality level for a long lifetime. Regular maintenance
and expert repairs by our after-sales service can extend the useful life of the appliance. If an
appliance is defective and repair is not possible we ask you to follow the following instructions
for disposal. Do not dispose this appliance together with your standard household waste. Please
bring this product to an approved collection point for recycling of electric and electronic products. By separate collection and disposal of waste products you help to protect natural resources
and ensure, that the product is disposed in an adequate way to protect health and environment.
Do not dispose of used batteries as household waste. Dispose of this product via
your appliance dealer or take it to the municipal collection point.
FR
NL
IT
ES
PL
The instruction booklet is also available for download: www.unold.de
Stand 3.3.2020
31 von 88

DE
Copyright UNOLD AG | www.unold.de
NOTICE D´UTILISATION MODÈLE 86990
EN
FR
NL
IT
ES
PL
SPÉCIFICATION TECHNIQUE
Puissance : 110 watts, 220-240 V~, 50-60 Hz
Dimensions : env. 26,0 x 21,5 x 73,5 cm (l/p/h)
Poids : env. 5,1 kg
Longueur de câble : env. 150 cm
Classe de protection :II
Couleur : blanc
Équipement : Fonctionnement du ventilateur, fonctionnement du
refroidisseur d’air, 3 vitesses, 3 types de soufflerie,
minuterie (1 à 8 heures), oscillation 40°, télécommande,
réservoir d’eau, filtre
Accessoires : Notice d’utilisation, télécommande avec pile,
2 accumulateurs de froid
Modifications et erreurs des caractéristiques de l‘équipement, de la technique, des
couleurs et du design réservées
EXPLICATION DES SYMBOLES
Ce symbole vous indique des risques possibles qui puissent entraîner
des lésions ou des endommagements de l’appareil.
POUR VOTRE SÉCURITÉ
Veuillez lire les indications suivantes et les conserver.
Consignes de sécurité générales / Personnes dans le foyer
1. Cet appareil peut être utilisé par des enfants à partir de 8 ans
et par des personnes dont les capacités physiques, sensorielles
ou intellectuelles sont limitées ou dont l’expérience et/ou les
connaissances sont insuffisantes, à condition que ces enfants/
personnes soient surveillés ou initiés à l’utilisation sécuritaire de
l’appareil et qu’ils aient compris les dangers pouvant en résulter.
2. Les enfants ne doivent pas jouer avec l’appareil.
3. Le nettoyage et l’entretien à la charge de l’utilisateur ne doivent
pas être effectués par des enfants, à moins qu’ils soient âgés de
plus de 8 ans et qu’ils soient surveillés.
4. Conserver l’appareil et le câble hors de portée des enfants de
moins de 8 ans.
32 von 88
Stand 3.3.2020

Remarques relatives à l’installation et à l’utilisation de l’appareil
Copyright UNOLD AG | www.unold.de
5. Utiliser exclusivement l’appareil à l’intérieur.
6. Veiller à avoir suffisamment d’espace à l’endroit où l’appareil est
installé. Dégager au moins 50 cm entre l’appareil et les autres
objets.
7. Ne pas utiliser l’appareil dans des endroits poussiéreux ni à
proximité de substances inflammables.
8. Ne jamais poser d’objets sur l’appareil pendant qu’il fonctionne.
9. Brancher l’appareil uniquement sur du courant alternatif dont la
tension est conforme à celle indiquée sur l’appareil.
10. Cet appareil ne doit pas être utilisé avec un minuteur externe
ni avec un système de télécommande (par exemple prises
radiocommandées). Exception faite de la télécommande fournie.
11. Ne jamais plonger l’appareil ou son cordon d’alimentation dans
l’eau ni dans aucun autre liquide - Danger de mort !
12. Ne jamais ouvrir le boîtier de l’appareil - Risque d’électrocution !
13. L’appareil est exclusivement destiné à un usage domestique
ou similaire, par exemple dans une kitchenette de magasin, de
bureaux ou de tout autre lieu de travail, pour les clients dans des
hôtels, motels ou autres lieux d’hébergement, dans des pensions
privées ou des résidences de vacances.
14. Veillez à ce que le cordon d’alimentation ne risque pas de faire
trébucher.
15. Afin de ne pas endommager le cordon, ne l’enroulez jamais
autour de l’appareil.
16. Afin de ne pas endommager le cordon de secteur, débranchez-le
toujours au niveau de la prise murale. Ne tirez jamais sur le
cordon.
17. Attention : la prise murale utilisée doit être aisément accessible
afin de pouvoir débrancher rapidement l’appareil en cas de
danger.
18. Veillez à ne pas coincer le cordon d’alimentation et à ne pas le
faire passer sur des angles qui pourraient l’abîmer.
19. Si possible, n’utilisez pas de rallonge. Si toutefois une rallonge
est indispensable, dérouler totalement la rallonge et respecter
les puissances maximales admissibles du câble en question.
20. Ne pas poser l’appareil directement sous une prise murale.
Stand 3.3.2020
33 von 88
DE
EN
FR
NL
IT
ES
PL

DE
Copyright UNOLD AG | www.unold.de
EN
FR
NL
IT
ES
PL
21. L’appareil ne doit pas être utilisé dans des locaux humides /
froids ou moites - Risque d’électrocution !
22. Éviter tout rayonnement intense du soleil sur l’appareil.
23. Ne jamais introduire les doigts ou des objets tels que des clous,
des crayons, etc. dans les orifices à l’intérieur de l’appareil Risque de blessure !
24. Vérifier régulièrement que l’appareil, la prise et le cordon
d’alimentation ne sont pas usés ni abîmés. S’il est abîmé,
veuillez renvoyer l’appareil à notre service clients pour contrôle
et réparation. Toute réparation non-conforme peut présenter des
dangers considérables pour l’utilisateur et entraîner l’annulation
de la garantie.
25. Si le cordon d’alimentation est endommagé, il doit être
exclusivement remplacé par le fabricant ou son service clients,
ou par toute autre personne techniquement qualifiée afin d’éviter
des situations dangereuses.
26. L’appareil ne doit pas être utilisé avec des accessoires d’autres
fabricants ou marques afin d’éviter des détériorations.
27. Débrancher l’appareil de la prise de secteur après utilisation et
avant le nettoyage. Ne jamais laisser l’appareil sans surveillance
lorsqu’il est branché.
Utilisation avec réservoir d’eau et accumulateurs de froid
28. Remplir le réservoir d’eau uniquement avec de l’eau du robinet.
Ne pas utiliser d’eau distillée ni aucun autre liquide.
29. Si du liquide réfrigérant s’écoule d’un des accumulateurs de
froid, ce dernier doit être remplacé.
30. Le liquide réfrigérant contenu (Super Absorber Polymer ) dans les
accumulateurs de froid est impropre à la consommation. Si un
liquide avec de la moisissure bleuâtre ressort de l’accumulateur
de froid, n’utilisez plus le réservoir.
31. Ne détruisez surtout pas la couche de glace qui peut se former
sur les accumulateurs de froid pendant le stockage.
32. Tenir les accumulateurs de froid hors de portée des enfants et
des animaux.
34 von 88
Stand 3.3.2020

Ne jamais introduire des objets comme des doigts, des ongles,
Copyright UNOLD AG | www.unold.de
des crayons, etc. à travers les orifices à l’intérieur de l’appareil: risque de blessure !
L
’appareil doit uniquement être utilisé sur un support stable et
plat afin qu’il ne bascule pas.
Le fabricant n’est nullement responsable en cas de montage non conforme, d‘utilisation irrégulière ou non
conforme ou suite à l’exécution de réparations par des tiers non autorisés.
EXPLICATION DES TOUCHES
DE
EN
FR
NL
IT
ES
PL
1 2 3
1
EIN/AUS / MARCHE/ARRÊT / ON/OFF
4
5
Pour allumer et éteindre l‘appareil
2
Vitesse / speed
Pour régler les trois différentes vitesses
3
Mode
Pour sélectionner le mode souhaité. Mode Standard ou mode Naturel.
4
Minuterie / timer
Pour sélectionner la durée au bout de laquelle l‘appareil s‘éteint
automatiquement ; réglage de 1 à 8 heures
5
Oscillation / swing
Pour activer et désactiver la fonction de pivotement / l’oscillation
6
Cool/Hum.
Pour activer et désactiver la fonction de refroidissement
Stand 3.3.2020
6
35 von 88
DE
Copyright UNOLD AG | www.unold.de
TÉLÉCOMMANDE
EN
FR
NL
IT
ES
PL
1. Retirez délicatement de la télécommande le cache du compartiment à pile.
2. Positionnez la pile dans le support prévu à cet effet.
3. Si vous voulez mettre une autre pile, veillez à utiliser une pile bouton du
type CR2025.
4. Repoussez le cache délicatement sur la télécommande.
5. Utiliser exclusivement des piles du même type.
6. Si vous réglez l‘appareil avec la télécommande, veillez à toujours la diriger
vers le ventilateur pendant les réglages.
7. Les mentions sur la télécommande sont identiques aux touches situées sur
l‘appareil.
8. Veillez à ne pas laisser tomber la télécommande d’une grande hauteur car
elle serait abîmée.
AVANT LA PREMIÈRE UTILISATION
1. Retirez tous les matériaux d‘emballage et les éventuelles protections de
transport. Conserver les matériaux d‘emballage hors de portée des enfants
- Risque d‘asphyxie !
2. Déroulez intégralement le cordon d‘alimentation.
3. Vérifiez que tous les accessoires sont complets et intacts. Ne mettez pas
l’appareil en service s’il est abîmé. Adressez-vous à votre revendeur ou à
notre service clients.
4. Familiarisez-vous avec toutes les fonctions de l’appareil.
5. Mettez les accumulateurs de froid fournis pendant au moins quatre heures
dans un compartiment de congélation.
L‘EMPLACEMENT IDÉAL
1. Maintenez une distance de sécurité suffisante (au moins un mètre) par rapport aux autres objets tels que les meubles, les rideaux, etc.
2. L‘appareil doit toujours être utilisé en position verticale.
3. Assurez-vous que l‘air puisse entrer et sortir sans gêne - les entrées et sorties d‘air de l‘appareil ne doivent en aucun cas être recouvertes.
4. Poser l’appareil impérativement sur une surface plate et stable. Pas sur des
surfaces molles (sofa, lit) afin d‘éviter que l‘appareil se renverse.
36 von 88
Stand 3.3.2020
5. Veillez par ailleurs à ne pas poser l‘appareil sur des tapis à longs poils ou
Copyright UNOLD AG | www.unold.de
dans un environnement très poussiéreux.
6. Pour des raisons de sécurité, il est interdit d‘utiliser cet appareil à proximité
de lavabos, baignoires ou raccords d‘eau.
7. Veillez à ce que la prise murale utilisée soit toujours aisément accessible.
8. Vérifiez que personne ne risque de trébucher sur le cordon d‘alimentation.
9. Si vous utilisez l’appareil avec la fonction ventilateur et refroidissement,
veillez à garder les portes et les fenêtres fermées. Ce qui garantit un refroidissement efficace et plus économique.
DE
EN
FR
NL
IT
ES
RÉSERVOIRS D’EAU
1. Éteindre l‘appareil à l’aide de la touche MARCHE / ARRÊT et débrancher la
prise de l‘appareil de la prise murale.
2. Retirez le réservoir de l’appareil légèrement vers l’arrière. Attention, le
réservoir d’eau ne peut pas être totalement retiré car la pompe de l’appareil
est fixée dans le réservoir d’eau.
3. Remplissez le réservoir d’eau avec de l’eau très froide, et vous pouvez si
nécessaire ajouter également quelques glaçons pour obtenir un meilleur
résultat de froid.
4. L’eau ne doit pas dépasser 40 °C.
5. Il faut verser au moins 1 000 ml d’eau (max. 2 000 ml) car sinon la pompe
dans le réservoir d’eau ne peut pas fonctionner correctement.
6. Remettre le réservoir dans
l’appareil.
7. Pour vider complètement le
réservoir, déverrouillez-le en
tournant le clip de verrouillage du boîtier vers la gauche
ou la droite.
8. Tirez doucement le réservoir
d‘eau légèrement hors de
l‘appareil.
9. Tournez le support de pompe
situé dans le réservoir d‘eau
vers l‘avant jusqu‘à ce que la
pompe puisse être tirée dou-
Stand 3.3.2020
cement vers le haut.
37 von 88
PL
DE
Copyright UNOLD AG | www.unold.de
EN
FR
NL
IT
ES
PL
10. Veillez à ne pas endommager ni desserrer le câble et le tuyau de la pompe.
11. Retirez le réservoir d‘eau et vidangez l‘eau. Nettoyez le réservoir d‘eau avec
un chiffon et, si nécessaire, avec un détergent doux, puis séchez soigneusement le réservoir d‘eau à l‘intérieur et à l‘extérieur.
12. Remplissez le réservoir d‘eau avec de l‘eau si vous souhaitez continuer à
utiliser l‘appareil, sinon remplacez le réservoir d‘eau vide.
13. Procédez dans l‘ordre inverse pour remplacer le réservoir d‘eau.
14. Veillez à insérer correctement la pompe et à la fixer avec le clip de verrouillage.
Attention : Remplacez l’eau dans le réservoir d’eau pour des raisons
d’hygiène pour éviter la formation de bactéries.
Ne versez jamais d‘eau directement dans l‘appareil !
ACCUMULATEURS DE FROID
1. Si nécessaire, vous pouvez faire refroidir les deux accumulateurs de froid
fournis dans le compartiment congélation puis les mettre dans le réservoir
d‘eau pour obtenir un meilleur refroidissement. Nous recommandons de
toujours utiliser un accumulateur de froid et de placer l’autre accumulateur
dans le compartiment congélateur pour le jour suivant.
2. Le réservoir d’eau doit avoir été rempli d’eau au préalable.
3. Les accumulateurs de froid contiennent un granulat spécial qui garantit une
capacité de refroidissement.
4. Ouvrez le capuchon à vis de l’accumulateur de froid.
5. Remplissez l’accumulateur
de froid avec de l‘eau du robinet
jusqu‘au repère.
6. Fermez soigneusement
l’accumulateur de froid et placezla au congélateur pendant quelques
heures.
7. Mettez l’accumulateur de froid
dans le réservoir d’eau. Attention,
l’accumulateur de froid augmente
le niveau d’eau. Le niveau d’eau ne
38 von 88
Stand 3.3.2020

doit cependant jamais dépasser le marquage Maximum. Verrouillez le réser-
Copyright UNOLD AG | www.unold.de
voir d‘eau conformément aux explications du chapitre précédent.
8. Attention : En cas de température très élevée, de l’eau de condensation peut
se former sur le réservoir d’eau et goutter sur le sol. Veillez à protéger le sol.
DE
EN
FR
METTRE LE FILTRE
1. Le filtre doit toujours être mis en place lorsque vous utilisez le refroidissement d’air pour éviter d’abîmer l’appareil. Faites toujours bien sécher le
filtre si vous avez utilisé l’appareil et que vous le ranger ensuite. Sinon le
filtre risque d’avoir une odeur de moisi à la prochaine utilisation.
2. Éteignez toujours l’appareil et débranchez la prise du secteur avant
d’intervenir sur le filtre.
Retrait
3. Attrapez les deux languettes du cache du filtre et retirez le cache de
l’appareil.
Positionnement
4. Placez d’abord le filtre en bas sur son support, puis enclenchez-le en haut
(voir illustration). Vérifiez si le filtre est correctement positionné afin d‘éviter
d‘endommager l‘appareil.
5. Si nécessaire, vous pouvez commander un filtre de remplacement auprès
de notre service client (bon de commande page 87).
NL
IT
ES
PL
Natte filtrante
Stand 3.3.2020
39 von 88

DE
Copyright UNOLD AG | www.unold.de
UTILISATION
EN
FR
NL
IT
ES
PL
1. Remarque : Vous pouvez utiliser la fonction Ventilateur même sans la fonction
Refroidissement.
2. Vérifiez que l‘appareil est placé sur une surface plane et appropriée, et qu‘il
est parfaitement stable et immobile.
3. Brancher la prise sur le secteur.
4. Appuyez ensuite une fois sur la touche « MARCHE / ARRÊT ». L’appareil
démarre. En position de base, l‘appareil fonctionne à vitesse lente en mode
normal.
Régler la vitesse
5. Appuyez plusieurs fois sur la touche « Vitesse » jusqu‘à ce que l‘appareil
fonctionne à la vitesse souhaitée. Le réglage est indiqué par le voyant de
contrôle correspondant :
Vitesse lente : Low
Vitesse moyenne : Med
Vitesse élevée : High
Fonction de pivotement / Oscillation
6. Appuyez sur la touche « Oscillation » pour activer la fonction de pivotement
de la sortie d‘air. Si vous appuyez de nouveau sur cette touche, l‘appareil
s‘arrête dans la position en cours, mais le ventilateur continue de fonctionner.
Minuterie
7. La touche „Minuterie“ permet de sélectionner la durée de fonctionnement
souhaitée de l‘appareil, soit 1, 2, 4 ou 8 heures. Appuyez sur la touche
„Minuterie“ jusqu‘à ce que le nombre d’heures souhaitées s‘affiche à
l‘écran. Une fois ce temps écoulé, l‘appareil s‘éteint automatiquement. Si
vous ne réglez pas de durée, l‘appareil fonctionne en permanence.
Régler le mode
8. Appuyez sur la touche « Mode » et choisissez le mode de fonctionnement
souhaité. Vous pouvez choisir le mode Standard ou Naturel (l‘appareil
fonctionne à vitesses variables, comme le mouvement naturel de l‘air) ou le
mode Repos (l‘appareil fonctionne aussi à vitesses variables, de la vitesse
40 von 88
Stand 3.3.2020

élevée à lente). Presser la touche „Modus“ plusieurs fois jusqu‘à ce que le
Copyright UNOLD AG | www.unold.de
réglage souhaité s‘affiche par le voyant de contrôle.
Allumer le refroidissement d’air
9. Vérifiez qu‘il y a suffisamment d’eau dans le réservoir d’eau.
10. Appuyez sur la touche „Cool/Hum“.
11. La pompe dans le réservoir d’eau est allumée et l’eau est dirigée dans le
réservoir d’eau par le filtre au dos de l’appareil pour refroidir l’air qui circule.
12. Si le réservoir d’eau est vide, remplissez-le conformément aux explications
du chapitre „Réservoir d’eau“.
13. Ne retirez en aucun cas le réservoir d’eau de l’appareil si le refroidissement
d‘air est allumé. Sinon l’appareil peut être abîmé par l’eau qui coule à
l’intérieur de l’appareil.
14. Appuyez de nouveau sur la touche „Cool/Hum“ pour désactiver la fonction.
Éteindre
Conseil: nous vous recommandons tout d‘abord de désactiver le refroidissement par
air et de laisser la fonction de ventilation fonctionner quelques minutes de plus. Cela
permet au filtre de sécher plus rapidement.
15. Appuyez de nouveau sur la touche « MARCHE/ARRÊT » de l’appareil ou de
la télécommande pour éteindre l‘appareil. Débranchez l‘appareil de la prise
murale si vous ne l’utilisez plus.
16. Retirez ensuite le filtre et faites-le sécher avant d’utiliser de nouveau
l’appareil.
DE
EN
FR
NL
IT
ES
PL
NETTOYAGE ET RANGEMENT
Éteindre l‘appareil en appuyant sur la touche « MARCHE/ARRÊT » et
débrancher la prise de l‘appareil de la prise murale.
Attention : ne jamais plonger l‘appareil dans l‘eau. Le moteur ou les
éléments électriques de l‘appareil ne doivent jamais être humides.
1. En principe, n‘utilisez aucun abrasif puissant, ni de laine de verre, ni
d’objets métalliques, ni de détergent chaud, ni de désinfectant.
2. Essuyez le boîtier et la grille du ventilateur à l’aide d’un chiffon légèrement
humide.
3. Avant chaque rangement pour une période prolongée, le réservoir d’eau doit
être vidangé (voir chapitre „Réservoir d’eau“.).
Stand 3.3.2020
41 von 88
DE
Copyright UNOLD AG | www.unold.de
EN
FR
NL
IT
ES
PL
4. Retirez le filtre et laissez-le complètement sécher pour éviter toute odeur de
moisi lors de la prochaine utilisation.
5. Conserver l‘appareil à la verticale dans un endroit sec et à l‘abri de la poussière. Protégez l‘appareil du froid et de la chaleur.
6. Ne mettez aucun autre objet sur l’appareil pour ne pas risque de l’abîmer.
CONDITIONS DE GARANTIE
En cas d’utilisation conforme et lors de dégâts manifestement dus à des défauts de fabrication, nos appareils
sont garantis 24 mois, lors d’utilisation professionnelles 12 mois, à dater de l’achat pour les dommages qui
sont manifestement attribuables à des défauts d’usine lorsqu’ils sont utilisés comme prévu. Pendant la période
de garantie, nous réparerons les défauts de matériaux et de fabrication à notre discrétion en les réparant ou en
les échangeant. Notre garantie n’est valide que pour les appareils vendus en Allemagne et en Autriche. Dans
tout autre pays veuillez contacter l’importateur. Veuillez envoyer à notre adresse les appareils, pour lesquels
vous réclamez une suppression de défauts, avec le bon d’achat montrant la date d’achat. Vous pouvez imprimer un coupon de retournement sur notre site Web www.unold.de/ruecksendung. (uniquement pour les entrées
d’Allemagne et d’Autriche). Les défauts causés par usure, utilisation incorrecte ou non-respect des instructions
de maintenance sont exclus. Notre obligation de garantie cesse, si de réparations ou des interventions sont
accomplies par des tiers. Cette garantie n’affecte pas les droits du consommateur contre le commerçant.
TRAITEMENT DES DÉCHETS / PROTECTION DE L’ENVIRONNEMENT
Nos appareils sont produits selon un standard élevé de qualité pour une longue durée d’utilisation. Un entretien régulier et des réparations compétentes par notre service après-vente
prolongent cette durée d’utilisation. Si néanmoins l’appareil est endommagé et ne peut plus
être réparé, veuillez suivre les instructions suivantes. Ne jamais disposer ce produit avec les
dégâts de ménage. Apportez ce produit à une station de collection pour récupération de produits
électriques et électroniques. Par la collection séparée vous aidez à protéger les ressources naturelles et prenez soin, que le produit est démonté sans risque pour la santé et l’environnement.
Ne pas jeter les piles usées dans les ordures ménagères. Veuillez les éliminer
chez un revendeur en électricité ou dans votre déchetterie communale.
42 von 88
Stand 3.3.2020

GEBRUIKSAANWIJZING MODEL 86990
Copyright UNOLD AG | www.unold.de
DE
TECHNISCHE GEGEVENS
Vermogen: 110 watt, 220-240 V~, 50-60 Hz
Afmetingen: ca. 26,0 x 21,5 x 73,5 cm (bxdxh)
Gewicht: ca. 5,1 kg
Kabellengte: ca. 150 cm
Beveiligingsklasse: II
Kleur: wit
Uitvoering: gebruik als ventilator, gebruik als luchtkoeler,
3 snelheidsstanden, 3 windtypes, tijdprogrammering (1
tot 8 uur), oscillatie 40°, afstandsbediening, watertank,
filter
Toebehoren: gebruiksaanwijzing, afstandsbediening incl. batterij, 2
koelelementen
Wijzigingen en vergissingen in de uitrustingskenmerken, techniek, kleuren en design
voorbehouden
VERKLARING VAN DE SYMBOLEN
Dit symbool wijst op eventuele gevaren die letsel tot gevolg kunnen
hebben of tot schade aan het apparaat leiden.
VOOR UW VEILIGHEID
Lees de volgende aanwijzingen a.u.b. door en bewaar ze goed.
EN
FR
NL
IT
ES
PL
Algemene veiligheidsinstructies / personen in het huishouden
1. Dit apparaat kan door kinderen vanaf 8 jaar worden gebruikt
en door personen die over verminderde fysieke, sensorische of
geestelijke vaardigheden of gebrek aan ervaring en/of kennis
beschikken, mits zij onder toezicht staan of instructies hebben
gekregen aangaande het veilige gebruik van dit apparaat en de
hieruit resulterende gevaren begrepen hebben.
2. Kinderen mogen niet met het apparaat spelen.
3. Reiniging en onderhoud door de gebruiker mogen niet door
kinderen uitgevoerd worden, tenzij deze ouder dan 8 jaar zijn en
onder toezicht staan.
4. Berg het apparaat en de kabel buiten het bereik van kinderen
jonger dan 8 jaar op.
Stand 3.3.2020
43 von 88

DE
Copyright UNOLD AG | www.unold.de
EN
FR
NL
IT
ES
PL
Aanwijzingen om het apparaat op te stellen en te bedienen
5. Gebruik het apparaat uitsluitend binnen.
6. Let op dat er genoeg ruimte voorhanden is op de plaats waar het
apparaat opgesteld is. Er moet minstens 50 cm afstand tussen
het apparaat en andere voorwerpen aangehouden worden.
7. Gebruik het apparaat niet in bijzonder stoffige ruimtes of in de
buurt van brandbare substanties.
8. Leg nooit voorwerpen op het apparaat terwijl het in werking is.
9. Sluit het apparaat uitsluitend aan op wisselstroom met een
spanning die overeenkomt met de gegevens op het typeplaatje.
10. Dit apparaat mag niet worden bediend met een externe scha
kelklok of een afstandsbediening (zoals bijvoorbeeld draadloze
stopcontacten). De meegeleverde afstandsbediening is hiervan
uitgezonderd.
11.
Dompel het apparaat of de voedingskabel nooit in water of andere
vloeistoffen – er bestaat levensgevaar!
12. Open de behuizing van het apparaat nooit, er bestaat gevaar voor
een elektrische schok!
13. Het apparaat is uitsluitend bestemd voor huishoudelijk gebruik
of voor soortgelijke doeleinden. Bijvoorbeeld in theekeukens in
bedrijven, kantoren of overige werklocaties, voor gebruik door
gasten in hotels, motels of andere logiesbedrijven, in particu
-
liere pensions of vakantiehuizen.
14.
Let op dat de aansluitkabel zodanig gelegd wordt dat er niemand
over kan struikelen.
15. Wikkel de voedingskabel nooit om het apparaat om schade aan
de kabel te vermijden.
16. Om schade aan de kabel te voorkomen, trekt u de voedingskabel
altijd aan de stekker uit het stopcontact en nooit aan de voe
-
dingskabel.
17.
Let op dat het gebruikte stopcontact gemakkelijk toegankelijk is,
zodat de stekker bij gevaar snel uit het stopcontact kan worden
getrokken.
18. Let erop dat de voedingskabel niet wordt ingeklemd of langs
een hoek wordt gelegd. Anders kan de voedingskabel beschadigd
raken.
44 von 88
Stand 3.3.2020

19. Maak, voor zover mogelijk, geen gebruik van een verlengkabel.
Copyright UNOLD AG | www.unold.de
Als dit onvermijdelijk is, rol de verlengkabel dan a.u.b. helemaal
af en neem de prestatiegrenzen van de betreffende kabel in acht.
20. Zet het apparaat nooit direct onder een stopcontact neer.
21. Het apparaat mag niet in natte/natkoude of vochtige ruimtes
worden gebruikt i.v.m. kans op een elektrische schok!
22. Stel het apparaat niet bloot aan sterk zonlicht.
23. Steek nooit vingers of voorwerpen, zoals naalden, pennen enz.
door de openingen in het apparaat i.v.m. kans op letsel!
24. Controleer het apparaat, de stekker en de voedingskabel regel
matig op slijtage of beschadigingen. Stuur het apparaat bij
beschadiging voor
controle en reparatie naar onze klantenservice. Ondeskundige reparaties kunnen ernstige gevaren voor de
gebruiker veroorzaken en hebben uitsluiting van de garantie tot
gevolg.
25.
Als de voedingskabel is beschadigd, mag deze uitsluitend door
de fabrikant resp. zijn klantenservice of een andere, vaktech
nisch gekwalificeerde persoon worden vervangen om gevaren te
voorkomen.
26.
Om schade te voorkomen, mag het apparaat niet met toebehoren
van andere fabrikanten of andere merken worden gebruikt.
27. Trek de voedingsstekker uit het stopcontact nadat u het apparaat
heeft gebruikt en voordat u het gaat reinigen. Laat het apparaat
nooit zonder toezicht achter als de voedingsstekker in het stop
-
contact steekt.
Omgang met watertank en koelelementen
28.
Doe uitsluitend leidingwater in de watertank. Gebruik geen
gedestilleerd water of andere vloeistoffen.
29. Als er koelvloeistof uit één van de koelelementen lekt, moet dit
koelelement worden vervangen.
30. De in de koelelementen aanwezige koelvloeistof (Super Absorber
Polymer) is niet geschikt voor consumptie.
31. Eet nooit de ijslaag op die zich bij het bewaren op de koelele
-
menten kan vormen.
Houd kinderen en dieren verwijderd van de koelelementen.
32.
DE
EN
FR
NL
IT
ES
PL
Stand 3.3.2020
45 von 88
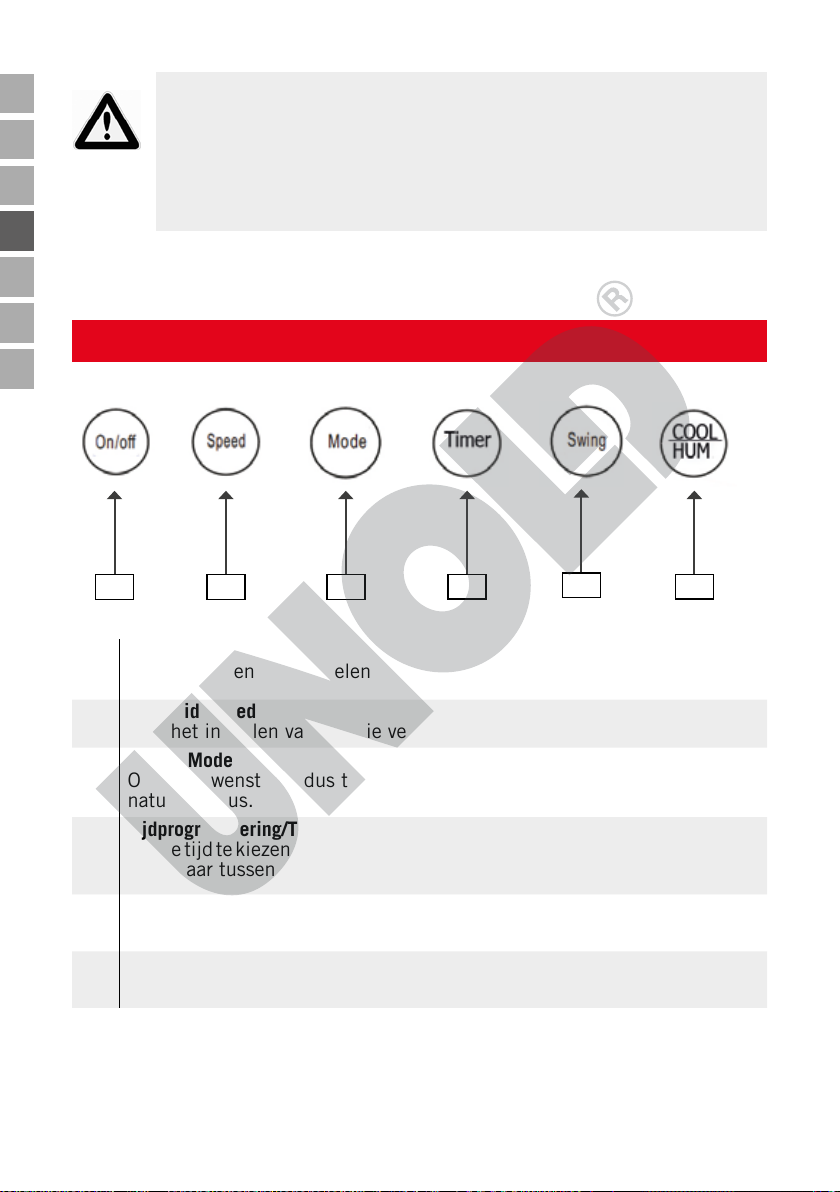
DE
Copyright UNOLD AG | www.unold.de
EN
FR
NL
IT
ES
PL
Er mogen nooit voorwerpen, zoals vingers, naalden, pennen
enz. door de openingen heen in het binnenste van de ventilator
worden gestoken in verband met kans op letsel!
Het apparaat uitsluitend op een effen, stabiele ondergrond
gebruiken, zodat het niet kan omvallen.
De fabrikant is niet aansprakelijk, indien het apparaat verkeerd gemonteerd, ondeskundig of foutief
gebruikt of door niet geautoriseerde derden gerepareerd werd.
VERKLARING VAN DE KNOPPEN
1 2 3
1
AAN/UIT/ON OFF
4
5
Voor het in- en uitschakelen van het apparaat
2
Snelheid/Speed
Voor het instellen van de drie verschillende snelheden
3
Modus/Mode
Om de gewenste modus te kiezen. U kunt kiezen uit de standaard- of de
natuur-modus.
4
Tijdprogrammering/Timer
Om de tijd te kiezen, waarna het apparaat automatisch wordt uitgeschakeld,
instelbaar tussen 1 en 8 uur
5
Oscillatie/Swing
Voor het in- en uitschakelen van de zwenkfunctie/oscillatie
6
Cool/Hum.
Voor het in-en uitschakelen van de koelfunctie
46 von 88
6
Stand 3.3.2020
AFSTANDSBEDIENING
Copyright UNOLD AG | www.unold.de
DE
1. Trek het deksel van het batterijcompartiment voorzichtig uit de afstandsbediening.
2. Plaats de batterij in de hiervoor bedoelde houder.
3. Als u een andere batterij wilt plaatsen, let er dan op dat u een knoopcel van
het type CR2025 gebruikt.
4. Schuif het deksel weer voorzichtig in de afstandsbediening.
5. Gebruik alleen batterijen van hetzelfde type.
6. Als u het apparaat met de afstandsbediening wilt instellen, let er dan op dat
u deze tijdens de instellingen steeds in de richting van de ventilator houdt.
7. De aanduidingen op de afstandsbediening zijn identiek aan de knoppen op
het apparaat.
8. Laat de afstandsbediening niet van grote hoogte naar beneden vallen om
schade te voorkomen.
VÓÓR HET EERSTE GEBRUIK
1. Verwijder alle verpakkingsmaterialen en evt. transportbeveiligingen. Houd
verpakkingsmaterialen uit de buurt van kinderen i.v.m. kans op verstikking!
2. Rol de voedingskabel helemaal af.
3. Controleer of alle onderdelen compleet en intact zijn. Neem het apparaat bij
beschadigingen niet in gebruik, maar neem contact op met uw verkooppunt
of onze klantenservice.
4. Maak u vertrouwd met alle functies van het apparaat.
5. Plaats de meegeleverde koelelementen minimaal vier uur lang in de vriezer.
EN
FR
NL
IT
ES
PL
DE IDEALE STANDPLAATS
1. Houd voldoende veiligheidsafstand (minimaal een meter) tot andere voorwerpen, zoals meubels, gordijnen enz. aan.
2. Het apparaat mag uitsluitend rechtop staand in werking worden gesteld.
3. Zorg ervoor dat de lucht ongehinderd in- en uit kan stromen – de luchtinlaaten uitlaatopeningen van het apparaat mogen in geen geval afgedekt worden.
4. Zet het apparaat uitsluitend op een stabiele, effen ondergrond neer. Zet
het apparaat niet op een zacht oppervlak (bank, sofa, bed), omdat het kan
omkiepen.
Stand 3.3.2020
47 von 88

DE
Copyright UNOLD AG | www.unold.de
EN
FR
NL
IT
ES
PL
5. Let er bovendien op dat u het apparaat niet op hoogpolige tapijten of in een
stoffige omgeving neerzet.
6. Om veiligheidsredenen mag het apparaat niet in de buurt van wasbakken,
badkuipen of wateraansluitingen worden gebruikt.
7. Let erop dat het gebruikte stopcontact altijd makkelijk toegankelijk is.
8. Controleer of de aansluitkabel zodanig ligt, dat er niemand over kan struikelen.
9. Als u het apparaat met ventilator- en koelfunctie gebruikt, houd dan deuren en ramen gesloten. Zo wordt een effectieve, energiebesparende koeling
gegarandeerd.
WATERTANKS
1. Schakel het apparaat met de AAN/UIT-knop uit en trek de stekker uit het
stopcontact.
2. Trek de tank iets naar achteren ut het apparaat. Let er daarbij op dat de
watertank niet helemaal kan worden uitgenomen, omdat de pomp van het
apparaat in de watertank is bevestigd.
3. Vul de watertank met heel koud water, indien nodig kunt u ook een paar
ijsblokjes toevoegen om een beter koelresultaat te verkrijgen.
4. Het water mag niet warmer zijn dan 40°C.
5. De tank moet met minimaal 1.000 ml water (max. 2.000 ml) worden gevuld,
omdat de pomp in de watertank anders niet goed kan werken.
6. Schuif de tank weer in het
apparaat.
7. Om het water volledig te legen,
ontgrendelt u het watertank
door de borgclip op de behuizing naar links of rechts te
draaien.
8. Trek het watertank voorzichtig
uit het apparaat.
9. Draai de pompsteun in het
watertank naar voren totdat de
pomp voorzichtig omhoog kan
worden getrokken.
48 von 88
Stand 3.3.2020

10. Pas op dat u de kabel en slang van de pomp niet beschadigt of losmaakt.
Copyright UNOLD AG | www.unold.de
11. Verwijder het watertank en laat het water weglopen. Reinig het waterreservoir met een doek en, indien nodig, met een mild schoonmaakmiddel en
droog het watertank vervolgens binnen en buiten grondig.
12. Vul het watertank opnieuw met water als u het apparaat wilt blijven gebruiken, anders het lege watertank vervangen.
13. Ga in omgekeerde volgorde te werk om het watertank te vervangen.
14. Zorg ervoor dat u de pomp op de juiste manier plaatst en beveiligt met de
borgclip.
Let op: Wissel het water in de watertank om hygiënische redenen een keer
per dag om bacterievorming te voorkomen.
Doe nooit water direct in het apparaat!
KOELELEMENTEN
1. Indien nodig, kunt u de beide meegeleverde koelelementen in de vriezer
laten bevriezen en vervolgens eveneens in de watertank leggen om een nog
groter koeleffect te verkrijgen. Wij adviseren om altijd een koelelement te
gebruiken en het andere koelelement voor de volgende dag in de vriezer te
bewaren.
2. De watertank moet van tevoren gevuld zijn met water.
3. De koelelementen bevatten een speciaal granulaat, dat ervoor zorgt dat de
koelcapaciteit van de koelelementen hoger is.
4. Open de schroefdop van de oplaadbare koelelement.
5. Vul de koelelemente tot het merkteken met kraanwater.
6. Sluit de koelelement voorzichtig en
plaats deze enkele uren in de vriezer.
7. Leg het koelelement in de watertank. Houd er rekening mee dat door
het koelelement het waterpeil stijgt.
Het waterpeil mag echter nooit de
max-markering overschrijden. Sluit de
watertank af, zoals beschreven in het
vorige hoofdstuk.
8. Let op: Bij zeer warme temperaturen
kan zich condens langs de watertank
vormen dat op de bodem kan drup-
Stand 3.3.2020
pelen. Bescherm daarom de boden.
49 von 88
DE
EN
FR
NL
IT
ES
PL

DE
Copyright UNOLD AG | www.unold.de
FILTER PLAATSEN
EN
FR
NL
IT
ES
PL
1. Het filter moet altijd zijn geplaatst als u de luchtkoeling gebruikt om schade
aan het apparaat te voorkomen. Laat het filter altijd goed drogen als u het
apparaat hebt gebruikt en vervolgens opbergt. Het filter kan anders bij het
volgende gebruik een muffe geur verspreiden.
2. Schakel altijd het apparaat uit en trek de stekker uit het stopcontact voordat
u werkzaamheden aan het filter uitvoert.
Uitnemen
3. Pak de beide lussen aan de filterafdekking vast en trek de filterafdekking
uit het apparaat.
Plaatsen
4. Plaats het filter eerst onder aan de filterinzet en laat het dan boven inklikken (zie afbeelding). Controleer of het filter goed zit om schade aan het
apparaat te voorkomen.
5. Indien nodig kunt u een vervangend filter bestellen bij onze klantenservice
(bestelformulier pagina 87).
Filtermat
50 von 88
Stand 3.3.2020
BEDIENING
Copyright UNOLD AG | www.unold.de
DE
1. Aanwijzing: U kunt de ventilatorfunctie ook zonder koelfunctie gebruiken.
2. Controleer of het apparaat op een geschikte, vlakke ondergrond staat en
veilig en stabiel is opgesteld.
3. Steek de stekker in het stopcontact.
4. Druk een keer op de knop „AAN/UIT“. Het apparaat start. In de basisinstelling draait het apparaat met lage snelheid in de normale modus.
Snelheid instellen
5. Druk herhaaldelijk op de knop „Snelheid“ totdat het apparaat met de
gewenste snelheid draait. De betreffende instelling wordt weergegeven door
het bijbehorende controlelampje:
Lage snelheid: Low
Gemiddelde snelheid: Med
Hoge snelheid: High
Zwenkfunctie/oscillatie
6. Druk op de knop „Oscillatie“ om de zwenkfunctie van de luchtuitlaat in te
schakelen. Als u nogmaals op deze knop drukt, stopt het apparaat in de
huidige positie, de ventilator draait echter verder.
Tijdprogrammering
7. Via de knop „Tijdprogrammering“ kunt u de gewenste werkingsduur van het
apparaat instellen. Hierbij kunt u kiezen tussen 1, 2, 4 en 8 uur. Druk zo
vaak op de knop „Tijdprogrammering“ tot het gewenste aantal uren op het
display verschijnt. Na afloop van deze tijd wordt het apparaat automatisch
uitgeschakeld. Als u geen tijd instelt, werkt het apparaat ononderbroken
door.
EN
FR
NL
IT
ES
PL
Modus instellen
8. Druk op de knop „Modus“ en stel de gewenste modus in. U kunt kiezen
tussen standard-modus, natuur-modus (het apparaat werkt met wisselende
snelheden die het gevoel van een natuurlijke luchtbeweging geven) of slaapmodus (het apparaat werkt eveneens met wisselende snelheden van hoge tot
lage snelheid). Druk herhaaldelijk op de knop „Modus“ totdat de gewenste
instelling door het controlelampje weergegeven wordt.
Stand 3.3.2020
51 von 88

DE
Copyright UNOLD AG | www.unold.de
EN
FR
NL
IT
ES
PL
Luchtkoeling inschakelen
9. Controleer of zich voldoende water in de watertank bevindt.
10. Druk op de knop „Cool/Hum“.
11. De pomp in de watertank wordt ingeschakeld en het water in de watertank
wordt door het filter aan de achterkant van het apparaat geleid om de circulerende lucht af te koelen.
12. Als de watertank leeg is, vult u deze bij, zoals beschreven in het hoofdstuk
„Watertank“.
13. Trek de watertank nooit uit het apparaat als de luchtkoeling is ingeschakeld. Anders kan het apparaat door stromend water in het binnenste van het
apparaat beschadigd raken.
14. Druk opnieuw op de knop „Cool/Hum“ om de functie uit te schakelen.
Uitschakelen
Tip: we raden aan om eerst de luchtkoeling uit te schakelen en de ventilator een paar
minuten langer te laten werken. Hierdoor kan het filter sneller drogen.
15. Druk opnieuw op de knop „AAN/UIT“ op het apparaat of op de afstandsbediening om het apparaat uit te schakelen. Trek de stekker uit het stopcontact als u het apparaat niet meer gebruikt.
16. Neem vervolgens het filter uit en laat dit drogen voordat u het apparaat weer
gebruikt.
REINIGING EN OPSLAG
Schakel het apparaat uit door op de knop „AAN/UIT“ te drukken en trek dan
de stekker uit het stopcontact.
Denk eraan dat u het apparaat nooit in water dompelt. Motor of elektrische
componenten van het apparaat mogen niet vochtig worden.
1. Gebruik nooit scherpe schuurmiddelen, staalwol, metalen voorwerpen, hete
schoonmaakmiddelen of desinfecterende middelen.
2. Veeg de behuizing en het rooster van de ventilator met een licht vochtige
doek af.
3. Elke keer voordat u het apparaat voor langere tijd opbergt, moet de watertank worden geleegd (zie het hoofdstuk „Watertank“.).
4. Verwijder het filter en laat dit volledig drogen, omdat zich anders bij het
volgende gebruik een muffe geur kan verspreiden.
52 von 88
Stand 3.3.2020

5. Bewaar het apparaat rechtop staand op een droge, stofvrije plek. Bescherm
Copyright UNOLD AG | www.unold.de
het apparaat tegen koude en hitte.
6. Plaats geen andere voorwerpen op het apparaat. Anders kan het apparaat
beschadigd raken.
DE
EN
FR
GARANTIEVOORWAARDEN
Wij geven op onze apparaten een garantietermijn van 24 maanden (12 maanden bij commerciële gebruik),
gerekend vanaf de dag van aanschaf. Deze garantie geldt voor schade, die bij correct gebruik aantoonbaar is
veroorzaakt door een fout in de productie. Binnen de garantietermijn verhelpen wij materiaal- en productiefouten door herstelling of vervanging naar onze keuze. Onze garantie is slechts geldig voor in Duitsland en Oostenrijk verkopte apparaten. In andere landen a.u.b. de importeur aanspreken. Apparaaten, waarvoor garantie in
aanspraak wordt genomen, moeten ons samen met een kopie van de machineel gegenereerde kassabon waaruit
de koopdatum duidelijk wordt, alsmede een beschrijving van de fout goed verpakt aan onze klantenservice
worden toegezonden. U kunt een retourbon afdrukken op onze website www.unold.de/ruecksendung. (alleen voor
inzendingen uit Duitsland en Oostenrijk). De garantie dekt geen schade veroorzaakt door slijtage, onbehoorlijk
gebruik/foutieve handelingen en niet-naleving van de onderhouds- en reinigingsaanwijzingen. Het recht op
garantie vervalt, wanneer reparaties of manipulaties aan het apparaat door derden worden doorgevoerd. Eventuele rechten van de eindgebruiker t.o.v. de verkoper of distributeur worden door deze garantie niet aangetast.
VERWIJDEREN VAN AFVAL / MILIEUBESCHERMING
Onze apparaten zijn geproduceerd met een hoge qualiteit voor een lange gebruik. Regelmatige
onderhoud en vakkundig reparaties door onze klantenservice verlengt de gebruiksduur. Wanneer het apparat defekt is en kan niet meer gerepareerd worden, let op de volgende instructies.
Dit product mag niet samen met het normale huishoudelijke afval worden afgevoerd. U dient
dit product bij een voor het recycleren van elektrische of elektronische apparaten aangewezen
verzamelplaats in te leveren. Door het separaat inzamelen en recycleren van afvalproducten
helpt u mee bij het zuinig omgaan met de natuurlijke hulpbronnen en zorgt u ervoor dat het
product op een gezondheids- en milieuvriendelijke manier afgevoerd wordt.
NL
IT
ES
PL
Verbruikte batterijen horen niet bij het gewone huisvuil. Geef uw verbruikte batterijen alstublieft af bij uw elektrohandelaar of bij de desbetreffende gemeentelijke inzamelplaats.
Stand 3.3.2020
53 von 88
DE
Copyright UNOLD AG | www.unold.de
ISTRUZIONI PER L’USO MODELLO 86990
EN
FR
NL
IT
ES
PL
DATI TECNICI
Potenza: 110 Watt, 220-240 V~, 50-60 Hz
Dimensioni: circa 26,0 x 21,5 x 73,5 cm L/P/A
Peso: circa 5,1 kg
Lunghezza del cavo: circa 150 cm
Classe di isolamento: II
Colore: Bianco
Dotazioni: Esercizio come ventilatore, esercizio come raffrescatore,
3 livelli di velocità, 3 tipi di ventate, temporizzazione
(1 - 8 ore), oscillazione 40°, telecomando, serbatoio
dell’acqua, filtro
Accessori: Istruzioni per l’uso, telecomando inclusa batteria, 2
accumulatori di freddo
Con riserva di modifiche ed errori relativi a caratteristiche delle dotazioni, tecnica,
colore e design
SIGNIFICATO DEI SIMBOLI
Questo simbolo segnala possibili pericoli in grado di provocare lesioni a
persone o danni all‘apparecchio.
PER LA VOSTRA SICUREZZA
Si raccomanda di leggere e conservare le presenti istruzioni.
Avvertenze di sicurezza generali/persone in ambito domestico
1. Questo apparecchio può essere utilizzato da bambini a partire
dagli 8 anni di età e da persone che presentano ridotte capacità
fisiche, sensoriali o mentali o che difettano della necessaria
esperienza e/o conoscenze solo se adeguatamente sorvegliati
o addestrati sull’uso in sicurezza dell’apparecchio e se a
conoscenza dei rischi correlati.
2. I bambini non devono giocare con l’apparecchio.
3. La pulizia e la manutenzione dell’utente non devono essere
eseguite da bambini, a meno che non abbiano più di 8 anni e
non vengano sorvegliati.
4. Conservare l’apparecchio e il cavo fuori dalla portata dei bambini
di età inferiore agli 8 anni.
54 von 88
Stand 3.3.2020

Avvertenze per l’installazione e l’uso dell’apparecchio
Copyright UNOLD AG | www.unold.de
5. Usare l’apparecchio solo in interni.
6. Fare attenzione che nel posto in cui l’apparecchio è installato
sia disponibile uno spazio sufficiente. Tra l’apparecchio e altri
oggetti deve essere mantenuta una distanza di almeno 50 cm.
7. Non utilizzare l’apparecchio in ambienti particolarmente polve
-
rosi o nelle vicinanze di sostanze infiammabili.
8.
Non appoggiare mai alcun oggetto sull’apparecchio mentre è in
funzione.
9. Collegare l’apparecchio soltanto a corrente alternata con ten
-
sione conforme alle indicazioni della targhetta di omologazione.
10.
Questo apparecchio non deve essere comandato tramite timer
esterni o sistemi di telecomando (come ad es. prese radioco
-
mandate). Fa eccezione il telecomando fornito in dotazione.
11.
Non immergere mai l’apparecchio o il cavo di alimentazione in
acqua o altri liquidi – sussiste pericolo di morte!
12. Non aprire mai la scocca dell’apparecchio, sussiste il pericolo di
scosse elettriche!
13. L’apparecchio è progettato esclusivamente per l’uso domestico
o impieghi similari, ad es. in aree cucina di negozi, uffici o altri
luoghi di lavoro, per l’utilizzo da parte degli ospiti di hotel, motel
o altre strutture ricettive, in pensioni private o case di vacanza.
14. Fare attenzione che il cavo di alimentazione sia posato in modo
da escludere che vi si possa inciamparvi.
15. Per evitare danni al cavo, non avvolgere mai il cavo di alimenta
-
zione attorno all’apparecchio.
16.
Per evitare danni al cavo, staccare la spina di rete dalla presa
elettrica afferrando sempre la spina, mai il cavo di alimenta
-
zione.
17.
Fare attenzione che la presa elettrica usata sia facilmente acces-
sibile, in modo che in caso di pericolo la spina possa essere
staccata velocemente.
18.
Prestare attenzione che il cavo di alimentazione non si incastri
e non sfreghi contro gli spigoli. Altrimenti il cavo può venir dan
-
neggiato.
DE
EN
FR
NL
IT
ES
PL
Stand 3.3.2020
55 von 88

DE
Copyright UNOLD AG | www.unold.de
EN
FR
NL
IT
ES
PL
19. Se possibile, non usare prolunghe. Se ciò è inevitabile, si raccomanda di srotolare completamente la prolunga e di osservare i
limiti prestazionali del relativo cavo.
20.
Non posizionare l’apparecchio direttamente sotto a una presa
elettrica.
21. Non far funzionare l’apparecchio in ambienti bagnati/bagnati e
freddi oppure umidi – pericolo di scosse elettriche!
22. Evitare radiazioni solari intense sull’apparecchio.
23. Non introdurre mai le dita oppure oggetti come aghi, spine ecc.
attraverso le aperture all’interno dell’apparecchio – pericolo di
ferirsi!
24. Controllare regolarmente che l’apparecchio, la spina e il cavo di
alimentazione non siano danneggiati o usurati. In caso di danni
inviare l’apparecchio al servizio clienti per il controllo e l’even
tuale riparazione. Riparazioni non a regola d’arte possono causare notevoli pericoli per l’utente e comportano il decadere della
garanzia.
25.
Se il cavo di alimentazione è danneggiato, per evitare danni,
deve essere sostituito esclusivamente dal produttore o dalla rela
tiva assistenza clienti o da un’altra persona analogamente qualificata.
26.
Per evitare danni l’apparecchio non deve essere utilizzato con
accessori di altri produttori o altri marchi.
27. Dopo l’utilizzo e prima della pulizia staccare la spina dalla presa
elettrica. Non lasciare mai l’apparecchio incustodito quando la
spina è inserita in una presa elettrica.
Uso del serbatoio dell’acqua e degli accumulatori di freddo
28. Versare nel serbatoio esclusivamente acqua di rubinetto. Non
usare acqua distillata o altri fluidi.
29. Se da un accumulatore di freddo fuoriesce del fluido refrige
-
rante, l’accumulatore deve essere sostituito.
30.
Il fluido refrigerante contenuto (Super Absorber Polymer) negli
accumulatori di freddo non è commestibile.
31. Non ingerire in nessun caso lo strato di ghiaccio che si può for
-
mare sugli accumulatori di freddo durante la conservazione.
32.
Tenere gli accumulatori di freddo fuori dalla portata dei bambini.
56 von 88
Stand 3.3.2020
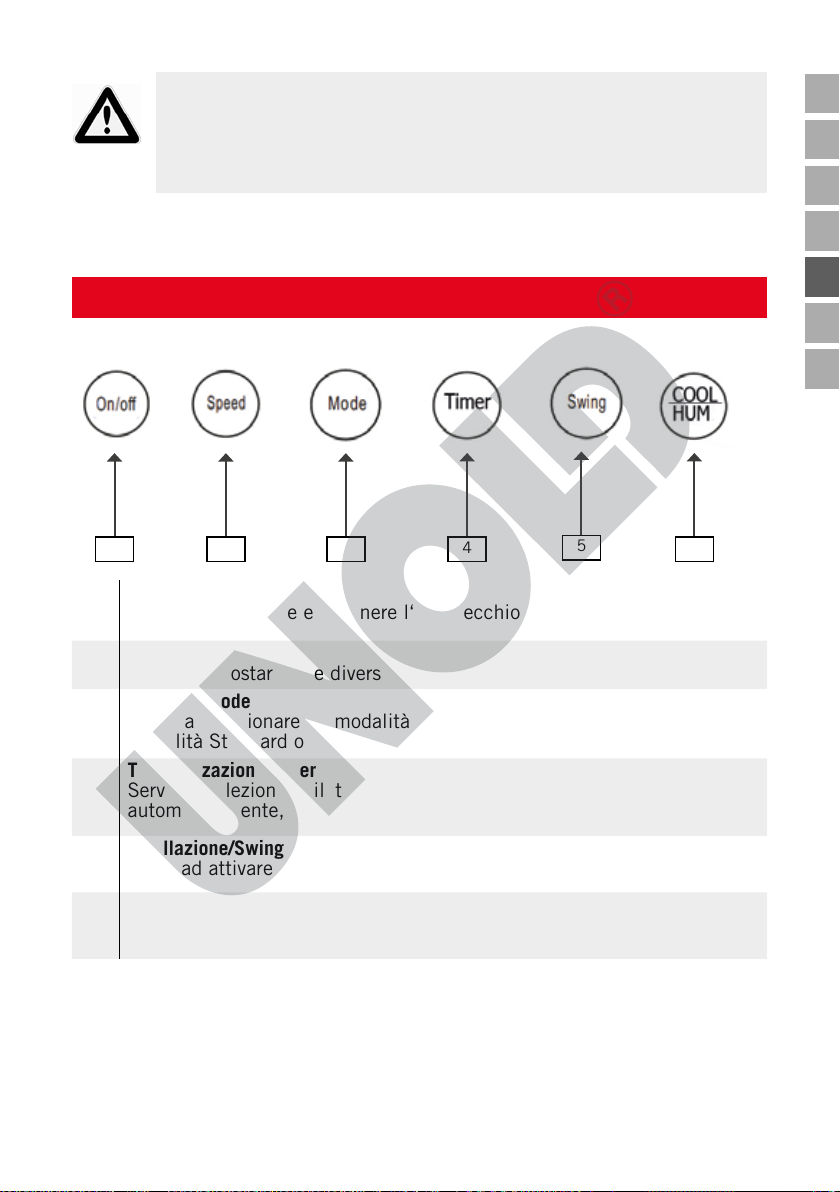
Non introdurre mai oggetti come dita, aghi, spine ecc. attraver-
Copyright UNOLD AG | www.unold.de
so le aperture all’interno dell’apparecchio – pericolo di ferirsi!
Far funzionare l’apparecchio soltanto su un sottofondo piano e
stabile, di modo che non si rovesci.
DE
EN
FR
Il produttore declina qualunque responsabilità in caso di montaggio errato, utilizzi errati o non idonei o
qualora le riparazioni siano eseguite da terzi non autorizzati.
SPIEGAZIONE DEI TASTI
1 2 3
1
ACCESO-SPENTO/ON-OFF
4
5
6
Serve ad accendere e spegnere l‘apparecchio
2
Velocità/Speed
Serve a impostare i tre diversi livelli di velocità
3
Modalità/Mode
Serve a selezionare la modalità desiderata. E’ possibile selezionare la
modalità Standard o quella Naturale.
4
Temporizzazione/Timer
Serve a selezionare il tempo dopo il quale l‘apparecchio si disattiva
automaticamente, impostabile tra 1 e 8 ore
NL
IT
ES
PL
5
Oscillazione/Swing
Serve ad attivare/disattivare la funzione Swing/Oscillazione
6
Cool/Hum.
Serve ad attivare/disattivare la funzione raffrescamento
Stand 3.3.2020
57 von 88

DE
Copyright UNOLD AG | www.unold.de
TELECOMANDO
EN
FR
NL
IT
ES
PL
1. Staccare cautamente il coperchio dal vano batterie del telecomando.
2. Inserire la batteria nell‘apposito supporto.
3. Se si desidera utilizzare un‘altra batteria stare attenti a usare una pila a
bottone di tipo CR2025.
4. Riapplicare cautamente il coperchio sul telecomando.
5. Utilizzare soltanto batterie di tipo adatto.
6. Nel regolare l‘apparecchio con il telecomando, stare attenti che durante le
regolazioni questo sia puntato sempre in direzione del ventilatore.
7. Le designazioni sul telecomando sono identiche ai tasti dell‘apparecchio.
8. Per evitare danni, non far cadere il telecomando da grandi altezze.
PRIMA DEL PRIMO UTILIZZO
1. Rimuovere tutti i materiali da imballo e le eventuali protezioni da trasporto.
Tenere i materiali da imballo fuori dalla portata dei bambini – Pericolo di
soffocamento!
2. Svolgere completamente il cavo di alimentazione.
3. Controllare che tutti i componenti siano presenti ed integri. In presenza di
danni non mettere in funzione l’apparecchio, bensì rivolgersi al rivenditore
di fiducia o alla nostra assistenza clienti.
4. Familiarizzare con tutte le funzioni dell’apparecchio.
5. Mettere gli accumulatori di freddo in un vano freezer per almeno quattro
ore.
UBICAZIONE IDEALE
1. Mantenere una distanza di sicurezza sufficiente (almeno un metro) da altri
oggetti come mobili, tende ecc.
2. L‘apparecchio può essere messo in funzione soltanto in verticale.
3. Fare in modo che l‘aria possa entrare e uscire senza ostacoli – le entrate
dell‘aria dell‘apparecchio non devono essere coperte in alcun caso.
4. Installare l‘apparecchio soltanto su sottofondi solidi e piani. Non appoggiarlo su superfici morbide (divano, letto), in quanto può ribaltarsi.
5. Prestare anche attenzione a non posizionare l‘apparecchio su tappeti e
moquette a pelo lungo o in ambienti polverosi.
58 von 88
Stand 3.3.2020

6. Per ragioni di sicurezza l‘apparecchio non deve essere usato nei pressi di
Copyright UNOLD AG | www.unold.de
lavandini, vasche da bagno o raccordi dell‘acqua.
7. Fare attenzione che la presa elettrica usata sia sempre facilmente accessibile.
8. Controllare che il cavo di alimentazione sia posato in modo che nessuno
possa inciamparvi.
9. Se si fa funzionare l’apparecchio con la funzione ventilatore e raffrescamento tenere chiuse porte e finestre. In questo modo si assicura un raffrescamento efficace e il risparmio energetico.
DE
EN
FR
NL
IT
ES
SERBATOIO DELL‘ACQUA
1. Spegnere l‘apparecchio tramite il tasto ON/OFF e staccare la spina dalla
presa elettrica.
2. Estrarre il serbatoio dall’apparecchio tirandolo leggermente all’indietro. Si
tenga presente che il serbatoio dell‘acqua non può essere estratto completamente, in quanto la pompa dell‘apparecchio è fissata nel serbatoio.
3. Riempire il serbatoio con acqua molto fredda. Eventualmente, per ottenere
un effetto di raffrescamento migliore, è possibile aggiungervi alcuni cubetti
di ghiaccio.
4. L’acqua non deve avere una temperatura superiore a 40°C.
5. Devono essere versati almeno 1.000 ml d’acqua (max. 2.000 ml), in quanto
altrimenti la pompa nel serbatoio non può funzionare correttamente.
6. Reinserire il serbatoio
nell‘apparecchio.
7. Per svuotare completamente, sbloccare il serbatoio
dell‘acqua ruotando la clip di
bloccaggio sull‘alloggiamento
verso sinistra o destra.
8.
Estrarre delicatamente
il serbatoio dell‘acqua
dall‘apparecchio.
9. Ruotare in avanti il supporto
della pompa situato nel serbatoio dell‘acqua fino a quando
la pompa può essere delicata-
Stand 3.3.2020
mente tirata verso l‘alto.
59 von 88
PL
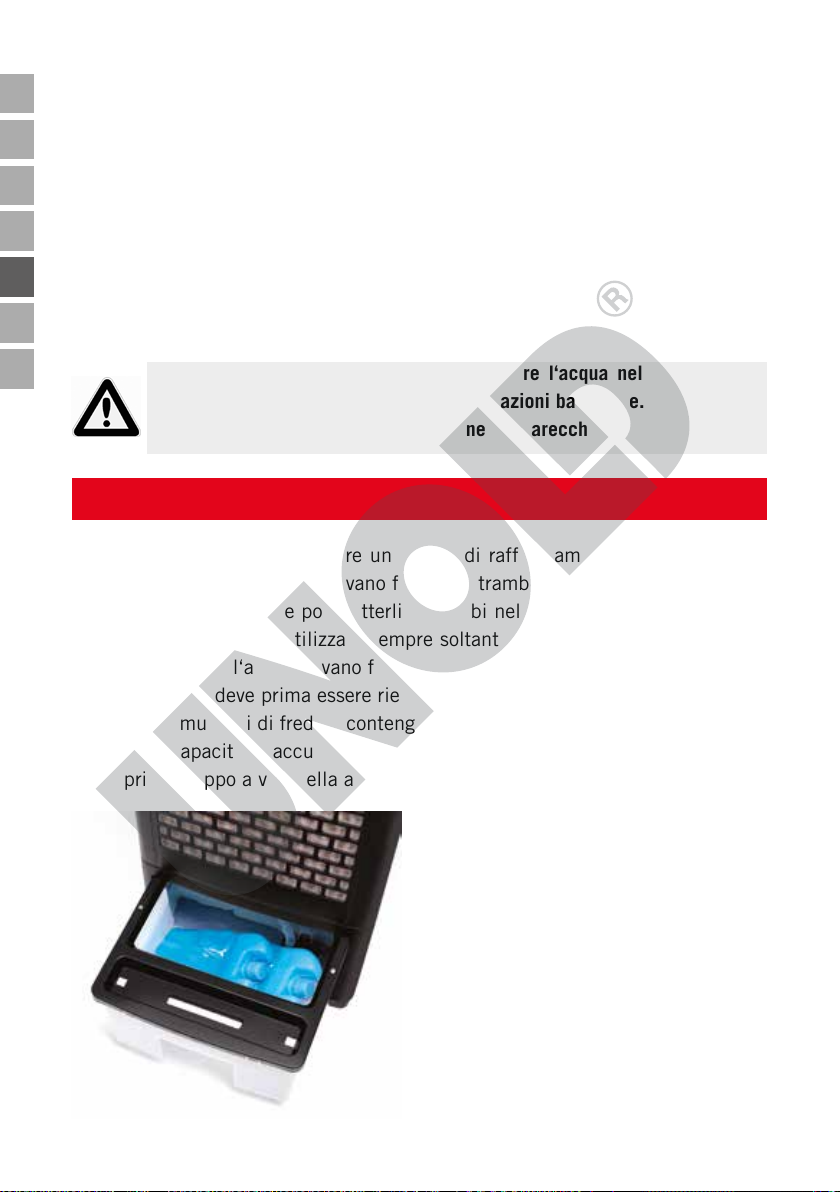
DE
Copyright UNOLD AG | www.unold.de
EN
FR
NL
IT
ES
PL
10. Fare attenzione a non danneggiare o allentare il cavo e il tubo della pompa.
11. Rimuovere il serbatoio dell‘acqua e scaricare l‘acqua. Pulire il serbatoio
dell‘acqua con un panno e, se necessario, con un detergente delicato, quindi
asciugare completamente il serbatoio dell‘acqua all‘interno e all‘esterno.
12. Riempire nuovamente il serbatoio dell‘acqua con acqua se si desidera continuare a far funzionare l‘unità, altrimenti sostituire il serbatoio dell‘acqua
vuoto.
13. Procedere in ordine inverso per sostituire il serbatoio dell‘acqua.
14. Assicurarsi di inserire correttamente la pompa e fissarla con la clip di bloccaggio.
Attenzione: per questioni igieniche, cambiare l‘acqua nel serbatoio una
volta al giorno, in modo da evitare proliferazioni batteriche.
Non versare mai l’acqua direttamente nell’apparecchio!
ACCUMULATORI DI FREDDO
1. Eventualmente, per ottenere un effetto di raffrescamento ancor maggiore,
è possibile raffreddare nel vano freezer entrambi gli accumulatori di freddo
forniti in dotazione e poi metterli entrambi nel serbatoio dell‘acqua. Tuttavia, consigliamo di utilizzare sempre soltanto un accumulatore di freddo e
di conservare l‘altro nel vano freezer per il giorno successivo.
2. Il serbatoio deve prima essere riempito con acqua.
3. Le accumulatori di freddo contengono uno speciale granulato, che assicura
che la capacità di accumulatori di freddo di raffreddamento sia maggiore.
4. Aprire il tappo a vite della accumulatori di freddo .
5. Riempi l’accumulatore di freddo con
acqua di rubinetto fino al segno.
6. Chiudi con cura l’accumulatore di
freddo e inseriscila in un congelatore per alcune ore.
7. Porre l’accumulatore di freddo nel serbatoio dell‘acqua. Si tenga presente
che per effetto dell’accumulatore
il livello dell‘acqua sale. Il livello
dell’acqua non deve oltrepassare in
60 von 88
Stand 3.3.2020
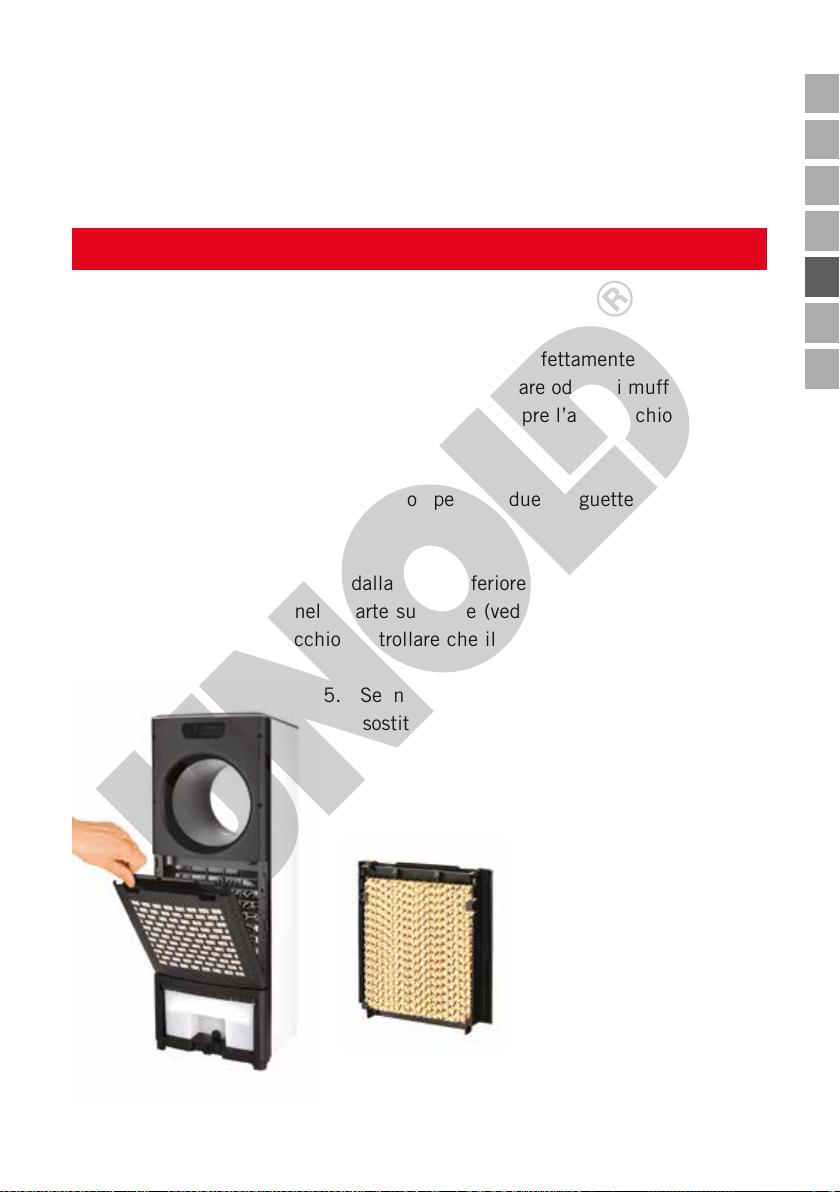
nessun caso la marcatura Max. Chiudere il serbatoio dell‘acqua, come illus-
Copyright UNOLD AG | www.unold.de
trato nel capitolo precedente.
8. Attenzione: a temperature molto calde nel serbatoio dell‘acqua può formarsi
della condensa, che può gocciolare sul pavimento. Pertanto è opportuno
proteggere adeguatamente il pavimento.
INSERIMENTO DEL FILTRO
1. Quando si usa il raffrescamento, per evitare danni all‘apparecchio, il filtro
deve essere sempre inserito. Quando si vuole riporre l’apparecchio precedentemente utilizzato far asciugare sempre perfettamente il filtro. Altrimenti, al successivo utilizzo, il filtro può emanare odore di muffa.
2. Prima di eseguire lavori sul filtro spegnere sempre l’apparecchio e staccare
la spina dalla presa elettrica.
Estrazione
3. Afferrare la copertura del filtro per le due linguette e rimuoverla
dall’apparecchio.
Inserimento
4. Posizionare il filtro, prima dalla parte inferiore, sull’inserto filtro e quindi
fissarlo in posizione nella parte superiore (vedere la figura). Per evitare di
danneggiare l‘apparecchio controllare che il filtro sia correttamente posizionato.
5. Se necessario, è possibile ordinare un filtro
sostitutivo dal nostro servizio clienti (modulo
d‘ordine pagina 87).
DE
EN
FR
NL
IT
ES
PL
Feltro filtrante
Stand 3.3.2020
61 von 88

DE
Copyright UNOLD AG | www.unold.de
USO
EN
FR
NL
IT
ES
PL
1. Avvertenza: è possibile usare la funzione ventilatore anche senza quella di raffrescamento.
2. Assicurarsi che l‘apparecchio sia posizionato su un sottofondo piano idoneo
e che sia stato installato in maniera stabile e sicura.
3. Collegare la spina a una presa elettrica.
4. Premere una volta il tasto „ON/OFF“. L’apparecchio si avvia. Nell‘impostazione
base, l‘apparecchio funziona a bassa velocità in modalità normale.
Regolazione della velocità
5. Premere ripetutamente il tasto „Velocità“ finché l‘apparecchio funziona alla
velocità desiderata. La relativa impostazione è indicata dall‘apposita spia di
controllo:
Velocità bassa: Low
Velocità media: Med
Velocità alta: High
Funzione Swing/Oscillazione
6. Per attivare la funzione Swing dell’uscita dell‘aria premere il tasto „Oscillazione“. Premendo nuovamente questo tasto l‘apparecchio si arresta nella
posizione attuale, mentre il ventilatore continua a funzionare.
Temporizzazione
7. Tramite il tasto „Temporizzazione“ è possibile selezionare il tempo di funzionamento desiderato per l‘apparecchio. Questo può essere compreso
tra 1, 2, 4 e 8 ore. Premere il tasto „Temporizzazione“ finché sul display
compare il numero di ore desiderato. Una volta trascorso tale lasso di
tempo l‘apparecchio si disattiva automaticamente. Se non viene effettuata
alcun‘impostazione temporale, l‘apparecchio funziona in maniera continua.
Impostazione della modalità
8. Premere il tasto „Modalità“ e selezionare la modalità operativa desiderata.
E’ possibile scegliere tra le modalità Standard, Naturale (l‘apparecchio
lavora a velocità mutevoli, che assomigliano ai movimenti dell‘aria naturale)
o Sonno (anche in questo caso l‘apparecchio lavora a velocità mutevoli, da
alta a bassa). Premere ripetutamente il tasto „Modalità“ finché la spia di
controllo visualizza l‘impostazione desiderata.
62 von 88
Stand 3.3.2020

Attivazione del raffrescamento aria
Copyright UNOLD AG | www.unold.de
9. Accertarsi che nel serbatoio sia presente una sufficiente quantità d‘acqua.
10. Premere il tasto „Cool/Hum“.
11. La pompa nel serbatoio è attivata e l’acqua presente nel serbatoio è convogliata attraverso il filtro sul retro dell’apparecchio in modo da raffreddare
l‘aria circolante.
12. Quando il serbatoio dell‘acqua è vuoto riempirlo come descritto nel capitolo
„Serbatoio dell‘acqua“.
13. Non estrarre mai il serbatoio dell‘acqua dall‘apparecchio quando il raffrescamento aria è attivato. Altrimenti l’apparecchio può essere danneggiato
dall’acqua che scorre al suo interno.
14. Per disattivare la funzione premere nuovamente il tasto „Cool/Hum“.
Spegnimento
Suggerimento: si consiglia di disattivare prima il raffreddamento ad aria e lasciare
funzionare la funzione della ventola per qualche minuto in più. Ciò consente al filtro
di asciugarsi più velocemente.
15. Per spegnere l‘apparecchio premere nuovamente il tasto „ON/OFF“
dell’apparecchio o del telecomando. Quando l‘apparecchio non viene più
utilizzato staccare la spina dalla presa elettrica.
16. Quindi rimuovere il filtro e, prima di riutilizzare l’apparecchio, farlo asciugare.
DE
EN
FR
NL
IT
ES
PL
PULIZIA E CONSERVAZIONE
Spegnere l‘apparecchio premendo il tasto „ON/OFF“ e staccare la spina
dalla presa elettrica.
Fare attenzione a non immergere mai l‘apparecchio in acqua. Il motore o i
componenti elettrici dell‘apparecchio non devono inumidirsi.
1. In linea di principio non si devono usare prodotti abrasivi, lana d’acciaio,
oggetti metallici, disinfettanti o detergenti caldi.
2. Strofinare la scocca e la griglia del ventilatore con un panno leggermente
inumidito.
3. Prima di ogni conservazione di lunga durata è necessario svuotare il serbatoio dell‘acqua (vedere il capitolo „Serbatoio dell‘acqua“.).
Stand 3.3.2020
63 von 88

DE
Copyright UNOLD AG | www.unold.de
EN
FR
NL
4. Estrarre il filtro e lasciarlo asciugare completamente, in quanto altrimenti
alla successiva messa in funzione può emanare odore di muffa.
5. Conservare l’apparecchio in verticale in un luogo asciutto e non polveroso.
Proteggere l‘apparecchio dal freddo e dal calore.
6. Non conservare sull’apparecchio altri oggetti. Altrimenti l’apparecchio può
subire dei danni.
IT
ES
PL
NORME DIE GARANZIA
I nostri prodotti sono garantiti per 24 mesi, 12 mesi in caso di uso professionale, dalla data di acquisto per i
guasti manifestatisi durante un utilizzo conforme alle disposizioni e attribuibili in modo dimostrabile a difetti
di fabbricazione. Nel periodo di garanzia porremo rimedio ai difetti materiali e di produzione secondo la nostra
valutazione, procedendo alla riparazione o alla sostituzione dell’apparecchio. Le nostre prestazioni di garanzia valgono esclusivamente per gli apparecchi venduti in Germania e Austria. In tutti gli altri casi rivolgersi
all‘importatore. Gli apparecchi per i quali si richiede la riparazione di guasti ci devono essere e debitamente
imballati, unitamente a una copia del documento di acquisto redatto a macchina dal quale risulti la data di
vendita, nonché la descrizione del guasto. È possibile stampare un modulo di reso sul nostro sito Web www.
unold.de/ruecksendung. (solo per voci provenienti da Germania e Austria). Sono esclusi dalla garanzia i guasti
dovuti all’usura, all’uso inappropriato o al mancato rispetto delle regole di manutenzione. Il diritto di garanzia
decade qualora siano state effettuate riparazioni o interventi da parte di terzi. Eventuali diritti del consumatore
finale verso il venditore o negoziante non vengono limitati dalla presente garanzia.
SMALTIMENTO / TUTELA DELL’AMBIENTE
I nostri apparecchi vengono prodotti rispettando un elevato standard qualitativo per una lunga
durata di utilizzo. Una corretta manutenzione e riparazioni adeguate a cura dal nostro servizio
clienti possono prolungare la durata di utilizzo del prodotto. Se un apparecchio è difettoso e non
più riparabile, per il suo smaltimento si presti attenzione ai punti che seguono. Questo prodotto
non deve essere smaltito unitamente ai comuni rifiuti domestici. Consegnare il prodotto a un
centro di raccolta per il riciclaggio dei rifiuti elettrici o elettronici. Con la raccolta differenziata
dei rifiuti e dei prodotti riciclabili è possibile contribuire alla tutela delle risorse naturali e far
smaltire il prodotto nel rispetto dell’ambiente e della salute.
Le batterie esauste non devono essere smaltite tramite i rifiuti domestici. Si
raccomanda di smaltirle tramite il rivenditore di forniture elettriche di fiducia
oppure tramite il punto di raccolta municipale.
64 von 88
Stand 3.3.2020

MANUAL DE INSTRUCCIONES MODELO 86990
Copyright UNOLD AG | www.unold.de
DE
DATOS TÉCNICOS
Potencia: 110 vatios, 220-240 V~, 50-60 Hz
Medidas: aprox. 26,0 x 21,5 x 73,5 cm An/Pr/Al
Peso: aprox. 5,1 kg
Longitud del cable: aprox. 150 cm
Clase de protección: II
Color: Blanco
Equipamiento: modo de ventilador, modo de refrigerador por aire, 3
niveles de velocidad, 3 tipos de viento, preselección
de tiempo (de 1 a 8 horas), oscilación de 40°, control
remoto, depósito de agua, filtro
Accesorios: manual de instrucciones, control remoto con batería
incluida, 2 acumuladores de frío
Salvo modificaciones y errores a nivel de las características de equipamiento, la
tecnología, los colores y el diseño
EXPLICACIÓN DE SÍMBOLOS
Este símbolo se asocia con riesgos eventuales que pueden provocar
lesiones o daños en el aparato.
PARA SU SEGURIDAD
Lea y conserve las siguientes instrucciones.
Indicaciones generales de seguridad/personas en el hogar
1. Este aparato puede ser usado por niños a partir de 8 años, así
como por personas con una capacidad física, mental o sensorial
reducida o carentes de experiencia y/o conocimientos siempre
que estén supervisados o hayan sido correspondientemente
instruidos en el manejo seguro de dicho aparato y comprendan
los peligros que conlleva.
2. El aparato no es un juguete.
3. No está permitido que los niños lleven a cabo la limpieza ni el
mantenimiento que corresponde al usuario a no ser que tengan
más de 8 años y estén supervisados.
4. Guarde el aparato y el cable fuera del alcance de niños menores
de 8 años.
EN
FR
NL
IT
ES
PL
Stand 3.3.2020
65 von 88

DE
Copyright UNOLD AG | www.unold.de
EN
FR
NL
IT
ES
PL
Indicaciones sobre la colocación y el manejo del aparato
5. Utilice el aparato solo en espacios interiores.
6. Asegúrese de que haya espacio suficiente en el lugar de
emplazamiento del aparato. Como mínimo debe haber 50 cm
entre el aparato y otros objetos.
7. No utilice el aparato en recintos con mucho polvo o cerca de
sustancias inflamables.
8. No coloque nunca objetos sobre el aparato mientras esté en
funcionamiento.
9. Conecte el aparato solo a corriente alterna con una tensión de
acuerdo con la placa de características.
10. Este aparato no se debe utilizar con un reloj programador
externo ni con un sistema de mando a distancia (como, p. ej.,
enchufes por control remoto). Esto no se aplica al control remoto
suministrado.
11. No sumerja nunca el aparato o el cable de alimentación en agua
o en otros líquidos. ¡Existe peligro de muerte!
12. No abra la carcasa del aparato. ¡Existe peligro de descarga
eléctrica!
13. El aparato está destinado exclusivamente al uso doméstico o a
fines de uso similares, por ejemplo, en cocinas tipo office en
comercios, oficinas u otros lugares de trabajo, para el uso por
parte de clientes en hoteles, moteles u otros establecimientos
de alojamiento colectivo o para el uso en pensiones privadas o
en casas vacacionales.
14. Preste atención a tender el cable de alimentación de manera
que quede excluido el riesgo de tropiezos.
15. No enrolle nunca el cable de alimentación alrededor del aparato
para evitar daños en el mismo.
16. Con el fin de evitar daños en el cable, desenchufe siempre el
cable de red tirando del enchufe. No tire nunca del cable de
alimentación.
17. Preste atención a que la toma de corriente utilizada sea fácilmente
accesible, de manera que pueda desenchufar rápidamente el
aparato en caso de peligro.
66 von 88
Stand 3.3.2020

18. Preste atención a que el cable de alimentación no quede
Copyright UNOLD AG | www.unold.de
aprisionado ni tendido por esquinas. De lo contrario, el cable de
alimentación podría resultar dañado.
19. De ser posible, no use ningún cable de prolongación. Si fuera
inevitable hacerlo, desenrolle completamente el cable de
prolongación y tenga en cuenta los límites de potencia del cable
en cuestión.
20. No coloque el aparato directamente debajo de una toma de
corriente.
21. El aparato no se debe operar en ambientes húmedos, mojados y
fríos. ¡Peligro de descarga eléctrica!
22. Evite exponer el aparato a la radiación solar excesiva.
23. No introducir nunca los dedos u objetos como agujas, bolígrafos,
etc. por los orificios al interior del aparato. ¡Peligro de lesiones!
24. Revise periódicamente si el equipo, el enchufe y el cable de
alimentación presentan desgaste o daños. En caso de daños
envíe el aparato para su verificación y reparación a nuestro
servicio de atención al cliente. Las reparaciones inadecuadas
pueden ocasionar considerables peligros para el usuario y tienen
como consecuencia la exclusión de la garantía.
25. En caso de que el cable de alimentación esté dañado, para
evitar peligros lo deberá cambiar el fabricante, su servicio
de atención al cliente u otra persona profesional cualificada
correspondientemente.
26. Para evitar daños en el aparato, este no debe utilizarse con
accesorios de otros fabricantes o marcas.
27. Desenchufe el aparato tanto después de su uso como antes de
la limpieza. No deje nunca el aparato sin vigilancia cuando esté
enchufado.
Manejo con depósito de agua y acumuladores de frío
28. Llene el depósito de agua solo con agua del grifo. No utilice
agua destilada u otros líquidos.
29. Si sale líquido refrigerante de uno de los acumuladores de frío,
se debe sustituir el acumulador de frío.
30. El líquido refrigerante contenido (Super Absorber Polymer) en
los acumuladores de frío no es apto para el consumo.
DE
EN
FR
NL
IT
ES
PL
Stand 3.3.2020
67 von 88
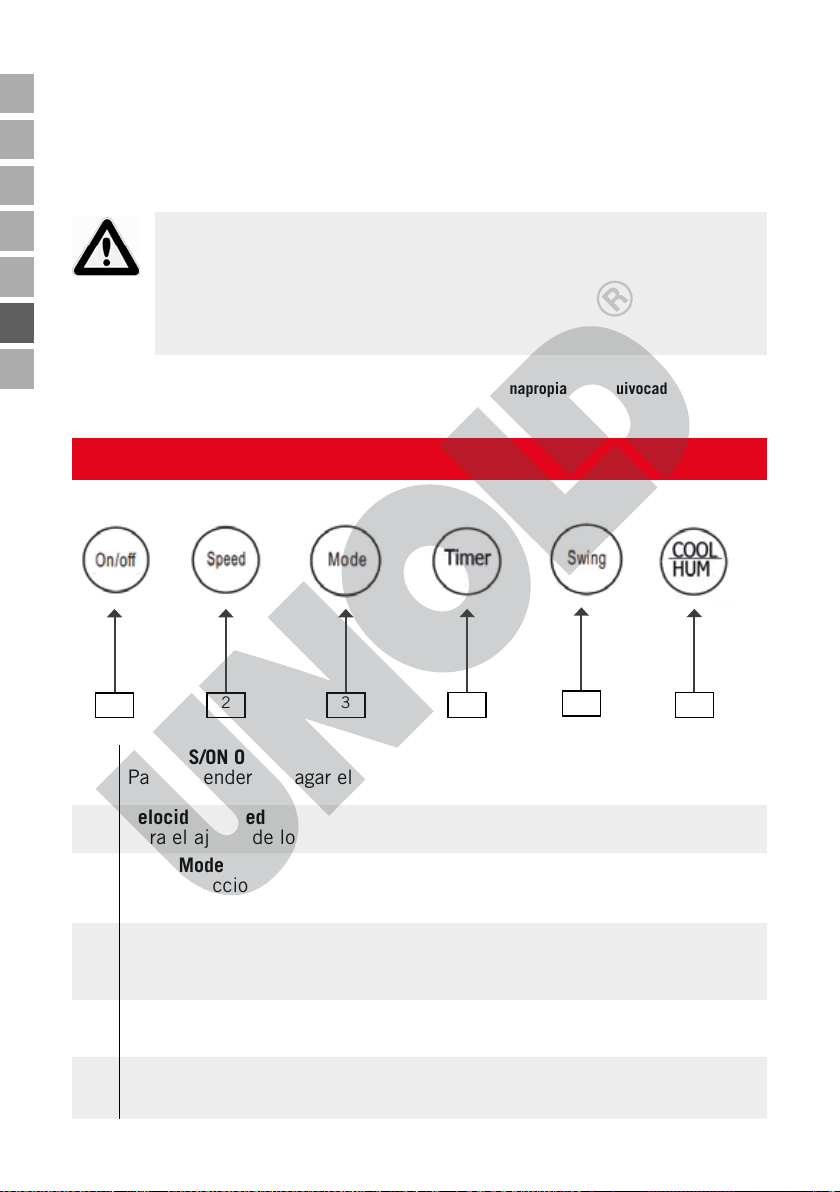
DE
Copyright UNOLD AG | www.unold.de
EN
FR
31. No consuma nunca la capa de hielo que se puede formar en los
acumuladores refrigerantes durante el almacenamiento.
32. Mantenga a los niños y animales alejados de los acumuladores
refrigerantes.
NL
IT
ES
PL
No se deben introducir nunca los dedos ni objetos como agujas,
bolígrafos, etc. por la rejilla hasta el interior del aparato.
¡Peligro de lesiones!
Operar el aparato solo sobre una base plana y estable para que
no vuelque.
El fabricante no es responsable en caso de montaje erróneo, uso inapropiado o equivocado o después de
haber sido efectuadas reparaciones por terceros no autorizados.
EXPLICACIÓN DE LAS TECLAS
1 2 3
1
CON/DES/ON OFF
Para encender y apagar el aparato
4
5
6
2
Velocidad/Speed
Para el ajuste de los tres niveles de velocidad diferentes
3
Modo/Mode
Para seleccionar el modo deseado. Se pueden seleccionar el modo
estándar o el modo natural.
4
Preselección de tiempo/Timer
Para la selección del tiempo, después del cual se debe desconectar el
aparato automáticamente. Se puede ajustar entre 1 y 8 horas
5
Oscilación/Swing
Para conectar y desconectar la función de giro/oscilación
6
Cool/Hum.
Para conectar y desconectar la función de refrigeración
68 von 88
Stand 3.3.2020

CONTROL REMOTO
Copyright UNOLD AG | www.unold.de
DE
1. Extraiga la cubierta del compartimento de pilas con cuidado del control
remoto.
2. Inserte la pila en el soporte previsto.
3. Si desea colocar otra pila, preste atención a utilizar una pila de botón de
tipo CR2025.
4. Vuelva e colocar la cubierta con cuidado en el control remoto.
5. Utilice solo pilas del tipo adecuado.
6. Si ajusta el aparato con el control remoto, asegúrese de mantener siempre el
control remoto en la dirección del ventilador durante los ajustes.
7. Las denominaciones de las teclas del control remoto son idénticas a las de
las teclas del aparato.
8. Para evitar daños, no deje caer el control remoto desde una gran altura.
ANTES DEL PRIMER USO
1. Retire todos los materiales de embalaje y, dado el caso, los seguros de
transporte. Mantenga el material de embalaje alejado de los niños. ¡Peligro
de asfixia!
2. Desenrolle el cable de alimentación por completo.
3. Compruebe si todas las piezas estén completas e intactas. No utilice el aparato si está dañado; diríjase a su proveedor o a nuestro servicio de atención
al cliente.
4. Familiarícese con todas las funciones del aparato.
5. Guarde los acumuladores refrigerantes suministrados en un congelador
durante al menos cuatro horas.
EN
FR
NL
IT
ES
PL
EL EMPLAZAMIENTO IDEAL
1. Mantenga una distancia de seguridad suficiente (al menos un metro) frente
a otros objetos, tales como muebles, cortinas, etc.
2. El aparato solo se debe utilizar en posición vertical.
3. Asegúrese de que el aire pueda entrar y salir libremente; los orificios de
entrada de aire en el aparato no se deben tapar bajo ningún concepto.
4. Coloque el aparato únicamente en una superficie firme y plana. No lo ponga
en superficies blandas (sofá, cama) porque puede volcar.
Stand 3.3.2020
69 von 88

DE
Copyright UNOLD AG | www.unold.de
EN
FR
NL
IT
ES
PL
5. Además, cuide de no colocar el aparato encima de alfombras de pelo largo
o en entornos polvorientos.
6. Por motivos de seguridad no debe utilizarse el aparato cerca de lavabos,
bañeras o conexiones de agua.
7. Asegúrese de que la toma de corriente utilizada sea fácilmente accesible en
todo momento.
8. Compruebe que el cable de alimentación esté colocado de manera que
nadie pueda tropezar con él.
9. Cuando ponga en funcionamiento el aparato con función de ventilador y de
refrigeración, mantenga cerradas las puertas y ventanas. De este modo, se
garantiza una refrigeración eficaz y de bajo consumo.
DEPÓSITOS DE AGUA
1. Desconecte el aparato con la tecla CON/DES y retire el enchufe de red de
la toma de corriente.
2. Extraiga el depósito ligeramente hacia atrás del aparato. Al hacerlo, tenga
en cuenta que el depósito de agua no se puede extraer completamente dado
que la bomba del aparato está fijada en el depósito del agua.
3. Llene el depósito de agua muy fría; en caso necesario, también puede añadir unos cubitos de hielo para obtener un mejor resultado de refrigeración.
4. El agua no debe estar a más de 40 °C.
5. Se deben llenar 1.000 ml
de agua como mínimo (max.
2.000 ml) dado que, de lo
contrario, la bomba del depósito de agua no puede funcionar correctamente.
6. Vuelva a colocar el depósito en
el aparato.
7. Para vaciarlo completamente,
desbloquee el depósito de
agua girando el clip de bloqueo de la carcasa hacia la
izquierda o la derecha.
8. Tire suavemente del depósito
de agua ligeramente fuera del
aparato.
70 von 88
Stand 3.3.2020
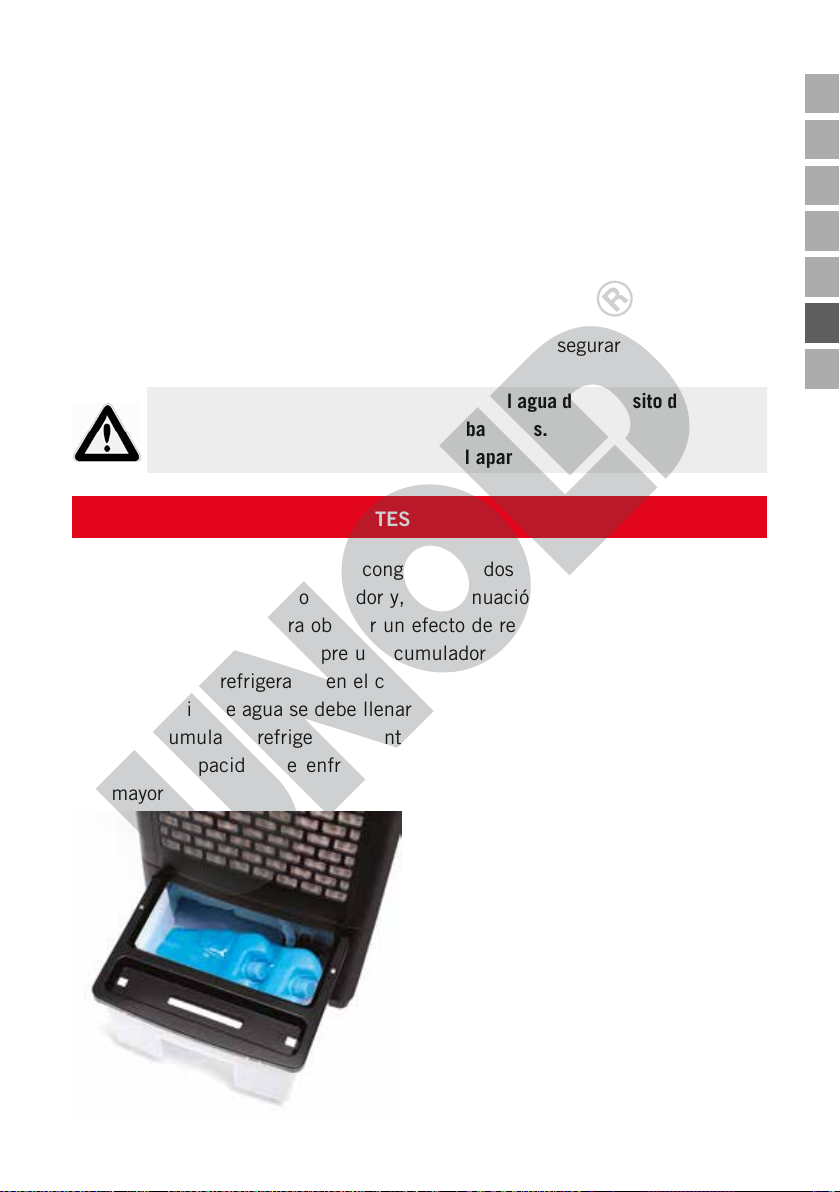
9. Gire el soporte de la bomba ubicado en el depósito de agua hacia adelante
Copyright UNOLD AG | www.unold.de
hasta que la bomba pueda ser jalada suavemente hacia arriba.
10. Tenga cuidado de no dañar o aflojar el cable y la manguera de la bomba.
11. Retire el depósito de agua y drene el agua. Limpie el tanque de agua con
un paño y, si es necesario, con un detergente suave y luego seque completamente el tanque de agua por dentro y por fuera.
12. Llene el depósito de agua con agua nuevamente si desea continuar operando la unidad; de lo contrario, reemplace el depósito de agua vacío.
13. Proceda en orden inverso para reemplazar el depósito de agua.
14. Asegúrese de insertar la bomba correctamente y asegurarla con el clip de
bloqueo.
Atención: Por razones de higiene, cambie el agua del depósito de agua una
vez al día para evitar la formación de bacterias.
¡No añada nunca agua directamente al aparato!
ACUMULADORES REFRIGERANTES
1. En caso necesario, puede congelar los dos acumuladores refrigerantes
suministrados en el congelador y, a continuación, colocarlos también en el
depósito de agua para obtener un efecto de refrigeración aún mayor. Recomendamos utilizar siempre un acumulador refrigerante y almacenar el otro
acumulador refrigerante en el congelador para el día siguiente.
2. El depósito de agua se debe llenar previamente con agua.
3. Las acumulador refrigerante contienen un granulado especial, que asegura
que la capacidad de enfriamiento de las acumuladores refrigerantes sea
mayor.
4. Abra el tapón de rosca de el acumulador refrigerante.
5. Llene el acumuladores refrigerante
con agua del grifo hasta la marca.
6. Cierre el acumulador refrigerante con
cuidado y colóquela en un congelador durante unas horas.
7. Coloque el acumulador refrigerante en
el depósito de agua. Tenga en cuenta
que el nivel del agua aumenta por el
DE
EN
FR
NL
IT
ES
PL
Stand 3.3.2020
71 von 88
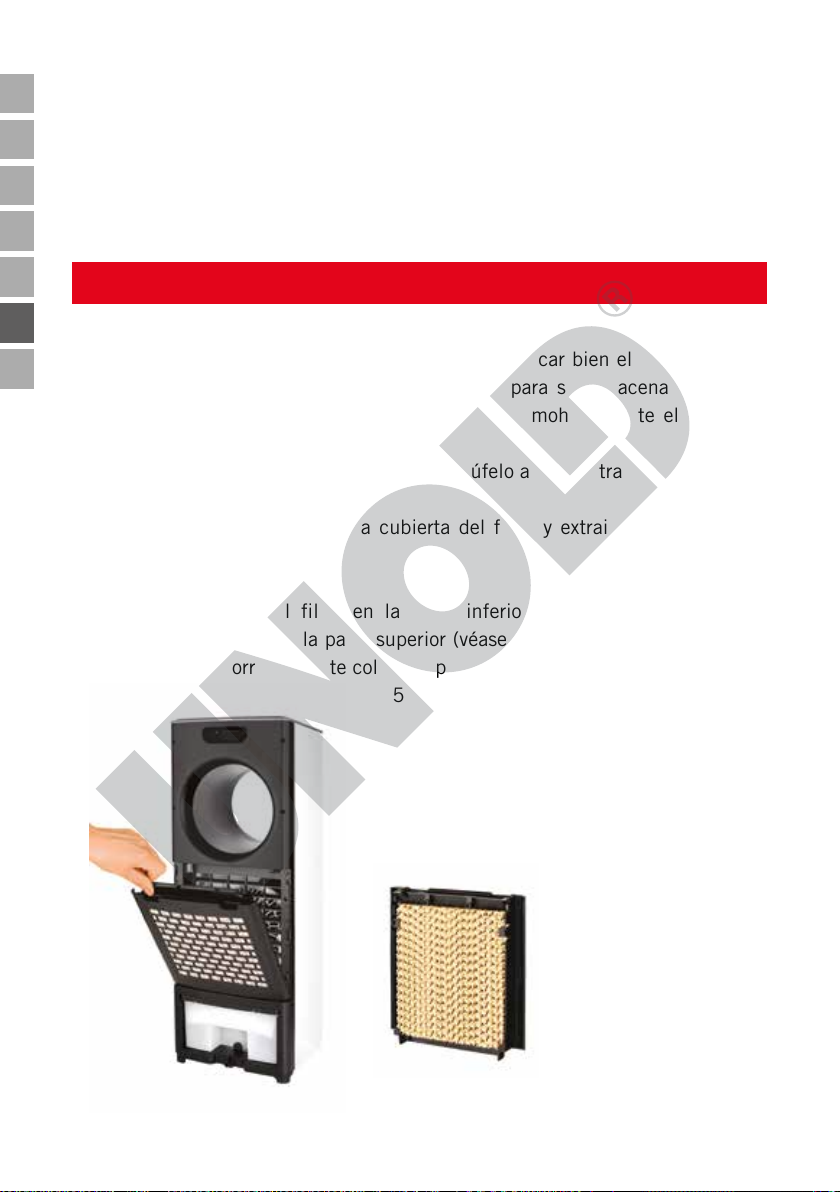
DE
Copyright UNOLD AG | www.unold.de
EN
FR
NL
acumulador refrigerante. Sin embargo, el nivel del agua nunca debe aumentar por encima de la marca máxima. Cierre el depósito de agua como se
describe en el capítulo anterior.
8. Atención: Con temperaturas muy cálidas se puede formar condensado en el
depósito de agua, que puede gotear sobre el suelo. Por lo tanto, proteja el
suelo adecuadamente.
IT
ES
PL
COLOCAR EL FILTRO
1. El filtro siempre debe estar colocado si se utiliza la refrigeración por aire
para evitar daños en el aparato. Deje siempre secar bien el filtro si ha utilizado el aparato y lo va a guardar después para su almacenamiento. De
lo contrario, el filtro podría desprender olor a moho durante el siguiente
funcionamiento.
2. Desconecte siempre el aparato y desenchúfelo antes de trabajar en el filtro.
Extraer
3. Sujete ambas pestañas de la cubierta del filtro y extraiga la cubierta del
filtro del aparato.
Insertar
4. Primero, coloque el filtro en la parte inferior del cartucho del filtro y,
después, encájelo en la parte superior (véase la ilustración). Compruebe si
el filtro está correctamente colocado para evitar daños en el aparato.
5. Si es necesario, puede solicitar un filtro de reemplazo a nuestro servicio al
cliente (formulario de pedido, página
87).
Estera de filtro
72 von 88
Stand 3.3.2020

MANEJO
Copyright UNOLD AG | www.unold.de
DE
1. Indicación: Puede utilizar la función del ventilador también sin la función de
refrigeración.
2. Asegúrese de que el aparato esté sobre una base adecuada y plana y de que
se haya colocado de forma segura y estable.
3. Inserte el enchufe en una toma de corriente.
4. Pulse una vez la tecla „CON/DES“. El aparato arranca. En el ajuste básico,
el aparato funciona con velocidad baja en modo normal.
Ajuste de velocidad
5. Pulse la tecla „Velocidad“ repetidas veces hasta que el aparato opera con
la velocidad deseada. El ajuste correspondiente se indica mediante el piloto
de control correspondiente:
Velocidad baja: Low
Velocidad media: Med
Velocidad alta: High
Función de giro/oscilación
6. Pulse la tecla „Oscilación“ para conectar la función de giro de la salida de
aire. Si pulsa de nuevo esta tecla se detiene el aparato en la posición actual.
Sin embargo, el ventilador sigue en marcha.
EN
FR
NL
IT
ES
PL
Preselección de tiempo
7. Mediante la tecla „Preselección de tiempo“ puede seleccionar el tiempo
de ejecución deseado del aparato. Este se encuentra en el rango de 1, 2, 4
y 8 horas. Pulse la tecla „Preselección de tiempo“ varias veces hasta que
se indiquen las horas deseadas en la pantalla. Una vez transcurrido este
tiempo, el aparato se desconecta automáticamente. Si no realiza ningún
ajuste de tiempo, el aparato funcionará de forma continua.
Ajustar el modo
8. Pulse la tecla „Modo“ y seleccione el modo de servicio deseado. Puede
elegir entre el modo estándar, el modo natural (el aparato funciona con
velocidades alternas que parecen movimientos de aire naturales) o el modo
de reposo (el aparato también funciona con velocidades alternas de alta a
baja velocidad). Pulse la tecla „Modo“ repetidas veces hasta que se indique
el ajuste deseado mediante el piloto de control.
Stand 3.3.2020
73 von 88

DE
Copyright UNOLD AG | www.unold.de
EN
FR
NL
IT
ES
PL
Conectar la refrigeración por aire
9. Asegúrese de que el depósito de agua tenga agua suficiente.
10. Pulse la tecla „Cool/Hum“.
11. Se conecta la bomba en el depósito de agua, y el agua del depósito se conduce a través del filtro situado en la parte posterior del aparato para enfriar
el aire circulante.
12. Si el depósito de agua está vacío, llénelo como se describe en el capítulo
„Depósito de agua“.
13. No extraiga nunca el depósito de agua del aparato si está conectada la refrigeración por aire. De lo contrario, el aparato podría dañarse por el agua que
corre en su interior.
14. Pulse de nuevo la tecla „Cool/Hum“ para desconectar la función.
Desconexión
Consejo: recomendamos apagar primero la refrigeración por aire y dejar que la
función del ventilador funcione durante unos minutos más. Esto permite que el filtro
se seque más rápido.
15. Pulse de nuevo la tecla „CON/DES“ en el aparato o en el control remoto para
desconectar el aparato. Retire el enchufe de la toma de corriente cuando no
utilice el aparato.
16. A continuación, extraiga el filtro y déjelo secar antes de volver a utilizar el
aparato.
LIMPIEZA Y ALMACENAMIENTO
Desconecte el aparato pulsando la tecla „CON/DES“ y retire el enchufe de
la toma de corriente.
Asegúrese de no sumergir nunca el aparato en agua. Ni el motor ni los
componentes eléctricos del aparato se deben mojar nunca.
1. No utilice nunca productos de limpieza agresivos, lana o estopa de acero,
objetos metálicos, productos de limpieza calientes o desinfectantes.
2. Limpie la carcasa y la rejilla del ventilador con un paño ligeramente húmedo.
3. Antes de cualquier almacenamiento prolongado se debe vaciar el depósito
de agua (véase el capítulo „Depósito de agua“).
74 von 88
Stand 3.3.2020

4. Extraiga el filtro y déjelo secar completamente dado que, de lo contrario,
Copyright UNOLD AG | www.unold.de
podría extenderse un olor a moho durante la próxima puesta en marcha.
5. Guarde el aparato en posición vertical en un lugar seco y sin polvo. Proteja
el aparato del frío y del calor.
6. No almacene ningún otro objeto sobre el aparato. En caso contrario, el aparato podría resultar dañado.
DE
EN
FR
NL
CONDICIONES DE GARANTIA
La garantía para nuestros equipos es de 24 meses, y de 12 meses en el caso de uso comercial, a partir de la
fecha de compra, cubriendo los daños que con un uso acorde a lo prescrito pueden atribuirse fehacientemente
a defectos de fabricación. Dentro del período de garantía, solucionamos errores de material y de fabricación a
consideración nuestra mediante reparación o cambio. Nuestros servicios de garantía son válidos únicamente
para los aparatos que han sido vendidos en Alemania y Austria. Para todos los demás casos diríjase por favor
al importador correspondiente. Aquellos aparatos que se presentan para eliminar errores, por favor enviarlos
junto a una copia del comprobante de compra extendido a máquina, del cual debe desprenderse la fecha de
compra, así como una breve descripción de las deficiencias, apropiadamente embalado a nuestro servicio al
cliente. Puede imprimir un comprobante de devolución en nuestro sitio web www.unold.de/ruecksendung. (solo
para entradas de Alemania y Austria). Aquellos daños causados por desgaste están excluidos de la garantía, así
como manipulación incorrecta, e incumplimiento de las condiciones de mantenimiento y cuidado. El derecho a
garantía expira si las reparaciones o mantenimiento son realizadas por terceros. Todo reclamo del consumidor
final ante el vendedor, comerciante no se ve afectado por esta garantía.
DISPOSICIÓN/PROTECCIÓN DEL MEDIO AMBIENTE
Nuestros aparatos se fabrican con un alto nivel de calidad por un largo período de uso. El
mantenimiento regular y las reparaciones de tipo técnico a través de nuestro servicio al cliente
pueden prolongar la duración del aparato. Cuando un aparato está defectuoso y ya no puede
repararse, por favor considere en la disposición final los siguientes puntos: Este producto no
puede ser eliminado junto a la basura domiciliaria. Usted debe entregar este producto a un lugar oficial para el reciclaje de aparatos eléctricos o electrónicos. Mediante la clasificación por
separado y el reciclaje de productos residuales, Usted contribuye a proteger los recursos naturales y asegura que el producto sea eliminado de forma salubre y acorde con el medio ambiente.
No deseche las pilas agotadas en la basura doméstica. Elimínelas a través de
las tiendas de artículos eléctricos o el punto de recogida local correspondiente.
IT
ES
PL
Stand 3.3.2020
75 von 88
DE
Copyright UNOLD AG | www.unold.de
INSTRUKCJA OBSŁUGI MODEL 86990
EN
FR
NL
IT
ES
PL
DANE TECHNICZNE
Moc: 110 W, 220-240 V~, 50-60 Hz
Wymiary: ok. 26,0 x 21,5 x 73,5 cm (szer./głęb./wys.)
Ciężar: ok. 5,1 kg
Długość kabla: ok. 150 cm
Stopień ochrony: II
Kolor: biały
Wyposażenie: tryb wentylatora, tryb chłodnicy powietrza, 3 stopnie prędkości,
Akcesoria: instrukcja obsługi, pilot z baterią, 2 wkłady chłodzące
Zmiany i błędy w opisie wyposażenia, technice, kolorach i konstrukcji są zastrzeżone.
OBJAŚNIENIE SYMBOLI
Symbol ten oznacza ewentualne niebezpieczeństwa, które mogą prowadzić do
obrażeń lub uszkodzenia urządzenia.
DLA BEZPIECZEŃSTWA UŻYTKOWNIKA
3 rodzaje nawiewu, wybór wstępny czasu (1 - 8 godzin),
oscylacja 40°, pilot, zbiornik na wodę, filtr
Prosimy przeczytać poniższe instrukcje i zachować je do użytku w
przyszłości.
Ogólne instrukcje bezpieczeństwa / wskazówki dotyczące osób w
gospodarstwie domowym
1. Urządzenie może być używane przez dzieci w wieku powyżej 8 lat
oraz osoby o ograniczonej sprawności fizycznej, sensorycznej czy
umysłowej lub osoby nieposiadające doświadczenia i/lub wiedzy,
jeśli są one nadzorowane lub zostały poinstruowane w zakresie
bezpiecznego użytkowania i zrozumiały niebezpieczeństwa
wynikające z użytkowania urządzenia.
2. Nie wolno dzieciom bawić się urządzeniem.
3. Czyszczenia i konserwacji, które powinien wykonać użytkownik,
nie wolno wykonywać dzieciom w wieku poniżej 8 lat. Dzieci w
wieku powyżej 8 lat mogą robić to pod nadzorem.
4. Urządzenie i kabel należy przechowywać w miejscu niedostępnym
dla dzieci w wieku poniżej 8 lat.
Wskazówki dotyczące ustawienia i obsługi urządzenia
5. Używać urządzenia wyłącznie wewnątrz pomieszczeń.
76 von 88
Stand 3.3.2020

6. Zwrócić uwagę na wystarczającą ilość miejsca w miejscu usta-
Copyright UNOLD AG | www.unold.de
wienia urządzenia. Między urządzeniem a innymi przedmiotami
zachowany musi być odstęp min. 50 cm.
7.
Nie używać urządzenia w bardzo zakurzonych pomieszczeniach
lub w pobliżu substancji palnych.
8. W żadnym wypadku nie kłaść przedmiotów na pracującym urzą
dzeniu.
9.
Urządzenie należy podłączać wyłącznie do prądu przemiennego
o napięciu podanym na tabliczce znamionowej.
10. Urządzenia nie wolno użytkować z zewnętrznym regulatorem cza
sowym lub systemem zdalnego sterowania (np. gniazdka zdalnie
sterowane). W
W żadnym wypadku nie zanurzać urządzenia lub kabla w wodzie
11.
yjątek stanowi dołączony pilot.
lub w innych cieczach – zagrożenie dla życia!
12. W żadnym wypadku nie otwierać obudowy urządzenia – niebez
pieczeństwo porażenia prądem elektrycznym!
13.
Urządzenie przeznaczone jest wyłącznie do użycia w gospodar-
stwie domowym lub w podobnych zastosowaniach, np. aneksach
kuchennych
sklepach, biurach lub innych zakładach, do uży-
w
cia przez gości w hotelach, motelach lub innych noclegowniach,
w prywatnych pensjonatach lub domach letniskowych.
14.
Kabel należy ułożyć w taki sposób, aby nie można było się o
niego potknąć.
15. Aby uniknąć uszkodzenia kabla, nigdy nie owijać go wokół urzą
dzenia.
16.
Aby uniknąć uszkodzenia kabla, należy go wyciągać z gniazdka
zawsze trzymając za wtyczkę, a nie ciągnąc za kabel.
17. Zwrócić uwagę na to, aby używane gniazdko było łatwo dostępne,
aby w razie niebezpieczeństwa wtyczkę można było szybko
wyciągnąć.
18. Zwrócić uwagę na to, aby nie zakleszczać kabla i nie przeciągać
go po narożnikach. Może to spowodować uszkodzenie kabla.
19. W miarę możliwości nie używać przedłużaczy. Jeśli nie da się
tego uniknąć, rozwinąć całkowicie przedłużacz i nie przekraczać
mocy granicznej danego kabla.
20. Nie ustawiać urządzenia bezpośrednio pod gniazdkiem.
DE
EN
FR
NL
-
IT
ES
-
PL
-
-
Stand 3.3.2020
77 von 88

DE
Copyright UNOLD AG | www.unold.de
EN
FR
NL
IT
ES
PL
21. Nie używać urządzenia w mokrych / mokrych i zimnych lub wilgotnych pomieszczeniach – niebezpieczeństwo porażenia prą-
dem elektrycznym!
22.
Unikać silnego nasłonecznienia urządzenia.
23. Nigdy nie wkładać do środka przez otwory palców ani przedmio
tów takich jak igły, długopisy itp. – niebezpieczeństwo obrażeń!
24.
Regularnie sprawdzać urządzenie, wtyczkę i kabel pod kątem
śladów zużycia lub uszkodzenia. W przypadku uszkodzenia urzą
dzenia odesłać je w celu sprawdzenia i naprawy do naszego serwisu klienta. Niewłaściwie wykonane naprawy mogą stwarzać
znaczne
niebezpieczeństwo
dla użytkownika i prowadzą do unie-
ważnienia gwarancji.
25.
Aby uniknąć niebezpieczeństw, uszkodzony kabel może wymie-
niać wyłącznie producent lub jego serwis klienta lub też inna,
odpowiednio wykwalifikowana osoba.
26.
Aby uniknąć szkód, nie wolno urządzenia używać z akcesoriami
innych producentów lub marek.
27. Po użyciu i przed czyszczeniem należy wyciągnąć wtyczkę sie
ciową z gniazdka. W żadnym wypadku nie pozostawiać urządzenia bez nadzoru, gdy wtyczka sieciowa włożona jest do gniazdka.
Obchodzenie się ze zbiornikiem na wodę i wkładami chłodzącymi
28.
Do zbiornika na wodę należy wlewać wyłącznie wodę z kranu. Nie
używać wody destylowanej ani innych płynów.
29. Jeżeli z wkładu chłodzącego wycieka płyn chłodzący, należy go
wymienić na nowy.
30. Płyn chłodzący we wkładach chłodzących (Superabsorpcyjny
polimer) nie nadaje się do spożycia.
31. Warstwa lodu, która może powstawać na wkładach chłodzących
podczas przechowywania, nie nadaje się pod żadnym pozorem
do spożycia.
32. Przechowywać wkłady chłodzące z dala od dzieci.
-
-
-
Nigdy nie wkładać w otwory wentylatora palców lub przedmiotów takich jak igły, długopisy itp. – niebezpieczeństwo obrażeń!
Używać urządzenia
tylko ustawionego na równym, stabilnym
podłożu, aby uniknąć jego przewrócenia się.
Producent nie przejmuje odpowiedzialności za nieodpowiednie bądź wadliwe użytkowanie lub po
przeprowadzonych naprawach przez nieautoryzowane zakłady bądź niekompetentne osoby.
78 von 88
Stand 3.3.2020

OBJAŚNIENIE PRZYCISKÓW
Copyright UNOLD AG | www.unold.de
DE
EN
FR
NL
IT
1 2 3
1
WŁ./WYŁ. / ON/OFF
4
5
6
Włączenie i wyłączenie urządzenia
2
Prędkość / Speed
Ustawianie 3 różnych stopni prędkości
3
Tryb / Mode
Ustawianie żądanego trybu. Do wyboru możliwy tryb standardowy lub
naturalny.
4
Wybór wstępny czasu / Timer
Wybór czasu, po upływie którego urządzenie automatycznie wyłączy się,
możliwość ustawienia w przedziale od 1 do 8 godzin.
5
Oscylacja / Swing
Włączenie i wyłączenie funkcji obracania / oscylacji
6
Cool/Hum.
Włączenie i wyłączenie funkcji chłodzenia
PILOT
1. Ostrożnie zdjąć z pilota osłonę schowka na baterię.
2. Umieścić baterię w przewidzianym miejscu.
3. Jeśli chcą Państwo włożyć inną baterię, należy pamiętać, aby używać
wyłącznie baterii okrągłej typu CR2025.
4. Ostrożnie nasunąć osłonę z powrotem na pilota.
5. Używać zawsze baterii odpowiedniego typu.
6. Jeżeli urządzenie ustawiane jest za pomocą pilota, należy podczas ustawia-
nia trzymać pilota skierowanego zawsze w kierunku wentylatora.
ES
PL
Stand 3.3.2020
79 von 88

DE
Copyright UNOLD AG | www.unold.de
EN
FR
7. Oznaczenia przycisków na pilocie są identyczne z oznaczeniami przycisków
na urządzeniu.
8. Aby uniknąć szkód, nie należy upuścić pilota z większej wysokości.
NL
IT
ES
PL
PRZED PIERWSZYM UŻYCIEM
1. Usunąć wszystkie materiały opakowaniowe i ewentualne zabezpieczenia
transportowe. Przechowywać materiały opakowaniowe poza zasięgiem dzieci
– niebezpieczeństwo uduszenia!
2. Całkowicie rozwinąć kabel.
3. Sprawdzić, czy wszystkie części są kompletne i sprawne. Uszkodzonego
urządzenia nie należy uruchamiać, lecz zwrócić się do punktu sprzedaży lub
naszego serwisu klienta.
4. Zapoznać się ze wszystkimi funkcjami urządzenia.
5. Dostarczone wkłady chłodzące należy włożyć na co najmniej cztery godziny
do zamrażalnika.
IDEALNA LOKALIZACJA
1. Zachować dostateczną odległość bezpieczeństwa (minimum 1 metr) od
innych przedmiotów, takich jak meble, zasłony itp.
2. Urządzenie może pracować tylko w pozycji pionowej.
3. Zapewnić niezakłócony dopływ i odpływ powietrza, w żadnym wypadku nie
wolno zasłaniać wlotów i wylotów powietrza w urządzeniu.
4. Stawiać urządzenie tylko na stałym i równym podłożu. Nie stawiać urządzenia
na miękkich powierzchniach (sofa, łóżko), gdyż może ono przewrócić się.
5. Ponadto zwrócić uwagę na to, aby nie stawiać urządzenia na dywanach z
długim włosiem lub w zapylonym otoczeniu.
6. Ze względów bezpieczeństwa urządzenia nie wolno używać w pobliżu umywalek, wanien lub przyłączy wody.
7. Zwrócić uwagę na to, aby używane gniazdko było w każdej chwili łatwo
dostępne.
8. Sprawdzić, czy kabel jest ułożony w taki sposób, aby nikt nie mógł się o
niego potknąć.
9. Gdy urządzenie używane jest z funkcją wentylacji i chłodzenia, zamknąć
drzwi i okna. Gwarantuje to skuteczne, energooszczędne chłodzenie.
80 von 88
Stand 3.3.2020

ZBIORNIKI NA WODĘ
Copyright UNOLD AG | www.unold.de
DE
1. Wyłączyć urządzenie przyciskiem WŁ./WYŁ. i wyciągnąć wtyczkę sieciową z
gniazdka.
2. Wyciągnąć zbiornik z urządzenia lekko do tyłu. Zbiornika na wodę nie da się
całkiem wyjąć z urządzenia, gdyż jest w nim zamocowana pompa urządzenia.
3. Napełnić zbiornik na wodę bardzo zimną wodą, w razie potrzeby można
dodać do niej kilka kostek lodu, aby osiągnąć lepszy efekt chłodzenia.
4. Temperatura wody nie może być wyższa niż 40°C.
5. Należy wlać przynajmniej 1.000 ml wody (max. 2.000 ml), aby pompa w
zbiorniku na wodę mogła prawidłowo pracować.
6. Wsunąć zbiornik na wodę z
powrotem do urządzenia.
7. Aby całkowicie opróżnić, odb-
lokuj zbiornik wody, obracając
zatrzask blokujący na obudo-
wie w lewo lub w prawo.
8. Delikatnie wyciągnij zbiornik
wody z urządzenia.
9. Obrócić wspornik pompy
znajdujący się w zbiorniku
wody do przodu, aż pompę
można delikatnie pociągnąć
do góry.
10. Uważaj, aby nie uszkodzić ani nie poluzować kabla i węża pompy.
11. Wyjmij zbiornik na wodę i spuść wodę. Oczyść zbiornik wody szmatką i, jeśli
to konieczne, łagodnym detergentem, a następnie dokładnie wysusz zbiornik
wody wewnątrz i na zewnątrz.
12. Napełnij ponownie zbiornik na wodę, jeśli chcesz kontynuować użytkowanie
urządzenia, w przeciwnym razie wymień pusty zbiornik na wodę.
13. Postępuj w odwrotnej kolejności, aby wymienić zbiornik na wodę.
14. Upewnij się, że pompa została prawidłowo włożona i zabezpieczona klipsem
blokującym.
Uwaga: ze względów higienicznych wodę w zbiorniku na wodę należy
codziennie wymieniać, aby uniknąć tworzenia się w niej bakterii.
Nie wlewać wody bezpośrednio do urządzenia!
EN
FR
NL
IT
ES
PL
Stand 3.3.2020
81 von 88

DE
Copyright UNOLD AG | www.unold.de
WKŁADY CHŁODZĄCE
EN
FR
NL
IT
ES
PL
1. W razie potrzeby obydwa dostarczone wkłady chłodzące można zamrozić
w zamrażalniku, po czym włożyć do zbiornika na wodę, aby osiągnąć jeszcze lepszy efekt chłodzenia. Zalecamy używać zawsze jednego wkładu
chłodzącego, a drugi przechowywać w zamrażalniku na następny dzień.
2. Zbiornik na wodę należy wcześniej napełnić wodą.
3. Zbiorniki chłodzące zawierają specjalny granulat, który zapewnia wyższą
wydajność chłodzenia akumulatorów
chłodzących.
4. Otwórz zakrętkę akumulatora.
5. Napełnij akumulator chłodzący wodą z
kranu do oznaczenia.
6. Ostrożnie zamknij akumulator i umieść
go w zamrażarce na kilka godzin.
7. Włożyć wkład chłodzący do zbiornika
na wodę. Zwrócić uwagę na to, że po
włożeniu wkładu chłodzącego poziom
wody podwyższa się. Poziom wody nie
może przekroczyć oznaczenia „max”.
Zamknąć zbiornik na wodę w sposób opisany w poprzednim rozdziale.
8. Uwaga: przy bardzo wysokich temperaturach na zbiorniku na wodę mogą
powstawać skropliny, które mogą kapać na podłogę. Chronić podłogę w
odpowiedni sposób.
82 von 88
Stand 3.3.2020

WŁOŻENIE FILTRA
Copyright UNOLD AG | www.unold.de
DE
1. Filtr musi być zawsze włożony, gdy używana jest funkcja chłodzenia powie-
trza, aby uniknąć uszkodzenia urządzenia. Po użyciu urządzenia zawsze
zaczekać, aż filtr będzie całkiem suchy, po czym odłożyć go do przechowania. W innym wypadku podczas następnego użycia z filtra może wydobywać
się stęchły zapach.
2. Przed czynnościami przy filtrze należy zawsze najpierw wyłączyć urządzenie
i wyciągnąć wtyczkę sieciową z gniazdka.
Wyjęcie
3. Sięgnąć w obydwie wypustki w osłonie filtra i wyciągnąć osłonę filtra z
urządzenia.
Włożenie
4. Umieścić filtr najpierw na dole we wkładzie, po czym zatrzasnąć go u góry
(patrz rysunek). Sprawdzić, czy filtr jest prawidłowo osadzony, aby uniknąć
uszkodzenia urządzenia.
5. W razie potrzeby możesz zamówić filtr wymienny w naszym dziale obsługi
klienta (formularz zamówienia na stronie 87).
EN
FR
NL
IT
ES
PL
Mat filtr
Stand 3.3.2020
83 von 88
DE
Copyright UNOLD AG | www.unold.de
OBSŁUGA
EN
FR
NL
IT
ES
PL
1. Wskazówka: z funkcji wentylacji można korzystać również bez funkcji
chłodzenia.
2. Upewnić się, że urządzenie jest ustawione na odpowiednim i równym podłożu
w sposób pewny i stabilny.
3. Włożyć wtyczkę do gniazdka.
4. Nacisnąć teraz jeden raz przycisk „WŁ./WYŁ.”. Urządzenie uruchamia się.
W ustawieniu podstawowym urządzenie pracuje z niską prędkością w trybie
normalnym.
Ustawianie prędkości
5. Nacisnąć kilkakrotnie przycisk „Prędkość“, aż urządzenie będzie pracować
z żądaną prędkością. Wybrane ustawienie sygnalizowane jest odpowiednią
lampką kontrolną:
Niedrige Geschwindigkeit: Low
Mittlere Geschwindigkeit: Med
Hohe Geschwindigkeit: High
Funkcja obracania / oscylacja
6. Nacisnąć przycisk „Oscylacja“, aby włączyć funkcję obracania wylotu powietrza. Po ponownym naciśnięciu tego przycisku urządzenie zatrzymuje się w
aktualnej pozycji, przy czym wentylator nadal pracuje.
Wybór wstępny czasu
7. Za pomocą przycisku „Wybór wstępny czasu“ można wybrać żądany czas
pracy urządzenia. Jest to możliwe w zakresie 1, 2, 4 i 8 godzin. Naciskać
przycisk „Wybór wstępny czasu“ tak długo, aż na wyświetlaczu pojawi się
żądana liczba godzin. Po upływie tego czasu urządzenie automatycznie
wyłącza się. Jeśli nie zostanie wybrany czas, urządzenie pracuje bez przerwy.
Ustawianie trybu
8. Nacisnąć przycisk „Tryb“ i wybrać żądany rodzaj pracy. Wybrać można
między trybem standardowym, naturalnym (urządzenie pracuje ze zmienną
prędkością zbliżoną do naturalnego ruchu powietrza) i nocnym (urządzenie
pracuje ze zmienną prędkością, zmieniającą się od wysokiej do niskiej).
Nacisnąć kilkakrotnie przycisk „Mode“, aż zapali się odpowiednia lampka
kontrolna, sygnalizująca żądane ustawienie.
84 von 88
Stand 3.3.2020

Włączenie funkcji chłodzenia powietrza
Copyright UNOLD AG | www.unold.de
9. Upewnić się, że w zbiorniku na wodę znajduje się wystarczająca ilość wody.
10. Nacisnąć jeden raz przycisk „Cool/Hum“.
11. Pompa w zbiorniku na wodę włącza się i woda w zbiorniku na wodę przepływa
przez filtr w tyle urządzenia, aby schłodzić cyrkulujące powietrze.
12. Jeżeli zbiornik na wodę jest pusty, napełnić go wodą w sposób opisany w
rozdziale „Zbiornik na wodę”.
13. Nie wyciągać zbiornika na wodę z urządzenia, gdy włączona jest funkcja
chłodzenia powietrza. W innym przypadku może dojść do uszkodzenia
urządzenia przez wodę we wnętrzu urządzenia.
14. Ponownie nacisnąć przycisk „Cool/Hum“, aby wyłączyć funkcję.
Wyłączenie
Wskazówka: zalecamy najpierw wyłączyć chłodzenie powietrzem i pozwolić, aby
funkcja wentylatora działała jeszcze kilka minut. Dzięki temu filtr szybciej wysycha.
15. Nacisnąć ponownie przycisk „WŁ./WYŁ.“ na urządzeniu lub pilocie, aby
wyłączyć urządzenie. Wyciągnąć wtyczkę z gniazdka, gdy urządzenie nie jest
używane.
16. Następnie wyjąć filtr i zaczekać, aż całkowicie wyschnie przed ponownym
użyciem urządzenia.
CZYSZCZENIE I PRZECHOWYWANIE
DE
EN
FR
NL
IT
ES
PL
Wyłączyć urządzenie przez naciśnięcie przycisku „WŁ./WYŁ.“ i
wyciągnąć wtyczkę z gniazdka.
W żadnym wypadku nie zanurzać urządzenia w wodzie. Silnik i
podzespoły elektryczne urządzenia nie mogą się zmoczyć.
1. Z zasady nie używać ostrych środków szorujących, wełny stalowej, metalowych
przedmiotów, gorących środków czyszczących ani środków dezynfekujących.
2. Wytrzeć obudowę i kratkę wentylatora lekko wilgotną ściereczką.
3. Przed dłuższym przechowywaniem należy opróżnić zbiornik na wodę (patrz
rozdział „Zbiornik na wodę”).
4. Wyjąć filtr i zaczekać do jego całkowitego wyschnięcia, inaczej podczas
następnego użycia będzie ulatniać się stęchły zapach.
5. Urządzenie należy przechowywać ustawione prosto, w suchym i niezakurzonym miejscu. Chronić urządzenie przed wysoką i niską temperaturą.
Stand 3.3.2020
85 von 88
DE
Copyright UNOLD AG | www.unold.de
EN
6. Nie przechowywać żadnych innych przedmiotów na urządzeniu. W innym
wypadku może dojść do uszkodzenia urządzenia.
FR
NL
IT
ES
PL
WARUNKI GWARANCJI
Udzielamy na nasze produkty 24 miesięcznej gwarancji od daty zakupu (warunkiem jest zachowanie faktury
zakupu lub paragonu) na szkody, które przy użytkowaniu zgodnym z przeznaczeniem wskazują na wadę fabrycz-
ną. W czasie trwania gwarancji usuniemy wady materiałowe bądź fabryczne zgodnie z naszym osądem poprzez
naprawę lub wymianę. Gwarancja udzielana jest na produkty sprzedawane na terenie Niemiec i Austrii. W innych
krajach proszę zwrócić się do właściwego Importera. Urządzenia, w których wymagane jest usunięcie wady,
proszę przesłać razem z kopią faktury zakupu, na której musi być widoczna data zakupu, z załączonym opisem
wady, w oryginalnym pudełku, dobrze zapakowane i na własny koszt na adres serwisu. Gwarancja nie obejmuje
szkód wynikających ze zużycia, użytkowania niezgodnie z przeznaczeniem i nieprzestrzegania wskazówek doty-
czących konserwacji i pielęgnacji. Roszczenie gwarancji wygasa, jeżeli naprawa bądź otwarcie przedmiotu będą
przeprowadzone przez stronę trzecią. Ewentualne roszczenia użytkownika końcowego wobec sprzedawcy/dealera
nie są ograniczone tą gwarancją.
UTYLIZACJA / OCHRONA ŚRODOWISKA
Nasze urządzenia wyprodukowane zostały na wysokim poziomie do długiego użytkowania. Regu-
larna konserwacja i fachowe naprawy poprzez nasz serwis mogą wydłużyć pracę urządzenia. W
razie kiedy urządzenie jest uszkodzone i nie nadaje się do naprawy, proszę przestrzegać zaleceń:
Ten produkt nie może być zutylizowany razem z normalnymi odpadami domowymi. Muszą Pań-
stwo dostarczyć ten produkt do zbiorczego punktu recyklingowego dla urządzeń elektrycznych i
elektronicznych. Poprzez oddzielne zbieranie i recykling odpadów pomagają Państwo chronić na-
turalne zasoby i sprawiają, że ten produkt będzie zutylizowany w sposób bezpieczny dla zdrowia
i środowiska naturalnego.
Zużyte baterie nie należą do śmieci i odpadów z gospodarstw domowych. Należy
je usuwać za pośrednictwem sklepów elektronicznych lub komunalnych placó-
wek zbiorczych.
86 von 88
Stand 3.3.2020

BESTELLFORMULAR ERSATZTEILE
Copyright UNOLD AG | www.unold.de
DE
Bitte senden Sie das ausgefüllte Bestellformular an:
Abteilung Service
Mannheimer Straße 4
68766 Hockenheim
Anrede Telefon
Vorname
Name Telefax
Straße/Nr.
PLZ/Ort E-Mail
BESTELLUNG Modell Air Cooler 86690
Stück
Art.-Nr.
8699025 Filtermatte
Bezeichnung
EN
FR
NL
IT
ES
PL
Es gelten unsere AGB. Die Verarbeitung Ihrer personenbezogenen Daten richtet sich nach den Regelungen der
Europäischen Datenschutzgrundverordnung. Weitere Hinweise erhalten Sie unter http://www.unold.de/datenschutz/
und http://www.unold.de/agb/
Aktuelle Preise und Informationen erhalten Sie auf unserer Internetseite unter www.unold.de oder telefonisch bei
unserem Service.
Stand 3.3.2020
87 von 88
Aus dem Hause
Copyright UNOLD AG | www.unold.de
Aus dem Hause
 Loading...