


 Loading...
1. Charging operation
 How to charge
■ Charging equipment and names
|
|
|
|
|
|
|
|
|
|
|
|
|
|
|
|
|
|
|
|
|
|
|
|
|
|
|
|
|
|
|
|
|
|
|
|
|
|
|
|
|
|
|
|
|
|
|
|
|
|
|
|
|
|
|
|
|
|
|
|
|
|
|
|
|
|
|
|
|
|
|
|
|
|
|
|
|
|
|
|
|
|
|
|
|
|
|
|
|
|
|
|
|
|
|
|
|
|
|
|
|
|
|
|
|
|
|
|
|
|
|
|
|
|
|
|
|
|
|
|
|
|
|
|
|
|
|
|
|
|
|
|
|
|
|
|
|
|
|
|
|
|
|
|
|
|
|
|
|
|
|
|
|
|
|
|
|
|
|
|
|
|
|
|
|
|
Charging indicator |
|
|
|
|
Charging port |
||||||||
|
|
|
|
|
||||||||||
|
Charging inlet |
|
|
|
|
Charging cable |
||||||||
|
|
|
|
|
||||||||||
|
Charging port lid |
|
|
|
|
|
|
|
||||||
|
|
|
|
|
|
|
|
|||||||
2
PLUG-IN QG_U (OM47747U)

1. Charging operation
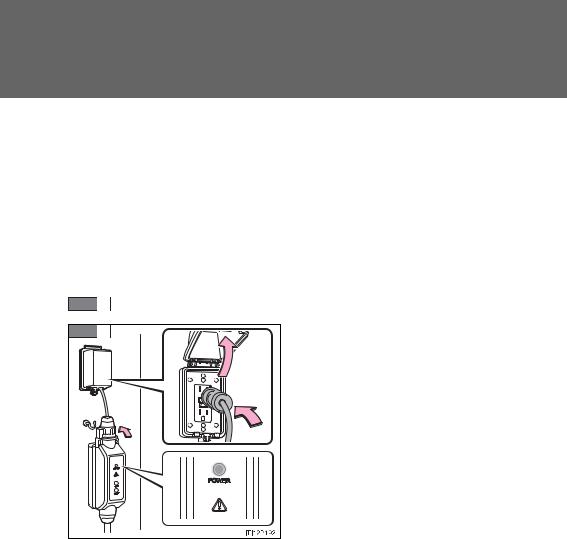
■ The names of each part of the charging cable
|
Charging connector |
|
Power indicator |
|
|
||
|
Latch release button |
|
Error warning indicator |
|
|
||
|
CCID (Charging Circuit Inter- |
|
Test button |
|
|
||
|
rupting Device) |
|
Reset button |
|
|
||
|
Plug* |
|
|
|
|
|
*: The shape of the plug differs in accordance with the voltage and the target region.
3
PLUG-IN QG_U (OM47747U)
1.Charging operation
■Confirm the following before recharging
●The parking brake is applied.
●Lights such as the headlights, emergency flashers and interior lights etc. are switched off.
If these light switches are turned ON, then these features will consume electricity, and recharging time will increase.
●The “POWER” switch is OFF.
■How to charge
STEP 1 Prepare the charging cable.
STEP 2 |
Insert the charging cable into the outlet of the external power source.
Make sure to hold the body of the plug and insert it firmly into the outlet.
Check that the power indicator of the CCID (Charging Circuit Interrupting Device) is illuminated.
In order to lessen the load on the outlet and plug, hang the CCID (Charging Circuit Interrupting Device) on a hook etc. while the plug is inserted.
4
PLUG-IN QG_U (OM47747U)

STEP 3
1. Charging operation
Press the test button on the CCID (Charging Circuit Interrupting Device) to check that the electrical leakage detection function operates properly.
If the error warning indicator illuminates when the test button is pressed, the function is operating correctly.
After the test has been completed, press the reset button to turn off the error warning indicator. Charging cannot be carried out while the error warning indicator is illuminated.
If the error warning indicator does not come on even if the test button is pressed, it is likely that the function is not operating correctly. Stop charging immediately and contact your Toyota dealer.
5
PLUG-IN QG_U (OM47747U)

1. Charging operation
STEP 4 |
Press the charging port lid to open.
The charging inlet light will illuminate.
STEP 5 |
Remove the charging connector |
|
cap. |
|
Affix the cap to the cable. |
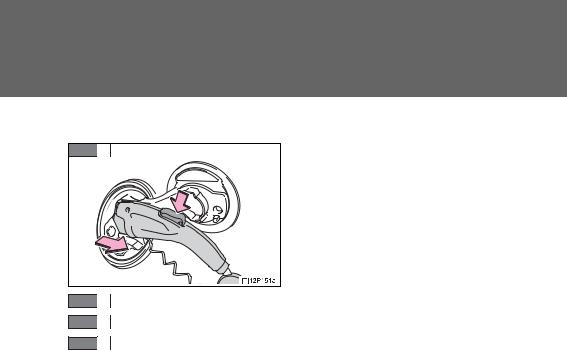
STEP 6 |
Insert the charging cable into the charging inlet.
When inserting, make sure not to press the latch release button.
Align with the guide position shown on the underside of the charging connector, and push in until a click is heard.
6
PLUG-IN QG_U (OM47747U)

STEP 7 |
1. Charging operation
Confirm that the charging indicator is illuminated. (When the charging timer function is in use, the light will turn off several seconds after illuminating.)
Charging cannot be started if the charging indicator does not illuminate when the charging cable is inserted.
The amount of time until charging is completed can be checked on the energy monitor by turning the “POWER” switch to ON mode.
The charging indicator will turn off when charging is completed.
7
PLUG-IN QG_U (OM47747U)
1.Charging operation
■After charging
STEP 1 |
Pull the charging connector towards you while pressing the latch release button.
If the charging connector is disconnected during charging (while the charging indicator is on), charging will be interrupted.
STEP 2 Attach the charging connector cap.
STEP 3 Close the charging port lid.
STEP 4 Remove the plug from the outlet when the charging equipment will not be used for a prolonged period of time.
Hold the body of the plug when removing.
Make sure to put the cable away immediately after disconnecting.
When leaving the plug inserted, inspect the plug and connector once a month to check if dirt or dust has accumulated.
8
PLUG-IN QG_U (OM47747U)

1. Charging operation
■ Charging timer function
By using the charging timer function, deterioration of the hybrid battery (traction battery) charge can be suppressed, and off-peak electricity can be used effectively.
●A charging time can be assigned by setting the charging start time or finish time.
●Once the time has been set, the time can be assigned again next time simply by pressing the charging timer switch.
■ Setting the charging timer function
STEP 1 |
Stop the vehicle and press the charging timer switch.
The multi-information display will switch to timer charging time display.
If not changing the set time: go to
STEP 6
STEP 2 |
Press and hold the charging timer switch.
The time display will change from solid to flashing.
9
PLUG-IN QG_U (OM47747U)

1. Charging operation
STEP 3 |
Press the charging timer switch |
|
to select a setting mode. |
|
Start time setting mode |
|
Finish time setting mode |
|
The mode will switch with each |
|
press of the charging timer |
|
switch. |
STEP 4 |
Adjust the set time using the time |
|
adjustment button. |
|
Adjust hours. |
|
Adjust minutes. |
|
Round to the nearest hour.* |
|
*: e.g. 1:00 to 1:29 → 1:00 |
|
1:30 to 1:59 → 2:00 |
STEP 5 |
Press and hold the charging timer switch.
Once set, the time display will change from flashing to solid, and the charging timer indicator on the instrument cluster will come on.
10
PLUG-IN QG_U (OM47747U)

1. Charging operation
STEP 6
STEP 7
Turn the “POWER” switch off.
The charging timer indicator will start flashing.
Connect the charging cable to the vehicle.
Check that the charging indicator (→P. 2) has come on. It will turn off after several seconds.
If the indicator does not come on, re-insert the charging connector. If it still does not come on, check the power supply status using the power indicator on the CCID (Charging Circuit Interrupting Device).
■ Canceling the charging timer function
If the charging timer switch is pressed while the charging timer indicator is illuminated or flashing, the charging timer function will be canceled. Charging will commence immediately if the charging cable is connected to the vehicle.
The charging timer indicator will turn off if the charging timer function is canceled.
11
PLUG-IN QG_U (OM47747U)
1. Charging operation
■ Displays shown on the multi-information display
Each type of information related to recharging is displayed on the multi-information display.
 Time until charging is complete
 Charging messages
If the “POWER” switch is turned to ON mode during charging, the current charging status and the amount of time needed until charging is complete will be displayed on the energy monitor.
After confirming, switch the “POWER” switch to OFF and turn off the display. The “POWER” switch will turn off automatically after several tens of seconds.
The first time the “POWER” switch is turned to ON mode after charging is completed, a message detailing the results of the charging will be displayed. Also, if an operation which cannot be carried out is attempted during charging, a warning message will be displayed.
Comply with the instructions in the message and carry out any necessary operations.
The message may not be displayed if the Remote Air Conditioning System has been used.
12
PLUG-IN QG_U (OM47747U)

1. Charging operation
■ Inspecting the electrical leakage detection function
For safety, inspect the charging cable on a routine basis (at least once a month).
Check that the electrical leakage detection function operates properly by following the procedure below.
In the unlikely event that the electrical leakage detection function does not operate properly, contact your Toyota dealer as soon as possible.
STEP 1 Insert the charging cable into the outlet of the external power source.
STEP 2 |
Press the test button on the |
|
CCID (Charging Circuit Interrupt- |
|
ing Device). |
If the error warning indicator illuminates when the test button is pressed, the function is operating correctly.
STEP 3 Press the reset button on the CCID (Charging Circuit Interrupting Device).
Turn off the error warning indicator. Charging cannot be carried out while the error warning indicator is illuminated.
Charging can be continued by following the normal procedure. If not charging, put away the charging cable.
13
PLUG-IN QG_U (OM47747U)

1.Charging operation
■Safety functions
●The hybrid system will not start while the charging cable is attached to the vehicle, even if the “POWER” switch is operated.
●If the charging cable is connected while the “READY” indicator is illuminated, the hybrid system will stop automatically and driving will not be possible.
●When the charging cable is connected to the vehicle, the shift position cannot be changed from P to another position.
●If the latch release button is pressed, charging will not begin even if the charging cable is connected.
Also, charging will be stopped if the latch release button is pressed and held for several seconds during charging. When restarting charging, reinsert the charging connector after pulling it out, and check that the charging indicator illuminates.
14
PLUG-IN QG_U (OM47747U)

1. Charging operation
 CAUTION
■When charging
Follow these points when charging. If you do not follow them, fire or electrical shock may occur, possibly resulting in death or serious injury.
●Connect to a power source suitable for charging.
●Check that the outlet, charging cable and charging inlet are not damaged.
●Check that the tips of the plug have not been deformed.
●If the plug is dirty or dusty, clean it before inserting.
●Plugging into the outlet that is located in a spot that is not high above the ground or floor is recommended.
●Insert the plug firmly into the outlet.
●Do not touch the electrical terminals of the charging connector or short it with foreign objects.
●Do not get water in the charging inlet.
Do not wash the vehicle while the charging cable is connected to the vehicle.
●Do not touch metal objects or pointed objects (needles etc.) to the port of the charging inlet.
●Do not charge if the charging cable is coiled or bundled.
●Wrapping 120 V charging cable while in-use is not recommended because cable may overheat. Failure to rewrap charging cable when not in-use could result in strangulation or tripping hazard.
●After connecting the charging cable, confirm that it is not bent.
●Do not place heavy objects on the charging cable.
●If charging is interrupted, remove the charging connector before removing the plug.
15
PLUG-IN QG_U (OM47747U)

1. Charging operation
 CAUTION
■When charging
●When charging outdoors, make sure to connect to a weatherproof outlet for outdoor use.
Also, if rain falls during charging, take care that rainwater does not run along the length of cable and enter the outlet.
●Do not insert the plug if the outlet is submerged in water or snow.
If the plug has already been inserted and it is necessary to remove it, first switch the circuit breaker OFF, then remove the plug.
●Follow these points when charging while it is raining or snowing.
•Check that no snow, water or ice has accumulated around the charging connector terminals and the vehicle charging inlet. Tap snow, water or ice gently from connector prior to inserting charging connector into the vehicle’s charging inlet.
•Do not connect the plug if your hands are wet. Also, do not get the plug or outlet wet.
●Do not charge the vehicle during a lightning storm.
■After charging
Remove the plug if it will not be used for a long time.
Dirt and dust may accumulate plug or outlet, which could cause a malfunction or fire, possibly leading to death or serious injury.
16
PLUG-IN QG_U (OM47747U)

1. Charging operation
 CAUTION
■Power sources precautions
Observe the following precautions.
If you do not follow them, fire, electrical shock or damage may occur, possibly resulting in death or serious injury.
●Connect to an AC 120 V outlet (NEMA 5-15R) with a Ground-Fault CircuitInterrupter (GFCI) supplied by a circuit breaker per your local code. Use of a 15A individual circuit is strongly recommended.
●Do not connect the charging cable to a multi-outlet adapter, multi-plugs, or conversion plug.
ITO12P109
ITO12P110 |
●Connecting the charging cable to an extension cord is strictly prohibited. The extension cord may overheat and does not contain a Ground-Fault CircuitInterrupter (GFCI).
●Do not connect to a power strip.
●Use of a block heater for charging is prohibited.
17
PLUG-IN QG_U (OM47747U)

1. Charging operation
 CAUTION
■Battery charger
Observe the following precautions. The battery charger is located under the luggage compartment.
Failure to do so may cause death or serious injury from burns or electric shocks.
●Do not touch the battery charger during charging, as it becomes hot.
●Do not disassemble, repair or modify the battery charger. If repair is necessary, consult your Toyota dealer.
■Routine inspection
Check the following points regularly.
If use is continued without inspection, fire or electric shock may occur, possibly resulting in death or serious injury.
●The charging cable, plug, charging connector, CCID (Charging Circuit Interrupting Device) etc. have not been damaged
●The outlet has not been damaged
●The plug does not get extremely hot during use
●The tip of the plug has not been deformed
●The plug is not dirtied by dust etc.
Inspect the plug after removing it from the outlet.
■Maintaining the charging cable
When the cable is dirty, first remove the dirt with a hard, wringed cloth, and then wipe the cable with a dry cloth. Do not wash with water, as doing so could cause a fire or electrical shock when charging, which could lead to death or serious injury.
■When not using the charging cable for a long time
Remove the plug from the outlet. Dust could accumulate on the plug or in the outlet, possibly causing overheating which could lead to a fire.
Also, keep the cable in a place free from moisture.
18
PLUG-IN QG_U (OM47747U)

2. Plug-in Hybrid Applications
Plug-in Hybrid Applications is a service for plug-in hybrid vehicles.
These are added to the Safety Connect and Entune products.
The contents provide charge support, comfort support and drive support via the vehicle’s navigation system and the owner’s Smartphone.
Both of the following accounts are required for the services.
●Active Safety Connect account
●Active Toyota Entune account
 Plug-in Hybrid Applications operation
The following functions can be used with the navigation system.
●Download of nearby charging stations to the map screen (Type A)
●View list of nearby charging stations and corresponding charging station information (such as voltage supported) (Type B)
The function of Type B is a function added to Entune.
For details about the function, refer to http://www.toyota.com/entune/.
19
PLUG-IN QG_U (OM47747U)
3. Basic operation
 How to operate the Remote Air Conditioning System
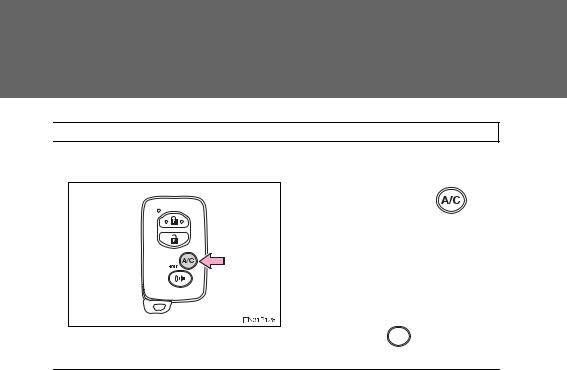
■ Activating the Remote Air Conditioning System
Press and hold the |
to |
operate the Remote Air Conditioning System.
The system will shut off if a door is opened.
The system can be stopped by
pressing the 
 twice.
■Operating conditions
The system will only operate if all of the following conditions are met:
●The shift position is in P.
●The “POWER” switch is OFF.
●All doors are closed.
●The hood is closed.
●The brake pedal is not being depressed.
20
PLUG-IN QG_U (OM47747U)
3. Basic operation
 How to operate unlocking and locking the doors
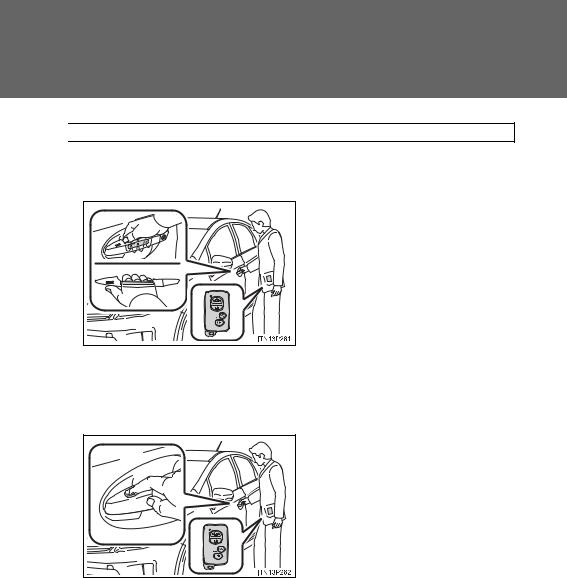
■Front door handles (including front passenger door handle if equipped with entry function)
Grip the driver’s door handle to unlock the door. Grip the passenger’s door handle to unlock all the doors.*
Make sure to touch the sensor on the back of the handle.
The doors cannot be unlocked for 3 seconds after the doors are locked.
*: The door unlock settings can be changed. (Refer to “Owner’s Manual”.)
Touch the lock sensor (the indentation on the upper part of the door handle) to lock the doors.
21
PLUG-IN QG_U (OM47747U)
3.Basic operation
■Back door (vehicles with entry function of front and back doors)
Press the unlock button to unlock all the doors.
The doors cannot be unlocked for 3 seconds after the doors are locked.
Press the lock button to lock all the doors.
22
PLUG-IN QG_U (OM47747U)

3. Basic operation
 How to operate the power (ignition) switch
■ Starting the hybrid system
STEP 1 Check that the charging cable is disconnected. STEP 2 Check that the parking brake is set.
STEP 3 Firmly depress the brake pedal.
Check that the “POWER” switch indicator turns green. If the indicator does not turn green, the hybrid system cannot be started.
When the shift position is N, the hybrid system cannot start. Shift the shift position to P when starting the hybrid system.
STEP 4 |
Press the “POWER” switch.
The hybrid system can be started from any “POWER” switch mode.
Continue depressing the brake pedal until the hybrid system is completely started.
STEP 5 Check that the “READY” indicator is on.
If the “READY” indicator changes from a flashing light to a solid light and the buzzer sounds, the hybrid system is starting normally.
The vehicle will not move when the “READY” indicator is off.
The vehicle can move when the “READY” indicator is on even if the engine is stopped. (The gasoline engine starts or stops automatically in accordance with the state of the vehicle.)
23
PLUG-IN QG_U (OM47747U)

3. Basic operation
■ Stopping the hybrid system
STEP 1 Stop the vehicle completely. STEP 2 Set the parking brake.
STEP 3 |
Shift the shift position to P. |
|
Check that the shift position indi- |
|
cator shows P. |
STEP 4 Press the “POWER” switch.
The hybrid system will stop.
STEP 5 Slowly release the brake pedal and check that the indicator on the “POWER” switch is off.
24
PLUG-IN QG_U (OM47747U)

3. Basic operation
■ Changing “POWER” switch modes
Modes can be changed by pressing the “POWER” switch with the brake pedal released. (The mode changes each time the switch is pressed.)
 Off
Off
The emergency flashers can be used.
 ACCESSORY mode
Some electrical components such as the audio system can be used.
The “POWER” switch indicator turns amber.
 ON mode
All electrical components can be used.
The “POWER” switch indicator turns amber.
25
PLUG-IN QG_U (OM47747U)

3. Basic operation
 Shift lever operation
■ Starting procedure
STEP 1 |
When the “READY” indicator comes on, shift the shift position to D or R and release it with the brake pedal depressed. The D or R position is selected and the lever returns to its home position. Confirm which position is selected with the shift position indicator in the instrument cluster.
STEP 2
Release the parking brake and your foot from the brake pedal gradually, and then start the vehicle by depressing the accelerator pedal gently.
26
PLUG-IN QG_U (OM47747U)

■ Stopping procedure
STEP 1
3. Basic operation
Stop the vehicle completely by depressing the brake pedal and then apply the parking brake.
STEP 2 |
Shift the shift position to P. Check that the shift position indicator on the instrument cluster is in P, and release the brake pedal gently after applying the parking brake.
27
PLUG-IN QG_U (OM47747U)

3.Basic operation
■About engine braking
When shift position B is selected, releasing the accelerator pedal will apply engine braking.
●When the vehicle is driven at high speeds, compared to ordinary gaso- line-fueled vehicles, the engine braking deceleration is felt less than that of other vehicles.
●The vehicle can be accelerated even when shift position B is selected.
If the vehicle is driven continuously in the B position, fuel efficiency will become low. Usually, shift the shift position to D.
 NOTICE
■Hybrid battery (traction battery) charge
If the shift position is in N, the hybrid battery (traction battery) will not be charged. To help prevent the battery from discharging, avoid leaving the N position selected for an extended period of time.
28
PLUG-IN QG_U (OM47747U)
3. Basic operation
 How to operate the wipers and washers
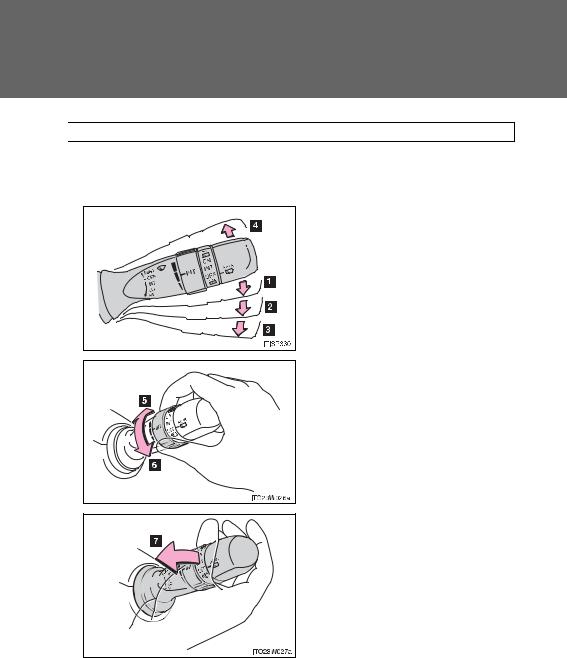
■ Windshield wipers and washer
Type A
 Intermittent wiper operation
 Low speed wiper operation
 High speed wiper operation
 Temporary operation
 Increases the intermittent windshield wiper frequency
  Decreases the intermittent windshield wiper frequency
 Washer/wiper dual operation
Wipers operate automatically.
29
PLUG-IN QG_U (OM47747U)

3. Basic operation
Type B
 Intermittent wiper operation
 Low speed wiper operation
 High speed wiper operation
 Temporary operation
 Increases the intermittent windshield wiper frequency
  Decreases the intermittent windshield wiper frequency
 Washer/wiper dual operation
Wipers operate automatically.
30
PLUG-IN QG_U (OM47747U)

3. Basic operation
■ Rear window wiper and washer
Type A
 Intermittent window wiper
operation
 Normal window wiper opera-
tion
 Washer/wiper dual operation
 Washer/wiper dual operation
Type B
 Intermittent window wiper operation
 Normal window wiper operation
 Washer/wiper dual operation
 Washer/wiper dual operation
31
PLUG-IN QG_U (OM47747U)
Loading...