


 Loading...
Display Audio System

 PT546-1C182
Owner’s Manual
for AM/FM/HD Radio™ broadcast/Aha Audio/iPod/ USB/Bluetooth Audio
1

Information to User
Alteration or modifications carried out without appropriate authorization may invalidate the user’s right to operate the equipment.
FCC ID: AJDK068
This device complies with part 15 of the FCC Rules. Operation is subject to the following two conditions: (1) This device may not cause harmful interference, and (2) this device must accept any interference received, including interference that may cause undesired operation.
This transmitter must not be co-located or operated in conjunction with any other antenna or transmitter.
The antenna for Bluetooth® cannot be removed (or replaced) by user.
[For 2.4 GHz Radio Transmitters]
This equipment complies with FCC radiation exposure limits set forth for an uncontrolled environment and meets the FCC radio frequency (RF) Exposure Guidelines. This equipment has very low levels of RF energy that it deemed to comply without maximum permissive exposure evaluation (MPE). But it is desirable that it should be installed and operated keeping the radiator at least 20 cm or more away from person’s body.
This equipment has been tested and found to comply with the limits for a Class B digital device, pursuant to Part 15 of the FCC Rules. These limits are designed to provide reasonable protection against harmful interference in a residential installation.
2

This equipment generates, uses and can radiate radio frequency energy and, if not installed and used in accordance with the instructions, may cause harmful interference to radio communications. However, there is no guarantee that interference will not occur in a particular installation. If this equipment does cause harmful interference to radio or television reception, which can be determined by turning the equipment off and on, the user is encouraged to try to correct the interference by one or more of the following measures:
-Reorient or relocate the receiving antenna.
-Increase the separation between the equipment and receiver.
-Connect the equipment into an outlet on a circuit different from that to which the receiver is connected.
-Consult the dealer or an experienced radio/TV technician for help.
USE OF CONTROL OR ADJUSTMENT OR PERFORMANCE OF PROCEDURES OTHER THAN THOSE SPECIFIED HEREIN MAY RESULT IN HAZARDOUS RADIATION EXPOSURE.
THE USE OF OPTICAL INSTRUMENTS WITH THIS PRODUCT WILL INCREASE EYE HAZARD.
3
4

TABLE OF CONTENTS
1 |
|
QUICK GUIDE |
13 |
|
|
|
|
2 |
|
AUDIO SYSTEM |
20 |
|
|
|
|
3 |
|
VOICE COMMAND SYSTEM |
77 |
|
|
|
|
4 |
|
Bluetooth® HANDS-FREE SYSTEM |
85 |
|
|
|
|
5 |
|
SETUP |
109 |
|
|
|
|
|
|
SPECIFICATIONS / INDEX |
137 |
5

Introduction
This manual explains the operation of the Display Audio system. Please read this manual carefully to ensure proper use.
The screen shots in this document and the actual screens of the Display Audio system differ depending on whether the functions and/or a contract existed at the time of producing this document.
6
SYMBOLS USED IN ILLUSTRATIONS
Safety symbol
The symbol of a circle with a slash through it means “Do not”, “Do not do this” or “Do not let this happen”.
Arrows indicating operations
 Indicates the action (pushing, turning, etc.) used to operate switches and other devices.
 Indicates the outcome of an operation (e.g. a lid opens).
HOW TO READ THIS MANUAL
|
|
|
|
|
|
|
|
|
|
|
|
|
|
|
|
|
|
|
|
|
|
|
|
|
|
|
|
|
|
|
|
|
|
|
|
|
|
|
|
|
|
|
|
|
|
|
|
|
|
|
|
|
|
|
|
|
|
|
|
|
|
|
|
|
|
|
|
|
|
|
|
|
|
|
|
|
|
|
|
|
|
|
|
|
|
|
|
|
|
|
|
|
|
|
|
|
|
|
|
|
|
|
|
|
|
|
|
|
|
|
|
|
|
|
|
|
|
|
|
|
|
|
|
|
|
|
|
|
|
|
|
|
|
|
|
|
|
|
|
|
|
|
|
|
|
|
|
|
|
|
|
|
|
|
|
|
|
|
|
|
|
|
|
|
|
|
|
|
|
|
|
|
|
|
|
|
|
|
|
|
|
|
|
|
|
|
|
|
|
|
|
|
|
|
|
|
|
|
|
|
|
|
|
|
|
|
|
|
|
|
|
|
|
|
|
|
|
|
|
No. |
Name |
|
Description |
|||||||
|
|
|
|
|
|
|
|
|
|
|
|
|
|
|
Operational Outlines |
An outline of the operation is explained. |
|||||
|
|
|
|
|||||||
|
|
|
|
Main Operations |
The steps of an operation are explained. |
|||||
|
|
|
|
|||||||
|
|
|
|
Related Operations |
A main operation’s supplementary operations are described. |
|||||
|
|
|
|
|||||||
|
|
|
|
Information |
Useful information for the user is described. |
|||||
|
|
|
|
|||||||
|
|
|
|
|||||||
|
|
|
|
|
|
|
|
|
|
|
|
|
|
|
|
|
|
|
|
|
|
7

IMPORTANT INFORMATION ABOUT THIS MANUAL
For safety reasons, this manual indicates items requiring particular attention with the following marks.
 CAUTION
This is a warning against anything which may cause injury to people if the warning is ignored. You are informed about what you must or must not do in order to reduce the risk of injury to yourself and others.
 NOTICE
This is a warning against anything which may cause damage to the vehicle or its equipment if the warning is ignored. You are informed about what you must or must not do in order to avoid or reduce the risk of damage to your vehicle and its equipment.
SAFETY INSTRUCTION
To use this system in the safest possible manner, follow all the safety tips shown below.
Do not use any feature of this system to the extent it becomes a distraction and prevents safe driving. The first priority while driving should always be the safe operation of the vehicle. While driving, be sure to observe all traffic regulations.
Prior to the actual use of this system, learn how to use it and become thoroughly familiar with it. Read the entire Display Audio system Owner’s manual to make sure you understand the system. Do not allow other people to use this system until they have read and understood the instructions in this manual.
For your safety, some functions may become inoperable when driving. Unavailable screen buttons are dimmed.
 CAUTION
For safety, the driver should not operate the Display Audio system while he/she is driving. Insufficient attention to the road and traffic may cause an accident.
8
To ensure the correct audio system operation
Do not allow this unit to come into contact with liquids. Electrical shock could result. Also, damage to this unit, smoke, and overheating could result from contact with liquids.
The use of cellular phones inside or near the vehicle may cause noise from the audio system speakers you are listening to. However, this does not indicate a malfunction.
The Safety of Your Ears is in Your Hands
Get the most out of your equipment by playing it at a safe level—a level that lets the sound come through clearly without annoying blaring or distortion and, most importantly, without affecting your sensitive hearing. Sound can be deceiving. Over time, your hearing “comfort level” adapts to higher volumes of sound, so what sounds “normal” can actually be loud and harmful to your hearing. Guard against this by setting your equipment at a safe level BEFORE your hearing adapts.
ESTABLISH A SAFE LEVEL:
Set your volume control at a low setting.
Slowly increase the sound until you can hear it comfortably and clearly, without distortion.
Once you have established a comfortable sound level, set the dial and leave it there.
BE SURE TO OBSERVE THE FOLLOWING GUIDELINES:
Do not turn up the volume so high that you cannot hear what’s around you.
Use caution or temporarily discontinue use in potentially hazardous situations.
Do not use headphones while operating a motorized vehicle; the use of headphones may create a traffic hazard and is illegal in many areas.
9
10
|
TABLE OF CONTENTS |
|
|
Introduction............................................... |
6 |
1 |
QUICK GUIDE |
|
|
OVERVIEW BUTTONS .......................... |
14 |
|
SYSTEM FUNCTION INDEX ................. |
15 |
|
TOUCH PANEL SCREEN |
|
|
OPERATION........................................ |
16 |
|
ENTERING LETTERS AND |
|
|
NUMBERS ........................................... |
18 |
2 |
AUDIO SYSTEM |
|
|
QUICK REFERENCE ............................. |
22 |
|
BASIC OPERATION............................... |
23 |
|
RADIO OPERATION .............................. |
26 |
|
Aha™ AUDIO OPERATION ................... |
34 |
|
USB MEMORY OPERATION................. |
44 |
|
iPod OPERATION .................................. |
50 |
|
Bluetooth® AUDIO OPERATION ............ |
56 |
|
AUX DEVICE OPERATION........................ |
66 |
|
STEERING SWITCHES ......................... |
69 |
|
AUDIO SYSTEM OPERATING HINT..... |
70 |
3 |
VOICE COMMAND SYSTEM |
|
|
VOICE COMMAND SYSTEM................. |
78 |
|
CASUAL SPEECH RECOGNITION ....... |
82 |
|
COMMAND LIST .................................... |
83 |
4Bluetooth® HANDS-FREE SYSTEM
QUICK REFERENCE ............................. |
86 |
HANDS-FREE SYSTEM ........................ |
87 |
REGISTERING Bluetooth® DEVICE ...... |
91 |
CALLING ON THE Bluetooth® |
|
PHONE ................................................ |
94 |
RECEIVING ON THE Bluetooth® |
|
PHONE ................................................ |
99 |
TALKING ON THE Bluetooth® |
|
PHONE .............................................. |
100 |
Bluetooth® PHONE MESSAGE |
|
FUNCTION......................................... |
103 |
5 |
SETUP |
|
1 |
|
|
|
|
|
QUICK REFERENCE ........................... |
110 |
|
|
GENERAL SETTINGS.......................... |
111 |
|
|
Bluetooth® SETTINGS.......................... |
113 |
2 |
|
PHONE SETTINGS .............................. |
120 |
|
|
DISPLAY SETTINGS............................ |
131 |
|
|
VOICE SETTINGS................................ |
133 |
3 |
|
VEHICLE SETTINGS |
|
|
|
(EQUALIZER SETTINGS).................. |
135 |
|
|
SPECIFICATIONS / INDEX |
|
4 |
|
SPECIFICATIONS ................................ |
138 |
|
|
ALPHABETICAL INDEX ....................... |
139 |
5 |
11
12

1
QUICK GUIDE |
|
1 |
|
|
|
||
|
|
|
|
|
|
|
2 |
1 |
OVERVIEW BUTTONS .................. |
14 |
|
2. |
SYSTEM FUNCTION INDEX.......... |
15 |
3 |
3. |
TOUCH PANEL SCREEN |
|
|
|
OPERATION ................................ |
16 |
|
4. |
ENTERING LETTERS AND |
|
4 |
|
NUMBERS.................................... |
18 |
|
|
|
|
5 |
13
1. QUICK GUIDE
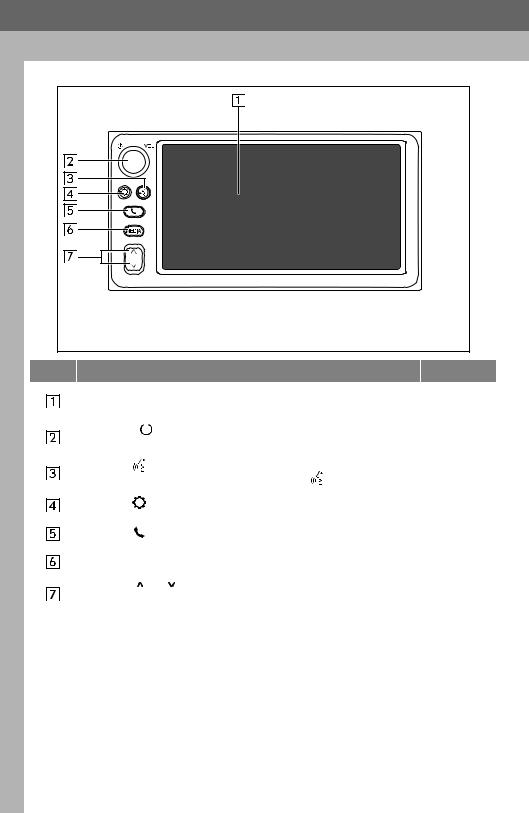
1. OVERVIEW BUTTONS
No. |
Function |
Page |
|
|
By touching the screen with your finger, you can control the selected |
16 |
|||
|
|
|||||
|
|
functions. |
|
|
|
|
|
|
|
|
|
|
|
|
|
|
|
|
|
|
|
|
Press the “ |
|
/VOL” knob to turn the system on and off, or turn it to |
23 |
|
|
|
|
||||
|
|
|
||||
|
|
adjust the volume. |
|
|||
|
|
|
|
|||
|
|
|
|
|||
|
|
Press the |
|
button to start the voice command system. |
78 |
|
|
|
|
||||
|
|
To cancel voice recognition, press and hold the |
button. |
|||
|
|
|
||||
|
|
|
||||
|
|
Press the |
|
button to customize the function settings. |
110 |
|
|
|
|
||||
|
|
Press the |
|
button to access the Bluetooth® hands-free system. |
86 |
|
|
|
|
||||
|
|
|
||||
|
|
Press the “MEDIA” button to access the audio system. |
22, 23 |
|||
|
|
|||||
|
|
Press the “ |
” or “ ” button to tune up or down for a radio station or to |
26, 34, 44, |
||
|
|
|||||
|
|
access a desired track/file. |
|
50, 56 |
||
|
|
|
||||
|
|
|
|
|
|
|
14
1.QUICK GUIDE
2.SYSTEM FUNCTION INDEX
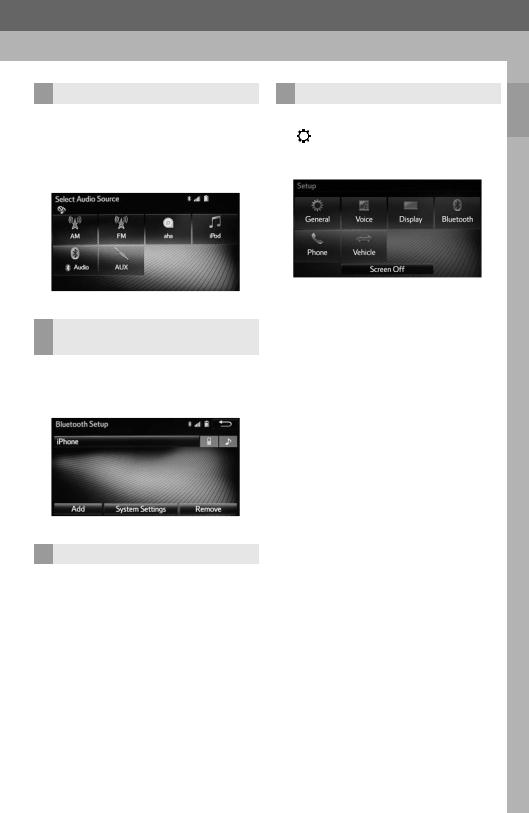
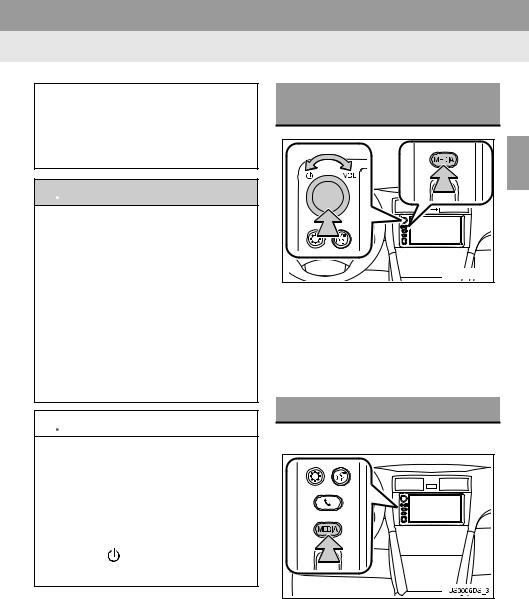
AUDIO SYSTEM
To access the audio system, press the “MEDIA” button. The audio control screen will be displayed. Audio sources: Radio,
Aha audio, USB/iPod, Bluetooth® audio, and AUX. For details, see page 22.
Bluetooth® HANDS-FREE
SYSTEM
To access the Bluetooth® hands-free sys-
tem, press the  button. For details, see page 86.
VOICE COMMAND SYSTEM
To access the voice command system,
press the 
 button. For details, see page 78.
SETUP
To customize the function settings, press
the button. The interface language can also be changed from the setup menu. For details, see pages 110.
1 QUICKGUIDE
15
1. QUICK GUIDE
3. TOUCH PANEL SCREEN OPERATION
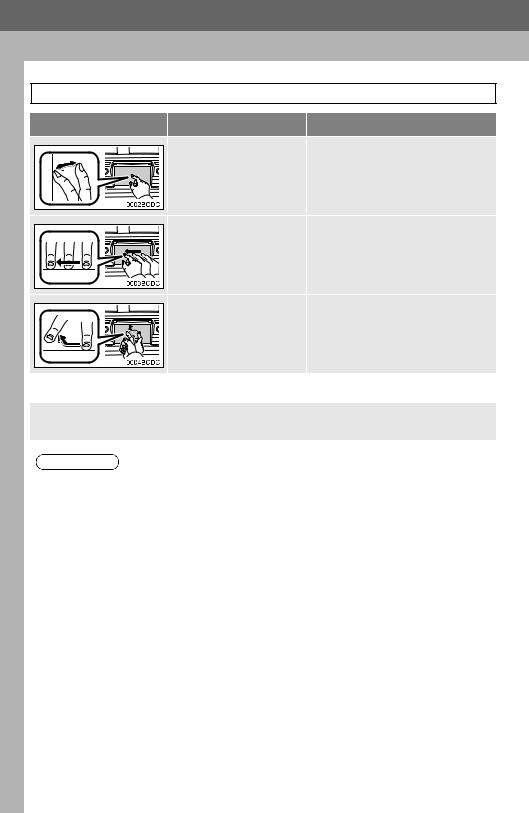
Operations are performed by touching the touch screen directly with your finger.
Operation method |
Outline |
Main use |
|
Touch |
|
Changing and selecting various set- |
|
Quickly touch and release |
|||
tings |
|||
once. |
|
||
|
|
||
Drag* |
|
|
|
Touch |
the screen with |
Scrolling the lists |
|
your finger, and move the |
|||
screen to the desired posi- |
|
||
tion. |
|
|
|
Flick* |
Scrolling the main screen panel |
Quickly move the screen |
|
by flicking with your finger. |
|
*: The above operations may not be available on all screens. |
|
When a screen button is touched, a beep sounds. To turn off the beep sound, see page 112.
INFORMATION
Flick operations may not be performed smoothly in high altitudes.
If the system does not respond to a touch on a screen button, move your finger away from the screen and then touch it again.
Dimmed screen buttons cannot be operated.
The displayed image may become darker and moving images may be slightly distorted when the screen is cold.
Under extremely cold conditions, the screen may not be displayed and the data input by a user may be deleted. Also, the screen buttons may be harder than usual to depress.
When you look at the screen through polarized material such as polarized sunglasses, the screen may be dark and hard to see. If so, look at the screen from different angles, adjust the screen settings on the “Display Settings” screen or take off your sunglasses.
16

1. QUICK GUIDE
 NOTICE
Drag and flick function does not operate while the vehicle is in motion.
To prevent damaging the screen, lightly touch the screen buttons with your finger.
Do not use objects other than your finger to touch the screen.
Wipe off fingerprints using a glass cleaning cloth. Do not use chemical cleaners to clean the screen, as they may damage the touch screen.
To prevent the 12-volt battery from being discharged, do not leave the system on longer than necessary when the engine is not running.
1 QUICKGUIDE
17

1. QUICK GUIDE
4. ENTERING LETTERS AND NUMBERS
When searching by a device, name, etc., or entering data, letters and numbers can be entered via the screen.
No. Function
Touch to enter desired characters.
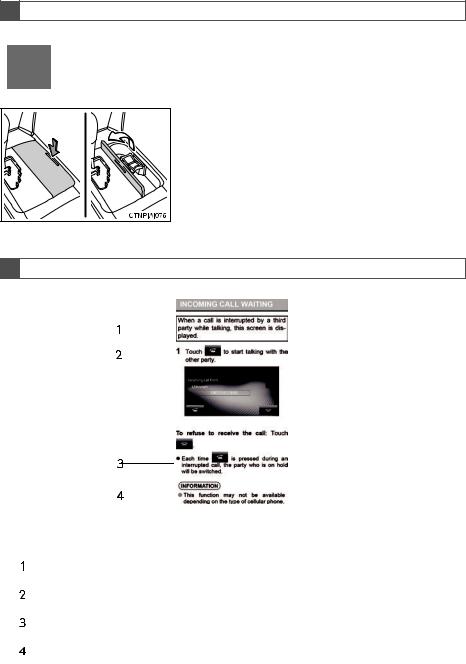
Text field. Entered character(s) will be displayed.
Touch to erase one character. Touch and hold to continue erasing characters.
Touch to display the alphabet keys.
Touch to display other symbols.
On certain letter entry screens, letters can be entered in upper or lower case.
 : Touch to enter in lower case.
  : Touch to enter in upper case.
Keyboard layout can be changed. ( P.112)
18

1. QUICK GUIDE
1 QUICKGUIDE
19

AUDIO SYSTEM
2
AUDIO SYSTEM
1 |
QUICK REFERENCE ..................... |
22 |
2. |
BASIC OPERATION....................... |
23 |
|
TURNING THE AUDIO SYSTEM ON |
|
|
AND OFF .............................................. |
23 |
|
SWITCHING AUDIO SOURCE ............... |
23 |
|
EQ ........................................................... |
24 |
|
AUTOMATIC SOUND LEVELIZER |
|
|
(ASL)..................................................... |
24 |
|
SOUND CONTROL................................. |
25 |
|
RESTARTING THE SYSTEM ................. |
25 |
3. |
RADIO OPERATION ...................... |
26 |
|
OVERVIEW............................................. |
26 |
|
SWITCHING TO RADIO MODE.............. |
28 |
|
PRESETTING A STATION ..................... |
28 |
|
RADIO BROADCAST DATA SYSTEM ... |
29 |
|
TRAFFIC ANNOUNCEMENT |
|
|
(FM RADIO).......................................... |
30 |
|
USING HD Radio™ TECHNOLOGY....... |
30 |
|
AVAILABLE HD Radio™ |
|
|
TECHNOLOGY..................................... |
31 |
|
TROUBLESHOOTING GUIDE................ |
33 |
4. |
Aha™ AUDIO OPERATION........... |
34 |
|
OVERVIEW............................................. |
34 |
|
INSTALLING THE Aha™ |
|
|
APPLICATION ...................................... |
37 |
|
CHANGING THE DISPLAY |
|
|
LANGUAGE.......................................... |
37 |
|
AVAILABILITY OF SERVICE .................. |
37 |
|
CONNECTING AN iPhone ...................... |
37 |
|
CONNECTING AN Android PHONE ....... |
38 |
|
SWITCHING TO Aha™ MODE ............... |
38 |
|
CONNECTING FOR Aha™..................... |
38 |
|
PLAYING Aha™ PRESET ...................... |
39 |
20
2
AUDIO SYSTEM
|
SELECTING Aha LOCATION BASED |
|
|
SERVICE ............................................. |
41 |
|
IF A MESSAGE APPEARS ON THE |
|
|
SCREEN .............................................. |
43 |
5. |
USB MEMORY OPERATION ......... |
44 |
|
OVERVIEW ............................................ |
44 |
|
CONNECTING A USB MEMORY .......... |
46 |
|
SWITCHING TO USB MODE................. |
46 |
|
PLAYING A USB MEMORY ................... |
47 |
6. |
iPod OPERATION .......................... |
50 |
|
OVERVIEW ............................................ |
50 |
|
CONNECTING AN iPod ......................... |
53 |
|
SWITCHING TO iPod MODE ................. |
53 |
|
PLAYING AN iPod.................................. |
54 |
7. |
Bluetooth® AUDIO OPERATION... |
56 |
|
OVERVIEW ............................................ |
56 |
|
SWITCHING TO Bluetooth® AUDIO |
|
|
MODE .................................................. |
60 |
|
REGISTERING/CONNECTING A |
|
|
Bluetooth® AUDIO PLAYER ................ |
60 |
|
STATUS DISPLAY ................................. |
63 |
|
LISTENING TO Bluetooth® AUDIO........ |
64 |
8. |
AUX DEVICE OPERATION ............... |
66 |
|
OVERVIEW ............................................ |
66 |
|
CONNECTING A PORTABLE AUDIO |
|
|
DEVICE................................................ |
68 |
|
SWITCHING TO AUX MODE................. |
68 |
|
PLAYING A PORTABLE AUDIO |
|
|
DEVICE................................................ |
68 |
9. |
STEERING SWITCHES .................. |
69 |
10. AUDIO SYSTEM OPERATING |
|
|
|
HINT.............................................. |
70 |
|
RADIO .................................................... |
70 |
iPod......................................................... |
71 |
FILE INFORMATION .............................. |
72 |
TERMS ................................................... |
73 |
ERROR MESSAGES.............................. |
75 |
1
2
3
4
5
21

2. AUDIO SYSTEM
1. QUICK REFERENCE
To access the audio system, press the “MEDIA” button. The audio system displays the current source screen or displays the source selection screen.
No. |
Function |
Page |
|
|
A selected audio source is displayed, and it can be operated with the |
|
|||
|
|
|||||
|
|
touch panel screen controls. |
||||
|
|
|
||||
|
|
|
||||
|
|
Touch to select your |
desired audio sources. The audio source |
23 |
||
|
|
|||||
|
|
selection screen will be displayed. |
||||
|
|
|
||||
|
|
|
||||
|
|
Press the “ |
|
/VOL” knob to turn the system on and off, or turn it to |
23 |
|
|
|
|
||||
|
|
|
||||
|
|
adjust the volume. |
|
|||
|
|
|
|
|||
|
|
|
|
|||
|
|
Press the “MEDIA” button to access the audio system. The audio sys- |
23 |
|||
|
|
tem displays the current source screen or displays the source selection |
||||
|
|
screen. |
|
|
||
|
|
|
|
|||
|
|
• Press the “ ” or “ ” button to tune the radio up or down or to |
26, 34, 44, |
|||
|
|
access a desired track/file. |
||||
|
|
|||||
|
|
• Press and hold the “ |
” or “ ” button until a beep is heard to seek up |
50, 56 |
||
|
|
or down. |
|
|
||
|
|
|
|
|
|
|
22
2. AUDIO SYSTEM
2. BASIC OPERATION
This section describes some of the basic features of the audio system.
Your audio system works when the engine switch is turned to the “ACC” or “ON” position.
 CAUTION
For vehicles sold in U.S.A. and Canada: Part 15 of the FCC Rules
FCC Warning: Changes or modifications in construction not expressly approved by the party responsible for compliance could void the user’s authority to operate the equipment. Radio frequency exposure. This device is approved for Mobile Application only and, to comply with applicable FCC radio frequency exposure regulations, must be used with a distance of at least 7.9 in. (20 cm) between the antenna and the body of any person at all time during use.
 NOTICE
To prevent the 12-volt battery from being discharged, do not leave the system on longer than necessary when the engine is not running.
When the last mode used is Aha Audio, the audio system does not turn on automatically even if the engine switch is turned to the “ACC” or “ON” position. Press the “ /VOL” knob to turn on the audio system.
TURNING THE AUDIO
SYSTEM ON AND OFF
|
2 |
US0011DS_3 |
SYSTEM AUDIO |
“  /VOL” knob: Press to turn the audio system on and off. The system turns on in the last mode used. Turn this knob to adjust the volume.
“MEDIA” button: Press to display screen for the audio system.
SWITCHING AUDIO SOURCE
1 Press the “MEDIA” button.
The audio system displays the current source screen or displays the source selection screen.
23

2. AUDIO SYSTEM
2On the current source screen, touch the “Source” or press the “MEDIA” button to display the audio source selection screen.
3 Touch a desired audio source.
INFORMATION
You cannot select dimmed screen buttons. Connect the audio device before selecting.
1 Touch |
on the audio control |
screen.
2Touch “EQ” to switch the settings between “NATURAL”, “POWERFUL”, and “VOCAL”.
INFORMATION
For more details, please visit the Toyota website at http://www.toyota.com/.
|
|
AUTOMATIC SOUND |
|
EQ |
|||
|
LEVELIZER (ASL) |
||
|
|
|
EQ is a modified DSP (Digital Signal Processing) system that provides a customized sound for your vehicle.
There are three stored equalizer curves that you can easily recall at any time. Here is a list of the equalizer curves:
POWERFUL is a curve in which lowand high-pitched sounds are boosted.
NATURAL is a curve in which lowand high-pitched sounds are slightly boosted.
VOCAL is a curve in which the midrange, which is the human vocal range, is boosted.
The system adjusts to the optimum volume and tone quality according to vehicle speed to compensate for increased vehicle noise.
1 Touch  on the audio control screen.
24
2. AUDIO SYSTEM
2Touch “ASL” to switch the settings between “Low”, “Mid”, “High” and
“Off”.
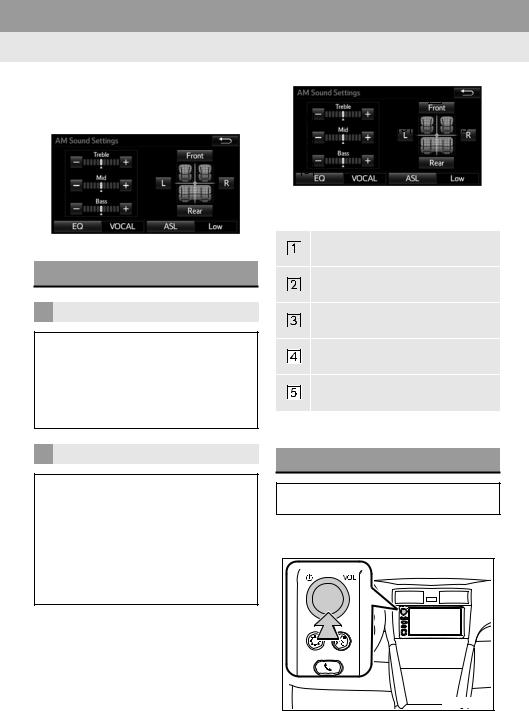
SOUND CONTROL
TONE
How good an audio program sounds is largely determined by the mix of the treble, mid and bass levels. In fact, different kinds of music and vocal programs usually sound better with different mixes of treble, mid and bass.
BALANCE
A good balance of the left and right stereo channels and of the front and rear sound levels is also important.
Keep in mind that when listening to a stereo recording or broadcast, changing the right/left balance will increase the volume of 1 group of sounds while decreasing the volume of another.
1 Touch  on the audio control screen.
2 Touch the desired screen button.
|
|
|
|
|
|
|
|
|
|
|
|
|
|
|
|
|
|
|
|
|
|
|
|
|
|
|
|
|
|
|
|
|
|
|
|
|
|
|
|
|
|
|
|
|
|
|
|
|
|
|
|
|
|
|
|
|
|
|
|
|
|
|
|
|
|
|
|
|
|
|
|
|
|
|
|
|
|
|
|
|
|
|
|
|
|
|
|
|
|
|
|
|
|
|
|
|
|
|
|
|
|
|
|
2 |
|
|
|
|
|
|
|
|
|
|
|
|
|
|
|
|
|
|
|
|
|
|
|
|
|
|
|
|
|
|
|
|
|
|
|
|
|
|
|
|
|
|
|
|
|
|
|
|
|
|
|
|
|
|
|
|
|
|
|
|
|
|
|
|
|
|
|
|
|
|
|
|
|
|
|
|
|
|
|
|
|
|
|
|
|
|
|
|
|
|
|
|
|
|
|
|
|
|
|
|
|
|
|
|
AUDIO |
No. |
Function |
|
||||||||||||
|
|
|||||||||||||
|
|
|
|
|
|
|
|
|
|
|
|
|
|
SYSTEM |
|
|
|
|
Touch “+” or “-” to adjust high- |
||||||||||
|
|
|
|
|||||||||||
|
|
|
|
pitched tones. |
||||||||||
|
|
|
|
|
||||||||||
|
|
|
|
Touch “+” or “-” to adjust mid- |
|
|||||||||
|
|
|
|
|
||||||||||
|
|
|
|
pitched tones. |
|
|||||||||
|
|
|
|
|
||||||||||
|
|
|
|
Touch “+” or “-” to adjust low- |
|
|||||||||
|
|
|
|
|
||||||||||
|
|
|
|
pitched tones. |
|
|||||||||
|
|
|
|
|
||||||||||
Touch to adjust the sound balance between the front and rear speakers.
Touch to adjust the sound balance between the left and right speakers.
RESTARTING THE SYSTEM
When system response is extremely slow, the system can be restarted.
1 Press and hold the “  /VOL” knob for 3 seconds or more.
US0006DS_5 |
25
2.AUDIO SYSTEM
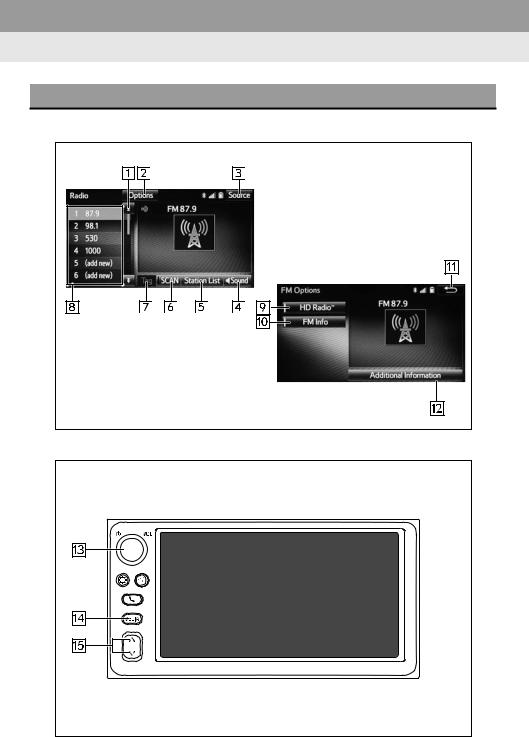
3.RADIO OPERATION
OVERVIEW
CONTROL SCREEN
Top screen
Option screen
CONTROL PANEL
26

2. AUDIO SYSTEM
No. |
Function |
Page |
||
|
|
|
|
|
|
|
|
Touch to scroll the page of preset buttons. |
|
|
|
|
||
|
|
|
|
|
|
|
|
|
|
|
|
|
Touch to display the option screen. |
30 |
|
|
|
||
|
|
|
Touch to display the audio source selection screen. |
28 |
|
|
|
||
|
|
|
||
|
|
|
Touch to display the sound setting screen. |
24, 25 |
|
|
|
||
|
|
|
||
|
|
|
Touch to display a list of receivable stations/channels. |
29, 30 |
|
|
|
||
|
|
|
||
|
|
|
Touch to scan for receivable stations/channels. |
|
|
|
|
||
|
|
|
||
|
|
|
Touch to store information of the audio currently being broadcast on |
31 |
|
|
|
||
|
|
|
||
|
|
|
the radio. |
|
|
|
|
|
|
|
|
|
|
|
|
|
|
Touch to tune to preset stations/channels. |
28 |
|
|
|
||
|
|
|
|
|
Touch to turn HD Radio mode on/off.
When the “HD Radio™” indicator is off, the station list shows only an- 30 alog broadcasts.
|
|
|
|
Analog FM only: Touch to display RBDS text messages. |
29 |
|
|
|
|
||
|
|
|
|
Touch to return to the previous screen. |
|
|
|
|
|
||
|
|
|
|
||
|
|
|
|
Touch to display the additional text information. |
|
|
|
* |
|||
|
|
||||
|
|
|
|
• Turn to adjust volume. |
23 |
|
|
|
|
||
|
|
|
|
• Press to turn the audio system on/off. |
|
|
|
|
|
||
|
|
|
|
• Press and hold to restart the audio system. |
|
|
|
|
|
|
|
|
|
|
|
Press to select an audio mode. |
28 |
|
|
|
|
||
|
|
|
|
• Press to step up/down frequencies |
|
|
|
|
|
||
|
|
|
|
||
|
|
|
|
• Press and hold for continuous seek. |
|
|
|
|
|
|
|
*: This operation cannot be performed while driving.
INFORMATION
The radio automatically changes to stereo reception when a stereo broadcast is received.
The radio automatically blends to an HD Radio signal in AM or FM where available.
2 AUDIOSYSTEM
27
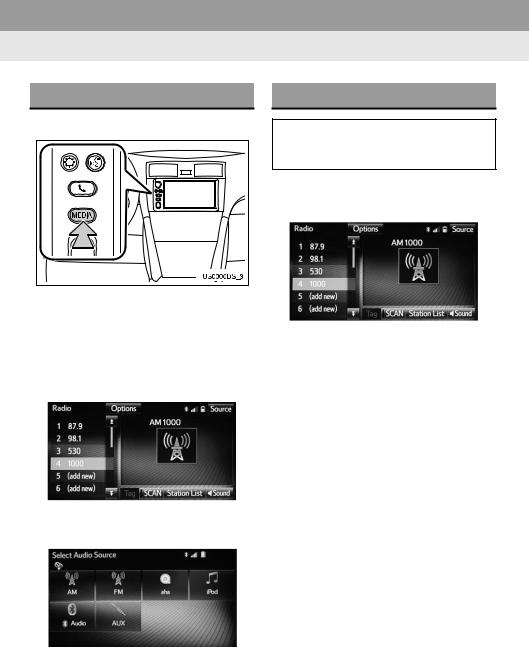
2. AUDIO SYSTEM
SWITCHING TO RADIO MODE
1 Press the “MEDIA” button.
The audio system displays the current source screen or displays the source selection screen.
2On the current source screen, touch the “Source” or press the “MEDIA” button to display the audio source selection screen.
3 Touch “AM” or “FM” on the screen.
PRESETTING A STATION
Radio mode has a preset function, which can store up to 18 stations from any of the AM or FM.
1Tune in the desired station.
2Touch “(add new)”.
To change the preset station to a current one, touch and hold the preset station. Skip Step 3 and 4.
3Touch “Yes” when the confirmation screen appears.
4Touch “OK”.
28
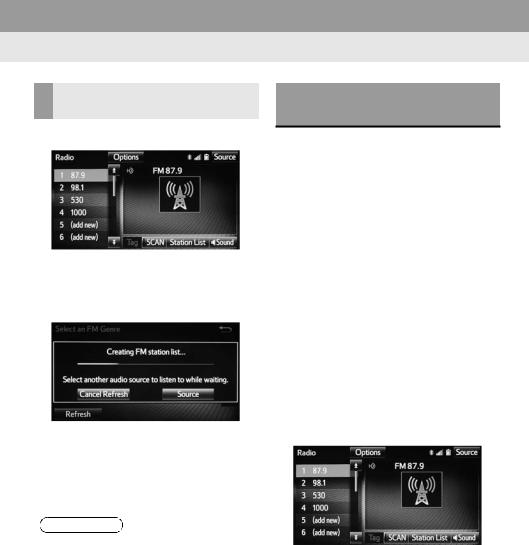
REFRESHING THE STATION LIST
1 Touch “Station List”.
2Touch “Refresh” on the station list
screen and the following screen will be displayed.
“Cancel Refresh”: Touch to cancel the refresh.
“Source”: Touch to change to another audio source while refreshing.
INFORMATION
The audio system sound is muted during refresh operation.
In some situations, it may take some time to update the station list.
2. AUDIO SYSTEM
RADIO BROADCAST DATA
SYSTEM
This audio system is equipped with Ra- |
|
|
||
dio Broadcast Data Systems (RBDS). |
|
2 |
||
RBDS mode allows text messages to |
|
|
||
be received from radio stations that uti- |
|
|
||
AUDIO |
||||
When RBDS is on, the radio can |
|
|||
lize RBDS transmitters. |
|
|
||
— only select stations of a particular |
|
SYSTEM |
||
— display messages from radio sta- |
|
|||
program type, |
|
|
||
tions. |
|
|
||
RBDS features are available only |
|
|
||
when listening to an FM station that |
|
|
||
broadcasts RBDS information and the |
|
|
||
“FM Info” indicator is on. |
|
|
||
|
|
|
|
|
|
SELECTING A DESIRED |
|
|
|
|
GENRE |
|
|
|
1 Touch “Station List”. |
|
|||
2FM radio only: Touch a desired genre of station and touch a desired station.
29
2. AUDIO SYSTEM
The genre list is in the following order:
•Country
•EasyLis (Easy Listening)
•Inform (Information)
•Jazz
•News
•Oldies
•Other
•Pop Music
•Religion
•Rock
•R&B (Rhythm and Blues)
•Sports
•Talk
•Traffic (Not available when “HD Radio™” indicator is off.)
•Alert (Emergency Alert)
TRAFFIC ANNOUNCEMENT (FM RADIO)
A station that regularly broadcasts traffic information is automatically located.
1 Touch “Station List”.
2Touch the desired traffic program station.
INFORMATION
If a traffic program station is found, the name of the traffic program station will be displayed for a while.
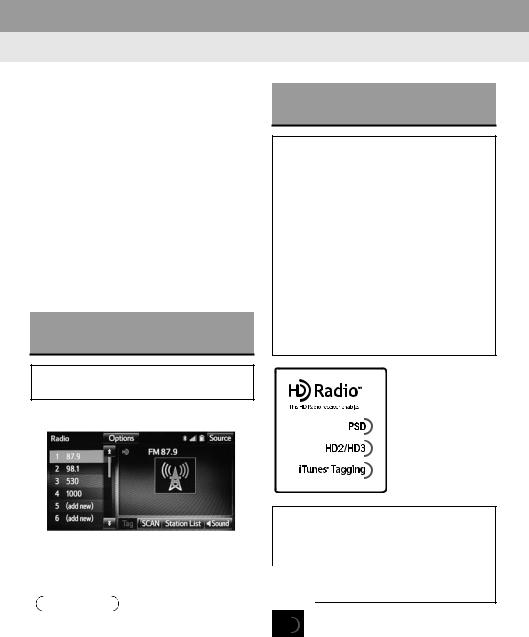
USING HD Radio™
TECHNOLOGY
HD Radio™ Technology is the digital evolution of analog AM/FM radio. Your radio product has a special receiver which allows it to receive digital broadcasts (where available) in addition to the analog broadcasts it already receives. Digital broadcasts have better sound quality than analog broadcasts as digital broadcasts provide free, crystal clear audio with no static or distortion. For more information, and a guide to available radio stations and programming, refer to www.hdradio.com.
HD Radio Technology manufactured under license from iBiquity Digital Corporation. U.S. and Foreign Patents. HD Radio™ and the HD, HD Radio, and “Arc” logos are proprietary trademarks of iBiquity Digital Corp.
Program Service Data: Contributes to the superior user experience of HD Radio Technology. Presents song name, artist, station IDs, HD2/HD3 Channel Guide, and other relevant data streams.
30
Loading...