


Camry 2008
Table of contents
 Loading...
SECTION 1
BASIC FUNCTIONS
21
BASIC FUNCTIONS
Basic information before operation
D Initial screen 22. . . . . . . . . . . . . . . . . . . . . . . . . . . . . . . . . . . . . . . . . . .
D Touch screen operation 24. . . . . . . . . . . . . . . . . . . . . . . . . . . . . . . . .
D Inputting letters and numbers/List screen operation 24. . . . . . . . .
D Function help 28. . . . . . . . . . . . . . . . . . . . . . . . . . . . . . . . . . . . . . . . . .
D Map screen operation 28. . . . . . . . . . . . . . . . . . . . . . . . . . . . . . . . . . .
Current position display 28. . . . . . . . . . . . . . . . . . . . . . . . . . . . . . .
Screen scroll operation 29. . . . . . . . . . . . . . . . . . . . . . . . . . . . . . .
Switching the screens 34. . . . . . . . . . . . . . . . . . . . . . . . . . . . . . . . .
Map scale 36. . . . . . . . . . . . . . . . . . . . . . . . . . . . . . . . . . . . . . . . . . .
Foot print map 37. . . . . . . . . . . . . . . . . . . . . . . . . . . . . . . . . . . . . . .
Orientation of the map 38. . . . . . . . . . . . . . . . . . . . . . . . . . . . . . . .
BASIC FUNCTIONS
22
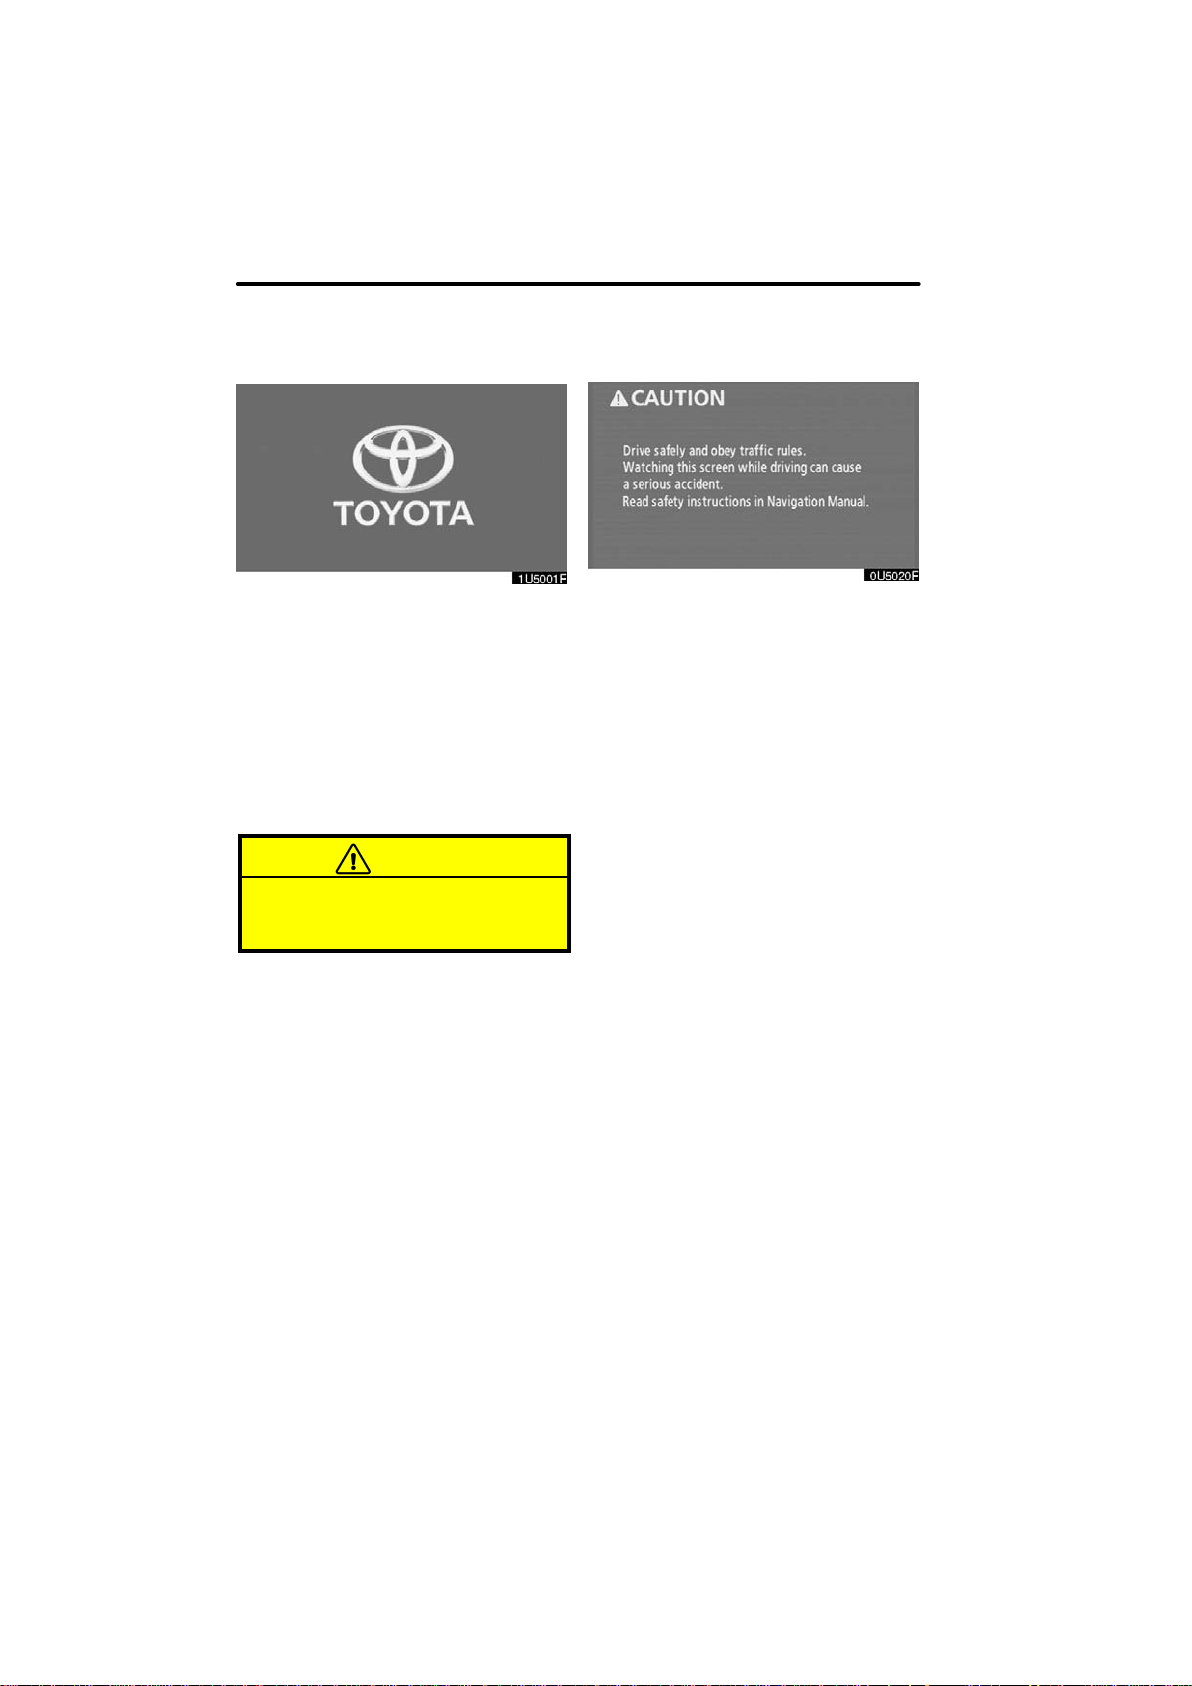
Vehicles with smart key system —
When the “ENGINE START STOP” switch
is in ACCESSORY or IGNITION ON
mode, the initial screen will be displayed
and the system will begin operating.
Vehicles without smart key system —
When the engine switch is in “ACC” or
“ON” position, the initial screen will be
displayed and the system will begin oper-
ating.
CAUTION
When the vehicle is stopped with the
engine running, always apply the
parking brake for safety.
After a few seconds, the “CAUTION”
screen will be displayed.
After about 5 seconds, the “CAUTION”
screen automatically switches to the map
screen. When the “MAP/VOICE” button
is also pushed, the map screen is dis-
played.
While the “CAUTION” screen is displayed,
the “DEST” or “MENU” button cannot be
operated. And if the “Language”, “Cal-
endar” or “Maintenance” buttons on the
“Information” screen are touched, the
screen will change back to “CAUTION”
screen and then change to the map screen
in about 5 seconds later or if the “MAP/
VOICE” button is pushed.
Initial screen
BASIC FUNCTIONS
23
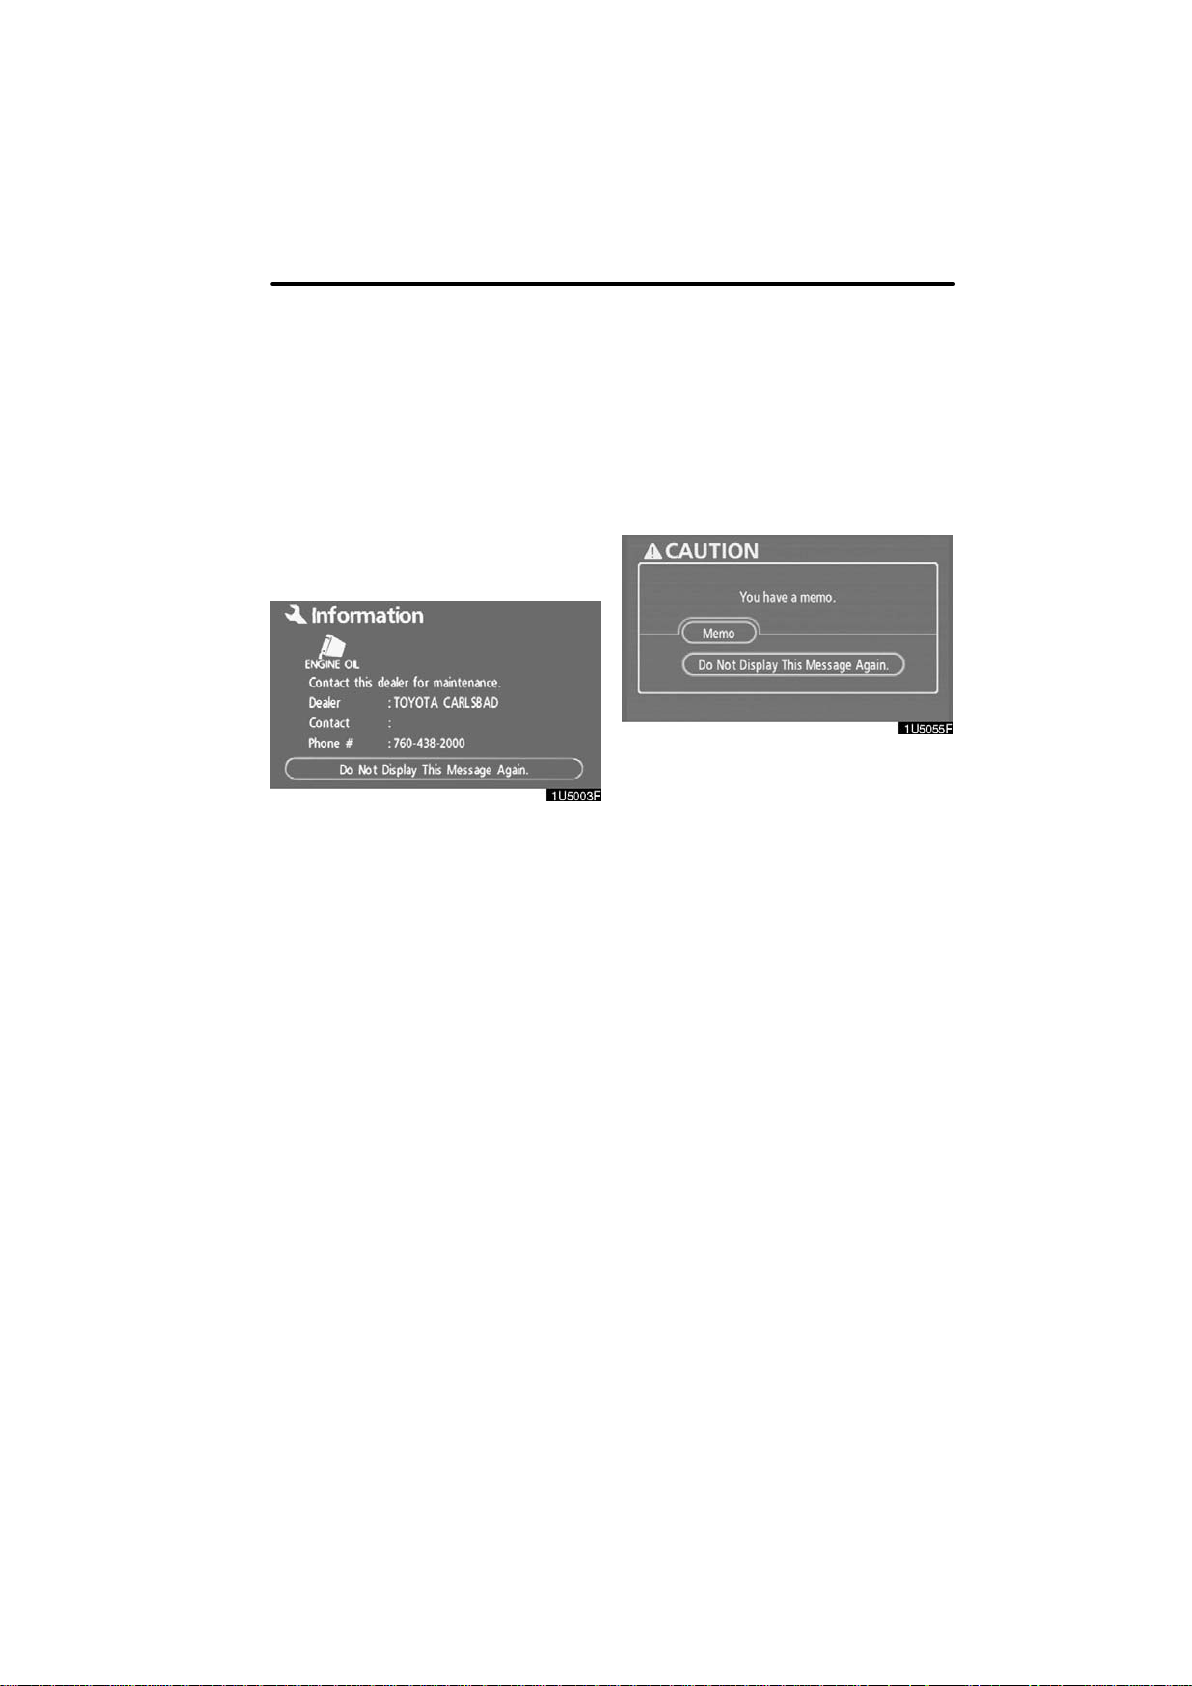
D Maintenance information
This system informs about when to replace
certain parts or components and shows
dealer information (if registered) on the
screen.
When the vehicle reaches a previously set
driving distance or date specified for a
scheduled maintenance check, the “Infor-
mation” screen will be displayed when the
navigation system is in operation.
To disable this screen, touch “Do Not
Display This Message Again.”. This
screen goes off if the screen is not op-
erated for several seconds.
To prevent this information screen from be-
ing displayed again, touch “Do Not
Display This Message Again.”.
To register “Maintenance information”, see
“Maintenance information” on page 118.
D Memo information
This system notifies about a memo entry.
At the specified date, the memo informa-
tion will be displayed when the navigation
system is in operation. The memo informa-
tion screen will be displayed every time the
system is turned on.
The memo of the current date can be
viewed by touching “Memo”. (See “ —
Editing a memo” on page 125.)
To disable this screen, touch “Do Not
Display This Message Again.”. This
screen goes off if the screen is not op-
erated for several seconds.
To prevent this information screen from be-
ing displayed again, touch “Do Not
Display This Message Again.”.
To register a memo information, see “Cal-
endar with memo” on page 122.
BASIC FUNCTIONS
24
This system is operated mainly by the
touch screen buttons on the screen.
To prevent damage to the screen, light-
ly touch buttons on the screen with the
finger. When a button on the screen is
touched, a beep sounds.
Do not use objects other than the finger
to touch the screen.
INFORMATION
D If the system does not respond to
a touch on a touch screen button,
move the finger away from the
screen and then touch it again.
D Dimmed touch screen buttons
cannot be operated.
D Wipe off fingerprints using a glass
cleaning cloth. Do not use chemi-
cal cleaners to clean the touch
screen.
D The displayed image may become
darker and moving images may be
slightly distorted when the display
is cold.
D Under extremely cold conditions,
the map may not be displayed and
the data input by a user may be de-
leted. Also, the touch screen but-
tons may be harder than usual to
depress.
D When you look at the screen
through polarised material such as
polarised sunglasses, the screen
may be dark and hard to see. If so,
look at the screen from different
angles, adjust the screen settings
on the “Display” screen, or take off
your sunglasses.
When searching for an address or a name,
or entering a memo, letters and numbers
can be input via the touch screen.
INFORMATION
Keyboard layout can be changed.
(See page 108.)
Touch screen operation
Inputting letters and
numbers/List screen
operation
BASIC FUNCTIONS
25
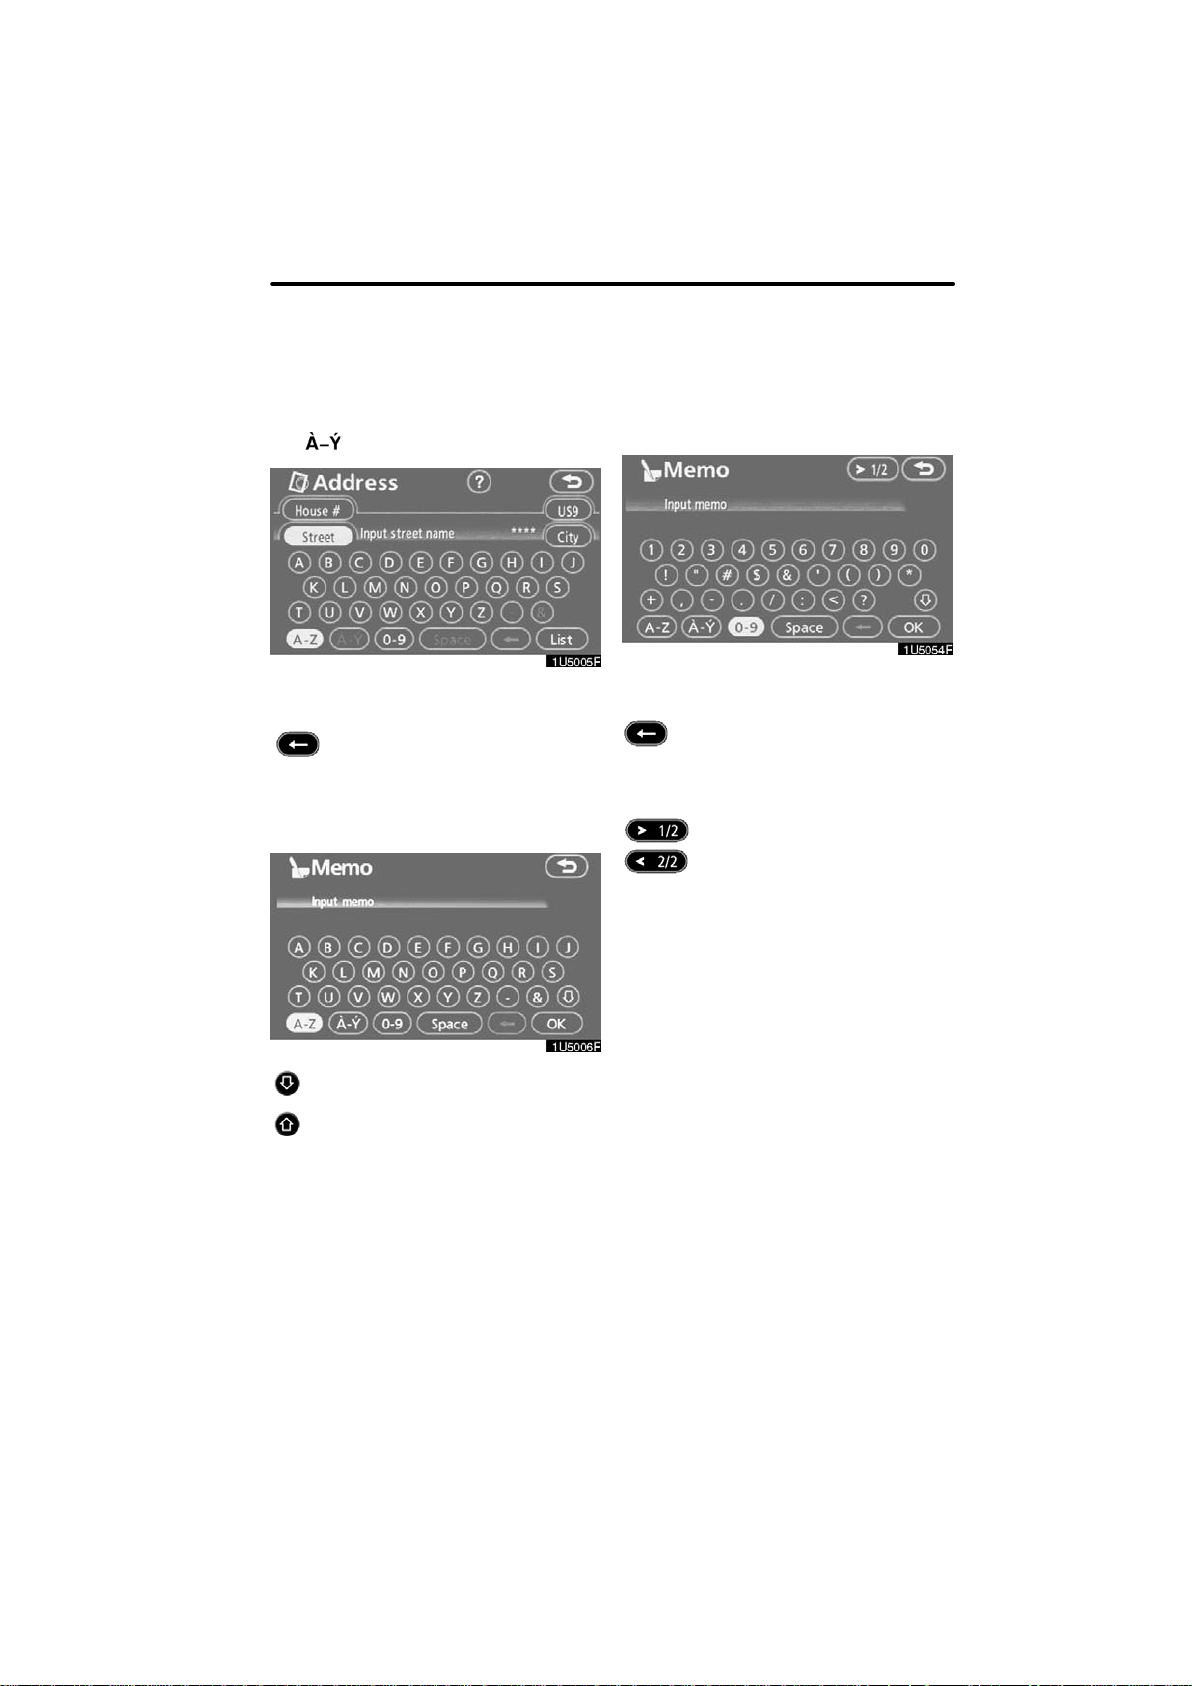
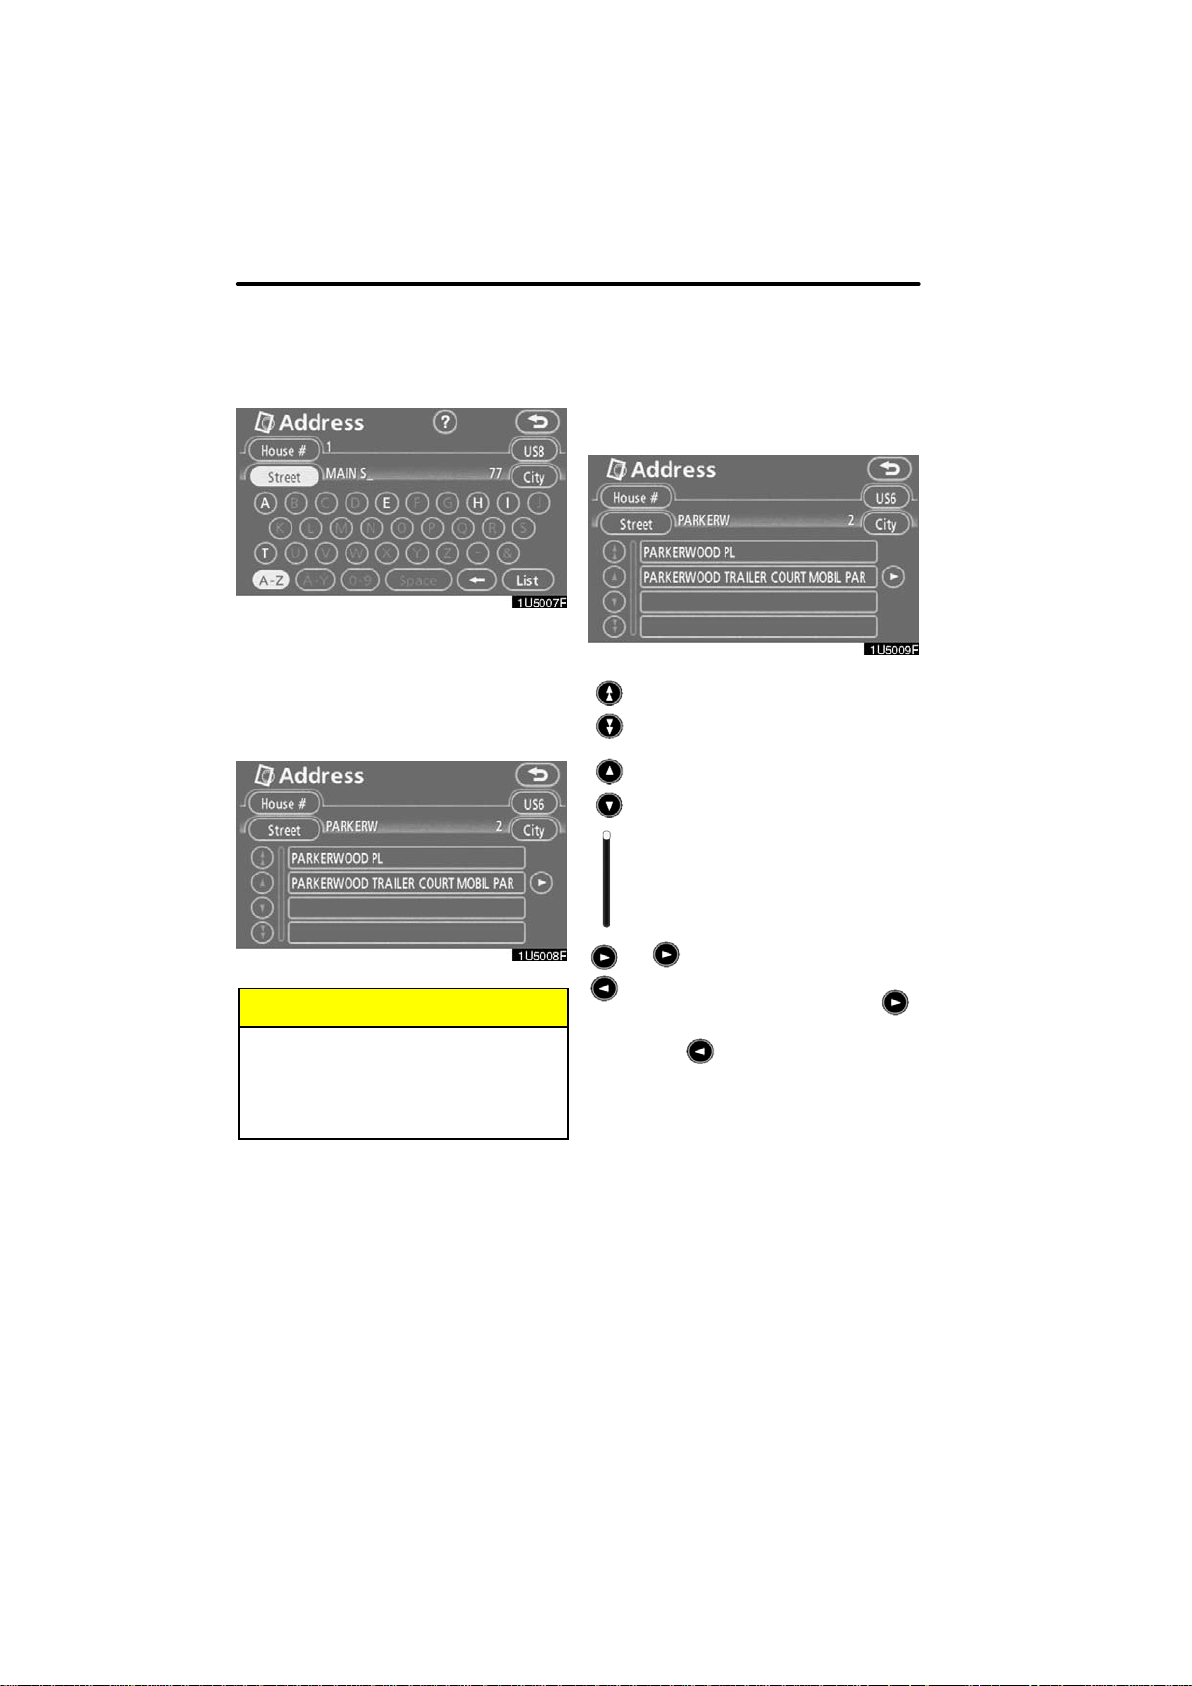
D To input letters
To display the alphabet keys, touch “A−Z”
or
“ ”.
Enter letters by touching the alphabet keys
directly.
: Touching this button erases one
letter. By holding this button, let-
ters will continue to be erased.
On certain letter entry screens, letters can
be entered in upper or lower case.
: To enter in lower case.
: To enter in upper case.
D To input numbers and symbols
To display the number keys and symbol
keys, touch “0−9”.
Enter numbers and symbols by touching
the number keys and symbol keys directly.
:
Touching this button erases
one letter. By holding this
button, letters will continue to
be erased.
: Touching this button displays
other symbols.
BASIC FUNCTIONS
26
D To display the list
To search for an address or a name, touch
“List”. Matching items from the database
are listed even if the entered address or
name is incomplete.
If the number of matches is four or less, the
list is displayed without touching “List”.
INFORMATION
The number of matching items is
shown to the right side of the screen.
If the number of matching items is
more than 9,999, the system displays
“
∗∗∗∗” on the screen.
D List screen operation
When a list is displayed, use the appropri-
ate button to scroll through the list.
To shift to the next or previous
page.
To scroll up or down one item at a
time.
This expresses a displayed
screen position.
If appears to the right of the
item name, the complete name is
too long for the display. Touch
to scroll to the end of the name.
Touch to scroll to the beginning
of the name.

BASIC FUNCTIONS
27
D Sorting
The order of a list displayed on the screen
can be rearranged.
TYPE A
1. Touch “Sort by”.
2. Select the desired sorting criteria.
Sorting criteria are as follows:
“Distance”: To sort in the order of dis-
tance from your current location.
“Date”: To sort in the order of the date.
“Category”: To sort in the order of the
category.
“Icon”: To sort in the order of the icons.
“Name”: To sort in order by name.
“Attribute”: To sort in order by attribute.
TYPE B
“Dist. Sort”: To sort in the order of dis-
tance from the current vehicle location.
The distance from current vehicle position
up to the destination is displayed to the
right of the name.
“Name Sort”: To sort in alphabetical order
by name.
BASIC FUNCTIONS
28
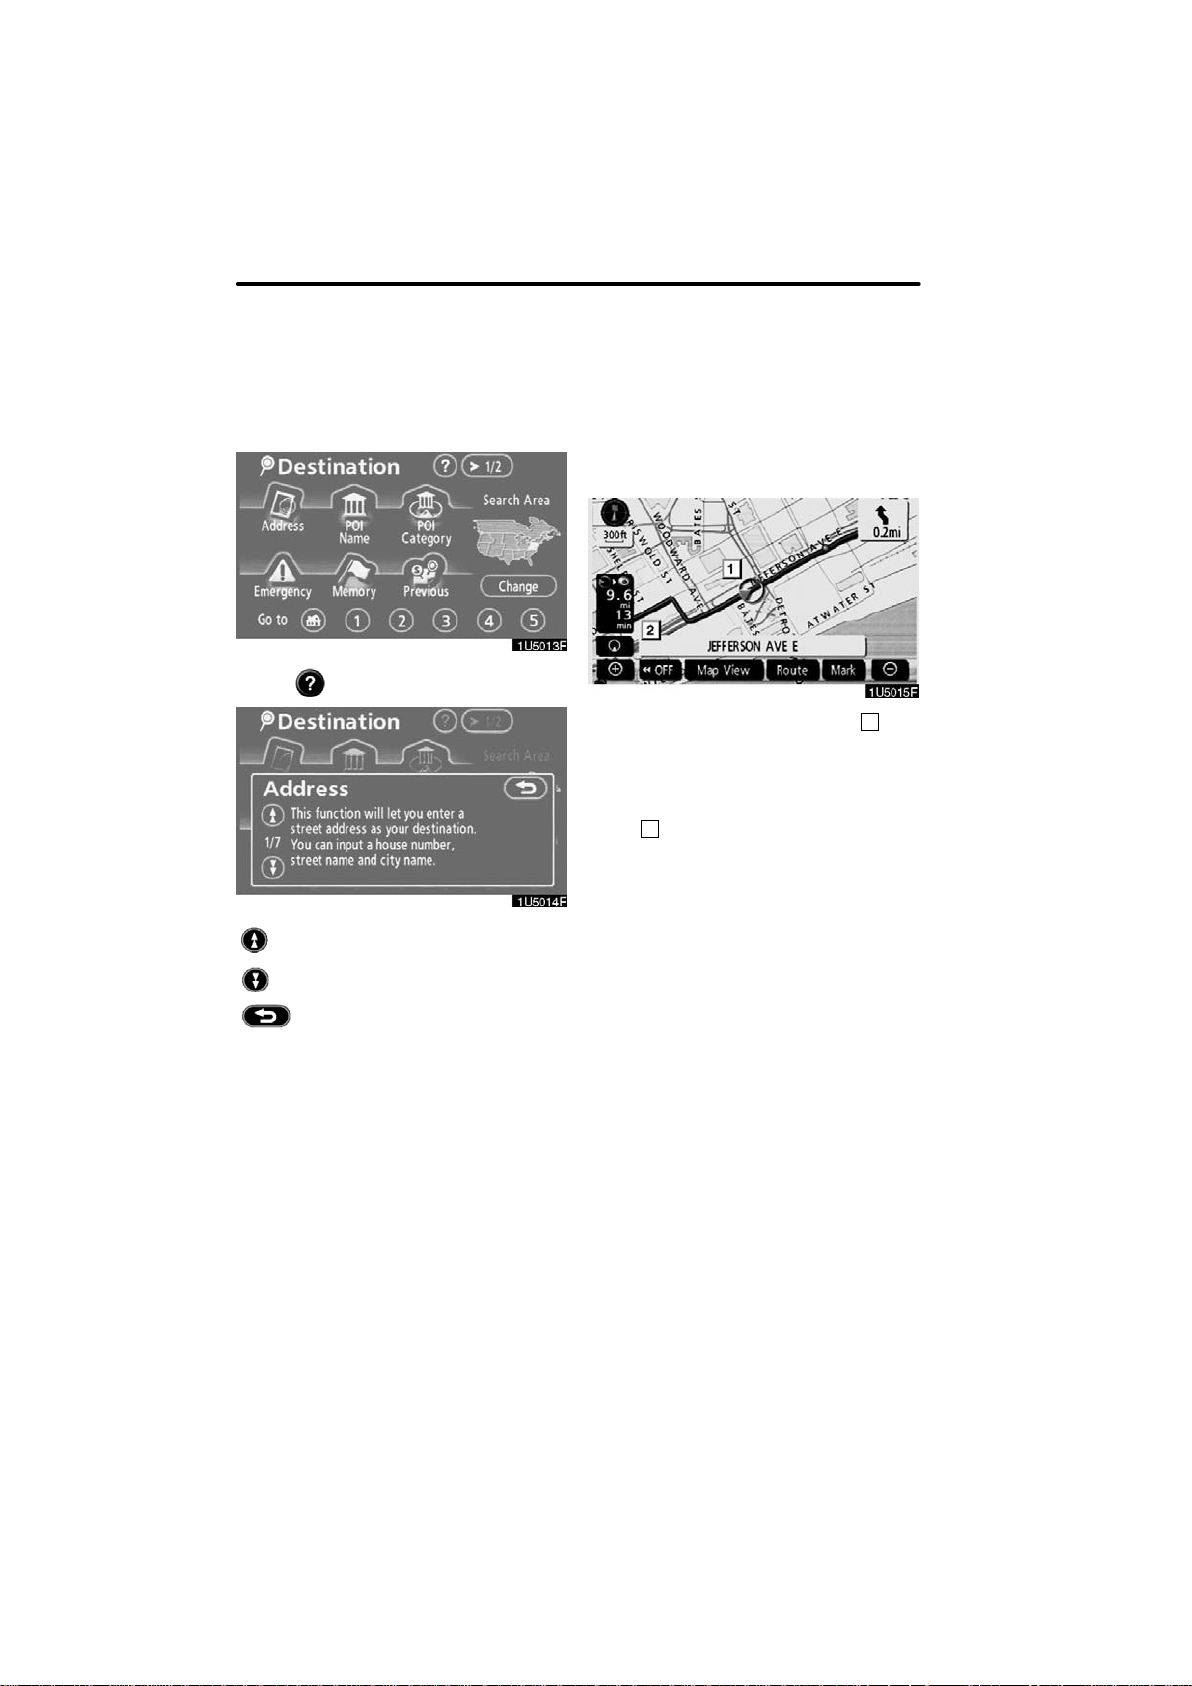
Explanations for the functions of the “Des-
tination”, “Setup” and “Menu” screens can
be viewed.
Touch .
: To view the previous page.
: To view the next page.
: To return to the previous screen.
When starting the navigation system, the
current position is displayed first.
This screen displays the current vehicle
position and a map of the surrounding local
area.
The current vehicle position mark (
1
) ap-
pears in the center or bottom center of the
map screen.
A street name will appear on the bottom of
the screen, depending on the scale of the
map (
2
).
You can return to this map screen that
shows your current position at any time
from any screen by pushing the “MAP/
VOICE” button.
While driving, the current vehicle position
mark is fixed on the screen and the map
moves.
The current position is automatically set as
the vehicle receives signals from the GPS
(Global Positioning System). If the current
position is not correct, it is automatically
corrected after the vehicle receives sig-
nals from the GPS.
Function help
Map screen operation —
— Current position display
BASIC FUNCTIONS
29
INFORMATION
D After battery disconnection, or on
a new vehicle, the current position
may not be correct. As soon as the
system receives signals from the
GPS, the correct current position
is displayed.
D To correct the current position
manually, see page 115.
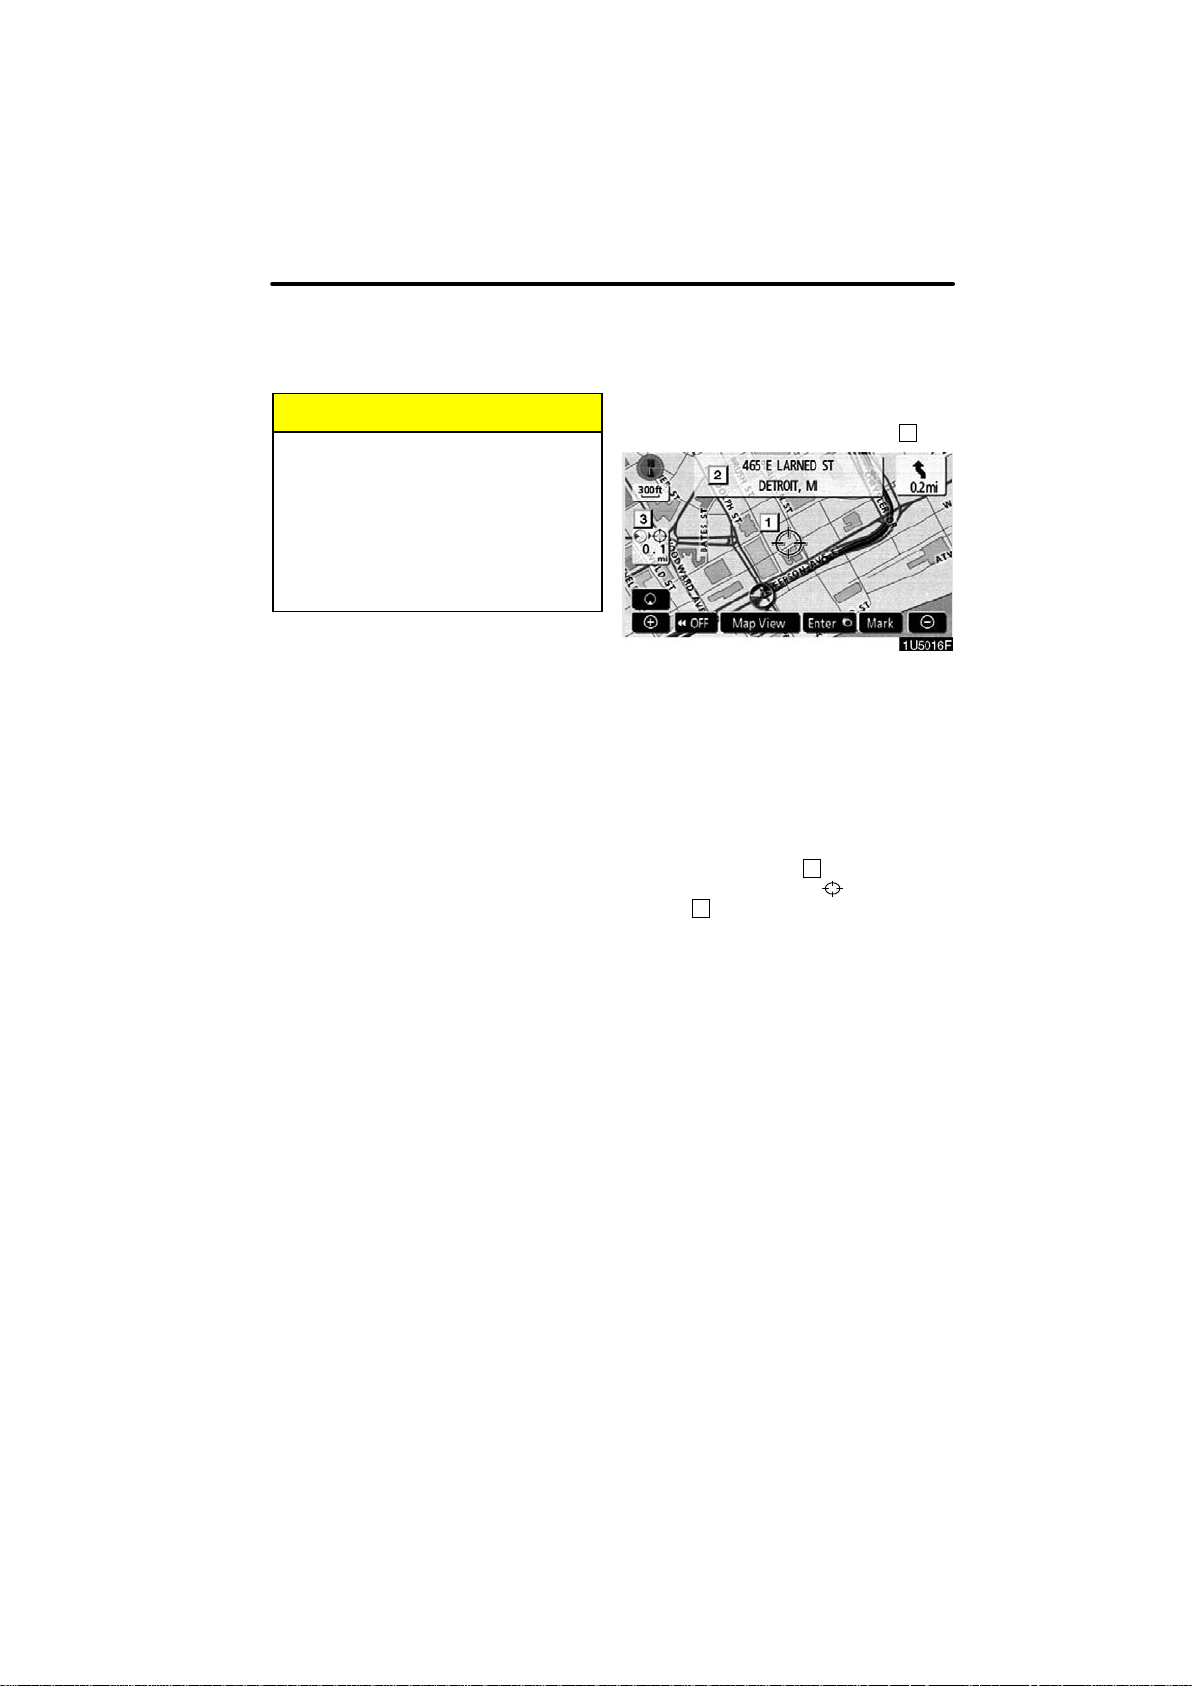
When any point on the map is touched,
that point moves to the center of the screen
and is shown by the cursor mark (
1
).
Use the scroll feature to move the desired
point to the center of the screen for looking
at a point on the map that is different from
the current position of the vehicle.
If the finger is continuously held on the
screen, the map will continue scrolling in
that direction until the finger is removed.
A street name, city name, etc. of the
touched point will be shown, depending on
the scale of the map (
2
). Distance from
the current position to
will also be
shown (
3
).
After the screen is scrolled, the map re-
mains centered at the selected location
until another function is activated. The cur-
rent vehicle position mark will continue to
move along your actual route and may
move off the screen. When the “MAP/
VOICE” button is pushed, the current ve-
hicle position mark returns to the center of
the screen and the map moves as the ve-
hicle proceeds along the designated route.
— Screen scroll operation
(one−touch scroll)
BASIC FUNCTIONS
30
INFORMATION
When the one−touch scroll feature is
used, the current vehicle position
mark may disappear from the screen.
Move the map with a one−touch scroll
again or push the “MAP/VOICE” but-
ton to return to the current vehicle
position map location display.
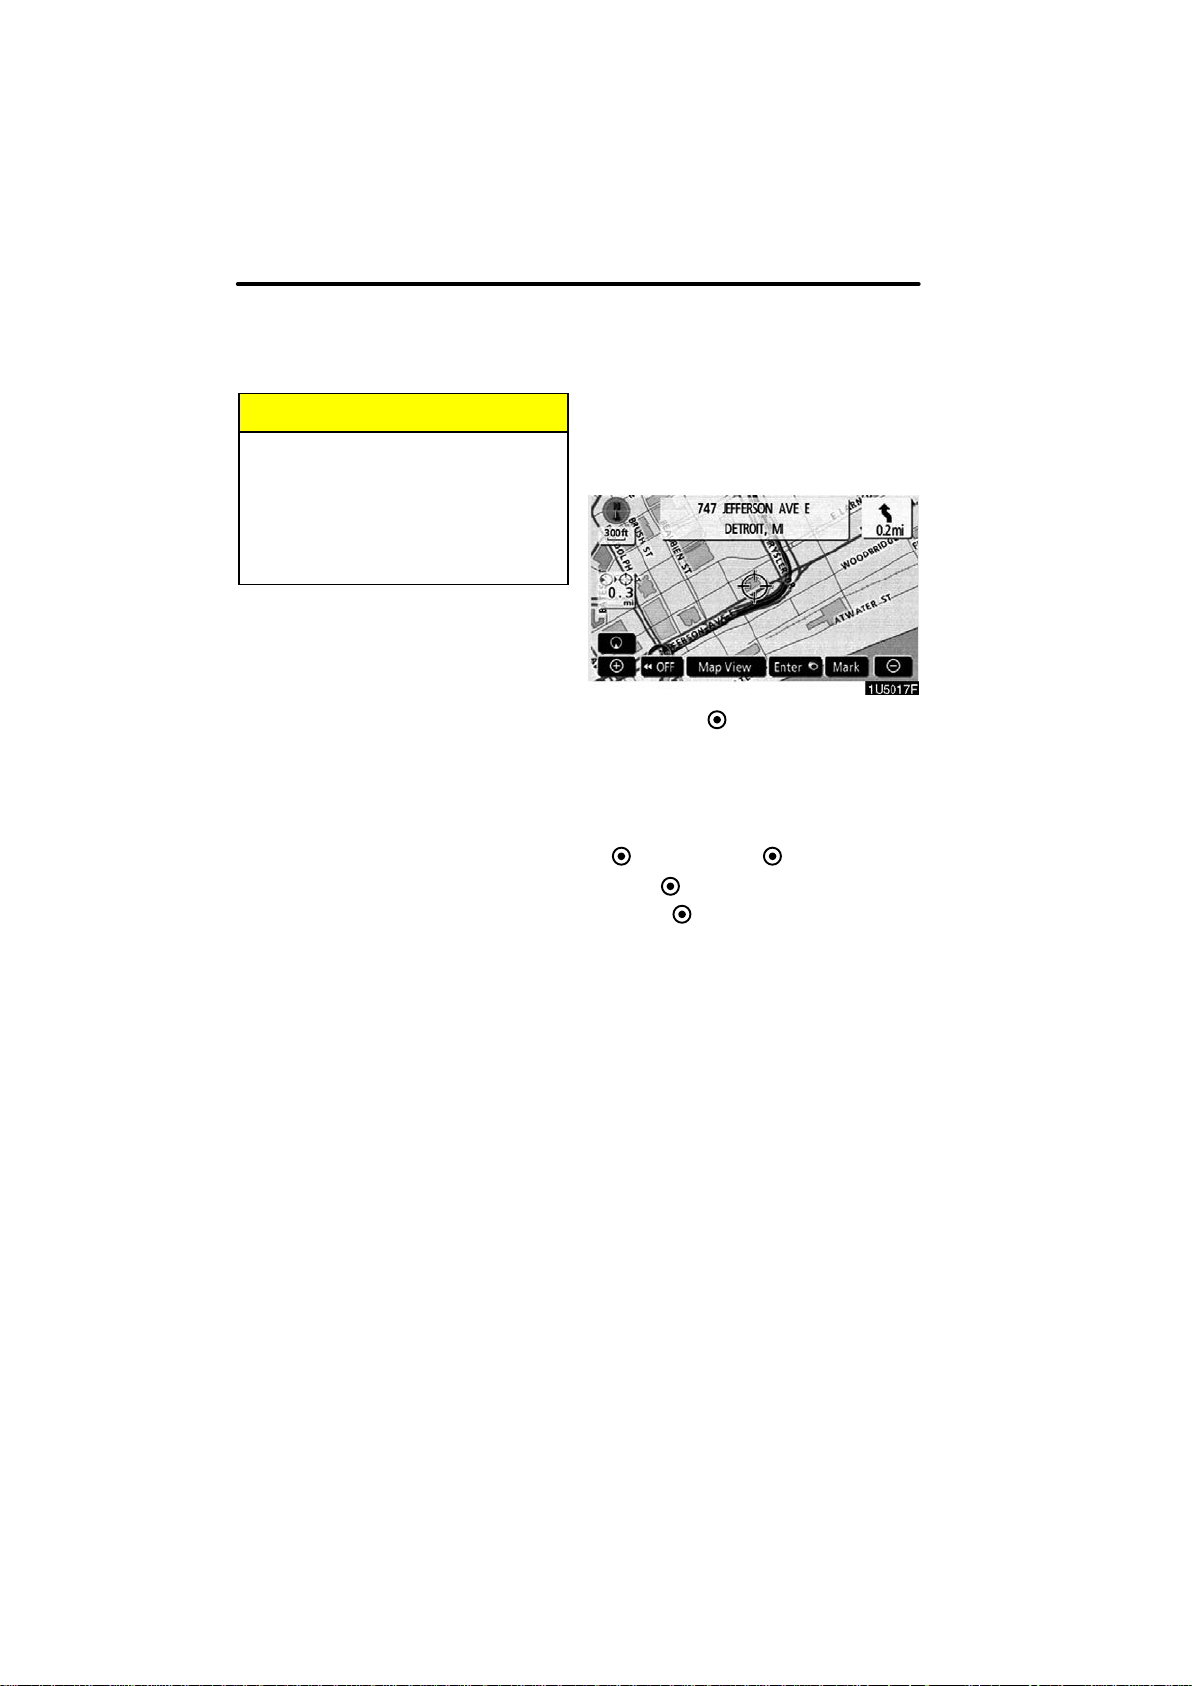
D To set the cursor position as a des-
tination
A specific point on the map can be set as
a destination using the one−touch scroll
function.
Touch “Enter ”.
The screen changes and displays the map
location of the selected destination and the
route preference. (See “Starting route
guidance” on page 61.)
If there is already a set destination, “Add
to
” and “Replace ” are displayed.
“Add to
”: To add a destination.
“Replace
”: To delete the existing des-
tinations and set a new one.
BASIC FUNCTIONS
31
D To register the cursor position as a
memory point
Memory point registration enables easy
access to a specific point.
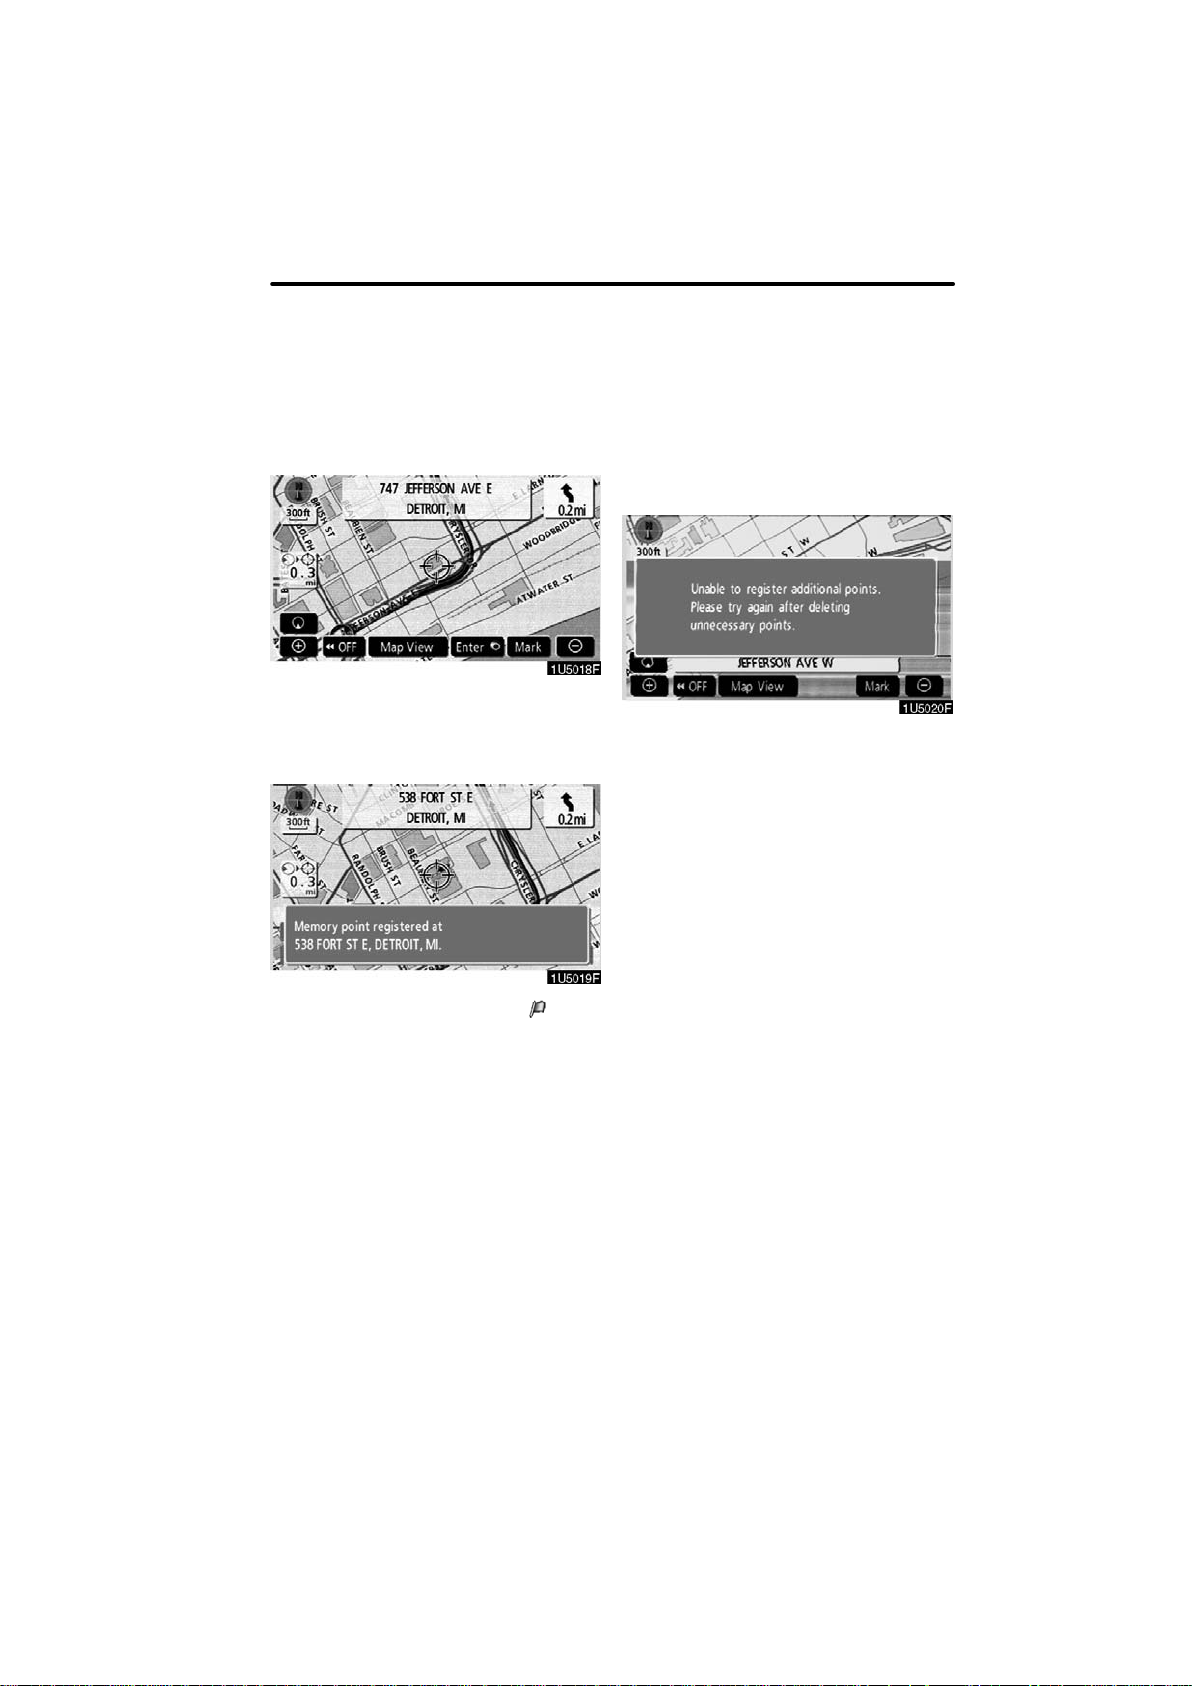
Touch “Mark”.
When you touch “Mark”, the following
screen appears for a few seconds, and
then the map screen returns.
The registered point is shown by on the
map.
To change the icon or name, etc., see “ —
Editing memory points” on page 94.
Up to 106 memory points can be regis-
tered. If there is an attempt to register
more than 106, a message appears for
confirmation.
BASIC FUNCTIONS
32
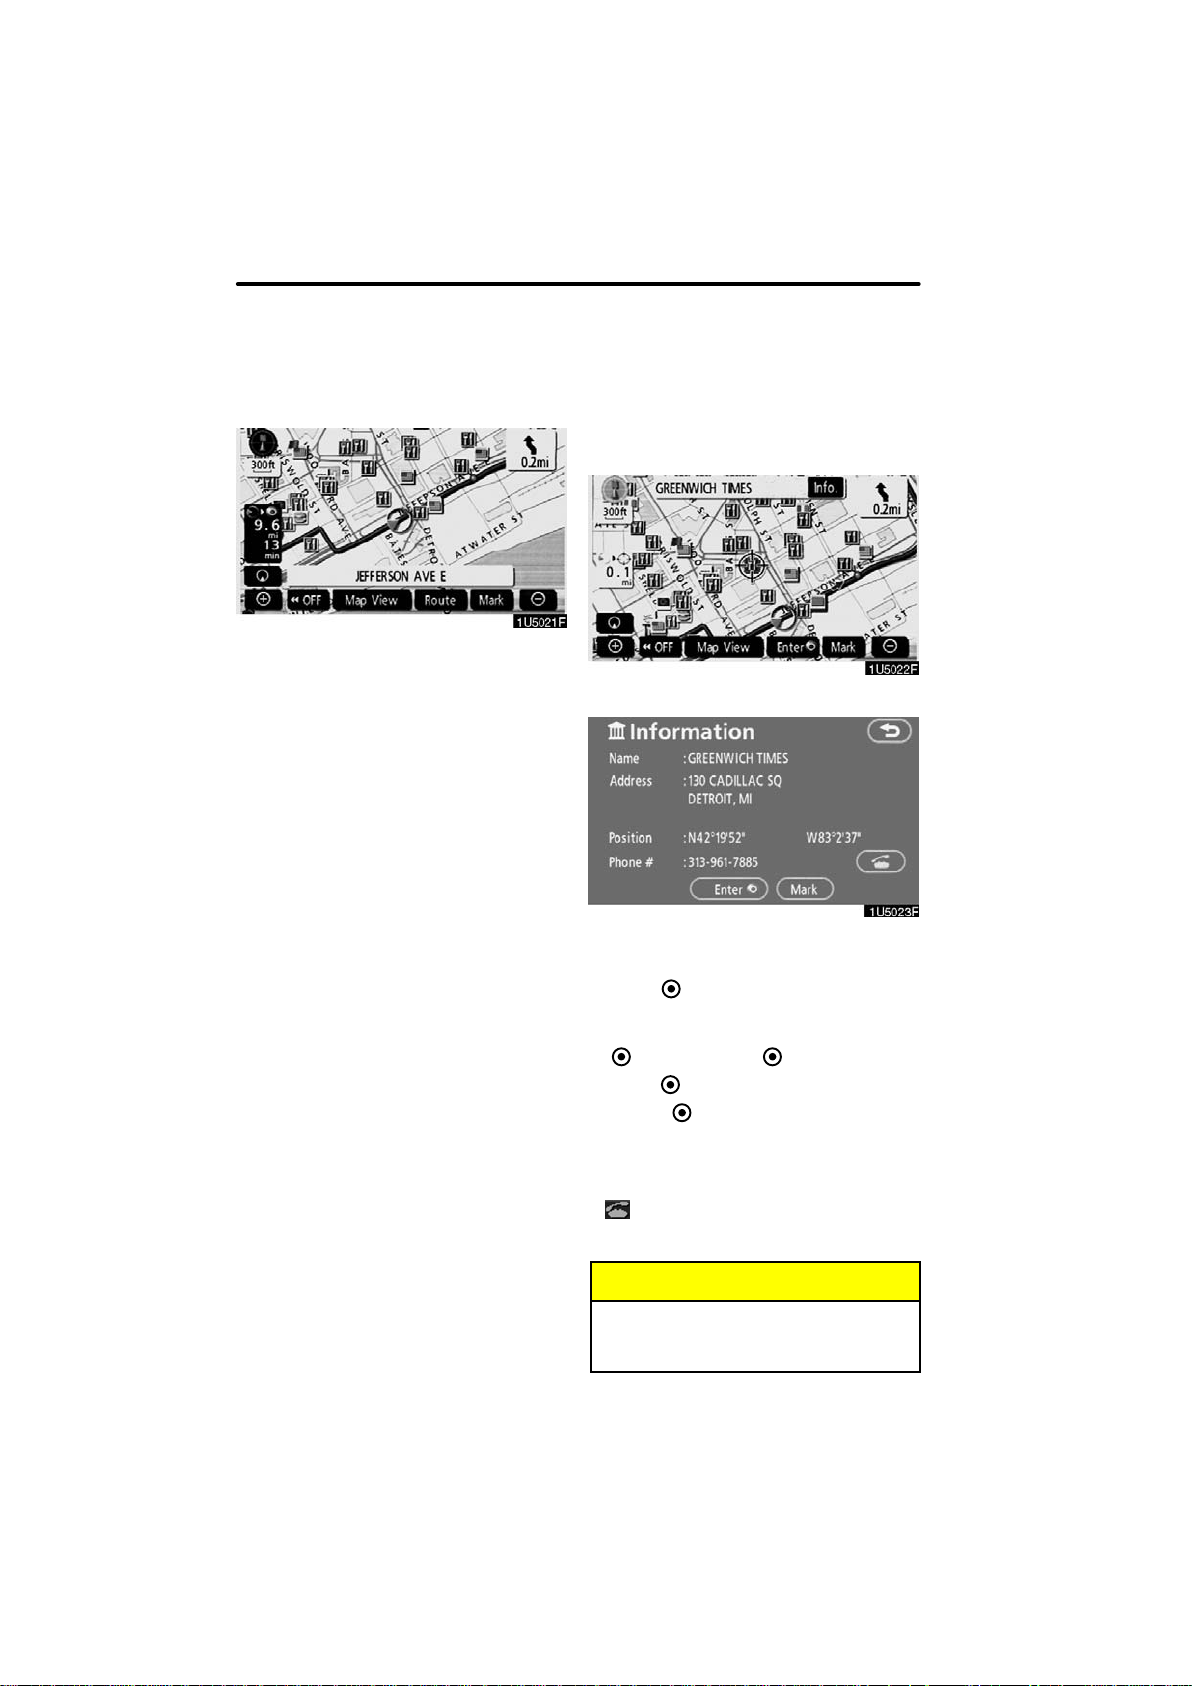
D To see information about the icon
where the cursor is set
To display information about an icon, set
the cursor on it.
POI INFORMATION
When the cursor is set on a POI icon, the
name and “Info.” are displayed on the top
of the screen.
Touch “Info.”.
Information such as the name, address,
and phone number are displayed.
If “Enter
” is touched, the position of the
cursor is set as a destination.
If there is already a set destination, “Add
to
” and “Replace ” are displayed.
“Add to
”: To add a destination.
“Replace
”: To delete the existing des-
tinations and set a new one.
To register this POI as a memory point,
touch “Mark”. (See page 93.)
If
is touched, the registered telephone
number can be called.
INFORMATION
The desired Point of Interest can be
displayed on the map screen. (See
“ — Display POI icons” on page 78.)
BASIC FUNCTIONS
33
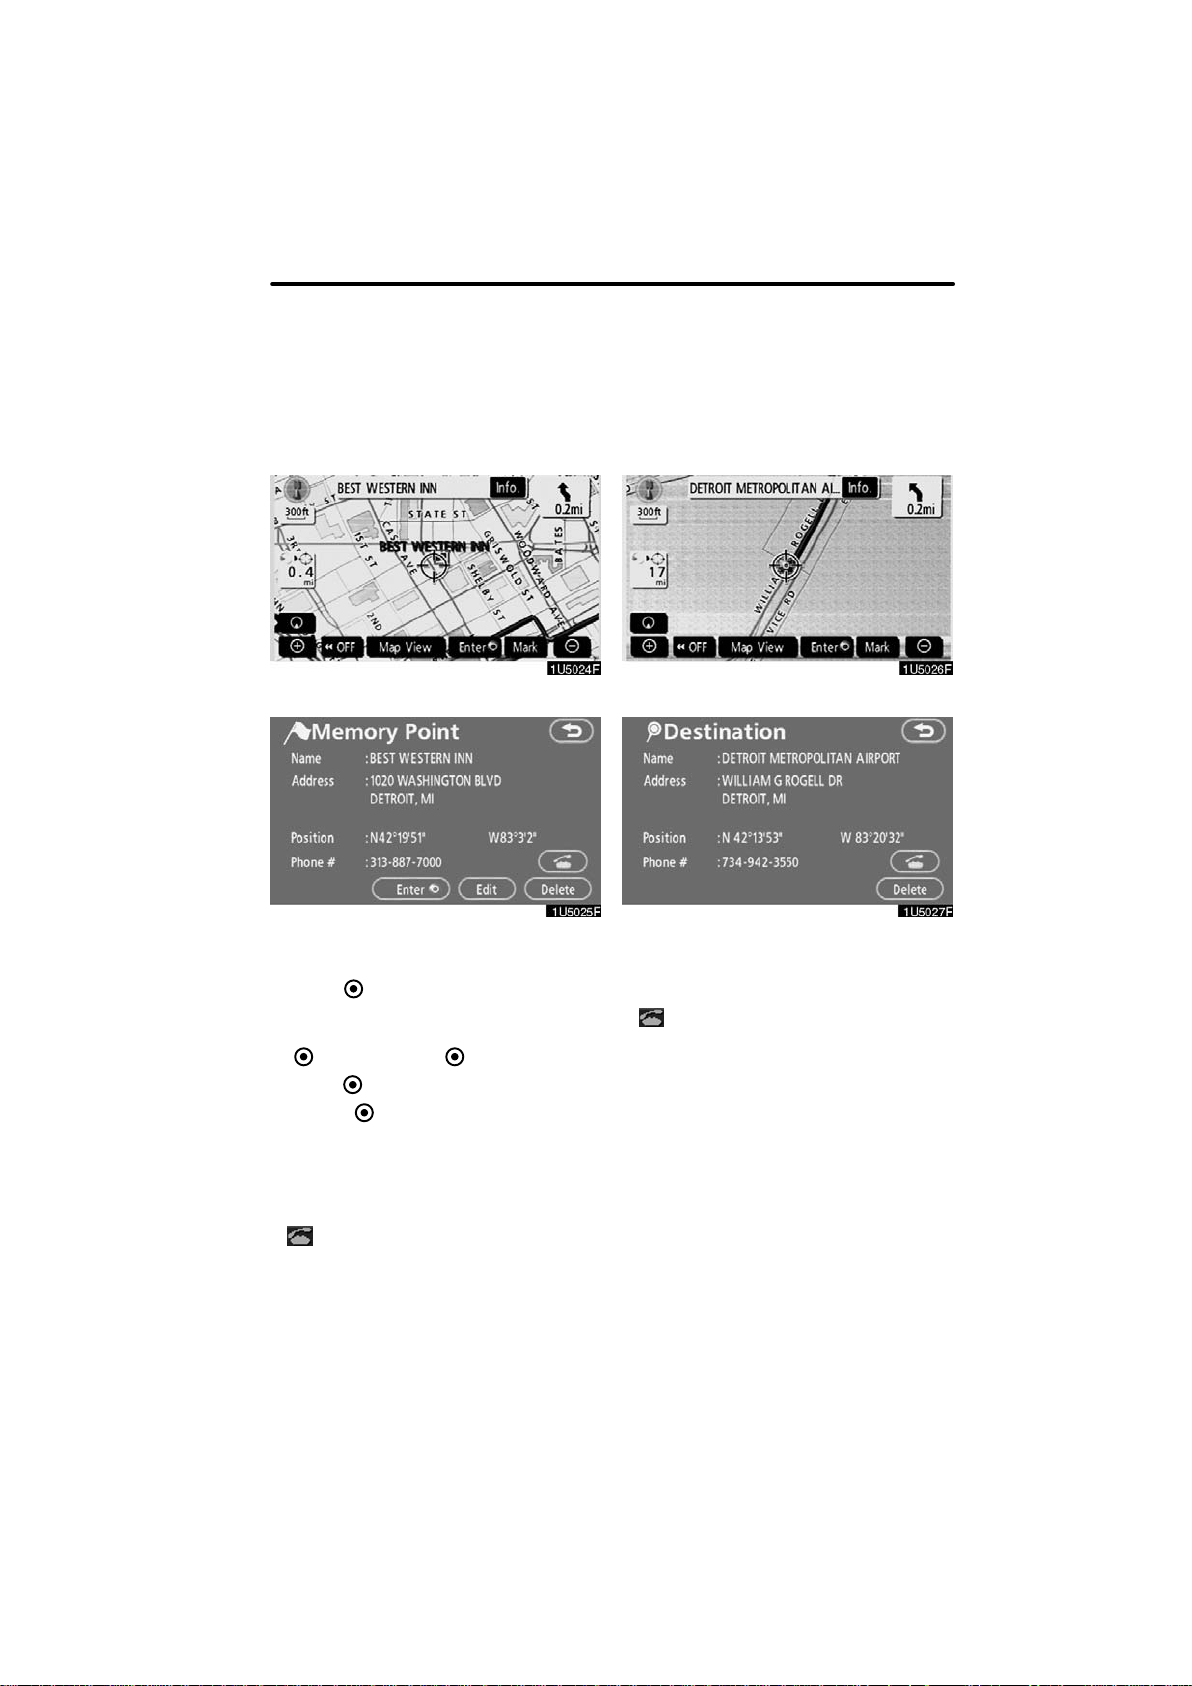
MEMORY POINT INFORMATION
When the cursor is set on a memory point
icon, the name and “Info.” are displayed
on the top of the screen.
Touch “Info.”.
Information such as the name, address,
and phone number are displayed.
If “Enter
” is touched, the position of the
cursor is set as a destination.
If there is already a set destination, “Add
to
” and “Replace ” are displayed.
“Add to
”: To add a destination.
“Replace
”: To delete the existing des-
tinations and set a new one.
To edit a memory point, touch “Edit”. (See
“ — Editing memory points” on page 94.)
To delete a memory point, touch “Delete”.
If
is touched, the registered telephone
number can be called.
DESTINATION INFORMATION
When the cursor is set on a destination
icon, the name and “Info.” are displayed
on the top of the screen.
Touch “Info.”.
Information such as the name, address,
and phone number are displayed.
To delete a destination, touch “Delete”.
If
is touched, the registered telephone
number can be called.
BASIC FUNCTIONS
34
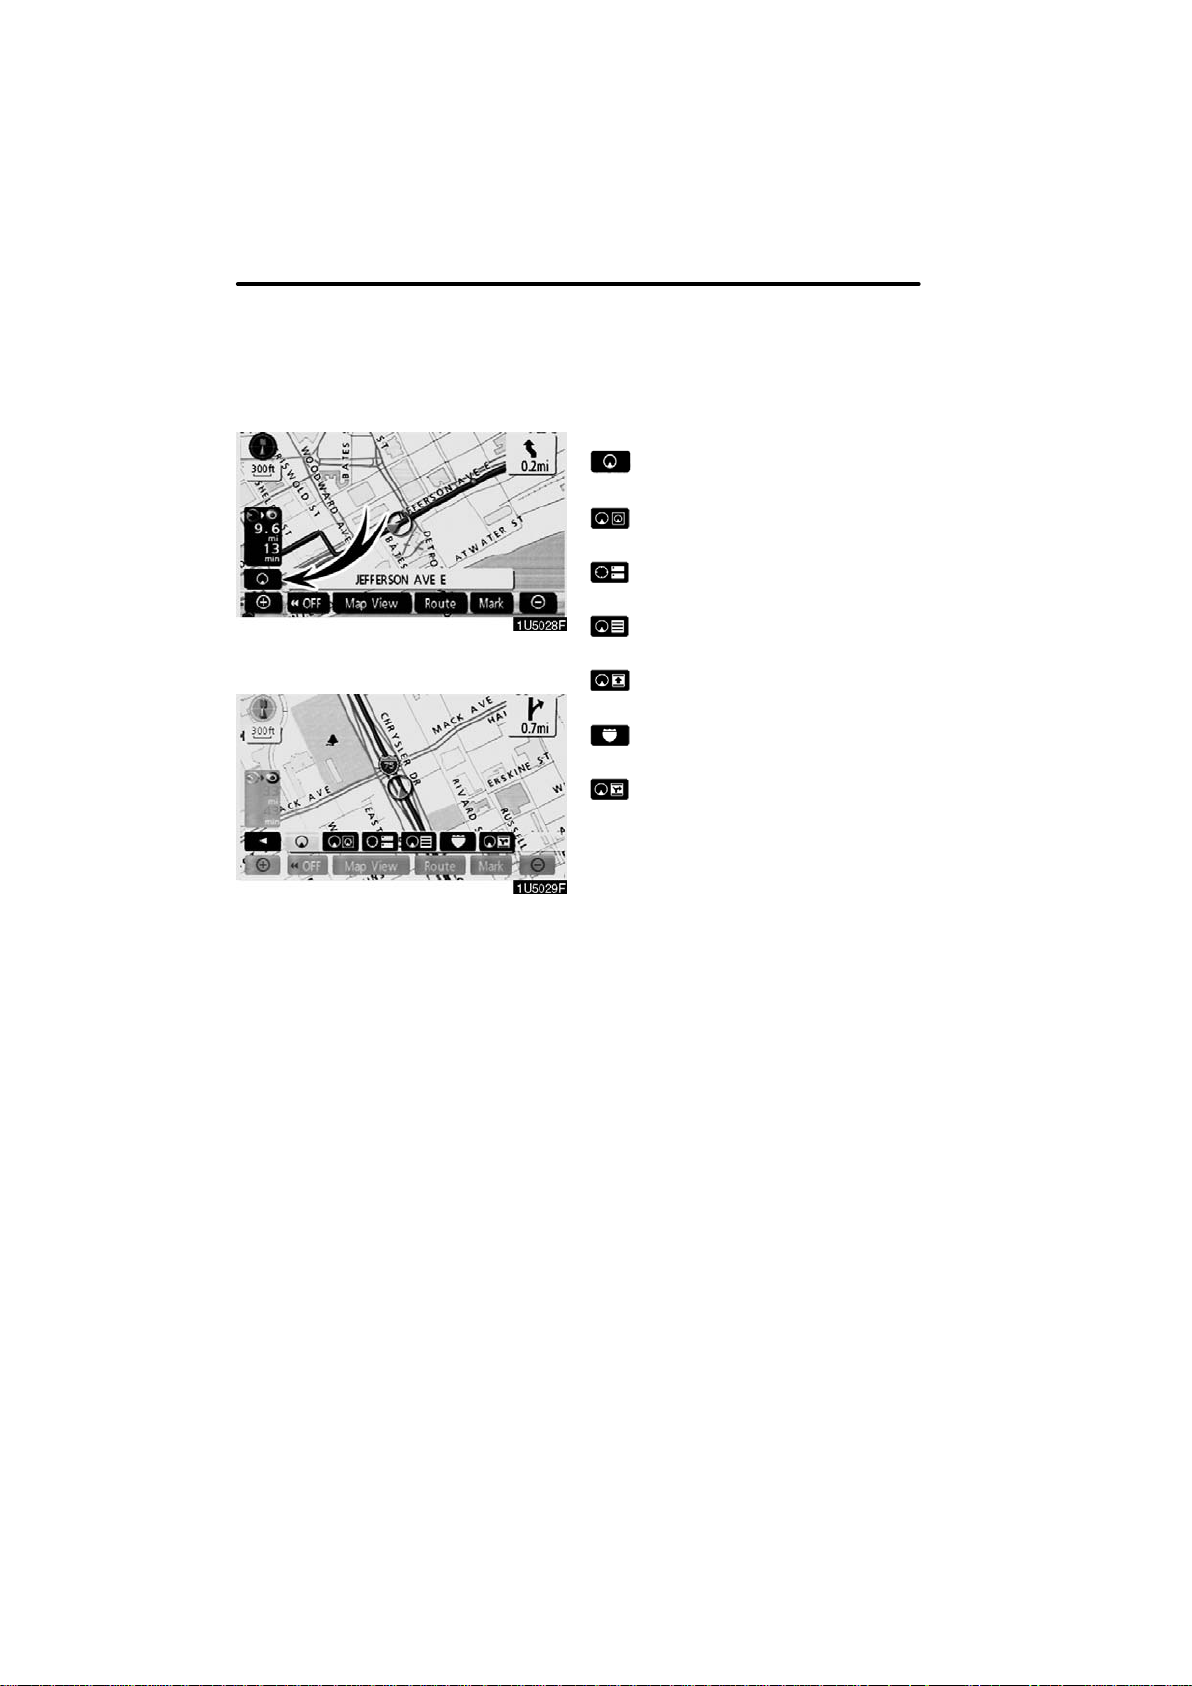
Any one of the screen configurations can
be selected .
1. Touch this button to display the fol-
lowing screen.
2. To select the desired screen config-
uration, touch one of the following but-
tons.
Depending on the conditions, certain
screen configuration buttons cannot be
selected.
: To display the single map screen.
(See page 35.)
: To display the dual map screen.
(See page 35.)
: To display the compass mode
screen. (See page 36.)
: To display the turn list screen.
(See page 68.)
: To display the arrow screen. (See
page 68.)
: To display the freeway information
screen. (See page 66.)
: To display the intersection guid-
ance screen or the guidance
screen on the freeway. (See page
67.)
— Switching the screens
BASIC FUNCTIONS
35
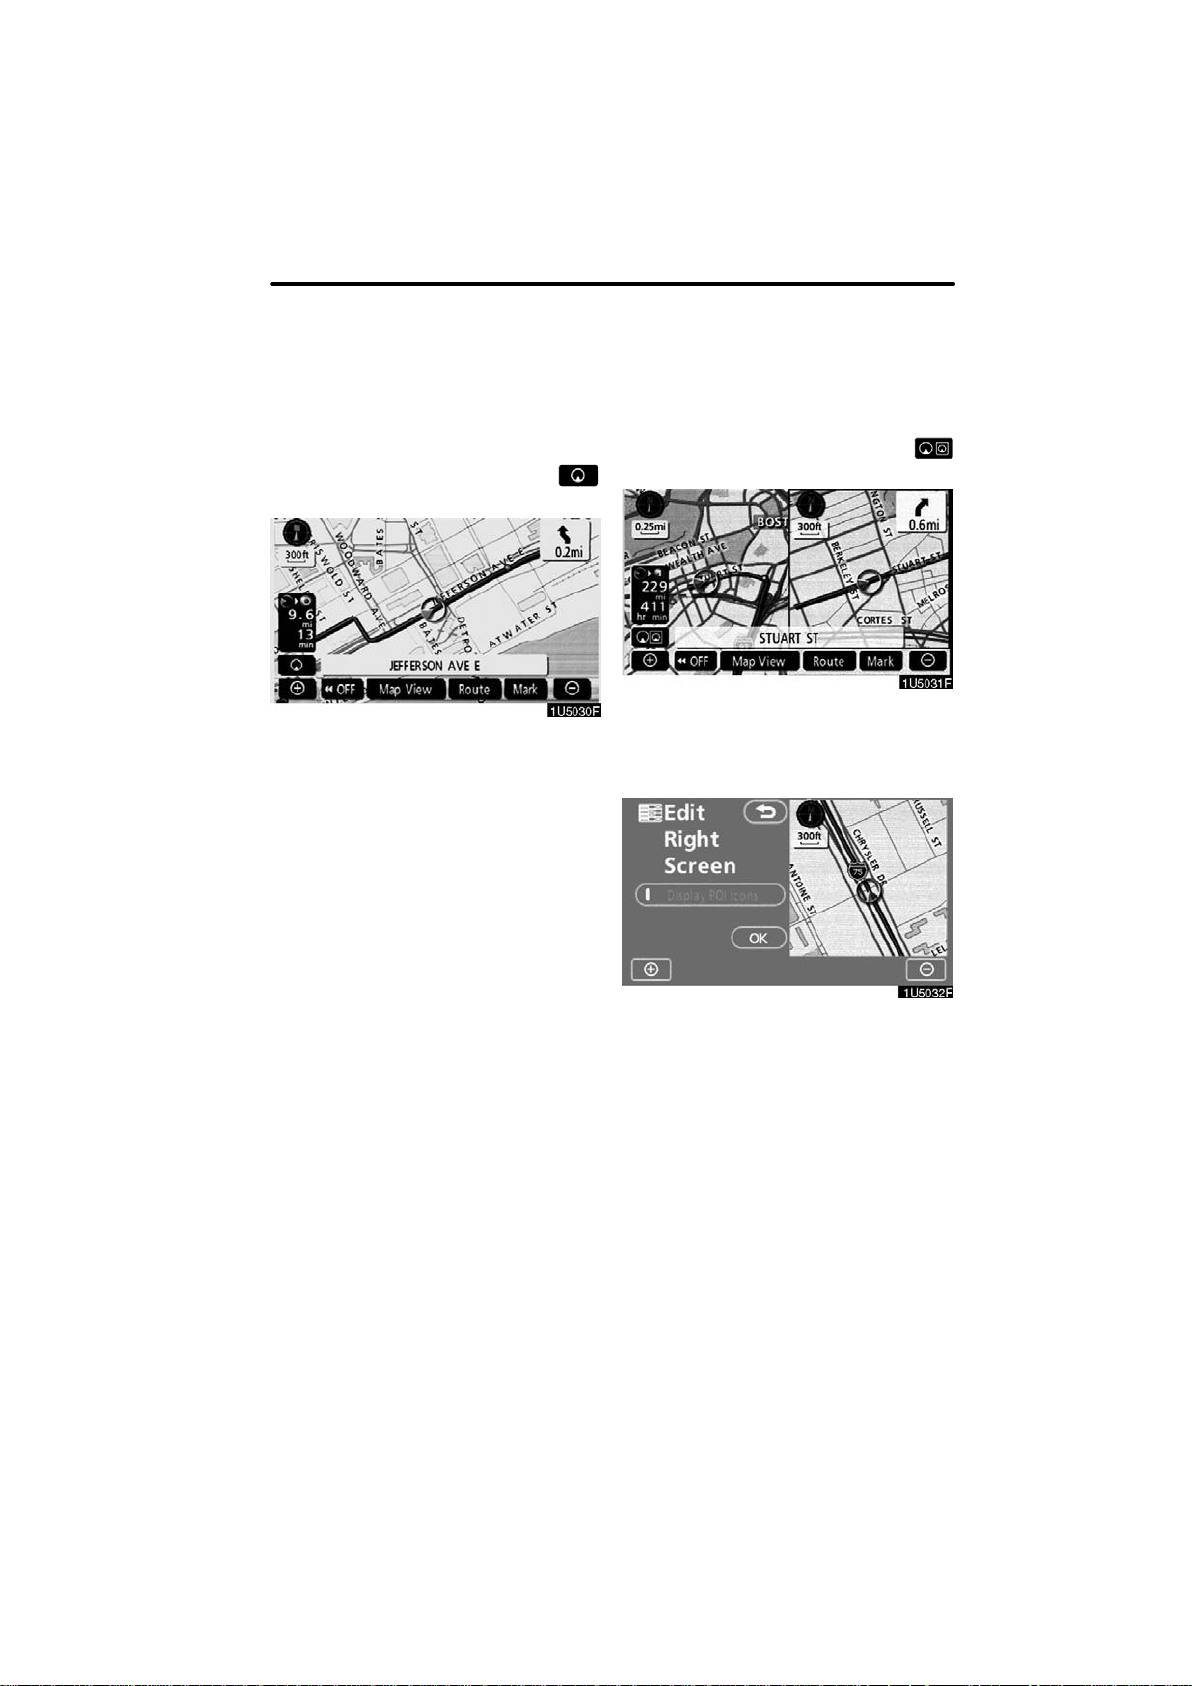
D Screen configurations
SINGLE MAP
This is a regular map screen.
While on a different screen, touching
will display the single map screen.
The screen shows the single map.
DUAL MAP
A map can be displayed split in two.
While on a different screen, touching
will display the dual map screen.
The screen shows the dual map. The map
on the left is the main map.
The right side map can be edited by touch-
ing any specific point on the right side map.
This screen can perform the following pro-
cedures:
1. Changing the map scale
2. Displaying the POI icon
3. Changing the orientation of the map
Touch “OK” when you complete edi-
ting.
The screen returns to the dual map screen.
BASIC FUNCTIONS
36
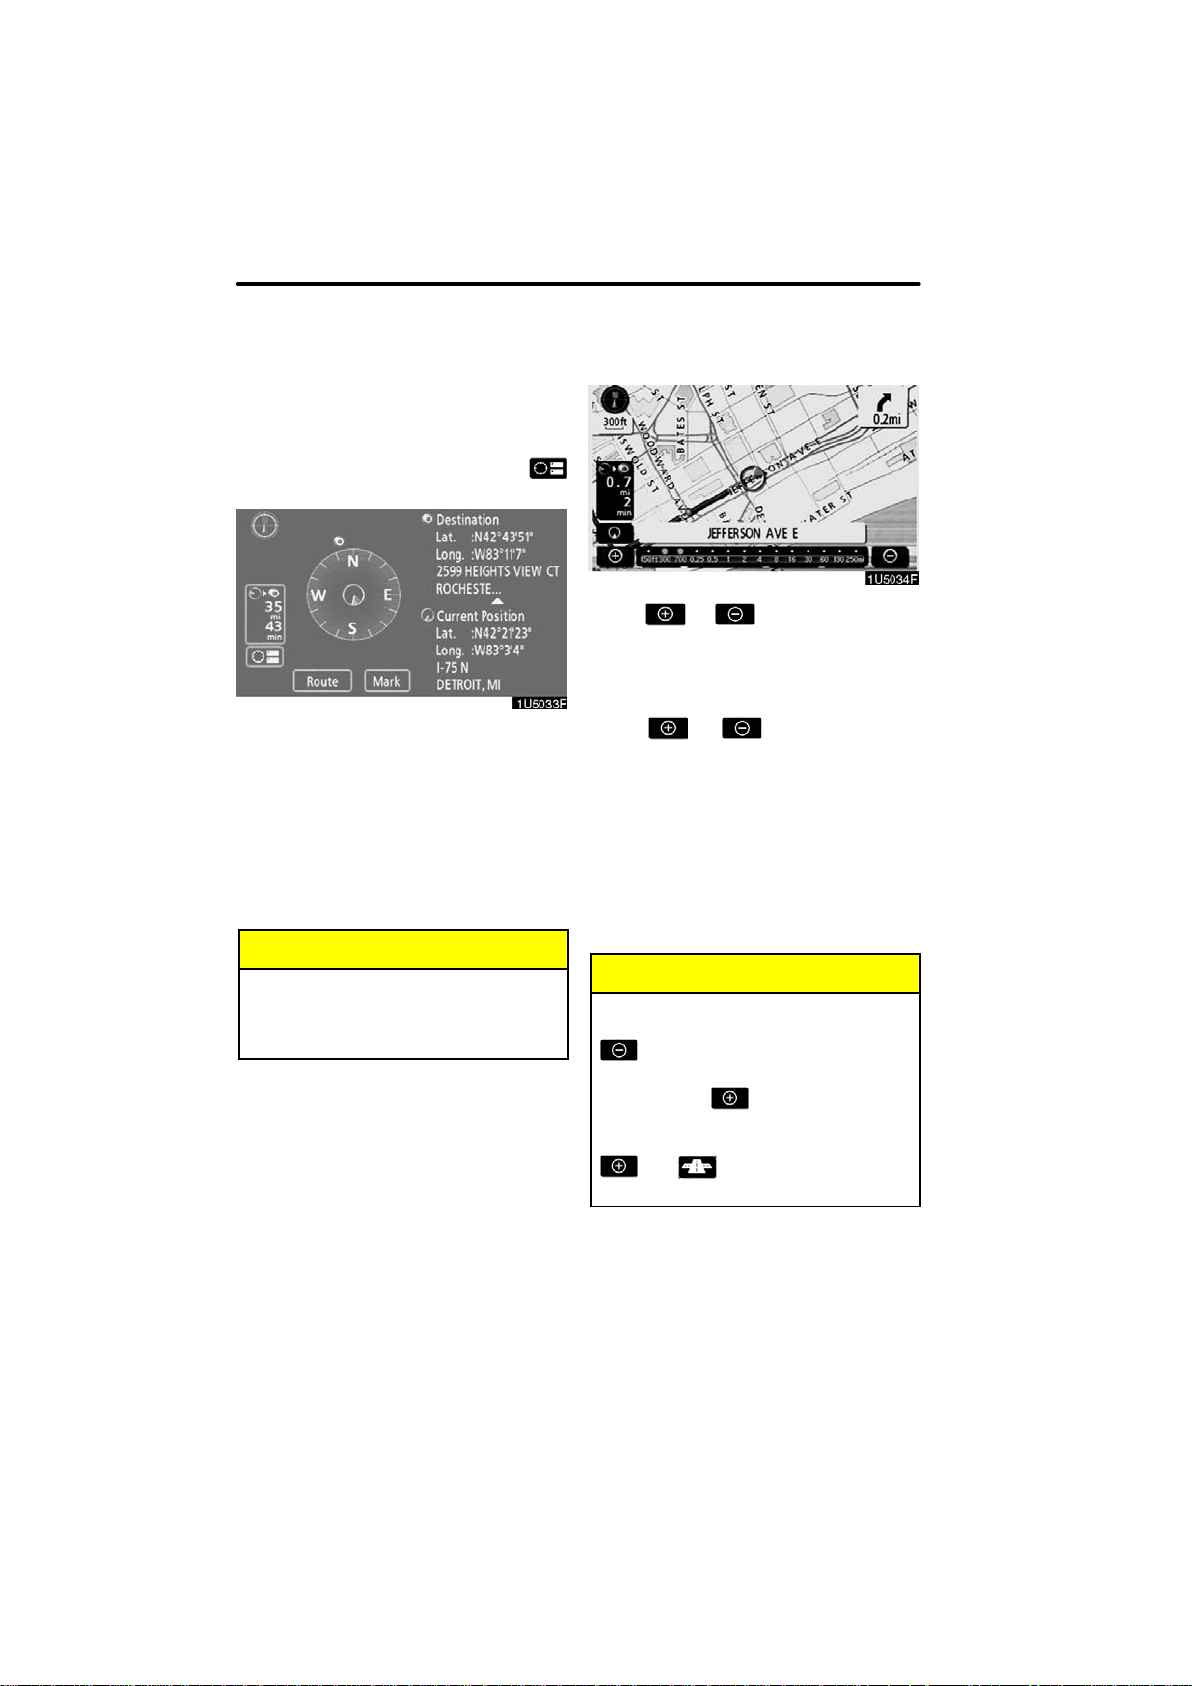
COMPASS MODE
Current vehicle position is indicated with a
compass, not with a map.
While on a different screen, touching
will display the compass mode screen.
Information about the destination and cur-
rent position, as well as a compass, is dis-
played on the screen.
The destination mark is displayed in the di-
rection of the destination. When driving re-
fer to the longitude and latitude coordi-
nates, and the compass, to make sure that
your vehicle is headed in the direction of
the destination.
INFORMATION
When the vehicle travels out of the
coverage area, the guidance screen
changes to the compass mode
screen.
Touch or to change the scale
of the map display. The scale bar and indi-
cator at the bottom of the screen indicates
the map scale menu. The scale range is
150 feet (50 m) to 250 miles (400 km).
Touch
or until the scale bar
changes normally. By continuing to touch
the button, the scale bar changes smooth-
ly.
The scale of the map display can be
changed by touching the scale bar directly.
It is not available while driving.
The map scale is displayed under the
north−up symbol or heading−up symbol at
the top left of the screen.
INFORMATION
When the map scale is at the maxi-
mum range of 250 miles (400 km),
is not shown. When the map
scale is at the minimum range of 150
feet (50 m), is not shown. In
areas where the foot print map is
available the map scale changes from
to when at the minimum
range.
— Map scale
BASIC FUNCTIONS
37
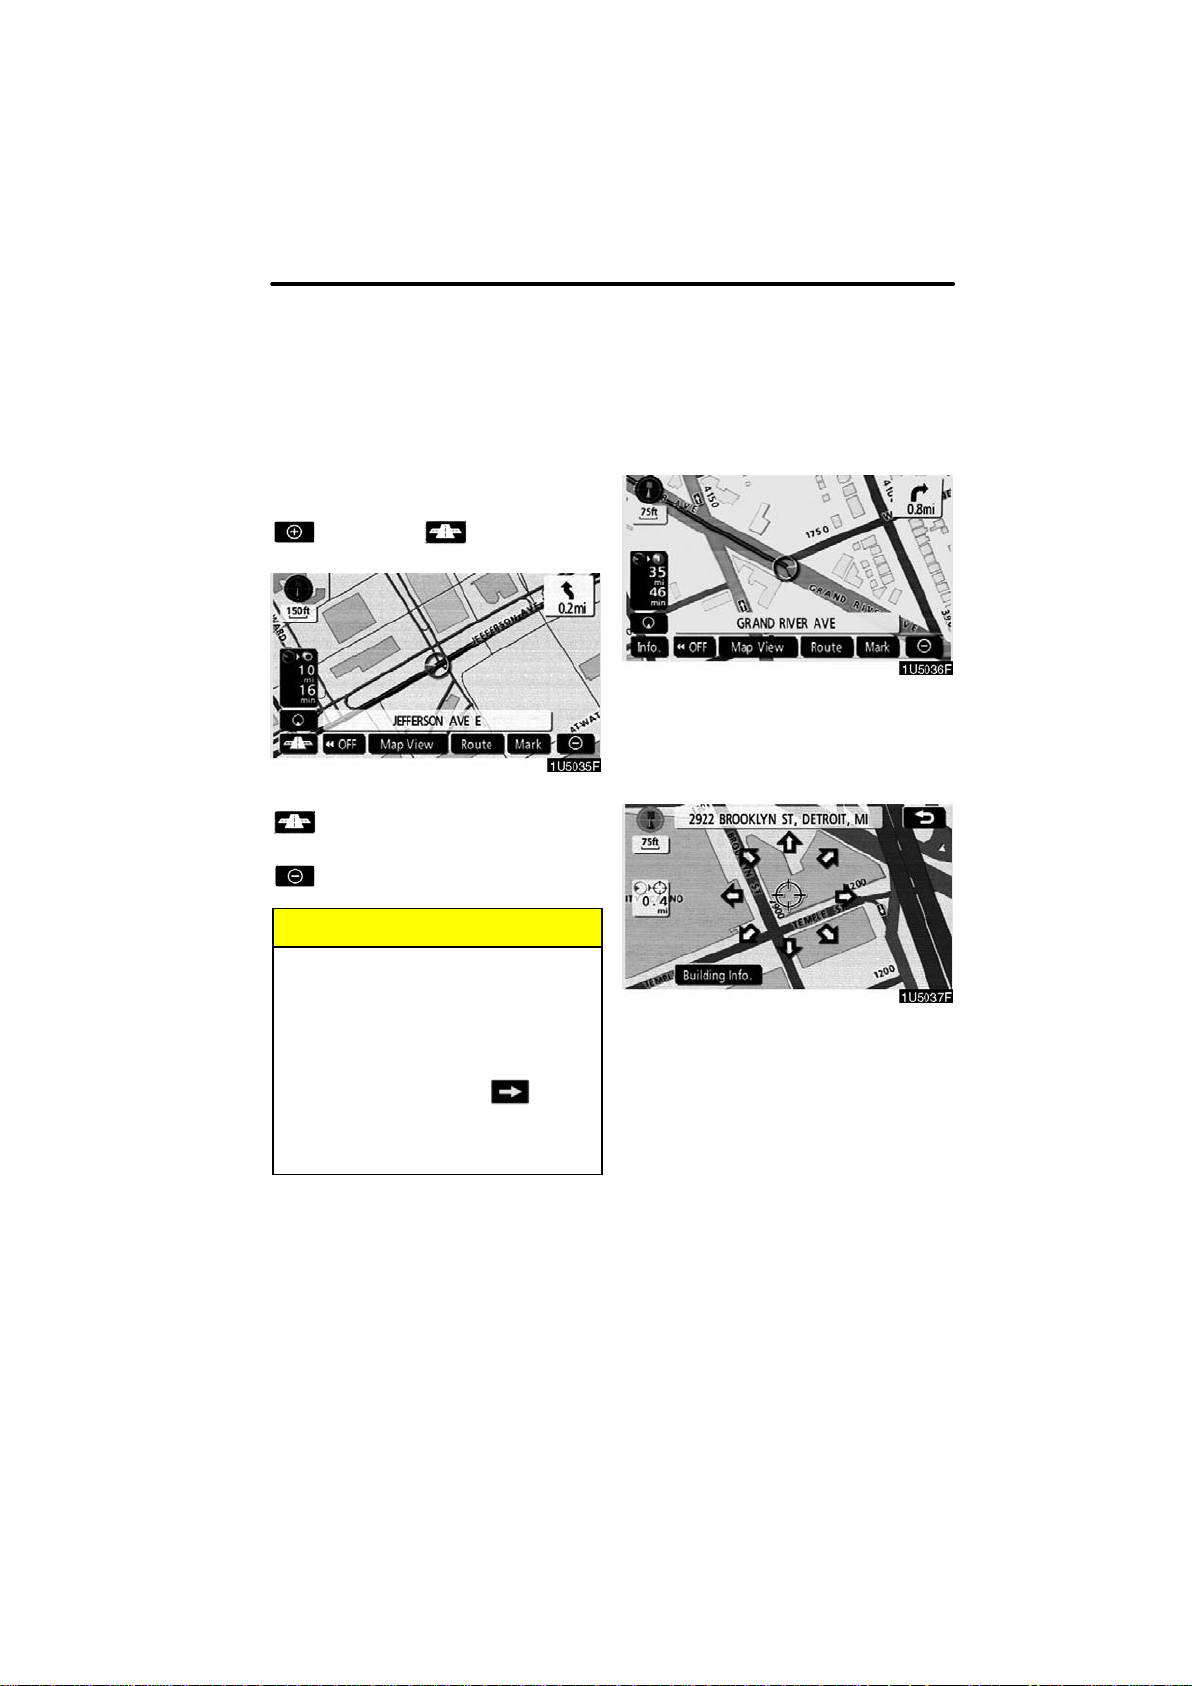
For the area which is covered by the foot
print map (Some areas in the following
cities: Detroit, Chicago, N.Y., L.A), you can
switch to the foot print map on a scale of 75
feet (25 m).
D To switch to the foot print map
changes into when the map is
scaled down to 150 feet (50 m).
To display the foot print map, touch
.
To delete the foot print map display, touch
.
INFORMATION
D If the map or the current position is
moved to the area which is not cov-
ered by the foot print map, the
screen scale automatically
changes to 150 feet (50 m).
D On the foot print map, a one way
street is displayed by .
D It is not possible to perform scroll-
ing on the foot print map (one−
touch scroll) while driving.
D To display building information
Information is available only for buildings
for which information is recorded on the
map disc.
1. Touch “Info.” while the foot print
map is displayed.
If the map is displayed by a split screen,
the map will change into a single map dis-
play.
2. Using the eight−direction arrow,
move the cursor to the position of the
building to display building informa-
tion.
3. Touch “Building Info.”.
— Foot print map
BASIC FUNCTIONS
38
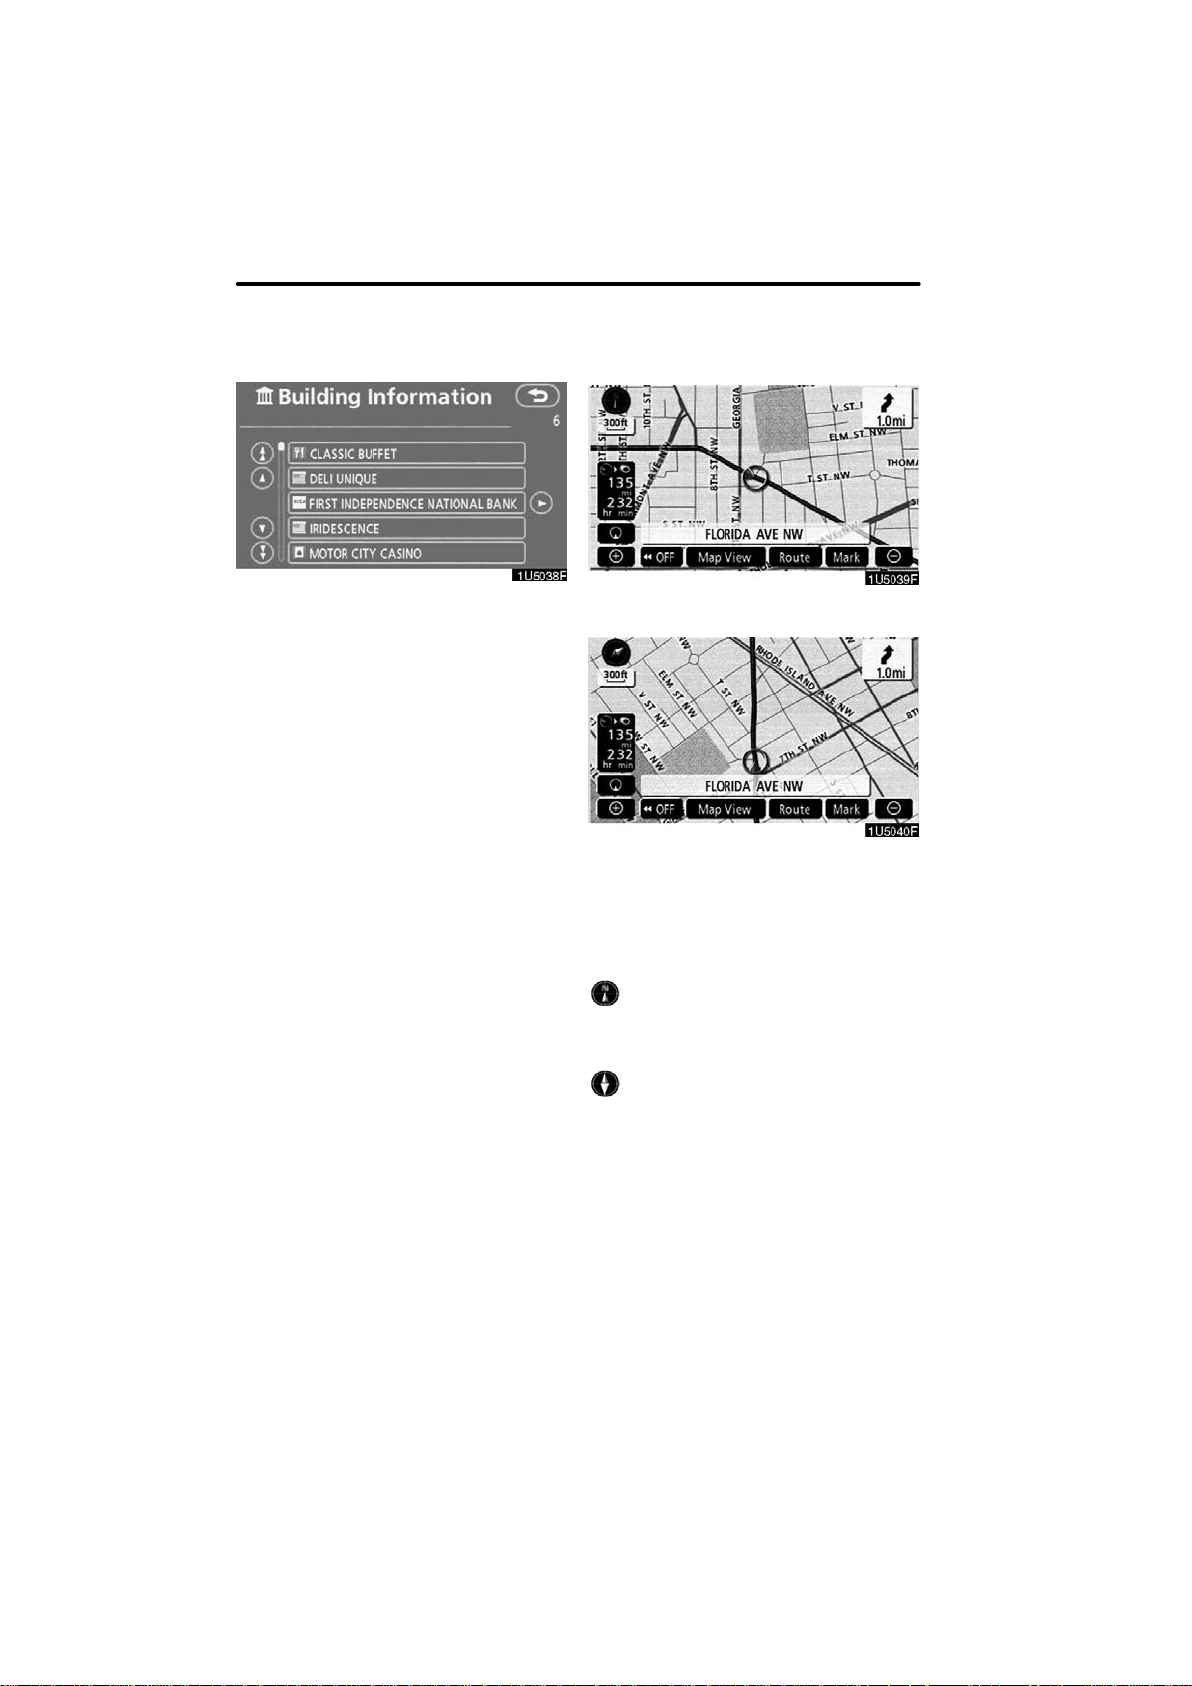
Details of POIs in some buildings may be
displayed.
For detailed POI information, touch the
building name. You can see details of the
selected POIs.
" North−up screen
" Heading−up screen
The orientation of the map can be changed
from North−up to Heading−up by touching
the orientation symbol at the top left of the
screen.
North−up symbol
Regardless of the direction of vehicle trav-
el, North is always up.
Heading−up symbol
The direction of vehicle travel is always up.
A red arrow indicates North.
— Orientation of the map

SECTION 2
DESTINATION SEARCH
39
DESTINATION SEARCH
Destination search
D Quick reference (”Destination” screen) 40. . . . . . . . . . . . . . . . . . . .
D Destination search 41. . . . . . . . . . . . . . . . . . . . . . . . . . . . . . . . . . . . .
Selecting the search area 42. . . . . . . . . . . . . . . . . . . . . . . . . . . . .
Destination search by Home 44. . . . . . . . . . . . . . . . . . . . . . . . . . .
Destination search by Quick access 44. . . . . . . . . . . . . . . . . . . .
Destination search by ”Address” 45. . . . . . . . . . . . . . . . . . . . . . .
Destination search by ”POI* Name” 49. . . . . . . . . . . . . . . . . . . . .
Destination search by ”POI* Category” 52. . . . . . . . . . . . . . . . . .
Destination search by ”Emergency” 56. . . . . . . . . . . . . . . . . . . . .
Destination search by ”Memory” 56. . . . . . . . . . . . . . . . . . . . . . . .
Destination search by ”Previous” 57. . . . . . . . . . . . . . . . . . . . . . .
Destination search by ”Map” 57. . . . . . . . . . . . . . . . . . . . . . . . . . .
Destination search by ”Intersection” 58. . . . . . . . . . . . . . . . . . . .
Destination search by ”Freeway Ent./Exit” 59. . . . . . . . . . . . . . .
Destination search by ”Coordinates” 60. . . . . . . . . . . . . . . . . . . .
Destination search by ”Phone #” 60. . . . . . . . . . . . . . . . . . . . . . .
D Starting route guidance 61. . . . . . . . . . . . . . . . . . . . . . . . . . . . . . . . .
∗
: Point of Interest
DESTINATION SEARCH
40
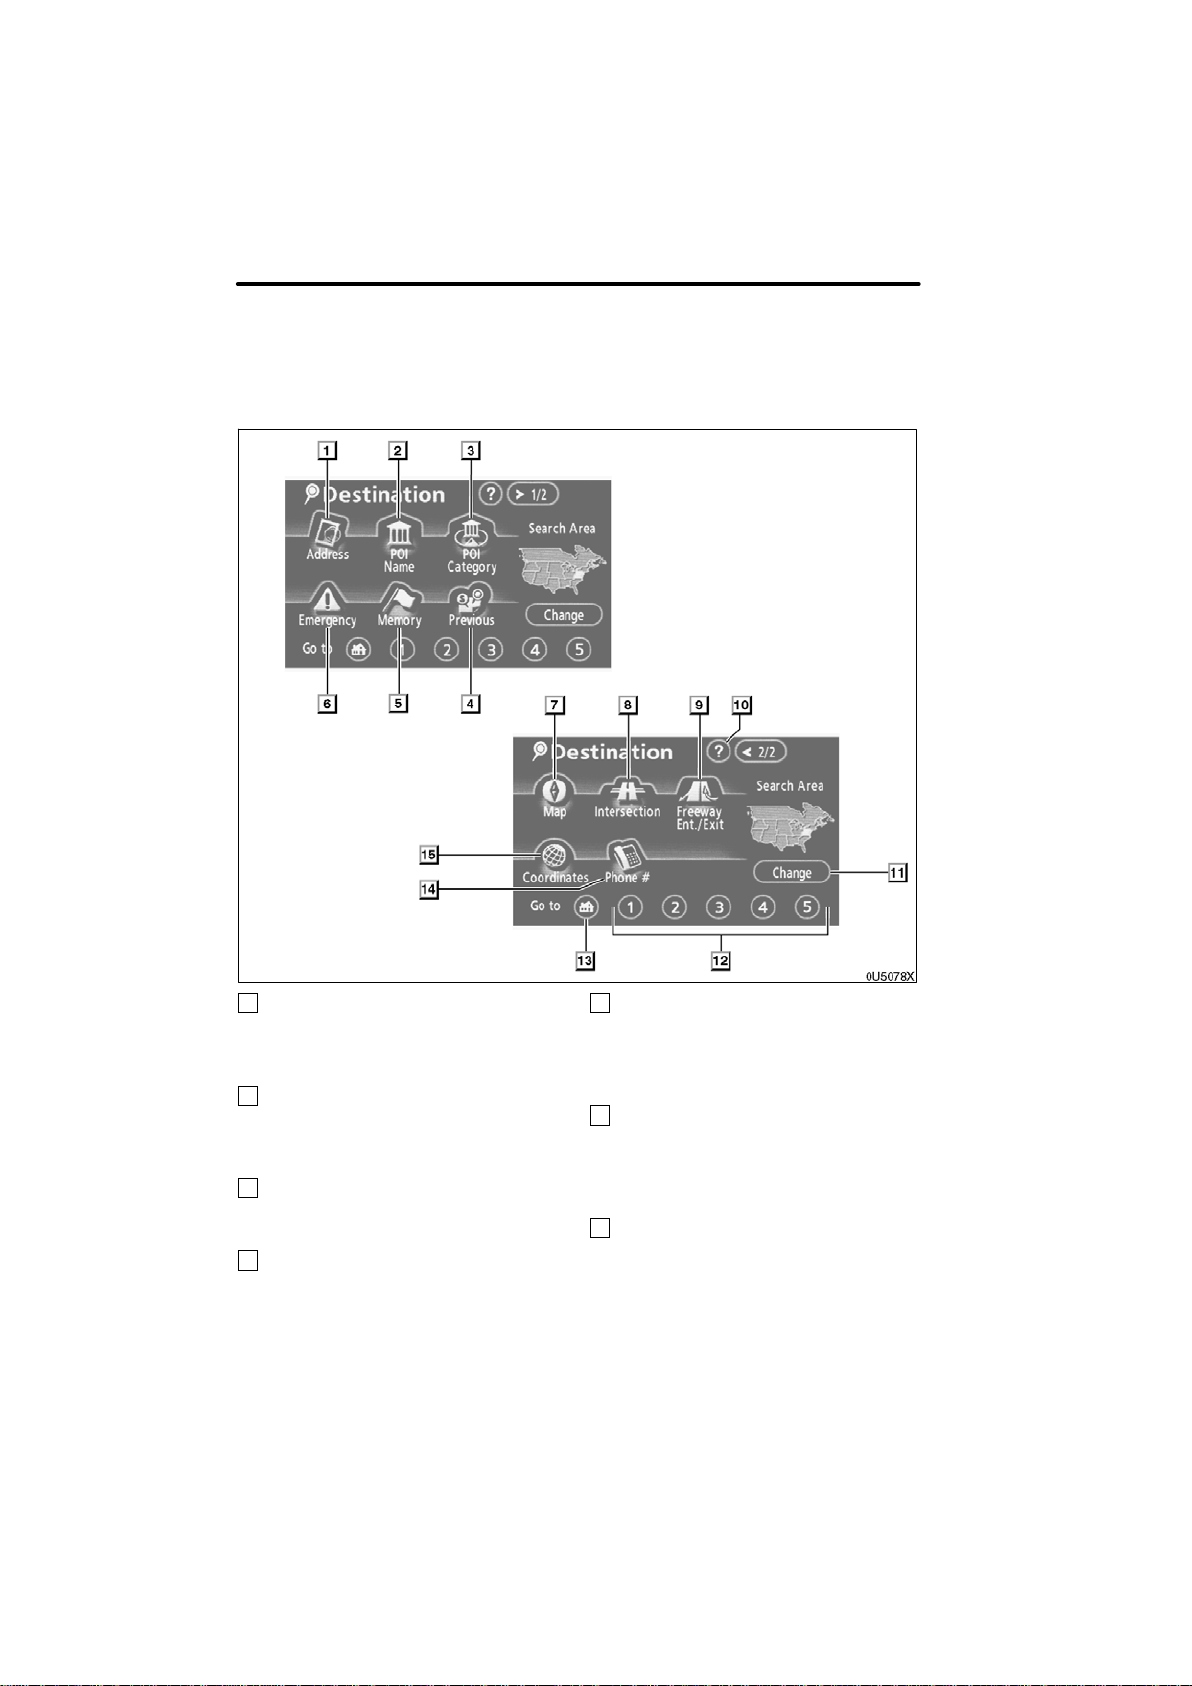
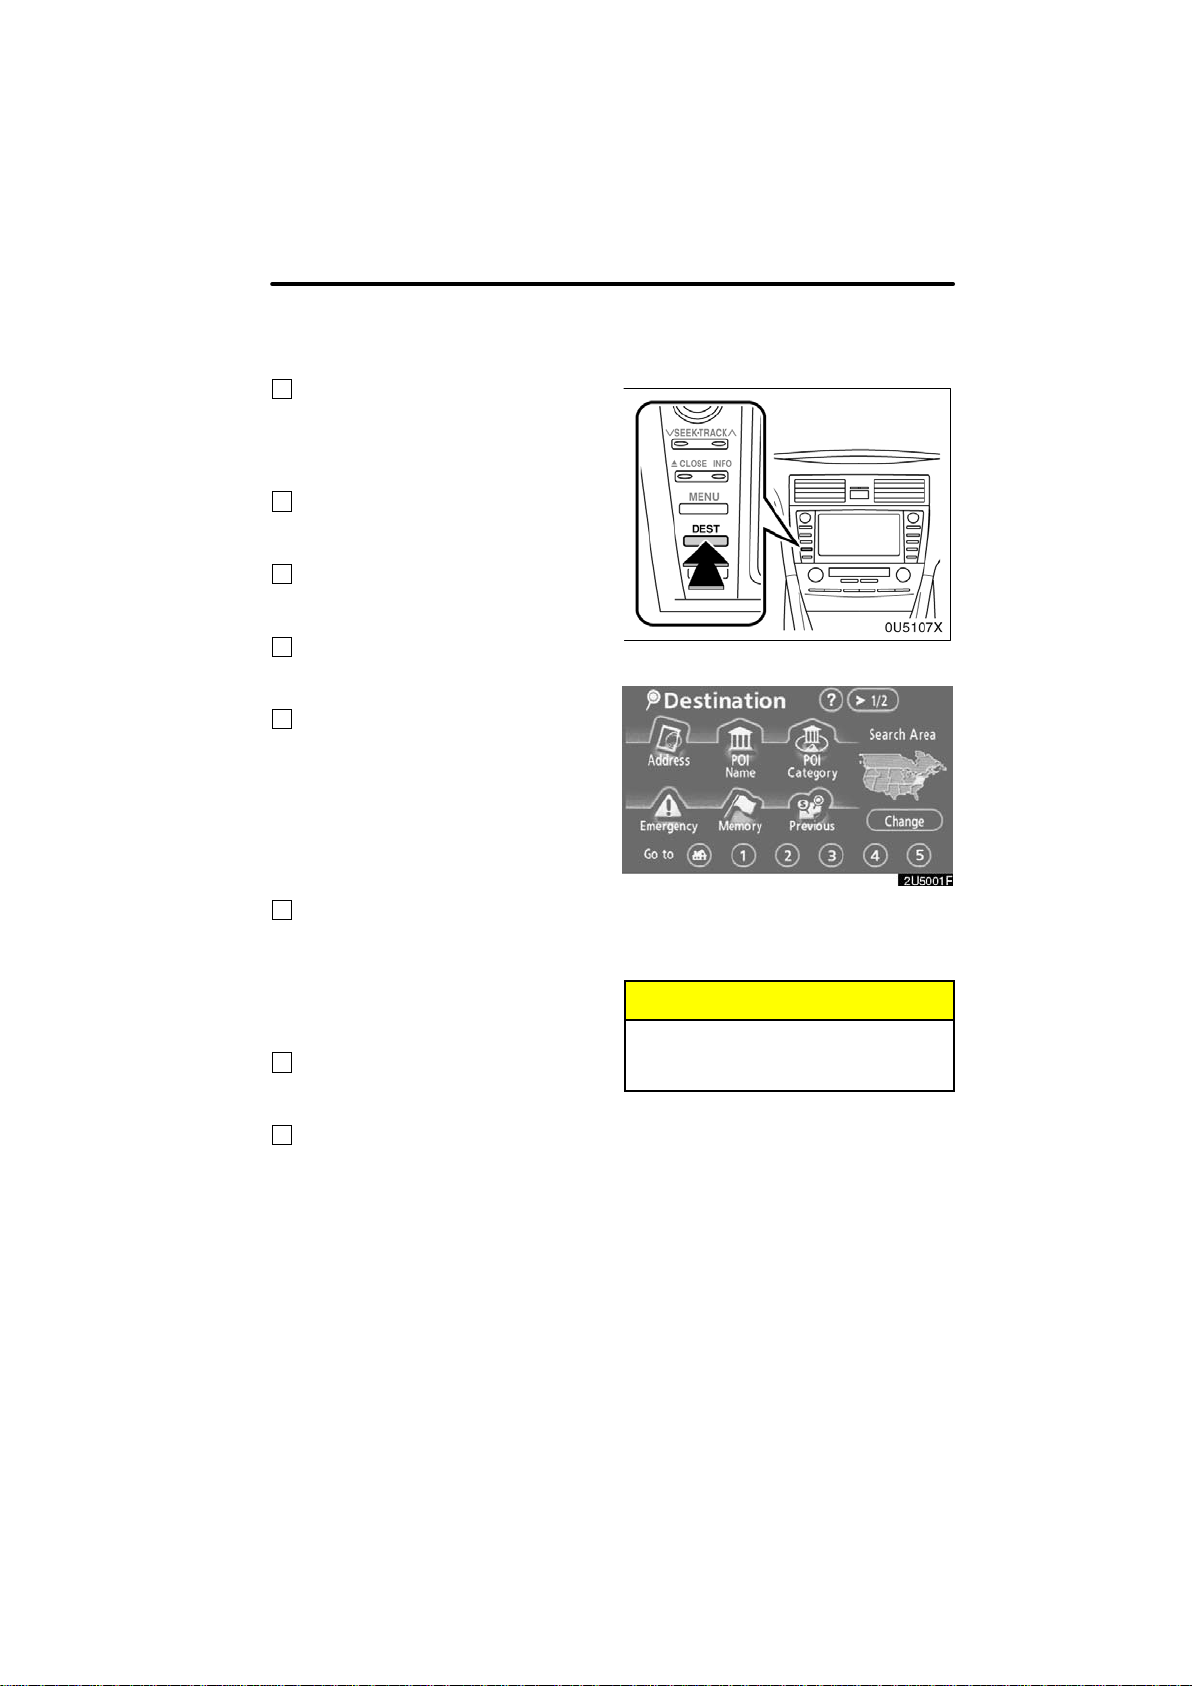
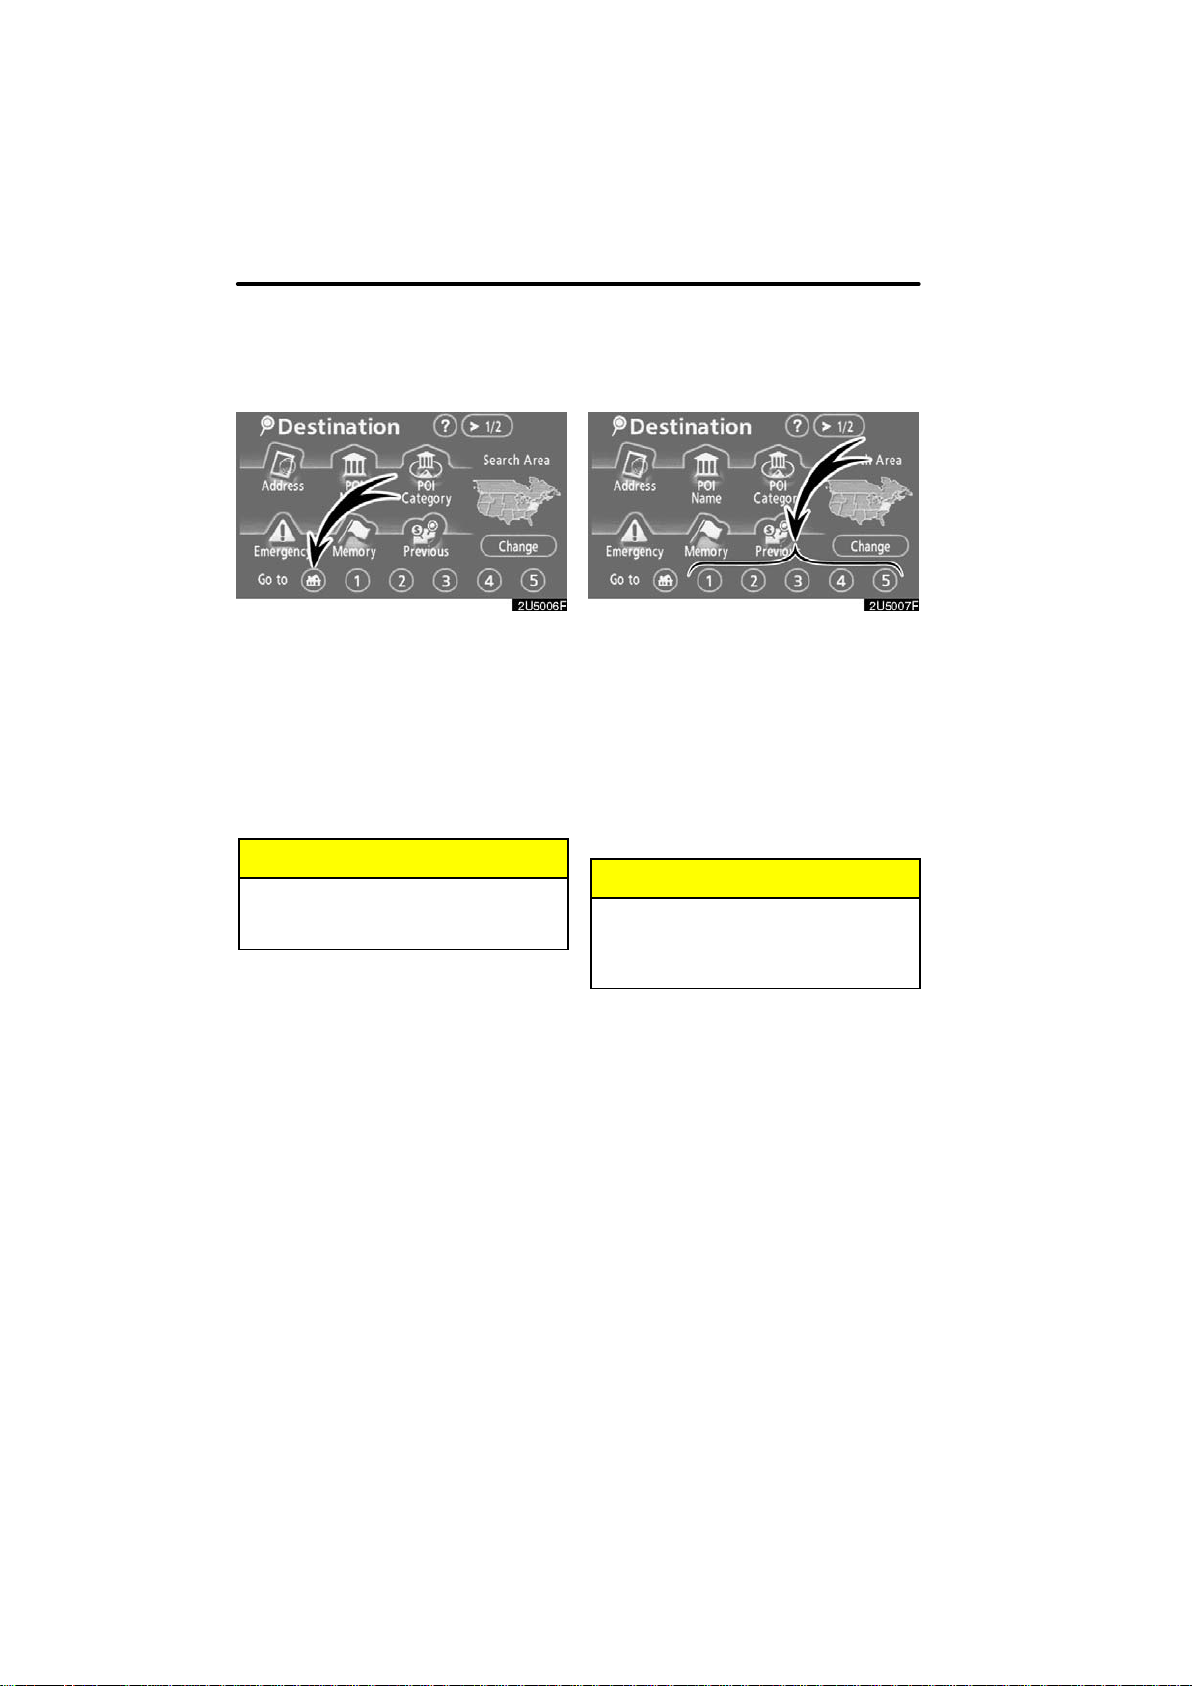
The “Destination” screen allows you to search for a destination. To display the “Destina-
tion” screen, push the “DEST” button.
1
“Address”
A house number and the street address
can be input by using the input keys.
45. . . . . . . . . . . . . . . . . . . . . . . . . . . . . . . . . .
2
“POI Name”
Select one of the many POIs (Points of In-
terest) that have already been stored in the
system’s database. 49. . . . . . . . . . . . . . . .
3
“POI Category”
A destination can be selected from the POI
category. 52. . . . . . . . . . . . . . . . . . . . . . . . .
4
“Previous”
A destination can be selected from any of
the last 100 previously set destinations
and from the previous starting point.
57. . . . . . . . . . . . . . . . . . . . . . . . . . . . . . . . . .
5
“Memory”
The location can be selected from the reg-
istered “Memory points”. (To register
memory points, see “ — Registering
memory points” on page 93.) 56. . . . . . . .
6
“Emergency”
One of the four categories of emergency
service points that are already stored in the
system’s database can be selected.
56. . . . . . . . . . . . . . . . . . . . . . . . . . . . . . . . . .
7
“Map”
A destination can be selected simply by
touching the location on the displayed
map. 57. . . . . . . . . . . . . . . . . . . . . . . . . . . . .
Quick reference (“Destination” screen)
DESTINATION SEARCH
41
8
“Intersection”
The names of two intersecting streets can
be entered. This is helpful if only the gen-
eral vicinity, not the specific address, is
known. 58. . . . . . . . . . . . . . . . . . . . . . . . . . .
9
“Freeway Ent./Exit”
The name of a freeway (interstate) en-
trance or exit can be entered. 59. . . . . . .
10
“?”
Function help for the “Destination” screen
can be viewed on this screen. 28. . . . . . .
11
“Change”
To change the search area, touch this but-
ton. 42. . . . . . . . . . . . . . . . . . . . . . . . . . . . . .
12
Quick access touch screen but-
tons
One of 5 preset destinations can be se-
lected by touching the screen directly. To
use this function, it is necessary to set the
“Quick Access” for each memory point.
(To register a “Quick Access”, see “ —
Editing memory points” on page 94.)
44. . . . . . . . . . . . . . . . . . . . . . . . . . . . . . . . . .
13
Home touch screen button
A personal home address can be selected
without entering the address each time. To
use this function, it is necessary to set
“Home” for the memory point. (To register
“Home”, see “ — Registering home” on
page 100.) 44. . . . . . . . . . . . . . . . . . . . . . . .
14
“Phone #”
A destination can be entered by the tele-
phone number. 60. . . . . . . . . . . . . . . . . . . .
15
“Coordinates”
A destination can be set by using latitude
and longitude as coordinates. 60. . . . . . .
Push the “DEST” button.
You can use one of 13 different methods to
search your destination. (See pages 44
through 61.)
INFORMATION
When searching the destination, the
response to the touch screen button
may be slow.
Destination search —
DESTINATION SEARCH
42
SELECTING THE SEARCH AREA ON
THE DESTINATION SCREEN
1. Push the “DEST” button.
2. Touch “Change” on the “Destina-
tion” screen to display a map of the
United States and Canada divided into
12 areas. (For map database information
and updates, see “Map database informa-
tion and updates” on page 228.)
3. Touch one of “US1” through “CAN”
to select a search area.
4. Touch “OK” and the “Destination”
screen returns.
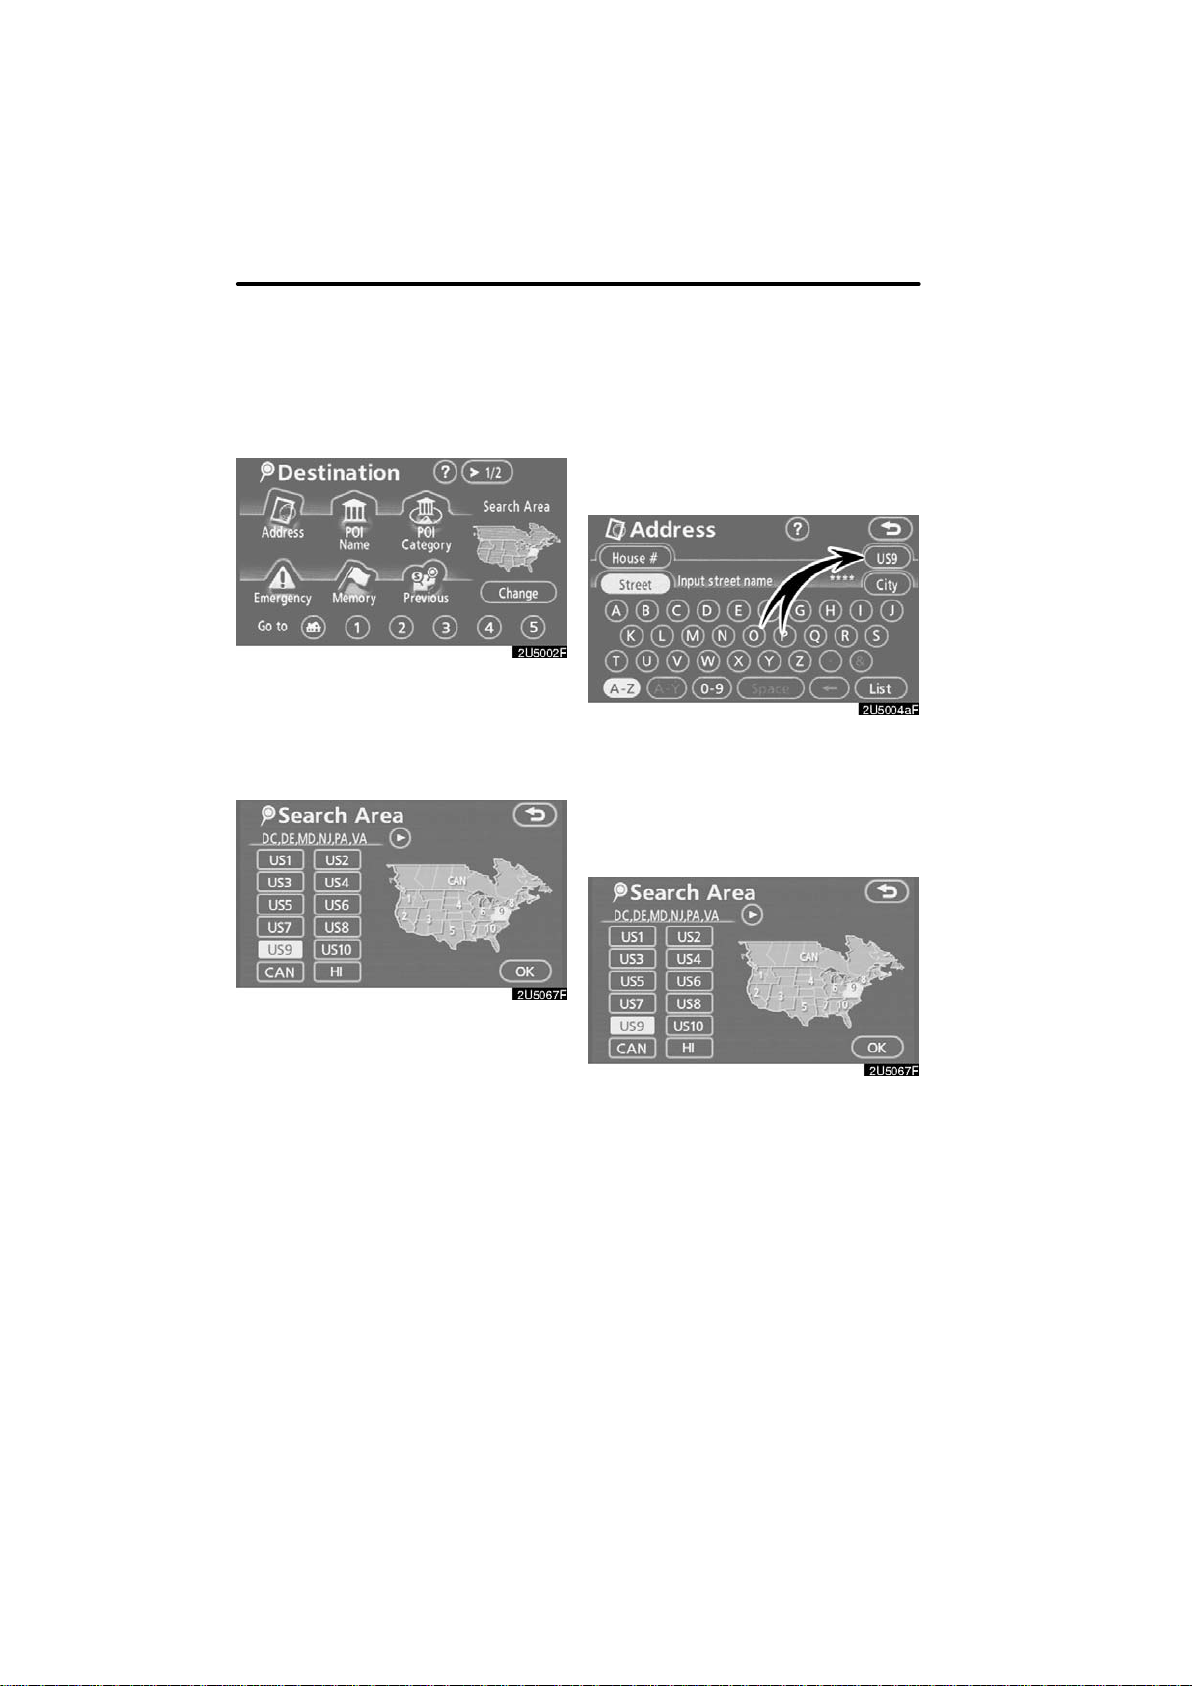
SELECTING THE SEARCH AREA ON
THE INPUT SCREEN
Change the search area in order to set a
destination from a different area by using
“Address”, “POI Name”, “Freeway Ent./
Exit” or “Intersection”.
1. Touch the search area button like
“US9” on the input screen to display a
map of the United States and Canada
divided into 12 areas. (For map data-
base information and updates, see “Map
database information and updates” on
page 228.)
2. Touch one of “US1” through “CAN”
to select a search area.
3. Touch “OK” and the previous
screen returns.
— Selecting the search area
DESTINATION SEARCH
43
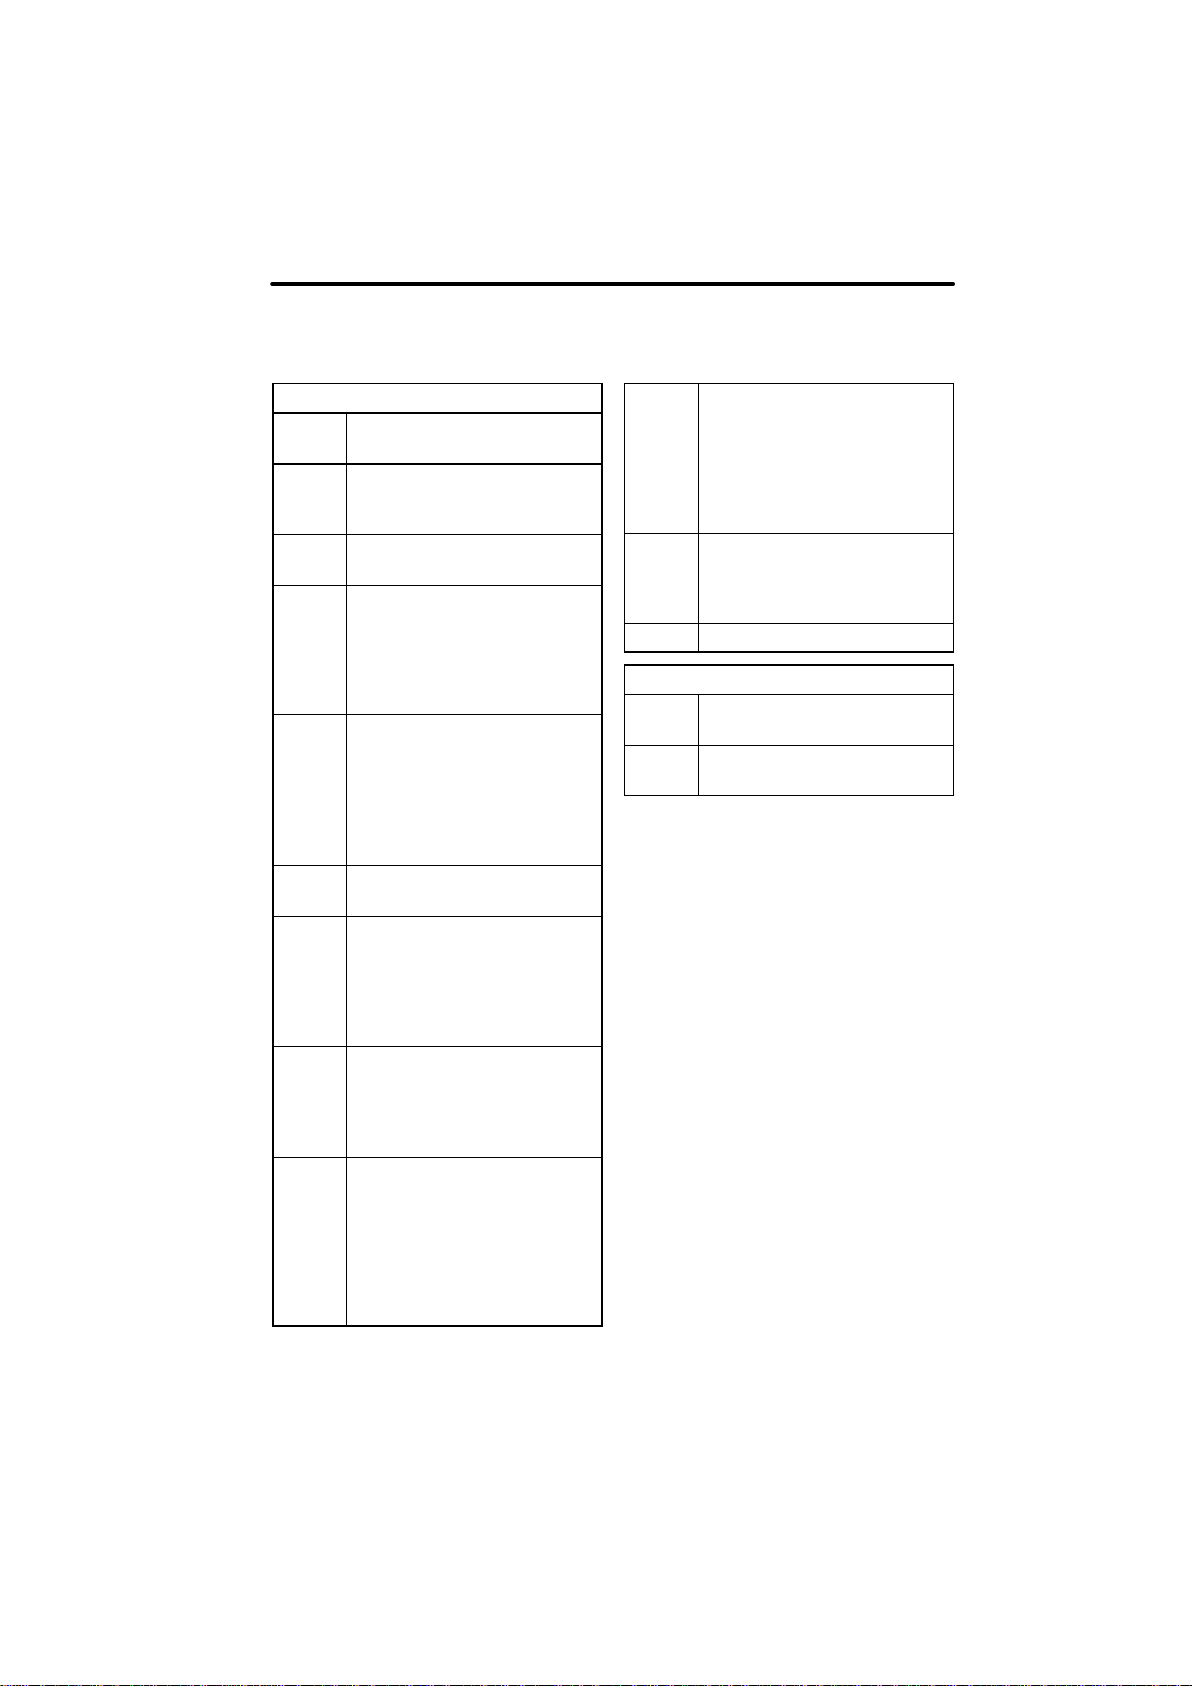
U.S.A.
Button
States included in the search
area
“US1”
Idaho
Oregon
Washington
“US2”
California
Nevada
“US3”
Arizona
Colorado
Montana
New Mexico
Utah
Wyoming
“US4”
Iowa
Kansas
Minnesota
Missouri
North Dakota
Nebraska
South Dakota
“US5”
Oklahoma
Texas
“US6”
Illinois
Indiana
Kentucky
Michigan
Ohio
Wisconsin
“US7”
Arkansas
Alabama
Louisiana
Mississippi
Tennessee
“US8”
Connecticut
Massachusetts
Maine
New Hampshire
New Jersey
New York
Rhode Island
Vermont
“US9”
Washington, D.C.
Delaware
Maryland
New Jersey
Pennsylvania
Virginia
West Virginia
“US10”
Florida
Georgia
North Carolina
South Carolina
“HI” Hawaii
Canada
Button
Provinces and regions in-
cluded in the search area
“CAN”
All provinces and regions in
Canada included in this button.
DESTINATION SEARCH
44
1. Push the “DEST” button.
2. Touch the home touch screen but-
ton on the “Destination” screen.
The screen changes and displays the map
location for home and the route prefer-
ence. (See “Starting route guidance” on
page 61.)
To use this function, it is necessary to set
“Home” for the memory point. (To register
“Home”, see page 100.)
INFORMATION
Guidance starts from the current ve-
hicle position to your home if “Enter”
is touched even while driving.
1. Push the “DEST” button.
2. Touch any of the quick access touch
screen buttons on the “Destination”
screen.
The screen changes and displays the map
location of the quick access point and the
route preference. (See “Starting route
guidance” on page 61.)
To use this function, it is necessary to set
“Quick Access” for each memory point.
(To register “Quick Access”, see page 96.)
INFORMATION
Guidance starts from the current ve-
hicle position to the quick access
point if “Enter” is touched even while
driving.
— Destination search by
Home
— Destination search by
Quick access
DESTINATION SEARCH
45
There are 2 ways to input a destination by
address.
1. Push the “DEST” button.
2. Touch “Address” on the “Destina-
tion” screen.
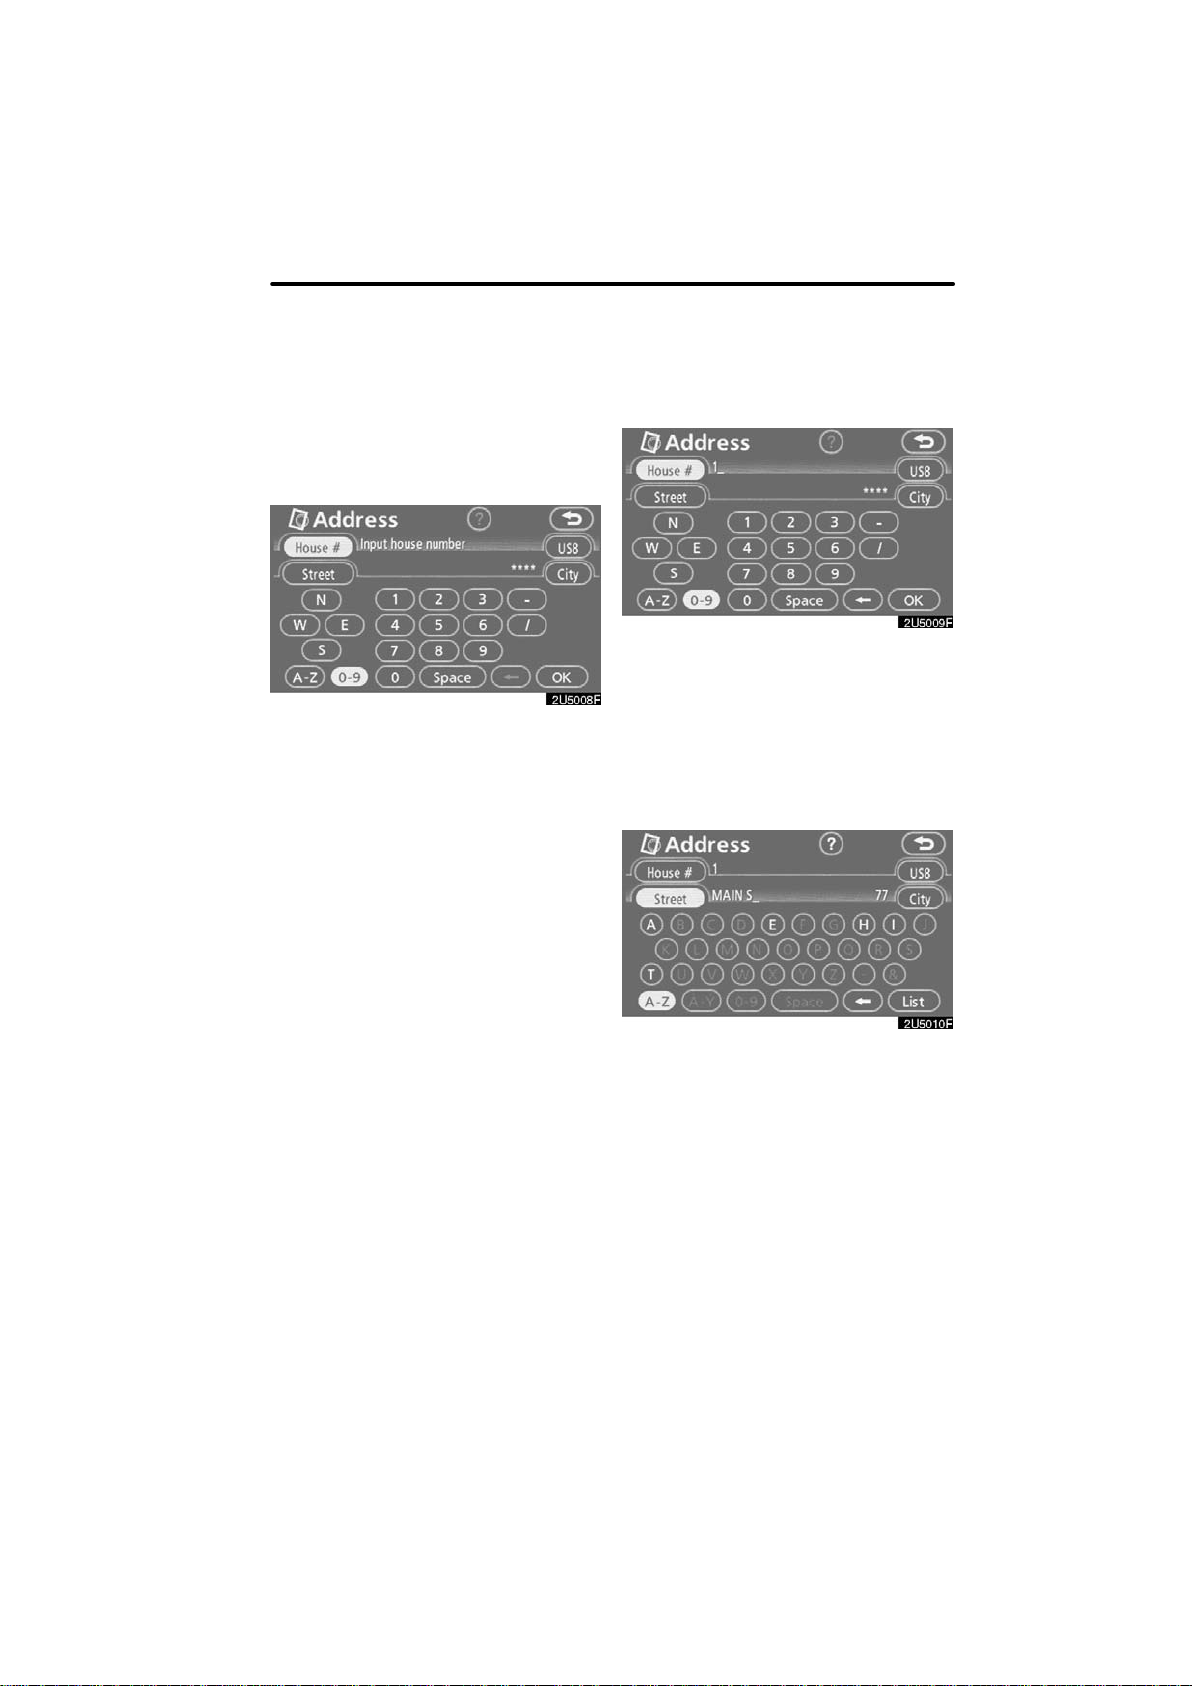
(a) Inputting a house number and a
street name
1. Touch numbers directly on the
screen to input a house number.
After inputting a house number, touch
“OK” to display the screen for inputting a
street name.
It is possible to input a street name first.
Touch “Street” to display the screen for in-
putting a street name.
2. Input the street name and touch
“List”.
— Destination search by
“Address”
DESTINATION SEARCH
46
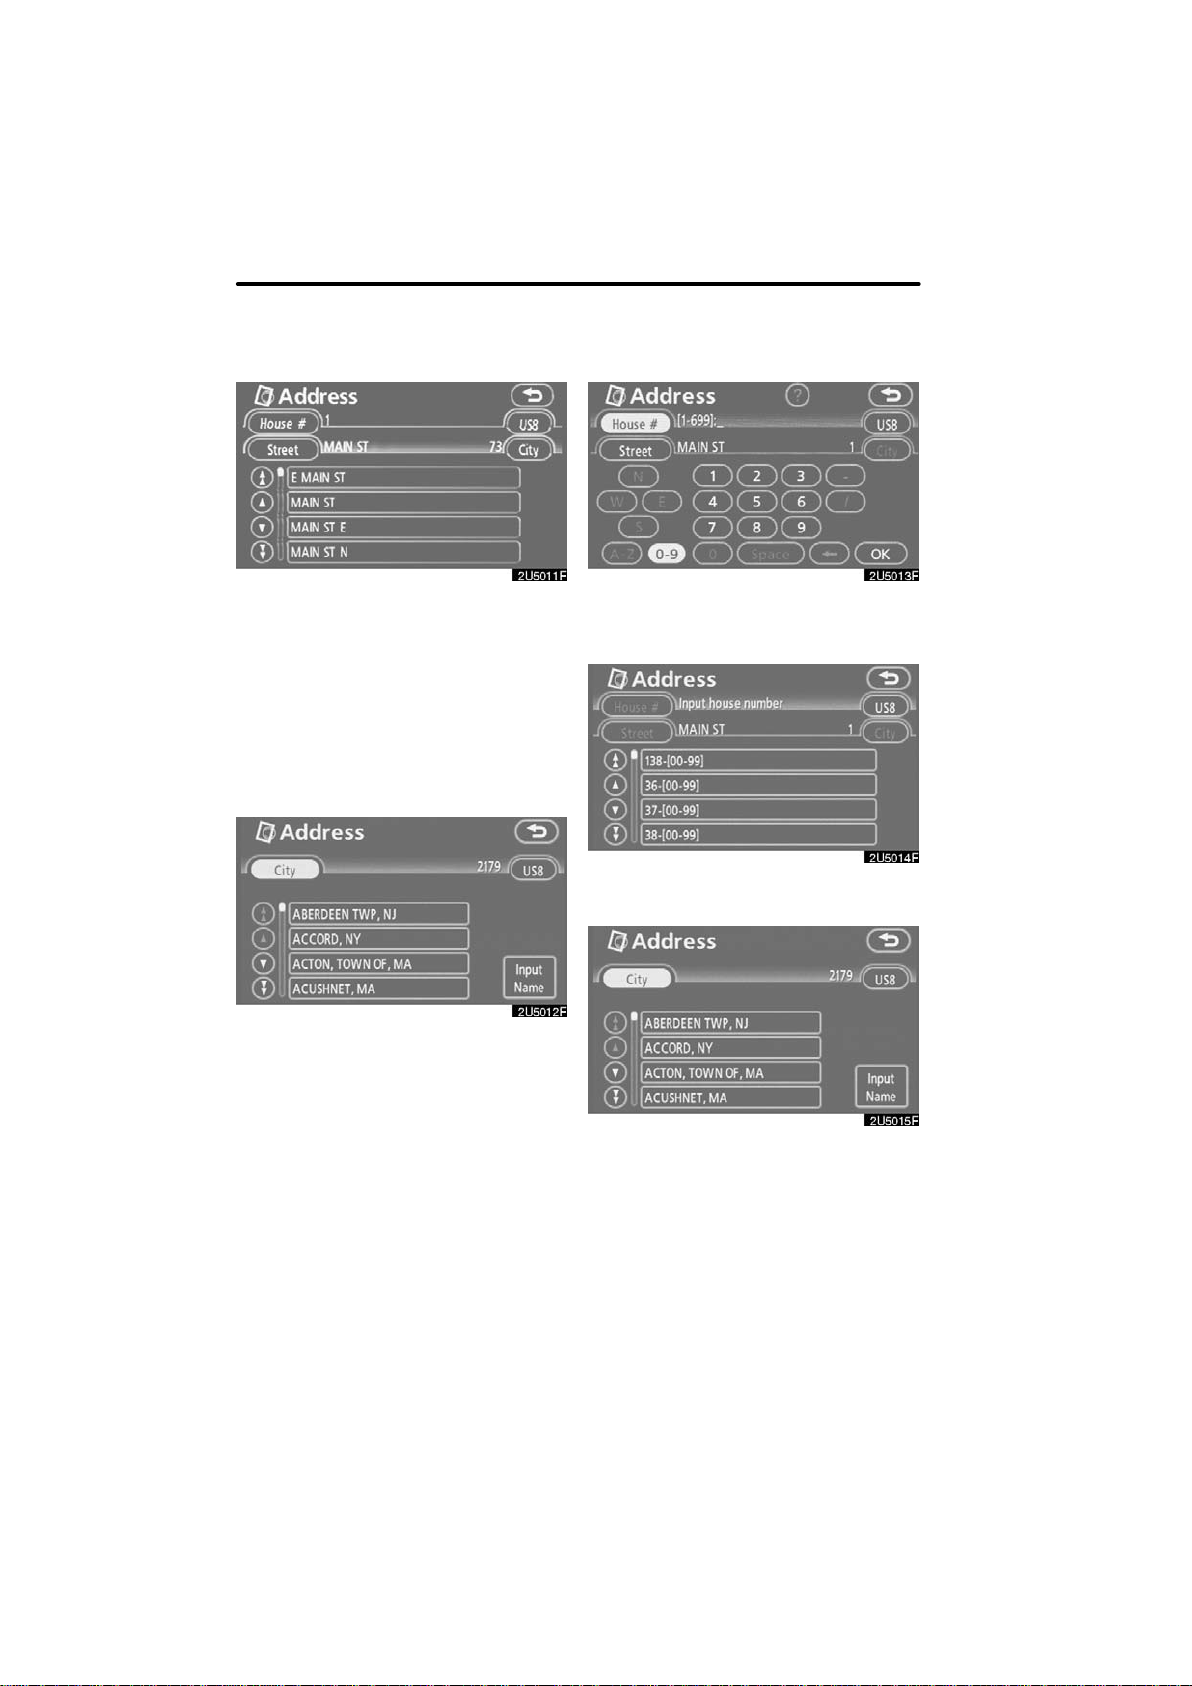
3. When the desired street name is
found, touch the corresponding but-
ton.
The screen changes and displays the map
location of the selected destination and the
route preference. (See “Starting route
guidance” on page 61.)
If the same address exists in more than
one city, the current screen changes to the
city list screen.
4. Select or enter the desired city.
“Input Name”: To narrow down the listed
items by inputting the city name.
If inputting a street name first, the screen
changes. The house number can then be
input.
If the above screen appears, an address
range on the screen can be selected.
If the same address exists in more than
one city, the current screen changes to the
city list screen.
DESTINATION SEARCH
47
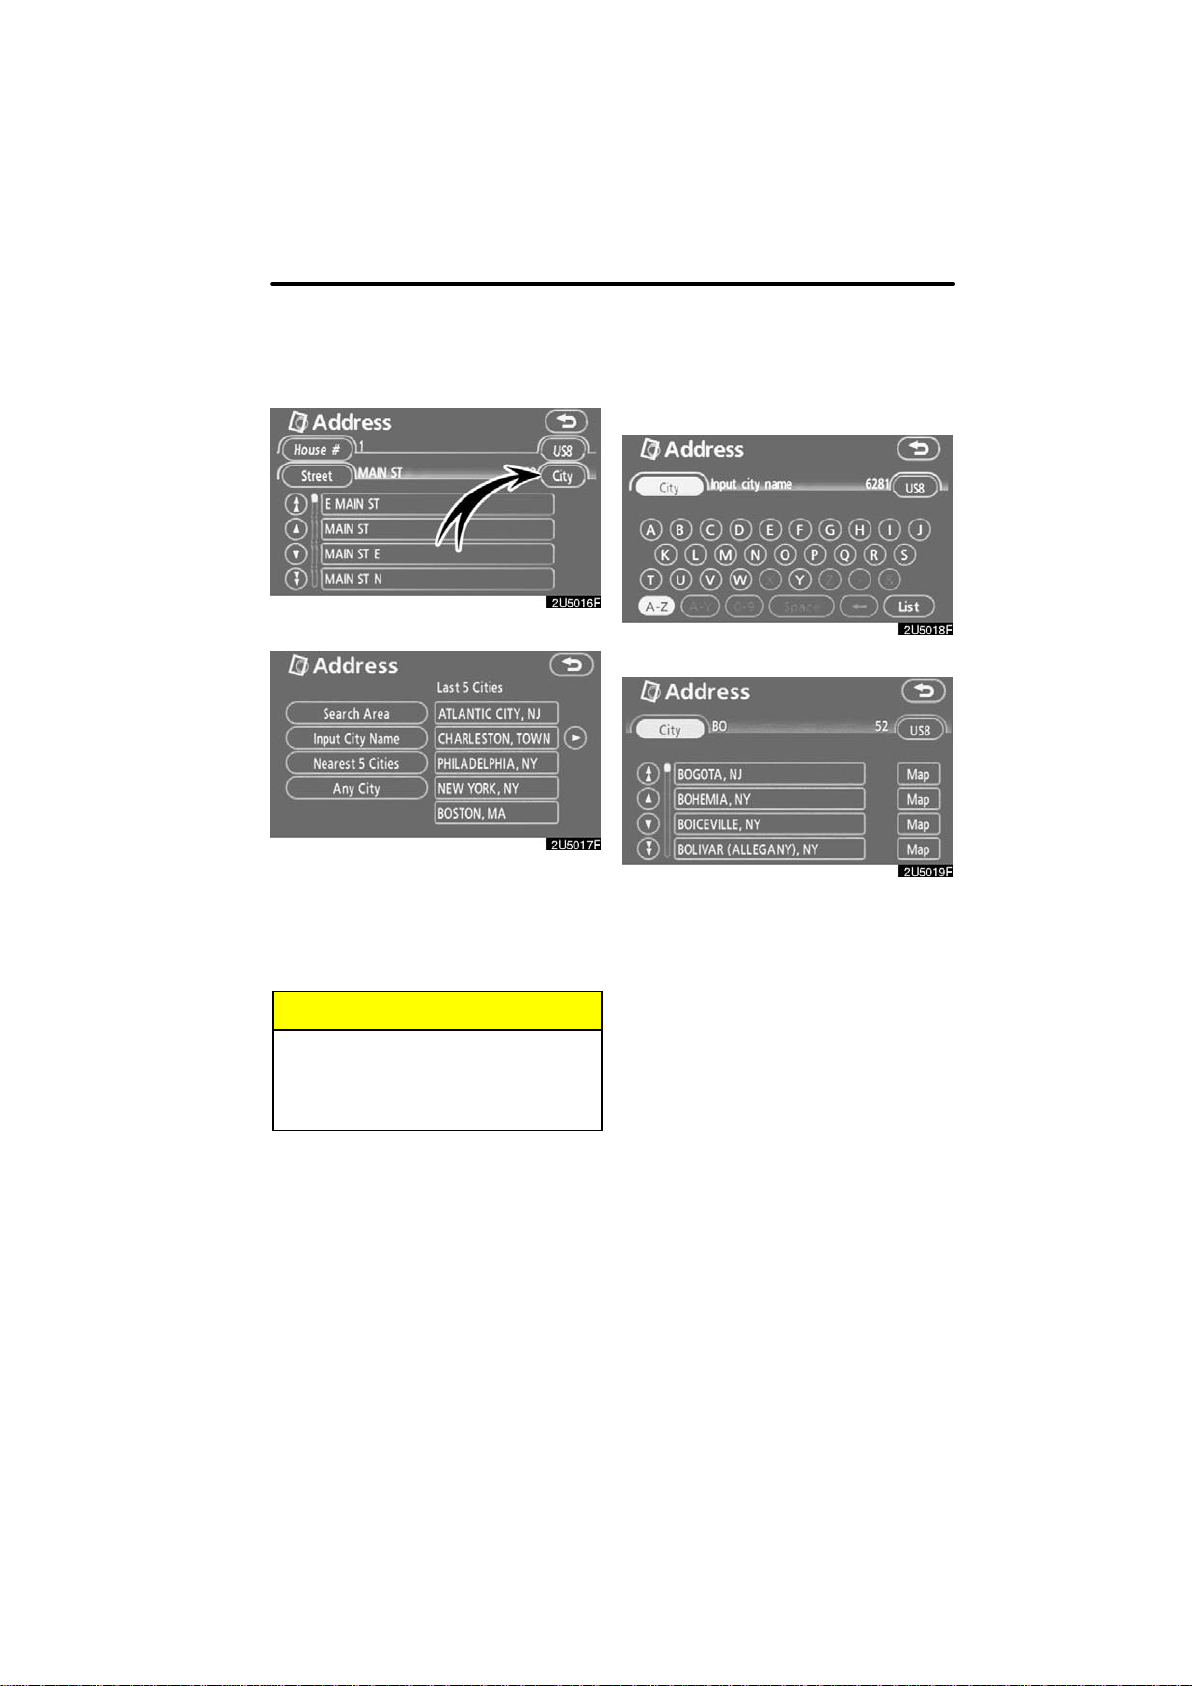
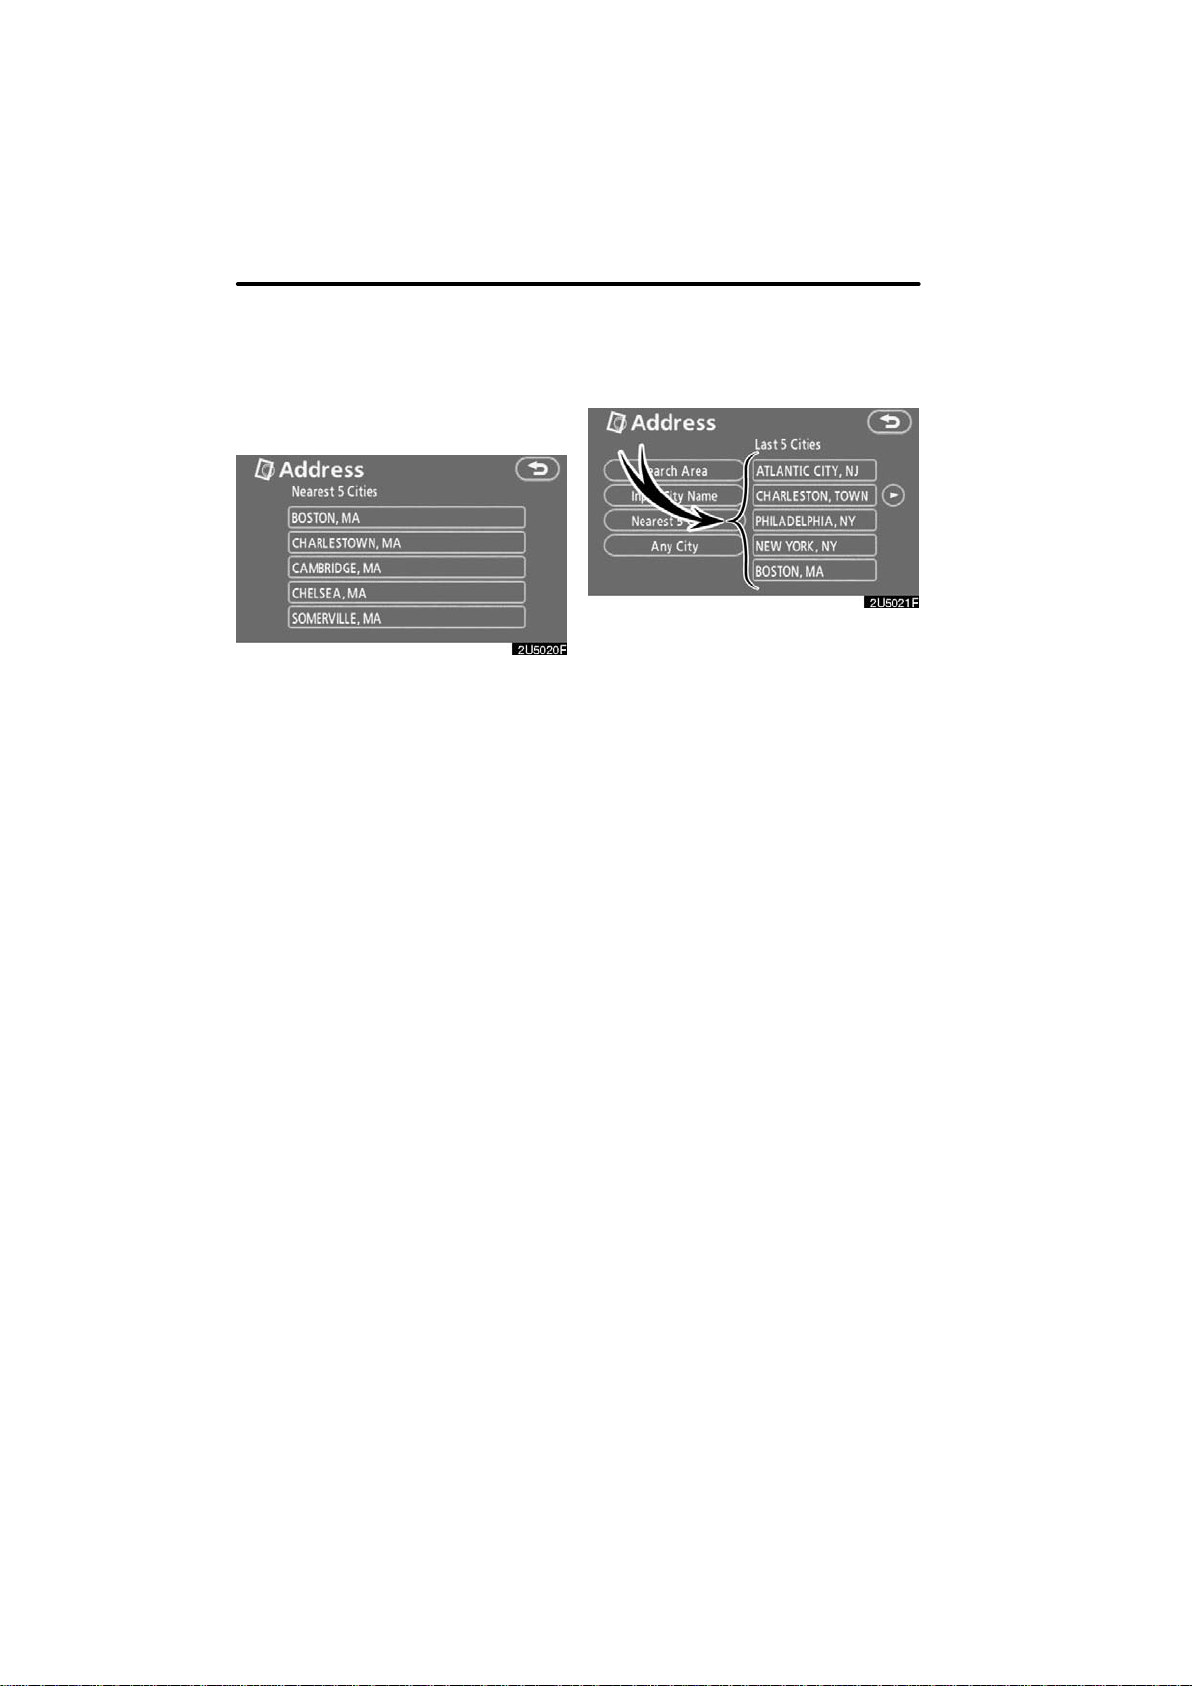
(b) Selecting a city to search
Touch “City”.
To search by city, the following three meth-
ods are possible.
1. Input the city name
2. Select from the nearest 5 cities
3. Select from the last 5 cities
INFORMATION
D To change the search area, touch
“Search Area”.
D To cancel the city setting, touch
“Any City”.
INPUTTING THE CITY NAME
1. Touch “Input City Name”.
2. Input a city name.
3. Touch the button of the desired city
name from the displayed list.
“Map”: To display the selected destination
and the route preference. (See “Starting
route guidance” on page 61.)
The current screen changes to the screen
for inputting a house number or a street
name. (See “(a) Inputting a house number
and a street name” on page 45.)
DESTINATION SEARCH
48
SELECTING FROM THE NEAREST 5
CITIES
1. Touch “Nearest 5 Cities”.
2. Touch the button of the desired city
name from the displayed list.
The current screen changes to the screen
for inputting a house number or a street
name. (See “(a) Inputting a house number
and a street name” on page 45.)
SELECTING FROM THE LAST 5 C I T I E S
Touch the button of the desired city
name.
If the navigation has never been used, no
cities will be displayed on the screen.
The current screen changes to the screen
for inputting a house number or a street
name. (See “(a) Inputting a house number
and a street name” on page 45.)
DESTINATION SEARCH
49
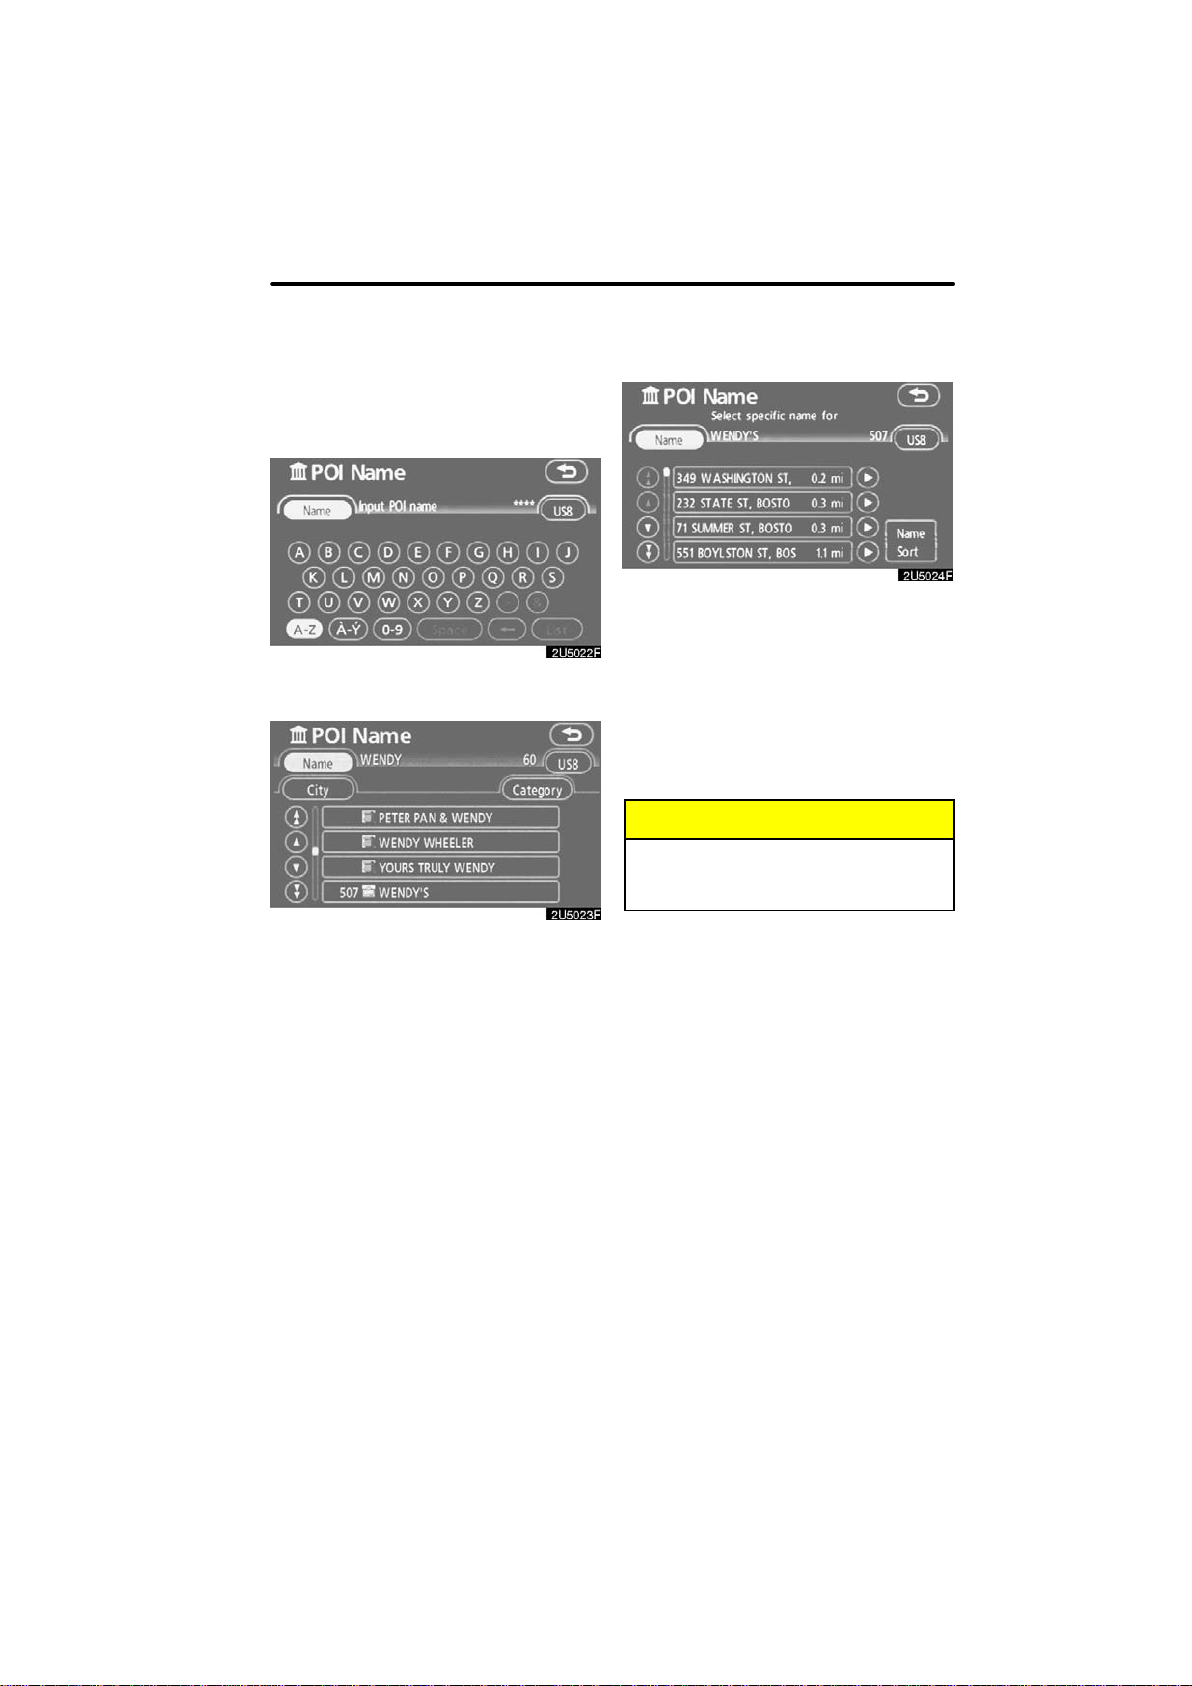
1. Push the “DEST” button.
2. Touch “POI Name” on the “Destina-
tion” screen.
3. Input the name of the Point of Inter-
est.
4. Touch the button of the desired des-
tination.
The screen changes and displays the map
location of the selected destination and the
route preference. (See “Starting route
guidance” on page 61.)
When inputting the name of a specific
Point of Interest, and there are two or more
sites with the same name, the list screen
is displayed.
Touch the button of the desired des-
tination.
If the same name exists in more than one
city, a search can be performed more easi-
ly with “City” and “Category”. (See “(a)
Selecting a city to search” on page 50 and
“(b) Selecting from the categories” on page
52.)
INFORMATION
The desired Point of Interest can be
displayed on the map screen. (See
“ — Display POI icons” on page 78.)
— Destination search by
“POI Name”
DESTINATION SEARCH
50
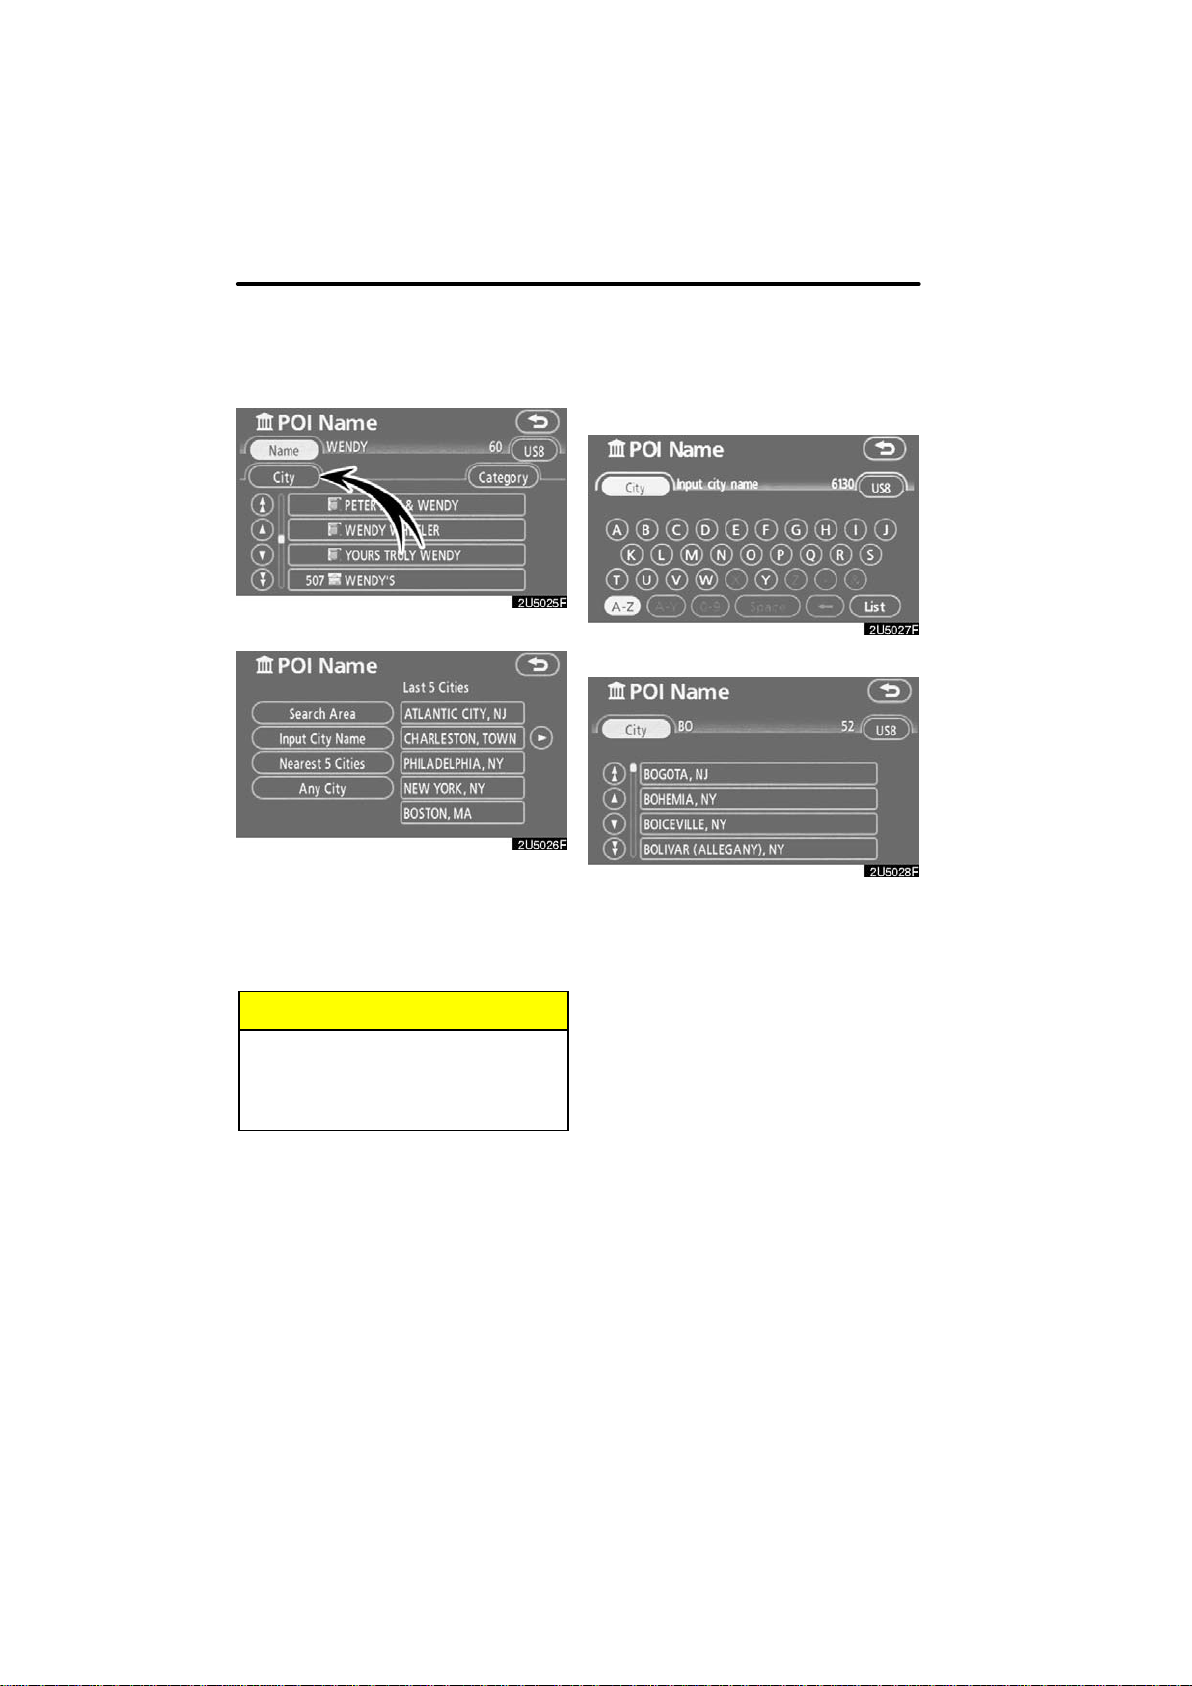
(a) Selecting a city to search
Touch “City”.
To search by city, the following three meth-
ods are possible.
1. Input the city name
2. Select from the nearest 5 cities
3. Select from the last 5 cities
INFORMATION
D To change the search area, touch
“Search Area”.
D To cancel the city setting, touch
“Any City”.
INPUTTING THE CITY NAME
1. Touch “Input City Name”.
2. Input the city name.
3. Touch the button of the desired city
name from the displayed list.
Loading...