


TOSHIBA
|
|
|
|
|
|
|
|
|
|
|
|
|
7 DAY TIMER |
OWNER’S MANUAL |
|||||||||||||||||||||
PROGRAMMATEUR HEBDOMADAIRE |
MODE D’EMPLOI |
||||||||||||||||||||||||||||||||||
|
|
|
|
|
|
|
|
|
|
7-TAGE-TIMER |
BENUTZERHANDBUCH |
||||||||||||||||||||||||
|
|
|
|
TIMER SEMANAL |
MANUAL DEL USUARIO |
||||||||||||||||||||||||||||||
TIMER SETTIMANALE |
MANUALE DELL’UTENTE |
||||||||||||||||||||||||||||||||||
|
|
|
|
|
|
|
7 DAGEN TIMER |
GEBRUIKERSHANDLEIDING |
|||||||||||||||||||||||||||
|
|
|
|
|
|
|
|
|
|
|
|
|
|
|
|
|
|
|
|
|
|
|
|
|
|
|
|
|
|
|
|
|
|
|
|
|
|
|
|
|
|
|
|
|
|
|
|
|
|
|
|
|
|
|
|
|
|
|
|
|
|
|
|
|
|
|
|
|
|
|
|
|
|
|
|
|
|
|
|
|
|
|
|
|
|
|
|
|
|
|
|
|
|
|
|
|
|
|
|
|
|
|
|
|
|
|
|
|
|
|
|
|
|
|
|
|
|
|
|
|
|
|
|
|
|
|
|
|
|
|
|
|
|
|
|
|
|
|
|
|
|
|
|
|
|
|
|
|
|
|
|
|
|
|
|
|
|
|
|
|
|
|
|
|
|
|
|
|
|
|
|
|
|
|
|
|
|
|
|
|
|
|
|
|
|
|
|
|
|
|
|
|
|
|
|
|
|
|
|
|
|
|
|
|
|
|
|
|
|
|
|
|
|
|
|
|
|
|
|
|
|
|
|
|
|
|
|
|
|
|
|
|
|
|
|
|
|
|
|
|
|
|
|
|
|
|
|
|
|
|
|
|
|
|
|
|
|
|
|
|
|
|
|
|
|
|
|
|
|
|
|
|
|
|
|
|
|
|
|
|
|
|
|
|
|
|
|
|
|
|
|
|
|
|
|
|
|
|
|
|
|
|
|
|
|
|
|
|
|
|
|
|
|
|
|
|
|
|
|
|
|
|
|
|
|
|
|
|
|
|
|
|
|
|
|
|
|
|
|
|
|
|
|
|
|
|
|
|
|
|
|
|
|
|
|
|
|
|
|
|
|
|
|
|
|
|
|
|
|
|
|
|
|
|
|
|
|
|
|
|
|
|
|
|
|
|
|
|
|
|
|
|
|
|
|
|
|
|
|
|
|
|
|
|
|
|
|
|
|
|
|
|
|
|
|
|
|
|
|
|
|
|
|
|
|
|
|
|
|
|
|
|
|
|
|
|
|
|
|
|
|
|
|
|
|
|
|
|
|
|
|
|
|
|
|
|
|
|
|
|
|
|
|
|
|
|
|
|
|
|
|
|
|
|
|
|
|
|
|
|
|
|
|
|
|
|
|
|
|
|
|
|
|
|
|
|
|
|
|
|
|
|
|
|
|
|
|
|
|
|
|
|
|
|
|
|
|
|
|
|
|
|
|
|
|
|
|
|
|
|
|
|
|
|
|
|
|
|
|
|
|
|
|
|
|
|
|
|
|
|
|
|
|
|
|
|
|
|
|
|
|
|
|
|
|
|
|
|
|
|
|
|
|
|
|
|
|
|
|
|
|
|
|
|
|
|
|
|
|
|
|
|
|
|
|
|
|
|
|
|
|
|
|
|
|
|
|
|
|
|
|
|
|
|
|
|
|
|
|
|
|
|
|
|
|
|
|
|
|
|
|
|
|
|
|
|
|
|
|
|
|
|
|
|
|
|
|
RBC-WT1-PE
1401449101R01

7 DAY TIMER
GB
●This Manual contains operational instructions relating to the 7 Day Timer.
●Thoroughly read this Manual before operation and use the device correctly.
●For the indoor and outdoor unit, please refer to respective Owner’s Manual.
●Keep this Manual in a convenient location for future reference.
●7 Day Timer can not be used with RBC-SR2-PE remote controller.
F
●Ce Manuel indique les instructions à suivre
●Lire attentivement ce Manuel avant l’utilisation
●Pour l’utilisation des unités intérieure et extérieure,
●Conserver ce Manuel avec ceux des unités
●Le programmateur hebdomadaire ne peut pas
D
●Diese Anleitung enthält Instruktionen, die sich
●Lesen Sie diese Anleitung vor der Inbetriebnahme
●Angaben zur Benutzung von Innenund Außengerät
●Bewahren Sie diese Anleitung zusammen mit
●Der 7-Tage-Timer kann nicht mit der Fernbedienung
E
●Este manual contiene instrucciones relacionadas
●Lea este manual completamente antes de realizar
●Para la utilización de las unidades interior y
●Guarde este manual junto con los manuales
●El Timer Semanal no es compatible con el
I
du programmateur hebdomadaire. faire un usage correct du programmateur. reporter à leurs guides d’utilisation respectifs. et extérieure.
avec la télécommande RBC-SR2-PE.
Betrieb des 7-Tage-Timers beziehen. durch, um das Gerät richtig zu benutzen.
dem jeweiligen Benutzerhandbuch zu entnehmen. des Innenund Außengerätes auf.
-SR2-PE verwendet werden.
la operación del Timer Semanal.
operación y utilice el aparato correctamente. las guías del usuario respectivas. interior y exterior.
RBC-SR2-PE.
● Questo manuale contiene le istruzioni per il funzionamento relative al timer settimanale.
● Si prega di leggere completamente questo |
del funzionamento e di usare |
correttamente il dispositivo. |
|
● Per il modo di impiego delle unità interna ed |
riferirsi ai relativi manuali dell’utente. |
● Conservare questo manuale con i manuali delle |
interna ed esterna. |
● Il Timer Settimanale non può essere utilizzato |
RBC-SR2-PE. |
NL |
|
●Deze handleiding bevat instructies voor de
●Lees deze handleiding goed door alvorens het
●Raadpleeg de betreffende gebruikershandleiding en buiteneenheid.
●Bewaar deze handleiding bij de handleidingen
●De 7-Dagen Timer kan niet met de RBC-SR2
van de weektimer.
in gebruik te nemen en gebruik het correct. het in gebruik nemen van de binnen-
binnenen buiteneenheden. worden gebruikt.
–

7 DAY TIMER
GB |
CONTENTS |
System Overview .......................................................... |
4 |
Names and Functions.............................................. |
5 – 6 |
Setting Present Time ..................................................... |
7 |
Setting Timer Program Operation ............................ |
8 – 9 |
Setting ON/OFF Times ............................................... |
10 |
Setting Holiday............................................................. |
11 |
Clearing Setting Contents for a Day ............................ |
12 |
Copying Settings of Preceding Day ............................. |
13 |
Confirming Program Setting......................................... |
14 |
Program Selection ....................................................... |
15 |
Weekly Timer and Air Conditioner Operation .............. |
16 |
Setting Error ................................................................ |
17 |
Specifications, Specs Table, Outline Drawing and |
|
Installation.................................................................... |
18 |
F |
SOMMAIRE |
Aperçu du Système ..................................................... |
19 |
Nomenclature et Fonctions .................................. |
20 – 21 |
Programme de l’Heure Actualle ................................... |
22 |
Programmation pour un Fonctionnement Programmé.... |
23 – 24 |
Programmation des Heures de ON/OFF .................... |
25 |
Programmation d’un Jour de Congé ............................ |
26 |
Annulation de la Programmation d’un Jour.................. |
27 |
Copie des Programmations de la Veille ....................... |
28 |
Vérification de le Programmation du Fonctionnement ... |
29 |
Sélection de Programme ............................................. |
30 |
Programmateur Hebdomadaire et Fonctionnement |
|
du Climatiseur.............................................................. |
31 |
Erreur de Programmation ........................................... |
32 |
Caractéristiques........................................................... |
33 |
D |
INHALT |
Systemübersicht ......................................................... |
34 |
Bezeichnung und Funktion .................................. |
35 – 36 |
Einstellung der aktuellen Uhrzeit ................................. |
37 |
Einstellung auf Timer-Programmbetrieb .............. |
38 – 39 |
Einstellung der Ein-/Ausschaltzeiten ........................... |
40 |
Ruhetag-Einstellung..................................................... |
41 |
Annullierung der Einstellung für einen Tag .................. |
42 |
Kopieren der Einstellungen des Vortags...................... |
43 |
Überprüfen der Timer-Programmeinstellung ............... |
44 |
Programmwahl............................................................. |
45 |
7-Tage-Timer- und Klimageräte-Betrieb....................... |
46 |
Einstellungsfehler ........................................................ |
47 |
Technische Daten, Spezifikationstabelle, Maßzeichnung |
|
und Installation............................................................. |
48 |
E |
CONTENIDO |
I |
INDICE |
Descrizione del Sistema ............................................. |
64 |
Nomi e Funzioni................................................... |
65 – 66 |
Regolazione dell’ora Attuale ........................................ |
67 |
Regolazione per il Funzionamento Programmato con il Timer.68 – 69 |
|
Regolazione delle Ore ON/OFF .................................. |
70 |
Regolazione del Giorno Festivo................................... |
71 |
Cancellazione del Contenuto della Regolazione per un Giorno.72 |
|
Copia delle Regolazioni del Giorno Precedente .......... |
73 |
Conferma della Regolazione per il Programma ........... |
74 |
Selezione del Programma............................................ |
75 |
Funzionamento del Timer Settimanale e del |
|
Condizionatore d’Aria .................................................. |
76 |
Errore di Regolazione ................................................. |
77 |
Dati Tecnici................................................................... |
78 |
NL |
INHOUD |
Systeemoverzicht ....................................................... |
79 |
Benamingen en functies..................................... |
80 – 81 |
De huidige tijd instellen............................................... |
82 |
Instellen van de timerprogramma-operatie......... |
83 – 84 |
Instellen van ON/OFF-tijden ...................................... |
85 |
Instelling vrije dag....................................................... |
86 |
Verwijderen van instellingsinhoud voor een dag......... |
87 |
Kopiëren van instellingen van de vorige dag .............. |
88 |
Bevestiging van programma-instellingen.................... |
89 |
Programmaselectie..................................................... |
90 |
Werking van de weektimer en airconditioning ............ |
91 |
Instellingsfout ............................................................. |
92 |
Specificaties, Specificatietabel, Omtrektekening, |
|
Installatie .................................................................... |
93 |
GB
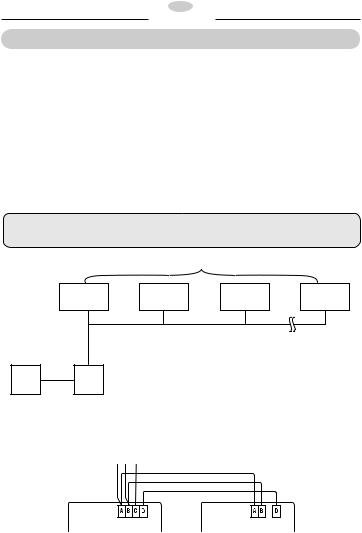
SYSTEM OVERVIEW
● Features of 7 Day Timer
1.Setting of two program operation patterns in a one-week period.
2.Setting of ON/OFF times twice a day in units of 1 minute.
3.Time display using 24-hour system.
4.Easy-to-understand bar display of daily timer program settings.
5.Easy cancellation of timer program operation using DAY OMIT function.
6.Quick pattern setting using DAY REPEAT function if operation pattern is the same as preceding day.
7.Easy cancellation of settings using DAY CLEAR functions.
8.Easy checking of program contents.
9.Automatic restart of timer program operation after power failure (no resetting is required for a power failure lasting up to 72 hours).
CAUTION
When the 7 Day Timer is used in combination with the Remote Controller (RBC-SR1-PE) the timer function of the Remote Controller is disabled.
Up to 16 indoor units per system
Unit 1 |
Unit 2 |
Unit 3 |
Unit 16 |
7 Day |
Remote |
Timer |
Controller |
RBC-WT1-PE |
RBC-SR1-PE |
Indoor Unit
RBC-SR1-PE |
RBC-WT1-PE |
– 4 –
GB
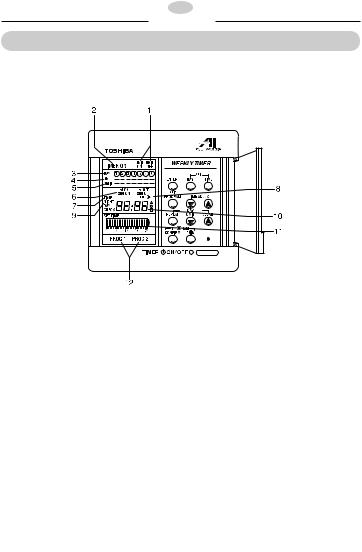
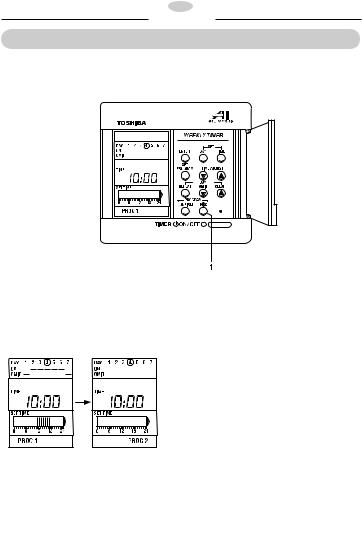
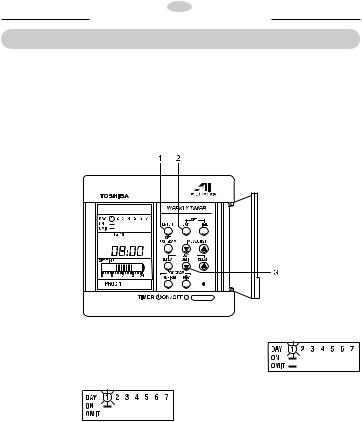
NAMES AND FUNCTIONS
● Display
All indications are shown for explanation purposes. During actual operation, only the selected items are indicated.
1. UNIT ON/OFF Indication
ON is indicated during ON timer operation in the timer operation mode or OFF in other status.
2. TIMER ON Indication
This is indicated during timer operation.
3. DAY Indication
Indicates the current day of the week or the day of the week in the program settings.
4. ON Indication
Indicated under the day of the week for which ON/OFF time is entered.
5. OMIT Indication
Indicated under the day designated as a holiday.
6. ON/OFF Time Indication
Indicated when entering ON/OFF time.
7. TIME Indication
Indicated in the present time mode or when entering the present time.
8. ERROR Indication
Indicated when an error occurs during entering of ON/OFF times or during copying of the preceding day setting. (For details, see p17.)
9. NEXT DAY Indication
Indicated when the next day is entered.
10. Time Indication
Indicates ON/OFF time and present time.
11. SET TIMES Indication
This bar display indicates the timer program contents.
12. PROG 1, PROG 2 Indication
Indicates the current program pattern number.
–
GB
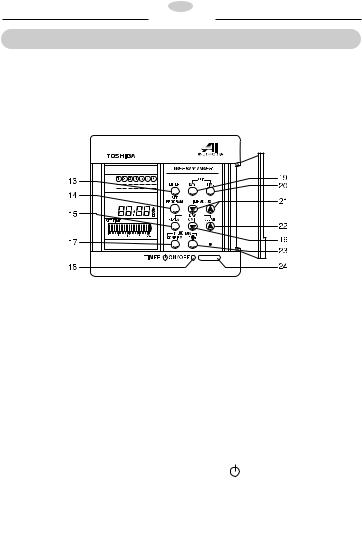
NAMES AND FUNCTIONS
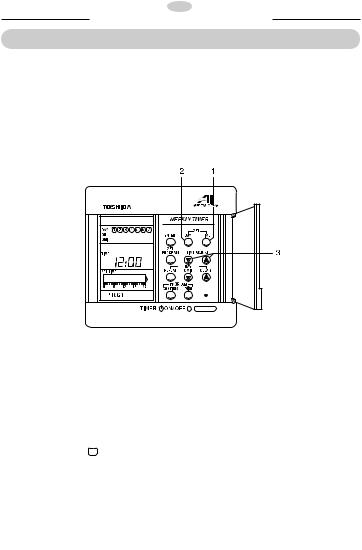
● Operation panel
Operate buttons to select a desired mode or enter desired values.
13. ENTER Button
Used to enter the timer program. (For details, refer to p8.)
14. SET PROGRAM Button
Used to enter the timer operation ON/OFF time.
15. DAY REPEAT Button
Used to copy contents of the setting of the preceding day. (For details, refer to p13.)
16. DAY OMIT Button
Used to enter or clear a holiday. (For details, refer to p11.)
17. PROGRAM CONFIRM Button
This is used to check setting contents of a week. (For details, refer to p14.)
18. TIMER ON/OFF Lamp
Lights during timer operation.
19. SET DAY Button
Used to select a desired day of the week.
20. SET TIME Button
Used to enter the present time.
21. TIME ADJUST Buttons
These buttons are used to enter the ON and OFF times. Pressing a button increases or decreases the value. (For details, refer to p7 and 8.)
22. DAY CLEAR Button
Used to clear the setting contents for a day. (For details, refer to p12.)
23. PROGRAM select Button
Used to select a desired program pattern.
24. TIMER  ON/OFF Button
Pressing this button once activates the timer operation and pressing it a second time cancels it.
–

GB
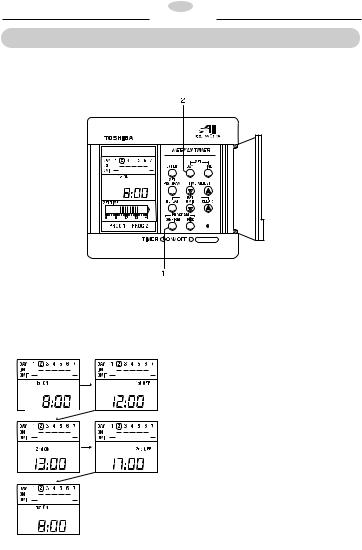
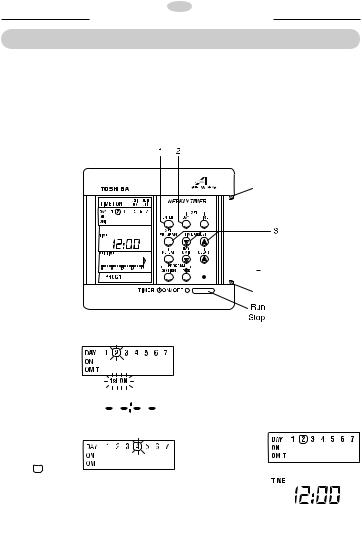
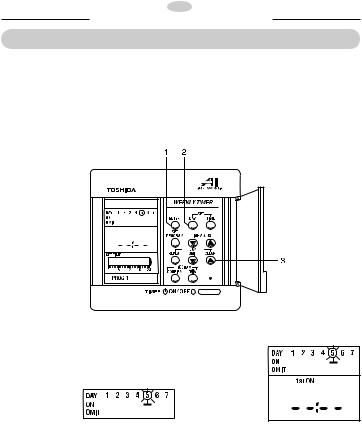
SETTING PRESENT TIME
●Always set the present time using the following procedure. (All operations are disabled after reset unless the present time is entered.)
●The present time is displayed as long as the power supply switch is on regardless of whether the timer operation is on or off. (Not indicated during a power failure.)
●The time is displayed in the 24-hour system. For example the display is 13:00 for 1:00PM .
Example: Setting the present time to 12:00 on Wednesday
POWER
Set the POWER switch to ON.
The red TIMER ON/OFF lamp flashes.
1. SET TIME Button
Press the SET TIME button. The present time indication flashes.
2. SET DAY Button
Operate the SET DAY button to move the mark to the “4” (Wednesday).
1 |
2 |
3 |
4 |
5 |
6 |
7 |
SUN |
MON |
TUE |
WED |
THU |
FRI |
SAT |
3. TIME ADJUST Buttons
Set the indicated time to 12:00 using the TIME ADJUST buttons.
END
Press the SET TIME Button again.
The flashing display disappears and the time setting is complete.
●The present time will be entered after 15 seconds even if the ending operation is not conducted.
●All buttons are disabled during the present time setting, except for the SET DAY and TIME ADJUST buttons.
–

GB
SETTING TIMER PROGRAM OPERATION
●Two patterns can be entered per day as timer programs (1st ON, 1st OFF, 2nd ON, 2nd OFF).
●One of the two OFF times may be set to a desired time on the next day.
●Enter ON and OFF times so as to prevent overlapping operation periods.
Example: Set 1st ON to 8:00, 1st OFF to 12:00, 2nd ON to 13:00 and 2nd OFF to 17:00 for Wednesday (4) on Monday (2)
1.ENTER Button
Press the ENTER button.
The present day of the week and “1st ON” are indicated by flashing.
2.SET DAY Button
Press the SET DAY button to move the mark to “4” (Wednesday).
3. TIME ADJUST and SET PROGRAM Buttons
Operate the TIME ADJUST and SET PROGRAM buttons to enter desired values for 1st ON, 1st OFF, 2nd ON and 2nd OFF. (For details, see p10.)
END
Press the ENTER Button
A bar is indicated under “4” (Wednesday) and the operation returns to the normal mode (the present time displays).
–

GB
SETTING TIMER PROGRAM OPERATION
RUN
Press the TIMER ON/OFF Button
The TIMER ON/OFF lamp lights red and “TIMER ON” message appears. During the ON timer operation, “UNIT ON” message appears while “UNIT OFF” message appears in other status.
STOP
Press the TIMER ON/OFF Button a second time
The TIMER ON/OFF lamp turns off and “TIMER ON” message disappears. “UNIT ON” or “UNIT OFF” message also disappears.
●The ending procedure may be omitted since the setting is automatically completed 15 seconds later or when the day of the week is changed using the SET DAY button.
●Always enter an ON time before entering an OFF time. If you attempt to enter an OFF time without entering an ON time, “ERROR” message appears.
● “NEXT DAY” message and the |
▲ |
mark on the right of the SET TIME displays appear when one of |
|
the OFF times is defined for the next day.
● Select PROG 1 or PROG 2 and enter the timer program for each program number.
–

|
|
|
|
|
|
|
GB |
|||||||||||||
|
|
|
|
|
|
|
|
|
|
|
|
|
|
|
|
|
|
|
|
|
|
SETTING ON/OFF TIMES |
|||||||||||||||||||
1. TIME ADJUST Buttons |
|
|
|
|
|
|
|
5. TIME ADJUST Buttons |
|
|
|
|
|
|
|
|
|
|||
|
|
|
|
|
|
|
|
|
|
|
|
|
|
|
|
|||||
Use the TIME ADJUST buttons |
|
|
|
|
|
|
|
Use the TIME ADJUST buttons |
|
|
|
|
|
|
|
|
|
|||
to set the time to 8:00. |
|
|
|
|
|
|
|
to set 13:00. |
|
|
|
|
|
|
|
|
|
|||
|
|
|
|
|
|
|
|
(When the button is pressed, |
|
|
|
|
|
|
|
|
|
|||
|
|
|
|
|
|
|
|
|
|
|
|
|
|
|
|
|
||||
|
|
|
|
|
|
|
|
the time entered previously |
|
|
|
|
|
|
|
|||||
|
|
|
|
|
|
|
|
appears or 12:00. if no times |
|
|
|
|
|
|
|
|||||
|
|
|
|
|
|
|
|
were entered previously.) |
||||||||||||
2. SET PROGRAM Button |
|
|
|
|
|
|
|
|
|
|
|
|
|
|
|
|
|
|
|
|
|
|
|
|
|
|
|
|
|
|
|
|
|
|
|
|
|
|
|
|
|
Press the SET PROGRAM |
|
|
|
|
|
|
|
|
|
|
|
|
|
|
|
|
|
|
|
|
button. |
|
|
|
|
|
|
|
|
|
|
|
|
|
|
|
|
|
|
|
|
“1st OFF” flashes. |
|
|
|
|
|
|
|
6. SET PROGRAM Button |
|
|
|
|
|
|
|
|
|
|
|
|
|
|
|
|
|
|
|
|
|
|
|
|
|
|
|
|
|
|
|||
|
|
|
|
|
|
|
|
|
|
|
|
|
|
|
|
|
|
|
||
|
|
|
|
|
|
|
|
Press the SET PROGRAM |
|
|
|
|
|
|
|
|
|
|||
|
|
|
|
|
|
|
|
button. |
|
|
|
|
|
|
|
|
|
|||
3. TIME ADJUST Buttons |
|
|
|
|
|
|
|
“2nd OFF” flashes. |
|
|
|
|
|
|
|
|
|
|||
|
|
|
|
|
|
|
|
|
|
|
|
|
|
|
|
|||||
|
|
|
|
|
|
|
|
|
|
|
|
|
|
|
|
|
|
|
|
|
|
|
|
|
|
|
|
|
|
|
|
|
|
|
|
|
|
|
|
|
|
Press the TIME ADJUST |
|
|
|
|
|
|
|
|
|
|
|
|
|
|
|
|
|
|
|
|
buttons to set to 12:00. |
|
|
|
|
|
|
|
|
|
|
|
|
|
|
|
|
|
|
|
|
(When the button is pressed, |
|
|
|
|
|
|
|
7. TIME ADJUST Buttons |
|
|
|
|
|
|
|
|
|
|
||
|
|
|
|
|
|
|
|
|
|
|
|
|
|
|
|
|
||||
the time entered previously |
|
|
|
|
|
|
|
|
|
|
|
|
|
|
|
|
|
|||
appears or 8:01, if no times |
|
|
|
|
|
|
|
Use the TIME ADJUST buttons |
|
|
|
|
|
|
|
|
|
|
||
were entered previously.) |
|
|
|
|
|
|
|
to set to 17:00. |
|
|
|
|
|
|
|
|||||
|
|
|
|
|
|
|
|
(When the button is pressed the |
|
|
|
|
|
|
|
|||||
|
|
|
|
|
|
|
|
|
|
|
|
|
|
|
||||||
|
|
|
|
|
|
|
|
time entered previously |
|
|
|
|
|
|
|
|
||||
|
|
|
|
|
|
|
|
appears or 13:01, if no times |
|
|
|
|
|
|
||||||
|
|
|
|
|
|
|
|
were entered previously.) |
||||||||||||
4. SET PROGRAM Button |
|
|
|
|
|
|
|
|
|
|
|
|
|
|
|
|
|
|
|
|
|
|
|
|
|
|
|
|
|
|
|
|
|
|
|
|
|
|
|
|
|
Press the SET PROGRAM |
|
|
|
|
|
|
|
|
|
|
|
|
|
|
|
|
|
|
|
|
button. |
|
|
|
|
|
|
|
|
|
|
|
|
|
|
|
|
|
|
|
|
“2nd ON” flashes. |
|
|
|
|
|
|
|
|
|
|
|
|
|
|
|
|
|
|
|
|
|
|
|
|
|
|
|
|
|
|
|
|
|
|
|
|
|
|
|
|
|
–
GB
SETTING HOLIDAY
●This function cancels the operation of the timer program on a specified holiday or holidays. (The timer operation stops but the contents of the timer program operation are maintained.)
Example: To designate Sunday as a holiday
1. ENTER Button
Press the ENTER button.
The present weekday and “1st ON” messages flash.
2. SET DAY Button
Press the SET DAY button and select a day of the week.
DAY OMIT Button
Press the DAY OMIT button. A bar
appears under the selected day on the OMIT column.
When another day is to be selected as a holiday, repeat Steps 2 and 3.
END
Press the ENTER Button again.
The operation returns to the normal mode (the present time displays).
●The ending procedure may be omitted since the setting is automatically completed 15 seconds later or when the day of the week is changed using the SET DAY button.
●To clear the holiday setting (OMIT), press the DAY OMIT button again (Step 3). The bar indicating a holiday disappears.
–

GB
7 TIMER
CLEARING SETTING CONTENTS FOR A DAY
● This function clears the timer program of the desired day.
Example: To clear the setting for Thursday
1. ENTER Button
Press the ENTER button to flash the present day of the week and “1st ON” messages.
2. SET DAY Button
Press the SET DAY button to set the desired day of the week.
END
Press the ENTER button again.
The operation returns to the normal mode (the present time displays).
●The ending procedure may be omitted since the setting is automatically completed 15 seconds later or when the week is changed using the SET DAY button.
●To clear the DAY CLEAR setting, press the DAY CLEAR button again (Step 3).
–

GB
COPYING SETTINGS OF PRECEDING DAY
● This function copies the timer program contents set for the preceding day.
Example: Copying the timer program contents of Wednesday (4) (1st ON of 12:00 and 1st OFF of 18:00) to Thursday (5)
1. ENTER Button
Press the ENTER button to flash the present time and “1st ON” messages.
2. SET DAY Button
Press the SET DAY button to select the day of the week to which the program is to be copied.
3. DAY REPEAT Button
Press the DAY REPEAT button. Setting of 1st ON and operation
schedule registered for the preceding day are indicated.
● To continue
copying the preceding day’s
timer program
contents, repeat Steps 2 and 3.
END
Press the ENTER button again.
The operation returns to the normal mode (the present time displays).
–
GB
7 TIMER
CONFIRMING PROGRAM SETTING
● This function indicates contents of the timer program for each day of the week.
1. PROGRAM CONFIRM Button
Press the PROGRAM CONFIRM button. Contents of the program are displayed sequentially for the week, starting from the current day of the week.
Typical indications are shown below:
● Nothing happens to the display when buttons other than the SET DAY and PROGRAM CONFIRM buttons are pressed during checking.
● If the SET DAY or PROGRAM CONFIRM button is not pressed during checking, the display automatically returns to the normal mode after displaying the setting contents starting from the current day of the week.
● Since the messages appear only for a short time, press the PROGRAM CONFIRM button again if you could not read them.
–
GB
7 DAY TIMER
PROGRAM SELECTION
● Select program 1 or 2 to set the desired timer program pattern.
1. Program Select Button
Press the Program Select button. Pressing this button alternates between Program 1 and 2. The contents of the timer program currently selected are displayed:
● The program mode remains the same when the Program Select button is pressed during program setting, present time setting or checking.
–

GB
WEEKLY TIMER AND AIR CONDITIONER OPERATION
●When the Weekly Timer is connected to the air conditioner, the priority of operation is given to the Remote Controller.
|
|
|
|
|
|
|
|
|
|
|
|
|
|
|
|
|
|
|
|
|
|
|
|
|
|
|
|
|
|
|
|
|
|
|
|
|
|
|
|
|
|
|
|
|
|
|
|
|
|
|
|
|
|
|
|
|
|
|
|
|
|
|
|
|
|
|
|
|
|
|
|
|
|
|
|
|
|
|
|
|
|
|
|
|
|
|
|
|
|
|
|
|
|
|
|
|
|
|
|
|
|
|
|
|
|
|
|
|
|
|
|
|
|
|
|
|
|
|
|
|
|
|
|
|
|
|
|
|
|
|
|
|
|
|
|
|
|
|
|
|
|
|
|
|
|
|
|
|
|
|
|
|
|
|
|
|
|
|
|
|
|
|
|
|
|
|
|
|
|
|
|
|
|
|
|
|
|
|
|
|
|
|
|
|
|
|
|
|
|
|
|
|
|
|
|
|
|
|
|
|
|
|
|
|
|
|
|
|
|
|
|
|
|
|
|
|
|
|
|
|
|
|
|
|
|
|
|
|
|
|
|
|
|
|
|
|
|
|
|
|
|
|
|
|
|
|
|
|
|
|
|
|
|
|
|
|
|
|
|
|
|
|
|
|
|
|
|
|
|
|
|
|
|
|
|
|
|
|
|
|
|
|
|
|
|
|
|
|
|
|
|
|
|
|
|
|
|
|
|
|
|
|
|
|
|
|
|
|
|
|
|
|
|
|
|
|
|
|
|
|
|
|
|
|
|
|
|
|
|
|
|
|
|
|
|
|
|
|
|
|
|
|
|
|
|
|
|
|
|
|
|
|
|
|
|
|
|
|
|
|
|
|
|
|
|
|
|
Example: |
|
|
|
|
|
|
|
|
|
|
|
|
|
|
|
|
|
|
|
|
||
|
|
|
|
|
|
|
|
|
|
|
|
|
|
|
|
|
|
|
|
|||
Current day and time: |
|
|
|
|
|
|
|
|
Monday 9:00 |
|
|
|
|
|
||||||||
Program contents for Monday: |
|
|
|
|
|
|
|
|
|
1st ON |
1st OFF |
2nd ON |
2nd OFF |
|||||||||
|
|
|
|
|
|
|
|
|
|
|
|
|||||||||||
|
|
|
8:00 |
|
|
12:00 |
|
13:00 |
17:00 |
|||||||||||||
The operation pattern of the above timer program is shown below:
Timer ON/OFF
setting
Operation of Remote
Controller
Operation of
Air Conditioner
Example: One-week operation pattern
Operated by timer program
Timer program operation is not applied because there are no settings.
Although settings are entered, timer program operation is not applied because it is set as a holiday.
–

GB
7 TIMER
SETTING ERROR
Preceding day’s setting |
Next day’s setting |
|
Possible setting range |
Setting is impossible |
Setting is |
|
impossible |
Example:
Assume that the current settings are 8:00 for 1st ON and 12:00 for 1st OFF. If you enter 11:00 for 2nd ON, the display stops and “ERROR” message appears at 12:00.
The following settings do not constitute errors:
(1)The same time is assigned to 1st OFF and 2nd ON or 2nd OFF and 1st ON.
(2)When the operation period specified by 2nd ON and 2nd OFF is earlier than that of 1st ON and 1st OFF (the machine automatically arranges the order).
1st ON |
1st OFF |
1st ON |
1st OFF |
12:00 |
18:00 |
8:00 |
12:00 |
|
|
|
|
2nd ON |
2nd OFF |
2nd ON |
2nd OFF |
8:00 |
12:00 |
12:00 |
18:00 |
–

GB
SPECIFICATIONS
SPECIFICATION TABLE
Power Source:
Power Consumption:
Time Indication:
Time Accuracy:
Timer Setting:
Battery Recharge Time: Guaranteed power failure period: Size:
Weight:
Connected to the Remote Controller of the indoor unit (AC 12V, 50/60Hz)
Maximum 1W
24-hour system
Monthly error within ±30 seconds (at 15-30˚C)
1-min steps, 2 timer programs per day
Approximately 5 days
Approximately 72 hours
120 x 120 x 14mm (width x height x depth)
Approximately 210g
TIMER DAY 7
● Outline Drawing |
|
|
|
|
|
● Installation |
|||||||||
|
|
|
|
|
|
|
|
|
|
|
|
|
|
Cut a U-shaped notch in the centre of the top |
|
|
|
|
|
|
|
|
|
|
|
|
|||||
|
|
|
|
|
|
|
|
|
|
|
|
|
|
edge of the cover and then pass the three-wire |
|
|
|
|
|
|
|
|
|
|
|
|
|
||||
|
|
|
|
|
|
|
|
|
|
|
|
|
|
vinyl cord trough the notch. |
|
|
|
|
|
|
|
|
|
|
|
|
|
|
|
|
|
|
|
|
|
|
|
|
|
|
|
|
|
|
|
|
|
|
|
|
|
|
|
|
|
|
|
|
|
|
|
|
|
|
|
|
|
|
|
|
|
|
|
|
|
|
|
Cut |
|
|
|
|
|
|
|
|
|
|
|
|
|
|
|
|
|
|
|
|
|
|
|
|
|
|
|
|
|
|
|
|
|
|
|
|
|
|
|
|
|
|
|
|
|
|
|
|
|
|
|
|
|
|
|
|
|
|
|
|
|
|
|
|
|
● Specifications and appearance are subject to change without notice.


Two fixing screws (not provided)
The cover can be removed by inserting a flathead screwdriver where indicated by the arrow and then prying the cover off.
–
F
APERÇU DU SYSTÉME
● Particularités du “7 Day Timer”
1.Programmation de deux cycles de fonctionnement programmé hebdomadaire.
2.Programmation de ON/OFF deux fois par jour par pas de 1 minute.
3.Indication horaire utilisant le système de 24 heures.
4.Indication par barres des programmations quotidiennes facile à comprendre.
5.Annulation facile du fonctionnement programmé d’un jour par la fonction DAY OMIT.
6.Programmation facile d’un cycle de fonctionnement avec la fonction DAY REPEAT lorsque ce cycle est identique à celui de la veille.
7.Annulation facile des programmations en utilisant la fonction DAY CLEAR.
8.Vérification facile du contenu de la programmation.
9.Rétablissement automatique du fonctionnement programmé après une panne de courant (une reprogrammation n’est pas nécessaire pour une panne de dépassant pas 72 heures).
ATTENTION
Lorsqu’on utilise le programmateur hebdomadaire avec la télécommande (RBC-SR1-PE) la fonction de programmateur de la télécommande principale est désactivée.
Jusqu’à 16 unités intérieures par système
Unité 1 |
Unité 2 |
Unité 3 |
Unité 16 |
Programmateur |
Télécommande |
hebdomadaire |
principale |
RBC-WT1-PE |
RBC-SR1-PE |
.
Unité intérieure
RBC-SR1-PE |
RBC-WT1-PE |
– 19 –

F
PROGRAMMATEUR
NOMENCLATURE ET FONCTIONS
● Affichage
Pour faciliter les explications, cette illustration présente toutes les indications. Pendant le fonctionnement réel, seuls les points sélectionnés apparaissent.
1.Indication de marche/arrêt de l’unité (UNIT ON/OFF)
ON est indiqué lors d’un fonctionnement en mode de fonctionnement programmé. OFF est indiqué dans les autres cas.
2.Indication de fonctionnement du programmateur (TIMER ON)
Indique que le programmateur est en fonction.
3.Indication du jour (DAY)
Indique le jour actuel de la semaine, ou le jour en cours de programmation.
4.Indication de jour de la semaine actif (ON)
Apparaît sous le jour de la semaine pour lequel des heures de ON/OFF ont été programmées.
5.Indication de jour de congé (OMIT)
Apparaît sous un jour de la semaine spécifié comme étant un jour de congé.
6.Indication d’heure de départ/arrêt (ON/OFF)
Apparaît pendant la programmation des heures de ON/OFF.
7.Indication de l’heure actuelle (TIME)
Apparaît en mode d’heure actuelle ou pendant la programmation de l’heure actuelle.
8.Indication d’erreur (ERROR)
Apparaît lorsqu’une erreur se produit pendant la programmation des heures de ON/OFF ou la copie de la programmation du jour précédent. (Pour les détails, voir p. 32.)
9.Indication du lendemain (NEXT DAY)
Apparaît lors de la programmation du lendemain.
10.Indication de l’heure
Indique les heures de ON/OFF et l’heure actuelle.
11.Indication du contenu de la programmation (SET TIMES)
Cet affichage à barres indique le contenu de la programmation.
12.Indication de programme 1 ou 2 (PROG 1, PROG 2)
Indique le numéro du cycle programmé actuel.
F
PROGRAMMATEUR
NOMENCLATURE ET FONCTIONS
● Panneau de commande
Appuyer sur les touches pour choisir un mode ou spécifier une valeur.
13. Touche d’entrée (ENTER)
Permet d’entrer la programmation. (Pour les détails, voir p. 23.)
14.Touche des heures de départ/arrêt (SET PROGRAM)
Permet de programmer les heures de ON/OFF du fonctionnement programmé.
15.Touche de copie de jour (DAY REPEAT)
Permet de copier le contenu de la programmation de la veille. (Pour les détails, voir p. 28.)
16.Touche de jour de congé (DAY OMIT)
Permet de spécifier ou d’annuler un jour de congé. (Pour les détails, voir p. 26.)
17.Touche de vérification (PROGRAM CONFIRM)
Permet de vérifier le contenu de la programmation d’une semaine. (Pour les détails, voir p. 29.)
18.Témoin d’activation/désactivation du programmateur (TIMER ON/OFF)
S’allume pendant le fonctionnement du programmateur.
19.Touche de jour de la semain (SET DAY)
Permet de sélectionner le jour de la semaine.
20.Touche de programmation de l’heure actuelle (SET TIME)
Permet de programmer l’heure actuelle.
21.Touches de réglage de l’heure
(TIME ADJUST)
Permettent de spécifier les heures de ON et OFF. A chaque pression sur la touche, la valeur augmente ou diminue. (Pour les détails, voir p. 22 et 23.)
22.Touche d’annulation d’un jour (DAY CLEAR)
Permet d’annuler le contenu de la programmation d’un jour. (Pour les détails, voir p. 27.)
23.Touche de sélection de programme
Utiliser cette touche pour choisir un cycle programmé.
24. Touche d’activation/désactivation du programmateur (TIMER ON/OFF)
Lorsqu’on appuie sur cette touche, le programmateur est activé. Une seconde pression sur cette touche désactive le programmateur.
F
PROGRAMMATEUR
PROGRAMME DE L’HEURE ACTUALLE
●Toujours procéder de la manière suivante pour programmer l’heure actuelle. (Si l’heure actuelle n’est pas programmée, toutes les opérations sont désactivées après une réinitialisation.)
●L’heure actuelle est indiquée lorsque l’interrupteur d’alimentation est en position de marche, que le fonctionnement programmé soit activé ou désactivé. (Elle n’est pas indiquée pendant une panne de courant.)
●L’heure est indiquée selon le système de 24 heures. L’indication est 13:00 pour 1 heure de l’aprèsmidi.)
Exemple : Programmation de l’heure actuelle à 12:00, mercredi
POWER
Placer l’interrupteur d’alimentation en position de marche
Le témoin rouge TIMER ON/OFF clignote.
1. Touche SET TIME
Appuyer sur la touche SET TIME. L’indication de l’heure actuelle clignote.
2. Touche SET DAY
Par des pressions successives sur la touche SET DAY, amener la marque sous le chiffre 4 (mercredi).
1 |
2 |
3 |
4 |
5 |
6 |
7 |
DIM |
LUN |
MAR |
MER |
JEU |
VEN |
SAM |
3. Touches TIME ADJUST
Programmer l’heure à 12:00 à l’aide des touches TIME ADJUST.
Fin
Appuyer à nouveau sur la touche SET TIME.
L’indication clignotante disparaît et la programmation de l’heure actuelle est terminée.
●L’heure actuelle est enregistrée 15 secondes plus tard même si l’on n’effectue pas la dernière opération.
●Pendant la programmation de l’heure actuelle, toutes les touches sont désactivées à l’exception des touches SET DAY et TIME ADJUST.
F
PROGRAMMATEUR
PROGRAMMATION POUR UN FONCTIONNEMENT PROGRAMMÉ
●Il est possible de programmer deux cycles de fonctionnement par jour (1st ON, 1st OFF, 2nd ON et 2nd OFF).
●L’une des deux heures OFF peut être programmée à une heure quelconque du lendemain.
●Programmer les heures de ON et OFF en veillant à ce que les cycles ne se chevauchent pas.
Exemple : Programmation 1st ON à 8:00, 1st OFF à 12:00, 2nd ON à 13:00 et 2nd OFF à 17:00 pour mercredi (4) le lundi (2).
|
|
|
|
|
|
|
|
|
|
|
|
|
|
|
|
|
|
|
|
|
|
|
|
|
|
|
|
|
|
|
|
|
|
|
|
|
|
|
|
|
|
|
|
|
|
|
|
|
|
|
|
|
|
|
|
|
|
|
|
|
|
|
|
|
|
|
|
|
|
|
|
|
|
|
|
|
|
|
|
|
|
|
|
|
|
|
|
|
|
|
|
|
|
|
|
|
|
|
|
|
|
|
|
|
|
|
|
|
|
|
|
|
|
|
|
|
|
|
|
|
|
|
|
|
|
|
|
|
|
|
|
|
|
|
|
|
|
|
|
|
|
|
|
|
|
|
|
|
|
|
|
|
|
|
|
|
|
|
|
|
|
|
|
|
|
|
|
|
|
|
|
|
|
|
|
|
|
|
|
|
|
|
|
|
|
|
|
|
|
|
|
|
|
|
|
|
|
|
|
|
|
|
|
|
|
|
|
|
|
|
|
|
|
|
|
|
|
|
|
|
|
|
|
|
|
|
|
|
|
|
|
|
|
|
|
|
|
|
|
|
|
|
|
|
|
|
|
|
|
|
|
|
|
|
|
|
|
|
|
|
|
|
|
|
|
|
|
|
|
|
|
|
|
|
|
|
|
|
|
|
|
|
|
|
|
|
|
|
|
|
|
|
|
|
|
|
|
|
|
|
|
|
|
|
|
|
|
|
|
|
|
|
|
|
|
|
|
|
|
|
|
|
|
|
|
|
|
|
|
|
|
|
|
|
|
|
|
|
|
|
|
|
|
|
|
|
|
|
|
|
|
|
|
|
|
|
|
|
|
|
|
|
|
|
|
|
|
|
|
|
|
|
|
|
|
|
|
|
|
|
|
|
|
|
|
|
|
|
|
|
|
|
|
|
|
|
|
|
|
|
|
|
|
|
|
|
|
|
|
|
|
|
|
|
|
|
|
|
|
|
|
|
|
|
|
|
|
|
|
|
|
|
|
|
|
|
|
|
|
|
|
|
|
|
|
|
|
|
|
|
|
|
|
|
|
|
|
|
|
|
|
|
|
|
|
|
|
|
|
|
|
|
|
|
|
|
|
|
|
|
|
|
|
|
|
|
|
|
|
|
|
|
|
|
|
|
|
|
|
|
|
|
|
|
|
|
|
|
|
|
|
|
|
|
|
|
|
|
|
|
|
|
|
|
|
|
|
|
|
|
|
|
|
|
|
|
|
|
|
|
|
|
|
|
|
|
|
|
|
|
|
|
|
|
|
|
|
|
|
|
|
|
|
|
|
|
|
|
|
|
|
|
|
|
|
|
|
|
|
|
|
|
|
|
|
|
|
|
|
|
|
|
|
|
|
|
|
|
|
|
|
|
|
|
|
|
|
|
|
|
|
|
|
|
|
|
|
|
|
|
|
|
|
|
|
|
|
|
|
|
|
|
|
|
|
|
|
|
|
|
|
|
|
|
|
|
|
|
|
|
|
|
|
|
|
|
|
|
|
|
|
|
|
|
|
|
|
|
|
|
|
|
|
|
|
|
|
|
|
|
|
|
|
|
|
|
|
|
Marche |
|
|||||||||||||
|
|
|
|
|
|
|
|
|
|
|
|
|
|
|
|
|
|
|
|
|
|
|
|
|
|
|
|
|
|
|
|
|
|||||||||||
|
|
|
|
|
|
|
|
|
|
|
|
|
|
|
|
|
|
|
|
|
|
|
|
|
|
|
|
|
Arrêt |
||||||||||||||
1. Touche ENTER |
|
|
|
|
|
|
|
|
|
|
|
3. Touches TIME ADJUST et SET PROGRAM |
|||||||||||||||||||||||||||||||
Appyer sur la |
|
|
|
|
|
|
|
|
|
|
|
A l’aide des touches TIME ADJUST et SET |
|||||||||||||||||||||||||||||||
touche ENTER. Le |
|
|
|
|
|
|
|
|
|
|
|
|
|
|
|
|
|
|
|
PROGRAM, programmer les valeurs désirées |
|||||||||||||||||||||||
jour actuel de la |
|
|
|
|
|
|
|
|
|
|
|
|
|
|
|
|
|
|
|
|
pour 1st ON, 1st OFF, 2nd ON et 2nd OFF. (Pour |
||||||||||||||||||||||
semaine et “1st |
|
|
|
|
|
|
|
|
|
|
|
|
|
|
|
|
|
|
les détails, voir p. 25.) |
||||||||||||||||||||||||
ON” sont indiqués |
|
|
|
|
|
|
|
|
|
|
|
|
|
|
|
|
|
|
|
|
|
|
|
|
|
|
|
|
|
|
|
|
|
|
|
|
|
|
|
|
|||
par un |
|
|
|
|
|
|
|
|
|
|
|
|
|
|
|
|
|
|
|
|
|
FIN |
|||||||||||||||||||||
clignotement. |
|
|
|
|
|
|
|
|
|
|
|
|
|
|
|
|
|
|
|||||||||||||||||||||||||
2. Touche SET |
|
|
|
|
|
|
|
|
|
|
|
|
|
|
|
|
|
|
|
|
Appuyer sur la touche ENTER. |
||||||||||||||||||||||
|
|
|
|
|
|
|
|
|
|
|
|
|
|
|
|
|
|
Une barre |
|||||||||||||||||||||||||
DAY |
|
|
|
|
|
|
|
|
|
|
|
|
|
|
|
|
|
|
|
|
|
||||||||||||||||||||||
Appuyer sur la |
|
|
|
|
|
|
|
|
|
|
|
apparaît sous 4 |
|||||||||||||||||||||||||||||||
touche SET DAY |
|
|
|
|
|
|
|
|
|
|
|
(mercredi) et le |
|
|
|
|
|
|
|
|
|||||||||||||||||||||||
pour déplacer la |
|
|
|
|
|
|
|
|
|
|
|
|
|
|
|
|
|
fonctionnement |
|
|
|
|
|
|
|
|
|
|
|
||||||||||||||
marque |
sous le |
|
|
|
|
|
|
|
|
|
|
|
|
|
|
|
|
|
revient au mode |
|
|
|
|||||||||||||||||||||
chiffre 4 (mercredi). |
|
|
|
|
|
|
|
|
|
|
|
normal (l’heure |
|
|
|
||||||||||||||||||||||||||||
|
|
|
|
|
|
|
|
|
|
|
|
|
|
|
|
|
|
|
|
|
|
actuelle est |
|
|
|
|
|
|
|
|
|
|
|
||||||||||
|
|
|
|
|
|
|
|
|
|
|
|
|
|
|
|
|
|
|
|
|
|
indiquée). |
|
|
|
||||||||||||||||||
|
|
|
|
|
|
|
|
|
|
|
|
|
|
|
|
|
|
|
|
|
|
|
|
|
|
|
|
|
|
|
|
|
|
|
|
|
|
|
|
|
|
|
|

F
PROGRAMMATEUR
PROGRAMMATION POUR UN FONCTIONNEMENT PROGRAMMÉ
Marche
Appuyer sur la touche TIMER ON/OFF.
Le témoin route TIMER ON/OFF s’allume et un message “TIMER ON” apparaît. Pendant le fonctionnement programmé ON, le message “UNIT ON” est affiché. Dans les autres cas, le message “UNIT OFF” est affiché.
Arrêt
Appuyer sur la touche TIMER ON/OFF une seconde fois.
Le témoin rouge TIMER ON/OFF s’éteint et le message “TIMER ON” disparaît. Le message “UNIT ON” ou “UNIT OFF” disparaît également.
●On pourra omettre la dernière opération car la programmation se termine automatiquement 15 secondes plus tard ou lorsqu’on change le jour de la semaine à l’aide de la touche SET DAY.
●Toujours programmer une heure ON avant de programmer une heure OFF. Si l’on tente une heure OFF sans programmer d’heure ON, le message “ERROR” (programmation impossible) apparaît.
● Le message “NEXT DAY” et la marque |
▲ |
à droite des affichages SET TIME apparaissent lorsque |
|
l’une des heures OFF et programmée pour le lendemain.
● Sélectionner PROG 1 ou PROG 2 et effecteur la programmation pour le programme correspondant.

F
PROGRAMMATEUR
PROGRAMMATION DES HEURES DE ON/OFF
1. Touche TIME ADJUST
Appuyer sur les touches TIME ADJUST pour programmer 8:00.
2. Touches SET PROGRAM
Appuyer sur la touche SET PROGRAM. “1st OFF” clignote.
3. Touches TIME ADJUST
Appuyer sur les touches TIME ADJUST pour programmer 12:00. (Lorsqu’on appuie sur la touche, l’affichage indique l’heure programmée précédement, ou 8:01 si aucune heure n’a été programmée précédemment.)
4. Touches SET PROGRAM
Appuyer sur la touche SET PROGRAM. “2nd ON” clignote.
5.Touches TIME ADJUST
Appuyer sur les touches TIME ADJUST pour programmer 13:00. (Lorsqu’on appuie sur la touche, l’affichage indique l’heure programmée précédement, ou 12:00 si aucune heure n’a été programée précédemment.)
6.Touches SET PROGRAM
Appuyer sur la touche SET PROGRAM. “2nd OFF” clignote.
7.Touches TIME ADJUST
Appuyer sur les touches TIME ADJUST pour programmer 17:00. (Lorsqu’on appuie sur la touche, l’affichage indique l’heure programmé précédement, ou 13:01 si aucune heure n’a été programée précédemment.)
F
PROGRAMMATEUR
PROGRAMMATION D’UN JOUR DE CONGÉ
● Cette fonction annule le fonctionnement programmé pour un ou plusieurs jours de congé.
(Le fonctionnement du programmateur est arrêté, mais le contenu de la programmation est conservé.)
Exemple : Pour spécifier le dimanche comme un jour de congé.
1. Touche ENTER
Appuyer sur la touche ENTER. Le jour de la semaine actuel est “1st ON” clignotent.
2. Touche SET DAY
Appuyer sur la touche SET DAY pour sélectionner un jour de la semaine.
Fin
Appuyer à nouveau sur la touche ENTER.
Le fonctionnement revient en mode normal (l’heure actuelle est indiquée).
●On pourra omettre la dernière opération car la programmation se termine automatiquement 15 secondes plus tard ou lorsqu’on change le jour de la semaine à l’aide de la touche SET DAY.
●Pour annuler la programmation d’un jour de congé (OMIT), appuyer à nouveau sur la touche DAY OMIT (à l’étape 3 ). La barre indiquant un jour de congé disparaît.
–26 –
F
PROGRAMMATEUR
ANNULATION DE LA PROGRAMMATION D’UN JOUR
● Cette fonction annule la programmation pour un jour sélectionné.
Exemple : Pour annuler la programmation pour le jeudi
1. Touche ENTER
Appuyer sur la touche “ENTER” pour faire clignoter les messages de jour de la semaine actuel et “1st ON”.
2. Touche SET DAY
Appuyer sur la touche SET DAY pour sélectionner le jour de la semaine désiré.
Fin
Appuyer à nouveau sur la touche ENTER.
Le fonctionnement revient en mode normal (l’heure actuelle est indiquée).
●On pourra omettre la dernière opération car la programmation se termine automatiquement 15 secondes plus tard ou lorsqu’on change le jour de la semaine à l’aide de la touche SET DAY.
●Pour annuler la programmation DAY CLEAR, appuyer à nouveau sur la touche DAY CLEAR (à l’étape 3 ).
–27 –

F
PROGRAMMATEUR
COPIE DES PROGRAMMATIONS DE LA VEILLE
● Cette fonction copie le contenu de la programmation du jour précédent.
Exemple : Copier le contenu de la programmation de mercredi (4) 1st ON : 12:00 et 1st OFF : 18:00 pour jeudi (5)
1. Touche ENTER
Appuyer sur la touche ENTER pour faire clignoter les messages de l’heure actuelle et “1st ON”.
2. Touche SET DAY
Appuyer sur la touche SET DAY pour sélectionner le jour de la semaine à programmer.
3. Touche DAY REPEAT
Appuyer sur la touche DAY REPEAT. La programmation 1st
ON et le contenu de la programmation enregistré pour le jour précédent sont
indiqués.
● Pour continuer la copie du contenu
de la
programmation du jour précédent, répéter les
étapes 2 et 3.
Fin
Appuyer à nouveau sur la touche ENTER.
Le fonctionnement revient en mode normal (l’heure actuelle est indiquée).

F
PROGRAMMATEUR
VÉRIFICATION DE LA PROGRAMMATION DU FONCTIONNEMENT
● Cette fonction indique le contenu de la programmation pour chaque jour de la semaine.
1. Touche PROGRAM CONFIRM
Appuyer sur la touche PROGRAM CONFIRM. Le contenu de la programmation est indiqué séquentiellement pour une semaine en commençant par le jour actuel de la semaine. (Des indications types sont données ci-dessous.)
● L’indication ne change pas sur l’écran lorsqu’on appuie sur des touches autres que la touche SET DAY et la touche PROGRAM CONFIRM.
● Si l’on n’appuie ni sur la touche SET DAY ni sur la touche de PROGRAM CONFIRM, l’indication revient automatiquement au mode normal après avoir indiqué le contenu de la programmation en commençant par le jour actuel de la semaine.
● Les messages n’apparaissent que pendant un court instant. Appuyer à nouveau sur la touche PROGRAM CONFIRM si l’on n’est pas parvenu à les lire.
– 29 –
 Loading...