


TOSHIBA
REMOTE CONTROLLER |
OWNER’S MANUAL |
|
TELECOMMANDE |
MODE D’EMPLOI |
|
FERNBEDIENUNG |
BENUTZERHANDBUCH |
|
MANDO DE CONTROL REMOTE |
MANUALE DELL’UTENTE |
|
TELECOMANDO |
MANUAL DEL USUARIO |
|
AFSTANDSBEDIENING |
GEBRUIKERSHANDLEIDING |
|
|
|
|
|
|
|
MODE |
FAN |
CENTRAL |
|
FAN ONLY |
AUTO |
OPERATION |
|
COOL |
HIGH |
STANDBY |
|
|
|
MED |
PREHEAT |
HEAT |
LOW |
DEFROST |
|
AUTO |
|
FILTER |
|
|
|
|
|
TEMP |
CHECK |
LOUVER |
|
UNIT |
|
MANUAL |
|
88˚C |
|
||
TIMER |
CONT. OFF ON |
ADDRESS |
|
88:88 |
|||
|
|
H |
M |
 NETWORK
REMOTE CONTROLLER
MODE
-+
TIMER ADJUST
CHECK FILTER
ON/OFF
RBC-SR1-PE
1401449001R01

AI REMOTE CONTROLLER
GB |
|
● This manual contains the operating instructions |
Remote Controller. |
● Please read this Manual before operating your |
. |
● For the indoor and outdoor units please refer |
Owner’s Manuals. |
● Keep this Manual in a convenient location for |
. |
F |
|
●Le présent manuel contient les consignes d’utilisation de la télécommande
●Ces consignes sont à lire avant d’utiliser le climatiseur.
●Pour l’utilisation des unités intérieures et extérieures, se reporter aux modes d’emploi respectifs.
● Conserver ce manuel dans un endroit adéquat |
|
le consulter. |
D |
|
|
● In diesem Benutzerhandbuch wird die Bedienung |
|
Fernbedienung beschrieben. |
● Bitte lesen Sie dieses Handbuch vor Inbetriebnahme Ihrer Klimaanlage sorgfältig durch. |
||
● Für Innenbzw. Außenanlagen lesen Sie bitte |
jeweilige Handbuch. |
|
● Das Handbuch immer leicht auffindbar |
|
|
E |
|
|
● Este manual contiene las instrucciones para |
|
del mando a distancia. |
● Lea este manual detenidamente antes de usar |
|
de aire. |
● Para las unidades de interior y exterior consulte |
|
del usuario correspondientes. |
● Mantenga este manual en un lugar conveniente |
|
poder consultarlo en el futuro. |
I |
|
|
● Questo manuale contiene le istruzioni per l’uso |
|
. |
● Leggere attentamente questo manuale prima |
|
il condizionatore d’aria. |
● Per le unità interne ed esterne consultare i |
|
. |
● Conservare questo manuale a portata di mano |
|
consultare in futuro. |
NL |
|
|
● In deze handleiding staan de bedieningsaanwijzingen |
de afstandsbesturing. |
|
● Lees deze handleiding door voordat u de airconditioning in werking stelt. |
||
● Voor de eenheden voor binnenen buitengebruik: |
|
de respectieve gebruikershandleidingen. |
● Leg deze handleiding op een geschikte plaats |
|
in de toekomst gemakkelijk kunt raadplegen. |
– 2 –

GB
AI REMOTE CONTROLLER
CONTENTS
F |
|
SOMMAIRE |
|
ZONE D’AFFICHAGE DE LA TÉlÉCOMMANDE .................................................................................. |
9 |
BOUTONS DE LA TÉlÉCOMMANDE.................................................................................................. |
10 |
FONCTIONNEMENT MANUEL .......................................................................................................... |
11 |
FONCTIONNEMENT AUTOMATIQUE ................................................................................................ |
12 |
PROGRAMMATION ............................................................................................................................ |
13 |
D |
|
INHALT |
|
E
CONTENIDO
I
I
NL |
|
INHOUD |
|
NAAM EN FUNCTIE VAN DE BEDIENINGSKNOPPEN .................................................................... |
29 |
INSTELLEN VAN DE KLOK ................................................................................................................ |
30 |
AUTOMATISCHE WERKING .............................................................................................................. |
31 |
VOORVERWARMEN .......................................................................................................................... |
32 |
KOELEN .............................................................................................................................................. |
33 |
GB
AI REMOTE
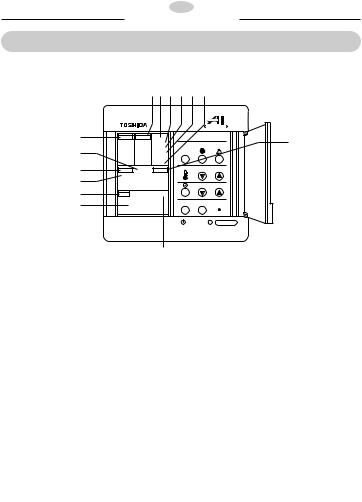
REMOTE CONTROL DISPLAY
All of the display items are shown in the diagram below for the purpose of explanation. Only selected items are displayed in actual operation.
|
|
2 3 4 |
5 |
6 |
7 |
|
||
|
|
|
|
|
|
NETWORK |
|
|
1 |
MODE |
FAN |
CENTRAL |
REMOTE CONTROLLER |
8 |
|||
FAN ONLY |
AUTO |
OPERATION |
||||||
|
|
|
|
|||||
9 |
COOL |
HIGH |
STANDBY |
|
|
|
||
|
MED |
PREHEAT |
MODE |
|
|
|
||
|
HEAT |
LOW |
DEFROST |
|
|
|
|
|
|
AUTO |
|
FILTER |
|
|
- + |
|
|
11 |
TEMP |
CHECK |
LOUVER |
|
|
|
||
10 |
UNIT |
|
MANUAL |
|
|
|
|
|
|
C |
|
|
|
|
|
||
12 |
88˚ |
|
|
|
TIMER ADJUST |
|
||
TIMER CONT. OFF ON |
ADDRESS |
|
|
|
|
|||
13 |
88:88 |
CHECK |
|
FILTER |
|
|||
|
|
H |
M |
|
|
|
|
|
ON/OFF
14
This display appears after 2500 hrs of operation.
– 4 –

GB
AI REMOTE CONTROLLER
REMOTE CONTROL BUTTON OPERATIONS
|
|
1 |
2 |
|
|
3 |
|
|
|
|
|
|
NETWORK |
|
|
MODE |
FAN |
CENTRAL |
REMOTE CONTROLLER |
4 |
|||
FAN ONLY |
AUTO |
OPERATION |
|||||
|
|
|
|||||
COOL |
HIGH |
STANDBY |
|
|
|
||
|
MED |
PREHEAT |
MODE |
|
|
|
|
|
|
|
|
|
|||
HEAT |
LOW |
DEFROST |
|
|
|
|
|
AUTO |
|
FILTER |
|
- |
+ |
|
|
TEMP |
CHECK |
LOUVER |
|
|
|||
UNIT |
|
MANUAL |
|
|
|
6 |
|
88˚C |
|
|
TIMER ADJUST |
||||
TIMER CONT. OFF ON |
ADDRESS |
|
|
|
|
||
88:88 |
CHECK |
FILTER |
5 |
||||
|
H |
M |
|
|
|
||
|
|
|
ON/OFF |
|
|
||
9 10 7 8
1. MODE Button
Selects the desired operation mode. Each time it is pressed, the display changes in the following sequence:-
FAN ONLY COOL HEAT AUTO
2. FAN Button
Selects the desired fan speed mode. Each time it is pressed, the display changes in the following sequence:-
AUTO HIGH MED LOW
3. LOUVER Button
This is used to drive the outlet louvers automatically when the air conditioner is in operation. When it is pressed, the louvers will start oscillation and the display will illuminate. When it is pressed again, the louvers will stop.
4. TEMP ADJUST ( ▼ ▲ ) Buttons
These buttons are used to set the required room temperatures (18-29°C).
5. TIMER Button
6.TIMER ADJUST Buttons
7.OPERATION Lamp
On initial power on or after a power interruption this lamp will flash. This lamp is lit during normal operation.
8. ON/OFF Button
When this button is pressed, the machine starts or stops within a couple of minutes.
9.CHECK Button
10.FILTER Button
●CHECK button and FILTER button are for the use of service engineers.
CAUTION
●When the air conditioner is switched off, the operation lamp and LOUVER display go off, but the other displays remain unchanged.
●Use the CHECK button for a malfunction check. Do not operate this button under normal

GB
AI REMOTE CONTROLLER
MANUAL OPERATION
The Main Isolation Switch needs to be set to the “on” position (the operation lamp flashes).
Caution
●Do not turn the power OFF while the machine is in use.
●If the air conditioner is to be used after a long period of mains power isolation, ensure the air conditioner has mains power supplied for 12 hours before operation.
|
|
1 |
2 |
|
|
|
|
|
|
|
|
|
NETWORK |
|
|
MODE |
FAN |
CENTRAL |
REMOTE CONTROLLER |
3 |
|||
FAN ONLY |
AUTO |
OPERATION |
|||||
|
|
|
|||||
COOL |
HIGH |
STANDBY |
|
|
|
||
|
MED |
PREHEAT |
MODE |
|
|
|
|
HEAT |
LOW |
DEFROST |
|
|
|
|
|
AUTO |
|
FILTER |
|
- |
|
|
|
TEMP |
CHECK |
LOUVER |
|
+ |
|
||
UNIT |
|
MANUAL |
|
|
|
|
|
88˚C |
|
|
TIMER ADJUST |
|
|||
TIMER CONT. OFF ON |
ADDRESS |
|
|
|
|
||
88:88 |
CHECK |
FILTER |
|
||||
|
H |
M |
|
|
|
|
|
ON/OFF
4
1. MODE Button
Selects the desired operation mode. Each time it is pressed the display changes in the following sequence:-
FAN ONLY COOL HEAT AUTO
2. FAN Button
Selects the desired fan speed mode. Each time it is pressed, the display changes in the following sequence.
AUTO HIGH MED LOW
●In the AUTO mode, the fan speed changes according to the room temperature.
3. TEMP ADJUST (▼ ▲ ) Buttons
These buttons are used to set the required room temperatures (18-29°C).
4. ON/OFF Button
When this button is pressed, the air conditioner is started or stopped.
Start of Heating Operation
After the preheating operation which lasts for 3 to 5 minutes with the indoor fans stopped.
– 6 –
GB
AI REMOTE CONTROLLER
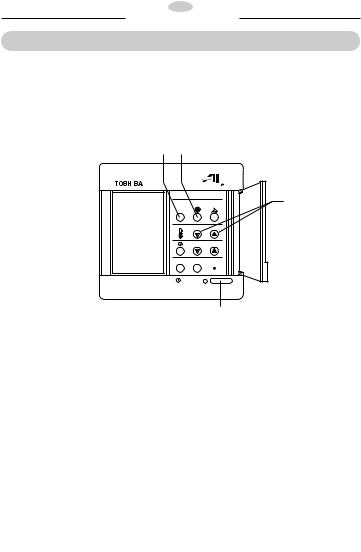
AUTOMATIC OPERATION
The Main Isolation Switch needs to be set to the “on” position (the operation lamp flashes).
Caution
●Do not turn the power OFF while the machine is in use.
●If the air conditioner is to be used after a long period of mains power isolation, ensure the air conditioner has mains power supplied for 12 hours before operation.
1 2
|
|
|
|
CENTRAL |
MODE |
|
FAN |
||
FAN ONLY |
|
AUTO |
OPERATION |
|
COOL |
|
HIGH |
STANDBY |
|
|
|
|
MED |
PREHEAT |
HEAT |
|
LOW |
DEFROST |
|
AUTO |
|
|
FILTER |
|
|
|
|
|
|
TEMP |
CHECK |
LOUVER |
||
UNIT |
|
|
MANUAL |
|
88˚C |
|
|||
|
|
|
|
|
TIMER |
CONT. OFF ON |
ADDRESS |
||
88:88 |
||||
|
|
|
H |
M |
1. MODE Button
Select the AUTO mode by pressing this button.
FAN ONLY COOL HEAT AUTO
2. FAN Button
Selects the desired fan speed mode. Each time it is pressed, the display changes in the following sequence:-
AUTO HIGH MED LOW
●In the AUTO mode, the fan speed changes according to the room temperature.
3. TEMP ADJUST (▼ ▲ ) Buttons
These buttons are used to set the required room temperatures (18-29°C).
 NETWORK
REMOTE CONTROLLER
3
MODE
-+
TIMER ADJUST
CHECK FILTER
ON/OFF
4
4. ON/OFF Button
When this button is pressed, the air conditioner is started or stopped.
●If the operation of the air conditioner is stopped and immediately restarted by pressing the ON/OFF button, the air conditioner will not operate for 3 minutes to protect the unit. After the three minutes, the unit will be allowed to start.

GB
AI REMOTE CONTROLLER
TIMER OPERATION
The Main Isolation Switch needs to be set to the “on” position (the operation lamp flashes).
●During timer operation, the remaining time is displayed. This is updated every minute.
●The timer operation range is from 10 minutes to 60 hours in 10 minute steps.
1. TIMER Button
This button selects the timer mode OFF, ON or CONTINUOUS. Set the timer in the OFF or the ON mode.
2. TIMER ADJUST ( ▼ ▲ ) Buttons
The ON or OFF times can be set by these buttons.
 NETWORK
MODE |
FAN |
CENTRAL |
REMOTE CONTROLLER |
|||
FAN ONLY |
AUTO |
OPERATION |
||||
|
|
|
||||
COOL |
HIGH |
STANDBY |
|
|
|
|
|
MED |
PREHEAT |
MODE |
|
|
|
HEAT |
LOW |
DEFROST |
|
|
|
|
AUTO |
|
FILTER |
|
- |
|
|
TEMP |
CHECK |
LOUVER |
|
+ |
||
UNIT |
|
MANUAL |
|
|
|
|
88˚C |
|
|
TIMER ADJUST |
|||
TIMER CONT. OFF ON |
ADDRESS |
|
|
|
||
88:88 |
CHECK |
FILTER |
|
|||
|
H |
M |
|
|
|
|
|
|
|
ON/OFF |
2 |
||
1
●When the timer adjust button is pressed once, the time changes by 10 minutes. If the button is held, the time changes in 1 hour steps.
●If the operation LED is illuminated, the timer operation will start on completion of the setting.
●If the operation LED is not illuminated, the timer operation will start on the operation of the ON/OFF button.
● The remaining time can be seen throughout the timer operation.
Operation Start
Stop
ON Timer |
The air conditioner starts |
(STOP ’START) |
operation when the time is up |
Remaining Time |
7.00pm |
RUN Lamp |
On |
OFF Timer |
The air conditioner stops |
(START ’STOP) |
operation when the time is up |
|
Operation |
Start |
|
|
Stop |
|
Remaining Time |
|
|
|
7.00pm |
RUN Lamp |
On |
Off |
To Stop the timer Operation
Push the ON/OFF button.
●The LED goes off and the air conditioner stops even if the set time is not reached.
●The set on or off time will be saved.
To Clear the timer
Push the timer button
●When the timer is pressed, the timer operation is suspended.
To Change the Set Time
Follow steps 1 & 2 above. Pressing ON/OFF will then adjust the timer.
●The operation LED illuminates and the newly set timer operation starts.
–8 –
F
AI TELECOMMANDE
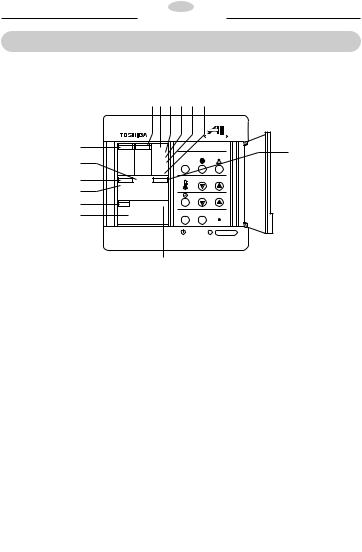
ZONE D'AFFICHAGE DE LA TÉLÉCOMMANDE
Afin d'aider l'utilisateur à comprendre le fonctionnement de la télécommande, tous les éléments d'affichage ont été intégrés dans le diagramme de la télécommande ci-dessous. Dans le fonctionnement réel, tous les éléments ne sont pas affichés en même temps.
|
|
2 3 4 |
5 |
6 |
7 |
|
||
|
|
|
|
|
|
NETWORK |
|
|
1 |
MODE |
FAN |
CENTRAL |
REMOTE CONTROLLER |
8 |
|||
FAN ONLY |
AUTO |
OPERATION |
||||||
|
|
|
|
|||||
9 |
COOL |
HIGH |
STANDBY |
|
|
|
||
|
MED |
PREHEAT |
MODE |
|
|
|
||
|
|
|
|
|
|
|||
|
HEAT |
LOW |
DEFROST |
|
|
|
|
|
|
AUTO |
|
FILTER |
|
|
- + |
|
|
11 |
TEMP |
CHECK |
LOUVER |
|
|
|
||
10 |
UNIT |
|
MANUAL |
|
|
|
|
|
|
C |
|
|
|
|
|
||
12 |
88˚ |
|
|
|
TIMER ADJUST |
|
||
TIMER CONT. OFF ON |
ADDRESS |
|
|
|
|
|||
13 |
88:88 |
CHECK |
|
FILTER |
|
|||
|
|
H |
M |
|
|
|
|
|
ON/OFF
14
1. "MODE" (mode)
Affiche le mode de fonctionnement sélectionné.
2. "FAN" (ventilation)
Affiche la vitesse de ventilation sélectionnée.
3."CENTRAL" (commande centralisée)
S'affiche lorsque l'accès aux fonctions du climatiseur ne peut se faire que depuis la télécommande centrale. Lorsque “central” clignote, cela indique que le climatiseur est verrouillé en position arrêt par la télécommande centrale.
4."OPERATION" (fonctionnement)
Indique que le climatiseur fonctionne.
5. "STANDBY" (attente)
S'affiche dans les cas où le climatiseur est raccordé à un gros multi système et que le fonctionnement est arrêté.
6."PRE HEAT DEFROST" (préchauffage/dégivrage)
S'affiche au début du chauffage ou pendant le dégivrage.
7."FILTER" (filtre)
Apparaît au bout de 2500 heures de fonctionnement.
8."LOUVER" ou "LOUVER MANUAL"
LOUVER indique que les volets automatiques sont actionnés. Si l'on appuie sur le bouton LOUVER mais qu'il n'y a pas de volets automatiques, LOUVER MANUAL s'affiche.
9."CHECK" (diagnostic)
S'affiche lorsque le climatiseur est en mode diagnostic.
10. "UNIT" (unité)
Utilisé en mode diagnostic.
11. "TEMP" (température)
Affiche la température sélectionnée.
12. "TIMER" (programmateur)
Si la mise en marche ou/et l'arrêt du climatiseur sont programmés ou si l'on règle le programmateur sur continu, "TIMER" s'affiche puis disparaît.
13.Affichage du temps ou du code de diagnostic
Indique soit le temps restant avant l'arrêt ou la mise en marche programmé(e) soit le code de diagnostic.
14."ADDRESS" (adresse)
S'affiche lorsqu'il y a des adresses LAN.
F
AI TELECOMMANDE
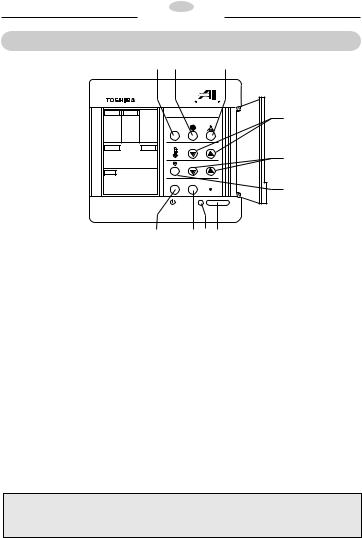
BOUTONS DE LA TELECOMMANDE
|
|
1 |
2 |
|
|
3 |
|
|
|
|
|
|
NETWORK |
|
|
MODE |
FAN |
CENTRAL |
REMOTE CONTROLLER |
4 |
|||
FAN ONLY |
AUTO |
OPERATION |
|||||
|
|
|
|||||
COOL |
HIGH |
STANDBY |
|
|
|
||
|
MED |
PREHEAT |
MODE |
|
|
|
|
HEAT |
LOW |
DEFROST |
|
|
|
|
|
AUTO |
|
FILTER |
|
- |
+ |
|
|
TEMP |
CHECK |
LOUVER |
|
|
|||
UNIT |
|
MANUAL |
|
|
|
6 |
|
88˚C |
|
|
TIMER ADJUST |
||||
TIMER CONT. OFF ON |
ADDRESS |
|
|
|
|
||
88:88 |
CHECK |
FILTER |
5 |
||||
|
H |
M |
|
|
|
||
|
|
|
ON/OFF |
|
|
||
9 10 7 8
1. "MODE" (mode)
Permet de sélectionner le mode de fonctionnement désiré. A chaque pression sur le bouton, la sélection change dans l'ordre suivant:-
FAN ONLY COOL HEAT AUTO (ventilation seule froid chaud auto)
2.Bouton de réglage de la ventilation
Permet de sélectionner la vitesse de ventilation. A chaque pression sur le bouton, la sélection change dans l'ordre suivant :-
AUTO HIGH MED LOW (auto haute moyenne basse)
3.Bouton de commande des volets
Sert à actionner automatiquement les volets lorsque le climatiseur fonctionne. Les volets commencent à osciller et l'affichage s'allume. Lorsque l'on appuie à nouveau sur le bouton, les volets s'arrêtent.
4. Boutons de réglage de la température ( ▼ ▲ )
Servent à régler la température ambiante entre 18 et 29°C.
5. Bouton de sélection programmateur (TIMER)
6 Boutons de réglage du programmateur (TIMER ADJUST)
7. Témoin de fonctionnement
Clignote à la mise sous tension initiale ou après une coupure de courant. Le témoin reste allumé durant le fonctionnement normal.
8. Bouton ON/OFF
Lorsqu’on appuie sur ce bouton le climatiseur se met en marche après un court instant. Lorsqu’on appuie une seconde fois sur ce Bouton, le climatiseur s’arrête.
9.Bouton du mode de contrôle (CHECK)
10.Bouton de filter
●CHECK(diagnostic) et FILTER (filtre) sont des bouton destinés au technicien de maintenance.
PRECAUTION
●Lorsque le climatiseur est arrêté, le témoin de fonctionnement s’ éteint et l’indication de LOUVER disparaît, mais les autres indications restent inchangées.
●La Bouton CHECK est destiné au dépistage des pannes. Ne pas l’utiliser dans des conditions normales.
–10 –
F
AI TELECOMMANDE
FONCTIONNEMENT MANUEL
Vérifier que le système est branché sur le secteur en appuyant le cas échéant sur l'interrupteur principal (le témoin clignote).
Attention
●Ne pas couper l'alimentation pendant que le climatiseur fonctionne.
●Si le climatiseur est resté coupé du secteur pendant une longue période, le mettre sous secteur pendant 12 heures avant de le faire fonctionner.
|
|
1 |
2 |
|
|
|
|
|
|
|
|
|
NETWORK |
|
|
MODE |
FAN |
CENTRAL |
REMOTE CONTROLLER |
3 |
|||
FAN ONLY |
AUTO |
OPERATION |
|||||
|
|
|
|||||
COOL |
HIGH |
STANDBY |
|
|
|
||
|
MED |
PREHEAT |
MODE |
|
|
|
|
HEAT |
LOW |
DEFROST |
|
|
|
|
|
AUTO |
|
FILTER |
|
- |
|
|
|
TEMP |
CHECK |
LOUVER |
|
+ |
|
||
UNIT |
|
MANUAL |
|
|
|
|
|
88˚C |
|
|
TIMER ADJUST |
|
|||
TIMER CONT. OFF ON |
ADDRESS |
|
|
|
|
||
88:88 |
CHECK |
FILTER |
|
||||
|
H |
M |
|
|
|
|
|
ON/OFF
4
1. MODE |
3. Boutons de réglage de la température |
|
Appuyer sur ce bouton pour sélectionner le mode |
Appuyer sur ces boutons pour régler la |
|
de fonctionnement désiré. A chaque pression sur |
température ambiante entre 18 et 29°C. |
|
le bouton, la sélection change dans l'ordre |
4. ON/OFF |
|
suivant :- |
||
FAN ONLY COOL HEAT AUTO |
Appuyer sur ce bouton pour mettre en marche ou |
|
2. Bouton de réglage de la ventilation |
arrêter le climatiseur. |
|
Mise en route du chauffage |
||
Appuyer sur ce bouton pour sélectionner la |
||
vitesse de ventilation désirée. A chaque pression |
Commence après l'opération de préchauffage qui |
|
sur le bouton, la sélection change dans l'ordre |
dure pendant 3/5 minutes avec les ventilateurs |
|
suivant : |
intérieurs arrêtés. |
|
AUTO HIGH MED LOW |
|
|
● En mode AUTO, la vitesse de ventilation |
|
|
change en fonction de la température |
|
|
ambiante. |
|
 Loading...