


Installation |
Instalación |
Montering |
Instalação |
Precautions
•Do not tamper with the four holes on the upper surface of the unit. They are used for tuner adjustments to be made only by service technicians.
•Choose the installation location carefully so that the unit will not interfere with driving.
•Avoid installing the unit where it would be subject to high temperatures, such as from direct sunlight or hot air from the heater, or where it would be subject to dust, dirt or excessive vibration.
•Use only the supplied mounting hardware for safe and secure installation.
Mounting angle adjustment
Adjust the mounting angle to less than 20°.
Precauciones
•No toque los cuatro orificios de la superficie superior de la unidad. Estos orificios son para ajustes del sintonizador que solamente deberán realizar técnicos de reparación.
•Elija cuidadosamente el lugar de montaje de forma que la unidad no interfiera las funciones normales de conducción.
•Evite instalar la unidad donde pueda quedar sometida a altas temperaturas, como a la luz solar directa o al aire de calefacción, o a polvo, suciedad, o vibraciones excesivas.
•Para realizar una instalación segura y firme, utilice solamente la ferretería de montaje suministrada.
Ajuste del ángulo de montaje
Ajuste el ángulo de montaje a menos de 20°.
Sökerhetsföreskrifter
•Låt de fyra hålen på bilstereons ovansida vara. De är till för radiojusteringar som endast får utföras av fackkunniga tekniker.
•Var noga när du väljer var i bilen du monterar bilstereon, så att den inte sitter i vägen när du kör.
•Montera inte bilstereon där den utsätts för värme, t ex solsken eller varmluft, eller där den utsätts för damm, smuts och/eller vibrationer.
•Använd endast de medföljande monteringstillbehören för att vara säker på att bilstereon monteras på ett säkert och korrekt sätt.
Tillåten monteringsvinkel
Monteringsvinkeln får inte vara större än 20 grader.
Precauções
•Não altere indevidamente os quatro orificios da superficie da parte superior do aparelho. Estes servem para regulações do sintonizador que devem ser efectuadas somente por técnicos qualificados.
•Escolha cuidadosamente o local de instalação para que o aparelho não interfira com a condução.
•Evite instalar o aparelho onde possa estar sujeito a altas temperaturas, tais como em locais expostos directamente à luz do sol, ao ar quente dos aquecimentos, ou sujeitos a pó, sujidade ou vibração excessiva.
•Para efectuar uma instalação segura utilize unicamente o equipamento de montagem fornecido .
Ajuste do ângulo de montagem
Ajuste o ângulo de montagem a menos de 20°.
How to Detach and Attach the Front Panel
Before installing the unit, detach the front panel.
To detach
Press the (RELEASE) to detach the front panel then gently pull it out.
To attach
Align parts A and B, and push the front panel in until it clicks.
Forma de extraer e instalar el panel frontal
Antes de instalar la unidad, extraiga el panel frontal.
Para extraerlo
Presione la tecla (RELEASE) para extraerlo y, a continuación, tire de él hacia fuera con suavidad.
Para instalarlo
Alinee las partes A y B, y presione el panel frontal hasta que chasquee.
Ta loss/fästa frontpanelen
Ta loss frontpanelen innan du monterar bilstereon.
Ta loss frontpanelen
Tryck på (RELEASE) för att ta loss frontpanelen. Dra den sedan försiktigt utåt.
Fästa frontpanelen
Lägg A och B mot varandra, kant i kant, och tryck tills du hör ett klickljud.
Para retirar e colocar o painel frontal
Retire o painel frontal antes de iniciar a instalação do aparelho.
Para retirar
Carregue em (RELEASE) para soltar o painel frontal e, em seguida, puxe-o com cuidado.
Para colocar
Alinhe as partes A e B, e fixe o painel frontal pressionando-o até que encaixe.
To detach |
|
To attach |
Para extraerlo |
|
Para instalarlo |
Ta loss frontpanelen |
|
Fästa frontpanelen |
Para retirar |
(RELEASE) |
Para colocar |
A
B
Mounting Example |
Ejemplo de montaje |
Installation in the dashboard |
Instalación en el salpicadero |
1 |
|
|
2 |
|
182 |
mm |
|
|
|
|
|
|
|
53 |
mm |
|
|
|
|
1 |
|
|
Bend these claws for a tight fit, |
|
|
|
if necessary. |
|
|
|
Si es necesario, doble estas uñas para |
|
|
|
que encaje firmemente. |
|
|
|
Vid behov, böj dessa flikar så att den |
|
|
|
sitter fast ordentigt. |
|
|
|
Dobre as garras, se necessário. |
Exempel på montering |
Exemplo de montagem |
Montera på instrumentbrädan |
Instalação no tablier |
3 |
Fire wall |
Panel cortafuegos |
|
|
Brandsäker mellanvägg |
|
Painel corta-fogo |
Dashboard |
|
Salpicadero |
|
Instrumentbräda |
2 |
Tablier |
|
1  3
3
Note for Connecting |
Nota sobre conexión |
Angående anslutningar |
If there is alternator noise (a whining sound |
Si el alternador emite ruido (un zumbido al |
Om motorn ger störningar (ett vinande ljud när |
when raising engine speed), ground the master |
aumentar la velocidad del motor), conecte la |
du gasar) bör du jorda huvudenheten till en |
unit by connecting it to a metal point of the car |
unidad principal a tierra y, para ello, enchúfela a |
metallpunkt på bilen med den medföljande |
with the supplied chassis ground cord 5. |
un punto de metal del automóvil mediante el |
chassijordkabeln 5. Anslut jordkabeln till |
Connect the ground cord to the master unit |
cable de toma a tierra del chasis 5 suministrado. |
huvudenheten med jordkontakten 2 enligt |
with part 2 as shown in the illustration. |
Conecte el cable de toma a tierra a la unidad |
bilden. |
|
principal con la pieza 2 como se muestra en la |
|
|
ilustración. |
|
2
5 |
To a metal point of the car |
|
A un punto de metal del automóvil |
Till en metallpunkt på bilen
A um ponto metálico do automóvel
Nota sobre a ligação
Se o alternador começar a produzir ruídos (um som agudo durante o aumento da velocidade do motor), ligue a unidade principal à terra. Para tal, ligue o cabo de terra do chassis 5 fornecido a um ponto metálico do automóvel. Ligue o cabo de ligação à terra ao aparelho principal com a peça 2, como se mostra na ilustração.
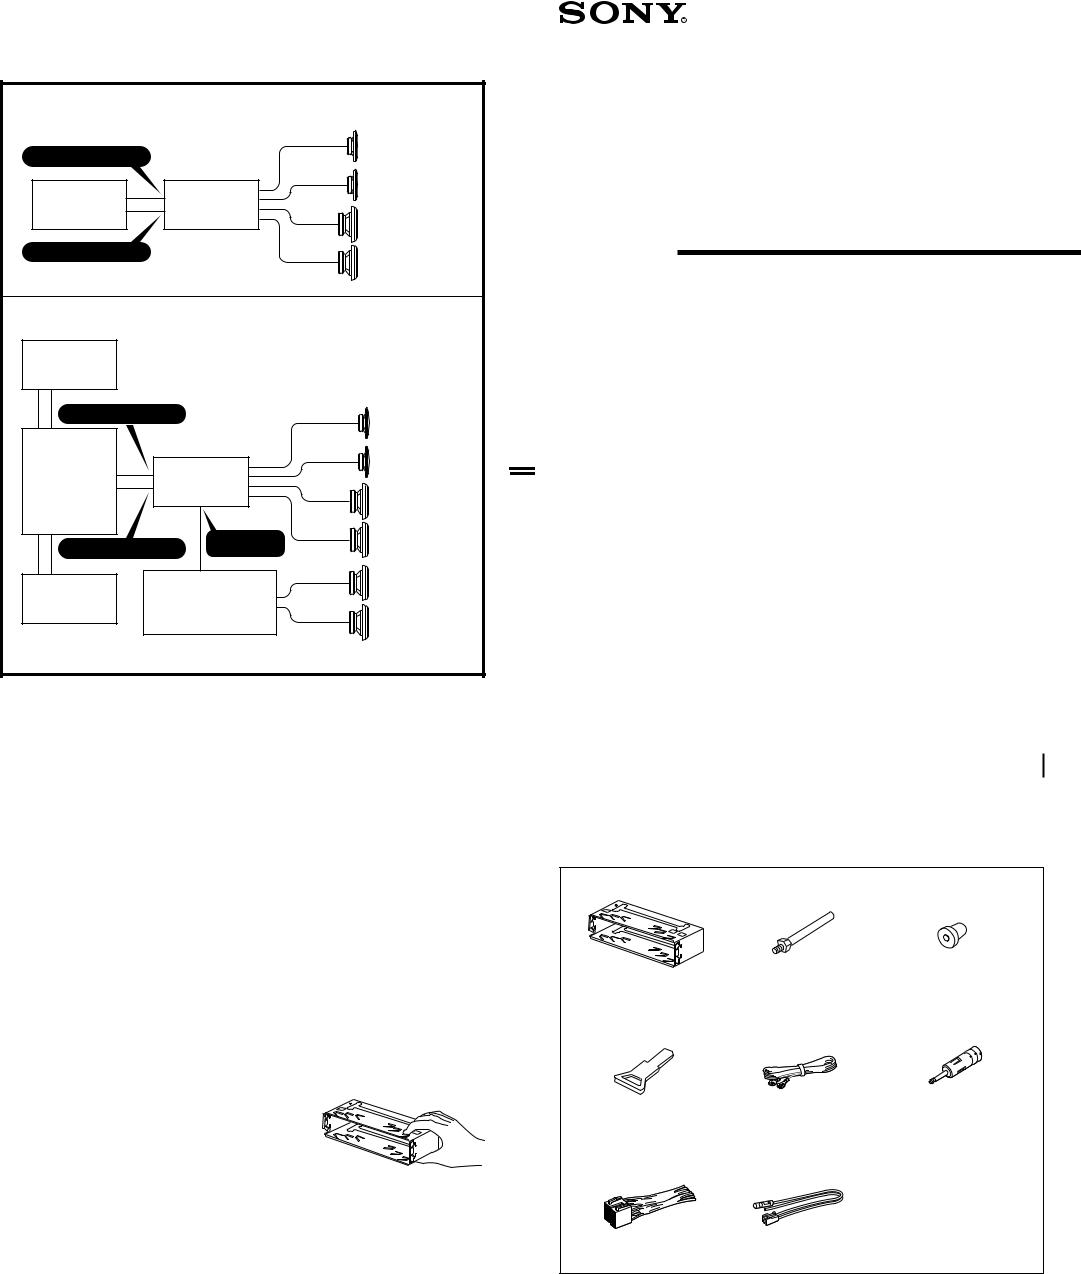
Connection Diagram
Diagrama de conexiones
Kopplingsschema
Diagrama de ligações
Example 1/Ejemplo 1/Exempel 1/Exemplo 1
|
Front speakers |
|
BUS AUDIO IN |
Altavoces delanteros |
|
|
Främre högtalare |
|
MD/CD unit |
Altifalantes dianteiros |
|
|
||
Unidad de MD/CD |
XR-C4100 |
|
MD/CD-spelare |
||
Dispositivo de |
Rear speakers |
|
MD/CD |
||
|
Altavoces traseros |
|
BUS CONTROL IN |
Bakre högtalare |
|
Altifalantes traseiros |
||
|
Example 2/Ejemplo 2/Exempel 2/Exemplo 2
MD/CD unit
Unidad de MD/CD
MD/CD-spelare
Dispositivo de
MD/CD
BUS AUDIO IN |
|
|
||
|
|
|
Front speakers |
|
Source selector |
|
|
Altavoces delanteros |
|
|
|
Främre högtalare |
||
XA-C30 |
|
|
||
|
|
Altifalantes dianteiros |
||
Selector de fuente |
|
|
||
XA-C30 |
|
XR-C4100 |
|
|
Väljare |
|
|
||
|
|
|
||
XA-C30 |
|
|
Rear speakers |
|
Selector de fonte |
|
|
||
|
|
Altavoces traseros |
||
XA-C30 |
|
|
||
|
|
|
Bakre högtalare |
|
BUS CONTROL IN |
LINE OUT |
Altifalantes traseiros |
||
|
|
|||
MD/CD unit |
Power Amplifier |
Rear speakers |
||
Unidad de MD/CD |
Altavoces traseros |
|||
MD/CD-spelare |
Amplificador de potencia |
|||
Bakre högtalare |
||||
Dispositivo de |
Effekförstärkare |
|||
MD/CD |
Amplificador de poténcia |
Altifalantes traseiros |
||
Note
If you connect an optional power amplifier to the LINE OUT and do not use the built-in amplifier, the beep-tone will be disabled.
Nota
Si conecta un amplificador opcional de potencia a LINE OUT y no utiliza el incorporado, los pitidos se desactivarán.
Observera
Varningssignalen avaktiveras om du inte använder den inbyggda förstärkaren, utan ansluter en annan förstärkare (tillval) till LINE OUT.
Nota
Se ligar um amplificador de potência opcional a LINE OUT e não utilizar o amplificador incorporado, o sinal sonoro será desactivado.
Caution
Cautionary notice for handling the bracket 1.
Handle the bracket carefully to avoid injuring your fingers.
Precaución
Advertencia sobre la manipulación del soporte 1. Tenga mucho cuidado al manipular el soporte para evitar posibles lesiones en los dedos.
Varning
Att observera angående konsolen 1.
Hantera konsolen med största aktsamhet så att du inte skadar fingrarna.
Cuidado
Aviso sobre as precauções a tomar no manuseamento do suporte 1.
Pegue no suporte com cuidado para não magoar os dedos.
3-861-732-11 (1)
FM/MW/LW
Cassette Car
Stereo
Installation/Connections
Instalación/Conexiones
Montering/Anslutning
Instalação/Ligações
XR-C4100
Sony Corporation 1998 Printed in Thailand
Parts for Installation and Connections
Componentes de montaje y conexiones
Medföljande monteringsdelar
Peças para instalação e ligações
1 |
2 |
3 |
4 |
5 |
6 |
7 |
8 |
The release key 4 is used for dismounting the unit. See the Operating Instructions manual for details. La llave de liberación 4 se utiliza para desmontar la unidad. Con respecto a los detalles, consulte el manual de instrucciones.
Använd den medföljande nyckeln 4 för bilstereons demontering ur instrumentinfattningen. Vi hänvisar till bilstereons bruksanvisning angående detaljer.
A chave de libertação 4 é necessária, se quiser desmontar o aparelho. Veja o manual de instruções para maiores detalhes.
 Loading...