Sony XR-C33R, XR-3100R User Manual
3-043-533-11 (1)
FM/MW/LW
Cassette
Car Stereo
Operating Instructions
Manual de instrucciones
Bruksanvisning
Manual de instruções
GB
ES
SE
PT
For installation and connections, see the supplied installation/connections manual.
Para obtener información sobre la instalación y las conexiones, consulte el manual de instalación/conexiones suministrado.
Vi hänvisar till det medföljande häftet angående montering/anslutningar.
Para a instalação e as ligações, consulte o manual de instalação/ligações fornecido.
XR-C33R
XR-3100R
2000 Sony Corporation

Welcome !
Thank you for purchasing this Sony Cassette Player. This unit lets you enjoy a variety of features using the following controller accessory:
Optional accessory
Rotary commander (RM-X4S)
XR-C33R only:
In addition to the cassette playback and radio operations, you can expand your system by connecting an optional CD/MD unit*1. When you operate this unit or a connected optional CD unit with the CD TEXT function, the CD TEXT information will appear in the display when you play a CD TEXT disc*2.
*1 You can connect a CD changer, an MD changer, a CD player, or an MD player.
*2 A CD TEXT disc is an audio CD that includes information such as the disc name, artist name, and track names.
This information is recorded on the disc.
Precautions
•If your car was parked in direct sunlight resulting in a considerable rise in temperature inside the car, allow the unit to cool off before operating it.
•If no power is being supplied to the unit, check the connections first. If everything is in order, check the fuse.
•If no sound comes from the speakers of a two-speaker system, set the fader control to the centre position.
•When a tape is played back for a long period, the cassette may become warm because of the built-in power amplifier. However, this is not a sign of malfunction.
If you have any questions or problems concerning your unit that are not covered in this manual, please consult your nearest Sony dealer.
To maintain high quality sound
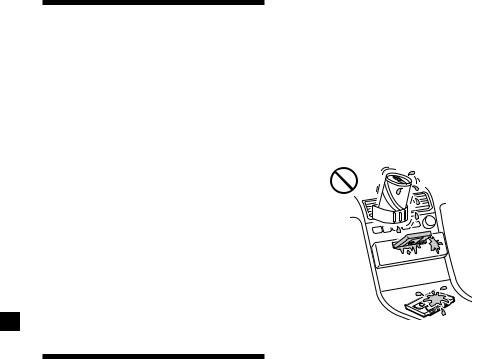
If you have drink holders near your audio equipment, be careful not to splash juice or other soft drinks onto the car audio. Sugary residues on this unit or cassette tapes may contaminate the playback heads, reduce the sound quality, or prevent sound reproduction altogether.
Cassette cleaning kits cannot remove sugar from the tape heads.
2
Notes on Cassettes
Cassette care
•Do not touch the tape surface of a cassette, as any dirt or dust will contaminate the heads.
•Keep cassettes away from equipment with built-in magnets such as speakers and amplifiers, as erasure or distortion on the recorded tape could occur.
•Do not expose cassettes to direct sunlight, extremely cold temperatures, or moisture.
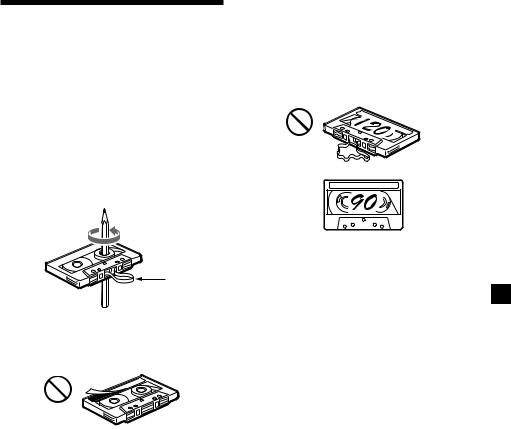
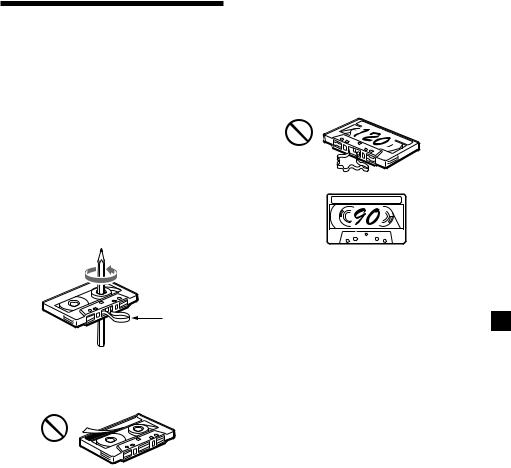
•Slack in the tape may cause the tape to be caught in the machine. Before you insert the tape, use a pencil or similar object to turn the reel and take up any slack.
Cassettes longer than 90 minutes
The use of cassettes longer than 90 minutes is not recommended except for long continuous play. The tape used for these cassettes is very thin and tends to stretch easily. Frequent playing and stopping of these tapes may cause them to become entangled in the cassette deck mechanism.
Slack
•Distorted cassettes and loose labels can cause problems when inserting or ejecting tapes. Remove or replace loose labels.
•The sound may become distorted while playing the cassette. The cassette player head should be cleaned after each 50 hours of use.
3

Table of Contents |
|
This Unit Only |
|
Location of controls ................................................. |
5 |
Getting Started |
|
Resetting the unit ................................................ |
6 |
Detaching the front panel .................................. |
6 |
Setting the clock .................................................. |
7 |
With Optional Equipment |
|
CD/MD Unit (XR-C33R only) |
|
Playing a CD or MD ......................................... |
20 |
Playing tracks repeatedly |
|
— Repeat Play .............................................. |
21 |
Playing tracks in random order |
|
— Shuffle Play .............................................. |
22 |
Cassette Player |
|
Listening to a tape ............................................... |
8 |
Playing a tape in various modes ....................... |
9 |
Radio |
|
Memorising stations automatically |
|
— Best Tuning Memory (BTM) .................... |
9 |
Memorising only the desired stations ............ |
10 |
Receiving the memorised stations .................. |
10 |
RDS |
|
Overview of the RDS function ......................... |
11 |
Displaying the station name ............................. |
11 |
Retuning the same programme automatically |
|
— Alternative Frequencies (AF) ................ |
12 |
Listening to traffic announcements ................ |
13 |
Presetting the RDS stations with the AF |
|
and TA data ................................................... |
14 |
Locating a station by programme type .......... |
15 |
Setting the clock automatically ....................... |
16 |
Other Functions |
|
Labelling the rotary commander .................... |
16 |
Using the rotary commander .......................... |
17 |
Adjusting the sound characteristics ............... |
18 |
Attenuating the sound ..................................... |
18 |
Changing the sound and display settings ..... |
19 |
Boosting the bass sound |
|
— D-bass ....................................................... |
19 |
Additional Information |
|
Maintenance ....................................................... |
22 |
Dismounting the unit ....................................... |
23 |
Specifications ..................................................... |
24 |
Troubleshooting guide ..................................... |
25 |
4
Location of controls
|
|
|
|
|
|
– PRESET |
+ |
MODE |
SOUND |
|
|
|
6 |
DISC |
D-BASS |
|
|
|
|
|
|
|
|
SEEK / AMS |
|
|
|
|
DSPL |
PTY AF/TA |
|
|
|
|
|
|
|||
|
|
|
|
|
|
|
OFF 1 2 |
|
SOURCE |
|
|
|
|
|
3 |
|
|
|
|
|
|
|
|
|
|
SHIFT |
SET UP |
PLAY MODE |
|
|
|
RELEASE |
OFF |
1 |
2 |
3 |
4 |
5 |
6 |
|
|
|
|
|
|
|
|
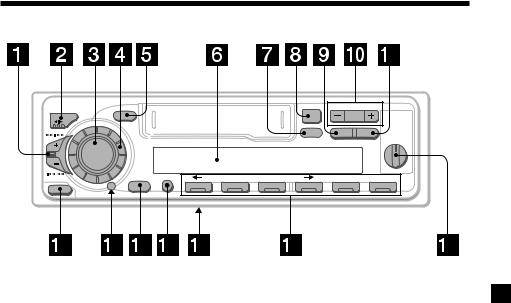
XR-C33R
Refer to the pages listed for details.
1SEEK/AMS (seek/Automatic Music Sensor/manual search) control
8, 10, 15, 21
2MODE (*)button
During tape playback: Playback direction change 8
During radio reception: BAND select 9, 10
During CD or MD playback: CD/MD unit select 20
3SOURCE (TAPE/TUNER/CD/MD) button 8, 9, 10 13, 20
4Dial (volume/bass/treble/left-right/rear- front control) 7, 18
5 SOUND button 18
6 Display window
7DSPL (display mode change) button 8, 11, 20
8 6 (eject) button 8
9PTY button
RDS Programme 15
!º PRESET/DISC button (XR-C33R)
During radio reception:
Preset stations select 10
During CD/MD playback:
Disc change 21
PRST button (XR-3100R)
During radio reception:
Preset stations select 10
!¡ AF/TA button 12, 13, 14
!™ RELEASE (front panel release) button
6, 23
!£ Reset button (located on the front side of the unit behind the front panel) 6
!¢ OFF button 6, 8
!∞ SHIFT button
PLAY MODE 9, 10, 11, 12, 14, 21, 22 SET UP 7, 16, 19, 20
!§ POWER SELECT switch
(located on the bottom of the unit)
See “POWER SELECT switch” in the Installation/Connections manual.
!¶ Number buttons 10, 13, 14
!• D-BASS control 19
The illustration of the front panel in the manual is of XR-C33R.
5

Getting Started
Resetting the unit
Before operating the unit for the first time or after replacing the car battery, you must reset the unit.
Remove the front panel and press the reset button with a pointed object, such as a ballpoint pen.
Reset button
Note
Pressing the reset button will erase the clock setting and some memorised functions.
Detaching the front panel
You can detach the front panel of this unit to protect the unit from being stolen.
1 Press (OFF).
2Press (RELEASE), then slide the front panel a little to the left, and pull it off towards you.
(OFF)
(RELEASE)

Notes
•Be sure not to drop the panel when detaching it from the unit.
•If you detach the panel while the unit is still turned on, the power will turn off automatically to prevent the speakers from being damaged.
•When carrying the front panel with you, use the supplied front panel case.
Attaching the front panel
Attach part a of the front panel to part b of the unit as illustrated and push the left side into position until it clicks.
a
b
Notes
•Be sure not to attach the front panel upside down.
•Do not press the front panel too hard against the unit when attaching it.
•Do not press too hard or put excessive pressure on the display window of the front panel.
•Do not expose the front panel to direct sunlight or heat sources such as hot air ducts, and do not leave it in a humid place. Never leave it on the dashboard of a car parked in direct sunlight or where there may be a considerable rise in temperature.
Caution alarm
If you turn the ignition key switch to the OFF position without removing the front panel, the caution alarm will beep for a few seconds (only when the POWER SELECT switch on the bottom of the unit is set to the A position).
If you connect an optional power amplifier and do not use the built-in amplifier, the beep sound will be deactivated.
6
Setting the clock
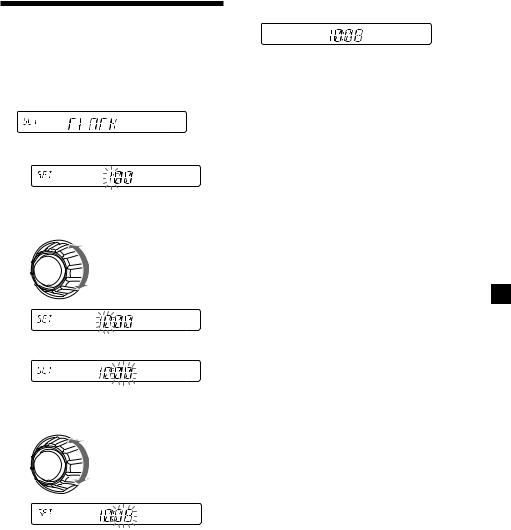
The clock uses a 24-hour digital indication.
Example: To set the clock to 10:08
1Press (SHIFT), then press (2) (SET UP) repeatedly until “CLOCK” appears.
1 Press (4) (n).
The hour indication flashes.
2 Set the hour.
to go backward
to go forward
3 Press (4) (n).
The minute indication flashes.
4 Set the minute.
to go backward
to go forward
2 Press (SHIFT).
The clock starts.
3Press (SHIFT).
After the clock setting is complete, the display returns to normal playback mode.
Note
If the POWER SELECT switch on the bottom of the unit is set to the B position, turn the power on first, then set the clock.
7
Cassette Player
Listening to a tape
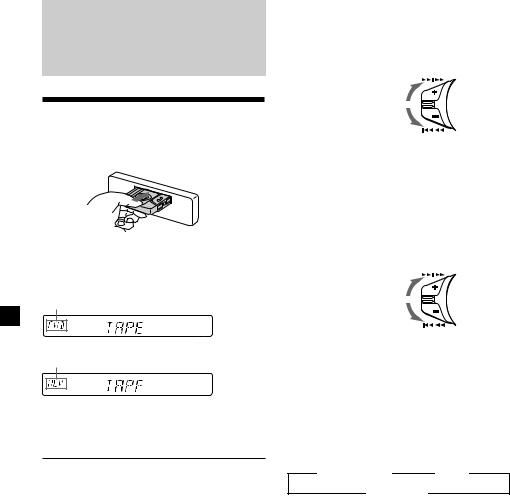
Insert a cassette.
Playback starts automatically.
If a cassette is already inserted, press (SOURCE) repeatedly until “FWD” or “REV” appears to start playback.
The side facing up is played.
The side facing down is played.
Tip
To change the tape‘s playback direction, press
(MODE) (*).
To |
Press |
Stop playback |
(OFF) |
Eject the cassette |
6 |
|
|
Fast-winding the tape
During playback, push the SEEK/AMS control up or down and hold.
SEEK / AMS
Fast-forward
Rewind
To start playback during fast-forwarding or rewinding, press (MODE) (*).
Locating a specific track
—Automatic Music Sensor (AMS)
During playback, push the SEEK/AMS control up or down and release for each track you want to skip.
You can skip up to nine tracks at one time.
SEEK / AMS
To locate succeeding tracks
To locate preceding tracks
Note
The AMS function may not work when:
—the blanks between tracks are shorter than four seconds
—there is noise between tracks
—there are long sections of low volume or quiet sections.
Changing the display item
Each time you press (DSPL), the item changes as follows:
z Tape playback |
z Clock |
Frequency* Z
*While either of the following functions are activated.
—ATA function
—AF/TA function
After you select the desired item, the display will automatically change to the Motion Display mode after a few seconds.
In the Motion Display mode, all the above items are scrolled in the display one by one in order.
Tip
The Motion Display mode can be turned off. (See “Changing the sound and display settings” on page 19).
8
Playing a tape in various modes
You can play the tape in various modes: •REP (Repeat Play) repeats the current track. •METAL (Metal) lets you play a metal or CrO2
tape.
•BL SKP (Blank Skip) skips blanks longer than eight seconds.
•ATA (Automatic Tuner Activation) turns on the tuner automatically when fast-winding the tape.
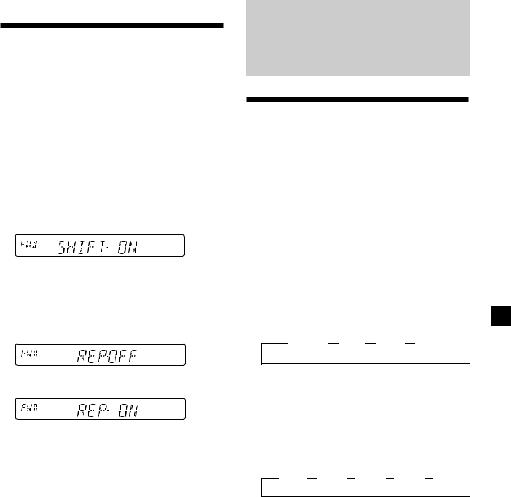
1During playback, press (SHIFT).
“SHIFT-ON” appears in the display.
2Press (3) (PLAY MODE) repeatedly until the desired play mode appears.
Each time you press (3) (PLAY MODE), the item changes as follows:
REP nMETALnBL SKP nATA
3 Press (4) (n) to select “ON.”
Play mode starts.
4 Press (SHIFT).
To return to normal playback mode, select “OFF” in step 3 above.
Note
If the “SFT” indication appears, press (SHIFT) to complete the mode setting.
Radio
Memorising stations automatically
— Best Tuning Memory (BTM)
The unit selects the stations with the strongest signals and memorises them in the order of their frequencies. You can store up to 6 stations on each band (FM1, FM2, FM3, MW, and LW).
Caution
When tuning in stations while driving, use Best Tuning Memory to prevent accidents.
1Press (SOURCE) repeatedly to select the tuner.
Each time you press (SOURCE), the source changes as follows:
z TUNER z CD* z MD* z TAPE 
*If the corresponding optional equipment is not connected, this item will not appear (XR-C33R only).
2Press (MODE) repeatedly to select the band.
Each time you press (MODE), the band changes as follows:
z FM1 z FM2 z FM3 z MW z LW 
3Press (SHIFT), then press (3) (PLAY
MODE) repeatedly until “B.T.M” appears.
4Press (4) (n).
The unit stores stations in the order of their frequencies on the number buttons.
A beep sounds when the setting is stored.
5 Press (SHIFT).
Notes
•The unit does not store stations with weak signals. If only a few stations can be received, some number buttons will retain their former setting.
•When a number is indicated in the display, the unit starts storing stations from the one currently displayed.
9

Memorising only the desired stations
You can preset up to 18 FM stations (6 each for FM1, 2, and 3), up to 6 MW stations, and up to 6 LW stations in the order of your choice.
1Press (SOURCE) repeatedly to select the tuner.
2Press (MODE) repeatedly to select the band.
3Push the SEEK/AMS control up or down to tune in the station that you want to store on the number button.
4Press and hold the desired number button ((1) to (6)) until “MEM” appears.
The number button indication appears in the display.
Note
If you try to store another station on the same number button, the previously stored station will be erased.
Receiving the memorised stations
1Press (SOURCE) repeatedly to select the tuner.
2Press (MODE) repeatedly to select the band.
3Press the number button ((1) to (6)) on which the desired station is stored.
Tip
Press either side of (PRESET/DISC) ((PRST)) to receive the stations in the order they are stored in the memory (Preset Search Function).
If you cannot tune in a preset station
Push and release the SEEK/AMS control up or down to search for the station (automatic tuning).
Scanning stops when the unit receives a station. Push the SEEK/AMS control up or down repeatedly until the desired station is received.
Note
If the automatic tuning stops too frequently, press (SHIFT), then press (3) (PLAY MODE) repeatedly until “LOCAL” (local seek mode) is displayed. Then press (4) (n) to select “LOCAL-ON.” Press (SHIFT). Only the stations with relatively strong signals will be tuned in.
Tip
If you know the frequency of the station you want to listen to, push the SEEK/AMS control up or down and hold until the desired frequency appears (manual tuning).
10
If FM stereo reception is poor
— Monaural Mode
1During radio reception, press (SHIFT), then press (3) (PLAY MODE) repeatedly until “MONO” appears.
2Press (4) (n) repeatedly until “MONO-
ON“ appears.
The sound improves, but becomes monaural (“ST” disappears).
3 Press (SHIFT).
To return to normal mode, select “MONOOFF” in step 2 above.
Changing the display item
Each time you press (DSPL), the item changes as follows:
Frequency (Station Name)* ˜Clock
*When you tune in an FM station that transmits RDS data, the station name appears.
After you select the desired item, the display will automatically change to the Motion Display mode after a few seconds.
In the Motion Display mode, all the above items are scrolled in the display one by one in order.
Tip
The Motion Display mode can be turned off. (See “Changing the sound and display settings” on page 19).
RDS
Overview of the RDS function
Radio Data System (RDS) is a broadcasting service that allows FM stations to send additional digital information along with the regular radio programme signal. Your car stereo offers you a variety of services. Here are just a few: retuning the same programme automatically, listening to traffic announcements, and locating a station by programme type.
Notes
•Depending on the country or region, not all of the RDS functions are available.
•RDS may not work properly if the signal strength is weak or if the station you are tuned to is not transmitting RDS data.
Displaying the station name
The name of the current station lights up in the display.
Select an FM station (page 9).
When you tune in an FM station that transmits RDS data, the station name appears in the display.
Note
The “*” indication means that an RDS station is being received.
Changing the display item
Each time you press (DSPL), the item changes as follows:
Station Name (Frequency) ˜Clock
After you select the desired item, the display will automatically change to the Motion Display mode after a few seconds.
In the Motion Display mode, all the above items are scrolled in the display one by one in order.
continue to next page n
11
Tip
The Motion Display mode can be turned off. (See “Changing the sound and display settings” on page 19).
Note
“NO NAME” appears if the received station does not transmit RDS data.
Retuning the same programme automatically
— Alternative Frequencies (AF)
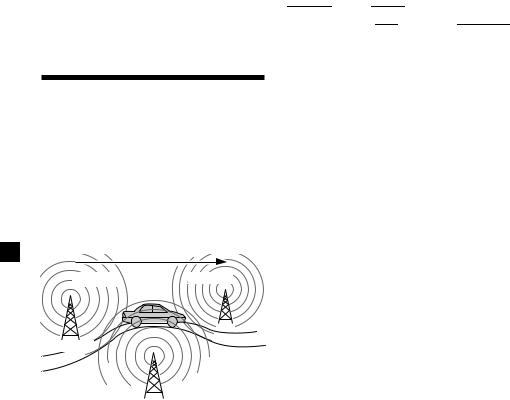
The Alternative Frequencies (AF) function automatically selects and retunes the station with the strongest signal in a network. By using this function, you can continuously listen to the same programme during a longdistance drive without having to retune the station manually.
Frequencies change automatically.
98.5MHz |
96.0MHz |
Station |
102.5MHz
1 Select an FM station (page 9).
2Press (AF/TA) repeatedly until “AF-ON” appears.
The unit starts searching for an alternative station with a stronger signal in the same network.
Note
When there is no alternative station in the area and you do not need to search for an alternative station, turn the AF function off by pressing (AF/TA) repeatedly until “AF TA-OFF” appears.
Changing the display item
Each time you press (AF/TA), the item changes as follows:
” TA-ON |
|
” AF TA-ON* |
|
|
|
|
AF-ON “ |
AF TA-OFF “ |
|
||
|
|
||||
|
|
|
|
|
|
*Select this to turn on both the AF and TA functions.
Notes
•When “NO AF” and the station name flash alternately, it means that the unit cannot find an alternative station in the network.
•If the station name starts flashing after selecting a station with the AF function on, this indicates that no alternative frequency is available. Push the SEEK/AMS control up or down while the station name is flashing (within eight seconds). The unit starts searching for another frequency with the same PI (Programme Identification) data (“PI SEEK” appears and no sound is heard). If the unit cannot find another frequency, “NO PI” appears, and the unit returns to the previously selected frequency.
Listening to a regional programme
The “REG-ON” (regional on) function lets you stay tuned to a regional programme without being switched to another regional station. (Note that you must turn the AF function on.) The unit is factory preset to “REG-ON,” but if you want to turn off the function, do the following.
1During radio reception, press (SHIFT), then press (3) (PLAY MODE) repeatedly until “REG” appears.
2Press (4) (n) repeatedly until “REG-OFF” appears.
3Press (SHIFT).
Note that selecting “REG-OFF” might cause the unit to switch to another regional station within the same network.
To return to regional on, select “REG-ON” in step 2 above.
Note
This function does not work in the United Kingdom and in some other areas.
12

Local link function (United Kingdom only)
The Local Link function lets you select other local stations in the area, even if they are not stored on your number buttons.
1Press a number button that has a local station stored on it.
2Within five seconds, press the number button of the local station again.
3Repeat this procedure until the desired local station is received.
Listening to traffic announcements
The Traffic Announcement (TA) and Traffic Programme (TP) data let you automatically tune in an FM station that is broadcasting traffic announcements even if you are listening to other programme sources.
Press (AF/TA) repeatedly until “TA-ON” or “AF TA-ON” appears.
The unit starts searching for traffic information stations. “TP” appears in the display when the unit finds a station broadcasting traffic announcements. When the traffic announcement starts, “TA” flashes. The flashing stops when the traffic announcement is over.
Tip
If the traffic announcement starts while you are listening to another programme source, the unit automatically switches to the announcement and goes back to the original source when the announcement is over.
Notes
•“NO TP” flashes for five seconds if the received station does not broadcast traffic announcements. Then, the unit starts searching for a station that broadcasts it.
•When “EON” appears with “TP” in the display, the current station makes use of broadcast traffic announcements by other stations in the same network.
To cancel the current traffic announcement
Press (AF/TA) or (SOURCE).
To cancel all traffic announcements, turn off the function by pressing (AF/TA) until “AF TA-OFF” appears.
13

Presetting the volume of traffic announcements
You can preset the volume level of the traffic announcements beforehand so you won’t miss the announcement. When a traffic announcement starts, the volume will be automatically adjusted to the preset level.
1 Select the desired volume level.
2Press (AF/TA) for two seconds.
“TA” appears and the setting is stored.
Receiving emergency announcements
If an emergency announcement comes in while you are listening to the radio, the programme will automatically switch to it. If you are listening to a source other than the radio, the emergency announcements will be heard if you set AF or TA to on. The unit will then automatically switch to these announcements no matter which source you are listening to at the time.
Presetting the RDS stations with the AF and TA data
When you preset RDS stations, the unit stores each station’s data as well as its frequency, so you don’t have to turn on the AF or TA function every time you tune in the preset station. You can select a different setting (AF, TA, or both) for individual preset stations, or the same setting for all preset stations.
Presetting the same setting for all preset stations
1 Select an FM band (page 9).
2Press (AF/TA) repeatedly to select either
“AF-ON,” “TA-ON” or “AF TA-ON” (for both AF and TA functions).
Note that selecting “AF TA-OFF” stores not only RDS stations, but also non-RDS stations.
3Press (SHIFT), then press (3) (PLAY
MODE) repeatedly until “B.T.M” appears.
4 Press (4) (n) until “B.T.M” flashes.
5 Press (SHIFT).
Presetting different settings for each preset station
1Select an FM band, and tune in the desired station.
2Press (AF/TA) repeatedly to select either
“AF-ON,” “TA-ON” or “AF TA-ON” (for both AF and TA functions).
3Press the desired number button and hold until “MEM” appears.
Repeat from step 1 to preset other stations.
Tip
If you want to change the preset AF and/or TA setting after you tune in the preset station, you can do so by turning the AF or TA function on or off.
14
Locating a station by programme type
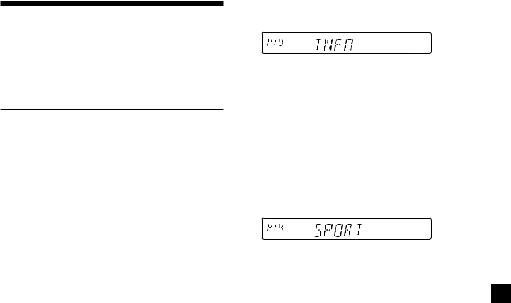
You can locate the station you want by selecting one of the programme types shown below.
Programme types |
Display |
News |
NEWS |
Current Affairs |
AFFAIRS |
Information |
INFO |
Sports |
SPORT |
Education |
EDUCATE |
Drama |
DRAMA |
Culture |
CULTURE |
Science |
SCIENCE |
Varied |
VARIED |
Popular Music |
POP M |
Rock Music |
ROCK M |
Easy Listening |
EASY M |
Light Classical |
LIGHT M |
Classical |
CLASSICS |
Other Music Type |
OTHER M |
Weather |
WEATHER |
Finance |
FINANCE |
Children’s Programmes |
CHILDREN |
Social Affairs |
SOCIAL A |
Religion |
RELIGION |
Phone In |
PHONE IN |
Travel |
TRAVEL |
Leisure |
LEISURE |
Jazz Music |
JAZZ |
Country Music |
COUNTRY |
National Music |
NATION M |
Oldies Music |
OLDIES |
Folk Music |
FOLK M |
Documentary |
DOCUMENT |
Not specified |
NONE |
Note
You cannot use this function in some countries where no PTY (Programme Type selection) data is available.
1Press (PTY) during FM reception until
“PTY” appears.
The current programme type name appears if the station is transmitting the PTY data. “- - - - -” appears if the received station is not an RDS station, or if the RDS data has not been received.
2Press (PTY) repeatedly until the desired programme type appears.
The programme types appear in the order shown in the above table. Note that you cannot select “NONE” (Not specified) for searching.
3Push the SEEK/AMS control up or down.
The unit starts searching for a station broadcasting the selected programme type. When the unit finds the programme, the programme type appears again for five seconds.
“NO” and the programme type appear alternately for five seconds if the unit cannot find the programme type. It then returns to the previously selected station.
15
Setting the clock automatically
The CT (Clock Time) data from the RDS transmission sets the clock automatically.
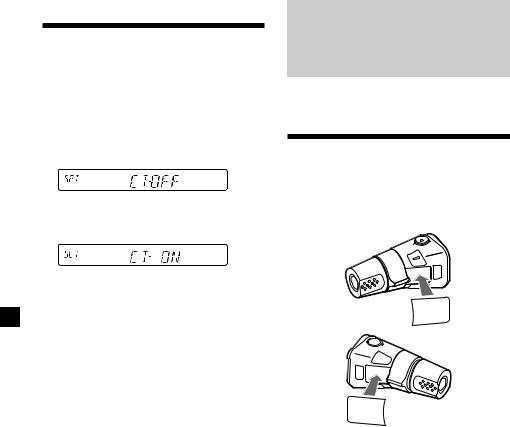
1During radio reception, press (SHIFT), then press (2) (SET UP) repeatedly until
“CT” appears.
2Press (4) (n) repeatedly until “CT-ON” appears.
The clock is set.
3Press (SHIFT) to return to the normal display.
To cancel the CT function
Select “CT-OFF” in step 2 above.
Notes
•The CT function may not work even though an RDS station is being received.
•There might be a difference between the time set by the CT function and the actual time.
Other Functions
You can also control this unit with the rotary commander.
Labelling the rotary commander
Depending on how you mount the rotary commander, attach the appropriate label as shown in the illustration below.
SOUND
MODE
DSPL
DSPL
MODE
SOUND
16
Using the rotary commander
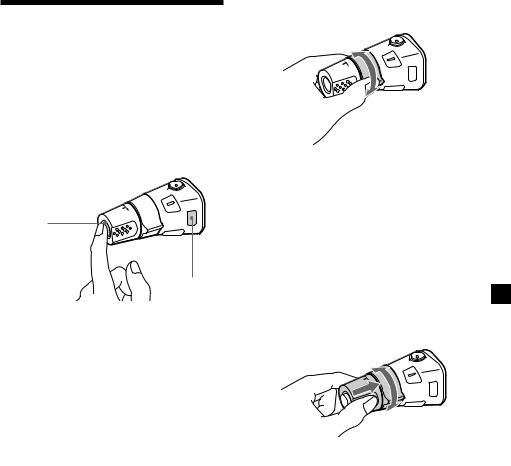
The rotary commander works by pressing buttons and/or rotating controls.
XR-C33R only:
You can also control the optional CD or MD units with the rotary commander.
By pressing buttons
(the SOURCE and MODE buttons)
(SOURCE)
(MODE)
Each time you press (SOURCE), the source changes as follows:
TUNER nCD* nMD* nTAPE
Pressing (MODE) changes the operation in the following ways;
•Tape : playback direction
•Tuner : FM1 nFM2 nFM3 nMW nLW
•CD unit* : CD1 nCD2 n…
•MD unit* : MD1 nMD2 n…
*If the corresponding optional equipment is not connected, the item will not appear (XRC33R only).
Tip
When the POWER SELECT switch is set to position B, you can turn on this unit by pressing (SOURCE) on the rotary commander.
By rotating the control (the SEEK/AMS control)
Rotate the control and release it to:
•Locate the beginnings of tracks on the tape. Rotate and hold the control, and release it to fast-wind the tape. To start playback while fast-winding the tape, press (MODE).
•Locate a specific track on a disc. Rotate and hold the control until you locate the specific point in a track, then release it to start playback.
•Tune in stations automatically. Rotate and hold the control to find a specific station.
By pushing in and rotating the control (the PRESET/DISC control)
Push in and rotate the control to:
•Receive the stations memorized on the number buttons.
•Change the disc (XR-C33R only).
17
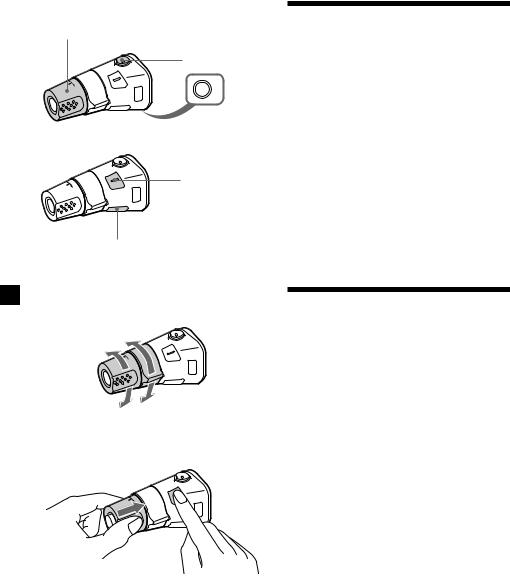
Other operations
Rotate the VOL control to adjust the volume.
Press (ATT) to attenuate the sound.
OFF
Press (OFF) to turn off the unit.
Press (SOUND) to adjust the volume and sound menu.
Press (DSPL) to change the displayed items.
Changing the operative direction
The operative direction of controls is factoryset as shown below.
To increase
To decrease
If you need to mount the rotary commander on the right hand side of the steering column, you can reverse the operative direction.
Press (SOUND) for two seconds while pushing the VOL control.
Tip
You can also change the operative direction of these controls with the unit (see “Changing the sound and display settings” on page 19).
Adjusting the sound characteristics
You can adjust the bass, treble, balance, and fader.
You can store the bass and treble levels independently for each source.
1Select the item you want to adjust by pressing (SOUND) repeatedly.
VOL (volume) nBAS (bass) nTRE (treble) n BAL (left-right) nFAD (front-rear)
2Adjust the selected item by rotating the dial.
Adjust within three seconds after selecting the item. (After three seconds, the dial function reverts to volume control.)
Attenuating the sound
Press (ATT) on the rotary commander.
“ATT-ON” flashes momentarily.
To restore the previous volume level, press (ATT) again.
18
Changing the sound and display settings
The following items can be set:
•CLOCK (page 7).
•CT (Clock Time) (page 16).
•BEEP – to turn the beep sound on or off.
•RM (Rotary Commander) – to change the operative direction of the rotary commander.
—Select “NORM” to use the rotary commander as the factory-set position.
—Select “REV” when you mount the rotary commander on the right side of the steering column.
•M.DSPL (Motion Display) – to turn the motion display on or off.
•A.SCRL (Auto Scroll)* (page 20) (XR-C33R only) .
1 Press (SHIFT).
2Press (2) (SET UP) repeatedly until the desired item appears.
Each time you press (2) (SET UP), the item changes as follows:
CLOCK nCT nBEEP nRM nM.DSPL n A.SCRL*
*When no CD or MD is playing, this item will not appear.
3Press (4) (n) to select the desired setting (Example: ON or OFF).
4Press (SHIFT).
After the mode setting is complete, the display returns to normal playback mode.
Note
If the “SFT” indication appears, press (SHIFT) to complete the mode setting.
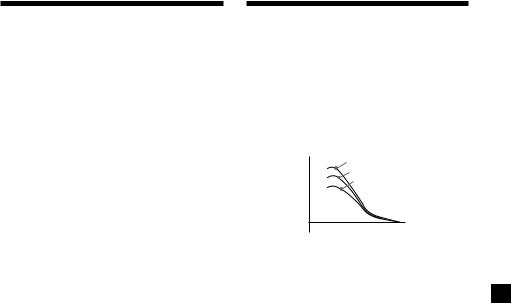
Boosting the bass sound
— D-bass
You can enjoy a clear and powerful bass sound. The D-bass function boosts the low frequency signal with a sharper curve than conventional bass boost.
You can hear the bass line more clearly even while the vocal volume remains the same. You can emphasize and adjust the bass sound easily with the D-BASS control.
Level |
D-BASS 3 |
|
D-BASS 2 |
|
D-BASS 1 |
0dB
Frequency (Hz)
Adjusting the bass curve
Turn the D-BASS control to adjust the bass level (1, 2, or 3).
“D-BASS” appears in the display.
To cancel, turn the control to OFF.
Note
If the bass sound becomes distorted, adjust the D-BASS control or volume.
19

With Optional Equipment
CD/MD Unit (XR-C33R only)
This unit can control a maximum of ten external CD/MD units in this configuration: CD unit – maximum of five
MD unit – maximum of five
Any combination up to ten will work.
If you connect an optional CD unit with the CD TEXT function, the CD TEXT information will appear in the display when you play a CD TEXT disc.
Playing a CD or MD
1Press (SOURCE) repeatedly to select CD or MD.
2Press (MODE) until the desired unit appears.
CD/MD playback starts.
When a CD/MD unit is connected, all the tracks play from the beginning.
Changing the display item
Each time you press (DSPL) during CD, CD TEXT, or MD playback, the item changes as follows:
$
Elapsed playback time
$
Disc name*1/Artist name*2
$
Track name*3
$
Clock
$
FM1 frequency*4
*1 If you have not labelled the disc or if there is no disc name prerecorded on the MD, “NO NAME” appears in the display.
*2 If you play a CD TEXT disc, the artist name appears in the display after the disc name. (Only for CD TEXT discs with the artist name.)
*3 If the track name of a CD TEXT disc or MD is not prerecorded, “NO NAME” appears in the display.
*4 While the AF/TA function is activated.
After you select the desired item, the display will automatically change to the Motion Display mode after a few seconds.
In the Motion Display mode, all the above items are scrolled in the display one by one in order.
Tip
The Motion Display mode can be turned off. (See “Changing the sound and display settings” on page 19).
Automatically scrolling a disc name
— Auto Scroll
If the disc name, artist name, or track name on a CD TEXT disc or MD exceeds 8 characters and the Auto Scroll function is on, information automatically scrolls across the display as follows:
•The disc name appears when the disc has changed (if the disc name is selected).
•The track name appears when the track has changed (if the track name is selected).
If you press (DSPL) to change the display item, the disc or track name of the MD or CD TEXT disc is scrolled automatically whether you set the function on or off.
1 During playback, press (SHIFT).
2Press (2) (SET UP) repeatedly until
“A.SCRL” appears.
3 Press (4) (n) to select “A.SCRL-ON.”
4 Press (SHIFT).
To cancel Auto Scroll, select “A.SCRL-OFF” in step 3 above.
Note
For some discs with very many characters, the following cases may happen:
—Some of the characters are not displayed
—Auto Scroll does not work.
Tip
To manually scroll the long name of an MD or CD TEXT disc after activating the Auto Scroll function, press (SHIFT), then (1) (N) (manual scroll).
20
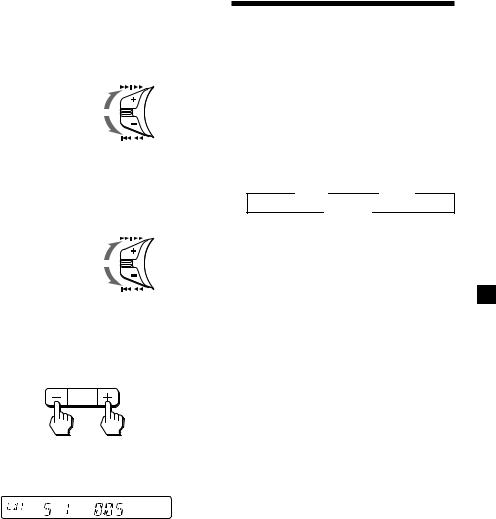
Locating a specific track
—Automatic Music Sensor (AMS)
During playback, push the SEEK/AMS control up or down and release for each track you want to skip.
SEEK / AMS
To locate succeeding tracks
To locate preceding tracks
Locating a specific point in a track
—Manual Search
During playback, push the SEEK/AMS control up or down and hold. Release when you have found the desired point.
SEEK / AMS
To search forward
To search backward
Switching to other discs
During playback, press either side of
(PRESET/DISC).
The desired disc in the current unit begins playback.
–PRESET +
DISC
For preceding |
For succeeding |
||||||
discs |
discs |
||||||
Disc number |
|
||||||
|
|
|
|
|
|
|
|
|
|
|
|
|
|
|
|
|
|
|
|
|
|
|
|
|
|
|
|
|
|
|
|
Track number
Playing tracks repeatedly
— Repeat Play
You can select:
•REP-1 – to repeat a track.
•REP-2 – to repeat a disc.
1During playback, press (SHIFT), then press (3) (PLAY MODE) repeatedly until
“REP” appears.
2Press (4) (n) repeatedly until the desired setting appears.
z REP-1 |
z REP-2 |
REP-OFF Z
Repeat Play starts.
3 Press (SHIFT).
To return to normal playback mode, select “REP-OFF” in step 2 above.
21
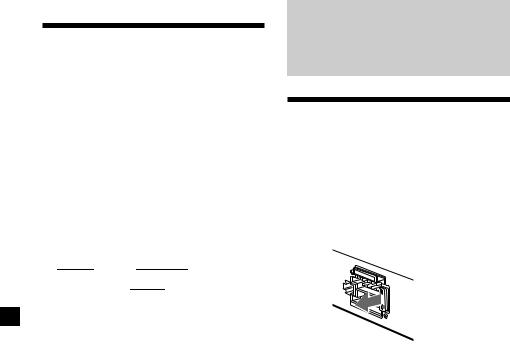
Playing tracks in random
order — Shuffle Play
You can select:
•SHUF-1 – to play the tracks on the current disc in random order.
•SHUF-2 – to play the tracks in the current unit in random order.
•SHUF-ALL – to play all the tracks in all the units in random order.
1During playback, press (SHIFT), then press (3) (PLAY MODE) repeatedly until
“SHUF” appears.
2Press (4) (n) repeatedly until the desired setting appears.
|
z SHUF-1 |
|
z SHUF-2 |
|
|
|
SHUF-OFF Z |
|
|
|
|
|
|
SHUF-ALL Z |
|
|
|
|
|
|
|||
Shuffle Play starts.
3 Press (SHIFT).
To return to normal playback mode, select “SHUF-OFF” in step 2 above.
Additional
Information
Maintenance
Fuse replacement
When replacing the fuse, be sure to use one matching the amperage rating stated on the original fuse. If the fuse blows, check the power connection and replace the fuse. If the fuse blows again after replacement, there may be an internal malfunction. In such a case, consult your nearest Sony dealer.

 Fuse (10 A)
Warning
Never use a fuse with an amperage rating exceeding the one supplied with the unit as this could damage the unit.
22
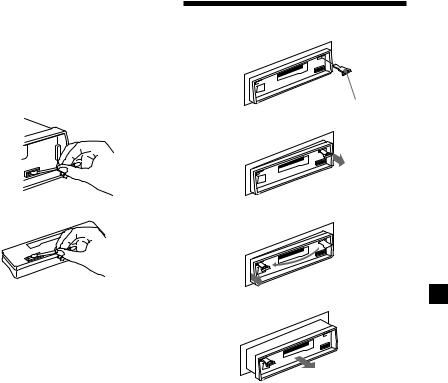
Cleaning the connectors
The unit may not function properly if the connectors between the unit and the front panel are not clean. In order to prevent this, open the front panel by pressing (RELEASE), then detach it and clean the connectors with a cotton swab dipped in alcohol. Do not apply too much force. Otherwise, the connectors may be damaged.
Dismounting the unit
1
Release key (supplied)
Main unit
Back of the front panel
Notes
•For safety, turn off the engine before cleaning the connectors and remove the key from the ignition switch.
•Never touch the connectors directly with your fingers or any metal device.
2
3
4
23

Specifications
Cassette player section
Tape track |
4-track 2-channel stereo |
|
Wow and flutter |
0.08 % (WRMS) |
|
Frequency response |
30 – 18,000 Hz |
|
Signal-to-noise ratio |
|
|
|
Cassette type |
|
|
TYPE II, IV |
61 dB |
|
TYPE I |
58 dB |
Tuner section
FM
|
Tuning range |
87.5 – 108.0 MHz |
|
Aerial terminal |
External aerial connector |
|
Intermediate frequency |
10.7 MHz |
|
Usable sensitivity |
9 dBf |
|
Selectivity |
75 dB at 400 kHz |
|
Signal-to-noise ratio |
65 dB (stereo), |
|
|
68 dB (mono) |
|
Harmonic distortion at 1 kHz |
|
|
|
0.7 % (stereo), |
|
|
0.4 % (mono) |
|
Separation |
35 dB at 1 kHz |
|
||
|
Frequency response |
30 – 15,000 Hz |
MW/LW
Tuning range |
MW: 531 – 1,602 kHz |
|
LW: 153 – 281 kHz |
Aerial terminal |
External aerial connector |
Intermediate frequency |
10.7 MHz/450 kHz |
Sensitivity |
MW: 30 µV |
|
LW: 50 µV |
Power amplifier section
Outputs |
Speaker outputs |
|
(sure seal connectors) |
Speaker impedance |
4 – 8 ohms |
Maximum power output |
45 W × 4 (at 4 ohms) |
General
Outputs |
Audio output (XR-C33R |
||
|
only) |
|
|
|
Power aerial relay control |
||
|
lead |
|
|
|
Power amplifier control |
||
|
lead (XR-C33R only) |
||
Tone controls |
Bass ±8 dB at 100 Hz |
||
|
Treble ±8 dB at 10 kHz |
||
Power requirements |
12 V DC car battery |
||
|
(negative earth) |
|
|
Dimensions |
Approx. 188 × |
58 × |
181 mm |
|
(w/h/d) |
|
|
Mounting dimensions |
Approx. 182 × |
53 × |
164 mm |
|
(w/h/d) |
|
|
Mass |
Approx. 1.2 kg |
|
|
Supplied accessories |
Parts for installation and |
||
|
connections (1 set) |
|
|
|
Front panel case (1) |
||
Optional accessories |
Rotary commander |
||
|
RM-X4S |
|
|
|
BUS cable (supplied with |
||
|
an RCA pin cord) |
|
|
|
RC-61 (1 m), RC-62 (2 m) |
||
|
(XR-C33R only) |
|
|
Optional equipment |
CD changer (10 discs) |
||
(XR-C33R only) |
CDX-828, CDX-737 |
|
|
|
MD changer (6 discs) |
||
MDX-65
Other CD/MD units with the Sony-BUS system Source selector
XA-C30
Design and specifications are subject to change without notice.
24
Troubleshooting guide
The following checklist will help you remedy the problems you may encounter with your unit. Before going through the checklist below, check the connections and operating procedures.
General
Problem |
Cause/Solution |
|
|
No sound. |
•Cancel the ATT function. |
|
•Set the fader control to the centre position for two-speaker |
|
systems. |
|
•Rotate the dial clockwise to adjust the volume. |
The contents of the memory have been erased.
•The power cord or battery has been disconnected.
•The reset button was pressed.
nStore again into the memory.
Indications do not appear |
Remove the front panel and clean the connectors. See |
in the display. |
“Cleaning the connectors” (page 23) for details. |
|
|
Tape playback
|
|
|
|
Problem |
Cause/Solution |
|
|
|
|
|
|
The sound is distorted. |
The tape head is contaminated. |
|
|
|
nClean the head with a commercially available dry-type |
|
|
|
cleaning cassette. |
|
|
The AMS does not operate correctly.
•There is noise in the space between tracks.
•A blank space is too short (less than four seconds).
•The SEEK/AMS control was pushed up immediately before the following track.
•The SEEK/AMS control was pushed down immediately after the track starts.
•A long pause, or a passage of low frequencies or very low sound level is treated as a blank space.
continue to next page n
25

Radio reception
Problem |
Cause/Solution |
|
|
Preset tuning is not possible. |
• Memorise the correct frequency. |
|
• The broadcast signal is too weak. |
|
|
Automatic tuning is not |
The broadcast signal is too weak. |
possible. |
nUse manual tuning. |
|
|
The stations cannot be |
Connect an power aerial control lead (blue) or accessory power |
received. |
supply lead (red) to the power supply lead of a car’s aerial |
The sound is hampered by |
booster. |
noises. |
(When your car has built-in FM/MW/LW aerial in the rear/ |
|
side glass only.) |
The “ST” indication flashes.
•Tune in the frequency accurately.
•The broadcast signal is too weak. nSet to MONO mode (page 11).
RDS
|
|
Problem |
Cause/Solution |
|
|
|
|
|
|
The SEEK starts after a few |
The station is non-TP or has a weak signal. |
|
|
seconds of listening. |
nPress (AF/TA) repeatedly until “AF TA-OFF” appears. |
|
|||
|
|
|
|
|
|
No traffic announcements. |
•Activate “TA.” |
|
|||
|
|
|
•The station does not broadcast any traffic announcements |
|
|
|
despite being TP. |
|
|
|
nTune to another station. |
|
|
|
|
|
|
PTY displays “NONE.” |
The station does not specify the programme type. |
|
|
|
|
CD/MD playback (XR-C33R only)
Problem |
Cause/Solution |
The sound skips. |
A dirty or defective disc. |
|
|
Cannot turn off the “--------” |
You cannot labell MDs unless you connect a CD unit with the |
indication. |
custom file function. |
|
nPress (PTY) for two seconds. |
|
|
26

Error displays (when an optional CD/MD unit is connected) (XR-C33R only)
The following indications will flash for about five seconds, and an alarm sound will be heard.
Display |
Cause |
Solution |
|
|
|
|
|
|
|
NO MAG |
The disc magazine is not inserted in |
Insert the disc magazine in the CD/ |
|
|
the CD/MD unit. |
MD unit. |
|
||
|
|
|
|
|
NO DISC |
No disc is inserted in the CD/MD unit. |
Insert discs in the CD/MD unit. |
|
|
|
|
|
|
|
|
A CD/MD cannot play because of |
Insert another CD/MD. |
|
|
NG DISCS some problem. |
|
|
|
|
|
A CD is dirty or inserted upside |
Clean or insert the CD correctly. |
|
|
ERROR*1 |
down.*2 |
|
|
|
An MD does not play because of some |
Insert another MD. |
|
||
|
|
|||
|
problem.*2 |
|
|
|
1 |
No tracks have been recorded on an |
Play an MD with tracks recorded on |
|
|
BLANK* |
MD.*2 |
it. |
|
|
RESET |
The CD/MD unit cannot be operated |
Press the reset button of the unit. |
|
|
because of some problem. |
|
|
|
|
|
|
|
|
|
|
The lid of the MD unit is open or MDs |
Close the lid or insert the MDs |
|
|
NO READY are not inserted properly. |
properly. |
|
|
|
|
||||
HI TEMP |
The ambient temperature is more than |
Wait until the temperature goes |
|
|
|
||||
50°C. |
down below 50°C. |
|
||
|
|
|
|
|
*1 When an error occurs during playback of a CD or MD, the disc number of the CD or MD does not appear in the display.
*2 The disc number of the disc causing the error appears in the display.
If the above-mentioned solutions do not help improve the situation, consult your nearest Sony dealer.
27
¡Bienvenido!
Gracias por adquirir este reproductor de cassettes Sony. Esta unidad permite disfrutar de una serie de funciones mediante el uso del siguiente accesorio de control:
Accesorio opcional
Mando rotativo (RM-X4S)
XR-C33R solamente:
Además de las operaciones de reproducción de cassettes y de la radio, es posible ampliar el sistema mediante la conexión de una unidad*1 de CD/MD opcional.
Cuando emplee esta unidad o una unidad de CD opcional conectada con la función CD TEXT, la información CD TEXT aparecerá en el visor al reproducir discos CD TEXT*2.
*1 Es posible conectar un cambiador de CD, un cambiador de MD, un reproductor de CD o un reproductor de MD.
*2 Un disco CD TEXT es un CD de audio que contiene información, como el título del disco, nombre del cantante y títulos de los temas. Esta información está registrada en el disco.
Precauciones
•Si aparca el automóvil bajo la luz solar directa y se produce un considerable aumento de temperatura en su interior, deje que la unidad se enfríe antes de utilizarla.
•Si la unidad no recibe alimentación, compruebe las conexiones en primer lugar. Si todo está en orden, examine el fusible.
•Si los altavoces no emiten sonido con un sistema de dos altavoces, ajuste el control de equilibrio en la posición central.
•Si reproduce la cinta durante mucho tiempo, el cassette puede calentarse debido al amplificador de potencia incorporado. No obstante, esto es normal.
Si desea realizar alguna consulta o solucionar algún problema referentes a la unidad que no se mencionen en este manual, póngase en contacto con el proveedor Sony más próximo.
Para mantener una alta calidad de sonido
Si existen soportes para bebidas cerca del equipo de audio, tenga cuidado de que no salpiquen zumos u otras bebidas dulces sobre el mismo, ya que la existencia de residuos azucarados en la unidad o en las cintas de cassette pueden ensuciar los cabezales de reproducción, reducir la calidad de sonido o eliminar el sonido de reproducción.
Los kits de limpieza para cassettes no eliminan las sustancias azucaradas de los cabezales de cinta.
2
Notas sobre los cassettes
Cuidados de los cassettes
•No toque la superficie de la cinta del cassette, ya que la suciedad o el polvo ensucian los cabezales.
•Mantenga los cassettes alejados de equipos provistos de imanes incorporados, como altavoces y amplificadores, ya que el sonido de la cinta grabada podría borrarse o distorsionarse.
•No exponga los cassettes a la luz solar directa, a temperaturas extremadamente frías ni a la humedad.
•La existencia de holguras en la cinta puede provocar que ésta se enrede en el mecanismo. Antes de insertarla, utilice un lápiz o un objeto similar para girar la bobina y eliminar holguras.
Cassettes de duración superior a 90 minutos
No se recomienda el uso de cassettes de duración superior a 90 minutos excepto para reproducciones largas y continuas. La cinta utilizada en estos cassettes es muy fina y tiende a estirarse con facilidad. Las operaciones frecuentes de reproducción y parada de estas cintas pueden hacer que éstas se enreden con el mecanismo de la platina de cassettes.
Holgura
•Los cassettes deformados y las etiquetas mal adheridas pueden causar problemas al insertar o expulsar las cintas. Retire o adhiera con firmeza las etiquetas.
•Es posible que el sonido se distorsione mientras se reproduce el cassette. El cabezal del reproductor de cassettes debe limpiarse después de 50 horas de uso.
3

Indice |
|
Sólo esta unidad |
|
Localización de los controles ................................. |
5 |
Procedimientos iniciales |
|
Restauración de la unidad ................................. |
6 |
Extracción del panel frontal ............................... |
6 |
Ajuste del reloj ..................................................... |
7 |
Reproductor de cassettes |
|
Escucha de cintas ................................................ |
8 |
Reproducción de cintas en diversos modos .... |
9 |
Radio |
|
Memorización automática de emisoras |
|
— Memorización de la mejor sintonía |
|
(BTM) ............................................................... |
9 |
Memorización de las emisoras deseadas ....... |
10 |
Recepción de emisoras memorizadas ............ |
10 |
RDS |
|
Descripción general de la función RDS ......... |
11 |
Visualización del nombre de la emisora ........ |
11 |
Resintonización automática del mismo |
|
programa |
|
— Frecuencias alternativas (AF) ................ |
12 |
Recepción de anuncios de tráfico ................... |
13 |
Programación de emisoras RDS |
|
con los datos AF y TA ................................. |
14 |
Localización de emisoras mediante el |
|
tipo de programa ......................................... |
15 |
Ajuste automático del reloj .............................. |
16 |
Otras funciones |
|
Etiquetado del mando rotativo ....................... |
16 |
Uso del mando rotativo ................................... |
17 |
Ajuste de las características de sonido ........... |
18 |
Atenuación del sonido ..................................... |
18 |
Cambio de los ajustes de sonido |
|
y visualización .............................................. |
19 |
Refuerzo de los graves |
|
— D-bass ....................................................... |
19 |
Equipo opcional |
|
Unidad de CD/MD |
|
(XR-C33R solamente) |
|
Reproducción de discos compactos (CD) o de |
|
minidiscos (MD) .......................................... |
20 |
Reproducción repetida de temas |
|
— Reproducción repetida ........................... |
21 |
Reproducción de temas en orden aleatorio |
|
— Reproducción aleatoria .......................... |
22 |
Información complementaria
Mantenimiento .................................................. |
22 |
Desmontaje de la unidad ................................. |
23 |
Especificaciones ................................................. |
24 |
Guía de solución de problemas ...................... |
25 |
4
 Loading...